

Page 1

Versão do Manual 1,0
Fevereiro de 2017
702P04567
Impressora Xerox
Guia do Usuário
®
Versant
®
3100
Page 2

©2017 Xerox Corporation. All rights reserved. Xerox®, Xerox and Design®, FreeFlow®,
SquareFold®, CentreWare®and Versant®are trademarks of Xerox Corporation in the
United States and/or other countries.
Adobe®PDF®is a registered trademarks of Adobe Systems, Inc. PostScript®is an Adobe
registered trademark used with the Adobe PostScript Interpreter, the Adobe page
description language, and other Adobe products.
Fiery®and EFI™are trademarks or registeredtrademarks of Electronics For Imaging, Inc.
GBC®and AdvancedPunch™are trademarks or registered trademarks of General Binding
Corporation.
3-IN-ONE®and WD-40®are a registered trademarks of the WD-40 Company.
Page 3

Índice
1 Símbolos do Produto........................................................................1-1
2 Getting Started..................................................................................2-1
Print Server Overview..........................................................................................................2-1
Press Components...............................................................................................................2-2
Internal Components............................................................................................2-2
Locating the Press Serial Number....................................................................2-2
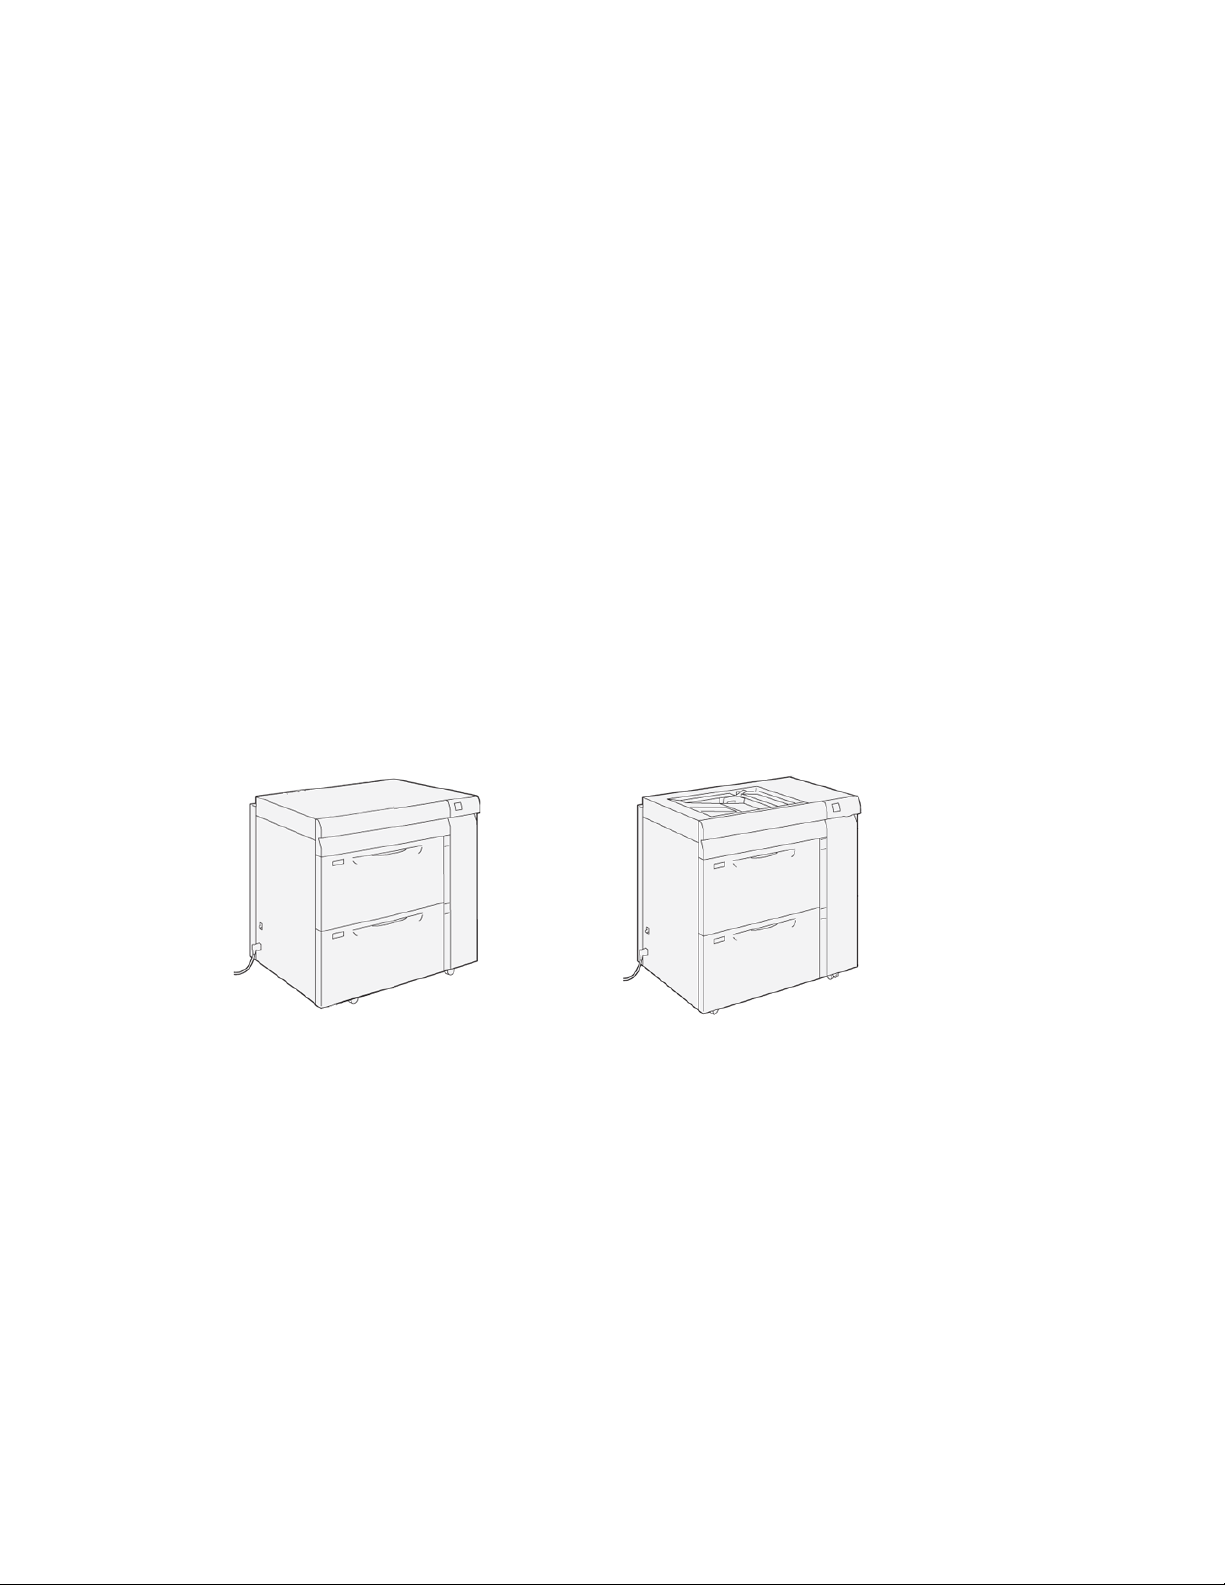
Advanced High Capacity Feeder (Trays 6 and 7)......................................2-3
Trays 6/7 Components............................................................................2-4
Control Panel............................................................................................................2-4
Status Lights................................................................................................2-6
Logon.............................................................................................................2-7
Language......................................................................................................2-7
Full System Configuration...................................................................................2-8
Power On / Off.......................................................................................................................2-8
Power Switches........................................................................................................2-8
Circuit Breaker Switch..............................................................................2-9
Main Power Switch....................................................................................2-9
Power On / Off Button.............................................................................2-9
Power On / Off the Press...................................................................................2-10
Power Saver Mode...............................................................................................2-10
Low Power Mode.....................................................................................2-11
Sleep Mode...............................................................................................2-11
Exiting Power Saver Mode...................................................................2-11
Obtenção de ajuda...........................................................................................................2-11
Help on the Xerox Web Site.............................................................................2-11
Stock Library Manager Online Help..............................................................2-11
Customer Diagnostic Tool................................................................................2-12
Print Server Customer Documentation.......................................................2-12
3 Envio de trabalho de impressão...................................................3-1
Informações que devem ser conhecidas antes de imprimir um
trabalho.........................................................................................................................3-1
How to Submit a Print Job................................................................................................3-2
Printing from Your Computer..........................................................................................3-2
Printing from the FreeFlow Print Server......................................................................3-3
Guia do Usuário
iImpressora Xerox®Versant®3100
Page 4

Índice
Printing from the EX Print Server...................................................................................3-3
Informações sobre impressão em divisórias.............................................................3-4
Imprimir em divisórias no servidor de impressão......................................3-5
4 Status do trabalho/máquina.........................................................4-1
Job Status...............................................................................................................................4-1
Job Status Area.......................................................................................................4-1
Guia Trabalhos ativos...........................................................................................4-1
Guia Trabalhos concluídos..................................................................................4-2
Machine Status.....................................................................................................................4-2
Machine Information Tab...................................................................................4-2
Machine Serial Number..........................................................................4-3
Current System Software.......................................................................4-3
IP Address and Host Name...................................................................4-3
Machine Configuration...........................................................................4-3
Software Version.......................................................................................4-3
Print Reports................................................................................................4-3
Maintenance Assistant...........................................................................4-4
Overwrite Hard Disk..................................................................................4-4
Guia Falhas................................................................................................................4-4
Billing Information Tab........................................................................................4-5
Acessar as informações de faturamento.........................................4-5
Informações sobre Impressões de faturamento..........................4-5
Modo de impressão de faturamento................................................4-6
Contadores de uso....................................................................................4-6
5 Papel e material.................................................................................5-1
Visão geral de papel e material.....................................................................................5-1
Diretrizes gerais para colocação de papel....................................................5-2
Material não suportado.......................................................................................5-2
Diretrizes de armazenamento de papel/material.....................................5-3
Papel suportado....................................................................................................................5-3
Faixas de tamanhos do papel...........................................................................5-3
Especificações do papel para todas as bandejas......................................5-4
Informações da bandeja do papel..................................................................5-5
Informações sobre as Bandejas 1, 2 e 3..........................................5-5
Informações sobre as Bandejas 6 e 7...............................................5-6
Informações da Bandeja do papel 5 (Manual).............................5-7
Informações sobre a produtividade da impressora .................................5-7
Informações de produtividade das Bandejas 1, 2, 3, 6 e
7.............................................................................................................5-9
Impressora Xerox®Versant®3100ii
Guia do Usuário
Page 5

Índice
Informações de produtividade da Bandeja 5
(Manual)..........................................................................................5-11
Colocação do papel..........................................................................................................5-12
Colocação de papel nas bandejas 1, 2 e 3................................................5-12
Colocação de papel nas Bandejas 6 e 7.....................................................5-13
Colocação de papel na Bandeja 5 (Manual)............................................5-14
Correspondência das informações de bandeja e material...............................5-15
Desempenho da alimentação de papel nas Bandejas 6 e 7...........................5-17
Melhoria do desempenho da alimentação de papel nas Bandejas
6 e 7................................................................................................................5-17
Impressão em material especial.................................................................................5-21
Transparências......................................................................................................5-21
Diretrizes para impressão em transparências.............................5-21
Colocar transparências nas Bandejas 1, 2 e 3............................5-22
Colocação de transparências nas Bandejas 6 e 7.....................5-22
Colocação de transparências na Bandeja 5 (Manual)............5-22
Papel perfurado....................................................................................................5-23
Diretrizes para imprimir em papel perfurado..............................5-23
Colocação de papel perfurado nas Bandejas 1, 2 e 3.............5-23
Colocação de papel perfurado nas Bandejas 6 e 7..................5-24
Colocação de papel perfurado na Bandeja 5 (Manual).........5-24
Divisória...................................................................................................................5-25
Diretrizes para imprimir em divisórias............................................5-25
Colocar divisórias nas Bandejas 1, 2 e 3.......................................5-26
Colocação de divisórias nas Bandejas 6 e 7................................5-27
Colocação de divisórias na Bandeja 5 (Manual).......................5-28
Etiquetas.................................................................................................................5-29
Diretrizes para impressão em etiquetas........................................5-29
Colocação de etiquetas em todas as bandejas..........................5-29
Papel brilhante......................................................................................................5-30
Diretrizes para imprimir em papel brilhante...............................5-30
Cartões postais.....................................................................................................5-30
Diretrizes para impressão em cartões postais............................5-30
Tamanhos de cartão postal suportados........................................5-31
Colocação de cartões postais nas Bandejas 6 e 7....................5-31
Colocação de cartões postais na Bandeja 5 (Manual)............5-32
Envelopes................................................................................................................5-33
Diretrizes para impressão em envelopes.......................................5-33
Tamanhos de papel suportados.......................................................5-34
Colocação de envelopes nas Bandejas 6 e 7 com o suporte
para cartão postal........................................................................5-34
Guia do Usuário
iiiImpressora Xerox®Versant®3100
Page 6

Índice
Carregamento de envelopes nas Bandejas 6 e 7 usando o
Kit de suporte de envelopes opcional..................................5-36
Colocação de envelopes na Bandeja 5 (manual)......................5-39
Colocação de material em dispositivos opcionais...............................................5-39
Colocação de material no Alimentador de alta capacidade
avançado duplo opcional (Bandejas 8 e 9)....................................5-39
Colocação de material pós-processo no Módulo de inserção
opcional.........................................................................................................5-39
Colocação de material pós-processo no GBC AdvancedPunch Pro
opcional.........................................................................................................5-40
6 Manutenção........................................................................................6-1
General Precautions and Warnings..............................................................................6-1
Cleaning the Press ..............................................................................................................6-2
Cleaning the Exterior............................................................................................6-2
Clean Fuser Assembly Information.................................................................6-2
Performing the Clean Fuser Assembly Procedure.........................6-3
Cleaning the Raster Output Scanner (ROS) Window Areas..................6-4
Execução do procedimento Limpar toner....................................................6-5
Calibrating the Press...........................................................................................................6-7
Matriz de largura total..........................................................................................6-7
Ajuste de uniformidade da densidade...........................................................6-8
Ajuste automático de uniformidade da densidade..................................6-8
Substituição de produtos consumíveis........................................................................6-9
Ordering Supplies.................................................................................................6-10
Checking the Status of Consumables..........................................................6-11
Substituição dos rolos de alimentação da Bandeja 5...........................6-13
Replacing the Tray 6/7 Feed Rolls.................................................................6-16
Substituir um cartucho de toner....................................................................6-20
Substituição do frasco de toner usado........................................................6-22
Substituir o filtro de sucção.............................................................................6-23
Replacing a Drum Cartridge............................................................................6-25
Fuser Assembly Procedures..............................................................................6-27
Fuser Assembly Cautions and Warnings.......................................6-28
Reasons for Removing / Replacing Fuser Assembly
Components...................................................................................6-29
Preparing the Tools................................................................................6-29
Removing the Fuser Module..............................................................6-30
Replacing the Stripper Finger Assembly........................................6-34
Substituir o Conjunto do rolo de pressão......................................6-34
Substituir o Conjunto da almofada de limpeza do rolo de
pressão.............................................................................................6-35
Instalação do Conjunto do fusor.....................................................6-36
Impressora Xerox®Versant®3100iv
Guia do Usuário
Page 7

Índice
Extending Fuser Life with Multiple Fusers..................................................6-38
Preventing Fuser Damage...................................................................6-38
Fuser Paper Width Information........................................................6-38
Changing the Fuser Width ID ..........................................................6-39
7 Solução de problemas......................................................................7-1
Solução de problemas geral............................................................................................7-1
Redução de consumo de toner.........................................................................7-7
Solução de problemas de qualidade da imagem (QI)..........................................7-8
Solução de problemas do Gerenciador da biblioteca de materiais..............7-12
Configurações padrão do Gerenciador da biblioteca de
materiais.......................................................................................................7-24
Atolamentos de papel.....................................................................................................7-33
Informações sobre atolamento de papel..................................................7-33
Eliminação de atolamentos na Área 2........................................................7-34
Eliminação de atolamentos nas Áreas 3, 4 e 5........................................7-37
Atolamentos de papel nas bandejas 1-3...................................................7-43
Atolamentos de papel na Bandeja manual (Bandeja 5).....................7-43
Atolamentos de papel quando a bandeja manual é instalada
nas Bandejas 6 e 7......................................................................7-43
Eliminação de atolamentos no OHCF (Bandejas 6 e 7).......................7-44
Clearing OHCF Jams (Trays 6 and 7)..............................................7-44
Paper Jams inside OHCF Trays 6 and 7.........................................7-45
OHCF (Trays 6 and 7) Paper Jams at Lever 1a and Knob
1c........................................................................................................7-45
OHCF (Trays 6 and 7) Paper Jams at Lever 1b and Knob
1c........................................................................................................7-46
OHCF (Trays 6 and 7) Paper Jams at Lever 1d and Knob
1c........................................................................................................7-47
Informações sobre falha................................................................................................7-48
Obtenção de informações sobre falha na tela de seleção por toque
da impressora..............................................................................................7-49
Mensagens de falha...........................................................................................7-50
Ajuda para solução de problemas..............................................................................7-51
Locating the Press Serial Number.................................................................7-51
Solicitar atendimento técnico.........................................................................7-51
8 Especificações.....................................................................................8-1
Especificações de desempenho.....................................................................................8-2
Especificações ambientais...............................................................................................8-2
Guia do Usuário
vImpressora Xerox®Versant®3100
Page 8

Índice
Impressora Xerox®Versant®3100vi
Guia do Usuário
Page 9
1
Símbolos do Produto
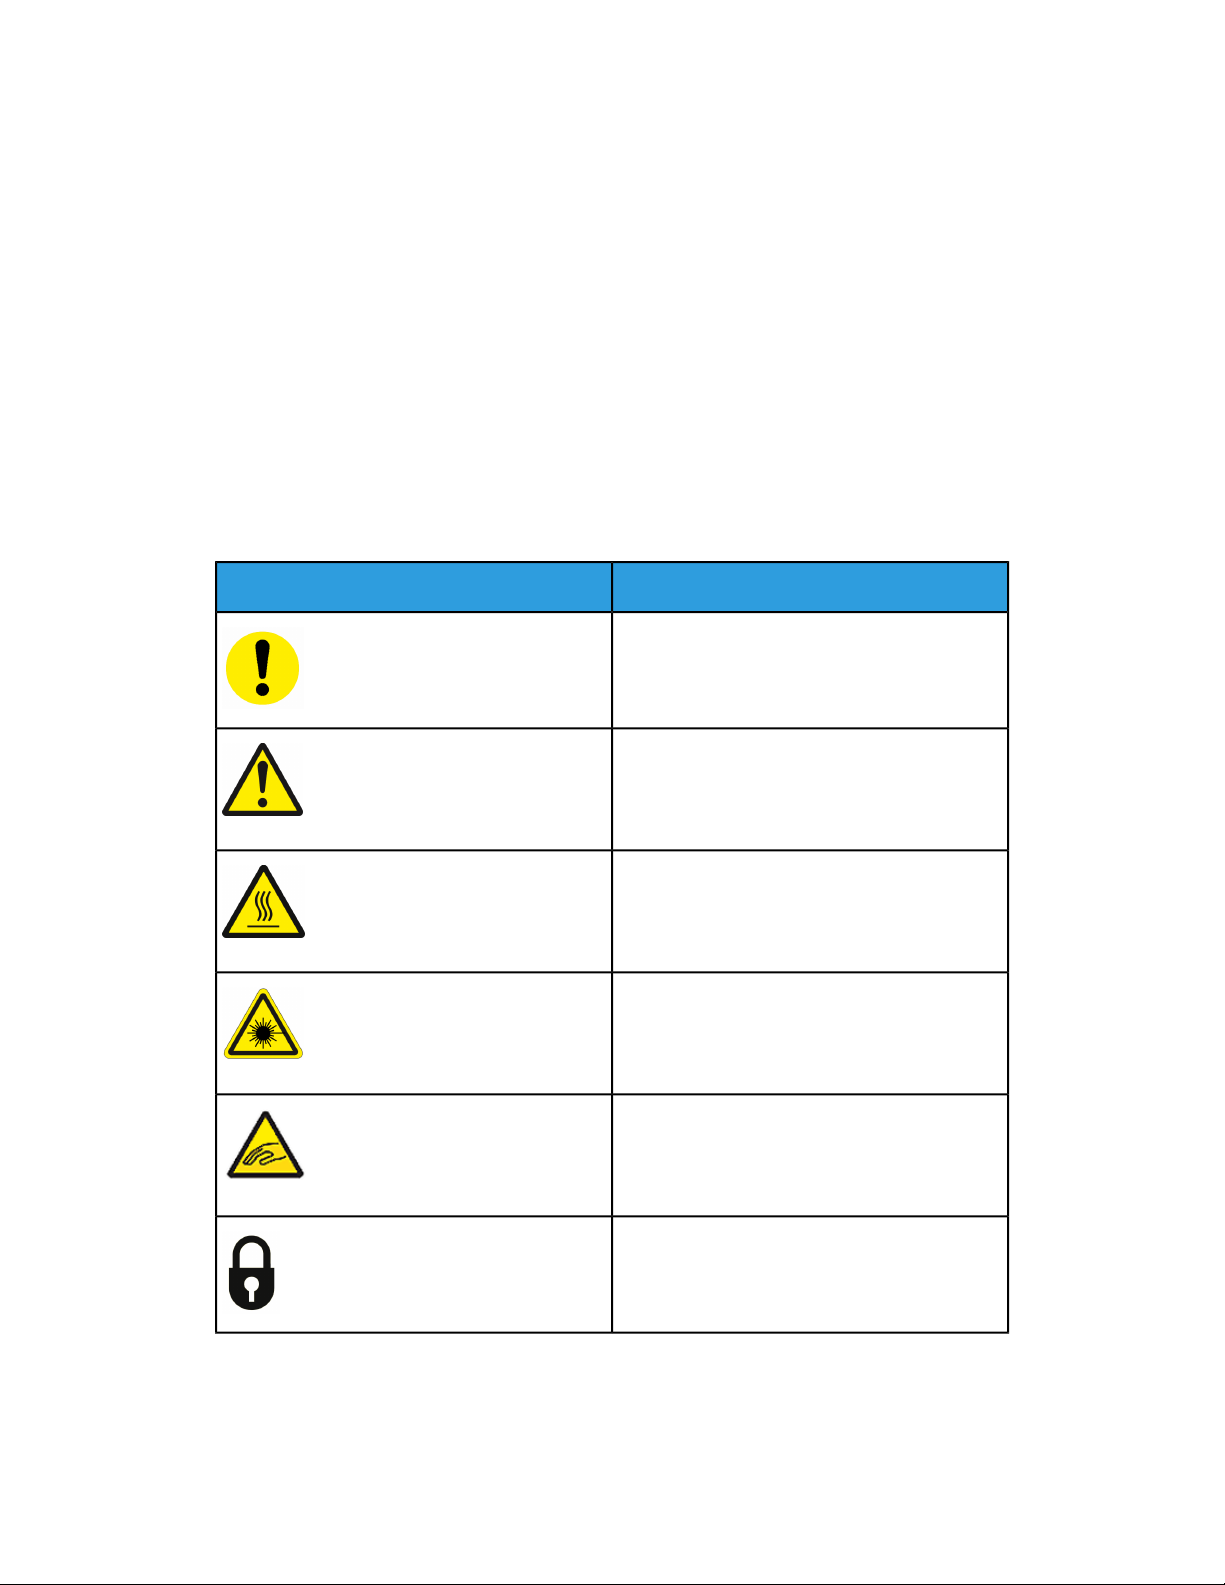
Este produto usa vários símbolos; consulte a tabela a seguir para obter uma lista desses
símbolos e suas definições.
Nome e Definição (se necessário)Símbolo
Cuidado
Esse símbolo indica uma ação obrigatória a ser
executada para evitar danos a essas áreas.
Aviso
Esse símbolo alerta os usuários para áreas em
que existe a possibilidade de ferimentos
pessoais.
Aviso de superfície quente
Esse símbolo alerta os usuários para áreas onde
existem superfícies quentes, as quais não
devem ser tocadas.
Aviso de laser
Esse símbolo indica que um laser está sendo
usado e alerta o usuário a consultar as
informações de segurança apropriadas.
Risco de aperto
Esse símbolo alerta os usuários para áreas em
que existe a possibilidade de ferimentos
pessoais.
Bloquear
Guia do Usuário
1-1Impressora Xerox®Versant®3100
Page 10
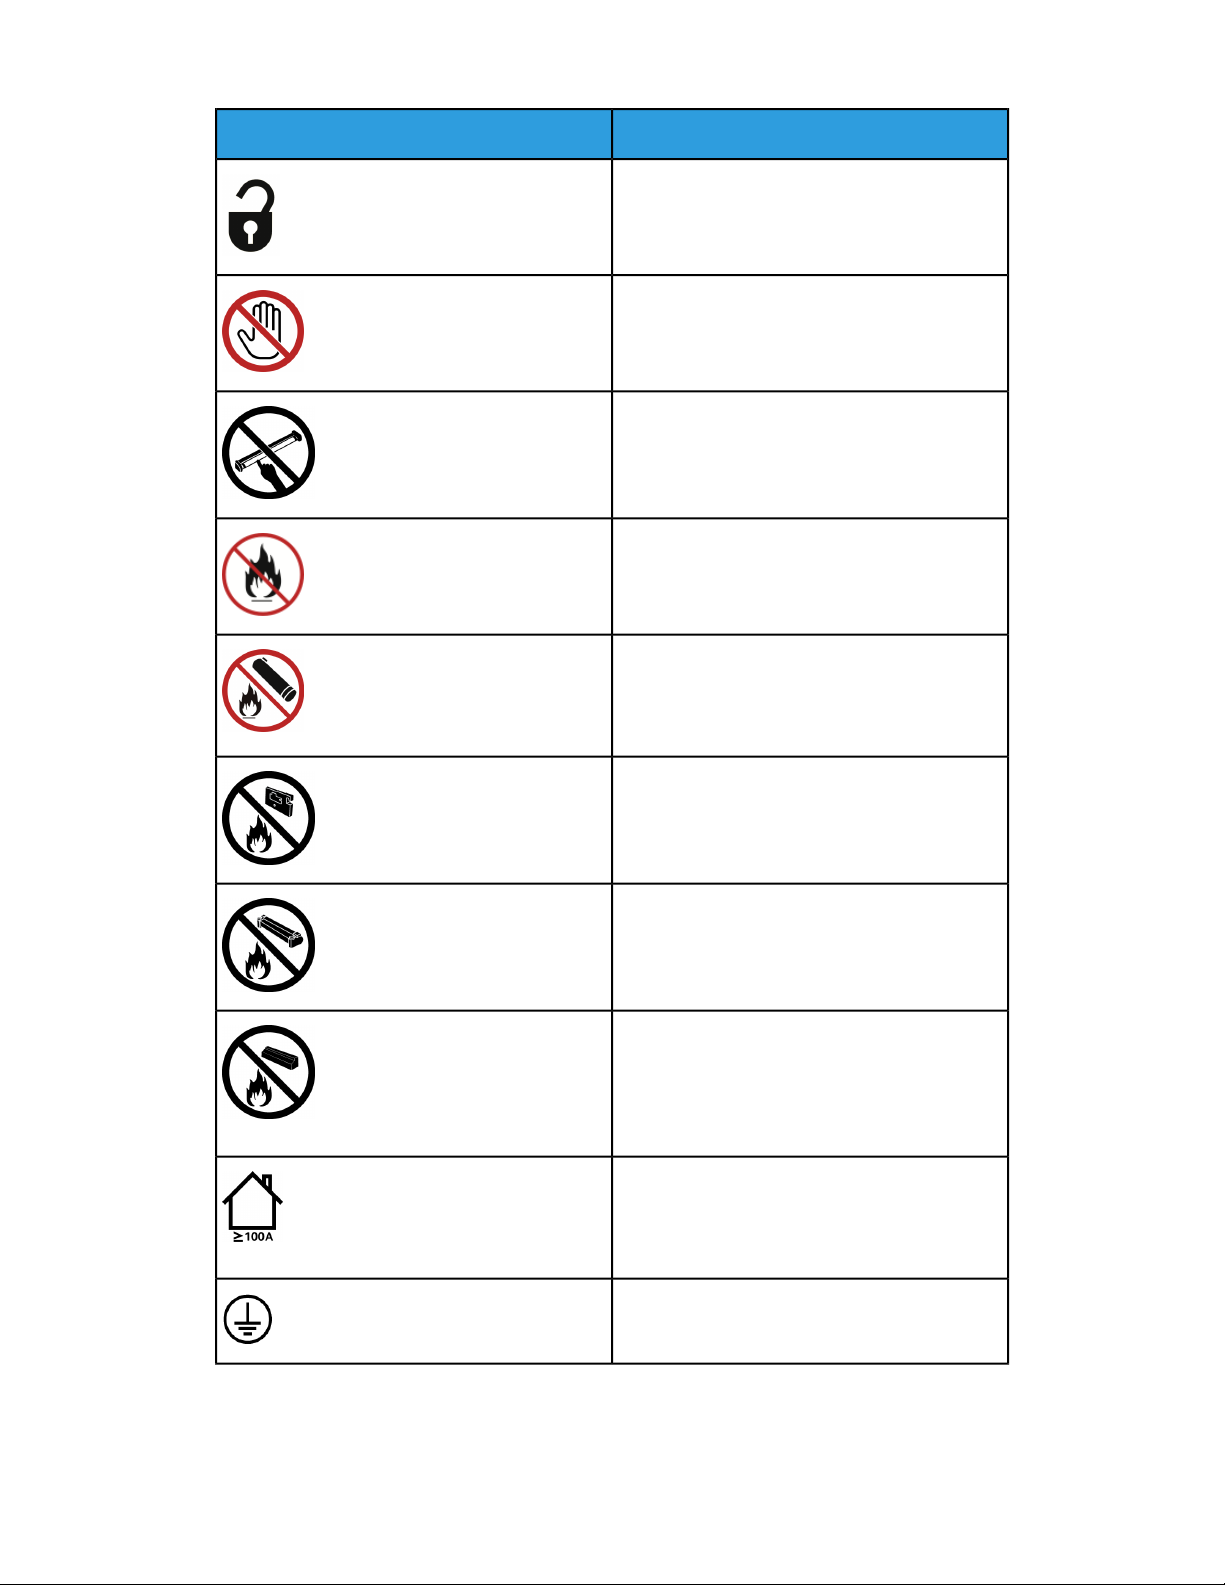
Símbolos do Produto
Nome e Definição (se necessário)Símbolo
Desbloquear
Não toque
Não toque no cartucho do fotorreceptor
Para evitar danos, não toque na superfície do
cartucho do fotorreceptor.
Não descartar em fogo / Incinerar
Não incinere o cartucho de toner
Sempre consulte as instruções de reciclagem
de sua região/mercado para obter informações
e procedimentos sobre o descarte correto.
Não incinere o frasco de toner usado
Sempre consulte as instruções de reciclagem
de sua região/mercado para obter informações
e procedimentos sobre o descarte correto.
Não incinere o cartucho do fotorreceptor
Sempre consulte as instruções de reciclagem
de sua região/mercado para obter informações
e procedimentos sobre o descarte correto.
Não incinere o segundo rolo polarizado de
transferência
Sempre consulte as instruções de reciclagem
de sua região/mercado para obter informações
e procedimentos sobre o descarte correto.
Etiqueta de cintilação/Corrente de 100 Amp
Esse símbolo indica o uso somente em locais
que tenham uma capacidade de corrente de
serviço igual a ou maior que 100 Amp por fase.
Terra / Comum / Terminal de terra
Impressora Xerox®Versant®31001-2
Guia do Usuário
Page 11
Símbolos do Produto
Nome e Definição (se necessário)Símbolo
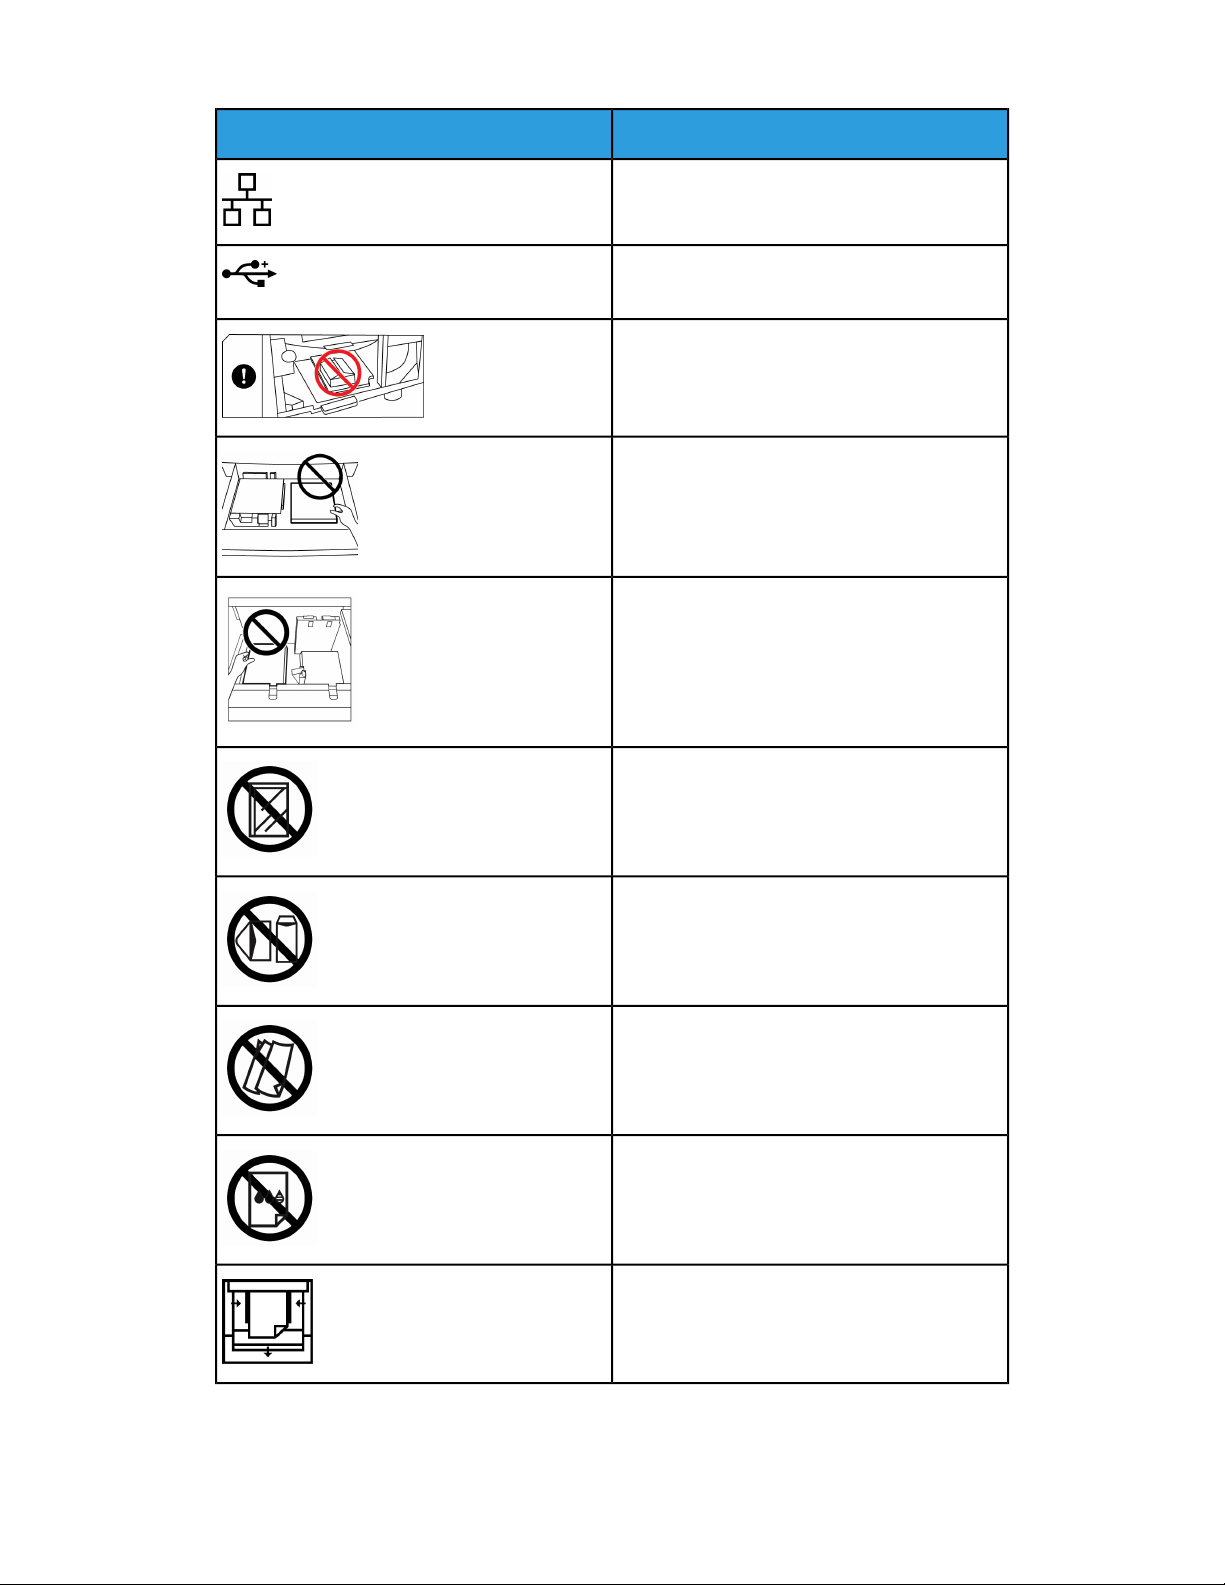
LAN
Local Area Network
USB
Barramento serial universal
Mantenha a área limpa
Não armazene quaisquer objetos neste local.
Mantenha a área limpa
Não armazene quaisquer objetos neste local.
Mantenha a área limpa
Não armazene quaisquer objetos neste local.
Não use transparências com uma tarja
branca/folhas do retroprojetor com uma tarja
branca
Não usar envelopes abertos
Não usar papel dobrado, amassado, com
curvatura ou enrugado
Não usar papel para jato de tinta
As guias da bandeja devem encostar no
material
Guia do Usuário
1-3Impressora Xerox®Versant®3100
Page 12

Símbolos do Produto
Nome e Definição (se necessário)Símbolo
Coloque os cartões postais na direção
indicada
Coloqueo papel perfurado conformeindicado
Ligado
Esse símbolo indica que o interruptor de
alimentação principal está na posição Ligado.
Desligado
Esse símbolo indica que o interruptor de
alimentação principal está na posição
Desligado.
Em espera
Esse símbolo indica que o interruptor de
alimentaçãosecundárioestánaposiçãoEspera.
Não descartar no lixo residencial normal
• A aplicação desse símbolo é a confirmação
de que você não deve descartar itens, como
Unidades substituíveis pelo cliente (CRUs),
no lixo residencial normal. Você deve
descartar esses itens de acordo com os
procedimentos nacionais acordados.
• Esse símbolo geralmente acompanha
baterias e indica que se forem usados
produtos elétricos e eletrônicos e bateria
eles não devem ser misturados com o lixo
residencial geral.
• Paraobter mais informações sobre a coleta
e a reciclagem, entre em contato com a
prefeitura, com o serviço de limpeza urbana
ou com o ponto de venda em que você
comprou os itens.
Impressora Xerox®Versant®31001-4
Guia do Usuário
Page 13

2
Getting Started
The Xerox®Versant®3100 Press is a full color / black and white, auto-duplex press that
operatesat a speed of 100 prints per minute (when printing on 8.5 x 11 inch / A4 paper).
The system configuration consists of the Advanced High Capacity Feeder (Trays 6 and
7), the print engine with internal feeding trays (Trays 1-3), and an embedded Control
Paneland touch screen (the user interface).A print server is also part of the configuration,
which includes the Stock Library Manager application used for stock and tray setup
and print job submission. An Offset Catch Tray may be connected to the press, or other
optional inline finishing devices are available.
NOTA
With the exception of the Offset Catch Tray, all other finishing devices require the
Interface Decurler Module.
The press includes the 4 dry ink / toner and drum cartridges, transfer belt and fuser /
ROS system, Full Width Array calibration feature, decurler, registration and paper path,
and paper inverter.
Print Server Overview
The print server networked with your press accepts, processes, and manages document
files for job submission to the press.
One of two print servers may be used with your press:
• Xerox®FreeFlow®Print Server
• Xerox®EX Print Server, Powered by Fiery
The print server contains the Stock Library Manager application. Refer to the Stock
Library Manager > Help for information on how to set up stocks, custom profiles, and
paper trays used by the press.
NOTA
For detailed information on your specific print server, refer to the customer
documentation that was delivered with it.
®
Guia do Usuário
2-1Impressora Xerox®Versant®3100
Page 14
Getting Started
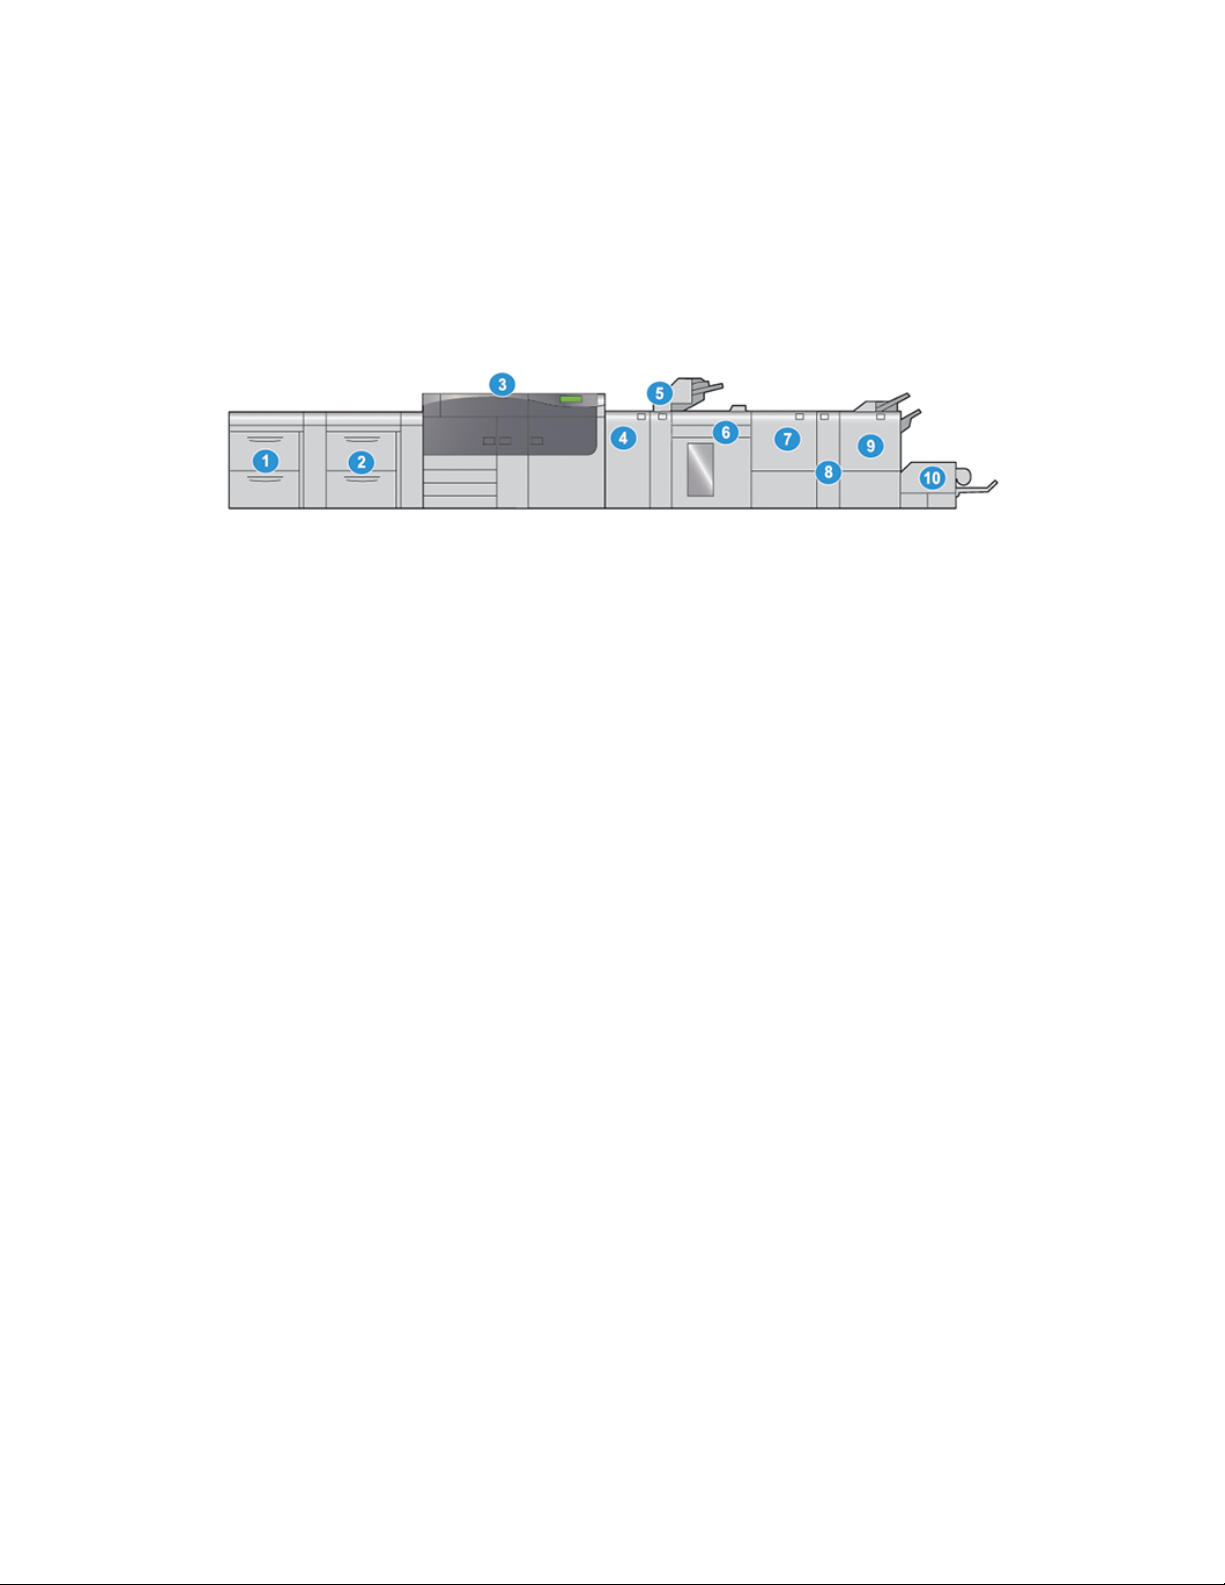
Press Components
6 and 7)
2. Dry Ink / Toner Cover
3. Control Panel and Touch Screen
4. Power On / Off Button
5. Offset Catch Tray (OCT)
6.1. Right Front DoorAdvanced High Capacity Feeder (Trays
7. Center Front Door
8. Left Front Door
9. Paper Trays 1, 2, and 3
Internal Components
5.1. Dry Ink / Toner Waste BottleDry Ink / Toner Cartridges
2. 6.Main Power Switch Fuser Module
7.3. Transfer ModuleCircuit Breaker Switch (on rear of press)
4. Paper Cooling Module
Locating the Press Serial Number
The press serial number can be accessed fromeither the press control panel or by locating
the serial number plate on the inside frame of the first feeder tray (Tray 1).
1. Press the Machine Status button on the press control panel.
2. From the Machine Status screen, ensure that the Machine Information tab is
displayed.
The press serial number is displayed under General Information.
Impressora Xerox®Versant®31002-2
Guia do Usuário
Page 15
Getting Started
3. If there is a loss of power and it is not possible to access the Machine Status screen,
the press serial number can also be found on the inside frameof the press near paper
Tray 1:
a) At the press, fully open paper Tray 1.
b) At the left of the feeder tray, on the press frame, locate the plate with the serial
number (SER#).
Advanced High Capacity Feeder (Trays 6 and 7)
DICA
The Advanced High Capacity Feeder is part of the standard press configuration.
The Advanced High Capacity Feeder contains Trays 6 and 7. These trays feed a variety
of stock sizes, including standard, heavyweight, and large-sized stocks up to 13 x 19.2
in. / 330 x 488 mm in size and weighing between 52 gsm and 350 gsm. Each tray holds
2,000 sheets of coated and uncoated stock.
NOTA
The Advanced High Capacity Feeder (Trays 6 and 7) may or may not include optional
Tray 5 (Bypass).
The following illustrations show the Trays 6 and 7 with and without the optional Tray
5 (Bypass).
Trays 6 and 7 without
the optional Tray 5
Trays 6 and 7 with
the optional Tray 5
Guia do Usuário
2-3Impressora Xerox®Versant®3100
Page 16
Getting Started
Trays 6/7 Components
4.1. Tray 6Paper Jam / Error Indicator Panel
2. 5.Paper Level Indicators Tray 7
6.3. Circuit Breaker SwitchFeeder Front Cover
Control Panel
The embedded Control Panel on the press includes an LCD touch screen, keypad and
feature buttons. The touch screen displays instructions, faults, and informational
messages. Select the Control Panel buttons to log in, perform job setup functions, and
view job, press, and supply statuses.
Number
DescriptionNameItem
Home button1
Tools button2
Job Status button3
Displays the main menu. Provides access to view the
supplies and trays available on the press and the status
of consumables.
Displays the Tools mode screen. For the operator, select
the Tools icon to view billing information and to perform
press calibration such as Full Width Array color uniformity
adjustments.
Use to check the progress of active jobs and detailed
information about completed jobs or pending jobs. This
area also allows you to delete a job (cancel printing) and
to pause jobs.
Impressora Xerox®Versant®31002-4
Guia do Usuário
Page 17
Number
Getting Started
DescriptionNameItem
Machine Status button4
Use to check the press configuration, the software version,
the press billing meter and counter information, and to
access and print job history or error reports.
Touch Screen5
Directly touch the screen to select and set features.
Displays instructional and informational messages, fault
clearance procedures and general press information.
Log In / Out button6
Use to log in and out of Administrator mode or
Authentication mode with user ID and password.
Language button7
Use to select a different language for the touch screen
options.
Power Saver button8
Use this button if the press has been inactive and the touch
screen is dark (system is in Energy Savermode). This button
manually exits the system from Energy Saver mode; it does
not place the press in Energy Save mode.
Numeric Keypad9
Use to enter alphanumeric characters. The ‘C’ Cancel Entry
cancels the previous entry made on the numeric keypad.
Cancel Entry button10
Use this button to cancel the previous entry made on the
numeric keypad.
Clear All button11
Use this button to return all selections to the same state
as when the press was powered on. Press once to clear a
current entry. Press twice to return to default settings.
Press to stop and pause the print job in progress.Stop button12
Start button13
Press to start and print a selected report. Also used by the
Customer Service Engineer during diagnostic routine
procedures.
Press Status Lights14
The three indicator lights that identify: data transmission
in progress, the press is experiencing an error, and main
power is on.
Guia do Usuário
2-5Impressora Xerox®Versant®3100
Page 18
Getting Started
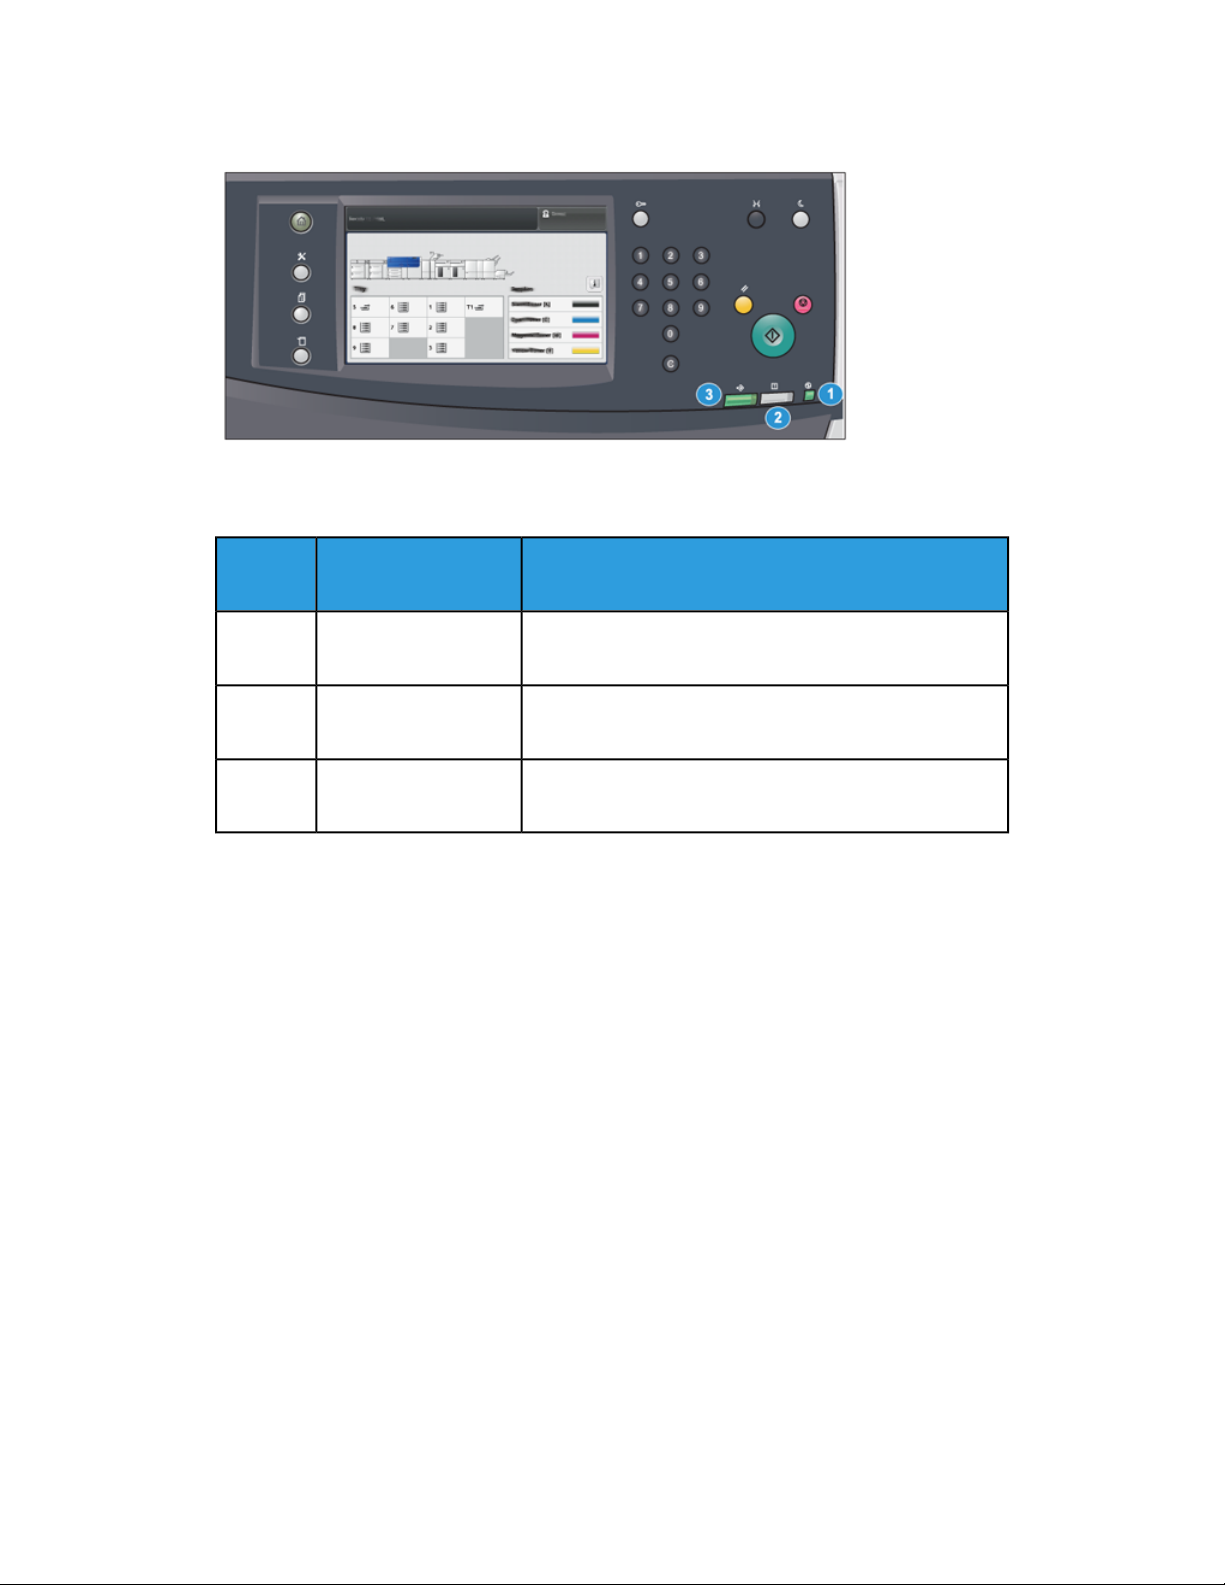
Status Lights
There are three status lights on the press directly below the Control Panel. From right
to left, they are:
DescriptionNameItem
Number
Main Power Status LED1
Error Status LED2
3
Data Transmission
Status LED
This is a steady green light indicating the main power to
the system is on.
This is a steady orange light indicating the press is
experiencing faults and / or errors.
This is a flashing green light indicating that the
transmission of an incoming print job is in process.
Impressora Xerox®Versant®31002-6
Guia do Usuário
Page 19

Getting Started
Logon
There are two logon levels:
• Guest / Operator: This is the default logon user. You are automatically logged on as
Guest.
• Administrator: This logon level is required to customize the system and network
defaults for your press and to customize particular print jobs by setting, or changing
parameters for certain features. Press the Guest button (or the Log in button on the
Control Panel) to access the Login screen.
NOTA
Refer to the System Administration Guide for more information on the Administrator
features.
Language
NOTA
The number of languages available on your system depends on what was installed during
the initial installation process.
Selecting a particular Language button immediately changes the language. No
confirmation is required.
Changing the Language
1. Press the Language button on the press Control Panel.
The Language window displays on the touch screen.
2. Select the desired language from the list and select Save.
The language on the screen changes to the new language and closes the Language
window.
3. Select the Cancel button to return to the main screen.
Guia do Usuário
2-7Impressora Xerox®Versant®3100
Page 20
Getting Started
Full System Configuration
NOTA
Full system configurations will vary depending on which optional devices are attached
to the press. For detailed information on optional devices, refer to the Optional Devices
Guide for Xerox®Versant®3100 Press.
The following illustration shows an example of a full system configuration with optional
devices attached; this is only one example.
6.1. High Capacity Stacker*Dual Advanced High Capacity Feeder
(Trays 8 and 9)*
2. Advanced High Capacity Feeder (Trays
6 and 7)
3. Color Press
4. Interface Decurler Module (IDM)*
5. Inserter*
7. Two-sided Trimmer*
8. C/Z Folder*
9. Production Ready (PR) Booklet Maker
Finisher*
10. SquareFold®Trimmer*
* Numbers 1 and 4-10 indicate optional devices.
Power On / Off
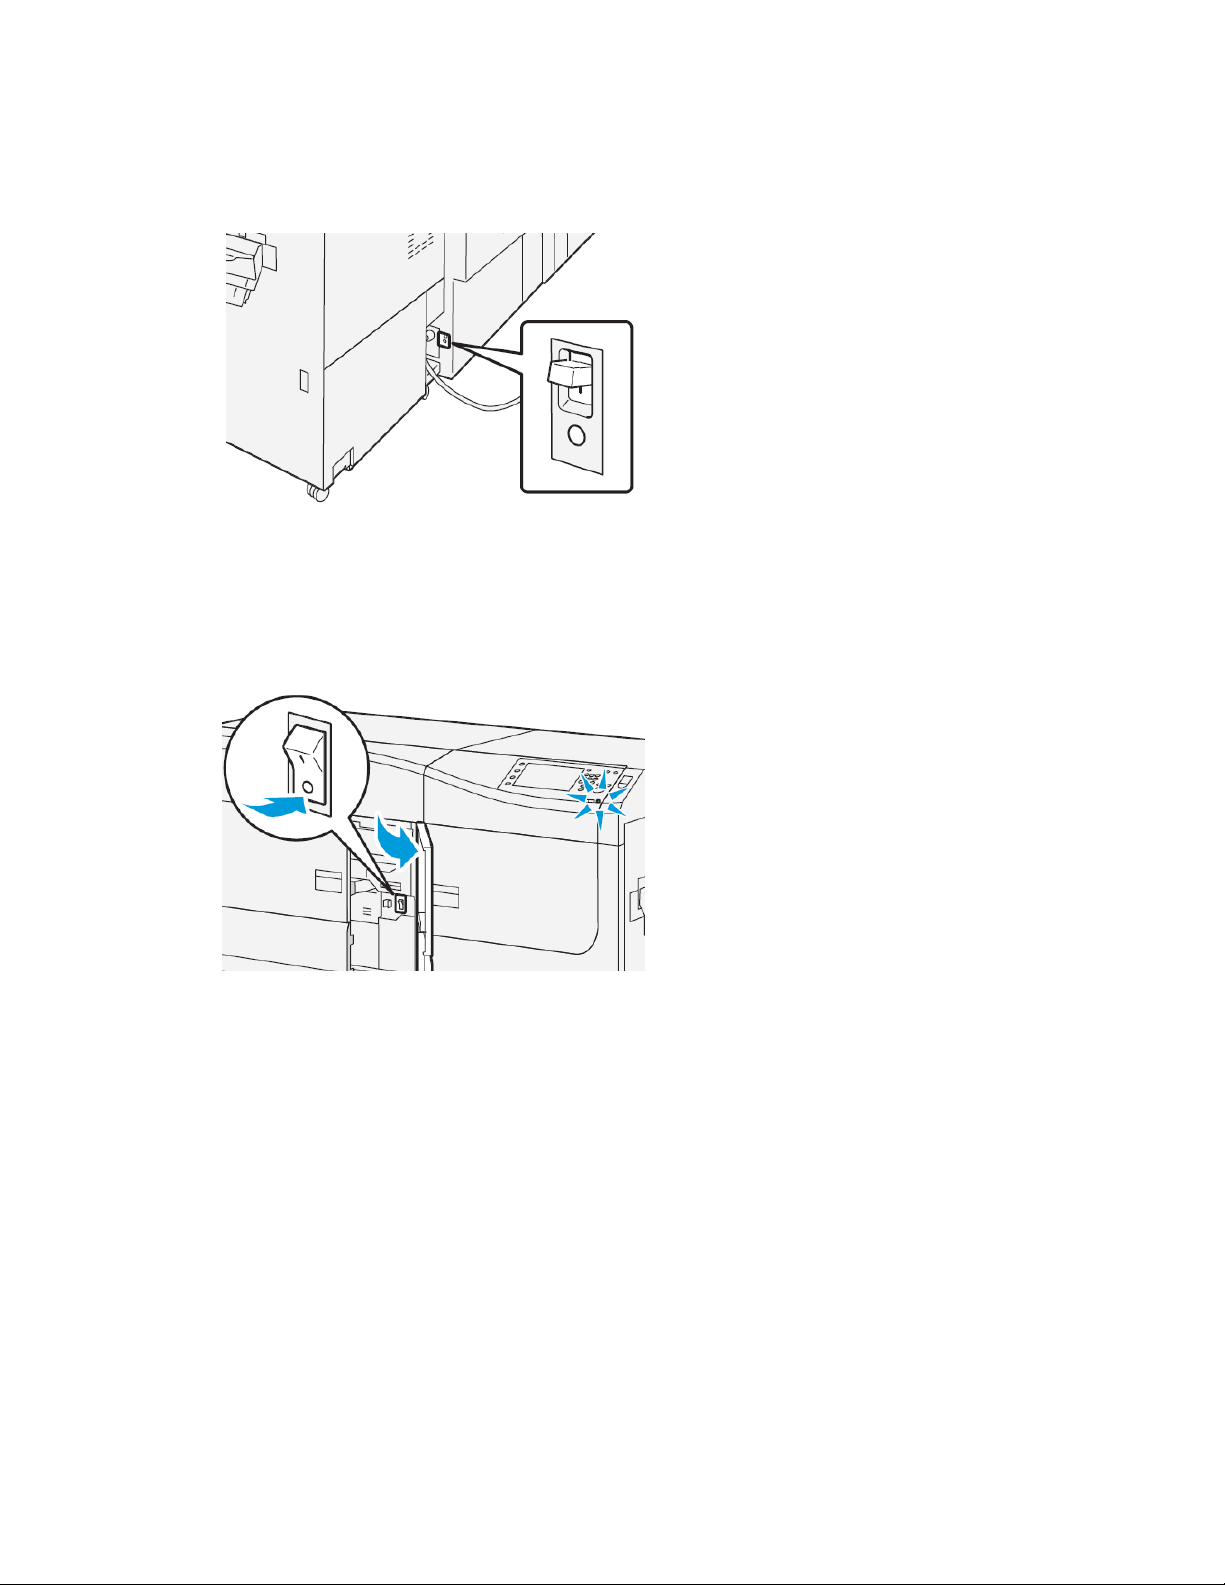
Power Switches
There are three power switches involved with the press:
• Circuit Breaker Switch
• Main Power Switch
• Power On / Off Button
IMPORTANTE
Always use the Power On / Off button first, and then power off the Main Power Switch.
Impressora Xerox®Versant®31002-8
Guia do Usuário
Page 21
Getting Started
Circuit Breaker Switch
The Circuit Breaker Switch located at the rear of the press. Initially check to make sure
this switch is set to On when the press is shipped.
Main Power Switch
The Main Power Switch located inside the Center Front Door.
NOTA
Switching off the Main Power also shuts off the Main Power Status LED.
DICA
Before switching off the press, ensure that it is not in Power Saver Mode.
This switch is used mainly by the Xerox Service Representative when servicing the press.
In rare troubleshooting situations, you may be directed to power off the press with this
switch.
Power On / Off Button
The Power On / Off Button is located on the right side of the Control Panel. Use this
button to power ON or OFF the press.
2-9Impressora Xerox®Versant®3100
Guia do Usuário
Page 22
Getting Started
Power On / Off the Press
1. To switch on the press, check that the Main Power switch behind the Center Front
Door is On.
2. Press the Power On / Off button on top of the press to the ON position.
The Ready Indicator light displays green.
A screen message advises of a short wait while the fuser warms up and the press runs
a system check. You can set features fora job during this time and the printing process
will start automatically when the press is ready.
3. To switch off, press the Power On / Off button to the Off position.
NOTA
Allow the press to remain off for a minimum of 10 seconds before switching on the
power again.
Power Saver Mode
The Power Saver feature allows the press to enter a reduced power consumption mode
when all print jobs have completed and there are no jobs currently processing. There
are two power saving modes: Low Power and Sleep.
• Low Power: After remaining inactive for a preset time period, the press enters the
Low Power mode.
• Sleep: After entering Low Power mode and remaining inactive for another preset
time period, the press enters the Sleep mode.
By default, the press automatically enters the Low Power mode after 1 minute of
inactivity. After 1 minute of inactivity, the press then enters Sleep mode. These time
intervals for both modes can be changed by the system administrator.
Refer to the following example:
• Low Power Mode is set to 1 minute.
• Sleep Mode is set to 10 minutes.
• Sleep Mode activates after 10 minutes of total inactivity and not 10 minutes after
the Low Power Mode begins.
Impressora Xerox®Versant®31002-10
Guia do Usuário
Page 23

Getting Started
Low Power Mode
In this mode, the power to the Control Panel and fuser unit is lowered to save power.
The display goes out and the Power Saver button on the Control Panel lights.
To exit the Low Power Mode, press the Power Saver button. The Power Saver button is
no longer lit, indicating that the Power Saver feature is canceled.
Sleep Mode
In this mode, the power is lowered more than in the Low Power mode. The display goes
out and the Power Saver button on the Control Panel lights.
To exit the Sleep Mode, press the Power Saver button. The Power Saver button is no
longer lit, indicating that the Power Saver feature is canceled.
Exiting Power Saver Mode
The press exits Power Saver mode either by pressing the Power Saver button on the
Control Panel or when receiving print data from an incoming job.
Obtenção de ajuda
Help on the Xerox Web Site
For technical product support, Xerox supplies, customer documentation, and answers to
frequently-asked questions, go to www.xerox.com. Youwillfind the latest documentation
and the knowledge base under Support & Drivers. Use the Contact link for specific
contact information / telephone numbers in your area.
NOTA
Be sure to periodically check this website for the latest information on your product.
It may be helpful to know your press serial number before calling for support. The press
serial number is shown on the Machine Information tab: Machine Status > Machine
Information.
Stock Library Manager Online Help
At the top of the print server window contains a Help area from which you can locate
information on how to use the print server’s job and print management features.
There is also Help fromwithin the Stock Library Manager application on the print server.
Use this Online Help to learn how to manage stocks used by the press and to select
advanced settings that resolve paper curl, offsetting, paper misfeeds, registration and
fold adjustments.
Guia do Usuário
2-11Impressora Xerox®Versant®3100
Page 24

Getting Started
From the Stock Library Manager window, select Help from the top left of the screen. An
About menu and Help menu are available:
• Select the About menu to learn the software version installed.
• Select the Help menu to access all of the Stock Library Help topics such as Tray
Properties, Stock information, how to add stock, and more.
In the Contents area, topics are displayed to the right of the book icons. Selecting a
book icon expands the view and provides selections to subtopics. The right and left arrow
buttons advance forward or backward one topic at a time using the same order as
displayed on the Contents tab.
Customer Diagnostic Tool
A Customer Diagnostic Tool CD is provided with your system. It provides you with the
information needed to identify and resolve image quality issues or faults the press may
be experiencing, and includes the procedures on how to replace customer-accessible
press components.
This tool is the first step you can use in isolating a problem or specific fault code and
the resolution associated with it.
Print Server Customer Documentation
• The FreeFlow Print Server features are documented in the Online Help system from
the Help menu shown on the main print server window. Additional FreeFlow Print
Server user documentation can be found at www.xerox.com.
• The EX Print Server Help menu on the Command WorkStation window is designed
to provide informationonspecific work flows when using the Command WorkStation.
Additional user documentation supplied by EFI Fiery is available to you from
www.xerox.com under the Support and Drivers link for your press.
Impressora Xerox®Versant®31002-12
Guia do Usuário
Page 25

3
Envio de trabalho de impressão
Informações que devem ser conhecidas antes de imprimir um trabalho
Fluxo de trabalho básico
O fluxo de trabalho básico para configuração de um trabalho e envio do servidor de
impressão é:
1. No Gerenciador da biblioteca de materiais no servidor de impressão, configure e
defina as propriedades de material do papel que será usado e atribua esse papel à
bandeja de alimentação.
2. Na impressora, coloque o papel adequado que deseja usar para o trabalho, que
corresponde às configurações da propriedade da bandeja.
3. Na janela principal do servidor de impressão, personalize seu trabalho como, por
exemplo, inserindo páginas especiais e divisórias, e crie a sua fila de impressão que
define os atributos desses trabalhos enviados para a fila.
4. Envie o arquivo de trabalho do servidor de impressão para a impressora em rede
para impressão.
Gerenciador da biblioteca de materiais
Comece o fluxo de trabalho no Gerenciador da biblioteca de materiais. O Gerenciador
da biblioteca de materiais é um aplicativo à parte que reside na área de trabalho do
servidor de impressão somente e não na impressora. Na janela principal do Gerenciador
da biblioteca de materiais, configure e gerencie os tipos de materiais, os perfis associados
a um material, a Biblioteca de materiais e a RML e os atributos da bandeja de
alimentação para usar quando imprimir um trabalho.
Guia do Usuário
3-1Impressora Xerox®Versant®3100
Page 26

Envio de trabalho de impressão
NOTA
Para obter informações completas sobre o Gerenciador da biblioteca de materiais e
sobre como definir o material e as configurações da bandeja de papel para o trabalho
de impressão, consulte a Ajuda on-line no Gerenciador da biblioteca de materiais.
Ativar funções da bandeja do papel
Na impressora, o Administrador do sistema pode ativar a função Troca automática de
bandejas e priorizar as bandejas para troca a fim de usar quando uma bandeja com o
mesmo papel ficar vazia.
Definir trabalhos e filas
Consultea documentaçãodo servidor de impressão para aprender sobre como programar
vários tipos de trabalhos, incluindo os trabalhos de divisórias e a montagem de diferentes
tipos de materiais de diferentes bandejas para o mesmo trabalho.
How to Submit a Print Job
There are a variety of ways to submit your job for printing:
• From your computer workstation (PC or Mac), using print drivers such as PostScript
and Printer Command Language (PCL), you can submit a document file to the print
server queue. From the print server, you would then submit the job to the press.
NOTA
Make sure the appropriate print drivers have been installed on your computer. Refer
to your print driver documentation or the Xerox web site for more information on
how to download or install print drivers.
• At any remote workstation, using a Hot Folders application to submit the document
file to the print server.
• At the print server, importing/adding a document file to a print queue. Manage the
job settings of the document and then submit to the press for printing.
Refer to the Stock Library Manager application’s Online Help on how to set up the
properties for a job that you submit from the print server.
Printing from Your Computer
The system supports either Xerox FreeFlow or Fiery EX print drivers. Through print drivers
installed on your computer or Mac, you can send a document file from your desktop to
the print server, which can then be submitted to the press for printing.
NOTA
You can also use a drag and drop Hot Folders feature by which to send your files to the
print server for printing to the press.
1. From your computer, select the file you want to print and open it in its application.
Impressora Xerox®Versant®31003-2
Guia do Usuário
Page 27

Envio de trabalho de impressão
2. Select File > Print.
3. Select the desired print server queue.
4. Select the Properties button for the queue.
5. Select the desired output options such as quantity or 1 sided / 2 sided printing.
6. Select OK to close the Properties window.
7. Select Print to send the job to the print server queue.
Printing from the FreeFlow Print Server
From your computer, you can submit your document files (select Print) to a directory on
the print server through the use of installed print drivers. You could also copy the
document files onto a USB flash drive or CD/DVD and then connect those devices to the
print server for importing.
1. If you copied the file onto a storage device, connect your device to the print server
and from the top menu bar select Services > Print From File.
2. From the Print From File window, select the Files tab and Browse.
3. From Look In, locate your storage device or other network directory containing the
document files you want.
4. Select and highlight one of the document files. Select OK.
5. Fromthe Queue field at the top right of the Print From File window, select the desired
print queue.
6. Using the other tabs on the screen, select the desired output options such as quantity
or 1- or 2-sided printing.
7. Select Print.
The job is sent to the desired queue and either held or immediately printed.
8. Select Close.
Printing from the EX Print Server
From your computer, you can submit your document files (select Print) to a directory
on the print server through the use of installed print drivers. You could also copy the
document files onto a USB flash drive or CD/DVD and then connect those devices to the
print server for importing.
1. If you copied the file onto a storage device, connect your device to the print server
and select Services > Print From File.
2. From the EX Print Server, select File > Import Job.
3. Select Add.
4. Locate your storage device or other directory containing the document files.
5. Select and highlight one of the document files. Select Open.
6. Select Import.
7. Select the desired queue such as Process and Hold or Print and Hold.
The job is sent to the selected queue or to the press for immediate printing.
Guia do Usuário
3-3Impressora Xerox®Versant®3100
Page 28

Envio de trabalho de impressão
Informações sobre impressão em divisórias
Antes de imprimir um trabalho com divisórias, leia as seguintes informações:
• Você pode configurarseu trabalho para inserir divisórias pré-impressas no documento.
• Use uma bandeja para as páginas do corpo, outra bandeja para a divisória
pré-impressa e outra bandeja para as páginas de capa e traseira.
• Ainda que você possa imprimir divisória de qualquer uma das bandejas de papel no
sistema (Bandejas 1, 2, 3, 5, 6, 7, 8 ou 9), recomenda-se usar as Bandejas 6, 7, 8 ou
9 para obter melhores resultados.
• Se planejar aplicar acabamento com grampo ou perfuração,usesomente as Bandejas
5, 6, 7, 8 ou 9.
• A orientação para colocação depende de qual bandeja você está usando.
• Consulte a seção Papéis e outrosmateriais para obter informações sobre como colocar
e alinhar a divisória nas bandejas.
Informações sobre programação de um trabalho com divisórias no Servidor
de impressão
Há vários tipos de materiais e sequências para divisórias disponíveis. Divisórias com
índice são geralmente usadas e têm duas orientações diferentes: a divisória de
alceamento único ou a divisória de alceamento reverso.
Quando programar trabalhos de divisórias e colocar a divisória, avalie o seguinte:
• Divisórias com índice só podem ser impressas em 1 face
• Há configurações de trabalho específicas que você precisa para definir a
ordem/sequência de divisórias, o número de jogos de embalagens, a gramatura do
material, o tamanho do papel e as páginas de corpo de inserção antes ou depois.
Consulte a documentação do servidor de impressão para obter informações mais
detalhadas sobre configuração.
• Sempre coloque a divisória ABL na bandeja, onde a borda reta do material é a borda
de ataque e as divisórias são orientadas na borda de fuga.
• Utilize sempre um jogo completo, embalagem ou divisórias na bandeja de papel.
• Se quiser um acabamento com grampos ou perfuração, use as bandejas 5, 6, 7, 8, 9
ou T1 (Módulo de inserção).
Impressora Xerox®Versant®31003-4
Guia do Usuário
Page 29

Envio de trabalho de impressão
Imprimir em divisórias no servidor de impressão
1. No servidor de impressão, crie e defina a divisória para a bandeja de papel que será
utilizada.
2. Coloque as divisórias nas Bandejas 1, 2, 3, 5, 6, 7, 8, 9 ou T1 (Módulo de inserção
opcional). Consulte o capítulo Papel e material de impressão.
3. Na janela do servidor de impressão, acesse a fila Retidos que contém o documento.
Selecione o documento de deseja configurar com divisórias. Clique duas vezes para
abrir as propriedades do arquivo.
4. Depois de fazer todas as configurações, selecione Imprimir.
A impressora imprime o jogo completo de divisórias com as páginas do corpo
definidas. Divisórias adicionais não utilizadas no trabalho são enviadas para a bandeja
de saída.
Guia do Usuário
3-5Impressora Xerox®Versant®3100
Page 30

Envio de trabalho de impressão
Impressora Xerox®Versant®31003-6
Guia do Usuário
Page 31

4
Status do trabalho/máquina
Job Status
The Job Status feature allows the user to check active, pending, and completed jobs.
The ability to cancel printing or pause jobs is also available from Job Status.
Job Status Area
The Job Status button on the press control panel displays the progress and status of any
currently printing jobs and lists all completed jobs.
1.
3.
Guia Trabalhos ativos
1. Pressione o botão Status do trabalho no painel de controle.
2. Selecione a guia Trabalhos ativos.
Guia do Usuário
Select the Active Jobs tab to view the status of currently pending or in-progress print
jobs on the system.
Select the Completed Jobs tab to view a list of all jobs that have printed successfully.2.
Select the Group Parent Jobs checkbox to list and display the jobs according to a
parent/child relationship hierarchy.
4-1Impressora Xerox®Versant®3100
Page 32

Status do trabalho/máquina
3. Na lista exibida, selecione o trabalho aplicável para visualização.
Use os botões para cima e para baixo para navegar na lista.
4. Se necessário, selecione Exibir hora para mostrar o tempo necessário para processar
o trabalho.
5. Para excluir um trabalho ou alterar a ordem de execução, selecione um trabalho na
lista.
6. Selecione Excluir ou Promover no menu pop-up.
• Excluir: Esta opção cancela o trabalho atual ou pendente.
• Promover: Esta opção move um trabalho para o início da lista e o executa depois
do trabalho que está sendo impresso/copiado.
• Detalhes: Esta opção mostra os detalhes do documento selecionado.
• Fechar Menu: Esta opção fecha o menu pop-up.
Guia Trabalhos concluídos
1. Pressione o botão Status do trabalho no Painel de Controle.
2. Selecione a guia Trabalhos concluídos.
Uma lista de trabalhos concluídos ou excluídos é exibida. Use a barra de rolagem
para navegar pela lista.
3. Para verificar os detalhes de um trabalho, selecione o trabalho na lista exibida.
4. Na janela Status, selecione um dos seguintes itens para imprimir um histórico deste
trabalho.
a) Para imprimir os detalhes do trabalho,selecione o botão Imprimir este relatório
de trabalhos.
b) Para imprimir o histórico de trabalhos principais/secundários, selecione o botão
Imprimir este histórico de trabalhos.
5. Após verificar os detalhes do trabalho, selecione Fechar.
Machine Status
Press the Machine Status button on the Control Panel to access the Machine Status
information,including press configuration, faults, billing information, maintenance, and
reporting features.
Machine Information Tab
This tab provides general information about the press such as the currently installed
software version and the press serial number. This area also allows you to print reports
and view details that apply to billing impressions.
Impressora Xerox®Versant®31004-2
Guia do Usuário
Page 33

Status do trabalho/máquina
5.1. Software VersionMachine Serial Number
2. 6.Current System Software Print Reports
7.3. Maintenance AssistantIP Address and Host Name
4. 8.Machine Configuration Overwrite Hard Disk
Machine Serial Number
The Machine Serial Number is displayed in the General Information area on the Machine
Information tab. Use this number when calling Xerox for technical information or
assistance.
Current System Software
The version of the system software that is currently installed on the press is displayed
under the Current System Software title.
IP Address and Host Name
This is the unique Internet Protocol (IP) address and host name that identifies the press
to the specific network to which it is connected.
Machine Configuration
Select the Machine Configuration button to display a list of the various hardware
components and options that are available on the press as well as their status. Hardware
components and options include any optional feeding and finishing devices attached
to the press.
Software Version
Select the Software Version button to display a list of the software versions for the
various system components, including any optional feeding and finishing devices.
Print Reports
This Print Reports button is enabled by the system administrator. From the various
reports available, select a report on the touch screen and then select the Start button
to print. Some reports are only available in the system administrator mode. From the
Print Reports screen, select the desired report to print.
Guia do Usuário
4-3Impressora Xerox®Versant®3100
Page 34

Status do trabalho/máquina
Job Status
From the Job Status screen, select the desired history report to print.
• Job History Report: This report lists the status, attributes, input source and output
destination of every print job completed, deleted or shutdown.
• Error History Report: This report lists the most recent errors and faults that occurred
on the press.
Printer Reports
Fromthe Printer Reports screen, select ConfigurationReport.The Configuration Report
lists the hardware configuration, devices and software installed, and the network settings
on the system such as port and proxy settings. Print and place this report near the press
for easy access to information such as the press serial number.
Job Counter Report
The Job Counter Report is available only when from the system administrator mode.
This report identifies the total number of minutes the press has been in various operating
modes, the billing counters for various size impressions printed from each tray, and a
summary of the number of jobs printed with various page counts.
Auditron Report / Meter Report
The Auditron Report / Meter Report is available only when from the system
administrator mode.
NOTA
This Auditron Report / Meter Report is not applicable to a print-only system.
Maintenance Assistant
Select the Maintenance Assistant button to send the Xerox Remote Print Services
diagnostic information on the press to Xerox Support.
Overwrite Hard Disk
The Overwrite Hard Disk feature is a standard data security function on the system. It
prevents the document image and registered data that is recorded on the press hard
disk from being illegally retrieved or removed.
Job image data stored on the hard disk within the press can be deleted and overwritten
after a number of overwrites or a period of time specified by the system administrator.
The Standby status indicates the completion of the overwriting process.
Guia Falhas
A guia Falhas fornece uma lista de falhas que ocorreram na impressora. Acesse essa
guia pressionando o botão Status da máquina no painel de controle e selecionando a
guia Falha.
Impressora Xerox®Versant®31004-4
Guia do Usuário
Page 35

Status do trabalho/máquina
A guia Falhas exibe as seguintes informações sobre as falhas que ocorreram na
impressora:
1. Código de falha: Essa coluna identifica o número do código atribuído à mensagem
de falha.
2. Data e hora: Essas colunas indicam o dia e a hora em que a falha ocorreu.
3. Contagem de imagens: Essa coluna indica o número total de impressões feitas.
NOTA
Billing Information Tab
Acessar as informações de faturamento
Para visualizar as informações de impressões e contadores (ou medidores) de
faturamento registradas pela impressora, acesse a área Status da máquina do Painel
de controle da impressora.
1. Pressione o botão Status da máquina no Painel de controle.
2. Selecione a guia Informações de faturamento.
A tela Informações de faturamento é exibida.
3. Para exibir o Modo Impressão de faturamento, pressione o botão Ferramentas no
Painel de controle, selecione o ícone Ferramentas e selecione Configuração > Modo
Impressão de faturamento.
Informações sobre Impressões de faturamento
A tela Informações de faturamento permite visualizar o número total de impressões
registrado pela impressora, incluindo a categoria do número de impressões em cores
somente, impressões em preto e branco somente e impressões em material grande. Ela
também exibe informações específicas do contador de uso. Os contadores exibem a
quantidade de impressões para todos os trabalhos impressos.
Todos os medidores que podem ser utilizados para fins de faturamento são exibidos na
tela Informações de faturamento:
• Impressões em cores: esse valor (número) representa o número total de impressões
em cores que foram feitas.
• Impressões em preto: esse valor (número) representa o número total de impressões
em preto somente que foram feitas.
4-5Impressora Xerox®Versant®3100
Guia do Usuário
Page 36

Status do trabalho/máquina
• Total de impressões: esse valor (número) representa o número total de TODAS as
impressões. É a soma das impressões em cores e das impressões em preto e branco.
• Impressões grandes em cores: esse valor (número) representa o número total de
impressões grandes em cores. Essas impressões são em uma face de uma folha de
material grande (por exemplo, 11 x17 pol./A3). Impressões grandes são impressões
maiores que 145 pol. quadradas/935 cm quadrados.
NOTA
Esse medidor/contador NÃO será adicionado ao medidor/contador de Total de
impressões, porque ele já foi adicionado ao medidor/contador de impressões em
cores.
• Impressões grandes em preto e branco: esse valor (número) representa o número
total de impressões grandes somente em preto e branco. Essas impressões são em
uma facede uma folha de material grande (por exemplo, 11 x17 pol./A3). Impressões
grandes são impressões maiores que 145 pol. quadradas/935 cm quadrados.
NOTA
Esse medidor/contador NÃO será adicionado ao medidor/contador de Total de
impressões, porque ele já foi adicionado ao medidor/contador de impressões em
preto e branco.
Modo de impressão de faturamento
O Modo Impressão de faturamento define como a impressora controla e registra as
impressões feitas em papel de tamanho grande, como A3 ou tabloide. O tipo de Modo
Impressão de Faturamento usado pela impressora é definido durante a instalação do
sistema. Um representante de vendas da Xerox pode confirmar o modo Impressão de
faturamento aplicável para sua impressora.
Há dois tipos de Modos de impressão:
• Modo de impressão A3: para todos os tamanhos de material (incluindo o tamanho
grande), conta todas as impressões da mesma forma.
• Modo de impressão A4 - Conta impressões grandes em material como A3 e 11 x 17
polegadas (material maior que 8,5 x 14 polegadas), como seu equivalente A4.
Para visualizar o modo Impressão de faturamento atual em vigor na impressora:
• Pressione o botão Ferramentas no Painel de controle, selecione o ícone Ferramentas
e Configuração > Modo Impressão de faturamento.
Contadores de uso
Selecione o botão Contadoresde uso para ver ainda mais detalhes sobre o faturamento
e as contas que estão sendo controladas na impressora, como o número de trabalhos
de impressão em 1 face em comparação com 2 faces.
Na lista suspensa Contadores,você pode selecionar o contador desejado para visualizar:
• Contadores de impressão
• Contadores de folhas
Impressora Xerox®Versant®31004-6
Guia do Usuário
Page 37

Status do trabalho/máquina
• Todos os contadores de uso
Contadores de impressão
Essa visualização exibe a quantidade total de impressões. Em outras palavras, a
impressão é a imagem em uma face de uma folha de material. Este contador mostra
a quantidade total de impressão em cores e em preto somente.
• Total de impressões: Este número representa o número total de impressões de todos
os trabalhos de impressão em cores e em preto somente.
• Impressões em preto e branco: Este número representa o número total de impressões
de todos os trabalhos de impressão em preto/branco.
• Impressões grandes em preto e branco: Estas impressões são em uma face de uma
folha de um documento grande preto somente (por exemplo, 11 x 17 pol./A3).
Impressões grandes são impressões maiores que o tamanho 8,5 x 14 pol./B4.
• Impressões em cores: Este número representa o número total de impressões de todos
os trabalhos de impressão em cores.
• Impressões grandes em cores: Estas impressões são em uma face de uma folha de
um documento grande em cores (por exemplo, 11 x 17 pol./A3). Impressões grandes
são impressões maiores que o tamanho 8,5 x 14 pol./B4.
Contadores de folhas
Este contador fornece informações sobre o número total de folhas que a impressora
alimenta para a área de saída. Cada folha conta como um clique no contador
(independentemente do tamanho ou de ser um trabalho de impressão de uma face
ou duas faces).
Todos os contadores de uso
Esta exibição fornece um total completo de todos os contadores, incluindo os totais
dos Contadores de impressão e Contadores de folhas.
Botão Atualizar
Selecione este botão para atualizar as contagens.
Guia do Usuário
4-7Impressora Xerox®Versant®3100
Page 38

Status do trabalho/máquina
Impressora Xerox®Versant®31004-8
Guia do Usuário
Page 39

5
Papel e material
Visão geral de papel e material
Antes de colocar o papel, considere o seguinte:
• Para definir atributos paraum material, para adicionar um novomaterial à Biblioteca
de materiais ou para atribuir um material a uma bandeja de papel para o trabalho
de impressão, acesse o Gerenciador da biblioteca de materiais no servidor de
impressão. Se você tiver acesso restrito, entre em contato com o Administrador do
sistema.
NOTA
O Gerenciador da biblioteca de materiais é um aplicativoque é carregado no servidor
de impressão e é usado para gerenciar os materiais e as bandejas de papel da
impressora.
- Por padrão, a função Biblioteca de materiais está disponível para os modos
operador e administrador do sistema.
- O Administrador do sistema pode restringir o acesso do usuário para alterar ou
adicionar materiais.
- Quando você estiver colocando papel, o aplicativo Gerenciador da biblioteca
de materiais abrirá a janela Propriedades da bandeja dessa bandeja e você
poderá ver ou alterar o material atribuído a ela.
• A impressora suporta a capacidade de puxar materiais de tamanhos diferentes e
tipos de papel de várias bandejas, e montá-los como parte de um único trabalho.
Para selecionar várias bandejas de papel e inserir papéis diferentes em um trabalho,
programe esse trabalho personalizado no servidor de impressão usando funções
como a de páginas especiais.
• A impressora suporta Trocaautomáticade bandejas, o que permite que um trabalho
mude automaticamente de uma bandeja vazia para uma bandeja cheia contendo
o mesmo tamanho de papel, orientação e tipo de material. Consulte o Guia do
administrador do sistema para obter informações sobre como ativar essa função e
priorizar a ordem de bandejas para pesquisa e uso.
5-1Impressora Xerox®Versant®3100
Guia do Usuário
Page 40

Papel e material
Diretrizes gerais para colocação de papel
• Ventile o papel antes de colocá-lo na bandeja.
• Não encha demais as bandejas do papel. Não coloque papel acima da linha de
preenchimento máximo indicada na bandeja.
• Ajuste as guias do papel de acordo com o tamanho do papel.
• Se ocorrerem atolamentos excessivos, use papel ou outro material aprovado de um
novo pacote.
• Não imprima em uma etiqueta que tenha sido removida da folha.
• Use somente envelopes de papel.
• Imprima envelopes somente em 1 face.
Material não suportado
Alguns tipos de papel e outros materiais podem causar qualidade da saída ruim, aumento
nos atolamentos de papel ou danos à impressora. Não use o seguinte:
• Papel áspero ou poroso
• Papel para jato de tinta
• Papel do tamanho de cartão de visita
• Papel dobrado ou enrugado
• Papel curvado além de 0,47 pol. (12 mm)
• Papel com cortes ou perfurações
• Papel grampeado
• Papel úmido
• Papel térmico ou de transferência de calor
• Envelopes com janelas, clipes de metal, costuras laterais ou adesivos com faixas de
liberação
• Envelopes acolchoados
NOTA
Além da lista acima, pode haveroutro material que não seja recomendado ou suportado.
Para obter detalhes, entre em contato com seu representante local Xerox.
Impressora Xerox®Versant®31005-2
Guia do Usuário
Page 41

Papel e material
Diretrizes de armazenamento de papel/material
Armazenar o papel e outro material adequadamente contribui para otimizar a qualidade
da impressão.
• Armazene o papel em locais escuros, frescos e relativamente secos. A maioria dos
papéis é suscetível a danos causados por luz ultravioleta e visível. A luz ultravioleta
do sol e de lâmpadas fluorescentes é particularmente prejudicial ao papel.
• Reduza a exposição do papel a luzes fortes por longos períodos de tempo.
• Mantenha as temperaturas constantes e a umidade relativa.
• Evite armazenar o papel em locais úmidos ou que atraem umidade.
• Armazene o papel nivelado em paletes, caixas, prateleiras ou gabinetes.
• Evite comidas ou bebidas na área em que o papel é armazenado ou manipulado.
• Não abra os pacotes lacrados de papel até que esteja pronto para colocá-lo na
impressora. Deixe o papel armazenado na embalagem original. A embalagem do
papel protege-o contra perda ou ganho de umidade.
• Alguns materiais especiais são colocados dentro de sacos plásticos que podem ser
lacradosnovamente.Armazene o material dentro do saco até que você esteja pronto
para usá-lo. Mantenha o material não utilizado no saco e lacre-o novamente para
proteção.
Papel suportado
Faixas de tamanhos do papel
Bandejas 1, 2 e 3
5,51 x 7,17 pol. / 140 x 182
mm
3,86 x 8,75 pol. / 98 x 146 mmBandeja 5 (Manual)
3,86 x 8,75 pol. / 98 x 146 mmBandejas 6 e 7
Tamanho máximoTamanho mínimoBandeja
13 x 19,2 pol. / 330,2 x 488
mm
13 x 19,2 pol. / 330,2 x 488
mm
13 x 19,2 pol. / 330,2 x 488
mm
Guia do Usuário
5-3Impressora Xerox®Versant®3100
Page 42

Papel e material
Especificações do papel para todas as bandejas
NOTA
Sempre consulte a Recommended Media List (Lista de materiais recomendados) para
obter uma lista completa de materiais suportados. A RML pode ser acessada do
Gerenciador da biblioteca de materiais e também pode ser transferida por download
dehttp://www.xerox.com/.
Papel comum
Revestido ou não
revestido
Papel perfurado
Revestido ou não
revestido)
Papel reciclado
(revestido e não
revestido)
Relevo
(revestido e não
revestido)
Tamanho do papelTipo de papel
alimentação
(ABL/ABC*)
•• ABC/ABLB5
• •A4 ABC/ABL
•• ABC/ABLCapa A4
•• ABCB4
• •A3 ABC
•• ABCSRA3
•• ABC/ABL7,25 x 10,5 pol.
• •8 x 10 pol. ABC/ABL
•• ABC8,46 x 12,4 pol.
•• ABC/ABL8,5 x 11 pol.
•• ABC/ABL8,5 x 13 pol.
•• ABC8,5 x 14 pol.
• •9 x 11 pol. ABC/ABL
•• ABC11 x 15 pol.
• •11 x 17 pol. ABC
•• ABC12 x 18 pol.
• •12,6 x 19,2 pol. ABC
•• ABC13 x 18 pol.
• •16-kai (TFX) ABC/ABL
•• ABC/ABL16-kai (GCO)
• •Pa-kai (TFX) ABC
•• ABCPa-kai (GCO)
BandejasDireção da
Todas as
bandejas
bandejas
Todas as
bandejas
Gramatura
(g/m²)
• Bandejas
1, 2 e 3: 52
a 256
• Bandejas
5, 6 e 7: 52
a 350
64 a 105Todas as
• Bandejas
1, 2 e 3:
106 a 256
• Bandejas
5, 6 e 7:
106 a 350
Cartão postal
(revestido e não
revestido)
Government-Legal
A6
215,9 x 330,2 mm
ABL8,5 x 11 pol. (A4)Transparência
bandejas
ABC4 x 6 pol.
(Manual), 6 e
7
ABC/ABL8,5 x 13 pol.
bandejas
Impressora Xerox®Versant®31005-4
—Todas as
106 a 350Bandejas 5
—Todas as
Guia do Usuário
Page 43

Papel e material
Double-Thick (DT)
Special A4
Double-Thick (DT)
Special A3
Envelopes
e não revestidas)
Tamanho do papelTipo de papel
226 x 310 mm
310,0 x 432,0 mm
pol.
• Nº10: 4,125 x 9,5 pol.
• C4: 229 x 324 mm
• C5: 162 x 229 mm
alimentação
(ABL/ABC*)
ABC/ABL8,90 x 12,20 pol.
ABC12,20 x 17,00 pol.
•• ABCMonarch:3,875 x 7,5
• ABC
• ABC/ABL
• ABC/ABL
ABL8,5 x 11 pol. / A4Etiquetas (revestidas
BandejasDireção da
bandejas
bandejas
(Manual), 6 e
7
Todas as
bandejas
Gramatura
(g/m²)
—Todas as
—Todas as
—Bandejas 5
• Bandejas
1, 2 e 3:
106 a 256
• Bandejas
5, 6 e 7:
106 a 350
ABL9 x 11 pol.Divisórias e
separadores
ABL = Alimentação pela borda longa; ABC = Alimentação pela borda curta
bandejas
163Todas as
Informações da bandeja do papel
Informações sobre as Bandejas 1, 2 e 3
As bandejas 1, 2 e 3 são idênticas. Quando a impressora é instalada pela primeira vez,
a configuração de tamanho das Bandejas 1 e 3 é definida em 8,5 x 11 polegadas ou
A4 (ABL). A configuração de tamanho da Bandeja 2 é definida em 11 x 17 polegadas
ou A3 (ABC).
NOTA
Cada bandeja de alimentação tem uma etiqueta de carregamento de material. Ao
colocar o material na bandeja, consulte as etiquetas no painel dentro da bandeja de
alimentação para saber a orientação correta desse tipo de material.
Quando o Gerenciador da biblioteca de materiais é instalado no servidor de impressão,
o padrão para todas as bandejas é Carta (8,5 x 11 polegadas). No Gerenciador da
biblioteca de materiais, o operador pode alterar as configurações de tamanhos de
material diferentes dos tamanhos padrão da bandeja.
Guia do Usuário
5-5Impressora Xerox®Versant®3100
Page 44

Papel e material
NOTA
Os tamanhos selecionados no Gerenciador da biblioteca de materiais para todas as
bandejas devem corresponder aos tamanhos de papel colocados nas bandejas.
As especificações para cada bandeja são:
• Máximo de 550 folhas de 24 lb. (90 g/m²) de papel não revestido; 28 a 80 lb. capa
(105 - 120 g/m²) de material revestido
• Faixa de gramaturas de papel entre 18 lb. Bond a 95 lb. Capa (64 g/m² a 256 g/m²)
• Tamanhos de papel a partir de 5,51 x 7,17 pol. / 140 x 182 até um máximo de 13 x
19,2 pol. (330,2 x 488 mm)
• Os tipos de materiais incluem transparências, alta gramatura, revestido e não
revestido, perfurados e divisórias
• Carregar papel pela borda longa (ABL)/retrato ou pela borda curta (ABC)/paisagem
(dependendo do tamanho real do papel)
• Capacidade de detecção automática de tamanho
• Ajusta automaticamente a posição da bandeja nas partes dianteira e traseira com
base no tamanho do papel; isto é feito quando a bandeja é fechada
Informações sobre as Bandejas 6 e 7
NOTA
Cada bandeja de alimentação tem uma etiqueta de carregamento de material. Ao
colocar o material na bandeja, consulte as etiquetas no painel dentro da bandeja de
alimentação para saber a orientação correta desse tipo de material.
As especificações para cada bandeja são:
• Máximo de 2.000 folhas de 24 lb. (90 g/m²) de papel não revestido; 2.100 folhas de
82 g/m² e 2.300 folhas de 64 g/m²
• Faixa de gramaturas de papel entre 52 a 350 g/m²
• Os tipos de materiais incluem transparências, alta gramatura, revestido e não
revestido, perfurados e divisórias
DICA
As transparências funcionam melhor quando impressas das Bandejas 6 e 7.
• Recomenda-se que você use a Bandeja 5 (Manual) para alimentar envelopes. No
entanto, as Bandejas 6 e 7 também podem ser usadas para alimentar envelopes.
- Se você usar as Bandejas 6 ou 7, os envelopes devem ser alimentados com o
suporte para cartão postal ou o Kit de suporte de envelope opcional instalado.
- Se o suporte para cartão postal for usado, a altura da pilha será limitada a 200
envelopes.
Impressora Xerox®Versant®31005-6
Guia do Usuário
Page 45

Papel e material
Suporte para cartão postal
O suporte para cartão postal é fornecido de fábrica com as Bandejas 6 e 7. O suporte
para cartão postal permite a impressão em materiais de tamanho menor sem a
necessidade de corte ou classificação de pós-processamento. O suporte para cartão
postal acomoda materiais ABC de 4 x 6 pol. (101,6 x 152,4 mm) e menores. Para obter
mais informações, consulte Faixas de tamanhos de papel.
NOTA
Para obter mais informações, consulte Cartões postais.
Kit de suporte para envelopes opcional
O Kit de suporte para envelopes permite que uma quantidade maior de envelopes seja
colocada e impressa das bandejas 6 ou 7. Esse kit opcional consiste em duas peças de
plástico que se encaixam na parte inferior da bandeja e um suporte para cartão postal
que se acopla na lateral da bandeja. As peças de plástico levantam um lado da pilha
de envelopes para deslocar a espessura extra das abas. Isso mantém o nível da pilha
para alimentação e permite que mais envelopes sejam alimentados da bandeja.
NOTA
Para obter mais informações, consulte Cartões postais.
Informações da Bandeja do papel 5 (Manual)
NOTA
Dependendo da configuração do sistema, a Bandeja 5 (Manual) opcional está localizada
na parte superior das Bandejas 6/7 ou das Bandejas 8/9 opcionais).
Essa bandeja é usada principalmente ao usar uma quantidade pequena e material
especial (como envelopes). Ao usar a Bandeja 5 (Manual), consulte as seguintes
informações:
• Máximo de 250 folhas de 24 lb. (90 g/m²) de papel não revestido; 28 lb. a 110 lb.
capa (106 - 300 g/m²) de material revestido
• Faixa de gramaturas de papel 52 g/m² (não revestido) a 300 g/m² (revestido)
• Os tipos de materiais incluem transparências, alta gramatura, revestido e não
revestido, perfurados e divisórias
• Programe as propriedades do material do trabalho no Gerenciador da biblioteca de
materiais no servidor de impressão.
• Não coloque papel de tamanhos diferentes na bandeja manual.
• Não coloque materiais acima da linha de preenchimento máximo MAX, como indicado
na bandeja.
• Recomenda-se que você use a Bandeja 5 (Manual) para alimentar envelopes.
Informações sobre a produtividade da impressora
As tabelas a seguir mostram a velocidade máxima de impressão da impressora na faixa
total de tamanhos de papel que a impressora suporta. A menos que seja observado o
contrário, a velocidade de impressão é idêntica à das impressões em quatro cores ou
preto e branco.
5-7Impressora Xerox®Versant®3100
Guia do Usuário
Page 46

Papel e material
A velocidade do processo e impressão baseia-se no modo 1 Face/2 Faces, no tipo,
gramatura e tamanho do papel, e também na bandeja de alimentação.
NOTA
As referências às faixas de gramatura Bond e Capa são aproximações baseadas na
conversão para a gramatura e o tipo de papel padrão mais próximos.
Impressora Xerox®Versant®31005-8
Guia do Usuário
Page 47

Papel e material
Informações de produtividade das Bandejas 1, 2, 3, 6 e 7
NOTA
Material de gramatura maior que 256 g/m² (90 lb. Capa) não pode ser alimentado das
Bandejas 1 a 3.
Tamanho do
papel
A4
A4
B4
A3
SRA3
/ 330,2 x 488
mm
A4
A4
Direção de
alimentação
do papel
ABL8,5 x 11 pol. /
ABL8,5 x 11 pol. /
papel
52 a 300 g/m²
18 lb Bond a
110 lb Capa
301 a 350
g/m²
110 lb Capa a
130 lb Capa
Impressõespor minuto (ppm)Tipo de papelGramatura do
2 Face1 Face
50100Revestido e
não revestido
4080ABC8,5 x 11 pol. /
3060ABC8,5 x 14 pol. /
2552ABC11 x 17 pol. /
2547ABC12 x 18 pol. /
2447ABC13 x 19,2 pol.
4080Revestido e
não revestido
3264ABC8,5 x 11 pol. /
B4
A3
SRA3
/ 330,2 x 488
mm
Guia do Usuário
2651ABC8,5 x 14 pol. /
2244ABC11 x 17 pol. /
2039ABC12 x 18 pol. /
203913 x 19,2 pol.
5-9Impressora Xerox®Versant®3100
Page 48

Papel e material
Tamanho do
papel
A4
A4
B4
A3
SRA3
A4
A4
Direção de
alimentação
do papel
ABL8,5 x 11 pol. /
ABL8,5 x 11 pol. /
ABL8,5 x 11 pol. /
papel
106 a 300
g/m²
g/m²
g/m²
Impressõespor minuto (ppm)Tipo de papelGramatura do
2 Face1 Face
–40Etiquetas e
Transparências
–32ABC8,5 x 11 pol. /
–25ABC8,5 x 14 pol. /
–22ABC11 x 17 pol. /
–19ABC12 x 18 pol. /
–32Divisória106 a 176
–23Divisória177 a 256
A4
ABL8,5 x 11 pol. /
16Divisória257 a 300
g/m²
Impressora Xerox®Versant®31005-10
Guia do Usuário
Page 49

Informações de produtividade da Bandeja 5 (Manual)
Papel e material
Tamanho do
papel
A4
A4
B4
A3
SRA3
/ 330,2 x 488
mm
A4
A4
Direção de
alimentação
do papel
ABL8,5 x 11 pol. /
ABL8,5 x 11 pol. /
papel
52 a 300 g/m²
18 lb Bond a
110 lb Capa
301 a 350
g/m²
110 lb Capa a
130 lb Capa
Impressõespor minuto (ppm)Tipo de papelGramatura do
2 Face1 Face
3570Revestido e
não revestido
3059ABC8,5 x 11 pol. /
2550ABC8,5 x 14 pol. /
2244ABC11 x 17 pol. /
2141ABC12 x 18 pol. /
2040ABC13 x 19,2 pol.
3570Revestido e
não revestido
2957ABC8,5 x 11 pol. /
B4
A3
SRA3
/ 330,2 x 488
mm
2447ABC8,5 x 14 pol. /
2040ABC11 x 17 pol. /
1937ABC12 x 18 pol. /
183613 x 19,2 pol.
Guia do Usuário
5-11Impressora Xerox®Versant®3100
Page 50

Papel e material
Colocação do papel
Colocação de papel nas bandejas 1, 2 e 3
No Gerenciador da biblioteca de materiais no servidor de impressão, defina as
configurações de tipo, gramatura e tamanho do material da bandeja. Na impressora,
verifique se o material colocado na bandeja de papel corresponde aos atributos da
bandeja de papel programados.
NOTA
Um atolamento de papel pode ocorrer se uma bandeja for aberta enquanto estiver
sendo usada para alimentar o material.
1. Selecione o papel apropriado para o trabalho de impressão.
2. Puxe a bandeja para fora lentamente até que ela pare.
3. Abra a resma de papel com o lado da emenda para cima.
4. Ventile as folhas antes de colocá-las na bandeja.
5. Estenda as guias do papel para fora até que elas parem.
6. Coloque o papel e alinhe a borda com a borda esquerda da bandeja.
O papel pode ser colocado na direção ABL/retrato ou ABC/paisagem.
7. Ajuste as guias do papel pressionando as travas das guias e movendo as guias
cuidadosamente até que elas encostem levementenas bordas do material na bandeja.
Impressora Xerox®Versant®31005-12
Guia do Usuário
Page 51

Papel e material
NOTA
Não coloque os materiais acima da linha MAX localizada nas guias.
8. Empurre delicadamente a bandeja até que pare.
A janela Propriedades da bandeja do papel é exibida no servidor de impressão (no
Gerenciador da biblioteca de materiais). Você pode ver e definir os atributos do
material, assim como verificar se as bandejas estão atribuídas ao material correto.
O Gerenciador da biblioteca de materiais está disponível no servidor de impressão
somente e não na impressora.
9. Na janela Propriedades da bandeja, insira ou verifique as informações corretas do
papel, incluindo tamanho, tipo, gramaturae, se necessário, a curvatura do papel e/ou
a opção de alinhamento. Selecione o material e atribua o material à bandeja a ser
utilizada.
10. Selecione OK para salvar as informações e fechar a janela Propriedades da bandeja.
Colocação de papel nas Bandejas 6 e 7
1. Selecione o papel apropriado para o trabalho de impressão.
2. Puxe a bandeja para fora lentamente até que ela pare.
3. Abra a resma de papel com o lado da emenda para cima.
4. Ventile as folhas antes de colocá-las na bandeja.
5. Estenda as guias do papel para fora até que elas parem.
Guia do Usuário
5-13Impressora Xerox®Versant®3100
Page 52

Papel e material
6. Coloque o papel e alinhe a borda do papel com a borda direita da bandeja.
O papel pode ser colocado na direção ABL/retrato ou ABC/paisagem.
7. Ajuste as guias do papel pressionando as travas das guias e movendo as guias
cuidadosamente até que elas encostem levementenas bordas do material na bandeja.
NOTA
Não coloque os materiais acima da linha MAX localizada nas guias.
8. Empurre delicadamente a bandeja até que pare.
A janela Propriedades da bandeja do papel é exibida no servidor de impressão (no
Gerenciador da biblioteca de materiais). Você pode ver e definir os atributos do
material, assim como verificar se as bandejas estão atribuídas ao material correto.
O Gerenciador da biblioteca de materiais está disponível no servidor de impressão
somente e não na impressora.
9. Na janela Propriedades da bandeja, insira ou verifique as informações corretas do
papel, incluindo tamanho, tipo, gramaturae, se necessário, a curvatura do papel e/ou
a opção de alinhamento. Selecione o material e atribua o material à bandeja a ser
utilizada.
10. Selecione OK para salvar as informações e fechar a janela Propriedades da bandeja.
Colocação de papel na Bandeja 5 (Manual)
1. Deslize as guias do papel para fora para o tamanho de papel desejado.
2. Selecione o papel apropriado para o trabalho de impressão.
3. Abra a resma de papel com o lado da emenda para cima.
4. Ventile as folhas antes de colocá-las na bandeja.
Impressora Xerox®Versant®31005-14
Guia do Usuário
Page 53

Papel e material
5. Insira o papel ou material na bandeja até parar.
6. Ajuste as guias do papel para que toquem as bordas da pilha.
A janela Propriedades da bandeja é exibida no Gerenciador da biblioteca de
materiais no servidor de impressão. O Gerenciador da biblioteca de materiais não
está disponível na impressora.
NOTA
Não coloque os materiais acima da linha MAX localizada nas guias.
7. Na janela Propriedades da bandeja, verifique se as informações corretas do papel,
como tamanho, tipo e gramatura, estão selecionadas e correspondem ao material
colocado na bandeja.
8. Selecione OK para salvar as informações e fechar a janela Propriedades da bandeja.
Correspondência das informações de bandeja e material
IMPORTANTE
Paraasseguraraprodutividade máxima e a conclusão bem-sucedida do trabalho, sempre
verifique se as informações em Propriedades da bandeja (em Gerenciador da biblioteca
de materiais no servidor de impressão) correspondem ao material de impressão real
colocado na bandeja que está sendo usada para o trabalho de impressão.
Antes de executar um trabalho de impressão, verifique todas as condições a seguir:
• Foram feitas modificações na Biblioteca de materiais, como
- Adição de um material
- Cópia de um material
- Criação de um novo material
- Edição de um material existente
• O material de impressão foi colocado na bandeja selecionada para o trabalho de
impressão
• A bandeja selecionada para o trabalho de impressão foi aberta/fechada
NOTA
Se qualquer uma destas condições se aplicarem, verifique se as informações em
Propriedades da bandeja correspondem ao conteúdo real da bandeja.
Guia do Usuário
5-15Impressora Xerox®Versant®3100
Page 54

Papel e material
Se o material colocado na bandeja não corresponder às informações na janela
Propriedades da bandeja, uma mensagem poderá ser exibida de uma ou mais das
maneiras a seguir:
• No interface com o usuário da impressora
• No aplicativo Gerenciador da biblioteca de materiais (no servidor de impressão)
• No servidor de impressão
• Em ambos no Gerenciador da biblioteca de materiais e no servidor de impressão
• No Gerenciador da biblioteca de materiais, no servidor de impressão e possivelmente
na interface com o usuário da impressora
DICA
As informações de incompatibilidade do papel/bandeja e como elas são exibidas
dependem do servidor de impressão individual. Se o material for alterado em uma
bandeja, uma mensagem pode não ser exibida; portanto, é importante sempre executar
as seguintes etapas antes de executar um trabalho de impressão.
1. Verifique se há uma mensagem de incompatibilidade de bandeja na interface com
o usuário da impressora. Se uma mensagem de incompatibilidade for exibida,
selecione-a.
Uma nova mensagem exibe e explica qual é o material necessário e o local da bandeja.
2. Vá para o servidor de impressão e verifique se há na janela principal/inicial uma
mensagem similar:
• Se existir uma mensagem, siga as informações fornecidasno servidor de impressão
para corrigir o problema de incompatibilidade do material e continue na próxima
etapa.
• Se uma mensagem não existir, continue na próxima etapa.
3. Coloque o material na bandeja.
Se a interface com o usuário na impressora exibir uma mensagem de
incompatibilidade, siga as instruções fornecidas para colocar o material correto.
4. Altere as Propriedades da bandeja para corresponder ao conteúdo da bandeja; isso
é feito no Gerenciador da biblioteca de materiais no servidor de impressão.
a) Verifique o tamanho, tipo (revestido, não revestido) e gramatura do papel
colocado na bandeja.
b) Se necessário, insira essas informações na janela Propriedades da bandeja.
5. Assegure-se de que a bandeja esteja fechada.
6. Assegure-se de que todas as mensagens de incompatibilidade de bandeja/material
tenham sido resolvidas.
7. Inicie o trabalho de impressão.
Impressora Xerox®Versant®31005-16
Guia do Usuário
Page 55

Papel e material
Desempenho da alimentação de papel nas Bandejas 6 e 7
Se ocorrer falha de registro/enviesamento na saída impressa alimentada das Bandejas
6 ou 7, o ajuste manual das alavancas de alimentação de papel poderá melhorar e
corrigir a saída impressa.
IMPORTANTE
Paraa maioria dos trabalhos de impressão, essas alavancas devem permanecer em sua
posição padrão. A posição destes seletores deve ser alterada somente se houver um
problema de enviesamento durante a execução de um trabalho de impressão e/ou tipo
de material específicos. A alteração das alavancas pode causar mais problemas de
enviesamento durante a execução de determinados tipos de material, como papel
revestido, etiqueta, divisória, papel perfurado, transparência, filme, cartões postais e
envelopes.
As alavancas de ajuste de alimentação de papel estão localizadas nas Bandejas 6 e 7.
Essas alavancas são utilizadas para melhorar a precisão da alimentação de papel e para
reduzir os problemas de enviesamento do papel.
Alavanca traseira de ajuste da
alimentação de papel
2.1. Alavanca direita de ajuste da
alimentação de papel
Melhoria do desempenho da alimentação de papel nas Bandejas 6 e 7
1. Abra a bandeja puxando-a para fora lentamente até parar.
2. Assegure-se de que o papel desejado foi colocado na bandeja.
3. Acesse o Gerenciador da biblioteca de materiais no servidor de impressão.
5-17Impressora Xerox®Versant®3100
Guia do Usuário
Page 56

Papel e material
a) Na janela Propriedades da bandeja, verifique as informações corretas sobre o
papel, incluindo tamanho, tipo, gramaturae a opção de curvaturaou alinhamento
do papel para a bandeja.
b) Selecione OK e feche a janela Propriedades da bandeja.
4. Na bandeja, deslize a alavanca de ajuste de alimentação de papel traseira para a
direita.
5. Feche a bandeja empurrando-a lentamente para dentro até que comece a parar.
6. Execute o trabalho de impressão.
7. Após concluir os trabalhos de impressão, abra a bandeja e retorne a alavanca de
ajuste de alimentação de papel traseira para sua posição padrão, deslizando-o para
a esquerda.
Deixe a bandeja aberta e continue na próxima etapa.
8. Recupere e avalie a saída impressa; escolha uma das seguintes opções:
• O papel é alimentado com precisão sem enviesamento e a saída impressa é
satisfatória. Feche a bandeja e sua tarefa está concluída.
• O papel fica enviesado e a saída impressa é insatisfatória; passe para a etapa
seguinte.
9. Ajuste a alavanca de alimentação de papel direita:
Impressora Xerox®Versant®31005-18
Guia do Usuário
Page 57

Papel e material
a) Na bandeja, deslize a alavanca de ajuste de alimentação de papel direita para
a parte traseira da bandeja.
b) Feche a bandeja e verifique as configurações da bandeja do Gerenciador da
biblioteca de materiais no servidor de impressão.
c) Execute o trabalho de impressão.
10. Recupere e avalie a saída impressa; escolha uma das seguintes opções:
• O papel é alimentado com precisão sem enviesamento e a saída impressa é
satisfatória; execute o seguinte:
1. Abra a bandeja.
2. Retorne a alavanca de ajuste de alimentação de papel direita para sua
posição padrão deslizando-a em direção à parte dianteira da bandeja.
3. Feche a bandeja e sua tarefa está concluída.
• O papel fica enviesado e a saída impressa é insatisfatória; passe para a etapa
seguinte.
11. Ajuste as duas alavancas:
a) Abra a bandeja e deslize a alavanca de ajuste de alimentação de papel traseira
para a direita.
Guia do Usuário
5-19Impressora Xerox®Versant®3100
Page 58

Papel e material
b) Assegure-se de que a alavanca de ajuste de alimentação de papel direita ainda
esteja na posição traseira.
c) Feche a bandeja e verifique as configurações da bandeja do Gerenciador da
biblioteca de materiais no servidor de impressão.
d) Execute o trabalho de impressão.
12. Após concluir o trabalho de impressão, abra a bandeja e retorne as duas alavancas
para suas posições padrão:
a) Retorne a alavanca de ajuste de alimentação de papel traseira para sua posição
padrão deslizando-a para a esquerda.
b) Retorne a alavanca de ajuste de alimentação de papel direita para sua posição
padrão deslizando-a em direção à parte dianteira da bandeja.
c) Feche a bandeja e continue na próxima etapa.
13. Recupere e avalie a saída impressa; escolha uma das seguintes opções:
• O papel é alimentado adequadamente sem enviesamento e a saída impressa é
satisfatória; sua tarefa está concluída.
• O papel fica enviesado e a saída impressa é insatisfatória; continue na etapa
seguinte.
Impressora Xerox®Versant®31005-20
Guia do Usuário
Page 59

Papel e material
14. Se você ainda tiver problemas com o ajuste de enviesamento, consulte as informações
em Configuração avançada do material no Gerenciador da biblioteca de materiais
no servidor de impressão. Se necessário, execute uma das ações a seguir:
• Crie/use um Perfil de alinhamento para resolver o problema.
• Ajuste a Pressão do rolo alinhador para resolver o problema.
• Ajuste o Regi-Loop para resolver o problema.
Se o problema persistir, entre em contato com o Centro de Atendimento ao Cliente.
IMPORTANTE
Se estiver usando a função Configuração avançada do material, sempre retorne a
função para sua configuração padrão antes de usar a impressora.
Impressão em material especial
Transparências
Diretrizes para impressão em transparências
Sempre consulte as seguintes diretrizes antes de usar transparências:
• Para obter o desempenho do sistema e a projeção de imagem ideais, use
transparências com fita removível da Xerox. Essas transparências Premium foram
especificamente projetadas para fornecer a qualidade de impressão ideal.
• O uso de outras transparências pode causar danos à máquina e resultar em excessivas
chamadas de atendimento técnico.
• As transparências podem ser impressas de todas as bandejas.
• Use somente as transparências listadas na Recommended Media List (lista de
materiais recomendados).
• Não misture papel com transparências na bandeja. Isso pode provocar atolamentos.
• Não coloque mais de 100 transparências em uma bandeja de papel ao mesmo tempo.
• Coloque transparências de 8,5 x 11 pol. (A4) somente com alimentação pela borda
longa (retrato).
• Antes de colocar as transparências, ventile-as para evitar que grudem.
• Coloque as transparências no topo de uma pilha pequena de papel de mesmo
tamanho.
• No Gerenciador da biblioteca de materiais, certifique-se de selecionar Transparência
como o tipo de papel ou material e selecione a bandeja que contém as transparências
como Papel.
• A altura máxima da pilha de saída não deve exceder 100 transparências.
Guia do Usuário
5-21Impressora Xerox®Versant®3100
Page 60

Papel e material
Colocar transparências nas Bandejas 1, 2 e 3
Coloque as transparências na direção ABL (retrato) e alinhe a borda das transparências
contra a borda esquerda da bandeja, com o lado a ser impresso voltado para cima.
Colocação de transparências nas Bandejas 6 e 7
Coloque as transparências na direção ABL (retrato) e alinhe a borda das transparências
contra a borda direita da bandeja, com o lado a ser impresso voltado para cima.
Colocação de transparências na Bandeja 5 (Manual)
Coloque as transparências na direção ABL (retrato) e alinhe a borda das transparências
contra a borda direita da bandeja, com o lado a ser impresso voltado para cima.
Impressora Xerox®Versant®31005-22
Guia do Usuário
Page 61

Papel e material
Papel perfurado
Diretrizes para imprimir em papel perfurado
O papel pré-perfurado tem dois ou mais furos ao longo de uma borda para uso em
fichários e cadernos.
Sempre consulte as seguintes diretrizes antes de usar papel perfurado:
• O papel com furos pode ser impresso de todas as bandejas.
• O papel perfurado pode ser colocado na direção ABL/retrato ou ABC/paisagem.
• Posicione os furos ao longo da borda de alimentação, como mostrado na imagem
na frente da bandeja.
• Coloque papel perfurado, com o lado a ser impresso voltado para cima.
• Para evitar atolamentos ou danos, certifique-se de que todos os plugues (peças
cortadas do papel para criar os furos) não permaneçam na pilha.
Colocação de papel perfurado nas Bandejas 1, 2 e 3
Coloque o papel perfurado e alinhe a borda com os orifícios na borda esquerda da
bandeja.
Guia do Usuário
5-23Impressora Xerox®Versant®3100
Page 62

Papel e material
Colocação de papel perfurado nas Bandejas 6 e 7
Direção da alimentação pela borda longa (ABL)
Coloque e alinhe o papel de encontro com o lado direito da bandeja na direção ABL.
Direção da alimentação pela borda curta (ABC)
Coloque e alinhe o papel de encontro com o lado direito da bandeja na direção ABC.
Colocação de papel perfurado na Bandeja 5 (Manual)
Coloqueo papel perfurado e alinhe a borda com os orifícios na borda direita da bandeja.
Impressora Xerox®Versant®31005-24
Guia do Usuário
Page 63

Papel e material
Divisória
Diretrizes para imprimir em divisórias
Sempre consulte as seguintes diretrizes antes de usar divisórias:
• As divisórias podem ser impressas de todas as bandejas.
• As divisórias são colocadas na bandeja somente na direção de alimentação pela
borda longa (ABL).
• A divisória é colocada de modo que a borda reta do material está na direção de
alimentação.
• Você pode colocar a divisória de alceamento único ou a divisória de alceamento
reverso.
• Consulte a documentação do servidor de impressão para obter informações mais
detalhadas sobre como configurar um trabalho de divisória em seu servidor de
impressão.
• Se ocorrer um atolamento durante a execução de jogos de divisórias, cancele o
trabalho e recomece.
• Antes de colocar as divisórias em uma bandeja, programe o trabalho de divisória no
aplicativo Gerenciador da biblioteca de materiais no servidor de impressão ou de
seu driver de impressão.
- Selecione Divisórias ou Divisórias com índice como o Tipo de papel.
- Selecione a bandeja que contém o material como a Origem do papel.
- Selecionea Gramaturade papel correta paraas divisórias, geralmente163 g/m².
A faixa de gramatura pode ser de 60 a 176 g/m².
- Configure Módulos para o número de divisórias no jogo.
- Para o tamanho de material, configure um Tamanho personalizado de 9 x 11
polegadas (229 x 279 mm) ABL.
- Para a Ordem de saída de impressão/Sequência das divisórias, selecione N a 1.
- Para Entrega da saída, selecione Face para cima.
Guia do Usuário
5-25Impressora Xerox®Versant®3100
Page 64

Papel e material
Colocar divisórias nas Bandejas 1, 2 e 3
Coloque as divisórias na direção ABL (retrato) e alinhe a borda reta das divisórias com
a borda esquerda da bandeja e com o lado a ser impresso voltado para baixo.
Colocação de divisórias alceadas retas
Coloqueas divisórias alceadas retas com o corte da primeira divisória em branco voltado
para a parte traseira da bandeja.
Colocação de divisórias alceadas reversas
Coloque as divisórias alceadas reversas com o corte da primeira divisória em branco
voltado para a parte dianteira da bandeja.
Impressora Xerox®Versant®31005-26
Guia do Usuário
Page 65

Papel e material
Colocação de divisórias nas Bandejas 6 e 7
Coloque a divisória na direção ABL, com o lado a ser impresso voltado para baixo; alinhe
a borda reta da divisória contra a borda direita da bandeja e as linguetas à esquerda.
Colocação de divisórias alceadas retas
Coloqueas divisórias alceadas retas com o corte da primeira divisória em branco voltado
para a parte dianteira da bandeja.
Colocação de divisórias alceadas reversas
Coloque as divisórias alceadas reversas com o corte da primeira divisória em branco
voltado para a parte traseira da bandeja.
Guia do Usuário
5-27Impressora Xerox®Versant®3100
Page 66

Papel e material
Colocação de divisórias na Bandeja 5 (Manual)
Coloque a divisória na direção ABL, com o lado a ser impresso voltado para cima; alinhe
a borda reta da divisória contra a borda direita da bandeja e as linguetas à esquerda.
Colocação de divisórias alceadas retas
Coloqueas divisórias alceadas retas com o corte da primeira divisória em branco voltado
para a parte dianteira da bandeja.
Colocação de divisórias alceadas reversas
Coloque as divisórias alceadas reversas com o corte da primeira divisória em branco
voltado para a parte traseira da bandeja.
Impressora Xerox®Versant®31005-28
Guia do Usuário
Page 67

Papel e material
Etiquetas
Diretrizes para impressão em etiquetas
Sempre consulte as seguintes diretrizes antes de usar etiquetas:
• As etiquetas podem ser impressas de todas as bandejas.
• Ao enviar seu arquivo de impressão, selecione Etiquetas como o Tipo de papel e
selecione a bandeja que contém as etiquetas como a Origem do papel.
• Use etiquetas projetadas para impressão a laser.
• Siga estas diretrizes de gramatura:
- As Bandejas 1, 2 e 3 podem comportar no máximo 256 g/m²
- A Bandeja 5 (Manual) pode comportar no máximo 300 g/m²
- As Bandejas 6 e 7 podem comportar no máximo 350 g/m²
• Não use etiquetas de vinil ou etiquetas de cola seca.
• Imprima somente um lado da folha de etiquetas.
• Não use folhas em que estejam faltando etiquetas, pois isso pode danificar a
impressora.
• Armazene as etiquetas niveladas não utilizadas em sua embalagem original.
• Deixe as folhas de etiquetas guardadas na embalagem original até que esteja pronto
para usá-las.
• Retorne as folhas de etiquetas não utilizadas para sua embalagem original e lacre
novamente.
• Não armazene as etiquetas em condições extremamente secas, úmidas, quentes ou
frias.
• Vire o material com frequência.
• Longos períodos de armazenamento em condições extremas podem fazer com que
as etiquetas se curvem e fiquem atoladas na impressora.
Colocação de etiquetas em todas as bandejas
Consulte o seguinte ao colocar etiquetas nas bandejas do papel.
• Coloque as etiquetas voltadas para baixo nas Bandejas 1, 2 e 3.
• Coloque as etiquetas voltadas para cima nas Bandejas 5 (Manual), 6 e 7.
Guia do Usuário
5-29Impressora Xerox®Versant®3100
Page 68

Papel e material
Papel brilhante
Diretrizes para imprimir em papel brilhante
Papelbrilhante é um tipo de papel revestido que pode ser impresso de todas as bandejas.
Sempre consulte as seguintes diretrizes antes de usar papel brilhante:
• Selecione Revestidocomo o Tipo de papel e selecione a bandeja que contém o papel
brilhante como a Origem do papel.
• Selecione a Gramatura do papel e o Tamanho corretos.
• Não abra os pacotes lacrados de papel brilhante até que esteja pronto para colocá-lo
na impressora.
• Armazene o papel brilhante nivelado na embalagem original.
• Remova todos os outros papéis da bandeja antes de colocar o papel brilhante.
• Coloque somente a quantidade de papel brilhante que você pretende usar e remova
a parte não utilizada da bandeja quando tiver concluído a impressão.
• Recoloque a parte não utilizada na embalagem original e lacre para uso posterior.
• Vire o material com frequência.
• Longos períodos de armazenamento em condições extremas podem fazer com que
o papel brilhante se curve e fique atolado na impressora.
Cartões postais
Diretrizes para impressão em cartões postais
Sempre consulte as seguintes diretrizes antes de usar cartão postal:
DICA
Ao imprimir cartões postais nas Bandejas 6 ou 7, é necessário o suporte para cartão
postal. Sempre instale o suporte para cartão postal antes de colocar e imprimir cartões
postais dessas bandejas.
• Os cartões postais podem ser impressos a partir das Bandejas 5, 6 e 7.
• Não abra os pacotes lacrados de cartão postal até que esteja pronto para colocá-lo
na impressora.
• Armazene o cartão postal nivelado na embalagem original.
• Remova todos os outros papéis da bandeja antes de colocar o cartão postal.
• Coloque somente a quantidade de cartão postal que pretende usar e remova a parte
não utilizada da bandeja quando tiver concluído a impressão.
• Recoloque a parte não utilizada na embalagem original e lacre para uso posterior.
• Se estiver usando as Bandejas 6 ou 7, sempre remova o suporte para cartão postal
quando concluir a impressão.
• Gire o cartão postal com frequência.
• Longos períodos de armazenamento em condições extremas podem fazer com que
o cartão postal se curve e fique atolado na impressora.
Impressora Xerox®Versant®31005-30
Guia do Usuário
Page 69

Papel e material
• Ao enviar seu arquivo de impressão, do Gerenciador da biblioteca de materiais ou
de seu driver de impressão, selecione as seguintes opções:
- Selecione Papel personalizado como o Tipo de papel e insira as dimensões de
Tamanho do cartão postal.
- Insira a Gramatura do papel para o cartão postal.
- Selecione a bandeja (Bandeja 5, 6 ou 7) como a Origem do papel.
Tamanhos de cartão postal suportados
Direção de alimentaçãoTamanho de cartão postal
Alimentação pela borda curta (ABC)4 x 6 pol. (101,6 x 152,4 mm)
Alimentação pela borda curta (ABC)A6 (148 x 105 mm)
(5,8 x 4,1 pol.)
Colocação de cartões postais nas Bandejas 6 e 7
NOTA
Instale o suporte para cartão postal antes de imprimir cartões postais.
1. Abra cuidadosamente uma das bandejas de papel até que ela pare e retire o papel.
2. Mova as guias de papel para sua maior posição.
3. Para remover o suporte para cartão postal, solte o parafuso no lado esquerdo da
bandeja ( ) e remova o suporte ( ).
Guia do Usuário
5-31Impressora Xerox®Versant®3100
Page 70

Papel e material
4. Instale o suporte para cartão postal:
a) Instale o suporte nos pinos de localização na estrutura superior e nos sulcos na
parte inferior da bandeja.
b) Aperte o parafuso-borboleta para que ele encaixe o suporte para cartão postal
no lugar.
5. Coloque os cartões postais na direção ABC ao longo do lado direito da bandeja.
6. Ajuste as guias do papel contra o material.
7. Feche a bandeja de papel e confirme as novas configurações no servidor de impressão.
8. Execute o trabalho de impressão.
9. Após concluir o trabalho de impressão, remova o cartão postal e o suporte para cartão
postal da bandeja.
10. Guarde o suporte para cartão postal inserindo-o na área de armazenamento no lado
esquerdo da bandeja ( ) e aperte o parafuso ( ).
Colocação de cartões postais na Bandeja 5 (Manual)
Coloque cartões postais na direção ABC, com o lado a ser impresso voltado para cima.
Impressora Xerox®Versant®31005-32
Guia do Usuário
Page 71

Papel e material
Envelopes
Diretrizes para impressão em envelopes
• A bandeja recomendada para imprimir envelopes é a Bandeja 5 (Manual).
• Os envelopes também podem ser impressos das Bandejas 6 ou 7. Antes de imprimir
envelopes das Bandejas 6 ou 7, um dos seguintes itens deve ser instalado:
- O suporte para cartão postal
- O Kit de suporte para envelope opcional
• Se estiver usando as Bandejas 6 ou 7 e o Suporte para cartão postal estiver montado,
a altura da pilha de envelopes será limitada ao máximo de 100 envelopes. A
capacidade pode variar de acordo com o tipo de envelope e o fabricante.
• Use somente tamanhos de envelopes suportados e coloque-os na direção de
alimentação recomendada. Para obter mais informações, consulte Tamanhos de
envelope suportados.
• É possível o uso de envelopes de outros tamanhos, mas o desempenho não é
garantido.
• Os envelopes devem ser executados somente em 1 face.
• A capacidade recomendada é de 30 a 40 envelopes. A capacidade pode variar de
acordo com o tipo de envelope e o fabricante.
• Sempre coloque envelopes com as abas fechadas e voltadas para baixo.
• Na direção ABC, coloque as abas voltadas para a parte dianteira da impressora.
• Na direção ABL, coloque as abas voltadas para a borda de ataque (direção da
alimentação na impressora).
• Ao enviar seu arquivo de impressão, selecione um papel personalizado como o Tipo
de papel e insira as dimensões do envelope.
- Alarguraé medida a partir da borda de ataque até a borda de fuga do envelope.
- Isto significa que se você estiver colocando o envelope na direção ABC, insira a
dimensão longa do envelope como a largura.
- Se você estiver colocando o envelope ABL, insira a dimensão curta do envelope
como a largura.
• Insira uma gramatura alta para o material, como 176 g/m² ou mais para envelopes
de 24 lb. Os melhores resultados irão variar de acordo com o tipo de envelope e o
fabricante.
• Selecione a Bandeja 5 (Manual) como a Origem do papel.
• Não use envelopes acolchoados. Use envelopes que estejam nivelados sobre uma
superfície.
5-33Impressora Xerox®Versant®3100
Guia do Usuário
Page 72

Papel e material
• Guarde os envelopes não utilizados na embalagem original para evitar excesso de
umidade ou ressecamento que podem afetar a qualidade da impressão e causar
enrugamento. Muita umidade pode fazer com que os envelopes colem antes ou
durante a impressão.
• Algumas rugas ou relevos podem ocorrer ao imprimir em envelopes. Um impressão
de envelopes bem-sucedida depende da qualidade e da estrutura dos envelopes.
Tente outra marca de envelope se ocorrerem problemas.
• É possível que ocorra maior variação no registro da imagem em envelopes.
• Mantenha as temperaturas constantes e a umidade relativa.
• Recomenda-se a remoção dos envelopes da bandeja de saída superior para minimizar
a má qualidade da pilha e possíveis atolamentos.
• Os envelopes impressos são enviados somente à bandeja coletora de deslocamento
(OCT) ou à bandeja superior dos módulos de acabamento padrão.
Tamanhos de papel suportados
Direção de alimentaçãoDimensões de altura x larguraTamanhodo envelope
ABC3,875 x 7,5 pol.Monarch
ABC4,125 x 9,5 pol.Nº10
ABC/ABL229 x 324 mmC4
ABC/ABL162 x 229 mmC5
Colocação de envelopes nas Bandejas 6 e 7 com o suporte para cartão postal
NOTA
Instale o suporte para cartão postal antes de imprimir envelopes.
1. Abra cuidadosamente uma das bandejas de papel até que ela pare e retire o papel.
2. Mova as guias de papel para sua maior posição.
Impressora Xerox®Versant®31005-34
Guia do Usuário
Page 73

Papel e material
3. Para remover o suporte para cartão postal, solte o parafuso no lado esquerdo da
bandeja ( ) e remova o suporte ( ).
4. Instale o suporte para cartão postal:
a) Instale o suporte nos pinos de localização na estrutura superior e nos sulcos na
parte inferior da bandeja.
b) Aperte o parafuso-borboleta para que ele encaixe o suporte para cartão postal
no lugar.
5. Coloque os envelopes na direção de alimentação pela borda curta (ABC) ou de
alimentação pela borda longa (ABL):
• Ao colocar envelopes na direção ABC, certifique-se de que as abas estejam
fechadas e voltadas para baixo, e posicione as abas ao longo da parte dianteira
da bandeja.
• Ao colocar envelopes na direção ABL, certifique-se de que as abas estejam fechadas
e voltadas para baixo, e posicione as abas ao longo do lado direito da bandeja.
Guia do Usuário
5-35Impressora Xerox®Versant®3100
Page 74

Papel e material
6. Ajuste as guias do papel contra o material.
7. Feche a bandeja de papel e confirme as novas configurações no servidor de impressão.
8. Execute o trabalho de impressão.
9. Após concluir o trabalho de impressão, remova os envelopes restantes e o suporte
para cartão postal da bandeja.
10. Guarde o suporte para cartão postal inserindo-o na área de armazenamento no lado
esquerdo da bandeja ( ) e aperte o parafuso ( ).
11. Armazene os envelopes restantes em sua embalagem original.
Carregamentode envelopes nas Bandejas 6 e 7 usando o Kit de suporte de envelopes opcional
NOTA
Se disponível, use o Kit de suporte de envelopes opcional e imprima envelopes a partir
das Bandeja 6 ou 7.
Impressora Xerox®Versant®31005-36
Guia do Usuário
Page 75
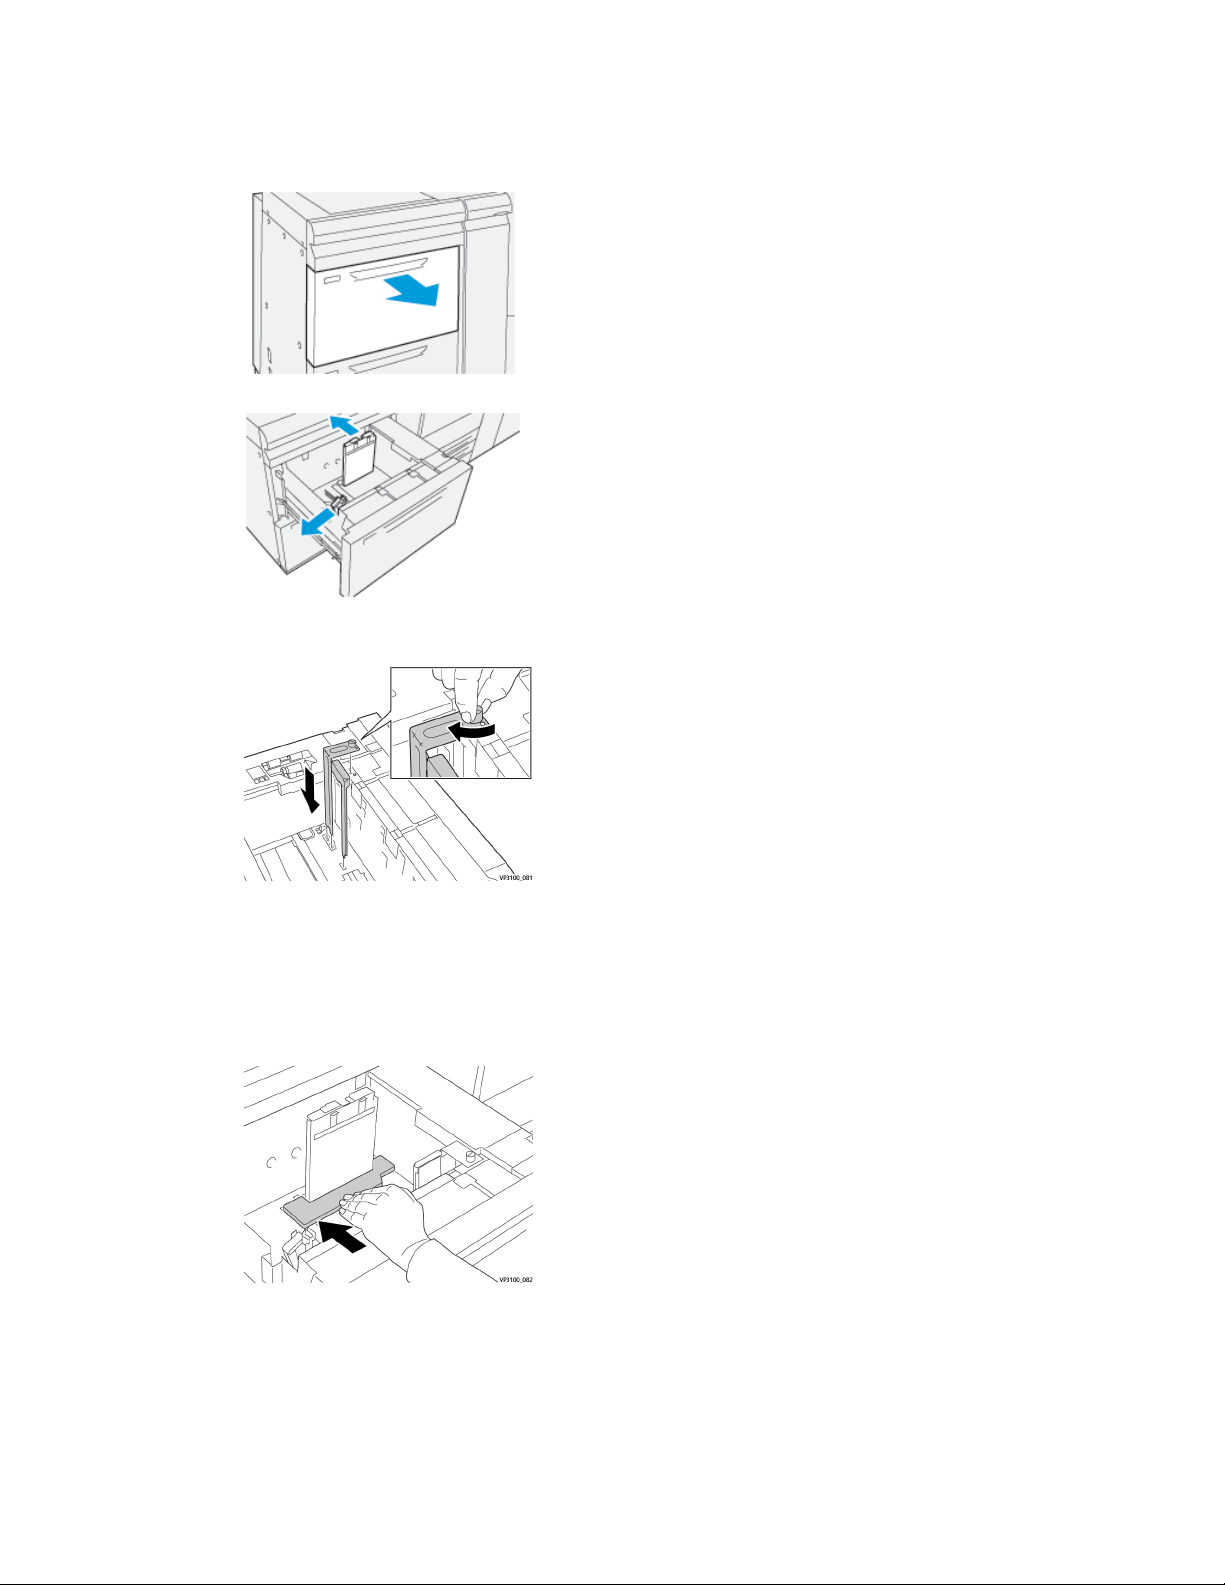
Papel e material
O Kit de suporte de envelopes permite que uma quantidade maior de envelopes seja
colocada e impressa a partir da bandeja.
1. Abra cuidadosamente uma das bandejas de papel até que ela pare e retire o papel.
2. Mova as guias de papel para sua maior posição.
3. Localize o Kit de suporte de envelopes.
4. Instale o suporte de envelopes em forma de L:
a) Instale o suporte nos pinos de localização na estrutura superior e nos sulcos na
parte inferior da bandeja.
b) Aperte o parafuso-borboleta para que ele encaixe o Suporte de envelope em
forma de L no lugar.
5. Localize a maior peça de plástico e coloque-a na parte inferior da bandeja, para que
ela se encaixe ao redor das extremidades da guia do papel interna.
Guia do Usuário
5-37Impressora Xerox®Versant®3100
Page 76

Papel e material
6. Localize a menor peça de plástica e instale-a na bandeja:
a) Coloque a menor peça de plástico na parte inferior da bandeja de modo que ela
se encaixe ao longo do lado direito da bandeja e no canto à direita do suporte
de envelope que você instalou.
b) Coloque o ímã na extremidade da peça no canto da bandeja e voltado para
baixo.
A parte elevada da peça na outra extremidade deve estar voltada para cima e
no topo da almofada de cortiça na parte inferior da bandeja.
7. Coloque os envelopes na direção ABC no topo das inserções de plástico, com as abas
fechadas e voltadas para baixo.
NOTA
As abas devem sempre ficar voltadas para baixo e posicionadas ao longo da parte
dianteira da bandeja.
8. Ajuste as guias do papel contra o material.
9. Feche a bandeja de papel e confirme as novas configurações no servidor de impressão.
10. Execute o trabalho de impressão.
11. Após concluir o trabalho de impressão, remova o envelope e os componentes do kit
de suprimento de envelopes.
12. Guarde os componentes do kit de suprimento de envelopes na área de
armazenamento.
13. Armazene os envelopes restantes em sua embalagem original.
Impressora Xerox®Versant®31005-38
Guia do Usuário
Page 77

Papel e material
Colocação de envelopes na Bandeja 5 (manual)
Coloque os envelopes na Bandeja 5 na direção de alimentação pela borda curta (ABC)
ou alimentação pela borda longa (ABL).
Colocação de envelopes na Bandeja 5 na direção ABC
Ao colocar envelopes na direção ABC, certifique-se de que as abas estejam fechadas e
voltadas para baixo, e posicione as abas ao longo da parte dianteira da bandeja.
Colocação de envelopes na Bandeja 5 na direção ABL
Ao colocar envelopes na direção ABL, certifique-se de que as abas estejam fechadas e
voltadas para baixo, e posicione as abas ao longo do lado direito da bandeja.
Colocação de material em dispositivos opcionais
Colocação de material no Alimentador de alta capacidade avançado duplo opcional (Bandejas 8 e 9)
Consulte o Guia de dispositivos opcionais da Impressora Xerox®Versant®3100, para
obter informações específicas sobre esse dispositivo.
Colocação de material pós-processo no Módulo de inserção opcional
Consulte o Guia de dispositivos opcionais da Impressora Xerox®Versant®3100, para
obter informações específicas sobre esse dispositivo.
Guia do Usuário
5-39Impressora Xerox®Versant®3100
Page 78

Papel e material
Colocação de material pós-processo no GBC AdvancedPunch Pro opcional
Paracolocardivisóriasno GBC AdvancedPunch, consulte o guia no CD de documentação
do cliente que acompanha o dispositivo, ou acesse o site www.xerox.com para obter
mais informações.
Impressora Xerox®Versant®31005-40
Guia do Usuário
Page 79

6
Manutenção
General Precautions and Warnings
AVISO
Precision components and high-voltage power supplies are used on the press:
• Never open or remove covers that are screwed shut unless specifically instructed in
the User Guide.
• A high-voltage component can cause electric shocks.
• When opening the panels and coversthat are screwed shut to install or detach optional
accessories, be sure to follow instructions in the User Guide.
• Do not try to alter the press configuration or modify any parts; doing so might cause
press malfunction or fire.
CUIDADO
• Do not place the equipment where people may step or trip on the power cord.
• Do not place objects on the power cord.
• Do not override or disable electrical or mechanical interlocks.
• Do not obstruct the ventilation openings. These openings prevent overheating of the
equipment.
• Never push objects of any kind into slots or openings on this equipment. Making a
contact with a voltage point or shorting out a part may result in fire or electrical
shock.
• Use the materials and supplies specifically designed for your equipment. The use of
unsuitable materials may result in poor performance of the equipment and possibly
a hazardous situation.
• Follow all warnings and instructions that are marked on or supplied with the
equpiment.
• Do not block or cover the slots and openings on the equipment.
• Do not attempt to override any electrical or mechanical interlock devices.
6-1Impressora Xerox®Versant®3100
Guia do Usuário
Page 80

Manutenção
Cleaning the Press
Read and adhere to the following information when cleaning the press:
• Before you start to clean the press, be sure to switch off the power using the circuit
breaker switch and unplug the press.
AVISO
Cleaning the press without switching off the power may cause an electric shock.
• Always use a dry lint-free cloth for all cleaning actions unless otherwise directed.
CUIDADO
Do not use benzene, paint thinner, other volatile liquids, or spray insect repellent on
the press as doing so may discolor, deform, or crack covers.
• If a moistened cloth is used, wipe afterwards with a dry lint-free cloth.
CUIDADO
Cleaning the press with an excessive amount of water may cause the press to
malfunction and/or damage documents during printing.
Cleaning the Exterior
1. Wipe the exterior with a soft cloth moistened with water. If dirt is difficult to remove,
try gently wiping with a soft cloth moistened with a small amount of neutral detergent.
2. Wipe off any excess water from the exterior with a soft cloth.
Clean Fuser Assembly Information
Run the Clean Fuser Assembly routine from the Tools menu when you encounter an
image quality issue caused by contaminants in the fuser. For example, use this feature
when you see dry ink / toner debris on the back side of prints.
The press automatically runs this routine periodically, but if you see image quality
problems with dry ink / toner on the back of prints, you can initiate this procedure
manually in order to resolve the issue.
Impressora Xerox®Versant®31006-2
Guia do Usuário
Page 81

Manutenção
Clean Fuser Assembly Methods
The Clean Fuser Assembly feature provides two methods for running the routine:
• Clean with Paper: This method runs blank sheets through the press to remove any
residual dry ink / toner from the fuser. The Clean with Paper method may be used
any press operator, and does not require administrator login.
• Clean with Felt: This method uses felt that is equipped inside the press to remove
any dry ink / toner from the fuser. The felt is applied against the pressure roll, and
any residual dry ink / toner is removed; this method does not use paper.
NOTA
You must be logged in as an administrator in order to use the Clean with Feltmethod.
For more information about the Clean with Felt method, refer to the System
Administration Guide for the press.
Performing the Clean Fuser Assembly Procedure
This procedure uses the Clean with Paper method and does not require administrator
login.
NOTA
If you still notice contaminants on the back of the prints after running this procedure,
contact your Xerox Service Representative. Dry ink / toner debris may be coming from
the transfer roll area instead of the fuser.
1. Select the Tools button on the press control panel.
2. Select Clean Fuser Assembly.
3. For Paper Supply, select the paper tray to use.
NOTA
Any type of paper and size can be used. However, the smooth surface of coated paper
does offer more contact area to the pressure roll.
4. For Number of Sheets, select the number of blank sheets to print (1 to 5).
NOTA
For best results, run fewer sheets for a multiple number of times. It is more effective
to run one or two sheets for multiple times than to run five sheets for one time only.
This is especially important when running larger sheets, in the short-edge-feed (SEF)
direction, such as 11 x 17 in. / A4 paper.
5. Select Save.
6. Press the Start button.
The system begins the cleaning process.
NOTA
When running five sheets of paper, the process takes approximately one minute.
When the cleaning process is finished, a successfully completed message displays.
7. Select OK.
Guia do Usuário
6-3Impressora Xerox®Versant®3100
Page 82

Manutenção
Cleaning the Raster Output Scanner (ROS) Window Areas
Unfused dry ink / toner collects on the four color raster output scanner (ROS) window
areas located just above the drum cartridge drawer inside the press. Contaminated ROS
windows can cause a white streak defect on your printed output.
If you notice white or light streaks on prints, to resolve this issue, clean the ROS windows
with the following procedure.
IMPORTANTE
Use only the cleaning wand and cloth pad provided when performing this procedure.
Do not use any other cleaning device, liquid solutions, or cloths.
1. Open the left and center front doors of the press.
2. Locate and remove the cleaning wand tool stored on the inside panel of the left front
door.
3. Make sure the pad at the tip of the wand is clean.
Several pads are provided with the cleaning wand when the press is installed.
NOTA
Replace the pad when it becomes a dark color. Always use a clean pad in order to
ensure optimum image quality on the printed output.
To acquire additional pads, contact your Xerox Service Representative.
4. Clean one of the ROS windows:
Impressora Xerox®Versant®31006-4
Guia do Usuário
Page 83

Manutenção
a) With the pad facing upward and the felt-tip first, insert and gently push the wand
fully into the ROS window opening.
b) Pull the wand fully out towards you.
c) Repeat the push-in and pull-out motion two or three additional times.
5. Remove the tool, insert it into the next hole, and repeat the previous step.
Continue until you have completed the procedure for all four ROS windows.
6. Replace the cleaning wand tool into the storage area on the inside panel of the left
front door.
7. Close the left and center front doors of the press.
Execução do procedimento Limpar toner
IMPORTANTE
O procedimento a seguir é executado somente por uma pessoa que tenha privilégios
de administrador da impressora e tenha feito login como administrador. Usuários não
administradores devem contatar um administrador para concluir este procedimento.
Siga o procedimento Limpar toner após executar um trabalho de baixa cobertura de
área, o qual foiseguido por um trabalho de grande cobertura de área e, portanto, existem
aglomerados e acúmulos de toner nas saídas impressas. A impressora executa um
meio-tom de página inteira para limpar os detritos e qualquer toner residual no sistema.
Guia do Usuário
6-5Impressora Xerox®Versant®3100
Page 84

Manutenção
NOTA
É recomendável que você execute algumas impressões de teste antes de executar o
procedimento de limpeza. Depois de selecionar o botão Iniciar limpeza, o sistema gerará
automaticamente uma impressão de teste. Isso permite que você compare o antes e o
depois das impressões para obter a qualidade da imagem.
1. No painel de controle da impressora, faça login como Administrador.
2. Pressione o botão Status da máquina.
3. Selecione a guia Recursos.
4. Selecione Configurações do sistema > Configurações de serviços comuns >
Manutenção.
5. Role pelas páginas de Manutenção e selecione Limpar toner.
6. Selecione as cores de toner que deseja limpar.
Se desejar, é possível selecionar todas as cores de toner.
7. Pressione Iniciar.
Depois de limpar as páginas impressas, será exibida a mensagem Concluído com
êxito.
8. Para assegurar que o problema foi resolvido, selecione Impressão de amostra.
9. Selecione Fechar repetidamente até que a tela principal Recursos seja exibida.
10. Encerre o modo Administrador.
Impressora Xerox®Versant®31006-6
Guia do Usuário
Page 85

Manutenção
Calibrating the Press
NOTA
The information contained in this section is about calibrating the press only.
For information about calibrating the print server, referthe SystemAdministrationGuide
for the press. Also refer to the print server documentation.
Matriz de largura total
A função Disposição de largura total, que é acessada a partir do painel de controle,
calibra apenas o mecanismo de impressão. A Disposição de largura total ajusta os
controles de cores do mecanismo de impressão, fornece uniformidade da densidade e
permite a calibração e criação de perfis do servidor de impressão sem a necessidade de
usar um espectrofotômetro externo.
A Disposição de largura total usa parâmetros xerográficos e diagnósticos para analisar
a imagem final e corrigir erros na cor da saída e na uniformidade da densidade. Essa
função usa tiras de calibração de cor internas (ou faixas) como referência para cores
conhecidas de um padrão de teste. Esses valores de cor são ajustados automaticamente
para produzir reproduções precisas e consistentes.
A Disposição de largura total está localizada no trajeto do papel após o fusor e contém
um scanner em linha para fornecer ajustes do mecanismo de impressão. Os ajustes
asseguram a uniformidade do toner nas impressões e o alinhamento da imagem.
A Disposição de largura total fornece estes dois ajustes:
• Ajuste automático de uniformidade da densidade: Execute esse ajuste de qualidade
de imagem quando a densidade de saída impressa for inconsistente (não uniforme)
na página impressa. A densidade inconsistente e não uniforme pode aparecer como
cores desbotadas em partes da página impressa (trabalhos claros e escuros).
O operador da impressora pode executar este procedimento e ele não requer acesso
do administrador do sistema.
• Alinhamento automático: Esta função ajusta a posição da imagem impressa no
papel. O alinhamento de imagem no material assegura o posicionamento correto
da imagem impressa no papel e é importante para calibrar o novo material. Consulte
a Ajuda do Gerenciador da biblioteca de materiais no servidor de impressão, para
obter mais informações sobre essa função.
NOTA
Essa função está disponível somente no Gerenciador da biblioteca de materiais,
no servidor de impressão e não em Ferramentas, no painel de controle da impressora.
Ela está disponível somente para administradores do sistema que usam a função
Perfis do Gerenciador da biblioteca de materiais.
Guia do Usuário
6-7Impressora Xerox®Versant®3100
Page 86

Manutenção
Essas medidas e ajustes do controle de qualidade da imagem da Disposição de largura
total serão automáticos, depois que você os iniciar a partir do menu Ferramentas no
painel de controle da impressora ou da função Gerenciador da biblioteca de materiais
Perfis.
A Disposição de largura total melhora a produtividade do operador e da impressora
porque substitui longos procedimentos manuais para o ajuste do mecanismo de
impressão da impressora, economiza tempo de digitalização de alvos com um
espectrofotômetro externo e usa etapas simples que anteriormente requeriam um
técnico para alguns procedimentos. A Disposição de largura total também pode ser
usada para economizar tempo digitalizando e medindo automaticamente os alvos ao
executar a calibração e criação de perfis do servidor de impressão iniciadas a partir do
servidor de impressão. Consulte o Guia do administrador do sistema e o Gerenciador da
biblioteca de materiais no servidor de impressão, para obter mais informações.
DICA
Antes de executar trabalhos críticos em cores, execute o procedimento de Ajuste de
uniformidade da densidade e use as funções de calibração no servidor de impressão
para garantir que a sua impressora mantenha a melhor qualidade de imagem com
menos ou nenhum tempo de inatividade.
NOTA
Consulte a documentação de usuário do Servidor de impressão ao executar o fluxo de
trabalho de calibração do servidor de impressão em conjunto com o mecanismo de
impressão. Os ajustes de alinhamento e registro são executados no servidor de impressão.
Ajuste de uniformidade da densidade
O Ajuste da uniformidade da densidade é feito para assegurar a densidade uniforme
em cada página.
A impressora imprime os padrões de teste da densidade, digitaliza-os e corrige
automaticamente quanto às variações redefinindo os controles de software. A
uniformidade é importante para aplicativos com alta cobertura de área em que o
movimento da densidade de borda a borda pode impactar a qualidade da imagem. O
Ajuste de uniformidade da densidade economiza tempo, porque sem ele é necessária
uma chamada de atendimento técnico para fazer esse tipo de ajuste.
Execute o Ajuste de uniformidade da densidade para corrigir os defeitosde uniformidade
da densidade internos e externos; por exemplo, a qualidade da imagem é mais clara
(desbotada) ou mais densa (mais espessa) nos lados direito ou esquerdo da saída (partes
interna/externa). Além disso, execute o Ajuste de uniformidade da densidade após
substituir os componentes xerográficos.
NOTA
O Ajuste de uniformidadedadensidade não requer acesso do administradordo sistema,
e pode ser executado pelo operador a partir do painel de controle da impressora.
Ajuste automático de uniformidade da densidade
1. Pressione o botão Ferramentas no painel de controle.
2. Selecione Ajuste de uniformidade da densidade da disposição na largura total.
Impressora Xerox®Versant®31006-8
Guia do Usuário
Page 87

Manutenção
3. Selecione o botão Papel.
4. Selecione a bandeja que contém papel 11 x 17 pol. (A3) ou 12 x 18 pol. (SRA3).
5. Selecione Salvar.
Talvez você tenha que esperar alguns minutos enquanto a disposição da largura
total fique pronta.
6. Selecione Iniciar.
A impressora imprime os alvos de teste, mede-os e ajusta automaticamente a
densidade de toner para a aplicação consistente em toda a página.
NOTA
As folhas impressas ainda não refletem as novas configurações, mas são as folhas
que foram usadas para fazer os ajustes.
7. Decida se você deseja verificar visualmente as novas configurações:
• Se você não quiser imprimir folhas com as configurações revisadas, selecione
Salvar e Fechar.
• Se você quiser imprimir folhas com as configurações revisadas, selecione o botão
Impressão de amostra para visualizar as impressões de ajustes.
As folhas de amostra são impressas com as configurações atualizadas.
8. Verifique as amostras impressas quanto à uniformidade/consistência da densidade.
• Verifique se cada linha de cor mostra a densidade uniforme em toda a página,
conforme mostrado na seguinte ilustração:
* Verifique a densidade uniforme e consistente em todas as barras de cores,
conforme indicado pelas setas na ilustração acima.
Se for aceitável, selecione Salvar e Fechar.
• Se os resultados não forem aceitáveis, repita as etapas anteriores deste
procedimento.
9. Selecione Fechar para concluir o ajuste de uniformidade da densidade.
Substituição de produtos consumíveis
NOTA
Consulte o site www.xerox.com para obter os números de peça mais recentes dos
consumíveis.
Guia do Usuário
6-9Impressora Xerox®Versant®3100
Page 88

Manutenção
Os itens a seguir são as unidades substituíveis pelo cliente (CRU) da impressora. É
recomendável que você tenha um suprimento desses itens disponível para eliminar o
tempo de espera quando precisarem ser substituídos.
• Cartuchos de toner (C, M, Y, K)
• Cartuchos do fotorreceptor (C, M, Y, K)
• Um frasco vazio de Toner usado
• Rolos de alimentação das bandeja 5, 6 e 7.
• Filtro de sucção
NOTA
Armazene os itens de suprimentos e peças Xeroxem suas embalagens originais em local
conveniente. Sempre recicle/descarte o CRU usado de acordo com as instruções de
descarte fornecidas com o novo CRU.
Ordering Supplies
Xerox supplies, paper, and throughput material can be ordered from the web site
www.xerox.com and clicking on the Supplies link. Forany item that is not orderable from
the web site, contact your Xerox Service Representative.
NOTA
The cleaning pads used with the ROS Window cleaning wand are not orderable. Contact
your Xerox service representative for any additional cleaning pads.
Reorder QuantityCRUs (Supply Item)
Approximate Print Yield
(Full Color 8.5x11/A4 Prints)
50,000*2 per boxBlack Dry Ink / Toner Cartridge
55,000*1 per boxCyan Dry Ink / Toner Cartridge
51,000*1 per boxMagenta Dry Ink / Toner Cartridge
51,000*1 per boxYellow Dry Ink / Toner Cartridge
45,0001Waste Dry Ink / Toner Bottle
200,0001Suction Filter
348,0001 per boxDrum Cartridge (R1)
348,0001 per boxDrum Cartridge (R2)
348,0001 per boxDrum Cartridge (R3)
348,0001 per boxDrum Cartridge (R4)
500,0001 kitFeed Roll Kit (Trays 6/7)**
Impressora Xerox®Versant®31006-10
Guia do Usuário
Page 89

Manutenção
* Dry Ink / Toner yield projections are based on 7.5 percent-area coverage per color (4
colors = 30 percent) at standardized conditions on A4 (8.5 x 11 in.), for Xerox Digital
Color Xpressions+, 24 lb. (90 gsm) and for Colotech Plus 90 gsm reference paper.
**Each tray requires its own feed roll kit: one kit for Tray 5, one kit for Tray 6, and one
kit for Tray 7. Each kit contains all the required items for replacing the feed rolls.
Checking the Status of Consumables
The Supplies area of the Home window on the press control panel displays an overview
of the level of dry ink / toner remaining in each cartridge. As the dry ink / toner is used,
the colored line representing each cartridge becomes shorter.
When a consumable is reaching the time it needs to be replaced, a message is displayed
on the control panel touch screen. This indicates when it is time to order and/or install
a new consumable item. With some Customer Replaceable Units (CRUs), the screen
indicates that the press may continue to run print jobs without immediately replacing
the item. Otherwise, when it is time to replace it, a message appears and the press stops
running.
To check the status of your consumables:
1. Press the Home button on the control panel.
Notice the Supplies area showing a 1-to-100% indicator bar that shows the remaining
amount of dry ink / toner.
NOTA
Remaining dry ink / toner is updated in 10-percent increments.
2. To display the exact percentage of remaining dry ink / toner for each cartridge, touch
the Information button .
The Supplies screen displays.
6-11Impressora Xerox®Versant®3100
Guia do Usuário
Page 90

Manutenção
3. From the menu, select Other Consumables to see the status of other consumables.
The Other Consumables window displays and provides information about the
percentage of remaining life for each consumable.
4. Use the up / down arrows to see additional consumables, such as the drum cartridges,
the dry ink / toner waste container, trays 6/7 feeder rolls, and consumables for any
additional optional devices that are configured with the press.
NOTA
The status of the suction filter is not shown, but a message displays when it requires
replacement.
Impressora Xerox®Versant®31006-12
Guia do Usuário
Page 91

Manutenção
Substituição dos rolos de alimentação da Bandeja 5
NOTA
Paraexecutaresteprocedimento,énecessário o kit do rolo de alimentação.O kit contém
todos os itens necessários para substituir os rolos de alimentação.
Substitua os rolos de alimentação da Bandeja 5 (Manual) quando estiver ocorrendo
alimentações múltiplas frequentes, alimentações individuais ou impressões em branco
na pilha das saídas impressas.
3.1. Rolo separadorRolo de alimentação
2. Rolo impulsor
1. Localize a Bandeja 5 (Manual) na parte superior das Bandejas 6 e 7.
2. Levante e abra a tampa da bandeja manual para acessar os componentes do rolo
de alimentação.
3. Remova o rolo de alimentação e instale um novo rolo.
Guia do Usuário
6-13Impressora Xerox®Versant®3100
Page 92

Manutenção
a) Remova o rolo de alimentação apertando o eixo de metal nas duas extremidades
e levantando e removendo a bandeja.
b) Instale o novo rolo de alimentação apertando o eixo de metal nas duas
extremidades e deslizando-o para o lugar.
4. Remova o rolo impulsor e instale um novo rolo.
a) Remova o rolo impulsor apertando o eixo de metal nas duas extremidades e
levantando e removendo a bandeja.
b) Instale o novo rolo impulsor apertando o eixo de metal nas duas extremidades
e deslizando-o para o lugar.
5. Remova o rolo separador e instale um novo rolo.
Impressora Xerox®Versant®31006-14
Guia do Usuário
Page 93

Manutenção
a) Remova o rolo separador apertando o eixo de metal nas duas extremidades e
levantando e removendo a bandeja.
b) Instale o novo rolo separadorapertando o eixo de metal nas duas extremidades
e deslizando-o para o lugar.
6. Feche a tampa da bandeja manual.
7. Verifique se a bandeja está funcionando corretamente, alimentando o papel da
bandeja manual.
8. Faça login como administrador ou peça ao administrador para executar as seguintes
etapas para redefinir a contagem de IAMF (Item de serviço de alta frequência) para
zero (0):
a) No painel de controle, pressione o botão Ferramentas.
b) Na tela que é exibida, selecione o ícone Recursos.
c) Selecione Configurações do sistema > Configurações de serviços comuns >
Manutenção.
d) Use os botões de seta paracima/para baixo para acessar as telas de Manutenção
seguintes.
e) Selecione o ícone Operador técnico. A função Operador técnico é exibida.
f) Selecione os itens dos rolos manuais que correspondem aos componentes
recém-substituídos.
g) Selecione Restaurar valor atual. O sistema redefine o IAMF (Item de serviço de
alta frequência) para 0:
h) Saia do modo de administrador pressionando o botão Login/Logout no painel
de controle. Quando solicitado, selecione Logout.
Guia do Usuário
6-15Impressora Xerox®Versant®3100
Page 94
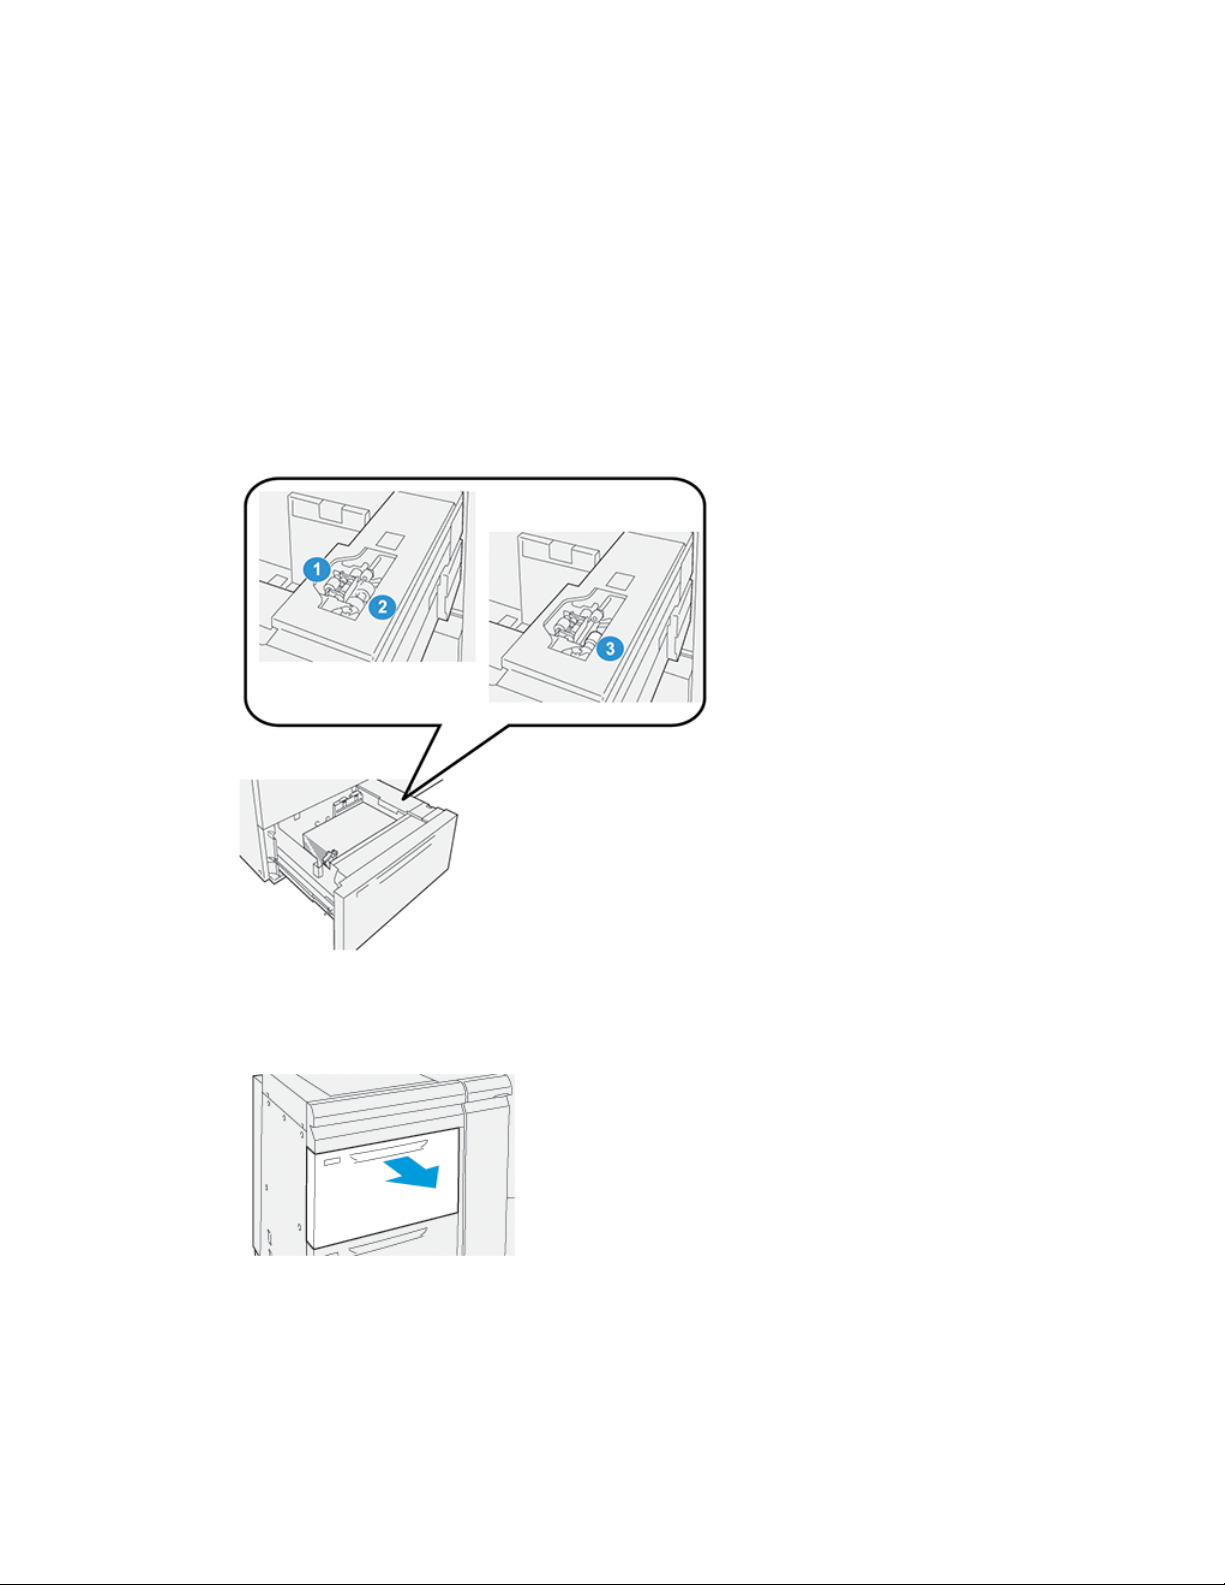
Manutenção
Replacing the Tray 6/7 Feed Rolls
NOTA
To perform this procedure, the feed roll kit is required. The kit contains all the required
items for replacing the feed rolls.
IMPORTANTE
If replacing the feed rolls for both trays, ensure to obtain two feed roll kits (one for each
tray).
Replacethe tray feedrolls every 300,000 prints or when experiencing frequent multifeeds,
single feeds, or blank prints in the stack of the output prints.
The tray feed rolls include the following components:
Nudger Roll
2. Feed Roll
3.1. Separator Roll (shown with the feed
roll removed)
1. To access the feed components , pull out the tray slowly until it stops.
2. Replace the nudger roll:
Impressora Xerox®Versant®31006-16
Guia do Usuário
Page 95

Manutenção
a) Remove the nudger roll by pushing down on the black tab with one hand (which
raises the roll upward) and then squeezing the metal shaft on both ends with
your other hand.
b) Lift out the nudger roll.
c) Install a new nudger roll by squeezing both ends of the metal shaft, and while
pushing down on the black tab, insert and release the roll ends into the notches.
3. To access the separator roll, remove the separator roll assembly at the side of the
tray:
a) Unscrew the three thumbscrews.
b) Slide the separator roll assembly all the way to the left so it is out of the slots.
c) Pull the assembly out towards you until completely removed from the tray, and
set aside the assembly.
4. With the separator roll assembly out, replace the feed roll:
Guia do Usuário
6-17Impressora Xerox®Versant®3100
Page 96

Manutenção
a) To remove the feed roll, squeeze both ends of the metal shaft and lift out.
b) To install a new feed roll, squeeze both ends of the new roll shaft, insert and
release the roll ends into the notches.
5. Replace the separator roll:
a) To remove the roll from the assembly, squeeze the shafts of the separator roll
and lift out of the assembly.
b) To install a new separator roll, squeeze both ends of the new roll shaft, insert
and release the roll ends into the notches on the separator roll assembly.
6. Reinstall the separator roll assembly into the tray.
a) Align the cutout holes of the assembly with the frameof the trayso the pin holes
match up.
Impressora Xerox®Versant®31006-18
Guia do Usuário
Page 97

Manutenção
b) Insert the assembly into the frame.
c) Slide the assembly all the way to the right using the pin as a guideline.
d) Ensure the device is all the way into the slots and the three screw areas align.
e) Screw in the three thumbscrews to attach the assembly. Do not over tighten.
7. Close the tray and verify that the tray is operating successfully by feeding paper
using that tray.
8. Either log in as the administrator or ask the administrator to perform the following
steps to reset the High Frequency Service Item (HFSI) counters to zero (0) for each
component.
a) At the control panel, press the Tools button.
b) From the screen that displays, select the Tools icon.
c) Select System Settings > Common Service Settings > Maintenance.
d) Use the up / down arrow buttons to access the next Maintenance screens.
e) Select the Technical Key Operator icon.
The Technical Key Operator feature displays.
f) Select the item that corresponds with the newly-replaced components.
g) Select Reset Current Value. The system resets the High Frequency Service Item
(HFSI) to 0.
h) Repeat the previous steps until the counters for all three components are reset
to zero (0).
i) Exit administrator mode by pressing the Log In / Out button on the control panel
When prompted, select Logout.
Guia do Usuário
6-19Impressora Xerox®Versant®3100
Page 98

Manutenção
Substituir um cartucho de toner
NOTA
O cartucho de toner pode ser substituído enquanto um trabalho está sendo impresso.
1. Abraa tampa do toner, localizada logo acima da porta/tampa dianteira da impressora.
2. Coloque papel no chão antes de remover o cartucho. Isso permitirá que qualquer
excesso de toner caia no papel.
3. Remova lentamente o cartucho de toner colocando os dedos sob a extremidade do
cartucho e puxando-o com cuidado direto para fora.Enquantopuxaparafora, segure
a parte inferior do cartucho com a outra mão para dar apoio.
Assegure-se de que esteja removendo o cartucho correspondente à cor indicada na
mensagem.
4. Descarte ou recicle o cartucho de acordo com as autoridades e regulamentações
locais.
Nos Estados Unidos, consulte também o website da Electronic Industries Alliance:
www.eiae.org. Paraobtermais informaçõessobreos programas ambientais da Xerox,
acesse www.xerox.com/environment.
5. Remova o novo cartucho de toner da embalagem.
6. Prepare o cartucho para instalação:
Impressora Xerox®Versant®31006-20
Guia do Usuário
Page 99

Manutenção
NOTA
O material do toner no interior do novo cartucho é compacto. Solte e redistribua o
material de toner antes de colocá-lo no entalhe do toner.
a) Com uma mão em cada lado do cartucho, agite vigorosamente e gire o novo
cartucho para cima e para baixo e depois para a esquerda e para a direita por
30 segundos.
b) Teste se o material do toner foi distribuído suficientemente girando o eixo na
extremidade do cartucho.
c) Se o eixo não girar facilmente, continue a agitar o cartucho e a soltar o material
de toner. Quando o eixo girar sem resistência, o cartucho de toner está pronto
para instalação.
7. Instale o cartucho de toner alinhando-o direto para forada impressora e deslizando-o
com cuidado até ele parar.
8. Feche a tampa do toner.
Se a tampa não fechar completamente, verifique se o cartucho está na posição de
travamento e está instalado no local de toner adequado.
NOTA
Após substituir um cartucho de toner, o contador de uso do IAMF (Item de serviço
de alta frequência) desse CRU será zerado (0) automaticamente pelo sistema.
Verifique a redefinição e o novo status na tela Suprimentos.
Guia do Usuário
6-21Impressora Xerox®Versant®3100
Page 100

Manutenção
Substituição do frasco de toner usado
O frasco de toner usado coleta o toner usado que acumula durante o processo de
impressão.
NOTA
Quando o frascodetoner usado está cheio, uma mensagem é exibida na tela de seleção
por toque da impressora informando para trocar o frasco cheio por um vazio.
1. Verifique se a impressora está parada (nenhum trabalho em execução).
2. Abra a porta dianteira central e localize o frasco de toner usado.
3. Segure a alça do frasco de toner e puxe-o lentamente até a metade para fora da
impressora.
Puxar lentamente o frasco evita que o toner derrame.
4. Continue puxando lentamente o frasco até que ele seja removido da impressora:
Impressora Xerox®Versant®31006-22
Guia do Usuário
 Loading...