


Book Version 1.0
April 2017
702P04571
Xerox
®
Versant
®
3100 Press
Optional Devices Guide

©2017 Xerox Corporation. All rights reserved. Xerox®, Xerox and Design®, FreeFlow®,
SquareFold®, CentreWare®and Versant®are trademarks of Xerox Corporation in the
United States and/or other countries.
Adobe®PDF®is a registered trademarks of Adobe Systems, Inc. PostScript®is an Adobe
registered trademark used with the Adobe PostScript Interpreter, the Adobe page
description language, and other Adobe products.
Fiery®and EFI™are trademarks or registered trademarks of Electronics For Imaging, Inc.
GBC®and AdvancedPunch™are trademarks or registered trademarks of General Binding
Corporation.
3-IN-ONE®and WD-40®are a registered trademarks of the WD-40 Company.

Table of Contents
1 Dual Advanced High Capacity Feeder (Trays 8 and 9)..............1-1
Trays 8/9 Components.......................................................................................................1-2
Paper and Media for Trays 8 and 9..............................................................................1-3
Paper and Media Overview.................................................................................1-3
General Paper Loading Guidelines.....................................................1-3
Unsupported Media.................................................................................1-3
Paper / Media Storage Guidelines......................................................1-4
Supported Paper.....................................................................................................1-4
Paper Size Ranges for Trays 8 and 9..................................................1-4
Paper Specifications for Trays 8 and 9.............................................1-4
Paper Tray Information for Trays 8 and 9.......................................1-6
Loading Paper in the Trays 8 and 9................................................................1-7
Paper Feed Performance in Trays 8 and 9....................................................1-8
Improving Paper Feed Performance in Trays 8 and 9.................1-9
Printing on Special Media.................................................................................1-12
Transparencies.........................................................................................1-12
Hole-punched Paper..............................................................................1-13
Tab Stock....................................................................................................1-14
Labels..........................................................................................................1-15
Glossy Paper.............................................................................................1-15
Postcards....................................................................................................1-16
Envelopes...................................................................................................1-18
Tray 8/9 Maintenance.....................................................................................................1-24
Ordering the Feed Roll Kit for Tray 8/9........................................................1-24
Checking the Status of Consumables..........................................................1-24
Replacing the Tray 5 Feed Rolls......................................................................1-25
Replacing the Tray 8/9 Feed Rolls.................................................................1-28
Trays 8 and 9 Troubleshooting....................................................................................1-32
Paper Jams in Trays 8 and 9............................................................................1-32
Paper Jams When the Bypass is Installed on Trays 8 and
9..........................................................................................................1-32
Paper Jams Inside Trays 8 and 9......................................................1-34
Trays 8 and 9 Paper Jams at Lever 1a and Knob 1c.................1-34
Trays 8 and 9 Paper Jams at Lever 1b and Knob 1c.................1-35
Trays 8 and 9 Paper Jams at Lever 1d and Knob 1c.................1-36
Trays 8/9 Fault Messages.................................................................................1-36
Trays 8/9 Fault Code Information...................................................1-37
Optional Devices Guide
iXerox®Versant®3100 Press

Table of Contents
Trays 8 and 9 Specifications.........................................................................................1-37
2 Interface Decurler Module (IDM).......................................................2-1
Interface Decurler Module (IDM) Components......................................................2-2
IDM Control Panel..................................................................................................2-2
IDM Curl Correction............................................................................................................2-3
IDM Curl Correction Modes and Functions..................................................2-4
IDM Troubleshooting.........................................................................................................2-6
IDM Paper Jams......................................................................................................2-6
Clearing IDM Paper Jams......................................................................2-7
IDM Fault Messages..............................................................................................2-8
IDM Fault Code Information................................................................2-9
3 Inserter..........................................................................................................3-1
Inserter Components..........................................................................................................3-1
Inserter Control Panel...........................................................................................3-2
Paper and Media for Inserter Tray T1.........................................................................3-3
Supported Paper for the Inserter Tray T1.....................................................3-3
Loading Paper in Inserter Tray T1...................................................................3-3
Printing on Special Media...................................................................................3-4
Purge Function for Tray T1...............................................................................................3-5
Tray T1 Purge Function Settings......................................................................3-6
Changing the Purge Function Setting for Tray T1.....................................3-6
Inserter Troubleshooting..................................................................................................3-7
Inserter Paper Jams...............................................................................................3-7
Clearing Paper Jams from Inserter E1 Area...................................3-8
Clearing Paper Jams from Inserter E2 Area...................................3-8
Clearing Paper Jams from Inserter E3 Area...................................3-9
Inserter Fault Messages....................................................................................3-11
Inserter Fault Code Information......................................................3-11
4 GBC AdvancedPunch Pro........................................................................4-1
5 High Capacity Stacker (HCS)................................................................5-1
High Capacity Stacker (HCS) Components................................................................5-2
HCS Circuit Breaker................................................................................................5-3
Output Trays.............................................................................................................5-4
Control Buttons.......................................................................................................5-4
Unloading the Stacker Tray / Cart...................................................................5-4
HCS Troubleshooting..........................................................................................................5-5
HCS Paper Jams......................................................................................................5-5
Clearing Paper Jams from HCS Area E1...........................................5-6
Clearing Paper Jams from HCS Area E2...........................................5-7
Xerox®Versant®3100 Pressii
Optional Devices Guide

Table of Contents
Clearing Paper Jams from HCS Area E3...........................................5-8
Clearing Paper Jams from HCS Area E4...........................................5-9
Clearing Paper Jams from HCS Area E5........................................5-10
Clearing Paper Jams from HCS Area E6........................................5-11
Clearing Paper Jams from HCS Area E7........................................5-12
HCS Fault Messages............................................................................................5-13
HCS Fault Code Information..............................................................5-13
Additional HCS Troubleshooting Information.........................................5-14
Hints and Tips for Using the HCS.....................................................5-14
HCS Specifications............................................................................................................5-14
HCS Media Guidelines.......................................................................................5-15
6 Two-Sided Trimmer..................................................................................6-1
Two-Sided Trimmer Components..................................................................................6-2
Two-Sided Trimmer Maintenance.................................................................................6-2
Emptying the Two-Sided Trimmer Waste Container................................6-2
Two-Sided Trimmer Troubleshooting..........................................................................6-4
Two-Sided Trimmer Paper Jams.......................................................................6-4
Clearing Paper Jams from Trimmer Area E1..................................6-5
Clearing Paper Jams from Trimmer Area E2..................................6-6
Clearing Paper Jams from Trimmer Area E3..................................6-8
Clearing Paper Jams from Trimmer Area E4................................6-10
Clearing Paper Jams from Trimmer Area E5................................6-11
Clearing Paper Jams from Trimmer Area E6................................6-12
Clearing Paper Jams from Trimmer Area E7................................6-14
Two-Sided Trimmer Fault Messages............................................................6-16
Two-Sided Trimmer Fault Code Information..............................6-17
Two-Sided Trimmer Specifications.............................................................................6-17
7 C/Z Folder.....................................................................................................7-1
C/Z Folder Components.....................................................................................................7-1
Trifold Output...........................................................................................................7-2
C/Z Folder Troubleshooting..............................................................................................7-3
C/Z Folder Paper Jams..........................................................................................7-3
Clearing Paper Jams from Folder Area E10....................................7-4
Clearing Paper Jams from Folder Area E11....................................7-5
Clearing Paper Jams from Folder Area E12....................................7-6
C/Z Folder Fault Messages..................................................................................7-7
C/Z Folder Fault Code Information....................................................7-8
C/Z Folder Specifications..................................................................................................7-8
Optional Devices Guide
iiiXerox®Versant®3100 Press

Table of Contents
8 Production Ready (PR) Finisher / Production Ready (PR)
Booklet Maker Finisher.......................................................................8-1
Finisher Components..........................................................................................................8-3
Finisher Output Trays............................................................................................8-3
Top Tray.........................................................................................................8-4
Stacker Tray.................................................................................................8-5
Booklet Tray.................................................................................................8-5
Paper Curl Correction with the PR Finishers.................................................8-5
Bi-Fold Feature (PR Booklet Maker Finisher Only).....................................8-5
Booklet Output Button.........................................................................................8-6
Finisher Maintenance.........................................................................................................8-6
Finisher Consumable Supplies...........................................................................8-6
Checking the Status of Finisher Consumables............................................8-7
Replacing the Basic Staple Cartridge (for Side Stitching)......................8-8
Replacing the Booklet Staple Cartridge (for Saddle Stitching)............8-9
Replacing the Finisher Staple Waste Container.......................................8-11
Emptying the Hole Punch Waste Container..............................................8-13
Finisher Troubleshooting................................................................................................8-15
Finisher Paper Jams............................................................................................8-15
Clearing Paper Jams from Finisher Area E1.................................8-16
Clearing Paper Jams from Finisher Area E2.................................8-17
Clearing Paper Jams from Finisher Area E3.................................8-18
Clearing Paper Jams from Finisher Area E4.................................8-18
Clearing Paper Jams from Finisher Area E5.................................8-19
Clearing Paper Jams from Finisher Area E6.................................8-20
Clearing Paper Jams from Finisher Booklet Area E7................8-20
Clearing Paper Jams from Finisher Booklet Area E8................8-21
Clearing Paper Jams from Finisher Booklet Area E9................8-22
Finisher Staple Faults.........................................................................................8-23
Clearing Staple Jams in the Basic Stapler....................................8-24
Reinserting the Basic Staple Cartridge..........................................8-25
Clearing Staple Jams in the Booklet Stapler................................8-28
Finisher Fault Messages....................................................................................8-29
Finisher Fault Code Information......................................................8-30
Finisher Specifications....................................................................................................8-30
Staple Output Capacity.....................................................................................8-34
9 SquareFold Trimmer.................................................................................9-1
SquareFold Trimmer Components................................................................................9-2
SquareFold Trimmer Circuit Breaker...............................................................9-3
Output Trays.............................................................................................................9-3
Xerox®Versant®3100 Pressiv
Optional Devices Guide

Table of Contents
Control Panel............................................................................................................9-4
SquareFold Trimmer Paper Path.......................................................................9-4
Square Fold and Trim Features.......................................................................................9-5
Square Fold Feature...............................................................................................9-5
Square Fold Adjustment Settings.......................................................9-6
Trim Feature..............................................................................................................9-7
Trim Options................................................................................................9-7
Trim Guidelines..........................................................................................9-7
SquareFold Trimmer Maintenance...............................................................................9-9
Emptying the SquareFold Trimmer Waste Container..............................9-9
SquareFold Trimmer Troubleshooting......................................................................9-11
SquareFold Trimmer Paper Jams...................................................................9-11
Clearing Paper Jams from SquareFold Trimmer Areas E1
and E2...............................................................................................9-12
Clearing Paper Jams from SquareFold Trimmer Area
E3........................................................................................................9-13
SquareFold Trimmer Fault Messages...........................................................9-13
SquareFold Trimmer Fault Code Information.............................9-14
Guidelines for Using the SquareFold Trimmer.........................................9-14
Full-Page Images on Booklets...........................................................9-14
Booklet Considerations........................................................................9-14
Considerations for Obtaining Desired Booklet Output............9-15
SquareFold Trimmer Specifications...........................................................................9-15
10 Production Ready (PR) Finisher Plus.............................................10-1
PR Finisher Plus Components.......................................................................................10-2
PR Finisher Plus Maintenance......................................................................................10-2
PR Finisher Plus Troubleshooting................................................................................10-3
PR Finisher Plus Paper Jams.............................................................................10-3
Clearing Paper Jams in Finisher Module Areas E1-E6..............10-4
Clearing Paper Jams in the Finisher Module Area E7..............10-4
Clearing Paper Jams in the Finishing Transport.........................10-5
Stapler Faults in the PR Finisher Plus...........................................................10-8
PR Finisher Plus Fault Messages.....................................................................10-9
PR Finisher Plus Fault Code Information.......................................10-9
PR Finisher Plus Specifications.....................................................................................10-9
11 Job Workflows.......................................................................................11-1
Booklets with Full Bleed Using Four Optional Finishing Devices....................11-1
Creating Booklets with Full Bleed on the EX Fiery Print
Servers............................................................................................................11-1
Creating Booklets with Full Bleed on the FreeFlow Print
Server..............................................................................................................11-3
Optional Devices Guide
vXerox®Versant®3100 Press

Table of Contents
Using the Production Ready (PR) Finisher, Basic Punch, and C/Z
Using the Inserter to Include Sheets or Tabs into the Printed
Using the GBC AdvancedPunch Pro........................................................................11-13
Folder...........................................................................................................................11-7
Producing Simple Folded Sheets with the EX Print Servers.................11-7
Producing Simple Folded Sheets with the FreeFlow Print
Server..............................................................................................................11-8
Inserting Folded Sheets into a Document with the EX Print
Servers............................................................................................................11-9
Inserting Folded Sheets into a Document with the FreeFlow Print
Server..............................................................................................................11-9
Output......................................................................................................................11-11
Inserting Sheets andTabs into the Printed OutputwiththeEXPrint
Servers.........................................................................................................11-11
Inserting Sheets and Tabs into the Printed Output with the
FreeFlow Print Server.............................................................................11-12
Using the AdvancedPunch Pro with the EX Print Servers..................11-13
Using the AdvancedPunch Pro with the FreeFlow Print
Server...........................................................................................................11-14
Xerox®Versant®3100 Pressvi
Optional Devices Guide
1
Dual Advanced High Capacity Feeder (Trays 8 and 9)
The Dual Advanced High Capacity Feeder is an optional feeding device that may be
added to the system to extend the paper capacities by providing two additional trays.
This optional feeding device contains Trays 8 and 9.
These traysfeed a variety of stock sizes, including standard, heavyweight,andlarge-sized
stocks up to 13 x 19.2 in. / 330 x 488 mm in size and weighing between 52 gsm and 350
gsm. Each tray holds 2,000 sheets of coated and uncoated stock.
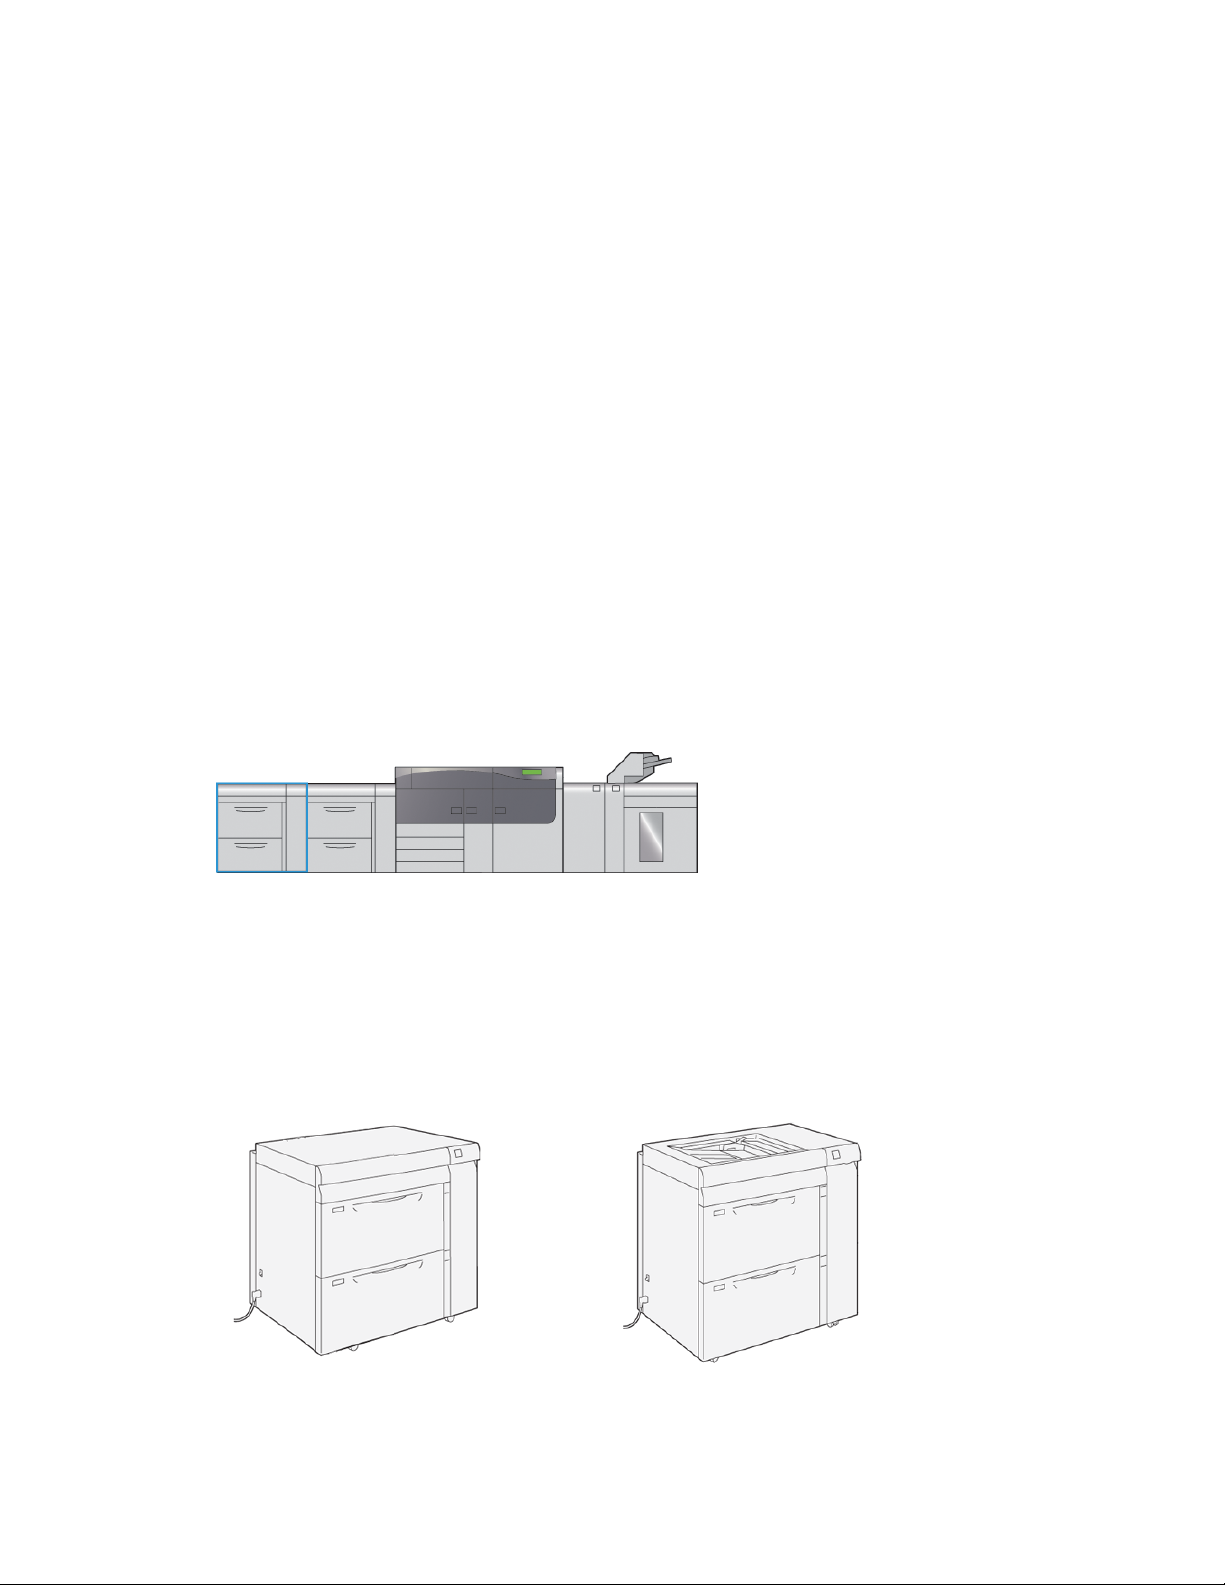
The following illustrations show the Trays 8 and 9 with and without the optional Tray
5 (Bypass).
Trays 8 and 9 without
the optional Tray 5
Trays 8 and 9 with
the optional Tray 5
Optional Devices Guide
1-1Xerox®Versant®3100 Press

Dual Advanced High Capacity Feeder (Trays 8 and 9)
Note
For information about optional Tray 5, refer to the User Guide for your press.
Trays 8/9 Components
5.1. Tray 8Paper Jam / Error Indicator Panel
2. 6.Paper Level Indicators Tray 9
7.3. Feeder Front CoverOptional Tray 5 (Bypass)
4. 8.Circuit Breaker Switch Top Drawer (on Trays 6/7)
Xerox®Versant®3100 Press1-2
Optional Devices Guide

Dual Advanced High Capacity Feeder (Trays 8 and 9)
Paper and Media for Trays 8 and 9
Paper and Media Overview
Before loading paper, consider the following:
• To define attributes for a stock, to add a new stock to the Stock Library, or to assign
a stock to a paper tray for the print job, access the Stock Library Manager on the
print server. If you have restricted access, contact your System Administrator.
Note
The Stock Library Manager is an application that is loaded onto the print server and
is used to manage the stocks and paper trays for your press.
- Bydefault, the Stock Library feature is available to both the operator and system
administrator modes.
- Your System Administrator may restrict user access to change or add stocks.
- When you are loading paper, the Stock Library Manager application opens the
Tray Properties window for that tray and you can view or change the stock
assigned to that tray.
• The press supports the ability to pull different stock sizes and paper types from various
trays and assemble them as part of a single job. To select multiple paper trays and
insert different papers within one job, program this custom job at the print server
using features such as special pages.
• The press supports Automatic Tray Switching, which allows a job to switch
automatically from an empty tray to a full tray containing the same size paper,
orientation and stock type. Refertothe SystemAdministration Guide for information
on how to enable this feature and prioritize the order of trays to search on and use.
General Paper Loading Guidelines
• Fan paper before loading it in the paper tray.
• Do not overfill the paper trays. Do not load paper above the indicated maximum fill
line in the tray.
• Adjust the paper guides to fit the paper size.
• If excessive jams occur, use paper or other approved media from a new package.
• Do not print on label media after a label has been removed from a sheet.
• Use only paper envelopes.
• Print envelopes 1-sided only.
Unsupported Media
Some paper and other media types can cause poor output quality, increased paper jams,
or damage the press. Do not use the following:
• Rough or porous paper
• Inkjet paper
• Paper that is business-card size
1-3Xerox®Versant®3100 Press
Optional Devices Guide

Dual Advanced High Capacity Feeder (Trays 8 and 9)
• Paper that is folded or wrinkled
• Paper that is curled more than 0.47 in. / 12 mm
• Paper with cutouts or perforations
• Stapled paper
• Damp paper
• Thermal or heat-transfer paper
• Envelopes with windows, metal clasps, side seams, or adhesives with release strips
• Padded envelopes
Note
In addition to the above list, there may be other media that is not recommended or
supported. For details, please contact your local Xerox representative.
Paper / Media Storage Guidelines
Storing paper and other media properly contributes to optimum print quality.
• Store paper in dark, cool, relativelydrylocations.Mostpaper is susceptible to damage
fromultraviolet and visible light. Ultravioletlight,from the sun and fluorescent bulbs,
is particularly damaging to paper.
• Reduce the exposure of paper to strong lights for long periods of time.
• Maintain constant temperatures and relative humidity.
• Avoid storing paper in locations that are damp or collect moisture.
• Store paper flat, either on pallets, cartons, shelves, or in cabinets.
• Avoid food or drinks in the area where paper is stored or handled.
• Do not open sealed packages of paper until you are ready to load the paper into the
trays. Leave stored paper in the original packaging. The paper wrapper protects the
paper from moisture loss or gain.
• Some special media is packagedinsideresealableplasticbags.Storethemediainside
the bag until you are ready to use it. Keep unused media in the bag and reseal it for
protection.
Supported Paper
Paper Size Ranges for Trays 8 and 9
Maximum SizeMinimum Size
13 x 19.2 in. / 330.2 x 488 mm3.86 x 5.75 in. / 98 x 146 mm
Paper Specifications for Trays 8 and 9
Note
Always refer to the RecommendedMediaList(RML)for a comprehensivelistofsupported
media. The RML can be downloaded from http://www.xerox.com/.
Xerox®Versant®3100 Press1-4
Optional Devices Guide

Dual Advanced High Capacity Feeder (Trays 8 and 9)
Coated and uncoated
Hole-punched paper
Coated and uncoated)
(coated and uncoated)
(coated and uncoated)
Paper SizePaper Type
(LEF / SEF*)
•• SEF / LEFB5
• •A4 SEF / LEF
•• SEF / LEFA4 Cover
• •B4 SEF
•• SEFA3
•• SEFSRA3
• •7.25 x 10.5 in. SEF / LEF
•• SEF / LEF8 x 10 in.
• •8.46 x 12.4 in. SEF
•• SEF / LEF8.5 x 11 in.
• •8.5 x 13 in. SEF / LEF
•• SEF8.5 x 14 in.
• •9 x 11 in. SEF / LEF
•• SEF11 x 15 in.
• •11 x 17 in. SEF
•• SEF12 x 18 in.
• •12.6 x 19.2 in. SEF
•• SEF13 x 18 in.
• •16-kai (TFX) SEF / LEF
•• SEF / LEF16-kai (GCO)
• •Pa-kai (TFX) SEF
•• SEFPa-kai (GCO)
Weight (gsm)Feed Direction
52 to 350Plain paper
64 to 105Recycled paper
106 to 350Embossed
Postcard (coated and uncoated)
Government-Legal
Double-Thick (DT) Special
A4
Double-Thick (DT) Special
A3
A6
215.9 x 330.2 mm
226.0 x 310.0 mm
310.0 x 432.0 mm
in.
• #10: 4.125 x 9.5 in.
• C4: 229 x 324 mm
• C5: 162 x 229 mm
•• SEFMonarch: 3.875x7.5
• SEF
• SEF / LEF
• SEF / LEF
—LEF8.5 x 11 in. (A4)Transparency
106 to 350SEF4 x 6 in.
—SEF / LEF8.5 x 13 in.
—SEF / LEF8.90 x 12.20 in.
—SEF12.20 x 17.00 in.
—Envelopes
Optional Devices Guide
1-5Xerox®Versant®3100 Press

Dual Advanced High Capacity Feeder (Trays 8 and 9)
Paper SizePaper Type
(LEF / SEF*)
coated)
LEF = Long Edge Feed; SEF = Short Edge Feed
Weight (gsm)Feed Direction
106 to 350LEF8.5 x 11 in. / A4Labels (coated and un-
163LEF9 x 11 in.Tabs and Dividers
Paper Tray Information for Trays 8 and 9
Note
Each feeder tray has a stock loading label. When loading media into the tray, refer to
the labels on the inside panel of the feeder tray for the correct orientation of that stock
type.
The specifications for each tray are:
• Maximum of 2,000 sheets of 24 lb. (90 gsm) uncoated paper; 2,100 sheets of 82 gsm
and 2,300 sheets of 64 gsm
• Paper weight range of 52 to 350 gsm
• Stock types include transparencies, heavyweight,coated and uncoated, hole-punched,
and tabs
Tip
Transparencies perform best when printed from Trays 8 and 9.
• It is recommended that you use Tray 5 (Bypass) to feed envelopes. However, Trays
8 and 9 may also be used for feeding envelopes.
- If you use Trays 8 or 9, envelopes must be fed either with the Postcard Bracket
or the optional Envelope Support Kit installed.
- If the Postcard Bracket is used, the stack height is limited to 200 envelopes.
Postcard Bracket
The postcard bracket is delivered with Trays 8 and 9 from manufacturing. The postcard
bracket allows you to print on smaller size media without requiring post-processing
cutting or sorting. The postcard bracket accommodates 4 x 6 in. (101.6 x 152.4 mm)
SEF media and smaller. For more information, refer to Paper Size Ranges for Trays 8
and 9.
Note
For more information, refer to Postcards.
Xerox®Versant®3100 Press1-6
Optional Devices Guide
Dual Advanced High Capacity Feeder (Trays 8 and 9)
Optional Envelope Support Kit
The Envelope Support Kit enables a greater quantity of envelopes to be loaded and
printed from Trays 8 or 9. This optional kit consists of two plastic pieces that fit into the
bottom of the tray and a postcard bracket that attaches to the side of the tray. The
plastic pieces lift one side of the stack of envelopes to offset the extra thickness of the
flaps. This keeps the stack level for feeding and enables more envelopes to be fed from
the tray.
Note
For more information, refer to Envelopes.
Loading Paper in the Trays 8 and 9
1. Select the appropriate paper stock for your print job.
2. Pull out the tray slowly until it stops.
3. Open the ream of paper with the seam side facing up.
4. Fan the sheets before loading them into the tray.
5. Extend the paper guides outward until they stop.
6. Load and align the edge of the paper against the right edge of the tray.
Paper can be loaded either in the LEF / portrait or SEF / landscape direction.
7. Adjust the paper guides by pressing in the guide releases and carefully moving the
guides until they lightly touch the edges of the material in the tray.
Optional Devices Guide
1-7Xerox®Versant®3100 Press
Dual Advanced High Capacity Feeder (Trays 8 and 9)
Note
Do not load materials above the MAX line located on the guides.
8. Gently push in the tray until it comes to a stop.
The paper Tray Properties window displays on the print server (on Stock Library
Manager). You can view and set stock attributes and verify trays are assigned with
the correct stock. The Stock Library Manager is available from the print server only
and not at the press.
9. From the Tray Properties window, enter or verify the correct paper information,
including size, type, weight and, if necessary, paper curl and / or alignment option.
Select the stock and assign the stock to the tray to be used.
10. Select OK to save the information and close the Tray Properties window.
Paper Feed Performance in Trays 8 and 9
If misregistration / skew occurs on printed output that was fed from Trays 8 or 9, manual
adjustment of the paper-feed levers may improve and correct the printed output.
Important
For most print jobs, these levers should remain in their default position. The position of
these levers should be changed only if there is a skew problem when running a specific
print job and / or media type. Changing the levers may cause more skew problems when
running certain media types such as coated, label, tab stock, hole-punched paper,
transparency, film, postcards, and envelopes.
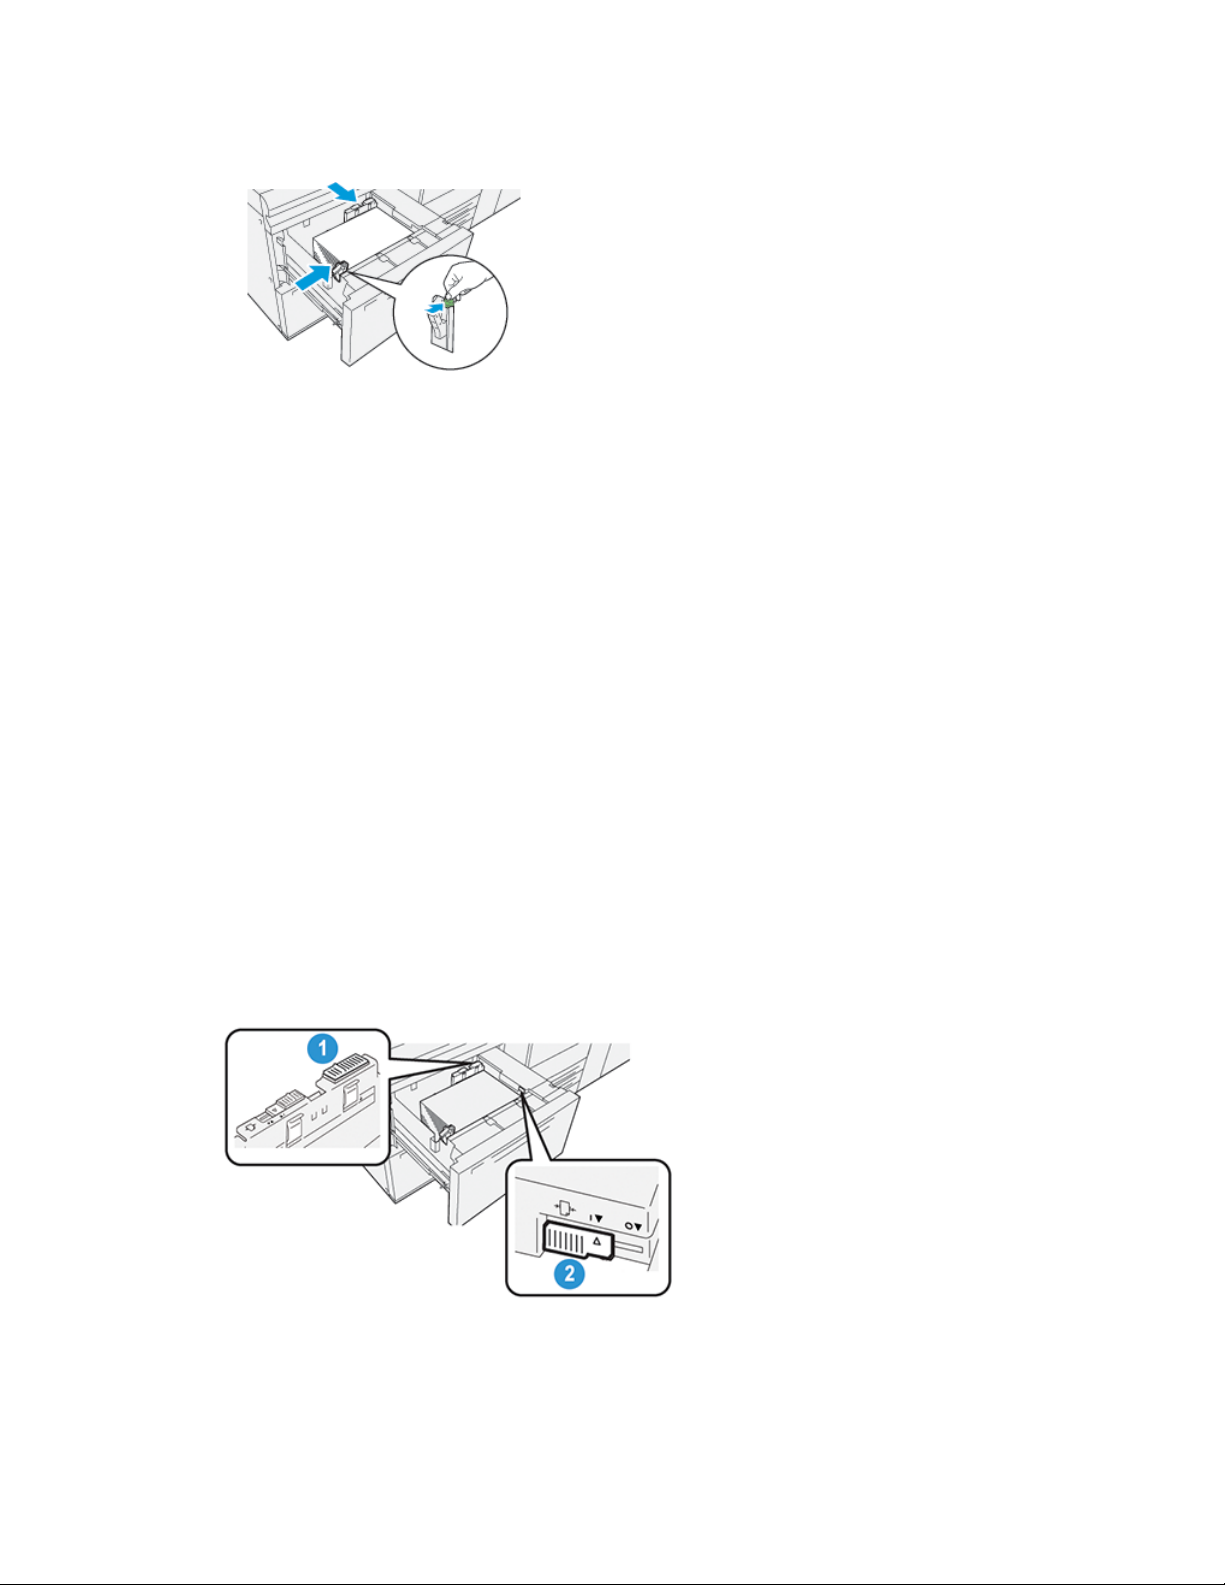
The paper-feed adjustment levers are found in Trays 8 and 9. These levers are used to
improve paper feed accuracy and to reduce paper skew problems.
Rear Paper-feed Adjustment Lever
2.1. Right-side Paper-feed Adjustment
Lever
Xerox®Versant®3100 Press1-8
Optional Devices Guide
Dual Advanced High Capacity Feeder (Trays 8 and 9)
Improving Paper Feed Performance in Trays 8 and 9
1. Open the tray by pulling it out slowly until it stops.
2. Ensure that the desired paper is loaded into the tray.
3. Go to the Stock Library Manager on the print server.
a) From the Tray Properties window, verify the correct paper information including
size, type, weight, and paper curl or alignment option for the tray.
b) Select OK and close the Tray Properties window.
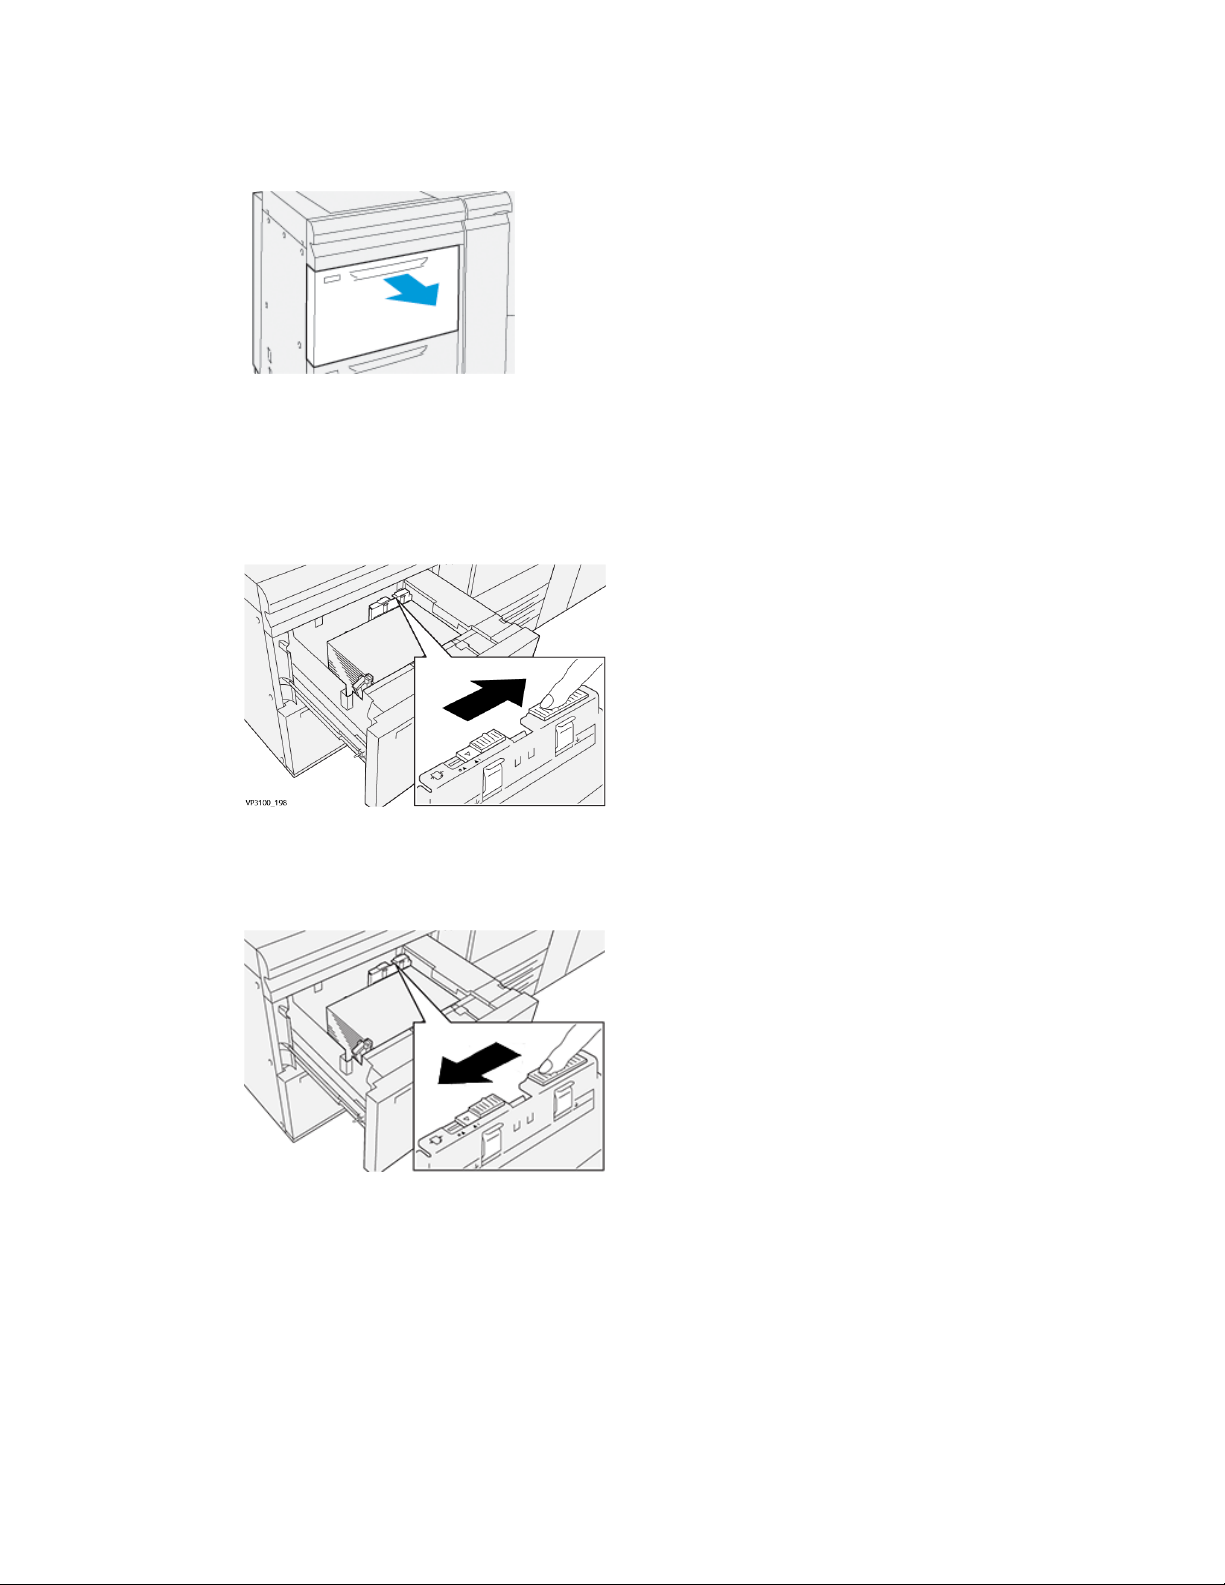
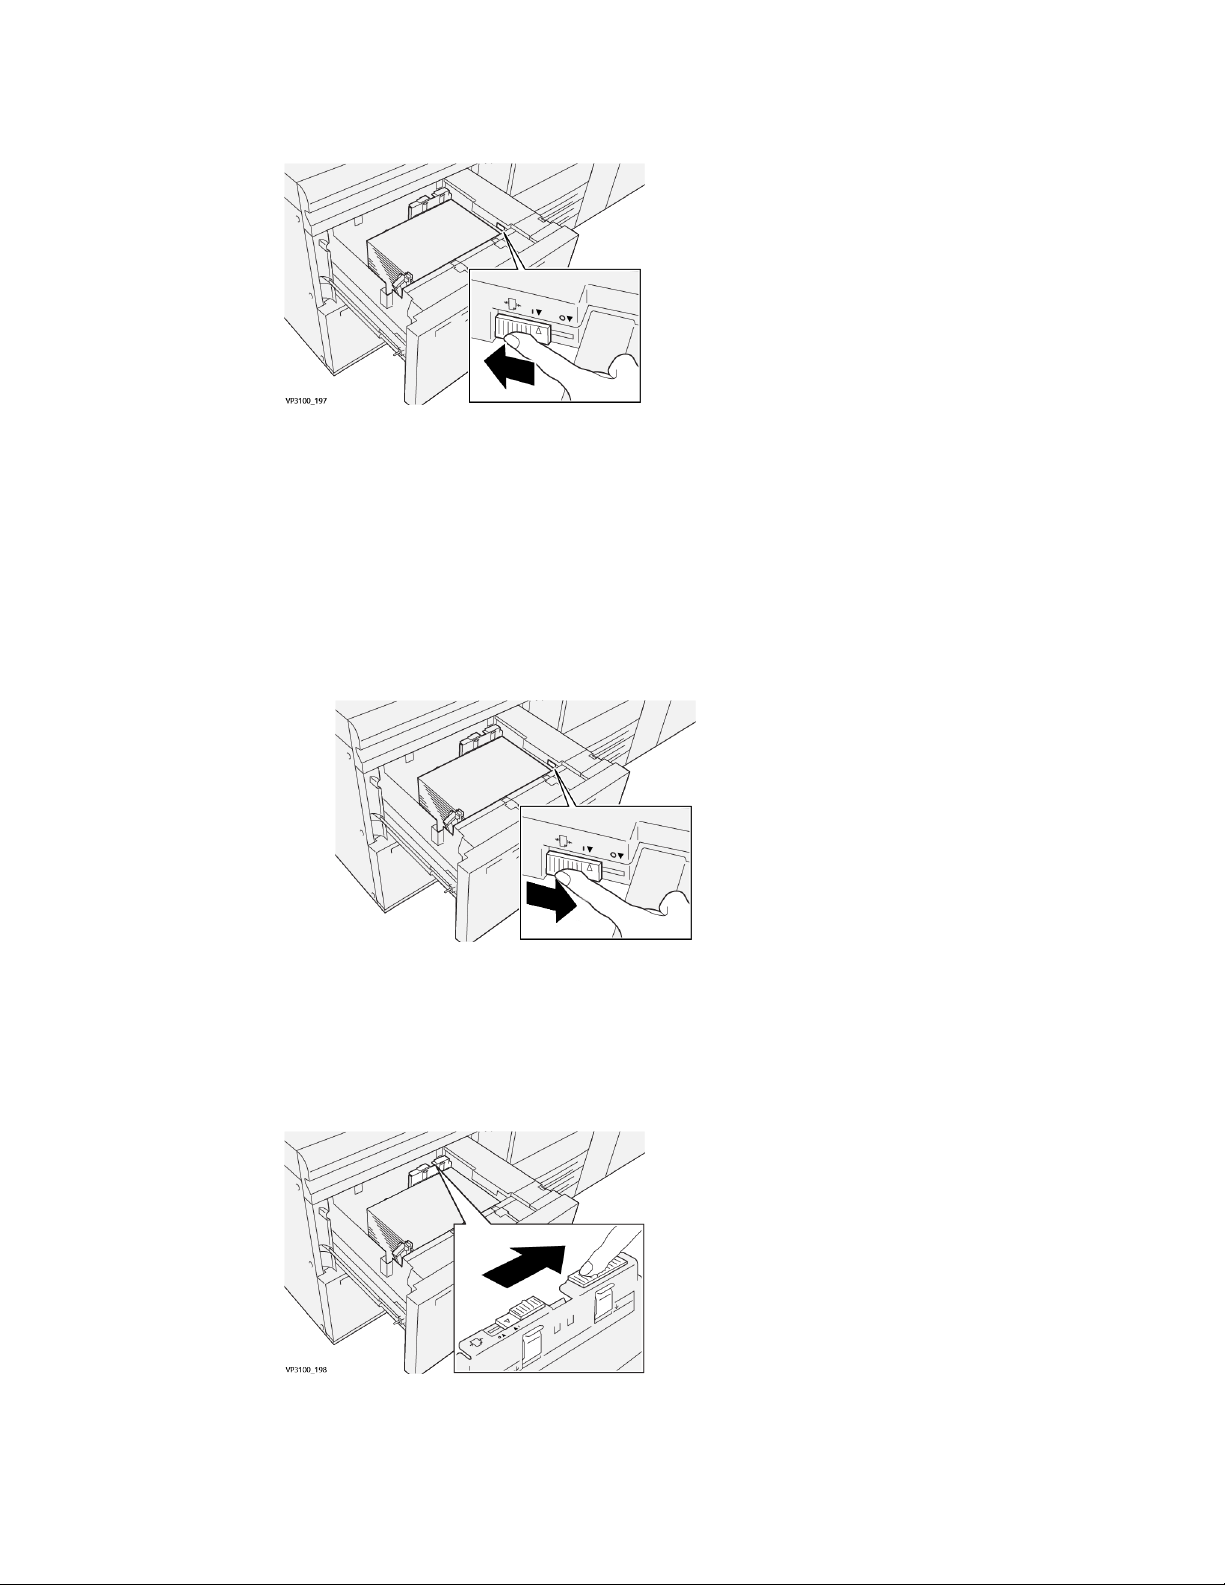
4. On the tray, slide the rear paper-feed adjustment lever to the right.
5. Close the tray by slowly pushing it in until it comes to a stop.
6. Run your print job.
7. After the print job finishes, open the tray and return the rear paper-feed adjustment
lever to its default position by sliding it to the left.
Leave the tray open, and continue to the next step.
8. Retrieve and evaluate the printed output; choose one of the following:
• The paper is fed accurately without skew and the printed output is satisfactory.
Close the tray and your task is completed.
• The paper is skewed and the printed output is unsatisfactory; proceed to the next
step.
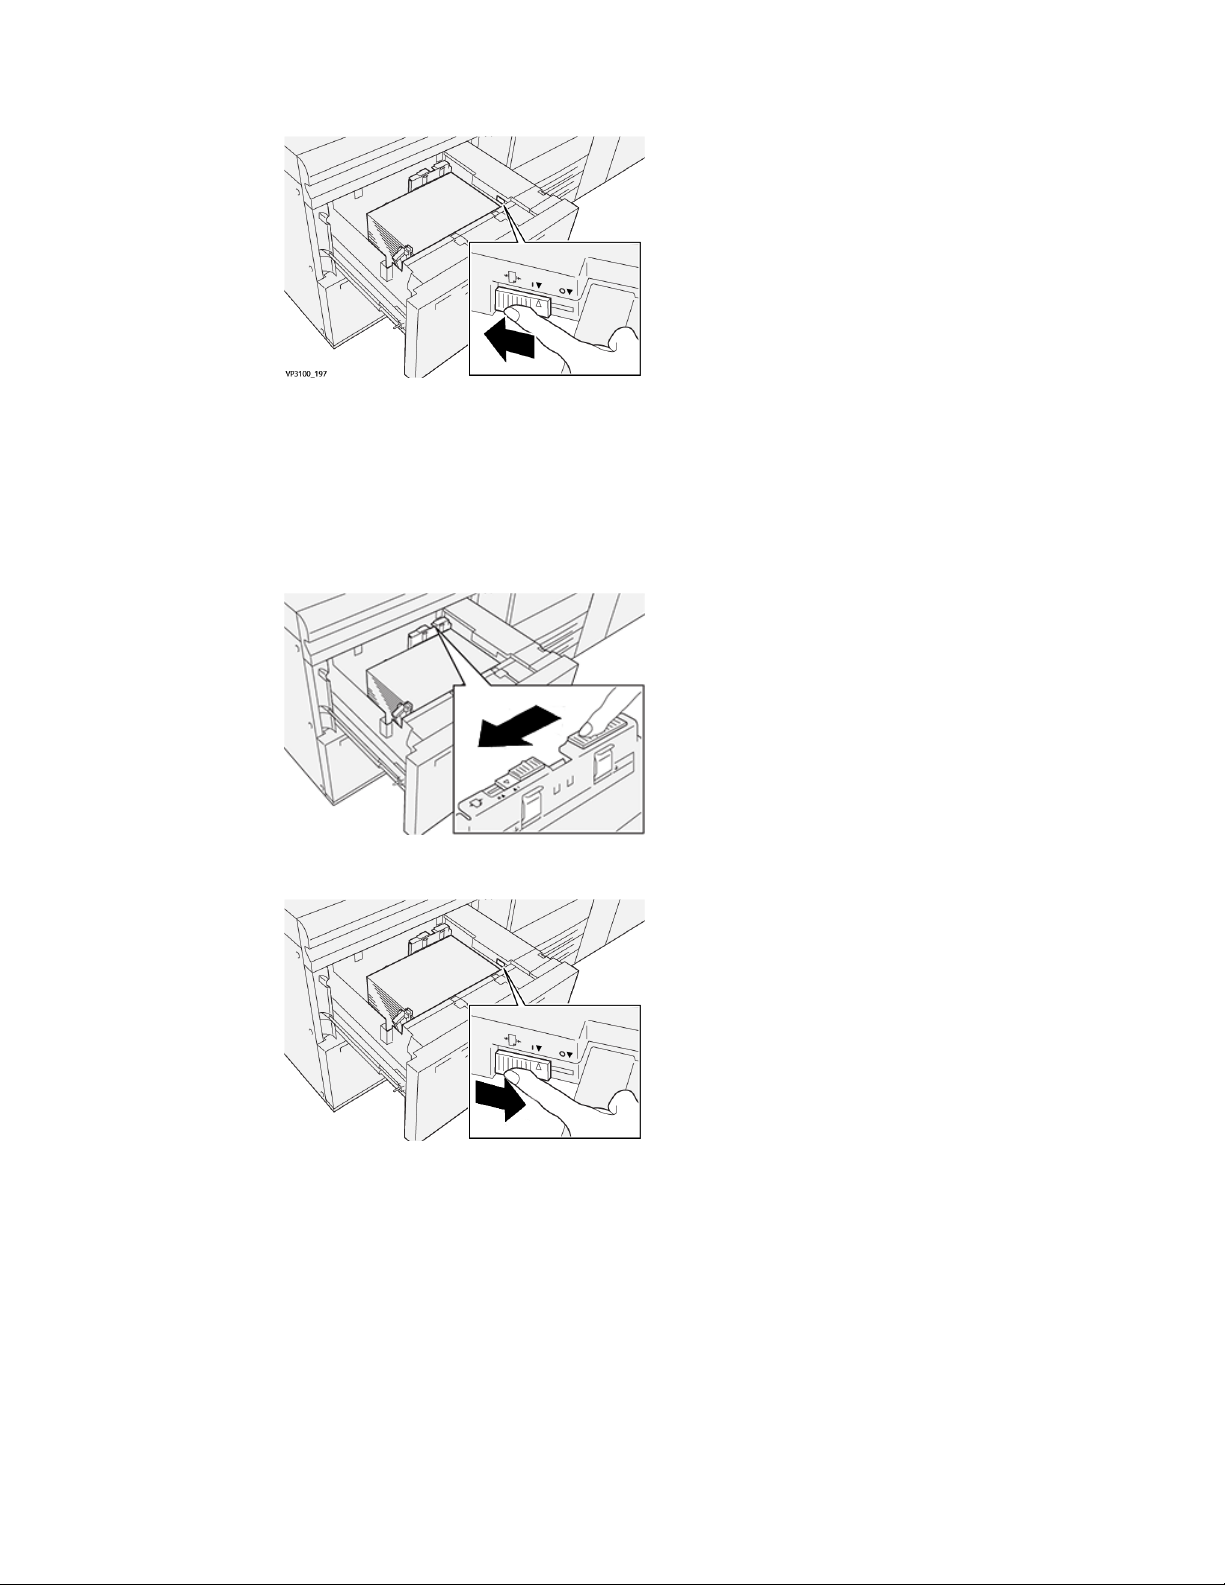
9. Adjust the right-side paper-feed lever:
Optional Devices Guide
1-9Xerox®Versant®3100 Press
Dual Advanced High Capacity Feeder (Trays 8 and 9)
a) On the tray, slide the right-side paper-feed adjustment lever toward the rear of
the tray.
b) Close the tray and verify the tray settings from the Stock Library Manager on
the print server.
c) Run your print job.
10. Retrieve and evaluate the printed output; choose one of the following:
• The paper is fed accurately without skew and the printed output is satisfactory;
perform the following:
1. Open the tray.
2. Return the right-side paper-feed adjustment lever to its default position
by sliding it toward the front of the tray.
3. Close the tray and your task is completed.
• The paper is skewed and the printed output is unsatisfactory; proceed to the next
step.
11. Adjust both levers:
a) Open the tray and slide the rear paper-feed adjustment lever to the right.
Xerox®Versant®3100 Press1-10
Optional Devices Guide
Dual Advanced High Capacity Feeder (Trays 8 and 9)
b) Ensure that the right-side paper-feed adjustment leverstill is in the rear position.
c) Close the tray and verify the tray settings from the Stock Library Manager on
the print server.
d) Run your print job.
12. After the print job finishes, open the tray and return both levers to their default
positions:
a) Return the rear paper-feed adjustment lever to its default position by sliding it
to the left.
b) Return the right-side paper-feed adjustment lever to its default position by sliding
it toward the front of the tray.
c) Close the tray, and continue to the next step.
13. Retrieve and evaluate the printed output; choose one of the following:
• The paper is fed accurately without skew and the printed output is satisfactory;
your task is completed.
• The paper is skewedand the printed output is unsatisfactory; continue to the next
step.
14. If you are still having skew adjustment problems, refer to the Advanced Stock Setup
information on the Stock Library Manager on the print server. If necessary, perform
one of the following:
Optional Devices Guide
1-11Xerox®Versant®3100 Press

Dual Advanced High Capacity Feeder (Trays 8 and 9)
• Create / use an Alignment Profile to resolve the problem.
• Adjust the Aligner Roll Pressure to resolve the problem.
• Adjust the Regi-Loop to resolve the problem.
If the problem continues, contact the Customer Support Center.
Important
If using an Advanced Stock Setup feature, always return the feature to its default
setting before using the press.
Printing on Special Media
Transparencies
Guidelines for Printing on Transparencies
Always refer to the following guidelines before using transparencies:
• For optimum system performance and image projection, use Xerox removable stripe
transparency materials. These premium transparencies are specifically designed to
provide optimum print quality.
• Use of other transparencies may cause machine damage and result in excessive
service calls.
• Transparencies can be printed from all trays.
• Use only transparency stock listed in the Recommended Media List (RML).
• Do not intermix paper with individual transparencies in a tray. Jams may occur.
• Do not load more than 100 transparencies in a paper tray at one time.
• Load 8.5 x 11 in. (A4) transparencies long edge feed only (portrait).
• Fan the transparencies to stop them from sticking together before loading.
• Load transparencies on top of a small stack of same-size paper.
• At the Stock Library Manager, make sure to select Transparency as the Paper or
Media Type and select the tray containing the transparencies as the Paper Source.
• The maximum output stack height should not exceed 100 transparencies.
Loading Transparencies in Trays 8 and 9
Load the transparencies in the LEF (portrait) direction and align the edge of the
transparencies against the right edge of the tray, with the side to be printed on facing
up.
Xerox®Versant®3100 Press1-12
Optional Devices Guide
Dual Advanced High Capacity Feeder (Trays 8 and 9)
Hole-punched Paper
Guidelines for Printing on Hole-punched Paper
Hole-punched paper is defined as having two or more holes along one edge for use in
ring binders and notebooks.
Always refer to the following guidelines before using hole-punched paper:
• Paper with punched holes can be printed from all trays.
• Hole-punched paper can be loaded either in the LEF / portrait or SEF / landscape
direction.
• Position the holes along the feed edge, as shown on the image on the front of the
tray.
• Load hole-punched paper with the side to be printed on facing up.
• To prevent jams or damage, make sure that any plugs (pieces cut out of the paper
to create the holes) do not remain in the stack.
Loading Hole-punched Paper in Trays 8 and 9
Long-edge (LEF) Feed Direction
Load and align the paper against the right side of the tray for LEF direction.
Short-edge (SEF) Feed Direction
Load and align the paper against the right side of the tray for SEF direction.
Optional Devices Guide
1-13Xerox®Versant®3100 Press
Dual Advanced High Capacity Feeder (Trays 8 and 9)
Tab Stock
Guidelines for Printing on Tab Stock
Always refer to the following guidelines before using tab stock:
• Tab Stock can be printed from all trays.
• Tabs are loaded in the tray only in the long-edge feed (LEF) direction.
• Tab stock is loaded so the straight edge of the stock is in the feed direction.
• You can load either single straight collated or single reverse collated tab stock.
• Refer to the print server documentation for more detailed information on how to set
up a tab job at your print server.
• If a jam occurs while running tabbed sets, cancel the job and start again.
• Before loading tab stock in a tray, program your tab job at the Stock Library Manager
application on the print server or from your print driver:
- Select Tab Stock or Precut Tabs as the Paper Type.
- Select the tray containing the stock as the Paper Source.
- Select the correct Paper Weight for the tabs, usually 163 gsm. The weight range
may be 106 to 176 gsm.
- Set Modules to the number of tabs in the set.
- For the stock size, set a Custom Size of 9 x 11 inches (229 x 279 mm) LEF.
- For the Print Output Order / Tab Sequence, select N to 1.
- For Output Delivery, select Face Up.
Loading Tab Stock in Trays 8 and 9
Load the tab stock LEF, with the side to be printed on facing down; align the straight
edge of the tab stock against the right edge of the tray and the tabs to the left.
Loading Straight Collated Tabs
Load straight collated tabs with the first blank tab cutout toward the front of the tray.
Xerox®Versant®3100 Press1-14
Optional Devices Guide

Dual Advanced High Capacity Feeder (Trays 8 and 9)
Loading Reverse Collated Tabs
Load reverse collated tabs with the first blank tab cutout toward the rear of the tray.
Labels
Guidelines for Printing on Labels
Always refer to the following guidelines before using labels:
• Labels can be printed from all trays.
• Trays 8 and 9 can hold a maximum of 350 gsm.
• When submitting your print file, select Labels as the Paper Type, and select the tray
containing the labels as the Paper Source.
• Use labels designed for laser printing.
• Do not use vinyl labels or dry gum labels.
• Only print on one side of the sheet of labels.
• Do not use any sheet where labels are missing as it may damage the press.
• Store unused labels flat in their original packaging.
• Leave the label sheets inside the original packaging until ready to use.
• Return any unused sheets of labels to their original packaging and reseal.
• Do not store labels in extremely dry, humid, hot or cold conditions.
• Rotate stock frequently.
• Long periods of storage in extreme conditions can cause labels to curl and jam in the
press.
Loading Labels in Trays 8 and 9
Load labels in Trays 8 and 9 with the labels face up.
Glossy Paper
Guidelines for Printing on Glossy Paper
Glossy Paper is a type of coated paper that can be printed from all trays.
Always refer to the following guidelines before using glossy paper:
• Select Coated as the Paper Type, and select the tray containing the glossy paper as
the Paper Source.
• Select the correct Paper Weight and Size.
• Do not open sealed packages of glossy paper until you are ready to load them into
the press.
1-15Xerox®Versant®3100 Press
Optional Devices Guide

Dual Advanced High Capacity Feeder (Trays 8 and 9)
• Store glossy paper flat in the original packaging.
• Remove all other paper from the tray before loading glossy paper.
• Load only the amount of glossy paper you plan to use, and remove the unused portion
from the tray when you are finished printing.
• Replace the unused portion in the original wrapper and seal for later use.
• Rotate stock frequently.
• Long periods of storage in extreme conditions can cause glossy paper to curl and jam
in the press.
Postcards
Guidelines for Printing on Postcards
Always refer to the following guidelines before using postcard stock:
Tip
When printing postcards in Trays 8 or 9, the Postcard Bracket is required. Always install
the postcard bracket before loading and printing postcards from these trays.
• Postcards may be printed from Trays 5, 6, 7, 8, and 9.
• Do not open sealed packages of postcard stock until you are ready to load them into
the press.
• Store postcard stock flat in the original packaging.
• Remove all other paper from the tray before loading postcard stock.
• Load only the amount of postcard stock you plan to use, and remove the unused
portion from the tray when you are finished printing.
• Replace the unused portion in the original wrapper and seal for later use.
• If using Trays 8 or 9, always remove and store the Postcard Bracket when you are
finished printing.
• Rotate the postcard stock frequently.
• Long periods of storage in extreme conditions can cause postcardstock to jam in the
press.
• When submitting your print file, from either the Stock Library Manager or from your
print driver, select the following options:
- Select Custom Paper as the Paper Type, and enter the Size dimensions of the
postcard.
- Enter the Paper Weight for the postcard stock.
- Select the tray (Tray 8 or 9) as the Paper Source.
Supported Postcard Sizes
Feed DirectionPostcard Size
Short Edge Feed (SEF)4 x 6 in. / 101.6 x 152.4 mm
Short Edge Feed (SEF)A6 / 148 x 105 mm
(5.8 x 4.1 in.)
Xerox®Versant®3100 Press1-16
Optional Devices Guide
Dual Advanced High Capacity Feeder (Trays 8 and 9)
Loading Postcards in Trays 8 and 9
Note
Install the postcard bracket before printing postcards.
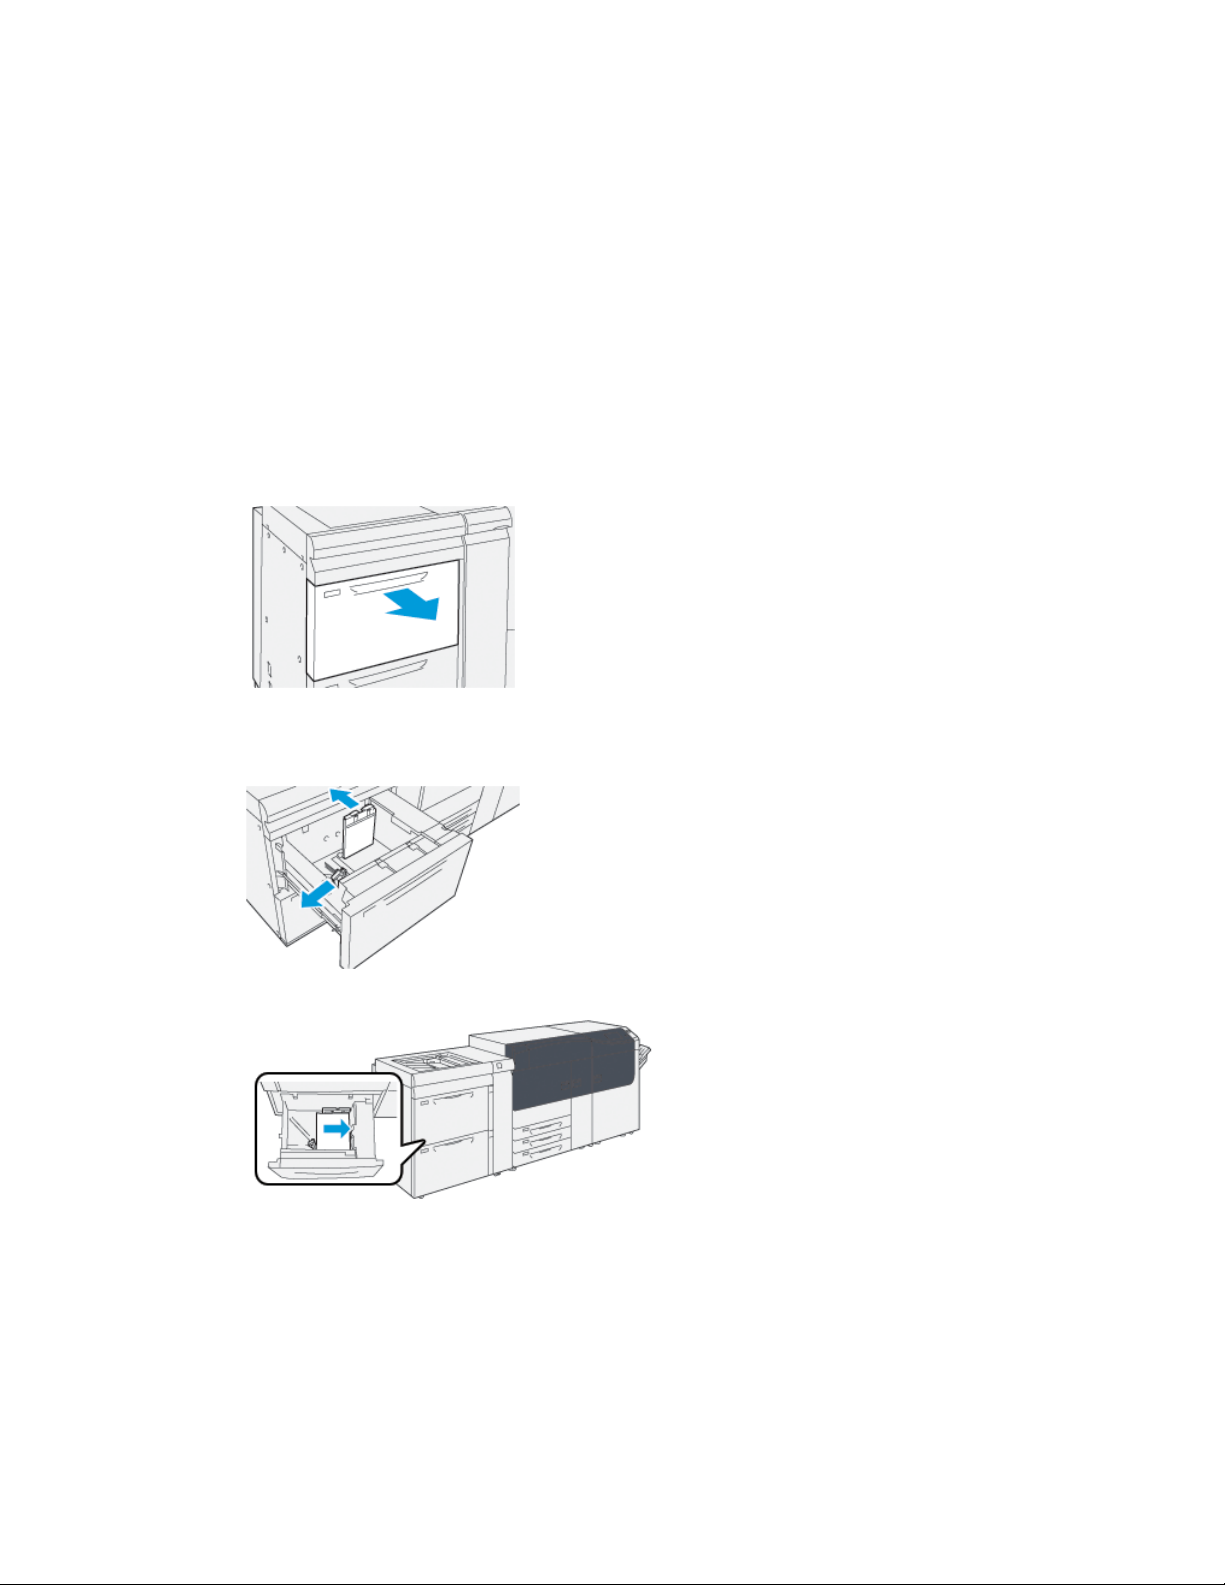
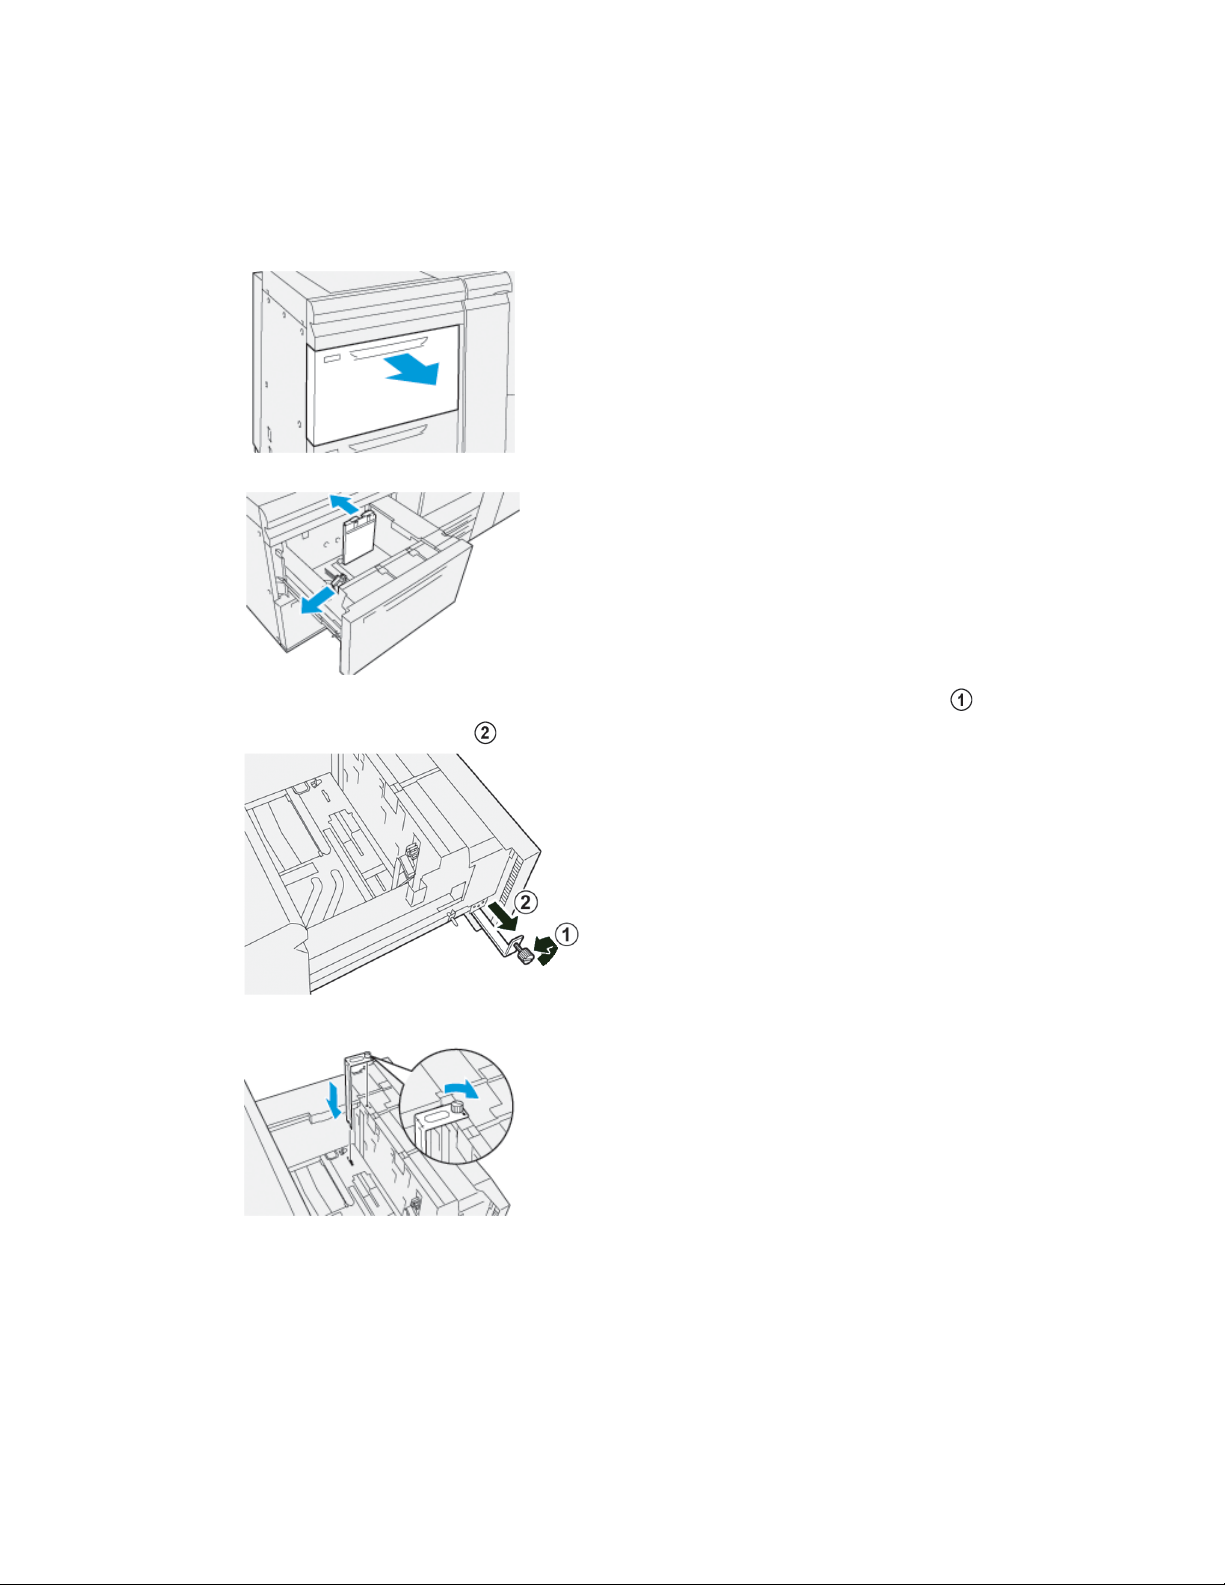
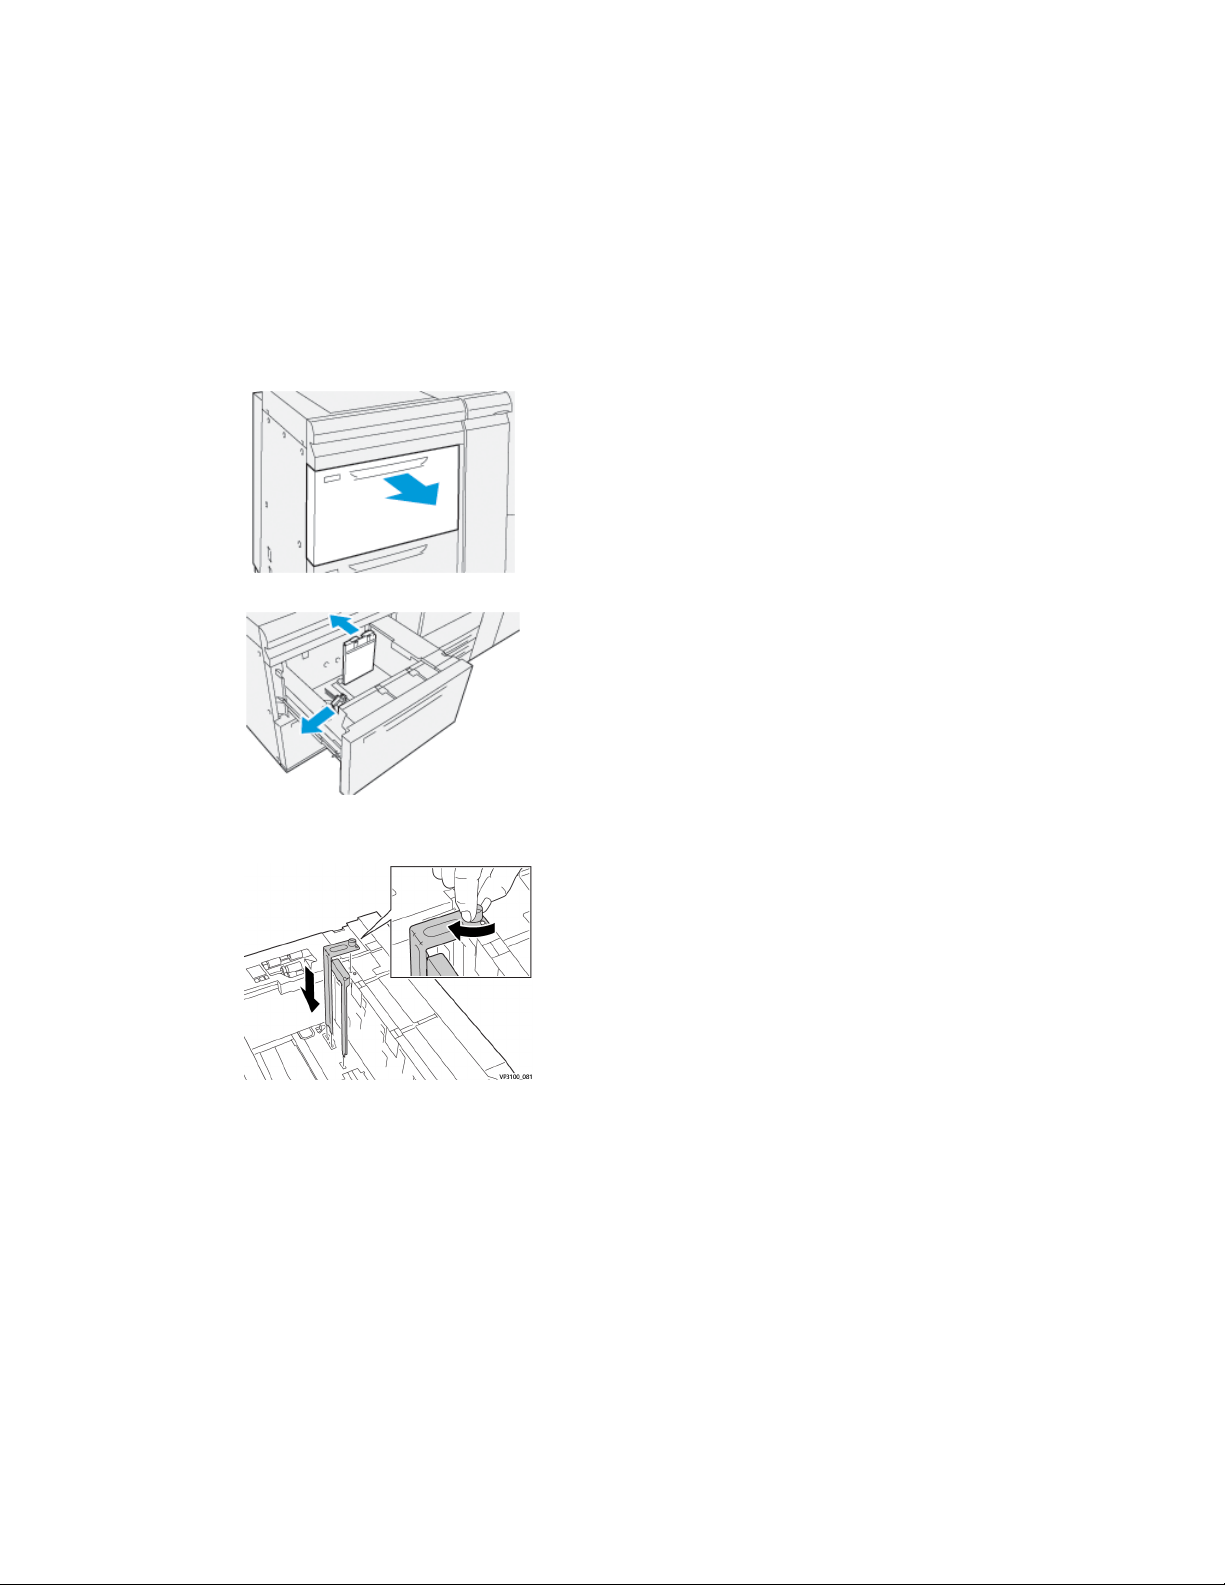
1. Slowly open one of the paper trays until it stops and remove the paper.
2. Move the paper guides out to their largest position.
3. To remove the postcard bracket, loosen the screw on the left side of the tray ( )
and remove the bracket ( ).
4. Install the postcard bracket:
a) Sit the bracket on the locating pins on the upper frame and in the grooves on
the bottom of the tray.
b) Tighten the thumb screw so it locks the postcard bracket in place.
Optional Devices Guide
1-17Xerox®Versant®3100 Press
Dual Advanced High Capacity Feeder (Trays 8 and 9)
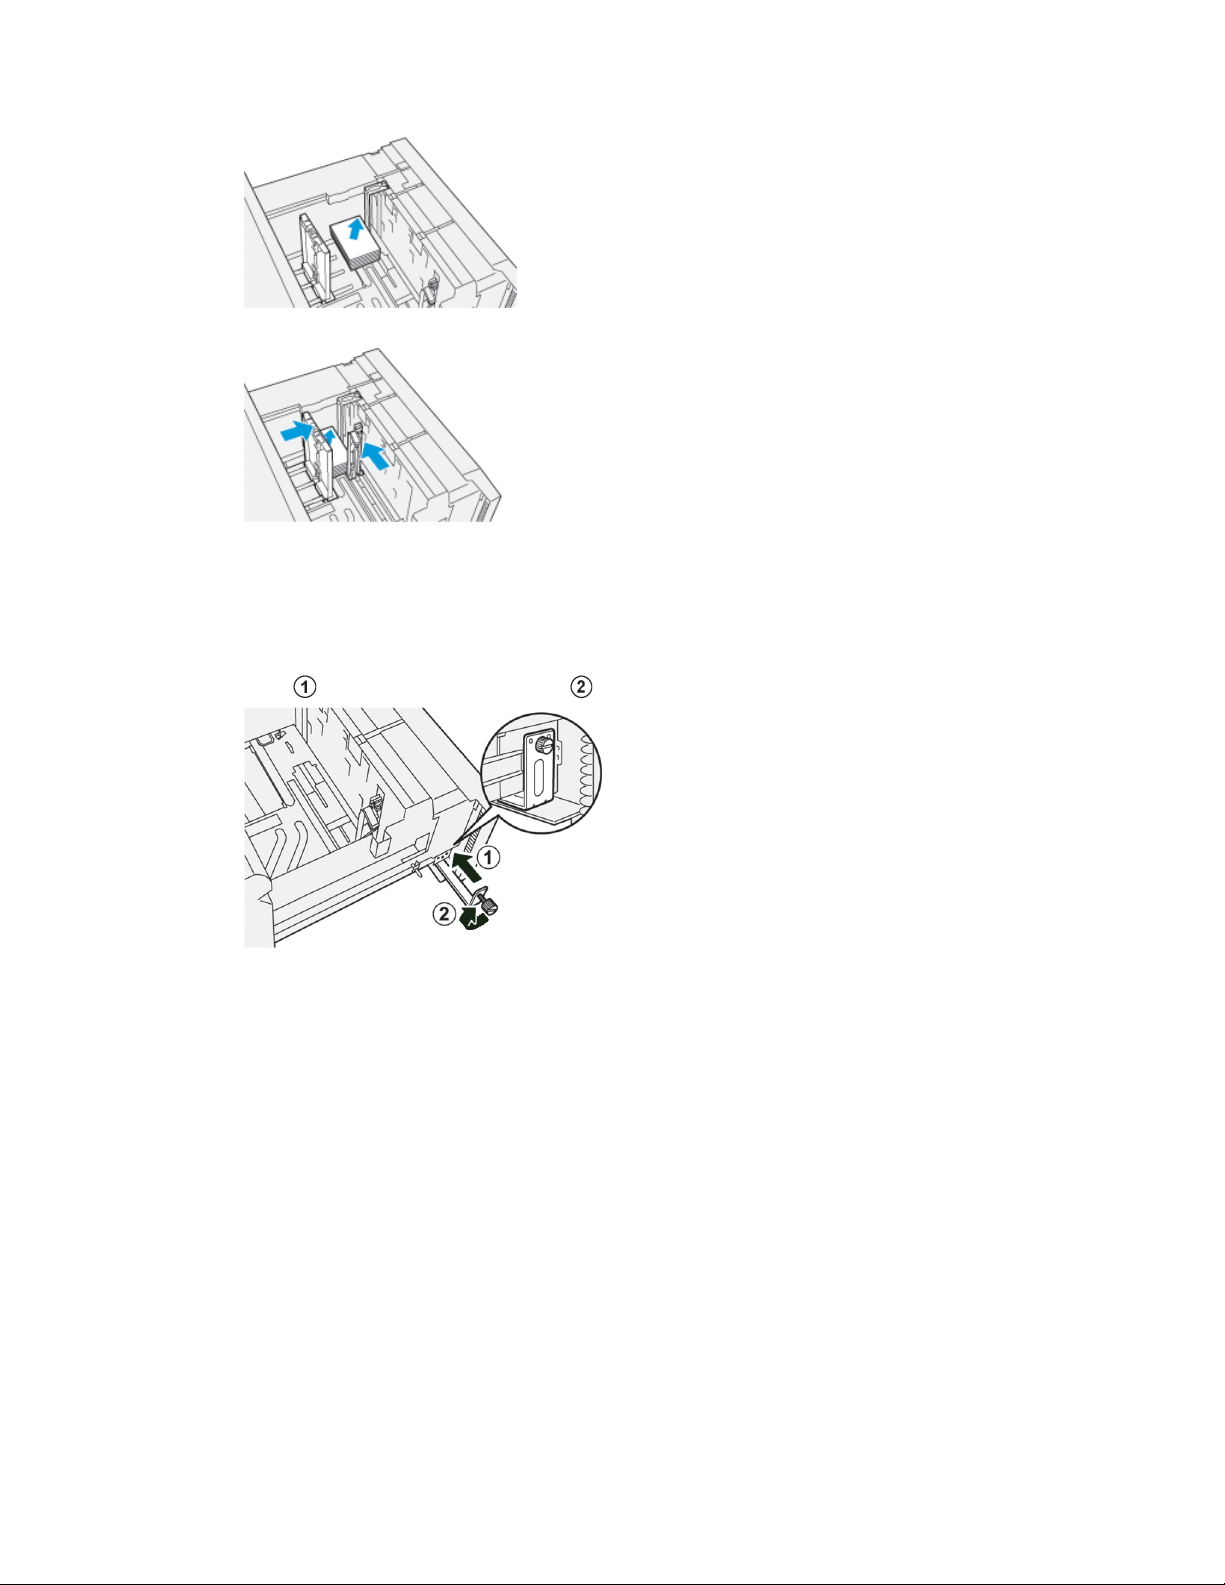
5. Load the postcard stock SEF and against the right side of the tray.
6. Adjust the paper guides against the stock.
7. Close the paper tray and confirm the new settings at the print server.
8. Run your print job.
9. Upon completion of your print job, remove the postcard stock and the postcard
bracket from the tray.
10. Store the postcard bracket by inserting it into the storage area on the left side of the
tray ( ) and tightening the screw ( ).
Envelopes
Guidelines for Printing on Envelopes
• The recommended tray for printing envelopes is Tray 5 (Bypass).
• Envelopes also may be printed from Trays 6, 7, 8, and 9. Before printing envelopes
from Trays 8 or 9, one the following must be installed:
- The Postcard Bracket
- The optional Envelope Support Kit
• If using Trays 8 or 9 and the Postcard Bracket is mounted, the envelope stack height
is limited to a maximum of 100 envelopes. Capacity may vary based on envelope
type and manufacturer.
• Use only supported envelope sizes, and load them in the recommended feed direction.
For more information, refer to Supported Envelope Sizes.
• Use of other size envelopes may be used, but performance is not guaranteed.
Xerox®Versant®3100 Press1-18
Optional Devices Guide

Dual Advanced High Capacity Feeder (Trays 8 and 9)
• Envelopes must be run 1-sided only.
• Recommended capacity is 30-40 envelopes. Capacity may vary based on envelope
type and manufacturer.
• Always load envelopes with the flaps closed and flaps face down.
• When loading SEF, place the flaps facing the front of the press.
• When loading LEF, place the flaps facingthe lead edge (feeddirection into the press).
• When submitting your print file, select a custom paper as the Paper Type, and enter
the dimensions of the envelope.
- The width is measured from the lead edge to the trail edge of the envelope.
- This means that if you are loading the envelope SEF, enter the long dimension
of the envelope as the width.
- If you are loading the envelope LEF, enter the short dimension of the envelope
as the width.
• Enter a heavy weight for the media, such as 176 gsm or greater for 24lb envelopes.
Best results will vary based on envelope type and manufacturer.
• Select the Tray 5 (Bypass) as the Paper Source.
• Do not use padded envelopes. Use envelopes that lie flat on a surface.
• Store unused envelopes in their original packaging to avoid the excess moisture or
dryness which can affect print quality and cause wrinkling. Excessive moisture can
cause the envelopes to seal before or during printing.
• Some wrinkling or embossing may occur when printing on envelopes. Successful
envelope printing depends on the quality and construction of the envelopes. Try
another envelope brand if problems occur.
• Greater image registration variance may be experienced on envelopes.
• Maintain constant temperatures and relative humidity.
• Removal of the envelopes from the output top tray is recommended to minimize
poor stack quality and possible jams.
• Printed envelopes are sent only to the Offset Catch Tray (OCT) or to the top tray of
the standard finishers.
Supported Envelope Sizes
Feed DirectionHeight x Width DimensionsEnvelope Size
SEF3.875 x 7.5 in.Monarch
SEF4.125 x 9.5 in.#10
SEF / LEF229 x 324 mmC4
SEF / LEF162 x 229 mmC5
Loading Envelopes in Trays 8 and 9 with the Postcard Bracket
Note
Install the postcard bracket before printing envelopes.
Optional Devices Guide
1-19Xerox®Versant®3100 Press
Dual Advanced High Capacity Feeder (Trays 8 and 9)
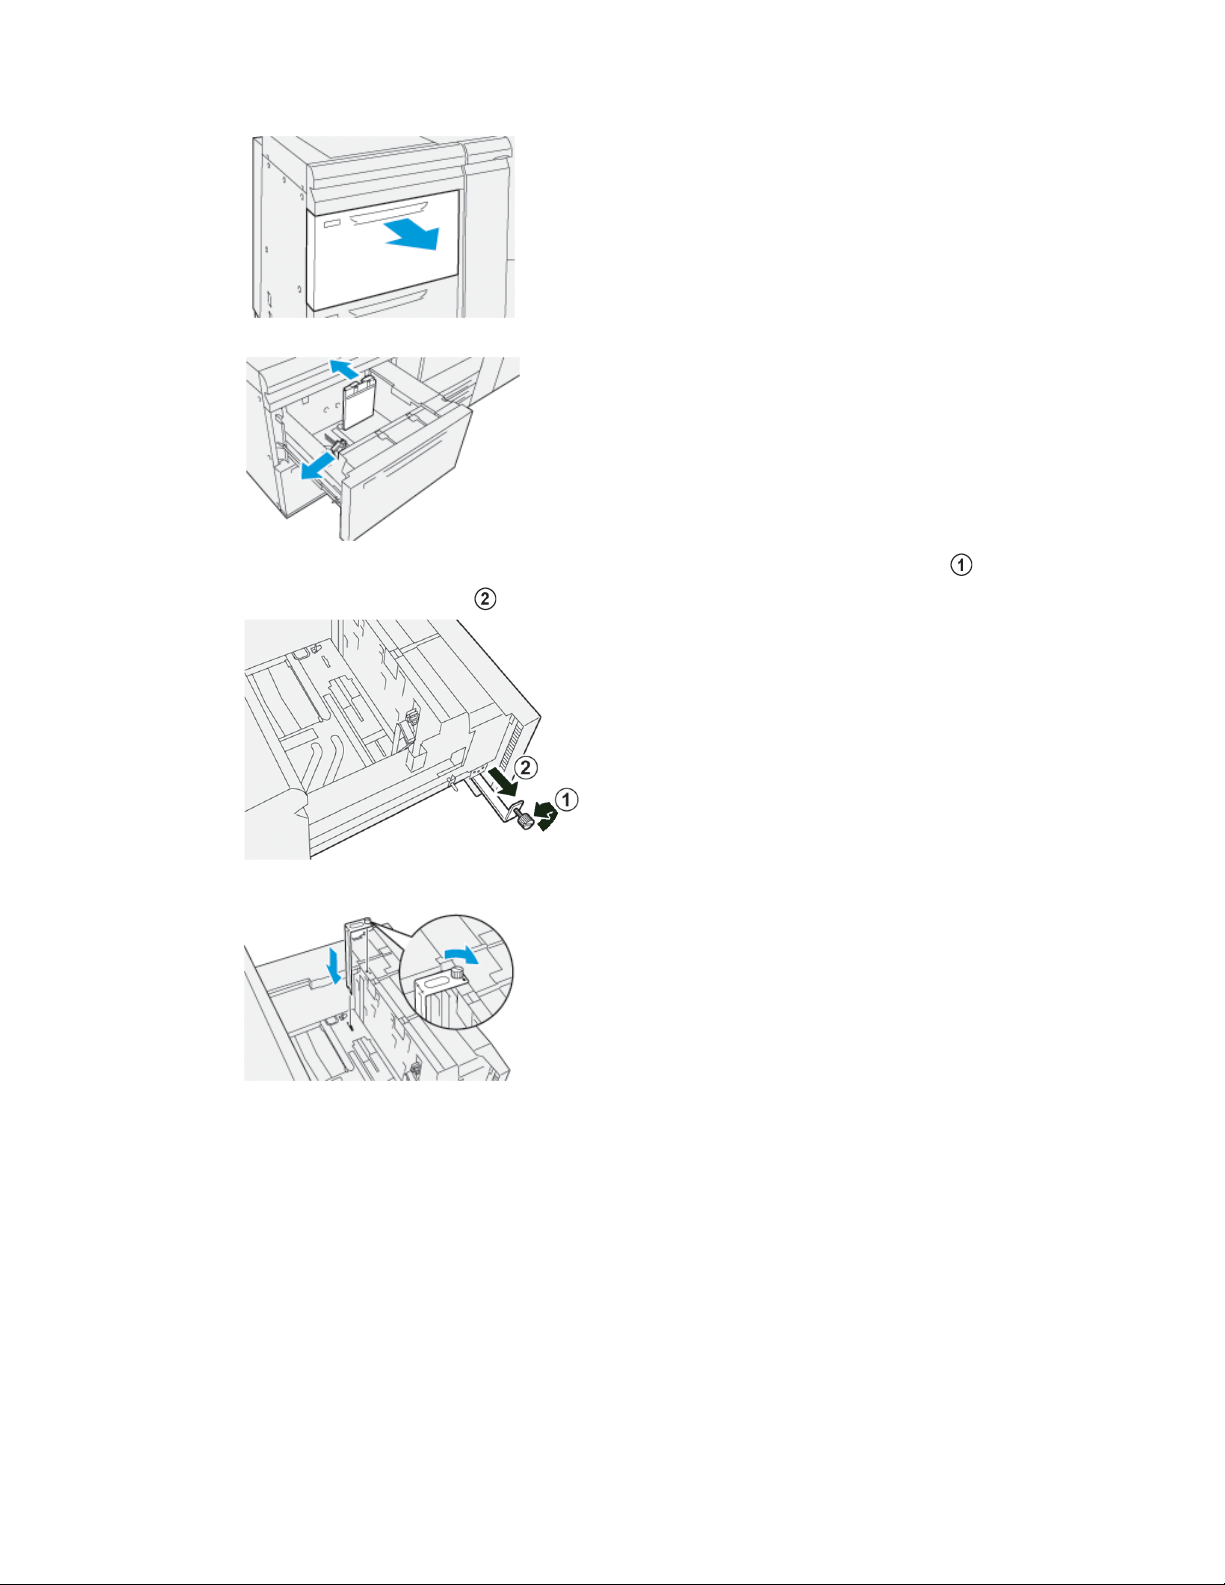
1. Slowly open one of the paper trays until it stops and remove the paper.
2. Move the paper guides out to their largest position.
3. To remove the postcard bracket, loosen the screw on the left side of the tray ( )
and remove the bracket ( ).
4. Install the postcard bracket:
a) Sit the bracket on the locating pins on the upper frame and in the grooves on
the bottom of the tray.
b) Tighten the thumb screw so it locks the postcard bracket in place.
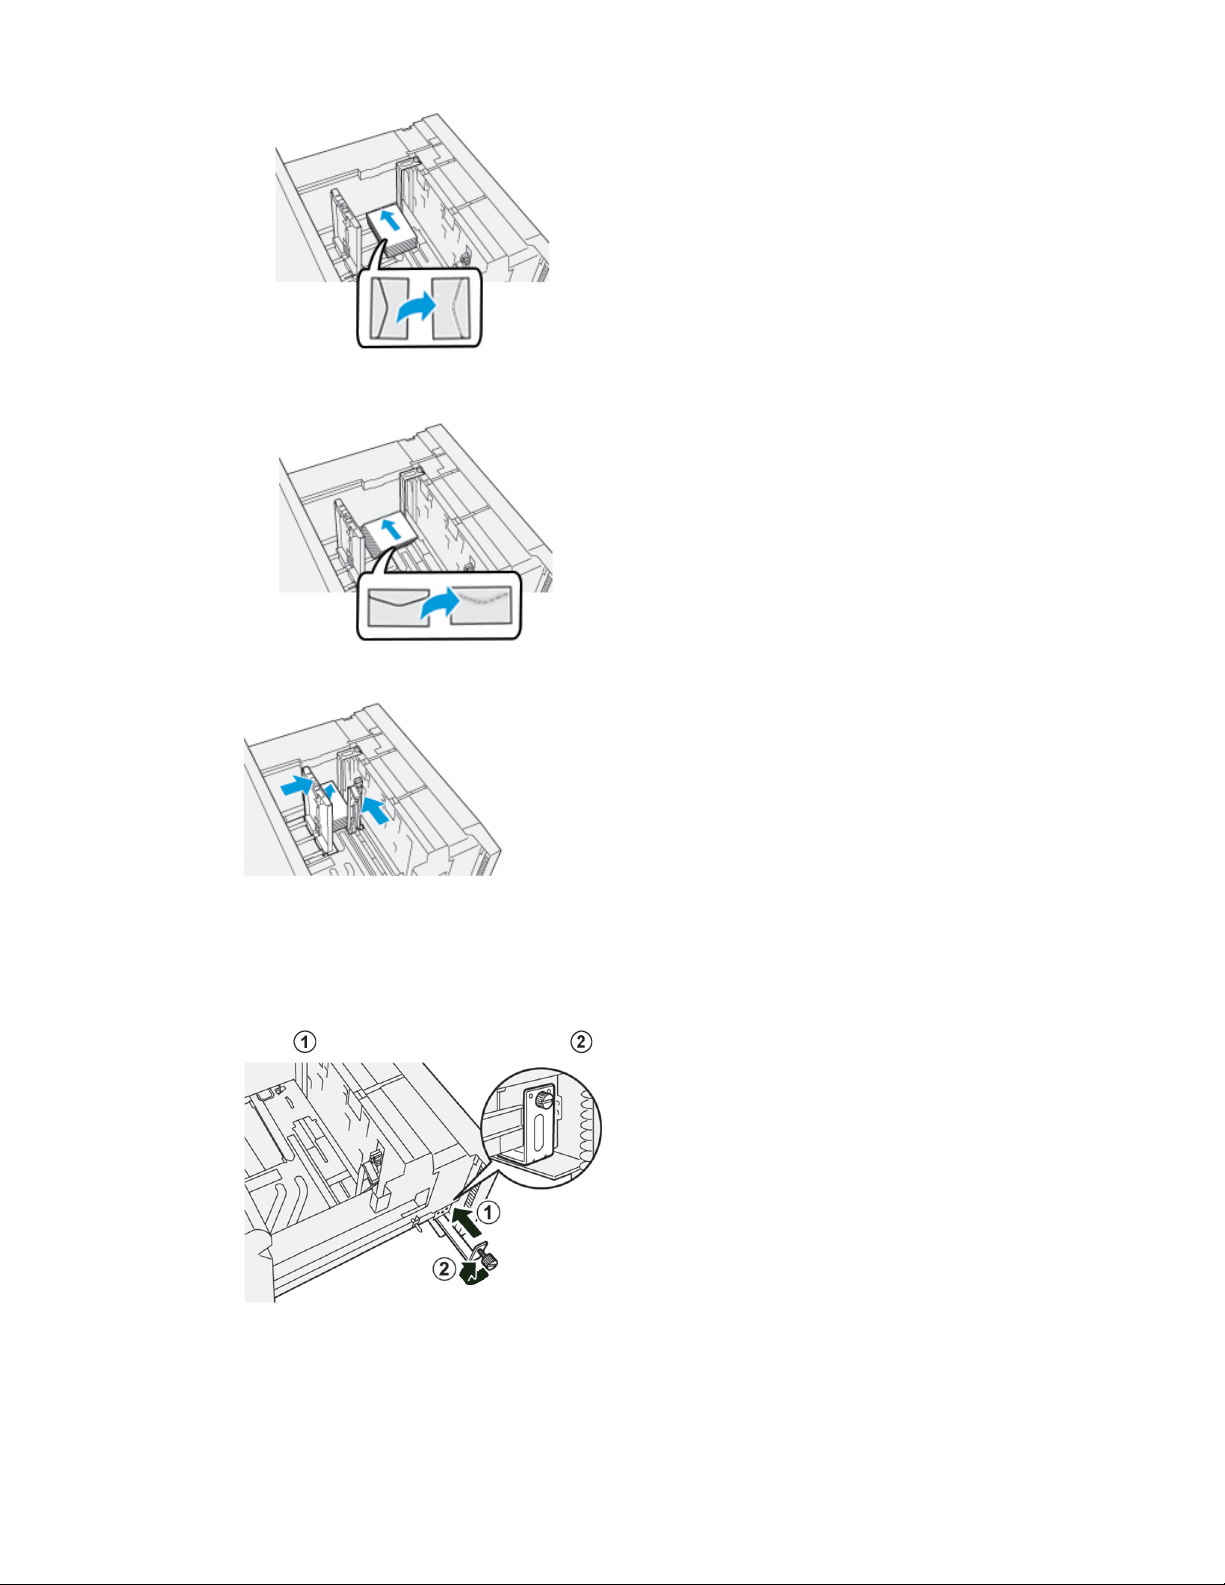
5. Load the envelope either in the short-edge-feed (SEF) or long-edge-feed (LEF) direction:
• When loading envelopes SEF, ensure the flaps are closed and face down, and
postion the flaps along the front of the tray.
Xerox®Versant®3100 Press1-20
Optional Devices Guide
Dual Advanced High Capacity Feeder (Trays 8 and 9)
• When loading envelopes LEF, ensure the flaps are closed and face down, and
postion the flaps along the right of the tray.
6. Adjust the paper guides against the stock.
7. Close the paper tray and confirm the new settings at the print server.
8. Run your print job.
9. Upon completion of your print job, remove the remaining envelopes and the postcard
bracket from the tray.
10. Store the postcard bracket by inserting it into the storage area on the left side of the
tray ( ) and tightening the screw ( ).
Optional Devices Guide
1-21Xerox®Versant®3100 Press
Dual Advanced High Capacity Feeder (Trays 8 and 9)
Loading Envelopes in Trays8 and 9 with the Optional Envelope Support Kit
Note
If available, use the optional Envelope Support Kit to feed and print envelopes from
Trays 8 or 9.
The Envelope Support Kit enables a greater quantity of envelopes to be loaded and
printed from the tray.
1. Slowly open one of the paper trays until it stops and remove the paper.
2. Move the paper guides out to their largest position.
3. Locate the Envelope Support Kit.
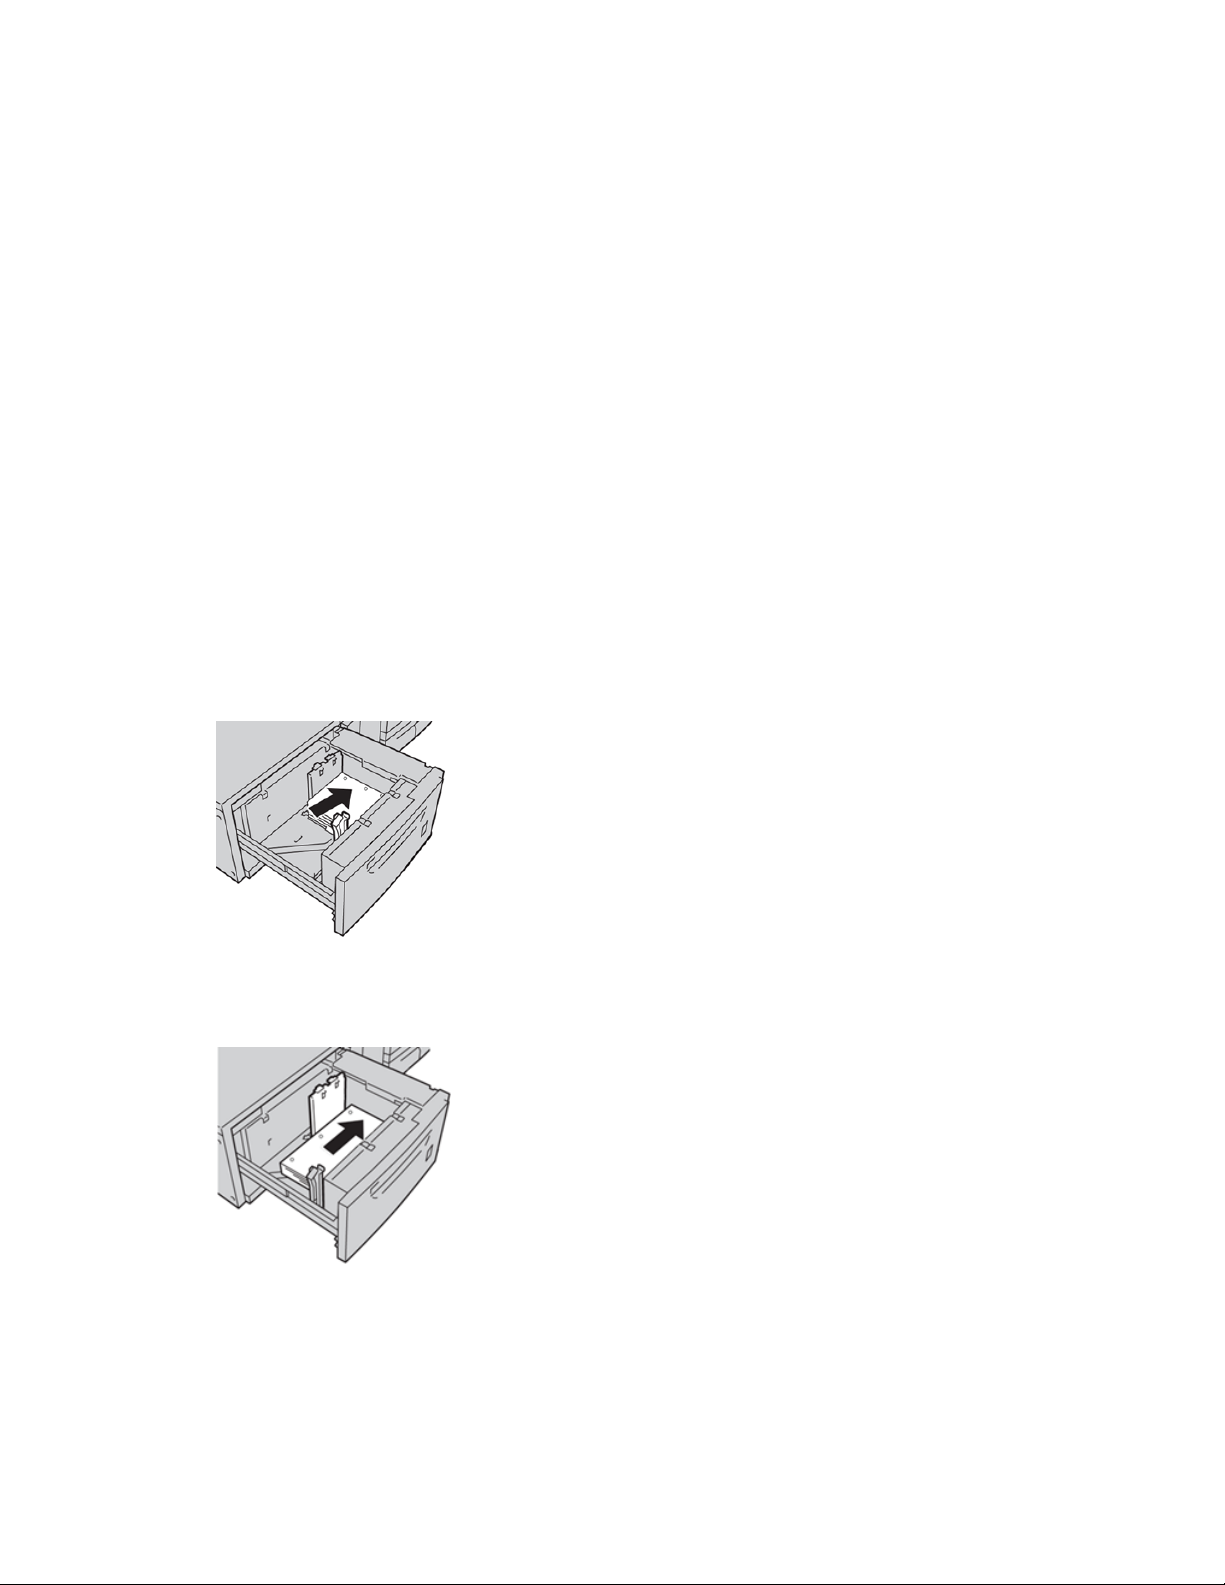
4. Install the L-shape envelope bracket:
a) Sit the bracket on the locating pins on the upper frame and in the grooves on
the bottom of the tray.
b) Tighten the thumb screw so it locks the L-shape envelope bracket in place.
Xerox®Versant®3100 Press1-22
Optional Devices Guide

Dual Advanced High Capacity Feeder (Trays 8 and 9)
5. Locate the larger of the plastic pieces and place it in the bottom of the tray so that
it fits around the ends of the inboard paper guide.
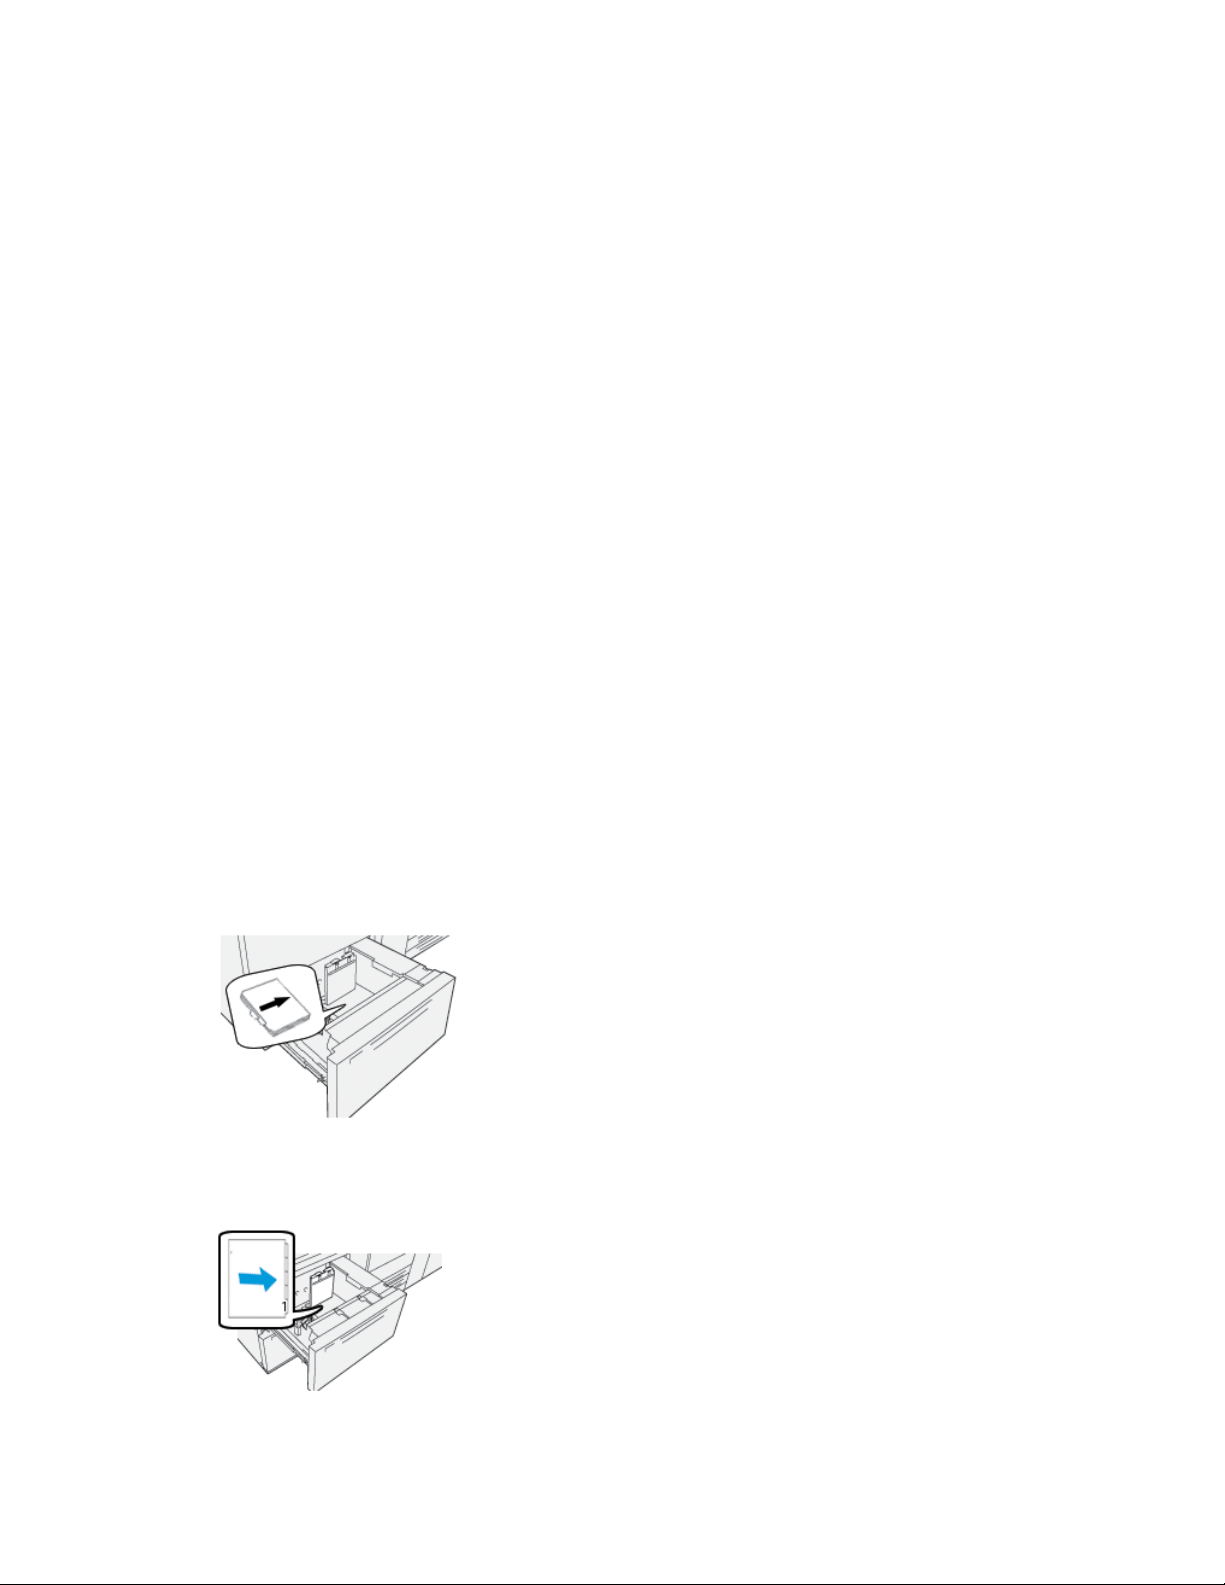
6. Locate the shorter plastic piece install it in the tray:
a) Place the shorter plastic piece in the bottom of the tray so that it fits along the
right side of the tray and into the corner, to the right of the envelope bracket
that you installed.
b) Place the magnet at the end of the piece into the corner of the tray and facing
down.
The raised portion of the piece at the other end should be facing up, and on top
of the cork pad on the tray bottom.
7. Load the envelopes SEF on top of the plastic inserts, with the flaps closed and facing
down.
Note
The flaps should always be down and positioned along the front of the tray.
Optional Devices Guide
1-23Xerox®Versant®3100 Press

Dual Advanced High Capacity Feeder (Trays 8 and 9)
8. Adjust the paper guides against the stock.
9. Close the paper tray and confirm the new settings at the print server.
10. Run your print job.
11. Upon completion of your print job, remove the envelope stock and the envelope
supply kit components from the tray.
12. Place the envelope supply kit components into storage.
13. Store the remaining envelopes in their original packaging.
Tray 8/9 Maintenance
Ordering the Feed Roll Kit for Tray 8/9
Xerox supplies, such as the feed roll kit for Trays 8 and 9, can be ordered from the web
site www.xerox.com and clicking on the Supplies link. For items that are not orderable
from the web site, contact your Xerox Service Representative.
Reorder QuantityCRUs (Supply Item)
*Each tray requires its own feed roll kit: one kit for Tray 8 and one kit for Tray 9. Each kit
contains all the required items for replacing the feed rolls.
Approximate Print Yield
(Full Color 8.5x11/A4 Prints)
500,0001 kitTray 8/9 Feed Roll Kit*
Checking the Status of Consumables
When a consumable is reaching the time it needs to be replaced, a message is displayed
on the control panel touch screen. This indicates when it is time to order and/or install
a new consumable item. With some Customer Replaceable Units (CRUs), the screen
indicates that the press may continue to run print jobs without immediately replacing
the item. Otherwise, when it is time to replace it, a message appears and the press stops
running.
Xerox®Versant®3100 Press1-24
Optional Devices Guide

Dual Advanced High Capacity Feeder (Trays 8 and 9)
To check the status of your consumables:
1. Press the Home button on the press control panel.
2. To display more information about supplies and their status, touch the Information
button .
The Supplies screen displays.
3. From the menu, select Other Consumables to see the status of other consumables.
The Other Consumables window displays and provides information about the
percentage of remaining life for each consumable.
4. Use the up / down arrows to see additional consumables, such as the trays 6, 7, 8,
and 9 feeder rolls, and other consumables for any additional optional devices that
are configured with the press.
Replacing the Tray 5 Feed Rolls
Note
To perform this procedure, the feed roll kit is required. The kit contains all the required
items for replacing the feed rolls.
Optional Devices Guide
1-25Xerox®Versant®3100 Press

Dual Advanced High Capacity Feeder (Trays 8 and 9)
Tip
Replace the feed rolls for Tray 5 (Bypass) when experiencing frequent multifeeds, single
feeds, or blank prints in the stack of the output prints.
3.1. Separator RollFeed Roll
2. Nudger Roll
1. Locate Tray 5 (Bypass) on top of Trays 8 and 9.
2. Lift up and open the bypass tray cover to access the feed roll components.
3. Remove the feed roll and install a new one.
a) Remove the feed roll by squeezing the metal shaft at both ends and lifting it up
and out of the tray.
Xerox®Versant®3100 Press1-26
Optional Devices Guide

Dual Advanced High Capacity Feeder (Trays 8 and 9)
b) Install a new feed roll by squeezing the metal shaft at both ends and sliding it
into place.
4. Remove the nudger roll and install a new one.
a) Remove the nudger roll by squeezing the metal shaft at both ends and lifting
it up and out of the tray.
b) Install a new nudger roll by squeezing the metal shaft at both ends and sliding
it into place.
5. Remove the separator roll and install a new one.
a) Removethe separator roll by squeezing the metal shaft at both ends and lifting
it up and out of the tray.
Optional Devices Guide
1-27Xerox®Versant®3100 Press

Dual Advanced High Capacity Feeder (Trays 8 and 9)
b) Install a new separator roll by squeezing the metal shaft at both ends and sliding
it into place.
6. Close the bypass tray cover.
7. Verify that the tray is operating correctly by feeding paper from the bypass tray.
8. Either log in as the administrator or ask the administrator to perform the following
steps to reset the High Frequency Service Item (HFSI) count to zero (0):
a) At the control panel, press the Tools button.
b) From the screen that displays, select the Tools icon.
c) Select System Settings > Common Service Settings > Maintenance.
d) Use the up / down arrow buttons to access the next Maintenance screens.
e) Select the Technical Key Operator icon. The Technical Key Operator feature
displays.
f) Select the bypass roll items that corresponds with the newly-replaced components.
g) Select Reset Current Value. The system resets the High Frequency Service Item
(HFSI) to 0.
h) Exit the administrator mode by pressing the Log In / Out button on the control
panel. When prompted, select Logout.
Replacing the Tray 8/9 Feed Rolls
Use this procedure to replace the Tray 8/9 feed rolls.
Note
To perform this procedure, the feed roll kit is required. The kit contains all the required
items for replacing the feed rolls.
Important
If replacing the feed rolls for both trays, ensure to obtain two feed roll kits (one for each
tray).
Replace the Tray 8/9 feed rolls every 300,000 prints or when experiencing frequent
multifeeds, single feeds, or blank prints in the stack of the output prints.
Xerox®Versant®3100 Press1-28
Optional Devices Guide

Dual Advanced High Capacity Feeder (Trays 8 and 9)
The Tray 8/9 feed rolls which include the following components:
Nudger Roll
2. Feed Roll
3.1. Separator Roll (shown with the feed
roll removed)
1. To access the feed components , pull out the tray slowly until it stops.
2. Replace the nudger roll:
a) Remove the nudger roll by pushing down on the black tab with one hand (which
raises the roll upward) and then squeezing the metal shaft on both ends with
your other hand.
b) Lift out the nudger roll.
Optional Devices Guide
1-29Xerox®Versant®3100 Press

Dual Advanced High Capacity Feeder (Trays 8 and 9)
c) Install a new nudger roll by squeezing both ends of the metal shaft, and while
pushing down on the black tab, insert and release the roll ends into the notches.
3. To access the separator roll, remove the separator roll assembly at the side of the
tray:
a) Unscrew the three thumbscrews.
b) Slide the separator roll assembly all the way to the left so it is out of the slots.
c) Pull the assembly out towards you until completely removed from the tray., and
set aside the assembly.
4. With the separator roll assembly out, replace the feed roll:
a) To remove the feed roll, squeeze both ends of the metal shaft and lift out.
Xerox®Versant®3100 Press1-30
Optional Devices Guide

Dual Advanced High Capacity Feeder (Trays 8 and 9)
b) To install a new feed roll, squeeze both ends of the new roll shaft, insert and
release the roll ends into the notches.
5. Replace the separator roll:
a) To remove the roll from the assembly, squeeze the orange shafts of the separator
roll and lift out of the assembly.
b) Install a new separator roll into the black notches of the assembly using the same
technique.
6. Reinstall the separator roll assembly into the tray.
a) Align the cutout holes of the assembly with the frame of the tray so the pin holes
match up.
b) Insert the assembly into the frame.
c) Slide the assembly all the way to the right using the pin as a guideline.
Optional Devices Guide
1-31Xerox®Versant®3100 Press

Dual Advanced High Capacity Feeder (Trays 8 and 9)
d) Ensure the device is all the way into the slots and the three screw areas align.
e) Screw in the three thumbscrews to attach the assembly. Do not over tighten.
7. Close the tray and verify that the tray is operating successfully by feeding paper
using that tray.
8. Either log in as the administrator or ask the administrator to perform the following
steps to reset the High Frequency Service Item (HFSI) counters to zero (0) for each
component.
a) At the control panel, press the Tools button.
b) From the screen that displays, select the Tools icon.
c) Select System Settings > Common Service Settings > Maintenance.
d) Use the up / down arrow buttons to access the next Maintenance screens.
e) Select the Technical Key Operator icon.
The Technical Key Operator feature displays.
f) Select the item that corresponds with the newly-replaced components.
g) Select Reset Current Value. The system resets the High Frequency Service Item
(HFSI) to 0.
h) Repeat the previous steps until the counters for all three components are reset
to zero (0).
i) Exit administrator mode by pressing the Log In / Out button on the control panel
When prompted, select Logout.
Trays 8 and 9 Troubleshooting
Paper Jams in Trays 8 and 9
Paper Jams When the Bypass is Installed on Trays 8 and 9
Tip
Always ensure that all paper jams, including any small, ripped pieces of paper, are cleared
before proceeding with any print jobs.
1. Remove the paper currently loaded in the Bypass (Tray 5).
Xerox®Versant®3100 Press1-32
Optional Devices Guide

Dual Advanced High Capacity Feeder (Trays 8 and 9)
2. Lift and open the Top Cover of the Bypass (Tray 5).
3. Remove any jammed paper.
Note
If paper is torn, check inside the press and remove it.
4. Close the Top Cover of the Bypass (Tray 5).
5. Pull open the Top Drawer (located at the top of Trays 6 and 7).
Optional Devices Guide
1-33Xerox®Versant®3100 Press

Dual Advanced High Capacity Feeder (Trays 8 and 9)
6. Lift levers 2a and 2b, and remove any paper jams.
7. Close levers 2a and 2b.
8. Close the Top Drawer.
9. Reload paper into the tray and resume printing.
Paper Jams Inside Trays 8 and 9
1. Pull out the tray where the paper jam occurred.
2. Remove the jammed paper.
Note
If paper is torn, check inside the machine and remove it.
3. Gently push in the tray until it comes to a stop.
Trays 8 and 9 Paper Jams at Lever 1a and Knob 1c
1. Open the front cover of the feeder module.
Xerox®Versant®3100 Press1-34
Optional Devices Guide

Dual Advanced High Capacity Feeder (Trays 8 and 9)
2. Move the lever 1a to the right and turn the knob 1c to the right. Remove the jammed
paper.
Note
If paper is torn, check inside the machine and remove it.
3. Return the lever 1a to the original position.
4. Close the front cover of the feeder module.
Note
If the frontcover of the feeder module is not completely closed, a message will appear
and the machine will not operate.
Trays 8 and 9 Paper Jams at Lever 1b and Knob 1c
1. Open the front cover of the feeder module.
2. Move the lever 1b to the right and turn the knob 1c to the right. Remove the jammed
paper.
Note
If paper is torn, check inside the machine and remove it.
3. Return the lever 1b to the original position.
4. Close the front cover of the feeder module.
Note
If the frontcover of the feeder module is not completely closed, a message will appear
and the machine will not operate.
Optional Devices Guide
1-35Xerox®Versant®3100 Press

Dual Advanced High Capacity Feeder (Trays 8 and 9)
Trays 8 and 9 Paper Jams at Lever 1d and Knob 1c
1. Open the front cover of the feeder module.
2. Move the lever 1d upward and remove the jammed paper.
Note
If paper is torn, check inside the machine and remove it.
3. If the paper cannot be removed, turn the knob 1c clockwise, and then remove the
jammed paper.
4. Return the lever 1d to the original position.
5. Close the front cover of the feeder module.
Note
If the frontcover of the feeder module is not completely closed, a message will appear
and the machine will not operate.
Trays 8/9 Fault Messages
When an fault occurs, such as paper jams, open doors or covers, or a press malfunction,
the press stops printing, and a message appears on the press touch screen. A graphical
illustration shows the location of the fault with a brief explanation of corrective actions
forclearing the fault. If a fault occurs in more than one location, the illustration changes
to indicate the multiple locations and the required corrective actions.
The touch screen also displays a Faults button which provides information about the
fault and detailed instructions for correcting the fault. The (E) code on the upper-left
part of the Fault message displays which error indicator is lit on the Trays 8/9 indicator
panel (E1–E7).
Note
For information about faults and fault messages, refer to the press User Guide,
Troubleshooting chapter.
Xerox®Versant®3100 Press1-36
Optional Devices Guide

Dual Advanced High Capacity Feeder (Trays 8 and 9)
Trays 8/9 Fault Code Information
When an fault occurs, such as paper jams, open doors or covers, or a press malfunction,
the press stops printing, and a message appears on the press touch screen.
The touch screen also displays a Faults button which provides information about the
fault and detailed instructions for correcting the fault.
Tip
Trays 8 and 9 faults are identified by the codes which start with the three-digit number
“178.”
Trays 8 and 9 Specifications
SpecificationItem
Short Edge Feed (SEF):Sheet size
• 8.5 x 11 in. / A4
• 8.5 x 13 in.
• 8.5 x 14 in.
• 10 x 14 in. / B4
• 11 x 17 in. / A3
• 12 x 18 in.
• 12.6 x 17.7 in. / SRA3
• 13 x 18 in.
• 13 x 19 in.
• 12.6 x 19.2 in.
• B5
Long Edge Feed (LEF):
• B5
• 7.25 x 10.5 in. (executive)
• A4
• 8.5 x 11 in.
• 8.0 x 10 in.
Custom sizes: 182-330 mm (7.2-13 in.) Width and 182-488 mm (7.2-19.2
in.) Length
Optional Devices Guide
1-37Xerox®Versant®3100 Press

Dual Advanced High Capacity Feeder (Trays 8 and 9)
SpecificationItem
16 lb. to 130 lb. cover / 52-350 gsmPaper weight
Paper capacity
2,000 sheets per tray
Important
When using up to Xerox 24 lb. / 90 gsm paper.
Xerox®Versant®3100 Press1-38
Optional Devices Guide

2
Interface Decurler Module (IDM)
Important
The Interface Decurler Module is required with any inline finishing devices installed with
the system; it is not required with the Offset Catch Tray.
The Interface Decurler Module provides the following functions:
• Communication between the press and the attached finishing device
• An aligned paper path between the press and the attached finishing device, and
• Cooling and decurling of the paper as it exits the press.
Optional Devices Guide
2-1Xerox®Versant®3100 Press

Interface Decurler Module (IDM)
Interface Decurler Module (IDM) Components
2.1. IDM Front CoverPaper Jam / Error Indicator Panel
IDM Control Panel
4.1. Manual Curl Down ButtonPaper Jam / Error Indicator
2. 5.Curl Up/Down Indicators Auto Curl Button and Indicator
3. Manual Curl Up Button
For more informationabout the IDM curl correction feature, refer to IDM Curl Correction.
Xerox®Versant®3100 Press2-2
Optional Devices Guide

Interface Decurler Module (IDM)
IDM Curl Correction
Tip
The purpose of this curl correction is to fix paper curl as it leaves the press but before it
reaches the next inline-finishing device. Use the IDM curl correction feature while the
press is printing.
3.1. IDM Down-Curl Paper PathPrinted Media from the Press
2. 4.IDM Up-Curl Paper Path Printed Media From IDM to Inline
Finishing Device
As media enters the module, it is fed to the IDM decurler for paper curl correction. The
IDM decurler has both upper and lower decurler rolls that apply pressure to the media
based upon the following:
• System default (Auto on)
• Manual selections made from the IDM control panel
Based on the IDM paper curl correction settings, the decurler gate routes the paper to
either the up-curl (cupped) path, or the down-curl (bridged) path. The degree of pressure
is applied independently to the upward and downward decurler arms.
If you want to quickly, and at the point-of-need, adjust the paper curl on the printed
output, use the manual curl up or down buttons. If the printed output contains too much
curl after using these buttons, refer to the Stock LibraryManager Help on the print server
for information about adjusting the paper curl (Stock Library > Advanced Stock
Settings). Also refer to the Stock Library Manager Help, the section entitled “Correcting
Paper Curl.”
Fromthe IDM decurler, the print media is cooled and routed from the IDM to the optional
finishing device that is next inline and connected to the press.
Optional Devices Guide
2-3Xerox®Versant®3100 Press

Interface Decurler Module (IDM)
IDM Curl Correction Modes and Functions
Note
When an IDM curl correction mode is selected, the new mode is applied to the next
sheet that is delivered to the IDM.
FunctionModeIndicator
This is the default mode.Auto
• Automatically corrects the paper curl
by selecting the curl direction and
amount. This is based on the paper
size and orientation, and the finishing device that is receiving the output.
• When Auto is selected, the indicator
to the right of the button is lit.
• This mode has seven automated
settings for controlling paper curl:
three up-curl settings, three down-curl
settings, and off.
• When using the Auto mode, an indicator momentarily flashes on the
control panel. This indicates the
preselected curl direction and
amount that is being applied to the
paper.
Off
When this indicator is lit, for either the
Auto or Manual modes, no curl correction
is applied to the printed output.
Xerox®Versant®3100 Press2-4
Optional Devices Guide

Interface Decurler Module (IDM)
FunctionModeIndicator
Manual Upward Curling
Manual Downward
Curling
• When the printed output is curled
upwards, select the curl-up button.
• There are three upward curl correction values.
• The top three indicators show which
level of upward curl correction is selected.
• The top indicator is the highest
amount of upward curl correction
that can be applied to a printed output.
• When the printed output is curled
downwards, select the curl-down
button.
• There are three downward curl correction values.
• The top three indicators show which
level of downward curl correction is
selected.
• The bottom indicator is the lowest
amount of downward curl correction
that can be applied to a printed output.
Optional Devices Guide
2-5Xerox®Versant®3100 Press

Interface Decurler Module (IDM)
Pressing the curl-up button changes the curl correction levels as shown:
Pressing the curl-down button changes the curl correction levels as shown:
IDM Troubleshooting
IDM Paper Jams
The following occurs when there is an fault, such as paper jams, open doors or covers,
or a press malfunction:
• The press stops running and an fault message displays on the press touch screen.
• The message includes a graphical illustration showing the location of the fault along
with a brief explanation of corrective actions for clearing the fault.
• Paper jams may occur in multiple areas of the press and any optional devices
connected to the press. When this happens, the graphical illustration changes to
show the multiple locations and the required corrective actions.
• Additionally, if a fault occurs with an optional device, an indicator lights on that
device's control panel and shows the corresponding area on the device where the
fault occurred.
Always refer to the following information when clearing paper jams:
• Do not power off the press when removing paper jams.
• Paper jams can be removed with the press still powered on. When the power is turned
off, all information stored to the system's memory will be erased.
Xerox®Versant®3100 Press2-6
Optional Devices Guide

Interface Decurler Module (IDM)
• Clear all paper jams before resuming print jobs.
• Do not touch components inside the press. This can cause print defects.
• Ensure that all paper jams, including any small ripped pieces of paper, are cleared
before proceeding with print jobs.
• Gently remove the paper taking care not to tear it. If paper is torn, be sure to remove
all torn pieces.
• After removing paper jams, close all doors and covers. The press cannot print when
doors or covers are open.
• After clearing a paper jam, printing automatically resumes from the state before the
paper jam occurred.
• If all paper jams are not cleared, an error message continues to display on the press
touch screen. To clear any remaining jams, refer to the press touch screen for
instructions and information.
Clearing IDM Paper Jams
1. Open the IDM front cover.
2. Remove jammed paper:
a) Open lever 1a downward .
b) Turn knob 1b counterclockwise .
Important
To ensure the jammed paper exits the area, turn the knob a minimum of ten
(10) times or more.
c) Remove the jammed paper .
Important
Remove the jammed paper by carefully pulling it out of the area.
Optional Devices Guide
2-7Xerox®Versant®3100 Press

Interface Decurler Module (IDM)
3. Return lever 1a to its original position.
4. If you encounter difficulty when removing jammed paper, open lever 1c upward
and carefully remove jammed paper .
5. Return lever 1c to its original position.
6. Close the IDM front cover.
7. If required, follow the instructions on the press touch screen to clear other areas of
the system.
IDM Fault Messages
When an fault occurs, such as paper jams, open doors or covers, or a press malfunction,
the press stops printing, and a message appears on the press touch screen. A graphical
illustration shows the location of the fault with a brief explanation of corrective actions
forclearing the fault. If a fault occurs in more than one location, the illustration changes
to indicate the multiple locations and the required corrective actions.
The touch screen also displays a Faults button which provides information about the
fault and detailed instructions for correcting the fault.
Xerox®Versant®3100 Press2-8
Optional Devices Guide

Interface Decurler Module (IDM)
Note
For information about faults and fault messages, refer to the press User Guide,
Troubleshooting chapter.
IDM Fault Code Information
When an fault occurs, such as paper jams, open doors or covers, or a press malfunction,
the press stops printing, and a message appears on the press touch screen.
The touch screen also displays a Faults button which provides information about the
fault and detailed instructions for correcting the fault.
Tip
IDM faults are identified by the codes which start with the three-digit number “048.”
Optional Devices Guide
2-9Xerox®Versant®3100 Press

Interface Decurler Module (IDM)
Xerox®Versant®3100 Press2-10
Optional Devices Guide

3
Inserter
Note
This optional finishing device requires the Interface Decurler Module.
Use the Inserter to load stock, such blank, preprinted, or special stock, which is inserted
into the finished output. This stock serves as separators and covers for the finished
output. Paper fed from the Inserter is not printed on; however, the paper is placed into
the printed output at selected locations.
Note
The Inserter sometimes is referredto as the “post-process inserter” and/or the “interposer.”
Inserter Components
3.1. Inserter Front CoverTray T1 (Inserter Tray)
2. Inserter Control Panel
Optional Devices Guide
3-1Xerox®Versant®3100 Press

Inserter
Inserter Control Panel
DescriptionComponentNumber
Paper Jam / Error Indicator1
Curl Up/Down Indicators2
Important
Use one of the following buttons only if paper curl continues after setting the curl correction
level to the highest or lowest setting on the Interface Decurler Module (IDM). For information
about correcting paper curl from the Interface Decurler Module (IDM), refer to IDM Curl Cor-
rection.
This indicator lights when a
paper jam occurs in the Inserter.
Similar to the Interface Decurler Module (IDM), these indicators show the direction of the
curl correction. However, there
are only three curl correction
options for the Inserter:
• One upward curl correction;
this is the top indicator.
• One downward curl correction; this is the bottom indicator.
• Off (no curl correction); this
is the middle indicator.
Manual Curl Up Button3
Manual Curl Down Button4
Auto Curl Button
When the printed output is
curled upwards, select the curlup button.
When the printed output is
curled downwards, select the
curl-down button.
Automatically corrects the paper curl by selecting the curl
direction and amount.
Xerox®Versant®3100 Press3-2
Optional Devices Guide

Inserter
Paper and Media for Inserter Tray T1
Tip
Paper fed from the Inserter is not printed on; however, the paper is placed into the
printed output at selected locations.
Supported Paper for the Inserter Tray T1
Tray CapacityPaper WeightPaper Size
7.2 x 5.8 in. / 182 x 148 mm –
13 x 19.2 in. / 330 x 488 mm
(A3)
*
Note
Use Tray 5 when combining the following paper types and saddle stitch / bi-fold:
• Coated paper weighing 127 g/m2or less
• Blank sheets (unprinted paper) weighing 80 g/m2or less
If a tray other than Tray5 is used, the combination may cause misalignment of folding positions
and wrinkle.
52-350 gsm uncoated / 72-350
gsm coated *
250 sheets
(based on Colotech+90)
Loading Paper in Inserter Tray T1
Before using tray T1, review the following guidelines:
• Remove any remaining paper from the tray.
• Load all the paper required for the job into the tray.
• Touse saddle stitch / bi-foldoptions, ensure that the paper loaded in the main feeding
tray (for example, tray 1) is the same size as the paper loaded in tray T1.
• For supported paper information, refer to Supported Paper for the Inserter Tray T1.
To insert separator sheets or cover sheets, such as blank or preprinted sheets, use the
Inserter Tray T1. Paper loaded in tray T1 is inserted into the finished / printed output.
A maximum of 250 sheets (Colotech+90) may be loaded in tray T1.
Optional Devices Guide
3-3Xerox®Versant®3100 Press

Inserter
Tip
Paper fed from the Inserter is not printed on; however, the paper is placed into the
printed output at selected locations.
1. Load the paper, aligning all edges.
If the paper is preprinted, load the paper with the printed side facing up.
Note
Do not load paper above the maximum fill line. It may cause paper jams or press
malfunctions.
2. Hold the center of the paper guides and gently slide them to the desired paper size
so that they are touching the edges of the paper.
If the distance between the guides is too long or short relative to the paper, paper
jams may occur.
If set by the system administrator, the Tray Properties window displays on Stock
Library Manager on the print server.
3. From the Tray Properties window, enter or verify the correct paper information.
4. Select OK to save the information and close the Tray Properties window.
Printing on Special Media
Hole-punched Paper
Load hole-punched paper into tray T1 long-edge feed (LEF), and with the holes on the
right side when you face the front of the Inserter.
Xerox®Versant®3100 Press3-4
Optional Devices Guide

Inserter
Tab Stock
Load tab stock paper in tray T1 long-edge feed (LEF), and with the tabs on the left side
when you face the front of the Inserter.
Purge Function for Tray T1
If tray T1 runs out of paper, the press stops printing. When this happens, any printed
output leaving the press is delivered to the inline finishing device output tray.
Tip
Do not reuse the output that is ejected by the purge function as this may cause paper
jams.
Toprevent the purge function from occurring when tray T1 runs out of paper, the function
may be disabled / switched off from the press Tools mode.
Important
Only a system administrator for the press can change the setting for the purge function
for tray T1.
3-5Xerox®Versant®3100 Press
Optional Devices Guide

Inserter
Tray T1 Purge Function Settings
The purge function allows you to specify how the press behaves when tray T1 is used.
The purge function has two settings:
Standard
For each printed set that requires the inclusion of paper into the finished set, the press
checks that paper Is loaded in tray T1 before it starts printing.
This setting increases the waiting time between sets, and thereby causes decreased
productivity. However, paper purging does not occur even if tray T1 runs out of paper.
Speed First
The printer starts printing regardless of the paper status of tray T1.
This setting maintains productivity based on press productivity. However, paper is
purged from the press and the press stops printing when tray T1 runs out of paper.
Note
Speed First is the default setting for the tray T1 purge function.
Changing the Purge Function Setting for Tray T1
Important
The following procedure must be performed by a system administrator with press
administrator login authority.
1. Log in as the administrator.
2. Press the Tools button on the press control panel.
3. From the screen that displays, select the Tools icon.
4. Select System Settings > Common Service Settings.
5. Select Maintenance.
The Maintenance screen displays.
6. Use the up/down arrows to scroll through the Maintenance screens until you see
“Print Action When Using Tray T1 (Inserter).”
7. Select Print Action When Using Tray T1 (Inserter).
The Tray T1 purge function screen displays.
8. Select the desired purge function option:
• Standard: Select this option to switch off the purge function. It decreases
productivity, but the press continues to run even when tray T1 runs out of paper.
This may cause some printed output sets to be delivered to the designated finishing
tray without inserts.
• Speed First: This setting maintains productivity. Select this option to have the
press stop printing and purge paper when tray T1 runs out of paper.
Note
Speed First is the default setting.
9. Select Save / OK.
The Maintenance screen displays.
Xerox®Versant®3100 Press3-6
Optional Devices Guide

Inserter
10. Select Close.
The main Tools tab screen displays.
11. Exit the administrator mode.
Inserter Troubleshooting
Inserter Paper Jams
The following occurs when there is an fault, such as paper jams, open doors or covers,
or a press malfunction:
• The press stops running and an fault message displays on the press touch screen.
• The message includes a graphical illustration showing the location of the fault along
with a brief explanation of corrective actions for clearing the fault.
• Paper jams may occur in multiple areas of the press and any optional devices
connected to the press. When this happens, the graphical illustration changes to
show the multiple locations and the required corrective actions.
• Additionally, if a fault occurs with an optional device, an indicator lights on that
device's control panel and shows the corresponding area on the device where the
fault occurred.
Always refer to the following information when clearing paper jams:
• Do not power off the press when removing paper jams.
• Paper jams can be removed with the press still powered on. When the power is turned
off, all information stored to the system's memory will be erased.
• Clear all paper jams before resuming print jobs.
• Do not touch components inside the press. This can cause print defects.
• Ensure that all paper jams, including any small ripped pieces of paper, are cleared
before proceeding with print jobs.
• Gently remove the paper taking care not to tear it. If paper is torn, be sure to remove
all torn pieces.
• After removing paper jams, close all doors and covers. The press cannot print when
doors or covers are open.
• After clearing a paper jam, printing automatically resumes from the state before the
paper jam occurred.
Optional Devices Guide
3-7Xerox®Versant®3100 Press

Inserter
• If all paper jams are not cleared, an error message continues to display on the press
touch screen. To clear any remaining jams, refer to the press touch screen for
instructions and information.
Clearing Paper Jams from Inserter E1 Area
1. Open the T1 cover , and remove jammed papers and all the paper loaded in
the tray .
Note
When two or more sheets of paper are loaded, remove all sheets.
Fan the paper you removed, and make sure all four corners are aligned correctly.
2. Reload the paper into the tray.
3. Close the T1 cover.
Clearing Paper Jams from Inserter E2 Area
1. Open the Inserter front cover.
2. Open lever 1a upward and turn knob 1b counterclockwise .Removeany jammed
paper .
Xerox®Versant®3100 Press3-8
Optional Devices Guide

Inserter
3. Return lever 1a to its original position.
4. If you have difficulty when removing jammed paper, open lever 1c to the right
and turn knob 1b counterclockwise . Remove any jammed paper .
5. Return lever 1c to its original position.
6. Close the Inserter front cover.
Clearing Paper Jams from Inserter E3 Area
1. Open the Inserter front cover.
2. Open lever 1d downward and turn knob 1e counterclockwise . Remove any
jammed paper .
Optional Devices Guide
3-9Xerox®Versant®3100 Press

Inserter
Note
The jammed paper may be hidden behind the upper-left cover area.
3. Return lever 1d to its original position.
4. If you have difficulty when removing jammed paper, open lever 1a upward and
turn knob 1e counterclockwise . Remove any jammed paper .
5. Return lever 1a to its original position.
6. Close the Inserter front cover.
Xerox®Versant®3100 Press3-10
Optional Devices Guide

Inserter
Inserter Fault Messages
When an fault occurs, such as paper jams, open doors or covers, or a press malfunction,
the press stops printing, and a message appears on the press touch screen. A graphical
illustration shows the location of the fault with a brief explanation of corrective actions
forclearing the fault. If a fault occurs in more than one location, the illustration changes
to indicate the multiple locations and the required corrective actions.
The touch screen also displays a Faults button which provides information about the
fault and detailed instructions for correcting the fault. The (E) code on the upper-left
part of the Fault message displays which error indicator is lit on the Inserter control
panel (E1, E2, E3).
Note
For information about faults and fault messages, refer to the press User Guide,
Troubleshooting chapter.
Inserter Fault Code Information
When an fault occurs, such as paper jams, open doors or covers, or a press malfunction,
the press stops printing, and a message appears on the press touch screen.
The touch screen also displays a Faults button which provides information about the
fault and detailed instructions for correcting the fault.
Tip
Inserter faults are identified by the codes which start with the three-digit numbers “012,”
“013,” and “024.”
Optional Devices Guide
3-11Xerox®Versant®3100 Press

Inserter
Xerox®Versant®3100 Press3-12
Optional Devices Guide

4
®
GBC
The GBC®AdvancedPunch™Pro is an automatic hole punch module that integrates with
the press to streamline the production of reports, directories, pricing guides and other
bound books. It equals or betters traditional quality while saving time and increasing
productivity by eliminating the labor-intensive steps of manual punching. The compact
AdvancedPunchPro takes minimal space and accepts a variety of optional multiple hole
punch die sets.
The AdvancedPunch Pro may be connected to a variety of optional finishing devices
and sits inline with these devices.
Note
This optional finishing device requires the Interface Decurler Module.
AdvancedPunch™Pro
The AdvancedPunch Pro provides the following capabilities:
• A bigger range of media sizes and types
• Trail edge, LEF and SEF punching
• Full-bleed processing for common sizes including SRA4, oversized LTR and more
• Die set detection control panel shows die type and cycle count
• User Die set options include comb, wire, coil, and 3–7 hole varieties to enable most
popular binding formats
• Operates at rated print engine speed for most paper sizes
• Quick-change die sets that can be interchanged without any tools
• All die sets include an Identification Label providing the user with the hole pattern
and name
• Convenient storage area for two extra Die Sets which is located above the sheet
bypass on the device
4-1Xerox®Versant®3100 Press
Optional Devices Guide

GBC®AdvancedPunch™Pro
For detailed information and instructions for using the AdvancedPunch Pro, refer to the
guide on the customer documentation CD that came with the device, or go to
www.xerox.com for more information.
Xerox®Versant®3100 Press4-2
Optional Devices Guide

5
High Capacity Stacker (HCS)
Note
This optional finishing device requires the Interface Decurler Module.
The High Capacity Stacker (HCS) is an optional finishing device that provides
large-capacity stacking and offsetting capabilities for production output to a stacker
tray / cart. The HCS also provides a top tray convenient for short stack runs.
Optional Devices Guide
5-1Xerox®Versant®3100 Press

High Capacity Stacker (HCS)
High CapacityStacker (HCS) Components
DescriptionComponentNumber
Paper jam / error indicators1
Sample button2
Top tray4
Circuit breaker switch5
These indicators light when a paper jam occurs in HCS
areas E1-E8.
Press this button to have the HCS deliver a sample
sheet to the top tray.
The indicator to the left of the button blinks until a
sample sheet is delivered to the top tray.
Press this button to stop printing and remove paper.Unload button3
Receives the printed output, and sample sheets also
are delivered here.
Holds a maximum of 500 sheets (13 x 19.2 in. / 330 x
488 mm).
Note
When a second HCS or another inline finished devices
is installed, this tray is used as a paper path for transporting media through the HCS to another connected
finishing device.
The circuit breaker switch is located on the rear of the
HCS. This switch automatically shuts off electricity in
the event of electrical failure or a short circuit.
Open this cover to clear paper jams.Top cover6
Xerox®Versant®3100 Press5-2
Optional Devices Guide

High Capacity Stacker (HCS)
DescriptionComponentNumber
Stacker tray / cart7
Optional second HCS9
Collated sets (up to a total of 5000 sheets) are transported to the stacker tray, which is located on a movable stacker cart.
Open this door to remove paper / printed output.Front door8
A second, optional HCS can be added to the system
configuration for additional output productivity.
HCS Circuit Breaker
The HCS circuit breaker is located on the rear of the HCS unit.
2.1. On / Off SwitchTest Button
The circuit breaker switch is normally in the ON position.
Note
When an electrical interruption is detected, the circuit breaker automatically switches
off to discontinue the electrical flow to the HCS. For electrical information, refer to the
Versant 3100 Press Safety Guide.
Optional Devices Guide
5-3Xerox®Versant®3100 Press

High Capacity Stacker (HCS)
Output Trays
The High Capacity Stacker (HCS) has two output trays.
2.1. Stacker Tray / CartTop Tray
The Top Tray offers the following:
• Convenience for short stack runs (up to 500 sheets) without offsetting.
• Delivery of purged sheets.
Control Buttons
Sample button: Press this button to
output a sample sheet to the top tray.
2.1. Unload button: Press this button to
stop printing and remove paper.
Unloading the Stacker Tray / Cart
Note
The HCS may be unloaded while it is running.
1. Press the Unload button on the HCS control panel.
2. After the Unload Indicator lights, open the HCS front door.
3. Position the securing bar on top of the stacked paper.
4. Pull the Stacker Cart straight out of the HCS.
Xerox®Versant®3100 Press5-4
Optional Devices Guide

High Capacity Stacker (HCS)
5. Remove the securing bar.
6. Remove the paper from the stacker tray.
7. Push the empty Stacker Cart straight into the HCS.
8. Position the securing bar on the fixed area inside the HCS.
9. Close the front door; the tray will rise to the operate position.
HCS Troubleshooting
HCS Paper Jams
The following occurs when there is an fault, such as paper jams, open doors or covers,
or a press malfunction:
• The press stops running and an fault message displays on the press touch screen.
• The message includes a graphical illustration showing the location of the fault along
with a brief explanation of corrective actions for clearing the fault.
• Paper jams may occur in multiple areas of the press and any optional devices
connected to the press. When this happens, the graphical illustration changes to
show the multiple locations and the required corrective actions.
• Additionally, if a fault occurs with an optional device, an indicator lights on that
device's control panel and shows the corresponding area on the device where the
fault occurred.
Always refer to the following information when clearing paper jams:
• Do not power off the press when removing paper jams.
• Paper jams can be removed with the press still powered on. When the power is turned
off, all information stored to the system's memory will be erased.
• Clear all paper jams before resuming print jobs.
• Do not touch components inside the press. This can cause print defects.
• Ensure that all paper jams, including any small ripped pieces of paper, are cleared
before proceeding with print jobs.
• Gently remove the paper taking care not to tear it. If paper is torn, be sure to remove
all torn pieces.
• After removing paper jams, close all doors and covers. The press cannot print when
doors or covers are open.
Optional Devices Guide
5-5Xerox®Versant®3100 Press

High Capacity Stacker (HCS)
• After clearing a paper jam, printing automatically resumes from the state before the
paper jam occurred.
• If all paper jams are not cleared, an error message continues to display on the press
touch screen. To clear any remaining jams, refer to the press touch screen for
instructions and information.
Clearing Paper Jams from HCS Area E1
1. Open the HCS top cover.
2. Open lever 1b upward ( ) and remove jammed papers ( ).
3. Return lever 1b to its original position.
4. Close the HCS top cover.
5. If the press indicates there are additional paper jams, follow the instructions to clear
the paper and to resume printing.
Xerox®Versant®3100 Press5-6
Optional Devices Guide

High Capacity Stacker (HCS)
Clearing Paper Jams from HCS Area E2
1. Open the HCS top cover.
2. Open lever 1b upward ( ) and rotate knob 1a counterclockwise ( ); removejammed
papers ( ).
3. Return lever 1b to its original position.
4. Close the HCS top cover.
5. If the press indicates there are additional paper jams, follow the instructions to clear
the paper and to resume printing.
Optional Devices Guide
5-7Xerox®Versant®3100 Press

High Capacity Stacker (HCS)
Clearing Paper Jams from HCS Area E3
1. Open the HCS top cover.
2. Open lever 1b upward ( ) and rotate knob 1a counterclockwise ( ); removejammed
papers ( ).
3. Return lever 1b to its original position.
4. Open lever 2b upward ( ) and turn knob 2c counterclockwise ( ); remove jammed
papers ( ).
Xerox®Versant®3100 Press5-8
Optional Devices Guide

High Capacity Stacker (HCS)
5. Return lever 2b to its original position.
6. Close the HCS top cover.
7. If the press indicates there are additional paper jams, follow the instructions to clear
the paper and to resume printing.
Clearing Paper Jams from HCS Area E4
1. Open the HCS top cover.
2. Open lever 2a downward ( ) and remove jammed papers( ).
3. Return lever 2a to its original position.
4. Close the HCS top cover.
Optional Devices Guide
5-9Xerox®Versant®3100 Press

High Capacity Stacker (HCS)
5. If the press indicates there are additional paper jams, follow the instructions to clear
the paper and to resume printing.
Clearing Paper Jams from HCS Area E5
1. Open the HCS top cover.
2. Open lever 2b upward ( ) and turn knob 2c counterclockwise ( ); remove jammed
papers ( ).
3. Return lever 2b to its original position.
4. Close the HCS top cover.
5. If the press indicates there are additional paper jams, follow the instructions to clear
the paper and to resume printing.
Xerox®Versant®3100 Press5-10
Optional Devices Guide

Clearing Paper Jams from HCS Area E6
1. Press the Unload button.
2. Make sure the HCS front door is unlocked and then open it.
High Capacity Stacker (HCS)
3. Pull out the stacker cart slowly and remove any jammed paper.
4. Push the stacker cart back into its original position.
5. Close the HCS front door.
6. If the press indicates there are additional paper jams, follow the instructions to clear
the paper and to resume printing.
Optional Devices Guide
5-11Xerox®Versant®3100 Press

High Capacity Stacker (HCS)
Clearing Paper Jams from HCS Area E7
1. Remove any output delivered to the top tray.
2. Open the HCS top cover.
3. Open lever 1b upward ( ) and remove jammed papers ( ).
4. Return lever 1b to its original position.
Xerox®Versant®3100 Press5-12
Optional Devices Guide

High Capacity Stacker (HCS)
5. Open lever 2a downward ( ) and remove jammed paper ( ).
6. Return lever 2a to its original position.
7. Close the HCS top cover.
8. If the press indicates there are additional paper jams, follow the instructions to clear
the paper and to resume printing.
HCS Fault Messages
When an fault occurs, such as paper jams, open doors or covers, or a press malfunction,
the press stops printing, and a message appears on the press touch screen. A graphical
illustration shows the location of the fault with a brief explanation of corrective actions
forclearing the fault. If a fault occurs in more than one location, the illustration changes
to indicate the multiple locations and the required corrective actions.
The touch screen also displays a Faults button which provides information about the
fault and detailed instructions for correcting the fault. The (E) code on the upper-left
part of the Fault message displays which error indicator is lit on the HCS control panel
(E1–E8).
Note
For information about faults and fault messages, refer to the press User Guide,
Troubleshooting chapter.
HCS Fault Code Information
When an fault occurs, such as paper jams, open doors or covers, or a press malfunction,
the press stops printing, and a message appears on the press touch screen.
The touch screen also displays a Faults button which provides information about the
fault and detailed instructions for correcting the fault.
5-13Xerox®Versant®3100 Press
Optional Devices Guide

High Capacity Stacker (HCS)
Tip
HCS faults are identified by the codes which start with the three-digit numbers “049.”
Additional HCS Troubleshooting Information
Hints and Tips for Using the HCS
Refer to the following hints and tips when using the HCS:
1. Check the paper in the the applicable HCS tray for curl.
a) If no curl is present and if the output is acceptable (meets customer satisfaction),
you are finished.
b) If no curl is present and if the output is not acceptable, call for service.
c) If curl is present, continue to the next step.
2. To correct the paper curl, use the paper curl correction controls on the top of the
Interface Decurler Module (IDM); refer to IDM Curl Correction.
3. If the output has not improved, adjust the paper curl again.
4. If the output still has not improved, call the Customer Support Center.
HCS Specifications
SpecificationItem
Top tray500 sheetsTray capacity
Stacker tray / cart5,000 sheets
Note
The values are based on paper less than 80 g/m
2
Xerox®Versant®3100 Press5-14
Optional Devices Guide

High Capacity Stacker (HCS)
SpecificationItem
Top trayPaper size
cart
MinimumStandard size
Maximum
HeightCustom size
Width
Maximum
HeightCustom size
Width
Postcard
4 x 6 in.
100 x 148 mm
13 x 19 in.
A3
3.9–13 in.
98.0–330.2 mm
6-26 in.
148.0–660.4 mm
JIS BSMinimumStandard sizeStacker tray /
13 x 19 in.
A3
8–13 in.
203.0–330.2 mm
7.2–19.2 in.
182.0–488.0 mm
Top TrayPaper weight
Stacker tray /
cart
52–350 g/m
52–300 g/m
2
2
HCS Media Guidelines
• Stacker tray / cart accepts 52-350 g/m2(either coated or uncoated stock) with the
possibility of degradedstock quality and increased jam rate forstocks that are heavier
than 300 gsm.
• Transparencies may be run to either the top tray or the stacker tray / cart. Stack
height should be limited to 100 transparencies.
• Coated paper lighter than 100 g/m2may not run as reliably as coated paper heavier
than 100 g/m2.
• Non-standard papers longer than 305 mm (12 in.) in the feed direction require 210
mm (8.3 in.) minimum measurement across the feed direction.
• Non-standard papers shorter than 254 mm (10 in.) in the cross-feed direction require
330 mm (13 in.) minimum measurement in the feed direction.
Optional Devices Guide
5-15Xerox®Versant®3100 Press

High Capacity Stacker (HCS)
Xerox®Versant®3100 Press5-16
Optional Devices Guide

6
Two-Sided Trimmer
Note
This optional finishing device requires the Interface Decurler Module.
The Two-Sided Trimmer is an optional finishing device that provides trimming on two
sides of the output.
• Trims 0.24–0.99 in. (6–25 mm from) the top and bottom of prints or booklets to
produce an even edge.
• When paired with the SquareFold®Trimmer,all sides of booklets are trimmed except
the binding, which enables full-bleed booklets; for information, refer to SquareFold
Trimmer.
• Trims paper sizes 7.2 x 10.1 in. (182 x 257 mm) to 13 x 19.2 in. (330 x 488 mm).
• Handles uncoated paper 52–350 gsm or coated paper 106–350 gsm.
Optional Devices Guide
6-1Xerox®Versant®3100 Press

Two-Sided Trimmer
Two-Sided Trimmer Components
DescriptionComponentNumber
1
2
Paperjam / error indicator
Trimmer Waste Container Full indicator
Lower cover4
This indicator lights when a paper jam occurs.
If the indicator is blinking, you must clear the paper
jam before printing can resume.
This indicators lights when it is time to empty the
TrimmerWaste Container and blinks when the container is full.
Open this cover to clear paper jams.Upper cover3
Open this cover to empty the Trimmer WasteContainer.
Two-Sided Trimmer Maintenance
Emptying the Two-Sided Trimmer Waste Container
When the trimmer waste container is nearing the full condition, an indicator lights on
the top of the Two-Sided Trimmer.
Note
The waste container may be emptied before it reaches its full condition, and it may be
emptied while the printer is running.
Once the waste container reaches the full condition, the indicator changes from a steady
lighted condition to blinking, and a message displays on the press indicating the waste
container is full.
Xerox®Versant®3100 Press6-2
Optional Devices Guide

Perform the following steps to empty the trimmer waste container.
1. Open the lower cover of the Two-Sided Trimmer.
Two-Sided Trimmer
2. Pull out and remove the waste container.
3. Discard all waste.
Important
Ensure that the waste container is empty. If waste or debris remains in the container,
the trimmer may malfunction.
Optional Devices Guide
6-3Xerox®Versant®3100 Press

Two-Sided Trimmer
4. To ensure that all waste / debris is removed, especially beneath the frame that is
located behind the container, use the poker to remove any remaining waste from
inside the trimmer.
5. Return the poker to its original position on the inside of the lower cover.
6. Reinsert the waste container and push it in fully.
7. Close the lower cover.
Two-Sided Trimmer Troubleshooting
Two-Sided Trimmer Paper Jams
The following occurs when there is an fault, such as paper jams, open doors or covers,
or a press malfunction:
Xerox®Versant®3100 Press6-4
Optional Devices Guide

Two-Sided Trimmer
• The press stops running and an fault message displays on the press touch screen.
• The message includes a graphical illustration showing the location of the fault along
with a brief explanation of corrective actions for clearing the fault.
• Paper jams may occur in multiple areas of the press and any optional devices
connected to the press. When this happens, the graphical illustration changes to
show the multiple locations and the required corrective actions.
• Additionally, if a fault occurs with an optional device, an indicator lights on that
device's control panel and shows the corresponding area on the device where the
fault occurred.
Always refer to the following information when clearing paper jams:
• Do not power off the press when removing paper jams.
• Paper jams can be removed with the press still powered on. When the power is turned
off, all information stored to the system's memory will be erased.
• Clear all paper jams before resuming print jobs.
• Do not touch components inside the press. This can cause print defects.
• Ensure that all paper jams, including any small ripped pieces of paper, are cleared
before proceeding with print jobs.
• Gently remove the paper taking care not to tear it. If paper is torn, be sure to remove
all torn pieces.
• After removing paper jams, close all doors and covers. The press cannot print when
doors or covers are open.
• After clearing a paper jam, printing automatically resumes from the state before the
paper jam occurred.
• If all paper jams are not cleared, an error message continues to display on the press
touch screen. To clear any remaining jams, refer to the press touch screen for
instructions and information.
Clearing Paper Jams from Trimmer Area E1
1. Open the trimmer upper cover.
2. Open lever 1a downward ( ), lever 1b downward ( ) and lever 1d upward ( ).
Remove jammed paper ( ).
Note
Check behind the upper cover for any hidden jammed paper.
Optional Devices Guide
6-5Xerox®Versant®3100 Press

Two-Sided Trimmer
3. If you have difficulty removing any paper jams, rotate knob 1c clockwise ( ), and
remove the jammed paper ( ).
4. Return levers 1a, 1b and 1d to their original positions.
5. Close the trimmer upper cover.
6. If the press indicates there are additional paper jams, follow the instructions to clear
the paper and to resume printing.
Clearing Paper Jams from Trimmer Area E2
1. Open the trimmer upper cover.
Xerox®Versant®3100 Press6-6
Optional Devices Guide

Two-Sided Trimmer
2. Rotate knob 2 counterclockwise to align the mark on the knob with the unlock position
(a mark resembling an open padlock).
3. Open lever 1a downward ( ) and lever 1b downward ( ).
4. Turn knob 1c clockwise ( ) and remove jammed papers ( ).
5. Return levers 1a and 1b to their original positions.
Optional Devices Guide
6-7Xerox®Versant®3100 Press

Two-Sided Trimmer
6. If you have difficulty removing any paper jams, open lever 1d upward ( ) and lever
2a to the left ( ).
7. Rotate knob 2b counterclockwise ( ) and remove jammed papers ( ).
8. Return levers 1d and 2a to their original positions.
9. Close the trimmer upper cover.
10. If the press indicates there are additional paper jams, follow the instructions to clear
the paper and to resume printing.
Clearing Paper Jams from Trimmer Area E3
1. Open the trimmer upper cover.
Xerox®Versant®3100 Press6-8
Optional Devices Guide

Two-Sided Trimmer
2. Rotate knob 2 counterclockwise to align the mark on the knob with the unlock position
(a mark resembling an open padlock).
3. Open lever 2c downward ( ) and remove jammed paper ( ).
Note
Check behind the upper cover for any hidden jammed paper.
4. Return lever 2c to its original position.
5. Close the trimmer upper cover.
6. If the press indicates there are additional paper jams, follow the instructions to clear
the paper and to resume printing.
Optional Devices Guide
6-9Xerox®Versant®3100 Press

Two-Sided Trimmer
Clearing Paper Jams from Trimmer Area E4
1. Open the trimmer upper cover.
2. Open lever 2c downward ( ), lever 2d upward ( ) and lever 2e to the right ( ).
3. Rotate knob 2f clockwise ( ) and remove jammed paper ( ).
Note
Grasp the lead edge of the jammed sheet, and gently pull out the sheet to remove
it.
4. If you have difficulty removing the jammed sheet, grasp the top edge at the
inner-right side of the sheet, and gently pull out the sheet to remove it.
Xerox®Versant®3100 Press6-10
Optional Devices Guide

Two-Sided Trimmer
5. Return levers 2e ( ), 2d ( ) and 2c ( ) to their original positions.
6. Close the trimmer upper cover.
7. If the press indicates there are additional paper jams, follow the instructions to clear
the paper and to resume printing.
Clearing Paper Jams from Trimmer Area E5
1. Open the trimmer upper cover.
2. Open lever 3a to the right ( ), lever 3b to the left ( ).
3. Rotate knob 3c clockwise ( ) and remove jammed paper ( ).
Optional Devices Guide
6-11Xerox®Versant®3100 Press

Two-Sided Trimmer
4. Rotate knob 2f counterclockwise ( ) and remove jammed paper ( ).
5. Return levers 3a and 3b to their original positions.
6. Close the trimmer upper cover.
7. If the press indicates there are additional paper jams, follow the instructions to clear
the paper and to resume printing.
Clearing Paper Jams from Trimmer Area E6
1. Open the trimmer upper cover.
2. Open lever 3a to the right ( ), lever 4b downward ( ) and lever 4c to the right ( ).
Remove jammed paper ( ).
Xerox®Versant®3100 Press6-12
Optional Devices Guide

Two-Sided Trimmer
3. Rotate knob 4d counterclockwise ( ) and remove jammed paper ( ).
4. Open lever 4a to the right ( ) and rotate knob 2f counterclockwise ( ). Remove
jammed paper ( ).
Note
Hold lever 4a while rotating knob 2f.
5. Rotate knob 3c clockwise ( ) and remove jammed paper ( ).
6. Return levers 3a, 4b and 4c to their original positions.
7. Close the trimmer upper cover.
Optional Devices Guide
6-13Xerox®Versant®3100 Press

Two-Sided Trimmer
8. If the press indicates there are additional paper jams, follow the instructions to clear
the paper and to resume printing.
Clearing Paper Jams from Trimmer Area E7
1. Open the trimmer upper cover.
2. Open lever 3a to the right ( ) and rotate knob 2f counterclockwise ( ).
Note
Rotate the knob five times or more.
3. Pull out and push in the trimmer waste container continuously for three times or
more.
Xerox®Versant®3100 Press6-14
Optional Devices Guide
 Loading...