

Page 1

Versant 3100 Press
Printer Unit Manual
Page 2
Microsoft product screen shots reprinted with permission from Microsoft Corporation.
In this manual, safety instructions are preceded by the symbol . Always read and follow the instructions
before performing the required procedures.
It may be a legal offence to print currency notes, certificates of stocks and securities, or any other documents of
similar nature, regardless of whether they will be used.
If a malfunction occurs with the machine's hard disk or other storage media, any received or stored data including registered configurations may be lost. Fuji Xerox is not responsible for any direct or indirect damages arising
from or caused by such data loss.
Fuji Xerox is not responsible for any breakdown of machines due to infection of computer virus or computer hacking.
Important
1. This manual is copyrighted with all rights reserved. Under the copyright laws, this manual may not be copied
or modified in whole or part, without the written consent of the publisher.
2. Parts of this manual are subject to change without prior notice.
3. We welcome any comments on ambiguities, errors, omissions, or missing pages.
4. Never attempt any procedure on the machine that is not specifically described in this manual. Unauthorized
operation can cause faults or accidents. Fuji Xerox is not liable for any problems resulting from unauthorized
operation of the equipment.
An export of this product is strictly controlled in accordance with Laws concerning Foreign Exchange and Foreign Trade of Japan and/or the export control regulations of the United States.
Xerox, Xerox and Design, Fuji Xerox and Design, Versant as well as CentreWare are registered trademarks or trademarks of Xerox Corporation in Japan and/or other countries.
Other company names or product names are registered trademarks or trademarks of each company.
2
Printer Unit Manual
Page 3

Preface
Fuji Xerox Co.,Ltd.
Thank you for selecting the Versant 3100 Press.
The Versant 3100 Press is a color printing system that quickly processes data from client computers and
delivers high-quality outputs. The Versant 3100 Press consists of the printer unit and a variety of optional
units as well as a Print Server.
The Versant 3100 Press offer high-speed color printing: up to 100 sheets/minute (A4) (the actual speed
depends on the size, type, and weight of paper).
This manual is intended to provide first-time users of the Versant 3100 Press with necessary information
such as operating procedures, daily maintenance, and precautions on using the printer unit.
Before using the Versant 3100 Press, please read this manual thoroughly to obtain the best performance
of the Versant 3100 Press.
After reading this manual, please keep it in a safe place for further reference. It will be useful in case you
forget how to perform operations or if a problem occurs with the printer.
For information on functions and operations of the Print Server, refer to customer documentation supplied
with Print Servers.
Preface
3
Page 4

Table of Contents
Preface...................................................................................................................................................................................................................................... 3
Table of Contents................................................................................................................................................................................................................. 4
Types of Manuals................................................................................................................................................................................................................. 6
Using This Manual ............................................................................................................................................................................................................... 7
Features of Versant 3100 Press...................................................................................................................................................................................... 8
Chapter 1 Before Using the Machine.......................................................................................... 9
1.1 Machine Components ...............................................................................................................................................9
1.2 Power On/Off .............................................................................................................................................................12
1.2.1 Powering On ...................................................................................................................................................................12
1.2.2 Powering Off .................................................................................................................................................................. 13
1.2.3 Main Power Switch...................................................................................................................................................... 14
1.2.4 Circuit Breaker Switch ................................................................................................................................................14
1.3 Image Printable Area and Assured Image Area.......................................................................................... 15
Chapter 2 Load and Output Paper.............................................................................................17
2.1 Paper Types ................................................................................................................................................................ 17
2.1.1 Recommended Paper.................................................................................................................................................17
2.1.2 Supported Paper........................................................................................................................................................... 18
2.1.3 Storing and Handling Paper....................................................................................................................................23
2.2 Output Paper.............................................................................................................................................................. 24
2.3 Loading Paper............................................................................................................................................................ 25
2.3.1 Loading Paper in Trays .............................................................................................................................................. 25
2.3.2 Loading paper in High Capacity Trays ............................................................................................................... 27
2.3.3 Loading paper in Bypass Tray ................................................................................................................................ 31
4
Printer Unit Manual
Page 5

Chapter 3 Problem Solving ...........................................................................................................33
3.1 Troubleshooting........................................................................................................................................................ 33
3.1.1 Printing Troubles ..........................................................................................................................................................34
3.1.2 Image Quality Trouble .............................................................................................................................................. 37
3.2 Paper Jams in the Printer Unit............................................................................................................................ 41
3.2.1 Paper Jams in the Transfer Module ..................................................................................................................... 41
3.2.2 Paper Jams in Tray ...................................................................................................................................................... 44
3.2.3 Paper Jams in the Paper Feeding Unit ............................................................................................................... 45
3.2.4 Long Paper Jam ............................................................................................................................................................ 47
3.3 Paper Jams in the Printer Output Unit ............................................................................................................ 48
3.3.1 Paper Jams in the Cooling Unit ............................................................................................................................. 48
3.3.2 Paper Jams inside the Cover................................................................................................................................... 51
3.3.3 Paper Jams in the Output Area.............................................................................................................................. 54
3.4 Paper Jams in the High Capacity Feeder C3-DS.......................................................................................... 55
3.4.1 Paper Jams in Tray ...................................................................................................................................................... 55
3.4.2 Paper Jams inside the Right Side Cover .............................................................................................................57
Chapter 4 Maintenance .................................................................................................................60
4.1 Consumables.............................................................................................................................................................. 60
4.1.1 Replacing the Toner Cartridge............................................................................................................................... 61
4.1.2 Replacing the Waste Toner Bottle ....................................................................................................................... 63
4.2 Full Width Array ........................................................................................................................................................ 65
4.3 Cleaning the Printer ................................................................................................................................................ 66
4.3.1 Cleaning Chute ............................................................................................................................................................. 68
4.3.2 Cleaning High Capacity Trays................................................................................................................................ 70
4.3.3 Cleaning the Paper Feeding Unit in the High Capacity Tray ................................................................... 72
Chapter 5 Appendix.........................................................................................................................75
5.1 Specifications............................................................................................................................................................. 75
5.2 Optional Components ............................................................................................................................................ 78
Index ...................................................................................................................................................................................................................................... 80
Table of Contents
5
Page 6

Types of Manuals
Refer
The Versant 3100 Press comes bundled with the following manuals:
For information on functions and operations of the Print Server, refer to customer documentation supplied
with Print Servers.
Some of them come with manuals. The manuals for optional components describe all the necessary steps
for using the optional components and installing the software.
For details on the functions of your 3rd Vendor Finisher or GBC® AdvancedPunch™ Pro, refer to the manual
supplied with the device.
PDF Manual
The Manuals are stored as PDF files on the Versant 3100 Press Instruction Manuals CD.
Double-click "index.html" and select the language of the manual you wish to display.
Versant 3100 Press Printer Unit Manual (this manual)
Describes how to load paper, how to replace consumables, how to clear paper jams, and the daily maintenance procedures for the printer unit. (These descriptions are also applied to the printer unit equipped
with Offset Catch Tray.)
Versant 3100 Press Optional Units Manual
Describes how to replace consumables and how to clear paper jams in the optional units (High Capacity
Stacker, Finisher, and others).
Versant 3100 Press User Interface Manual
Describes the operations of the user interface (UI) for operating the printer.
The user interface allows you to confirm status of the printer, and to set the printer behavior.
Versant 3100 Press Paper Jams: Quick Access Guide
Illustrates possible paper jam areas, allowing you to quickly identify a paper jam location.
HTML Manual
Stock Library Manager Manual
Describes Stock Library Manager with which you can change the paper settings.
The manual can be viewed from the [Help] menu of Stock Library Manager.
CentreWare Internet Services Help
The help describes CentreWare Internet Services where you can change various settings of the printer
using a client computer.
Click [Help] in the upper right corner of CentreWare Internet Service window to display the help.
6
To display the online help for CentreWare Internet Services, users need to have the environment to connect
Important
to the Internet. The communication fee shall be borne by you.
Paper Manual
Versant 3100 Press Safety Notes
Provides information for using the printer safely. Read this manual before using the printer.
Printer Unit Manual
Page 7

Using This Manual
Important
Note
Refer
This manual is intended to provide first-time users of the Versant 3100 Press with necessary information
such as operating procedures, daily maintenance, and precautions on using the printer unit.
Organization of This Manual
This manual consists of the following chapters:
Chapter 1 Before Using the Machine
Describes machine components, powering on/off the machine, and other information required before
using the machine. Please read this chapter first.
Chapter 2 Load and Output Paper
Describes sizes and types of supported paper, precautions for handling paper stocks, and how to load and
output paper. Read this chapter when loading paper.
Chapter 3 Problem Solving
Describes how to deal with paper jams, error messages, unsatisfactory print quality, or other problems.
Read this chapter when a problem occurs.
Chapter 4 Maintenance
Describes procedures for daily maintenance such as replacing Toner Cartridges or other consumables.
Chapter 5 Appendix
Describes specifications of the machine.
Conventions
This manual uses the following symbols:
Indicates important information you have to know or be reminded before operations.
Indicates supplemental information useful for operations.
Indicates references to other chapters and manuals.
< > Indicates the Control Panel, and buttons and lamps on the printer or optional units.
[ ] Indicates the names of tabs, options, buttons, menus and file names on the touch screen
display.
> Indicates the path to the touch screen. e.g. [XXX] > [XXX]
" " Indicates the names of reference sections in this manual, characters to be entered, path
names, and messages.
XXX Manual Indicates the names of the reference manuals.
Illustrations in This Manual
All illustrations contained in this manual are of the product equipped with Offset Catch Tray.
Using This Manual
7
Page 8
Features of Versant 3100 Press
Refer
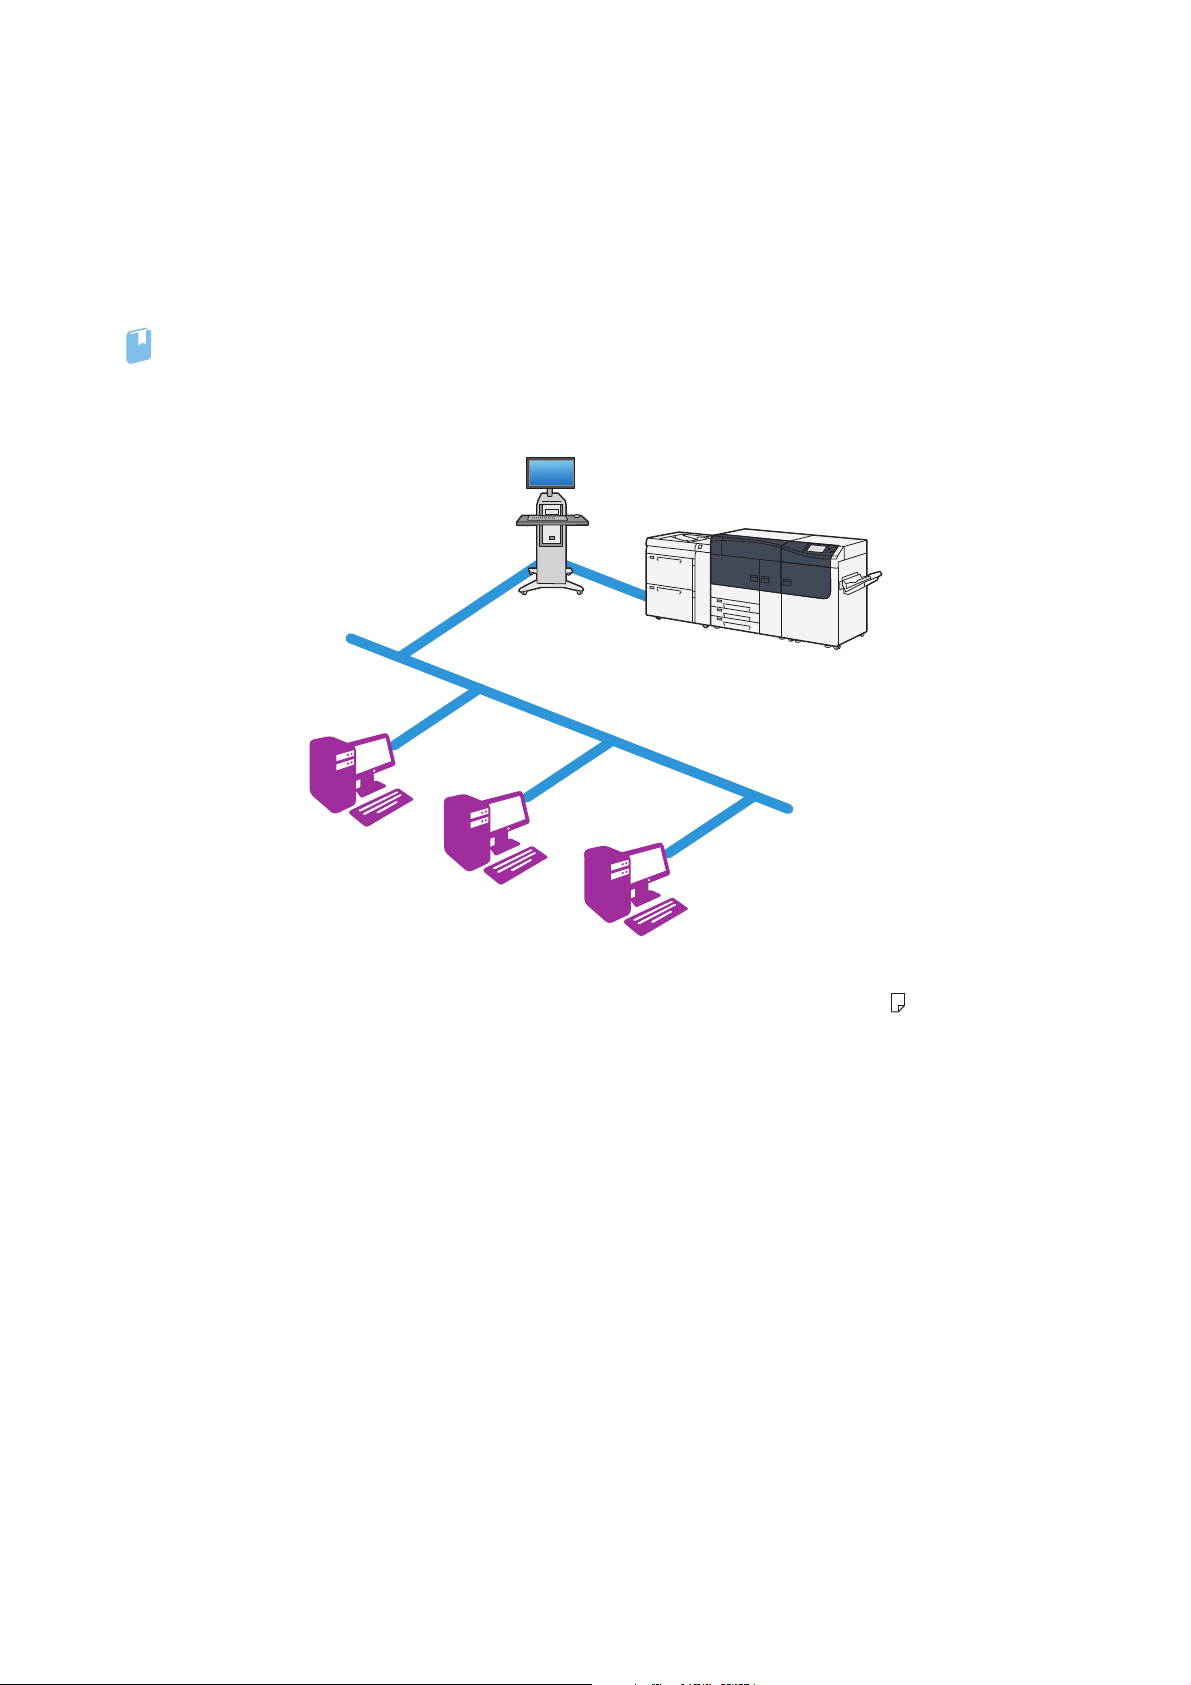
Print Server
Client Computers
Printer
The Versant 3100 Press is a color printing system that quickly processes data from client computers and
delivers high-quality outputs.
The standard configuration consists of the Versant 3100 Press printer unit and a Print Server.
For information on the optional units other than Offset Catch Tray, refer to Optional Units Manual.
In this manual, a computer storing the software for the printer is called a "client computers".
High-speed, high-quality color printing
The Versant 3100 Press offer high-speed color printing: up to 100 sheets/minute (A4 ) (the actual speed
depends on the size, type, and weight of paper), with the image quality of 2,400 dpi.
A wide range of paper types supported, including 52 - 350 g/m2 paper, transparency, and
coated paper
The printer runs under optimal conditions for the paper type specified by the user.
8
Printer Unit Manual
Page 9
Chapter 1
9
10
5
123
4
6
7
8
1.1 Machine Components.............................................................................. 9
1.2 Power On/Off .............................................................................................12
1.3 Image Printable Area and Assured Image Area..........................15
Before Using the Machine
1.2.1 Powering On .......................................................................................................... 12
1.2.2 Powering Off ......................................................................................................... 13
1.2.3 Main Power Switch ............................................................................................. 14
1.2.4 Circuit Breaker Switch........................................................................................ 14
1.1
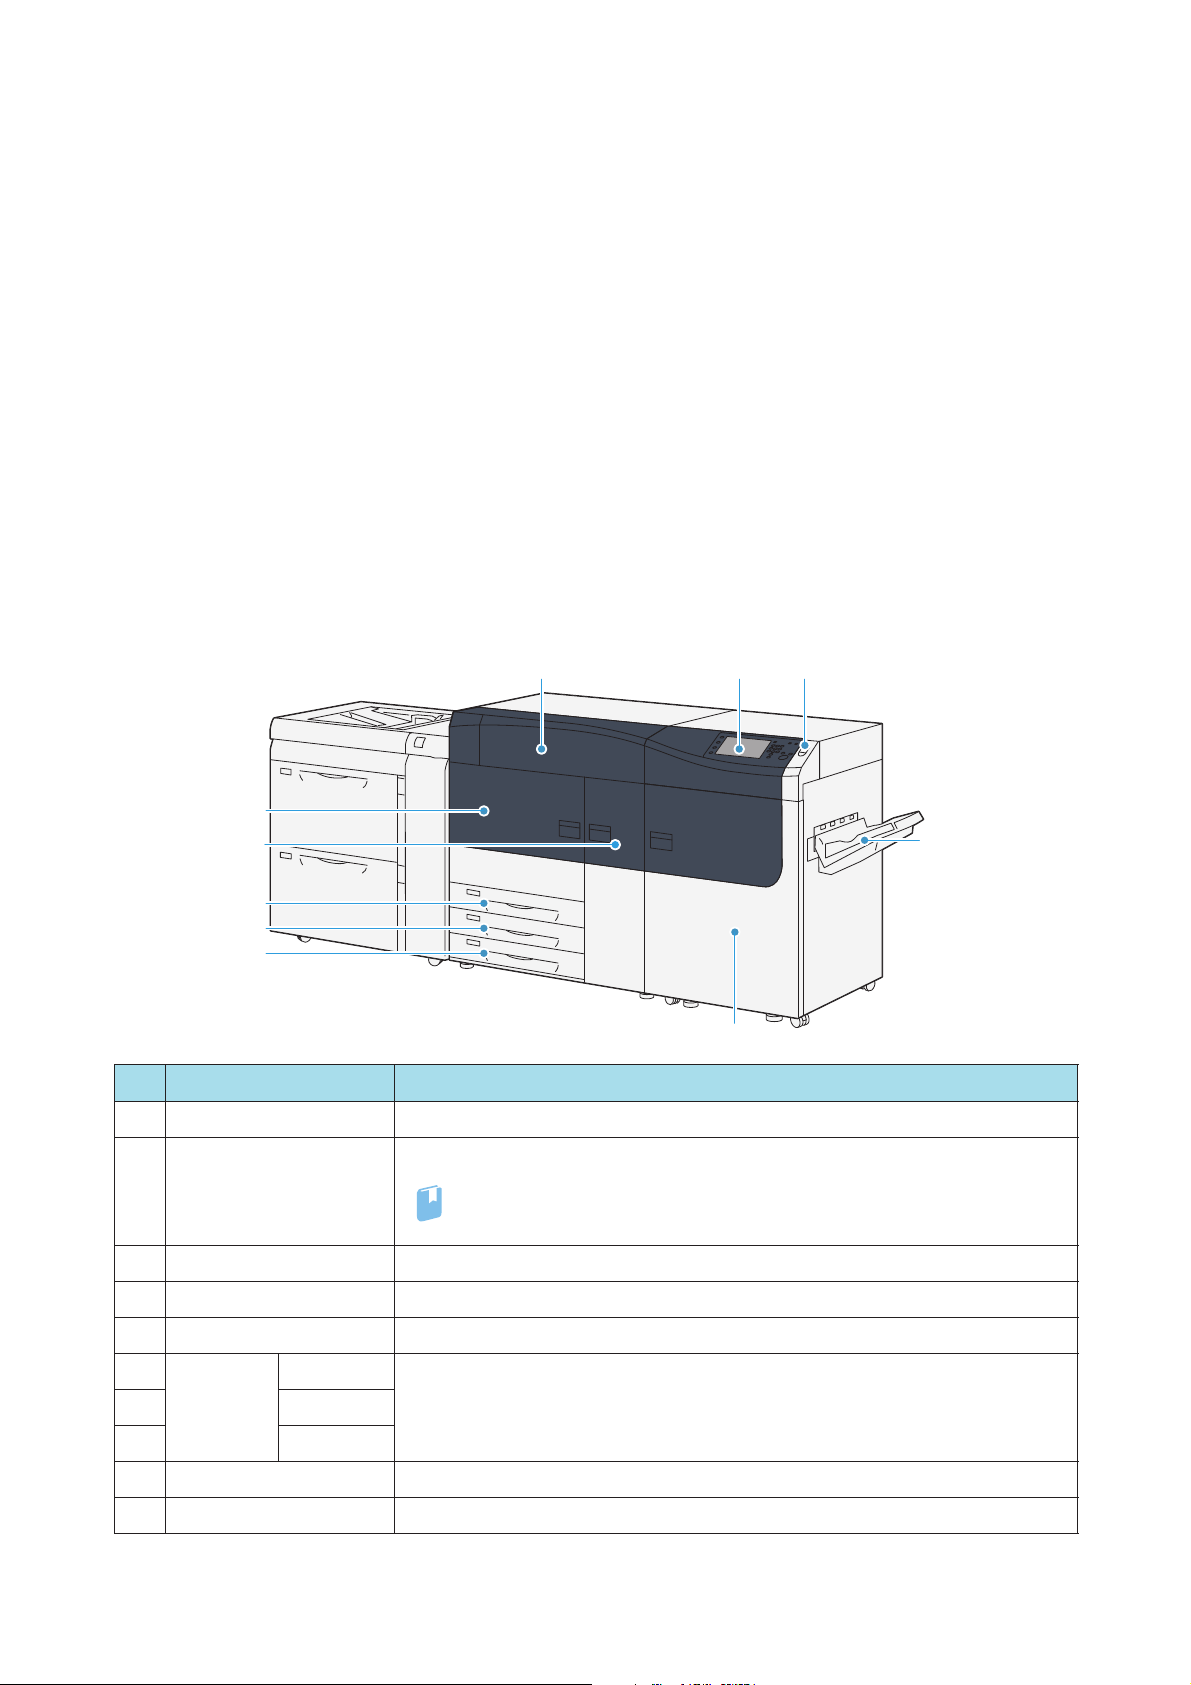
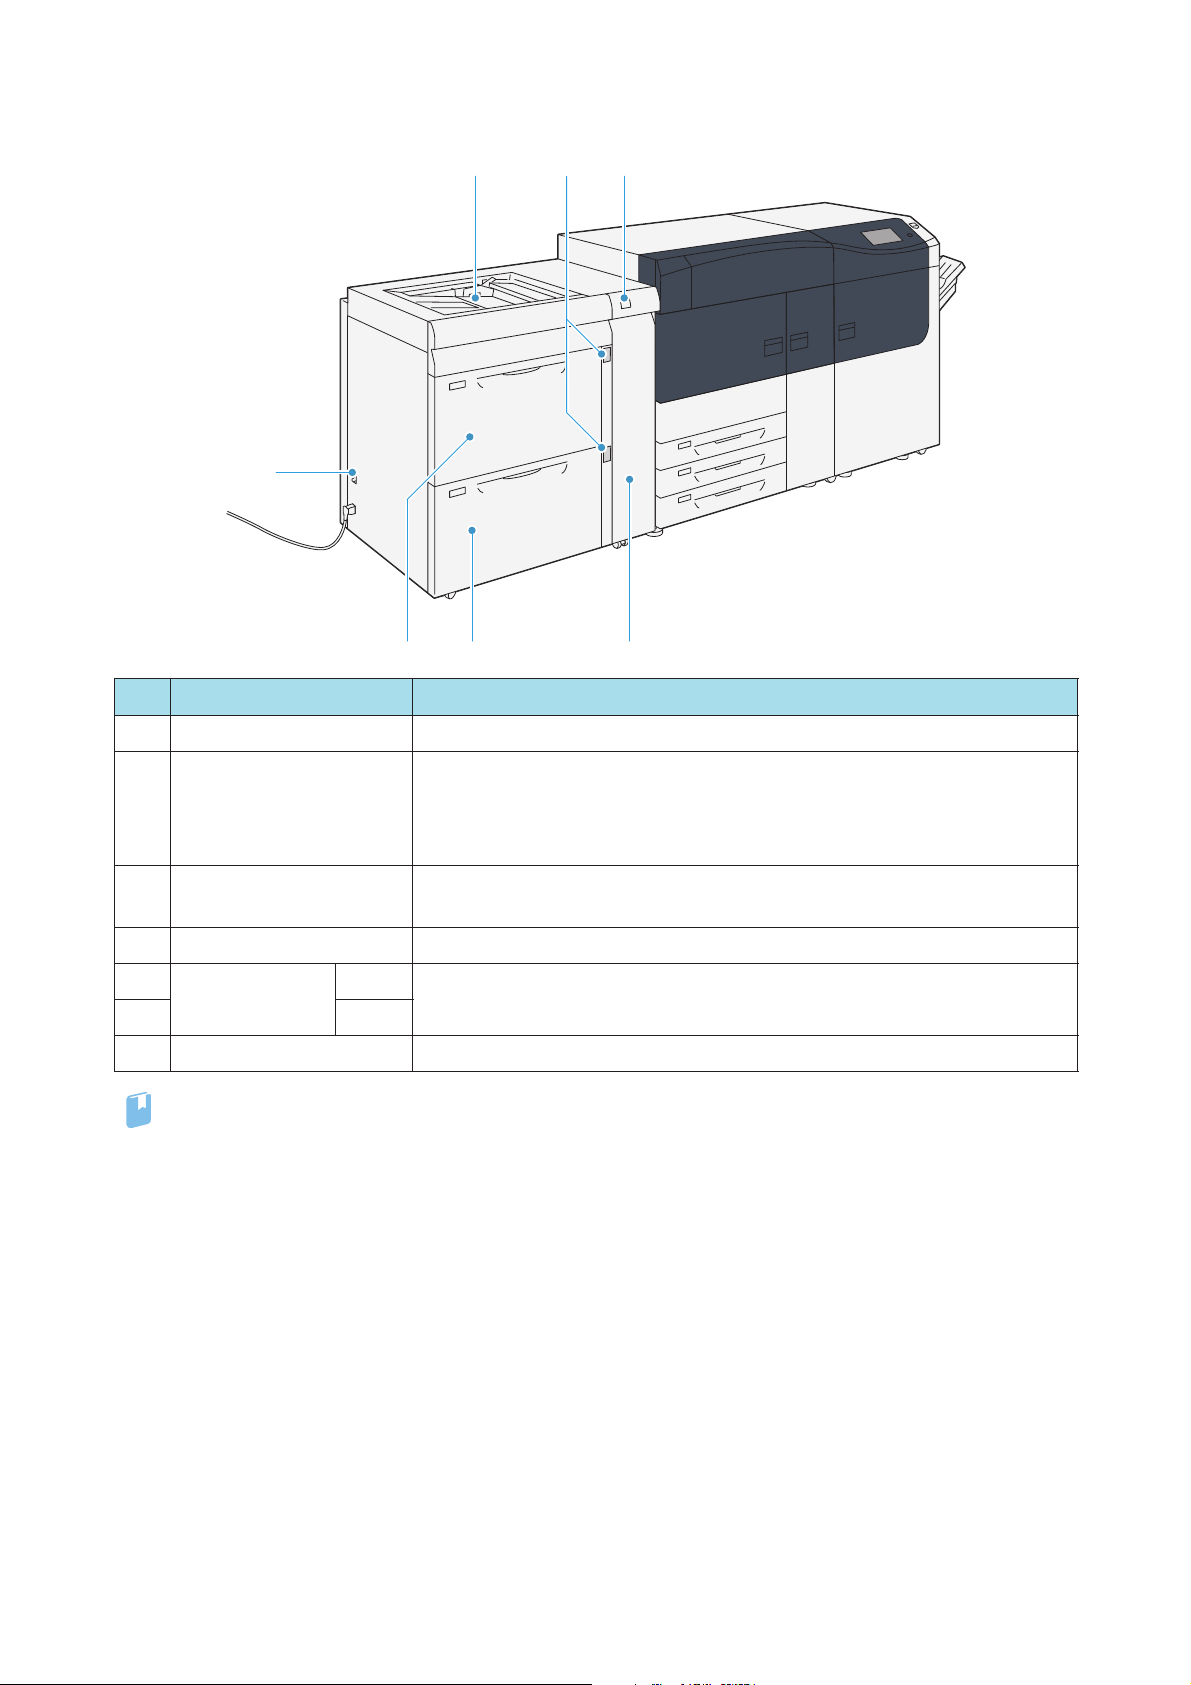
Machine Components
Front of the Machine
No. Component Description
1 Power switch Powers on/off the printer.
User interface Buttons and touch screen to operate the printer.
2
3 Toner cover Open this cover to replace Toner Cartridges.
4 Left side cover Open this cover to clear paper jams.
5 Center cover Open this cover to clear paper jams, or to replace Waste Toner Bottles.
6 Printe r Unit
Trays
7 Tray 2
8 Tray 3
9 Right side cover Open this cover to clear paper jams.
10 Offset Catch Tray Receives output sheets stacked with offset.
Tray 1 Load paper here.
Refer
Images are printed on the underside of the loaded paper.
For detailed information about the user interface, refer to User Interface Manual.
Chapter 1 Before Using the Machine
9
Page 10
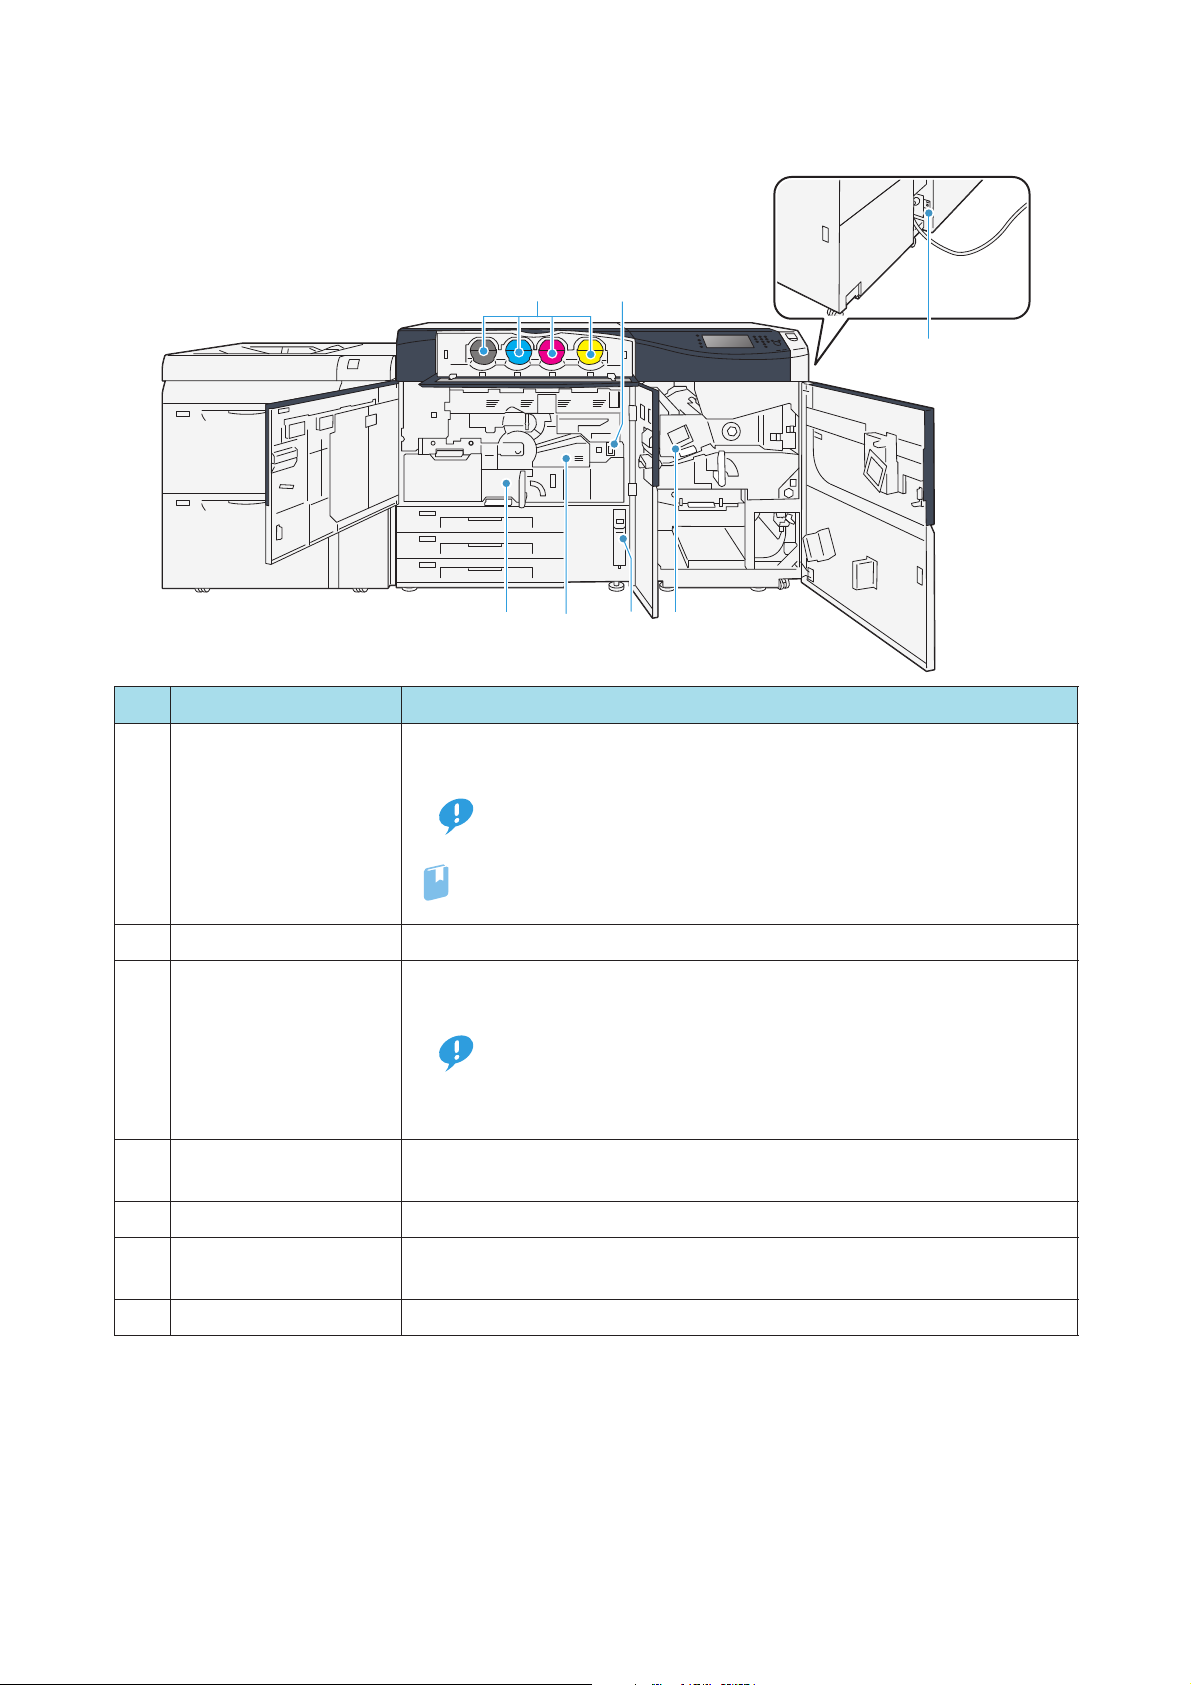
Inside of the Machine
Important
Refer
Important
12
5
3
No. Component Description
4
6
The back side
7
Main power switch Switches the main power of the machine on and off. Always follow the
instructions by the system administrator.
1
2 Toner Cartridges There are Toner Cartridges, each one for Black, Cyan, Magenta, and Yellow.
Transfer Module This module transfers the toner onto paper.
Pull out this module to clear paper jams.
3
Fusing Module Fuses toner on paper.
4
5 Waste Toner Bottles Collects waste toner.
Cooling Unit This part cools the paper.
6
7 Circuit breaker switch Automatically shuts off electricity in the event of fault current or a short circuit.
The Fusing Module is extremely hot, so do not touch it.
Pull out this unit to clear paper jams.
Always switch the power off before switching the main power off.
For detailed information, refer to "1.2 Power On/Off" (p.12).
If an abrupt power shutdown of the printer due to an electrical outage or other disruption arises when the printer is in operation, do not
pull out the Transfer Module, before the power is back.
The Transfer Module must only be handled when the power is on.
10
Printer Unit Manual
Page 11
High Capacity Feeder C3-DS
Refer
12
4
3
765
No. Component Description
1 Error lamp Illuminates when a paper jam occurs.
Paper level indicator lamp The top active indicator lamp lights when the corresponding Tray is active.
2
Bypass Tray (Tray 5) Load paper here.
3
4 Circuit breaker switch Automatically shuts off electricity in the event of fault current or a short circuit.
5 High Capacity
Trays
6 Tray 7
7 Right side cover Open this cover to clear paper jams.
For detailed information about the 2nd High Capacity Feeder C1-DS, refer to "Chapter 1 2nd High Capacity
Feeder C1-DS" in the Optional Units Manual.
Tray 6 Load paper here.
The four center lamps (1=25%) indicate the amount of remaining paper.
When all of the four lamps turn off, Tray becomes empty and paper empty
indicator lamp lights.
Images are printed on the face side of the loaded paper.
Images are printed on the face side of the loaded paper.
Chapter 1 Before Using the Machine
11
Page 12
1.2
Note
Note
Refer
The printer warms up and becomes ready to print within about 5 minutes after powered on.
Switch the power off at the end of a day or if the machine is not used for a long time.
Power On/Off
The warm-up time may vary with an initial temperature of the printer.
After being inactive for a while, the printer automatically enters the Power Saver mode to reduce power
consumption. For detailed information about the Power Saver mode, refer to "1.4 Power Saver Mode" in the
User Interface Manual.
1.2.1 Powering On
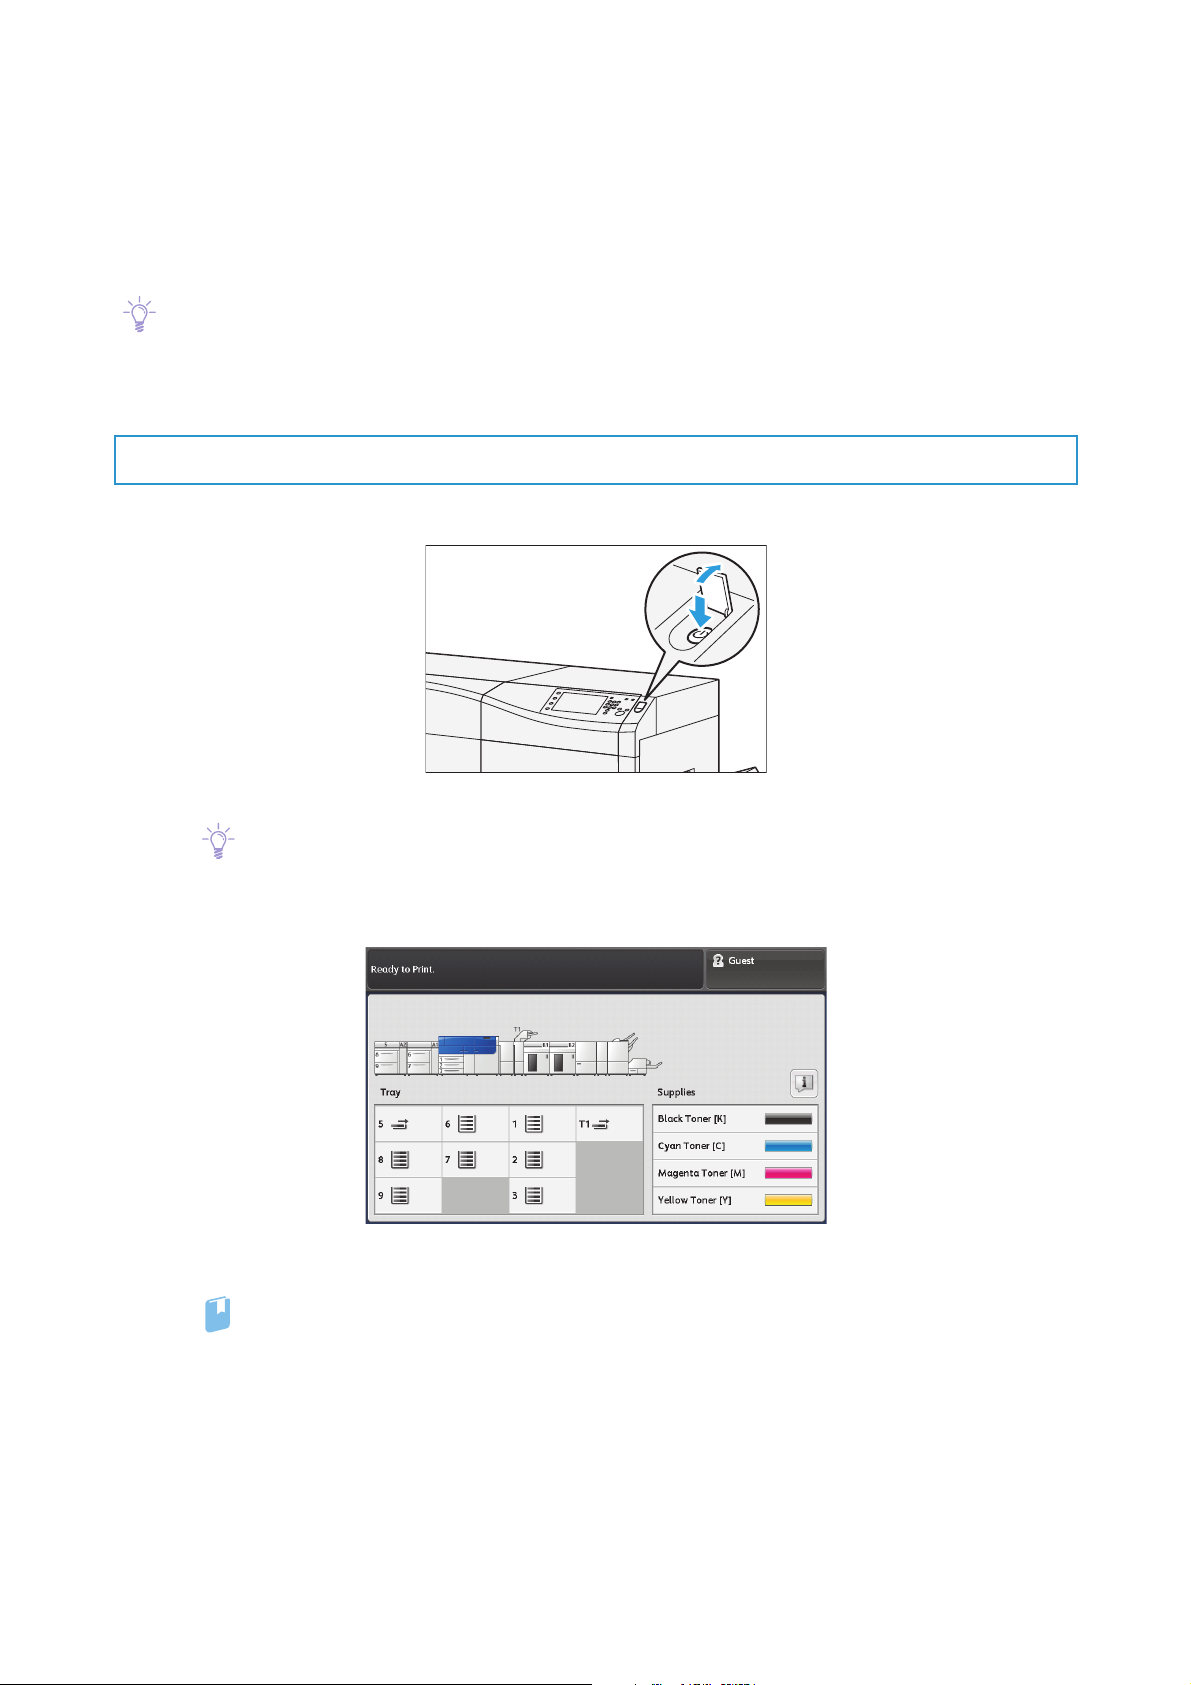
1.
Press the power switch on the printer unit.
User interface will be powered on.
When powered on, the printer immediately gets started to proceed with image quality adjustment,
but it takes some time before the printer becomes ready to print.
When the printer becomes ready to print (i.e. enters the Standby mode), the message changes to "Ready
to Print."
2.
Power on your Print Server to start the Print Server.
For information on functions and operations of the Print Server, refer to customer documentation
supplied with Print Servers.
12
Printer Unit Manual
Page 13
3.
Refer
Important
Note
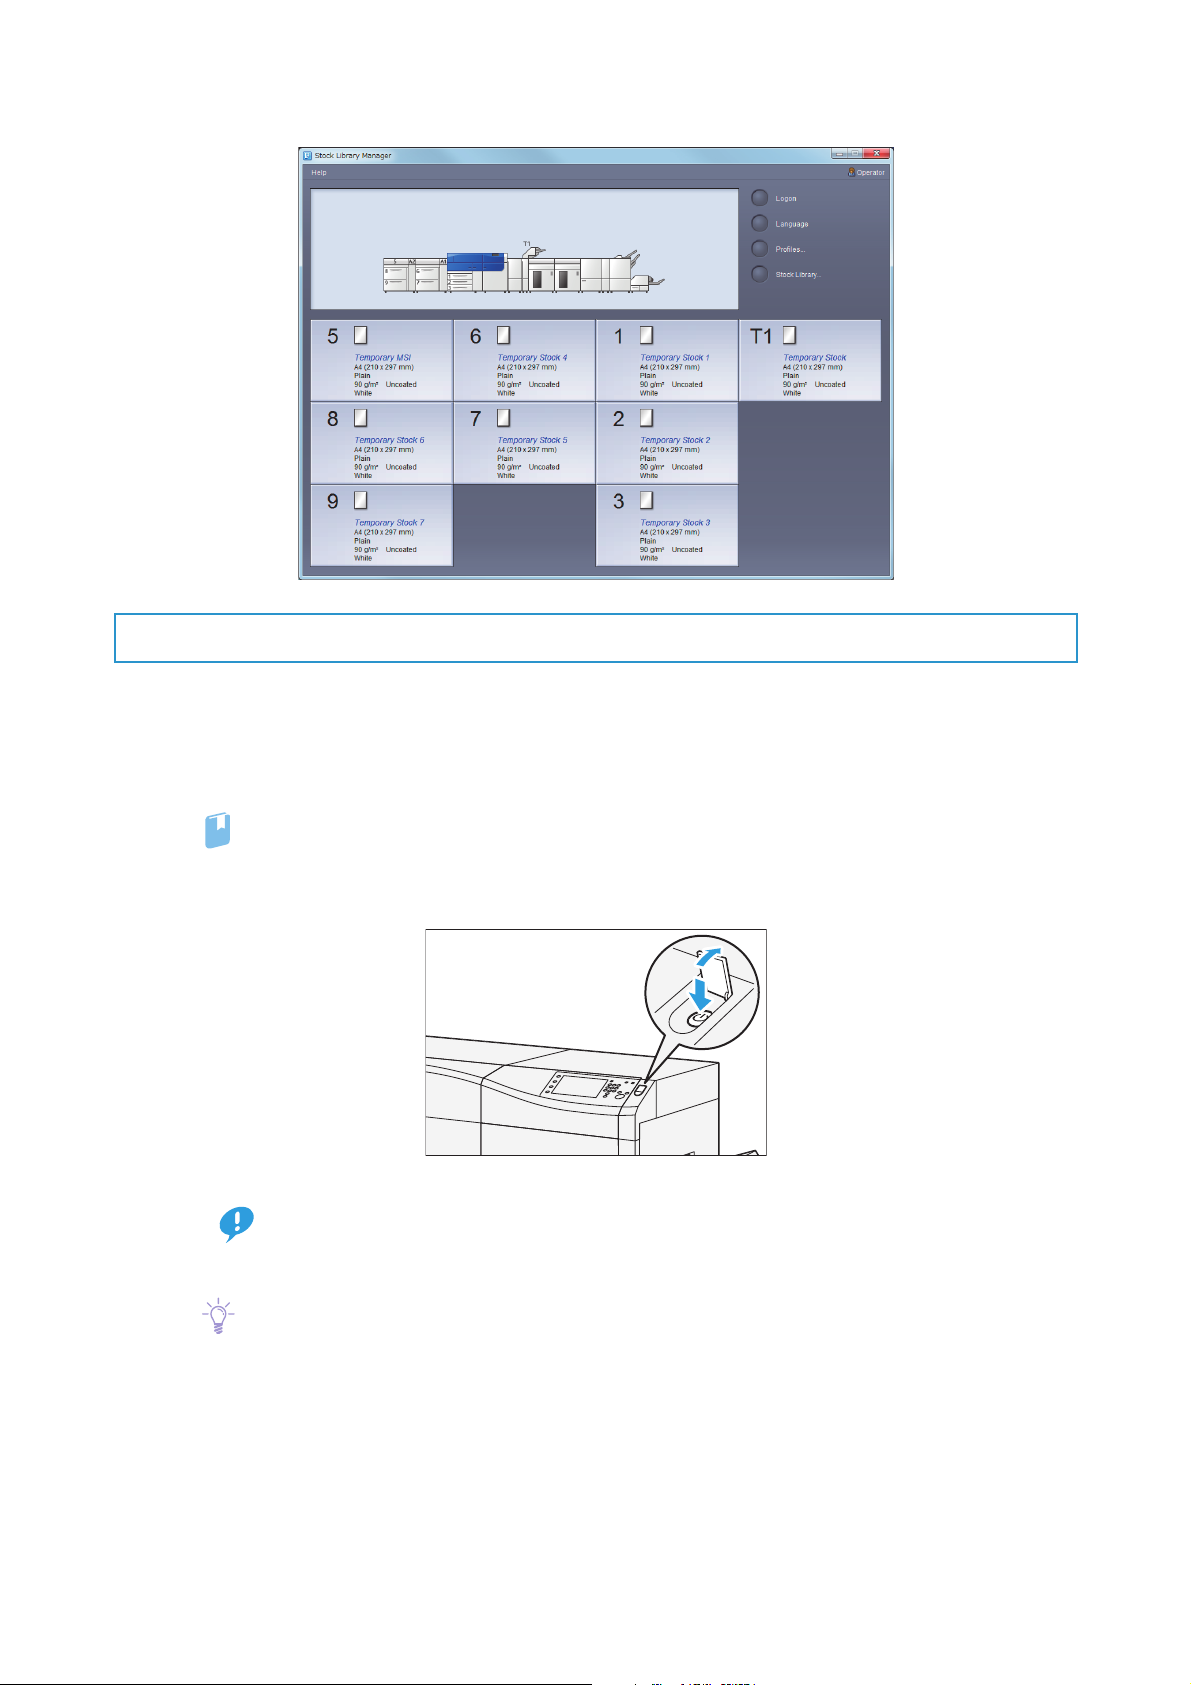
On Print Server, make sure the Stock Library Manager is activated.
1.2.2 Powering Off
1.
Make sure all the printing is finished and the <Data> lamp is not blinking.
2.
Shut down the Print Server.
Stock Library Manager will be closed as the Print Server is shut down.
For information on functions and operations of the Print Server, refer to customer documentation
supplied with Print Servers.
3.
Press the power switch on the printer unit.
On pressing the power switch, the printer will be turned off after the time displayed on the screen lapses.
When you switch the power off, the <Power Saver> button on the control panel may continue blinking even after the touch screen goes dark. Do not switch the main power off until the light of the
<Power Saver> button goes off. (You can turn on the printer again.)
When powering the printer on after it has been switched off, wait 10 seconds or more after the
touch screen has gone dark.
You can also switch the power off by clicking [Power Off] on CentreWare Internet Services under
[Status] tab > [General].
Chapter 1 Before Using the Machine
13
Page 14
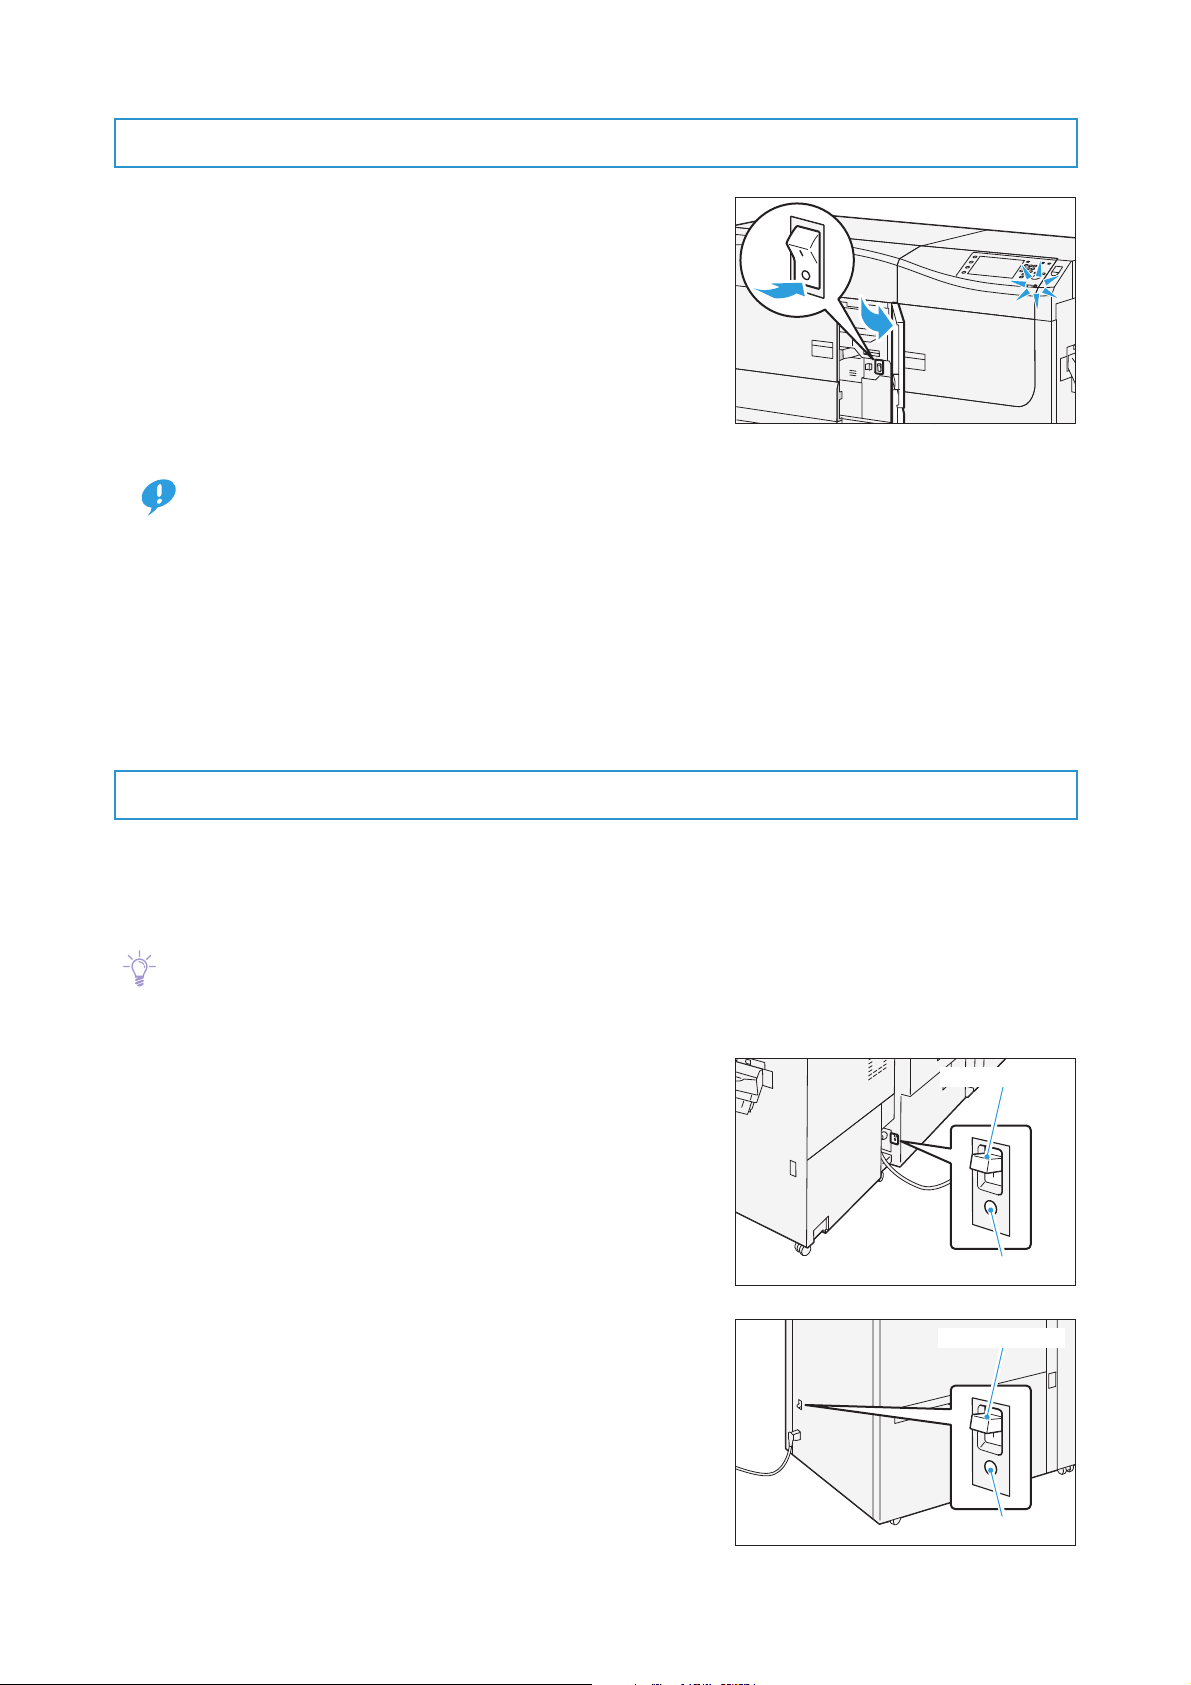
1.2.3 Main Power Switch
Note
Breaker switch
TEST button
Breaker switch
TEST button
If you turn off the main power, the power consumption can be
reduced. (but cannot be reduced to zero.)
Note that the machine needs more time to warm up if switched on
after the main power is off.
The printer may be damaged if you switch the main power off
immediately after switching the power off. Make sure the <Power
Saver> button is out and then switch off the main power.
Cooling down may take up to 60 minutes.
Switching off the main power may damage the hard disk and the memory or cause a printer malfunction,
Important
Open Machine Center Door and push the lower side of the switch to <O> (OFF).
The <Power> indicator goes out on the control panel.
The switch is normally in the upper <|> (On) position.
please adhere to the following guidelines.
Do not switch the main power off while the touch screen displays a screen or the <Power Saver> button
blinks.
Switch the main power off first when unplugging the power cord.
Do not switch off the main power immediately after switching on the main power.
1.2.4 Circuit Breaker Switch
The switch is normally in the upper position.
If the machine will be moved or unused for an extended period of time, turn off the switch by pressing it
to the lower position.
When fault current is detected, the circuit breaker is automatically turned off to discontinue the electrical
flow. Do not touch the breakers under normal condition. For information on fault current, refer to the Safety
Notes.
Printer Unit
High Capacity Feeder C3-DS
14
Printer Unit Manual
Page 15
1.3
Refer
Note
Image Printable Area
Assured Image Area
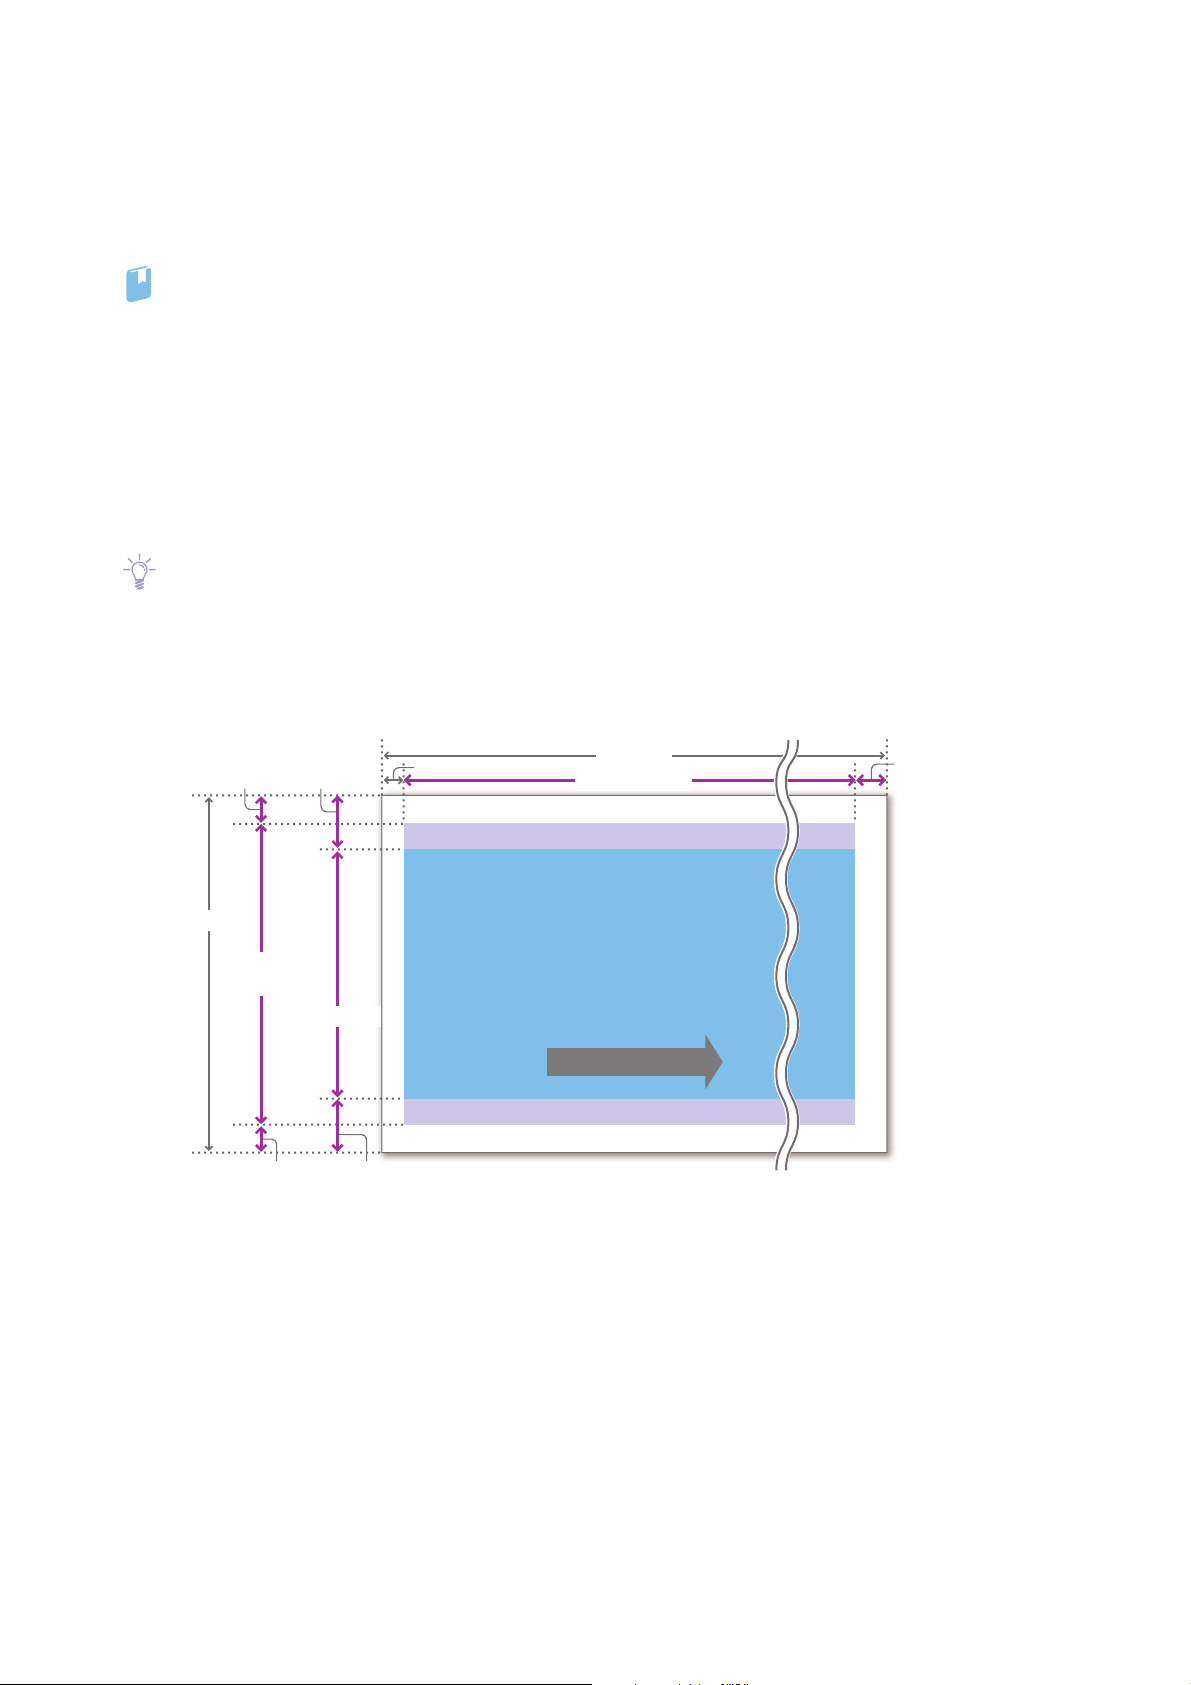
Image Printable Area and Assured Image Area
The printer defines "Image Printable Area" and "Assured Image Area" for printing.
For detailed information about the supported paper size, refer to "2.1.2 Supported Paper" (p.18).
Image Printable Area
Image Printable Area is the area where the printer can print.
In the area close to boundary of printable area, image or text printed may become slightly blur but does
not give impacts if printing crop marks or color patches.
Assured Image Area
Assured Image Area is the area where Fuji Xerox assures image quality.
When an image with high area coverage is placed in the area described above, Fusing Unit jam may be
caused.
High temperature and high pressure on the Fusing Unit may cause the paper to expand or contract.
Regardless of size, there are some areas where printer cannot print on the lead, tail, top and bottom of a
paper.
Top 3.5 (2) mm 6.5 mm
330.2 mm
323.2
(326.2) mm
317.2 mm
bottom 3.5 (2) mm
6.5 mm
Rear edge 2 mm
Image Printable Area
Image Printable Area
When Bypass Tray is used for the paper feed, 172.4 mm is added in each
of the following:
Paper size: 488->660.4 mm
Assured image area: (484-A)->(656.4-A) mm
488 mm
(484-A) mm
Assured Image Area
Assured Image Area
Feed Direction
Front edge A mm
Chapter 1 Before Using the Machine
15
Page 16

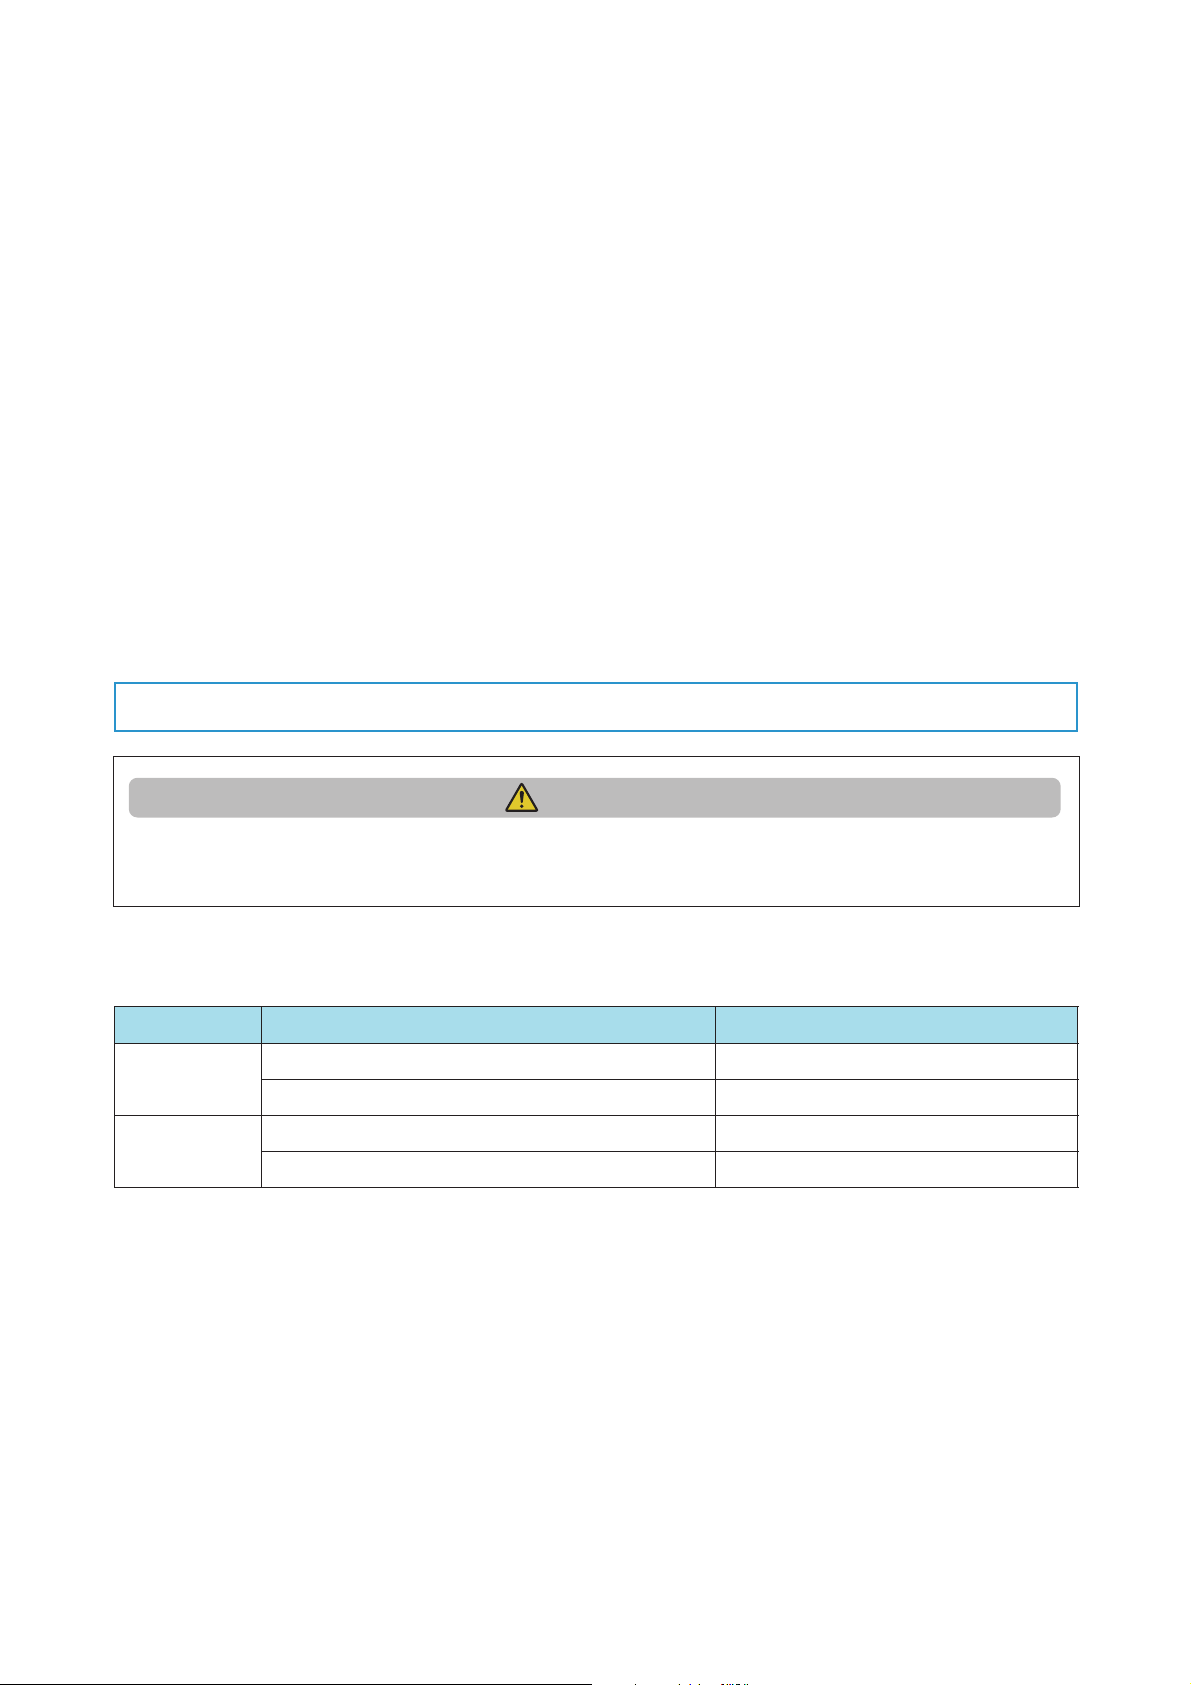
Note
Refer
Item Size
Image printable area Maximum fed from Printer Unit Trays (1 - 3) 323.2 x 482 mm
fed from Bypass Tray (5) 326.2 x 654.4 mm
fed from High Capacity Trays (6 - 9) 326.2 x 482 mm
Assured image area Maximum fed from Printer Unit Trays (1 - 3) 317.2 x 482 mm
fed from Bypass Tray (5) 317.2 x 654.4 mm
fed from High Capacity Trays (6 - 9) 317.2 x 482 mm
Image Loss Area Front edge
Paper type Paper weight Value of lead edge A
Uncoated 52 - 350 g/m
Coated* 52 - 72 g/m
73 - 119 g/m
120 - 350 g/m
2
2
2
2
Rear edge 2 mm
Top / bottom fed from Printer Unit Trays (1 - 3) 3.5 mm
fed from Bypass Tray (5) 2 mm
fed from High Capacity Trays (6 - 9) 2 mm
*: For paper weighing 71 g/m2 or lighter, paper feed performance cannot be guaranteed.
The lead edge A is set to 4 mm as the factory default value. If you change this default setting, contact your
local Fuji Xerox representative.
For detailed information about the Register Paper Feeding Positions, refer to "4.1.8 Maintenance" in the User
Interface Manual.
2 mm
4 mm
3 mm
2 mm
16
Printer Unit Manual
Page 17
Chapter 2
WARNING
2.1 Paper Types ................................................................................................17
2.2 Output Paper..............................................................................................24
2.3 Loading Paper............................................................................................25
Load and Output Paper
2.1.1 Recommended Paper........................................................................................ 17
2.1.2 Supported Paper.................................................................................................. 18
2.1.3 Storing and Handling Paper ........................................................................... 23
2.3.1 Loading Paper in Trays...................................................................................... 25
2.3.2 Loading paper in High Capacity Trays....................................................... 27
2.3.3 Loading paper in Bypass Tray........................................................................ 31
2.1
Paper Types
2.1.1 Recommended Paper
Do not use conductive paper such as origami paper, carbonic paper or conductively-coated paper.
When paper jam occurs, it may cause short-circuit and eventually a fire accident.
Choose the paper compliant with the standards if using commercially available paper. We recommend following types of standard paper.
Type Paper name or size Paper weight
Uncoated J Paper 82 g/m
Colotech+90 90 g/m
Coated OS coated paper W 127 g/m
Colotech+ Gloss Coated 120 g/m
2
2
2
2
For available paper types other than the standard paper, refer to the Recommended Media List in Stock
Library. If you intend to use paper not included in the Recommended Media List, contact your local Fuji
Xerox representative.
Chapter 2 Load and Output Paper
17
Page 18
The printed image may fade or damaged due to moisture caused by water, rain, or vapor. For information,
Note
Refer
Note
Important
contact your local Fuji Xerox representative.
Even if you use recommended paper types, however, please note that they do not necessarily yield the
optimum print results depending on the environment where the printer is installed (room temperature,
humidity, and others), and/or on the print data.
If you are running a large print job, we recommend that you print some sample sets to check the print
quality before you continue to the remaining.
The print system fuses toner images on paper by applying heat. Therefore, a certain amount of expansion
and contraction can occur on any type of paper.
Ballpoint inks and water-color inks may hard to penetrate into the surface of printed paper.
Adhesive materials such as tapes, sticky notes, and book binding adhesives may come unglued quickly on
printed paper.
White dots or white areas may appear on the output due to paper dust, small coating pieces, or other foreign materials.
Performance of preprinted paper depends on types of preprint. Before running a job, please test preprinted
paper and ensure its output quality and running performance.
For detailed information about the Stock Library, refer to "Stock Library" in the Stock Library Manager Man-
ual.
2.1.2 Supported Paper
Below is the list of paper sizes available for printing by setting paper properties with Stock Library Manager.
If you load paper whose paper properties are different from those currently being set for the specified Tray, it
Important
can cause paper jams and image quality defects. Make sure the selected paper size, paper type, and paper
weight are all correct.
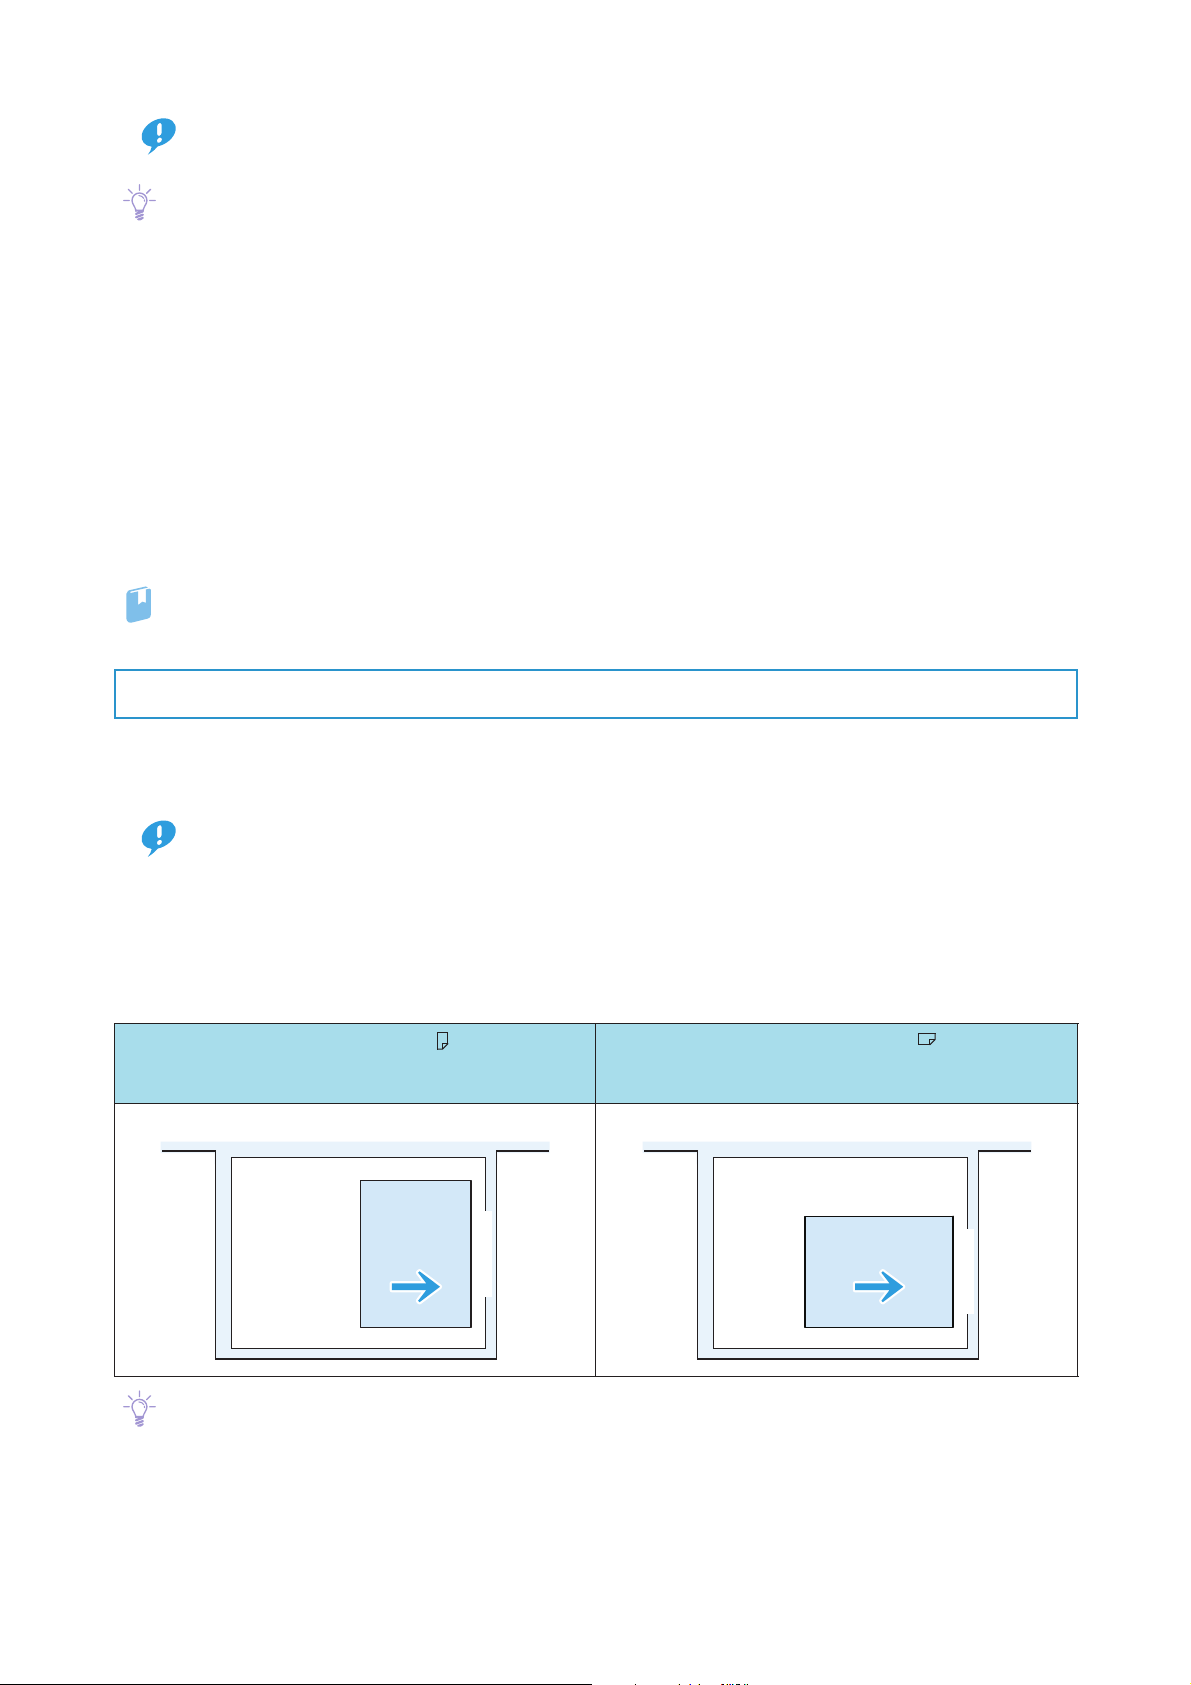
Paper Orientation
There are two paper orientations: Long Edge Feed (LEF) and Short Edge Feed (SEF).
The figures below describe front, rear, top, and bottom edges of the paper for LEF and SEF.
Long Edge Feed (LEF )
Long edge: landscape (width),
Short edge: portrait (height)
The front of the printer The front of the printer
To p
Landscape
Rear edge
Feed direction
Bottom
Front edge
Portrait
Short Edge Feed (SEF )
Short edge: landscape (width),
Long edge: portrait (height)
To p
Landscape
Rear edge
Feed direction
Bottom
Portrait
Front edge
18
The feed direction shown above works in an opposite manner for Printer Unit Trays and Inserter Tray.
Printer Unit Manual
Page 19
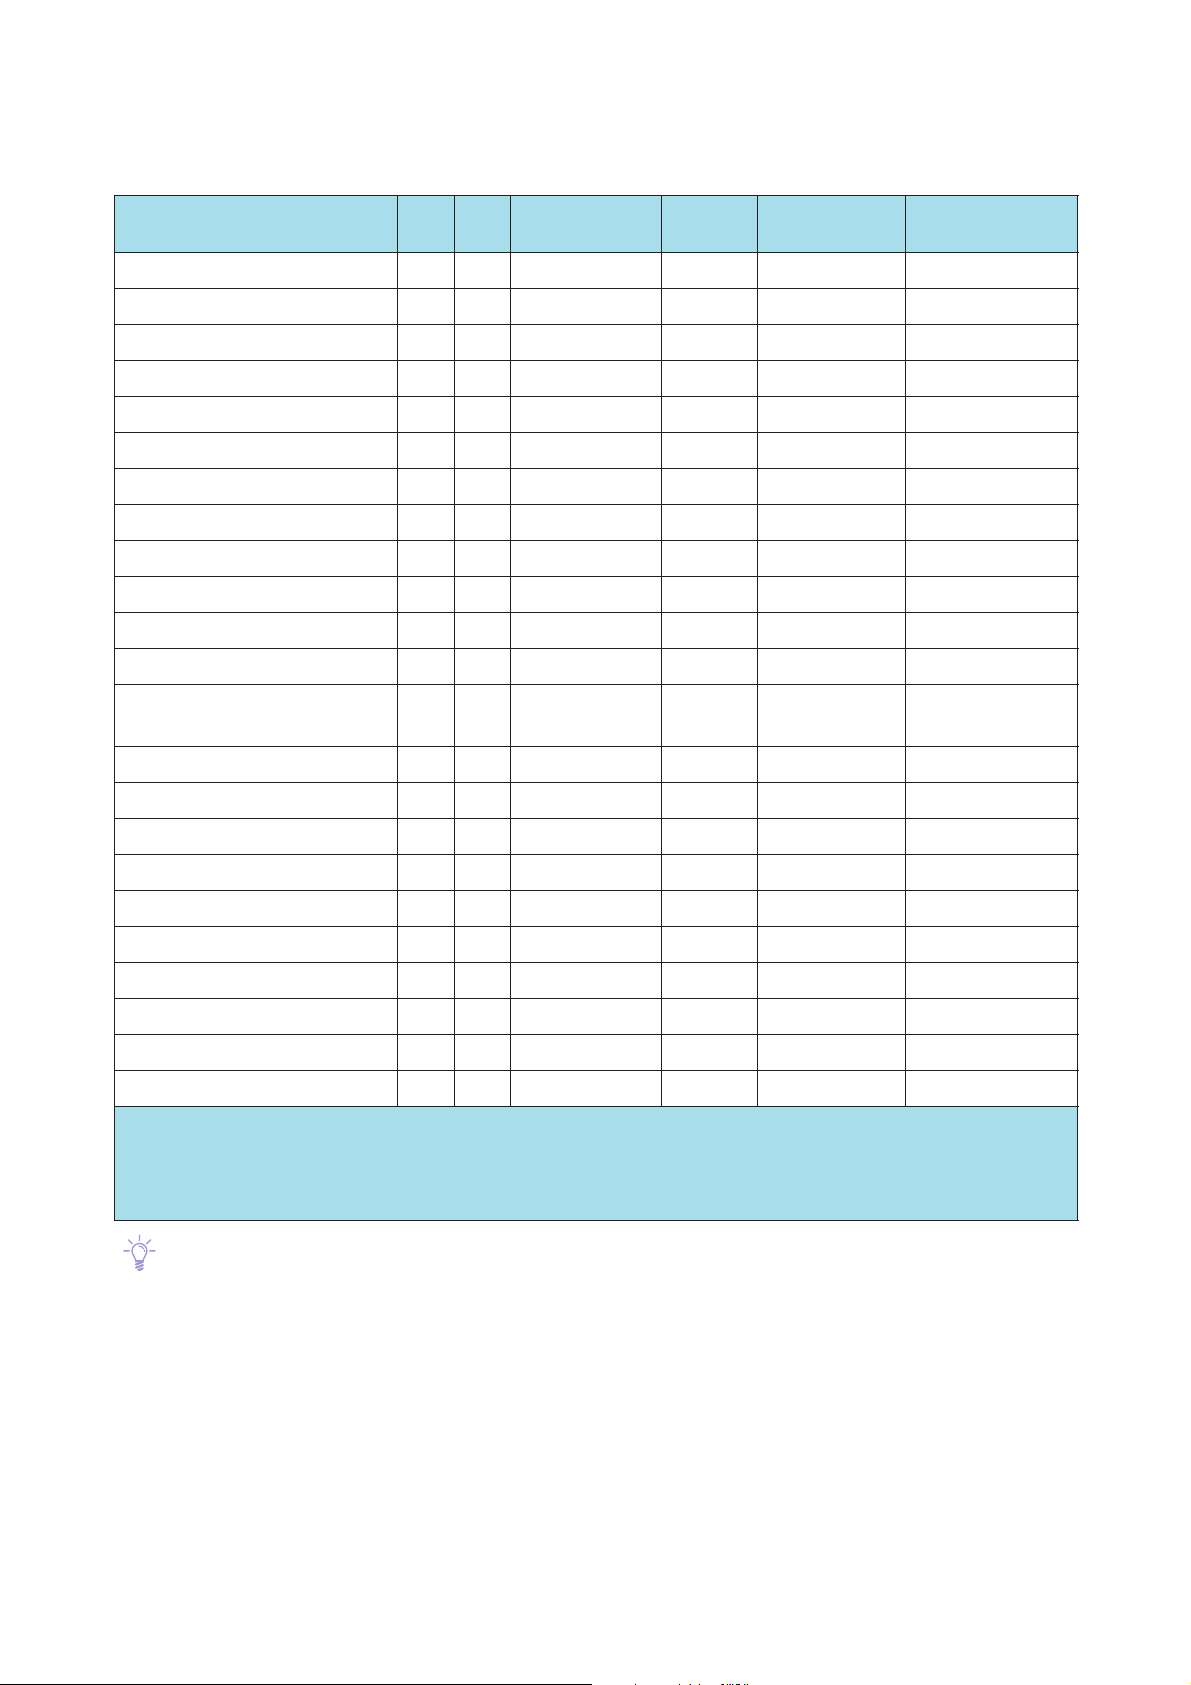
Paper Size
Note
Standard size
Size (short edge x long edge) LEF SEF
SRA3 (320 x 450mm) /
A3 (297 x 420mm) /
A4 (210 x 297mm)
JIS B4 (257 x 364 mm) /
JIS B5 (182 x 257 mm)
8K (267 x 388 mm) /
8K (270 x 390 mm) /
16K (194 x 267 mm)
16K (195 x 270 mm)
Tabloid Oversized (12 x 18") /
Tabloid (11 x 17") /
Legal (8.5 x 14") /
Foolscap (8.5 x 13")
Letter (8.5 x 11")
Printer Unit
Trays (1 - 3)
Bypass
Tray (5)
- (LEF),
(SEF)
High Capacity
Trays (6 - 9)
(LEF), * (SEF)
(LEF), * (SEF)
* (LEF), O (SEF)
Inserter Tray
(T1)
/
Quarto (8 x 10")
Executive (7.25 x 10.5")
DT Special A4 (226 x 310 mm)
DT Special A3 (310 x 432 mm) /
12.6 x 19.2" /
13 x 18" /
13 x 19" /
Postcard (100 x 148 mm) /
Postcard (4 x 6") /
: Can be automatically detected by selecting [Size] in Stock Library
/
/
(LEF), * (SEF)
(LEF), * (SEF)
/ (LEF), * (SEF)
/
/
* : Handled as non-standard size paper as it cannot be automatically detected when loaded
/ : Paper orientation cannot be selected and Stock cannot be applied
- : The stock can be applied, however, the image quality and paper feed performance cannot be guaranteed
Use Postcard Kit for paper size 181.9 mm portrait or smaller in High Capacity Trays.
Chapter 2 Load and Output Paper
19
Page 20

Custom size
Note
Refer
When you use non-standard size paper and long paper, from one of the Stock Library, select [Custom] for
[Size] to specify the paper size using [Width] and [Height].
Printer Unit Trays (1 - 3) LEF: 139.7 - 330.2 mm
SEF: 182.0 - 488.0 mm
Bypass Tray (5) LEF: 98.0 - 330.2 mm
SEF: 148.0 - 660.4 mm
High Capacity Trays (6 - 9) LEF: 98.0 - 330.2 mm
SEF: 148.0 - 488.0 mm
Inserter Tray (T1) LEF: 182.0 - 297.0 mm
SEF: 182.0 - 488.0 mm
For Bypass Tray, paper size 146.0 - 147.9 mm landscape or larger can be loaded but the image quality and
Important
paper feed performance cannot be guaranteed.
Long paper has the following restrictions:
- Only one sheet can be loaded. (Image quality and paper feed performance cannot be guaranteed when
multiple sheets are loaded.)
- The 2 sided and the printing in reverse side (changing the side to output) are not available.
- Available Paper types are [Plain], [Film], and [Recycled]. You cannot select [Matte Coated].
When GBC AdvancedPunch Pro is installed, the image quality and paper feed performance cannot be guaranteed for the papers 488.1 mm landscape or larger.
Use Postcard Kit for paper size 181.9 mm portrait or smaller in High Capacity Trays.
The printer defines "Image Printable Area" and "Assured Image Area" for printing. For detailed information
about the Image Printable Area and Assured Image Area, refer to "1.3 Image Printable Area and Assured
Image Area" (p.15).
20
Printer Unit Manual
Page 21
Paper Weight (g/m2)
Note
Plain
Type
Printer Unit
Trays (1 - 3)
Bypass
Tray (5)
High
Capacity
Trays (6 - 9)
Inserter
Tray (T1)
64 - 256 52 - 300 52 - 350 52 - 350
Long paper
(488.1 mm
landscape or larger)
52 - 220 (Uncoated)
72 - 220 (Coated /
Cast Coated)
Transp are ncy -- - - /
Film 64 - 256 64 - 300 64 - 350 / 72 - 220
Postcard / 106 - 300 106 - 350 / /
Textured/Embossed 106 - 256 106 - 300 106 - 350 106 - 350 /
Precut tab - Plain 64 - 256 52 - 300 52 - 350 52 - 350 /
Precut tab - Embossed 106 - 256 106 - 300 106 - 350 106 - 350 /
Full cut tab - Plain 64 - 256 52 - 300 52 - 350 52 - 350 /
Full cut tab - Embossed 106 - 256 106 - 300 106 - 350 106 - 350 64 - 105
Ordered/Sequenced - Plain 64 - 256 52 - 300 52 - 350 52 - 350 /
Ordered/Sequenced - Embossed 106 - 256 106 - 300 106 - 350 106 - 350 /
Recycled 64 - 105 64 - 105 64 - 105 64 - 105 /
Labels 106 - 256 106 - 300 106 - 350 / /
Adhesive /- - / /
Transfer Paper / 129 - 176 - / /
- : Paper weight cannot be loaded
/ : Stock cannot be applied
Paper weight 52 - 350 g/m2 can be loaded for some of the types although they are not supported; In this
Important
case the image quality and paper feed performance cannot be guaranteed. For coated paper, we only
guarantee printing on paper weighing 72 g/m
For Bypass Tray, paper weight 301 - 350 g/m2 can be loaded but the image quality and paper feed performance cannot be guaranteed.
When loading coated paper (coated, cast coated, matte coated), transparencies or films into the Tray
other than High Capacity Tray, make sure you load one sheet at a time.
If two or more sheets are loaded, the image quality and paper feed performance will not be not guaranteed.
Paper weight means the weight of a paper in gram per 1 square meter (g/m2).
For information on supported transparency, contact your local Fuji Xerox representative.
Transparency having a white strip on the edge is not supported.
For 2-sided print jobs where both front and back sides contain toner density, use 115 g/m2 or heavier paper.
2
or heavier.
Chapter 2 Load and Output Paper
21
Page 22
Paper Type
Note
Type Preprinted Stock (Sides 2) Coating Modulus
Plain
-
Transp are ncy ---
Film ---
Postcard *
-
Textured/Embossed **-
Precut tab - Plain
Precut tab - Embossed **
Full cut tab - Plain
-
Full cut tab - Embossed **-
Ordered/Sequenced - Plain
Ordered/Sequenced - Embossed **
Recycled
-
Labels -*-
Adhesive ---
Transfer Paper ---
Custom The same as Plain
: Can be loaded
- : Cannot be loaded
* : Can be loaded but ineffective
If you select [Matte Coated] or [Cast Coated] under [Coating], settings for [Preprinted Stock] will be disabled.
[Ordered/Sequenced] is a set of multiple papers as same as the precut tab. When you select [Ordered/
Sequenced] or [Precut tab], enter the number of papers in a set in [Modules].
When you print a set of paper consists of 5 sheets, enter "5" in [Modules], and if the paper jam occurred on
the 3rd paper of the set, the 4th, 5th, next 1st, and next 2nd papers are purged (ejected without printing),
and the 3rd paper of the next set is printed.
Unsupported Paper
Do not use the following paper. It may damage the machine.
Inkjet paper
Business-card-size paper
Folded or wrinkled paper
Damp or wavy damp paper
12 mm or more curled paper
Thermal paper, Heat-transfer paper
Window envelope
There are some unsupported papers other than the one listed above. For more information, contact your
local Fuji Xerox representative.
22
Printer Unit Manual
Page 23

2.1.3 Storing and Handling Paper
Important
Refer
Storing Paper
Paper is easy to get moist by the open air and to be deformed by the impact. Therefore, be sure to note
the following:
Store paper inside a cabinet or other dry places. Paper that has absorbed moisture can cause paper
jams and image quality defects.
After unpacking the paper, store any remaining paper in the wrapper.
Store paper flat to prevent from bending or warping.
Keep papers out of direct sunlight.
Handling Paper
Do not load a bunch of sheets that were once separate and then put together.
Do not use folded or wrinkled paper.
Do not load mixed sizes or types together into the Tray.
Fan Transparencies, films, or coated paper well before loading in a Tray. These types of paper may be
jammed or multifeed (multiple sheets transferred simultaneously). Also, setting Tray Air Assist feature
may help improving its feeding performance when using High Capacity Tray.
Paper absorbs moisture if the paper is left in a Tray for a long time under highly humid conditions. Paper
with excessive moisture may cause paper jams and image quality defects when it goes through the
machine. It is recommended to remove all such paper from the Tray, and replace it with fresh paper.
Do not use damp paper, paper left unwrapped for long periods of time, and/or paper having excessive curl.
For detailed information about the Tray Air Assist, refer to "Stock Library" in the Stock Library Manager Man-
ual.
Removing Paper Dust
Edges of a paper may have paper dust or coating materials
generated during a paper cutting process.
Before loading paper in a Tray, remove paper dust and coating
materials from paper edges using a vacuum cleaner or dry
cloth.
Chapter 2 Load and Output Paper
23
Page 24
2.2
Note
Refer
Output Paper
Offsetting
When offsetting is enabled, each set of printed paper is staggered
in the output tray so that you can separate the stack easily.
Enable offsetting on Print Server.
Offsetting is disabled when:
Sheets 297.1 mm portrait or larger and 181.9 mm portrait or smaller.
Offset is performed only when the paper length (portrait) is in a range between 182 and 297 mm.
Sheets 488.1 mm landscape or larger
The Offset Catch Tray offers a capacity of 500 sheets (A4 , Colotech+90, 1-sided job). Please note, however,
the capacity may be reduced depending on the following conditions.
Size of paper, Weight of paper
Types of paper (such as coated/uncoated) and the degree to which the paper is curled
2-sided printing
Ton e r de ns i t y
When the Offset Catch Tray becomes full, the machine detects it and stops running.
For detailed information on capacities of High Capacity Stacker Output tray and Finisher Output tray, refer to
the relevant chapters describing these units in the Optional Units Manual.
Purge Function
The sheets are ejected to the Offset Catch Tray or Output tray on optional units when they are in mid-flow
being fed, before paper jam causes the machine to stop. Also, after the jammed papers are removed, the
remaining sheets in the machine are ejected to the Offset Catch Tray (or to the Output tray closer to the
printer unit if any optional units are installed).
Do not reuse the sheets ejected by the Purge function, as this may cause paper jams.
Important
24
Printer Unit Manual
Page 25

2.3
Refer
CAUTION
Loading Paper
After loading the paper, be sure to set the information of the loaded paper in [Tray Stock Properties] window on Stock Library Manager.
For detailed information on how to regard Tray settings, refer to "Tray Status Confirmation / Setting Area" in
the Stock Library Manager Manual.
When pulling out the Tray, do it gently. If pulled out with too much force, the Tray can hit and injure
your knees.
Do not place any paper or objects in the empty space of Trays. It may cause paper jams or printer malfunc-
Important
tions.
Do not load mixed types of paper in a Tray as this may cause paper jams.
While the printer is processing a job, do not pull out the Tray being used for the job.
To avoid paper jams, and to prevent the different type of paper being loaded, make sure you do not add
paper to the remaining stack of paper in the Tray. If you removed remaining paper from the Tray, load new
paper first, and then add the remaining paper over the new paper.
Paper may stick together in case of some types or the state of the paper. Fan the paper well before loading
it.
2.3.1 Loading Paper in Trays
The Trays 1, 2 and 3 are refilled in the same way.
Images are printed on the underside of the loaded paper.
Up to 550 sheets (Colotech+90) can be loaded to each Tray.
Feed Direction
Printed side
Chapter 2 Load and Output Paper
25
Page 26
1.
Important
Pull out the Tray toward you until it stops.
2.
Remove any paper remaining in the Tray.
3.
Hold the long-side paper guide by its grip and move
it to lightly contact the paper edges ( ).
4.
Hold the short-side paper guide by its grip and move
it to lightly contact the paper edges ( ).
5.
Fan the paper well and load it with the printed side
1
2
facing down, with the edges aligned in the direction
of the arrow.
Do not load paper above the maximum fill line. It
may cause paper jams or machine malfunctions.
Position the guides correctly to match the paper
size. Incorrectly positioned guides may cause misfeeding and paper jam s.
6.
Push the Tray into the machine.
The [Tray Stock Properties] window appears on the Stock Library Manager.
7.
Change the Tray settings.
Special Media Setting
Transparency
Loading side: Load sheets with the printed side facing up.
Hole punched paper
Orientation: Place the holes of paper on the left side when you face the front side of printer.
Precut tab
Orientation: Place the tabs of paper on the right side when you face the front side of printer.
26
Printer Unit Manual
Page 27
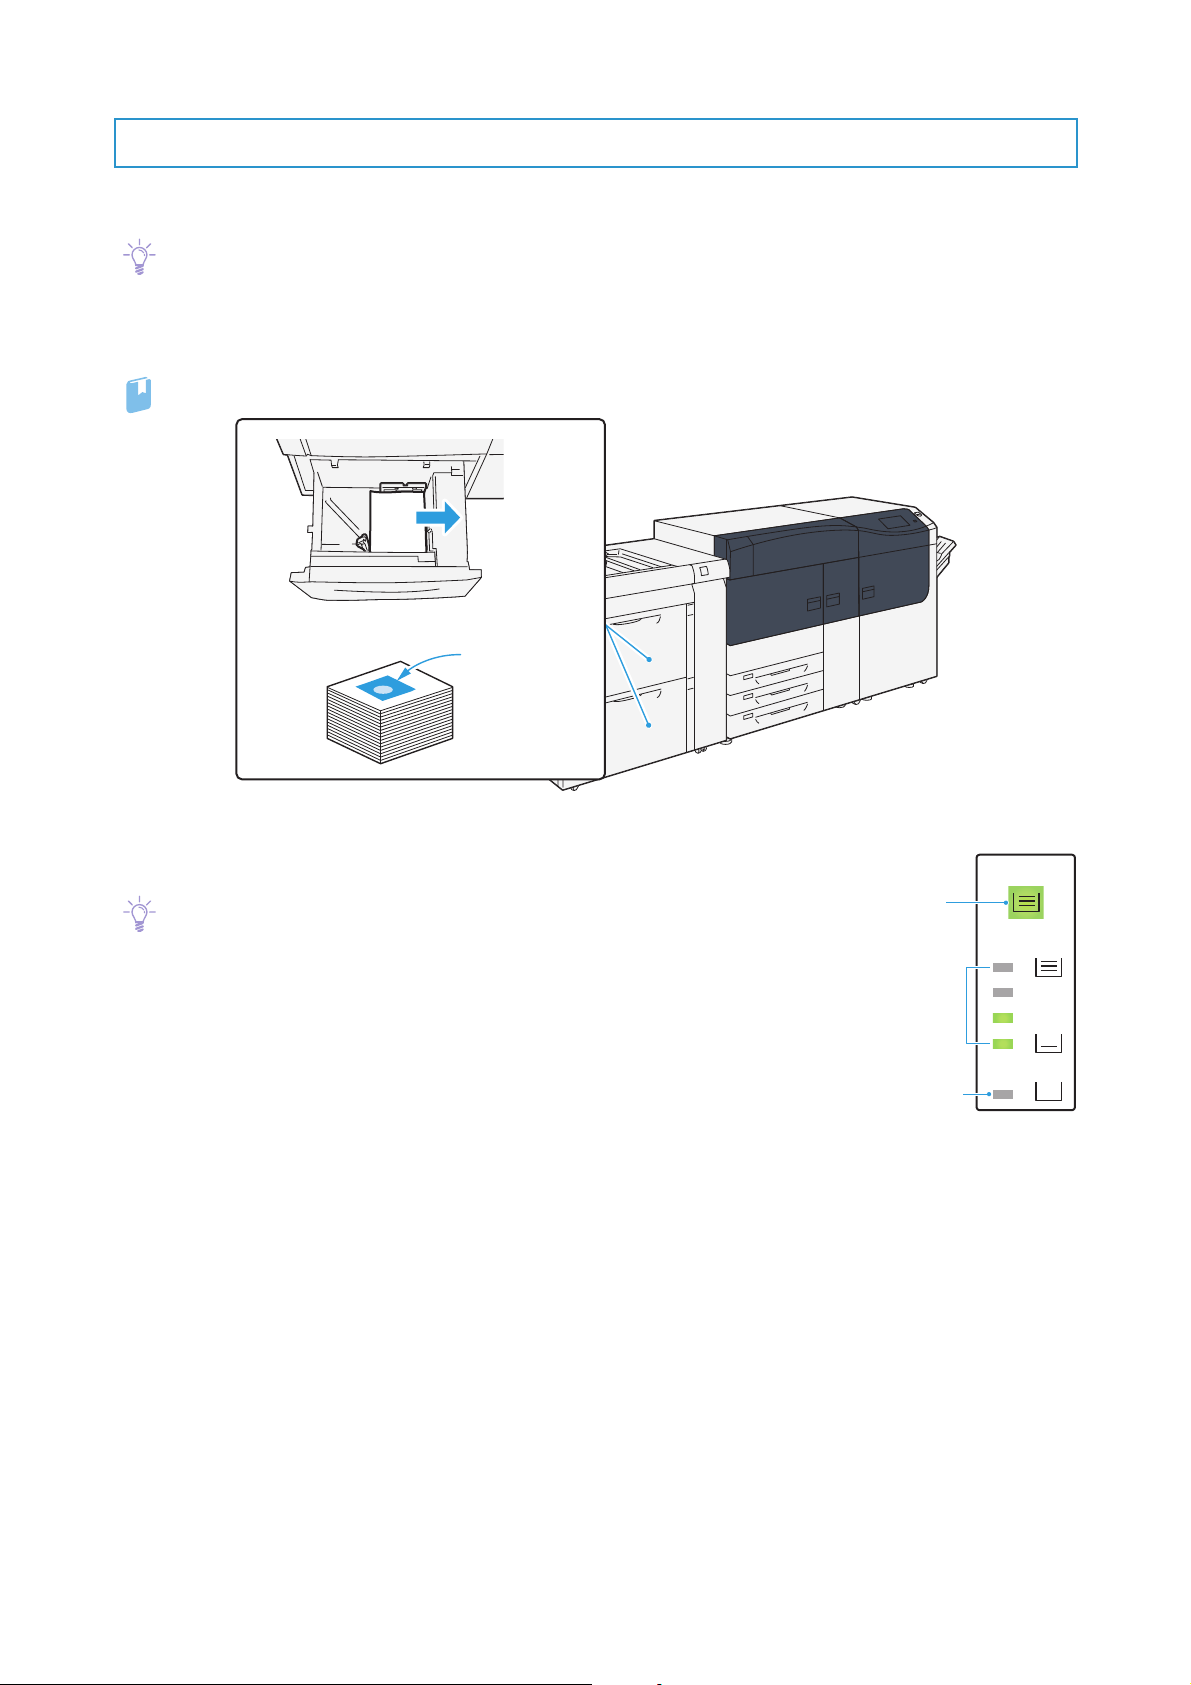
2.3.2 Loading paper in High Capacity Trays
Note
Refer
Note
Printed side
Feed Direction
Paper Empty
Active
Paper Level
The Trays 6 and 7 are refilled in the same way.
The 2nd High Capacity Feeder C1-DS (Trays 8 and 9) is also refilled in the same way.
Images are printed on the face side of the loaded paper.
Up to 2,000 sheets (Colotech+90) can be loaded to each Tray.
For detailed information about the Bypass Tray (5), refer to "2.3.3 Loading paper in Bypass Tray" (p.31).
Checking Remaining Paper Level
Remaining paper level can be checked with the paper level indicator lamp.
If an incorrect level is indicated, pull out the Tray, make sure the plate is lowered, and then push the Tray into the machine slowly and firmly.
After setting the paper, it may take some time for the lamp to illuminate.
This is because the printer is raising the bottom plate or setting up the Air
Assist function, and thus not a malfunction.
The top active indicator lamp lights when the corresponding Tray is active. The
four center lamps (1=25%) indicate the amount of remaining paper. When all
of the four lamps turn off, Tray becomes empty and paper empty indicator
lamp lights.
Chapter 2 Load and Output Paper
27
Page 28

Loading Paper in a Tray
Note
Important
Important
Important
Note
2
1
The number of sheets is the value when Colotech+90 is used. Adjust the number according to the type or the
weight of the paper.
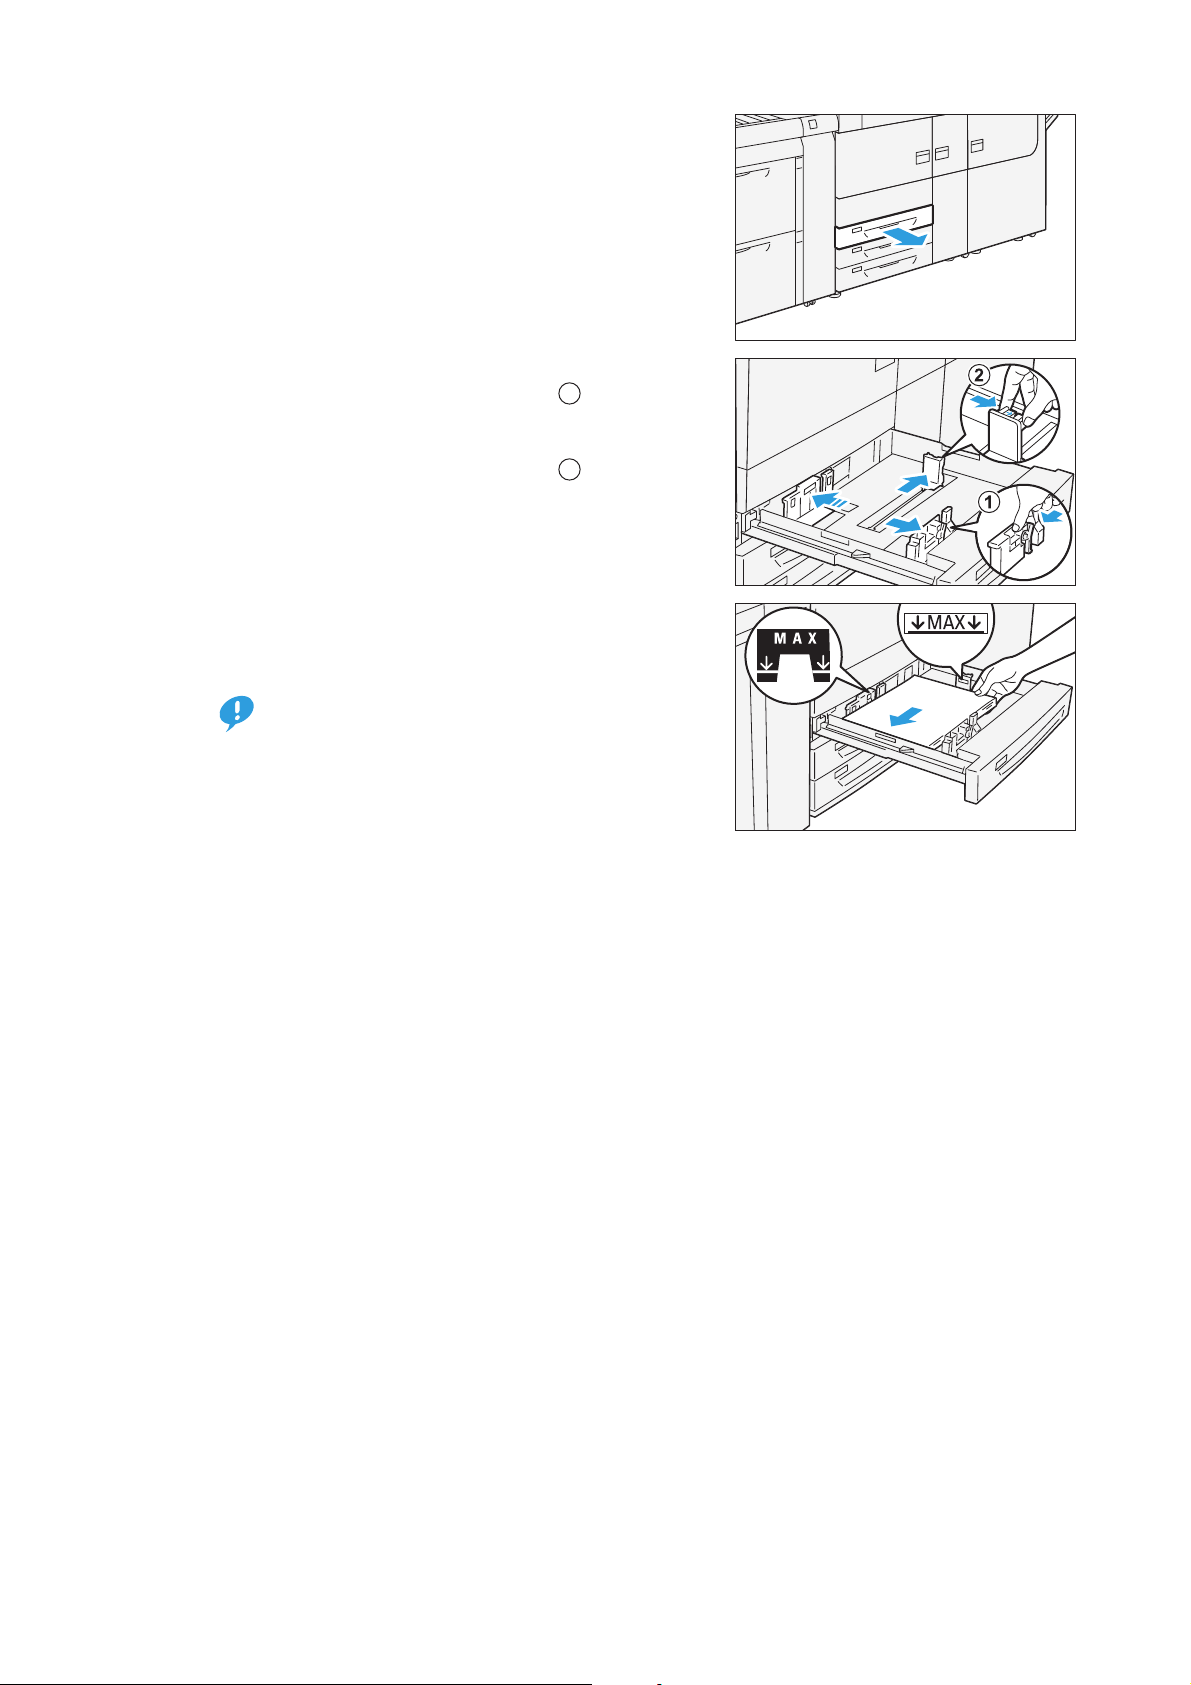
1.
Pull out the Tray toward you until it stops.
2.
Remove any paper remaining in the Tray.
3.
Fan the paper well and load about 100 to 500 sheets
with the printed side facing up, and the paper edges
aligned in the direction of the arrow ( ).
4.
Hold the long-side paper guide by its grip and move
it to lightly contact the paper edges ( ).
If the amount of the loaded paper is less than 100
sheets, the guides apply more pressure to the paper.
It may cause the paper to be distorted, leading to
paper jams.
1
5.
Load remaining sheets with the printed side facing
up, and align the paper edges in the direction of the
arrow ( ).
6.
Hold the short-side paper guide by its grip and move
it to lightly contact the paper edges ( ).
Do not load paper above the maximum fill line. It
may cause paper jams or machine malfunctions.
Position the guides correctly to match the paper
size. Incorrectly positioned guides may cause misfeeding and paper jam s.
7.
Push the Tray into the machine.
The [Tray Stock Properties] window appears on the Stock Library Manager.
In the event power is disconnected while the Tray's bottom plate is rising, the plate may not move
up when the power is recovered. In this case, pull out the Tray, make sure the plate is lowered, and
then push the Tray into the machine slowly and firmly.
When paper sheets are loaded or fed, the Tray makes a sound of supplying air. This is caused by the
Air Assist function that supplies air to coated or heavy weight paper, and not an abnormal noise.
8.
Change the Tray settings.
2
28
Postcard Setting
Attach Postcard Kit to the Tray to load paper size 181.9 mm portrait or smaller.
Postcard Kit may be purchased separately.
Below is how to load paper with the Kit, taking postcards for example.
Printer Unit Manual
Page 29

1.
Important
Important
Important
1
2
1
2
1
2
1
2
1
2
1
Pull out the Tray toward you until it stops.
2.
Remove any paper remaining in the Tray.
3.
If the Postcard Kit is supplied with the Tray, loosen
the screw ( ) on the left side of the Tray to remove
the Kit ( ).
4.
Insert the small protrusion of the Kit into the notch
to the right side of the bottom of the Tray ( ). Align
the hole of the Kit with the front Tray hole and
tighten the screw to fasten the Kit ( ).
2
1
5.
Load about 100 to 500 sheets of paper with the
printed side facing up, and align the paper edges in
the direction of the arrow ( ).
Be sure to set them in short edge feed.
The right side short edge of the set postcard will be
the lead edge.
6.
Hold the long-side paper guide by its grip and move
it to lightly contact the paper edges ( ).
If the amount of the loaded paper is less than 100
sheets, the guides apply more pressure to the paper.
It may cause the paper to be distorted, leading to
paper jams.
7.
Load remaining sheets with the printed side facing
1
2
up, and align the paper edges in the direction of the
arrow ( ).
8.
Hold the short-side paper guide by its grip and move
it to lightly contact the paper edges ( ).
Do not load paper above the maximum fill line. It
may cause paper jams or machine malfunctions.
Position the guides correctly to match the paper
size. Incorrectly positioned guides may cause misfeeding and paper jam s.
2
Chapter 2 Load and Output Paper
29
Page 30

9.
Important
Note
Note
1
2
Push the Tray into the machine.
The [Tray Stock Properties] window appears on the Stock Library Manager.
In the event power is disconnected while the Tray's bottom plate is rising, the plate may not move
up when the power is recovered. In this case, pull out the Tray, make sure the plate is lowered, and
then push the Tray into the machine slowly and firmly.
When paper sheets are loaded or fed, the Tray makes a sound of supplying air. This is caused by the
Air Assist function that supplies air to coated or heavy weight paper, and not an abnormal noise.
10.
Change the Tray settings.
11.
To remove the Postcard Kit from the Tray, loosen the screw completely and then
remove the Kit.
12.
Store the Kit in place by inserting it from the left side
of the Tray ( ) and tightening the screw ( ).
Special Media Setting
Transparency
Loading side: Load sheets with the printed side facing up.
Hole punched paper
Orientation: Place the holes of paper on the right side when you face the front side of printer.
Precut tab
Orientation: Place the tabs of paper on the left side when you face the front side of printer.
Envelope
Loading side: Load sheets with the printed side facing up.
Direction with the flap open: Place the flap of Envelope on the left side when you face the front side of
printer.
Direction with the flap closed: Place the flap of Envelope on the right or near side when you face the front
side of printer.
If envelopes are loaded with the flaps unfolded, the size will not be automatically detected as standard
size.
Fold the flaps when loading self-seal envelopes.
If you place the flap of envelope closed on this side, a failure in printing might occur on the rear edge of
papers depending on the arranged images.
30
Improving Paper Feed Precision
If print skew (misregistration of print) occurs on properly loaded paper, the problem can be solved by
switching the paper feed precision.
On other than plain paper with 220 g/m2 or less, switching the paper feed precision may cause the paper jam
Important
Printer Unit Manual
because papers may not normally be fed. Also, this function has no effect when you use the Postcard Kit.
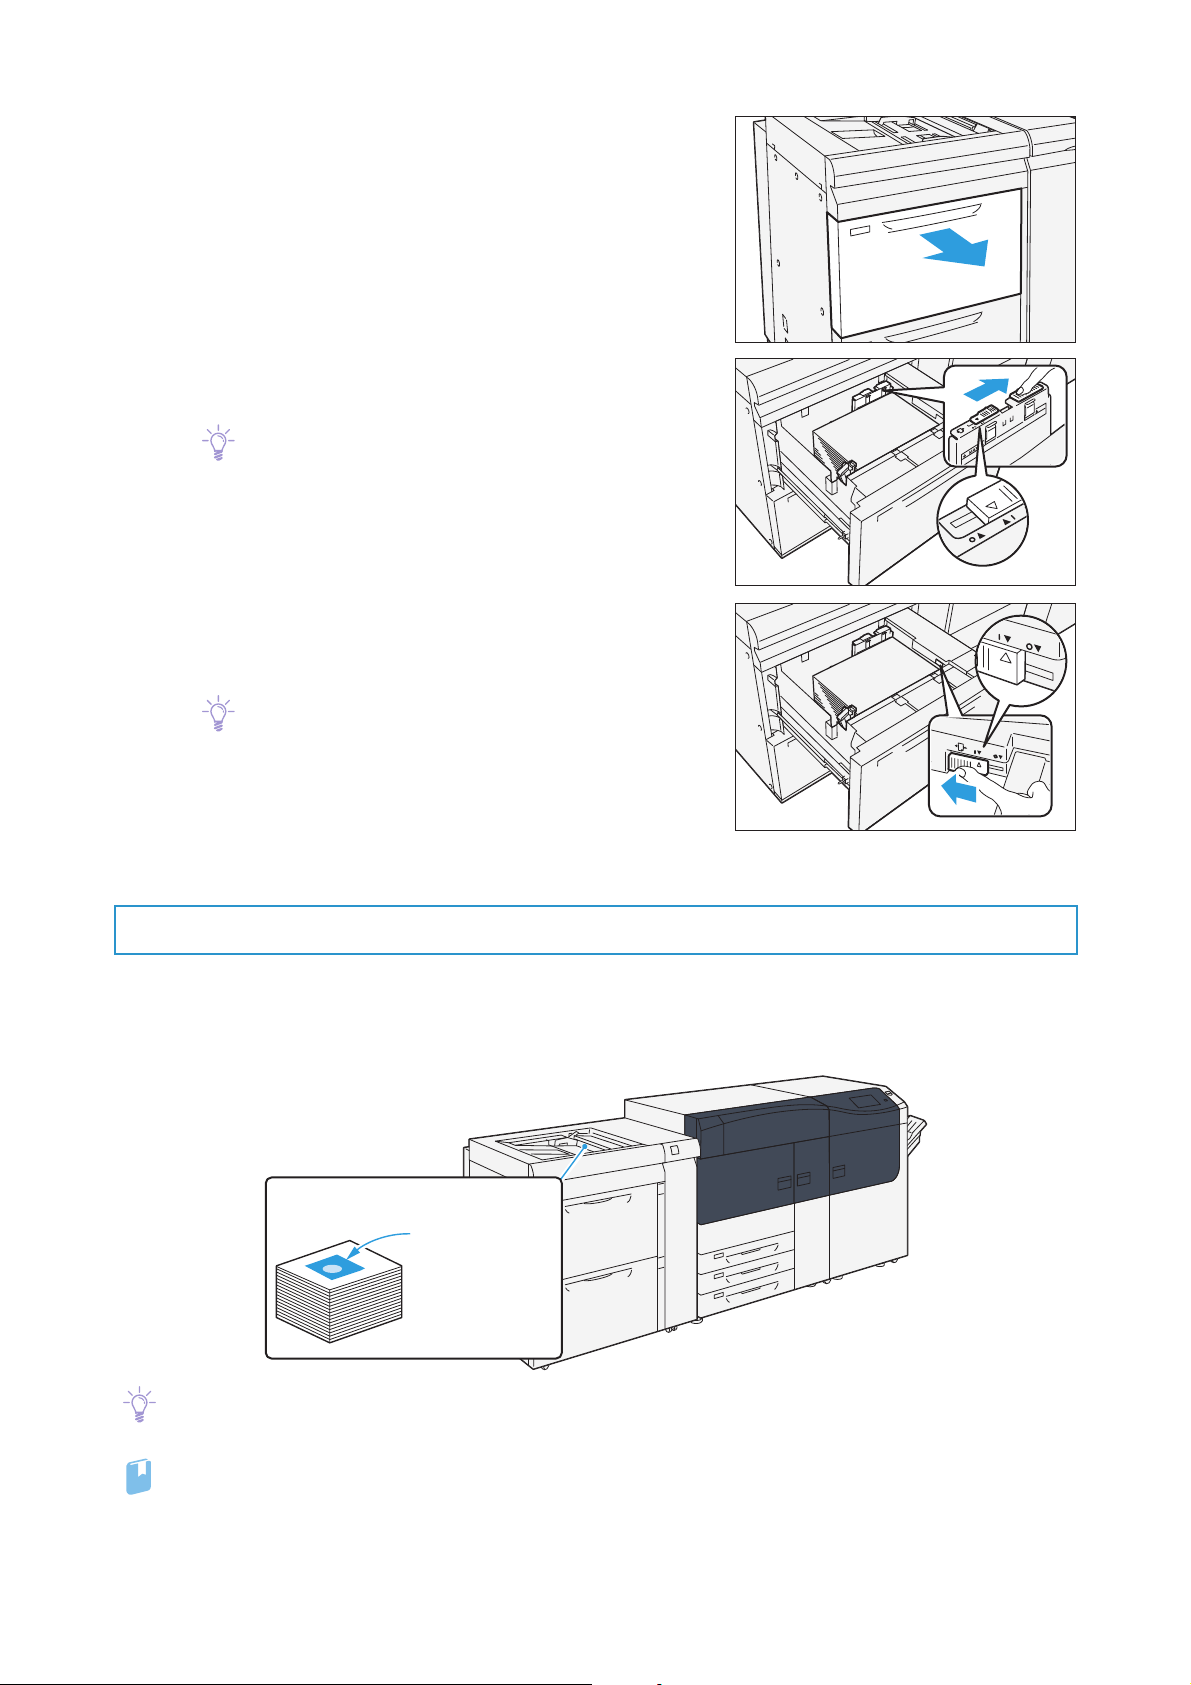
Page 31
1.
Note
Note
Note
Refer
Pull out the Tray toward you until it stops.
2.
Slide the switch on top of the long-side paper guide
to the right side until it stops.
To return the switch to its original position, slide it to
the left side until it stops.
3.
If the paper feeding does not improve after Step 2.,
slide the switch on the front right side toward the
rear side until it stops.
To return the switch to its original position, slide it
toward you until it stops.
4.
Push the Tray into the machine.
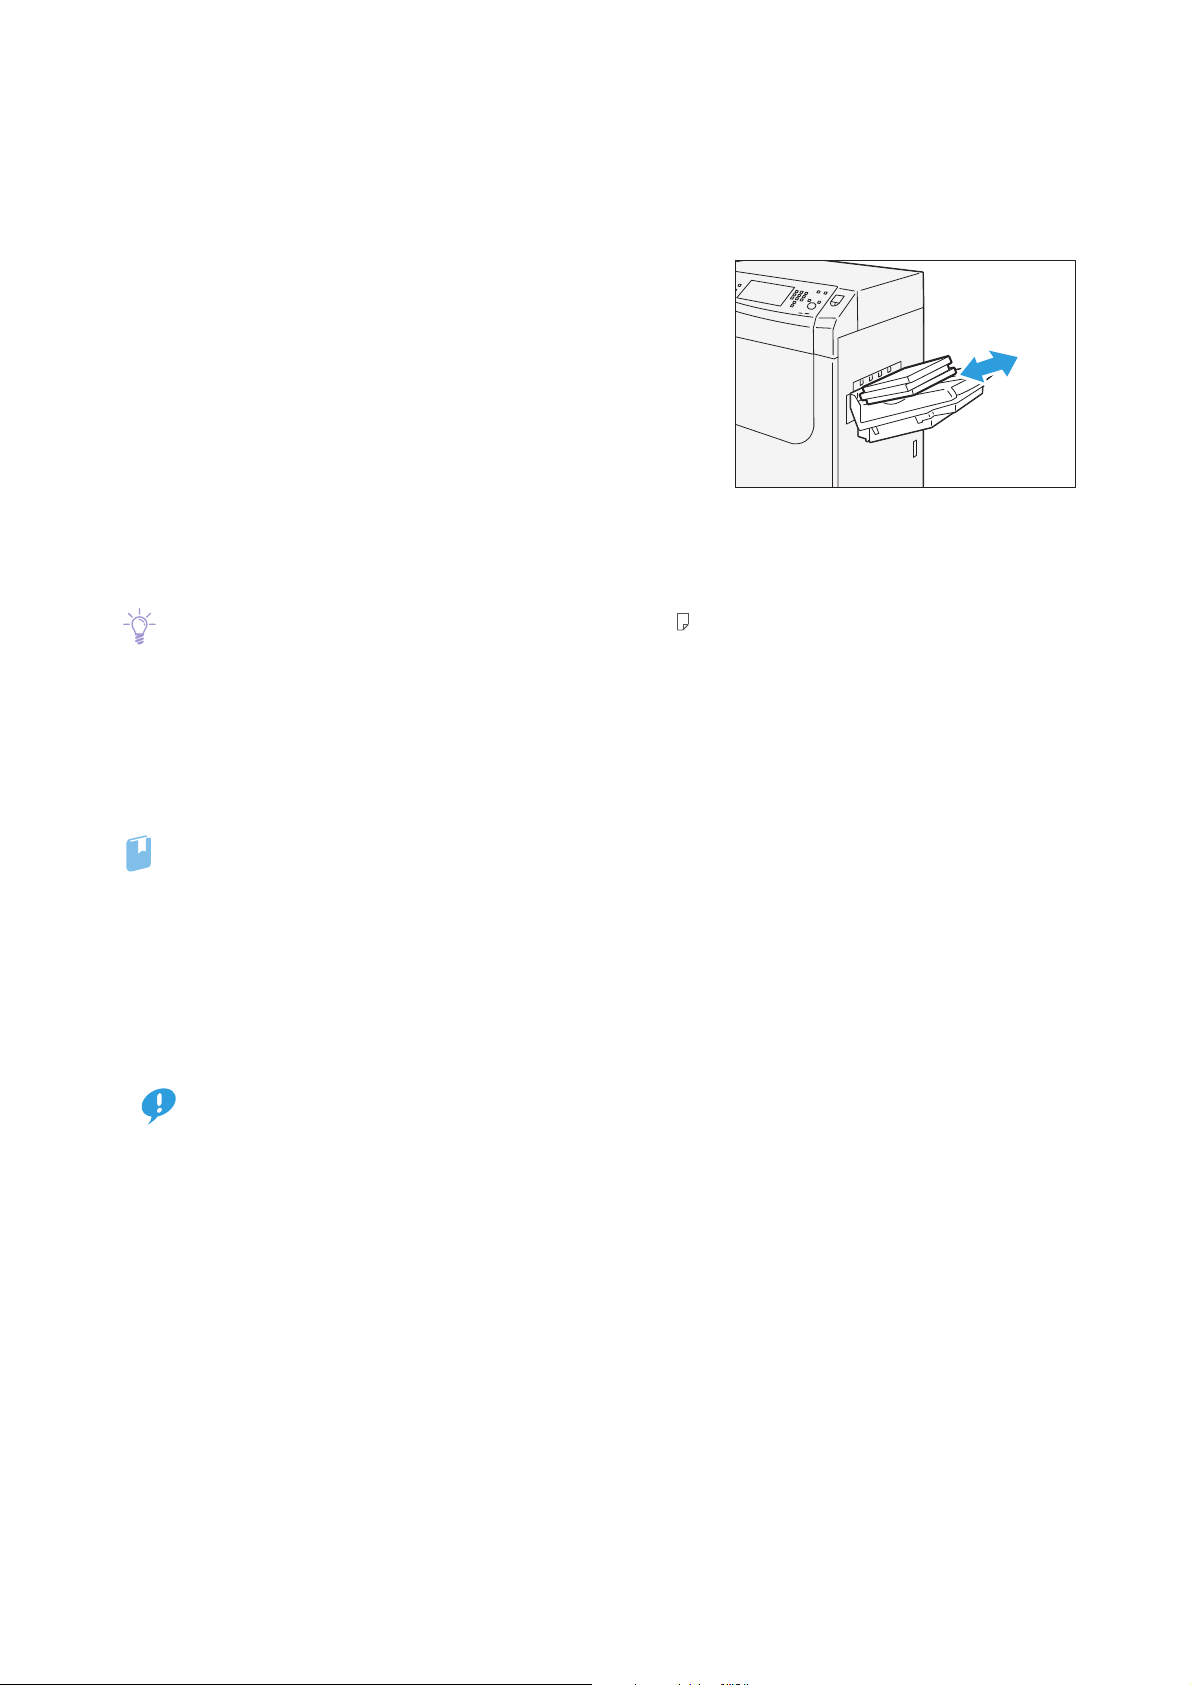
2.3.3 Loading paper in Bypass Tray
Types of paper unavailable in the Trays or High Capacity Trays can be loaded in Bypass Tray (5).
Images are printed on the face side of the loaded paper.
Up to 250 sheets (Colotech+90) can be loaded.
Printed side
If any paper remains in the Tray, remove the paper first, and put the paper and the new paper together, and
then load all of the paper into the Tray at once.
For detailed information on the paper available in Bypass Tray, refer to "2.1.2 Supported Paper" (p.18).
Chapter 2 Load and Output Paper
31
Page 32
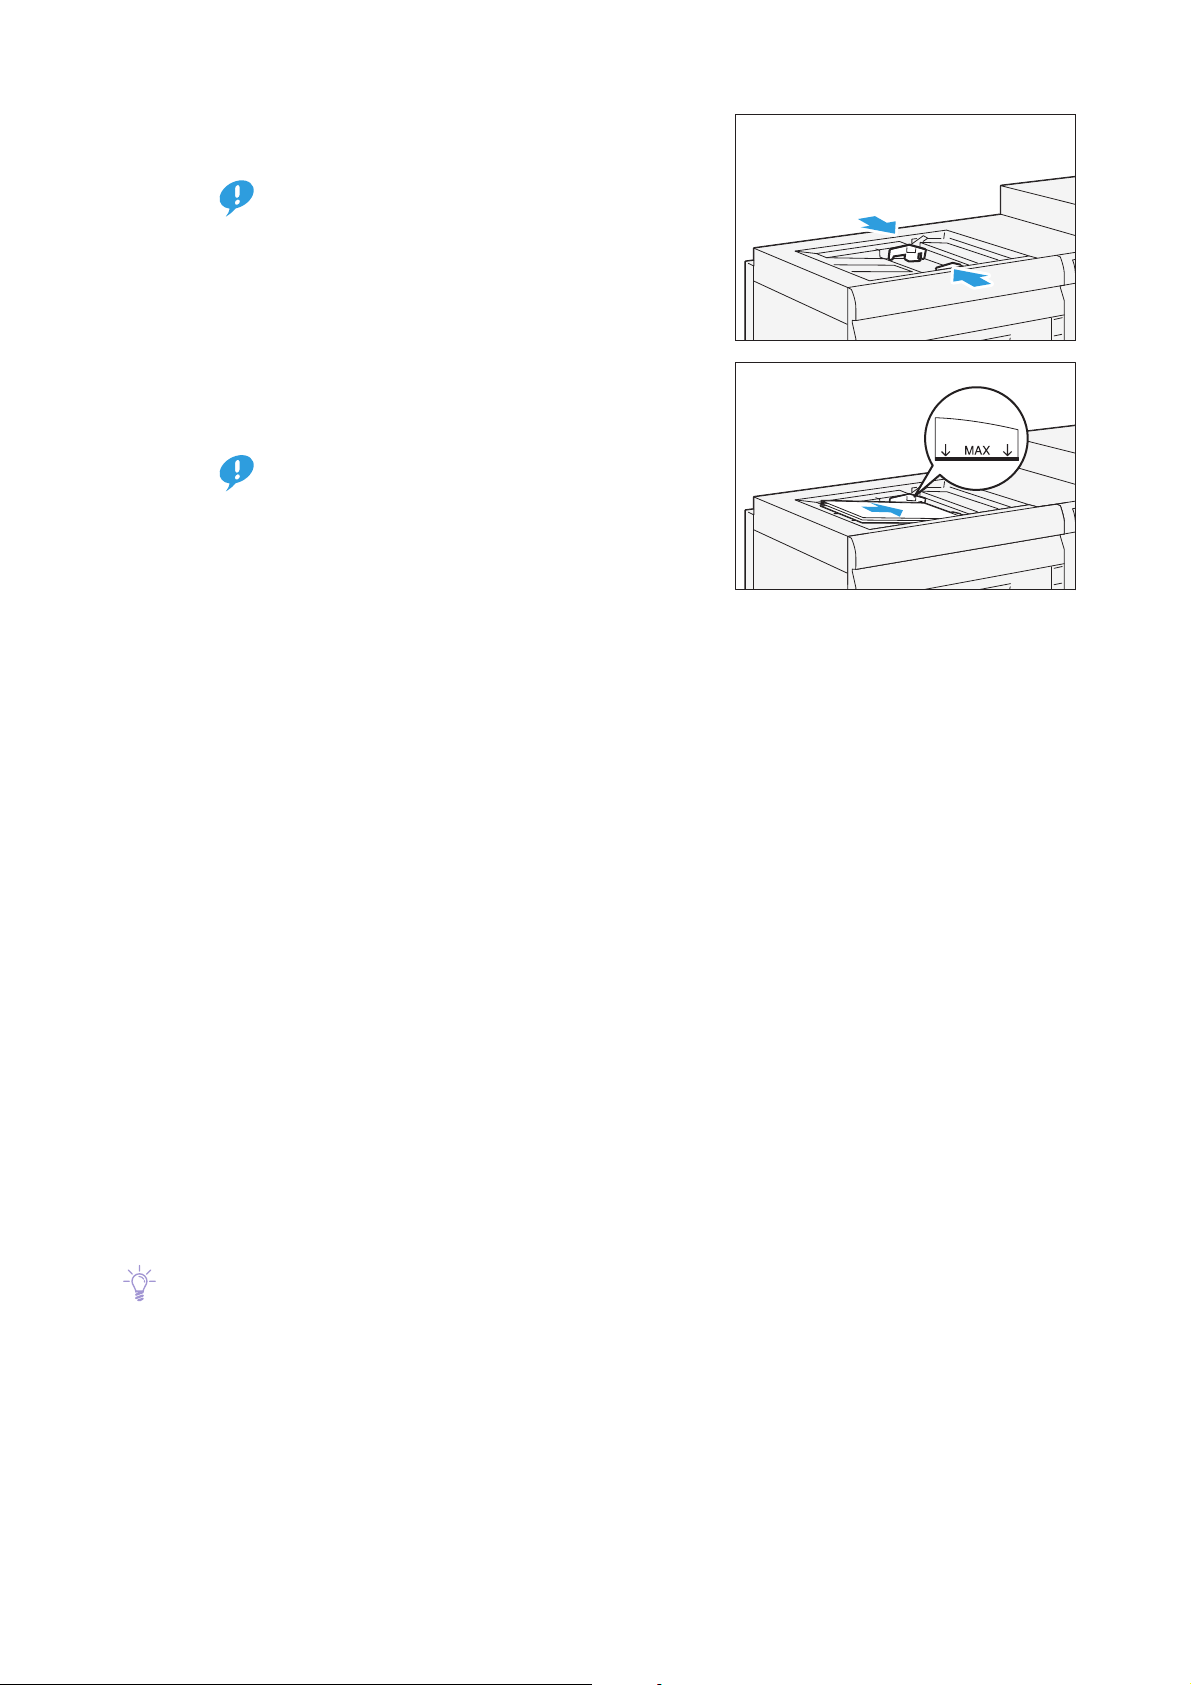
1.
Important
Important
Note
Hold the center of the paper guides and slide them to
the desired paper size.
If the distance between the guides is too long or short
relative to the paper, paper jams may occur.
2.
Fan the paper well and insert it along the paper
guide all the way until it touches the back, with the
printed side facing up.
Do not load paper above the maximum fill line. It
may cause paper jams or machine malfunctions.
3.
When loading a non-standard size paper, slightly move the paper guides to the desired
paper size.
Special Media Setting
Transparency
Loading side: Load sheets with the printed side facing up.
Hole punched paper
Orientation: Place the holes of paper on the right side when you face the front side of printer.
Precut tab
Orientation: Place the tabs of paper on the left side when you face the front side of printer.
Postcard
Orientation: SEF
Envelope
Loading side: Load sheets with the printed side facing up.
Direction with the flap open: Place the flap of Envelope on the left side when you face the front side of
printer.
Direction with the flap closed: Place the flap of Envelope on the right or near side when you face the front
side of printer.
If envelopes are loaded with the flaps unfolded, the size will not be automatically detected as standard
size.
Fold the flaps when loading self-seal envelopes.
If you place the flap of envelope closed on this side, a failure in printing might occur on the rear edge of
papers depending on the arranged images.
32
Printer Unit Manual
Page 33

Chapter 3
3.1 Troubleshooting........................................................................................33
3.2 Paper Jams in the Printer Unit............................................................41
3.3 Paper Jams in the Printer Output Unit ............................................48
3.4 Paper Jams in the High Capacity Feeder C3-DS ..........................55
Problem Solving
3.1.1 Printing Troubles.................................................................................................. 34
3.1.2 Image Quality Trouble...................................................................................... 37
3.2.1 Paper Jams in the Transfer Module............................................................. 41
3.2.2 Paper Jams in Tray.............................................................................................. 44
3.2.3 Paper Jams in the Paper Feeding Unit....................................................... 45
3.2.4 Long Paper Jam ................................................................................................... 47
3.3.1 Paper Jams in the Cooling Unit..................................................................... 48
3.3.2 Paper Jams inside the Cover .......................................................................... 51
3.3.3 Paper Jams in the Output Area..................................................................... 54
3.4.1 Paper Jams in Tray.............................................................................................. 55
3.4.2 Paper Jams inside the Right Side Cover .................................................... 57
3.1
Follow the procedures shown in this chart to solve problems.
For troubles concerning the job processing and solutions to them, refer to customer documentation supplied with Print Servers.
Troubleshooting
The printer does not work properly.
No
A message is displayed.
No
The image quality is poor.
No
Having network troubles.
No
If the error is not resolved even after following the above procedure, contact your local Fuji Xerox
representative.
Yes
Yes
Yes
Yes
"3.1.1 Printing Troubles" (p.34)
An error code is displayed.
"8.2 Error Messages" in the User Interface Manual.
Paper is jammed.
"3.2 Paper Jams in the Printer Unit" (p.41)
"3.3 Paper Jams in the Printer Output Unit" (p.48)
"3.4 Paper Jams in the High Capacity Feeder C3-DS" (p.55)
"3.1.2 Image Quality Trouble" (p.37)
"8.1 IPv4 and IPv6 Connection Problems"
in the User Interface Manual.
Chapter 3 Problem Solving
33
Page 34
3.1.1 Printing Troubles
Refer
Refer
Refer
When paper jams or any other troubles with the printer unit occurs, follow the procedures shown in the
touch screen. If the machine does not work properly after taking the procedure, contact your local Fuji
Xerox representative.
Troubles with the Printer Unit
Symptom Cause Remedy
Power switch is on, but
printer is not turned on
"1.2 Power
On/Off"
(p.12)
The <Error> indicator is
blinking
The <Error> indicator is lit Is there a paper jam? Follow the instruction displayed and remove
Is the emergency main power switch
in the
<|>
(ON) position?
Is the circuit breaker switch in the
"ON" (upper position)?
The printer unit or optional units may
be having trouble.
The hard disk may not be recognized. Switch off the printer and then on again.
Is any cover open? Follow the instructions displayed to solve the
Is any massage shown, suggesting
the replacement of consumables?
Is any error massage shown? Follow the instructions displayed to solve the
Press the main power switch to the
position.
Press the circuit breaker switch to the "ON"
(upper position).
Switch off the printer and then on again.
Confirm that the power to the High Capacity
Feeder C3-DS and optional unit is on.
jammed papers.
problem.
Follow the instructions displayed to solve the
problem.
problem.
If an error code such as "016-450" is displayed,
check the error code list and solve the problem.
<|>
(ON)
The touch screen is too
dark
"8.2 Error Messages" in the User
Interface Manual.
Is the <Power Saver> button lit? The printer is in the Power Saver mode.
Press the <Power Saver> button on the control
panel to exit the Power Saver mode.
"1.4 Power Saver Mode" in the
User Interface Manual.
34
Printer Unit Manual
Page 35
Refer
Refer
Refer
Symptom Cause Remedy
Unable to print Is the message "Machine Cooling in
The printer is in cooling mode. Please wait.
Progress" displayed on the touch
screen?
Is any of below happening?
The power was left OFF for a long
It may take time to start printing as image
quality adjustment is in progress.
time.
A job was sent right after the printer
returned from the Sleep mode.
A job with large volume was sent.
Does the loaded paper correspond
with the stock set with Stock Library
Load the corresponding paper and print the
job again.
Manager?
Troubles with the Trays
"2.3 Loading Paper" (p.25)
Symptom Cause Remedy
Unable to insert or
remove the Tray
Did you open a cover or turn the
power switch off during printing?
Do not forcibly insert or remove the Tray. Turn the power
switch off. In a few seconds, switch on the power.
When the printer is ready to receive data, insert or
remove the Tray.
"1.2.1 Services Home" in the User
Interface Manual.
Stock Library Manager Manual
Indicated paper level
is wrong
Tray bottom plate
does not move up
(High Capacity
Trays)
Is there extra paper or any object
placed in a space in the Tray?
Placing extra paper or anything in the space may cause
the printer to recognize incorrect paper size or paper
level or to malfunction. Make sure nothing is placed in
the space.
Is paper loaded correctly? First remove all the paper from the Tray, and then
reload it correctly. Slide the long-side and short-side
paper guides to just touch the edges of the paper. Push
the Tray into the machine slowly and firmly.
Is any paper sheet stuck at the
exit of the Tray?
Was power supply disconnected
while the bottom plate was rising?
Remove jammed papers and push the Tray into the
machine slowly and firmly.
If yes, the bottom plate may fail to move up when the
printer is powered on again.
In this case, pull out the Tray, make sure the plate is
lowered, and then push the Tray into the machine
slowly and firmly.
Is there extra paper or any object
placed in a space in the Tray?
Placing extra paper or anything in the space may cause
the printer to recognize incorrect paper size or paper
level or to malfunction. Make sure nothing is placed in
the space.
Is the paper curled? Turn over or flatten the curled paper, or replace with
uncurled paper.
Do not use 12 mm or more curled paper.
Is the loaded paper different from
what is set on the Stock Library?
Change the stock settings to match the loaded paper.
Load the same paper set on the Stock Library.
Chapter 3 Problem Solving
35
Page 36

Symptom Cause Remedy
Tray 5 - 9 are not
displayed on the
touch screen
Indicated paper level
is wrong (High
Capacity Trays)
Are the main unit and the High
Capacity Feeder C3-DS
connected?
Is the Tray inserted correctly? Pull out the Tray, make sure the plate is lowered, and
Make sure the devices are securely connected.
then push the Tray into the machine slowly and firmly.
It may take some time for the printer to indicate the
paper level. This is because the printer is raising the
bottom plate or setting up the Air Assist function, and
thus not a malfunction.
Troubles Concerning the Paper
Symptom Cause Remedy
Paper jams or wrinkles
on paper occurs
frequently (problems
in how the paper is
loaded)
Are the paper and Tray settings
correct?
Are the paper guides set correctly? Load the paper correctly, and align the paper guides
Is paper exceeding the maximum
fill line in the Tray?
Please check if the set stock setting (size, type, weight
etc.) and the paper match.
Refer
with the paper.
Load paper in the Tray so that it does not exceed the
maximum fill line.
Stock Library Manager Manual
Paper jams or wrinkles
on paper occurs
frequently (problems
with the paper itself)
Are the special media loaded with
correct orientation?
Are there any torn pieces of paper
or foreign objects left in the
printer?
Is unsupported paper loaded in
the Tray?
Is the paper finely cut out? Some types of paper may not be cut correctly. Load
Is any folded or wrinkled paper
loaded in the Tray?
Is the paper damp? Replace with fresh paper that has just been unpacked.
Are edges or holes of the loaded
paper sheets neatly aligned?
Is the paper curled? Turn over or flatten the curled paper, or replace with
Is paper curl correction properly
configured?
Load the media in correct direction.
Refer
Check for jammed or torn paper, or any other objects
in the parts where paper often jams.
Replace with supported paper.
the paper after fanning it.
Remove folded or wrinkled paper sheets, or replace
with new paper.
Replace paper having irregular edges or holes.
uncurled paper.
Do not use 12 mm or more curled paper.
Perform curl correction.
"2.3 Loading Paper" (p.25)
36
Printer Unit Manual
Page 37

3.1.2 Image Quality Trouble
Refer
If the image quality of a printed document is poor, identify the symptom in the following table to perform
the remedy.
If image quality does not improve even after performing the remedy, contact your local Fuji Xerox representative.
Symptom Cause Remedy
Color density is less than desired. Output characteristics has
Tone jumping or tonal defect appears.
Colors do not match the previously
printed samples.
Printing is faint (rough, smudged,
unclear).
been changed by the
changes in environment or
conditions.
The paper is damp. Replace paper.
The Fusing Module may be
dirty.
There is a possibility of
transfer defect.
The drum cartridge has
deteriorated or is damaged.
The toner is old. Clean the toner on a regular basis.
Correct the print quality with Full Width
Array.
Refer
Clean the Fusing Module on a regular basis.
Refer
Specify each item for [Advanced Stock
Setup] on Stock Library.
Refer
Contact your local Fuji Xerox representative
to replace the Drum Cartridge.
Refer
"3.3.2 Full Width Array" in the
User Interface Manual.
"3.3.1 Clean Fusing Unit" in the
User Interface Manual.
"Stock Library" in the Stock
Library Manager Manual.
"4.1.8 Maintenance" in the User
Interface Manual.
There is no toner left in the
toner cartridge.
Black dots are printed. The Fusing Module may be
dirty.
The drum cartridge has
deteriorated or is damaged.
Black or colored lines are printed. The Fusing Module may be
dirty.
The drum cartridge has
deteriorated or is damaged.
Replace the toner cartridge with a new one.
Clean the Fusing Module on a regular basis.
"3.3.1 Clean Fusing Unit" in the
User Interface Manual.
Contact your local Fuji Xerox representative
to replace the Drum Cartridge.
Clean the Fusing Module on a regular basis.
Refer
Contact your local Fuji Xerox representative
to replace the Drum Cartridge.
"3.3.1 Clean Fusing Unit" in the
User Interface Manual.
Chapter 3 Problem Solving
37
Page 38

Symptom Cause Remedy
Feed Direction
Dirt appears at equal intervals. The paper path is dirty. Print a few pages to remove the dirt.
The Fusing Module may be
dirty.
The drum cartridge has
deteriorated or is damaged.
White dots appear in black filled areas. The paper is unsuitable. Load suitable paper.
The Fusing Module may be
dirty.
The drum cartridge has
deteriorated or is damaged.
The toner is old. Clean the toner on a regular basis.
Printed toner smudges when rubbed
with your finger.
Toner is not fused.The paper is soiled
with toner.
The paper is damp. Replace paper.
The paper setting is
unsuitable.
Clean the Fusing Module on a regular basis.
Refer
Contact your local Fuji Xerox representative
to replace the Drum Cartridge.
Clean the Fusing Module on a regular basis.
Refer
Contact your local Fuji Xerox representative
to replace the Drum Cartridge.
Refer
Load the paper type and paper weight
correctly.
"3.3.1 Clean Fusing Unit" in the
User Interface Manual.
"3.3.1 Clean Fusing Unit" in the
User Interface Manual.
"4.1.8 Maintenance" in the User
Interface Manual.
38
The entire paper area is printed black. The drum cartridge has
deteriorated or is damaged.
High-voltage power supply
may have malfunctioned.
Nothing is printed. Multifeed (multiple sheets
transferred simultaneously)
occurs.
Power supply or highvoltage power supply may
have malfunctioned.
Printer Unit Manual
Contact your local Fuji Xerox representative
to replace the Drum Cartridge.
Contact your local Fuji Xerox representative.
Fan the paper well and load it again.
Contact your local Fuji Xerox representative.
Page 39

Symptom Cause Remedy
Feed Direction
White areas or white or colored stripes
appear.
The entire output is faint. Multifeed (multiple sheets
Paper becomes wrinkled. The paper is unsuitable. Replace paper.
The paper is damp. Replace paper.
The paper is unsuitable. Load suitable paper.
Fan the paper well and load it again.
transferred simultaneously)
occurs.
Paper has been added to
the paper loaded.
The paper is damp.
Text is blurred. The paper is unsuitable. Replace paper.
Paper has been added to
the paper loaded.
The paper is damp.
White or color patches appear
vertically.
The Fusing Module may be
dirty.
The drum cartridge has
deteriorated or is damaged.
No toner remains in the
toner cartridge.
Clean the Fusing Module on a regular basis.
Refer
Contact your local Fuji Xerox representative
to replace the Drum Cartridge.
Replace the toner cartridge with a new one.
"3.3.1 Clean Fusing Unit" in the
User Interface Manual.
Chapter 3 Problem Solving
39
Page 40
Symptom Cause Remedy
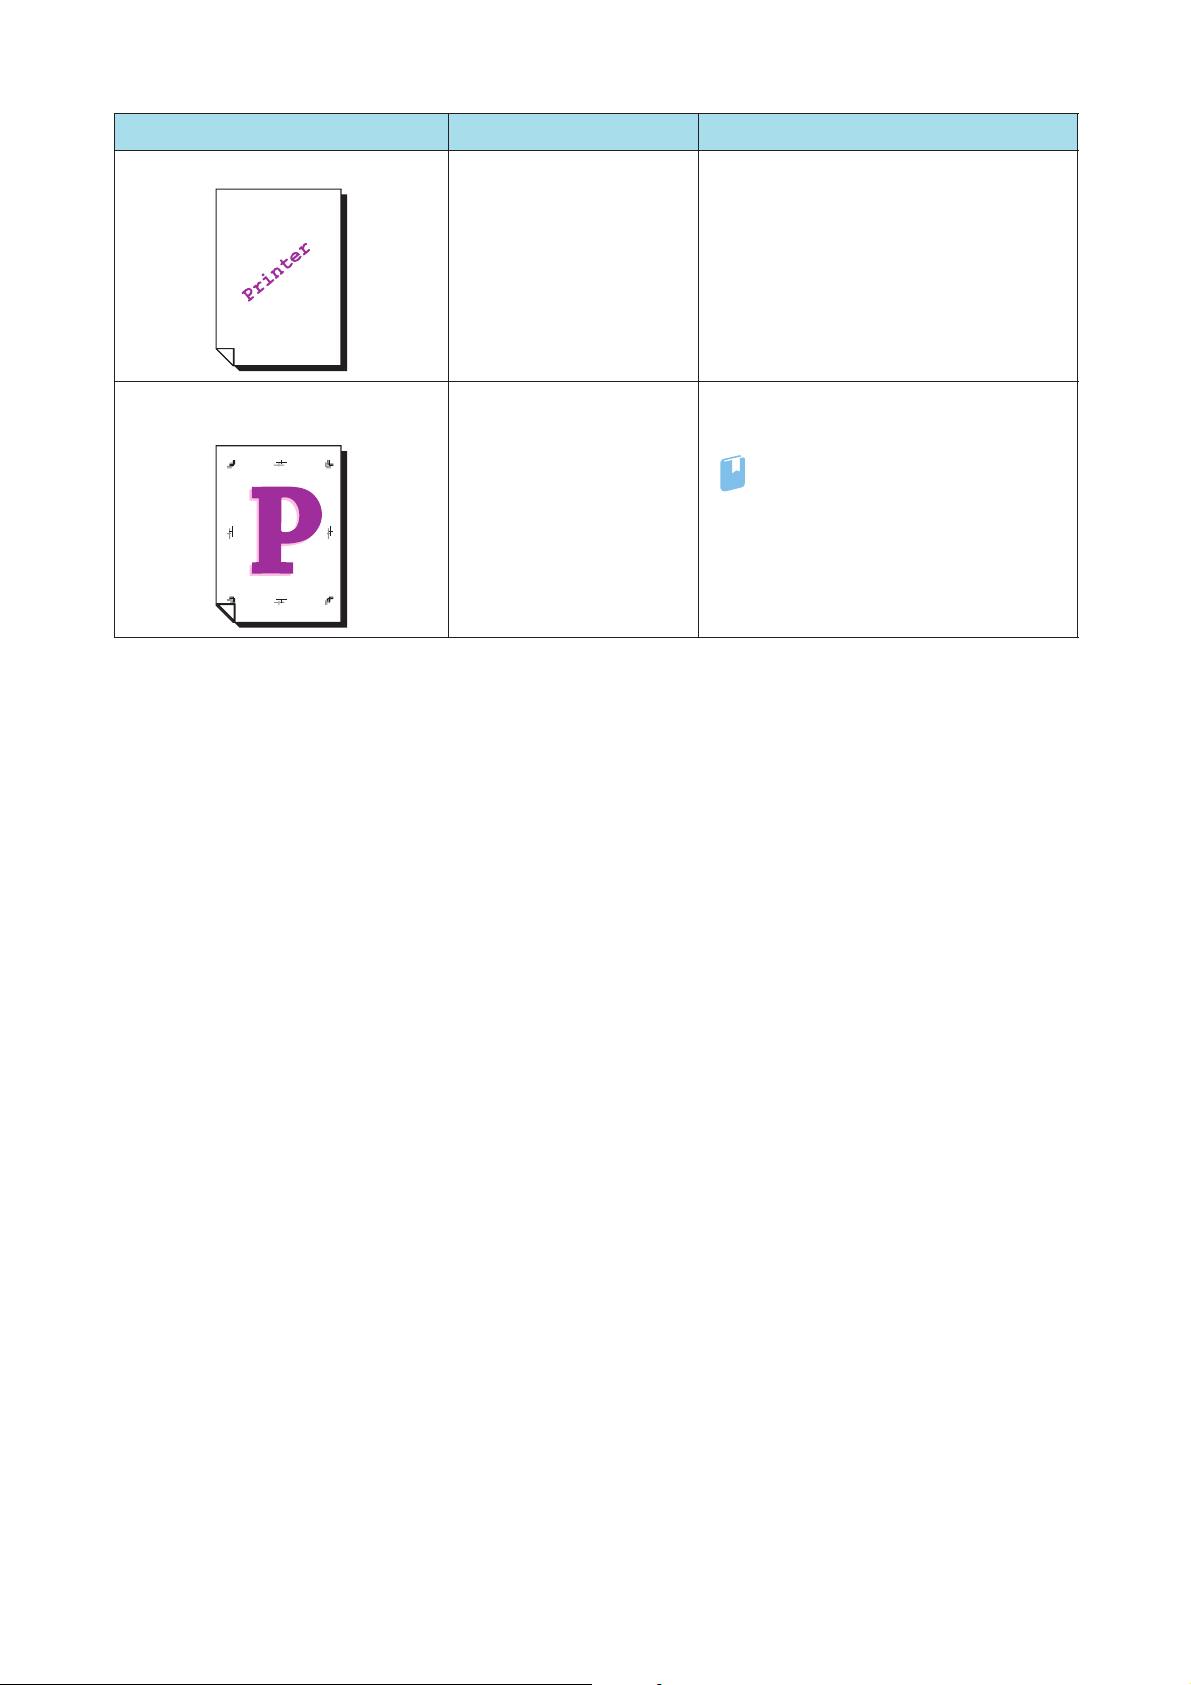
Text or images are printed at an angle. Paper guides in the Trays
are not in the right position.
Prints on the front and back side of the
paper are off-center.
Alignment (registration
adjustment) is not properly
set.
Place the long-side and short-side paper
guides in the right position.
Create an alignment profile to correct the
misregistration.
Refer
"Profiles" in the Stock Library
Manager Manual.
40
Printer Unit Manual
Page 41

3.2
Refer
Important
Note
Paper Jams in the Printer Unit
If there is a paper jam, the printing will be canceled.
The Error Message area of the touch screen will show the affected area in red, along with the message.
If there is a paper jam in the following area, tap the [Faults] and the [Faults] screen will appear, explaining
how to remove jammed papers.
For detailed information on how to regard the messages, refer to "1.2.1 Services Home" in the User Interface
Manual.
CAUTION
Do not attempt to remove a paper jammed inside the printer, particularly a paper wrapped around a
Fusing Unit or a heat roller. Otherwise, it may cause injuries or burns. Switch off the product
promptly immediately and contact your local Fuji Xerox representative.
Always follow all warning instructions marked on or supplied with this printer.
To avoid the risk of burn injuries and electric shock, never touch the area with the "High Temperature" or "High Voltage" marks on.
Remove the paper only after you are sure the printer is no longer moving.
After removing jammed papers, be sure to close the cover. Leaving the cover open will not be able to continue to print jobs.
Leave the power on and proceed to remove jammed papers.
If there is still paper remaining, the paper jam message will continue to display. Make sure that there is no
jammed paper left and also no jams in other places.
3.2.1 Paper Jams in the Transfer Module
Follow the steps below to clear paper jams in the Transfer Module.
CAUTION
When pulling out the Transfer Module, do it gently. If pulled out with too much force, the module can
hit and injure your knees.
Chapter 3 Problem Solving
41
Page 42

1.
Important
Note
Important
Note
Open the left side and center covers of the printer
unit.
2.
Turn lever "2" in the unlocking direction (toward the
opened-lock mark).
3.
Grip lever "2" and gently pull out the Transfer Module
toward you until it stops.
If the paper is curled and caught in the Transfer Module, stop
pulling when the jammed paper is visible, and then continue to
pull it out while holding down the paper with a hand.
4.
Remove jammed papers.
Paper Jams at Area "2a" ...................................................................................................................................................p.42
Paper Jams at Lever "2b"..................................................................................................................................................p.43
Paper Jams at Area "2c"....................................................................................................................................................p.43
Paper Jams at Lever "2d" / "2e" ......................................................................................................................................p.43
Paper Jams at Lever "2f"...................................................................................................................................................p.44
Be sure to remove jammed papers in the Areas "2a" and "2c", and then remove the paper at the
Levers "2b" and "2d" / "2e".
Solutions differ depending on where the paper jam occurs. Confirm the jammed area in the Error
Message area.
Paper Jams at Area "2a"
(1) Remove jammed papers rightward.
If you pull out the paper in the opposite way, smudge
will remain inside.
If you cannot see any jammed paper, check lever
"2b" and area "2c" as well.
If there are sheets in both lever "2b" and area "2c",
remove the paper in area "2c" first.
42
Printer Unit Manual
Page 43

Paper Jams at Lever "2b"
Note
Note
Important
Note
Note
1
2
(1) Open lever "2b" upward ( ) and remove jammed
papers ( ).
2
Remove the paper while holding lever "2b" with the
other hand.
(2) Return lever "2b" to its original position.
If you cannot see any jammed paper, check levers
"2d" / "2e" and "2f" as well.
Paper Jams at Area "2c"
(1) Remove jammed papers leftward.
If you pull out the paper in the opposite way, smudge
will remain inside.
If you cannot see any jammed paper, check levers
"2b" and "2d" / "2e" as well.
Paper Jams at Lever "2d" / "2e"
(1) Open lever "2d" upward ( ) and lever "2e" to the
right ( ). Remove jammed papers ( ).
1
3
(2) Return levers "2d" and "2e" to their original positions.
If you cannot see any jammed paper, check levers
"2b" and "2f" as well.
Chapter 3 Problem Solving
43
Page 44

Paper Jams at Lever "2f"
1
1
(1) Open lever "2f" downward ( ) and remove jammed
papers ( ).
(2) Return lever "2f" to its original position.
5.
Push the Transfer Module gently into the machine
2
until it stops ( ).
6.
Turn lever "2" in the locking direction (toward the
closed-lock mark) ( ).
7.
Close the covers.
2
3.2.2 Paper Jams in Tray
Follow the steps below to clear paper jams in Tray.
CAUTION
When pulling out the Tray, do it gently. If pulled out with too much force, the Tray can hit and injure
your knees.
44
Printer Unit Manual
Page 45

1.
Pull out the Tray where the paper jam occurred
toward you until it stops.
2.
Remove jammed papers.
3.
Make sure the long-side and short-side paper guides
are positioned to just touch the paper, and then push
the Tray into the machine.
3.2.3 Paper Jams in the Paper Feeding Unit
Follow the steps below to clear paper jams in the paper feeding unit, from the High Capacity Feeder C3DS.
1.
Open the right side cover of the High Capacity
Feeder C3-DS.
Chapter 3 Problem Solving
45
Page 46

2.
2
1
1
2
Open lever "1d" upward ( ) and remove jammed
papers ( ).
3.
Return lever "1d" to its original position.
4.
If you cannot see any jammed paper, open the cover
on the lower right (the cover on the left side of the
printer unit).
5.
Remove jammed papers.
6.
Close the cover.
46
Printer Unit Manual
Page 47

3.2.4 Long Paper Jam
Refer
If you open the cover of printer unit while printing a long paper, the paper is remained in the paper feeding unit and you cannot remove the paper.
In this case, remove the paper with the following steps.
1.
Close the cover of printer unit.
2.
Wait until the paper is passed to the Transfer Module.
When the paper is transferred, a message in the Error Message area is changed.
3.
Pull the Transfer Module out, and then remove the paper remained in the area, "2a" or
"2c".
While pulling the Transfer Module out, stop when the jammed paper is visible, and then continue to pull
it out with the paper holding down by a hand.
For detailed information on Step 3, refer to "3.2.1 Paper Jams in the Transfer Module" (p.41).
When Optional Units are Installed
If the jammed paper is lying across more than one unit, open the levers of units on both sides that are
indicated in the Error Message area before you remove the jammed paper.
Levers you may open if the jammed paper is lying across multiple areas include:
Printer Unit…3a
Interface Decurler…1c
Inserter…1a, 1d
High Capacity Stacker…entry: 1b; exit: 3b
Crease and Two-sided Trimmer…entry: 1a; exit: 1d
Folder Unit…2a
Finisher…1a
For example, if a paper jam occurs in the location shown in the figure above, you must open "3a" for
Printer Unit, "1c" for Interface Decurler, "1a" and "1d" for Inserter, and "1b" for High Capacity Stacker
before you can remove the jammed paper.
Chapter 3 Problem Solving
47
Page 48

3.3
Refer
Important
Note
CAUTION
Paper Jams in the Printer Output Unit
If there is a paper jam, the printing will be canceled.
The Error Message area of the touch screen will show the affected area in red, along with the message.
If there is a paper jam in the following area, tap the [Faults] and the [Faults] screen will appear, explaining
how to remove jammed papers.
For detailed information on how to regard the messages, refer to "1.2.1 Services Home" in the User Interface
Manual.
CAUTION
Do not attempt to remove a paper jammed inside the printer, particularly a paper wrapped around a
Fusing Unit or a heat roller. Otherwise, it may cause injuries or burns. Switch off the product
promptly immediately and contact your local Fuji Xerox representative.
Always follow all warning instructions marked on or supplied with this printer.
To avoid the risk of burn injuries and electric shock, never touch the area with the "High Temperature" or "High Voltage" marks on.
Remove the paper only after you are sure the printer is no longer moving.
After removing jammed papers, be sure to close the cover. Leaving the cover open will not be able to continue to print jobs.
Leave the power on and proceed to remove jammed papers.
If there is still paper remaining, the paper jam message will continue to display. Make sure that there is no
jammed paper left and also no jams in other places.
3.3.1 Paper Jams in the Cooling Unit
Follow the steps below to clear paper jams in the Cooling Unit.
When pulling out the Cooling Unit, do it gently. If pulled out with too much force, the unit can hit and
injure your knees.
48
Printer Unit Manual
Page 49

1.
Note
Open the right side cover of the printer unit.
2.
Turn lever "4" in the unlocking direction (toward the
opened-lock mark).
3.
Grip lever "4" and gently pull out the Cooling Unit
toward you until it stops.
4.
Remove jammed papers.
Paper Jams at Knob "4a" ..................................................................................................................................................p.49
Paper Jams at Lever "4b" / "4d"......................................................................................................................................p.50
Paper Jams at Lever "4c"...................................................................................................................................................p.50
Solutions differ depending on where the paper jam occurs. Confirm the jammed area in the Error
Message area.
Paper Jams at Knob "4a"
(1) Remove the paper in sight.
Chapter 3 Problem Solving
49
Page 50
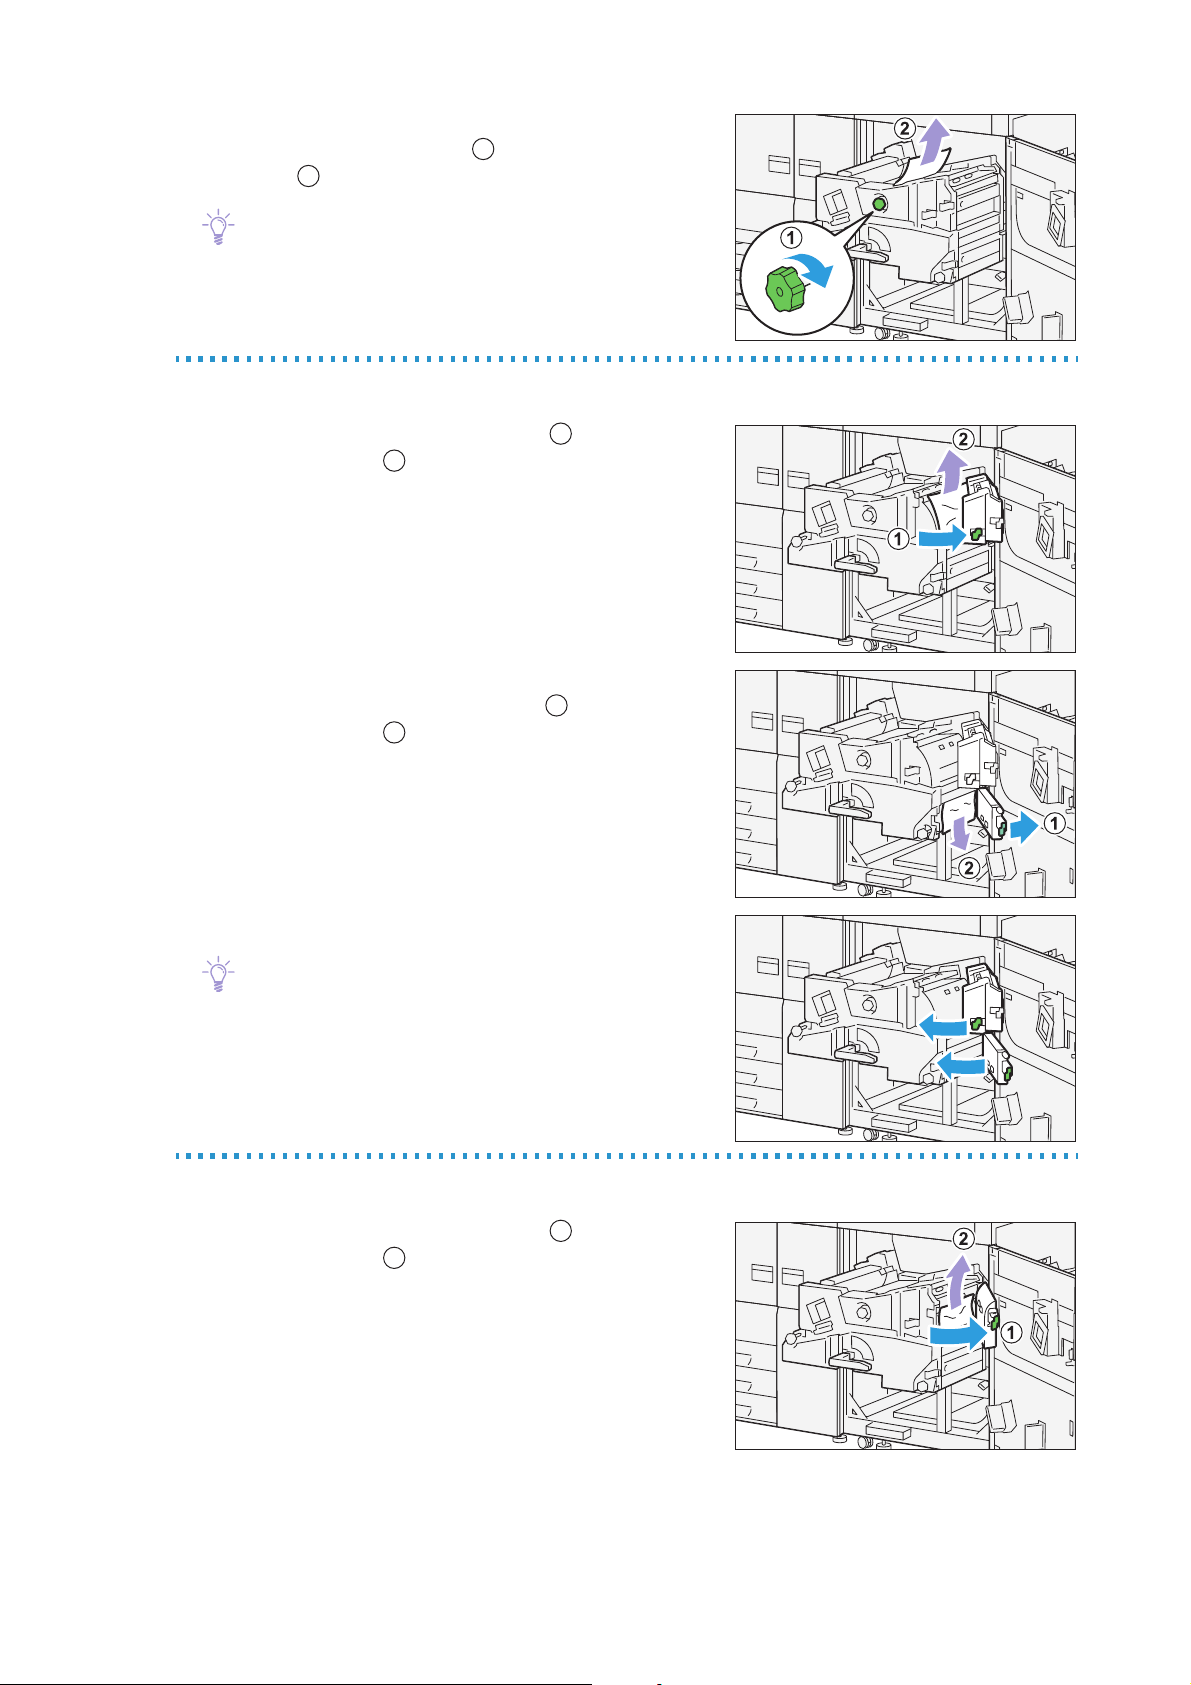
(2) If you have difficulty in removing jammed papers,
Note
Note
1
2
1
2
1
2
turn knob "4a" clockwise ( ), and remove jammed
papers ( ).
2
If you cannot see any jammed paper, check levers
"4b" / "4d" as well.
1
Paper Jams at Lever "4b" / "4d"
(1) Open lever "4b" to the right ( ) and remove
jammed papers ( ).
(2) If you have difficulty in removing jammed papers,
open lever "4d" to the right ( ), and remove
jammed papers ( ).
(3) Return levers "4b" and "4d" to their original positions.
If you cannot see any jammed paper, check lever "4c"
as well.
Paper Jams at Lever "4c"
(1) Open lever "4d" to the right ( ) and remove
jammed papers ( ).
50
Printer Unit Manual
Page 51

(2) Return lever "4c" to its original position.
Note
Note
1
If you cannot see any jammed paper, check lever "4d"
as well.
5.
Push the Cooling Unit gently into the machine until it
stops ( ).
6.
Turn lever "4" in the locking direction (toward the
closed-lock mark) ( ).
7.
Close the cover.
2
3.3.2 Paper Jams inside the Cover
Follow the steps below to clear paper jams inside the cover.
1.
Open the right side cover of the printer unit.
2.
Remove jammed papers.
Paper Jams at Lever "3a" / Knob "3b" ..........................................................................................................................p.52
Paper Jams at Lever "5a" / Knob "5b" ..........................................................................................................................p.52
Paper Jams at Lever "5c" / Knob "5d"...........................................................................................................................p.53
Solutions differ depending on where the paper jam occurs. Confirm the jammed area in the Error
Message area.
Chapter 3 Problem Solving
51
Page 52

Paper Jams at Lever "3a" / Knob "3b"
Important
Important
1
2
2
1
2
1
(1) Open lever "3a" to the upper ( ) and remove
jammed papers ( ).
(2) If you have difficulty in removing jammed papers,
turn knob "3b" clockwise ( ), and remove jammed
1
papers rightward ( ).
There may be extra sheets remaining in the printer
unit. Be sure to turn the knob at least 3 times to check
for extra sheets.
(3) Return lever "3a" to its original position.
Paper Jams at Lever "5a" / Knob "5b"
(1) Open lever "5a" downward ( ) and remove jammed
papers ( ).
(2) If you have difficulty in removing jammed papers,
turn knob "5b" clockwise ( ), and remove jammed
papers ( ).
2
If you turn the Knob "5b" when no paper is jammed at
the Lever "5a" or after removing jammed papers at
the Lever "5a", paper jam may occur in other areas.
52
Printer Unit Manual
Page 53

(3) Return lever "5a" to its original position.
Note
Note
2
1
(4) Remove the fallen paper inside the printer if there is
any.
If you cannot see any jammed paper, check lever "5c"
as well.
Paper Jams at Lever "5c" / Knob "5d"
(1) Open lever "5c" downward ( ) and remove jammed
1
papers ( ).
(2) If you have difficulty in removing jammed papers,
turn knob "5d" clockwise ( ), and remove jammed
papers ( ).
2
(3) Return lever "5c" to its original position.
If you cannot see any jammed paper, check lever "5a"
as well.
3.
Close the cover.
Chapter 3 Problem Solving
53
Page 54

3.3.3 Paper Jams in the Output Area
Follow the steps below to clear paper jams in the output area.
1.
Remove the paper stuck at the exit.
54
Printer Unit Manual
Page 55

3.4
Note
Refer
Paper Jams in the High Capacity Feeder C3-DS
If there is a paper jam, the printing will be canceled.
The Error Message area of the touch screen will show the affected area in red, along with the message.
Also, the error lamp on the top of the machine will illuminate.
If there is a paper jam in the following area, tap the [Faults] and the [Faults] screen will appear, explaining
how to remove jammed papers.
Remove the paper only after you are sure the printer is no longer moving.
Important
After removing jammed papers, be sure to close the cover. Leaving the cover open will not be able to continue to print jobs.
Leave the power on and proceed to remove jammed papers.
If there is still paper remaining, the paper jam message will continue to display. Make sure that there is no
jammed paper left and also no jams in other places.
For detailed information on how to regard the messages, refer to "1.2.1 Services Home" in the User Interface
Manual.
3.4.1 Paper Jams in Tray
Follow the steps below to clear paper jams in Tray.
CAUTION
When pulling out the Tray, do it gently. If pulled out with too much force, the Tray can hit and injure
your knees.
Chapter 3 Problem Solving
55
Page 56

1.
Note
Refer
Important
Refer
Important
Remove jammed papers.
When Lamp E5 is Lit...........................................................................................................................................................p.56
When Lamp E6 is Lit...........................................................................................................................................................p.56
When Lamp E7 is Lit...........................................................................................................................................................p.57
Solutions differ depending on where the paper jam occurs. Confirm the jammed area in the Error
Message area.
The code (E) on the upper-left part of the message indicates which error lamp on the top of the
machine is illuminating.
When Lamp E5 is Lit
When the 2nd High Capacity Feeder C1-DS is installed, refer to "Chapter 1 2nd High Capacity
Feeder C1-DS" in the Optional Units Manual.
(1) Open the cover on the top of the Bypass Tray, and
remove jammed papers and all papers loaded in the
Bypass Tray.
When two or more sheets of paper are loaded,
remove all the sheets from the Tray.
(2) Close the cover.
(3) Fan the paper you removed and make sure all four
corners are aligned correctly. Then reload the paper.
If you have difficulty in removing jammed papers, open
the cover on the right side to remove the paper inside.
For detailed information on paper jams inside the right side cover, refer to "3.4.2 Paper Jams inside
the Right Side Cover" (p.57).
When Lamp E6 is Lit
(1) Pull out the Tray 6 toward you until it stops.
Before pulling out the Tray, make sure no paper is
jammed inside the right side cover.
(2) Remove jammed papers.
56
(3) Make sure the long-side and short-side paper guides are positioned to just touch the
paper, and then push the Tray into the machine.
Printer Unit Manual
Page 57

When Lamp E7 is Lit
Important
Note
(1) Pull out the Tray 7 toward you until it stops.
Before pulling out the Tray, make sure no paper is
jammed inside the right side cover.
(2) Remove jammed papers.
(3) Make sure the long-side and short-side paper guides are positioned to just touch the
paper, and then push the Tray into the machine.
3.4.2 Paper Jams inside the Right Side Cover
Follow the steps below to clear paper jams inside the cover of the High Capacity Feeder C3-DS.
1.
Open the right side cover of the High Capacity
Feeder C3-DS.
2.
Remove jammed papers.
When Lamp E1 is Lit...........................................................................................................................................................p.58
When Lamp E2/E4 is Lit ....................................................................................................................................................p.58
When Lamp E3 is Lit...........................................................................................................................................................p.59
Solutions differ depending on where the paper jam occurs. Confirm the jammed area in the Error
Message area.
The code (E) on the upper-left part of the message indicates which error lamp on the top of the
machine is illuminating.
Chapter 3 Problem Solving
57
Page 58

When Lamp E1 is Lit
2
1
3
1
2
1
2
3
1
2
(1) Open lever "1d" upward ( ) and turn knob "1c"
clockwise ( ). Remove jammed papers ( ).
3
(2) Return lever "1d" to its original position.
When Lamp E2/E4 is Lit
(1) Open lever "1a" to the right ( ) and turn knob "1c"
clockwise ( ). Remove jammed papers( ).
3
(2) If you have difficulty in removing jammed papers,
loaded in the Bypass Tray, open the top cover and
remove them.
(3) Return lever "1a" to its original position.
58
Printer Unit Manual
Page 59

When Lamp E3 is Lit
3
1
2
(1) Open lever "1b" to the right ( ) and turn knob "1c"
clockwise ( ). Remove jammed papers ( ).
(2) Return lever "1b" to its original position.
3.
Close the cover.
3
Chapter 3 Problem Solving
59
Page 60

Chapter 4
4.1 Consumables..............................................................................................60
4.2 Full Width Array........................................................................................65
4.3 Cleaning the Printer................................................................................66
Maintenance
4.1.1 Replacing the Toner Cartridge....................................................................... 61
4.1.2 Replacing the Waste Toner Bottle................................................................ 63
4.3.1 Cleaning Chute .................................................................................................... 68
4.3.2 Cleaning High Capacity Trays....................................................................... 70
4.3.3 Cleaning the Paper Feeding Unit in the High Capacity Tray ...........72
4.1
Using consumables not recommended by Fuji Xerox may affect print quality or performance provided by
the printer. Use consumables that Fuji Xerox recommends for the printer.
Replacing the Toner
Cartridge
Replacing the Waste
Ton er Bo tt l e
*A4 sized image (one sided printing with area coverage at 7.5%)
Important
Consumables
Item Type of supplies Product code
Toner Cartridge - Black CT202225 1 item / 1 box About 50,000 sheets p.61
Toner Cartridge - Cyan CT202226 1 item / 1 box About 55,000 sheets
Toner Cartridge - Magenta CT202227 1 item / 1 box About 51,000 sheets
Toner Cartridge - Yellow CT202228 1 item / 1 box About 55,000 sheets
Waste Toner Bottle CWAA0663 1 item / 1 box About 45,000 sheets p.63
After replacing the consumables, be sure to close the cover. Leaving the cover open will not be able to continue to print jobs.
Quantity /
box
Yield projections
(maximum number
of printed output)*
Page
Handling Consumables
Handle the consumables paying attention to the following:
Do not store boxes for consumables upright.
Do not unpack consumables until they are used. Avoid storing consumables in the following locations:
- Hot and humid location
60
- Location close to a fire
- Location exposed to direct sunlight
- Dusty location
Before using consumables, read instructions and precautions on the packages carefully.
It is recommended to have spare consumables ready.
To place orders for consumables, take a note of the part number and contact your local Fuji Xerox representative.
Printer Unit Manual
Page 61
Collecting Used Consumables
Note
WARNING
CAUTION
For environmental protection and efficient use of resources, Fuji Xerox recycles collected consumables.
Used consumables require proper disposal. For more details, please contact your local Fuji Xerox representative.
4.1.1 Replacing the Toner Cartridge
When it is time to replace a Toner Cartridge, a message appears on the Error Message area telling you
that the Toner Cartridge should be replaced. When the message appears, please replace the Toner Cartridge of the specified color.
The printer displays a prior notice, prints about 2,500 sheets*, and then stops running.
*For detailed information about the number of printable sheets, refer to "4.1 Consumables" (p.60).
Never use a vacuum cleaner for spilled toner and residual toner in this product, Toner Cartridge or
Waste Toner Bottle.
It may catch fire by electric sparks inside a vacuum cleaner and cause explosion.
Use a broom or a wet cloth to wipe off the spills. If you spill a large volume of toner, contact your
local Fuji Xerox representative.
Never throw a Toner Cartridge into an open flame. Remaining toner in the cartridge may catch fire
and cause burn injuries or explosion.
If you have a used Toner Cartridge no longer needed, contact your local Fuji Xerox representative for
its disposal.
Keep Toner Cartridges out of the reach of children. If a child accidentally swallows toner, spit it out,
rinse mouth with water, drink water and consult a physician immediately.
When replacing Toner Cartridges, be careful not to spill the toner. In case of any toner spills, avoid
contact with clothes, skin, eyes and mouth as well as inhalation.
If toner spills onto your skin or clothing, wash it off with soap and water.
If you get toner particles in the eyes, wash it out with plenty of water for at least 15 minutes until irritation is gone. Consult a physician if necessary.
If you inhale toner particles, move to a fresh air location and rinse your mouth with water.
If you swallow toner, spit it out, rinse your mouth with water, drink plenty of water and consult a physician immediately.
When replacing a Toner Cartridge, toner may spill and soil the floor. It is recommended to lay paper on the
floor beforehand.
Toner Cartridges can be replaced when printing.
The life of the Toner Cartridges varies depending on your print environment and print job settings.
The life of the Toner Cartridges means the approximate number of printable sheets per cartridge, calculated based on the toner density of A4 sized image (one sided printing with area coverage at 7.5%).
Black and white print is available even though any of Cyan, Magenta and Yellow Toner Cartridges have run
out.
Chapter 4 Maintenance
61
Page 62
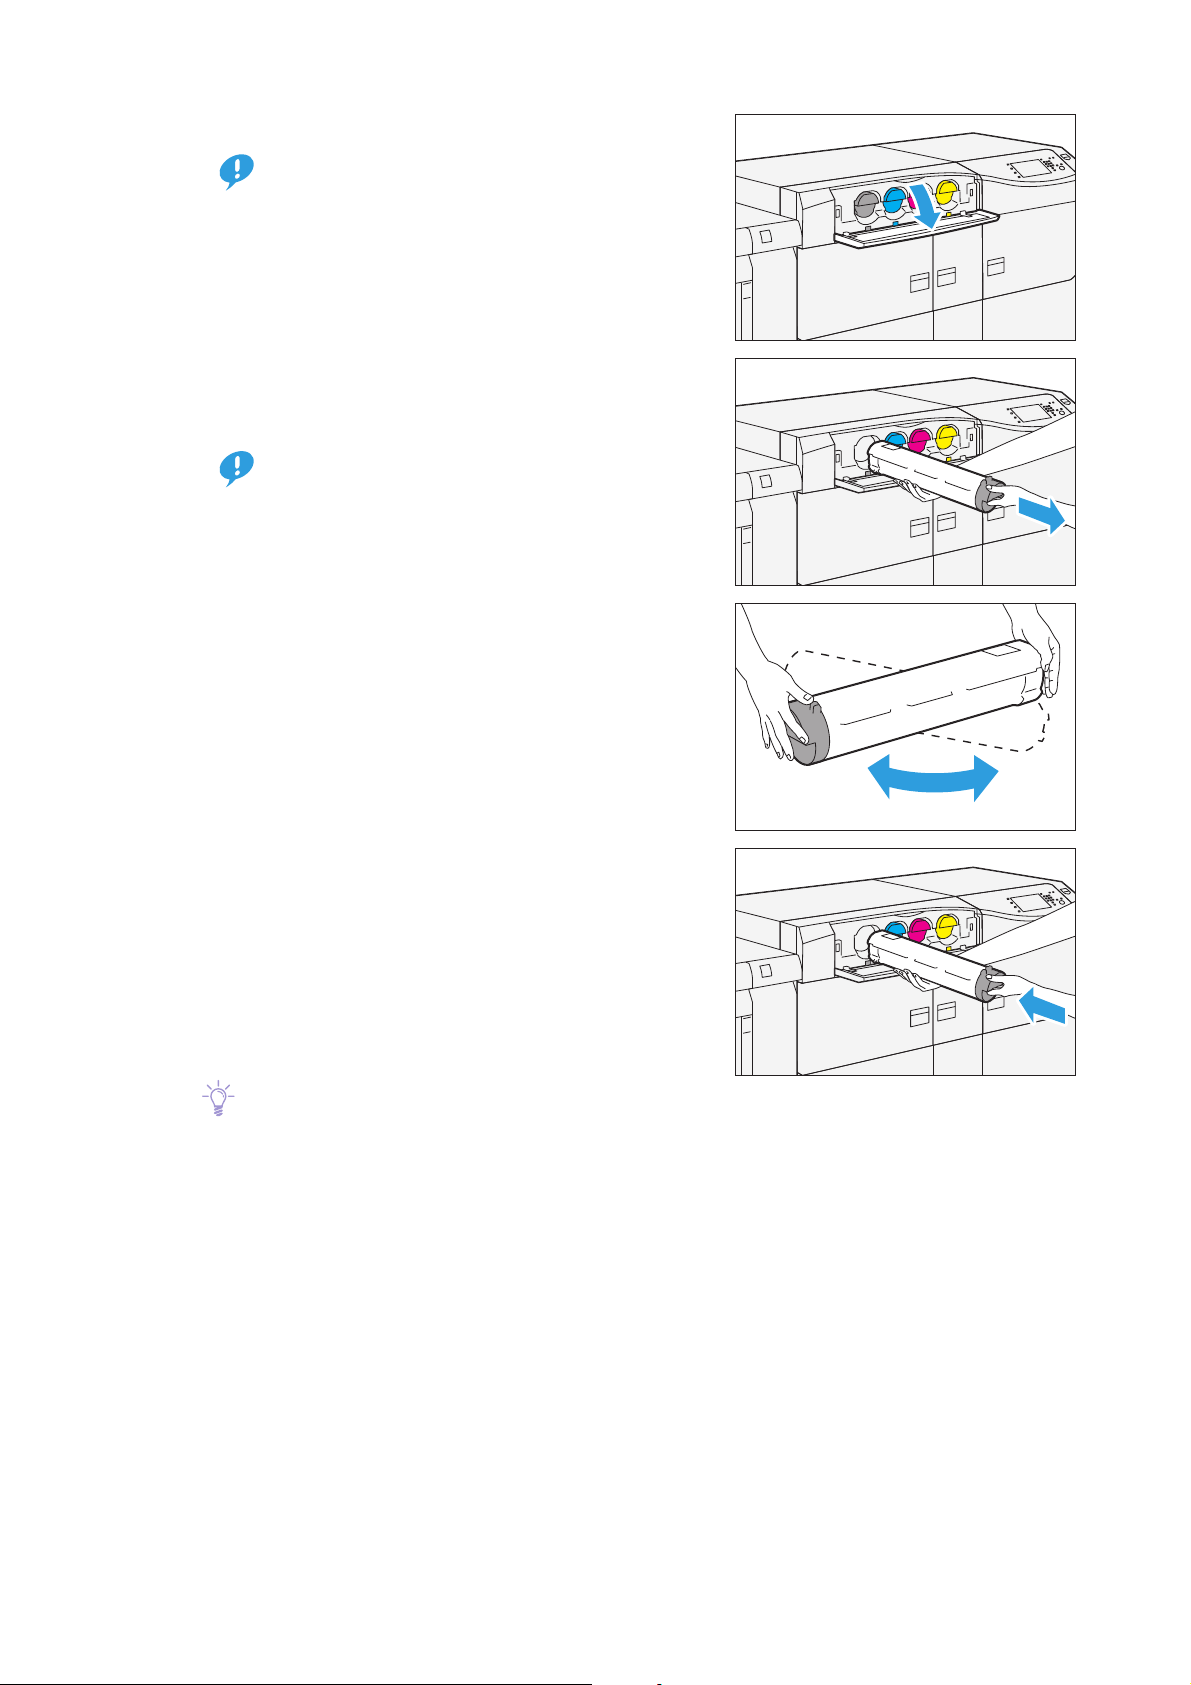
1.
Important
Important
Note
Open the Toner cover.
Gently open / close the Toner covers when replacing a
toner while printing.
Shakes by opening / closing the cover may cause
image defect.
2.
Gently pull out the Toner Cartridge of the color displayed in the message, holding the bottom of the
cartridge.
Pull out the Toner Cartridge gently. Otherwise, toner
may fly out of the cartridge.
3.
Prepare the new Toner Cartridge of the same color as
the old one, and gently tilt it up and down, and then
left and right several times.
4.
Push the Toner Cartridge into the machine until it
stops.
5.
Close the Toner cover.
Toner supply stops while a Toner cover is open, which
will stop the printing.
Close the Toner cover immediately after replacing the toner.
62
Printer Unit Manual
Page 63

4.1.2 Replacing the Waste Toner Bottle
Note
WARNING
The Waste Toner Bottle collect residual toner left on the drum after printing.
When it is time to replace a Toner Bottle, a message appears on the Error Message area telling you that
the Toner Bottle should be replaced.
The printer displays a prior notice, prints about 5,000 sheets*, and then stops running.
*For detailed information about the number of printable sheets, refer to "4.1 Consumables" (p.60).
Never throw a Waste Toner Bottle into an open flame. Toner may catch fire and cause burn injuries or
explosion.
If you have a used Waste Toner Bottle no longer needed, contact your local Fuji Xerox representative
for its disposal.
Do not take out Waste Toner Bottles or tilt them around before they are filled up. The machine cannot mea-
Important
sure accurately and toner may spill from the Waste Toner Bottle.
When replacing a Waste Toner Bottle, toner may spill and soil the floor. It is recommended to lay paper on
the floor beforehand.
1.
Open the center cover of the printer unit.
2.
Pull out the Waste Toner Bottle about halfway.
3.
Gripping the bottle handle, take out the bottle from
the Tray.
4.
Put the used Waste Toner Bottle into the supplied plastic bag.
Chapter 4 Maintenance
63
Page 64

5.
Hold the center part on the top of a new Waste
Toner Bottle and insert it until it stops.
6.
Close the cover.
64
Printer Unit Manual
Page 65

4.2
Refer
Note
Full Width Array
By utilizing the Full Width Array, image quality adjustments (Calibration, Density Uniformity Adjustment)
and Alignment adjustment can be performed automatically.
Perform the image quality adjustments when replacing the Drum Cartridge or switching papers.
Thirty to sixty minutes after the power is on (as the printer is unstable immediately after turned on)
After the room temperature and humidity become stable in case the room is air-conditioned (as the
print colors vary according to the temperature / humidity)
For detailed information about the Calibration and Density Uniformity Adjustment, refer to "3.3.2 Full
Width Array" in the User Interface Manual.
For detailed information about the Auto Alignment, refer to "Profiles" > "Alignment" in the Stock Library
Manager Manual.
Calibration (Automatic Tone Reproduction
Curve Adjustment)
Density Uniformity Adjustment
Performing Automatic Tone Reproduction Curve
Adjustment and Density Uniformity Adjustment
on a daily basis will help to reduce frequency of
a calibration of the Print Server. However, if you
need advanced stability of the printed images,
perform calibration of the Print Server for each
of the papers to be used.
Auto Alignment
Chapter 4 Maintenance
65
Page 66
4.3
Important
WARNING
CAUTION
When you clean printer products, use the cleaning materials designated in every step.
To wipe with a wet cloth, use the soft cloth tightly wrung out of water. If the parts are not completely
dry, the printer may malfunction.
Using commercially available non-woven dry type fabric is effective for cleaning paper dust.
Choose Non-woven fabric with soft and highly adsorptive that can easily wipe dirt and dust off. Do not
use non-woven fabric containing organic solvents or a polishing agent.
Do not use benzene, paint thinner, or other organic solvents. Doing so might damage paint or coating
on plastic parts.
When cleaning the printer, use the designated cleaning materials exclusive to it. Other cleaning materials may result in poor performance of the product. Never use aerosol cleaners to avoid catching fire
and explosion.
Cleaning the Printer
When cleaning the printer, always switch off and unplug it. Access to a live printer interior may cause
electric shock.
After cleaning, be sure to close the cover. Leaving the cover open will not be able to continue to print jobs.
Important
Running Paper
Cleaning may temporarily cause a number of white dots to appear on the output. After cleaning, feed
paper through the machine to ensure effectiveness of the cleaning.
1.
Create image data consisting C100% and M100% for SRA3 or A3 size.
2.
Run a 2-sided job to print this image on about 20 sheets of paper.
Cleaning the Exterior
1.
Wipe the exterior with a firmly wrung soft cloth moistened with water.
If dirt does not come off easily, try gently wiping with a soft cloth moistened with a small amount of
neutral detergent.
Do not use cleaning agents other than water or neutral detergent.
66
2.
Wipe off any excess water with a soft cloth.
Printer Unit Manual
Page 67
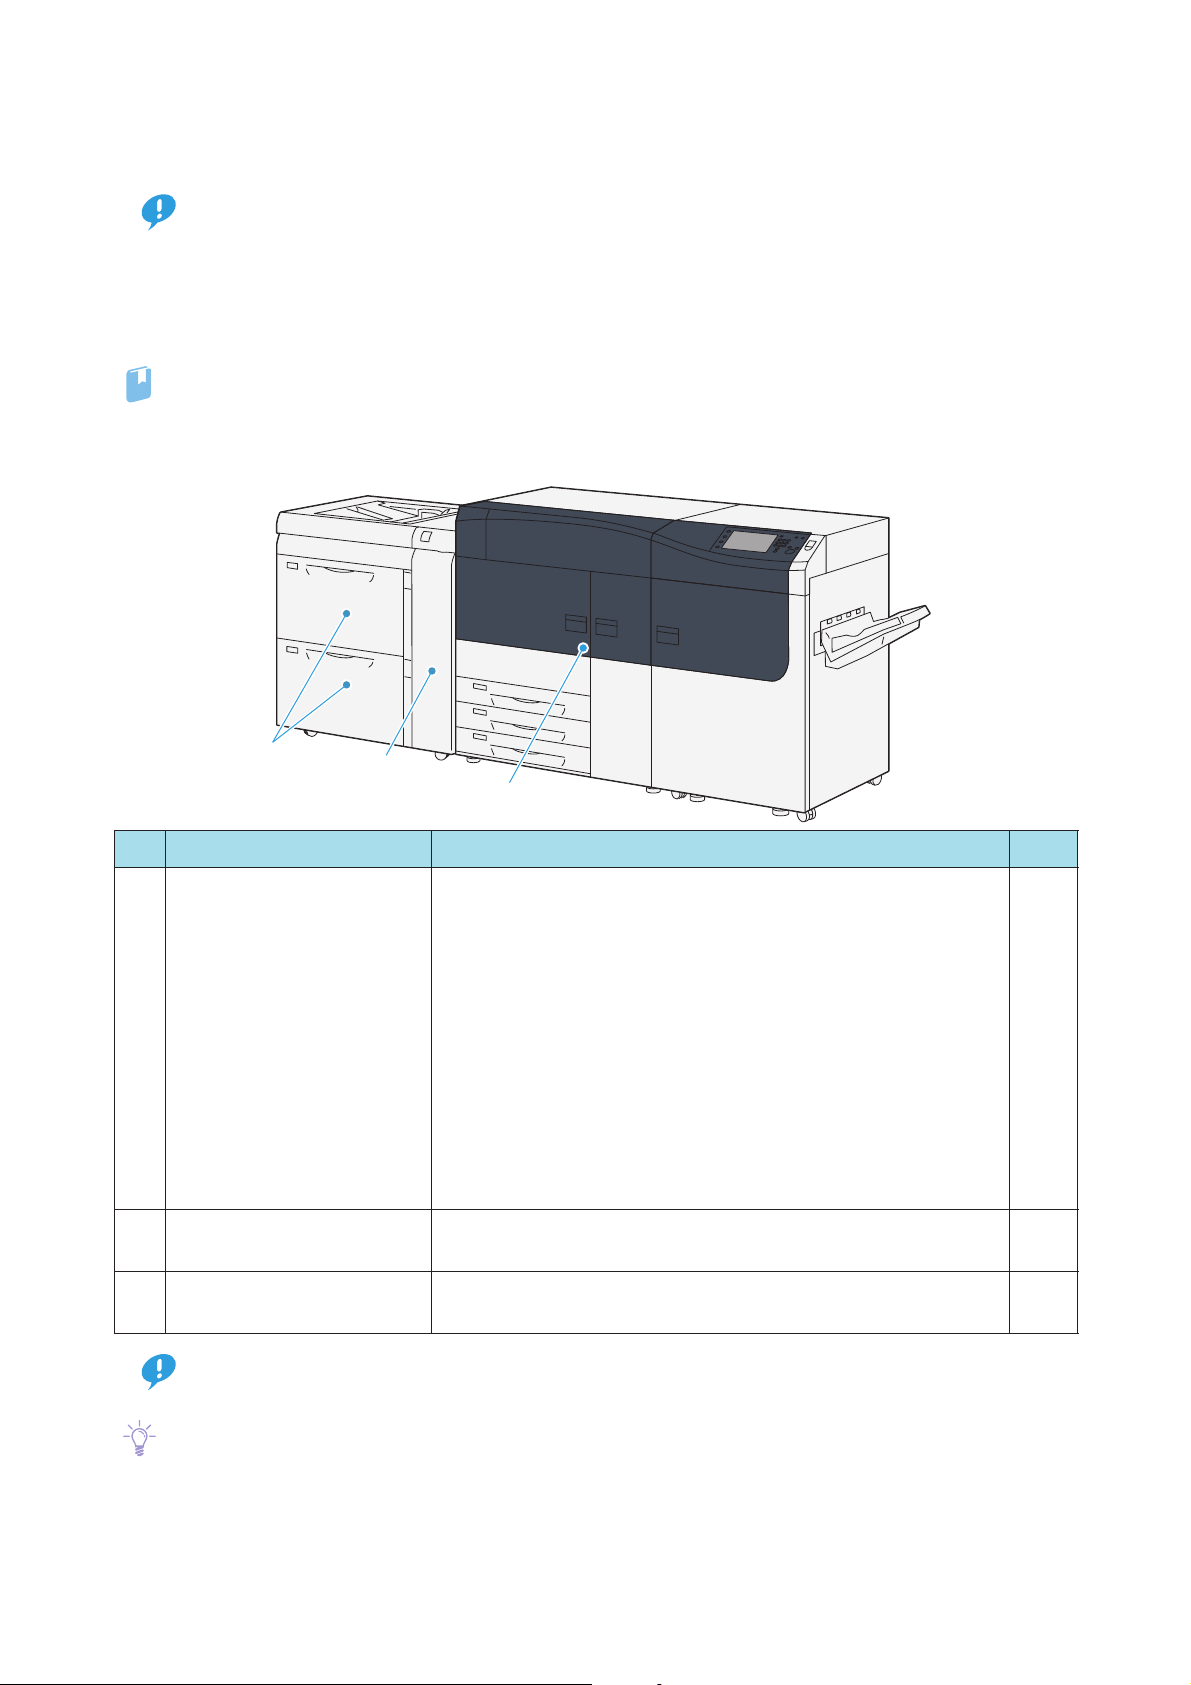
Cleaning the Touch Screen
Important
Refer
Note
1
2
3
Wipe the touch screen with a firmly wrung soft cloth moistened with neutral detergent or alcohol.
When you moisten the cloth with neutral detergent or alcohol, do not allow the excess liquid to drip down
from the cloth. If the cloth is moistened with the excess liquid, wring the cloth gently.
Cleaning the touch screen with an excessive force may cause the screen to be damaged. Wipe the screen
gently.
Cleaning the Toner / Fusing Unit
For detailed information on how to clean, refer to refer to "4.1.8 Maintenance" and "3.3.1 Clean Fusing Unit"
in the User Interface Manual.
Where to Clean
No. Work Frequency Page
Cleaning Chute Perform when:
you print with the paper size larger than that printed in bulk just
p.68
before.
(Example: Print with A4 in large quantities and then to print with
JIS B4.)
1
you printed on small strength papers
you print under the high temperature and high humidity environment (Frequently cleaning is recommended.)
you ran papers that generate much paper dust (such as roughly cut
papers and much coated papers)
you printed in bulk with extremely low toner density of image
under low temperature and low humidity
Cleaning High Capacity Trays Every week (When collected paper dust is found in the Tray Guide or
2
Cleaning the Paper Feeding
3
Unit in the High Capacity Tray
roller in the Feeder Cover)
Every week p.72
p.70
When you have finished cleaning, make sure the roller and the surface of paper path are free from foreign
Important
objects.
This cleaning instruction also applies to the 2nd High Capacity Feeder C1-DS.
Chapter 4 Maintenance
67
Page 68

4.3.1 Cleaning Chute
Clean the exit and inlet chutes of the Transfer Module.
CAUTION
When pulling out the Transfer Module, do it gently. If pulled out with too much force, the module can
hit and injure your knees.
1.
Open the left side and center covers of the printer
unit.
2.
Turn lever "2" in the unlocking direction (toward theopened-lock mark).
3.
Grip lever "2" and gently pull out the Transfer Module
toward you until it stops.
68
Printer Unit Manual
Page 69

Cleaning Exit Chute
Important
Important
1
Clean gently. If you perform with too much force, the ribs or the metal fingers for releasing paper
might be broken.
Do not give damage on the roll near by.
(1) Use a soft and dry cloth to wipe the surface of the
ribs (gray) from the bottom to top.
(2) Wipe the inner surface of the ribs (white) similarly.
(3) Wipe the plate on the side of the roll off with the
small folded cloth.
(4) Wipe the inner surface of the plate similarly.
Cleaning Inlet Chute
(1) Wipe the surface of the chute from this side to far
side or from far side to this side.
Do not wipe the surface toward the paper feed direction because it may cause of a failure in cleaning of
the roll due to paper dust.
4.
Push the Transfer Module gently into the machine
until it stops ( ).
5.
Turn lever "2" in the locking direction (toward the
closed-lock mark) ( ).
6.
Close the covers.
2
Chapter 4 Maintenance
69
Page 70
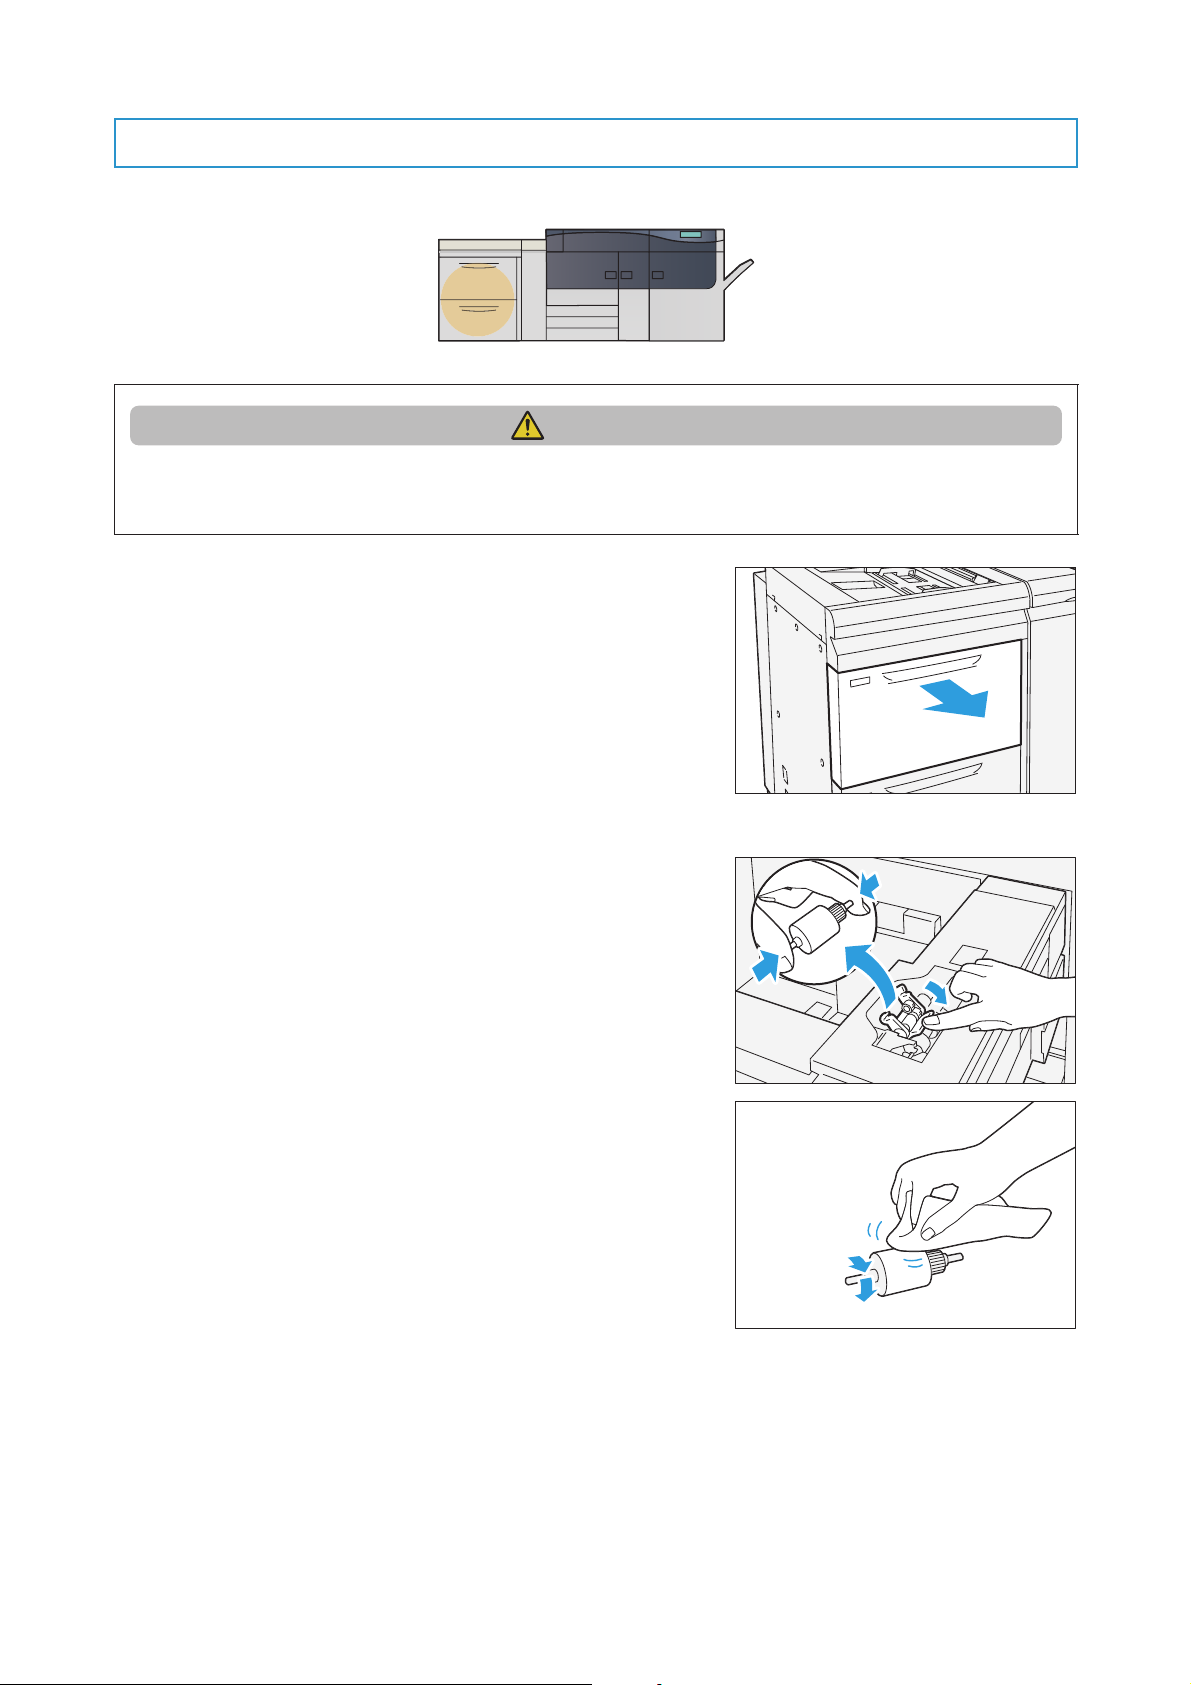
4.3.2 Cleaning High Capacity Trays
Clean the roller in the feeder cover.
CAUTION
When pulling out the Tray, do it gently. If pulled out with too much force, the Tray can hit and injure
your knees.
1.
Pull out the Tray toward you until it stops.
2.
Clean the roller in the feeder cover located on the
right side of the paper Tray.
(1) Press down the roller 1 holder to the direction of the
arrow, and remove roller 1 by picking up the both
ends of its pin with fingers.
(2) Wipe the surface of roller 1 with the soft cloth tightly
wrung out of water.
70
Printer Unit Manual
Page 71

(3) Reinstall roller 1.
Note
Note
Make sure that roller 1 is installed in the holder completely.
(4) Remove roller 2 by picking up the both ends of its
pin.
(5) Wipe the surface of roller 2.
(6) Rotate the shaft of roller 3 with one hand, and wipe
the surface of roller 3 with the other hand.
Clean roller 3 without reinstalling roller 2.
(7) Reinstall roller 2.
3.
Push the Tray into the machine.
4.
Clean also the other Tray with the steps 1. to 3..
Chapter 4 Maintenance
71
Page 72

4.3.3
Note
Roller
Paper path surface
Roller
Clean the roller and the surface of paper path behind the right side cover.
Important
1.
Open the right side cover.
Cleaning the Paper Feeding Unit in the High Capacity Tray
Do not press a roller during the cleaning, otherwise the roller may drop off.
Non-woven dry type fabric can be used effectively for cleaning paper dust.
2.
Open lever "1a" to the right.
3.
Clean behind lever "1a" .
(1) Wipe the roller surface with the soft cloth tightly
wrung out of water.
(2) Lightly wipe paper dust off on the surface of the
paper path.
4.
Return lever "1a" to its original position.
72
Printer Unit Manual
Page 73

5.
Roller
Paper path surface
Roller
Paper path surface
Roller
Open lever "1b" to the right.
6.
Clean behind lever "1b" .
(1) Wipe the roller surface with the soft cloth tightly
wrung out of water.
(2) Lightly wipe paper dust off on the surface of the
paper path.
7.
Return lever "1b" to its original position.
8.
Open lever "1d" upward.
9.
Clean behind lever "1d" .
(1) Wipe the roller surface with the soft cloth tightly
wrung out of water.
(2) Lightly wipe paper dust off on the surface of the
paper path.
Chapter 4 Maintenance
73
Page 74

10.
Return lever "1d" to its original position.
11.
Close the cover.
74
Printer Unit Manual
Page 75

Chapter 5
Refer
Important
5.1 Specifications ............................................................................................75
5.2 Optional Components............................................................................78
Appendix
5.1
Specifications
This section lists main specifications of the machine. Note that the specifications and the appearance of
the product are subject to change without prior notice.
We are unable to guarantee the image quality or feedability of the following papers. Regarding we recom-
Important
mend Fuji Xerox paper. Please contact your local Fuji Xerox representative concerning our paper.
For specifications of the optional units, refer to Optional Units Manual.
For specifications of Print Servers, refer to customer documentation supplied with Print Servers or specification sheets available from your local Fuji Xerox representative.
Printer Unit + Offset Catch Tray
Item Specification
Ty p e Co n s o l e
Color capability Full color
Printing resolution 2,400 dpi x 2,400 dpi
Halftone (printable
colors)
Warm-up time Maximum 300 seconds (at room temperature of 20
256 color graduation for each color (16,700,000 colors)
o
C)
Print speed
(When printing a document in simplex and continuous
modes, 52 - 300 g/m
2
, uncoated paper)
The continuous printing speed may be reduced due to the relationship between data content and function.
Continuous printing may slow due to Automatic image quality adjustment.
The continuous printing speed may be reduced due to the jobs with mixed paper size/type, or switching
of Trays.
Due to some of the restrictions on the Print Server, the continuous printing speed can fall below the specification levels.
If one of the following conditions is true, in a continuous printing of a single job, the print speed can fall
below the specification levels due to delay caused by adjustment of image quality and/or paper feeding
speed.
- The print system determines to make adjustment of image quality to optimize the performance balance between print image generation and toner fusing on paper.
- A job needs to be printed with mixed paper sizes and/or paper types. (This includes cases where Automatic Tray Switching is performed for the same size and type of paper.)
A4 100 impressions/minute
A3 52 impressions/minute
Chapter 5 Appendix
75
Page 76
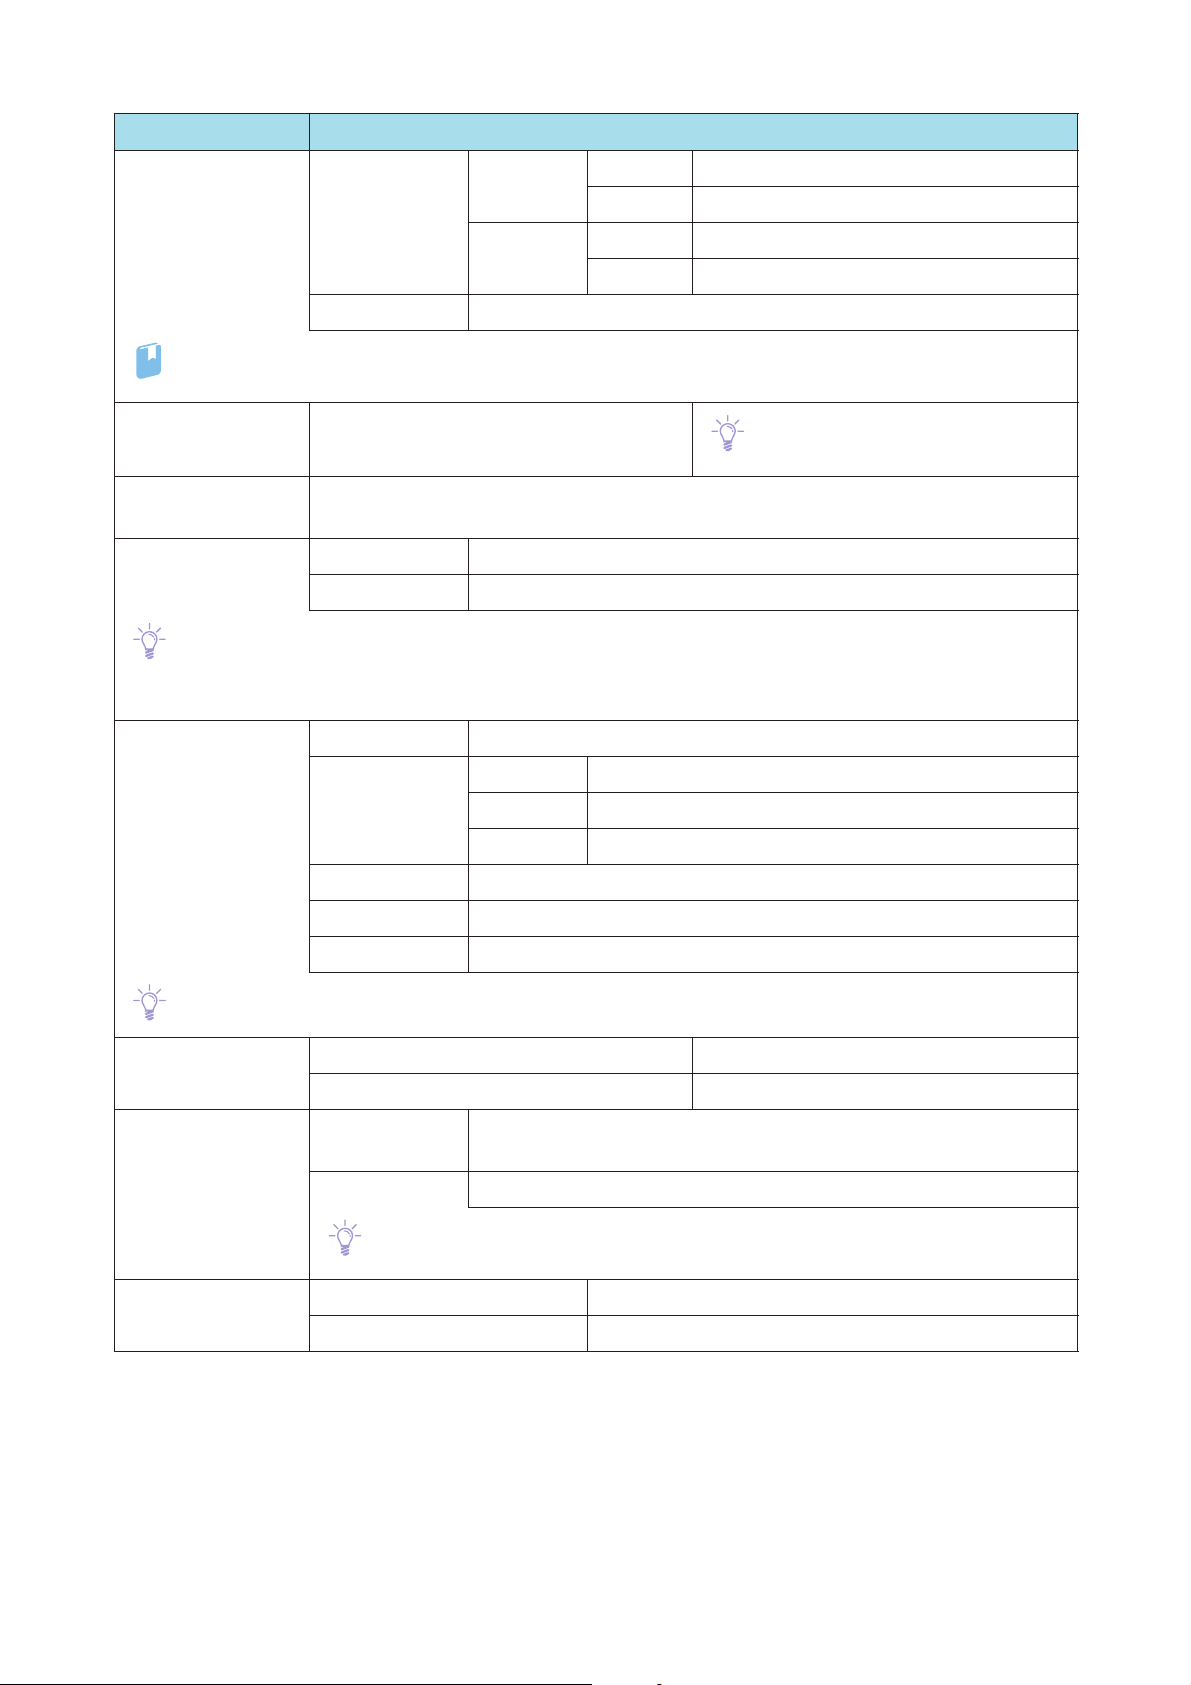
Refer
Note
Note
Note
Item Specification
Paper size
Paper weight
Paper size Standard
size
(Printer Unit Trays)
Custom size Height 139.7 - 330.2 mm
2
For detailed information about the supported paper size and weight, refer to "2.1.2 Supported Paper"
(p.18).
Tray capacity
(Printer Unit Trays)
Offset Catch Tray
Paper weight 64 - 256 g/m
550 sheets x 3 Trays
(Maximum capacity: 1,650 sheets)
Maximum 500 sheets
capacity
Noise Standby 5.9 B, 40.8 dBA
Running 7.95 B, 61.2 dBA
ISO9296 compliant.
B: Declared A-weighted sound power level (L
dBA: A-weighted sound pressure level (bystander position)
Power supply
Power consumption
Power supply 220 - 240 V AC, 24 A, 50 Hz or 60 Hz
Peak 220 V 5.28 kW
Maximum A3, 13 x 19"
Minimum JIS B5
Width 182.0 - 488.0 mm
The values are based on Colotech+90.
WAd
Note
)
230 V 5.52 kW
240 V 5.76 kW
Standby 608 W
Low Power mode 279 W
Sleep mode 4.0 W
High Capacity Feeder C3-DS is not taken into account in Power consumption value.
Dimension High Capacity Feeder C3-DS + Printer Unit Width 2,670 x Depth 807 x Height 1,110 mm
Offset Catch Tray Width 406 x Depth 393 x Height 184 mm
Space requirement Minimum Width 4,276 x Depth 3,407 mm
(High Capacity Feeder C3-DS + Printer Unit + Offset Catch Tray)
Maximum Width 9,966 x Depth 3,407 mm (with all optional units)
The maximum width with the Finishing Transport attached is 9,484 mm, however, extra room for the 3rd Vendor Finisher is required to install it.
Weight Printer Unit 535 kg
Offset Catch Tray 6 kg
76
Printer Unit Manual
Page 77
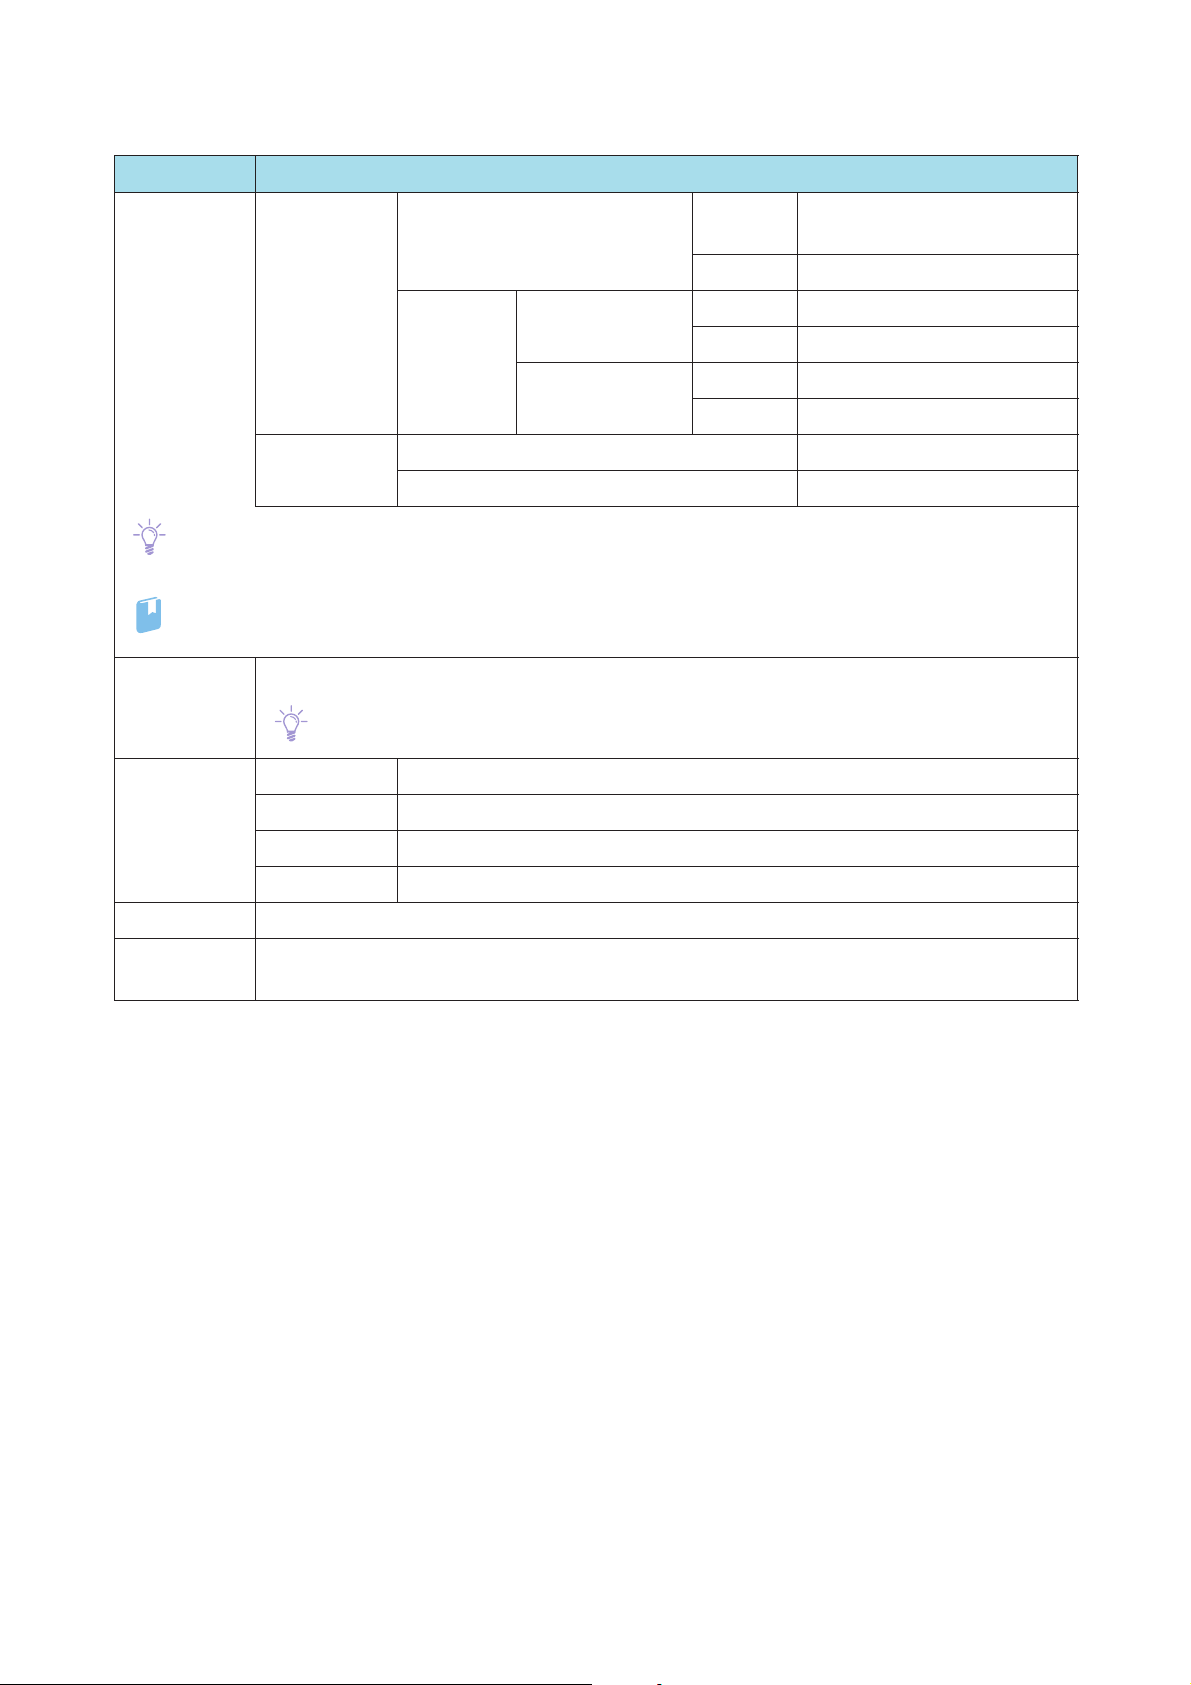
High Capacity Feeder C3-DS
Note
Refer
Item Specification
Paper size
Paper size Standard size Maximum A3, 13 x 19"
Paper weight
Minimum Post Card (100 x 148 mm)
Custom size Bypass Tray Height 98.0 - 330.2 mm
Width 148.0 - 660.4 mm
High Capacity Tray Height 98.0 - 330.2 mm
Width 148.0 - 488.0 mm
Paper weight Bypass Tray 52 - 300 g/m
High Capacity Tray 52 - 350 g/m
Printing on long paper can cause decreased continuous printing speed.
There is a certain limitation on how long paper can be fed and delivered.
For detailed information about the supported paper size and weight, refer to "2.1.2 Supported Paper"
(p.18).
2
2
Tray capacity 2,000 sheets x 2 Trays (Maximum capacity: 4,000 sheets), Bypass Tray: 250 sheets
The values are based on Colotech+90.
Power supply
Power
consumption
Note
Power supply 100 - 120 V AC ±10%, 6 A, 50 Hz or 60 Hz
Peak 600 W
Power supply 200 - 240 V AC ±10%, 4 A, 50 Hz or 60 Hz
Peak 880 W
Dimension Width 988 x Depth 762 x Height 992 mm
Weight With Bypass Tray: 232 kg
Without Bypass Tray: 245 kg (When 2nd High Capacity Feeder C1-DS is installed.)
Chapter 5 Appendix
77
Page 78
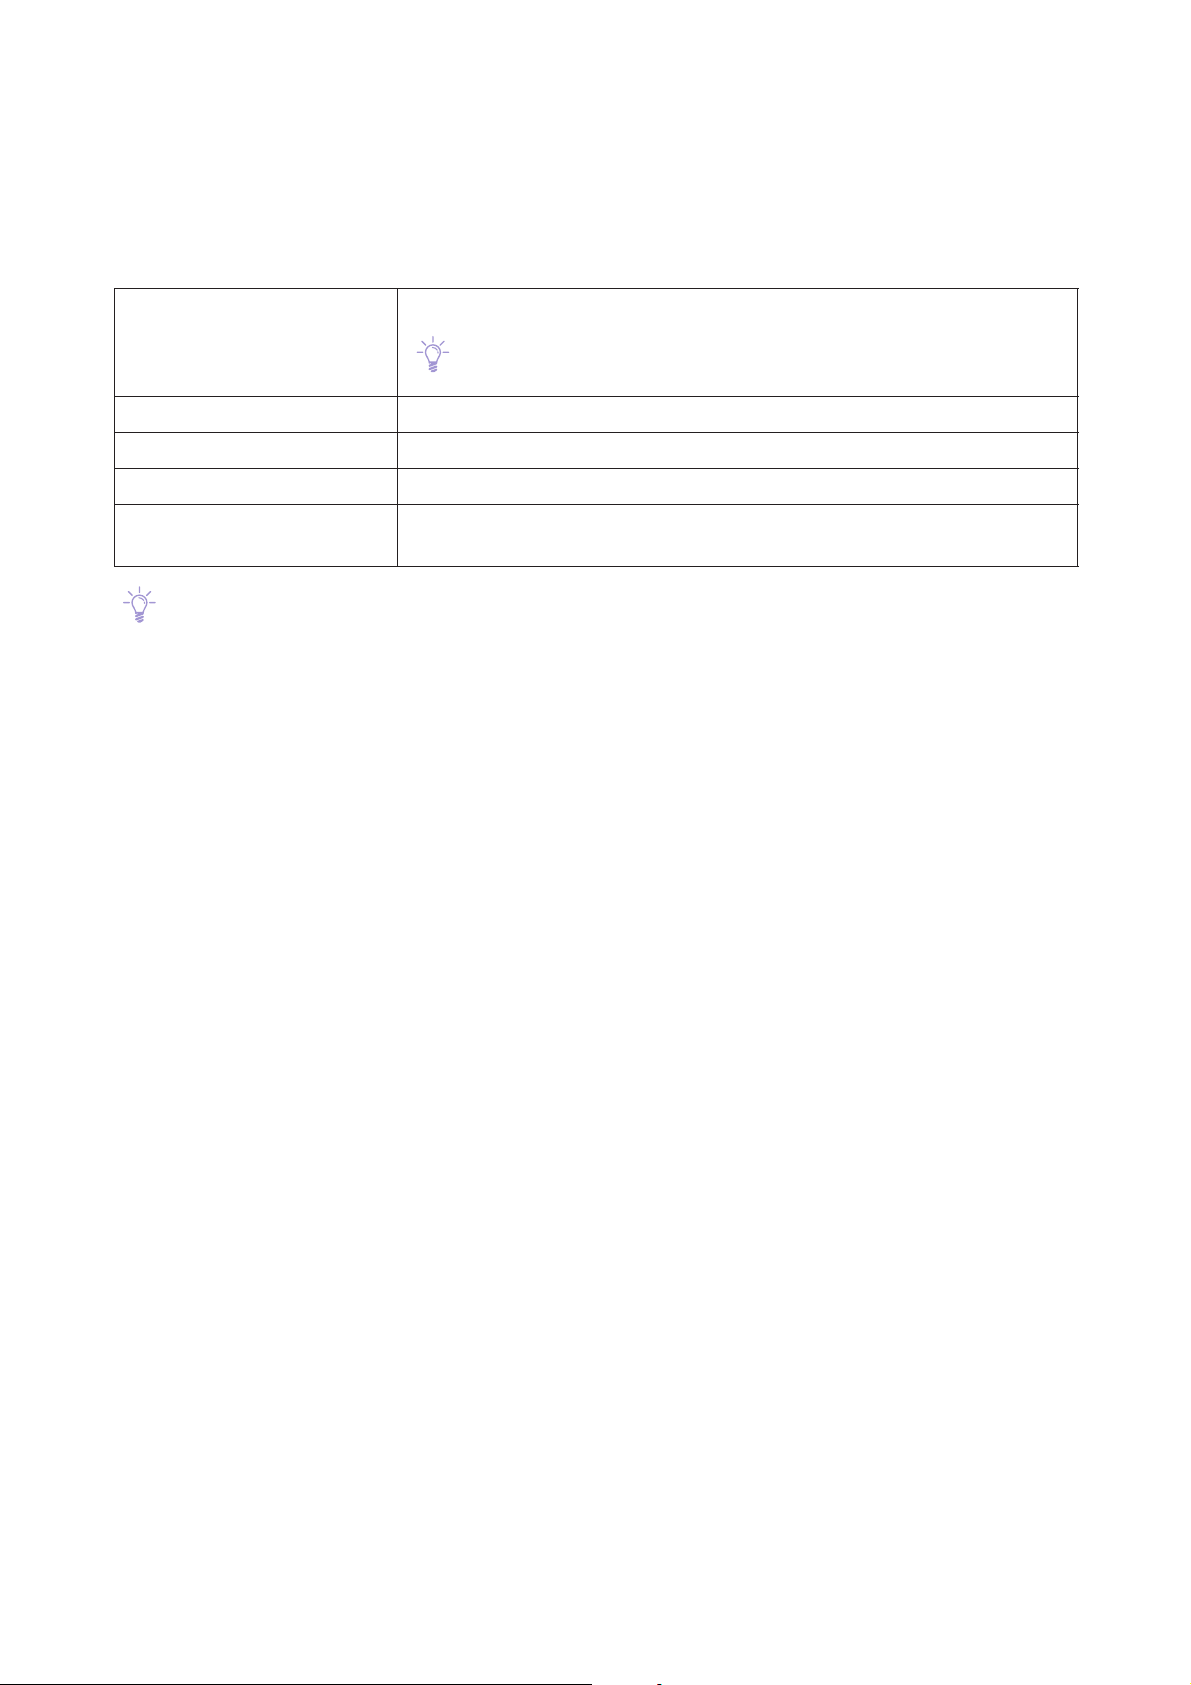
5.2
Note
Note
The following table shows the optional components available. To purchase these options, contact your
local Fuji Xerox representative.
Postcard Kit 2 The kit to load postcards in the High Capacity Tray.
Punch Unit A unit that must be installed with Finisher to perform hole punching.
USB port expansion kit The kit to add an extra USB port for USB authentication device.
Counter-earthquake kit Bolts and clamps to fix the machine to the floor.
Mobility plates Plate reinforcements to be used on the floors with low load bearing or uneven
Optional Components
One set is included in the standard accessories. The Kit is required to
load postcards in the Trays 6 and 7.
floors when installing the machine.
The optional components are subject to change without notice.
For the latest information, contact your local Fuji Xerox representative.
78
Printer Unit Manual
Page 79

Chapter 5 Appendix
79
Page 80

Index
A
Assured Image Area.......................................................................
C
Circuit Breaker Switch ....................................................................
Cleaning ..............................................................................................
Consumables .....................................................................................
F
Full Width Array ...............................................................................
I
Image Printable Area.....................................................................
L
Loading Paper ...................................................................................
15
14
66
60
65
15
25
P
Paper.....................................................................................................
Paper Jams
High Capacity Feeder C3-DS..................................................
Printer Output Unit ....................................................................
Printer Unit ....................................................................................
Paper Level .........................................................................................
Power....................................................................................................
Purge Function..................................................................................
S
Specifications ....................................................................................
T
Toner Cartridge ................................................................................
W
Waste Toner Bottle.........................................................................
17
55
48
41
27
12
24
75
61
63
M
Main Power Switch..........................................................................
14
O
Offsetting............................................................................................
Output Paper .....................................................................................
Versant 3100 Press Printer Unit Manual
24
24
Author - Fuji Xerox Co., Ltd. Edition 1 - August 2016
Publisher - Fuji Xerox Co., Ltd.
ME6851E2-3
 Loading...