


Versant 3100 Press
User Interface Manual

Microsoft, Windows, Windows Vista and Internet Explorer are registered trademarks of Microsoft Corporation in the
U.S. and other countries.
RSA and BSAFE are either registered trademarks or trademarks of EMC Corporation in the United States and/or
other countries.
Microsoft product screen shots reprinted with permission from Microsoft Corporation.
It may be a legal offence to print currency notes, certificates of stocks and securities, or any other documents of
similar nature, regardless of whether they will be used.
If a malfunction occurs with the machine's hard disk or other storage media, any received or stored data including registered configurations may be lost. Fuji Xerox is not responsible for any direct or indirect damages arising
from or caused by such data loss.
Fuji Xerox is not responsible for any breakdown of machines due to infection of computer virus or computer hacking.
Important
1. This manual is copyrighted with all rights reserved. Under the copyright laws, this manual may not be copied
or modified in whole or part, without the written consent of the publisher.
2. Parts of this manual are subject to change without prior notice.
3. We welcome any comments on ambiguities, errors, omissions, or missing pages.
4. Never attempt any procedure on the machine that is not specifically described in this manual. Unauthorized
operation can cause faults or accidents. Fuji Xerox is not liable for any problems resulting from unauthorized
operation of the equipment.
An export of this product is strictly controlled in accordance with Laws concerning Foreign Exchange and Foreign Trade of Japan and/or the export control regulations of the United States.
Xerox, Xerox and Design, Fuji Xerox and Design, Versant as well as CentreWare are registered trademarks or trademarks of Xerox Corporation in Japan and/or other countries.
Other company names or product names are registered trademarks or trademarks of each company.
2
User Interface Manual

Preface
Fuji Xerox Co.,Ltd.
Thank you for selecting the Versant 3100 Press.
The Versant 3100 Press is a color printing system that quickly processes data from client computers and
delivers high-quality outputs. The Versant 3100 Press consists of the printer unit and a variety of optional
units as well as a Print Server.
The Versant 3100 Press offer high-speed color printing: up to 100 sheets/minute (A4) (the actual speed
depends on the size, type, and weight of paper).
This manual is intended to provide first-time users of the Versant 3100 Press with necessary information
on user interface operation.
Before using the Versant 3100 Press, please read this manual thoroughly to obtain the best performance
of the Versant 3100 Press.
After reading this manual, please keep it in a safe place for further reference. It will be useful in case you
forget how to perform operations or if a problem occurs with the printer.
For information on functions and operations of the Print Server, refer to customer documentation supplied
with Print Servers.
Preface
3

Table of Contents
Preface...................................................................................................................................................................................................................................... 3
Table of Contents................................................................................................................................................................................................................. 4
Types of Manuals................................................................................................................................................................................................................. 7
Using This Manual ............................................................................................................................................................................................................... 8
Chapter 1 Using the User Interface ..........................................................................................10
1.1 Power On/Off .............................................................................................................................................................10
1.1.1 Powering On ...................................................................................................................................................................10
1.1.2 Powering Off .................................................................................................................................................................. 12
1.2 Components on the Control Panel .................................................................................................................... 13
1.2.1 Services Home ...............................................................................................................................................................14
1.2.2 Error Information.........................................................................................................................................................16
1.2.3 Operating the Touch Screen................................................................................................................................... 17
1.2.4 Switching to a Different Language...................................................................................................................... 18
1.3 Log In to and Out of Administrator Mode..................................................................................................... 19
1.4 Power Saver Mode ...................................................................................................................................................21
Chapter 2 Basic Operation of Print Jobs..................................................................................23
2.1 Print Job Processing................................................................................................................................................. 23
2.2 Job Status.................................................................................................................................................................... 24
2.2.1 [Active Jobs] Tab.......................................................................................................................................................... 24
2.2.2 [Completed Jobs] Tab................................................................................................................................................ 25
Chapter 3 Maintenance .................................................................................................................26
3.1 Maintenance.............................................................................................................................................................. 26
3.1.1 Consumables Status ................................................................................................................................................... 26
3.1.2 Setting Restore Tool ...................................................................................................................................................27
3.2 Machine Status ......................................................................................................................................................... 28
3.2.1 [Machine Information] Tab ....................................................................................................................................28
3.2.2 [Faults] Tab..................................................................................................................................................................... 31
3.2.3 [Billing Information] Tab..........................................................................................................................................31
3.3 Tools .............................................................................................................................................................................. 33
3.3.1 Clean Fusing Unit......................................................................................................................................................... 33
3.3.2 Full Width Array ............................................................................................................................................................34
3.3.3 DFA Finisher Profile..................................................................................................................................................... 37
4
User Interface Manual

Chapter 4 Tools.................................................................................................................................38
4.1 Common Service Settings..................................................................................................................................... 38
4.1.1 Machine Clock / Timers .............................................................................................................................................39
4.1.2 Power Saver Settings ..................................................................................................................................................42
4.1.3 Audio Tones ................................................................................................................................................................... 43
4.1.4 Screen Settings ............................................................................................................................................................. 45
4.1.5 Paper Tray Settings..................................................................................................................................................... 46
4.1.6 Image Quality ...............................................................................................................................................................48
4.1.7 Reports..............................................................................................................................................................................48
4.1.8 Maintenance.................................................................................................................................................................. 49
4.1.9 Plug-in Settings .............................................................................................................................................................54
4.1.10 Other Settings................................................................................................................................................................ 54
4.2 Connectivity and Network Setup ....................................................................................................................... 58
4.2.1 Port Settings................................................................................................................................................................... 59
4.2.2 Protocol Settings ..........................................................................................................................................................60
4.2.3 Machine's E-mail Address / Host Name ............................................................................................................ 63
4.2.4 Proxy Server Settings ..................................................................................................................................................64
4.2.5 EP Proxy Server Setup.................................................................................................................................................66
4.2.6 Security Settings........................................................................................................................................................... 67
4.2.7 Other Settings................................................................................................................................................................ 70
Chapter 5 Accounting, Authentication / Security Settings...............................................71
5.1 Accounting.................................................................................................................................................................. 71
5.1.1 Accounting Type .......................................................................................................................................................... 72
5.1.2 Create / View User Accounts...................................................................................................................................75
5.1.3 Reset User Accounts ...................................................................................................................................................77
5.1.4 Accounting Login Screen Settings........................................................................................................................ 78
5.2 Authentication / Security Settings .................................................................................................................... 80
5.2.1 System Administrator Settings .............................................................................................................................. 81
5.2.2 Authentication ..............................................................................................................................................................83
5.2.3 Job Status Default....................................................................................................................................................... 87
5.2.4 Overwrite Hard Disk .................................................................................................................................................... 88
Chapter 6 Network and Encryption Settings..........................................................................90
6.1 CentreWare Internet Services Settings ...........................................................................................................90
6.1.1 Display CentreWare Internet Services................................................................................................................ 90
6.1.2 Troubles with CentreWare Internet Services...................................................................................................92
6.2 Encryption Settings .................................................................................................................................................93
6.2.1 HTTP Communications Encryption...................................................................................................................... 94
6.2.2 Encryption Using IPsec..............................................................................................................................................94
Table of Contents
5

Chapter 7 Authentication and Accounting Features ..........................................................96
7.1 Overview ......................................................................................................................................................................96
7.2 Configuration for Authentication...................................................................................................................... 99
7.2.1 Enabling Authentication........................................................................................................................................... 99
7.2.2 Configuring for IC Card Reader.......................................................................................................................... 100
7.2.3 Configuration for Account Administration.................................................................................................... 101
7.3 Authentication Operations.................................................................................................................................102
7.3.1 User Authentication Operations ........................................................................................................................ 102
7.3.2 Changing Passcode.................................................................................................................................................. 104
Chapter 8 Troubleshooting and Error Codes.......................................................................105
8.1 IPv4 and IPv6 Connection Problems..............................................................................................................105
8.2 Error Messages ........................................................................................................................................................106
8.2.1 Remedies for Other Error Codes......................................................................................................................... 106
8.2.2 Error Codes...................................................................................................................................................................107
Chapter 9 Appendix...................................................................................................................... 122
9.1 Notes and Restrictions .........................................................................................................................................122
9.2 License ........................................................................................................................................................................124
Index ....................................................................................................................................................................................................................................138
6
User Interface Manual

Types of Manuals
Refer
The Versant 3100 Press comes bundled with the following manuals:
For information on functions and operations of the Print Server, refer to customer documentation supplied
with Print Servers.
Some of them come with manuals. The manuals for optional components describe all the necessary steps
for using the optional components and installing the software.
For details on the functions of your 3rd Vendor Finisher or GBC® AdvancedPunch™ Pro, refer to the manual
supplied with the device.
PDF Manual
The Manuals are stored as PDF files on the Versant 3100 Press Instruction Manuals CD.
Double-click "index.html" and select the language of the manual you wish to display.
Versant 3100 Press User Interface Manual (this manual)
Describes the operations of the user interface (UI) for operating the printer.
The user interface allows you to confirm status of the printer, and to set the printer behavior.
Versant 3100 Press Printer Unit Manual
Describes how to load paper, how to replace consumables, how to clear paper jams, and the daily maintenance procedures for the printer unit. (These descriptions are also applied to the printer unit equipped
with Offset Catch Tray.)
Versant 3100 Press Optional Units Manual
Describes how to replace consumables and how to clear paper jams in the optional units (High Capacity
Stacker, Finisher, and others).
Versant 3100 Press Paper Jams: Quick Access Guide
Illustrates possible paper jam areas, allowing you to quickly identify a paper jam location.
HTML Manual
Stock Library Manager Manual
Describes Stock Library Manager with which you can change the paper settings.
The manual can be viewed from the [Help] menu of Stock Library Manager.
CentreWare Internet Services Help
The help describes CentreWare Internet Services where you can change various settings of the printer
using a client computer.
Click [Help] in the upper right corner of CentreWare Internet Service window to display the help.
To display the online help for CentreWare Internet Services, users need to have the environment to connect
Important
to the Internet. The communication fee shall be borne by you.
Paper Manual
Versant 3100 Press Safety Notes
Provides information for using the printer safely. Read this manual before using the printer.
Types of Manuals
7

Using This Manual
This manual is intended to provide first-time users of the Versant 3100 Press with necessary information
on user interface operation.
Organization of This Manual
This manual consists of the following chapters:
Chapter 1 Using the User Interface
Describes powering on/off the printer, the Services Home and logging on to and from the Administrator
mode. Please read this chapter first.
Chapter 2 Basic Operation of Print Jobs
Describes basic operation of print jobs.
Chapter 3 Maintenance
Describes daily maintenance such as printing reports and checking meters.
Chapter 4 Tools
Describes basic functions of the printer and how to setup the network.
Chapter 5 Accounting, Authentication / Security Settings
Describes how to create user accounts, to configure accounting administration, and to setup authentication and security feature of the printer.
Chapter 6 Network and Encryption Settings
Describes how to setup CentreWare Internet Services and to encrypt data communications.
Chapter 7 Authentication and Accounting Features
Describes overview, setup and operation of authentication and accounting administration.
Chapter 8 Troubleshooting and Error Codes
Describe how to address troubles, and error codes.
Chapter 9 Appendix
Describes precautions and restrictions on using the printer, as well as notes on licenses.
8
User Interface Manual
Conventions
Note
Important
Note
Refer
Bottom
Feed direction
Front edge
Portrait
Landscape
To p
Rear edge
This manual uses the following symbols:
Indicates important information you have to know or be reminded before operations.
Indicates supplemental information useful for operations.
Indicates references to other chapters and manuals.
< > Indicates the Control Panel, and buttons and lamps on the printer or optional units.
[ ] Indicates the names of tabs, options, buttons, menus and file names on the touch screen
display.
> Indicates the path to the touch screen. e.g. [XXX] > [XXX]
" " Indicates the names of reference sections in this manual, characters to be entered, path
names, and messages.
XXX Manual Indicates the names of the reference manuals.
Paper
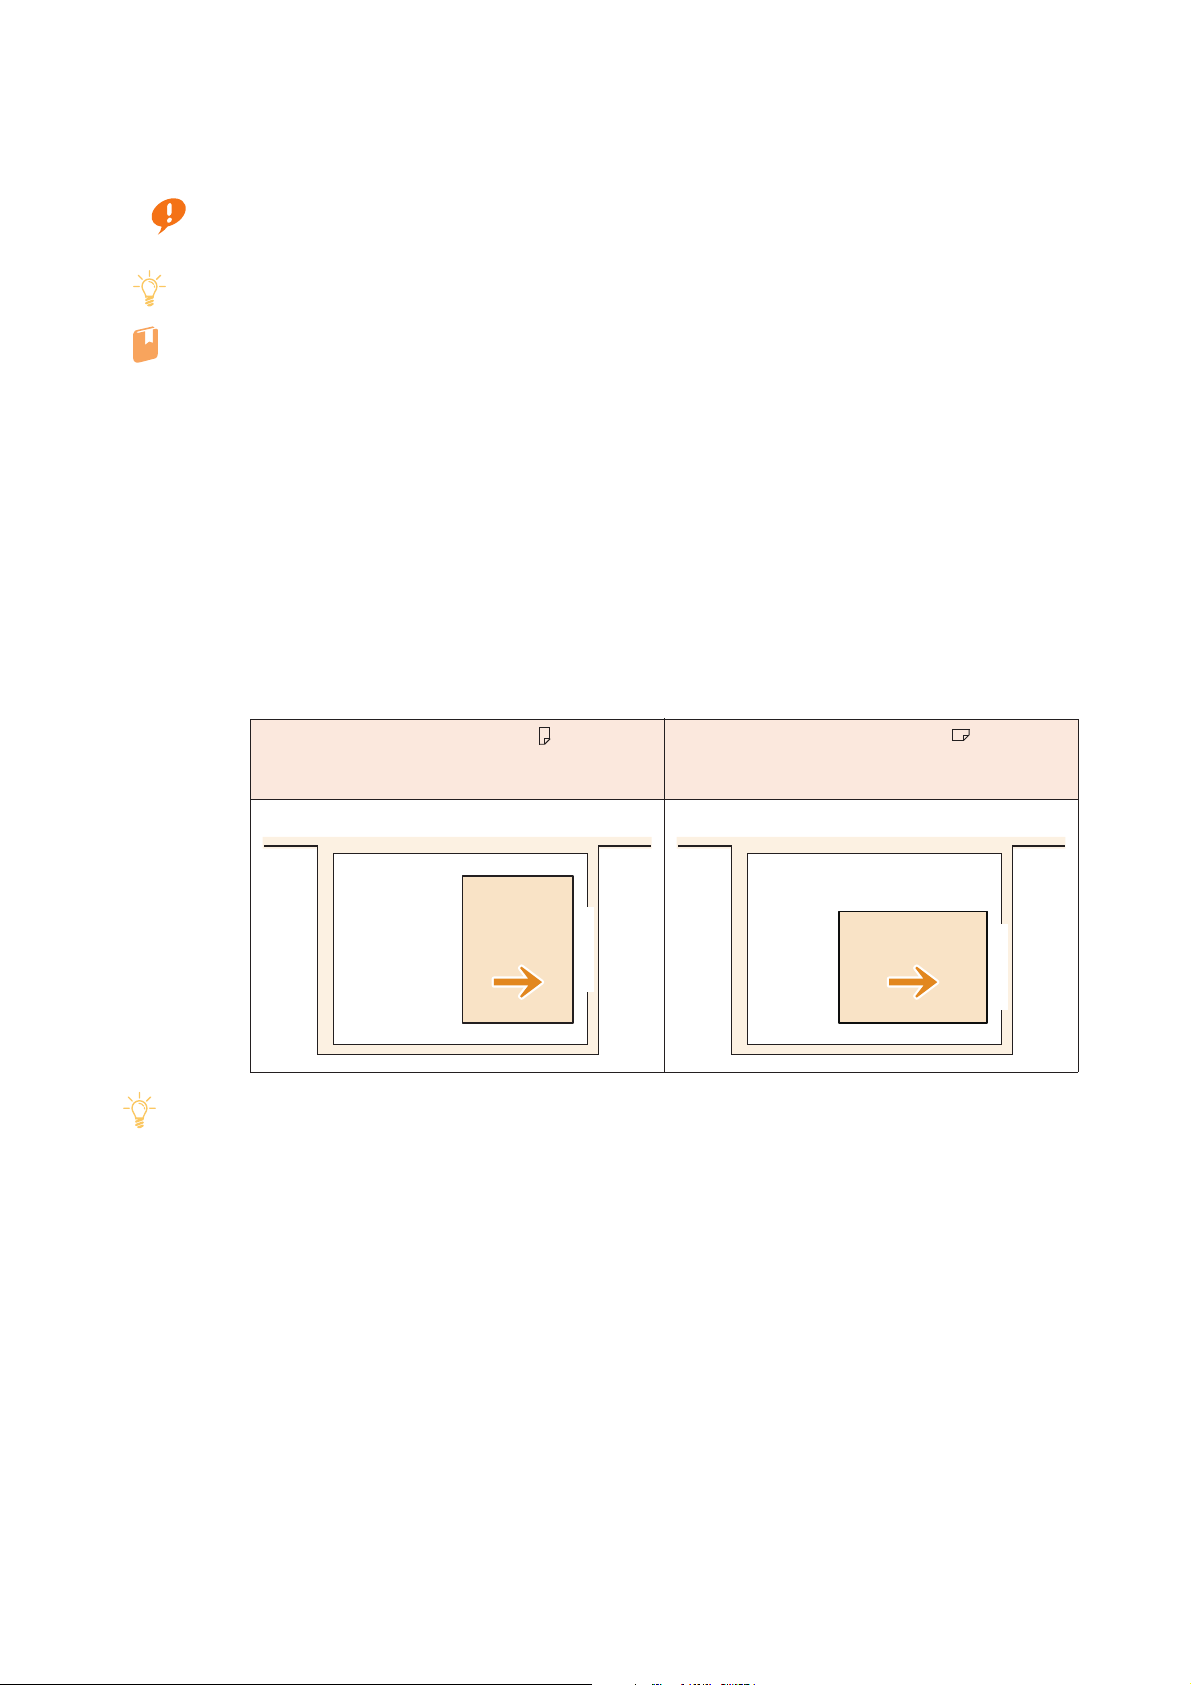
Orientation
There are two paper orientations: Long Edge Feed (LEF) and Short Edge Feed (SEF).
The figures below describe front, rear, top, and bottom edges of the paper for LEF and
SEF.
Long Edge Feed (LEF )
Long edge: landscape (width),
Short edge: portrait (height)
The front of the printer The front of the printer
The feed direction shown above works in an opposite manner for Printer Unit Trays and Inserter Tray.
Short Edge Feed (SEF )
Short edge: landscape (width),
Long edge: portrait (height)
To p
Landscape
Rear edge
Feed direction
Bottom
Portrait
Front edge
Terminology Used in This Manual
In this manual, we refer to the part with buttons as "Control Panel" and the screen as "Touch Screen",
which are on the user interface to configure the printer.
The number of characters you can input is indicated in "bytes". A single-byte character takes one byte, and
a double-byte character takes two bytes.
Screen Images in This Manual
All images contained in this manual are captured from the screen with all optional units installed.
Using This Manual
9
Chapter 1
Note
Note
1.1 Power On/Off .............................................................................................10
1.2 Components on the Control Panel....................................................13
1.3 Log In to and Out of Administrator Mode.....................................19
1.4 Power Saver Mode ...................................................................................21
Using the User Interface
1.1.1 Powering On .......................................................................................................... 10
1.1.2 Powering Off ......................................................................................................... 12
1.2.1 Services Home ...................................................................................................... 14
1.2.2 Error Information ................................................................................................ 16
1.2.3 Operating the Touch Screen........................................................................... 17
1.2.4 Switching to a Different Language ............................................................. 18
1.1
The printer warms up and becomes ready to print within about 5 minutes after powered on.
Switch the power off at the end of a day or if the machine is not used for a long time.
Power On/Off
The warm-up time may vary with an initial temperature of the printer.
After being inactive for a while, the printer automatically enters the Power Saver mode to reduce power
consumption.
For detailed information about the Power Saver mode, refer to "1.4 Power Saver Mode" (p.21).
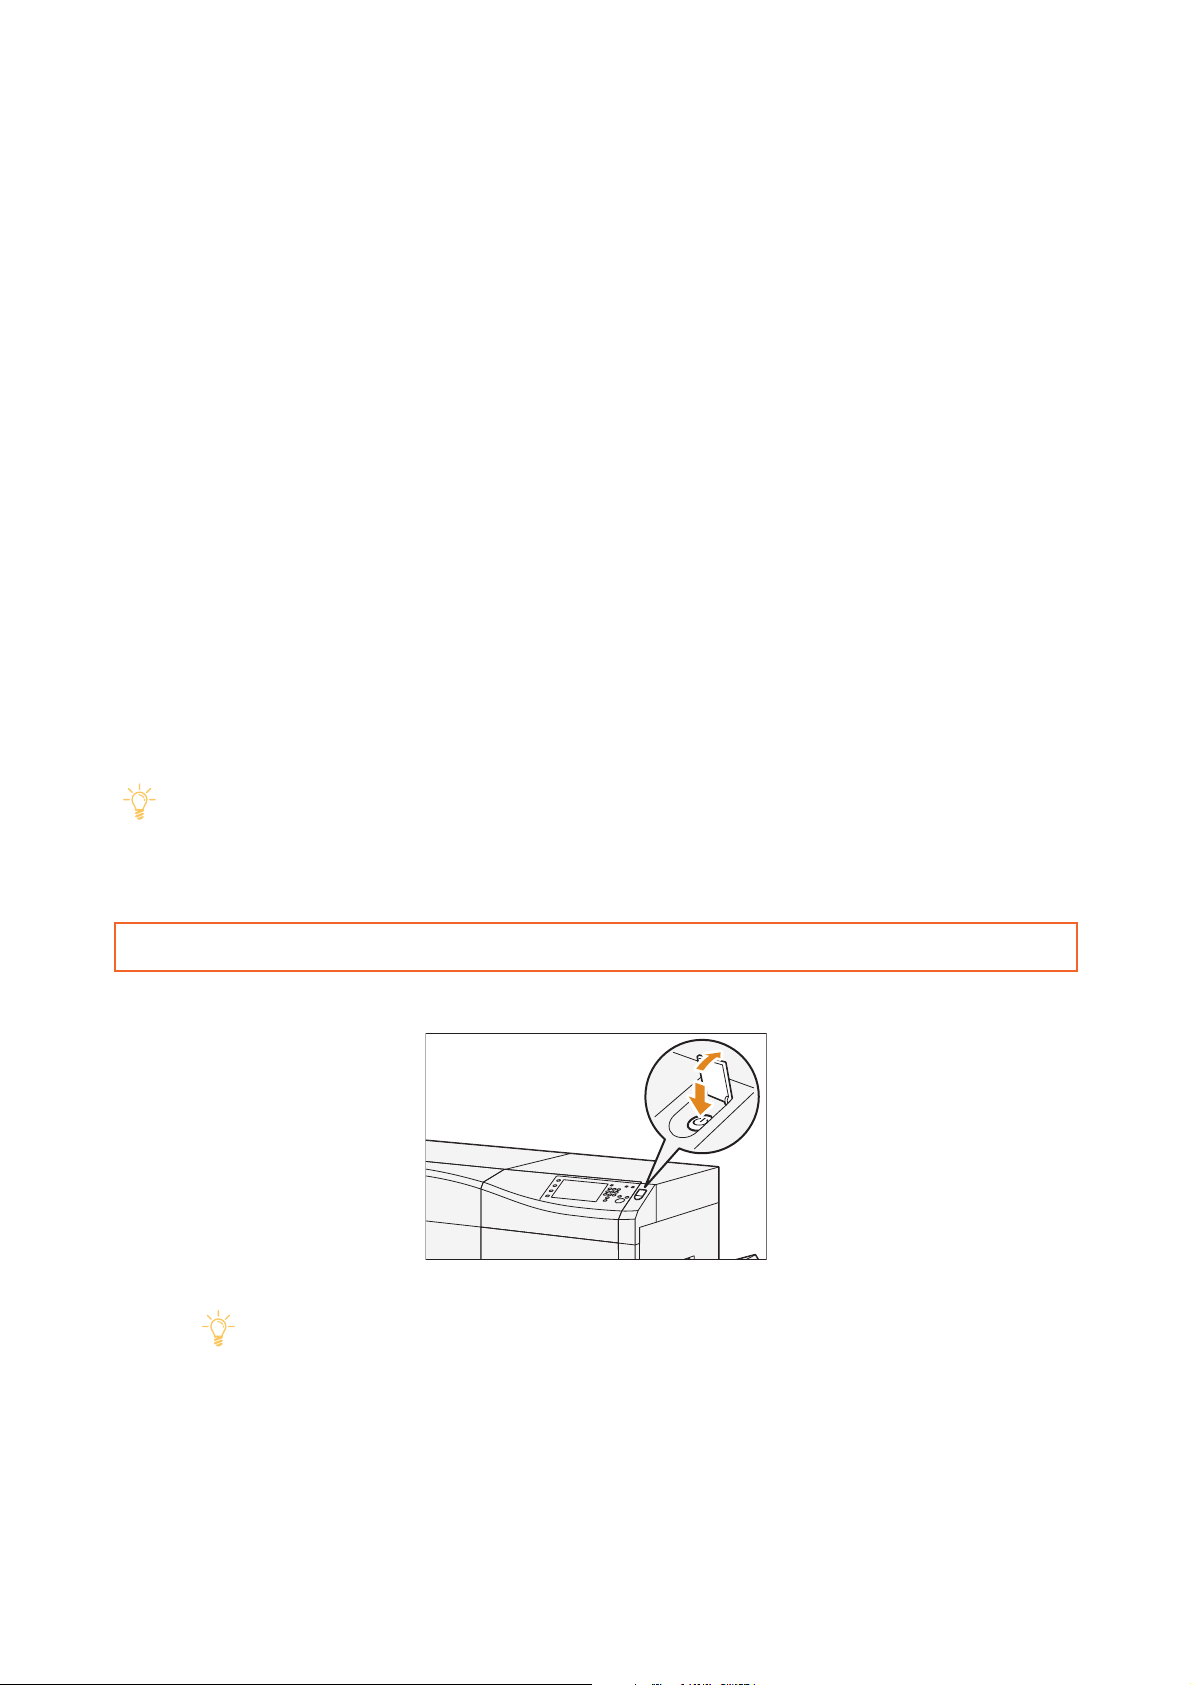
1.1.1 Powering On
1.
Press the power switch on the printer unit.
10
User interface will be powered on.
When powered on, the printer immediately gets started to proceed with image quality adjustment,
but it takes some time before the printer becomes ready to print.
User Interface Manual
When the printer becomes ready to print (i.e. enters the Standby mode), the message changes to "Ready
Refer
to Print."
2.
Power on your Print Server to start the Print Server.
For detailed information on functions and operations of the Print Server, refer to customer documentation supplied with Print Servers.
3.
On Print Server, make sure the Stock Library Manager is activated.
Chapter 1 Using the User Interface
11
1.1.2 Powering Off
Refer
Important
Note
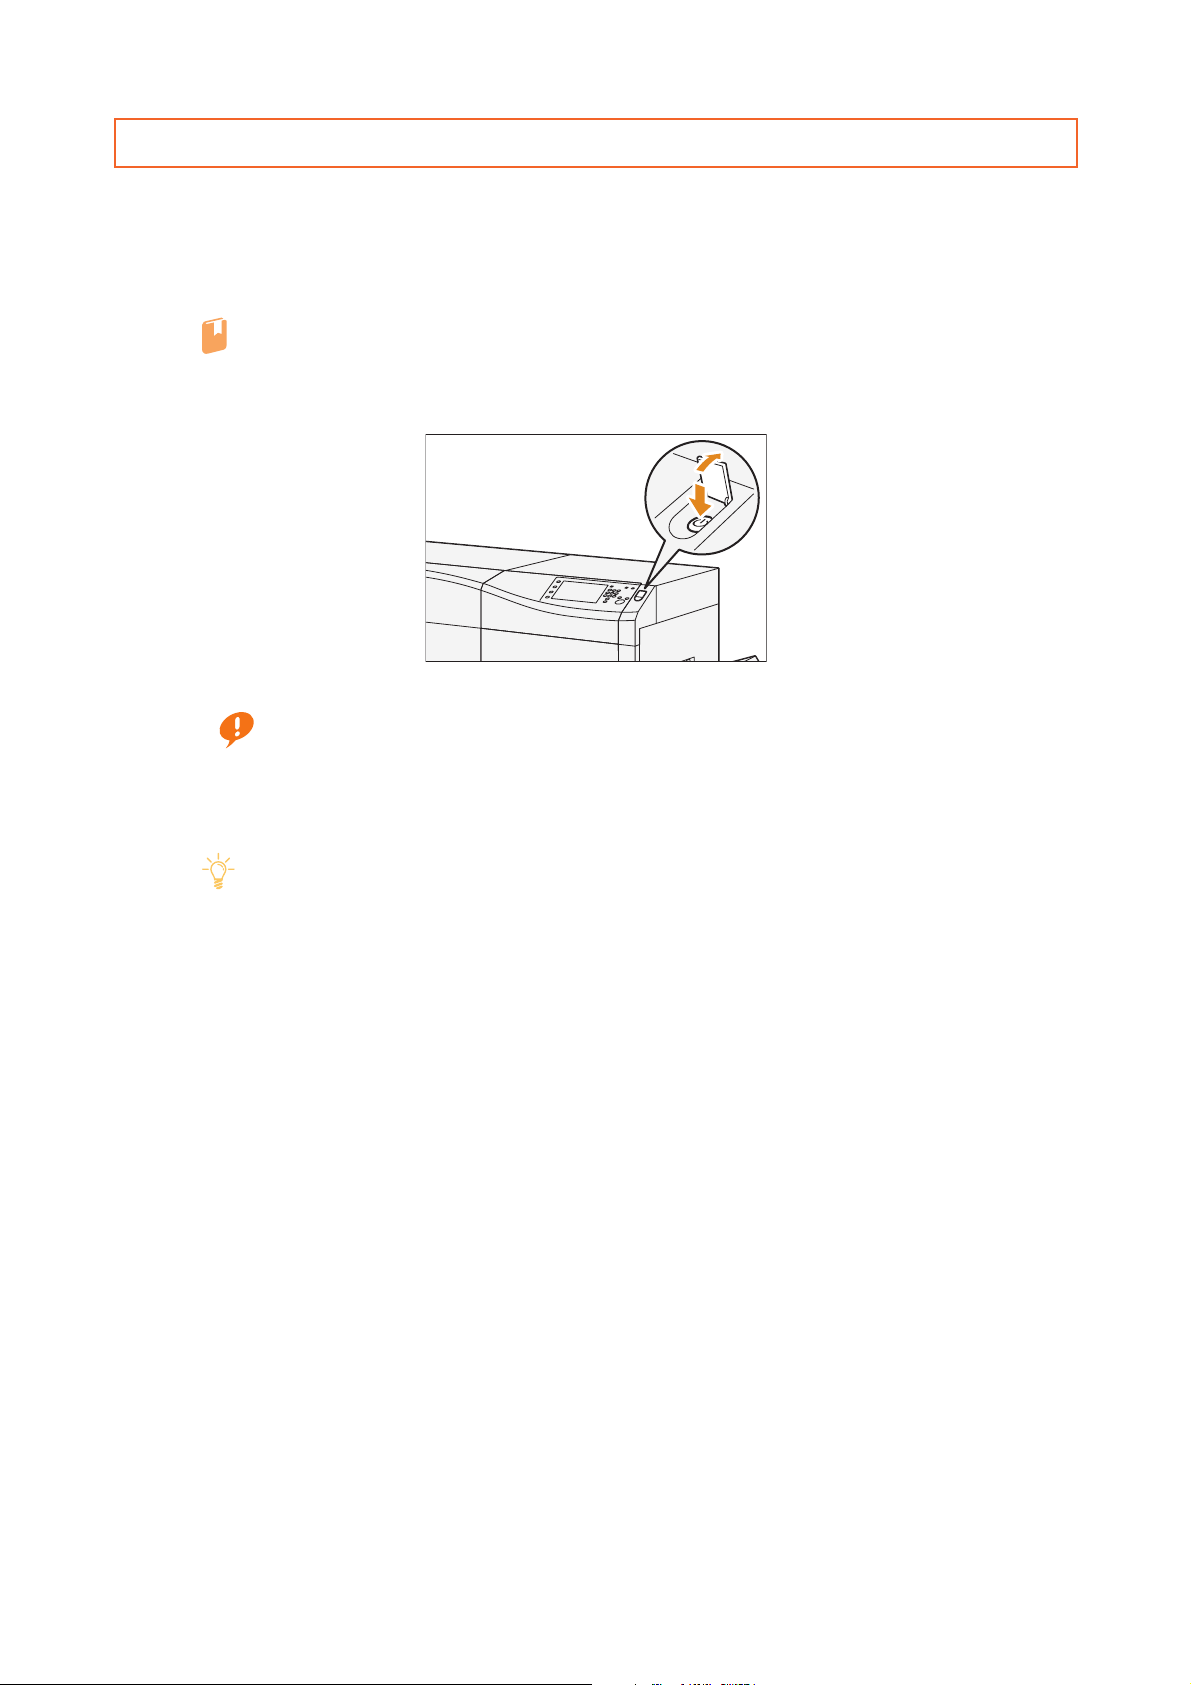
1.
Make sure all the printing is finished and the <Data> lamp is not blinking.
2.
Shut down the Print Server.
Stock Library Manager will be closed as the Print Server is shut down.
For detailed information on functions and operations of the Print Server, refer to customer documentation supplied with Print Servers.
3.
Press the power switch on the printer unit.
On pressing the power switch, the printer will be turned off after the time displayed on the screen lapses.
When you switch the power off, the <Power Saver> button on the control panel may continue blinking even after the touch screen goes dark. Do not switch the main power off until the light of the
<Power Saver> button goes off. (You can turn on the printer again.)
For detailed information about the main power switch, refer to "1.2.3 Main Power Switch" in the
Printer Unit Manual.
When powering the printer on after it has been switched off, wait 10 seconds or more after the
touch screen has gone dark.
You can also switch the power off by clicking [Power Off] on CentreWare Internet Services under
[Status] tab > [General].
12
User Interface Manual
1.2
123
456
789
0
C
<Tools> button
Press to display Tools Screen.
<Job Status> button
Press this button to check or cancel the current
job, or to check completed jobs. (p.23)
<Machine Status> button
Press this button to check the machine status
and meters, and to print reports. (p.28)
<Log In / Out> button
Press this button to log in to Administrator mode. (p.19)
<Power Saver> button
Press this button to activate Power Saver
mode. (p.21)
Numeric keypad
Use the numeric buttons to enter passcodes and other
numerical values.
<C (Clear)> button
Press this button to cancel the values entered with the
numeric keypad.
<Stop> button
Press this button to suspend a print
job in progress. (p.24)
<Start> button
Press this button to resume the
suspended printing. (p.24)
<Language> button
Press this button to switch languages
displayed on the touch screen. (p.18)
<Home> button
Press this button to display Services
Home. (p.14)
<Clear All> button
Press this button to reset all of the functions
and values that have been set, and then
return to Tools Screen.
Tou c h s c re e n
Displays messages required for operation
and buttons for various features. You can
directly touch the screen to operate the
printer or configure the settings for
fea tur es.
<Power> indicator
Lights up when the main power is switched on.
<Error> indicator
Blinks if a system error occur.
This indicator lights up when a problem other than
system errors occurs with the printer, including paper
jams and running out of paper or toner.
<Data> indicator
Blinks when receiving data from Print Server.
Components on the Control Panel
You can operate the control panel by pressing the buttons and tapping the touch screen on the display.
Chapter 1 Using the User Interface
13
1.2.1 Services Home
Note
Note
Refer
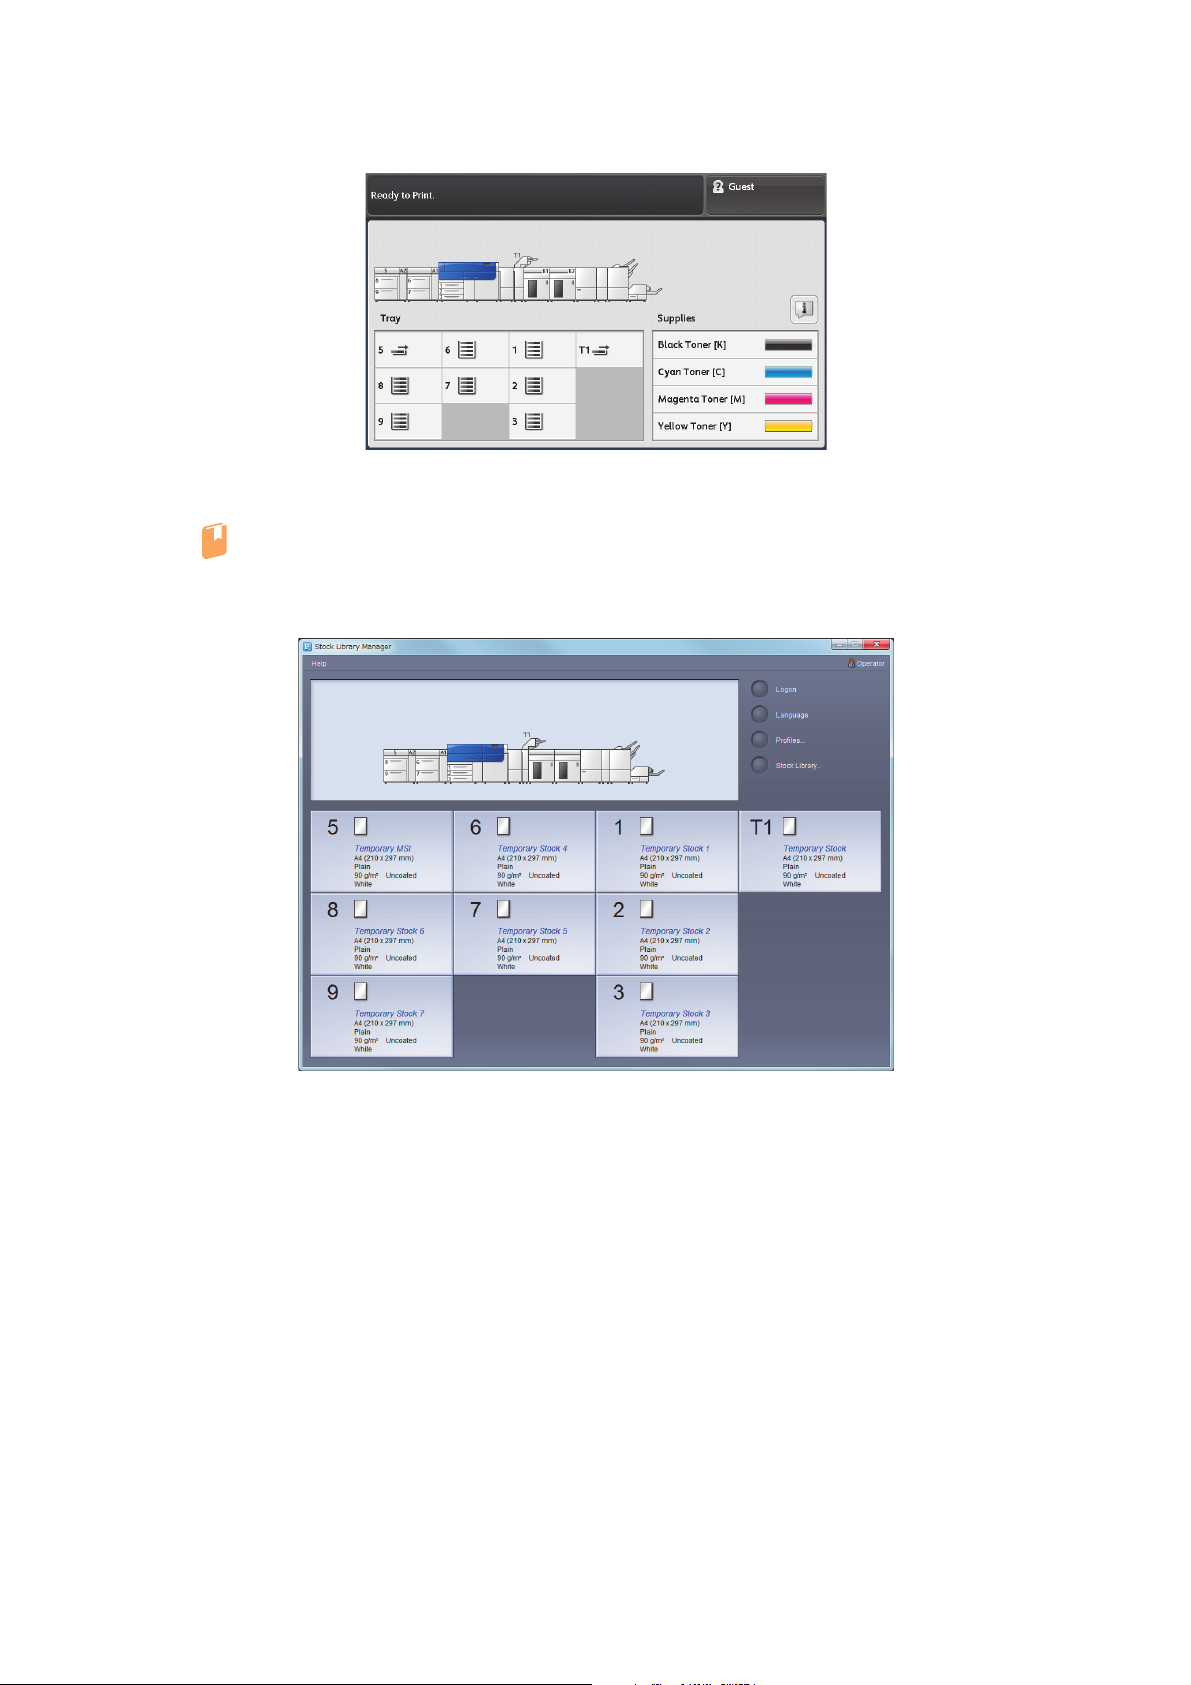
Printer Message / Job Status Area
Status of the printer is shown here.
Login mode
Displays the login mode. Tap this area to log in
to Administrator mode. (p.19)
Error Message Area
In case of an error such as paper jam, open covers, or printer malfunction, the affected area is displayed in red and the
relevant message is displayed. (p.16)
Refer
For detailed information about messages, refer to "8.2 Error Messages" (p.106).
Tray Status Area
Displays the Tray numbers and the paper level
remaining in the Trays.
Ton er S tat us A re a
Displays the toner level.
Consumables Status
Tap this icon to display toner levels and detailed
information on consumables. (p.26)
Tray Status Area
Allows you to check the paper level. (Each cell indicates 25% of the capacity.)
For Bypass Tray and the Inserter Tray, paper levels are indicated either 0% or 100%.
If an incorrect level is indicated for High Capacity Trays, make sure the plate is lowered, and then push the
Tray into the machine.
After loading the paper to High Capacity Trays, it may take some time for the area to display. This is
because the printer is raising the bottom plate or setting up the Air Assist function, and thus not a malfunction.
When (Manual Tray Switching) is displayed on the Tray in use, tap and choose Tray so that the
Tray to feed papers can be changed.
You can only switch Trays with the same Stock applied.
is not displayed when [Disabled] is selected under [Tools] > [Common Service Settings] > [Paper Tray Settings] > [Manual Tray Switching].
For detailed information about [Manual Tray Switching], refer to "4.1.5 Paper Tray Settings" (p.46).
For detailed information about the Stock, refer to "Stock Library" in the Stock Library Manager Manual.
14
User Interface Manual

Cooling Mode
Note
When overheated, the printer will display [Machine Cooling in Progress] message and enter the cooling
mode.
[Machine Cooling in Progress] message closes automatically when machine cooling is finished. Wait until
the message closes itself.
If the room temperature is high, it takes longer to cool off; Lower the room temperature.
Do not open covers or switch off the power as the fan runs to cool the heat off during the cooling mode.
Important
[Machine Cooling in Progress] message can be closed by selecting [Close], however, the cooling mode will
not be disabled; Meanwhile, you cannot operate the printer.
The printer will not enter the Sleep mode during the printer cooling is in progress.
Chapter 1 Using the User Interface
15
1.2.2 Error Information
Important
In case of an error such as paper jam, open covers, or printer malfunction, the affected area is displayed in
red and the relevant message is displayed.
1.
Tap [Faults] on the Services Home.
2.
Tap the item shown on the error list.
The items are listed in descending order of priority.
Clear the errors down the list.
Tap an error item to view the procedures in details.
If you do not follow the list, errors may keep displayed although all the errors are removed.
Attention is required to remove jammed papers in the part where is displayed. Please read
the instructions well and remove the paper.
3.
Clear the error according to the message.
4.
When you have finished, tap [Close].
16
User Interface Manual
1.2.3 Operating the Touch Screen
Screen Operations
Item Screen Description
Tabs Tap one of the tabs to display the corresponding
page.
[]
and [] buttons Tap [] or [] to change the numerical value. Tap
and hold the arrow to change the value continuously.
A fixed range is shown in the parentheses.
Ta p [] or [] to switch pages if there are two or
more pages.
List Box Tap [] to select an item.
Unavailable button Buttons or options that are in unusable state due to a
particular combination of functions or other reasons
appear in gray.
[Change Settings] Tap this to configure the selected item.
[Save] Tap this to confirm the settings you made and close
the window.
[Cancel] Tap this to discard the settings you made and close
the window.
[Close] Tap this to this to close the current screen and go
back to the previous screen.
Chapter 1 Using the User Interface
17
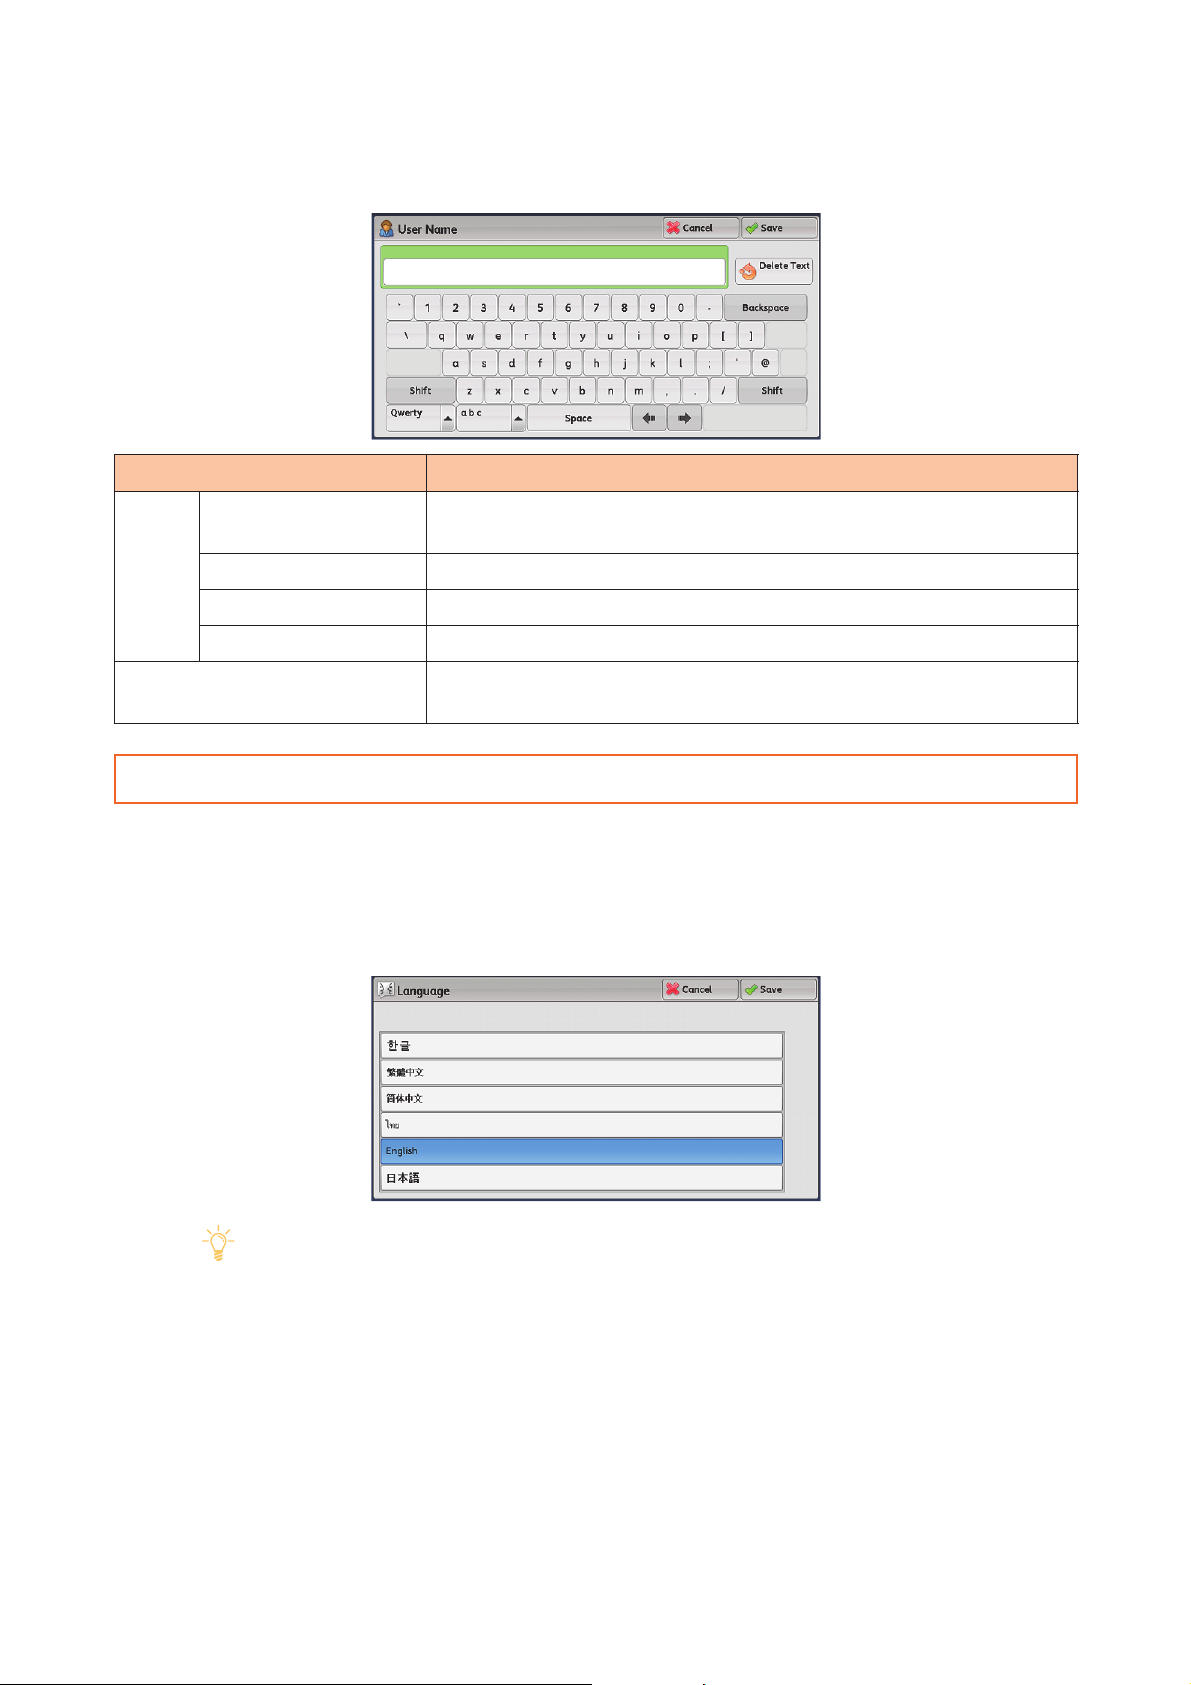
Entering Text
Note
During operations, a screen for entering text sometimes appears.
The following describes how to enter text.
Item Description
Enter alphabets and numerals Tap [Shift] to enter uppercase letters.
To return to the lowercase letters, tap [Shift] again.
Symbols Tap the [abc] tab to switch the sets of symbols displayed.
Keyboard arrangement Tap the [Qwerty] tab to switch the arrangements of the keyboard.
Space Tap [Space].
Delete Tap [Backspace] to delete one character at a time.
Tap [Delete Text] to delete all characters.
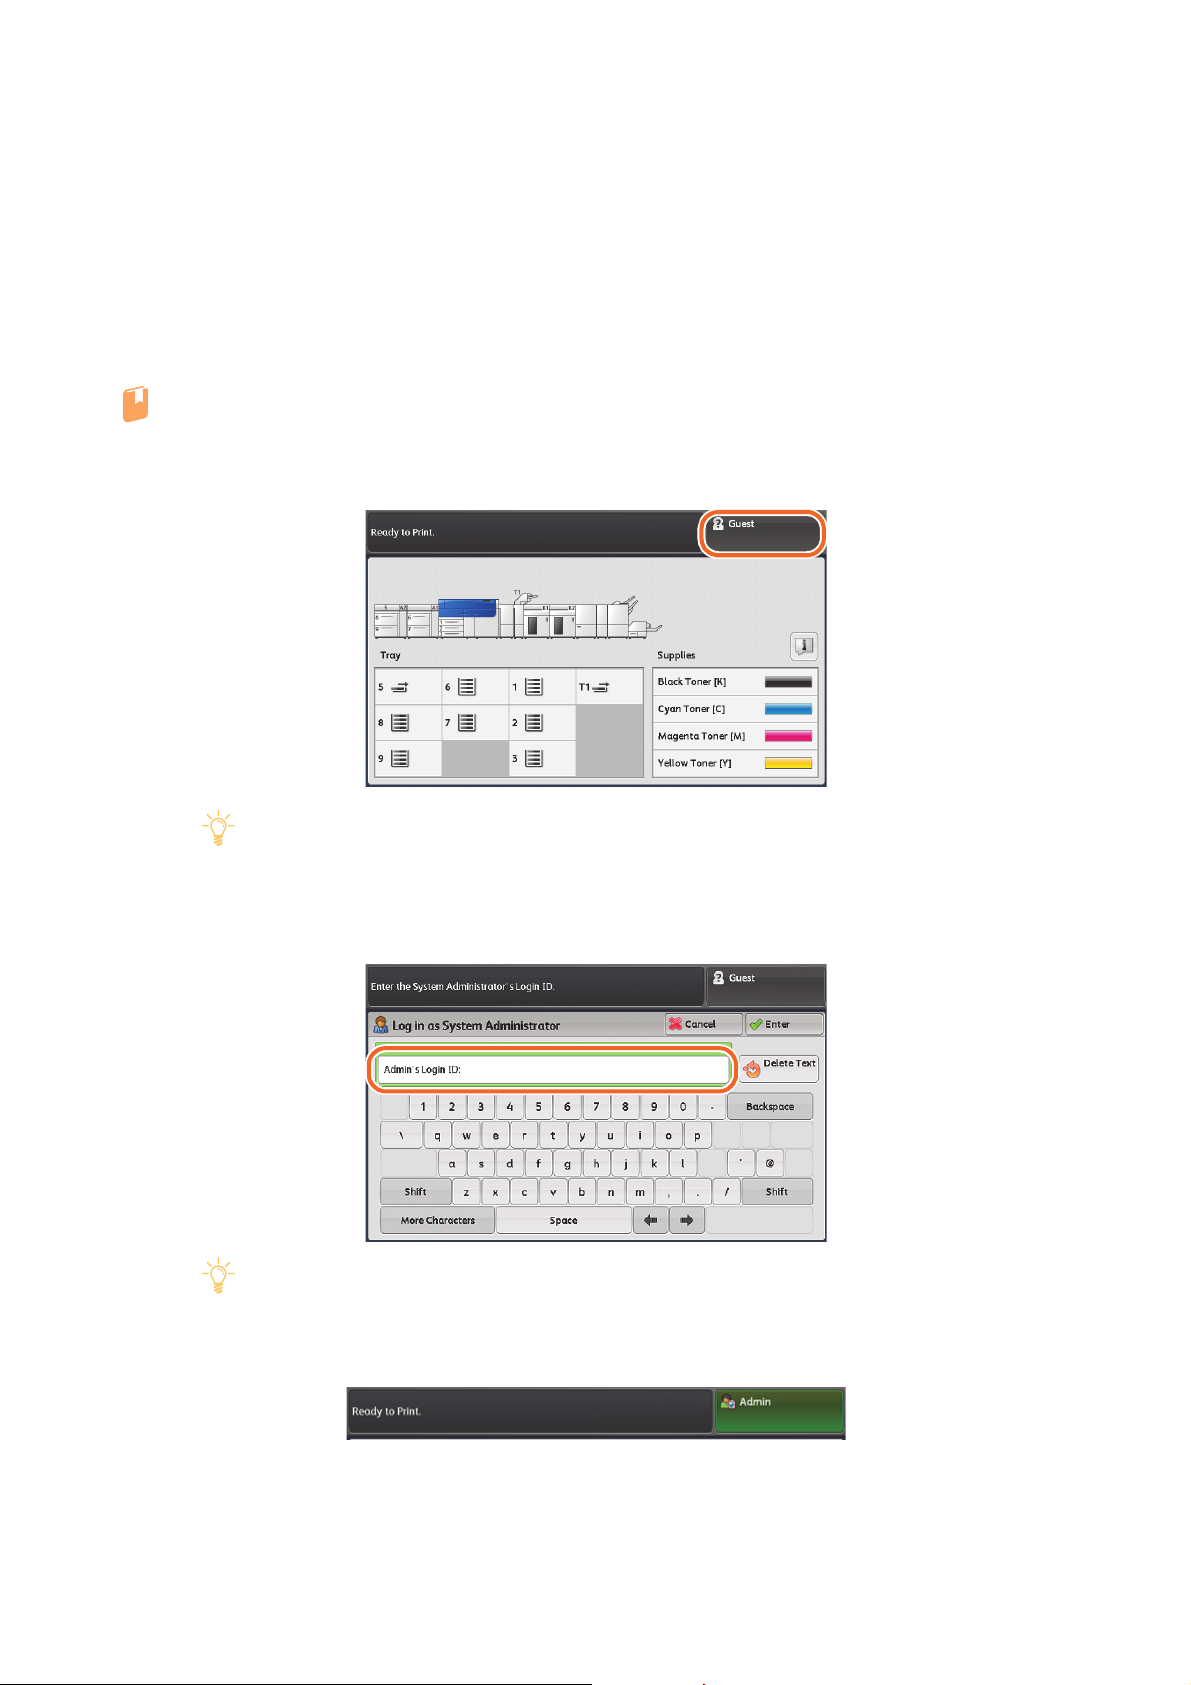
1.2.4 Switching to a Different Language
The touch screen can be switched to other languages.
1.
Press <Language> button on the control panel.
2.
Select the language you prefer.
The language setting switched by clicking [Language] lasts only temporarily and will return to the
default language specified at [Default Language] under [Tools] > [Common Service Settings] >
[Screen Settings] once you turn off the power.
For detailed information about [Default Language], refer to "4.1.4 Screen Settings" (p.45).
18
User Interface Manual
1.3
Refer
Note
Note
Logging in to the Administrator mode allows you to configure the settings which cannot be performed in
Guest mode.
Log In to and Out of Administrator Mode
Logging in to Administrator Mode
When power is switched on, the printer is in "Guest" mode.
For detailed information on how to change the administrator ID and passcode, refer to "5.2 Authentication /
Security Settings" (p.80).
1.
Tap the Login mode displayed in the upper right corner of the Services Home.
You can also log in by pressing the <Log In / Out> button on the control panel.
2.
Enter the administrator ID, and tap [Enter]. (Enter the user ID when the authentication
feature is enabled.)
When passcode is required, tap [Next], enter the passcode and then tap [Enter].
The default administrator ID is "11111".
The default passcode is "x-admin".
Once logged in to Administrator mode, the Login mode will be displayed as "Admin" in the upper right
corner of the Services Home. Then <Log In / Out> button will also lights up.
Chapter 1 Using the User Interface
19
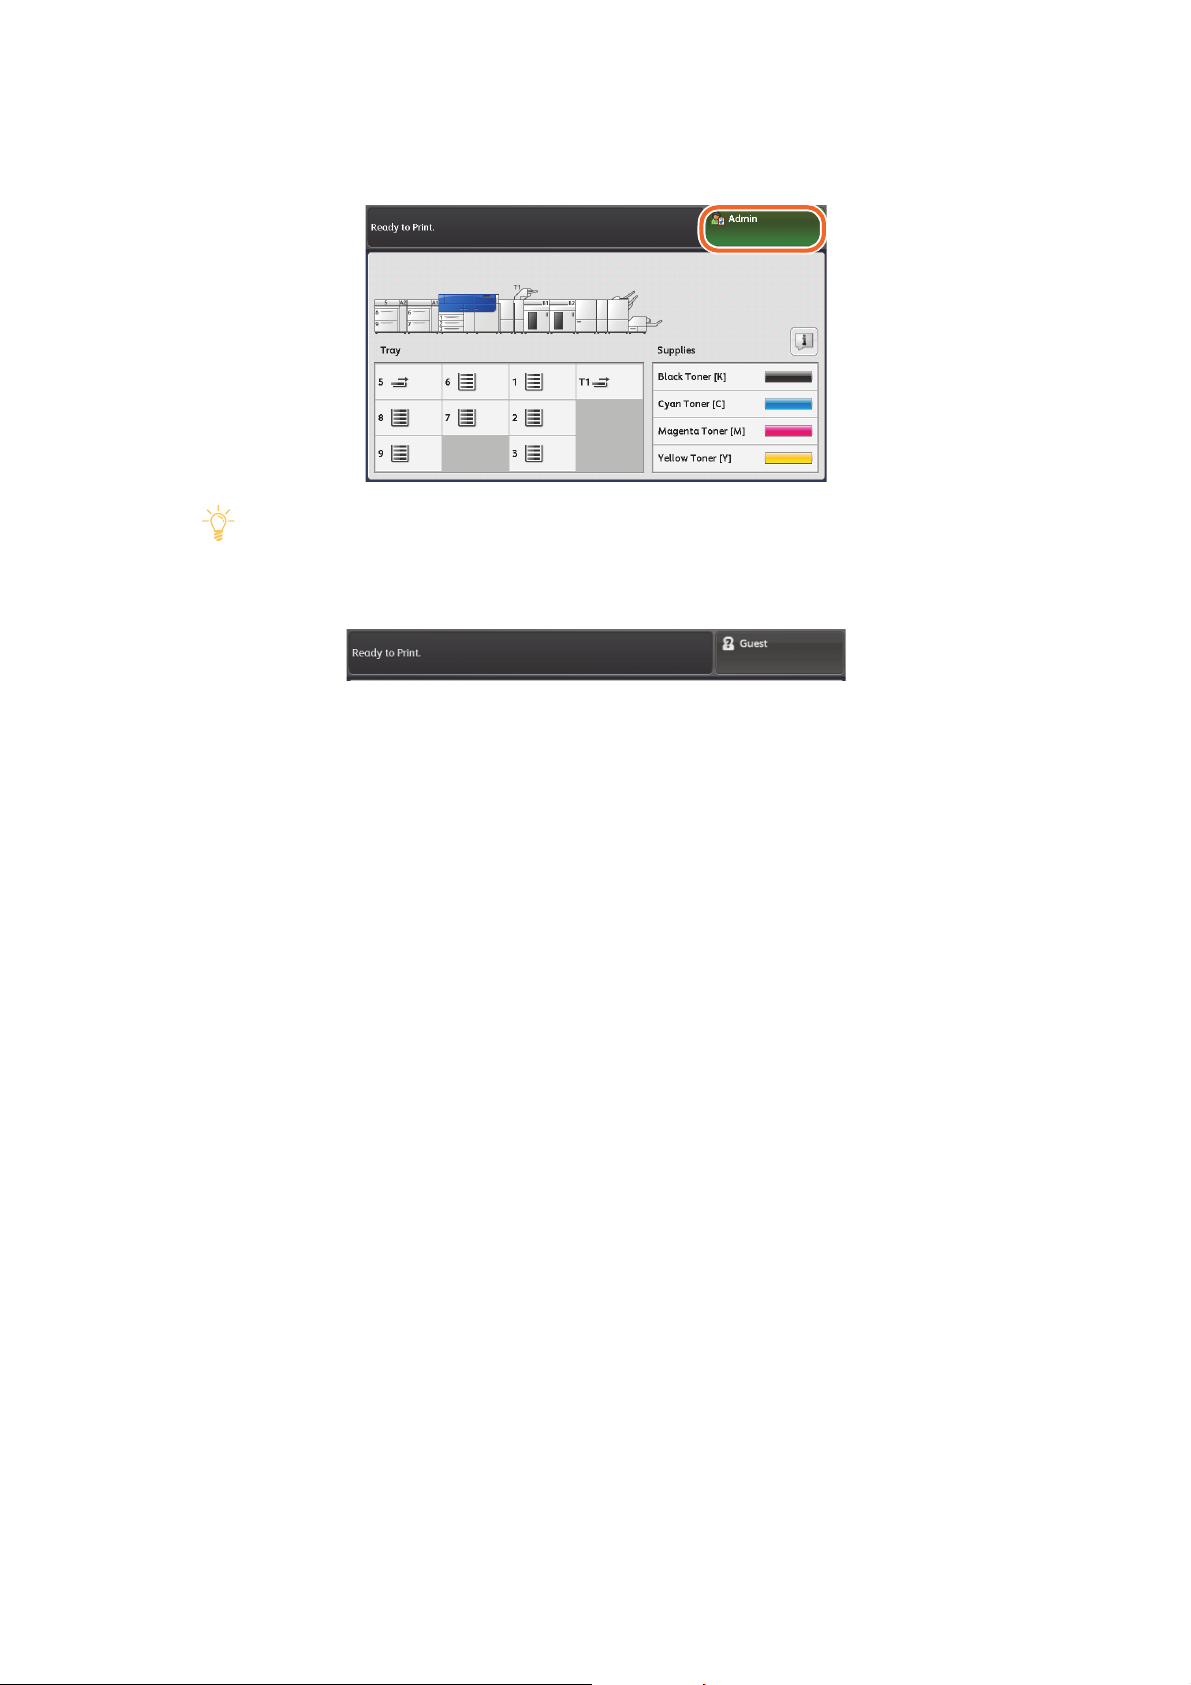
Logging out of Administrator Mode
Note
1.
Tap the Login mode displayed in the upper right corner of the Services Home.
You can also log out by pressing the <Log In / Out> button on the control panel.
After logging out of Administrator mode, the Login mode will be displayed as "Guest" in the upper right
corner of the Services Home.
20
User Interface Manual

1.4
Note
Note
Power Saver Mode
Power Saver mode reduces power consumption to conserve electricity.
After being inactive for a while the printer automatically enters the "Low Power mode". Then after a given
time, the printer enters the "Sleep mode".
Low Power mode
The power supply to the user interface and the Fusing Unit is lowered.
Sleep mode
The power supply to devices such as hard disk drive is suspended, and the power consumption will be
smaller than the Low Power mode.
The printer is equipped with the feature to save electricity by supplying power only to the devices necessary to activate the printer after exiting the Power Saver mode
Entering Power Saver Mode
The printer enters the Power Saver mode by the following instances:
Pressing the <Power Saver> button on the control panel (enters Power Saver mode in about 5 seconds)
The printer is not operated for the set period of time to enter the Power Saver mode.
If the printer enters Power Saver mode while authenticating, the authentication will be disabled.
The printer will not enter the Sleep mode during the printer cooling is in progress.
When the printer enters the Power Saver mode, the touch screen goes off and the <Power Saver> button
lights up.
Stock Library Manager cannot be operated when the printer is in Power Saver mode.
Exiting the Power Saver Mode
The printer exits the Power Saver mode by the following instances:
Touching the IC Card Reader with a card (only in Low Power mode)
Pressing the <Power Saver> button on the control panel
Receiving jobs such as print
Clicking [Apply] in CentreWare Internet Services
When the printer is in the Sleep mode, it takes longer to exit the Power Saver mode than when the printer is
in the Low Power mode.
It may take longer to exit the Power Saver mode when the <Power Saver> button is pressed immediately
after the touch screen blacks out, or when the printer has not completely entered the Power Saver mode.
Wait for a few seconds until the printer can comply the instruction to exit the Power Saver mode, and then
press the <Power Saver> button again.
When the printer enters the Power Saver mode with the optional IC Card Reader, it may take longer than
usual to exit the Power Saver mode.
When exiting the Power Saver mode, the printer supplies power only to the devices necessary to activate
the service.
For detailed information on how to configure, refer to "Power Saver Deactivation" (p.43).
Chapter 1 Using the User Interface
21
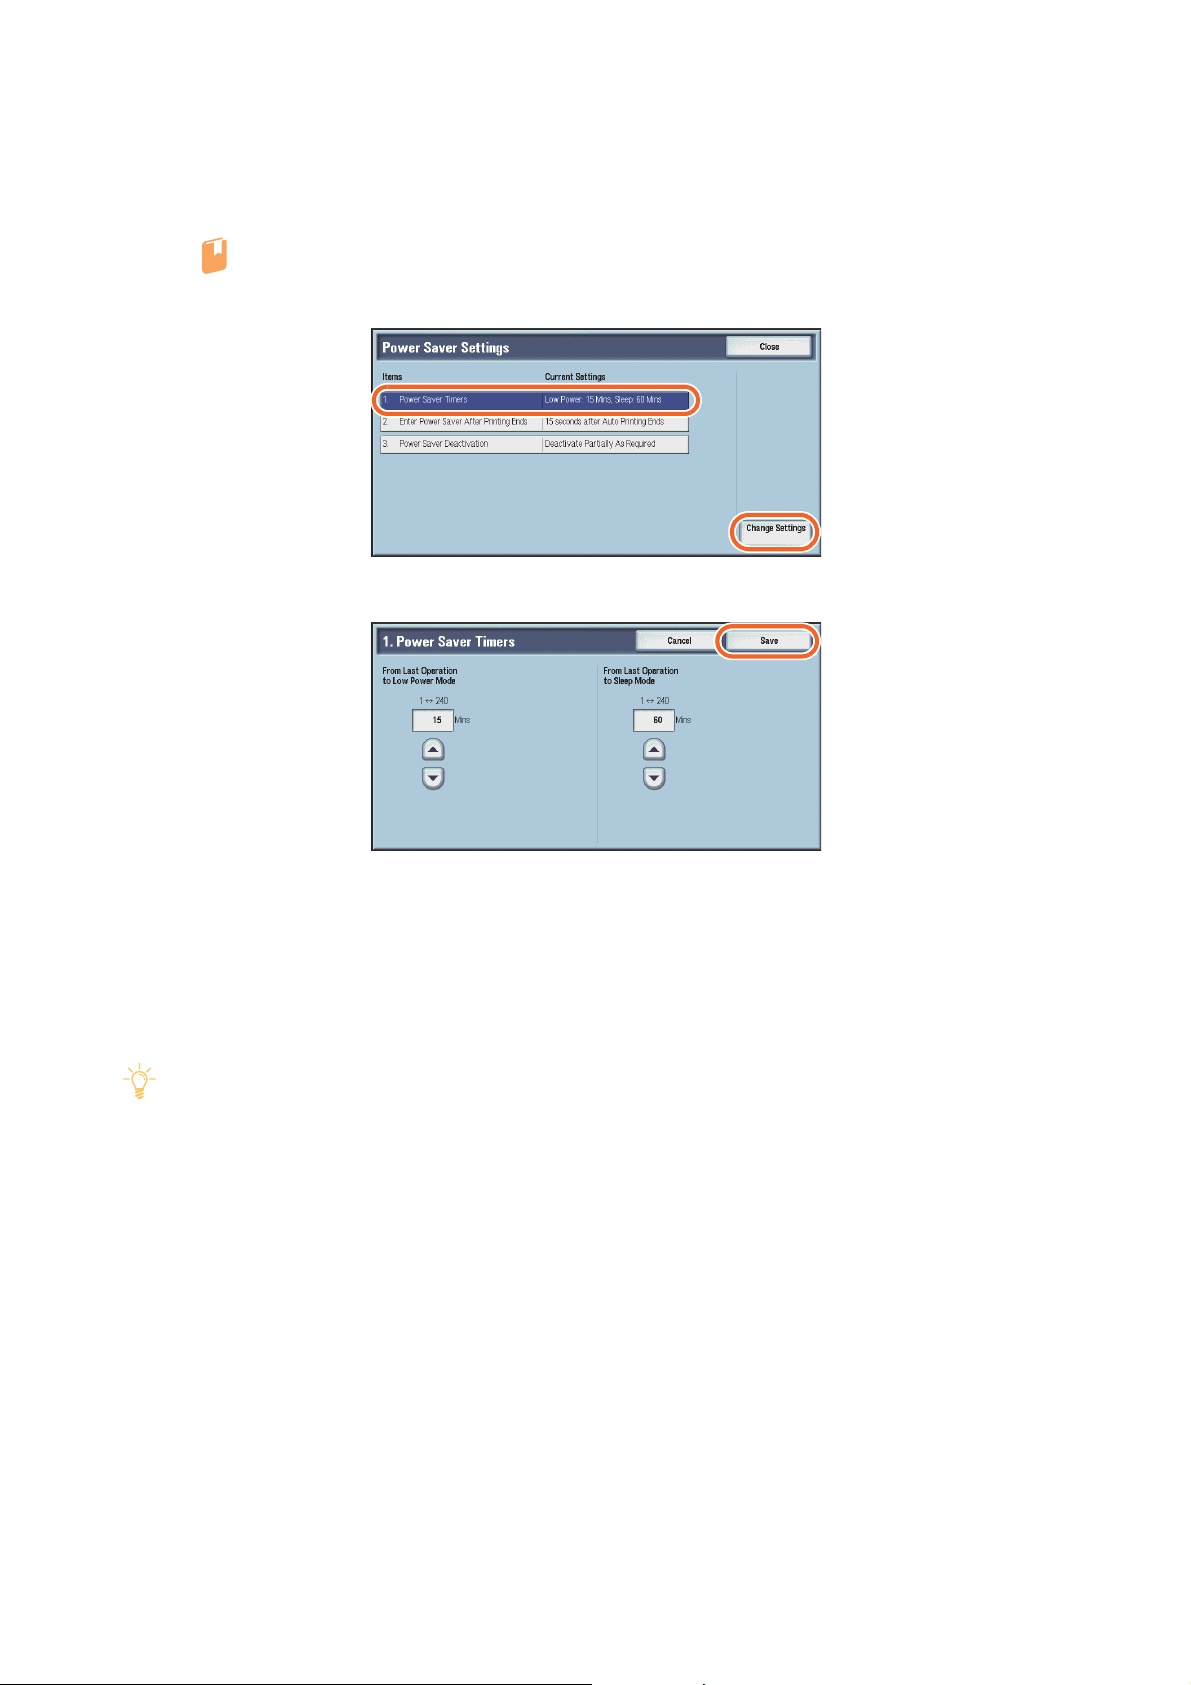
Power Saver Timers
Refer
Note
1.
Log in to the Administrator mode, press <Tools> button, and then select [Tools] > [Common Service Settings] > [Power Saver Settings].
For detailed information on how to display the window, refer to "4.1.2 Power Saver Settings" (p.42).
2.
Select [Power Saver Timers], then tap [Change Settings].
3.
Specify the time after which the printer enters Power Saver mode, and tap [Save].
From Last Operation to Low Power Mode
Specify the time the printer enters Low Power mode after not having been used for a certain amount of
time.
From Last Operation to Sleep Mode
Specify the time the printer enters Sleep mode after not having been used for a certain amount of time.
If the set time to enter the Power Saver mode is the same as the time to enter the Sleep mode, or if the set
time for Sleep mode is shorter, the printer enters Sleep mode immediately.
If you print when the touch screen is blacked out in Power Saver mode, only the devices necessary to print
will be activated.
In this instance, the printer enters Sleep mode in 15 seconds regardless of the time specified.
22
User Interface Manual
Chapter 2
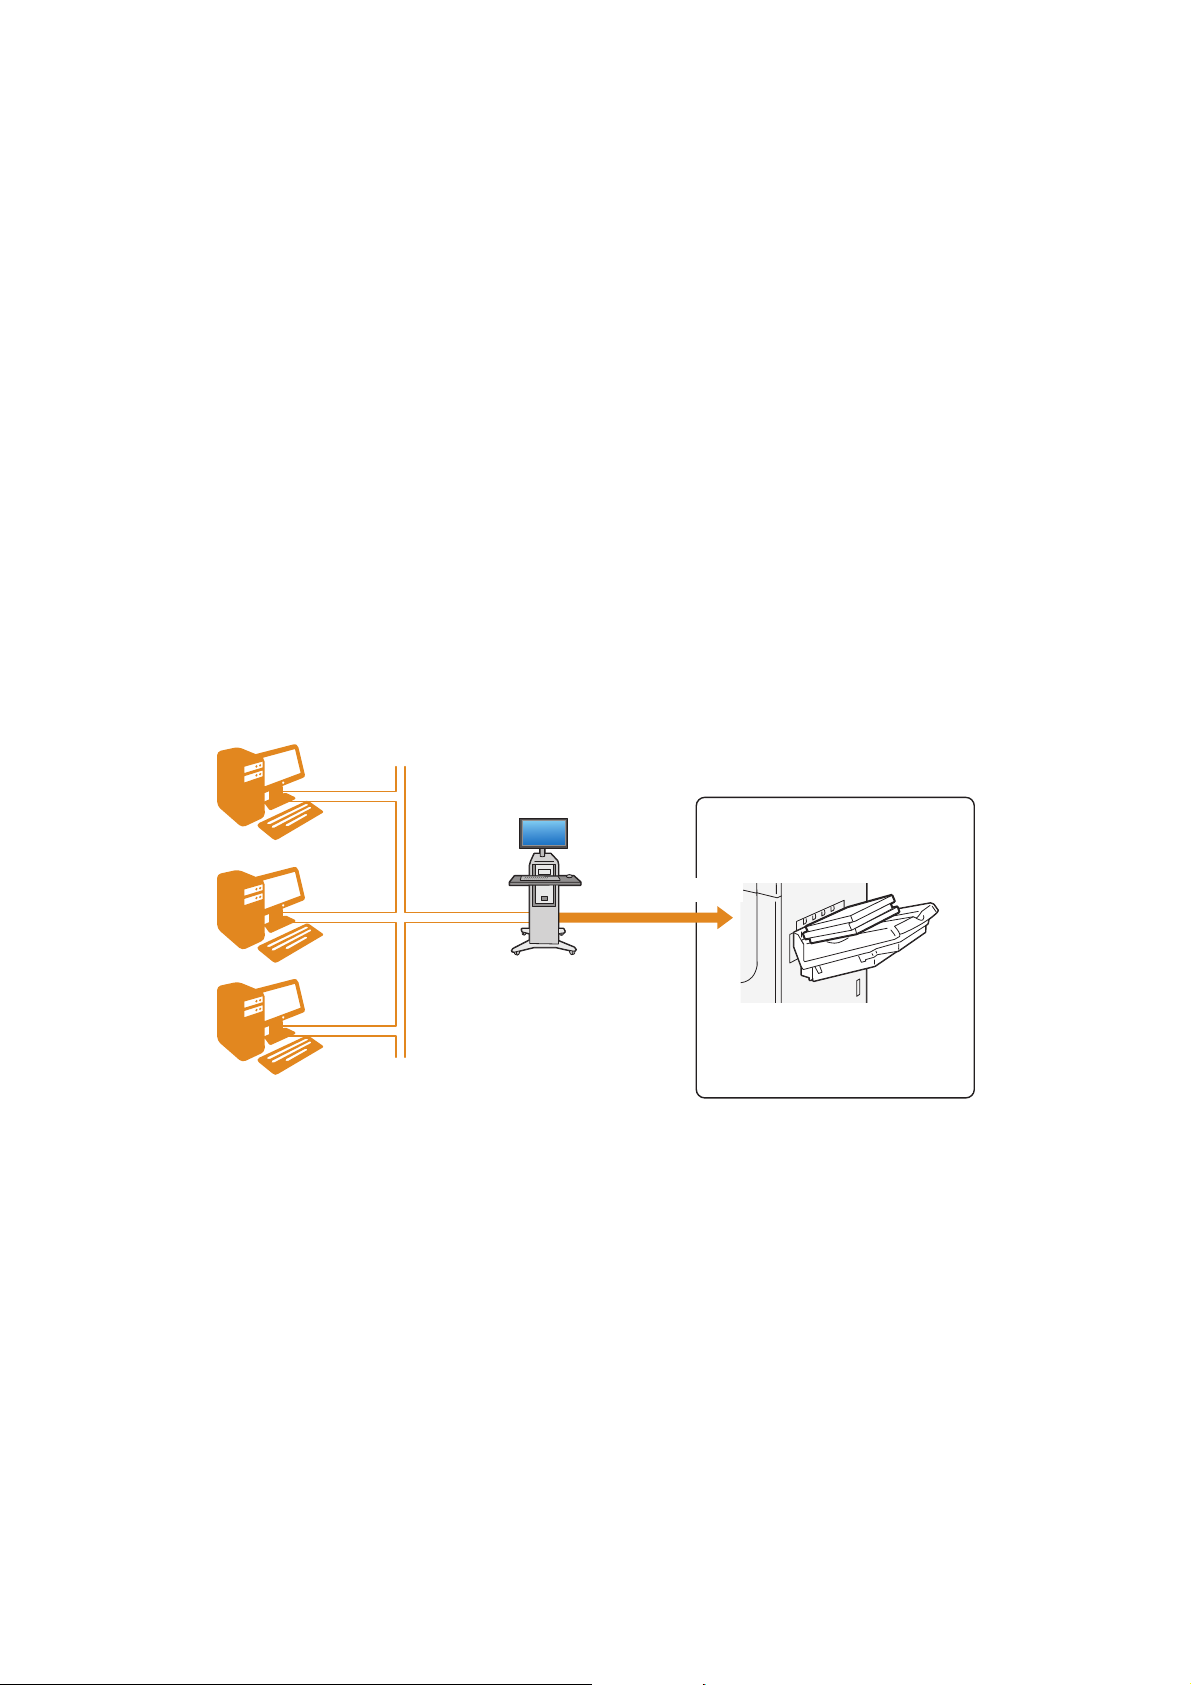
Client computers
Print Server
Printer
Job printed
Print Jobs
2.1 Print Job Processing.................................................................................23
2.2 Job Status....................................................................................................24
Basic Operation of Print Jobs
2.2.1 [Active Jobs] Tab.................................................................................................. 24
2.2.2 [Completed Jobs] Tab........................................................................................ 25
2.1
What Is a Job?
Each data unit processed by the printer is called a "job".
Print job
A print job is the data submitted from a client computer to the printer though the Print Server. One job
consists of a file containing print instructions such as the number of sheets and paper properties. This file
is created by an application program.
Print Job Processing
Paper Properties Specified for a Job
A print job contains paper properties such as paper size, paper type and paper weight.
On loading the paper, be sure to set the paper properties on [Tray Stock Properties] window on Stock
Library Manager.
Also, Versant 3100 Press has Stock Library feature. Stock Library feature manages the stocks by naming
them according to paper attributes (size, type, weight etc.).
The registered "Stock" can also be applied to print jobs.
The job sent to the printer ends with an error unless all of the followings are consistent; the loaded paper,
the paper properties set on [Tray Stock Properties] window, and the paper properties contained in the
print job.
Chapter 2 Basic Operation of Print Jobs
23
2.2
Note
Refer
Refer
You can check the job information and progress.
1.
Job Status
The information may not be displayed depending on the settings at [Authentication / Security Settings] >
[Job Status Default].
For detailed information about [Job Status Default], refer to "5.2.3 Job Status Default" (p.87).
Press the <Job Status> button on the control panel to display Job Status window.
2.2.1 [Active Jobs] Tab
1.
Display Job Status window.
For detailed information on how to display the window, refer to "2.2 Job Status" (p.24).
2.
Select the job to operate.
Print Waiting Jobs
The following jobs will be forcibly printed: suspended jobs, waiting jobs to be printed at the time set
under [Tools] > [Common Service Settings] > [Machine Clock / Timers] > [Auto Print].
For detailed information about [Auto Print], refer to "4.1.1 Machine Clock / Timers" (p.39).
3.
Tap the button for desired operation.
24
User Interface Manual
Delete
Note
Note
Refer
Note
Tap this button and the job will forcibly be canceled and deleted.
Promote Job
Tap this button to raise the priority of the job to be printed. will be displayed on the list.
Stop
Tap this button to suspend a print job in progress.
You can also suspend the job by pressing the <Stop> button on the control panel.
Start
Tap this button to resume the suspended printing.
You can also resume the suspended job by pressing the <Start> button on the control panel.
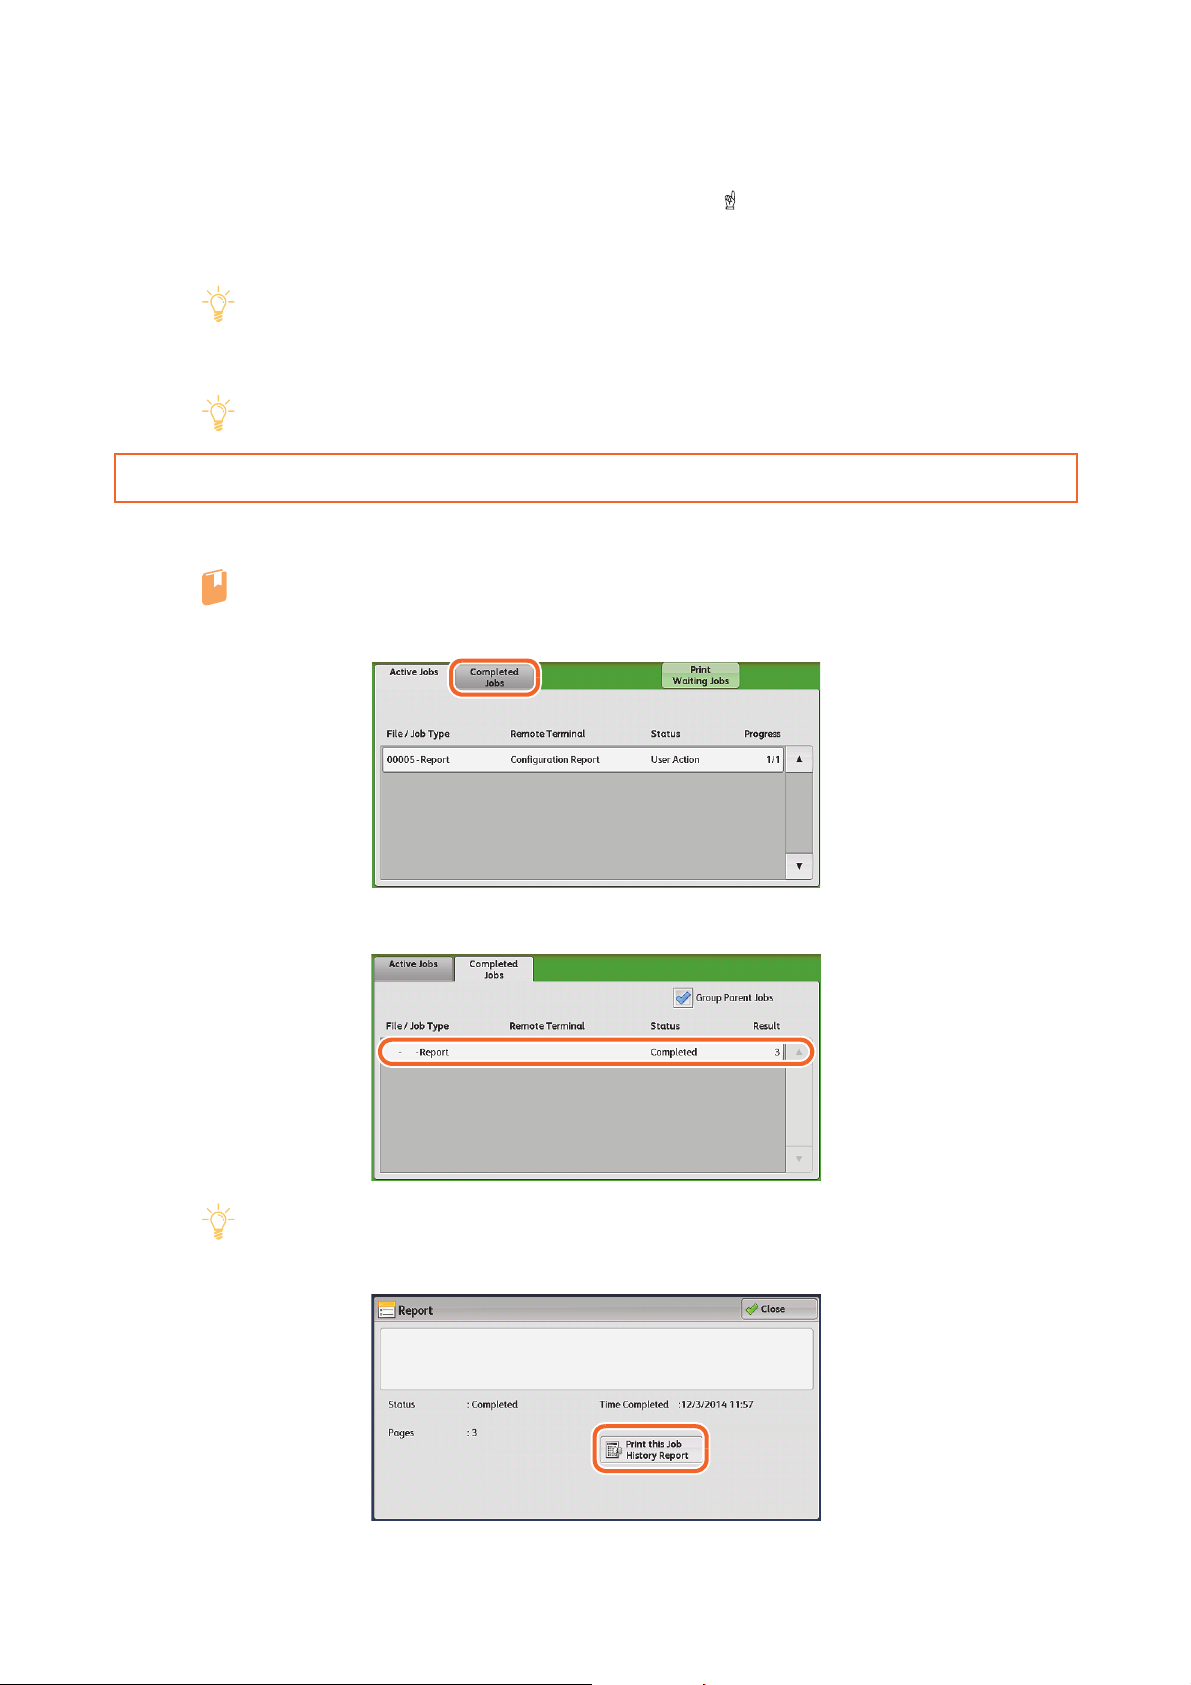
2.2.2 [Completed Jobs] Tab
1.
Display Job Status window.
For detailed information on how to display the window, refer to "2.2 Job Status" (p.24).
2.
Tap the [Completed Jobs] Tab.
3.
Select the job to operate.
Checking the [Group Parent Jobs] box does not enable the function.
4.
Tap [Print this Job History Report] to print the job history report.
Chapter 2 Basic Operation of Print Jobs
25
Chapter 3
Refer
3.1 Maintenance..............................................................................................26
3.2 Machine Status.........................................................................................28
3.3 Tools...............................................................................................................33
Maintenance
3.1.1 Consumables Status .......................................................................................... 26
3.1.2 Setting Restore Tool........................................................................................... 27
3.2.1 [Machine Information] Tab ............................................................................ 28
3.2.2 [Faults] Tab............................................................................................................. 31
3.2.3 [Billing Information] Tab.................................................................................. 31
3.3.1 Clean Fusing Unit................................................................................................ 33
3.3.2 Full Width Array ................................................................................................... 34
3.3.3 DFA Finisher Profile............................................................................................. 37
3.1
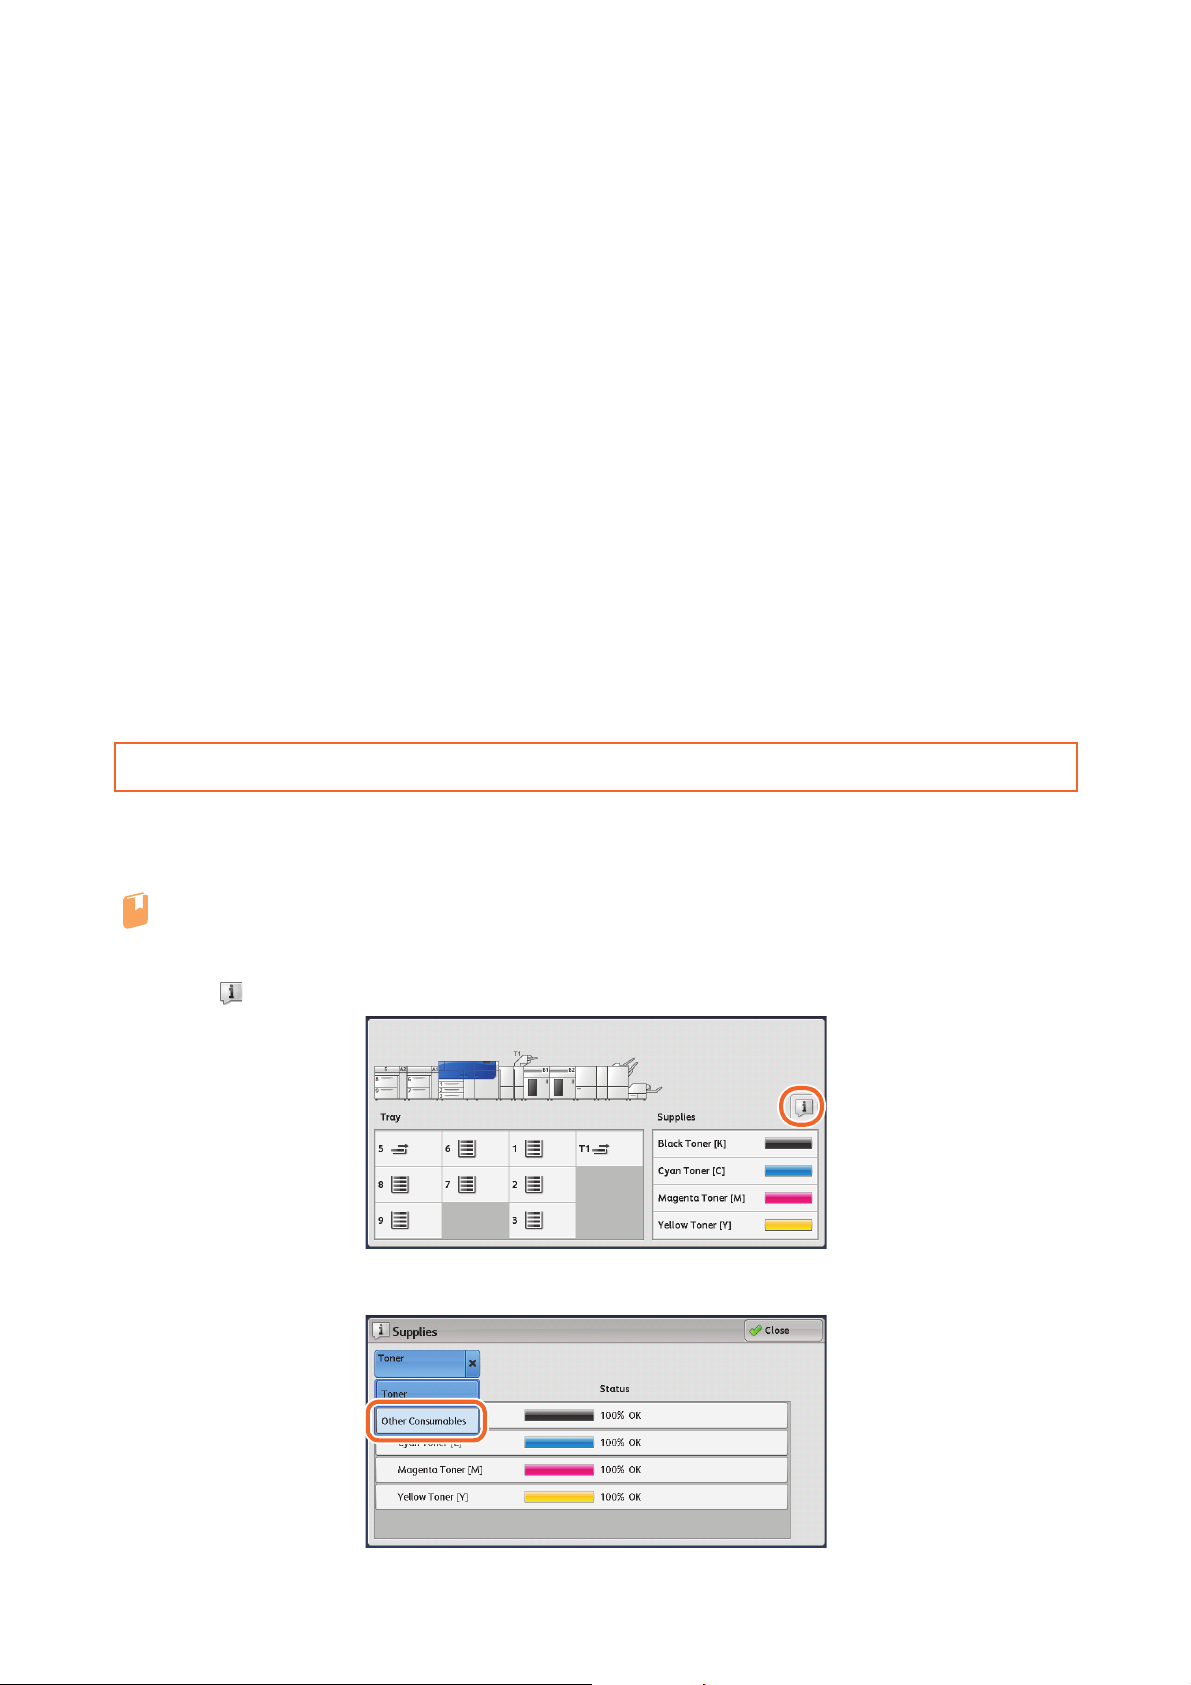
3.1.1 Consumables Status
The status of the consumables is displayed.
The status is shown as "OK", "Replace Soon" or "Replace Now".
1.
Maintenance
For detailed information on how to replace consumables, refer to "4.1 Consumables" in the Printer Unit Manual.
Tap (Consumables Status) on the Services Home.
26
2.
Select [Other Consumables] from the list box to check the status of other consumables.
User Interface Manual

3.
Select a consumable to display the status message.
3.1.2 Setting Restore Tool
Setting Restore Tool backs up the settings data to reduce the time required to reconfigure in case of malfunction of the printer or hard disk replacement.
For the Setting Restore Tool, contact your local Fuji Xerox representative.
The following data can be backed up on the client computer:
Job log
Error log
Auditron log
Other information such as user setting data
Users cannot replace the hard disk by themselves. When replacing the hard disk, contact your local Fuji
Xerox representative.
Chapter 3 Maintenance
27
3.2
Note
Refer
Note
You can check machine status and the number of printed pages on the screen. You can also print various
reports/lists to check the job history, settings and registered information.
1.
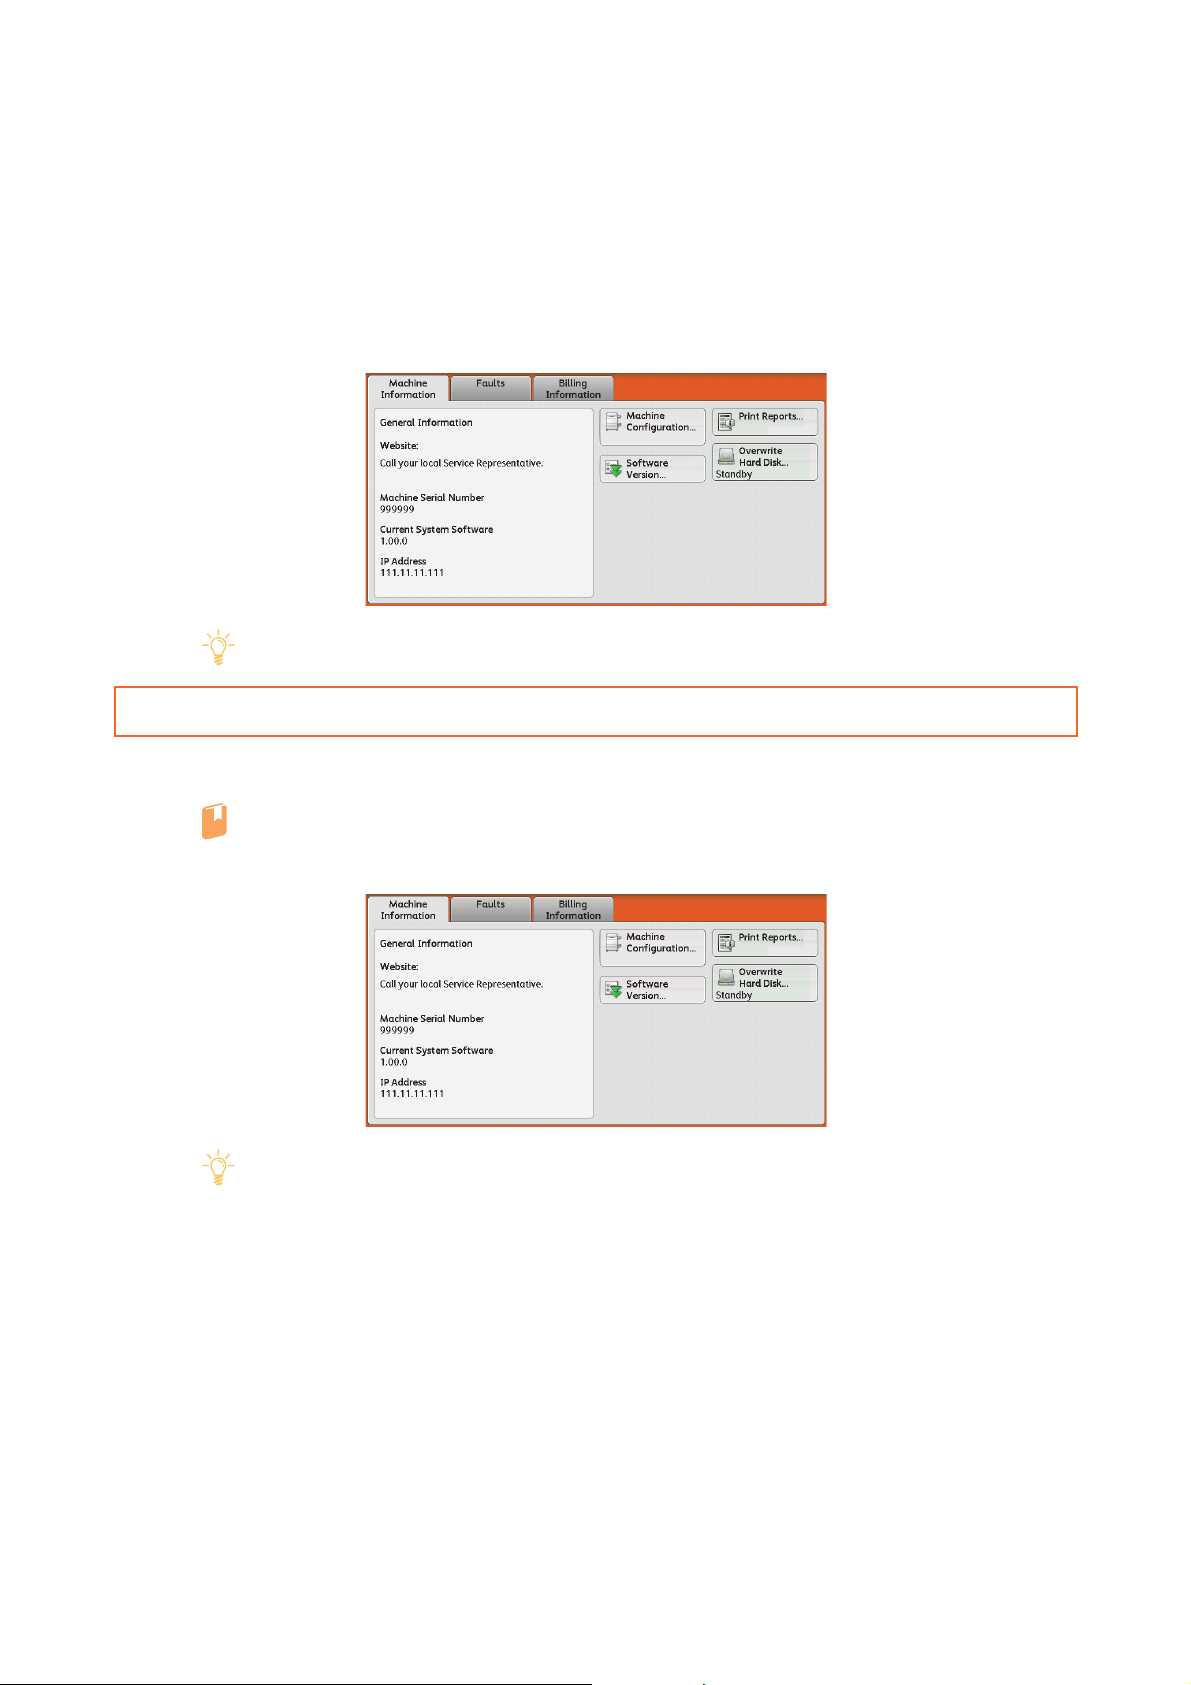
Machine Status
Press the <Machine Status> button on the control panel to display Machine Status window.
Press <Machine Status> button to update the consumables status when replacing consumables.
3.2.1 [Machine Information] Tab
1.
Display Machine Status window.
For detailed information on how to display the window, refer to "3.2 Machine Status" (p.28).
2.
Tap the button for desired operation.
[Print Report] is displayed only in Administrator mode when [Disabled] is selected for [Print Report
Button] under [Tools] > [Common Service Settings] > [Reports].
For detailed information about [Print Report Button], refer to "4.1.7 Reports" (p.48).
Machine Configuration
Tap this to display the attached Optional Units.
28
Software Version
Tap this to display the installed software version.
User Interface Manual
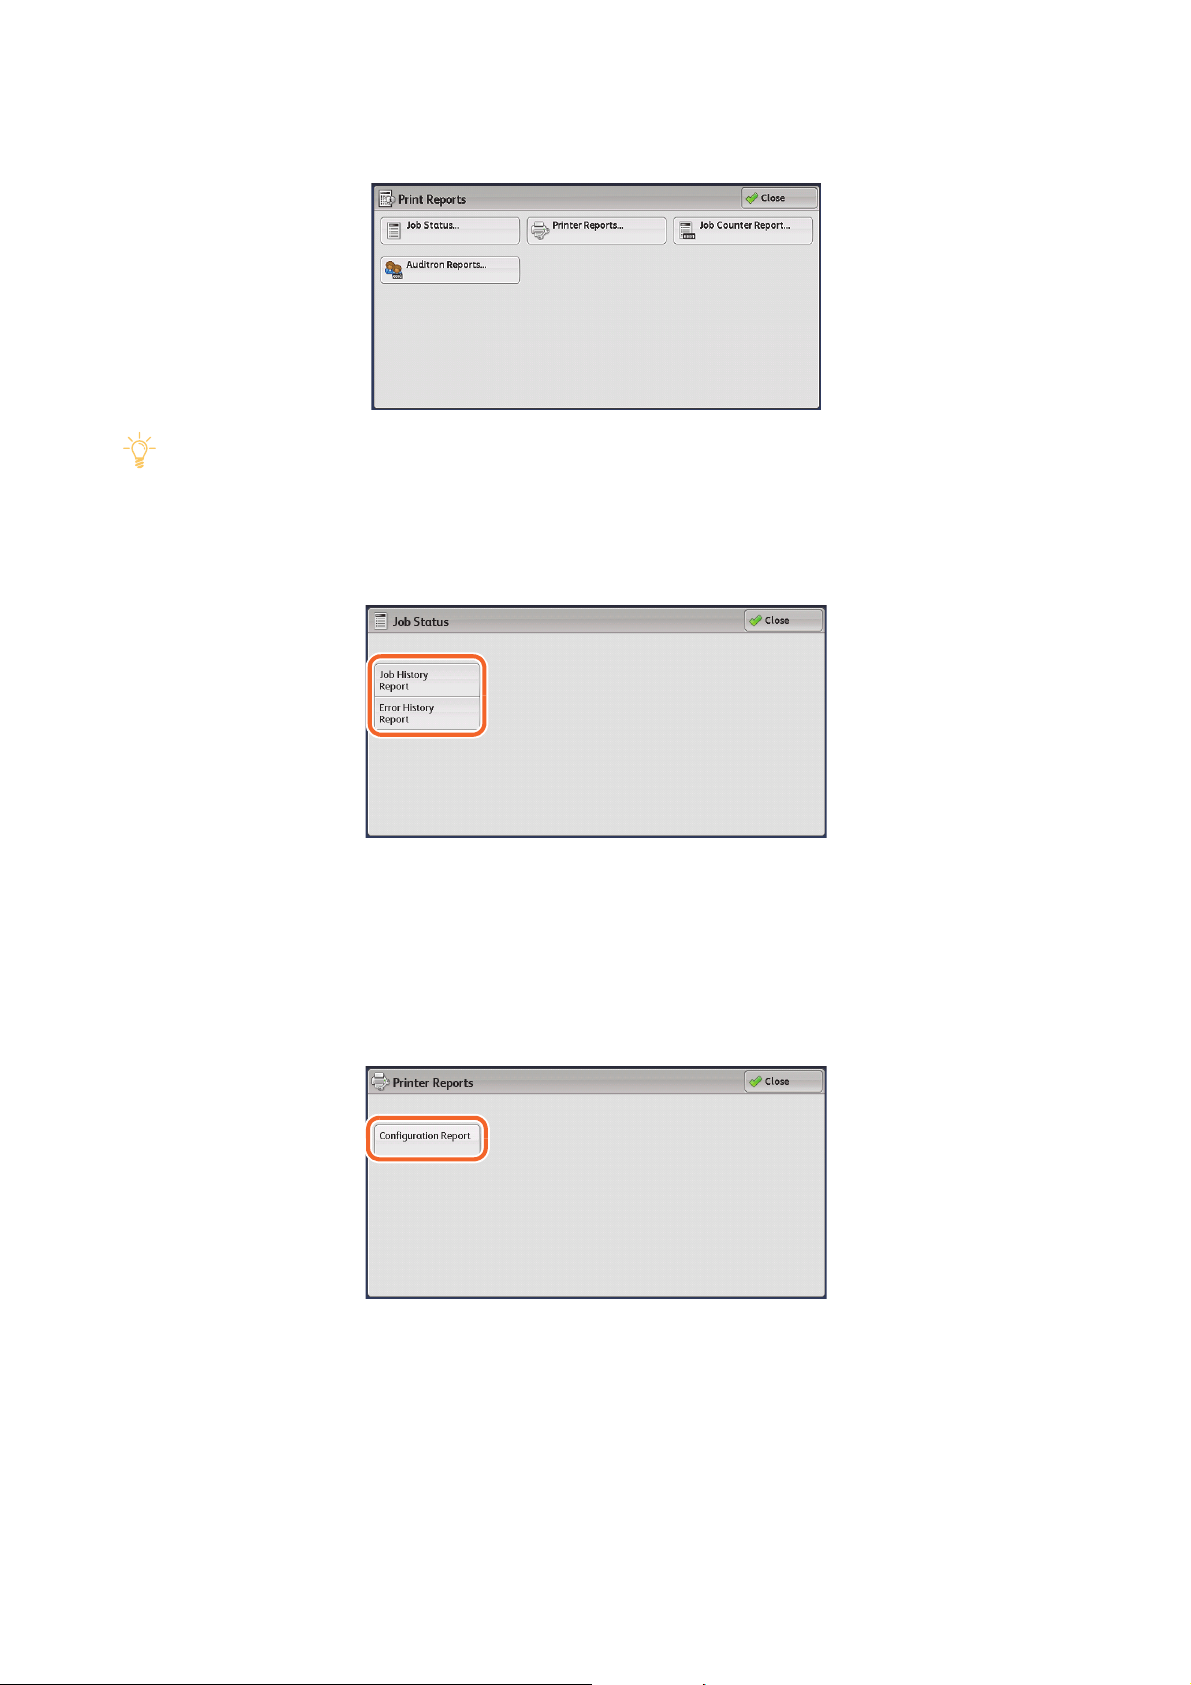
Print Reports
Note
Tap this to print reports and lists.
The reports are printed with the setting selected under [Tools] > [Common Service Settings] > [Reports].
For detailed information about [Reports], refer to "4.1.7 Reports" (p.48).
The items other than [Job Status] and [Printer Reports] are displayed only in Administrator mode.
Job Status
Select the history to print and press the <Start> button.
Job History Report
Up to 200 latest jobs can be printed.
Error History Report
The latest 50 errors can be printed.
Printer Reports
You can check the hardware configuration, network information, and print settings of the printer.
Tap [Configuration Report] and press the <Start> button.
Chapter 3 Maintenance
29
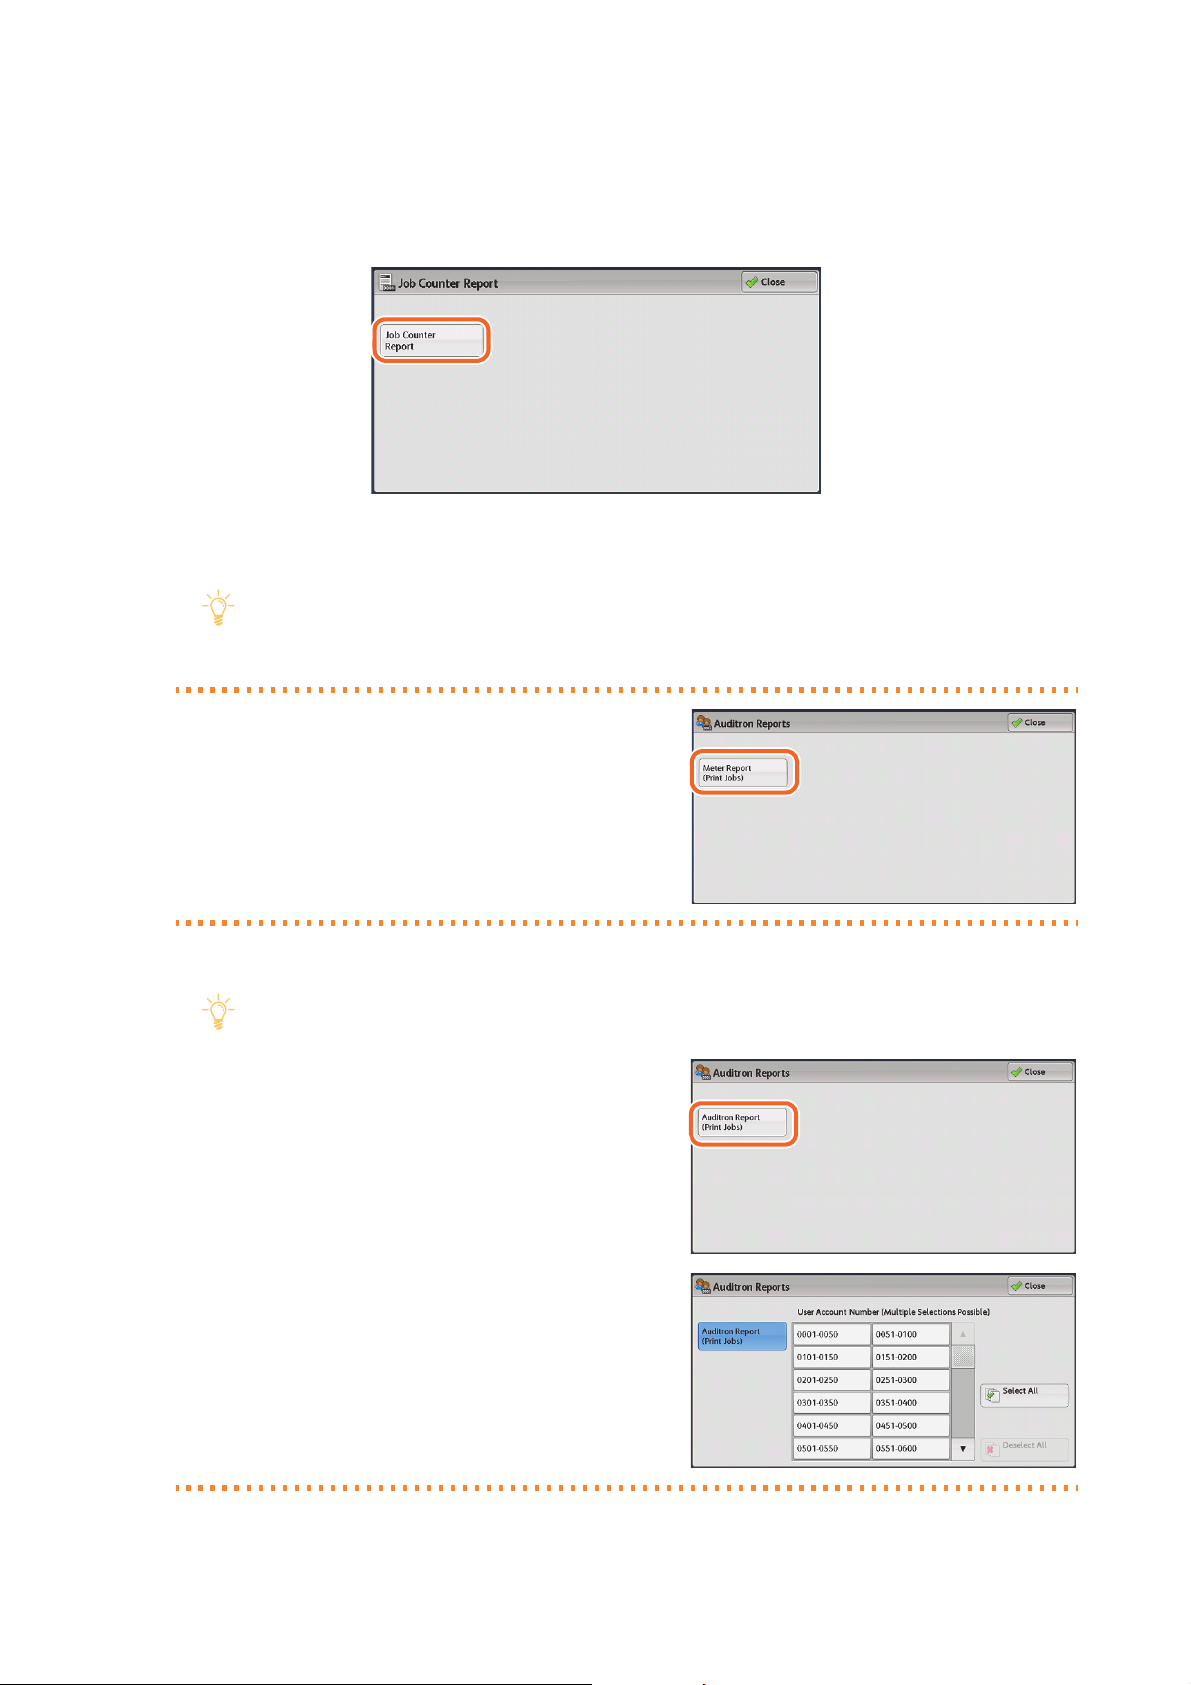
Job Counter Report
Note
Note
You can check the breakdown of the number of actual printer use by feature (such as the number of pages
printed and the number of times used) and cumulative time of when the printer is not in use (such as
standby time, Low Power mode, Sleep mode, and power-off time) by minutes on the Job Counter Report.
Tap [Job Counter Report] and press the <Start> button.
Auditron Reports
You can check the number of pages printed by each user ID on the screen.
The items to be printed vary depending on the setting selected under [Tools] > [Accounting] >
[Accounting Type].
For detailed information about [Accounting Type], refer to "5.1.1 Accounting Type" (p.72).
When [Accounting Type] is set to other than
[Local Accounting]
Tap [Meter Report (Print Jobs)] and press the <Start> button.
[Meter Report (Print Jobs)] counts pages from the time at
which the data is initialized.
When [Accounting Type] is set to [Local Accounting]
Except when [Disable Accounting] is selected under [Accounting Type] > [Auditron Mode] > [Print
Jobs].
(1) Tap [Auditron Report (Print Jobs)].
(2) Select the range of user ID numbers to print and
press the <Start> button.
30
User Interface Manual

Overwrite Hard Disk
Refer
Refer
Refer
Refer
You can check the overwriting status of the hard disk.
For detailed information about the settings to overwrite hard disk, refer to "5.2.4 Overwrite Hard Disk" (p.88).
3.2.2 [Faults] Tab
Displays error codes, dates, time and image count (total number) of errors.
For detailed information on how to print the history, refer to "Job Status" (p.29).
1.
Display Machine Status window.
For detailed information on how to display the window, refer to "3.2 Machine Status" (p.28).
2.
Tap the [Faults] Tab.
3.2.3 [Billing Information] Tab
You can check the number of pages printed per meter or user ID.
1.
Display Machine Status window.
For detailed information on how to display the window, refer to "3.2 Machine Status" (p.28).
2.
Tap the [Billing Information] Tab.
Chapter 3 Maintenance
31

3.
Note
Note
Note
Tap the button for desired operation.
Items other than [Billing Information] are displayed only when authentication feature is enabled.
For detailed information on Authentication, refer to "7.3.1 User Authentication Operations" (p.102).
Billing Information
Serial Number
Displays the serial number of the printer.
Color Impressions
Displays the total number of pages printed in full color.
Black Impressions
Displays the total number of pages printed in black and white.
Color Large Impressions
Displays the total number of pages printed in full color for the paper sizes from 0.1116 m2 (279 × 400 mm)
2
to less than 0.1874143 m
Black Large Impressions
(1.5 times of A3 = 297.2 × 420.4 mm paper size).
Displays the total number of pages printed in black and white for the paper sizes from 0.1116 m2 (279 ×
2
400 mm) to less than 0.1874143 m
Total Impressions
(1.5 times of A3 = 297.2 × 420.4 mm paper size).
Displays the total number of Color Impressions and Black Impressions
For paper size of 0.1874143 m2 (1.5 times of A3 = 297.2 × 420.4 mm paper size) or larger, the number is
counted 2 times for one printed page and the total number of pages are displayed in the following respectively:
Print in black and white: Black Impressions
Print in full color: Color Impressions
32
User Account Billing Information
[User Account Billing Information] is the value of the meter while [Enable Accounting] is selected for [Print
Jobs] under [Tools] > [Accounting] > [Accounting Type].
[User Account Billing Information] is displayed when [Local Accounting] is selected for [Accounting Type]
under [Tools] > [Accounting].
For detailed information about [Accounting Type], refer to "5.1.1 Accounting Type" (p.72).
User Interface Manual

3.3
Note
Note
Note
Tools
3.3.1 Clean Fusing Unit
Print quality can be improved by cleaning the Fusing Module.
You can clean the Fusing Module using either paper or felt.
You can only clean with felt when logging in to Administrator mode.
Clean with Paper
1.
Prepare the paper.
Load either of the following types of paper:
Paper suitable for double-sided print
Uncoated paper, 81 - 350 g/m
Coated paper, 106 - 350 g/m
Load A4 , Letter (8.5 x 11") , or larger standard-size paper in the LEF orientation. (It is more
effective to use horizontally-long paper such as A3.)
Set the Stock on the Stock Library Manager as follows:
- Uncoated paper: Select [Textured/Embossed] for [Type]
- Coated paper: Select [Cast Coated] for [Coating]
2
2
2.
Press <Tools> button on the control panel.
3.
Tap [Clean Fusing Unit].
4.
If necessary, tap [Start] after any changes made to the settings.
5.
Tap [Confirm].
It is more effective to print one or two pages for multiple times than to print many (five) pages at a
time. Especially, the paper which is long in landscape-orientation such as A3, print fewer pages at a
time.
Chapter 3 Maintenance
33

Clean with Felt
Refer
Clean the Fusing Module with the felt equipped inside the printer. Paper is not required for cleaning.
1.
Log in to the Administrator mode and press <Tools> button on the control panel.
For detailed information on how to log in to the Administrator mode, refer to "1.3 Log In to and Out
of Administrator Mode" (p.19).
2.
Tap [Clean Fusing Unit].
3.
Tap [Clean with Felt] and then [Start].
4.
Tap [Confirm].
3.3.2 Full Width Array
By utilizing the Full Width Array, image quality adjustments (Calibration, Density Uniformity Adjustment)
can be performed automatically.
Perform the image quality adjustments when replacing the Drum Cartridge or switching papers.
Thirty to sixty minutes after the power is on (as the printer is unstable immediately after turned on)
After the room temperature and humidity become stable in case the room is air-conditioned (as the
print colors vary according to the temperature / humidity)
Full Width Array Calibration
The calibration is performed when color in prints or the reproducibility of density deteriorates.
Before performing the Calibration, define the paper to be the standard of adjustment.
The recommended paper is J Paper, OS coated paper W, or uncoated paper.
The following papers are not recommended for the standard of Calibration:
Important
Heavyweight paper
Paper which has a background color
Paper which is used whitener
Paper which has strong coated such as cast coated paper
Paper which has rough surface such as embossed paper
34
User Interface Manual

When you decided the standard paper, always perform the Calibration with the same paper type.
Note
Note
Note
Calibrates reproduced by the printer can be maintained uniform by continuing to adjust the Calibrates
using the standard paper.
1.
Prepare the paper.
Load A4 , Letter (8.5 x 11") , or larger standard-size paper in the LEF orientation.
2.
Press <Tools> button on the control panel.
3.
Tap [Full Width Array Calibration].
4.
If necessary, tap [Start] after any changes made to the settings.
Tar g e t Va l u e fo r
Following types of paper can be the target to which the gradation will be reproduced:
[Uncoated Paper] for J Paper, [Coated Paper] for OS Coated Paper W, [Custom Paper] for the paper to
be the standard of adjustment of your choice.
If you want to use the target measured in advance in [TRC Calibration Mode] > [Custom Calibration],
select [Custom Paper].
Desired calibration result may not be obtained depending on the paper type.
TRC Calibration Mode
If you select [Full Calibration], the adjustment will be made until it approaches very close to the target
value. If you select [Quick Calibration], adjustment will be made just one time.
If you select [Custom Calibration], a target is created after measuring the graduation of the standard
paper that you selected. To perform [Custom Calibration], set [Custom Paper] in [Target Value for].
Restore Previous Settings
Tap [Yes] on the screen to be displayed to restore the previously saved value.
Calibration will start and paper for adjustment will be output.
The calibration is not performed in [Custom Calibration]. (You also cannot see the result of calibration.)
To calibrate with the standard paper in which the gradation target is created, select [Custom Paper]
in [Target Value for] and then select [Quick Calibration] or [Full Calibration] in [TRC Calibration
Mode].
Chapter 3 Maintenance
35

5.
Note
Note
Note
When you choose [Quick Calibration] or [Full Calibration], tap [Sample Printout] to
check the adjustment result.
Printing will start.
There is a change that there will be irregularities on the first few printed sheet. We recommend
setting [Quantity] to [10].
Tap [Save] to skip the confirmation of calibration result.
When you select [Custom Calibration], calibration is not performed; therefore, Sample Printout is
not required.
6.
Tap [Save].
Full Width Array Density Uniformity Adjustment
Follow the steps below when the density of the toner on the paper is uneven.
1.
Prepare the paper.
Load A3, Tabloid (11 x 17"), or larger size paper.
2.
Press <Tools> button on the control panel.
3.
Tap [Full Width Array DensityUniformityAdj].
4.
Select a Tray and tap [Start].
Restore Factory Default Settings
Tap [Yes] on the screen displayed to restore the factory default values.
Restore Previous Settings
Tap [Yes] on the screen displayed to restore the previously saved value.
Density Uniformity Adjustment will start and papers for adjustment will be output.
5.
Tap [Sample Printout] to check the adjustment result.
Printing will start.
Tap [Save] to skip the confirmation of the result.
36
6.
Tap [Save].
User Interface Manual

3.3.3 DFA Finisher Profile
Note
Refer
Note
Refer
When a 3rd Vendor Finisher is installed, you can make adjustment to the 3rd Vendor Finisher, and register
the adjustment values to a Finishing Devices Profile.
“DFA” stands for “Document Finishing Architecture“.
3rd Vendor Finisher may be unavailable in some countries or regions.
For details on the functions of your 3rd Vendor Finisher, refer to the manual supplied with the device.
1.
Press <Tools> button on the control panel.
2.
Tap [DFA Finisher Profile].
3.
Select a profile and tap [Create / Edit].
You can delete the registered profile by selecting it and then tapping [Delete].
4.
In [Name], enter a profile name.
5.
If necessary, tap [Save] after any changes are made to the settings.
For details on these settings, refer to the manual supplied with your 3rd Vendor Finisher.
Chapter 3 Maintenance
37

Chapter 4
Refer
4.1 Common Service Settings.....................................................................38
4.2 Connectivity and Network Setup.......................................................58
Too ls
4.1.1 Machine Clock / Timers .................................................................................... 39
4.1.2 Power Saver Settings ......................................................................................... 42
4.1.3 Audio Tones........................................................................................................... 43
4.1.4 Screen Settings .................................................................................................... 45
4.1.5 Paper Tray Settings ............................................................................................ 46
4.1.6 Image Quality ...................................................................................................... 48
4.1.7 Reports..................................................................................................................... 48
4.1.8 Maintenance......................................................................................................... 49
4.1.9 Plug-in Settings .................................................................................................... 54
4.1.10 Other Settings....................................................................................................... 54
4.2.1 Port Settings .......................................................................................................... 59
4.2.2 Protocol Settings ................................................................................................. 60
4.2.3 Machine's E-mail Address / Host Name.................................................... 63
4.2.4 Proxy Server Settings ......................................................................................... 64
4.2.5 EP Proxy Server Setup........................................................................................ 66
4.2.6 Security Settings.................................................................................................. 67
4.2.7 Other Settings....................................................................................................... 70
4.1
You can make settings related to the printer's common features.
1.
2.
3.
Common Service Settings
Log in to the Administrator mode and press <Tools> button on the control panel.
For detailed information on how to log in to the Administrator mode, refer to "1.3 Log In to and Out
of Administrator Mode" (p.19).
Tap [Tools].
Any changes made to the settings.
38
User Interface Manual

4.
Refer
If the reboot operation is required to enable the setting, reboot the machine by tapping
[Reboot Now].
4.1.1 Machine Clock / Timers
1.
Display [Common Service Settings].
For detailed information on how to display the window, refer to "4.1 Common Service Settings"
(p.38).
2.
Tap [Machine Clock / Timers].
3.
Select the item to set and then tap [Change Settings].
Date
Specify the date to be set on this printer.
1.
Select a date format.
2.
Specify [Day], [Month] and [Year].
Chapter 4 Tools
39

Time
Note
Specify the time to be set on this printer.
1.
Select the time format.
2.
When you select [12 Hour Clock], specify [AM] or [PM].
3.
Specify [Hours] and [Minutes].
NTP Time Synchronization
Specify whether to receive time information from the time server (NTP: Network Time Protocol).
Connection Interval
Specify the time interval to connect to the time server.
Time Server Address
Specify the server name or IP address of the time server.
This option is enabled when [On] is selected for [NTP Time Synchronization].
1.
Enter the server name or IP address and tap [Save].
Enter the IP address in IPv4 or IPv6 format.
40
User Interface Manual

Auto Clear
Specify whether to automatically reset the settings after the set time lapses.
When the settings are automatically reset, the Services Home will be displayed.
1.
Specify the time when selecting [On].
Auto Job release
Specify whether to cancel the active job and start the next job if an error such as document or paper jams
and running out of paper occurs. In that case, those jobs not affected by the error can be processed.
1.
Specify the time when selecting [On].
Auto Print
Specify whether to start the next job immediately after the user finishes the operation of the control
panel (except for <Start> and <Clear All> button).
1.
Specify the time when selecting [On].
Chapter 4 Tools
41

Printer Lockout
Refer
Refer
You can set the printer to disable printing during the specified time.
1.
Specify the time when selecting [On].
Time Zone
Set the time difference from GMT (Greenwich Mean Time).
Daylight Savings
Specify whether to set daylight-saving time.
During the period set as daylight-saving time, the printer moves the clock forward by one hour.
1.
If you select either [Adjust by Day, Month & Time] or [Adjust by Month, Week, Day of
Week & Time], tap [Start Date] and [End Date] and set the period.
4.1.2 Power Saver Settings
For detailed information about Power Saver mode, refer to "1.4 Power Saver Mode" (p.21).
1.
Display [Common Service Settings].
For detailed information on how to display the window, refer to "4.1 Common Service Settings"
(p.38).
42
2.
Tap [Power Saver Settings].
User Interface Manual

3.
Note
Note
Refer
Select the item to set and then tap [Change Settings].
Power Saver Timers
Specify the period after which the printer enters Power Saver mode.
Enter Power Saver After Printing Ends
Specify how the printer enters Power Saver mode after print job is finished.
If the cooling mode starts due to the printer overheat after the completion of print jobs, shifting mode to
Power Saver may not be done in 15 seconds. In this case, the Power Saver mode works after 15 seconds when
the printer is cooled.
Power Saver Deactivation
Select the parts to exit the Power Saver mode.
Pressing <Power Saver> button releases all of the power saved places even if [Deactivate Partially As
Required] is being selected.
4.1.3 Audio Tones
1.
Display [Common Service Settings].
For detailed information on how to display the window, refer to "4.1 Common Service Settings"
(p.38).
2.
Tap [Audio Tones].
Chapter 4 Tools
43

3.
Refer
Select the item to set and then tap [Change Settings].
Control Panel Select Tone
Select the volume to be sounded when a button on the control panel is correctly tapped.
Control Panel Alert Tone
Select the volume to be sounded when an unselectable button is selected, or an error occurs.
Base Tone
Setting this item does not enable the function.
Machine Ready Tone
Select the volume to be sounded when the printer is ready to print, or powered on.
Job Complete Tone
Select the volume to be sounded when a job is completed without any errors.
Fault Tone
Select the volume to be sounded when a job fails.
Auto Clear Alert Tone
Select the volume to be sounded at five seconds before automatically returning to the initial screen by
Auto Clear function.
For detailed information about Auto Clear, refer to "Auto Clear" (p.41).
Alert Tone
Select the volume to be sounded when a fault such as a paper jam occurs, and the job remains in failure
state.
Out of Paper Warning Tone
Select the volume to be sounded when a job is suspended because there is no paper in a Tray.
Low To ner A ler t Ton e
Select the volume to be sounded when the toner cartridge needs to be replaced.
44
User Interface Manual

4.1.4 Screen Settings
Refer
1.
Display [Common Service Settings].
For detailed information on how to display the window, refer to "4.1 Common Service Settings"
(p.38).
2.
Tap [Screen Settings].
3.
Select the item to set and then tap [Change Settings].
Auto Display of Login Screen
When the authentication feature is enabled on the printer, specify whether to automatically display the
login screen after turning on the printer or canceling the Power Saver mode.
Default Language
Select the language to be displayed on the touch screen.
Display Consumables Screen
Specify whether to display the consumables status when a replacement is required.
Keyboard Input Restriction
Specify whether to restrict the keyboard input only to ASCII characters.
If you tap [On (ASCII Only)], you can prevent characters from being garbled when switching character
sets.
Operation of Up / Down Buttons
Specify whether to enable continuous scrolling when pressing the scroll buttons.
Chapter 4 Tools
45

4.1.5 Paper Tray Settings
Refer
Note
1.
Display [Common Service Settings].
For detailed information on how to display the window, refer to "4.1 Common Service Settings"
(p.38).
2.
Tap [Paper Tray Settings].
3.
Select the item to set.
Paper Tray Priority
When papers in the Tray in use ran out, the Tray to feed papers is automatically switched to another one
to which the same Stock applied. Select the priority of Trays to be switched at that time.
Bypass Tray (5) does not support Auto Tray Switching.
"Temporary Stock" switches automatically only when [Auto Tray Switching Control] is set to [Enabled] and
Print Server tray selection is set to "Auto". Note that only the Temporary Stocks that have the same settings other than [Advanced Setup] as the Tray in use are the target of automatic switching Tray.
1.
Tap [Change Settings].
46
User Interface Manual

2.
Note
Note
Note
Select each Tray and specify the priority.
Auto Tray Switching Control
Specify whether to enable Auto Tray Switching on "Temporary Stock".
Only the Temporary Stocks to which the same settings other than [Advanced Setup] applied can automatically be switched.
Select also the operation when switching Tray.
The Tray can automatically be switched only when the Print Server tray selection is set to "Auto".
1.
Select a Tray to be set or [Tray Switching Order], and then tap [Change Settings].
Tray* Auto Switching
Select whether to include the selected tray among the candidate for switching.
Tray Switching Order
Select the operation when switching Tray.
If paper stocks in Tray 6 run out when the switching order is set in the order of 1>3>6>8:
Changes to Tray 1 when the setting is [Always Switch to First Priority Tray].
Changes to Tray 8 when the setting is [Switch to Next Priority Tray].
Manual Tray Switching
Specify whether to display (Manual Tray Switching) in Tray Status Area.
"Temporary Stock" cannot be switched to Manual Tray Switching.
Chapter 4 Tools
47

4.1.6 Image Quality
Refer
Refer
Refer
Only item configurable here is the [Full Width Array].
For detailed information about Full Width Array, refer to "3.3.2 Full Width Array" (p.34).
4.1.7 Reports
For detailed information about reports, refer to "3.2.1 [Machine Information] Tab" (p.28).
1.
Display [Common Service Settings].
For detailed information on how to display the window, refer to "4.1 Common Service Settings"
(p.38).
2.
Tap [Reports].
3.
Tap the item to set and then tap [Change Settings].
Print Reports Button
Specify whether to display [Print Reports] on Machine Status window in Guest mode.
Job History Report
Specify whether to automatically print a Job History Report when a total of 50 jobs have been processed.
2 Sided Report
Select either one side or both sides of the paper to be printed when printing a report.
Report Output Tray
Select the Tray in which the paper to print reports are loaded.
48
User Interface Manual

4.1.8 Maintenance
Refer
Note
1.
Display [Common Service Settings].
For detailed information on how to display the window, refer to "4.1 Common Service Settings"
(p.38).
2.
Tap [Maintenance].
3.
Tap the item to set.
Initialize Hard Disk
Only the data on the hard disk will be initialized.
Logs will not be erased.
1.
Tap [Partition A] and tap [Start].
2.
Tap [Yes].
Chapter 4 Tools
49

Delete All Data
Important
Note
Refer
All data stored on the printer will be deleted.
It takes several minutes to several hours to delete all data.
1.
Tap [Start].
2.
Tap [Yes].
Software Options, NVM Read / Write
This feature is for service representative use. For more information, contact your local Fuji Xerox representative.
Power on Self Test
Specify whether to perform self test when the printer is turned on and started up.
If any abnormal condition such as intentional program modification should be found during the program
diagnosis, the printer stops starting up and records the information in the auditlog.
The information may not be recorded in the audit log depending on the status of program malfunction.
Finisher Adjustment
Refer to "3.3.3 DFA Finisher Profile" (p.37).
Delete All Certificates / Initialize Settings
Deletes all certificates stored in the printer if you cannot use a certificate data in the printer because of an
abnormality of certificate file even when the certificate is set to be enabled for [SSL / TLS Settings] under
[Connectivity & Network Setup] > [Security Settings].
1.
Tap [Start].
50
2.
Tap [Yes].
User Interface Manual

Quick Setup Home
Refer
Note
Refer
Note
Refer
Only item configurable here is the IP address.
For detailed information about [IP Address Settings], refer to "4.2.2 Protocol Settings" (p.60).
Register Paper Feeding Positions
Paper feeding position is adjusted automatically.
In High Capacity Trays (6 - 9), the paper feeding position adjustment improves the accuracy of alignment
(position gap between images and papers) in comparison with the Printer Unit Trays (1 - 3).
Perform the paper feeding position adjustment when you reinstalled High Capacity Feeder C3-DS / 2nd
High Capacity Feeder C1-DS or when you feel that the accuracy becomes dull.
The blank sheets output at adjustment will not be counted.
For detailed information about Image Printable Area, refer to "1.3 Image Printable Area and Assured Image
Area" in the Printer Unit Manual.
1.
Tap [Paper Supply].
2.
Select the Tray to adjust and then tap [Save].
3.
Return to 1. and enter the number of pages to be printed for adjustment, and then tap
[Start].
For High Capacity Trays (6 - 9), twice the number of pages entered will be printed.
4.
After adjusting, tap [Confirm].
Cleaning Fusing Unit
Refer to "3.3.1 Clean Fusing Unit" (p.33).
Chapter 4 Tools
51

Process Control Setup
Note
Note
In normal use, toner density is automatically adjusted. Use this feature if you are not satisfied with the
result of the auto adjustment or if you want more accurate results.
Do not execute Process Control Setup repeatedly. Consecutive executions will not lead to a better result.
1.
Tap [Start].
Process Control Setup will start.
Productivity Mode
The printing environment can be configured to perform more productive printing.
Optimize for Image Quality
This mode sustains high productivity when paper of the same type and weight is used to print continuously.
The printer automatically switches the fusing temperature depending on the type and weight of the
paper used.
This mode provides optimum print quality regardless of paper types or weights, however, it may take time
to switch the temperature of the Fusing Module. The waiting time becomes longer as the weight difference between the papers to be switched becomes greater.
Optimize for Speed
This mode sustains high productivity when different types or weights of paper loaded on multiple Trays
are combined in a job.
The printer runs at a constant temperature which reduces waiting time derived by the differences among
paper types.
However, the temperature of the Fusing Module is set to provide the best results on heavy weight paper,
therefore, the glossiness of the light weight paper increases. Also, image quality adjustments may not be
performed when the paper types change, which causes considerable variation in print quality.
Optimize for Speed for Mixed Weight Papers Above 300gsm
This mode sustains high productivity when different types or weights of paper loaded on multiple Trays
are combined in a job.
Printing can be done in shorter time with high productivity, especially when printing on both of the follow-
2
ing paper weights: paper weighs between 52 - 300 g/m
, and between 301 - 350 g/m2.
However, the temperature of the Fusing Module is set to provide the best results on heavy weight paper ,
therefore, the glossiness of the light weight paper increases. Also, image quality adjustments may not be
performed when the paper types change, which causes considerable variation in print quality.
52
The continuous printing speed may be reduced due to the relationship between data content and function.
User Interface Manual

Print Action When Using Tray T1 (Inserter)
Refer
You can specify how the printer behaves when Inserter Tray is used.
Standard
For each set, the printer checks that paper is loaded in Inserter Tray before it starts printing.
This setting results in increased waiting time and thus causes decreased productivity. However, paper
purging does not occur even if paper runs out.
Speed First
The printer starts printing regardless of the status of Inserter Tray. This setting helps you maintain productivity based on the productivity of the printer unit.
However, paper being fed is purged when paper loaded in Inserter Tray runs out.
For detailed information about the Purge function, refer to "3.2 Loading Paper" in the Optional Units Manual.
Clean Toner
Print quality can be improved by removing old toner left in the developing unit and supplying new toner.
You need to clean toners when the following occur:
White dots due to condensed toners are frequently found during printing. ("White dots due to condensed toners" are deletions having a core which is the same color as the image.)
Low toner density jobs are being printed - per 3,000 pages
Twice a day, morning and evening (start / end of operation)
To check the current status, perform test printing.
1.
Check the target toner for cleaning, and enter CIN (Toner density).
2.
Select a Tray and press the <Start> button.
Printing will start.
3.
Check the toner for cleaning on with the quality of the sheets result, and then press
[Cleaning].
Chapter 4 Tools
53

4.
Refer
Press the <Start> button.
Cleaning will start.
4.1.9 Plug-in Settings
This feature is for service representative use. For more information, contact your local Fuji Xerox representative.
4.1.10 Other Settings
1.
Display [Common Service Settings].
For detailed information on how to display the window, refer to "4.1 Common Service Settings"
(p.38).
2.
Tap [Other Settings].
3.
Select the item to set and then tap [Change Settings].
Offset Stacking (Right Middle Tray)
Setting this item does not enable the function.
Offset stacking can be set on the Print Server.
Offset Stacking (Stacker - Stacker Cart)
Setting this item does not enable the function.
Offset stacking can be set on the Print Server.
Unload High Capacity Stacker
Select the unloading function when Paper Eject Button on the High Capacity Stacker is pressed.
54
Default Print Paper Size
Select the paper size to print reports/lists.
User Interface Manual

Paper Size Settings
Refer
Select a combination of sizes to be detected automatically.
For detailed information about available paper sizes, refer to "2.1.2 Supported Paper" in the Printer Unit Man-
ual.
Millimeters / Inches
Select the unit of measurement for the Auto Detect feature.
Data Encryption
Specify whether to encrypt data recorded on the hard disk.
When you enable data encryption, the printer automatically encrypts print data written to the hard disk.
This prevents unauthorized access to the stored data.
The encrypted data cannot be restored in the following cases:
Important
- When a problem occurs with the hard disk
- When you have forgotten the encryption key
- When you have forgotten the administrator ID and a passcode when [On] is selected in [Service Rep.
Restricted Operation]
When rebooting, the printer initializes the part of the disk area responsible for data encryption.
An error will occur if the hard disk and encryption settings match.
When our service representative replaces the electrical circuit board, the encryption key is initialized. Do
not lose the encrypted information.
1.
If you select [On], tap [New Encryption Key], and enter an encryption key of up to 12
single-byte characters, and then tap [Save].
2.
Tap [Retype Encryption Key], enter the same encryption key, and then tap [Save].
3.
Tap [Save].
4.
Tap [Yes].
Chapter 4 Tools
55

Encryption Key for Confidential Data
Important
Note
Enter an encryption key to encrypt confidential information such as the passcode of the administrator.
Encrypting confidential information prevents a network hacking and an unauthorized access to the information.
If you change the existing encryption key, you may not be able to restore confidential information from a
backup.
The factory default encryption key is "x-admin".
1.
If you select [On], tap [New Encryption Key], and enter an encryption key of up to 12
single-byte characters, and then tap [Save].
2.
Tap [Retype Encryption Key], enter the same encryption key, and then tap [Save].
3.
Tap [Save].
4.
Tap [Yes].
Service Rep. Restriction Operation
Specify whether to restrict the operation by our service representative to protect the security settings from
being altered by someone impersonating our service representative.
"Delete All Data" (p.50)
"Other Settings" (p.54)
"Data Encryption" (p.55)
"Encryption Key for Confidential Data" (p.56)
"LPD, Port9100, SNMP, SOAP" (p.59)
"SSL / TLS Settings" (p.67)
"IPsec Settings" (p.68)
"User Role" (p.76)
"Accounting Login Screen Settings" (p.78)
"Maximum Login Attempts by System Administrator" (p.86)
"Overwrite Hard Disk" (p.88)
56
If you lose the administrator ID and passcode, the items restricted to the service representative cannot be
Important
changed.
If you lose the passcode, our service representative cannot perform maintenance in the case an error
occurs in the printer.
To change the restricted items or perform maintenance, the electric circuit board of the printer must be
replaced. You will be charged for the electrical circuit board and handling cost. Be sure not to lose the
administrator ID and passcode.
User Interface Manual

1.
Note
Tap [Maintenance Passcode] when selecting [On].
2.
Tap [New Passcode] and enter a passcode of 4 to 12 single-byte characters, and then
tap [Save].
3.
Tap [Retype Passcode], enter the same passcode, and then tap [Save].
Software Download
This feature is for service representative use. For more information, contact your local Fuji Xerox representative.
Data Indicator
Select the lighting pattern of the <Data> indicator.
Resume Job After Print Error
Select how to handle the print job after the error is cleared which suspended the print job.
When [Resume by User] is selected, confirmation message will be displayed after clearing the error.
Chapter 4 Tools
57

4.2
Refer
Refer
Setup the network.
1.
2.
Connectivity and Network Setup
Detailed configuration can be performed with CentreWare Internet Services. For detailed information, refer
to "6.1 CentreWare Internet Services Settings" (p.90).
Log in to the Administrator mode and press <Tools> button on the control panel.
For detailed information on how to log in to the Administrator mode, refer to "1.3 Log In to and Out
of Administrator Mode" (p.19).
Tap [Tools].
3.
Tap [Connectivity & Network Setup].
4.
Any changes made to the settings.
5.
If the reboot operation is required to enable the setting, reboot the machine by tapping
[Reboot Now].
58
User Interface Manual

4.2.1 Port Settings
Important
Refer
Note
Refer
Do not use a number that is the same as a port number of another port. Furthermore, if any ports are set to
one of the numbers indicated below, operation may not be performed properly depending on the setting
conditions of the port: 25, 139, 427, 445, 631, 15000.
1.
Display [Connectivity & Network Setup].
For detailed information on how to display the window, refer to "4.2 Connectivity and Network
Setup" (p.58).
2.
Tap [Port Settings].
3.
Select the item to set and then tap [Change Settings].
LPD, Port9100, SNMP, SOAP
This feature is for service representative use. For more information, contact your local Fuji Xerox representative.
E-mail Notification Service
Specify whether to enable the E-mail Notification Service which notifies you of the machine status.
"Consumables Status", "Parts Status", "Paper Tray Status", "Output Tray Status", "Jam Status", "Interlock Status", "Fault Notice", and "Billing" are notified as the machine status.
You can configure the E-mail Notification Service in CentreWare Internet Services.
For detailed information, refer to the help by clicking [Help] on the upper right corner of CentreWare Internet
Services window.
Chapter 4 Tools
59

1.
Important
Refer
Tap [Change Settings].
Internet Services (HTTP)
Set the items to be used when communicating with CentreWare Internet Services.
1.
Select the item to set and then tap [Change Settings].
You can use the same port number for the port which uses SOAP.
Port Status
Specify whether to enable HTTP used for CentreWare Internet Services.
Port Number
Enter a port number when HTTP is enabled.
4.2.2 Protocol Settings
1.
Display [Connectivity & Network Setup].
For detailed information on how to display the window, refer to "4.2 Connectivity and Network
Setup" (p.58).
2.
Tap [Protocol Settings].
60
User Interface Manual

3.
Note
Select the item to set and then tap [Change Settings].
Ethernet Settings
Configure the Ethernet settings.
1.
Tap [Change Settings].
TCP/IP - Common Settings
Select the TCP/IP operation mode.
1.
Tap [Change Settings].
Select [Dual Stack] for an environment using both IPv4 and IPv6.
Chapter 4 Tools
61

TCP/IP - Network Settings
Note
Note
1.
Select the item to set and then tap [Change Settings].
IPv4 - IP Address Resolution
Select a method for obtaining the IP address, subnet mask, and gateway address.
If the printer fails to communicate with the DHCP server when [DHCP / AutoIP] is selected, the AutoIP function is automatically enabled and an IP address (169.254.xxx.xxx) is assigned to the printer. When communication between the printer and the DHCP server recovers, the printer obtains an IP address, a subnet mask,
and a gateway address by the DHCP server.
IPv4 - IP Address, IPv4 - Subnet Mask, IPv4 - Gateway Address
Enter the item when selecting [STATIC] at [IPv4 - IP Address Resolution].
The subnet mask and the gateway address are configurable when the IP address is specified.
IPv4 - DNS Server Setup
Set up the IPv4 - DNS Server.
Select the item to set and then tap [Change Settings].
Get IP Address from DHCP
Specify whether to automatically obtain the address when [DHCP / AutoIP] is selected at [IPv4 - IP
Address Resolution].
DNS Server IP Address
When [Get IP Address from DHCP] is set to [Disabled], manually set the DNS server address.
IPv4 - IP Filter
Specify whether to limit the IPv4 addresses that can access the printer.
[IPv4 - IP Filter] applies to all features using TCP/IP.
To set the IPv4 IP addresses that the printer accepts connection from, use [IP Filtering] in CentreWare
Internet Services.
For more information, refer to the help by clicking [Help] in the upper right corner of CentreWare Internet
Services window.
62
IPv6 Address Manual Configuration
Specify whether to configure the IPv6-address settings manually.
User Interface Manual

Manually Configured IPv6 Address, Manually Configured IPv6 Address Prefix, Manually
Note
Refer
Configured IPv6 Gateway
Enter the item when selecting [Enabled] for [IPv6 Address Manual Configuration].
The prefix and the gateway are configurable when the IP address is specified.
IPv6 - DNS Server Setup
Set up the IPv6 - DNS Server.
Select the item to set and then tap [Change Settings].
Get IP Address from DHCP
Specify whether to automatically obtain the address.
DNS Server IP Address
When [Get IP Address from DHCP] is set to [Disabled], manually set the DNS server address.
Automatically Configured IPv6 Address
Displays the automatically assigned addresses.
IPv6 - IP Filter
Specify whether to limit the IPv6 addresses that can access the printer.
[IPv6 - IP Filter] applies to all features using TCP/IP.
To set the IPv6 IP addresses that the printer accepts connection from, use [IP Filtering] in CentreWare
Internet Services.
For more information, refer to the help by clicking [Help] in the upper right corner of CentreWare Internet
Services window.
4.2.3 Machine's E-mail Address / Host Name
1.
Display [Connectivity & Network Setup].
For detailed information on how to display the window, refer to "4.2 Connectivity and Network
Setup" (p.58).
2.
Tap [Machine's E-mail Address / Host Name].
Chapter 4 Tools
63

3.
Refer
Select the item to set and then tap [Change Settings].
E-mail Address
Enter the E-mail address of the printer with up to 128 single-byte characters.
Account Name
Enter the account name with up to 32 single-byte characters.
Host Name
Enter the host name with up to 32 single-byte characters.
Domain Name
Enter the domain with up to 64 single-byte characters.
4.2.4 Proxy Server Settings
1.
Display [Connectivity & Network Setup].
For detailed information on how to display the window, refer to "4.2 Connectivity and Network
Setup" (p.58).
2.
Tap [Proxy Server Settings].
3.
Select the item to set and then tap [Change Settings].
64
User Interface Manual

Use Proxy Server
Specify whether to use a proxy server.
Proxy Server Setup
Select how to set up a proxy server.
Same Proxy for All Protocols
HTTP proxy server settings are applied to the HTTPS proxy server.
Different Proxy for Each Protocol
HTTPS proxy server is also configurable.
Addresses to Bypass Proxy Server
Enter addresses not using the proxy server. You can specify the addresses by IPv4 address, IPv6 address,
and FQDN. You can also use wildcards "*" to specify the addresses.
HTTP Proxy Server Name
Enter the server name with up to 255 single-byte characters. You can specify the addresses by IPv4
address, IPv6 address, and FQDN.
HTTP Proxy Server Port Number
Set the server port number.
Do not use a number that is the same as a port number of another port. Furthermore, if any ports are set to
Important
one of the port numbers indicated below, operation may not be performed properly depending on the setting conditions of the port: 25, 139, 427, 445, 631, 15000.
HTTP Proxy Server Authentication
Specify whether to require authentication to connect to the server.
HTTP Proxy Server Login Name
Enter the login name for the server with up to 31 single-byte characters.
HTTP Proxy Server Password
Enter a password to the server with up to 31 single-byte characters.
HTTPS Proxy Server Name
Enter the server name with up to 255 single-byte characters. You can specify the addresses by IPv4
address, IPv6 address, and FQDN.
HTTPS Proxy Server Port Number
Set the server port number.
Do not use a number that is the same as a port number of another port. Furthermore, if any ports are set to
Important
one of the port numbers indicated below, operation may not be performed properly depending on the setting conditions of the port: 25, 139, 427, 445, 631, 15000.
HTTPS Proxy Server Authentication
Specify whether to require authentication to connect to the server.
Chapter 4 Tools
65

HTTPS Proxy Server Login Name
Refer
Refer
Enter a login name for the server with up to 31 single-byte characters.
HTTPS Proxy Server Password
Enter a password of the server with up to 31 single-byte characters.
4.2.5 EP Proxy Server Setup
For detailed information about EP system, contact your local Fuji Xerox representative.
1.
Display [Connectivity & Network Setup].
For detailed information on how to display the window, refer to "4.2 Connectivity and Network
Setup" (p.58).
2.
Tap [EP Proxy Server Setup].
3.
Select the item to set and then tap [Change Settings].
Configure the EP proxy server in the same manner as the proxy server.
For detailed information about proxy server setup, refer to "4.2.4 Proxy Server Settings" (p.64).
66
User Interface Manual

4.2.6 Security Settings
Refer
Important
1.
Display [Connectivity & Network Setup].
For detailed information on how to display the window, refer to "4.2 Connectivity and Network
Setup" (p.58).
2.
Tap [Security Settings].
3.
Tap the item to set.
SSL / TLS Settings
Configure the SSL / TLS settings to encrypt the communication between Print Server and the printer.
Enabling SSL / TLS encrypts the route and protects the communication from an unauthorized access and
prevents information leakage or data falsification.
1.
Select the item to set and then tap [Change Settings].
Do not use a number that is the same as a port number of another port. Furthermore, if any ports
are set to one of the port numbers indicated below, operation may not be performed properly
depending on the setting conditions of the port: 25, 139, 427, 445, 631, 15000.
Device Certificate - Server
Select a certificate for SSL / TLS communications.
Chapter 4 Tools
67

HTTP - SSL / TLS Communication
Note
Note
Specify whether to enable SSL / TLS communications.
HTTP - SSL / TLS Port Number
Set the port number used for SSL / TLS communication.
IPsec Settings
1.
Tap [Change Settings].
2.
Select the item to set and then tap [Change Settings].
Consult your network administrator when configuring the IPsec.
For detailed information, refer to "6.2 Encryption Settings" (p.93).
IKE Authentication Method
Select the IKE authentication method.
Preshared Key
Enter a preshared key when [IKE Authentication Method] is set to [Authenticate by Preshared Key].
Device Certificate
Select a certificate when [IKE Authentication Method] is set to [Authenticate by DigitalSignature].
A self-signed certificate created by CentreWare Internet Services cannot be used.
IPsec Communication
Specify whether to enable IPsec communications.
IKE SA Life Time
Specify IKE SA lifetime; The value must be greater than the value set in [IPsec SA Life Time].
IPsec SA Life Time
Specify IPsec SA lifetime; The value must be smaller than the value set in [IKE SA Life Time].
68
DH Group
Set DH group.
User Interface Manual

PFS Settings
Specify whether to enable PFS.
Destination IPv4 Address
Set the IPv4 address of the destination.
Destination IPv6 Address
Set the IPv6 address of the destination.
Communicate with Non-IPsec Devices
Specify whether to communicate with non-IPsec devices.
IEEE 802.1x Settings
1.
Tap [Change Settings].
2.
Select the item to set and then tap [Change Settings].
IEEE 802.1x
Specify whether to use IEEE 802.1x authentication.
Authentication Method
Select the authentication method.
Login User Name
Enter the login user name with up to 128 single-byte characters.
Login Password
Enter the login password with up to 128 single-byte characters.
Server Certificate Verification
Specify whether to verify a server certificate when [PEAP/MS-CHAPv2] is selected in [Authentication
Method].
Chapter 4 Tools
69

4.2.7 Other Settings
Refer
The FTP server is used when calibration is performed with the Print Server.
1.
Display [Connectivity & Network Setup].
For detailed information on how to display the window, refer to "4.2 Connectivity and Network
Setup" (p.58).
2.
Tap [Other Settings].
3.
Select the item to set and then tap [Changes Settings].
FTP Server Login Name
Enter the FTP server login name with up to 14 single-byte characters.
FTP Server Password
Enter the FTP server password with up to 49 single-byte characters.
70
User Interface Manual

Chapter 5
Refer
Refer
Note
5.1 Accounting..................................................................................................71
5.2 Authentication / Security Settings....................................................80
Accounting, Authentication /
Security Settings
5.1.1 Accounting Type.................................................................................................. 72
5.1.2 Create / View User Accounts.......................................................................... 75
5.1.3 Reset User Accounts .......................................................................................... 77
5.1.4 Accounting Login Screen Settings............................................................... 78
5.2.1 System Administrator Settings ..................................................................... 81
5.2.2 Authentication ..................................................................................................... 83
5.2.3 Job Status Default .............................................................................................. 87
5.2.4 Overwrite Hard Disk ........................................................................................... 88
5.1
You can register the users who use the printer, and set the operation settings of the Accounting feature.
1.
2.
3.
Accounting
For detailed information about accounting, refer to "7.1 Overview" (p.96).
Log in to the Administrator mode and press <Tools> button on the control panel.
For detailed information on how to log in to the Administrator mode, refer to "1.3 Log In to and Out
of Administrator Mode" (p.19).
Tap [Tools].
Tap [Accounting].
Setting the [Accounting / Billing Device Settings] does not enable the function.
Chapter 5 Accounting, Authentication / Security Settings
71

4.
Refer
Note
Any changes made to the settings.
5.
If the reboot operation is required to enable the setting, reboot the machine by tapping
[Reboot Now].
5.1.1 Accounting Type
1.
Display [Accounting].
For detailed information on how to display the window, refer to "5.1 Accounting" (p.71).
2.
Tap [Accounting Type].
3.
Select an accounting type.
[Accounting Disabled] does not select when [Login to Local Accounts] is selected under [Authentication / Security Settings] > [Authentication] > [Login Type].
For detailed information about [Login Type], refer to "5.2.2 Authentication" (p.83).
72
User Interface Manual

Local Accounting
Note
This item does not select when [No Login Required] is selected under [Authentication / Security Settings] >
[Authentication] > [Login Type].
For detailed information about [Login Type], refer to "5.2.2 Authentication" (p.83).
1.
Tap [Auditron Mode].
2.
Tap [Change Settings].
3.
Specify whether to use the Local Accounting feature.
Network Accounting
1.
Tap [Verify User Details], and then select the verification type.
2.
Tap [Customize Use Prompts], and then select an item to enter for verification.
Chapter 5 Accounting, Authentication / Security Settings
73

3.
When the authentication feature is activated, tap [Auditron Mode].
4.
Tap [Change Settings].
5.
Specify whether to use the Network Accounting feature.
Xerox Standard Accounting
1.
Tap [Auditron Mode].
2.
Tap [Change Settings].
74
3.
Specify whether to use the Xerox Standard Accounting feature.
User Interface Manual

5.1.2 Create / View User Accounts
Note
Refer
Up to 1,000 user data can be registered.
You can set a limit on the number of pages for each user ID registered. You can also check the cumulative
number of pages for each user ID registered.
This item does not appear when [Network Accounting] is selected for [Accounting Type].
1.
Display [Accounting].
For detailed information on how to display the window, refer to "5.1 Accounting" (p.71).
2.
Tap [Create / View User Accounts].
3.
Tap a [User ID] for which you want to register a user ID, and then tap [Create / Delete].
Entering a number in the [Go to] field with the numeric keypad displays the specified number at the top
of the column.
4.
Selecting a number showing "Available" and enter a user ID with up to 32 single-byte
characters.
Chapter 5 Accounting, Authentication / Security Settings
75

5.
Refer
Select the item to set.
UserID
Enter the user ID with up to 32 single-byte characters.
User Name
Enter the user name with up to 32 single-byte characters.
Passcode
1.
Tap [New Passcode] and enter a passcode of 4 to 12 single-byte characters, and then
tap [Save].
2.
Tap [Retype Passcode], enter the same passcode, and then tap [Save].
Device Access
Specify whether to allow the printer use with the registered user ID.
Service Access
Tap [Change Account Limit] to set restrictions on the maximum number of allowed pages for each user
ID.
User Role
Select a user role for each user ID registered.
76
For detailed information about operations available for each role, refer to "7.1 Overview" (p.96).
User Interface Manual

Reset Account
Note
Refer
Note
Tap [Delete] on the window to delete all registered information and the account status will return to
"Available".
Reset Total Impressions
Tap [Reset] on the window to reset the current cumulative number of pages.
5.1.3 Reset User Accounts
This item does not appear when [Network Accounting] is selected for [Accounting Type].
1.
Display [Accounting].
For detailed information on how to display the window, refer to "5.1 Accounting" (p.71).
2.
Tap [Reset User Accounts].
3.
Select any item and tap [Reset].
Select an item and tap [Print the Auditron Report] (or [Print the Meter Report]) to print the report.
All User Accounts
Select this to reset all the information registered for each user.
All Feature Access Settings
The feature-access limits for all users return to the default setting.
All Account Limits
Account limits for all users return to the default setting.
Total Impressions
Select this to reset all the accounting data for all users.
Chapter 5 Accounting, Authentication / Security Settings
77

Meter (Print Jobs)
Note
Note
Refer
This item is not displayed when [Enable Accounting] is selected under [Accounting Type] > [Local Accounting] > [Auditron Mode] > [Print Service].
For detailed information about [Accounting Type], refer to "5.1.1 Accounting Type" (p.72).
Select this to reset all the printer auditron data.
Also deletes automatically registered user IDs.
5.1.4 Accounting Login Screen Settings
This item does not appear when [No Login Required] is selected under [Authentication / Security Settings] >
[Authentication] > [Login Type].
For detailed information about [Login Type], refer to "5.2.2 Authentication" (p.83).
1.
Display [Accounting].
For detailed information on how to display the window, refer to "5.1 Accounting" (p.71).
2.
Tap [Accounting Login Screen Settings].
3.
Select the item to set and then tap [Change Settings].
Alternative Name for User ID
You can change the "UserID" to another word.
Enter an alias for "User ID" with up to 15 single-byte characters.
The alias will also appear on reports/lists.
Mask User ID (***)
You can set how an entered user ID is shown on the screen.
78
User Interface Manual

Alternative Name for Account ID
Note
Note
Note
Note
Note
Note
This item is displayed when [Network Accounting] is selected in [Accounting Type].
For detailed information about [Accounting Type], refer to "5.1.1 Accounting Type" (p.72).
You can change the "AccountID" to another word.
Enter an alias for "Account ID" with up to 15 single-byte characters.
The alias will also appear on reports/lists.
Mask Account ID (***)
This item is displayed when [Network Accounting] is selected in [Accounting Type].
For detailed information about [Accounting Type], refer to "5.1.1 Accounting Type" (p.72).
You can set how an entered account ID is shown on the screen.
Display Billing Information Upon Login
This item is displayed when [Local Accounting] is selected in [Accounting Type].
For detailed information about [Accounting Type], refer to "5.1.1 Accounting Type" (p.72).
You can set whether to display billing information (total impression, account limit and available balance)
per user when a user logs in.
When a user logs in as the administrator, billing information will not be displayed even if [Enabled] is
selected.
Only the billing information for the services that the user is allowed to use will be displayed.
When a user logs in as the administrator, billing information will not be displayed.
Store User Details
This item is displayed when [Network Accounting] is selected in [Accounting Type].
For detailed information about [Accounting Type], refer to "5.1.1 Accounting Type" (p.72).
You can set the destination to save authentication information.
"NVM" stands for nonvolatile memory and the data on it is stable after the printer is turned off.
Chapter 5 Accounting, Authentication / Security Settings
79

5.2
Refer
Refer
You can configure the authentication of users and security settings.
1.
2.
Authentication / Security Settings
For detailed information about authentication, refer to "7.1 Overview" (p.96).
Log in to the Administrator mode and press <Tools> button on the control panel.
For detailed information on how to log in to the Administrator mode, refer to "1.3 Log In to and Out
of Administrator Mode" (p.19).
Tap [Tools].
3.
Tap [Authentication / Security Settings].
4.
Any changes made to the settings.
5.
If the reboot operation is required to enable the setting, reboot the machine by tapping
[Reboot Now].
80
User Interface Manual

5.2.1 System Administrator Settings
Refer
1.
Display [Authentication / Security Settings].
For detailed information on how to display the window, refer to "5.2 Authentication / Security Settings" (p.80).
2.
Tap [System Administrator Settings].
3.
Select the item to set.
System Administrator's Login ID
Specify whether to set the administrator ID.
The default of the administrator ID is "11111".
1.
Tap [Keyboard] when selecting [On].
Chapter 5 Accounting, Authentication / Security Settings
81

2.
Note
Note
Enter the administrator ID with up to 32 single-byte characters, and then tap [Save].
3.
Tap [Keyboard] and re-enter the same ID, and then tap [Save].
System Administrator's Passcode
The default passcode is "x-admin".
Setting a passcode is strongly recommended to enhance security.
The administrator passcode is required when [Passcode Entry for Control Panel Login] is [On] under [Authentication] > [Passcode Policy].
For detailed information about [Passcode Entry for Control Panel Login], refer to "5.2.2 Authentication"
(p.83).
1.
Tap [New Passcode] and enter a passcode of 4 to 12 single-byte characters, and then
tap [Save].
If no passcode is to be set, leave the text boxes blank and tap [Save].
2.
Tap [Retype Passcode], enter the same passcode, and then tap [Save].
3.
Tap [Yes].
82
User Interface Manual

5.2.2 Authentication
Refer
Note
1.
Display [Authentication / Security Settings].
For detailed information on how to display the window, refer to "5.2 Authentication / Security Settings" (p.80).
2.
Tap [Authentication].
3.
Select the item to set.
Login Type
Select a type of authentication.
Access Control
Specify whether to restrict printing of the jobs that are not authenticated.
1.
Tap [Service Access].
Tapping [Device Access] does not allow you to configure anything.
Chapter 5 Accounting, Authentication / Security Settings
83

2.
Refer
Refer
Refer
Tap [Change Settings].
Create / View User Accounts
Refer to "5.1.2 Create / View User Accounts" (p.75).
Reset User Accounts
Refer to "5.1.3 Reset User Accounts" (p.77).
User Details Setup
1.
Select the item to set and then tap [Change Settings].
Alternative Name for User ID, Mask User ID (***)
Refer to "5.1.4 Accounting Login Screen Settings" (p.78).
Failed Access Log
Specify whether to log an error if authentication fails the number of times specified here within a predetermined period (10 minutes) to detect unauthorized access.
Specify the time when selecting [On].
Logout Confirmation Screen
Specify whether to display a logout confirmation screen when a user session ends.
84
User Interface Manual

User ID for Login
Important
Note
Note
Refer
Specify whether to make the user ID entry field on the user login screen case-sensitive
Do not select [Non-Case Sensitive] when the printer stores user IDs such as “ABC” and “abc” which are
regarded as the same ID under this setting. Some user IDs may not be displayed.
When Smart Card Reader is Connected
This item does not appear when [Disabled] is selected for [Use of Smart Card].
Specify whether to enable user ID authentication when the smart card reader (option) is connected.
Account Auto Setup for Card Login
This item does not appear when [Disabled] is selected for [Use of Smart Card].
Specify whether to register new user information when an unregistered user holds a card over the smart
card reader.
Select the type of registration when selecting [Enabled].
For detailed information about [User Name] and [Service Access], refer to "5.1.2 Create / View User
Accounts" (p.75).
Use of Smart Card
Specify whether to use smart card authentication.
Select the type of smart card use when selecting [Enabled].
Smart Card Logout Timing
Select the logout method for smart card authentication when a non-contact smart card is used for
authentication.
Chapter 5 Accounting, Authentication / Security Settings
85

Maximum Login Attempts by System Administrator
Note
Specify whether to deny access if authentication for an administrator ID fails more than specified times
continuously.
The failure count is reset when the printer is restarted.
1.
Specify the time when selecting [Limit Attempts].
Passcode Policy
1.
Select the item to set and then tap [Change Settings].
Passcode Entry for Control Panel Login
Specify whether to enter the passcode when logging in.
Passcode Entry for Smart Card Login
This item does not appear when [Disabled] is selected under [User Details Setup] > [Use of Smart Card].
Specify whether to enter the passcode when logging in.
Minimum Passcode Length
Specify whether to enter the passcode when logging in.
Specify the number of digits when selecting [Set].
86
User Interface Manual

5.2.3 Job Status Default
Note
Refer
For detailed information about job control, refer to "2.2 Job Status" (p.24).
1.
Display [Authentication / Security Setting]
For detailed information on how to display the window, refer to "5.2 Authentication / Security Settings" (p.80).
2.
Tap [Job Status Default].
3.
Tap the item to set.
Active Jobs View
Select how to display <Job Status> button > [Active Jobs] tab.
Completed Jobs View
Select how to display <Job Status> button > [Completed Jobs] tab.
1.
Specify whether to restrict information when selecting [All Job Viewing at All Times] or
[Require Login to View Jobs].
2.
Select the target jobs when selecting [Require Login to View jobs].
Chapter 5 Accounting, Authentication / Security Settings
87

5.2.4 Overwrite Hard Disk
Refer
Important
Deletes data by overwriting with different data on the blank area on the hard disk so the original data
cannot be restored. This feature prevents unauthorized retrieval or restoration of the data recorded on the
hard disk.
If the number of overwrites is set to 3, three different data will be overwritten.
1.
Display [Authentication / Security Setting]
For detailed information on how to display the window, refer to "5.2 Authentication / Security Settings" (p.80).
2.
Tap [Overwrite Hard Disk].
3.
Tap [Number of Overwrites] and select a number.
If the printer is turned off during the overwriting, unfinished files may remain on the hard disk, but
the overwriting will resume if you turn the printer on again.
88
User Interface Manual

Using the Data Security Feature
Refer
Notes to the system administrator
To maintain the security of the hard disk, the following settings are required:
- [Common Service Settings] > [Other Settings] > [Data Encryption] > [On]
- [Common Service Settings] > [Other Settings] > [Service Rep. Restriction Operation] > [On]
- [Authentication / Security Settings] > [Authentication] > [Passcode Policy] > [Passcode Entry for Control
Panel Login] > [On]
- [Authentication / Security Settings] > [Authentication] > [Maximum Login Attempts] > [Limit
Attempts] / [5]
Make sure to change the administrator's factory default passcode (x-admin). Register a new passcode
of 7 characters or more.
Be careful not to register a passcode that can be easily assumed and not to disclose the passcode anyone but the system administrator.
Never lose the administrator ID and the passcode. The machine configuration will not be able to recover in
Important
case of malfunction.
For detailed information about [Other Settings], refer to "4.1.10 Other Settings" (p.54).
For detailed information about [Authentication], refer to "5.2.2 Authentication" (p.83).
For detailed information on how to change the administrator passcode, refer to "5.2.1 System Administrator Settings" (p.81).
Notes to the managers (of the organizations that the printer is used in)
Assign appropriate persons as network manager and system administrator, and manage and train them
properly.
When turning off the printer, make sure no operation is running. Train the users to turn off the printer
after an active operation completes, if any.
Install an anti-bugging device on the internal network that the printer is located, and perform the network settings properly to protect the printer from interceptions.
To block unauthorized access, install a firewall device between the external network and the internal
network that the printer is located on.
Set the passcode and encryption key according to the following rules:
- Do not use easily assured character string
- Use both characters and numerics
Chapter 5 Accounting, Authentication / Security Settings
89

Chapter 6
Refer
6.1 CentreWare Internet Services Settings ...........................................90
6.2 Encryption Settings.................................................................................93
Network and Encryption Settings
6.1.1 Display CentreWare Internet Services ....................................................... 90
6.1.2 Troubles with CentreWare Internet Services........................................... 92
6.2.1 HTTP Communications Encryption ............................................................. 94
6.2.2 Encryption Using IPsec..................................................................................... 94
6.1
When in TCP/IP environment, following options are available on CentreWare Internet Services:
To display status of the printer or job
To change the printer settings
To check the printer usage
To retrieve audit logs (operation logs of the printer)
Certificate Settings
CentreWare Internet Services Settings
6.1.1 Display CentreWare Internet Services
1.
Log in to System Administration mode and press <Tools> button, and then select
[Enabled] for [Port Status] under [Tools] > [Connectivity & Network Setup] > [Port Settings] > [Internet Services].
90
For detailed information on how to display the window, refer to "4.2.1 Port Settings" (p.59).
User Interface Manual

2.
Note
Refer
Refer
Note
Note
Refer
Any changes made to the settings on [Tools] > [Connectivity & Network Setup] > [Protocol Settings] > [TCP/IP - Network Settings].
If an IP address is already set, you can skip this step. For an environment with DHCP or BOOTP, configure the method for obtaining the address.
For detailed information on how to display the window, refer to "4.2.2 Protocol Settings" (p.60).
3.
Print out a "Configuration Report" to confirm that the port for CentreWare Internet
Services is enabled and TCP/IP is set up correctly.
For detailed information on how to print the list, refer to "3.2.1 [Machine Information] Tab" (p.28).
4.
Start a Web browser on a client computer.
5.
Enter the printer's IP address or the Internet address in the address box on the web
browser, and press the <Enter> key.
If your network uses DNS (Domain Name System) and the printer's host name is registered on
the domain name server, you can access the printer using the Internet address combining the
host name and the domain name. For example, if the host name is "myhost", and the domain
name is "example.com" then the Internet address is "myhost.example.com".
When specifying a port number, add ":" and the port number after the Internet address.
If HTTP communications are encrypted, use "https" instead of "http".
For detailed information about encryption of HTTP communications, refer to "6.2.1 HTTP Communications Encryption" (p.94).
[Status] window will be displayed.
You cannot change settings from CentreWare Internet Services while user interface is being operated. You can change settings after the printer resets the settings automatically.
The default administrator ID and passcode is the same as those set on the printer.
For detailed information on how to operate, refer to the help by clicking [Help] in the upper right
corner of CentreWare Internet Services window.
Chapter 6 Network and Encryption Settings
91

6.1.2 Troubles with CentreWare Internet Services
The following chart describes troubles that may occur with CentreWare Internet Services.
Symptom Remedy
Unable to connect to CentreWare Internet
Services.
The [Please wait] message is continuously
displayed.
The [Refresh] button is not functioning. Depending on the Web browser, [Refresh] button does not function
Selecting the menu on the left frame does
not update the contents in the right frame.
The screen display is distorted. Change the window size of the browser.
The latest information is not displayed Click the [Refresh] button on the browser.
Is the printer working properly?
Check whether the printer is turned on.
Is [Enabled] is selected for [Port Status]?
Print out a "Configuration Report" and confirm.
Is the Internet address correctly entered?
Enter IP address if unable to connect.
Is a proxy server being used?
Depending on the proxy server, connections may not be established.
Set the browser to "Not using proxy server" or set that particular
address to "Not using a proxy server".
If the status does not change, click the [Refresh] button on the
browser.
If this does not impart any effect, make sure whether the printer is
operating correctly.
properly.
Change the browser or update your browser to the latest version.
Clicking [Apply] does not apply the new
settings.
When you click [Apply], a message such as
"The server has returned ineffective or
unrecognizable response" or "No data" is
displayed on the browser.
Cannot delete jobs. Wait for a while, and click [Refresh].
Are the entered values correct?
If a value outside of the permitted range is entered, the update will
automatically be made within the range.
You cannot change settings from CentreWare Internet Services while
user interface is being operated. You can change settings after the
printer resets the settings automatically.
Is the password correct?
Enter the correct password.
Switch off the printer and then on again.
92
User Interface Manual

6.2
The data sent between the printer and computers on a network can be encrypted.
Encryption Settings
Types of Encryption
Encrypting HTTP Communications (from a Client Computer to the Printer)
The SOAP and Internet Services (HTTP) ports use the HTTP server of the printer.
The SSL / TLS protocol is used to encrypt the HTTP communications between a client computer and the
printer.
Encrypting HTTP Communications (from the Printer to a Remote Server)
The SSL / TLS protocol is used to encrypt the HTTP communications between the printer and a remote
server.
No certificate is required in general. However; if a remote server is set to require an SSL client certificate,
you can use a certificate issued by another CA.
Encryption using IPsec
IPsec enables encrypted communications. The communications are encrypted in IP-level regardless of the
applications.
After encrypting HTTP communications, import a certificate issued by another CA, which should be registered as the certificate for IPsec.
Types of Certificate
Self-Signed Certificate
A self-signed certificate created by CentreWare Internet Services
The valid period can be specified from 1 to 9,999 days.
A certificate issued by another CA
A certificate issued by another CA.
When you use a certificate issued by another CA, import the certificate using CentreWare Internet Services.
Chapter 6 Network and Encryption Settings
93

6.2.1 HTTP Communications Encryption
Refer
Refer
Note
No certificate is registered to the printer by factory default. Configure certificates for an SSL server as
needed.
1.
Start CentreWare Internet Service.
For detailed information on how to operate, refer to the help by clicking [Help] in the upper right
corner of CentreWare Internet Services window.
2.
Click [Create New Self Signed Certificate] under [Properties] tab > [Security] >
[Machine Digital Certificate Management], and any changes made to the settings.
3.
Refresh the web browser after clicking [Apply].
Steps 2. and 3. are only required for "Self-singed Certificate".
4.
Click [SSL / TLS Settings] under [Properties] tab > [Security], and select the [Enabled]
check box for [HTTP - SSL / TLS Communication].
5.
Click [Apply] and then [Reboot Machine].
6.
In case of "A certificate issued by another CA", import the certificate after the Steps
and
5.
For detailed information on how to import a certificate, refer to "6.2.2 Encryption Using IPsec"
(p.94).
If communications are encrypted, use "https" instead of "http".
4.
6.2.2 Encryption Using IPsec
No certificate is imported to the printer by factory default. Configure certificates for an IPsec server as
needed.
94
When [Authenticate by Preshared Key] is selected under [Tools] > [Connectivity & Network Setup] > [Security Settings] > [IPsec Settings] > [IKE Authentication Method], no operations on CentreWare Internet Services are required.
For detailed information about [IKE Authentication Method], refer to "4.2.6 Security Settings" (p.67).
A self-signed certificate created by CentreWare Internet Services cannot be used.
The printer supports to import "RSA public key (up to 4096 bits)".
If the certificate to be imported contains the V3 extension "keyUsage", "digitalSignature" must be asserted.
User Interface Manual

1.
Refer
Refer
Important
Refer
Start CentreWare Internet Service.
For detailed information on how to operate, refer to the help by clicking [Help] in the upper right
corner of CentreWare Internet Services window.
2.
Encrypt HTTP communications if not.
For detailed information about encryption of HTTP communications, refer to "6.2.1 HTTP Communications Encryption" (p.94).
3.
Click [Upload Signed Certificate] under [Properties] tab > [Security] > [Machine Digital
Certificate Management], and enter the password.
4.
Select the file to be imported and click [Save].
5.
Click [Apply] and then [Reboot Machine].
6.
Refresh the web browser after clicking [Import].
You cannot import a certificate that has been already registered in [Local Device] or [Others].
Delete the registered certificate before importing.
7.
Click [Certificate Management] under [Properties] tab > [Security], and select [Local
Device] for [Category] and [IPsec] for [Certificate Purpose].
8.
Select the check box next to the certificate to set, and click [Certificate Details], [Use
this Certificate] and then [Reboot Machine].
9.
Log in to the Administrator mode, press <Tools> button, and then any changes made to
the settings on [Tools] > [Connectivity & Network Setup] > [Security Settings] > [IPsec
Settings].
For detailed information on how to display the window, refer to "4.2.6 Security Settings" (p.67).
10.
Create an IP security policy and assign the IP security policy.
Chapter 6 Network and Encryption Settings
95

Chapter 7
Refer
Note
7.1 Overview ......................................................................................................96
7.2 Configuration for Authentication......................................................99
7.3 Authentication Operations................................................................102
Authentication and Accounting
Features
7.2.1 Enabling Authentication.................................................................................. 99
7.2.2 Configuring for IC Card Reader.................................................................. 100
7.2.3 Configuration for Account Administration ........................................... 101
7.3.1 User Authentication Operations ............................................................... 102
7.3.2 Changing Passcode......................................................................................... 104
7.1
Using authentication feature allows you to restrict the print jobs per user. It also counts up and manages
the number of pages printed per user.
Overview
For detailed information about user roles and service access , refer to "5.1.2 Create / View User Accounts"
(p.75).
Types of User
System Administrator
The system administrator can change system settings.
A system administrator is authenticated with a specific user ID called an administrator ID.
Login User
A Login User is a user registered on the printer. Login users can be authenticated with respective user IDs.
Unregistered User
An unregistered user is a user not registered on the printer.
An unregistered user cannot use restricted services.
96
When the authentication feature is disabled, users are classified as either an administrator or a guest.
For detailed information about administrator, refer to "1.3 Log In to and Out of Administrator Mode" (p.19).
User Roles
Allows you to set the scope of authority for each login user.
System Administrator
The same authority as an administrator is given except for changing the passcode of the administrator.
User Interface Manual

Account Administrator
Note
Refer
Refer
The following authorities are given:
Create, delete, change (except for passcode), and view (unavailable depending on some settings) user
information
Create, delete, change, and view accounting
Change Alternative Name for Account ID or Mask Account ID
Print an Auditron Report for each user
Access Control
Allows you to restrict printing.
Account Limit for All User
You can restrict printing by all users. User authentication is needed to use this feature.
Account Limit for Each User
Allows you to restrict prints per user ID registered. You can also set the maximum number of pages
allowed for the user ID.
The limit cannot be set when [Network Accounting] is selected for [Accounting Type].
Authentication Method
This printer employs "Login to Local Accounts" which uses the user information registered on the printer.
For detailed information about authentication print, refer to customer documentation supplied with Print
Servers.
User ID Authentication
Authentication is performed by matching registered user information with the user ID and passcode
entered on the login screen.
Smart Card Authentication
Authentication is performed by matching registered user information when the card is held over the smart
card reader.
Combined Use of Smart Card Authentication and User ID Authentication
Authentication is performed by combination of smart card authentication and user ID authentication to
match registered user information.
Combined use can be selected at [User Details Setup].
For detailed information about [User Details Setup], refer to "5.2.2 Authentication" (p.83).
Chapter 7 Authentication and Accounting Features
97

Types of Account Administration
Note
Note
Local Accounting
Local accounting is available when authentication feature is enabled.
The number of pages processed is counted per registered user ID on the printer.
Network Accounting
The remote server collects job data stored on the printer and counts up the numbers of pages processed
for each user which is managed by remote services.
User information managed by the remote service is sent from the remote service and registered on the
printer.
Therefore, when the user information is updated, the updated information must be sent from the remote service.
Xerox Standard Accounting
Xerox standard accounting is available when authentication feature is enabled.
Auditron reports are created in CSV format using CentreWare Internet Services.
When setting the user ID information or account information for another machine, we recommend that you
use the Cloning feature of CentreWare Internet Services.
98
User Interface Manual

7.2
Refer
Configuration for Authentication
7.2.1 Enabling Authentication
1.
Log in to the Administrator mode, press <Tools> button, and then tap [Login to Local
Account] under [Tools] > [Authentication / Security Settings] > [Authentication] >
[Login Type].
For detailed information on how to display the window, refer to "5.2.2 Authentication" (p.83).
2.
Any changes made to the settings on [Authentication].
Chapter 7 Authentication and Accounting Features
99

7.2.2 Configuring for IC Card Reader
Note
Refer
Perform the following steps when optional IC Card Reader is attached.
For detailed information about IC card reader, contact your local Fuji Xerox representative.
IC Card Reader
MIFARE® (Type A)
Fuji Xerox IC Card (Type A)
Other MIFARE compatible smart cards (The embedded IC Card Reader of the printer may not support
some smart cards.)
eLWISE/ELWISE (Type B)
eLWISE
ELWISE
®
FeliCa
Fuji Xerox IC Card
IC Card compatible with SSFC® version 1.0 format (The embedded IC Card Reader of the printer may
not support some smart cards.)
Other FeliCa compatible smart cards (The embedded IC Card Reader of the printer may not support
some smart cards.)
IC Card Reader (HID)
HID-Prox (The embedded IC Card Reader of the printer may not support some smart cards.)
1.
Log in to the Administrator mode, press <Tools> button, and then select the logout
method under [Tools] > [Authentication / Security Settings] > [Authentication] > [User
Details Setup] > [Smart Card Logout Timing].
For detailed information on how to display the window, refer to "5.2.2 Authentication" (p.83).
100
User Interface Manual
 Loading...