


System Software Version 100.21.44
Book Version 3.0
September 2015
702P02816
Xerox
®
Versant
®
Quick Start Guide
2100 Press

©2015 Xerox Corporation. All rights reserved. Xerox®, Xerox and Design®, FreeFlow®,
SquareFold®, CentreWare®and Versant®are trademarks of Xerox Corporation in the
United States and/or other countries.
Adobe®PDF®is a registered trademarks of Adobe Systems, Inc. PostScript®is an Adobe
registered trademark used with the Adobe PostScript Interpreter, the Adobe page
description language, and other Adobe products.
Fiery®and EFI™are trademarks or registered trademarks of Electronics For Imaging, Inc.
GBC®and AdvancedPunch™are trademarks or registered trademarks of General Binding
Corporation.
3-IN-ONE®and WD-40®are a registered trademarks of the WD-40 Company.
BR4005

Table of Contents
1 Product Overview.......................................................................................1-1
Press Overview.......................................................................................................................1-1
Print Server Overview..........................................................................................................1-1
Press Components...............................................................................................................1-2
Locating the Press Serial Number....................................................................1-3
Control Panel............................................................................................................1-4
Energy Saver Mode.............................................................................................................1-5
Low Power Mode.....................................................................................................1-6
Sleep Mode...............................................................................................................1-6
Exiting Power Saver Mode...................................................................................1-6
Power On/Off.........................................................................................................................1-6
The Power Switches...............................................................................................1-6
Power On / Off the Press......................................................................................1-7
Feeding and Finishing Devices.......................................................................................1-7
Calling for Service................................................................................................................1-8
2 Stock Library Manager............................................................................2-1
Desktop Shortcuts................................................................................................................2-2
3 Where to Find Help...................................................................................3-1
Diagnostic Tool.....................................................................................................................3-1
Help on the Xerox Web Site.............................................................................................3-1
Print Server Customer Documentation.......................................................................3-2
4 Paper and Other Media..........................................................................4-1
Loading Paper in Trays 1, 2, and 3................................................................................4-1
Loading Paper in the Bypass (Tray 5)..........................................................................4-2
Loading Paper in the OHCF (Trays 6 and 7)..............................................................4-3
5 Maintenance...............................................................................................5-1
Ordering Supplies.................................................................................................................5-1
Replacing Consumable Supplies....................................................................................5-2
Replacing the Bypass Tray Feed Rolls for the OHCF (Trays 6 and
7).........................................................................................................................5-2
Replacing the Feed Rolls for the OHCF (Trays 6 and 7)...........................5-4
Replacing a Dry Ink / Toner Cartridge............................................................5-8
Replacing the Dry Ink / Toner Waste Bottle.................................................5-9
Replacing a Drum Cartridge............................................................................5-10
Quick Start Guide
iXerox®Versant®2100 Press

Table of Contents
Replacing the Suction Filter.............................................................................5-13
Removing the Fuser Module............................................................................5-15
Replacing the Stripper Finger Assembly........................................5-19
Replacing the Pressure Roll Assembly............................................5-19
Replacing the Pressure Roll Cleaning Pad Assembly................5-20
Installing the Fuser Module.............................................................................5-21
Extending Fuser Life..............................................................................5-23
Changing the Fuser Width ID ..........................................................5-24
6 Paper Jams...................................................................................................6-1
Information about Paper Jams......................................................................................6-1
Paper Jams Inside the Press............................................................................................6-2
Clearing Jams in Transfer Drawer (Area 2)...................................................6-2
Clearing Jams in the Output Module (Areas 3, 4 and 5)........................6-4
Paper Jams in Trays 1-3.....................................................................................................6-6
Paper Jams When the Bypass is Installed on Trays 6 and 7...............................6-7
Xerox®Versant®2100 Pressii
Quick Start Guide

1
Product Overview
Press Overview
The Xerox®Versant®2100 Press is a full color / black and white, auto-duplex press that
operates at a speed of 100 prints per minute (when printing on 8.5 x 11 inch / A4 paper).
The system configuration consists of the Oversized High Capacity Feeder (OHCF / Trays
6 and 7), the print engine with internal feeding trays (Trays 1-3), and an embedded
Control Panel and touch screen (the user interface). A print server is also part of the
configuration, which includes the Stock Library Manager application used for stock and
tray setup and print job submission. An Offset Catch Tray can be attached to the print
engine or various optional inline finishing devices with the Interface Module are offered.
Print Server Overview
The print server networked with your press accepts, processes, and manages document
files for job submission to the press.
One of two print servers may be used with your press:
• Xerox®FreeFlow®Print Server
• Xerox®EX Print Server, Powered by Fiery
The print server contains the Stock Library Manager application. Refer to the Stock
Library Manager > Help for information on how to set up stocks, custom profiles, and
paper trays used by the press.
Note
For detailed information on your specific print server, refer to the customer
documentation that was delivered with it.
Quick Start Guide
®
1-1Xerox®Versant®2100 Press
Product Overview
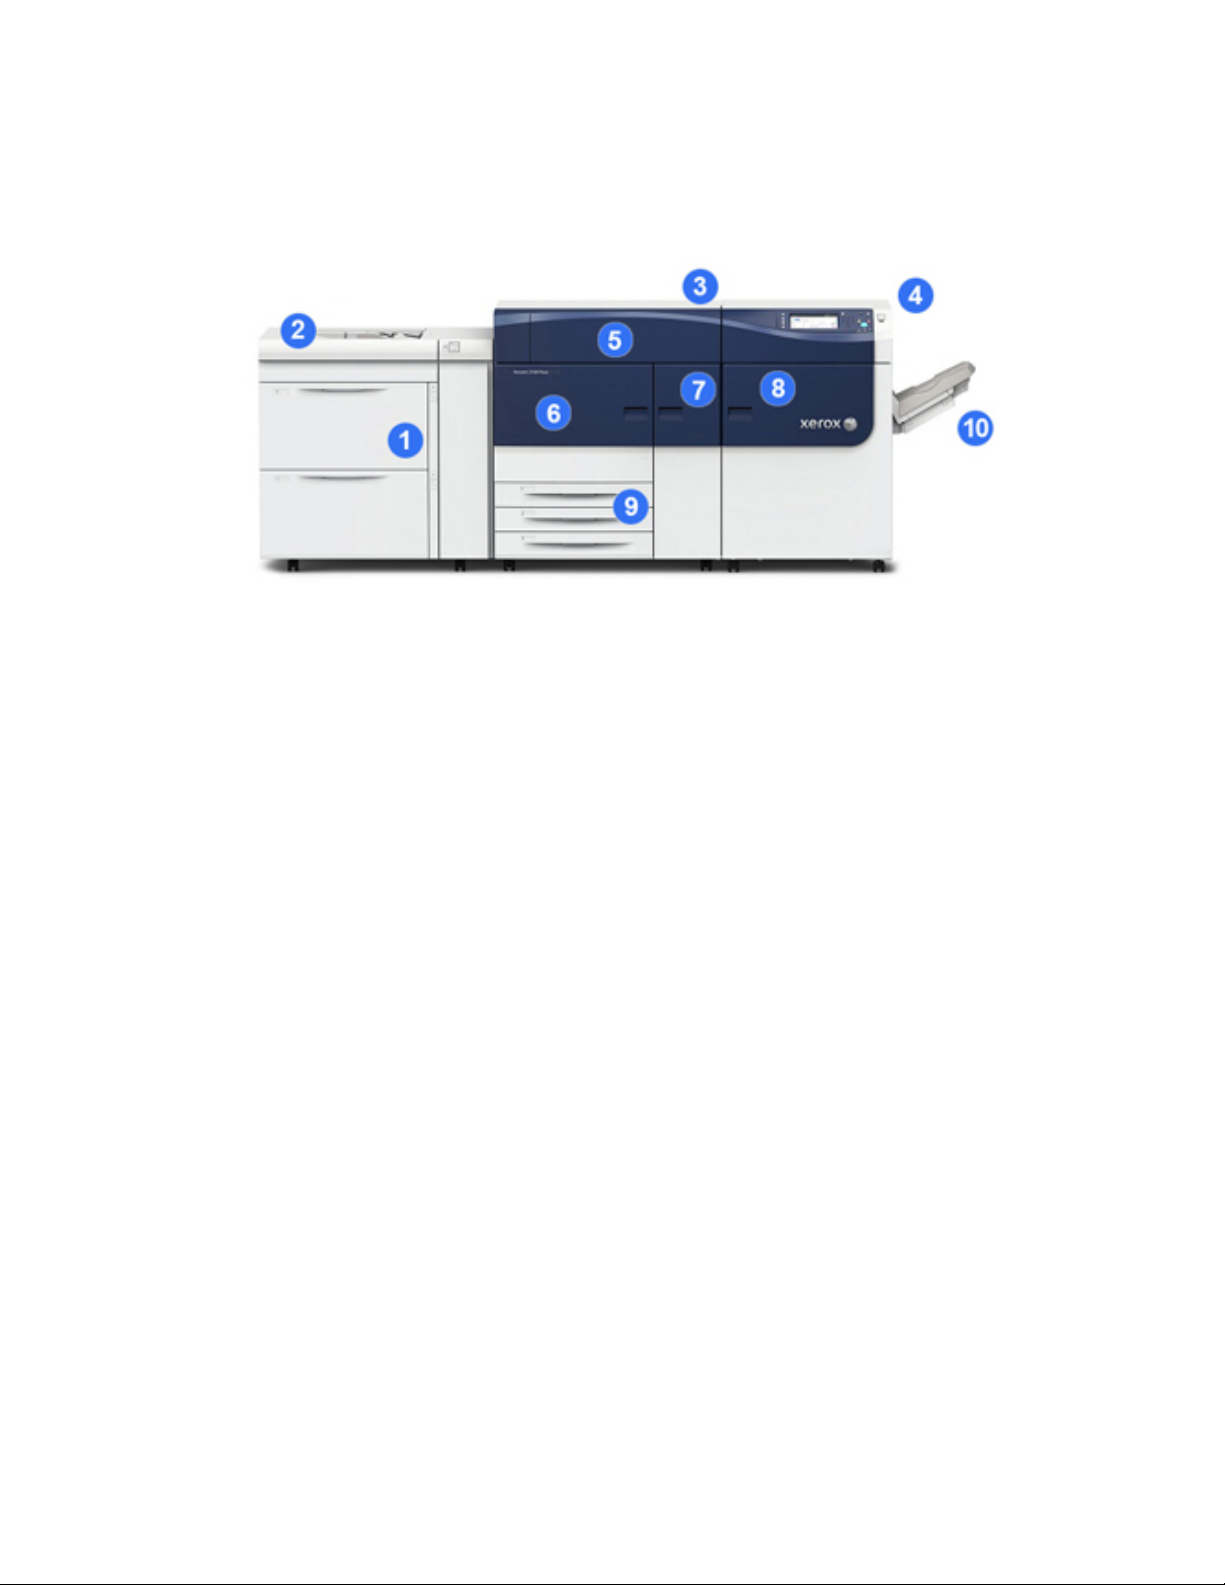
Press Components
1 Oversized High Capacity Feeder (OHCF / Trays 6 and 7)
One OHCF is part of the configuration. The feeder includes two drawers (Trays 6 and
7) that hold 2,000 sheets each. The right portion of the feeder is the J Transport area.
2 Bypass Tray
An optional Bypass tray (Tray 5) can be installed on top of the OHCF to allow for
additional feeding options. Otherwise, the system does not come with this feeding
tray.
3 Print Engine
The press includes the 4 dry ink / toner and drum cartridges, transfer belt and fuser /
ROS system, Full Width Array calibration feature, decurler, registration and paper path,
and paper inverter.
4 Control Panel and Touch Screen
An embedded Control Panel on the top panel of the press consists of buttons, a touch
screen and a keypad for logging on / off, setting job features, printing reports, and
viewing supply, job and press status.
5 Dry Ink / Toner Cover
Open this cover to access and replace the dry ink / toner cartridges.
6 Left Front Door
Open this door to access the registration area and paper handling drawer to clear paper
jams. This area also includes the Transfer Drawer and Xerographic Drawer for replacing
customer replaceable units (CRUs).
Xerox®Versant®2100 Press1-2
Quick Start Guide
Product Overview
7 Center Front Door
Open this door to access the decurler area and fuser assembly.
8 Right Front Door
Open this Output Module door to access the exit / inverter area, the cooling belt and
full width array.
9 Paper Trays 1, 2, and 3
These internal trays of the print engine feed standard size paper.
10 Offset Catch Tray (OCT)
If there are no inline finishing devices attached to the system, the Offset Catch Tray
can be installed for holding print output.
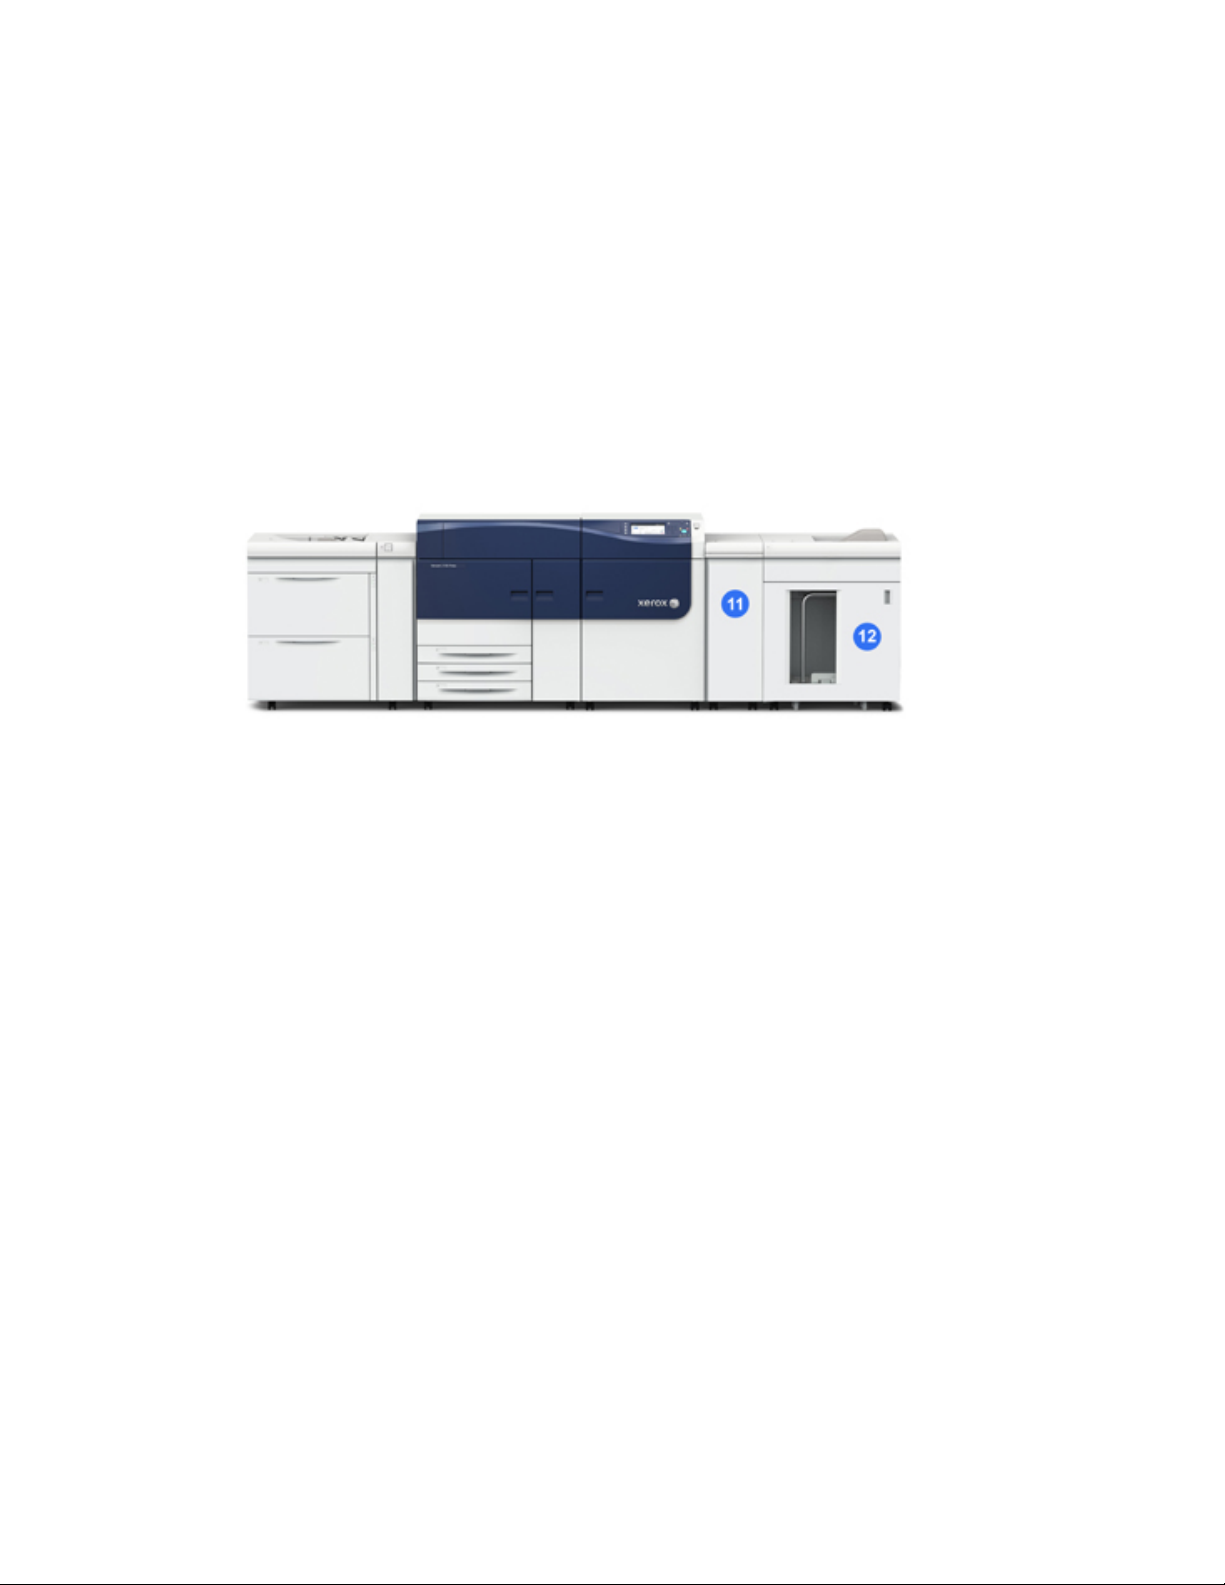
11 Interface Module
12 High Capacity Stacker
The Interface Module and optional finishing devices, such as the High Capacity
Stacker, are not part of the base configuration.
When the Offset Catch Tray is removed, and any of the optional finishing devices are
attached, the Interface Module is required to provide decurling and paper height
adjustment between the print engine and the attached finishing device.
Locating the Press Serial Number
The press serial number can be accessed from either the press control panel or by locating
the serial number plate on the inside frame of the first feeder tray (Tray 1).
1. Press the Machine Status button on the press control panel.
2. From the Machine Status screen, ensure that the Machine Information tab is
displayed.
The press serial number is displayed under General Information.
3. If there is a loss of power and it is not possible to access the Machine Status screen,
the press serial number can also be found on the inside frame of the press near the
Paper Tray 1 drawer:
a) At the press, fully open Paper Tray 1.
Quick Start Guide
1-3Xerox®Versant®2100 Press

Product Overview
b) At the left of the feeder tray, on the press frame, locate the plate with the serial
number (SER#).
Control Panel
The embedded Control Panel on the press includes an LCD touch screen, keypad and
feature buttons. The touch screen displays instructions, faults, and informational
messages. Select the Control Panel buttons to log in, perform job setup functions, and
view job, press, and supply statuses.
1 Home button
Displays the main menu. Provides access to view the supplies and trays available on
the press and the status of consumables.
2 Tools button
Displays the Tools mode screen. For the operator, select the Tools icon to view billing
information and to perform press calibration such as Full Width Array color uniformity
adjustments.
3 Job Status button
Use to check the progress of active jobs and detailed information about completed
jobs or pending jobs. This area also allows you to delete a job (cancel printing) and to
pause jobs.
4 Machine Status button
Use to check the press configuration, the software version, the press billing meter and
counter information, and to access and print job history or error reports.
5 Touch Screen
Directly touch the screen to select and set features. Displays instructional and
informational messages, fault clearance procedures and general press information.
6 Log In / Out button
Use to log in and out of Administrator mode or Authentication mode with user ID and
password.
7 Language button
Use to select a different language for the touch screen options.
Xerox®Versant®2100 Press1-4
Quick Start Guide

Product Overview
8 Power Saver button
Use this button if the press has been inactive and the touch screen is dark (system is
in Energy Saver mode). This button manually exits the system from Energy Saver mode;
it does not place the press in Energy Save mode.
9 Numeric Keypad
Use to enter alphanumeric characters. The ‘C’ Cancel Entry cancels the previous entry
made on the numeric keypad.
10 Clear All button
Use this button to return all selections to the same state as when the press was powered
on. Press once to clear a current entry. Press twice to return to default settings.
11 Stop button
Press to stop and pause the print job in progress.
12 Cancel Entry button
Use this button to cancel the previous entry made on the numeric keypad.
13 Start button
Press to start and print a selected report from the print engine. Also used by the
Customer Service Engineer during diagnostic routine procedures.
14 Press Status Lights
The three indicator lights that identify: data transmission in progress, the press is
experiencing an error, and main power is on.
Energy Saver Mode
The Energy Saver feature allows the press to enter a reduced power consumption mode
when all print jobs have completed and there are no jobs currently processing. There
are two energy saving modes: Low Power and Sleep.
By default, the press automatically enters the Low Power mode after 15 minutes of
inactivity. After 60 minutes of inactivity, the press then enters Sleep mode. These time
intervals for both modes can be changed by the system administrator.
Here are two examples:
• If Low Power Mode is set to 15 minutes and Sleep Mode is set to 60 minutes, Sleep
Mode activates after 60 minutes of total inactivity, not 60 minutes after Low Power
Mode begins.
• If Low Power Mode is set to 15 minutes and Sleep Mode is set to 20 minutes, Sleep
Mode activates 5 minutes after Low Power Mode begins.
Quick Start Guide
1-5Xerox®Versant®2100 Press

Product Overview
Low Power Mode
In this mode, the power to the Control Panel and fuser unit is lowered to save power.
The display goes out and the Energy Saver button on the Control Panel lights. To use
the press, select the Energy Saver button. The Energy Saver button is no longer lit,
indicating that the Energy Saver feature is canceled.
Sleep Mode
In this mode, the power is lowered more than in the Low Power mode. The display goes
out and the Energy Saver button on the Control Panel lights. To use the press, select the
Energy Saver button. The Energy Saver button is no longer lit, indicating that the Energy
Saver feature is canceled.
Exiting Power Saver Mode
The press exits Power Saver mode either by pressing the Power Saver button on the
press Control Panel or when receiving print data for an incoming job to be printed.
Power On/Off
The Power Switches
There are three power switches involved with the press:
• The Breaker switch located at the rear of the press. Initially check to make sure this
switch is set to On when the press is shipped.
• The Main Power switch located inside the Center Front Door. This switch is used
mainly by the Xerox Service Representative when servicing the press. In rare problem
solving cases, you may be directed to power off the press with this switch.
Xerox®Versant®2100 Press1-6
Quick Start Guide

Product Overview
• The Power On / Off button located on the right side of the Control Panel. This button
is the primary way for you to switch on or off the press. It is used by the operator as
workflow requires.
Use the Power On / Off button to power ON or power OFF the press.
Important
Always use the Power On / Off button first, and then power off the Main Power Switch.
Power On / Off the Press
To switch on the press:
• Check that the Main Power switch behind the Center Front Door is On and then press
the Power On / Off button on top of the print engine to the ON position. The Ready
Indicator light displays green.
A screen message advises of a short wait while the fuser warms up and the press runs
a system check. You can set features for a job during this time and the printing process
will start automatically when the press is ready.
To switch off the press:
• Press the Power On / Off button on the print engine.
Note
Allow the press to remain off for a minimum of 10 seconds before switching on the
power again.
Feeding and Finishing Devices
Available with your press is a variety of optional feeding and finishing devices.
Note
Refer to the User Guide or go www.xerox.com for more information on the optional
feeding and finishing devices.
Quick Start Guide
1-7Xerox®Versant®2100 Press

Product Overview
Calling for Service
1. Record any displayed fault codes.
2. Record the press serial number. To access, select the Machine Status button at the
press Control Panel. From the Machine Status screen, select the Machine Information
tab to view the serial number listed. If the serial number is not displayed, open the
press Paper Tray 1 drawer and locate the serial number plate on the left side of the
frame (SER #).
3. If output quality is a problem, take a sample as a reference to assist you in describing
the problem over the telephone when answering the questions from the customer
support operator about the defects.
4. If possible, use a phone near the press when calling for assistance. Follow the
instructions provided by the operator.
5. For system support, user help, and service support, call the appropriate number. For
the specific number in your area, go to www.xerox.com and select the Support link.
Xerox®Versant®2100 Press1-8
Quick Start Guide

2
Stock Library Manager
The Stock Library Manager is an application that is loaded onto the print server, and
it is used to manage the stocks and trays for your press.
Important
Access the Stock Library Manager application on the print server; it cannot be accessed
from the press.
Use the Stock Library Manager application to:
1. Log on/off as Administrator
2. Change the language that is displayed on the Stock Library Manager application
3. Manage profiles that are associated with stocks (including creating, editing, and
deleting profiles); profiles include alignment, folder adjustment (optional), and
third-party finishing devices (optional)
4. Manage stocks that the press uses, including assigning specific stocks to feeder
trays, and adding, copying, editing, creating, and deleting stocks from the Stock
Library list
5. Choose specific System Settings options associated with stocks and feeder trays.
The System Settings feature is available only when logged on as Administrator
6. View tray properties, assign a specific stock to a tray, and set a variety of parameters
for that assigned stock
Note
For detailed information on the Stock Library Manager application and how to use it,
go the print server and from the Stock Library Manager main window, select Help in
the upper left corner of the window.
Quick Start Guide
2-1Xerox®Versant®2100 Press

Stock Library Manager
Desktop Shortcuts
Two desktop / shortcut icons are provided on the print server for easy and quick access
to the Stock Library Manager application and to the customized Stock Library list. During
the installation of the Stock Library Manager application, two icons are created on the
print server's desktop. These icons are shortcuts to the following items:
• Stock Library Manager application: This shortcut icon allows the user to quickly and
easily open and start the application (if it is not already running)
• Stock Library Manager Profiles folder: This shortcut icon displays as a folder on the
print server's desktop and allows the user to access the customized Stock Library list.
To use the desktop shortcuts, perform the following steps:
1. Acess the desktop of the print server.
2. Locate the two icons (Stock Library Manager application and Stock Library Manager
Profiles).
3. To open / access either the Stock Library Manager application or the Stock Library
Manager Profiles folder, double click on the desired icon.
Depending on which icon is selected, either the Stock Library Manager application
opens or the folder containing the Stock Library list opens.
Xerox®Versant®2100 Press2-2
Quick Start Guide

3
Where to Find Help
Diagnostic Tool
A Customer Diagnostic Tool CD is provided with your system. It provides you with the
information needed to identify and resolve image quality issues or faults the press may
be experiencing, and includes the procedures on how to replace customer-accessible
press components.
This tool is the first step you can use in isolating a problem or specific fault code and
the resolution associated with it.
Help on the Xerox Web Site
For technical product support, Xerox supplies, customer documentation, and answers to
frequently-asked questions, go to www.xerox.com. You will find the latest documentation
and the knowledge base under Support & Drivers. Use the Contact link for specific
contact information / telephone numbers in your area.
Note
Be sure to periodically check this website for the latest information on your product.
It may be helpful to know your press serial number before calling for support. The press
serial number is shown on the Machine Information tab: Machine Status > Machine
Information.
Quick Start Guide
3-1Xerox®Versant®2100 Press

Where to Find Help
Print Server Customer Documentation
• The FreeFlow Print Server features are documented in the Online Help system from
the Help menu shown on the main print server window. Additional FreeFlow Print
Server user documentation can be found at www.xerox.com.
• The EFI Print Server Help menu on the Command WorkStation window is designed
to provide information on specific work flows when using the Command WorkStation.
Additional user documentation supplied by EFI is available to you from www.xerox.com
under the Support and Drivers link.
Xerox®Versant®2100 Press3-2
Quick Start Guide

4
Paper and Other Media
Loading Paper in Trays 1, 2, and 3
From the Stock Library Manager on the print server, set the stock type, weight and size
settings for the tray. At the press, check that the stock loaded in the paper tray matches
the paper tray attributes programmed.
Note
A paper jam may occur if a tray is opened while it is being used to feed stock.
1. Select the appropriate paper stock for your print job.
2. Pull out the tray slowly until it stops.
3. Open the ream of paper with the seam side facing up.
4. Fan the sheets before loading them into the tray.
5. Load and align the edge of the paper against the left edge of the tray.
Paper can be loaded either in the LEF / portrait or SEF / landscape direction.
6. Adjust the paper guides by pressing in the guide release and carefully moving the
Edge Guide until it lightly touches the edge of the material in the tray.
Do not load materials above the MAX line located on the rear Edge Guide.
7. Gently push in the tray until it comes to a stop.
Quick Start Guide
4-1Xerox®Versant®2100 Press

Paper and Other Media
The Paper Tray Properties window displays on the print server (on Stock Library
Manager). You can view and set stock attributes and verify trays are assigned with
the correct stock. The Stock Library Manager is available from the print server only
and not at the press.
8. From the Tray Properties window, enter or verify the correct paper information,
including size, type, weight and, if necessary, paper curl and / or alignment option.
Select the stock and assign the stock to the tray to be used.
9. Select OK to save the information and close the Tray Properties window.
Loading Paper in the Bypass (Tray 5)
1. Gently extend the Bypass (Tray 5) as necessary to accommodate the paper.
2. Hold the center of the paper guides and slide them to the desired paper size.
3. Select the appropriate paper stock for your print job.
4. Open the ream of paper with the seam side facing up.
5. Fan the sheets before loading them into the tray.
6. Insert the paper or media into the tray until it stops.
7. Adjust the paper guides so that they touch the edges of the stack.
The Paper Tray Properties window displays on the Stock Library Manager on the
print server. The Stock Library Manager is not available at the press.
8. From the Tray Properties window, verify that the correct paper information such as
size, type and weight are selected and match the stock loaded in the tray.
9. Select OK to save the information and close the Tray Properties window.
Xerox®Versant®2100 Press4-2
Quick Start Guide

Paper and Other Media
Loading Paper in the OHCF (Trays 6 and
7)
1. Select the appropriate paper stock for your print job.
2. Pull out the tray slowly until it stops.
3. Open the ream of paper with the seam side facing up.
4. Fan the sheets before loading them into the tray.
5. Load paper into the tray.
6. Adjust the paper guides by pressing in the guide release and carefully moving the
Edge Guide until it lightly touches the edge of the material in the tray.
Do not load materials above the MAX line located on the rear Edge Guide.
7. Gently push in the tray until it comes to a stop.
The Tray Properties window displays on the print server. You can view and set stock
attributes and verify trays are assigned with the correct stock. The Stock Library
Manager is available from the print server only and not at the press.
8. From the Tray Properties window, enter or verify the correct paper information,
including size, type, weight and, if necessary, paper curl and / or alignment option.
Select the stock and assign the stock to the tray to be used.
9. Select OK to save the information and close the Tray Properties window.
Quick Start Guide
4-3Xerox®Versant®2100 Press

Paper and Other Media
Xerox®Versant®2100 Press4-4
Quick Start Guide

5
Maintenance
Ordering Supplies
Xerox supplies, paper, and throughput material can be ordered from the web site
www.xerox.com and clicking on the Supplies link. For any item that is not orderable from
the web site, contact your Xerox Service Representative.
Note
The cleaning pads used with the ROS Window cleaning wand are not orderable. Contact
your Xerox representative for any additional cleaning pads.
Reorder QuantityCRUs (Supply Item)
Approximate Print Yield (Full
Color 8.5x11/A4 Prints)
50,0002 per boxBlack Dry Ink / Toner Cartridge
55,0001 per boxCyan Dry Ink / Toner Cartridge
51,0001 per boxMagenta Dry Ink / Toner Cartridge
51,0001 per boxYellow Dry Ink / Toner Cartridge
45,0001Waste Dry Ink / Toner Bottle
200,0001Suction Filter
348,0001 per boxDrum Cartridge (R1)
348,0001 per boxDrum Cartridge (R2)
348,0001 per boxDrum Cartridge (R3)
348,0001 per boxDrum Cartridge (R4)
Quick Start Guide
5-1Xerox®Versant®2100 Press

Maintenance
Reorder QuantityCRUs (Supply Item)
Approximate Print Yield (Full
Color 8.5x11/A4 Prints)
500,0001 kitOHCF Feed Roll Kit (Trays 6 / 7)
Replacing Consumable Supplies
The following items are the Customer Replaceable Units (CRU) for the press. It is
recommended that you have a supply of these items available to eliminate down time
when they need to be replaced.
• Dry Ink / Toner cartridges (C, M, Y, K)
• Drum cartridges (C, M, Y, K)
• An empty Waste Dry Ink/Toner bottle
• OHCF (Trays 6 / 7) feed rolls (all items for OHCF are in one kit)
• Suction Filter
Refer to www.xerox.com for the latest consumable part numbers.
Note
The Fuser Module (Belt, Pressure Roll, Stripper Fingers, and PR Cleaning Pad) may be
replaced by the customer only if directed to do so by Service.
Note
Store supply items and Xerox parts in their original packages in a convenient location.
Always recycle / dispose the used CRU according to the disposal instructions supplied
with the new CRU.
Replacing the Bypass Tray Feed Rolls for the OHCF (Trays 6 and
7)
Tip
The feed rolls for OHCF bypass tray should be replaced when experiencing frequent
multifeeds, single feeds, or blank prints in the stack of the output prints.
Use this procedure to replace the (OHCF) bypass tray feed rolls, which includes:
• Feed Roll
• Nudger Roll
• Retard Roll
Xerox®Versant®2100 Press5-2
Quick Start Guide

Maintenance
Note
After you replace all of the feed rolls, contact your system administrator who will reset
the High Frequency Service Item (HFSI) usage counter for these CRU components to
zero (0).
1. Locate and access the Bypass Tray on top of the OHCF.
2. Lift up and open the Bypass Tray cover to access the feed roll components.
3. Remove and replace the feed roll by squeezing the metal shaft and lifting out.
4. Remove and replace the nudger roll using the same technique.
Quick Start Guide
5-3Xerox®Versant®2100 Press

Maintenance
5. Remove and replace the retard roll using the same technique.
6. Close the bypass tray cover.
7. Verify that the tray is operating correctly by feeding paper from the bypass tray.
8. Either log in as the administrator or ask the administrator to perform the following
steps to reset the High Frequency Service Item (HFSI) count to zero (0):
a) At the Control Panel, press the Tools button.
b) From the screen that displays, select the Tools icon.
c) Select System Settings > Common Service Settings > Maintenance.
d) Use the up / down arrow buttons to access the next Maintenance screens.
e) Select the Technical Key Operator icon. The Technical Key Operator feature
displays.
f) Select the Multisheet Inserter (MSI / Bypass) rolls item that corresponds with
the newly-replaced components.
g) Select Reset Current Value. The system resets the High Frequency Service Item
(HFSI) to 0.
9. Exit the administrator mode by pressing the Log In / Out button on the Control Panel.
When prompted, select Logout.
Replacing the Feed Rolls for the OHCF (Trays 6 and 7)
The OHCF feed rolls should be replaced every 300,000 prints or when experiencing
frequent multifeeds, single feeds, or blank prints in the stack of the output prints.
Use this procedure to replace the OHCF feed rolls, which includes:
• Feed Roll
• Nudger Roll
• Retard Roll
Xerox®Versant®2100 Press5-4
Quick Start Guide

Maintenance
Note
After you replace all of the feed rolls, contact your system administrator who will reset
the High Frequency Service Item (HFSI) usage counter for these CRU components to
zero (0).
1. Pull open the top tray of the OHCF to access the feed components.
2. Notice the feed roll compartment on the right side panel of the drawer.
3. Removethenudger roll by pushing down on the black tab with one hand (which raises
the roll upward) and then squeezing the metal shaft on both ends with your other
hand. Lift out the nudger roll.
4. Replace the new roll by squeezing both ends of the metal shaft, and pushing down
on the black tab, insert and release the roll ends into the notches.
Quick Start Guide
5-5Xerox®Versant®2100 Press

Maintenance
5. Next, remove the retard roll assembly at the side of the feeder tray to access the
retard roll. Unscrew the 3 thumbscrews.
6. Slide the retard assembly all the way to the left so it is out of the slots. Pull the
assembly out towards you until completely removed from the tray. Set aside.
7. With the retard assembly out, access and remove the feed roll. To remove, squeeze
both ends of the metal shaft and lift out. To replace, squeeze both ends of the new
roll shaft, and insert and release the roll ends into the notches.
Xerox®Versant®2100 Press5-6
Quick Start Guide

Maintenance
8. Finally, replace the retard roll. Squeeze the orange shafts of the retard roll and lift
out of the assembly.
9. Replace a new retard roll into the black notches of the assembly using the same
technique.
10. Reinstall the retard assembly into the tray. Align the cutout holes of the assembly
with the frame of the tray so the pin holes match up. Insert the assembly into the
frame. Slide the assembly all the way to the right using the pin as a guideline. Ensure
the device is all the way into the slots and the 3 screw areas align.
11. Screw in the 3 thumbscrews to attach the assembly. Do not over tighten.
12. Close the tray and verify that the tray is operating successfully by feeding paper
using that tray.
13. Either log in as the administrator or ask the administrator to perform the following
steps to reset the High Frequency Service Item (HFSI) count to zero (0).
a) At the Control Panel, press the Tools button.
b) From the screen that displays, select the Tools icon.
c) Select System Settings > Common Service Settings > Maintenance.
d) Use the up / down arrow buttons to access the next Maintenance screens.
Quick Start Guide
5-7Xerox®Versant®2100 Press

Maintenance
e) Select the Technical Key Operator icon.
The Technical Key Operator feature displays.
f) Select the item (HCF) that corresponds with the newly-replaced components.
g) Select Reset Current Value. The system resets the High Frequency Service Item
(HFSI) to 0.
14. Exit administrator mode by pressing the Log In / Out button on the Control Panel.
When prompted, select Logout.
Replacing a Dry Ink / Toner Cartridge
Note
The dry ink / toner cartridge can be replaced while a job is printing.
Note
After you replace a dry ink / toner cartridge, the system automatically resets the High
Frequency Service Item (HFSI) usage counter for this CRU to zero (0). Check the
Consumables Supplies screen to verify the reset and new status.
1. Open the Dry Ink / Toner cover, located just above the press front door / cover.
2. Lay paper on the floor before removing the cartridge. This will allow any excess dry
ink / toner to fall on the paper.
3. Grasp the handle of the dry ink / toner cartridge matching the color indicated in the
message.
4. Remove the dry ink / toner cartridge by slowly and gently pulling it straight out. While
pulling out, hold the bottom of the cartridge with your other hand to give it support.
5. Dispose of or recycle the cartridge per your local authorities and regulations.
In the United States, also refer to the Electronic Industries Alliance website:
www.eiae.org. For more information about Xerox environmental programs, go to
www.xerox.com/environment.
6. Remove the new dry ink / toner cartridge from its packaging.
7. The dry ink / toner material inside the new cartridge is compact. Loosen and
redistribute the dry ink / toner material before placing into the dry ink / toner slot:
Xerox®Versant®2100 Press5-8
Quick Start Guide

Maintenance
a) With one hand on either side of the cartridge, vigorously shake and rotate the
new cartridge up and down and then left and right for 30 seconds.
b) Test whether the dry ink / toner material is distributed sufficiently by turning the
white auger on the end of the cartridge.
c) If the auger does not turn easily, continue to shake the cartridge and loosen the
dry ink / toner material. When the auger does turn without resistance, the dry
ink / toner cartridge is ready to be installed.
8. Position the cartridge with the white auger end facing the press. Install the new dry
ink / toner cartridge by gently and evenly sliding the cartridge into the press until it
stops.
9. Close the dry ink / toner cover. If the cover does not close completely, make sure the
cartridge is in the lock position and is installed into the appropriate dry ink / toner
location.
Replacing the Dry Ink / Toner Waste Bottle
The Dry Ink / Toner Waste Bottle collects dry ink / toner that accumulates during the
printing process. When the Waste bottle is full, a message displays on the press touch
screen informing you to exchange the full bottle with an empty one.
The press contains one waste bottle located at the front of the press behind the front
center door. When removing a full Dry Ink / Toner Waste Bottle, SLOWLY pull it out of
the press. This will prevent any dry ink / toner from spilling out of the bottle.
Note
After you replace the Dry Ink / Toner Waste Bottle, the system automatically resets the
High Frequency Service Item (HFSI) usage counter for this CRU component to zero (0).
Check the Consumables Supply screen to verify the reset.
1. Ensure that the press is stopped (not running any jobs).
2. Open the front center cover and locate the waste bottle at the bottom right of the
press near the door.
Quick Start Guide
5-9Xerox®Versant®2100 Press

Maintenance
3. Grasp the handle of the Dry Ink / Toner Waste Bottle and pull it halfway out of the
press.
4. Grip the handle with one hand and slowly begin to remove the waste bottle from the
press.
Caution
Never use a vacuum cleaner when cleaning up spilled dry ink / toner. Use a broom or
a cloth moistened with a neutral detergent.
5. Since the waste bottle may be heavy, support the underside of the bottle with your
other hand as you continue pulling it out from the press.
6. Use both hand to place the old used Dry Ink / Toner Waste Bottle into the provided
plastic bag.
7. Remove a new, empty waste bottle from the packaging.
8. Hold the center part on the top of a new bottle and insert it evenly and gently into
the press until it comes to a stop.
9. Close the front cover door.
Replacing a Drum Cartridge
Other than replacing a drum cartridge after 348,000 prints, you may need to replace a
drum cartridge if it is damaged by light or you are experiencing spots and streaks on
your output.
Note
All four Drum cartridges are interchangeable.
Note
After replacing the drum cartridge, the system automatically resets the High Frequency
Service Item (HFSI) usuage counter of this CRU component to zero (0). Check the
Consumables screen for the reset and new status.
Xerox®Versant®2100 Press5-10
Quick Start Guide

Maintenance
Caution
Do not leave the Drum Cartridge Drawer open for more than one minute. Exposing the
drum cartridges to direct sunlight or strong light from indoor fluorescent lighting for
more than one minute may cause image quality defects.
Caution
Replace drum cartridges while the press is powered ON.
1. Ensure that the press is stopped and not currently printing jobs. Proceed to the next
step.
2. Open the press Left and Center Front doors.
3. Rotate and turn the R1-R4 Drum Drawer Handle to the unlock position.
Quick Start Guide
5-11Xerox®Versant®2100 Press

Maintenance
4. Open the bag containing the new drum cartridge. Place the new drum cartridge near
the press.
Caution
Do not touch or scratch the surface of the drum when you take it out from the bag.
5. Unwrap the sheet covering the new drum cartridge and place it under the cartridge.
Some drum cartridges may include a protective film. Remove the film on the drum
cartridge, if the film is present.
6. Grab the Release Handle and pull the Drum Drawer straight out.
7. Remove the old drum cartridge by holding the finger rings provided at the both ends
of the drum cartridge and gently lifting up.
Xerox®Versant®2100 Press5-12
Quick Start Guide

Maintenance
Caution
Drums are light sensitive. Do not leave the Drum Cartridge Drawer open for more
than one minute when replacing cartridges. Exposing the drum cartridges to direct
sunlight or strong light from indoor fluorescent lighting for more than one minute
may cause image quality defects.
8. Install the new drum cartridge into the press following the guides with the side marked
front facing the front.
9. Press both ends of the drum cartridge to place it in a horizontal position.
10. Immediately close the drum cartridge drawer to protect the other drums from light.
11. Return the Release Handle to its original position.
12. Return the R1-R4 handle to the original position and close the front door / cover.
13. Insert the used drum cartridge into an empty container for recycling.
Replacing the Suction Filter
You will need the T10 Torx driver tool for this procedure.
After you replace the filter, you will need to contact the system administrator who will
log into administrator mode and reset the High Frequency Service Item (HFSI) counter
for this CRU to zero (0).
Caution
Make sure the press is powered off before performing this procedure.
1. At the back of the press, locate the Suction filter cover on the lower panel.
Quick Start Guide
5-13Xerox®Versant®2100 Press

Maintenance
2. Use the Torx driver to remove the screw on the right side of the cover by turning the
screw counterclockwise.
3. Pull out and remove the Suction filter cover.
4. Grasp the handle of the filter box and pull straight out.
5. Remove the Suction filter out of the box.
6. Place the new Suction filter into the box and push the tray back in until it stops and
is flush with the press.
7. Place the cover back onto the filter box area. Make sure to first insert the left two
tabs of the cover into the left side of the box area. Then push the entire cover flush
to the press.
8. Insert the Torx driver with the screw attached into the cover and turn clockwise to
tighten.
9. Either log in as the administrator or ask the administrator to perform the following
steps to reset the High Frequency Service Item (HFSI) count to zero (0), which indicates
a new filter has been installed.
a) At the Control Panel, press the Tools button.
b) From the screen that displays, select the Tools icon.
Xerox®Versant®2100 Press5-14
Quick Start Guide

Maintenance
c) Select System Settings > Common Service Settings > Maintenance.
d) Use the up / down arrow buttons to access the next Maintenance screens.
e) Select the Technical Key Operator icon. The Technical Key Operator feature
displays.
f) Select the CRU item that corresponds with the newly-replaced component.
g) Select Reset Current Value. The system resets the High Frequency Service Item
(HFSI) to 0.
10. Exit administrator mode by pressing the Log In / Out button on the Control Panel.
When prompted, select Logout.
Removing the Fuser Module
Warning
You must wait 50 minutes to allow the Fuser Assembly to cool down to a safe temperature
before performing these tasks.
Caution
When pulling out the Transfer Drawer to the Service position, do not attempt to pull the
drawer further out towards you. Pulling the drawer further out will disengage it from the
rails resulting in damage to the drawer and possible injury.
Caution
Make sure the press is powered off. Do not perform this replacement procedure with
the power on or electrical power supplied to the system. Allow the fuser to cool down
for 50 minutes before performing any maintenance.
The reasons for removing and / or replacing the Fuser Module components include:
• Replace the entire Fuser Module, which includes the components listed below, after
650,000 prints or if damaged:
- Belt Module (choose up to 3 different modules available for fuser width change;
at installation, one standard fuser is provided)
- Pressure Roll
- Stripper Finger Assembly
- Pressure Roll Cleaning Pad
• Experiencing image quality issues or damage in the Fuser area
• Accessing other components within the Fuser Assembly area for maintenance
• if you run a mixed type of job within your workflow and switched from running 11
inch paper to an oversized paper, this could cause an edgewear defect. To resolve,
you can exchange and use another Fuser Belt Module, up to 3 different widths (for
example, 11 inch / A4 width, 12 inch width, or a custom size)
If you exchange the fuser type, you will need to also connect the associated jumper to
the assembly to identify the Fuser Width ID being used:
• Connecting and Changing the Fuser Width ID
5-15Xerox®Versant®2100 Press
Quick Start Guide

Maintenance
Prerequisite: Prepare Your Tools
While waiting for the Fuser Assembly to cool down, locate the tools you will need to
complete the removal and replacement procedures.
• Fuser Holding Rack
• T10 and T15 Torx drivers (located in the Nationalization Kit)
• Fuser Handles (originally stored inside the Paper Tray 2 compartment)
• Pressure Roll Handles (originally stored inside the Paper Tray 2 compartment)
1. Power off the press by pressing the On / Off button on the right side of the Control
Panel.
2. When the indicator light stops blinking, open the Left Front Door and the Center
Front Door and switch off the main power switch.
3. Locate the green Handle (2) and rotate clockwise to the horizontal position to unlock
the Transfer Drawer.
4. When the Fuser has cooled, pull the Transfer Drawer out to the jam clearance position.
Xerox®Versant®2100 Press5-16
Quick Start Guide

Maintenance
5. You will now need to pull the Transfer Drawer out to an extended position. While
gently pulling the drawer, use the pointed end of the Fuser Belt Module Handle to
push through the hole in the Transfer Drawer rail to release the tabs on each side of
the drawer.
Warning
Do not extend the drawer beyond this service position. Pulling the drawer further out
will disengage it from the rails resulting in damage to the drawer and possible injury.
6. Locate the black Fuser Front Cover. Notice if there is a black or gray fuser width
identifier clip at the front left side of the cover. The clip identifies the width of the
fuser currently installed, such as 13 inch. If there is no clip and jumper connected
(this is the default at install), the standard fuser is installed, which accommodates
all paper widths.
7. Using the provided T10 Torx driver, remove one screw and the Fuser Front Cover.
Caution
Save all screws for reinstallation. If you drop a screw inside the Fuser Assembly, make
sure to locate and remove the screw before continuing. Otherwise, the press could
be damaged or an image quality issue or fault code may result.
8. Remove the two mounting screws using the provided T15 Torx driver and lift the
Fuser Top Cover to the access position.
Quick Start Guide
5-17Xerox®Versant®2100 Press

Maintenance
9. If there is a jumper harness attached to the wire bundle, it identifies the fuser width
restriction / resistance. One of two resistance jumpers may be installed. No jumper
(this is the default) indicates that the standard fuser is installed. Disconnect the four
Fuser connectors:
a) Pinch the tabs on both sides of the black connector and lift to remove.
b) Using a Torxdriver, gently push the tabs in on each of the three white connectors
while pulling slightly on the wires to remove.
c) Release the wire bundle from the harness clip.
10. Locate the storage area of the press that holds the pack of Fuser and Pressure Roll
Lift Handles. Remove the Lift Handles pack from the storage area.
11. Place the Fuser Belt Module Handles on the posts on each end of the module.
12. Facing the right side of the drawer, push the module slightly away from you and lift
the Fuser Belt straight up and out of the press, letting the weight of the module hang
in your hands.
Note
Do not twist or rotate the module as you place it in the Holding Rack.
13. Place it on the Fuser Holding Rack provided. Align the edge of the roller to the scribe
mark on the holding rack frame.
Xerox®Versant®2100 Press5-18
Quick Start Guide

Maintenance
14. If damaged or end-of-life, place it inside the original box and return to Xerox for
recycling.
15. With the Fuser Belt removed, you can now remove and replace the Fuser Stripper
Finger Bracket, the Fuser Pressure Roll Assembly and the Pressure Roll Cleaning Pad
Assembly. Refer to those procedures.
16. If a different width fuser is going to be installed, remove the new fuser from its
packaging. Store the unused fuser in its original box.
17. To install the fuser, refer to that procedure Installing the Fuser Module.
Replacing the Stripper Finger Assembly
Caution
Make sure the press is powered off. Do not perform this replacement procedure with
the power on or electrical power supplied to the press. Allow the fuser to cool down for
50 minutes before performing any maintenance.
1. Perform the steps for Removing the Fuser Module.
2. Once the Fuser Belt Assembly is out of the press, you can access and remove the
Fuser Stripper Finger baffle:
a) Using the T10 Torx driver, remove the two screws and the Fuser Entrance Baffle.
Set aside the screws for reinstallation.
b) Note the position of the Fuser Belt Edge Sensor so as not to damage it when
removing the Pressure Roll.
c) Press the front and back Spring Levers at the same time and lift out the Stripper
Finger Assembly.
3. To replace the Stripper Finger Assembly, align the two slots in the assembly with the
two posts and click into place.
4. Position the Entrance Baffle by aligning the two perforations and the two screw holes.
5. Reinstall the two screws to secure the baffle.
6. Ask the administrator to reset the High Frequency Service Item (HFSI) count for this
newly-replaced CRU component at the press Control Panel.
Replacing the Pressure Roll Assembly
Caution
Make sure the press is powered off. Do not perform this replacement procedure with
the power on or electrical power supplied to the press. Allow the fuser to cool down for
50 minutes before performing any maintenance.
1. Perform the steps for Removing the Fuser Module.
2. Perform the steps for Replacing the Stripper Finger Assembly
3. Once the Fuser Belt Assembly is out of the press and the stripper finger bracket
removed, you can access and remove the Pressure Roll Assembly:
a) Push down and release the front and back Bearing Holder Springs, and move
each spring into the holding position.
b) Install the Pressure Roll Handles under the bearings on each side of the roll.
Quick Start Guide
5-19Xerox®Versant®2100 Press

Maintenance
c) Lift the Pressure Roll straight out of the press and place in an available box.
4. Install the new Pressure Roll Assembly. Use the Pressure Roll Handles to help position
the Pressure Roll in the Fuser Assembly.
5. Align the bearings to the cradle as you gently lower the Pressure Roll into place, and
then remove the handles.
6. Rotate the roll to ensure that the gears mesh properly.
7. Replace the Bearing Holder Springs to secure the Pressure Roll in place.
8. Ask the administrator to reset the High Frequency Service Item (HFSI) count for this
newly-replaced CRU component at the press Control Panel.
Replacing the Pressure Roll Cleaning Pad Assembly
Caution
Make sure the press is powered off. Do not perform this replacement procedure with
the power on or electrical power supplied to the press. Allow the fuser to cool down for
50 minutes before performing any maintenance.
1. Perform the steps for Removing the Fuser Module.
2. Perform the steps for Replacing the Stripper Finger Assembly.
3. Perform the steps for Replacing the Pressure Roll Assembly.
4. To remove the Pressure Roll Cleaning Pad, use a T15 Torx driver and loosen the one
screw in the front of the press. It is not necessary to remove the screw.
5. Push the pad to the rear of the press and remove it.
6. Install the new cleaning pad. Make sure to align the locking tabs with the holes in
the frame and once the Cleaning Pad Assembly is seated, push the assembly towards
the front of the press against the screw.
Xerox®Versant®2100 Press5-20
Quick Start Guide

Maintenance
7. Tighten the screw to secure the pad in place.
8. Ask the administrator to reset the High Frequency Service Item (HFSI) count for this
newly-replaced CRU component at the press Control Panel.
Installing the Fuser Module
After removing the Fuser Belt Module and removing / replacing the other fuser
components, you are ready to reinstall the existing or new Fuser Belt Module.
Note
If a different width fuser is going to be installed, remove the new fuser from its packaging.
Otherwise, you will be retrieving the fuser you removed and placed on the Holding Rack.
Important
To replace the Fuser Belt Module correctly, it is important to know about the 3 alignment
points. There are two in the front and one in the back of the assembly. Proper alignment
ensures proper performance.
1. Place the Fuser Belt Module Handles on each side of the belt and reinsert the required
Fuser Belt Module into the Fuser Assembly.
Quick Start Guide
5-21Xerox®Versant®2100 Press

Maintenance
2. Using the handles, position the Belt Module into the Fuser Assembly using the 3
alignment points. The Belt Module can be moved front to back and side to side to
achieve the proper placement.
Make sure the fuser is seated correctly and completely or the Fuser Top Cover will
not close and machine damage may result.
3. To validate the Belt Module is installed properly, gently close the Fuser Top Cover. If
it closes completely, the module is installed correctly. If it does not close, try to reinstall
the Fuser Belt Module again. Leave the Top Cover open.
4. Replace the wire bundle into the harness clip. Reconnect the three white connectors
at the front of the Fuser by pushing into place.
5. Push the black connector in until it clicks into place.
Note
The three white connectors are keyed and cannot be mixed up. The smallest connector
is in the back and the largest is in the front.
Xerox®Versant®2100 Press5-22
Quick Start Guide

Maintenance
Note
Notice that the small white connector with the two black wires does not need to be
connected for this configuration.
6. Gently close the Fuser Top Cover. Reinstall the two larger screws using the T15 Torx
driver.
Note
You must reinstall the Front Fuser Cover.
7. Replace and secure the Fuser Front Cover with the smaller T10 screw.
Warning
You must push the drawer in. Pulling the drawer further out will disengage it from
the rails resulting in damage to the drawer and possible personal injury.
8. To push in and close the Transfer Drawer, press the rail tabs on each side of the
drawer with your fingers as you gently push the drawer into the press.
9. Latch the Transfer Drawer and close the Front Covers to complete the procedure.
10. Ask the administrator to reset the High Frequency Service Item (HFSI) count for this
newly-replaced CRU component. The HFSI components that need to be reset at the
press touch screen are:
• Belt Module 1 (No Fuser connector)
• Belt Module 2 (Fuser connector 1)
• Belt Module 3 (Fuser connector 2)
Extending Fuser Life
While the press is installed with only one type of fuser (standard type), the system is
able to detect 3 different fuser width settings. To optimize your image quality, you can
exchange the standard fuser with up to 3 different width fusers. Use the different jumper
resistance connectors to identify the specific fuser and match up with the paper width
NVM settings in the following table. Also, a clip on the Front Cover of the fuser identifies
the width of the fuser being used.
Quick Start Guide
5-23Xerox®Versant®2100 Press

Maintenance
Table 1: Bypass Connector Used for Default Paper Width NVM Settings
NVM Default ValueWidth RangeMedia SizeBypass ConnectorRange No.
All paper widthsNone1
mm (3.858 -
13.0 in.)
Black Resistor Type2
Blue Type3
A4 / Letter SEF
A3 SEF
A4 / Letter LEF
11 x 17 in.
SRA312 in. /
13 in.
Custom4 See Note
180.0 - 249.9
mm (lower limit) 270.4 - 298.0
mm (upper limit)
300.0 - 310.0
mm (lower limit) 307.0 - 330.2
mm (upper limit)
100.0 - 330.2
mm (3.937 -
13.0 in.)
980-330298.0 - 330.2
1800-2499 27042980
3000-3100 30703302
Note
Refer to the System Administrator Guide for the procedure on how to reset NVM settings
for other widths not shown in this table.
Changing the Fuser Width ID
The press is installed with a default standard fuser type that is suitable for all media
sizes (paper widths). However, when Removing the Fuser Module you can optimize its
life and maintain the system’s image quality output by attaching a jumper connector
to the fuser assembly that identifies the specific paper width range to use.
If you plan to print jobs using a specific paper width, use this procedure to attach the
bypass connector for that fuser to the fuser assembly. This identifies to the system that
a different fuser is being used and only certain paper widths will be allowed to print.
The fuser types available are:
• 11 inch (A4 / Letter SEF) width fuser
• 12 inch (A3 SEF / A4 / Letter LEF / 304.8 mm) width fuser
• 13 inch (SRA 3/ 330.2 mm) width fuser
• Custom and other size papers
Inform the System Administrator who will then set the NVM settings at the press touch
screen to identify the fuser type and set minimum and maximum NVM width values.
When you then connect the bypass connector to the fuser, the press detects the fuser
type and width and confirms it is appropriate for the system.
Xerox®Versant®2100 Press5-24
Quick Start Guide

Maintenance
Note
The bypass connectors required for each fuser width type are located in the
Nationalization kit. To order additional fusers for this product, contact your Customer
Support Center.
Warning
Before performing this procedure, power off the press and allow 50 minutes for the fuser
to cool down. Always observe the warning labels inside the press.
1. If needed, ask the System Administrator to update the NVM width range settings
for the fuser at the press Control Panel and identify the specific width range of media
that can be run through the fuser.
Refer to the Default and Custom Paper Width Settings tables in the NVM Setting
procedure defined in the Common Settings section of the System Administrator
Guide. Always set the NVM settings before using the new fuser.
2. Open both the Left and Front Center Doors.
3. Locate the black fuser cover.
4. Remove the fuser cover by using the T10 Torx driver to unscrew the one mounting
screw at the center of the cover.
5. Locate the fuser identifier clip on the fuser assembly and, using a marker, write on
the identifier the fuser width being used.
Quick Start Guide
5-25Xerox®Versant®2100 Press

Maintenance
6. Locate the two bypass fuser connectors in the kit. The black resistor jumper (left) is
used for the 2 range value and the blue jumper (right) represents the 3 range value.
For the Range Numbers, refer to the Bypass Connector table in Extending Fuser Life
.
7. Attach the appropriate jumper to the exposed white connector at the front of the
fuser assembly by pushing the two ends together. There is no release. To disconnect,
simply pull apart.
8. Position the fuser cover back on the assembly and screw tightly in place.
9. Close both front doors of the press.
10. If the paper in the print job does not match the width set for the fuser, an error
message displays and the job will not print. Cancel the job and submit the correct
paper width for that job or install the correct width range fuser.
Xerox®Versant®2100 Press5-26
Quick Start Guide

6
Paper Jams
If a paper jam occurs, a fault screen displays a message on the press control panel
indicating in which area the jam is situated. Follow the instructions provided for clearing
the jam and resuming press operation.
Information about Paper Jams
Review the following list to address paper jams:
• When paper jams inside the press, the press stops and a fault message displays.
• Follow the instructions displayed on the screen to remove the jammed paper.
• Gently remove the paper taking care not to tear it. If paper is torn, be sure to remove
all torn pieces.
• If a piece of jammed paper remains inside the press, the paper jam message will
remain on the display.
• Paper jams can be removed with the press still powered on. When the power is turned
off, all information stored to the system's memory will be erased.
• Do not touch components inside the press. This can cause print defects.
• After clearing a paper jam, printing is automatically resumed from the state before
the paper jam occurred.
• If a paper jam occurred during printing, press the Start button. Printing is resumed
from the state before the paper jam occurred.
Warning
When removing jammed paper, make sure that no pieces of jammed paper are left in
the press. A piece of paper remaining in the press can cause fire. If a piece of paper is
stuck in a hidden area or paper is wrapped around the fuser unit or rollers, do not remove
it forcefully. You can get injured or burned. Switch off the press immediately and contact
the Customer Support Center.
6-1Xerox®Versant®2100 Press
Quick Start Guide

Paper Jams
Paper Jams Inside the Press
The press touch screen displays paper jam notifications and indicates the areas of the
press that need to be cleared. There are three main module areas of the press where
paper jams may occur:
• The Registration area behind the Front Left Door (Xerographic Drawer, Transfer
Drawer and Paper Handling Drawer)
• Fuser Assembly and Decurler area behind the Front Center Door
• Inverter and Entrance/Exit areas of the Output / Cooling Module behind the Front
Right Door
Tip
Always check the Output Module first for a paper jam at the entrance of the module.
Rotate the green knobs to pull paper through the entrance areas completely. Always
ensure that all paper jams, including any small ripped pieces of paper, are cleared before
proceeding with your print job.
Warning
Never touch a labeled area (found on the fuser unit or nearby) indicating High
Temperature and Caution. Contact can lead to burns.
Clearing Jams in Transfer Drawer (Area 2)
There are several jam clearance areas of the Transfer Drawer: Registration and Alignment
Transport, Registration Roll, Duplex Transport and entrance to Fuser.
1. Make sure that the press has stopped printing before opening doors.
2. Open the Front Left and Center Doors.
Xerox®Versant®2100 Press6-2
Quick Start Guide

Paper Jams
3. Unlock and pull out the Transfer Drawer by turning the green 2 handle (at the center)
to the right until it is in the horizontal position. Pull the drawer straight out until it
stops.
4. Locate and lift up the green 2b lever to remove jammed paper from the registration
area.
5. If paper is jammed at the top of the Transfer Module, remove paper from the
registration roll (area 2a) by pulling it straight out.
6. Locate area 2c and pull any jammed paper out towards the left.
Quick Start Guide
6-3Xerox®Versant®2100 Press

Paper Jams
7. Locate and push down on the green 2f lever to remove jammed paper from the
Duplex Transport Baffle.
8. Locate and lift up on the 2e lever to remove jammed paper.
9. Lift up the 2d Lever to remove jammed paper.
10. Grasp the green 2 handle and gently push in the Transfer Drawer completely. Turn
the green handle to the left to lock the drawer in place.
Be careful when clearing jams in the fuser area.
11. Close the Front Left and Front Center Doors completely. The press will not operate
if a door is open even slightly.
Clearing Jams in the Output Module (Areas 3, 4 and 5)
The Output or Exit Module contains entrance and exit areas that may require jam
clearance. If paper is jammed at the entrance area, make sure to remove that paper
first before pulling out the Exit Module Drawer. Area 3 clears jams at the entrance baffle.
Always refer to the press touch screen for what areas of the press have a paper jam.
1. Make sure that the press has stopped printing before opening doors.
2. Open the Output Module Front Right Door.
Xerox®Versant®2100 Press6-4
Quick Start Guide

Paper Jams
Do not pull out the Exit Module Drawer.
3. To clear the entrance baffle area (3a and 3b), lift the Upper Cooling 3a lever and
also rotate the 3b knob clockwise to advance the paper jammed in the Module
Entrance Roll. Ensure paper has completely moved through the roll beyond the
entrance area.
4. Rotate the 5d knob clockwise to advance paper and pull down on the 5c green lever
to remove any paper in this area.
5. At the far right of the press, locate the 5a lever and 5b knob. Pull down on the 5a
lever to access the inverter area and remove any paper. Rotate the 5b knob clockwise
to advance any paper coming down into the inverter.
Quick Start Guide
6-5Xerox®Versant®2100 Press

Paper Jams
6. It is now safe to unlock and pull out the Exit Module Drawer. Grasp the green Drawer
handle (4) and rotate handle to the right to the horizontal position. Slowly pull out
the Drawer assembly until it stops.
7. Rotate the 4a knob clockwise and advance paper to remove.
8. Lift 4b, 4c, and 4d levers to remove any paper and return the levers in their original
positions.
9. Grasp the green Drawer handle (4) and gently push in the Exit Drawer assembly
completely. Rotate the handle to the left to lock the drawer in place.
10. Close the Front Right Door completely. The press will not operate if a door is open
even slightly.
Paper Jams in Trays 1-3
Note
Paper is sometimes torn and remains inside the press if you open a tray without checking
the paper jam position. This may cause a malfunction. Check where the paper jam
occurred before clearing the problem.
1. Open the tray where the paper jam occurred.
Xerox®Versant®2100 Press6-6
Quick Start Guide

Paper Jams
2. Remove the jammed paper.
3. Push the tray in gently until it comes to a stop.
Paper Jams When the Bypass is Installed on Trays 6 and 7
Tip
Always ensure that all paper jams, including any small, ripped pieces of paper, are cleared
before proceeding with any print jobs.
1. Remove the paper currently loaded in the Bypass (Tray 5).
2. Lift and open the Top Cover of the Bypass (Tray 5).
3. Remove any jammed paper.
Quick Start Guide
6-7Xerox®Versant®2100 Press

Paper Jams
Note
If paper is torn, check inside the press and remove it.
4. Close the Top Cover of the Bypass (Tray 5).
5. Reload paper into the tray and resume printing.
Xerox®Versant®2100 Press6-8
Quick Start Guide


 Loading...