


Version 1.0
September 2020
702P08468
Xerox
®
VersaLink
®
C8000W Color
Printer
Essential Guide to Successful Printing

© 2020 Xerox Corporation. All rights reserved. Xerox®, Xerox and Design®, VersaLink®, SMARTsend®, Scan to PC
Desktop
Platform
®
, MeterAssistant®, SuppliesAssistant®, Xerox Secure Access Unified ID System®, Xerox Extensible Interface
®
, Global Print Driver®, and Mobile Express Driver®are trademarks of Xerox Corporation in the United States
and/or other countries.
®
Adobe
PostScript
Apple
Mac OS
Google Cloud Print
, Adobe PDF logo, Adobe®Reader®, Adobe®Type Manager®, ATM™, Flash®, Macromedia®, Photoshop®,
®
, Acrobat®, Illustrator®, and InDesign®are trademarks or registered trademarks of Adobe Systems, Inc.
®
, Bonjour®, EtherTalk™, TrueType®, iPad®, iPhone®, iPod®, iPod touch®, AirPrint®and the AirPrint Logo®, Mac®,
®
, and Macintosh®are trademarks or registered trademarks of Apple Inc. in the U.S. and other countries.
™
web printing service, Gmail™webmail service, and Android™mobile technology platform are
trademarks of Google, Inc.
®
HP-GL
, HP-UX®, and PCL®are registered trademarks of Hewlett-Packard Corporation in the United States and/or
other countries.
®
IBM
and AIX®are registered trademarks of International Business Machines Corporation in the United States and/or
other countries.
McAfee
®
, ePolicy Orchestrator®, and McAfee ePO™are trademarks or registered trademarks of McAfee, Inc. in the
United States and other countries.
Microsoft
®
, Windows Vista®, Windows®, Windows Server®, OneDrive®, and PowerPoint®are registered trademarks of
Microsoft Corporation in the United States and other countries.
Mopria is a trademark of the Mopria Alliance.
PANTONE
UNIX
Linux
Wi-Fi CERTIFIED Wi-Fi Direct
®
and other Pantone, Inc. trademarks are the property of Pantone, Inc.
®
is a trademark in the United States and other countries, licensed exclusively through X/ Open Company Limited.
®
is a registered trademark of Linus Torvalds.
®
is a trademark of the Wi-Fi Alliance.

Table of Contents
1 General Overview......................................................................................................................5
Purpose of this Essential Guide.... ........... ..... ..... ..... ..... ..... ........... ..... ..... ..... ..................... ..... ..... 6
Principles of Printing in White plus CMY ... ..... ........... ..... ..... ..... .......... ........... ..... ..... ..... ............. 7
Driver and Firmware Updates.. ..... ................ ..... ..... ..... ..... ................ ..... ..... ..... ..... ........... ... 7
Methods of Printing .. ..... ..... ..................... ..... ..... ..... ........... .......... ..... ..... ..... ..... ........... ..... .. 7
Color Media Options ... ..... ..... ................ ..... ..... ..... ..... ................ ..... ..... ..... ..... ........... ..... ..... 9
General Design Considerations..... ..................... ..... ..... ..... ........... ..... ..... ..... ..... ................ ..... .. 11
General Printing Tips.... ..................... ..... ..... ..... ..... ...... ..... ..... ..... ..... .......... ........... ..... ..... .. 11
Guidelines for Printing on Clear Media ...... .......... ..... ..... ..... ..... ........... ..... ..... ..... ............... 11
Setting Up a Document to Print in White plus CMY on Color Media ..... ..... ..... ..... ..... ......... 11
Calibration................. ..... ..... ..... ........... .......... ..... ..... ..... ........... ..... ..... ..... ..... ..................... ..... 13
White Density Calibration ...... .......... ........... ..... ..... ..... ..................... ..... ..... ..... ........... ..... .. 13
Transfer Voltage .... ..... ..... ..... ..... ........... ..... ..... ..... ..... ................ ..... ..... ..... ..... ........... ..... ... 13
2 Printing with Microsoft Applications...................................................................................15
Printing RGB Composite Files with Microsoft Applications ........... ..... ..... ..... ..... ..... ........... ..... .. 16
Reducing the Visibility of Margins in Microsoft
Reducing the Visibility of Margins in Microsoft
Reducing the Visibility of Margins in Microsoft
White Star on Blue Paper with an RGB File ......... ..... ..... ..... ..... ................ ..... ..... ..... ..... ............ 21
Green Star on White Paper with an RGB File.... ..... ..... ..... ..... ..................... ..... ..... ..... ........... .... 22
Green and Yellow Star on Blue Paper with an RGB File.. ..... ..... ..... ........... ..... ..... ..... ..... ............ 23
White and CMY Toners on Clear Media .... ..... ........... ..... ..... ..... ..................... ..... ..... ..... ........... 24
®
Word Documents ... ..... ..... ..... ..... ........... . 16
®
PowerPoint®... ..... ..... ..... ..................... .... 17
®
Publisher ................ ..... ..... ..... ..... ........... . 19
3 Printing with Adobe®Applications......................................................................................25
Guidelines for Printing with Adobe Applications . ..... ..... ..................... ..... ..... ..... ........... ..... ..... . 26
White Only on Blue Paper with a CMYK File.... ..... ..... ................ ..... ..... ..... ..... ........... ..... ..... ..... 28
Green Box on White Paper with a CMYK File .... ..... ..................... ..... ..... ..... ........... ..... ..... ..... ... 30
Green and Yellow Box on Blue Paper with a CMYK File .... ..... ........... ..... ..... ..... ..... .......... ...... ... 32
Green and Yellow Box on Blue Paper with an RGB File ... ........... ..... ..... ..... ..... ..... ..... ........... ..... 34
White and CMY Toners on Clear Media Using RGB Files ..... ..... ..... ..... ................ ..... ..... ..... ..... . 36
General Tips for Using Adobe Design Products ..... ..... ..................... ..... ..... ..... ..................... .... 37
A Xerox Reference Media..........................................................................................................39
No-Toner Values for Xerox Reference Media .............. ..... ..... ..... ..... ........... ..... ..... ..... .......... ..... 40
B Automatic Background Feature...........................................................................................41
Known Issues with the Automatic Background Feature........ ..... ..... ..... ..................... ..... ..... ..... 42
Xerox®VersaLink®C8000W Color Printer
Essential Guide to Successful Printing
3

Table of Contents
4
Xerox®VersaLink®C8000W Color Printer
Essential Guide to Successful Printing

1
General Overview
This chapter contains:
• Purpose of this Essential Guide. ..... ..... ..... ..................... ..... ..... ..... ........... ..... ..... ..... ..... ................ .. 6
• Principles of Printing in White plus CMY ..... ..... ..... ..... ........... .......... ..... ..... ..... ........... ..... ..... ..... ..... 7
• General Design Considerations.. ..... ..... ..... ..................... ..... ..... ..... ..... ........... ..... ..... ..... .......... ..... 11
• Calibration... ..... ..... ................ ..... ..... ..... ..... ................ ..... ..... ..... ..... ........... ..... ..... ..... .......... ........ 13
Xerox®VersaLink®C8000W Color Printer
Essential Guide to Successful Printing
5

General Overview
Purpose of this Essential Guide
The Xerox®VersaLink®C8000W Color Printer is not a traditional CMYK printer and uses white toner in
place of black. It is important to read this document to learn how to design successfully with this
printer to achieve your required output.
For more information on how to best use your Xerox
xerox.com/versalinkwhite.
Note: The guidelines in this document are for A4 and Letter media. Adjustments are required
for other media sizes.
®
VersaLink®C8000W Color Printer, visit www.
6
Xerox®VersaLink®C8000W Color Printer
Essential Guide to Successful Printing
General Overview
Principles of Printing in White plus CMY
DDrriivveerr aanndd FFiirrmmwwaarree UUppddaatteess
Xerox is dedicated to providing you with the best possible performance and reliability. To stay current,
download and install updates to the device firmware and client print drivers from www.xerox.com/
office/VLC8000Wsupport.
MMeetthhooddss ooff PPrriinnttiinngg
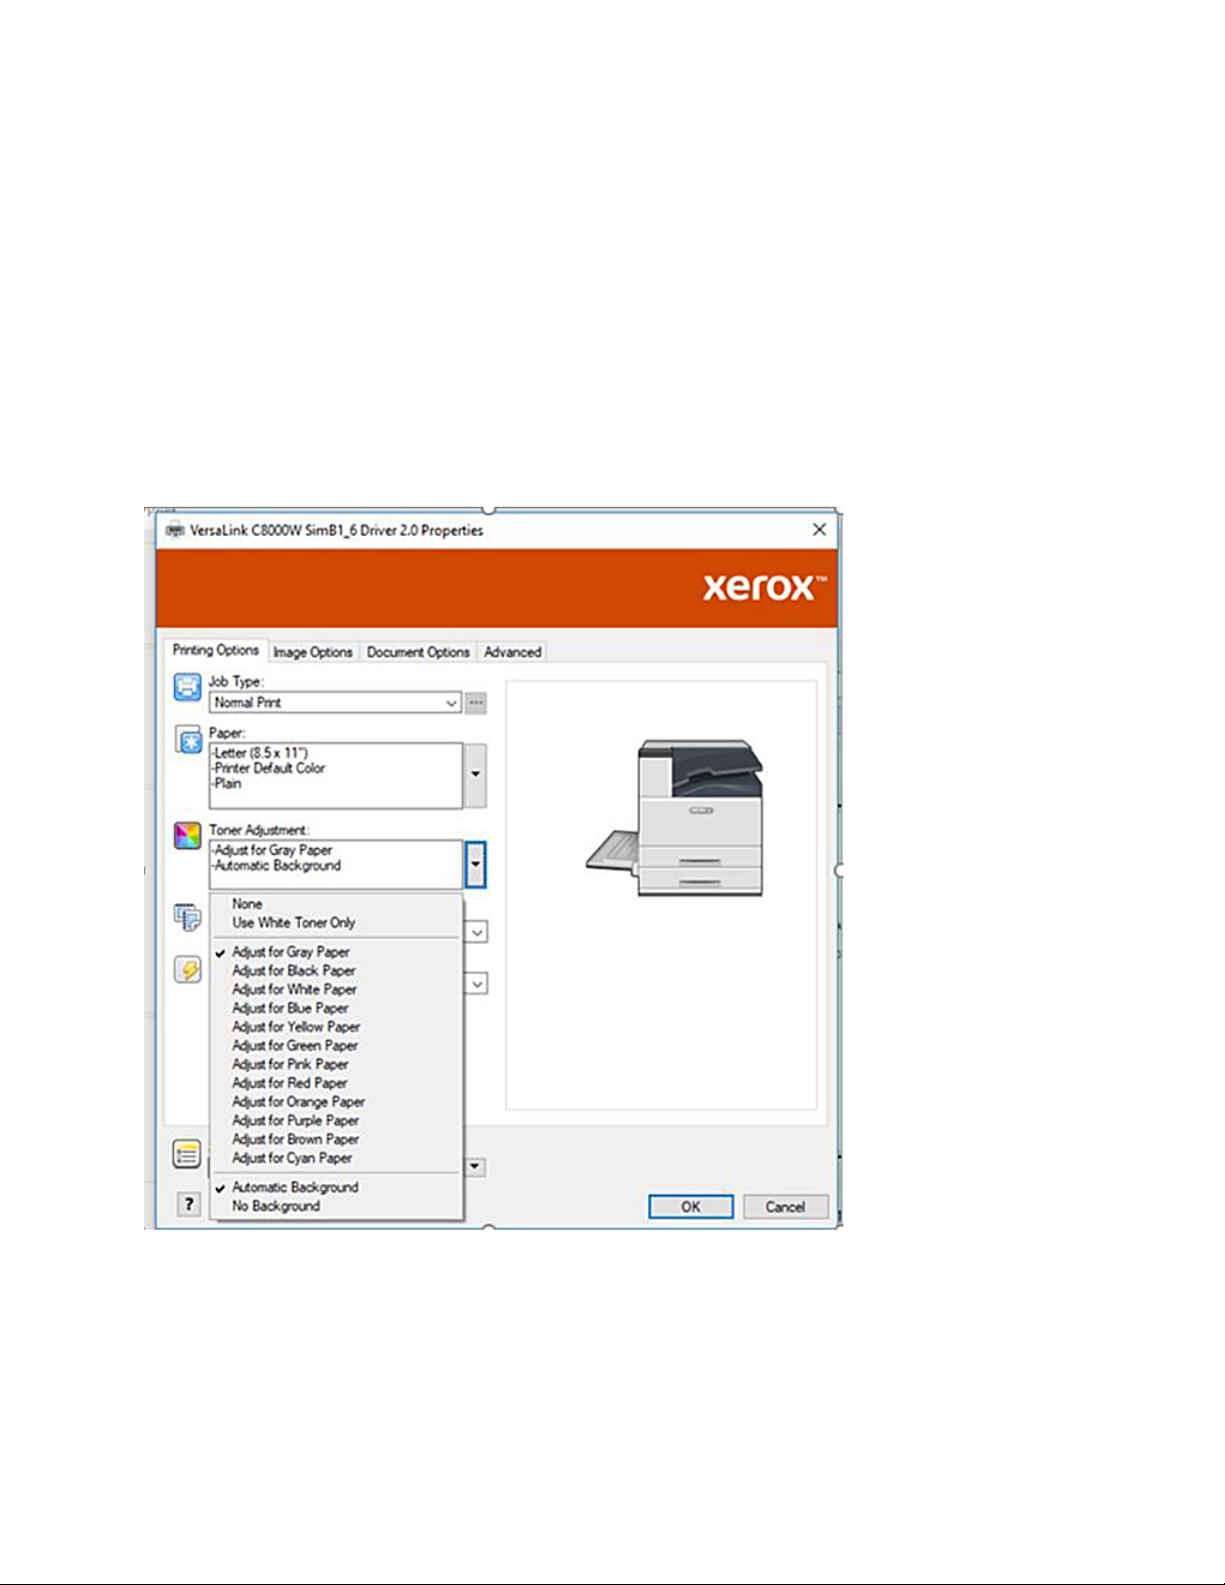
You can select from three different methods of printing on your printer using the Toner Adjustment
options defined in the PostScript print driver as shown.
• None: When you select this option, the printer uses the color tables provided in the device with no
adjustment for media color or white toner. The printer replaces black toner areas with white toner.
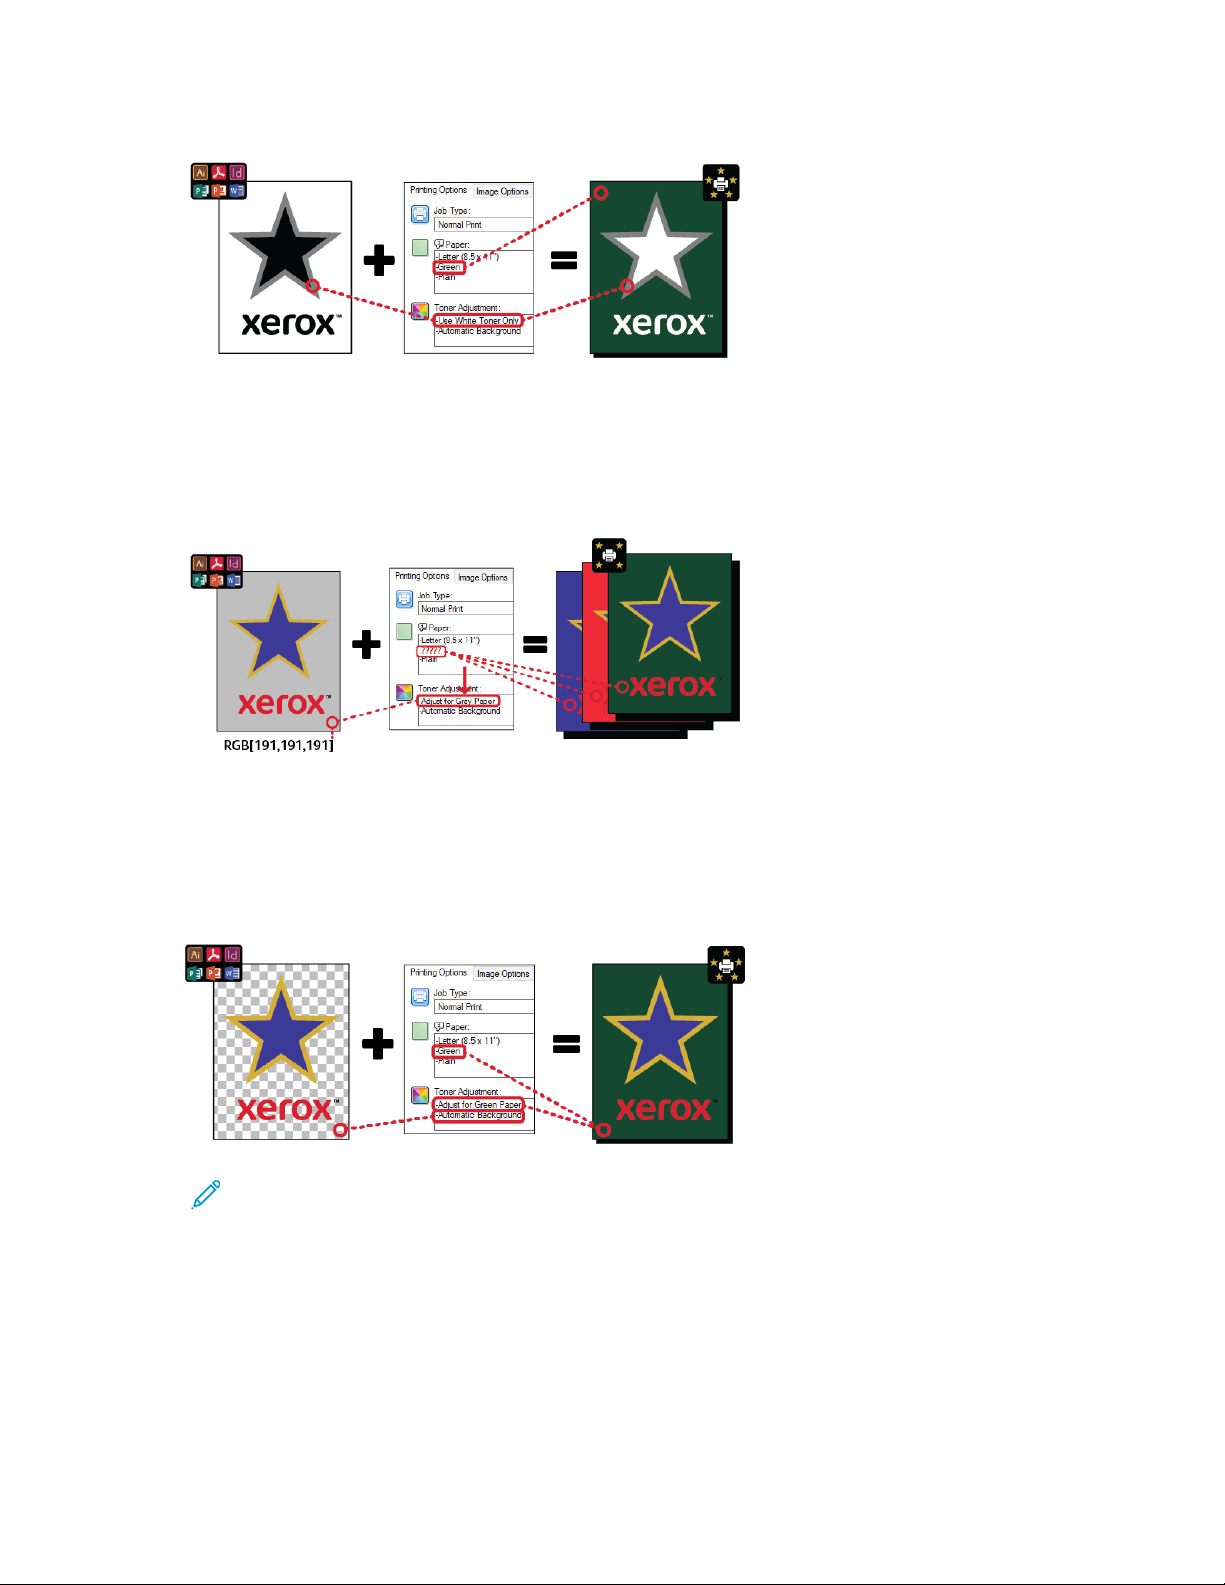
• Use White Toner Only: When you select this option, the printer prints white toner only, in reverse
grayscale. The printer replaces black areas of your document with white toner. White areas of
your document print with no toner, as shown in the following image.
®
Xerox
VersaLink®C8000W Color Printer
Essential Guide to Successful Printing
7
General Overview
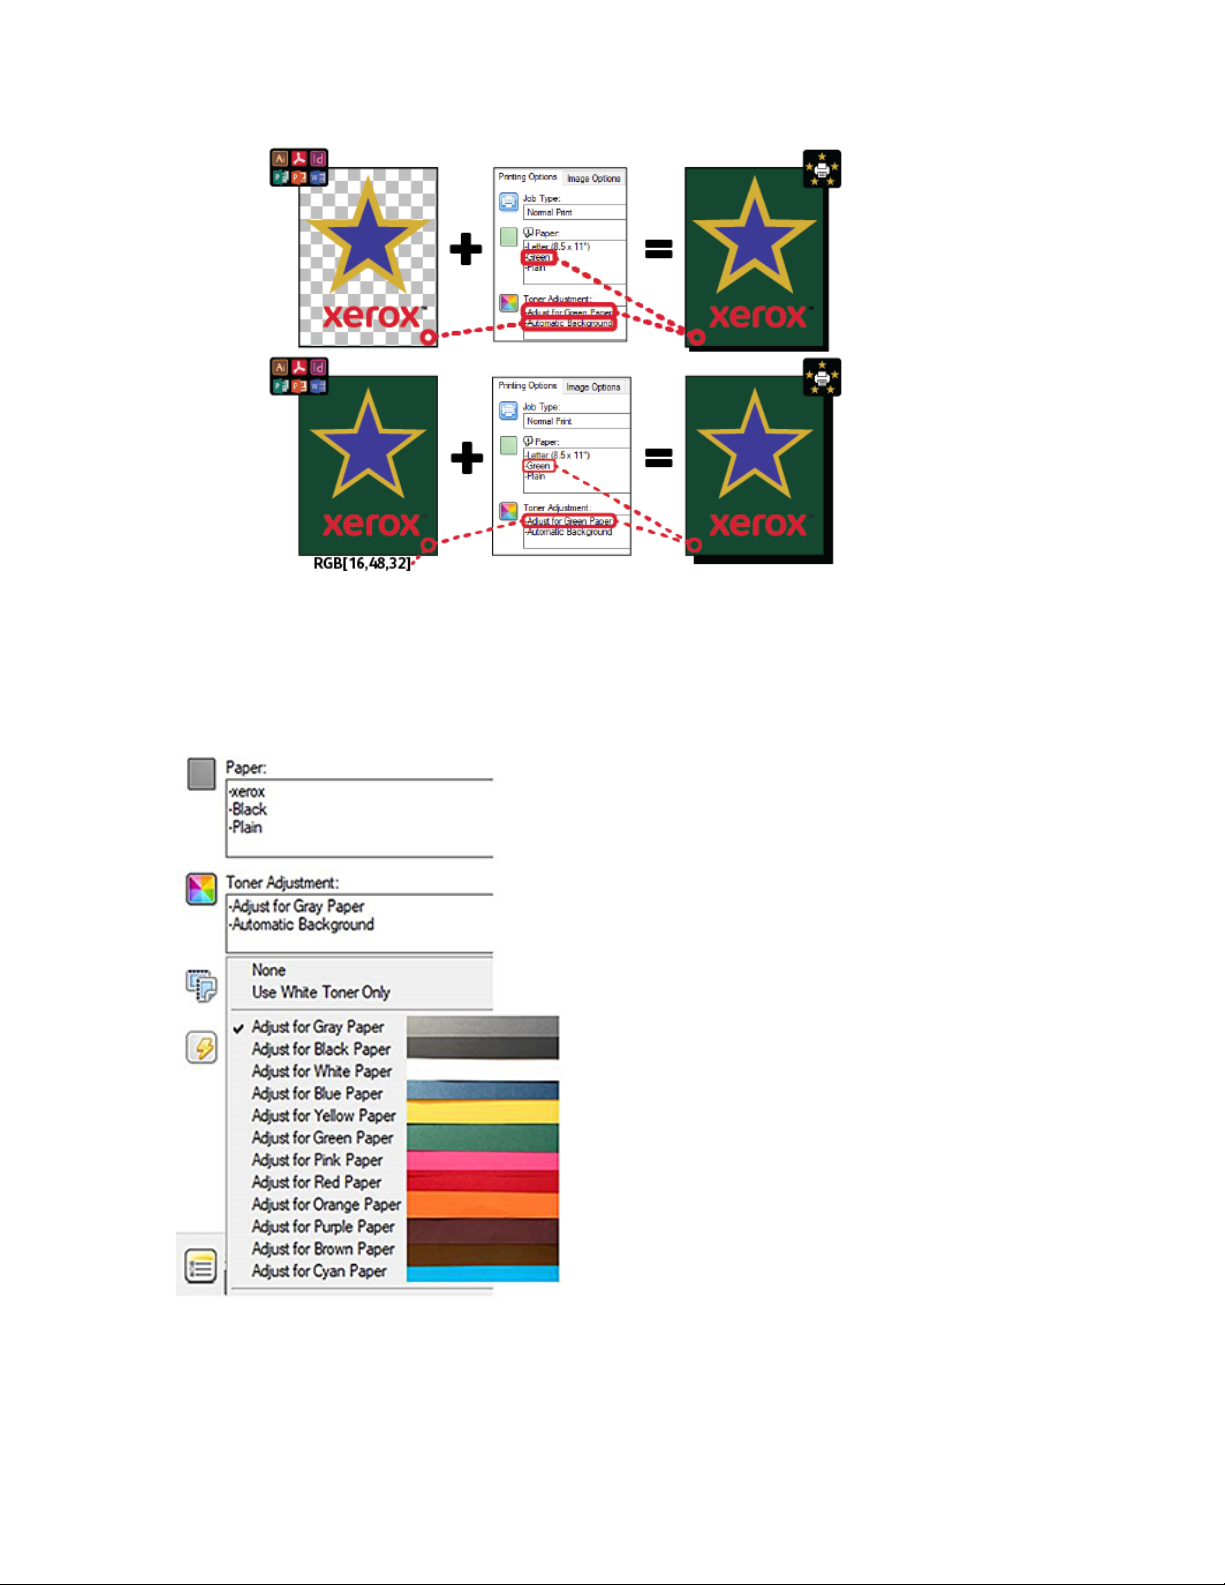
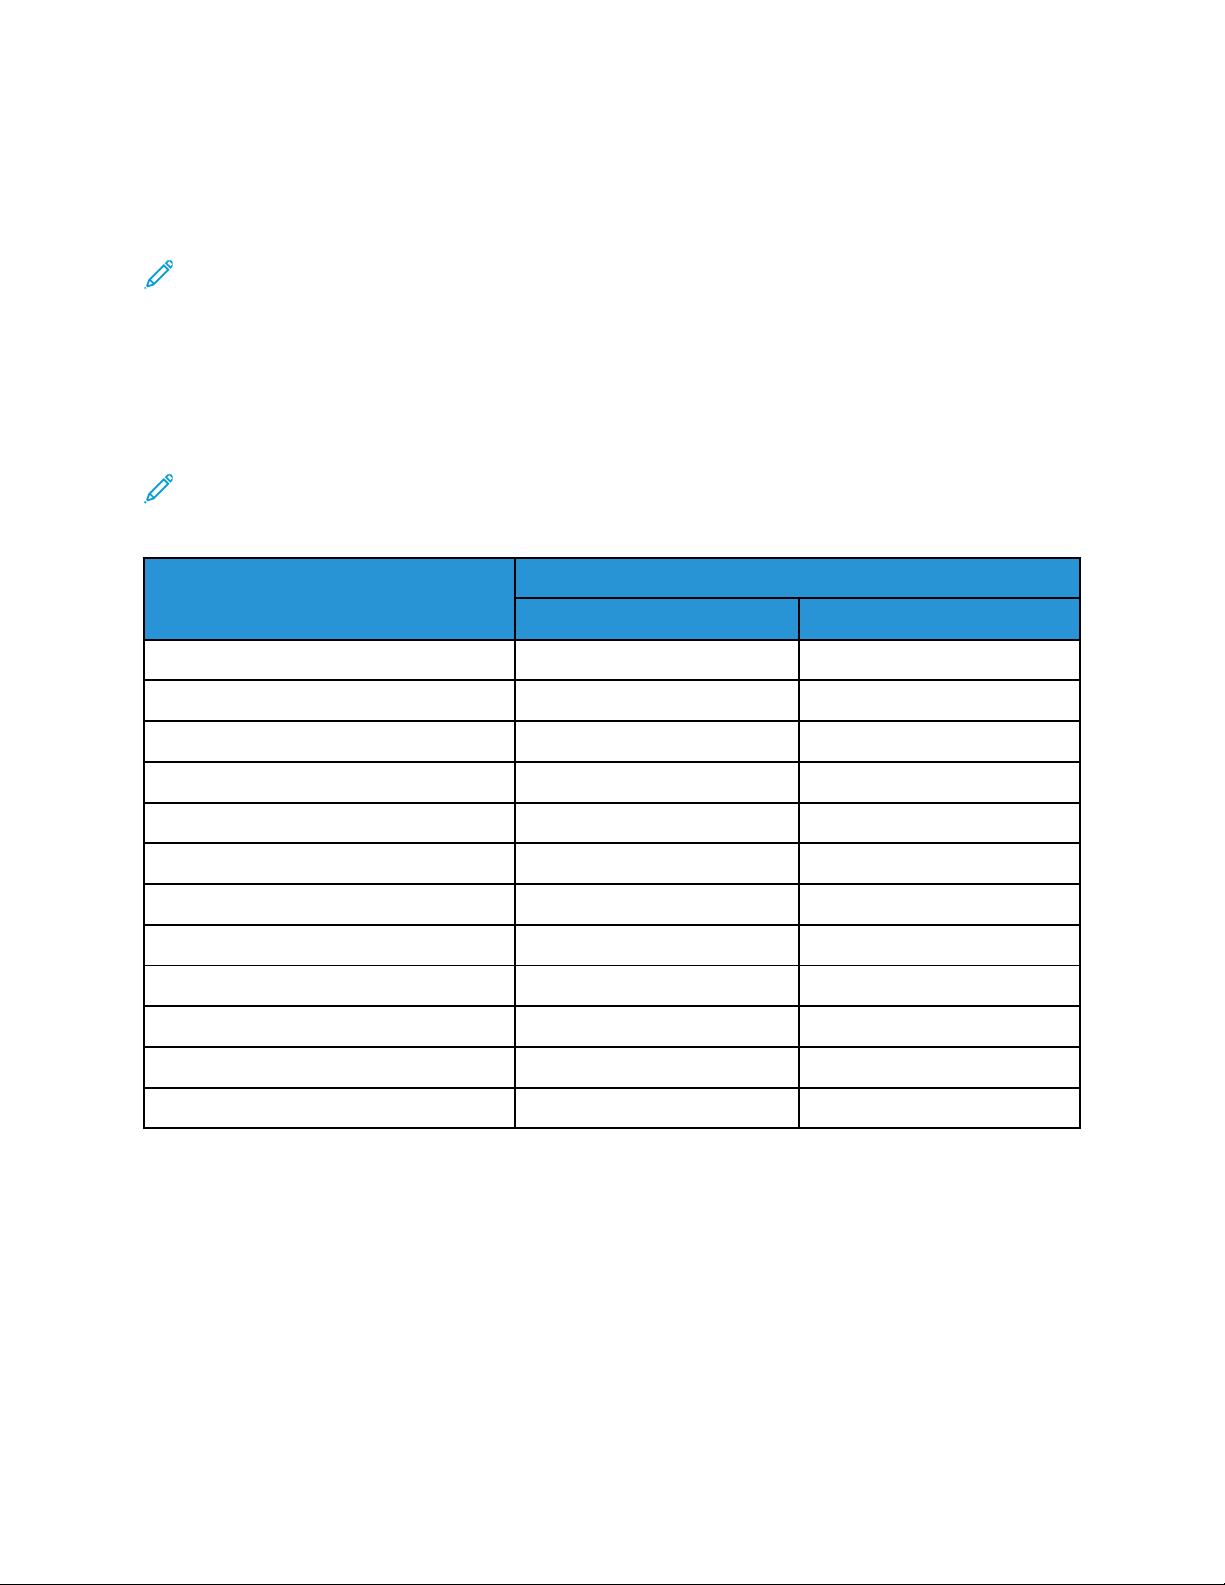
• Adjust for … Paper, where … refers to the paper color: These options use color tables designed
for the Xerox recommended media in these colors. Colors are produced using a blend of white and
CMY on top of a base layer of white toner. Adjust for Gray Paper is the default option and
produces acceptable output on most media types. The following image shows an example of the
output when Adjust for Gray Paper is selected.
The Background Fill feature defines how to treat the background where there are no design elements.
You can select from two options:
• Automatic Background: This option creates a no-toner value background automatically that
corresponds to the paper color that you selected. Where there are no design elements and a
transparent background, the paper is unmarked. This option is selected by default.
Note: For more details about the Automatic Background feature, refer to Known
Issues with the Automatic Background Feature
• No Background Fill: This option disables the Automatic Background feature, allowing advanced
users more freedom of design.
To have more precise control of the design, you can add a no-toner value background manually, as
shown in the following example.
8
Xerox®VersaLink®C8000W Color Printer
Essential Guide to Successful Printing
CCoolloorr MMeeddiiaa OOppttiioonnss
General Overview
The Xerox®VersaLink®C8000W Color Printer has internal color tables that, when used with the
PostScript print driver, allow for printing in vivid color on different color papers. The following image
shows samples of the paper colors, with their associated Toner Adjustment settings in the print driver.
The following table shows the list of paper colors that these color tables were designed for. For best
results, use this color paper or a similar color. For specific colorimetric values of the reference paper
colors, refer to No-Toner Values for Xerox Reference Media. If you are unsure of the paper color that
you plan to use, it is recommended that you select Adjust for Gray Paper, and use the corresponding
®
Xerox
VersaLink®C8000W Color Printer
Essential Guide to Successful Printing
9
General Overview
no-toner values. If you try to print on a paper color that does not match closely the recommended
color, to produce the required output, you can try different color table options. The table lists a CMYK
and RGB value for each color table. These values are the no-toner point for each color table. Where
any vector image is assigned that value in your design, no toner is applied.
Note: To avoid discontinuities in the image where toner is not applied between pixels, bitmap
objects, such as photos, do not have any associated no-toner values.
Vector objects are made up of points, lines, and curves that are based on mathematical equations. If
vector objects contain areas that correspond to the no-toner values for the color table for the media
you are using, there can be areas that do not have toner added to the paper.
Raster objects, such as .jpeg, .png, or.tiff files, are composed of pixels. All parts of these objects are
covered with toner, so if areas have a no-toner value, there are no discontinuities in the image.
Note: The no-toner values in the table can change with each new software release. Ensure that
you are using the latest table for your software release, which you can find at www.xerox.com/
office/VLC8000Wsupport
Toner Adjustment Setting
No-Toner Values
RGB (0–255) CMYK (%)
Adjust for Black Paper 64, 64, 64 0, 0, 0, 100
Adjust for White Paper 255, 255, 255 0, 0, 0, 0
Adjust for Blue Paper 16, 32, 64 70, 50, 5, 70
Adjust for Yellow Paper 255, 255, 128 0, 0, 50, 0
Adjust for Green Paper 16, 48, 32 85, 50, 70, 50
Adjust for Pink Paper 255, 64, 255 0, 50, 0, 0
Adjust for Gray Paper 191, 191, 191 11, 11, 11, 11
Adjust for Red Paper 255, 32, 48* 0, 100, 85, 20*
Adjust for Orange Paper 255, 160, 96 0, 35, 85, 0
Adjust for Purple Paper 79, 63, 79 85, 85, 70, 5
Adjust for Brown Paper 80, 64, 64 50, 50, 50, 35
Adjust for Cyan Paper 86, 255, 255 85, 20, 0, 0
* Use this value for software versions for this printer later than 72.64.01. For software version
72.64.01, use RGB [240,80,112] or CMYK [10,85,50,10].
For more details about media colors and no-toner values, refer to No-Toner Values for Xerox Reference
Media.
10
Xerox®VersaLink®C8000W Color Printer
Essential Guide to Successful Printing

General Overview
General Design Considerations
GGeenneerraall PPrriinnttiinngg TTiippss
• Ensure that the output document size matches the paper size that you are printing on. Any space
on the output document that is not covered in the design can print as white margin space, which
uses a significant amount of white toner.
• When you load media into the trays, ensure that you enter the correct size, color, and weight. This
makes it easier to select media in the print driver.
• In the PostScript print driver, you can select the paper that is loaded in the device. In Acrobat
the advanced sizing option in the PostScript print driver allows you to adjust the size of the output
paper. If you choose this option, ensure that you change the document size in the original file.
• If the output paper size on the printer does not match the size in the application, adjust the paper
size on the printer.
• If possible, use RGB for better overall color reproduction.
• You can assign no-toner areas to vector objects only. Raster objects do not have areas without
toner.
®
,
• Do not use spot or Pantone colors. Use the RGB or CMYK equivalents.
• Design with the expectation of some color shift. White toner is not the same as using white paper.
GGuuiiddeelliinneess ffoorr PPrriinnttiinngg oonn CClleeaarr MMeeddiiaa
• When you print on clear media, follow the guidelines for printing on black media. For information
on printing on black media, refer to the Xerox
available from www.xerox.com/office/VLC8000Wdocs.
• It is recommended that you print on black paper first to check how your design output appears.
• To obtain the best results, in the print driver, for Toner Adjustments, select Adjust for Black
Paper.
• When you are designing your document, try setting the background layer to match the final
location of the output. This option helps you to obtain the most vivid output for your object.
Ensure that you set the background to black again before you print your document.
• When you load clear polyester film into the paper trays, for the best fusing performance, in the
print driver, select Heavyweight Cardstock.
• Be aware of which side of the media you want to print on.
• For more information on clear media, refer to the Xerox
Customer Expectations and Installation Guide provided by your Xerox representative.
®
VersaLink®C8000W Color Printer User Guide
®
VersaLink®C8000W Color Printer
SSeettttiinngg UUpp aa DDooccuummeenntt ttoo PPrriinntt iinn WWhhiittee pplluuss CCMMYYoonn
CCoolloorr MMeeddiiaa
If you want to use the paper as your background, ensure that the Automatic Background setting is
enabled, or add a no-toner value background manually. To add a no-toner value background
manually, set the background color to match the no-toner value for that paper color. When you select
a paper color, set the background of the design to match the no-toner value for the paper color that
®
Xerox
VersaLink®C8000W Color Printer
Essential Guide to Successful Printing
11

General Overview
you are using. You can create background no-toner areas in the design and lock these areas to
prevent inadvertent editing or selection.
Note: Paper colors can vary, and the no-toner values provided are for the Xerox recommended
paper. If your paper is not the Xerox recommended paper, still use the Xerox no-toner color
values, so that no toner is applied to the background area.
When you design your document, if you want to blend colors from colored areas to no-toner areas,
artifacts can appear in the transition from the toner areas to the no-toner areas.
12
Xerox®VersaLink®C8000W Color Printer
Essential Guide to Successful Printing

General Overview
Calibration
WWhhiittee DDeennssiittyy CCaalliibbrraattiioonn
You can adjust the color density to either decrease or increase the amount of toner on your prints.
Increasing the density can result in brighter colors, particularly white. If you notice that your white
prints start to look gray, run the color density adjustment routine. To access this routine, log in to the
printer control panel as an administrator.
Use color calibration to maintain consistent colors. You can adjust the color density, gray balance, or
both. For the best results, adjust the color density, then adjust the gray balance. Because the printer
does not have a black toner cartridge, a pure neutral black cannot be printed. Only composite black
can be printed. For this reason, the gray balance adjustment is not as useful as the white color
calibration adjustment. For example, when your white prints look grayer than required, use the white
color calibration to increase your white toner density. For instructions on using the gray balance
calibration routine, refer to the Xerox
com/office/VLC8000Wdocs.
At the start of each color calibration procedure, three pages are printed:
• An instruction sheet that explains the calibration and evaluation procedures that are used for
both color density calibration pages and the gray balance calibration pages.
®
VersaLink®C8000W Color Printer User Guide at www.xerox.
• An initial Color Reference Page that has color density patches that range from 5 percent to 100
percent. Mark this initial page to identify it from the final Color Reference Page, which is printed
automatically at the completion of your adjustments.
• A calibration page that changes, based on the adjustment procedure. The calibration page is your
primary tool for evaluating when an adjustment is required. To allow you to repeat an adjustment
until the calibration is complete, this page reprints each time you make an adjustment. All colors
on a calibration page reflect the previous adjustments. An adjustment is complete when the
center, or zero, position shows the best available color setting.
With one exception, print color calibration pages on white paper. The white toner adjustment requires
black paper.
TTrraannssffeerr VVoollttaaggee
Use the transfer voltage calibration routine if mottle or other inconsistencies in the white toner areas
are visible in the printed output, or there are other signs of toner adhesion issues. There is an internal
transfer voltage routine that you can access when you are logged in as an administrator. The transfer
voltage routine allows users to adjust the transfer voltage for different media weights.
Use Transfer Voltage Adjustment to specify the bias transfer roller voltage for printing on the selected
paper type. If the printed image is too light, increase the voltage for the paper that you are using. If
the printed image looks mottled or blotchy, decrease the voltage for the paper that you are using.
For more details, refer to the Xerox
office/VLC8000Wdocs.
®
VersaLink®C8000W Color Printer User Guide at www.xerox.com/
®
Xerox
VersaLink®C8000W Color Printer
Essential Guide to Successful Printing
13

General Overview
14
Xerox®VersaLink®C8000W Color Printer
Essential Guide to Successful Printing

2
Printing with Microsoft Applications
This chapter contains:
• Printing RGB Composite Files with Microsoft Applications .... ..... ..... ..... ..... ................ ..... ..... ..... ... 16
• White Star on Blue Paper with an RGB File ..... ..... ..... ........... ..... ..... ..... ..... ..... ........... ..... ..... ..... .... 21
• Green Star on White Paper with an RGB File.......... ........... ..... ..... ..... ..................... ..... ..... ..... ....... 22
• Green and Yellow Star on Blue Paper with an RGB File.............. ..... ..... ..... ..... ........... ..... ..... ..... .... 23
• White and CMY Toners on Clear Media ...... ..... ..... ..... ........... ..... ..... ..... ..... ..... ........... ..... ..... ..... ... 24
Xerox®VersaLink®C8000W Color Printer
Essential Guide to Successful Printing
15

Printing with Microsoft Applications
Printing RGB Composite Files with Microsoft Applications
To use the paper as your background so that the background prints with no toner, ensure that the
Automatic Background setting is enabled, or add a no-toner value background manually using the
following process.
To add a no-toner background manually, you can assign a color to the background. To assign the
color, fill the background with the appropriate no-toner value. For details, refer to the table in Color
Media Options. This option helps to prevent adding toner where you have no design elements.
RReedduucciinngg tthhee VViissiibbiilliittyy ooff MMaarrggiinnss iinn MMiiccrroossoofftt
®®
WWoorrdd DDooccuummeennttss
1. In Microsoft®Word, from the ribbon, select File→Options→Display.
2. For Printing options, ensure that the check box is selected for Print background colors and
images.
16
Xerox®VersaLink®C8000W Color Printer
Essential Guide to Successful Printing

Printing with Microsoft Applications
RReedduucciinngg tthhee VViissiibbiilliittyy ooff MMaarrggiinnss iinn MMiiccrroossoofftt
PPoowweerrPPooiinntt
1. In Microsoft®PowerPoint®, from the ribbon, select Design, then from the Customize area, select
Slide Size→Custom Slide Size….
2. For Width and Height, use the arrows to select the required values, or type the required values.
Note: This example shows values for Letter size documents. If you print on other size
documents, to that ensure the document covers the entire output document area as
needed, add more bleed. Ensure that your design elements do not exceed the page
boundaries, and that only the background exceeds the page boundaries.
®®
®®
Xerox®VersaLink®C8000W Color Printer
Essential Guide to Successful Printing
17

Printing with Microsoft Applications
3. Click OK.
The scaling window appears.
4. Select Maximize.
When you print a document, if you are prompted with a warning about printing outside of the
printable area, select Ignore.
18
Xerox®VersaLink®C8000W Color Printer
Essential Guide to Successful Printing

Printing with Microsoft Applications
RReedduucciinngg tthhee VViissiibbiilliittyy ooff MMaarrggiinnss iinn MMiiccrroossoofftt
®®
PPuubblliisshheerr
1. In the PostScript print driver, select the settings for margins in the print driver as shown.
Xerox®VersaLink®C8000W Color Printer
Essential Guide to Successful Printing
19

Printing with Microsoft Applications
2. Select the toner adjustment settings that you need. The following settings are the default
advanced settings to use.
20
Xerox®VersaLink®C8000W Color Printer
Essential Guide to Successful Printing

Printing with Microsoft Applications
White Star on Blue Paper with an RGB File
When you select Use White Toner Only, the printer prints white toner only, in reverse grayscale.
Note: This option replaces black areas in your document with white toner. White areas of your
document print with no toner.
1. Place a black star in a Microsoft
2. In the PostScript print driver, select the Paper settings and Toner Adjustment options as follows.
Ensure that the tray that contains the blue paper that you are using is selected. For Toner
Adjustment, ensure that Use White Toner Only is selected.
®
Publisher document.
3. Click OK, then click Print.
The black star prints as a bright white star.
®
Xerox
VersaLink®C8000W Color Printer
Essential Guide to Successful Printing
21

Printing with Microsoft Applications
Green Star on White Paper with an RGB File
This example uses cyan, yellow, and magenta to produce the output.
1. Place a star in a Microsoft
for the body of the star.
2. In the PostScript print driver, select the Paper settings and Toner Adjustment options as shown.
Ensure that the tray that contains the white paper that you are using is selected. For Toner
Adjustment, ensure that Adjust for White Paper is selected.
®
Publisher document, then select green fill for the outline and green fill
3. Click OK.
22
Xerox®VersaLink®C8000W Color Printer
Essential Guide to Successful Printing

Printing with Microsoft Applications
Green and Yellow Star on Blue Paper with an RGB File
This example uses a white underlay with cyan and yellow on top.
1. Place a star in a Microsoft
fill for the body of the star.
2. In the Publisher document, set the background of the file to the no-toner value for the media
that you are using. For details, refer to the table in Color Media Options.
To set the background automatically, in the print driver, in addition to the Adjust for Blue Paper
setting, for Toner Adjustment, select Automatic Background.
3. Select the Paper settings and Toner Adjustment options as shown. Ensure that the tray that
contains the blue paper that you are using is selected. For Toner Adjustment, in addition to your
Automatic Background selection, ensure that Adjust for Blue Paper is selected.
®
Publisher document, then select yellow fill for the outline and green
4. Click OK, then click Print.
®
Xerox
VersaLink®C8000W Color Printer
Essential Guide to Successful Printing
23

Printing with Microsoft Applications
White and CMY Toners on Clear Media
These instructions for clear media are for reflective, not transmissive, applications only.
1. Use a black background for your design. Fill the bottom layer with the no-toner value for black, as
defined in the table in Color Media Options.
To set the background automatically, in the Toner Adjustment settings in the print driver, in
addition to the Adjust for Black Paper setting, select Automatic Background.
2. Load the clear media in the bypass tray. In the print driver, for Paper, select the correct size, and
specify Black and Heavyweight Cardstock.
Note: These options produce the best fusing performance.
3. Select the Toner Adjustment options as shown. Ensure that the tray that contains the clear
media that you are using is selected. For Toner Adjustment, in addition to your Automatic
Background selection referred to in step 1, ensure that Adjust for Black Paper is selected.
24
Xerox®VersaLink®C8000W Color Printer
Essential Guide to Successful Printing

3
Printing with Adobe
This chapter contains:
• Guidelines for Printing with Adobe Applications. . ..... ..... ..... ..................... ..... ..... ..... ..... ........... ..... 26
• White Only on Blue Paper with a CMYK File........... ..... ..... ..... ..................... ..... ..... ..... ........... ....... 28
• Green Box on White Paper with a CMYK File ...... ..... ..... ..... ..................... ..... ..... ..... ..... ................ 30
• Green and Yellow Box on Blue Paper with a CMYK File..... ..... ..... ..... ........... ..... ..... ..... .......... ........ 32
• Green and Yellow Box on Blue Paper with an RGB File ..... ..... ..... ..... ................ ..... ..... ..... ..... ........ 34
• White and CMY Toners on Clear Media Using RGB Files . ..... ........... ..... ..... ..... .......... ........... ..... ... 36
• General Tips for Using Adobe Design Products ... ........... .......... ..... ..... ..... ........... ..... ..... ..... ..... ..... 37
®
Applications
Xerox®VersaLink®C8000W Color Printer
Essential Guide to Successful Printing
25

®
Printing with Adobe
Applications
Guidelines for Printing with Adobe Applications
When you print with Adobe applications, refer to the following guidelines:
• To use the media color as the background with no added toner, create a rectangle that is the size
of the output document. Fill the triangle with the no-toner value for the media color toner
adjustment you are using. Assign that layer to the bottom of the design to create the background.
Alternatively, you can set the media color as the background automatically: In the Toner
Adjustment settings in the print driver, in addition to your adjust for colored paper selection, you
can select Automatic Background.
• The PostScript print driver settings that you select vary depending on the type of job you are
printing. The following guidelines are the current recommendations for printing on the Xerox
VersaLink®C8000W Color Printer from various applications, in CMYK and RGB color modes, for
vector and raster images. For documents with mixed content, experiment with the settings to
achieve the required output.
– For raster images, in the Color Management area of the print driver, for Color Handling, select
Let PostScript
®
printer determine colors. When working in Illustrator®, for CMYK images,
select the check box for Preserve CMYK Numbers, and for Rendering Intent, leave as the
default value, which is Relative Colorimetric.
®
– For vector images in CMYK that you print from Illustrator, ensure that the PostScript print
driver settings are the same as for the raster images.
– For raster images in RGB files that you print from Illustrator, in the Color Management area,
for Color Handling, select Let PostScript
®
printer determine colors.
– For vector images in RGB files that you print from Illustrator, in the Color Management area,
for Color Handling, select Let Illustrator determine colors.
26
Xerox®VersaLink®C8000W Color Printer
Essential Guide to Successful Printing

Printing with Adobe®Applications
Xerox®VersaLink®C8000W Color Printer
Essential Guide to Successful Printing
27

®
Printing with Adobe
Applications
White Only on Blue Paper with a CMYK File
1. Open an Illustrator document, then place an image file, such as a .jpeg file, that transitions to
grayscale correctly.
2. In the PostScript print driver, select the Paper settings and Toner Adjustment options as shown.
Ensure that the tray that contains the blue paper that you are using is selected. For Toner
Adjustment, ensure that Use White Toner Only is selected.
28
Xerox®VersaLink®C8000W Color Printer
Essential Guide to Successful Printing

Printing with Adobe®Applications
3. Adjust the Illustrator Color Management settings to allow the PostScript printer to assign colors
and maintain the CMYK values as shown.
Xerox®VersaLink®C8000W Color Printer
Essential Guide to Successful Printing
29

®
Printing with Adobe
Applications
Green Box on White Paper with a CMYK File
This example uses cyan, yellow, and magenta to produce the output.
1. Open an Illustrator document, then place a rectangle. Select Green fill for the body of the box.
To set the background automatically, in the print driver, for Toner Adjustments, select Adjust for
White Paper and Automatic Background.
2. In the PostScript print driver, select the Paper Settings and Toner Adjustment options as shown.
Ensure that the tray that contains the white paper that you are using is selected. For Toner
Adjustment, in addition to your Automatic Background selection referred to in step 1, ensure
that Adjust for White Paper is selected.
30
Xerox®VersaLink®C8000W Color Printer
Essential Guide to Successful Printing

Printing with Adobe®Applications
3. Adjust the Illustrator Color Management settings to allow the PostScript printer to assign colors
and maintain the CMYK values as shown.
Xerox®VersaLink®C8000W Color Printer
Essential Guide to Successful Printing
31

®
Printing with Adobe
Applications
Green and Yellow Box on Blue Paper with a CMYK File
This example uses a white underlay with cyan, magenta, and yellow on top.
1. In an Illustrator document, place a rectangle as the bottom layer on your design. Set the fill color
of the rectangle to the CMYK no-toner value for blue media, as defined in the table in Color
Media Options.
To set the background automatically, in the Toner Adjustment settings in the print driver, in
addition to the Adjust for Blue Paper setting, select Automatic Background.
2. Place another smaller rectangle above the background no-toner rectangle. Set the fill of the
smaller rectangle to be a gradient between green and yellow.
32
Xerox®VersaLink®C8000W Color Printer
Essential Guide to Successful Printing

Printing with Adobe®Applications
3. In the PostScript print driver, select the Paper Settings and Toner Adjustment options as shown.
Ensure that the tray that contains the blue paper that you are using is selected. For Toner
Adjustment, in addition to your Automatic Background selection referred to in step 1, ensure
that Adjust for Blue Paper is selected.
4. Adjust the Illustrator Color Management settings to allow the PostScript printer to assign colors
and maintain the CMYK values as shown.
Xerox®VersaLink®C8000W Color Printer
Essential Guide to Successful Printing
33

®
Printing with Adobe
Applications
Green and Yellow Box on Blue Paper with an RGB File
This example uses a white underlay with cyan, magenta, and yellow on top.
1. In an Illustrator document, place a rectangle as the bottom layer on your design. Set the fill color
of the rectangle to the RGB no-toner value for blue media, as defined in the table in Color Media
Options.
To set the background automatically, in the print driver, in addition to the Adjust for Blue Paper
setting, for Toner Adjustment, select Automatic Background.
2. Place another smaller rectangle above the background no-toner rectangle. Set the fill of the
smaller triangle to be a gradient between green and yellow.
34
Xerox®VersaLink®C8000W Color Printer
Essential Guide to Successful Printing

Printing with Adobe®Applications
3. In the PostScript print driver, select the Paper Settings and Toner Adjustment options as shown.
Ensure that the tray that contains the blue paper that you are using is selected. For Toner
Adjustment, in addition to your Automatic Background selection referred to in step 1, ensure
that Adjust for Blue Paper is selected.
4. In the Illustrator Color Management settings, for Color Handling, select Let Illustrator
determine colors.
Xerox®VersaLink®C8000W Color Printer
Essential Guide to Successful Printing
35

®
Printing with Adobe
Applications
White and CMY Toners on Clear Media Using RGB Files
These instructions for clear media are for reflective, not transmissive, applications only.
1. In an Illustrator document, use a black background for your design. Fill the bottom layer with the
no-toner value for black, as defined in the table in Color Media Options.
To set the background automatically, in the Toner Adjustment settings in the print driver, in
addition to the Adjust for Black Paper setting, select Automatic Background.
2. Load the clear media in the bypass tray. In the print driver, for Paper, select the correct size, and
specify Black and Heavyweight Cardstock.
Note: These options produce the best fusing performance.
3. Select the Toner Adjustment options as shown. Ensure that the tray that contains the clear
media that you are using is selected. For Toner Adjustment, in addition to your Automatic
Background selection referred to in step 1, ensure that Adjust for Black Paper is selected.
4. Adjust the Illustrator Color Management settings. For CMYK files, allow the PostScript printer to
assign colors and maintain the CMYK values. For RGB files, allow Illustrator to determine colors.
For tips on printing on clear media, refer to Guidelines for Printing on Clear Media.
36
Xerox®VersaLink®C8000W Color Printer
Essential Guide to Successful Printing

Printing with Adobe®Applications
General Tips for Using Adobe Design Products
• If you use a drop shadow with InDesign®or Illustrator, a box can appear around the image.
• An unflattened blend can produce unwanted results that can be seen only in the printed output.
• No-toner values are not recognized for rasterized images, such as some gradients, drop shadows,
or vector plus raster blends. As a result, all areas are covered with toner, which prevents
unintended discontinuities in images that have this value.
• When you create a new document in InDesign and Illustrator, you start with a set of default
colors. Print on black paper to verify that the colors match what you expect. If the colors are not
what you expect, you can create your own colors.
• Objects are processed and printed based on the object and layer order in your design.
®
Xerox
VersaLink®C8000W Color Printer
Essential Guide to Successful Printing
37

Printing with Adobe
®
Applications
38
Xerox®VersaLink®C8000W Color Printer
Essential Guide to Successful Printing

A
Xerox Reference Media
This appendix contains:
• No-Toner Values for Xerox Reference Media ..... ..... ................ ..... ..... ..... ..... ........... .......... ..... ..... .. 40
Xerox®VersaLink®C8000W Color Printer
Essential Guide to Successful Printing
39

Xerox Reference Media
No-Toner Values for Xerox Reference Media
Media
Color
Black Mohawk Vellum
White Xerox Bold Adjust for
Blue Carnival Vellum
Yellow Carnival Vellum
Green Carnival Vellum
Pink Mohawk Vellum
Xerox Reference
Media
-6X40-80-320M-LBLACK
iTone Cover- 80-SDeep Blue
Cover- 80-LYellow
iTone Cover- 80-S
- Forest Green
Cover- 80 216 gm
Rhodamine
2
-
Toner
Adjustment
Setting
Adjust for
Black Paper
White Paper
Adjust for
Blue Paper
Adjust for
Yellow Paper
Adjust for
Green Paper
Adjust for
Pink Paper
No-Toner Values Media Colorimetric Values
RGB
CMYK (%)
L* a* b*
(0–255)
64, 64, 64 0, 0, 0, 100 26.168 0.993 -2.243
255, 255,
255
16, 32, 64 70, 50, 5,
255, 255,
128
16, 48, 32 85, 50, 70,5030.758 -13.019 0.859
255, 64,
255
0, 0, 0, 0
25.193 -0.18 -15.047
70
0, 0, 50, 0 81.899 12.33262 63.70108
0, 50, 0, 0 55.385 58.743 -5.491
Gray Strathmore Prem
Wove Text- 80-LSmoke Gray
Red Carnival Vellum
iTone Cover-80-SRed
Orange Mohawk Vellum
Text - 70 L- Warm
Red
Purple Strathmore Prem
Wove Text- 80-LEggplant
Brown Strathmore Prem
Wove Text- 80-LMahogany
Cyan Mohawk Vellum
Cover- 80 -L-Cyan
Adjust for
Gray Paper
Adjust for Red
Paper
Adjust for
Orange Paper
Adjust for
Purple Paper
Adjust for
Brown Paper
Adjust for
Cyan Paper
191, 191,
191
255, 32,
48*
255, 160,
96
79, 63, 79 85, 85, 70,528.007 9.508 -5.494
80, 64, 64 50, 50, 50,3526.684 3.9 4.095
86, 255,
255
11, 11, 11,1163.428 0.346 2.225
0, 100, 85,
20*
0, 35, 85, 0 63.831 51.833 43.899
85, 20, 0, 0 55.261 -18.258 -38.488
35.635 47.642 17.762
* Use this value for software versions for this printer later than 72.64.01. For software version
72.64.01, use RGB [240,80,112] or CMYK [10,85,50,10].
40
Xerox®VersaLink®C8000W Color Printer
Essential Guide to Successful Printing

B
Automatic Background Feature
This appendix contains:
• Known Issues with the Automatic Background Feature.... ..... ........... ..... ..... ..... ..... ................ ..... .. 42
Xerox®VersaLink®C8000W Color Printer
Essential Guide to Successful Printing
41

Automatic Background Feature
Known Issues with the Automatic Background Feature
There are some known issues when you use the Automatic Background feature in the print driver only,
rather than use no-toner values to set the background manually. The following list details the
application and operating system affected, and the solution:
• Acrobat
• Illustrator
• Microsoft
• InDesign
• Microsoft
the background color from White to 100% Transparent.
• Microsoft
– Microsoft
– Mac
®
: Disable PostScript Passthrough on both Mac®and Microsoft®Windows.
®
: No issues.
®
Publisher: No issues.
®
: No issues.
®
Word: In Microsoft®Word for Microsoft®365 and Mac®only, ensure that you change
®
PowerPoint:
®
Windows®: Change the background color from White to 100% Transparent.
®
: The Automatic Background feature does not work with this application. Instead, set a
no-toner value background manually in your document design.
• Other applications: It is likely that the Automatic Background feature does not work as expected
in other applications. In these cases, set a no-toner value background manually in your document
design.
42
Xerox®VersaLink®C8000W Color Printer
Essential Guide to Successful Printing


 Loading...