

Xerox ApeosPort-IV C2275, ApeosPort-IV C3373, ApeosPort-IV C3375, ApeosPort-IV C4475, ApeosPort-IV C5575 Administrator Guide
...Page 1

ApeosPort-IV C5575
DocuCentre-IV C5575
ApeosPort-IV C4475
ApeosPort-IV C3375
ApeosPort-IV C3373
ApeosPort-IV C2275
DocuCentre-IV C4475
DocuCentre-IV C3375
DocuCentre-IV C3373
Administrator Guide
Page 2
Microsoft, Windows, Windows NT, Windows Server, Windows Vista, Internet Explorer, and Microsoft
Network are trademarks or registered trademarks of Microsoft Corporation in the U.S. and other countries.
NetWare is a registered trademark of Novell, Inc. in the United States and other countries.
Adobe, Acrobat, PostScript, and Adobe PostScript 3 are trademarks of Adobe Systems Incorporated.
EtherTalk, Macintosh, and Mac OS are trademarks of Apple, Inc..
PCL, HP-GL, and HP-GL/2 are registered trademarks of Hewlett-Packard Corporation.
ThinPrint is a registered trademark of ThinPrint GmbH in Germany and other countries.
Unicode is a registered trademark of Unicode, Inc..
All product/brand names are trademarks or registered trademarks of the respective holders.
Microsoft product screen shot(s) reprinted with permission from Microsoft Corporation.
For information on license, refer to About License.
In this manual, safety instructions are preceded by the symbol .
Always read and follow the instructions before performing the required procedures.
The data saved in the hard disk of the machine may be lost if there is any problem in the hard disk.
Fuji Xerox is not responsible for any direct and indirect damages arising from or caused by such data
loss.
Fuji Xerox is not responsible for any breakdown of machines due to infection of computer virus or
computer hacking.
Important
1. This manual is copyrighted with all rights reserved. Under the copyright laws, this manual may not
be copied or modified in whole or part, without the written consent of the publisher.
2. Parts of this manual are subject to change without prior notice.
3. We welcome any comments on ambiguities, errors, omissions, or missing pages.
4. Never attempt any procedure on the machine that is not specifically described in this manual.
Unauthorized operation can cause faults or accidents. Fuji Xerox is not liable for any problems
resulting from unauthorized operation of the equipment.
An export of this product is strictly controlled in accordance with Laws concerning Foreign
Exchange and Foreign Trade of Japan and/or the export control regulations of the United States.
XEROX, the sphere of connectivity design, PDF Bridge, ContentsBridge, Smart WelcomEyes, ApeosWare,
CentreWare, and DocuShare are trademarks or registered trademarks of Xerox Corporation in the U.S. or Fuji
Xerox Co., Ltd.
DocuWorks is a trademark of Fuji Xerox Co., Ltd.
Page 3

Table of Contents
Table of Contents.................................................................................................................................................3
1 Before Using the Machine...................................................................................................................15
Preface ...................................................................................................................................................................16
Types of Manuals...............................................................................................................................................17
Using This Guide................................................................................................................................................18
Organization of This Guide......................................................................................................................18
Conventions................................................................................................................................................... 19
Interface Cables.................................................................................................................................................21
Using the USB Interface...........................................................................................................................21
Using the Ethernet Interface..................................................................................................................22
Energy Saver Mode...........................................................................................................................................23
Changing the Interval for Entering Energy Saver Mode.............................................................24
Completely Disabling Smart WelcomEyes ........................................................................................26
Customizing the Control Panel.....................................................................................................................27
Changing the Screen Default .................................................................................................................27
Setting the Screen After Auto Clear..................................................................................................... 28
Customizing the Button Layout.............................................................................................................29
Assigning Services to the Custom Buttons........................................................................................33
Adjusting Screen Brightness....................................................................................................................35
Changing the Feature Screen.................................................................................................................35
Table of Contents
Entering Text....................................................................................................................................................... 36
2 Paper and Other Media ........................................................................................................................37
Paper Types.......................................................................................................................................................... 38
Loadable Quantity and Weight for Supported Paper...................................................................38
Supported Paper Type...............................................................................................................................39
Loading Paper .....................................................................................................................................................50
Loading Paper in Trays 1 to 4.................................................................................................................50
Loading Paper in Tray 3 (When Tandem Tray Module is Installed).......................................51
Loading Paper in Tray 4 (When Tandem Tray Module is Installed).......................................52
Loading Paper in Tray 5............................................................................................................................52
Loading Paper in Tray 6 (HCF B1) ........................................................................................................53
Changing the Paper Size.................................................................................................................................55
Changing the Paper Size for Trays 1 to 4.......................................................................................... 55
Changing the Paper Size for Tray 3 (When Tandem Tray Module is Installed)................56
Changing the Paper Size for Tray 4 (When Tandem Tray Module is Installed)................57
Changing the Paper Size for Tray 6 (HCF B1)..................................................................................58
Changing the Paper Settings........................................................................................................................60
3 Maintenance ............................................................................................................................................63
Replacing Consumables..................................................................................................................................64
Replacing Toner Cartridges .....................................................................................................................66
Replacing Waste Toner Container (R5).............................................................................................. 68
3
Page 4

Replacing Drum Cartridges R1, R2, R3, or R4
(for Customers Having a Spot Maintenance Contract)............................................................... 71
Replacing Staple Cartridge (for Finisher-A1) ................................................................................... 75
Replacing Staple Cartridge (for Finisher-B1) ................................................................................... 76
Replacing Staple Cartridge (for Finisher-C1 or Finisher-C1 with Booklet Maker) ............. 78
Replacing Staple Cartridge (for Booklet Maker Unit for Finisher-B1).................................... 79
Replacing Staple Cartridge (for Finisher-C1 with Booklet Maker)........................................... 80
Emptying the Hole Punch Waste Container (for Finisher-B1)................................................... 82
Emptying the Hole Punch Waste Container
(for Finisher-C1 or Finisher-C1 with Booklet Maker) .....................................................................83
Replacing Stamp (for Duplex Automatic Document Feeder B1-C) ........................................ 84
Replacing Stamp (for Duplex Automatic Document Feeder B1-PC)......................................85
Cleaning the Machine...................................................................................................................................... 87
Cleaning the Exterior................................................................................................................................. 87
Cleaning the Interior (LED Printheads)..............................................................................................87
Cleaning the Touch Screen ..................................................................................................................... 89
Cleaning Document Cover and Document Glass
(for Duplex Automatic Document Feeder B1-C) ............................................................................ 89
Cleaning Document Cover and Document Glass
(for Duplex Automatic Document Feeder B1-PC).......................................................................... 90
Cleaning Film and Constant Velocity Transport Glass
(for Duplex Automatic Document Feeder B1-C) ............................................................................ 91
Cleaning Film and Constant Velocity Transport Glass
(for Duplex Automatic Document Feeder B1-PC).......................................................................... 91
Cleaning Document Feeder Rollers...................................................................................................... 93
Executing Calibration....................................................................................................................................... 94
Executing 2 Sided Color Scanning Calibration ...................................................................................... 98
Printing a Report/List .....................................................................................................................................100
Deleting a Private Charge Print Job with an Invalid User ID.........................................................101
Setting Restore Tool.......................................................................................................................................102
4 Machine Status.....................................................................................................................................103
Overview of Machine Status .......................................................................................................................104
Machine Information ....................................................................................................................................105
General Information................................................................................................................................105
Paper Tray Status......................................................................................................................................106
Print Reports................................................................................................................................................106
Automatically Printed Reports/Lists ..................................................................................................115
Overwrite Hard Disk..................................................................................................................................116
Print Mode....................................................................................................................................................116
Fax Receiving Mode.................................................................................................................................119
Faults....................................................................................................................................................................120
Supplies................................................................................................................................................................121
Billing Information..........................................................................................................................................122
Billing Information...................................................................................................................................122
User Account Billing Information.......................................................................................................123
4
Page 5

Table of Contents
5 Tools......................................................................................................................................................... 125
System Settings Procedure......................................................................................................................... 126
Step 1 Entering System Administration Mode............................................................................. 126
Step 2 Entering the System Administrator User ID and Passcode....................................... 126
Step 3 Selecting [Tools] ......................................................................................................................... 127
Step 4 Selecting a Setting Item on the [Tools] Screen ............................................................. 127
Step 5 Setting a Feature........................................................................................................................ 129
Step 6 Exiting System Administration Mode ................................................................................ 129
Tools Menu List................................................................................................................................................ 130
Common Service Settings............................................................................................................................ 144
Machine Clock/Timers ............................................................................................................................ 144
Energy Saver Settings............................................................................................................................. 147
Audio Tones................................................................................................................................................ 148
Screen/Button Settings .......................................................................................................................... 149
Paper Tray Settings ................................................................................................................................. 152
Image Quality Adjustment................................................................................................................... 156
Reports..........................................................................................................................................................158
Maintenance .............................................................................................................................................. 159
Watermark .................................................................................................................................................. 161
Secure Watermark.................................................................................................................................... 163
Force Annotation...................................................................................................................................... 166
Print Universal Unique ID (ApeosPort Series Models Only) .................................................... 167
Image Log Control (ApeosPort Series Models Only).................................................................. 168
Notify Job Completion by E-mail ....................................................................................................... 170
Other Settings............................................................................................................................................ 170
Copy Service Settings.................................................................................................................................... 186
Copy Tab - Features Allocation........................................................................................................... 186
Preset Buttons............................................................................................................................................187
Copy Defaults ............................................................................................................................................ 187
Copy Control............................................................................................................................................... 192
Original Size Defaults.............................................................................................................................. 194
Reduce/Enlarge Presets.......................................................................................................................... 195
Custom Colors............................................................................................................................................ 195
Annotations - Create Comments ....................................................................................................... 195
Connectivity & Network Setup..................................................................................................................196
Port Settings............................................................................................................................................... 196
Protocol Settings....................................................................................................................................... 201
Machine's E-mail Address/Host Name ............................................................................................ 204
Proxy Server Settings (ApeosPort Series Models Only) .............................................................205
EP Proxy Server Setup............................................................................................................................. 206
SIP Settings................................................................................................................................................. 207
T.38 Settings............................................................................................................................................... 210
Outgoing/Incoming E-mail Settings.................................................................................................210
Remote Authentication/Directory Service...................................................................................... 212
Security Settings....................................................................................................................................... 217
Other Settings............................................................................................................................................ 222
Print Service Settings..................................................................................................................................... 223
Allocate Memory....................................................................................................................................... 223
5
Page 6

Delete Form.................................................................................................................................................225
Other Settings.............................................................................................................................................225
Scan Service Settings .....................................................................................................................................230
Screen Defaults..........................................................................................................................................230
Scan Defaults..............................................................................................................................................231
Scan to PC Defaults..................................................................................................................................233
Original Size Defaults..............................................................................................................................234
Output Size Defaults................................................................................................................................234
Reduce/Enlarge Presets ..........................................................................................................................235
Other Settings.............................................................................................................................................235
Fax Service Settings........................................................................................................................................238
Screen Defaults..........................................................................................................................................238
Fax Defaults ................................................................................................................................................239
Fax Control...................................................................................................................................................240
Fax Received Options ..............................................................................................................................245
Reduce/Enlarge Presets ..........................................................................................................................246
Original Size Defaults..............................................................................................................................246
Local Terminal Information..................................................................................................................246
Internet Fax Control.................................................................................................................................248
E-mail/Internet Fax Service Settings .......................................................................................................251
E-mail Control.............................................................................................................................................251
Address Book Settings ...................................................................................................................................254
Folder Service Settings ..................................................................................................................................255
Job Flow Service Settings (ApeosPort Series Models Only)............................................................256
Media Print Service Settings .......................................................................................................................257
Stored File Settings.........................................................................................................................................258
Web Applications Service Setup (ApeosPort Series Models Only)...............................................260
Server Certificate Verification Settings............................................................................................260
Server Setup ................................................................................................................................................262
Other Settings.............................................................................................................................................263
Web Browser Setup.........................................................................................................................................264
Setup.....................................................................................................................................................................266
Create Folder...............................................................................................................................................266
Stored Programming................................................................................................................................268
Create Job Flow Sheet.............................................................................................................................268
Create Job Flow Sheet Keyword..........................................................................................................277
Add Address Book Entry.........................................................................................................................277
Create Fax Group Recipients................................................................................................................284
Add Fax Comment....................................................................................................................................285
Paper Tray Attributes ..............................................................................................................................285
Accounting .........................................................................................................................................................286
Create/View User Accounts...................................................................................................................286
View Accounts ............................................................................................................................................289
Reset User Accounts.................................................................................................................................290
System Administrator's Meter (Copy Jobs)....................................................................................291
Accounting Type........................................................................................................................................291
6
Page 7

Table of Contents
Accounting Login Screen Settings..................................................................................................... 292
Fax Billing Data ......................................................................................................................................... 293
Accounting/Billing Device Settings ................................................................................................... 293
Authentication/Security Settings.............................................................................................................296
System Administrator Settings ...........................................................................................................296
Authentication........................................................................................................................................... 297
Allow User to Disable Active Settings............................................................................................... 305
Job Status Default.................................................................................................................................... 305
Overwrite Hard Disk................................................................................................................................. 306
6 CentreWare Internet Services Settings....................................................................................... 309
Installation of CentreWare Internet Services..................................................................................... 310
Preparations................................................................................................................................................ 310
Configuration on the Machine............................................................................................................ 311
Starting CentreWare Internet Services.................................................................................................. 312
Configuring Machine Settings Using CentreWare Internet Services......................................... 313
7 Printer Environment Settings.......................................................................................................... 317
Print Overview..................................................................................................................................................318
Installation When Using USB Port........................................................................................................... 321
Step 1 Preparations ................................................................................................................................. 321
Step 2 Configuration on the Machine ............................................................................................. 321
Step 3 Configuration on the Computer........................................................................................... 322
CentreWare Internet Services Setting Items................................................................................ 322
Installation When Using TCP/IP (LPD/Port 9100)............................................................................. 323
Step 1 Preparations ................................................................................................................................. 323
Step 2 Configuration on the Machine ............................................................................................. 323
Step 3 Configuration on the Computer........................................................................................... 324
CentreWare Internet Services Setting Items................................................................................ 324
Installation When Using NetWare .......................................................................................................... 326
Step 1 Preparations ................................................................................................................................. 326
Step 2 Configuration on the Machine ............................................................................................. 326
Step 3 Configuration on the Computer........................................................................................... 327
CentreWare Internet Services Setting Items................................................................................ 328
Installation When Using Microsoft Network (SMB)......................................................................... 329
Step 1 Preparations ................................................................................................................................. 329
Step 2 Configuration on the Machine ............................................................................................. 329
Step 3 Configuration on the Computer........................................................................................... 330
CentreWare Internet Services Setting Items................................................................................ 330
Installation When Using Internet Printing Protocol (IPP).............................................................. 331
Step 1 Preparations ................................................................................................................................. 331
Step 2 Configuration on the Machine ............................................................................................. 331
Step 3 Configuration on the Computer........................................................................................... 332
CentreWare Internet Services Setting Items................................................................................ 332
Installation When Using EtherTalk ......................................................................................................... 333
Step 1 Preparations ................................................................................................................................. 333
Step 2 Configuration on the Machine ............................................................................................333
7
Page 8

Step 3 Configuration on the Computer ...........................................................................................334
CentreWare Internet Services Setting Items.................................................................................334
8 E-mail Environment Settings............................................................................................................335
E-mail Overview................................................................................................................................................336
Preparations.......................................................................................................................................................337
Installation Procedures .................................................................................................................................339
Step 1 Enabling Port and Setting up TCP/IP..................................................................................339
Step 2 Configuring E-mail Environment ..........................................................................................340
CentreWare Internet Services Setting Items.................................................................................341
9 Scanner Environment Settings........................................................................................................343
Scan Service Overview ...................................................................................................................................344
Configuration of Store to Folder ...............................................................................................................346
Step 1 Enabling Port and Setting up TCP/IP..................................................................................346
Step 2 Registering a Folder...................................................................................................................347
Step 3 Configuring a Computer..........................................................................................................347
Configuration of Scan to PC .......................................................................................................................348
Step 1 Preparations..................................................................................................................................348
Step 2 Enabling Port and Setting up TCP/IP..................................................................................349
Step 3 Configuration on the Computer ...........................................................................................350
Configuration of Store to USB...................................................................................................................351
Step 1 Available USB Memory Devices ............................................................................................351
Step 2 CentreWare Internet Services Setting Items...................................................................351
Configuration of Network Scanning (Job Template Scanning)....................................................352
Step 1 Preparations..................................................................................................................................352
Step 2 Enabling Ports and Setting up TCP/IP................................................................................352
Step 3 Configuring the SNMP Port.....................................................................................................353
Step 4 Configuration on the Computer ...........................................................................................353
Configuration of Scan to Home (ApeosPort Series Models Only)................................................354
Step 1 Preparations..................................................................................................................................354
Step 2 Enabling SMB Port and Setting up TCP/IP .......................................................................354
Step 3 Configuring Remote Authentication...................................................................................355
Step 4 Configuring Scan to Home......................................................................................................356
Step 5 Configuration on the Computer ...........................................................................................357
Configuration of Job Flow Sheets.............................................................................................................358
Step 1 Enabling Ports and Setting up TCP/IP................................................................................358
Step 2 Configuring the SNMP Port.....................................................................................................359
Step 3 Configuration on the Computer ...........................................................................................359
Configuration of Store & Send Link .........................................................................................................360
Step 1 Configuring E-mail......................................................................................................................360
Step 2 Enabling Authentication ..........................................................................................................360
Step 3 Other Settings ..............................................................................................................................360
Step 4 CentreWare Internet Services Setting Items...................................................................361
Configuration of Store to WSD..................................................................................................................362
Step 1 Preparations..................................................................................................................................362
Step 2 Enabling Port ................................................................................................................................362
8
Page 9

Table of Contents
Step 3 Confirmation on the Computer............................................................................................ 363
10 Using IP Fax (SIP) ............................................................................................................................... 365
IP Fax (SIP) Overview.................................................................................................................................... 366
Preparations...................................................................................................................................................... 367
System Requirements for the Machine ........................................................................................... 367
Settings by System Configuration..................................................................................................... 367
Installation Procedures................................................................................................................................. 368
Step 1 Enabling Port and Setting up TCP/IP ................................................................................. 368
Step 2 Configuring the SIP User Name...........................................................................................369
Step 3 Configuring Fax Environment............................................................................................... 369
Step 4 Configuring the SIP Server..................................................................................................... 370
Step 5 Registering the VoIP Gateway.............................................................................................. 371
11 Using the Internet Fax Service....................................................................................................... 373
Internet Fax Overview ................................................................................................................................. 374
Preparations...................................................................................................................................................... 374
System Requirements for the Machine ........................................................................................... 374
E-Mail Environment................................................................................................................................. 375
Installation Procedures................................................................................................................................. 376
Step 1 Enabling Port and Setting up TCP/IP ................................................................................. 376
Step 2 Configuring E-mail Environment.......................................................................................... 377
Step 3 Testing the Internet Fax.......................................................................................................... 378
12 Using the Server Fax Service........................................................................................................... 379
Server Fax Overview ...................................................................................................................................... 380
Preparations...................................................................................................................................................... 380
System Requirements for the Machine ........................................................................................... 380
Installation Procedure................................................................................................................................... 381
Installation Overview..............................................................................................................................381
Step 1 Fax Settings.................................................................................................................................. 381
Step 2 Setting the Server Fax Feature ............................................................................................. 382
13 Encryption and Digital Signature Settings................................................................................. 385
Encryption and Digital Signature Overview.........................................................................................386
Types of Certificate................................................................................................................................. 386
Encryption Features for Communication........................................................................................ 386
Encryption and Digital-Signature Features for Scan Files....................................................... 387
Configuration of HTTP Communications Encryption ...................................................................... 388
Installation Overview..............................................................................................................................388
Step1 Configuration on the Machine............................................................................................... 388
Step2 Configuration on the Computer............................................................................................ 389
Configuration of Encryption using IPSec.............................................................................................. 390
Installation Overview..............................................................................................................................390
Step1 Import and Configuration of a Certificate .......................................................................390
Step2 Configuration on the Machine (Configuration of IPSec)............................................ 391
Step3 Configuration on the Computer............................................................................................ 392
Configuration of E-mail Encryption/Digital Signature..................................................................... 393
9
Page 10

Installation Overview...............................................................................................................................393
Step1 Configuration on the Machine ...............................................................................................393
Step2 Configuration on Sender and Recipient .............................................................................395
Configuration of PDF/DocuWorks/XPS Signature (ApeosPort Series Models Only).............397
Installation Overview...............................................................................................................................397
Step1 Configuration on the Machine ...............................................................................................398
Step2 Configuration on the Computer.............................................................................................399
14 Authentication and Accounting Features...................................................................................401
Overview of Authentication and Accounting Feature......................................................................402
Overview of Authentication Feature.................................................................................................402
Overview of Accounting Feature.........................................................................................................403
Authentication..................................................................................................................................................404
User Types Managed by Authentication Feature........................................................................404
User Roles and Authorization Groups ...............................................................................................404
Types of Authentication.........................................................................................................................406
Types of Account Administration.......................................................................................................407
Authentication and Accounting Relationship ...............................................................................408
Services Controlled by Authentication....................................................................................................409
Overview .......................................................................................................................................................409
Services Restricted by User ID Authentication..............................................................................409
Services Restricted by the Combined Use of Smart Card Authentication and
User ID Authentication...........................................................................................................................412
Authentication for Job Flow Sheets and Folders................................................................................415
Overview .......................................................................................................................................................415
When the Authentication Feature is Disabled..............................................................................417
When the Authentication Feature is Enabled ...............................................................................420
Jobs Manageable by Account Administration.....................................................................................424
Configuration for Authentication.............................................................................................................427
Installation Overview...............................................................................................................................427
Enabling Authentication ........................................................................................................................427
Changing the Default Authorization Group Settings.................................................................430
Creating an Authorization Group .......................................................................................................430
Configuration for IC Card Reader (Optional).......................................................................................432
Step 1 Preparations..................................................................................................................................432
Step 2 Logout Method Using the Smart Card...............................................................................432
Step 3 Registering Smart Card Information..................................................................................433
Configuration for Account Administration ...........................................................................................434
Step 1 Selecting an Accounting Type...............................................................................................434
Step 2 Registering User Information ................................................................................................434
User Authentication Operations................................................................................................................436
Authenticating Login Users...................................................................................................................436
Changing Passcode ..................................................................................................................................437
10
15 Problem Solving....................................................................................................................................439
Troubleshooting...............................................................................................................................................440
Machine Trouble..............................................................................................................................................441
Page 11

Table of Contents
Image Quality Trouble .................................................................................................................................446
Trouble during Copying................................................................................................................................452
Unable to Copy.......................................................................................................................................... 452
The Copy Result is Not What was Expected..................................................................................453
Trouble during Printing................................................................................................................................. 456
Unable to Print ..........................................................................................................................................456
The Print Result is Not What was Expected................................................................................... 457
Trouble during Faxing...................................................................................................................................459
Sending Problems..................................................................................................................................... 459
Receiving Problems.................................................................................................................................. 463
Trouble during Scanning..............................................................................................................................467
Unable to Scan with the Machine ..................................................................................................... 467
Unable to Import Scanned Documents to the Computer ....................................................... 468
Unable to Send a Scanned Document over the Network (FTP/SMB) ................................. 469
Unable to Send E-mail............................................................................................................................ 470
The Image is not What was Expected ............................................................................................. 470
Network-related Problems...........................................................................................................................472
When using SMB....................................................................................................................................... 472
When using NetWare.............................................................................................................................. 474
When using TCP/IP.................................................................................................................................. 478
When using EtherTalk............................................................................................................................. 479
CentreWare Internet Services Problems ......................................................................................... 480
E-mail Features Problems...................................................................................................................... 481
Internet/Intranet Connection Problems.........................................................................................482
IPv4 and IPv6 Connection Problems ................................................................................................ 483
Media Print - Text Trouble........................................................................................................................... 486
Media Print - Photos Trouble...................................................................................................................... 487
Error Code .......................................................................................................................................................... 488
Other Errors................................................................................................................................................. 571
Paper Jams ........................................................................................................................................................ 572
Paper Jams in Top Left Cover A.......................................................................................................... 573
Paper Jams in Bottom Left Cover C ..................................................................................................574
Paper Jams in Top Left Cover D.......................................................................................................... 575
Paper Jams in Trays 1 to 4....................................................................................................................576
Paper Jams in Tray 3 (When Tandem Tray Module is Installed).......................................... 576
Paper Jams in Tray 4 (When Tandem Tray Module is Installed).......................................... 577
Paper Jams in Tray 5...............................................................................................................................577
Paper Jams in Tray 6 (HCF B1) ...........................................................................................................578
Paper Jams in Duplex Module B......................................................................................................... 580
Paper Jams in Finisher-A1..................................................................................................................... 580
Paper Jams in Finisher-B1..................................................................................................................... 581
Paper Jams in Finisher-C1 / Finisher-C1 with Booklet Maker.................................................. 582
Document Jams............................................................................................................................................... 591
Duplex Automatic Document Feeder B1-C (optional) ..............................................................591
Duplex Automatic Document Feeder B1-PC (optional)............................................................ 593
Stapler Faults.................................................................................................................................................... 595
Staple Jams in Staple Cartridge (For Finisher-A1) ...................................................................... 595
11
Page 12

Staple Jams in Staple Cartridge (For Finisher-B1) .......................................................................597
Staple Jams in Staple Cartridge (For Finisher-C1 or Finisher-C1
with Booklet Maker).................................................................................................................................599
Staple Jams in Booklet Staple Cartridge (For Finisher-C1 with Booklet Maker)..............600
16 Appendix .................................................................................................................................................603
Specifications....................................................................................................................................................604
Printable Area ...................................................................................................................................................624
Standard Printable Area.........................................................................................................................624
Extended Printable Area.........................................................................................................................624
Internal Fonts....................................................................................................................................................625
Optional Components ...................................................................................................................................627
ESC/P-K Emulation ..........................................................................................................................................630
Emulation.....................................................................................................................................................630
Fonts...............................................................................................................................................................631
Output Feature...........................................................................................................................................631
ESC/P-K Emulation Print Features ......................................................................................................632
ESC/P-K Emulation Settings..................................................................................................................632
Magnification Table.................................................................................................................................639
Paper Size and Number of Printable Characters..........................................................................643
PDF Direct Print................................................................................................................................................645
PDF Direct Print Settings........................................................................................................................645
DocuWorks Direct Print .................................................................................................................................647
DocuWorks Direct Print Settings.........................................................................................................647
PCL Emulation...................................................................................................................................................649
Emulation.....................................................................................................................................................649
Fonts...............................................................................................................................................................650
Output Feature...........................................................................................................................................651
PCL Emulation Settings...........................................................................................................................651
HP-GL2 Emulation...........................................................................................................................................656
Emulation.....................................................................................................................................................656
Fonts...............................................................................................................................................................656
Output Feature...........................................................................................................................................657
Factory Default Settings ........................................................................................................................657
HP-GL/2 Emulation Settings.................................................................................................................658
Hard Clip Area ............................................................................................................................................664
Printable Area.............................................................................................................................................665
Auto Layout.................................................................................................................................................667
Notes and Restrictions...................................................................................................................................674
Notes and Restrictions on the Use of the Machine.....................................................................674
Notes and Restrictions on the Use of the Copy Feature...........................................................679
Notes and Restrictions on the Use of the Print Feature............................................................679
Notes and Restrictions on the Use of the Scan Features..........................................................682
Notes and Restrictions on the Use of the Fax Feature..............................................................688
Notes and Restrictions on the Use of the E-mail/Internet Fax Feature..............................690
Notes and Restrictions for IP Fax (SIP)............................................................................................694
Notes and Restrictions when Connecting with Internet Service Provider..........................696
12
Page 13

Table of Contents
Notes and Restrictions on the Interrupt Mode ............................................................................ 698
Notes and Restrictions on Folders ..................................................................................................... 700
Notes and Restrictions when Connecting to Internet or Intranet........................................ 700
Notes and Restrictions when Operating from Computers....................................................... 701
Notes and Restrictions on Job Flows ................................................................................................ 702
Notes and Restrictions on the Security Features......................................................................... 703
Notes and Restrictions on the Authentication and Accounting Features.........................704
Notes and Restrictions for Using SMB............................................................................................. 704
Notes and Restrictions for Using TCP/IP ........................................................................................706
Notes and Restrictions for Using EtherTalk................................................................................... 707
Notes and Restrictions for Using Bonjour ...................................................................................... 708
Notes and Restrictions for IPv6 Connection.................................................................................. 708
Notes and Restrictions for Print E-mail............................................................................................ 710
Notes and Restrictions for Custom Paper.......................................................................................710
Using the Telephone..................................................................................................................................... 711
Placing a Call..............................................................................................................................................711
Activity Report.................................................................................................................................................. 713
EP System........................................................................................................................................................... 717
Glossary............................................................................................................................................................... 718
Index....................................................................................................................................................................721
13
Page 14

14
Page 15

1 Before Using the Machine
This chapter describes the organization of this guide and conventions used in this guide.
z
Preface...............................................................................................................................................16
z
Types of Manuals..........................................................................................................................17
z
Using This Guide............................................................................................................................18
z
Interface Cables.............................................................................................................................21
z
Energy Saver Mode.......................................................................................................................23
z
Customizing the Control Panel.................................................................................................27
z
Entering Text...................................................................................................................................36
Page 16

1 Before Using the Machine
Preface
Before Using the Machine
1
Thank you for selecting the ApeosPort-IV C5575/C4475/C3375/C3373/C2275,
DocuCentre-IV C5575/C4475/C3375/C3373 (hereafter referred to as "the machine").
This guide is intended for system administrators, and provides maintenance information
such as how to replace consumables, how to configure network, and troubleshooting
procedures.
The guide assumes that you are familiar with a personal computer and that are
knowledgeable of computer networks. When you need additional information, refer to the
manuals provided with the personal computer, operating system, and network products.
After reading this guide, be sure to keep it handy for quick reference. It will be useful in case
you forget how to perform operations or if a problem occurs with the machine.
For more information on how to copy, print, scan, and fax, refer to the User Guide. For
information about optional components for the Print feature, refer to the guide provided
with each optional component.
16
Warning:
This equipment will be inoperable when mains power fails.
Page 17

Types of Manuals
Types of Manuals
The following guides are provided with the machine.
Accompanying Manuals
User Guide (Document CD-ROM)
The guide describes all the necessary steps for copy, print, scan, and fax.
Administrator Guide (this guide) (Document CD-ROM)
The guide is intended for system administrators, and describes how to configure network
and how to solve problems that may occur with the machine. This guide also describes daily
maintenance and the system settings procedures.
Quick Reference Guide (Booklet)
The guide describes the basic operations of the machine, as well as daily management and
maintenance.
Manual (HTML)
The manual describes installation and configuration procedures for print drivers and the
printer environment. This manual is included in the Driver CD Kit.
Print Driver Help
The help describes print features and operations.
Before Using the Machine
1
CentreWare Internet Services Help
The help describes how to change various settings of the machine using a web browser, and
how to import scanned data to a computer from the machine.
Guides for Optional Components
Optional components are available for the machine. Some of them come with user guides.
The guides for optional components describe all the necessary steps for using the optional
components and installing the software.
17
Page 18

1 Before Using the Machine
Using This Guide
Before Using the Machine
This guide is intended for system administrators, and provides maintenance information
such as how to replace consumables, how to configure network, and troubleshooting
procedures.
Organization of This Guide
This guide consists of the following chapters.
1 Before Using the Machine
Describes the organization of this guide and conventions.
1
2 Paper and Other Media
Describes the types of paper and other media that you can use on the machine and how to
load media in a tray.
3 Maintenance
Describes how to replace consumables and to clean the machine.
4 Machine Status
Describes how to check the faults that occurred on the machine and to print various reports/
lists.
5 Tools
Describes the procedures to set up the system.
6 CentreWare Internet Services Settings
Describes how to use CentreWare Internet Services.
7 Printer Environment Settings
Describes the settings to use the Print feature on the machine.
8 E-mail Environment Settings
Describes the settings to use various services via e-mail on the machine.
9 Scanner Environment Settings
Describes the settings to use the Scan services on the machine.
10 Using IP Fax (SIP)
Describes the settings to use the IP fax (SIP) service on the machine.
11 Using the Internet Fax Service
Describes the settings to use the services via the Internet Fax service on the machine.
12 Using the Server Fax Service
Describes how to use the Server Fax service on the machine.
18
13 Encryption and Digital Signature Settings
Describes how to configure the machine to use the Encryption and the Digital Signature
features with your communications and documents.
Page 19

14 Authentication and Accounting Features
15 Problem Solving
16 Appendix
Conventions
Using This Guide
The machine has the Authentication feature to restrict the availability of services for each
feature and the Accounting feature to manage the use of each feature based on the Login
Type selected.
Describes troubleshooting procedures to solve the problems with the machine.
Describes the specifications of the machine, optional accessories, and cautions/restrictions.
z
The screen shots and illustrations used in this guide vary depending on the machine
configuration and optional components installed. Some of the items in the screen shots
may not be displayed or available depending on your machine configuration.
z
The procedures in this guide may vary depending on the driver and utility software being
used due to the upgrades.
z
In this guide, "Computer" refers to a personal computer or workstation.
z
The following terms are used in this guide:
Before Using the Machine
1
Important : Important information that you should read.
Note : Additional information on operations or features.
z
The following symbols are used in this guide:
" " :zA cross-reference included in this guide.
z
Names of CD-ROM, features, and touch screen messages and
input text.
z
[ ] :
Folders, files, applications, button or menu names displayed on
the touch screen.
z
Names of menus, commands, windows, or dialog boxes
displayed on the computer screen and their buttons and menu
names.
< > button : Hardware buttons on the control panel.
< > key : Keys on the keyboard of the computer.
19
Page 20
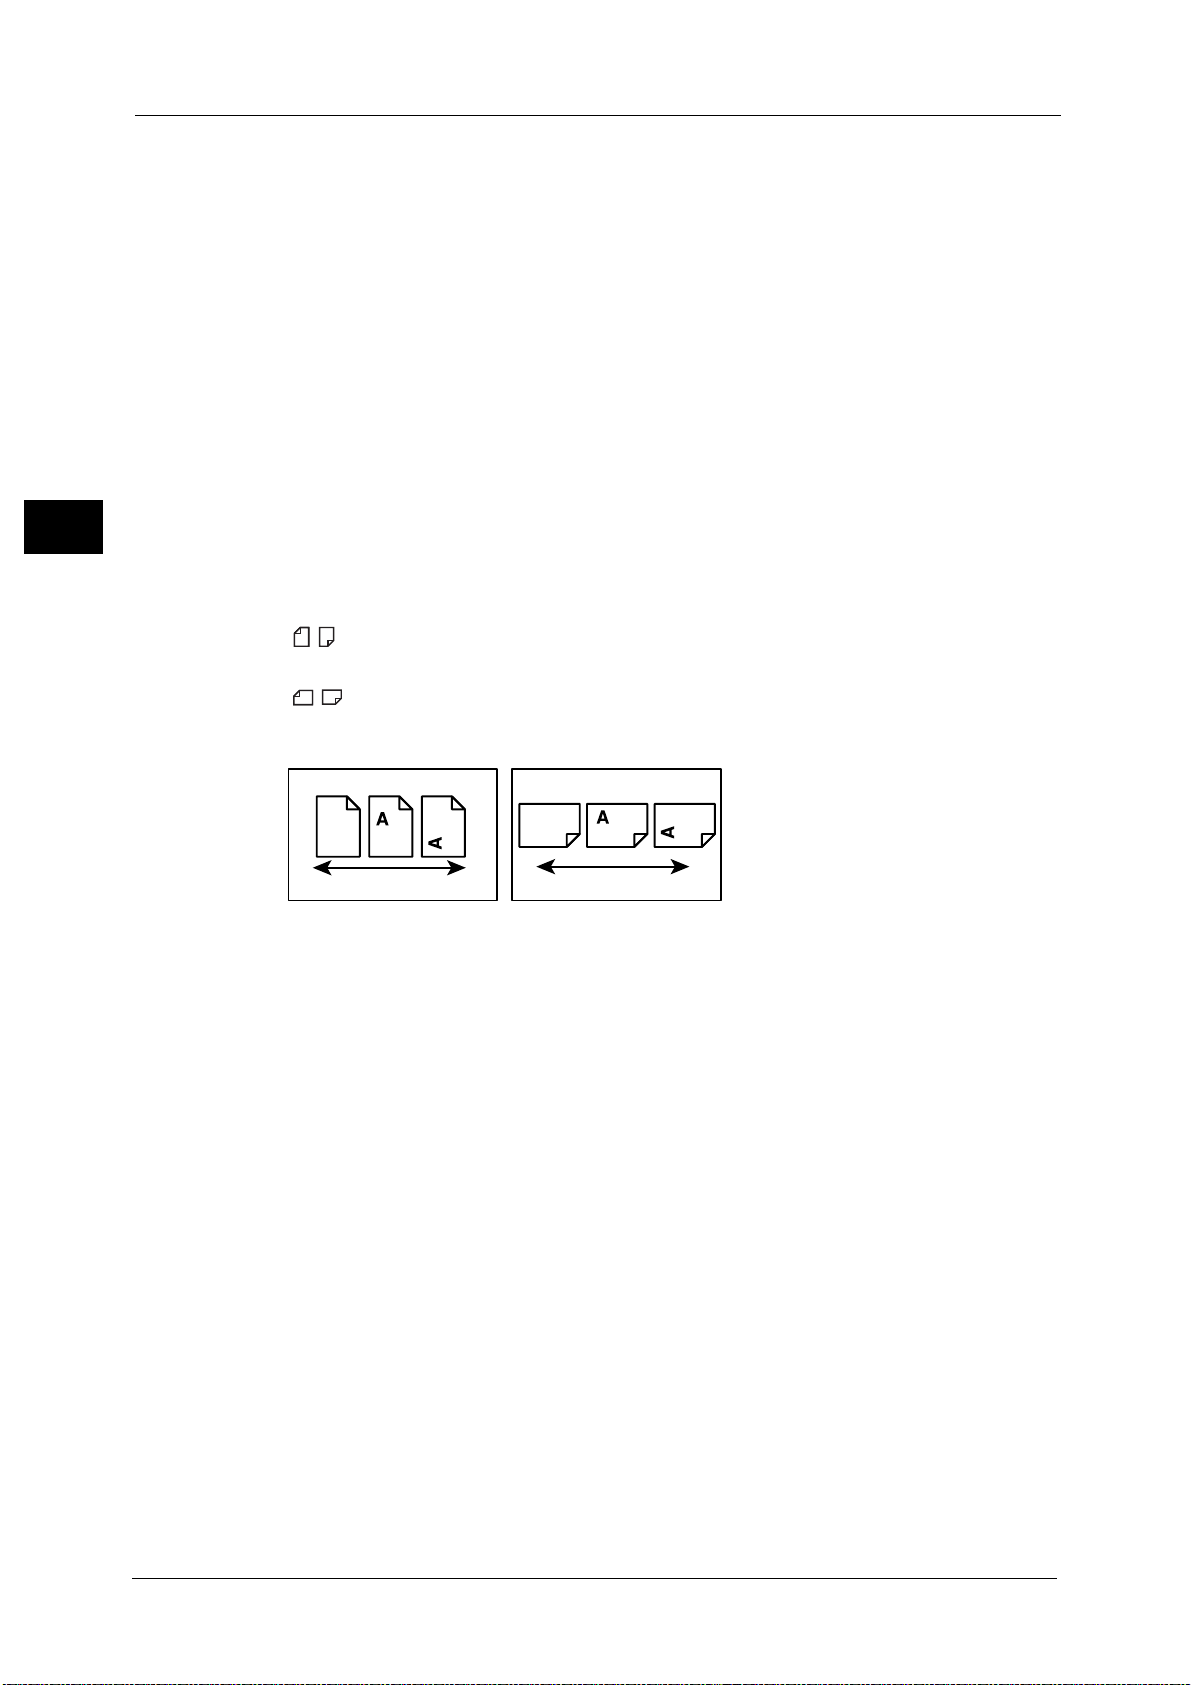
1 Before Using the Machine
LEF Orientation
Paper feed direction
SEF Orientation
Paper feed direction
Before Using the Machine
1
z
>:
Path to a certain item within a procedure on the control panel.
For example: When you see the procedure "select [Tools] >
[Setup] > [Create Folder]", this means that you need to select
[Tools], select [Setup], and then select [Create Folder].
z
Path to a certain item within a procedure on a computer.
For example: When you see the procedure "to search for files
and folders, click [Start] > [Search] > [For Files or Folders]", this
means that you need to click [Start], click [Search], and then
click [For Files or Folders] to search for files and folders.
z
Cross-reference
For example: "Refer to "5 Tools" > "Common Service Settings" >
"Audio Tones" in the Administrator Guide."
The sentence above means that you need to refer to the
section "Audio Tone", which can be found under "Common
Service Settings" in chapter 5 Tools of the Administrator Guide.
z
Orientation of documents or paper is described in this guide as follows:
, ,Long Edge Feed (LEF):Loading the document or paper in portrait orientation when
viewed from the front of the machine.
, ,Short Edge Feed (SEF):Loading the document or paper in landscape orientation
when viewed from the front of the machine.
20
Page 21
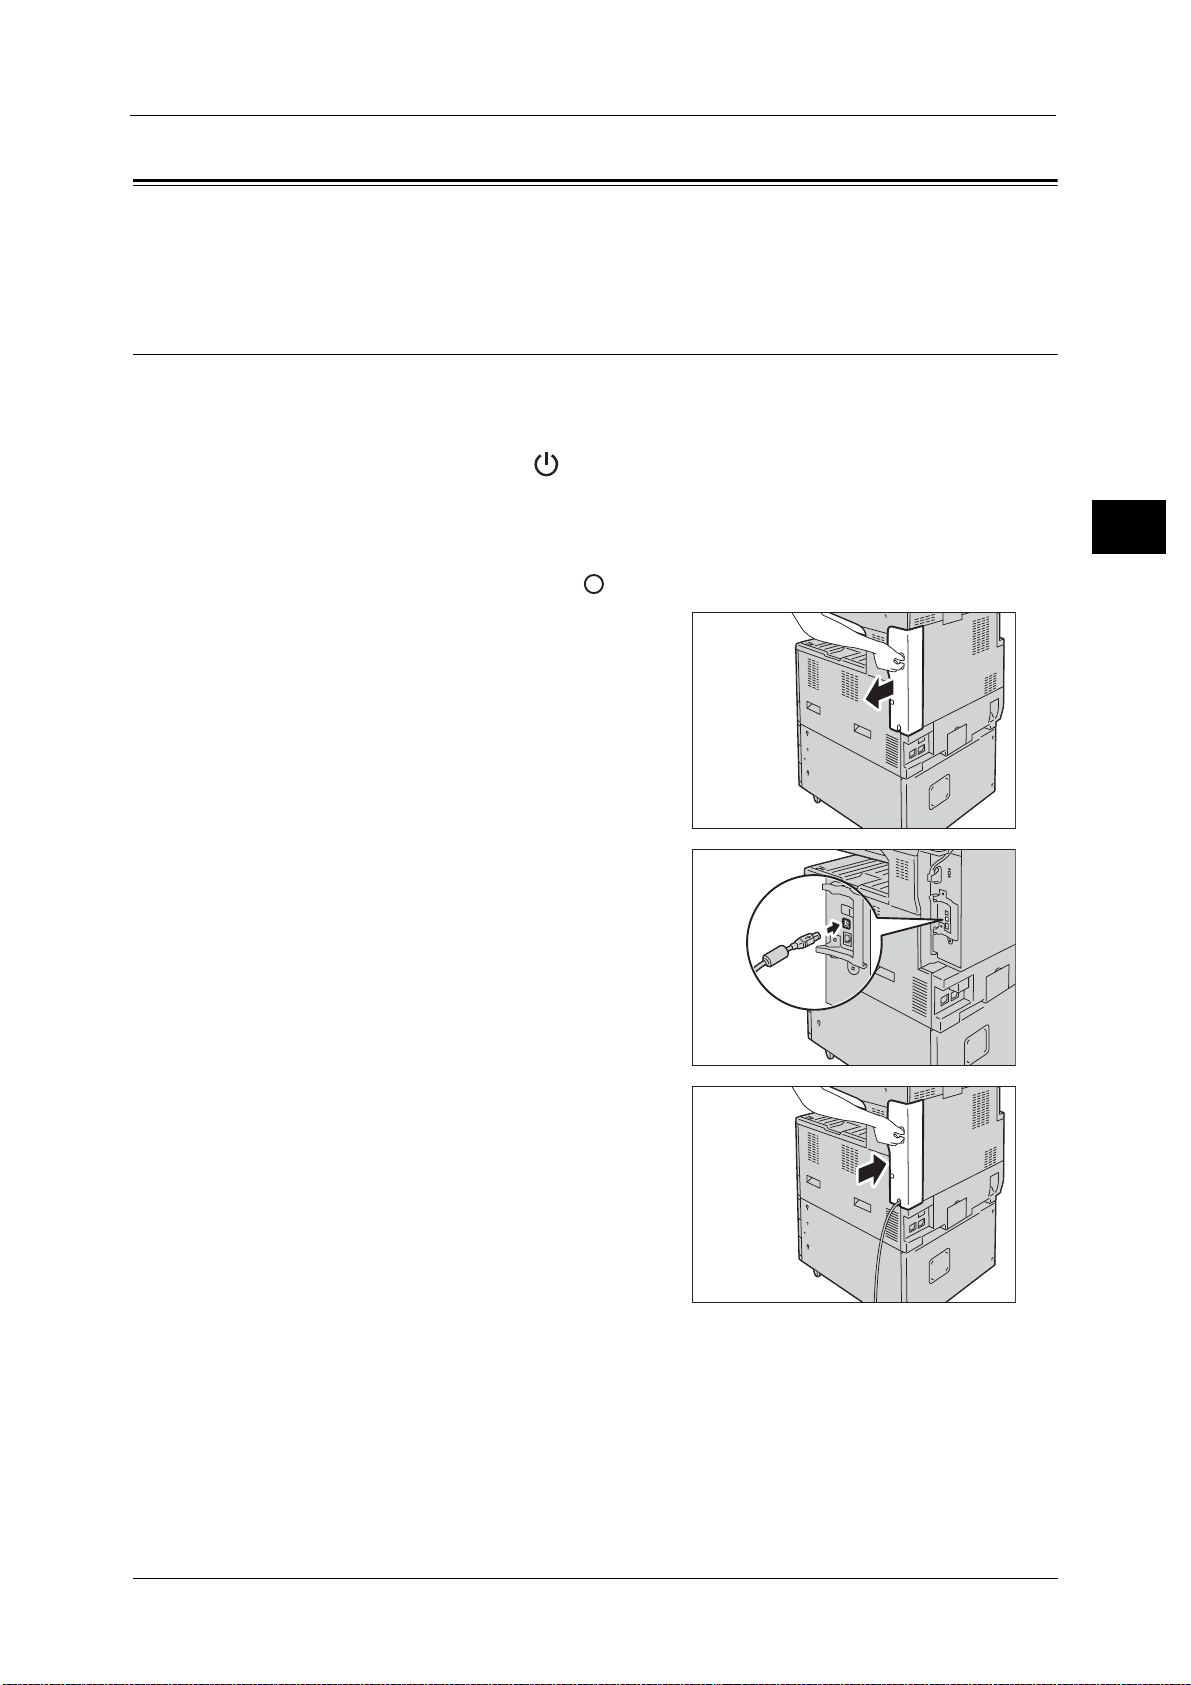
Interface Cables
Interface Cables
When you connect he machine directly to your computer, use the USB interface. When you
connect the machine to a network, use the Ethernet interface.
Using the USB Interface
The USB interface of the machine supports USB 2.0.
This section describes the installation procedures for the USB interface.
1 Press the power switch to the [ ] position to switch off the power.
2 Make sure that the touch screen is blank and the <Energy Saver> button does not light up.
3 Open the front cover.
4 Press the main power switch to the [ ] position to switch off the main power.
5 Remove the rear right cover.
Before Using the Machine
1
6 Connect the USB cable to the USB 2.0 interface
connector.
7 Return the rear right cover to its original
position.
8 Connect the other end of the USB cable to the computer.
9 Press the main power switch to the [ | ] position to switch on the main power.
10 Close the front cover.
11 Press the power switch to the [ | ] position to switch on the power.
12 Restart the computer.
21
Page 22
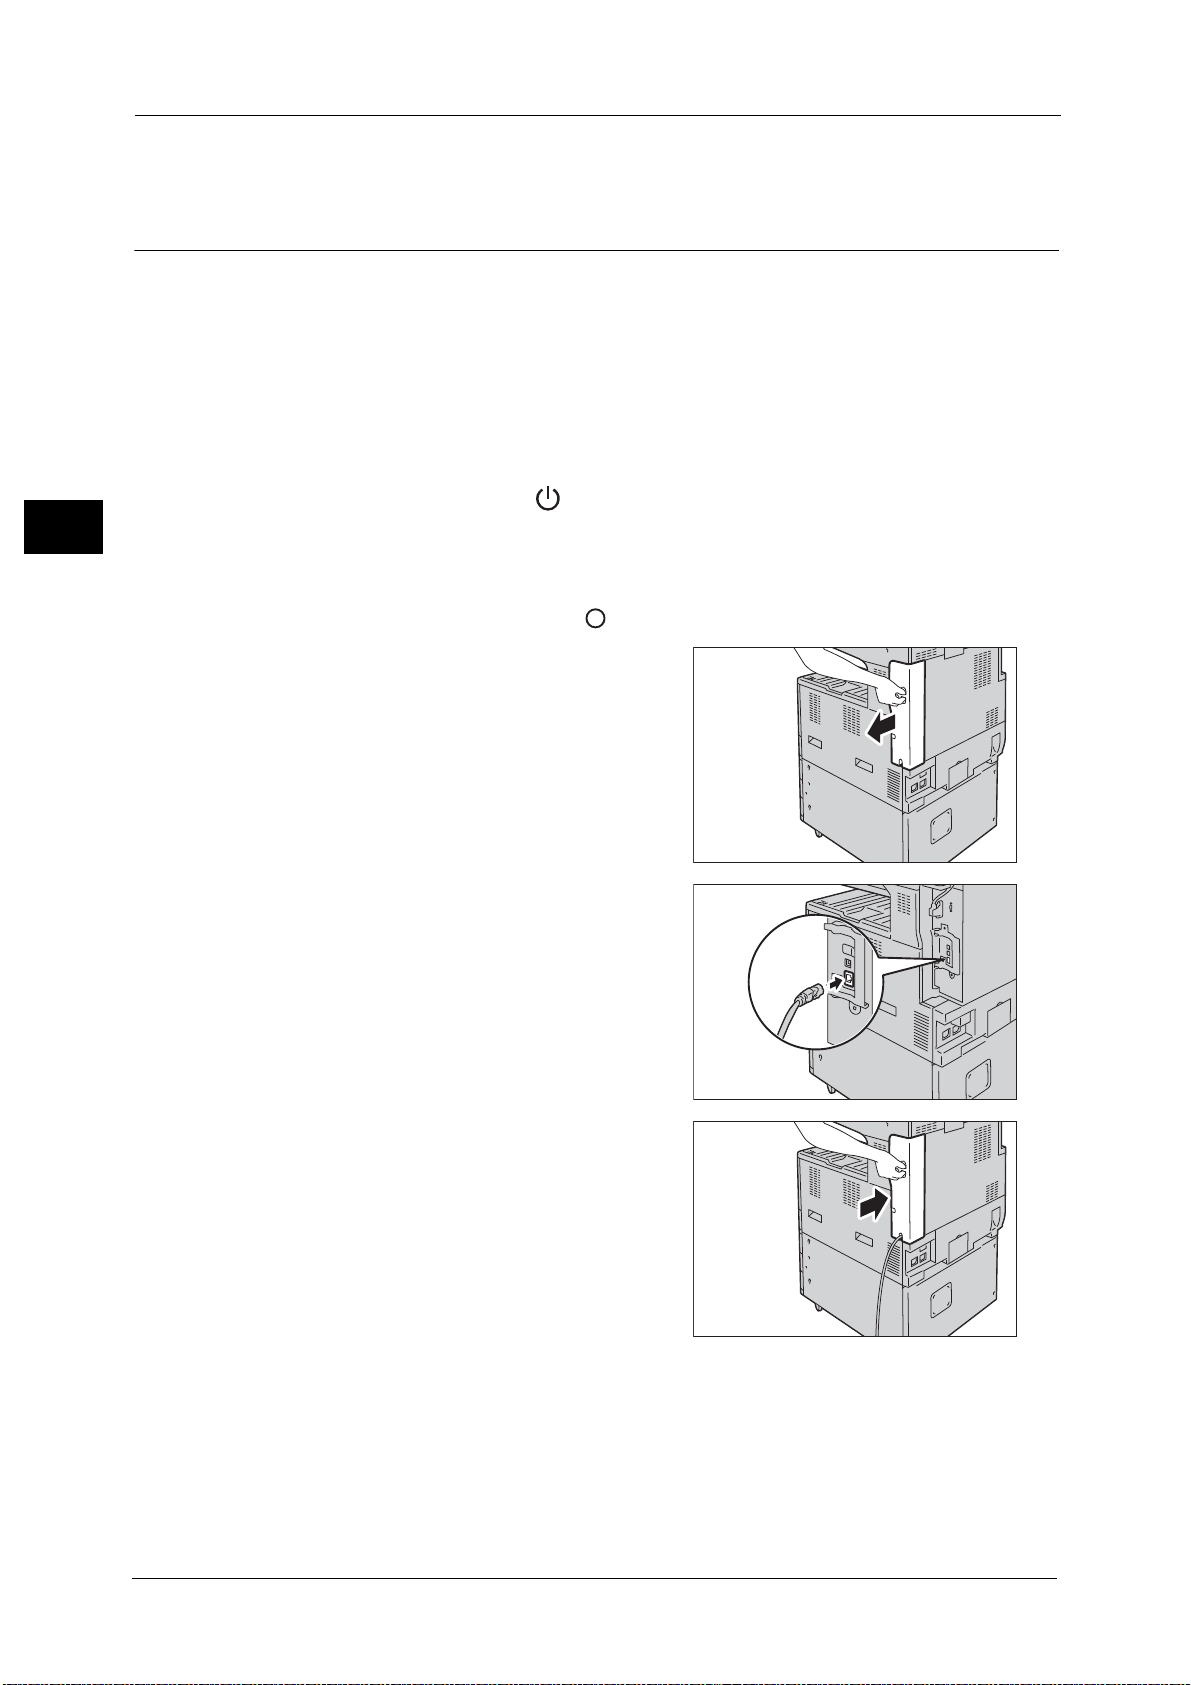
1 Before Using the Machine
For more information on setting items, refer to "Printer Environment Settings" (P.317).
Using the Ethernet Interface
Before Using the Machine
The Ethernet interface of the machine supports the following three types.
z
1000BASE-T
z
100BASE-TX
z
10BASE-T
Note • 1000BASE-T is not supported for some models. An optional component is required.
This section describes the installation procedures for the Ethernet interface.
1 Press the power switch to the [ ] position to switch off the power.
1
2 Make sure that the touch screen is blank and the <Energy Saver> button does not light up.
3 Open the front cover.
4 Press the main power switch to the [ ] position to switch off the main power.
5 Remove the rear right cover.
6 Connect the network cable to the Ethernet
interface connector.
Note • Always use the correct network cable with
your network connection. When you replace
the cable, contact our Customer Support
Center.
• To use the Ethernet interface as the Gigabit
Ethernet interface, install the Gigabit
Ethernet Kit (optional).
22
7 Return the rear right cover to its original
position.
8 Press the main power switch to the [ | ] position to switch on the main power.
9 Close the front cover.
10 Press the power switch to the [ | ] position to switch on the power.
For more information on setting items, refer to "Printer Environment Settings" (P.317).
Page 23

Energy Saver Mode
Energy Saver Mode
The machine is equipped with the Energy Saver mode that reduces the power consumption
by saving the electricity to the machine when no copy or print data is received for a specified
time.
The Energy Saver has two modes: the Low Power mode and the Sleep mode.
When you press the <Energy Saver> button or do not use the machine for a specified period
of time, the machine enters the Low Power mode.
When time exceeds the time specified in the Low Power mode, the machine then enters the
Sleep mode.
Press the <Energy Saver> button on the control panel to enter the Energy Saver mode.
It extinguishes the touch screen and lights up the <Energy Saver> button on the control
panel. To activate the machine, press the <Energy Saver> button. Pressing the <Energy
Saver> button extinguishes the light and deactivates the Energy Saver mode.
Note • When the following device is connected to the machine and a user operates the device, the Low
Power mode can be deactivated without pressing the <Energy Saver> button. If the machine is in
the Sleep mode, however, the Sleep mode will not be deactivated by the following operation. Set the
time long to elapse until the machine enters the Sleep mode from the Low Power mode. For
information on how to change the interval to enter the Low Power mode and Sleep mode, refer to
"Changing the Interval for Entering Energy Saver Mode" (P.24).
- Touch the card to IC Card Reader (optional)
• When the machine is in the Authentication mode, the Authentication mode is exited once the
machine enters the Low Power mode.
Low Power Mode
The Low Power mode reduces the power to the control panel and the fusing unit.
It extinguishes the touch screen and lights up the <Energy Saver> button on the control
panel. To activate the machine, press the <Energy Saver> button. Pressing the <Energy
Saver> button turns off the light and deactivates the Energy Saver mode.
Note • While the machine is in the Low Power mode, the power supply to the fusing unit is also reduced.
Before Using the Machine
1
Sleep Mode
The Sleep mode reduces the power to the machine even more than the Low Power mode.
It turns off the touch screen and lights up the <Energy Saver> button on the control panel.
To activate the machine, press the <Energy Saver> button. Pressing the <Energy Saver>
button turns off the light and deactivates the Energy Saver mode.
It takes longer time than the Low Power mode to deactivate the Sleep mode and enable to
use the machine.
Note • When you press the <Energy Saver> button during the Energy Saver mode, the touch screen lights
up. At this point, the scanner and the output devices remain the Energy Saver mode. Afterwards, by
operations such as using the touch screen, opening or closing of the document cover, and loading
paper in the document feeder, you can make the devices necessary to activate the machine exit the
Energy Saver mode and make the machine ready to start exiting the Energy Saver mode.
• When you make the machine exit Energy Saver mode by pressing the <Energy Saver> button, the
machine does not immediately identify the movements such as opening or closing of the front
cover. To make the machine identify these operations, exit all Energy Saver mode by operating the
control panel (for example, pressing the <Machine Status> button) before opening the front cover.
• If you replace toner cartridges or supply paper during the Energy Saver mode, the machine does not
identify these changes. Before performing these operations, exit Energy Saver mode by pressing the
<Energy Saver> button and the <Machine Status> button on the control panel.
• The Energy Saver mode is not exited by the following operations:
- Charge Print
- Secure Print
- Delayed Print
23
Page 24
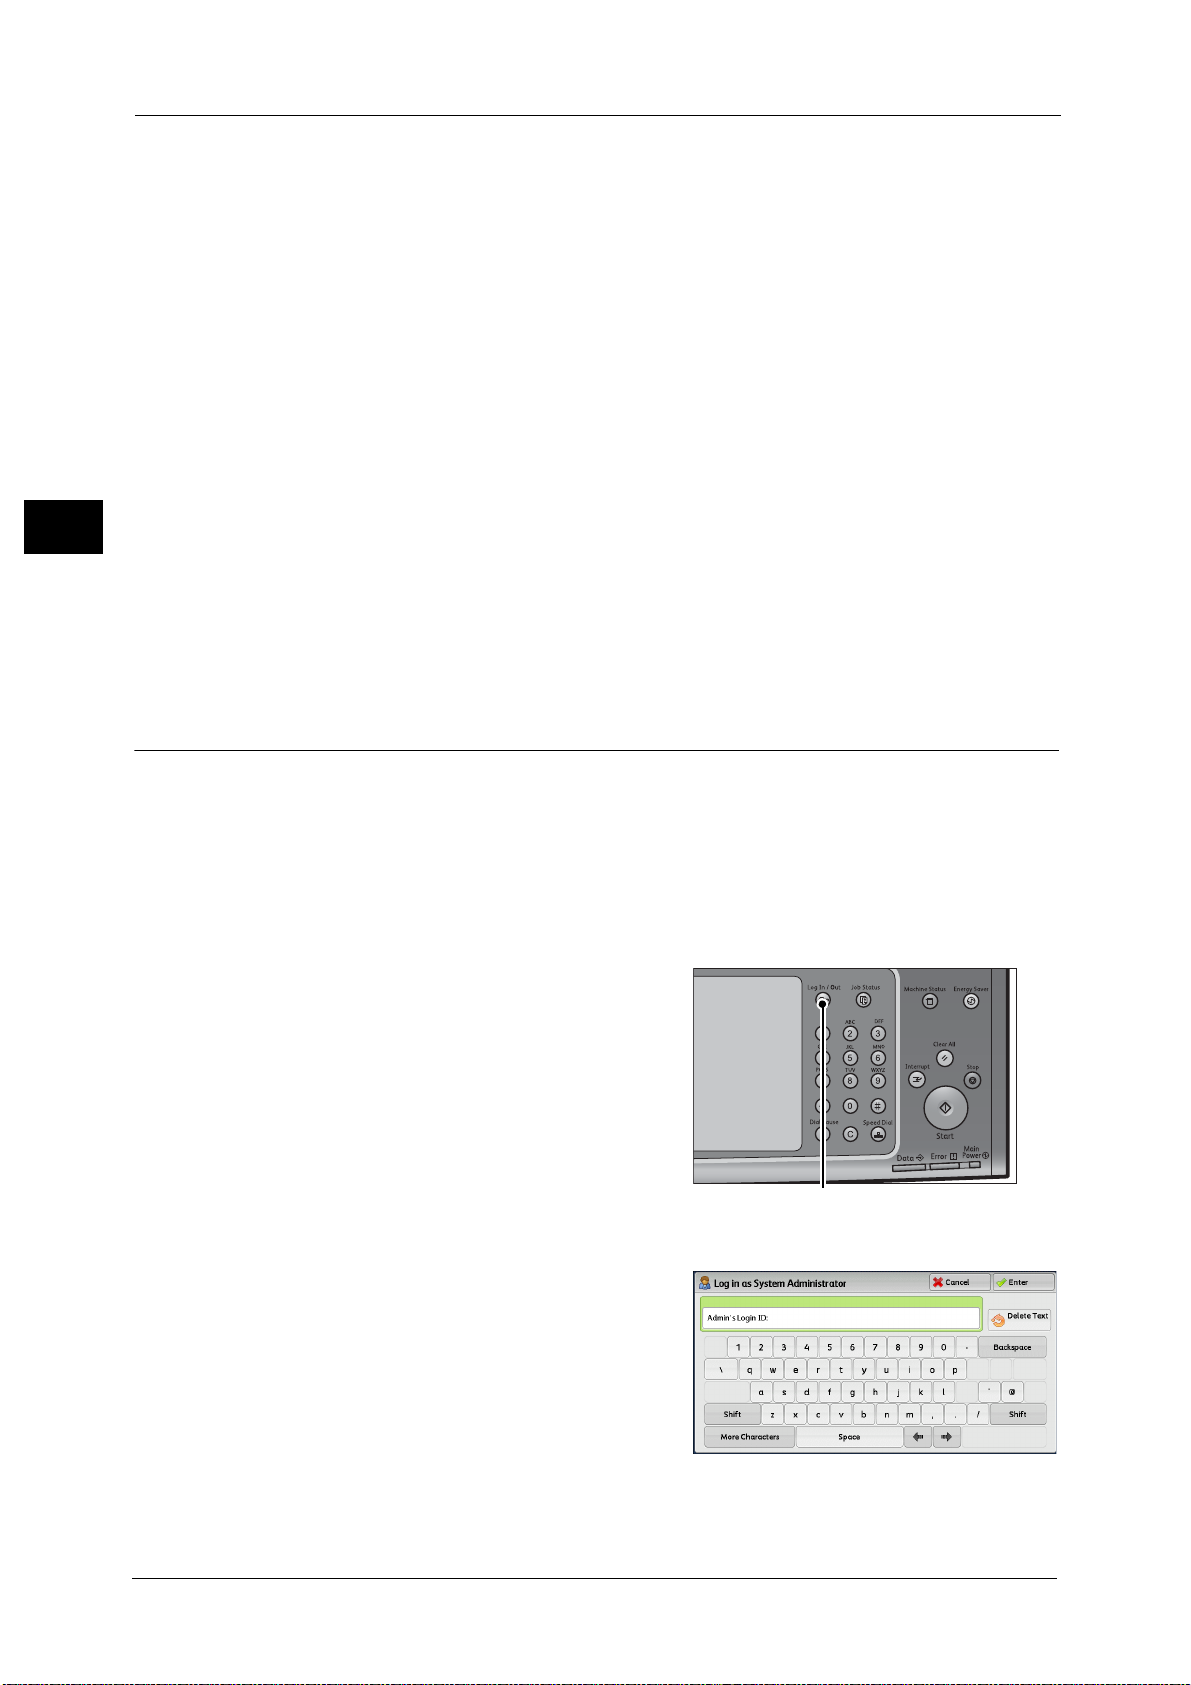
1 Before Using the Machine
<Log In/Out> button
Before Using the Machine
1
-Private Charge Print
- Faxes stored in folders
- Direct Fax
- Accessing a folder of the machine using CentreWare Internet Services
• The control panel remains lit off and only the output devices exit the Energy Saver mode by the
following operations:
-Print
- Sample Print
-Print Fax
• When [Deactivation With Smart WelcomEyes] is set to [Enabled] under [Tools] > [System Settings] >
[Common Service Settings] > [Energy Saver Settings], and human presence is detected, the machine
automatically exits the Energy Saver mode.
• When the following device is connected to the machine and a user performs the following
operation, the Low Power mode can be deactivated without pressing the <Energy Saver> button. If
the machine is in the Sleep mode, however, the Sleep mode will not be deactivated by the operation.
By setting longer time to elapse until the machine enters the Sleep mode, you can make the
machine to exit the Energy Saver mode without pressing the <Energy Saver> button. For more
information on how to change the time to elapse until the machine enters the Sleep mode, refer to
"Changing the Interval for Entering Energy Saver Mode" (P.24).
- Touch the card to IC Card Reader (optional).
• When the machine enters the Low Power mode during a user is authenticated, the machine exits the
authentication mode.
Changing the Interval for Entering Energy Saver Mode
This section describes the procedures for setting the Energy Saver mode.
To activate the Energy Saver, set the time to elapse until the machine enters the Low Power
mode as well as the time to elapse until the machine enters the Sleep mode.
Note • You can set the time to elapse until the machine enters the Low Power mode and the Sleep mode
from 1 to 240 minutes in 1 minute increments.
• When the interval setting specified for the Sleep Mode is the same as that specified for the Low
Power mode, the machine ignores the Low Power mode setting.
1 Press the <Log In/Out> button.
2 Enter the system administrator's user ID with
the numeric keypad or the keyboard displayed
on the screen, and select [Enter].
24
When a passcode is required, select [Next] and
enter the system administrator's passcode, and
select [Enter].
Note • The default user ID is "11111".
• The default passcode is "x-admin".
Page 25
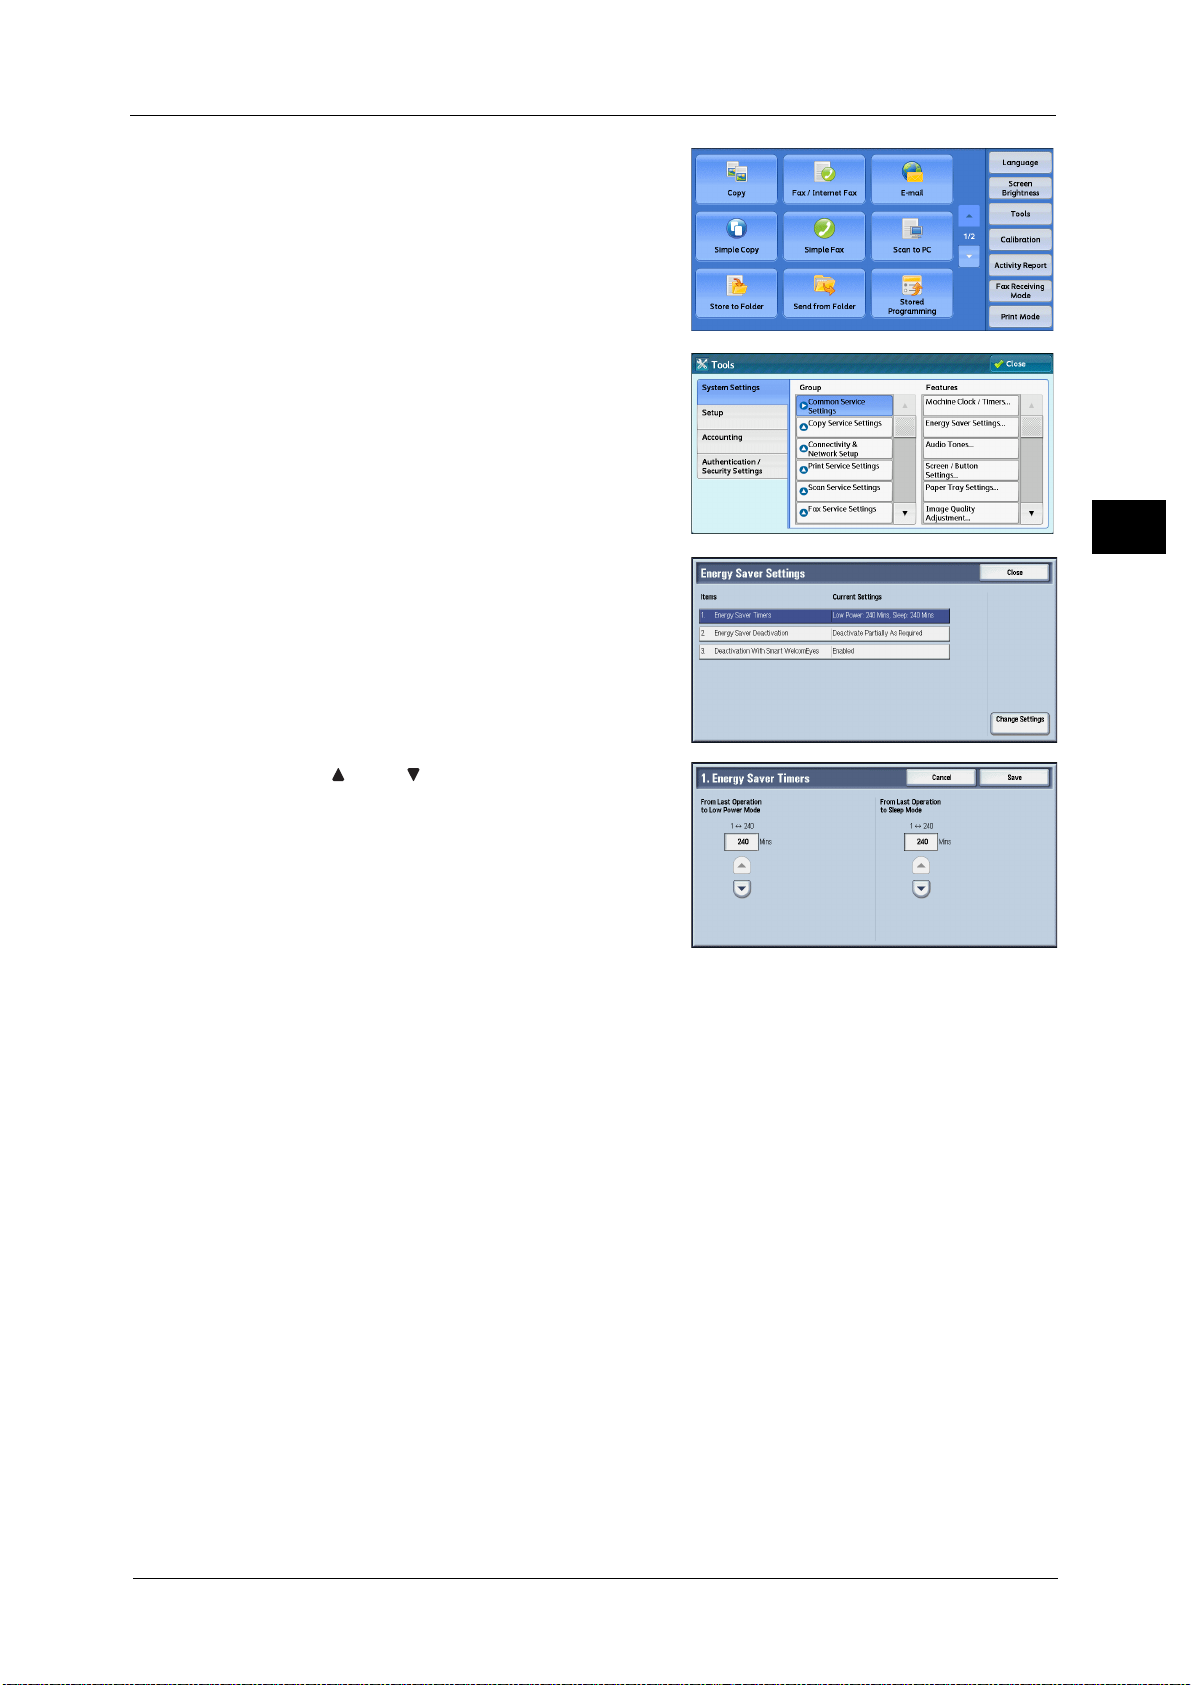
3 Select [Tools] on the [Services Home] screen.
Note • When the [Services Home] screen is not
displayed on the touch screen, press the
<Services Home> button.
4 Select [System Settings] > [Common Service
Settings] > [Energy Saver Settings].
5 Select [Energy Saver Timers], and then select
[Change Settings].
Energy Saver Mode
Before Using the Machine
1
6 Using [ ] and [ ], set the time to elapse until
entering the Energy Saver mode, in 1 minute
increments.
From Last Operation to Low Power Mode
Set the time to elapse from the last operation until the machine enters the Low Power mode.
Note • The default value for [From Last Operation to Low Power Mode] is [1] minute. You cannot disable
the Low Power mode.
• The timer does not start counting until the operator leaves the detectable area of Smart
WelcomEyes. The Access Lamp lights up while the machine detects human presence.
From Last Operation to Sleep Mode
Set the time to elapse from the last operation until the machine enters the Sleep mode.
Note • The default value for [From Last Operation to Sleep Mode] is 1 minute. To make the machine enter
the Low Power mode, set a longer period of time for [From Last Operation to Sleep Mode] than for
[From Last Operation to Low Power Mode].
• The timer does not start counting until the operator leaves the detectable area of Smart
WelcomEyes. The Access Lamp lights up while the machine detects human presence.
7 Select [Save].
8 Select [Close] repeatedly until the [Tools] screen is displayed.
9 Select [Close].
25
Page 26
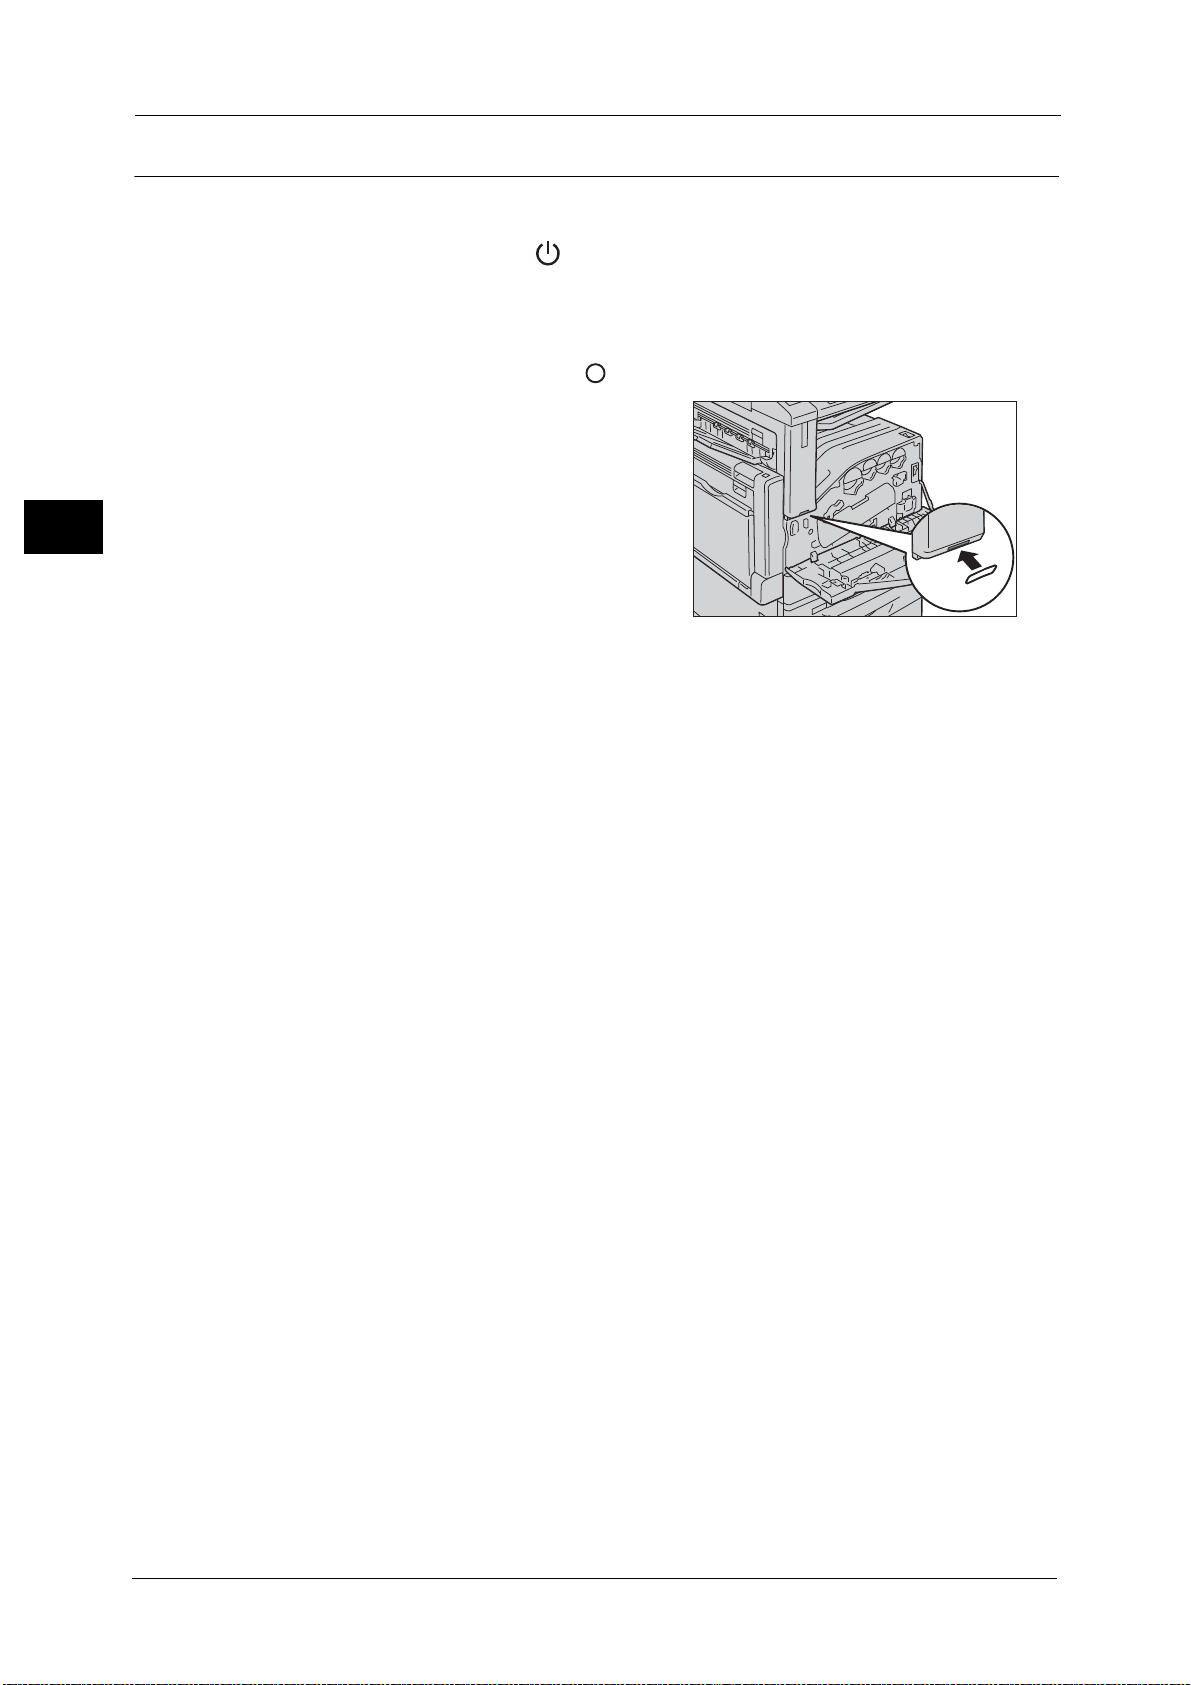
1 Before Using the Machine
Completely Disabling Smart WelcomEyes
This section describes how to disable Smart WelcomEyes completely.
Before Using the Machine
1
1 Press the power switch to the [ ] position to switch off the power.
2 Make sure that the touch screen is blank and the <Energy Saver> button is not lit.
3 Open the front cover.
4 Press the main power switch to the [ ] position to switch off the main power.
5 Cover the Smart WelcomEyes pyroelectric
sensor with the sticker provided with the
machine.
Important • Make sure that the Smart WelcomEyes
pyroelectric sensor is covered with the sticker
completely.
6 Press the main power switch to the [ | ] position to switch on the main power.
7 Close the front cover.
8 Press the power switch to the [ | ] position to switch on the power.
26
Page 27
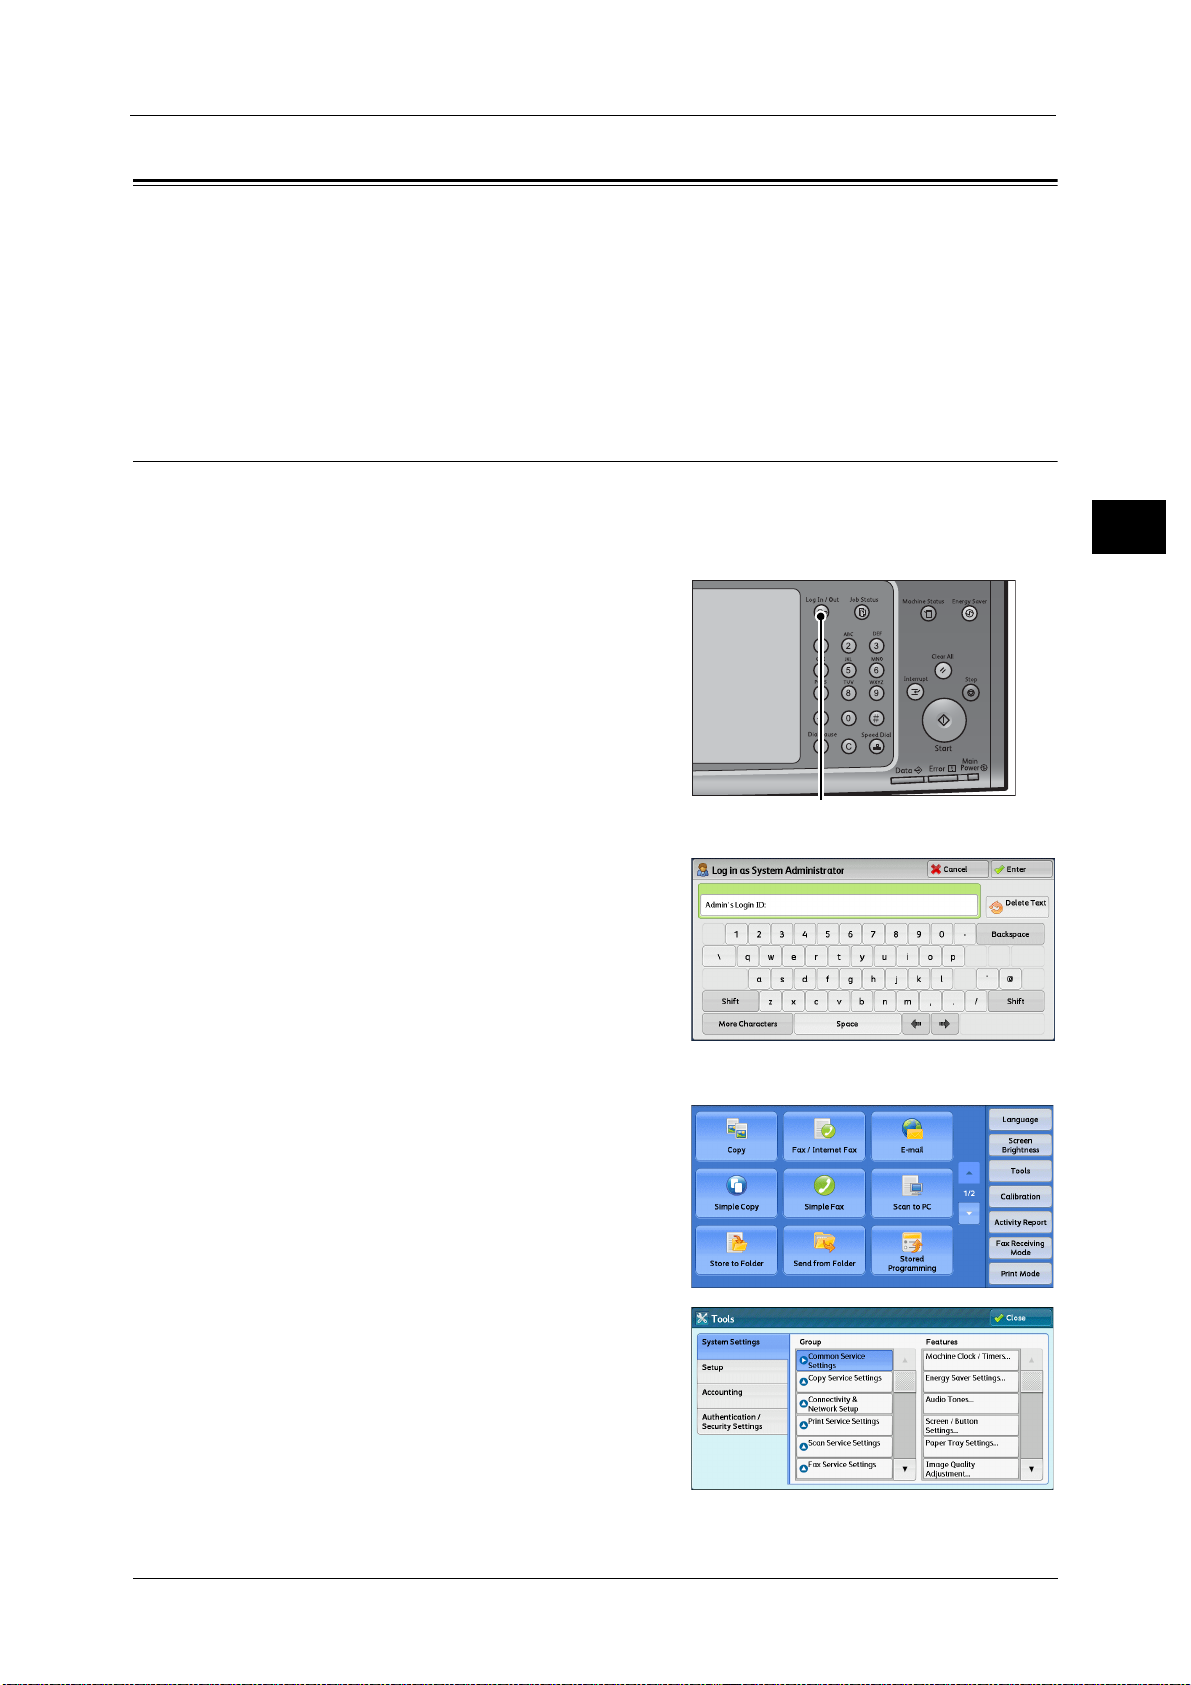
Customizing the Control Panel
<Log In/Out> button
Customizing the Control Panel
You can change the services displayed on the touch screen or the features assigned to the
buttons to make best use of the machine.
This section describes how to change the screen default, the services displayed after Auto
Clear, the services displayed on the [Services Home] screen, and the services assigned to the
custom buttons, and how to adjust the screen contrast.
For information on how to change the other settings of the control panel, refer to "Screen/Button Settings" (P.149).
Changing the Screen Default
You can change the screen displayed when the machine is turned on or the Energy Saver
mode is deactivated
The [Services Home] screen is displayed by factory default.
1 Press the <Log In/Out> button.
Before Using the Machine
1
2 Enter the system administrator's user ID with
the numeric keypad or the keyboard displayed
on the screen, and select [Enter].
When a passcode is required, select [Next] and
enter the system administrator's passcode, and
select [Enter].
Note • The default user ID is "11111".
• The default passcode is "x-admin".
3 Select [Tools] on the [Services Home] screen.
Note • When the [Services Home] screen is not
displayed on the touch screen, press the
<Services Home> button.
4 Select [System Settings] > [Common Service
Settings] > [Screen/Button Settings].
27
Page 28
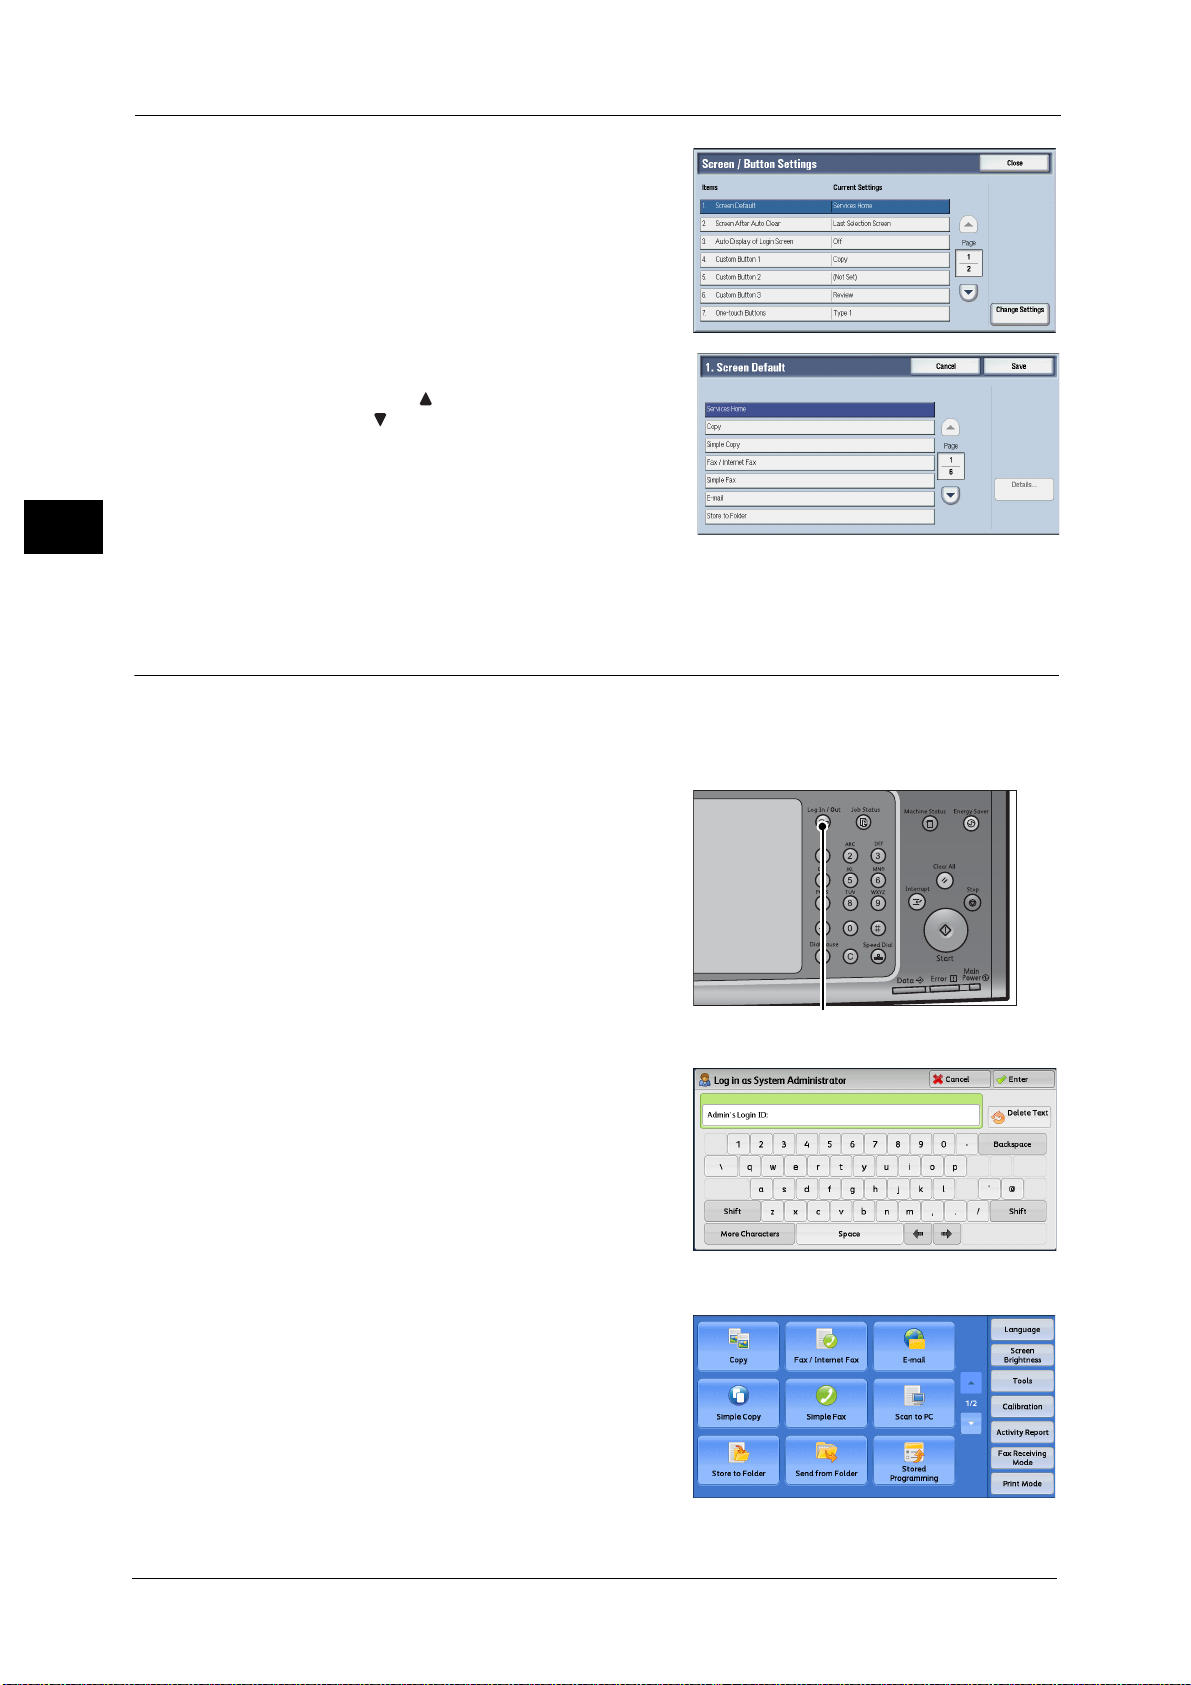
1 Before Using the Machine
<Log In/Out> button
5 Select [Screen Default], and then select
[Change Settings].
Before Using the Machine
6 Select a service you want to display.
Note • Select [ ] to display the previous screen or
[ ] to display the next screen.
1
7 Select [Save].
Setting the Screen After Auto Clear
You can select the screen to be displayed after Auto Clear from [Last Selection Screen] or
[Services Home].
For information on Auto Clear, refer to "Auto Clear" (P.145).
1 Press the <Log In/Out> button.
2 Enter the system administrator’s user ID with
the numeric keypad or the keyboard displayed
on the screen, and select [Enter].
When a passcode is required, select [Next] and
enter the system administrator's passcode, and
select [Enter].
Note • The default user ID is "11111".
• The default passcode is "x-admin".
28
3 Select [Tools] on the [Services Home] screen.
Note • When the [Services Home] screen is not
displayed on the touch screen, press the
<Services Home> button.
Page 29
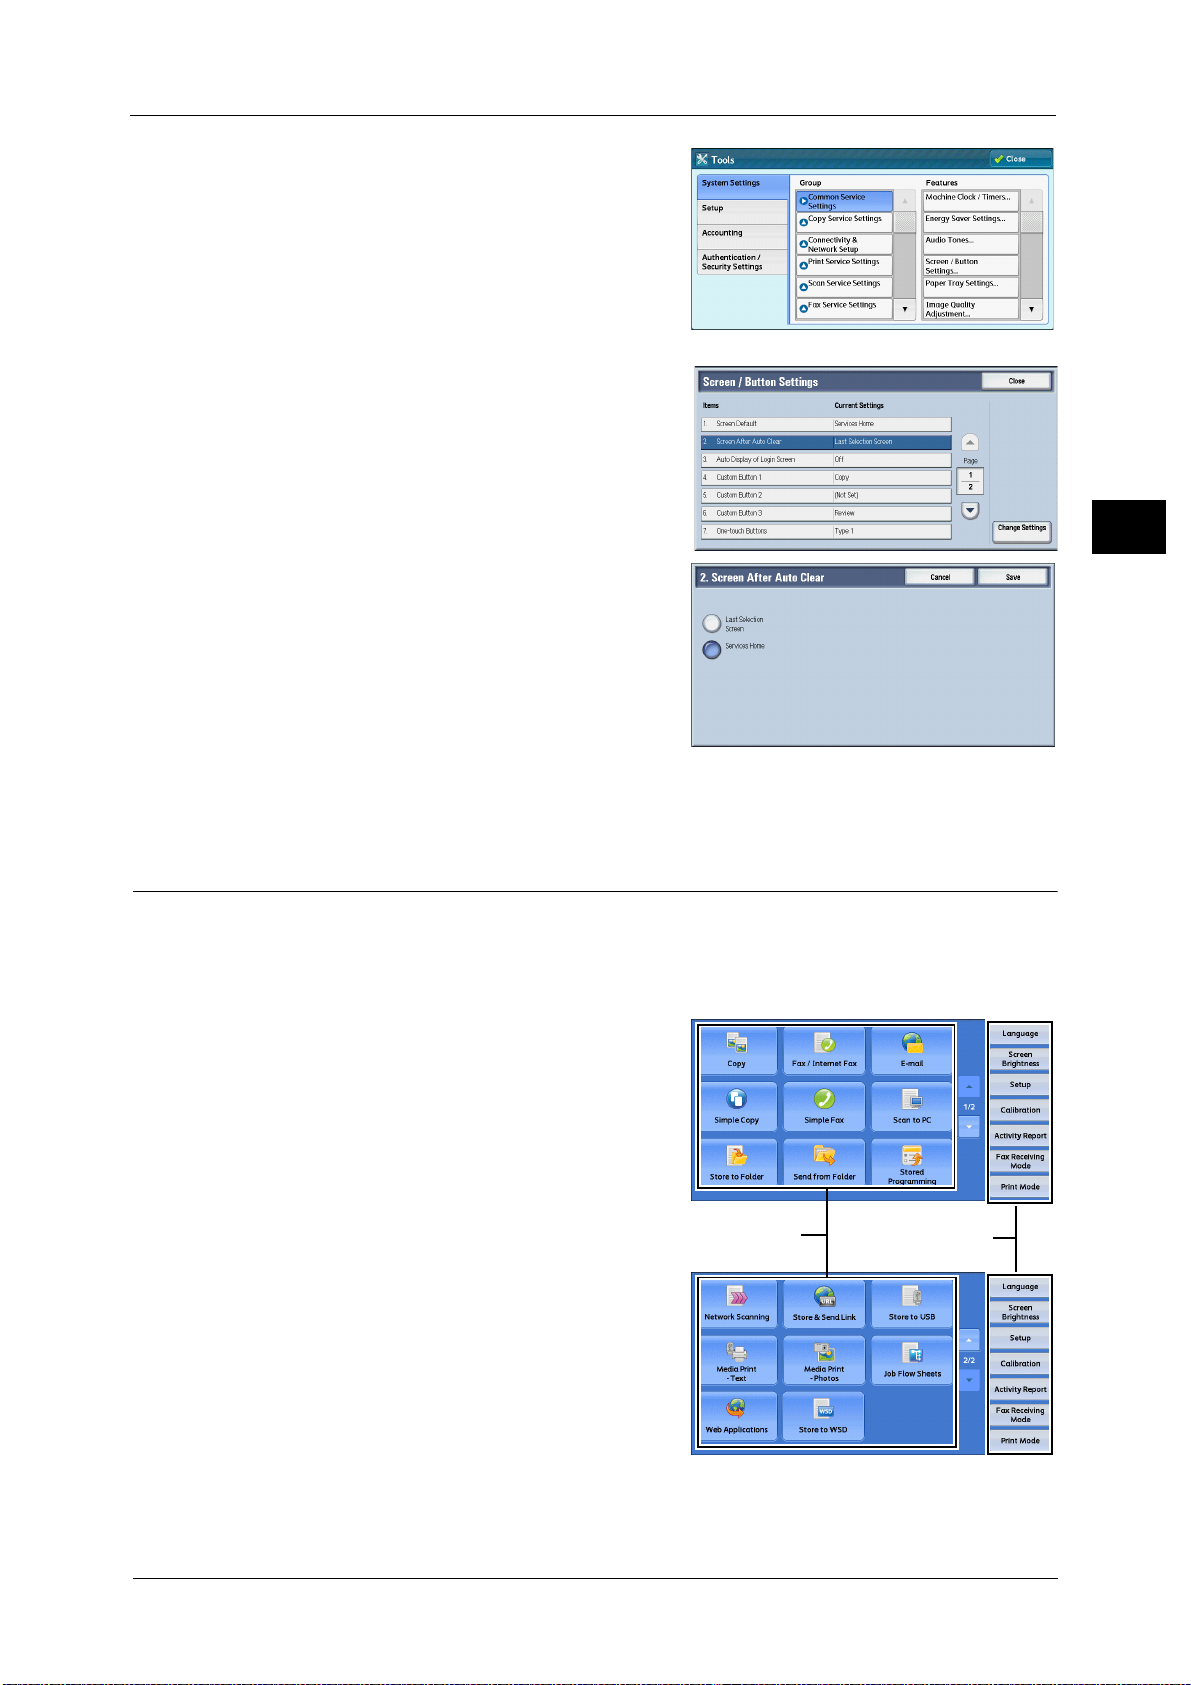
4 Select [System Settings] > [Common Service
Service buttons
Additional feature
buttons
Settings] > [Screen/Button Settings].
5 Select [Screen After Auto Clear], and then select
[Change Settings].
6 Select [Last Selection Screen] or [Services
Home].
Customizing the Control Panel
Before Using the Machine
1
7 Select [Save].
Customizing the Button Layout
You can customize the services and the button layout displayed on the [Services Home]
screen when you press the <Services Home> button on the control panel.
Note • Services not supported by the machine will not be displayed on the screen. Grayed out buttons
cannot be used as a result of malfunctioning.
z
Copy
z
Fax/Internet Fax
z
E-mail
z
Simple Copy
z
Simple Fax
z
Scan to PC
z
Store to Folder
z
Network Scanning (ApeosPort series models
only)
z
Store to USB
z
Send from Folder
z
Stored Programming
z
Store & Send Link
Note • This service is displayed when the User Authentication feature is used.
29
Page 30

1 Before Using the Machine
<Log In/Out> button
Before Using the Machine
1
z
Job Flow Sheets (ApeosPort series models only)
z
Web Applications (ApeosPort series models only)
z
Media Print - Text
z
Media Print - Photos
z
Secure Print
z
Sample Set
z
Delayed Print
z
Charge Print
z
Private Charge Print
z
Store to WSD
z
Custom Services
Note • This service is for service representative use. For more information, contact our Customer Support
Center.
z
Language
z
Screen Brightness
z
Setup
z
Calibration
z
Activity Report
z
Fax Receiving Mode
z
Print Mode
z
Lockout Printer/Release Printer
Note • WSD stands for Web Services on Devices.
• [Lockout Printer]/[Release Printer] is not displayed by default. To display this feature, select [Allow
User to Lock Out] in [Printer Lockout] under [Tools] > [System Settings] > [Common Service Settings]
> [Machine Clock/Timers], and then assign [Disable Auto Printing] to a button on the [Services Home
- Additional Features] screen.
Services Home
1 Press the <Log In/Out> button.
30
You can select service buttons, which are displayed on the [Services Home] screen.
If you select [(Not Assigned)], the position of the selected button becomes blank.
Page 31

2 Enter the system administrator’s user ID with
the numeric keypad or the keyboard displayed
on the screen, and select [Enter].
Customizing the Control Panel
When a passcode is required, select [Next] and
enter the system administrator's passcode, and
select [Enter].
Note • The default user ID is "11111".
• The default passcode is "x-admin".
3 Select [Tools] on the [Services Home] screen.
Note • When the [Services Home] screen is not
displayed on the touch screen, press the
<Services Home> button.
4 Select [System Settings] > [Common Service
Settings] > [Screen/Button Settings].
5 Select [Services Home], and then select
[Change Settings].
Note • Select [ ] to display the previous screen or
[ ] to display the next screen.
Before Using the Machine
1
6 Select the position where you want to assign a
service.
Note • Select [ ] to display the previous screen or
[ ] to display the next screen.
• The layout of the buttons in this screen
corresponds to the layout of those on the
[Services Home] screen.
7 Select a service you want to display on the
[Services Home] screen.
Note • Select [ ] to display the previous screen or
[ ] to display the next screen.
• You cannot assign the same feature to more
than one button.
8 Select [Save].
9 Select [Save].
31
Page 32

1 Before Using the Machine
<Log In/Out> button
Services Home - Additional Features
You can select additional feature buttons, which are displayed on the [Services Home]
screen.
Before Using the Machine
If you select [(Not Assigned)], the position of the selected button becomes blank.
You cannot assign [Setup] to [(Not Assigned)]. If you do not want to display the [Setup]
button, select the [Show this in Admin mode] check box.
1 Press the <Log In/Out> button.
1
2 Enter the system administrator’s user ID with
the numeric keypad or the keyboard displayed
on the screen, and select [Enter].
When a passcode is required, select [Next] and
enter the system administrator's passcode, and
select [Enter].
Note • The default user ID is "11111".
• The default passcode is "x-admin".
3 Select [Tools] on the [Services Home] screen.
Note • When the [Services Home] screen is not
displayed on the touch screen, press the
<Services Home> button.
4 Select [System Settings] > [Common Service
Settings] > [Screen/Button Settings].
32
5 Select [Services Home - Additional Features],
and then select [Change Settings].
Page 33

6 Select the position where you want to assign an
<Log In/Out> button
additional feature.
Note • The layout of buttons in this screen is
corresponding to the layout of those on the
[Services Home] screen.
7 Select a service you want to display on the
[Services Home] screen.
Note • Select [ ] to display the previous screen or
[ ] to display the next screen.
• You cannot assign the same feature to more
than one button.
8 Select [Save].
9 Select [Save].
Customizing the Control Panel
Before Using the Machine
1
Assigning Services to the Custom Buttons
You can assign services to the <Copy>, <(Not in Use)>, and <Review> buttons on the control
panel.
Assigning a service to a custom button allows you to switch to this service without having to
return to the [Services Home] screen. If you do not need to assign any service to a custom
button, select [(Not Set)].
[Copy] is assigned to the <Copy> button and [Review] is assigned to the <Review> button by
factory default, while the <(Not in Use)> button has no assignment.
This section describes how to assign [Send from Folder] to the <(Not in Use)> button, as an
example.
Note • After you change the assignment, apply the labels provided with the machine. When you assign a
service for which no label is provided, use a blank label and write down the service name with a
permanent marker. The labels include the services that are not supported by the machine.
1 Press the <Log In/Out> button.
33
Page 34

1 Before Using the Machine
2 Enter the system administrator’s user ID with
Before Using the Machine
the numeric keypad or the keyboard displayed
on the screen, and select [Enter].
When a passcode is required, select [Next] and enter the system administrator's passcode,
and select [Enter].
Note • The default user ID is "11111".
• The default passcode is "x-admin".
1
3 Select [Tools] on the [Services Home] screen.
Note • When the [Services Home] screen is not
displayed on the touch screen, press the
<Services Home> button.
4 Select [System Settings] > [Common Service
Settings] > [Screen/Button Settings].
5 Select [Custom Button 2], and then select
[Change Settings].
Note • Select [ ] to display the previous screen or
[ ] to display the next screen.
34
6 Select [Send from Folder].
Note • Select [ ] to display the previous screen or
[ ] to display the next screen.
7 Select [Save].
Page 35

Adjusting Screen Brightness
You can adjust the screen brightness of the screen on the [Services Home] screen.
Customizing the Control Panel
1 Select [Screen Brightness] on the [Services Home] screen.
2 Press [+] or [-] to adjust the screen brightness.
3 Select [Save].
To adjust the screen brightness from the [Tools] screen, refer to "Screen Brightness" (P.151).
Changing the Feature Screen
You can customize the features displayed on the initial screen of the following services on
the [Services Home] screen.
z
Copy
z
Fax/Internet Fax
z
E-mail
z
Store to Folder
z
Network Scanning (ApeosPort series models only)
z
Scan to PC
z
Store & Send Link
z
Store to USB
For information on how to change the settings, refer to "Copy Tab - Features Allocation" (P.186), "Screen Defaults" (P.230),
and "Screen Defaults" (P.238).
Before Using the Machine
1
35
Page 36

1 Before Using the Machine
Entering Text
Before Using the Machine
1
During operations, a screen for entering text sometimes appears. The following describes
how to enter text.
You can enter the following characters: numerals, alphabets, and symbols
Item Description
Entering alphabets and numerals To enter uppercase letters, select [Shift]. To return to the
lowercase letters, select [Shift] again.
Entering symbols Select [More Characters].
Note • Depending on the keyboard, you can select a symbol
from the pull-up options displayed on the bottom left
of the screen.
Entering a space Select [Space].
Deleting characters Select [Backspace] to delete one character at a time.
36
Page 37

2 Paper and Other Media
This chapter describes the paper that can be used with the machine, precautions when
handling paper, and how to load paper in trays.
z
Paper Types......................................................................................................................................38
z
Loading Paper.................................................................................................................................50
z
Changing the Paper Size.............................................................................................................55
z
Changing the Paper Settings....................................................................................................60
Page 38

2 Paper and Other Media
WARNING
Paper Types
This section describes the paper that can be used with this machine.
Use of unrecommended paper may result in paper jams, lower print quality, malfunctions,
or damage to the machine. To achieve optimum performance of the machine, we
recommend that you use only paper recommended by Fuji Xerox.
Paper and Other Media
If you desire to use paper other than the paper recommended by Fuji Xerox, contact our
Customer Support Center.
Do not use conductive paper such as origami paper, carbonic paper or conductivelycoated paper. When paper jam occurs, it may cause short-circuit and eventually a fire
accident.
Important • Moisture generated by water, rain, or vapor may cause the printed images to fade. For more
information, contact our Customer Support Center.
2
Loadable Quantity and Weight for Supported Paper
Paper Trays Basis Weight/Ream Weight Loadable Quantity*
Tray 1
Tray 2 to 4 (Optional)
Tray 3 (for the
Tandem Tray
Module)
Tray 4 (for the
Tandem Tray
Module)
Tray 5 55 to 280 gsm
Tray 6 (HCF B1)
(optional)
* : When using 80 gsm paper
Important • Printing on paper that differs from the paper type and size selected in the print driver, or printing
from a tray that does not support the loaded paper may result in a paper jam. To ensure correct
printing, select the correct paper size, paper type, and paper tray.
Note • Basis weight is the weight of 1 m
• Ream weight is the weight of 1,000 sheets of duodecimo size (788 x 1,091 mm) paper.
• When copying on non-standard size paper from Tray 5, you must enter the paper size. Furthermore,
if you frequently copy on non-standard size paper, you can preset the size on the machine. That size
then appears under [Standard Sizes] on the [Tray 5] screen. For more information on the settings,
refer to "Tray 5 - Paper Size Defaults" (P.153).
• Most ideal image quality with the paper can be obtained by setting the image quality for each type
of paper. For more information on the settings, refer to "Image Quality" (P.154).
60 to 256 gsm
Ream Weight: 51.6 - 220.1 kg
60 to 256 gsm
Ream Weight: 51.6 - 220.1 kg
60 to 256 gsm
Ream Weight: 51.6 - 220.1 kg
Ream Weight: 47.3 - 240.7 kg
55 to 216 gsm
Ream Weight: 47.3 - 186 kg
2
of a paper sheet.
500 sheets
867 sheets
1,133 sheets
Up to 10 mm
90 sheets
2,030 sheets
38
Page 39

Supported Paper Type
Standard Paper
When printing or copying on commonly used paper (plain paper), use paper meeting the
standards described below. To copy or print as clear as possible, we recommend the
following standard paper.
Paper Name Size
Basis Weight
(gsm)
Paper
Type
Paper Types
Paper and Other Media
Image
*1
Quality
*2
Notes / Countermeasure
Colotech Plus A4 90 Bond Plain A
Colotech Plus A3 90 Bond Plain A
Professional A4 80 Bond Plain A
Gold Flag ship A4 80 Bond Plain A
Gold Flag ship A3 80 Bond Plain A
Business (Blue) A3 80 Bond Plain A
Premier A4 80 Bond Plain A
Premier A3 80 Bond Plain A
Business A4 80 Bond Plain A
Business A3 80 Bond Plain A
Colotech Plus A4 90 Bond Plain A
Colotech Plus A3 90 Bond Plain A
z
Before copying or printing, fan
the paper well and reload it in
the tray.
z
Before copying or printing, fan
the paper well and reload it in
the tray.
z
Before copying or printing, fan
the paper well and load it in
the tray.
z
Before copying or printing, fan
the paper well and load it in
the tray.
2
Xtra A4 75 Plain Plain B
Xtra A3 75 Plain Plain B
Xtra A4 80 Bond Plain A
Xtra A3 80 Bond Plain A
Xtra 8.5
x
11
A-paper A4 75 Plain Plain B
A-paper A3 75 Plain Plain B
A-paper B4 75 Plain Plain B
A-paper B5 75 Plain Plain B
A-paper 8.5
x
11
Diplomat A4 80 Bond Plain A
80 Bond Plain A
75 Plain Plain B
z
Before copying or printing, fan
the paper well and reload it in
the tray.
39
Page 40

2 Paper and Other Media
Paper Name Size
Diplomat A3 80 Bond Plain A
Paper and Other Media
Semi Standard Paper
2
Paper Name Size
Performer Plus A4 75 Plain Plain B
Performer Plus A4 80 Bond Plain A
Performer Plus A3 80 Bond Plain A
Basis Weight
(gsm)
*1 : Select the paper type setting for the paper loaded on a tray. For more information, refer to "Changing the Paper Settings"
(P.60).
*2 : Most ideal image quality with the paper can be obtained by setting the image quality for each type of paper. For more
information on the settings, refer to "Image Quality" (P.154).
Paper
Type
*1
Image
Quality
*2
Notes / Countermeasure
z
Before copying or printing, fan
the paper well and reload it in
the tray.
z
Do not store unwrapped under
high temperature and
humidity conditions.
In addition to the standard paper, the following paper also can be used.
Basic Weight
(gsm)
Paper
Type
*1
Image
Quality
*2
Notes / Countermeasure
Performer Plus A4 80 Bond Plain A
Performer Plus A3 80 Bond Plain A
Business Plus A4 80 Bond Plain A
Business Plus A3 80 Bond Plain A
Laserprint A4 80 Bond Plain A
Laserprint A3 80 Bond Plain A
Xplore A4 70 Plain Plain B
Xplore A3 70 Plain Plain B
Xplore B4 70 Plain Plain B
Xplore B5 70 Plain Plain B
Xplore 8k 70 Plain Plain B
Xplore 16k 70 Plain Plain B
Xcite A4 80 Bond Plain A
Xcite A3 80 Bond Plain A
ASTRO EXTRA A4 70 Plain Plain B
ASTRO EXTRA A3 70 Plain Plain B
ASTRO EXTRA A4 80 Bond Plain A
ASTRO EXTRA A3 80 Bond Plain A
Explorer A4 70 Plain Plain B
Explorer A3 70 Plain Plain B
Explorer A4 75 Plain Plain B
Explorer A3 75 Plain Plain B
H-paper A4 80 Bond Plain A
40
Page 41

Paper Types
Paper Name Size
H-paper A3 80 Bond Plain A
H-paper B4 80 Bond Plain A
H-paper B5 80 Bond Plain A
LQ-PAPER A4 80 Bond Plain A
LQ-PAPER A3 80 Bond Plain A
LQ-PAPER B4 80 Bond Plain A
LQ-PAPER 8.5
LQ-PAPER 8.5
Astro Extra A4 80 Bond Plain A
UPM Office
MULTIFUNCTION
UPM Office
MULTIFUNCTION
Premier A4 80 Bond Plain A
Premier A3 80 Bond Plain A
Premier 8.5
Basic Weight
(gsm)
80 Bond Plain A
x
11
80 Bond Plain A
x
14
A4 70 Plain Plain B
A3 70 Plain Plain B
80 Bond Plain A
x
11
Paper
Type
*1
Image
Quality
*2
Notes / Countermeasure
Paper and Other Media
2
z
Performing 2-sided printing
may cause paper to be
wrinkled under high
temperature and humidity
conditions.
z
Performing 2-sided printing
may cause paper to be
wrinkled under high
temperature and humidity
conditions.
z
Performing 2-sided printing
may cause paper to be
wrinkled under high
temperature and humidity
conditions.
Gold Flag ship A4 70 Plain Plain B
Gold Flag ship A3 70 Plain Plain B
*1 : Select the paper type setting for the paper loaded on a tray. For more information, refer to "Changing the Paper Settings"
(P.60).
*2 : Most ideal image quality with the paper can be obtained by setting the image quality for each type of paper. For more
information on the settings, refer to "Image Quality" (P.154).
Usable Paper
In addition to the standard paper, the following paper also can be used.
Paper Name Size
DocuPaper Black A4 70 Plain Plain B
DocuPaper Black A3 70 Plain Plain B
Basis Weight
(gsm)
Paper
Type
*1
Image
Quality
*2
Notes / Countermeasure
41
Page 42

2 Paper and Other Media
Paper and Other Media
2
Paper Name Size
DocuPaper A4 80 Bond Plain A
DocuPaper A3 80 Bond Plain A
White Label A4 80 Bond Plain A
White Label A3 80 Bond Plain A
Xerox Green Label A4 70 Plain Plain B
Xerox Green Label A3 70 Plain Plain B
Xerox Green Label 8.5
Laserprint A4 80 Bond Plain A
Laserprint A3 80 Bond Plain A
Laserprint 8.5
Green Wrap
(Recycled)
Green Wrap
(Recycled)
Basis Weight
(gsm)
70 Plain Plain B
x
11
80 Bond Plain A
x
11
A4 80 Bond Plain A
A3 80 Bond Plain A
Paper
Type
*1
Image
Quality
*2
Notes / Countermeasure
Colotech Idol A4 100 Bond Plain A
Colotech Idol A3 100 Bond Plain A
Colotech Plus A4 100 Bond Plain A
Colotech Plus A3 100 Bond Plain A
Colotech Plus A4 120 Heavy-
weight
Colotech Plus A3 120 Heavy-
weight
Colotech Plus A4 160 Heavy-
weight
Colotech Plus A3 160 Heavy-
weight
Colotech Plus A4 200 Extra Heavy-
weight
Colotech Plus A3 200 Extra Heavy-
weight
Colotech Plus A3 250 Extra Heavy-
weight
Recycled Supreme
(Recycled)
A4 80 Bond Plain A
Heavyweight A
Heavyweight A
Heavyweight A
Heavyweight A
Heavyweight A
Heavyweight A
Heavyweight A
Extra
Extra
Extra
Recycled Supreme
(Recycled)
K-paper A4 75 Plain Plain B
K-paper A3 75 Plain Plain B
K-paper A4 80 Bond Plain A
A3 80 Bond Plain A
42
Page 43

Paper Types
Paper Name Size
K-paper A3 80 Bond Plain A
PAPER ONE All
Purpose
PAPER ONE All
Purpose
XEROX ONE A4 80 Bond Plain A
XEROX ONE A3 80 Bond Plain A
Performer A4 80 Bond Plain A
Performer A3 80 Bond Plain A
Professional A4 80 Bond Plain A
Professional A3 80 Bond Plain A
Xerox Undertones -
Several Colors
Xerox Undertones -
Several Colors
Recycled Pure
(Recycled)
Basis Weight
(gsm)
A4 80 Bond Plain A
A3 80 Bond Plain A
A4 80 Bond Plain A
A3 80 Bond Plain A
A4 80 Bond Plain A
Paper
Type
*1
Image
Quality
*2
Notes / Countermeasure
Paper and Other Media
2
Colotech Plus A4 90 Bond Plain A
Colotech Plus A3 90 Bond Plain A
Colotech Plus A4 100 Bond Plain A
Colotech Plus A3 100 Bond Plain A
Colotech Plus A4 120 Heavy-
weight
Colotech Plus A3 120 Heavy-
weight
Color Impression A4 90 Bond Plain A
Color Impression A3 90 Bond Plain A
Color Impression A4 250 Extra Heavy-
weight
Color Impression A3 250 Extra Heavy-
weight
Van Hawk Paper A4 70 Plain Plain B
Van Hawk Paper A3 70 Plain Plain B
Van Hawk Paper 8.5
x
11
70 Plain Plain B
Heavyweight A
Heavyweight A
Extra
Heavyweight A
Extra
Heavyweight A
Van Hawk Paper 8.5
x
14
Van Hawk Paper A4 80 Bond Plain A
Van Hawk Paper A3 80 Bond Plain A
70 Plain Plain B
43
Page 44

2 Paper and Other Media
Paper and Other Media
2
Paper Name Size
Van Hawk Paper 8.5
Van Hawk Paper 8.5
J Paper A4 82 Bond Plain A
J Paper A3 82 Bond Plain A
J Paper B4 82 Bond Plain A
JD Paper A4 98 Bond Plain A
JD Paper A3 98 Bond Plain A
JD Paper B4 98 Bond Plain A
Multi Purpose
Paper in Yellow &
Black Label
Multi Purpose
Paper in Yellow &
Black Label
Basis Weight
(gsm)
80 Bond Plain A
x
11
80 Bond Plain A
x
14
A4 75 Plain Plain B
A3 75 Plain Plain B
Paper
Type
*1
Image
Quality
*2
Notes / Countermeasure
RECYCLE PAPER
SHIH-TZU
Quality A4 70 Plain Plain B
Quality A3 70 Plain Plain B
Quality B4 70 Plain Plain B
Quality B5 70 Plain Plain B
Alcott A4 80 Bond Plain A
Alcott B4 80 Bond Plain A
Alcott 8.5
Roxy Paper A4 80 Bond Plain A
Roxy Paper B5 80 Bond Plain A
Roxy Paper 8.5
(Recycled)
B4 70 Plain Plain C
80 Bond Plain A
x
11
80 Bond Plain A
x
11
A4 80 Bond Plain A
A3 80 Bond Plain A
(Recycled)
(Recycled)
Star (Package:
Orange)
44
B4 80 Bond Plain A
A4 70 Plain Plain B
Page 45

Paper Types
Paper Name Size
Star (Package:
Orange)
Star (Package:
Orange)
Paper One A4 80 Bond Plain A
Paper One A3 80 Bond Plain A
Paper One B4 80 Bond Plain A
Paper One B5 80 Bond Plain A
Paper One 8k 80 Bond Plain A
Paper One A4 70 Plain Plain B
Paper One A3 70 Plain Plain B
Paper One B4 70 Plain Plain B
Paper One B5 70 Plain Plain B
Star A4 80 Bond Plain A
Star A3 80 Bond Plain A
Star B4 80 Bond Plain A
Basis Weight
(gsm)
B4 70 Plain Plain B
A3 70 Plain Plain B
Paper
Type
*1
Image
Quality
*2
Notes / Countermeasure
Paper and Other Media
2
Colotech Plus A3 100 Bond Plain A
Colotech Plus A4 120 Heavy-
weight
Colotech Plus A3 120 Heavy-
weight
Colotech Plus A4 160 Heavy-
weight
Colotech Plus A3 160 Heavy-
weight
Colotech Plus A4 250 Extra Heavy-
weight
Colotech Plus A3 250 Extra Heavy-
weight
Excel A4 80 Bond Plain A
Excel A3 80 Bond Plain A
Blue wrap-4Hole
Punch
Reflex A4 80 Bond Plain A
Reflex A3 80 Bond Plain A
Double A A4 80 Bond Plain A
A4 80 Bond Plain A
Heavyweight A
Heavyweight A
Heavyweight A
Heavyweight A
Extra
Heavyweight A
Extra
Heavyweight A
z
Automatic duplexing is not
available.
z
Automatic duplexing is not
available.
Double A A3 80 Bond Plain A
Warrior A3 80 Bond Plain A
Digital Plus A4 75 Plain Plain B
Digital Plus A3 75 Plain Plain B
Jet Set A4 70 Plain Plain B
45
Page 46

2 Paper and Other Media
Paper and Other Media
2
Paper Name Size
Basis Weight
(gsm)
Paper
Type
*1
Image
Quality
Jet Set A3 70 Plain Plain B
Jet Set A4 80 Bond Plain A
Jet Set A3 80 Bond Plain A
Xcite (Red) A4 80 Bond Plain A
Xcite (Red) A3 80 Bond Plain A
N000 A4 80 Bond Plain A
Multi Purpose (Red
A4 80 Bond Plain A
& White
Packaging)
Recycled Supreme A4 80 Bond Plain A
Red Label A4 80 Bond Plain A
Performer Plus A4 80 Bond Plain A
Performer Plus A3 80 Bond Plain A
*1 : Select the paper type setting for the paper loaded on a tray. For more information, refer to "Changing the Paper Settings"
(P.60).
*2 : Most ideal image quality with the paper can be obtained by setting the image quality for each type of paper. For more
information on the settings, refer to "Image Quality" (P.154).
*2
Notes / Countermeasure
Special Media
You can use the following special media such as postcards and envelopes:
Paper Name Size
3R98204 A4 Unknown Trans-
3R96019 A4 Unknown Heavy-
L515 Unknown Trans-
P801 A4 Unknown Trans-
Basis Weight
(gsm)
Paper
*1
Type
parency
weight
parency
parency
Image
Quality
Heavyweight C
*2
-
-
-
Notes / Countermeasure
z
Load transparencies with the
edge without the white stripe
facing the feeding slot of the
tray.
z
Small white dots may appear
on prints due to electric
discharge of paper.
z
Printed transparencies may
stick together when they are
delivered.
z
Small white dots may appear
on prints due to electric
discharge of paper.
z
The paper is charged with
static electricity after a copy or
print job.
z
When using Tray 5, insert
another type of paper at the
bottom of the stack before
loading transparencies.
46
Page 47

Paper Types
Paper Name Size
Basis Weight
(gsm)
Paper
Type
*1
24Up A4 Unknown Labels -
8Up A4 Unknown Labels -
1Up A4 Unknown Labels -
Laser card
040P00142
Universal
Transparenc y Plain
A4 Card 100 Extra Heavy-
weight
A4 Unknown Trans-
parency
115MIC
V510 A4 Unknown Trans-
parency
Image
Quality
Heavyweight A
*2
Extra
-
-
Notes / Countermeasure
z
Print one sheet at a time, using
Tray 5.
z
Do not reuse the used label or
partially peeled label.
z
Print one sheet at a time, using
Tray 5.
z
Do not reuse the used label or
partially peeled label.
z
Print one sheet at a time, using
Tray 5.
z
Do not reuse the used label or
partially peeled label.
z
When using Tray 5, load the
paper with the center slightly
curling upward.
z
When using the Finisher-A1 to
deliver the output, load the
paper with the edge without a
card attached facing the
feeding slot of the tray.
z
If two or more sheets of
transparencies are being fed
simultaneously (double-feed),
load one sheet at a time.
z
Transfer deterioration might
be occurred when copying or
printing in color. Also, toner
may spatter on color images in
prints.
z
When using Tray 5, insert
another type of paper at the
bottom of the stack before
loading transparencies.
Paper and Other Media
2
16Up A4 Unknown Labels -
*1 : Select the paper type setting for the paper loaded on a tray. For more information, refer to "Changing the Paper Settings"
(P.60).
*2 : Most ideal image quality with the paper can be obtained by setting the image quality for each type of paper. For more
information on the settings, refer to "Image Quality" (P.154).
Note • For more information on special paper such as other heavyweight paper, contact our Customer
Support Center.
Limited Paper
You can use the following paper with limitations:
Paper Name Size
Basis Weight
(gsm)
Colotech Plus A4 200 Extra Heavy-
Paper
Type
weight
Image
*1
Quality
Heavyweight A
*2
Extra
Notes / Countermeasure
z
Print one sheet at a time, using
Tray 5.
z
When using Tray 5, load the
paper with the center slightly
curling upward.
47
Page 48

2 Paper and Other Media
Paper and Other Media
2
Paper Name Size
Basis Weight
(gsm)
Paper
Type
*1
Colotech Plus A3 200 Extra Heavy-
weight
Colotech Plus A4 220 Extra Heavy-
weight
Colotech Plus A3 220 Extra Heavy-
weight
Image
Quality
Extra
Heavyweight A
Extra
Heavyweight A
Extra
Heavyweight A
Xplore Paper A4 70 Plain Plain B
Xplore Paper A3 70 Plain Plain B
Colotech Plus A4 280 Extra Heavy-
weight
Extra
Heavyweight
Plus
*2
Notes / Countermeasure
z
Print one sheet at a time, using
Tray 5.
z
When using Tray 5, load the
paper with the center slightly
curling upward.
z
Print one sheet at a time, using
Tray 5.
z
When using Tray 5, load the
paper with the center slightly
curling upward.
z
Print one sheet at a time, using
Tray 5.
z
When using Tray 5, load the
paper with the center slightly
curling upward.
Colotech Plus A3 280 Extra Heavy-
weight
*1 : Select the paper type setting for the paper loaded on a tray. For more information, refer to "Changing the Paper Settings"
(P.60).
*2 : Most ideal image quality with the paper can be obtained by setting the image quality for each type of paper. For more
information on the settings, refer to "Image Quality" (P.154).
"High temperature and humidity conditions" in the above table means an environment with
temperature of 28 °C and humidity of 85%, and "low temperature and humidity conditions"
means an environment with temperature of 10 °C and humidity of 15%.
Extra
Heavyweight
Plus
48
Page 49

Unusable Paper
Using paper and transparencies not recommended by Fuji Xerox may cause a paper jam or
machine malfunction. Use paper and transparencies recommended by Fuji Xerox.
z
z
z
z
z
z
z
z
z
Transparencies
Symphony (Pastel Pink etc)
Damp or wet paper
Paper pre-printed with aother printer or copying machine
Wrinkled, creased, or ripped paper
Envelopes that are not flat, or that have clasps
Color paper with surface treatments
Paper with rough surface, such as pulp paper or fibrous paper
Symphony (Pastel Pink etc.) A4 80 gsm
Paper Types
Paper and Other Media
Storing and Handling Paper
Please keep the following points in mind when storing paper
z
Store paper inside a cabinet or other dry place. Paper that has absorbed moisture can
result in paper jams and lower image quality.
z
After opening a package of paper, wrap and store any remaining paper. We recommend
that you store remaining paper in moisture prevention packets.
z
Store paper on a flat surface to prevent bends or warping.
Please adhere to the following points when loading paper in a tray
z
Align the stack of paper neatly before setting it in a tray.
z
Do not use paper that is creased or wrinkled.
z
Do not use warped or curled paper.
z
Do not load paper of mixed sizes together into a tray.
z
Carefully fan transparencies and labels before use. Otherwise, the paper may stick
together, resulting in paper jams, or multiple sheets being fed to the machine
simultaneously.
z
When continuously outputting on transparencies, transparency sheets may stick
together. After printing 20 or more sheets, remove them from the output tray and fan
them to cool them down.
2
49
Page 50

2 Paper and Other Media
Loading Paper
This section describes how to load paper.
Types of paper loaded in trays
Paper and Other Media
2
The machine automatically detects the size and orientation of loaded paper in a tray, but
not a paper type. Normally, each tray is set to plain paper. When loading paper other than
plain paper, you must change the paper type setting. You can name paper types and can set
up to five paper types as user-defined paper.
For information on changing the paper type settings, refer to "Changing the Paper Settings" (P.60).
Automatic Tray Selection
If you set paper source on the [Paper/Output] tab to [Paper Tray] in the PCL print driver's
screen when printing, the machine automatically selects the paper tray according to the size
and orientation of the document to be printed. This is called [Automatic Tray Selection].
When copying, selecting [Auto Select] for [Paper Supply] enables automatic tray selection.
If the machine detects two or more corresponding trays for the automatic tray selection, the
machine selects the tray with the highest priority specified in [Paper Type Priority] among
the trays set under [Paper Type Settings]. Trays whose [Paper Type Priority] setting is set to
[Auto Paper Off] are ignored in automatic tray selection. Also, if the [Paper Type Priority]
settings are identical, the tray priority is determined by [Paper Tray Priority].
Note • Some trays may not be selected in automatic tray selection depending on the setting of that tray for
[Auto Paper Select]. For more information, refer to "Change Settings" (P.152).
• Tray 5 cannot be selected in automatic tray selection.
• When the paper runs out during copying or printing, select a tray containing the same sized paper
and orientation, and the machine continues copying or printing (Auto Tray Switching feature). The
machine cannot switch to a tray containing a paper type for which [Paper Type Priority] is set to
[Auto Paper Off].
For information about [Paper Type], [Paper Type Priority], and [Paper Tray Priority] settings, and the paper substitute
feature, refer to "Paper Tray Settings" (P.152). You can also set these settings from CentreWare Internet Services.
Adding paper
When the machine runs out of paper during copying or printing, a message appears on the
touch screen. Add paper according to the message instructions. Copying or printing
automatically resumes when paper is added.
Note • Carefully fan the paper before loading it in a tray. Otherwise, the paper may stick together, resulting
in paper jams, or multiple sheets being fed to the machine simultaneously.
Loading Paper in Trays 1 to 4
The following describes the procedures to load paper in Trays 1 to 4.
When the machine runs out of paper during copying or printing, a message appears on the
touch screen. Add paper according to the message instructions. Copying or printing
automatically resumes when paper is added.
Note • Carefully fan the paper before loading it in a tray. Otherwise, the paper may stick together, resulting
in paper jams.
For information on changing the paper size and orientation, refer to "Changing the Paper Size for Trays 1 to 4" (P.55).
50
Page 51

Loading Paper
1 Pull out the tray until it stops.
Important • While the machine is processing a job, do not
pull out the tray that is being used for the job.
• To prevent paper jams or erroneous
detection of loaded paper in a tray by the
machine, do not add paper on top of any
remaining paper in the tray. Remove any
remaining paper in the tray, and then load
that paper on top of the newly loaded paper.
• Do not pull out all the trays at the same time.
Otherwise, the machine gets inclined and
turns over, which may cause injuries.
2 Load and align the edge of the paper against
the left edge of the tray, with the side to be
copied or printed on facing up.
Important • Do not load paper above the maximum fill
line ("MAX" in the right figure). It may cause
paper jams or machine malfunction.
• Do not place any paper or objects in the
empty space on the right side of Trays 1 to 4.
It may cause paper jams or machine
malfunction.
3 Push the tray in gently until it stops.
Important • When inserting the tray, push it gently. Forcibly pushing the tray in may cause machine malfunction.
Paper and Other Media
2
Loading Paper in Tray 3 (When Tandem Tray Module is Installed)
The following describes the procedure for loading paper in Tray 3 when the Tandem Tray
Module is installed.
When the machine runs out of paper during copying or printing, a message appears on the
touch screen. Add paper according to the message instructions. Copying or printing
automatically resumes when paper is added.
Note • Carefully fan the paper before loading it in a tray. Otherwise, the paper may stick together, resulting
in paper jams.
For information on changing the paper size and orientation, refer to "Changing the Paper Size for Tray 3 (When Tandem
Tray Module is Installed)" (P.56).
1 Pull out the tray until it stops.
Important • Make sure to pull out the tray slowly. When
the tray is being pulled out with force, the
tray may possibly hit your knees or other
parts of your body causing injuries.
• While the machine is processing a job, do not
pull out the tray that is being used for the job.
• To prevent paper jams or erroneous
detection of loaded paper in a tray by the
machine, do not add paper on top of any
remaining paper in the tray.
51
Page 52

2 Paper and Other Media
2 Load and align the edge of the paper against
the left edge of the tray, with the side to be
copied or printed on facing down.
Important • Do not load paper above the maximum fill
line ("MAX" in the right figure). It may cause
paper jams or machine malfunction.
Paper and Other Media
3 Push the tray in gently until it stops.
Loading Paper in Tray 4 (When Tandem Tray Module is Installed)
The following describes the procedure for loading paper in Tray 4 when the Tandem Tray
Module is installed.
2
When the machine runs out of paper during copying or printing, a message appears on the
touch screen. Add paper according to the message instructions. Copying or printing
automatically resumes when paper is added.
Note • Carefully fan the paper before loading it in a tray. Otherwise, the paper may stick together, resulting
in paper jams.
For information on changing the paper size and orientation, refer to "Changing the Paper Size for Tray 4 (When Tandem
Tray Module is Installed)" (P.57).
1 Pull out Tray 4 until it stops.
Important • Make sure to pull out the tray slowly. When
the tray is being pulled out with force, the
tray may possibly hit your knees or other
parts of your body causing injuries.
• While the machine is processing a job, do not
pull out the tray that is being used for the job.
• To prevent paper jams or erroneous
detection of loaded paper in a tray by the
machine, do not add paper on top of any
remaining paper in the tray.
2 Load and align the edge of the paper against
the left edge of the tray, with the side to be
copied or printed on facing down.
Important • Do not load paper above the maximum fill
line ("MAX" in the right figure). It may cause
paper jams or machine malfunction.
3 Push the tray in gently until it stops.
Loading Paper in Tray 5
When printing or copying on a size or type of paper that cannot be set in Trays 1 to 4, use
Tray 5. The following describes the procedures to load paper in Tray 5. For printings, specify
the instructions using the [Paper/Output] tab in the print driver. Also specify the type of
paper to be loaded.
52
Page 53

Loading Paper
Important • To prevent paper jams and erroneous detection of paper loaded in the tray by the machine, do not
take out paper of a package until the tray runs out of paper.
Note • Carefully fan the paper before loading it in a tray. Otherwise, the paper may stick together, resulting
in paper jams, or multiple sheets being fed to the machine simultaneously.
1 Open Tray 5.
Note • If necessary, pull out the extension tray. The
extension tray can be extended in two stages.
Pull out the extension tray gently.
2 Load paper with the side to be copied or
printed on facing down, inserting the paper
until its edge lightly touches against the paper
feed entrance.
Important • Do not load mixed paper types into the tray.
• Do not load paper above the maximum fill
line. It may cause paper jams or machine
malfunction.
• Depending on the type of the heavyweight
paper, paper may not be fed to the machine
or image quality may deteriorate.
Paper and Other Media
2
3 Adjust the paper guides to align the edges of
the paper loaded.
4 Instruct a copy or print job.
Loading Paper in Tray 6 (HCF B1)
The following describes the procedure for loading paper into Tray 6 (HCF B1).
When the machine runs out of paper during copying or printing, a message is displayed on
the touch screen. Add paper according to the displayed instructions. Copying or printing is
automatically resumed when paper is added.
Note • Carefully fan the paper before loading it in a tray. Otherwise, the paper may stick together, resulting
in paper jams.
For information on changing the paper size and orientation, refer to "Changing the Paper Size" (P.55).
53
Page 54

2 Paper and Other Media
CAUTION
Paper and Other Media
2
1 Pull out Tray 6 until it stops.
Make sure to pull out the tray slowly. If
the tray is pulled out with too much force,
the tray might possibly hit your knees or
other parts of your body and cause
injuries.
Important • While the machine is processing a job, do not
pull out the tray that is being used for the job.
• To prevent paper jams or erroneous detection of loaded paper in a tray by the machine, do not add
paper on top of any remaining paper in the tray.
2 Load and align the edge of the paper against
the right edge of the tray with the side to be
copied or printed on facing down.
Important • Do not load paper above the maximum fill
line ("MAX" in the right figure). It may cause
paper jams or machine malfunction.
3 Push the tray in gently until it stops.
54
Page 55

Changing the Paper Size
This section describes how to change the paper size in Trays 1 to 4, and 6.
Note • The types of paper in Trays 1 to 4, and 6 are preset. Normally, Trays 1 to 4 are set to plain paper.
When changing to a different paper type, change the paper quality settings to match the type of
paper to be loaded so that you can maintain high quality printing.
For more information on paper type settings, refer to "Changing the Paper Settings" (P.60).
• Non-standard size paper can be loaded in Trays 1 to 4. When loading non-standard size paper, you
must register the paper size. For information on registering paper sizes, refer to "Paper Size" (P.152).
For more information on corresponding paper sizes, refer to "Paper Size Settings" (P.172).
For more information on how to copy on non-standard size paper, refer to "3 Copy" > "Copy" > "Paper Supply (Selecting the
Paper for Copying)" in the User Guide. For more information on how to print on non-standard size paper, refer to the help of
the print driver.
Important • Do not load paper of mixed sizes together into a tray.
Changing the Paper Size
Paper and Other Media
Changing the Paper Size for Trays 1 to 4
The following describes how to change paper size in Trays 1 to 4.
Note • The types of paper in Trays 1 to 4 are preset. There are 16 paper types: Plain paper, Bond paper,
Recycled paper, Transparency, Heavyweight paper, Gloss, Labels, Punched, Letterhead, Pre-Print,
Other, and Custom paper 1 to 5, and normally, plain paper is set. When changing to a different
paper type, change the paper quality settings to match the type of paper to be loaded so that you
can maintain high quality printing.
For more information on paper type settings, refer to "Changing the Paper Settings" (P.60).
• When loading non-standard size paper, you must register the paper size. For information on
registering paper sizes, refer to "Paper Tray Attributes" (P.152).
For more information on how to copy on non-standard size paper, refer to "3 Copy" > "Copy" > "Paper Supply (Selecting the
Paper for Copying)" in the User Guide. For more information on how to print on non-standard size paper, refer to the help of
the print driver.
1 Pull out the Tray until it stops.
Important • While the machine is processing a job, do not
pull out the tray that is being used for the job.
• To prevent paper jams or erroneous
detection of loaded paper in a tray by the
machine, do not add paper on top of any
remaining paper in the tray.
2 Remove any paper loaded in the tray.
2
3 While pinching the two paper guides, move
them to the edges of the paper.
55
Page 56

2 Paper and Other Media
CAUTION
4 Load and align the edge of the paper against
the left side of the tray, with the side to be
copied or printed on facing up.
Important • Do not load paper above the maximum fill
line ("MAX" in the right figure).
5 Push the tray in gently until it stops.
Paper and Other Media
Important • When inserting the tray, push it gently.
Forcibly pushing the tray in may cause
machine malfunction.
Note • Affix the paper size label to the front of the
paper tray.
For more information on paper type settings, refer to "Changing the Paper Settings" (P.60).
Changing the Paper Size for Tray 3 (When Tandem Tray Module is Installed)
2
The following describes how to change paper size in Tray 3 when the Tandem Tray Module
is installed.
1 Pull out Tray 3 until it stops.
Make sure to pull out the tray
slowly. When the tray is being
pulled out with force, the tray may
possibly hit your knees or other
parts of your body causing injuries.
Important • While the machine is processing a job, do not pull out the tray that is being used for the job.
• To prevent paper jams or erroneous detection of loaded paper in a tray by the machine, do not add
paper on top of any remaining paper in the tray.
2 Remove any paper loaded in the tray.
3 Pinch the paper guide and slide it to the desired
paper size.
4 Load and align the edge of the paper against
the left edge of the tray, with the side to be
copied or printed on facing down.
Important • Do not load paper above the maximum fill
line. It may cause paper jams or machine
malfunction.
5 While pinching the paper guide, lightly align
the edge to the edge of the paper.
6 Push the tray in gently until it stops.
Note • Affix the paper size label to the front of the paper tray.
56
Page 57

Changing the Paper Size
CAUTION
7 Specify the type of loaded paper when you have changed the paper type.
For information on how to set the paper types, refer to "Changing the Paper Settings" (P.60).
Changing the Paper Size for Tray 4 (When Tandem Tray Module is Installed)
The following describes how to change paper size in Tray 4 when the Tandem Tray Module
is installed.
1 Pull out Tray 4 until it stops.
Make sure to pull out the tray slowly.
When the tray is being pulled out with
force, the tray may possibly hit your knees
or other parts of your body causing
injuries.
Important • While the machine is processing a job, do not pull out the tray that is being used for the job.
• To prevent paper jams or erroneous detection of loaded paper in a tray by the machine, do not add
paper on top of any remaining paper in the tray.
2 Remove any paper loaded in the tray.
3 Pinch the paper guide and slide it to the desired
paper size.
Paper and Other Media
2
4 Load and align the edge of the paper against
the left edge of the tray, with the side to be
copied or printed on facing down.
Important • Do not load paper above the maximum fill
line. It may cause paper jams or machine
malfunction.
5 While pinching the paper guide, lightly align
the edge to the edge of the paper.
6 Push the tray in gently until it stops.
Note • Affix the paper size label to the front of the paper tray.
7 Specify the type of loaded paper when you have changed the paper type.
For information on how to set the paper types, refer to "Changing the Paper Settings" (P.60).
57
Page 58

2 Paper and Other Media
CAUTION
Changing the Paper Size for Tray 6 (HCF B1)
The following describes how to change paper size in Tray 6 (HCF B1).
1 Pull out the Tray 6 until it stops.
Paper and Other Media
2
Make sure to pull out the tray slowly. If
the tray is pulled out with too much force,
the tray might possibly hit your knees or
other parts of your body and cause
injuries.
Important • While the machine is processing a job, do not
pull out the tray that is being used for the job.
• To prevent paper jams or erroneous detection of loaded paper in a tray by the machine, do not add
paper on top of any remaining paper in the tray.
2 Remove any paper loaded in the tray.
3 Open the end guide (1) and unscrew the screw
(2). And then remove the guide from the tray.
4 Insert the small protrusions at the bottom of the guide into the holes corresponding to the
paper size (1). Insert the protrusion on the tray into a hole corresponding to the paper size
on the top of the guide, and tighten up the screw (2).
5 Unscrew the screw of the front guide and
remove the guide from the tray.
58
Page 59

Changing the Paper Size
6 Insert the small protrusions at the bottom of the guide into the holes corresponding to the
paper size (1). Insert the protrusion on the tray into a hole corresponding to the paper size
on the top of the guide, and tighten up the screw (2).
7 Pull up the lever of the end guide (1). Move the
lever along the slot, and set it at the position
corresponding to the paper size (2). And then
press the lever down (3).
Important • Adjust the end guide correctly to the size of
the paper. If the end guide is not adjusted
correctly, the machine cannot feed the paper
properly, resulting in paper jams.
Note • The slot to the left of 8.5" is not used.
Paper and Other Media
2
8 Open the end guide (1), and load and align the
edge of the paper against the right edge of the
tray with the side to be copied or printed on
facing down (2).
Important • Do not load paper above the maximum fill
line ("MAX" in the right figure). It may cause
paper jams or machine malfunction.
9 Close the end guide securely.
10 Push the tray in gently until it stops.
59
Page 60

2 Paper and Other Media
<Log In/Out> button
Changing the Paper Settings
This section describes how to change the paper type for Trays and how to set image quality
processing by the individual paper type.
After loading paper in a tray, specify the type of paper loaded and select image quality for
Paper and Other Media
the paper type. Setting Image quality for each paper type enables you to print with the most
suitable image quality for the paper type.
For information on image quality processing for each paper type, refer to "Image Quality" (P.154).
Note • Users can name Custom 1 to Custom 5 displayed in the paper type settings. For information on how
to set names to Custom 1 to Custom 5, refer to "Custom Paper Name/Color" (P.152).
• You can change the paper type setting without entering to the System Administration mode on the
[Setup] screen, which is displayed by selecting [Setup] in the [Services Home] screen if you configure
the settings in advance. For more information, refer to "Customize Paper Supply Screen" (P.153).
1 Press the <Log In/Out> button.
2
2 Enter the system administrator's user ID with
the numeric keypad or the keyboard displayed
on the screen, and select [Enter].
When a passcode is required, select [Next] and
enter the system administrator's passcode, and
select [Enter].
Note • The default user ID is "11111".
• The default passcode is "x-admin".
3 Select [Tools] on the [Services Home] screen.
Note • When the [Services Home] screen is not
displayed on the touch screen, press the
<Services Home> button.
4 Select [System Settings] > [Common Service
Settings] > [Paper Tray Settings].
60
Page 61

5 Select [Paper Tray Attributes].
6 Select a paper tray for changing the paper type
setting under [Items].
Changing the Paper Settings
Paper and Other Media
7 Select [Change Settings].
8 Select the [Paper Type], [Paper Size], [Paper
Color], and [Auto Paper Select] respectively.
9 Select [Cancel], [Save], [Confirm], or [Close] repeatedly until the [Paper Tray Settings]
screen is displayed.
10 Select [Image Quality].
2
11 Select the paper type for changing the image
quality settings under [Items], and then select
[Change Settings].
Note • Select [ ] to display the previous screen or
[ ] to display the next screen.
61
Page 62

2 Paper and Other Media
Paper and Other Media
2
12 Select the image quality, and then select
[Save].
13 Make sure that the paper type you selected is displayed under [Current Settings] of [Items],
and then select [Close].
14 Select [Close] repeatedly until the [Tools] screen is displayed.
15 Select [Close].
62
Page 63

3 Maintenance
This chapter describes how to replace consumables, clean the machine, calibrate colors,
print a report/list, and delete a print job with an invalid User ID.
z
Replacing Consumables..............................................................................................................64
z
Cleaning the Machine..................................................................................................................87
z
Executing Calibration...................................................................................................................94
z
Executing 2 Sided Color Scanning Calibration..................................................................98
z
Printing a Report/List................................................................................................................100
z
Deleting a Private Charge Print Job with an Invalid User ID....................................101
z
Setting Restore Tool..................................................................................................................102
Page 64

3 Maintenance
WARNING
Replacing Consumables
The machine is provided with the following consumables and periodic replacement parts.
We recommend the use of the following consumables as they are manufactured to meet the
specifications of the machine.
Maintenance
3
Type of Consumables/
Periodic Replacement Parts
Toner cartridge K (Black) CT201370 1 unit/box
Toner cartridge C (Cyan) CT201371 1 unit/box
Toner cartridge M (Magenta) CT201372 1 unit/box
Toner cartridge Y (Yellow) CT201373 1 unit/box
Waste toner container CWAA0751 1 unit/box
Drum cartridge CT350851 1 unit/box
Staple cartridge (Finisher-C1 with Booklet
Maker)*
Staple cartridge (Finisher-A1/B1/C1/FinisherC1 with Booklet Maker)*
Staple cartridge (Booklet Maker Unit for
Finisher-B1)*
Stamp Replacement Kit F451 1 unit/box
*1 : For Finisher-C1 with Booklet Maker
*2 : For Finisher-A1, Finisher-B1, Finisher-C1, and Finisher-C1 with Booklet Maker
*3 : For Booklet Maker Unit for Finisher-B1
Note • We recommend that you always keep spare consumables/periodic replacement parts available.
1
2
3
Product Code Quantity/Box
CWAA0749 4 sets/box
CWAA0540 3 sets/box
CWAA0728 4 sets/box
z
Use a broom or a wet cloth to wipe off spilled toner. Never use a vacuum cleaner for the
spills. It may catch fire by electric sparks inside the vacuum cleaner and cause explosion.
If you spill a large volume of toner, contact your local Fuji Xerox representative.
z
Never throw a toner cartridge into an open flame. Remaining toner in the cartridge may
catch fire and cause burn injuries or explosion.
If you have a used toner cartridge no longer needed, contact your local Fuji Xerox
representative for its disposal.
z
Never throw a waste toner container into an open flame. Toner may catch fire and
cause burn injuries or explosion.
If you have a used waste toner container no longer needed, contact your local Fuji
Xerox representative for its disposal.
64
Page 65

Replacing Consumables
CAUTION
z
Keep drum cartridges and toner cartridges out of the reach of children. If a child
accidentally swallows toner, spit it out, rinse mouth with water, drink water and consult
a physician immediately.
z
When replacing drum cartridges and toner cartridges, be careful not to spill the toner.
In case of any toner spills, avoid contact with clothes, skin, eyes and mouth as well as
inhalation.
z
If toner spills onto your skin or clothing, wash it off with soap and water.
If you get toner particles in your eyes, wash it out with plenty of water for at least 15
minutes until irritation is gone. Consult a physician if necessary.
If you inhale toner particles, move to a fresh air location and rinse your mouth with
water.
If you swallow toner, spit it out, rinse your mouth with water, drink plenty of water and
consult a physician immediately.
Maintenance
Handling consumables/periodic replacement parts
z
Do not store boxes of consumables/periodic replacement parts upright.
z
Do not unpack consumables/periodic replacement parts before use. Avoid storing
consumables/periodic replacement parts in the following locations:
- In high temperature and humid locations
- Near heat-generating devices
- Areas exposed to direct sunlight
- Dusty areas
z
When using consumables/periodic replacement parts, carefully read precautions for use.
Precautions for use are instructed on their bodies or packages, or a precaution sheet is
included in their packages.
z
We recommend always keeping spare consumables/periodic replacement parts in stock.
z
When calling our Customer Support Center to order consumables/periodical replacement
parts, have the product codes ready.
z
The use of consumables/periodic replacement parts not recommended by Fuji Xerox
could impair machine quality and performance. Use only consumables/periodic
replacement parts recommended by Fuji Xerox.
Checking the status of consumables
You can check the status of consumables on the [Supplies] screen.
For information on consumables, refer to "Supplies" (P.121).
3
The following shows the reference section for each procedure.
Replacing Toner Cartridges ......................................................................................................................................................... 66
Replacing Waste Toner Container (R5) .................................................................................................................................... 68
Replacing Drum Cartridges R1, R2, R3, or R4 (for Customers Having a Spot Maintenance Contract) ..................... 71
Replacing Staple Cartridge (for Finisher-A1) .......................................................................................................................... 75
Replacing Staple Cartridge (for Finisher-B1)........................................................................................................................... 76
Replacing Staple Cartridge (for Finisher-C1 or Finisher-C1 with Booklet Maker)........................................................... 78
Replacing Staple Cartridge (for Booklet Maker Unit for Finisher-B1) ............................................................................... 79
Replacing Staple Cartridge (for Finisher-C1 with Booklet Maker) ..................................................................................... 80
65
Page 66

3 Maintenance
CAUTION
Emptying the Hole Punch Waste Container (for Finisher-B1) .............................................................................................82
Emptying the Hole Punch Waste Container (for Finisher-C1 or Finisher-C1 with Booklet Maker) .............................83
Replacing Stamp (for Duplex Automatic Document Feeder B1-C) ....................................................................................84
Replacing Stamp (for Duplex Automatic Document Feeder B1-PC)..................................................................................85
Replacing Toner Cartridges
The following messages are displayed on the touch screen depending on the amount of
toner remaining. Replace the toner cartridge according to the message.
Maintenance
3
Message*
Please order a Yellow Toner
[Y] Cartridge.
Yellow Toner [Y] Cartridge
needs to be replaced soon.
Yellow Toner [Y] Cartridge
needs to be replaced. -
*1 : The messages in the above table apply to Yellow Toner. "Yellow Toner [Y]" shown in the messages vary depending on the
color and number of the applicable toner.
*2 : The remaining page yield for copy/print jobs is applicable when A4 paper LEF ( ) is used. The value is an estimate and
varies depending on the conditions such as the content printed, dot coverage (area coverage), paper size, paper type, copy/
print density, output image type, and the machine operating environment.
z
Keep drum cartridges and toner cartridges out of the reach of children. If a child
1
Remaining Page yield*
Black: Approx. 3,500 pages
Other than Black: Approx. 2,500
pages
Approx. 40 pages Replace the toner cartridge with
2
You do not need to replace the
Toner Cartridge immediately.
Order the Toner Cartridge
displayed on the screen.
a new one.
The machine will stop. Replace
the toner cartridge with a new
one.
Solution
accidentally swallows toner, spit it out, rinse mouth with water, drink water and consult
a physician immediately.
z
When replacing drum cartridges and toner cartridges, be careful not to spill the toner.
In case of any toner spills, avoid contact with clothes, skin, eyes and mouth as well as
inhalation.
z
If toner spills onto your skin or clothing, wash it off with soap and water.
If you get toner particles in your eyes, wash it out with plenty of water for at least 15
minutes until irritation is gone. Consult a physician if necessary.
If you inhale toner particles, move to a fresh air location and rinse your mouth with
water.
If you swallow toner, spit it out, rinse your mouth with water, drink plenty of water and
consult a physician immediately.
Important • When replacing a toner cartridge, toner may spill and soil the floor. We recommend laying paper on
the floor beforehand.
• The use of toner cartridges not recommended by Fuji Xerox may degrade image quality and
performance. Use only toner cartridges recommended by Fuji Xerox.
• When the remaining amount of toner is low, the machine may stop printing and display a message.
If this occurs, replace the toner cartridge to resume copying or printing.
• Replace toner cartridges while the machine is on.
• Copy or print density may decrease slightly after the message "Please order a XXX Toner Cartridge"
appears on the touch screen.
66
Page 67

• If you replace a toner cartridge with a partially used toner cartridge, the number of pages that you
WARNING
can copy or print after the message "Please order a XXX Toner Cartridge" is displayed may differ
significantly from the values described in the above table.
1 Make sure that the machine is not operating, and
open the front cover.
Replacing Consumables
2 Put your hand under the dent of the toner
cartridge indicated in the message, and slightly
lift up the cartridge.
Note • "Y", "M", "C", or "K" indicates Yellow, Magenta,
Cyan, and Black, respectively.
3 Pull out the toner cartridge slowly, and slide it out.
Never throw a toner cartridge into an open
flame. Remaining toner in the cartridge may
catch fire and cause burn injuries or
explosion.
If you have a used toner cartridge no longer
needed, contact your local Fuji Xerox
representative for its disposal.
Important • Slide out the toner cartridge gently. Otherwise, toner may spill from the cartridge.
• If you have a used toner cartridge which is no longer needed, contact our Customer Support Center
for its disposal.
Maintenance
3
4 Take the new toner cartridge of the same color
out of the box, and shake the cartridge up and
down and left and right for ten times.
Important • Do not touch the shutter part.
67
Page 68

Maintenance
3 Maintenance
5 Hold the cartridge with the arrow facing up, and
push the cartridge in slowly until it stops.
3
6 Close the front cover.
Note • If the front cover is not closed completely, a message appears and the machine will remain paused.
Replacing Waste Toner Container (R5)
The waste toner container holds used toner. The following messages are displayed on the
touch screen according to the status of the waste toner container. Follow the messages as
necessary.
Message
Please order a Waste Toner
Container.
Page yield after the
message is displayed*
ApeosPort-IV C5575,
DocuCentre-IV C5575:
- Approx. 2,300 pages
ApeosPort-IV C4475,
DocuCentre-IV C4475:
- Approx. 1,500 pages
ApeosPort-IV C3375,
DocuCentre-IV C3375:
- Approx. 1,200 pages
ApeosPort-IV C3373,
DocuCentre-IV C3373:
- Approx. 1,100 pages
ApeosPort-IV C2275:
- Approx. 600 pages
Solution
Order the waste toner container.
68
The Waste Toner Container
needs to be replaced.
* : The remaining page yield for copy /print jobs is applicable when A4 paper LEF ( ) is used. The value is an estimate and varies
depending on the conditions such as the content printed, dot coverage (area coverage), paper size, paper type, copy/print
density, output image type, and machine operating environment.
-The machine will stop. Replace
the waste toner container with a
new one.
Page 69

Replacing Consumables
WARNING
Waste Toner Container
When replacing the waste toner container, clean the LED printhead with the supplied
cleaning bar to prevent inconsistencies in density or color in copies and prints.
Use a broom or a wet cloth to wipe off spilled toner. Never use a vacuum cleaner for the
spills. It may catch fire by electric sparks inside the vacuum cleaner and cause explosion.
If you spill a large volume of toner, contact your local Fuji Xerox representative. Never
throw a waste toner container into an open flame. Toner may catch fire and cause burn
injuries or explosion.
If you have a used waste toner container no longer needed, contact your local Fuji Xerox
representative for its disposal.
Important • Do not touch the five gray-colored sponge parts on the back side of the waste toner container.
Otherwise, your hands may get dirty with toner.
• When replacing the waste toner container, toner may spill and soil the floor. We recommend laying
paper on the floor beforehand.
• The proper disposal of used waste toner containers is required. Return the old waste toner container
to our Customer Support Center.
• The use of waste toner containers not recommended by Fuji Xerox may degrade image quality and
performance. Use only waste toner containers recommended by Fuji Xerox.
1 Make sure that the machine is not operating, and
open the front cover.
2 Pull out the toner cartridge slowly while holding
its left side with one hand.
Maintenance
3
3 Prepare a new waste toner container out of a box.
69
Page 70

Maintenance
WARNING
3 Maintenance
4 While holding the left side of the waste toner
container, push the bottle in until it clicks.
5 Insert the used waste toner container into the
supplied plastic bag and then seal it firmly with
the zipper.
3
6 Carefully place the old waste toner container into
the empty box with both hands.
Never throw a waste toner container into
an open flame. Toner may catch fire and
cause burn injuries or explosion.
If you have a used waste toner container
no longer needed, contact your local Fuji
Xerox representative for its disposal.
7 Rotate the release lever of the drum cartridge
cover counterclockwise.
8 Lower the cover.
Note • You can now see the drum cartridge.
70
Page 71

9 Slowly slide out the cleaning bars housed within
the LED printhead until it stops. The cleaning bars
are located in the cleaning connection just under
the drum cartridges (R1, R2, R3, or R4).
Note • Slide out the cleaning bars until you see "zzz".
Important • Do not remove the cleaning bars from the
housing.
10 Slowly slide the cleaning bars back into place.
Note • Clean the four LED printheads (R1 to R4) by
sliding the cleaning bars back and fourth for two
or three times, respectively.
Replacing Consumables
Maintenance
11 Return the cover to the original position.
Note • Push the cover until it clicks into place.
12 Rotate the release lever clockwise to lock the
cover.
13 Close the front cover.
Note • If the front cover is not closed completely, a message appears and the machine will remain paused.
3
Replacing Drum Cartridges R1, R2, R3, or R4 (for Customers Having a Spot Maintenance Contract)
The machine displays the following messages when a drum cartridge needs to be replaced.
When the message is displayed, contact our Customer Support Center.
Refer to this section and locate the position or the indicated drum cartridge (R1, R2, R3, or
R4), and replace the drum cartridge.
71
Page 72

3 Maintenance
CAUTION
If you continue to copy or print without replacing the drum cartridge after the message is
displayed on the touch screen, the machine will stop after copying or printing the number of
pages shown in the following table.
Message Remaining Page yield Solution
Maintenance
3
Please order a Drum
Cartridge RX.
Drum Cartridge needs
to be replaced.
ApeosPort-IV C5575,
DocuCentre-IV C5575:
Black: Approx. 6,000 pages
Other than Black: Approx. 5,000 pages
ApeosPort-IV C4475,
DocuCentre-IV C4475:
Black: Approx. 5,000 pages
Other than Black: Approx. 5,000 pages
ApeosPort-IV C3375,
DocuCentre-IV C3375:
Black: Approx. 3,000 pages
Other than Black: Approx. 3,000 pages
ApeosPort-IV C3373,
DocuCentre-IV C3373:
Black: Approx. 3,000 pages
Other than Black: Approx. 3,000 pages
ApeosPort-IV C2275:
Black: Approx. 4,000 pages
Other than Black: Approx. 3,000 pages
-Replace the drum
You do not need to
replace the Drum
Cartridge immediately.
Order the Drum
Cartridge displayed on
the screen.
cartridge with a new
one.
z
Keep drum cartridges and toner cartridges out of the reach of children. If a child
accidentally swallows toner, spit it out, rinse mouth with water, drink water and consult
a physician immediately.
z
When replacing drum cartridges and toner cartridges, be careful not to spill the toner.
In case of any toner spills, avoid contact with clothes, skin, eyes and mouth as well as
inhalation.
z
If toner spills onto your skin or clothing, wash it off with soap and water.
If you get toner particles in your eyes, wash it out with plenty of water for at least 15
minutes until irritation is gone. Consult a physician if necessary.
If you inhale toner particles, move to a fresh air location and rinse your mouth with
water.
If you swallow toner, spit it out, rinse your mouth with water, drink plenty of water and
consult a physician immediately.
Important • The use of drum cartridges not recommended by Fuji Xerox may degrade image quality and
performance. Use only drum cartridges recommended by Fuji Xerox.
Note • Do not expose drum cartridges to direct sunlight or strong light from indoor fluorescent lighting. Do
not touch or scratch the surface of the drum. Doing so may result in unsatisfactory printing.
• The remaining page yield is applicable when A4 paper LEF ( ) is used. The value is an estimate
and varies depending on the conditions such as the paper size, the paper orientation, the number of
pages continuously print, and the machine operating environment.
• Images output from the machine may get dirty after the message "Please order a Drum Cartridge
XXX RX" appears on the touch screen.
72
Page 73

1 Make sure that the machine is not operating,
and open the front cover.
2 Rotate the release lever of the drum cartridge
cover counterclockwise.
Replacing Consumables
Maintenance
3 Lower the cover.
Note • The drum cartridge is unlocked.
4 Grasp the handle of the drum cartridge
indicated in the message (R1, R2, R3, or R4)
and gently slide out the cartridge.
Important • When removing the drum cartridge, be
careful not to drop it on the floor.
Note • This section explains how to replace the drum
cartridge R1, as an example.
5 Hold the bottom of the drum cartridge as
shown in the illustration, and pull it out from
the machine.
Note • Be careful not to touch the toner attached to
the cartridge.
3
6 Take the new drum cartridge out of the box, and insert the used drum cartridge into the
supplied plastic bag and place it into the box.
Important • Do not place the new drum cartridge in an upright position.
• Return the old drum cartridge to our Customer Support Center.
73
Page 74

Maintenance
3 Maintenance
7 Insert the front two points of the new drum
cartridge with protective cover in the holes on
the machine.
Note • Insert the two points as shown in the
illustration on the right.
8 Pull out the black paper while holding the
protective cover with one hand. While doing so,
keep the two points inserted in the holes.
3
9 Grasp the tab on top of the cartridge and slide
it toward the machine while holding the
protective cover with one hand.
10 Slide the tab until it stops.
11 Carefully remove the protective cover.
12 Push the drum cartridge straight in the housing
until it stops.
Note • Place the protective cover into the box.
74
Page 75

13 Return the cover to the original position.
Note • Push the cover until it clicks into place.
14 Rotate the release lever clockwise to lock the
cover.
Replacing Consumables
Maintenance
15 Close the front cover.
Note • If the front cover is not closed completely, a message appears and the machine will remain paused.
Replacing Staple Cartridge (for Finisher-A1)
When the optional Finisher-A1 is installed and the staple cartridge needs to be replaced, a
message appears on the touch screen. When this message appears, load a new staple case
into the staple cartridge.
Important • The use of staple cartridges not recommended by Fuji Xerox may degrade quality and performance.
Use only staple cartridges recommended by Fuji Xerox.
Note • To order a staple cartridge, contact our Customer Support Center.
1 Make sure that the machine is not operating,
and open the finisher front cover.
3
2 Take the staple cartridge out of the finisher.
75
Page 76

Maintenance
3 Maintenance
3 After you take out the staple cartridge, check
inside of the finisher for any remaining staples.
4 Pinch both sides of the empty staple case with
your fingers (1), and remove the staple case
from the cartridge (2).
3
5 Insert the front side of the new staple case into
the staple cartridge (1), and then push the rear
side into the cartridge (2).
6 Push the staple cartridge into the finisher until
it clicks into place.
7 Close the finisher front cover.
Note • If the front cover is not closed completely, a message appears and the machine will remain paused.
Replacing Staple Cartridge (for Finisher-B1)
When the optional Finisher-B1 is installed and the staple cartridge needs to be replaced, a
message appears on the touch screen. When this message appears, load a new staple case
into the staple cartridge.
Important • The use of staple cartridges not recommended by Fuji Xerox may degrade quality and performance.
Use only staple cartridges recommended by Fuji Xerox.
Note • To order a staple cartridge, contact our Customer Support Center.
76
Page 77

1 Make sure that the machine is not operating,
and open the finisher front cover.
2 Grasp the handle and pull out the staple
cartridge holder to the right, towards you.
Replacing Consumables
Maintenance
3 Take the staple cartridge out of the finisher.
Note • The staple cartridge is firmly inserted. A slight
force is required to pull the cartridge out of
the finisher.
4 Pinch both sides of the empty staple case with
your fingers (1), and remove the staple case
from the cartridge (2).
5 Insert the front side of the new staple case into
the staple cartridge (1), and then push the rear
side into the cartridge (2).
3
77
Page 78

3 Maintenance
6 Push the staple cartridge into the finisher until
it clicks into place.
7 Close the finisher front cover.
Note • If the front cover is not closed completely, a message appears and the machine will remain paused.
Maintenance
Replacing Staple Cartridge (for Finisher-C1 or Finisher-C1 with Booklet Maker)
When the optional Finisher-C1 or optional Finisher-C1 with Booklet Maker is installed and
3
the staple cartridge needs to be replaced, a message appears on the touch screen. When this
message appears, load a new staple case into the staple cartridge.
This section explains how to replace the staple cartridge in the Finisher-C1 with Booklet
Maker, as an example. You can apply the same procedures to the Finisher-C1.
Important • The use of staple cartridges not recommended by Fuji Xerox may degrade quality and performance.
Use only staple cartridges recommended by Fuji Xerox.
Note • To order a staple cartridge, contact our Customer Support Center.
1 Make sure that the machine is not operating,
and open the finisher front cover.
2 Grasp the handle R1 of the staple cartridge
holder, and pull out the holder to the right,
towards you.
78
Page 79

3 Take the staple cartridge out of the finisher.
Note • The staple cartridge is firmly inserted. A slight
force is required to pull the cartridge out of
the finisher.
4 Pinch both sides of the empty staple case with
your fingers (1), and remove the staple case
from the cartridge (2).
Replacing Consumables
Maintenance
5 Insert the front side of the new staple case into
the staple cartridge (1), and then push the rear
side into the cartridge (2).
6 Push the staple cartridge into the finisher until
it clicks into place.
7 Close the finisher front cover.
Note • If the front cover is not closed completely, a message appears and the machine will remain paused.
3
Replacing Staple Cartridge (for Booklet Maker Unit for Finisher-B1)
When the optional Booklet Maker Unit for Finisher-B1 is installed and the staple cartridge
needs to be replaced, a message appears on the touch screen. When this message appears,
load a new staple case into the staple cartridge.
Important • The use of staple cartridges not recommended by Fuji Xerox may degrade quality and performance.
Use only staple cartridges recommended by Fuji Xerox.
Note • To order a staple cartridge, contact our Customer Support Center.
79
Page 80

Maintenance
3 Maintenance
1 Make sure that the machine is not operating,
and open the finisher side cover.
2 Hold the tabs on both sides of the staple
cartridge and pull the cartridge out of the
finisher.
3
3 Hold the tabs on both sides of a new staple
cartridge, and insert it into the original position
until it clicks.
4 Repeat steps 2 and 3 to replace the other staple cartridge.
5 Close the finisher side cover.
Note • If the cover is not completely closed, a message will appear and the machine remain paused.
Replacing Staple Cartridge (for Finisher-C1 with Booklet Maker)
When the optional Finisher-C1 with Booklet Maker is installed and the staple cartridge needs
to be replaced, a message appears on the touch screen. When this message appears, load a
new staple case into the staple cartridge.
Important • The use of staple cartridges not recommended by Fuji Xerox may degrade quality and performance.
Use only staple cartridges recommended by Fuji Xerox.
Note • To order a staple cartridge, contact our Customer Support Center.
80
1 Make sure that the machine is not operating,
and open the finisher front cover.
Page 81

2 Press and hold the lever to the right (1), and
take the staple cartridge unit out of the finisher
(2).
3 Hold the tabs on both sides of the staple
cartridge.
Replacing Consumables
Maintenance
4 Rotate the booklet staple cartridge at an angle.
5 Lift the booklet staple cartridge out of the unit.
6 With holding the tabs, return the cartridge to
the original position, and then gently push the
cartridge in until it clicks into place.
3
81
Page 82

3 Maintenance
7 Return the unit to the original position.
8 Close the finisher front cover.
Note • If the front cover is not closed completely, a message appears and the machine will remain paused.
Maintenance
Emptying the Hole Punch Waste Container (for Finisher-B1)
When the optional Finisher-B1 is installed and the hole punch waste container becomes full,
a message appears on the touch screen. When the message appears, empty the hole punch
waste container as instructed.
3
Make sure to discard all paper chads when emptying the hole punch waste container. Not
doing so will cause the container to fill up before the message telling you to empty the
container appears again, and this can cause machine malfunction.
Important • Empty the hole punch waste container when the machine is on. If you empty the container while the
machine is off, the machine does not recognize that the container has been emptied.
1 Make sure that the machine is not operating,
lift the top transport cover, and then open the
front transport cover of the finisher.
2 Pull out the hole punch waste container.
3 Empty the container.
82
Page 83

Replacing Consumables
4 Insert the emptied hole punch waste container
into the finisher until it stops.
5 Close the front transport cover, and then close the top transport cover of the finisher.
Note • If the cover is not completely closed, a message will appear and the machine remain paused.
Emptying the Hole Punch Waste Container (for Finisher-C1 or Finisher-C1 with Booklet Maker)
When the optional Finisher-C1 or the optional Finisher-C1 with Booklet Maker is installed
and the hole punch waste container becomes full, a message appears on the touch screen.
When the message appears, empty the hole punch waste container as instructed.
Make sure to discard all paper chads when emptying the hole punch waste container. Not
doing so will cause the container to fill up before the message telling you to empty the
container appears again, and this can cause machine malfunction.
Important • Empty the hole punch waste container when the machine is on. If you empty the container while the
machine is off, the machine does not recognize that the container has been emptied.
Maintenance
3
1 Make sure that the machine is not operating,
and open the finisher front cover.
2 Pull out the hole punch waste container R4.
3 Empty the container.
83
Page 84

3 Maintenance
Lever
4 Insert the emptied hole punch waste container
into the finisher until it stops.
5 Close the finisher front cover.
Note • If the front cover is not closed completely, a message appears and the machine will remain paused.
Maintenance
Replacing Stamp (for Duplex Automatic Document Feeder B1-C)
If the machine offers the Fax service and the Stamp Kit (optional) is installed, replace the
stamp cartridge when stamp impressions start to fade.
3
Important • Do not touch the ink pad of the stamp cartridge. If it comes into contact with your skin, wash
immediately.
• Problems caused by using consumables not recommended by Fuji Xerox are not covered by the
maintenance service contract.
• Before using consumables, carefully read instructions and precautions on their packages.
Note • We recommend always keeping spare consumables/periodic replacement parts in stock.
• To order consumables, contact our Customer Support Center.
(Product Name: Stamp Replacement Kit, Product Code: F451)
1 Pull up the knob on the document feeder top
cover, and open the document feeder top cover
completely.
2 Pull up the lever to open the inner cover.
84
Page 85

3 Stick the supplied pin into the old stamp
cartridge, and pull it straight out of the
machine.
Note • If only the sponge part of the stamp
cartridge is removed, make sure of removing
the bottom part of the cartridge.
4 Insert the new stamp cartridge.
Replacing Consumables
Maintenance
5 Close the inner cover of the document feeder.
6 Close the left cover of the document feeder until it clicks into place, and confirm that there
is no space between the near or far side of the cover and the document feeder.
Replacing Stamp (for Duplex Automatic Document Feeder B1-PC)
If the machine offers the Fax service and the Stamp Kit (optional) is installed, replace the
stamp cartridge when stamp impressions start to fade.
Important • Do not touch the ink pad of the stamp cartridge. If it comes into contact with your skin, wash
immediately.
• Problems caused by using consumables not recommended by Fuji Xerox are not covered by the
maintenance service contract.
• Before using consumables, carefully read instructions and precautions on their packages.
Note • We recommend always keeping spare consumables/periodic replacement parts in stock.
• To order consumables, contact our Customer Support Center.
(Product Name: Stamp Replacement Kit, Product Code: F451)
1 Lift the document feeder gently, and open the
Side 2 scanner.
3
85
Page 86

Maintenance
3 Maintenance
2 Stick the supplied pin into the old stamp
cartridge, and pull it straight out of the
machine.
Note • If only the sponge part of the stamp
cartridge is removed, make sure of removing
the bottom part of the cartridge.
3 Insert the new stamp cartridge.
3
4 Close the Side 2 scanner, and then close the
document feeder gently.
86
Page 87

Cleaning the Machine
WARNING
CAUTION
This section describes how to clean the machine such as the machine exterior, document
cover, document feeder, and document glass.
When cleaning this product, use the designated cleaning materials exclusive to it. Other
cleaning materials may result in poor performance of the product. Never use aerosol
cleaners, or it may catch fire and cause explosion.
Cleaning the Machine
When cleaning this product, always switch off the power and then the main power inside
the body front cover, and unplug the product. Access to a live machine interior may cause
electric shock.
Cleaning the Exterior
The following describes how to clean the exterior of the machine.
Important • Do not use benzene, paint thinner, or other volatile liquids or spray insect repellent on the machine
as they might discolor, deform, or crack covers.
• Cleaning the machine with an excessive amount of water may cause the machine to malfunction or
damage documents during copying.
1 Wipe the exterior with a firmly wrung soft cloth
moistened with water.
Important • Do not use cleaning agents other than water
or neutral detergent.
Note • If you cannot remove the dirt easily, gently
wipe the machine with a soft cloth moistened
with a small amount of neutral detergent.
2 Wipe off any excess water with a soft cloth.
Maintenance
3
Cleaning the Interior (LED Printheads)
The following describes how to clean the interior (LED printheads) of the machine.
Normally, clean the LED printheads when you replace the waste toner container. However,
if you have image quality problems such as white or colored stripes appear on copied or
printed outputs, clean the LED printheads.
Important • Clean the LED printheads periodically when you replace the waste toner container.
87
Page 88

Maintenance
3 Maintenance
1 Make sure that the machine is not operating,
and open the front cover.
2 Rotate the release lever of the drum cartridge
cover counterclockwise.
3
3 Lower the cover.
Note • You can now see the drum cartridge.
4 Slowly slide out the cleaning bars housed
within the LED printhead until it stops. The
cleaning bars are located in the cleaning
connection just under the drum cartridges (R1,
R2, R3, or R4).
Note • Slide out the cleaning bars until you see
"zzz".
Important • Do not remove the cleaning bars from the
housing.
5 Slowly slide the cleaning bars back into place.
Note • Clean the four LED printheads (R1 to R4) by
sliding the cleaning bars back and fourth for
two or three times, respectively.
88
Page 89

6 Return the cover to the original position.
Note • Push the cover until it clicks into place.
7 Rotate the release lever clockwise to lock the
cover.
Cleaning the Machine
Maintenance
8 Close the front cover.
Note • If the front cover is not closed completely, a message appears and the machine will remain paused.
Cleaning the Touch Screen
This section describes how to clean the touch screen of the machine.
1 Wipe the LCD only with a soft cloth moistened
with neutral detergent or alcohol.
Important • Do not apply too much neutral detergent or
alcohol. Squeeze out excess moisture before
you wipe the LCD if the fluid drips.
• Do not use volatile solvent such as benzene
and paint thinner or insect killer. Doing so
might cause discolored, deformed, or cracked
parts.
• Wipe the panel softly, otherwise, the parts
might be damaged.
Cleaning Document Cover and Document Glass (for Duplex Automatic Document Feeder B1-C)
3
If the document cover and document glass become soiled, smudges may appear on copies,
faxes, or scanned documents and the machine may not properly detect document sizes.
To ensure clear copies at all times, clean the document cover and the document glass once
a month.
Important • Do not use benzene, paint thinner, or other organic solvents. Doing so might damage paint or
coating on plastic parts.
• Cleaning the machine with an excessive amount of water may cause the machine to malfunction or
damage documents during copying, faxing, or scanning.
89
Page 90

Maintenance
3
3 Maintenance
1 Wipe the document cover with a soft cloth
moistened with water to remove any dirt, and
then wipe it with a soft, dry cloth.
Important • Do not use cleaning agents other than water
or neutral detergent.
Note • If you cannot remove dirt easily, gently wipe
the document cover with a soft cloth
moistened with a small amount of neutral
detergent.
2 Wipe the document glass with a soft cloth
moistened with water to remove any dirt, and
then wipe it with a soft, dry cloth.
Important • Do not use cleaning agents other than water
or neutral detergent.
Note • If you cannot remove dirt easily, gently wipe
the document glass with a soft cloth
moistened with a small amount of neutral
detergent.
Cleaning Document Cover and Document Glass (for Duplex Automatic Document Feeder B1-PC)
If the document cover and document glass become soiled, smudges may appear on copies,
faxes, or scanned documents and the machine may not properly detect document sizes.
To ensure clear copies at all times, clean the
document cover and the document glass once a
month with the cloth provided in the document
feeder as shown in the illustration.
Important • Do not use benzene, paint thinner, or other
organic solvents. Doing so might damage
paint or coating on plastic parts.
• Cleaning the machine with an excessive
amount of water may cause the machine to
malfunction or damage documents during
copying, faxing, or scanning.
1 Wipe the document cover with the provided
cloth.
Note • If you cannot remove dirt easily, gently wipe
the document cover with a soft cloth
moistened with a small amount of neutral
detergent.
Important • Do not use cleaning agents other than water
or neutral detergent.
90
Page 91

2 Wipe the document glass with the provided
cloth.
Note • If you cannot remove dirt easily, gently wipe
the document glass with a soft cloth
moistened with a small amount of neutral
detergent.
Important • Do not use cleaning agents other than water
or neutral detergent.
Cleaning the Machine
Cleaning Film and Constant Velocity Transport Glass (for Duplex Automatic Document Feeder B1-C)
If the film or constant velocity transport glass become soiled, smudges may appear on
copies, faxes, or scanned documents and the machine may not properly detect document
sizes.
To ensure clear copies at all times, clean the film and the constant velocity transport glass
once a month.
Important • Do not use benzene, paint thinner, or other organic solvents. Doing so might damage paint or
coating on plastic parts.
• Cleaning the machine with an excessive amount of water may cause the machine to malfunction or
damage documents during copying, faxing, or scanning.
1 Wipe the film with a soft cloth moistened with
water to remove any dirt, and then wipe it with
a soft, dry cloth.
Important • Do not press the film with an excessive force
as it can be easily damaged.
• Do not use cleaning agents other than water
or neutral detergent.
Note • If you cannot remove dirt easily, gently wipe
the film with a soft cloth moistened with a
small amount of neutral detergent.
2 Wipe the constant velocity transport glass with
a soft cloth moistened with water to remove
any dirt, and then wipe it with a soft dry cloth.
Important • Do not use cleaning agents other than water
or neutral detergent.
Note • If you cannot remove dirt easily, gently wipe
the glass with a soft cloth moistened with a
small amount of neutral detergent.
Maintenance
3
Cleaning Film and Constant Velocity Transport Glass (for Duplex Automatic Document Feeder B1-PC)
If the film or constant velocity transport glass become soiled, smudges may appear on
copies, faxes, or scanned documents and the machine may not properly detect document
sizes.
91
Page 92

Maintenance
3
3 Maintenance
To ensure clear copies at all times, clean the
film, the Side 1 constant velocity transport glass
and the Side 2 constant velocity transport glass
once a month with the cloth provided in the
document feeder as shown in the illustration.
Important • Do not use benzene, paint thinner, or other
organic solvents. Doing so might damage
paint or coating on plastic parts.
• Cleaning the machine with an excessive
amount of water may cause the machine to
malfunction or damage documents during
copying, faxing, or scanning.
1 Lift the document feeder gently, and open the
Side 2 scanner.
2 Wipe the film with the provided cloth.
Note • If you cannot remove dirt easily, gently wipe
the film with a soft cloth moistened with a
small amount of neutral detergent.
Important • Do not press the film with an excessive force
as it can be easily damaged.
• Do not use cleaning agents other than water
or neutral detergent.
3 Wipe the Side 1 constant velocity transport
glass and the Side 2 constant velocity transport
glass with the provided cloth.
Note • If you cannot remove dirt easily, gently wipe
the glass with a soft cloth moistened with a
small amount of neutral detergent.
Important • Do not use cleaning agents other than water
or neutral detergent.
4 Close the Side 2 scanner, and then close the
document feeder gently.
92
Page 93

Cleaning Document Feeder Rollers
With Duplex Automatic Document Feeder B1-C (optional)
With Duplex Automatic Document Feeder B1-PC (optional)
If the document feeder rollers become soiled, smudges may appear on copies, faxes, or
scanned documents and paper jams may occur.
To ensure clean copies at all times, clean the document feeder roller about once a month.
Important • Do not use benzene, paint thinner, or other organic solvents. Doing so might damage paint or
coating on plastic parts.
• Cleaning the machine with an excessive amount of water may cause the machine to malfunction or
damage documents during copying, faxing, scanning, or printing.
1 Pull up the knob on the document feeder top
cover, and open the document feeder top cover
completely.
Note • When you fully open the cover, it enters a
fixed position. Open the cover gently.
Cleaning the Machine
Maintenance
2 While turning the rollers, wipe them with a soft cloth moistened with water.
Important • Do not use cleaning agents other than water or neutral detergent.
• Use a cloth firmly wrung to prevent water drops from falling into the machine. If water gets into the
machine, it may cause the machine to malfunction.
Note • If you cannot remove dirt easily, gently wipe the rollers with a soft cloth moistened with a small
amount of neutral detergent.
3 Close the document feeder left cover until it clicks into place, and confirm that there is no
space between the near or far side of the cover and the document feeder.
3
93
Page 94

3 Maintenance
Executing Calibration
Calibrate the machine regularly to correct and ensure consistency of printing colors over
time, environment and devices.
Select a screen type on the [Calibration] screen and execute calibration, and calibration
data for that screen type will be saved. The saved calibration data will be applied to the job
when that type of screen is to be used for the job. Which type of screen is to be used for the
job will be determined by the job settings.
The following four screen types can be selected on the [Calibration] screen.
z
Copy Job 1
Maintenance
3
The calibration data for [Copy Job 1] will be applied when [Text], [Photo & Text], or [Map]
is selected for [Original Type].
z
Copy Job 2
The calibration data for [Copy Job 2] will be applied when [Photo] is selected for [Original
Type].
z
Print Job 1
For PCL print drivers
- The calibration data for [Print Job 1] will be applied when the screen for [Image
Quality], [Image Adjustment Mode], and [Image Types], which can be specified on the
[Color Options] tab, is to be used.
- The calibration data for [Print Job 1] will be applied when [Auto Screening], [Fineness],
or [Standard] is selected for [Screen] on the [Advanced] tab.
For PostScript print drivers
- The calibration data for [Print Job 1] will be applied when [High Quality] or [High
Resolution] is selected for [Image Quality] and [Auto Screening], [Fineness], or
[Standard] is selected for [Screen] on the [Color Options] tab.
- The calibration data for [Print Job 1] will be applied when [High Speed] is selected for
[Image Quality] and [Fineness] or [Standard] is selected for [Screen] on the [Color
Options] tab.
z
Print Job 2
94
For PCL print drivers
- The calibration data for [Print Job 2] will be applied when [Gradation] is selected for
[Screen] on the [Advanced] tab unless [High Resolution] is selected for [Image Quality].
- The calibration data for [Print Job 2] will be applied when [Print Page Mode] is selected
on the [Advanced] tab unless [High Resolution] is specified for [Image Quality].
For PostScript print drivers
- The calibration data for [Print Job 2] will be applied when [High Speed] is selected for
[Im ag e Q uality] an d [ Au to Screeni ng ] o r [Finene ss ] i s selected fo r [ Sc reen] on th e [ Col or
Options] tab.
Note • It is recommended to execute calibration for each of the four screen types. After calibration for the
first screening type, select the next screen type and repeat the procedure.
• When the printed colors do not seem to have been corrected properly despite regular calibration,
contact our Customer Support Center.
Page 95

• Make sure that the following settings are specified under [Tools] > [System Settings] > [Copy Service
<Log In/Out> button
Settings] > [Copy Defaults] in the System Administration mode before calibration.
-Lighten/Darken: Normal
-Contrast: Normal
-Sharpness: Normal
-Saturation: Normal
-Color Balance: 0, 0, 0
-Color Shift: Normal
• You can change the above [Copy Defaults] settings after calibration.
• For information on [Copy Defaults], refer to "Copy Defaults" (P.187).
• During calibration, the machine cannot receive print jobs or faxes.
The following describes how to calibrate the machine.
Executing Calibration
1 Select [Calibration] on the [Services Home]
screen.
When [Calibration] is not displayed, follow the procedure below.
1) Press the <Log In/Out> button.
2) Enter the System Administrator's user ID
with the numeric keypad or the keyboard
displayed on the screen, and select [Enter].
Maintenance
3
When a passcode is required, select [Next]
and enter the System Administrator's
passcode, and select [Enter].
Note • The default user ID is "11111".
• The default passcode is "x-admin".
3) Select [Tools] on the [Services Home] screen.
Note • When the [Services Home] screen is not
displayed on the touch screen, press the
<Services Home> button.
95
Page 96

Maintenance
Magenta
3
3 Maintenance
4) Select [System Settings] > [Common Service
Settings] > [Image Quality Adjustment].
5) Select [Calibration].
2 Set [Screen Type] and [Paper Supply].
Note • [Copy Job 1] is selected here as an example.
• Make sure that [Target] is set to [Copy & Print
Jobs]. If not, calibration will not be effective
for jobs outside the selected range.
3 Select [Start].
Note • A message saying "Outputting the
Calibration Chart... - Copy Job 1" appears,
and the machine prints the Calibration Chart.
4 Place the Calibration Chart face down on the
document glass with the magenta marks on
corners on your left hand side.
Note • Place the Calibration Chart on the document
glass.
5 Place at least five sheets of white paper on the
Calibration Chart to cover the Chart and close
the document cover.
96
Page 97

Executing Calibration
6 Select [Start].
A message saying "Calibration in progress... - Copy Job 1" appears, and the machine starts
calibration. It takes about 10 seconds to complete the calibration.
The calibration result will be shown on the screen.
7 Select [Confirm].
8 To execute calibration for aother screen type, repeat steps 2 to 7.
9 Select [Close] repeatedly until the [Tools] screen is displayed.
10 Select [Close].
11 Copy to confirm the image quality.
Note • During calibration, the machine cannot receive print jobs or faxes.
12 Select [Close].
Maintenance
3
97
Page 98

3 Maintenance
<Log In/Out> button
Executing 2 Sided Color Scanning Calibration
Calibrate the Duplex Automatic Document Feeder B1-PC (optional) regularly to correct and
ensure consistency of its scanning colors over time, environment and devices.
Important • For a better result, calibrate the machine in advance. For information on how to calibrate the
machine, refer to "Executing Calibration" (P.94).
1 Press the <Log In/Out> button.
Maintenance
3
2 Enter the System Administrator’s user ID with
the numeric keypad or the keyboard displayed
on the screen, and select [Enter].
When a passcode is required, select [Next] and
enter the System Administrator’s passcode, and
select [Enter].
Note • The default user ID is "11111".
• The default passcode is "x-admin".
3 Select [Tools] on the [Services Home] screen.
Note • When the [Services Home] screen is not
displayed on the touch screen, press the
<Services Home> button.
4 Select [System Settings] > [Common Service
Settings] > [Image Quality Adjustment].
98
5 Select [2 Sided Color Scanning Calibration].
Page 99

Executing 2 Sided Color Scanning Calibration
Magenta
Magenta
6 Select [Print Chart].
Note • To restore the previous values, select [Restore Previous Values], and then [Start]. To restore the
factory default values, select [Restore Factory Default Values], and then [Start]. When the
restoration is completed, a message appears on the screen.
7 Select [Start].
Note • A message saying “Outputting the chart for 2 Sided Color Scanning Calibration....” appears, and the
machine prints the 2 Sided Color Scanning Calibration Chart.
8 Load the 2 Sided Color Scanning Calibration
Chart face up on the document feeder with the
magenta marks on corners on your left hand
side.
Maintenance
9 Select [Start].
A message saying “Scanning chart...” appears.
10 Load the 2 Sided Color Scanning Calibration
Chart face down on the document feeder with
the magenta marks on corners on your left
hand side.
11 Select [Start].
A message saying “Scanning chart and performing color correction...” appears, and the
machine starts calibration. When the calibration is completed, the calibration result will be
shown on the screen.
Note • If an error message appears on the screen, select the [Confirm] button, and then repeat steps 8 to
11.
12 Select [Confirm].
13 Select [Close] repeatedly until the [Tools] screen is displayed.
3
14 Select [Close].
15 Copy an image to see the calibration result reflected on the printout.
Note • During calibration, the machine cannot receive print jobs or faxes.
16 Select [Close].
99
Page 100

3 Maintenance
<Machine Status> button
Printing a Report/List
You can print a report/list to check the settings and communication status.
This section describes how to print a report/ list.
For information on the types of report/list, refer to "Print Reports" (P.106).
Note • When the <Data> indicator is not lit, you cannot print the Stored Documents List.
1 Press the <Machine Status> button.
Maintenance
3
2 Select [Print Reports].
Note • If [Print Reports Button] under [Reports] is set
to [Disabled], the [Print Reports] button
appears only when the [Tools] button is
displayed on the [Services Home] screen. For
more information on [Reports], refer to
"Reports" (P.158).
• If you want to print [Billing Data List] or
[Auditron Report (Fax Jobs)], insert a card to
the machine before instructing print.
3 Select the service that you want a report or list
for.
4 Select a report or list to print, and then press the <Start> button.
Note • The reports and the lists to be displayed on the screen depend on the configuration of your
machine.
100
 Loading...