


Wilbur Curtis Co., Inc.
Service Manual – Gemini IntelliFresh® Satellite
Important Safeguards/Symbols
This appliance is designed for commercial use. Any servicing other than cleaning and preventive maintenance should be performed by an authorized Wilbur Curtis service technician.
• DO NOT immerse the unit in water or any other liquid.
•Toreducetheriskoffireorelectricshock,DONOTopenservicepanels.Therearenouserserviceable parts inside.
• Keep hands and other items away from hot surfaces of unit during operation.
• Never clean with scouring powders, bleach or harsh chemicals.
|
Symbols |
|
WARNINGS – To help avoid personal injury |
Model |
Important Notes/Cautions – from the factory |
GEM3IF |
|
GEM3IF30 |
Sanitation Requirements |
IntelliFresh Function and Features
The IntelliFresh system will alert you when the coffee has exceeded the desired holding time. The Intellifresh system is activated by a connector on the satellite coming into contact with a corresponding connector on the brewer. IntelliFresh is adjustable through the universal control module (UCM) on the brewer.
Quality Timer (factory setting: 2 hours)
Press ¤ to select, press ◄ or ► to choose the desired setting. The timer is intended to notify the user when the coffee loses its freshness. The LED indicator light on the satellite will remain solid red until the quality timer expires.At expiration, the LED will flash and continue flashing at the factory setting for an additional 8 hours. The additional 8 hours is controlled by the Warmer Auto-Off setting.
•Setting Range: 20 to 240 minutes.
•Time Expiration Indicator: The LED flashes after expiration of the quality timer setting for up to a total of 12 hours. The default time is 8 hours
after expiration of the quality timer.
Warmer Auto-Off (factory setting: 10 hours)
Press ¤ to select, press ◄ or ► to adjust from 1 to 12 hours. 


This feature has higher priority than the quality timer. It shuts
off the warmers after a pre-determined time, starting when the
BREW button is pushed. The quality timer does not affect this
function.
Error Codes:
1. Three long blinks and one short blink = heater error. 2. Three long blinks and two short blinks = sensor error
Warmers
The warmers, will turn on automatically whenever a coffee brew cycle is started. The temperature of the warmers are controlled at the warmer buttons on the control panel.
The G3 UCM is shown on |
|
the left side and the G4 touch |
|
screen UCM is on the right. |
WARMERS |
LOW MED HIGH
FOR THE LATEST SPECIFICATIONS AND INFORMATION GO TO WWW.WILBURCURTIS.COM
1

Illustrated Parts List - GEM3IF
1
2 |
|
3 |
|
|
13 |
4 |
|
7 |
|
|
16 |
5 |
18 |
|
19 |
|
6 |
8 |
|
|
|
|
9 |
15 |
|
|
|
|
14 |
|
10 |
|
20 |
11 |
|
|
|
|
|
12 |
|
|
A |
12A |
17 |
|
|
A
2
Illustrated Parts List - GEM3IF
Index № |
Part № |
Description |
|
|
|
|
|
11 |
WC-5622 |
LID, SATELLITE PLASTIC GEM-3 |
|
2 |
WC-2001 |
CAP, SHIELD W/VENT 77-4 GEN USE |
|
31 |
WC-2005 |
WASHER, SHIELD CAP 1/8” GEM-3/TC’S W/SG |
|
41 |
WC-2025 |
GLASS, GAUGE 8” |
|
5 |
WC-2010C |
SHIELD, GAUGE GLASS 3/4”D.X 8” |
|
61 |
WC-2006 |
WASHER, .188 ID X .188 THK BOTTOM GAUGE GLASS GEN USE |
|
7 |
WC-2102 |
GAUGE GLASS, ASSY 8”C |
|
8 |
WC-39747 |
LABEL, SIDE GEM-3IF CURTIS LOG |
|
9 |
WC-2007 |
BRACKET, GAUGE GLASS GEM-3 |
|
10 |
WC-6417 |
GUARD, FAUCET GEM-3 |
|
112 |
WC-1901A-103K |
KIT, SHANK ASSY, FAUCET W/ SHIELD BASE & O-RING |
|
11A |
WC-1901A |
SHANK, FAUCET W/SHIELD BASE |
|
121 |
WC-1800 |
FAUCET,”S” SERIES BLK LOCKING 1-1/32-14 UNS CURTIS |
|
12A |
WC-1800-CH |
FAUCET, “S” SERIES NONLOCKING 1-1/32-14 UNS CLASSIC |
|
131, 2 |
WC-981K |
KIT, INTELLIFRESH HEATR WC-981 GEM3IF |
|
13A2 |
WC-982K |
KIT, INTELLIFRESH HEATR WC-982 GEM3IF30 |
|
141 |
WC-37544 |
KIT, LED SENSOR GEM3IF |
|
15 |
WC-39746 |
LABEL, FRONT GEM3IF CURTIS LOGO |
|
161 |
WC-736K |
KIT, CONTROL MODULE, UPM 120V GEM3IF |
|
16A |
WC-739K |
KIT, CONTROL MODULE, UPM 220V GEM3IF30 |
|
171 |
WC-3705 |
KIT, FAUCET S SERIES NONLOCK USE ON WC-1800 |
|
18 |
WC-38151 |
LABEL, LOCK/UNLOCK GEM-3 |
|
19 |
WC-13426 |
WIRE ASSY, IF CONNECTOR GEM3IF |
|
20 |
WC-4320 |
O’RING, ½” I.D. |
|
1 SUGGESTED PARTS TO STOCK |
2 FOR UNITS BUILT AFTER 11/16/15 |
||
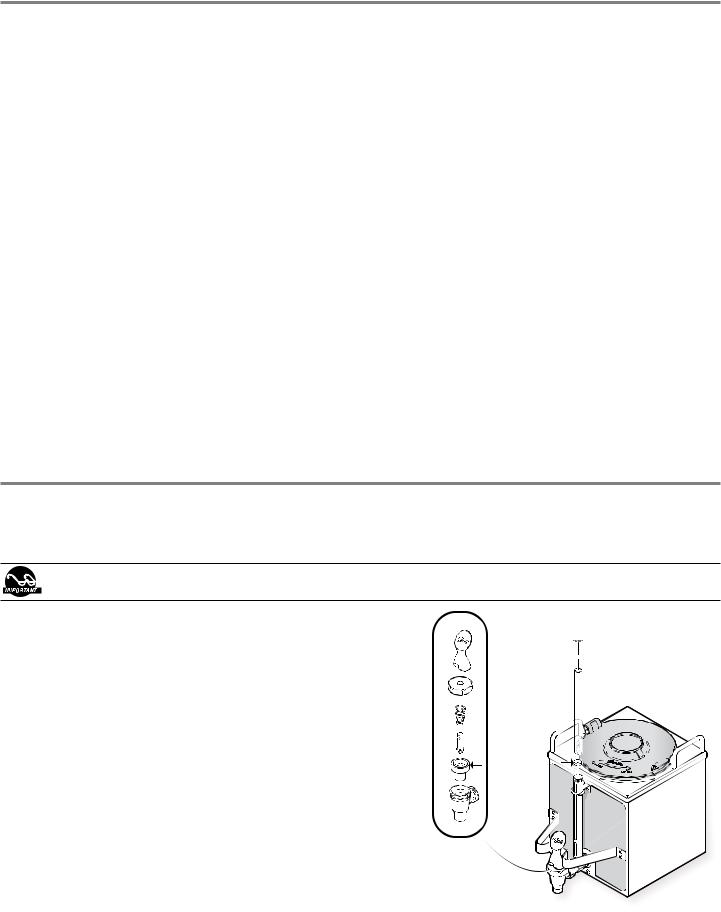
Cleaning the GEM3IF Satellite
A daily routine of cleaning the GEM3IF satellite will maintain the appearance of the unit and ensure great tasting coffee. To clean the satellite components, prepare a mild solution of detergent and warm water.
CAUTION – Do not use cleaning liquids, compounds or powders containing acids or corrosives. These products promote corrosion and will pit the stainless steel. USE OF THESE PRODUCTS WILL VOID THE WARRANTY.
DO NOT immerse the satellite in water or any other liquid.
1.Remove the lid from the satellite. Clean the lid at the funnel area with a spiral brush and detergent solution.
2.Rinse the lid, removing all traces of cleaning solution.
3.Clean inside of the satellite. Remove coffee residue with the detergent solution.
4.Thoroughly rinse out the satellite with clean warm water.
5.Unscrew the handle/bonnet assembly and remove it from the dispensing faucet.
6.Inspect the silicone seat cup for wear, cracks or hardening. If okay, then leave the seat cup attached to the handle/bonnet assembly. Soak then wipe clean. Replace the seat cup if damaged.
7.Remove the gauge glass tube by unscrewing the gauge glass cap.
8.Clean the gauge glass tube with a gauge brush soaked with detergent Soak and wipe the two washers. Rinse with clean water. Dry the
ble them onto the satellite. Hand tighten the cap.
9.Clean all the parts. Thoroughly rinse with clean warm water.
10. Dry and re-assemble the parts. Hand-tighten when assembling them.
CAP


WASHER


GLASS TUBE

|
|
WASHER |
SEAT |
|
|
|
|
|
CUP |
|
|
3
 Loading...