


FIND OUT MORE ON THE WEB.
W I L B U RC U RT I S . C O M
Models Included
• CB GT
WARNING HOT LIQUID,
Scalding may occur.
Avoid splashing.
CAUTION: Please use this setup procedure before attempting to use
this brewer. Failure to follow the instructions can result in injury or
the voiding of the warranty.
CAUTION: DO NOT connect this brewer to hot water. The inlet valve
is not rated for hot water.
IMPORTANT: After setup, run a full TEA cycle first before
running a COFFEE cycle. Place an empty tea container to catch both hot water from the brewcone and dilution water from spout on the front cover.
C
ISO 9001 REGISTERED
WILBUR CURTIS COMPANY
Montebello, CA 90640
WILBUR CURTIS COMPANY, INC.
Generation 3 - Coffee/Iced Tea Combo Brewer Instructions
Important Safeguards/Conventions
This appliance is designed for commercial use. Any servicing other than cleaning and maintenance should be performed by an authorized Wilbur Curtis service center.
•Do NOT immerse the unit in water or any other liquid
•To reduce the risk of fire or electric shock, do NOT open top or front panel. No user serviceable parts inside. Repair should be done only by authorized service personnel.
•Keep hands and other items away from hot parts of unit during operation.
•Never clean with scouring powders, bleach or harsh implements.
Conventions
WARNINGS – To help avoid personal injury
Important Notes/Cautions – from the factory
Sanitation Requirements
Your Curtis G3 Brewer is Factory Pre-Set and Ready to Go… Right out of the Carton.
Following are the Factory Settings for your Coffee/Tea Brewing System:
•Brew Temperature = 204°F
•Brew Volume = Set to dispensing vessel requirements
Generally there will never be a reason to change your G3 programming. However, should you need to make slight adjustments to meet your brewing needs, programming instructions are provided later in this manual.
System Requirements:
•Water Source 20 – 90 PSI (Minimum Flow Rate of 1 GPM)
•Electrical: See attached schematic for standard model or visit www.wilburcurtis.com for your model.
Equipment to be installed to comply with applicable federal, state, or local plumbing/electrical codes having jurisdiction.
SETUP STEPS
The unit should be level (left to right and front to back), located on a solid counter top. Connect a water line from the water filter to the brewer. NOTE: Some type of water filtration device must be used to maintain a trouble-free operation. (In areas with extremely hard water, we suggest that a sedimentary and taste & odor filter be installed.) This will prolong the life of your brewing system and enhance coffee and tea quality.
The National Sanitation Foundation requires the following water connection:
1.A quick disconnect or additional coiled tubing (at least 2x the depth of the unit) so that the machine can be moved for cleaning underneath.
2.In some areas an approved backflow prevention device may be required between the brewer and water supply.
1.A 1/4” Flare has been supplied for water line connection. Use tubing sized sufficiently to provide a minimum of 1.0 GPM.
2.Connect the unit to an appropriate electrical power circuit.
3.Turn on the toggle (STANDBY/ON) switch behind the unit. The heating tank will start to fill. When the water level in the tank rises to the correct volume, the heating element will energize automatically. With G3 Systems there is no danger of element burnout due to an unfilled heating tank.
4.The heating tank will require 20 to 30 minutes to reach operating temperature (204°F) as indicated by the READY-TO-BREW LED readout.
5.Important: Run one full TEA brewcycle first, before running a coffee brewcycle to purge water lines and valves of air. Five seconds of pulsing dilution water at the beginning of each TEA brewcycle is normal pre-programmed operating behavior.
BREWING INSTRUCTIONS – COFFEE
1.The brewer should be ON (Confirm at rear toggle switch, then press ON/OFF button on control panel). Ready-to-Brew should be displayed on the UCM screen.
2.Make sure folding airpot deck is rotated upright. Place a clean, empty airpot on the airpot brew deck.
3.Place a new paper filter into the brewcone.
4. Pour ground coffee |
5. Position filled |
6.Press COFFEE Brew button. |
into brewcone |
brewcone |
|
marked COFFEE |
into brew |
|
|
rails. |
|
FOR THE LATEST SPECIFICATIONS AND INFORMATION GO TO |
1 |
WWW.WILBURCURTIS.COM |

WARNING DO NOT refrigerateunusedtea overnight for later consumption.
IMPORTANT: Clean out the screen, within the brewcone,tomaintainthe flow of brewed tea.
Neglecting this screen will eventually cause the brewcone to overflow, spilling hot liquid over the unit.
CAUTION: DO NOT use undilutedbleachor chlorine.
 CAUTION
Do not immerse airpots in water.
 Do not place in dishwasher.
 Do not use harsh powders or cleansers containing chlorine.
  Do not use a wire brush or pot scourer to clean inside liner.
2
BREWING INSTRUCTIONS – TEA
1. Brewer should be ON (Confirm at rear toggle switch, then press ON/OFF button) and Ready-to-Brew displayed.
2. Make sure deck is folded down and tea container is in place.
IMPORTANT – Tea container must be pushed all the way to the back to ensure the safety switch is engaged and tea brewing can start.
2. Place filter in brew basket. |
3. Slide brew cone into brew |
4. Slide container in |
|
5. Press the TEA |
|||||||||
|
Pour leaf tea into basket |
|
rails. Place tea container |
to activate switch |
|
BREW button. |
|||||||
|
marked ICED TEA or |
|
under brew cone. |
behind folded |
|
|
|
|
|||||
|
TROPICAL TEA. |
|
|
|
coffee deck. |
|
|
|
|
||||
|
|
|
|
|
|
|
|
|
|
|
|
|
|
|
|
|
|
|
|
|
|
|
|
|
|
|
|
|
|
|
|
|
|
|
|
|
|
|
|
|
|
|
|
|
|
|
|
|
|
|
|
|
|
|
|
|
|
|
|
|
|
|
|
|
|
|
|
|
|
|
|
|
|
|
|
|
|
|
|
|
|
|
|
|
|
|
|
|
|
|
|
|
|
|
|
|
|
|
|
|
|
|
|
|
|
|
|
|
|
|
|
|
|
|
|
|
|
|
|
|
|
|
|
|
|
TEA TIPS
1. Store tea bags in a dark, cool and dry place away from strong odors and moisture. Do not refrigerate.
2. Never hold finished brewed tea for more than eight hours at room temperature. Discard any unused tea after eight hours
3. Brew only enough tea that you reasonably expect to sell within a few hours.
4. To protect tea flavor and to avoid bacterial contamination and growth, clean and sanitize tea brewing, storage and dispensing equipment at least once a day.
CLEANING
Regular cleaning of your airpots and tea containers will maintain the highest quality coffee and iced tea your equipment is capable of producing. A proper cleaning is essential in preserving the appearance of the brewer.
1.Turn off the unit button on the front control panel.
2.Wipe exterior surfaces with a damp cloth, removing spills and debris.
3.Slide the brewcone out and clean it. Thoroughly soap the sprayhead area with a mild detergent solution.
4.Wash the brewcone and wire brew basket, if applicable. Use a soft bristled brush for hard to clean areas. Wash both parts with a detergent solution or put these parts through a dishwasher.
5.Wash the tea container and top cover with a detergent solution. Remove the faucet assembly. Unscrew the handle assembly from the faucet and remove. Clean the faucet shank with a gage glass brush (circular bristle) by pushing the brush through the shank. Using the same brush clean the faucet body inlet and outlet. Clean the faucet cap and silicone seat cup.
6.After the cleaning, place the parts (sprayhead, brewcone and basket and faucet parts) into a sink to be sanitized. To sanitize the disassembled parts:
A.Use a clean container to submerge all parts. Wear rubber gloves for protection.
B.Immerse in commerical Bar Tabs/Sani-Tabs sanitizing solution
The solution must be warm (75°F.) Let the parts soak for at least one minute.
7.Thoroughly rinse parts with hot water. Air dry, all parts that were sanitized.
8.After cleaning, sanitizing and drying, assemble any parts taken from the tea container.
9.Clean out airpots with a sponge brush and a mild detergent solution. To remove mineral deposits, fill liner with vinegar and allow to soak.
Tank Temperature Check
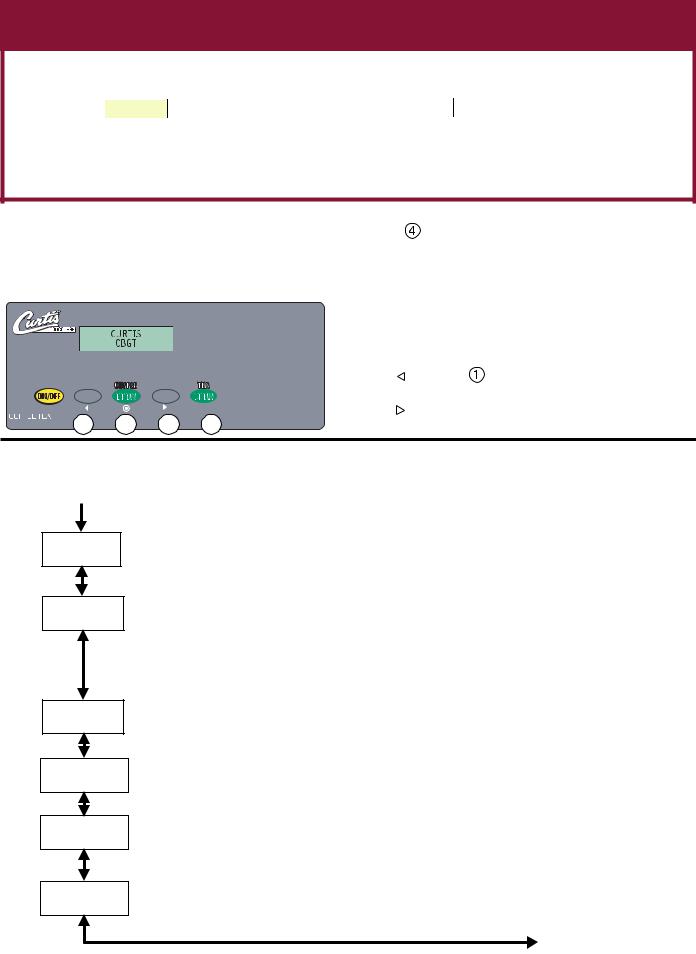
Turn on brewer at the control panel ON/OFF button. Press and hold 3 button (see illustration, page 3) for 5 seconds. Water Temperature will be displayed (temperature in heating tank).
Quick Start
Your Curtis ADS System is Factory Pre-Set for Optimum Performance.
CB GT
After connection to water and power; the rear toggle switch must be on. You will hear a beep sound, indicating power is available to the controller.
The control displays
C U R T I S |
. Press ON/OFF button and the screen will display |
< C o f f e e / T e a B r e w e r > |
After three seconds, |
C U R T I S |
is displayed. |
|
|
C U R T I S |
. |
F I L L I N G |
|||
|
|
|
|
|
|
|
Water will fill the tank (approximately 2-3 minutes depending on water flow rate). When the proper level is reached |
HCEUARTTI INSG |
will appear on the |
||
screen. It takes approximately 20 minutes to reach setpoint temperature of 204°F. |
|
|
||
|
|
|
|
|
Control will display |
C U R T I S |
when temperature reaches the setpoint (204°F). Unit is now ready to brew. |
|
|
READY TO BREW |
|
|
||
To Go Into Programming
Turn off (dark display) by pressing ON/OFF button (yellow). Press and hold BREW button
Continue holding BREW button. Display will read |
|
ENTERING PROGRAM |
, wait until |
ENTER CODE |
||
|
MODE |
– – – – |
||||
correspond to the buttons (see illustration below). |
|
|
|
|
|
|
The default code set at the factory is 1-2-3-4. Then |
|
PROGRAM MENUS |
|
will be displayed. |
||
|
< SELECT |
> |
||||
4 (green) and then press and release ON/OFF button (yellow).
is displayed Enter the 4-digit access code, the digits 1-4
All programming selections are performed with the three center buttons. The symbols below the buttons are:
1 


 2
2


 3
3


 4
4

Scroll LEFT
SELECTION or ENTER to save new parameter 
Scroll RIGHT 
PROGRAM MENUS
|
Brew Volume (Factory set to 3.0 Gallons) |
|
Program Menus |
||
Selecting Brew by Volume or Brew by Time depends on whether you know your brew time before starting. |
||
|
||
|
From Program Menus press > display will now show the next feature. |
|
|
Tea Recipes
Tea By Volume
Tea Recipe (Factory set to Standard Tea)
Press to Select. Press < or > to toggle between STANDARD TEA, TROPICAL TEA and #3 76/308. Set and exit by pressing .
Tea by Volume: Scroll until Brew by Volume is displayed. Press to Select. The display will read Select Brew Button! Once the desired brew button is selected, the display will read Press BREW to Start 0:00 Time. Press the BREW button and hot water starts dispensing. When the desired volume is reached, press BREW again to stop the flow. The brew volume has now been set. When EXIT is displayed, Press to select and exit the programming mode. Pressing
> button will display the subsequent menu features.
Tea By Time
Tea Dilut. Delay
Tea Dilut. Volume
Tea Dilut. Time
Tea by Time. Press to Select to change the brew time. Display will now show the current time. By pressing < or > you can toggle back and forth from minutes to seconds to exit (ex). Change the time or set and exit by pressing . Brew by Time is programmable from 0:00 to 9:59. Increments are minutes and seconds.
Dilution Delay: Press |
to Select, Delay Time in minutes (m.) and seconds (s.) will display. Press < or > to |
increase or decrease time. Range is from 30 seconds to 10 minutes. |
|
Dilution Volume: Press |
to Select, Display will now show Push START To Begin... Press the BREW button then |
hot water starts running, when desired volume is reached press BREW button again to stop the flow. Now the volume has been set. Pressing > button will display the subsequent menu features.
Dilution Time: Press to Select, Display will now show the current Time and ex (exit) will flash. Press < or > to toggle between minutes, seconds or exit. Pressing select to choose minutes will increase the minutes. Press to add minutes. Press < or > to move to seconds or exit. Dilution Time is from 0:00 to 9:59. Increments are
minutes and seconds.
Continued on Page 4
3
 Loading...