


 Loading...
White’s Electronics, Inc.
Sweet Home, Oregon USA
Building the World’s Finest metal detectors for over 60 years.

Congratulations! You have purchased a quality instrument that was designed and manufactured in the USA.
The Spectra series is the result of years of research and development, time-proven manufacturing and testing techniques, and, most of all... listening to our customers.
The Spectra VX3 represents the state-of-the-art in metal detecting technology. Three frequencies, color display, advanced features, and the ability to use wireless headphones produce a powerful and capable detector. VX3 has preset programs developed and refined by experts, leaving you ready to find what others have left behind.
This instruction manual covers the features of VX3 and introduces the detecting basics you need to get started. There are no substitutes for field experience; study this manual, and practice using your Spectra VX3. Before long, you may well be teaching the experts a thing or two.
I am proud of the Spectra VX3, and the people here at White’s who designed and built it for you. We’ve been designing, building, and distributing world-wide for over 60 years from our factory in Sweet Home, Oregon, USA. We put our “Made in America” label on every metal detector we build!
Happy Hunting!
President
White’s Electronics, Inc.

Spectra VX 3 User’s Guide
VX3 Specifications
Operating mode . . . . . . . . . . . . . . . . . . VLF/induction balance Frequencies . . . . . . . . . . . . . . . . . . . 2.5kHz, 7.5kHz, 22.5kHz Ground balance range. . . . . . . . . .Ferrite to salt (approx. 95°) Programs . . . . . . . . . . . . . . . . . . . . . . . . . . . . 8, all modifiable Discrimination segments . . . . . . . . . . . . . . . . . . . . . . . . . 191 Audio modes . . . . . . . 4: Std, all-metal, mixed mode, pinpoint Audio tones . . . . . . . . . . . . . . . . . . . . . . . . . . . . . . . . 1 or 191 Audio output . . .Speaker, headphones, wireless headphones Display . . . . . . . . . . . . . . . . . . . .320x240 QVGA Color, backlit Weight. . . . . . . . . . . . . . . . . . . . . . . . . . . . . . . . . . . . . . .4.3 lbs Length. . . . . . . . . . . . . . . . . . . . . . 45 - 52.5 inches, adjustable Search coil . . . . . . . . . . . . . . . . . . Eclipse 950 9.5” concentric Batteries . . . . . . . . . . . . . . . . . . . . . . . . . . . . . . (8) AA, alkaline Battery life . . . . . . . . . . . . . . . . . . . . . . . . . 8-10 hours typical1 Warranty . . . . . . . . . . . . . . . . . . . . . . . . . 2 years, transferrable
Customer Support
Questions concerning your VX3? There are three ways to contact us:
Internet: http://whiteselectronics.com/support.html
Phone: |
|
1-800-547-6911 (US) |
(0044) 1463 223456 (UK) |
Or mail us: |
|
White's Electronics |
White's Electronics |
1011 Pleasant Valley Road |
35 Harbour Road |
Sweet Home, OR 97386 |
Inverness, Scotland |
|
IV1 1UA |
1. Alkaline batteries, backlight off, no wireless headphones
Page i

Spectra VX 3 User’s Guide
Table of Contents
1 Introduction
Conventions . . . . . . . . . . . . . . . . . . . . . . . . . . . . . . 1-2 Layout . . . . . . . . . . . . . . . . . . . . . . . . . . . . . . . . . . 1-3 Assembly . . . . . . . . . . . . . . . . . . . . . . . . . . . . . . . . 1-5 Batteries . . . . . . . . . . . . . . . . . . . . . . . . . . . . . . . . . 1-6 The Basics of VLF Operation . . . . . . . . . . . . . . . . 1-7
2 QuickStart
Turn On & Go . . . . . . . . . . . . . . . . . . . . . . . . . . . . 2-1 Programs and Memory . . . . . . . . . . . . . . . . . . . . 2-2 Ground Balance . . . . . . . . . . . . . . . . . . . . . . . . . 2-3 Electromagnetic Interference (EMI) . . . . . . . . . . 2-4 Menus & Controls . . . . . . . . . . . . . . . . . . . . . . . . . 2-4 Live Control Bar . . . . . . . . . . . . . . . . . . . . . . . . . 2-5 Main Menu . . . . . . . . . . . . . . . . . . . . . . . . . . . . . 2-5 Controls. . . . . . . . . . . . . . . . . . . . . . . . . . . . . . . . 2-6 VX3 Displays . . . . . . . . . . . . . . . . . . . . . . . . . . . . . 2-6 Search mode. . . . . . . . . . . . . . . . . . . . . . . . . . . . . . 2-6 Pinpoint mode . . . . . . . . . . . . . . . . . . . . . . . . . . . . 2-7 VX3 Audio . . . . . . . . . . . . . . . . . . . . . . . . . . . . . . . 2-8 Metal Detecting Basics . . . . . . . . . . . . . . . . . . . . . 2-8
3 Basic Settings
Programs . . . . . . . . . . . . . . . . . . . . . . . . . . . . . . . . 3-2 Backlight . . . . . . . . . . . . . . . . . . . . . . . . . . . . . . . . 3-3 Sensitivity . . . . . . . . . . . . . . . . . . . . . . . . . . . . . . . 3-4 Rx Gain . . . . . . . . . . . . . . . . . . . . . . . . . . . . . . . . 3-4 All-Metal Sensitivity. . . . . . . . . . . . . . . . . . . . . . 3-5 Discrimination Sensitivity . . . . . . . . . . . . . . . . . 3-6 Audio . . . . . . . . . . . . . . . . . . . . . . . . . . . . . . . . . . . 3-6 Discrimination . . . . . . . . . . . . . . . . . . . . . . . . . . . . 3-6 Frequency. . . . . . . . . . . . . . . . . . . . . . . . . . . . . . . . 3-7 Ground Tracking . . . . . . . . . . . . . . . . . . . . . . . . . . 3-8 Filters . . . . . . . . . . . . . . . . . . . . . . . . . . . . . . . . . . . 3-9
Page ii

Spectra VX 3 User’s Guide
4 Operating Modes
Frequency. . . . . . . . . . . . . . . . . . . . . . . . . . . . . . . . 4-1
Three Frequency . . . . . . . . . . . . . . . . . . . . . . . . . 4-2
Salt Compensate . . . . . . . . . . . . . . . . . . . . . . . . . 4-2
Single Frequency . . . . . . . . . . . . . . . . . . . . . . . . 4-3
Frequency Offset. . . . . . . . . . . . . . . . . . . . . . . . . 4-4
Ground Balance . . . . . . . . . . . . . . . . . . . . . . . . . . . 4-5
AutoTrac . . . . . . . . . . . . . . . . . . . . . . . . . . . . . . . 4-5
LockTrac. . . . . . . . . . . . . . . . . . . . . . . . . . . . . . . 4-6
Audio . . . . . . . . . . . . . . . . . . . . . . . . . . . . . . . . . . . 4-6
All-Metal Audio . . . . . . . . . . . . . . . . . . . . . . . . . 4-7
Discrimination Audio . . . . . . . . . . . . . . . . . . . . 4-10
Mixed-Mode Audio . . . . . . . . . . . . . . . . . . . . . 4-12
Pinpoint Mode. . . . . . . . . . . . . . . . . . . . . . . . . . 4-13
Discrimination . . . . . . . . . . . . . . . . . . . . . . . . . . . 4-14
Speaker and Headphones . . . . . . . . . . . . . . . . . . . 4-15
Preset Icon Tables . . . . . . . . . . . . . . . . . . . . . . . . 4-16
5 Display Screens
Search screen . . . . . . . . . . . . . . . . . . . . . . . . . . . . . 5-1
VDI . . . . . . . . . . . . . . . . . . . . . . . . . . . . . . . . . . . 5-2
Icons . . . . . . . . . . . . . . . . . . . . . . . . . . . . . . . . . . 5-3
Depth. . . . . . . . . . . . . . . . . . . . . . . . . . . . . . . . . . 5-3
SpectraGraph . . . . . . . . . . . . . . . . . . . . . . . . . . . 5-3
Status Bar . . . . . . . . . . . . . . . . . . . . . . . . . . . . . . 5-8
Pinpoint Screen . . . . . . . . . . . . . . . . . . . . . . . . . . . 5-9
Salt Mode Anomaly . . . . . . . . . . . . . . . . . . . . . . 5-9
6 Advanced Features
Main Menu. . . . . . . . . . . . . . . . . . . . . . . . . . . . . . . 6-1
Filters & Speed . . . . . . . . . . . . . . . . . . . . . . . . . . . 6-2
Ground Filter. . . . . . . . . . . . . . . . . . . . . . . . . . . . 6-3
Recovery Delay. . . . . . . . . . . . . . . . . . . . . . . . . . 6-4
SAT. . . . . . . . . . . . . . . . . . . . . . . . . . . . . . . . . . . 6-5
Sensitivity Probe . . . . . . . . . . . . . . . . . . . . . . . . . . 6-5
Ground Probe. . . . . . . . . . . . . . . . . . . . . . . . . . . . . 6-6
Page iii

Spectra VX 3 User’s Guide
7 Programs
VX3 Memory Structure. . . . . . . . . . . . . . . . . . . . . . 7-1
Saving Programs . . . . . . . . . . . . . . . . . . . . . . . . . . 7-2
Restoring Programs . . . . . . . . . . . . . . . . . . . . . . . . 7-2
Rearranging Programs . . . . . . . . . . . . . . . . . . . . . . 7-3
8Wireless Headphones
9Troubleshooting
10Shortcuts
Back Cover: Warranty; Code of Ethics
Page iv

 CHAPTER
 1
1


Introduction
White’s VX3 represents the latest technology in metal detecting. The heart of VX3 is a high-performance ARM-9 RISC microprocessor which simultaneously analyzes signals from 3 transmitted frequencies. Those frequencies — 2.5kHz, 7.5kHz, and 22.5kHz — were chosen for their diverse responses to a variety of metal targets, resulting in a superior system of target analysis and identification.
The face of VX3 is a stunning 320x240 color display with an easy-to-use menu-driven interface. Along with three frequencies, there are three search modes and a three-level Spectra-
Graph® display which provides detailed target information for each frequency. With a level of simplicity for the novice user and advanced features to satisfy the experienced user, VX3 is a metal detector for everyone.
This manual is organized to provide progressive information, a format that attempts to minimize information overload. If you are a new detectorist, the QuickStart chapter will allow you to get a quick jump on using VX3. Then, as you run across new features and want to find out more, continue reading the manual to get progressively detailed information.
If you are already familiar with high-end detectors (especially those with a menu interface), you might want to read over the QuickStart chapter to get a feel for VX3’s features. VX3’s graphical interface makes the rest easy.
While VX3 is easy to use, it does have more features than many other detectors, and can appear overwhelming. Don't be intimidated! Start with the preset programs and go at your own
Page 1-1

Spectra VX 3 User’s Guide
pace. There is no need to master all the features to get excellent performance.
If you need help, White's Electronics is a phone call or mouse click away. Your dealer is an excellent resource, and the White’s web site has a VX3 help forum for questions & answers, tips, and sharing programs. Go to www.whiteselectronics.com and click on the Forum link. There are also many other on-line forums for metal detecting where you can chat with other White’s users and ask questions. Finally, look for a detecting club in your area. Members are often eager to help people get started, and there is nothing like having that help close by in the field.
Conventions
In discussing the features of VX3, we will use Arial-Bold- Caps to distinguish keypad buttons and menu selections. For example, “press ENTER” means to press the “Enter” key on the keypad, and “select Enable” might mean to select the “Enable” menu option, probably by using the arrow keys to highlight it and then pressing ENTER. VX3 keys and menus work just like a modern computer graphical interface, so things are fairly intuitive.
In some cases, you need to use multiple key combinations, or combinations with the trigger switch. “Press MENU, ENTER” means to press and release the MENU button, then press and release the ENTER button. But “press MENU+ENTER” means to press and hold the MENU button, and while holding it down press the ENTER button. Order often matters, so MENU+ENTER is not the same as ENTER+MENU. If you find that you have accidentally pressed the wrong key or key combo, pulling the trigger switch will usually back you out.
Tip: Keypad buttons usually take you into menus, trigger gets you out.
Page 1-2

Spectra VX 3 User’s Guide
Two keypad buttons have dual names. MENU/TAB is used both as an entry button into the menu system, and to “tab” from one screen area to the next. This tab method is identical to how a PC interface uses it. So in some cases we will tell you to press MENU, in other cases press TAB. It’s the same button. ZOOM/ VIEW works the same way. VX3 also has four arrow keys, and these may be either called UP DOWN LEFT RIGHT (or UP DN LT RT) or represented with the symbols . Any of these representations might be used.
Most menus are nested, so instead of telling you to press MENU, then select the Audio menu, then select Search Audio, then select Discrimination, then select Modulation, we may
instead say, select MENUAudioSearch AudioDiscrimina-
tionModulation. This means to drill down through the stated menu path.
Finally, there is a trigger switch under the pod. It has a normal (center) position, a forward position, and a momentary pulled position. When we say “pull the trigger,” we mean to pull it to the momentary position and release it. If we say “Pull/ hold the trigger,” then pull it back and hold it there. This might be in conjunction with a key press, such as, “Pull/hold the trigger and press ENTER,” which is the same as “Trigger+ENTER.”
Layout
The VX3 interface consists of a keypad and a color screen. The next page has a picture of the pod face with the default layout for the search screen. The search screen has four major regions:
1.Target information
2.SpectraGraph
3.Status Bar
4.Live Control Bar
The target information includes the “VDI” number, the depth, and icons representing the likely target. SpectraGraph displays
Page 1-3

Spectra VX 3 User’s Guide
|
Icons |
||
Target VDI |
|
Target |
|
|
|
||
|
|
Depth |
|
|
|
Spectra |
|
|
|
|
Graph |
Disc. |
|
|
|
Mask |
|
|
Live |
|
|
|
|
Status |
|
|
Control |
|
|
||
|
|
Bar |
|
Bar |
|
|
|
|
|
|
|
Navigation
Keypad
Toggle Switch (front of handle)
signal strength versus VDI and gives a detailed look at the VDI response. The status bar shows a few operational pieces of information, and the Live Control Bar provides quick on-the-fly access to operating modes and adjustment parameters. All of these will be covered in detail in subsequent chapters.
Page 1-4
Spectra VX 3 User’s Guide
Assembly
1.Remove all parts from the shipping carton. Check the assembly page to ensure all parts are present.
2.Insert the 2 rubber washers (b) into the recesses of the lower rod clevis and use the fiber bolt and thumb nut to secure the search loop to the lower rod.
3.Insert the lower rod into the “S”
rod (unlock the cam lock if necessary); the spring clip buttons will click into the adjustment holes. Turn the cam lock
Page 1-5

Spectra VX 3 User’s Guide
to secure. The second or third adjustment holes are suitable for average height adults. Exceptionally tall users may wish to consider purchase of the “tall-man” lower rod (500-0242-
3) and/or the “tall-man” S-rod (500-0240-1).
4.Wind the search loop cable around the rod assembly, first revolution starting over the top of the rod. Work your way to the top of the S-rod. Use the Velcro retainers, one near the loop and one near the top, to hold the cable in place.
5.Insert the rod/loop assembly into the control box rod (unlock the cam lock if necessary); the spring clip buttons will click into the holes. Turn the cam lock to secure. Normally, the S-rod should curve upward.
6.Two adhesive black foam pads are included; they can be placed on the insides of the arm cup.
7.Adjust the Velcro arm strap so that you can easily slip your arm in and out. The strap provides extra leverage and control, though some prefer not to use it.
8.Install the battery pack (see next section for details).
9.Hold the detector normally and check for comfortable angle and balance. Adjust the lower rod extension and/or the arm cup position if necessary.
Batteries
VX3 is provided with an 8-cell AA battery pack. For best results, use either alkaline batteries or high-capacity rechargeable (such as NiMH) batteries. Also available from White’s is a NiMH rechargeable pack plus recharging station; contact your dealer or White’s directly for details.
To install the batteries:
•Release the battery door latches on VX3 to open the battery door.
•Slide the battery pack in, with the metal contact plates facing forward.
Page 1-6
Spectra VX 3 User’s Guide
To replace the batteries, slide open the battery holder lid by gently lifting the tab.
A fresh set of alkalines will operate VX3 for about 7-8 hours with no backlight. Use of the backlight will reduce battery life. When you first power-up VX3 a start-up screen will display briefly with the battery voltage at the bottom. During operation, if the battery voltage drops below 8 volts a low-battery icon will display in the status bar:
You can also check the voltage at any time by selecting Backlight,VIEW from the Live Control Bar, or pressing MENU+ENTER to bring up the Info screen.
VX3 automatically powers off if no activity occurs in a 20 minute time span. Activity is defined as the use of the keypad or the trigger switch.
The Basics of VLF Operation
VX3 is a multi-frequency (MF) induction-balance (IB) very low frequency (VLF) transmit-receive (TR) metal detector. In order to understand what all the user adjustments do, it is important to have at least a rudimentary understanding of how a modern metal detector works.
Metal detectors work on the principle of induction, discovered by Michael Faraday in 1831. The typical induction-balance
metal detector1 uses a transmit coil to produce a magnetic field, and this magnetic field in turn produces a small reaction in nearby metal targets. A receive coil is used to detect this small
1.The first practical metal detector was an induction-balance design, built by Alexander Graham Bell in an effort to locate an assassin’s bullet lodged in US President James Garfield. He failed — not enough sensitivity. Ever since then, “more sensitivity” has been the goal of every detector.
Page 1-7

Spectra VX 3 User’s Guide
TX RX
reaction. A so-called “induction-balanced” coil arrangement prevents the receive coil from being overwhelmed by the transmit signal, allowing it to see very small target signals.
Phase & VDI
Practically all VLF-IB detectors operate as phase discriminators. The received signal is converted to phase, and the phase is a strong indication of what the target might be. The particular phase of a target can vary with the frequency of the transmitted signal, so different detectors designed to use different frequencies can report completely different phase results.
To keep users from having to learn all these different phase response scales, White’s has chosen to normalize them all to a standard “VDI” scale. VDI stands for Visual Discrimination Indicator and is simply a consistent numerical value assigned to targets regardless of the frequency being used. Therefore, a US nickel detected with a 6kHz detector will have the same VDI as with a 15kHz detector. For historical reasons, the standard VDI scale is based on a 6.592kHz detector and is shown below.
The ability to separate targets by VDI is what allows a detector to discriminate. Targets with a negative VDI are usually ferrous (iron), and targets with a positive VDI are usually non-ferrous. Small gold tends to have low VDI’s while thick silver coins have high VDI’s. Other targets like cupro-nickel coins, brass and bronze relics, and aluminum trash can have wildly varying VDI’s depending on their alloy, size, and thick-
Page 1-8

Spectra VX 3 User’s Guide
Ferrous 
|
|
|
|
|
e |
||
|
|
|
|
|
s |
|
|
|
|
|
|
a |
|
e |
|
|
|
|
|
h |
|
|
|
|
|
|
P |
|
|
l |
|
|
|
w |
|
|
|
a |
|
|
|
|
|
c |
|
||
R |
a |
|
I |
S |
|
|
|
|
|
|
|
||||
|
|
|
|
Nail |
|||
|
|
|
|
|
|||
|
|
|
V |
D |
|
|
|
|
|
|
|
|
|
|
|
90o
0
t l a S
 Non-Ferrous
|
|
R |
|
|
|
|
|
|
a |
|
|
|
|
|
V |
|
w |
|
|
|
|
|
|
P |
|
|
|
l |
D |
|
|
|
|
|
|
I |
|
h |
|
||
e |
|
|
|
a |
||
k |
|
S |
|
s |
||
c |
|
|
|
e |
||
|
|
c |
|
|||
i |
|
|
|
|
||
|
|
a |
|
|
||
N |
|
|
|
l |
|
|
S |
|
|
|
e |
|
|
U |
|
|
|
|
||
|
|
|
|
|
|
|
0o -95
Normal soil
|
|
|
r |
|
|
rte |
|
|
ua |
|
|
SQ |
|
|
|
U |
|
|
|
+95 180o
ness. This means you need to apply your own discriminator — your brain — in deciding what the VDI responses are telling you.
Ground Response
Unfortunately, buried metal is not the only thing the detector sees. Most soil contains ferric oxide minerals, and this min-
eralization looks like a target2. In terms of VDI, practically all ground mineralization falls in the extreme negative range of the scale, even beyond most iron targets. But it can vary somewhat as shown by the gray range in the prior diagram. At most locations the variation is small, so you can ground balance at a particular spot and be very close for the entire area. Some locations have significant variations and you should occasionally reground balance as you hunt, or use automatic ground tracking.
Many locations have enough mineralization to create quite a strong ground signal, often much stronger than that of a moderately deep target. The VDI diagram on the preceding page uses vectors to represent specific target responses, with the angle of the vector representing the VDI value. We can also use the length of the vector to represent the strength of the target
2.In this manual, we’ll refer to the signal resulting from ground mineralization (including salts) as the “ground signal” or the “ground response.”
Page 1-9

Spectra VX 3 User’s Guide
response, so that a strong ground and weak quarter response would look like:
0
 Strong
-95
Ground
|
|
k |
|
a |
|
e |
|
|
W |
|
|
|
|
|
|
r |
|
|
|
e |
|
|
|
rt |
|
|
|
a |
|
|
|
u |
|
|
|
|
Q |
|
|
|
|
+95
The detector will see both signals at the same time, and the combination of the two can be represented with a third vector as follows:
0
|
|
|
er |
|
|
|
|
art |
|
|
|
|
kQu |
|
|
|
|
ea |
|
R |
|
|
|
W |
|
|
e |
|
|
|
|
|
|
||
|
|
|
|
su |
|
|
|
|
|
|
ltin |
|
Stro |
|
|
g |
|
|
|
ng Grou |
|
||
-95 |
|
|
nd |
|
|
|
|
|
|
||
Signal
+95
The resulting signal appears to be a fairly strong ferrous target instead of a quarter. This is the downfall of the old TR-dis- criminator designs. Fortunately, since the VDI response for ground is usually far away from the response of desirable targets, there are ways to deal with it. In a modern VLF motion discriminator, the receiver determines what part of the signal is the ground response and, using special filter techniques, normalizes the whole VDI scale to the current ground signal, resulting in the ground signal being ignored. Graphically, this looks like:
Page 1-10

Spectra VX 3 User’s Guide
0
-95
New Origin 
|
|
|
|
|
|
|
|
0 |
|
|
|
|
|
|
|
|
r |
|
|
|
|
|
|
|
|
e |
|
|
|
|
|
|
|
|
rt |
|
|
|
|
|
|
|
|
a |
|
|
|
|
|
|
|
|
u |
|
|
|
|
|
|
|
|
k |
Q |
|
|
|
|
|
|
|
a |
|
|
|
|
|
|
|
|
e |
|
|
|
|
|
|
|
|
|
W |
|
|
|
|
+95 |
|
|
||
Str |
|
|
|
|
|||||
|
|
ong Gr |
|
|
|
||||
|
|
|
|
|
|
o |
|
|
|
|
|
|
|
|
|
|
u |
|
|
|
|
|
|
|
|
|
|
n |
|
-95 |
|
|
|
|
|
|
|
d |
+95 |
|
|
|
|
|
|
|
|
||
Any error in the ground balance point can result in an error in the target VDI response so it’s important to maintain a decent ground balance point.
Ground Tracking
In order to better handle variations in ground mineralization, many detectors now incorporate automatic ground track-
ing (White’s uses the term AutoTrac®). The detector attempts to determine what part of the signal is due to ground and continuously track the phase and strength of that signal, and eliminate it. One trick is to limit the range of VDI’s for normal ground (the grayed area in the VDI scale) and consider anything else a target. This works for most soils, with two caveats.
Besides “normal” ground mineralization, some areas contain rocks or small pockets consisting of material with slightly different mineralization than the surrounding ground. The difference in VDI between these anomalies and the surrounding ground isn’t enough to consider them a true target, but they are small enough to act like a target to the detector’s ground filters. These so-called “hot rocks” can create annoying responses in many detectors.
Another situation concerns soils with significantly conductive salts. A pure salt response lies all the way in the non-fer- rous region of the VDI scale, roughly in the midst of foil. Some salt-water beaches are close to having a pure salt VDI, while other beaches include black sand mineralization that creates a
Page 1-11

Spectra VX 3 User’s Guide
composite VDI that can land anywhere between pure ferrite (VDI = -95) and pure salt. Other areas, like fertilized fields with residual salt ions, can also have a composite ground response. Many deserts have a layer of surface salts that have been leached from the soil; this is generally not a problem as long as it is dry.
Frequency
Metal detectors are produced using a wide range of transmitted frequencies, from 1kHz up to around 100kHz, though the vast majority fall in the VLF range of 3kHz - 30kHz. Low frequencies usually favor thicker targets and metals of higher conductivity, while high frequencies favor thin and low-con- ductive targets.
Interesting Experiment: Thickness matters because of a phenomenon known as skin effect. To demonstrate this, cut several identical flat squares (say, 1”x1”) of aluminum foil. Test the VDI response of a single square, and see how the VDI varies as you stack more squares (tightly) together.
Low frequencies also do a better job penetrating ground mineralization, including salt. High frequencies tend to generate stronger ground and salt signals which can limit the ability to distinguish weak targets. Obviously, when trying to detect thin low-conductive targets (like nuggets and jewelry) in harsh ground (like wet salt sand or black sand) there are competing frequency requirements, so a compromise is necessary. With the ability to run 3 simultaneous frequencies or any one of them individually, VX3 has the ability to deal with a wide variety of conditions.
Page 1-12

CHAPTER |
2 |
QuickStart |
|
|
Turn On & Go
VX3 is highly programmable and includes several factory preset programs which provide good overall performance and allow a new user to quickly start hunting.
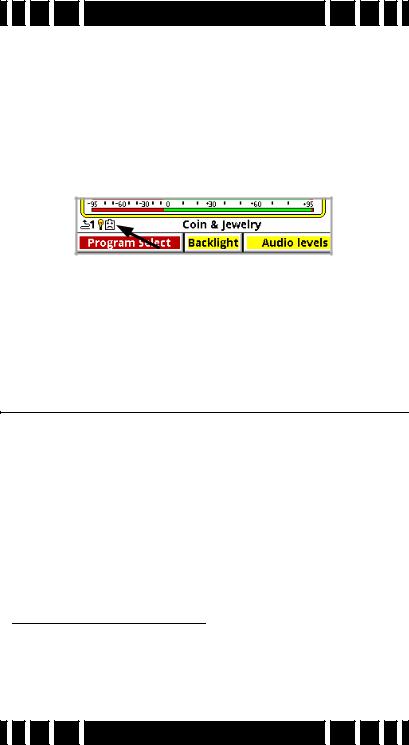
1.Press ON/OFF: VX3 briefly displays a start-up screen, and after 2 or 3 seconds goes straight to the search screen:
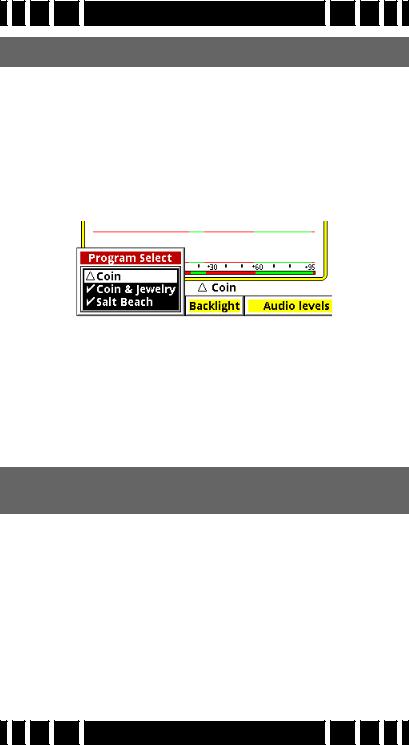
2. At the bottom of the screen is the Live Control Bar, which gives you direct access to most of VX3’s settings. The first item is Program Select; if you highlight this and press ENTER you will see a pop-up selector listing all the available programs:
Page 2-1

Spectra VX 3 User’s Guide
Select a desired program, pull the Trigger, and VX3 is ready to start hunting.
Programs and Memory
VX3 has 8 preset factory programs:
• Coin - Accepts most common US coins, including nickels. Most other VDI regions, including where most jewelry is found, are rejected.
• Coin & Jewelry - Accepts most common coins, along with rings and jewelry.
•Salt Beach - Coin & Jewelry using salt subtraction mode.
•Relic - Mixed mode, no Tone ID, no VCO.
•Prospecting - All-metal mode optimized for nugget hunting.
•Deep Silver - Optimized for deep silver.
•Hi-pro - Advanced Coin & Jewelry.
•Demo - Extra program for whatever you want. Factory set-
tings for this program are weak, intended for in-store demos.
These programs are designed for good performance under most conditions and provide an excellent starting point. However, ground conditions vary considerably, so some adjustments may be necessary. Changes to factory programs are automatically
Page 2-2
Spectra VX 3 User’s Guide
saved to memory and recalled each time VX3 is powered on. Restoring factory settings is covered in Chapter 7.
Ground Balance
VX3’s automatic ground balance system has a fast-track mode that attempts to balance the system to soil conditions within 20 seconds of turn-on. If you do not begin searching within 20 seconds or the ground is unusually trashy, VX3 may not fast-track correctly and you may want to do a manual ground balance:
•Squeeze/hold the Trigger, then press/hold ENTER.
•Pump the search coil over the ground (1-12 inches) until the background hum becomes steady (usually 4 to 6 times). Make sure you do this over an area free of targets.
•Release ENTER, then release the Trigger, and begin searching.
No Targets
Tip: If you release the trigger before releasing ENTER, VX3 will lock the screen to pinpoint mode. Simply pull the trigger twice to resume searching.
This manual ground balance sequence can be done at any time during normal search. Once the initial ground balance is completed, VX3 will automatically track to most typical ground mineral changes.
Page 2-3
Spectra VX 3 User’s Guide
Tip: If VX3 seems to have an erratic audio only when sweeping the search coil on the ground, check the ground balance.
Electromagnetic Interference (EMI)
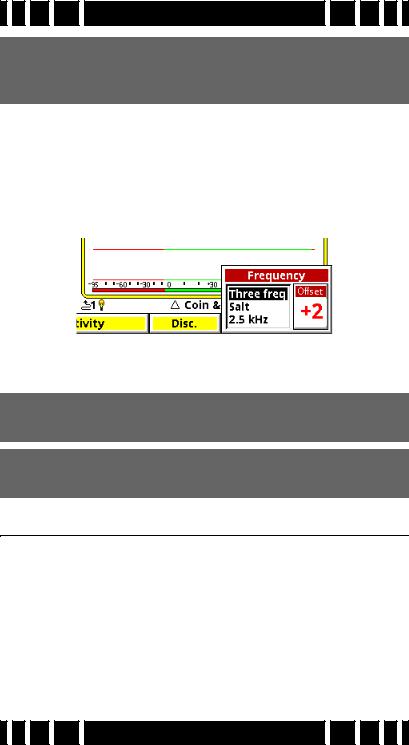
EMI can be a problem with any wide-band metal detector, whether a multi-frequency VLF or a pulse induction design. VX3 includes a frequency offset to help deal with this. Select the Transmit Frequency item on the Live Control Bar to access the Offset control:
There are 5 increments of frequency offset; with the search coil held in the air, find the one for best stability.
Tip: EMI is easiest to hear in pinpoint mode (trigger pulled).
Tip: If VX3 continues to have erratic audio with the search coil held in the air, reduce the RX Gain.
Menus & Controls
VX3 has a number of configuration settings with 2 ways to access them:
•Live Control Bar — Live-search settings
•Menus — All settings, suspends operation
When the MENU button is pressed during normal search the Main Menu appears. We will cover all the menu settings in subsequent chapters.
Page 2-4
Spectra VX 3 User’s Guide
Tip: Press ZOOM to change the font size of the menus.
Live Control Bar
You may want to quickly change settings while searching. The Live Control Bar is displayed at the bottom of the Search screen and its items are accessible via the left/right arrow buttons. When a Live Control item is selected (using the ENTER button), a small control box pops up with one or more individual controls:
Any available setting in the Live Control Bar performs the same function as any like-named setting in the menus, but the live controls can be adjusted while the detector is in normal operation. For many of the Live Control items, you can press the VIEW button to access menus with additional settings and controls. Accessing these menus suspends the search operation of VX3.
Tip: Press VIEW+DN and VIEW+UP to hide or expand the Live Control Bar.
Main Menu
While the Live Control Bar and its menus contain all of VX3’s configuration settings, they are rather spread out. The Main Menu pulls all the settings together in one easy-to-navi- gate linear list. The Main Menu can be accessed by pressing MENU from the Search screen. To exit back to the Search screen, simply pull the trigger switch. When you re-enter the Main Menu VX3 will remember where you were last, even if after a power down.
Page 2-5

Spectra VX 3 User’s Guide
Tip: Press MENU+ to quickly collapse levels of the menu tree.
Controls
VX3 uses a variety of different interface controls such as sliders and radio buttons. Most of them are very similar to those found in computer graphical interfaces so they will be familiar to many users.
VX3 Displays
VX3 has 2 display modes which are controlled by the position of the trigger switch:
•Trigger neutral — Normal Search
•Trigger forward — All-metal pinpoint (no SAT applied)
•Trigger pulled — All-metal pinpoint (no SAT applied)
This section briefly describes the modes and their screens. Chapter 5 has a more detailed discussion of display modes.
Search mode
Search mode is the normal display mode for VX3 and shows a 3-frequency SpectraGraph1:
1.Programs which run in single frequency mode will display a single frequency SpectraGraph.
Page 2-6
Spectra VX 3 User’s Guide
Along the top of the screen are the VDI number, icons, and depth. The majority of the screen consists of the SpectraGraph display, which provides real-time information on the target’s VDI. See Chapter 5 for more information on how to read this display.
Below the SpectraGraph is the Status Line, which contains icons for the status of wireless headphones and backlight. In the middle of the Status Line the name of the active Program is displayed, and is occasionally overwritten by the ground tracking status.
At the bottom of the Search screen is the Live Control Bar which gives instant access to the most common settings while VX3 is operating.
Pinpoint mode
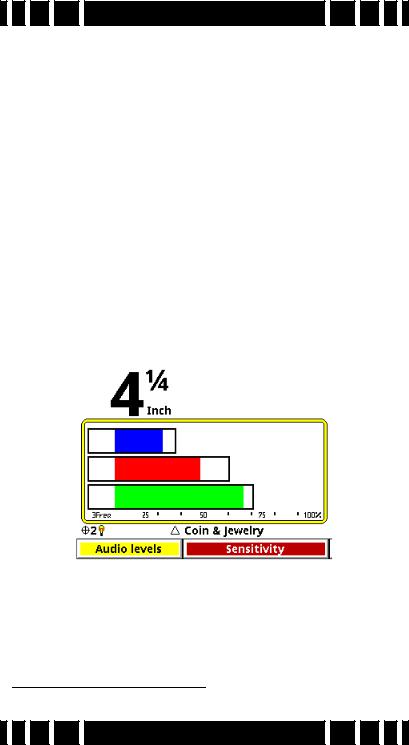
Pinpoint mode places VX3 in an all-metal mode and displays the Pinpoint screen:
Again, this screen has the depth (but no VDI or icons), Status Line, and Live Control Bar. The Pinpoint display consists of 3
horizontal moving bars2 which give the relative signal strengths of the three frequencies. This can be used to precisely pinpoint the target, and to see which frequency is giving the strongest
2. Or just one bar, for single frequency operation.
Page 2-7

Spectra VX 3 User’s Guide
response. See Chapter 5 for more information on how to read this display.
Tip: To lock VX3 in Pinpoint mode simply flip the trigger switch forward.
VX3 Audio
VX3 supports a built-in speaker, plug-in headphones, and White’s proprietary wireless headphones. Headphones are highly recommended as they help block out ambient noise, making it much easier to discern the deeper target responses. If you purchase the optional wireless headphones for your VX3, see Chapter 8 for connect instructions.
Metal Detecting Basics
There are many excellent books available that cover the hobby of metal detecting, and this manual cannot possibly do justice to all the aspects of the hobby. Ask your dealer to recommend a good introductory book. We will, however, touch on a few important topics.
Where to hunt
The basic rule of location is: the older the better. Old homes, home sites, schools, parks, swimming holes, and picnic areas can all yield great finds. However, “old” can also mean heavily used, which can result in a lot of accumulated trash. The best sites are those that have been “lost” or unused for decades.
Besides “old,” there are places which are constantly getting replenished. With high gold prices, hunting for jewelry at beaches can be very profitable, especially if it includes stones. At parks and recreation areas, people often lay items on the ground while they play sports, then lose or forget them.
Page 2-8

Spectra VX 3 User’s Guide
Permission
This is CRITICALLY IMPORTANT! Over the years, a small minority of inconsiderate detectorists have, in some places, created a negative image for the hobby (see the Treasure Hunter’s Code of Ethics on the back cover of this manual). Do your part to maintain a positive image: ask permission.
Private property always requires permission. Approach the owner in a professional manner; some detectorists even make up business cards. Be willing to offer the property owner a portion of the finds, especially if it’s a really choice site you’re dying to hunt.
In many cities, homes have easements (the grass strip between a sidewalk and street) which technically belong to the city but are kept up by the homeowner. Assume it belongs to the homeowner, and don’t hunt these areas without their permission.
Public lands have mixed access. National Parks are absolutely OFF LIMITS to metal detecting, and Park Rangers can confiscate your detector and even your vehicle. Don’t even try! State parks vary considerably, depending on the state and/or the type of park. The best approach is to check with the Ranger Station responsible for the park.
Local parks and schools are usually open to detecting, though some localities may require you to register. Find out what the local laws are.
Detecting fundamentals
When you arrive at a hunt site, use your best intuition (and, hopefully, research) to identify the most likely areas for good finds. Often a site will be too large to cover 100% so you need to narrow it down. If you are just learning, don’t be concerned with patterns, just walk around and hunt. As you get proficient with your detector and want to improve efficiency, you can mentally grid off areas and hunt them in a back-and-forth pattern.
Page 2-9
Loading...