


®
Coinmaster GT
White’s Electronics, Inc. Sweet Home, Oregon USA
Building the World’s Finest metal detectors for over 60 years.

Coinmaster GT Owner’s Manual
CONTENTS
Introduction. . . . . . . . . . . . . . . . . . . . . . . . . . . . . . . . . . . . . . . . 3
Assembly . . . . . . . . . . . . . . . . . . . . . . . . . . . . . . . . . . . . . . . . . 4
Batteries . . . . . . . . . . . . . . . . . . . . . . . . . . . . . . . . . . . . . . . . . . 5
QuickStart . . . . . . . . . . . . . . . . . . . . . . . . . . . . . . . . . . . . . . . . . 6
Controls
On/Off . . . . . . . . . . . . . . . . . . . . . . . . . . . . . . . . . . . . . . . . . 7
Sensitivity . . . . . . . . . . . . . . . . . . . . . . . . . . . . . . . . . . . . . . 7
Disc . . . . . . . . . . . . . . . . . . . . . . . . . . . . . . . . . . . . . . . . . . . 7
Tone ID . . . . . . . . . . . . . . . . . . . . . . . . . . . . . . . . . . . . . . . . 8
Trac Lock . . . . . . . . . . . . . . . . . . . . . . . . . . . . . . . . . . . . . . 8
Beach . . . . . . . . . . . . . . . . . . . . . . . . . . . . . . . . . . . . . . . . . 8
Pinpoint/All Metal . . . . . . . . . . . . . . . . . . . . . . . . . . . . . . . 8
Display . . . . . . . . . . . . . . . . . . . . . . . . . . . . . . . . . . . . . . . . . . . 9
More Info
VDI . . . . . . . . . . . . . . . . . . . . . . . . . . . . . . . . . . . . . . . . . . 10
Depth & Discrimination . . . . . . . . . . . . . . . . . . . . . . . . . . 11
Overload . . . . . . . . . . . . . . . . . . . . . . . . . . . . . . . . . . . . . . 12
Coil Size . . . . . . . . . . . . . . . . . . . . . . . . . . . . . . . . . . . . . . 12
Sweep Methods. . . . . . . . . . . . . . . . . . . . . . . . . . . . . . . . . 12
Sizing, Pinpointing, & Digging . . . . . . . . . . . . . . . . . . . . 13
Specifications . . . . . . . . . . . . . . . . . . . . . . . . . . . . . . . . . . . . . 14
Customer Support . . . . . . . . . . . . . . . . . . . . . . . . . . . . . . . . . . 14
Warranty . . . . . . . . . . . . . . . . . . . . . . . . . . . . . . . . . . . . . . . . . 15
Code of Ethics. . . . . . . . . . . . . . . . . . . . . . . . . . . . . .Back Cover
Page 2

|
|
|
|
|
|
|
|
|
Coinmaster GT Owner’s Manual |
|
|
|
|
|
|
|
|
|
||
|
|
|
|
|
|
|
|
|
|
Introduction |
|
|||||||||
|
|
Disc cursor |
|
|
|
|
|
Low battery |
|
|||||||||||
|
|
|
|
|
|
|
indicator |
|
||||||||||||
|
|
|
|
|
|
|
|
|
|
|
|
|
|
|||||||
|
|
Reject icons |
|
|
|
|
|
|
Backlight |
|
||||||||||
|
|
|
|
|
|
|
|
|
|
|
|
|
|
indicator |
|
|||||
|
|
Depth bar |
|
|
|
|
|
|
|
Sensitivity |
|
|||||||||
|
|
|
|
|
|
|
|
|
strength |
|
||||||||||
|
|
|
|
|
|
|
|
|
||||||||||||
Numeric VDI |
|
|
|
|
|
Tone ID mode |
|
|||||||||||||
|
|
and depth |
|
|
|
|
|
indicator |
|
|||||||||||
The Coinmaster GT (or CoinGT) is an easy-to-use metal detector with features and performance that rival more expensive models. The CoinGT has automatic ground tracking (Auto-
Trac®) which maximizes performance across many different ground conditions. It also features a 9-zone discriminator with both audio and visual target identification. Each zone may be accepted or rejected, providing the user with a way to ignore certain types of targets like iron or foil.
In normal search mode (i.e., “Disc” mode) the audio has a silent threshold and optional Tone ID with 9 tones that correlate to the 9 different discrimination zones. In addition to the audio response, the display provides visual information with an icon cursor that points to a probable target type and a Visual Display Indicator (VDI) number that provides even more detailed target information (see More Info for an explanation of VDI numbers). An estimated target depth is given by the depth bar. The Pinpoint and All Metal modes provide an audible threshold tone and a user-selectable VCO response or a loudness response (non-VCO).
The CoinGT uses 8 “AA” batteries and will typically run 25 hours on fresh alkaline batteries. The display includes an optional backlight which allows for extended hunting, but will increase battery consumption.
Page 3
Coinmaster GT Owner’s Manual
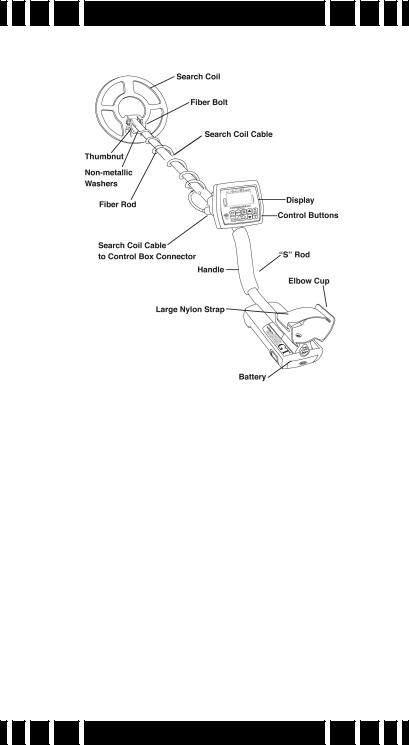
Assembly
1.Remove all parts from the shipping carton and check assembly diagram to ensure all parts are present.
2.Install black rubber washers on fiber clevis/lower rod, insert clevis lower rod onto loop ears. Use only nonmetallic washers, fiber bolt, and fiber thumb nut to secure loop/search coil to clevis/lower fiber rod.
3.Insert clevis/lower rod into curved “S” rod so that stainless steel spring clip buttons line up and lock into one of the adjustment holes in the curved “S” rod. The second or third adjustment holes are suitable for average sized adults.
4.Wind the loop cable around the rod assembly, first revolution over the top of the rod, all the way to the top of the curved “S” rod, about five revolutions. Use the black cable retainers, one near the loop, and one near the top of the curved “S” rod, to hold the loop cable in place. Plug the cable into the jack on the front of the control box.
Page 4

Coinmaster GT Owner’s Manual
5.Grip the instrument by the handle, with your arm in the elbow cup with strap and sweep the loop/search coil over the floor. If the instrument fit feels uncomfortable, readjust clevis/lower rod length with spring clip button and camlock so that search coil can be held near the floor without stooping over.
6.Adjust the elbow cup strap so that it is loose enough for you to slide your arm in and out without loosening each time you want to set the detector down. The elbow cup strap provides extra leverage and control. However, some prefer not to use it.
7.Install the battery pack.
Batteries
1.Remove the battery pack by pressing both buttons on sides of battery compartment.
2.Slide open the tray cover. Install eight (8) “AA” alkaline batteries taking note of correct (+) and (-) positions and close cover.
3.Slide battery pack into compartment. A vigorous ‘slam’ may be needed to ensure a good seating.
4.Press ON/OFF button. Good batteries will produce a high pitched beep on power-up. A low pitched beep indicates low batteries.
5.Batteries that are weak, or become weak during use, will automatically indicate Low Batt with a battery icon on the center portion of the display. A three-beep alarm also sounds to indicate batteries are too low for operation.
6.Most alkaline batteries will give about 25 hours of continuous operation. Battery life will vary with intermittent use, back-light use, temperature, control settings, target indications, battery quality, battery condition upon purchase, and
Page 5
 Loading...