


®
Owner’s Guide
Now with ON-BOARD Quick Reference Manual
White’s Electronics, Inc.
The World’s Finest Metal Detectors - manufactured in Sweet Home, Oregon USA
Beta Copy
March 2010 (see back cover)
pg

pg

A word from the President ...
Congratulations and thank you for choosing
White’s Spectra V3i.
Spectra is the result of years of research and development, time proven manufacturing and testing techniques, and most of all ... listening to our customers.
The Spectra represents many firsts for metal detector technology. More capabilities than any metal detector ever. Spectra has Preset Programs developed by our experts, already set up and ready to find what others have left behind.
This instruction manual will give you a good understanding of the basics. There are no substitutes for field experience. Practice using the Spectra, and then study this manual further. Before long, you may well be teaching the experts a thing or two.
I am proud of the Spectra, and the people here at White’s who designed and built it for you.
We’ve been designing, building, and distributing world wide for nearly 60 years from our factory in Sweet Home, Oregon, USA. We put our “Made In America” label on every metal detector we build!
Happy Hunting!
President
White’s Electronics, Inc.
“ I am proud to say
all White’s Metal Detectors are built in Sweet Home, Oregon USA”
pg

Table of CONTENTS - |
|
Assembly............................................................................................................................................ |
8 |
Batteries........................................................................................................................................... |
10 |
Owner Registration......................................................................................................................... |
12 |
Wireless Headphone...................................................................................................................... |
13 |
First Aid............................................................................................................................................. |
14 |
First Time Out................................................................................................................................... |
14 |
On-Board Answers.......................................................................................................................... |
14 |
Explore Your Spectra...................................................................................................................... |
16 |
In Depth Turn On and Go................................................................................................................. |
16 |
On/Off........................................................................................................................................... |
16 |
Zoom Option................................................................................................................................ |
16 |
Ground Balance........................................................................................................................... |
16 |
Coin & Jewelry............................................................................................................................. |
17 |
Backlight....................................................................................................................................... |
17 |
Live Controls................................................................................................................................ |
17 |
VDI Numbers & Spectragraph...................................................................................................... |
17 |
Icons............................................................................................................................................. |
18 |
Analyze......................................................................................................................................... |
19 |
Pinpoint........................................................................................................................................ |
19 |
Navigate........................................................................................................................................... |
20 |
Live Controls.................................................................................................................................... |
20 |
Six-Block Menu................................................................................................................................ |
23 |
Programs...................................................................................................................................... |
24 |
Restore................................................................................................................................... |
25 |
Memory Capabilities............................................................................................................... |
26 |
Sensitivity..................................................................................................................................... |
27 |
Audio........................................................................................................................................... |
28 |
Wireless................................................................................................................................ |
29 |
Discrimination............................................................................................................................... |
31 |
Ground Filter..................................................................................................................... |
33 |
Frequency.................................................................................................................................... |
34 |
Ground Tracking........................................................................................................................... |
35 |
Information/Configure.................................................................................................................. |
36 |
Preset Program Chart..................................................................................................................... |
38 |
Special Library Program Chart..................................................................................................... |
39 |
The Displays of the V3i................................................................................................................... |
40 |
Service Centers............................................................................................................................... |
41 |
Warranty Information.................................................................................................................... |
42 |
Quick Reference Expert Menu....................................................................................................... |
44 |
pg

Table of Contents |
|
Expert menu..................................................................................................................................... |
46 |
Programs....................................................................................................................................... |
46 |
Discrimination................................................................................................................................ |
47 |
Sensitivity...................................................................................................................................... |
48 |
Audio............................................................................................................................................. |
48 |
Frequency..................................................................................................................................... |
50 |
Ground Tracking............................................................................................................................ |
51 |
Filter & Speed............................................................................................................................... |
52 |
Configure........................................................................................................................................ |
54 |
Custom Program Notes.................................................................................................................. |
63 |
pg

3 Freqencies “why not 28!” ...
There is much confusion - some of it deliberate - over how many frequencies a detector actually uses, and whether multiple frequencies are truly better than a single frequency. What defines a multi-frequency detector? What do multiple frequencies really do for depth and discrimination?
A multi-frequency detector is defined as one that simultaneously—or, in automated sequence— transmits, receives, and processes more than one frequency. Some detectors have the ability to operate at one of several selectable frequencies, but they still are single frequency detectors because during operation they can only transmit and process a single frequency. The same is true of detectors that have a control to slightly vary their operating frequency to minimize interference; even though they have the ability to operate at many (slightly) different frequencies, they are fundamentally single frequency designs.
Currently, all multi-frequency hobby detectors run their multiple frequencies simultaneously as opposed to sequentially; they are all characterized by having multiple processing channels in the receive circuitry. Therefore, a 2-frequency detector will have two processing channels. SpectraV3i has three independent processing channels; it is a true 3-frequency detector.
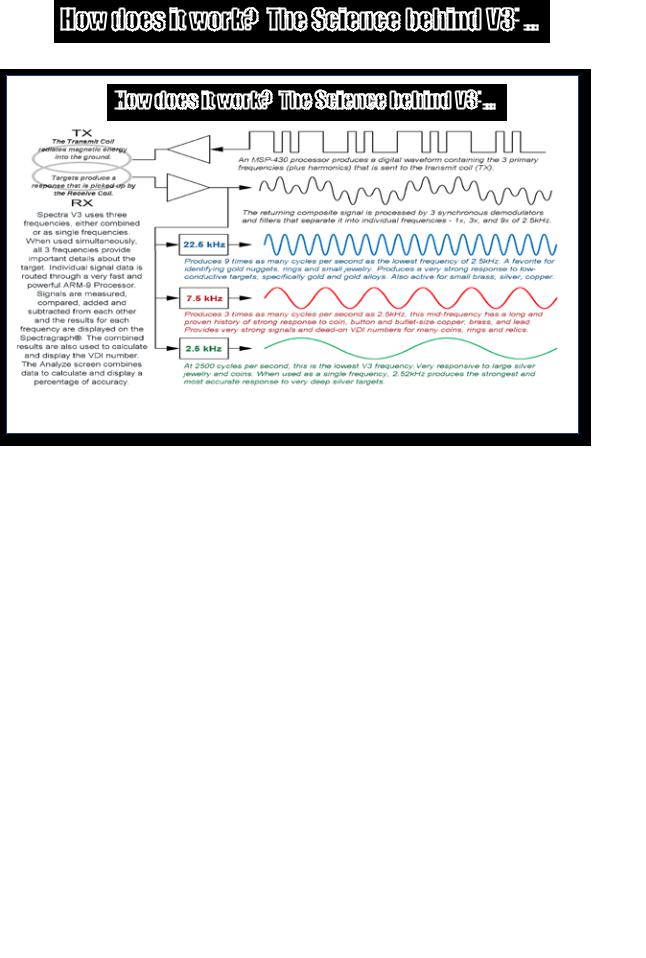
This all sounds easy, so where is the confusion? It turns out that (currently) all multi-frequency detectors create a transmit signal that is composed of digital waveforms which are designed to produce peak energies at the desired frequencies. As a side-effect, these digital waveforms also produce undesired harmonic frequencies. Lots and lots of harmonic frequencies, 10’s or even 100’s of them. These harmonics have no useful energy and are not part of the signal processing. So while we can claim to transmit many, many frequencies, we cannot claim to process or use them. Therefore, we could easily claim the Spectra V3i transmits 17 frequencies, or 28, or 39, or 55—we could get plain silly with this. And such a claim would be true, technically speaking, but since all those extra frequencies are not actually used, it would be misleading to make such a claim. White’s chooses, instead, to claim the number of frequencies we are actually using and processing. It may not sound as impressive as a 55-frequency detector, but it’s honest and accurate.
Pulse Induction (PI) detectors also utilize a digital (pulse) transmit waveform, so they transmit a tremendous number of harmonic frequencies as well. So is it fair to include pulse induction as a multifrequency technique? Not really, because PI detectors process in the time domain, not the frequency domain. So even though they use broad-band signals, they are not frequency-based detectors at all. Calling them “multi-frequency” is simply another attempt to confuse the consumer.
Once we get beyond the marketing hype, the real question is: What does multi-frequency do for depth and discrimination? The truth is, any time a detector is simultaneously transmitting more than one frequency, the transmit energy must be divided amongst the frequencies. Therefore, a single fre-
quency detector can usually squeeze out slightly more depth than a multi-frequency design at that certain frequency. But this is an advantage only at one frequency, which tends to favor only a narrow range of targets.
pg
How does it work? The Science behind V3 i
i
 ...
...

 How does it work? The Science behind V3
 i
i
 ...
...
This is where a multi-frequency detector such as the Spectra V3i really shines. V3i transmits at 2.5kHz, 7.5kHz, and 22.5kHz, making it simultaneously “hot” on silver, relics, and gold. Single frequency detectors are unable to have peak performance over such a wide range of targets. This is an advantage not only in detecting desirable targets, but also in discriminating out undesirable targets. So multi-fre- quency detectors get excellent depth over a much wider range of targets, and do a better job of identifying targets. But Spectra V3i can also beat single frequency detectors at their own game: V3i has the ability to run in single frequency mode using any of its three frequencies, and the transmit waveform is optimized to put all the energy into that one frequency. So if you want to hunt for only deep silver or only gold jewelry, V3i can be optimized for these tasks.
A final advantage of multi-frequency is the ability to simultaneously balance ferrous ground mineralization and conductive salt ground. Single frequency detectors cannot do this, and usually struggle in wet salt sand unless the sensitivity is turned down significantly.
Spectra V3i is the first production frequency domain metal detector to simultaneously use more than 2 frequencies. It is also the first multi-frequency detector to offer optimized single frequency modes. And V3i is the first to display the target phase response independently for each frequency. White’s will continue to be a leading innovator in metal detection technology, and instead of misleading claims, we’ll tell you what we are really doing.
pg
Complete Guide to Spectra® V3i
ASSEMBLY -
Washers between each
|
loop ear & clevis |
® |
|
|
|
|
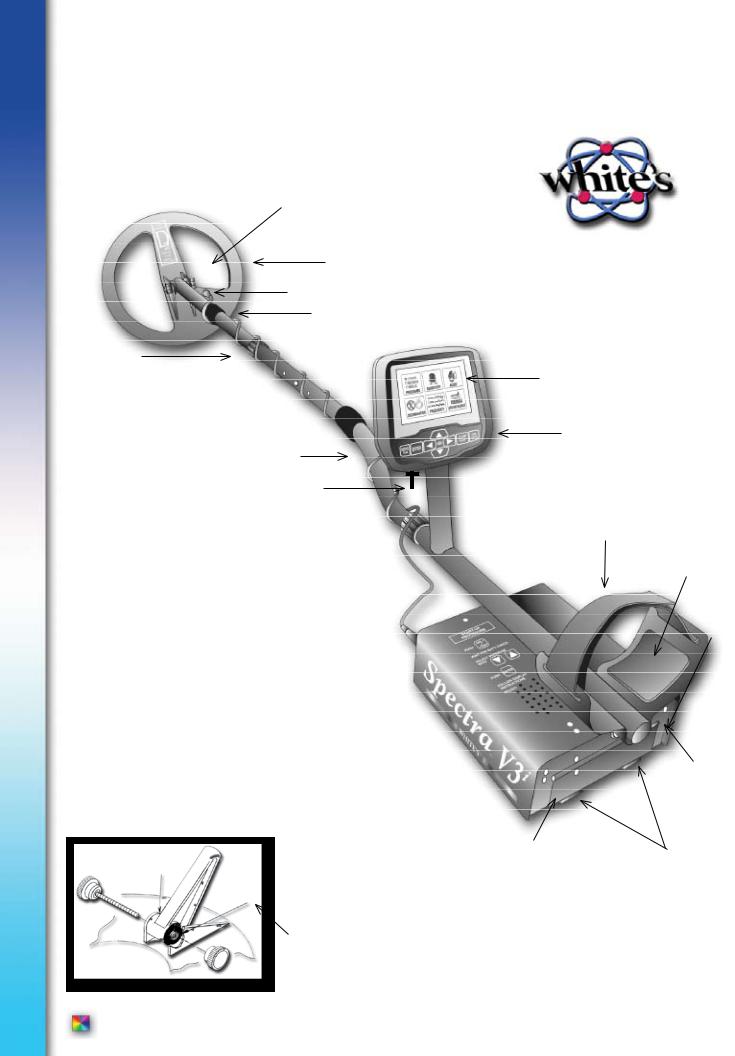
Search Coil |
|
|
Cable Retainer |
|
|
Camlock |
|
Clevis |
|
|
Lower Rod |
|
Display |
|
|
|
|
|
Touch Pads |
|
S-rod |
Select Programs |
|
Adjust Controls |
|
|
|
|
|
Trigger |
|
Elbow Cup Strap
Loop Connector 
Control Box 
|
|
Battery |
b |
|
Compartment Door |
|
|
|
|
b |
|
Place soft rubber washer (b) between clevis and ears - both sides.
Elbow Cup Foam
Pads - Inside
Elbow Cup
Headphone
Jack
Battery
Compartment Latches
pg

Complete Guide to Spectra®V3i
ASSEMBLY INSTRUCTIONS -
1.Remove all parts from shipping carton. Check the assembly page to make sure all parts are present.
2.Use the provided rubber washers between clevis/lower rod and loop ears. Use only nonmetallic washers, fiber bolt, and thumbnut to secure loop/search coil to clevis/lower rod.
3.Unlock “S” rod camlock and insert clevis/lower rod into curved “S” rod so that stainless steel spring clip buttons line up and lock into one of the adjustment holes in the curved “S” rod. Turn camlock to secure. The second or third adjustment holes are suitable for average size adults. Individuals 6’ or taller should use the fully extended position. Individuals well over 6’ tall should purchase the optional Tall Man Fiber Lower Rod #500-0242-3 and/or #500-0240-1 Tall Man Aluminum “S” Rod.
4.Unravel loop cable and wind the cable around the clevis and rod assembly, first revolution over the top of the rod. Wind cable all the way to the top of the curved “S” rod, about five revolutions. Use the black cable retainers, one near the loop, and one near the top of the curved “S” rod, to hold the loop cable in place.
5.Unlock control box rod cam-lock and insert curved “S” rod so that stainless steel spring clip buttons line up and lock into the rod on top of the control box. The “S” rod is designed to curve up toward the display. However, those who prefer to sweep the loop close to their feet may desire to assemble the “S” rod to curve down toward the ground. Turn cam-lock to secure. Plug loop connector into control box, screw lock ring to secure.
6.Grip the instrument by the handle, with your arm in the elbow cup with strap secure, and sweep the loop/search coil over the floor. If the instrument fit feels uncomfortable, adjust the elbow cup by removing and repositioning the bolt/thumbnut and installing in one of the optional positions. If necessary, readjust clevis/lower rod length with the spring clip buttons and camlock so that the search coil can be held near the floor without requiring stooping over.
7.Remove the protective paper from the two black elbow cup foam pads. Carefully align pads on the inside of the elbow cup, one on each side of the center rod, and press firmly into place.
8.Adjust the elbow cup strap so that it is loose enough for you to slide your arm in and out without loosening each time you want to set the detector down. The elbow cup strap provides extra leverage and control. However, some prefer not to use it.
9.Install battery as described in the next section, decal facing down, single larger plastic tab and steel contacts facing toward inside of battery compartment.
10.It should be noted at this point that the Spectra may not work as expected indoors due to the high degree of metals used in modern construction. It is best to tune and practice (outdoors) to ensure stable, predictable results.
11.Your Spectra is designed with an automatic turn OFF if the trigger on the grip (or another control) “is not used” for a period of 30 minutes. This protects the battery from damage (absolute discharge) in case of an accidental turn on during travel or storage. The Spectra will make a specific deep tone musical melody upon automatic turn off. To restart, simply press ON and squeeze and release the trigger on the grip to resume searching. The Spectra returns to pre-turn-off settings.
pg
A
S
S
E

M B L
 Y
Y
G U I
 D E
D E


Complete Guide to Spectra® V3i
Batteries
The Spectra is provided with two battery packs. The rechargeable Nickel Metal Hydride (NiMH) battery (Orange Decal) will require an initial 3-4 hour battery charge.
To begin using the Spectra immediately, use the back-up “AA” battery pack (Blue Decal).
•The standard battery holder (Blue Decal) holds eight “AA” cell batteries. Alkaline batteries are recommended for use with this battery holder.
•Non-alkaline batteries can be used in this holder. When non-alkaline or rechargeable “AA” cells are used, detecting time (before replacement/recharge) may be reduced or increased depending upon the type of battery used.
• An ” Unhappy Battery Icon” will automatically appear on the display (lower left status line) when the batteries become too low (8 volts) to properly operate the Spectra.
•A headphone icon with a battery inside indicates the batteries are low in the wireless headphone. See additional status indications on bottom of control box.
•The battery compartment opens by gently pulling down on the front of each of the two latches (on the bottom of the control box) releasing the catch and hinging open the door. The non-rechargeable battery holder can use many different types of batteries, including rechargeable. This holder is designed for standard size “AA” batteries 50 mm ± .10 mm. Battery lengths shorter than this will likely cause problems with this power supply.
•When the Spectra is turned on the battery voltage will momentarily appear on the opening display (lower left). The degree the battery is filled, toward +, indicates the battery condition. Full Fill = 100% battery life remaining, half fill = 50% battery life remaining.
 Battery Voltage Reading
• To recheck the battery voltage during searching, press MENU twice and note battery voltage under BATTERY. Spectra operates correctly between 8 Volts “low battery” and 13 Volts. Squeeze and release Trigger on grip (twice) to return to searching. Initial battery check voltage may indicate abnormally high. With new Alkaline, or a fresh battery charge, the most accurate battery voltage will be indicated after one hour of use.
pg 10
Complete Guide to Spectra®V3i
Using the Standard Battery Holder
•Slide open the battery holder lid (decal side of battery holder) by applying gentle upward pressure on the single large tab of the door so that it unlocks. Slide the door away from the battery box exposing the cell positions.
•Remove any old cells from the holder. Note the “+” and “-“ positions of each cell and the “+” and “-“ for each position marked inside the cell tray. Install new “AA” cells noting carefully the correct (+) and (-) positions. If any of the cells are installed incorrectly, battery life will be significantly reduced and/or the Spectra may require service by an Authorized Service Center.
•Slide the door closed so that it snaps securely.
•Insert the battery holder into the detector so that the decal is facing down, with the single larger battery holder door tab and metal contact points facing toward the
inside of the battery compartment. Close the battery compartment door and secure the two latches on the bottom of the case. Hook the front (nearest the door) of each latch first, and then snap down the rear (furthest from the door).
NiMH Rechargeable Battery
•A rechargeable NiMH (Nickel Metal Hydride) battery (Orange Decal) is provided with your Spectra. This battery can be recharged hundreds of times. Full charge can be achieved anytime during the discharge cycle (a non-memory system). The provided “Smart Charger” and “Charging Cradle/Stand” sense the type of charge the battery needs and automatically adjust the charge cycle. From fully low this system provides a full charge in as little as 3-4 hours. A full charge will last ten to twelve hours of normal use. Battery life will vary with temperature, the number of targets found, and the exact settings used. Six hours is not unusual for extreme high performance settings, or for batteries that have experienced extensive use.
•The battery will lose its charge during storage. If stored inserted in your
instrument, this loss will be more significant. It is recommended that the battery be removed from the Spectra during periods of storage. It is not advisable to store rechargeable batteries for long periods of time without use (six + months). If extended storage is necessary, store with a charge (charged). If possible, recharge at least once every six months of non-use.
•Do not discharge the battery in devices other than your metal detector. Unnecessary discharging and/or an absolute discharge will reduce battery life and may damage the battery. Unlike older rechargeable battery designs, the rechargeable battery provided with your Spectra can be recharged at any time. Regardless of whether or not it already has a partial charge, memory will not occur.
•White’s has provided the leading edge NiMH rechargeable battery technology with your Spectra. Disregard advice that conflicts with the above recommendations. Care for batteries provided by other manufacturers, or with other White’s models, may vary.
•Do not combine (use) any other battery, or any other battery charger, not specifically designed to work with this
system.
•The NiMH battery provided with your Spectra may be subject to recycling laws in your area. It is the right thing to do and is often legally required. If, perhaps many years in the future, you are uncertain as to where to return a White’s NiMH batteries for recycling, please return it to the place of purchase or any White’s Electronics Inc. address circling “the recycling” (trash can) portion of the label.
pg 11
A
S
S
E

M B L
 Y
Y
G U I
 D E
D E


Complete Guide to Spectra® V3i
Charging
-Plug the charger into a standard wall outlet. (110 volts for USA models, 220 volts for UK models).
-To charge, insert the battery into the cradle / stand (only fits one way) plug the charger plug into the back of the cradle / stand. Green light should glow.
-Green and Red Lights ON indicate battery and charger have made a good connection and the battery is charging. The battery charger is designed to charge a completely low battery in as little as 3-4 hours. However, no harm will come to the system leaving it charging for several days (automatic trickle charge).
-Red Light OFF, Green Light ON indicates battery is now fully charged and ready for use and
will now simply maintain the full charge indefinitely. It is normal for the battery and charger to get warm during use. However, if either the battery or the charger gets too hot to hold or deforms due to the heat, discontinue use and return for testing.
- When using fresh batteries, the voltage will initially check somewhere in the 10 to 13 volt area. Unlike standard batteries, the rechargeable battery voltage will quickly drop somewhere between 9 and 11 volts and plateau there for most of its life. Once the rechargeable battery voltage drops below this plateau, it will quickly drop below a usable voltage level (8 volts) and thus require a recharge. “Unhappy Battery Icon” will automatically appear on the display when the battery approaches 8 volts. It is recommended to either recharge or switch to “AA” pack when occasional unhappy battery starts to appear (flash) on display. With a consistent unhappy battery, Spectra will not be operating properly and will soon entirely cease to operate.
Owner Registration
How to Access – To access Information / Configure press MENU twice in succession. Arrow down to Owner Registration and press ENTER. To Exit squeeze and release trigger on hand grip twice
Owner Registration – Allows the Spectra owner to embed their name and contact information, protected from tampering, but updateable with original factory code.
• Select Owner Register and press ENTER. Press MENU / TAB to select Register and press ENTER.
• Password – IMPORTANT! Write down the password or code that automatically appears and keep it in a safe place separate from your Spectra… (Password code will disappear,
and must be manual re-entered, after first registration). If you normally keep your instruction manual at home, write it on the inside cover of the manual. Should you ever change addresses or sell your Spectra, this code must be retained and manually re-entered to update or revise
your Spectras registration information. To deter theft, without this original disappearing code, significant inconvenience can be expected regarding re-setting the Registration information.
Owner’s Name – Use the ARROWs Down / Up, and Left / Right to spell out your name. Or press ENTER to bring up a keyboard and then use ARROWs and ENTER to spell out your name.
• Select and ENTER blanks to add spaces. If you make an error, to redo that digit, squeeze and release trigger, ARROW back to that digit, and press ENTER to bring the Keyboard back, then redo that digit.
Contact - Press MENU / TAB to exit Name and select Contact. Type out your contact information using ARROWs, or pressing Menu to bring up the keyboard then ARROWs and ENTER.
SAVE – Use MENU / TAB to select SAVE, press ENTER to SAVE your Registration.
pg 12

Complete Guide to Spectra®V3i
Wireless Headphones |
|
|
|
|
|
|
|
|
|
|
|
|
|
|
Part Number 802-5282 |
|
|
|
|
|
|
|
|
|
|
|
|
||
|
|
|
|
|
|
|
|
|
|
|
|
Set Up - |
|
FCC# R8KUGWM1USHN33A |
|
|
|
||
|
|
|
|
|
|
|
|||
|
|
|
|
Locate battery dooropen by turning counter clockwise to |
|
||||
|
|
|
|
|
|||||
|
|
|
|
“Open” position. |
|
|
|
|
|
|
|
|
|
Install (2) AA Batteries (provided) Take care to orient batteries |
|
||||
|
|
|
|
|
|||||
|
|
|
|
per embossed exampleone upone down. |
|
||||
|
|
|
|
Replace Battery doorturn clockwise to ”Lock” position. |
|
||||
|
|
|
|
|
|||||
|
|
|
|
SpectraSound™ System comes factory pre-connected |
|
||||
|
|
|
|
|
|||||
|
|
|
|
(channel 4) allowing the “Quick Connect Sequence”. |
|
||||
|
|
|
|
|
|
|
|
|
|
Quick Connect Sequence -
Wireless Headphone - Quick Connect
• Select Audio or Zoom Audio
•  to
to 
 Wireless Headphone. Press
• Press |
to enable |
|
x |
• Press and hold headphone power button.
• Headphone is connected within five seconds when you hear... 
• Trigger to search.
Headphones automatically turn off with the detector. To manually turn OFF headphones, press headphone power button. You will hear
The metal detector speaker will connect within ten seconds.
More options available in “Information/ConfigureSection”.
TROUBLESHOOTING -
Substandard wireless sound, or built-in Speaker beeps when
Wireless are used.
•Select a different wireless channel.
•Increase Wireless Power
•Turn OFF Speaker under Signal (Monitor Battery)
•Check Wireless Battery.
•Check voltage - replace as needed.
pg 13
A
S
S
E

M B L
 Y
Y
G U I
 D E
D E


Complete Guide to Spectra® V3i
First Aid
• Help Balloons - From menu screens and Zoom menus, trigger forward - brings up a “Help Balloon” that offers more information about the menu item.
Help Balloon
Trigger Forward
•COMPLETE OWNER’S GUIDE - All of Spectra’s systems and controls are explained in complete detail.
•DVD - A short DVD designed to visually familiarize and instruct.
•Website/Forum - Ask questions, comment and share your experiences with White’s Spectra owners at White’s Website Forum: www.whiteselectronics.com.
•Live Help - Consult your local Dealer or contact White’s Authorized Regional Distributor at 1-800-547-6911.
We will be happy to help!
NOTE -
Explore your Spectra metal detector with complete confidence.
You cannot harm or destroy the original factory presets or software.
Original programs are easily restored!
Two keys to access an on-board reference manual. Menu/Zoom for immediate on-board answers to almost any question!
pg 14
Complete Guide to Spectra®V3i
First Time Out with Spectra V3i - ”Turn On And Go” ...
Press ON/OFF.
Optionally… Press ZOOM to select text size.
Squeeze & release Trigger on the handle grip.
Hold Trigger & hold ENTER, pump search coil (loop) up and down on the ground until background hum steadies, release ENTER… and then release Trigger and begin searching. (Note releasing Trigger before releasing ENTER) locks Spectra in pinpoint mode, squeeze and release trigger twice to unlock pinpoint.
Sweep search coil close to the ground, from side to side, overlapping each pass.
Locate a consistent “BEEP” upon several passes of the search coil.
Look at display. VDI, Blocks, and ICON, indicate a metal target worthy of digging.
Pinpoint squeeze & hold toggle on the grip and slowly “+” the area. Depth in inches and maximum bars indicates target center.
Pinpoint -
pg 15
A
S
S
E

M B L
 Y
Y
G U I
 D E
D E

Complete Guide to Spectra® V3i
Explore Your Spectra
Explore your Spectra metal detector with complete confidence. You cannot harm or destroy the original factory presets or software. Original programs are easily restored under Programs, Restore.
Option selections remain through ON/OFF and battery changes. To return to original selections, manually return to underlined or check marked levels, or Restore.
A Word About “Turn On & Go” -
All the Spectra features and performance are available by selecting a Program suited to your type of hunting. Typical settings and uses are available within the Program choices. Experts have developed these programs for you. Feel free to edit and experiment. Remember - It is easy to RESTORE.
In depth Turn-On & Go -
• Press ON/OFF: When first turned on the Spectra display shows the battery condition, (owner details) if registered, ARROW DOWN for more information about the detector and general features.
•Option - press ZOOM to select the size of text that best suits your eyesight and preference. Larger size text slightly changes display arrangements or feature positions.
•Squeeze and release the Trigger on the handle grip.
•Ground Balance - Squeeze and hold the Trigger press and hold the ENTER button, pump the search coil (loop) over the ground (1-12 inches) until the background hum becomes steady, release ENTER and then release trigger and begin searching.
SEARCH
PINPOINT
ANALYZE
pg 16

Complete Guide to Spectra®V3i
At anytime during searching, this “ground balance sequence” may be repeated to ground balance the Spectra to ignore ground minerals. The Spectra will automatically track to normal ground mineral changes. Quick (abrupt) and dramatic (usually visible) ground changes may require a manual sequence such as dirt to gravel, dry sand to wet salt sand, wood chips to dirt, sand to dirt, sand/dirt to rock, or other obvious ground changes.
•At initial turn-on, the Spectra begins in a general COIN & JEWELRY Program. This program provides typical coin discrimination (reject iron and small foil, accept nickels and up). The Discrimination pattern is visible by a color bar located across the bottom of the yellow/tan rectangle, RED representing rejected ranges, and GREEN representing accepted ranges.
•If you have already been using the Spectra and have switched to a different Program, the Spectra retains your preference and will begin in that Program (last used Program always returns regardless of battery condition or installation).
•The Program in use is indicated on the center lower portion of the display. 3 COIN & JEWELRY indicates that this is the original factory COIN & JEWELRY program, all settings are at the original default or SAVED levels. A triangle in front of COIN & JEWELRY indicates there has been a recent change to the COIN & JEWELRY program. (+/-) Behind COIN & JEWELRY indicates there is another program with the same name that has different settings in the Library.
Backlight - On the same line as COIN & JEWELRY, to the far left, a light bulb indicates the display BACKLIGHT is on. Press “ARROW RIGHT” until Backlight appears highlighted on the far right bottom corner of display. Press “ARROW UP” and “ARROW DOWN” to adjust the degree of backlight. Backlight will affect the ability to see the display in all light conditions. At medium backlight settings 15% reduction in battery life is expected (a 1.5 hour reduction out of ten hours use). At maximum backlight settings a 25% reduction in battery life is expected.
Live Controls - across the bottom of the display offer quick and easy “on the fly” adjustment of all common metal detector features. Use ARROW LEFT & RIGHT to highlight a feature, then ARROW UP & DOWN to adjust
it or ENTER to turn it ON/OFF. No need to enter a MENU. Adjustments are instant, like having knobs! Another White’s innovation.
SEARCH
PINPOINT
ANALYZE
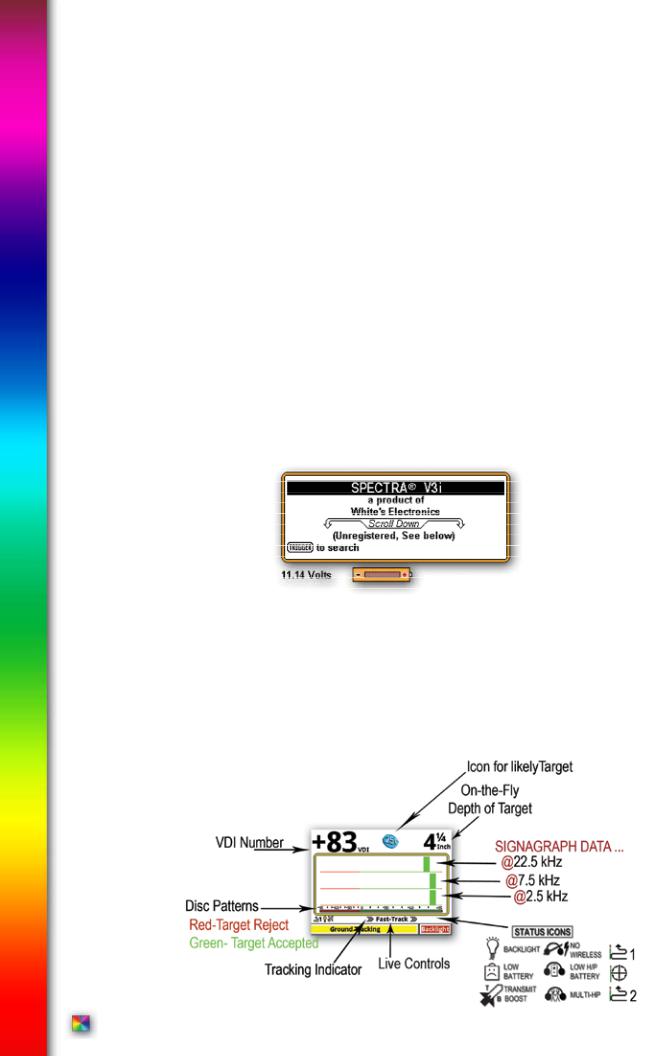
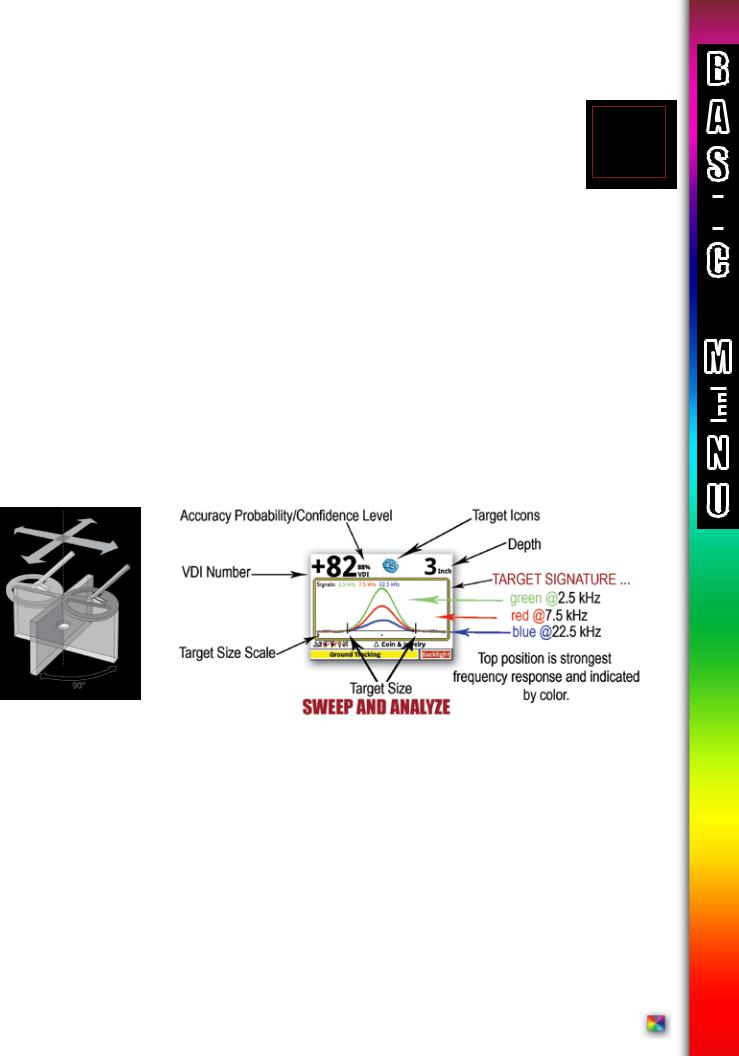
VDI Numbers and Spectragraph “R” - Within the yellow / tan rectangle which dominates the display important target indications are provided;
• A small target reference number scale VDI (Visual Discrimination Indication numbers) from -95-0-+95 are listed. -95 to 0 represents the negative (ferrous) or magnetic target range (most iron and steel). +1 to +95 represents the conductive (nonferrous) target range (most precious metals). The VDI number will vary depending upon the exact characteristics of the metal itself. These VDI numbers are the same reference numbers the Spectra uses to accept or reject different target types, especially important when customizing the Discrimination.
pg 17
B A S I
 C
C
M
E

N U

Complete Guide to Spectra® V3i
The current target VDI number appears much larger above the rectangle upper left side of display. Listen for a solid repeatable (over multiple search coil passes) audio “beep” then look for a consistent Icon and/or VDI number indicating a good quality metal target.
• While sweeping the search coil metal targets will produce blocks above the -95-0-+95 metal range for each frequency currently in use. Their position in relation to the -95-0-+95 range will indicate the electrical characteristics (target signature) of the metal itself, which is based on the exact metal alloy and size.
In the COIN & JEWELRY Program rejected VDI range blocks appear in RED, Accept VDI range blocks appear in Green. Taller and narrower block patterns indicate higher quality metal alloys. Top block (always the highest frequency) represents 22.5 kHz, center blocks 7.5 kHz, and bottom blocks (always the lowest frequency) 2.5 kHz.
Typically gold and nickel respond better / stronger at 22.5 kHz, brass better / stronger at 7.5, and silver/copper better / stronger at 2.5 kHz. Noting which line of blocks fades last (lingers longest) is a further indication of the targets likely alloy.
Multiple targets near each other can be tricky. When unusual variations are noticed, sweep the area from several different directions and/or hold the toggle on the grip and “X” the area to check for multiple targets. Then sweep each separately and note audio and display.
ICONs - In combination with the VDI number and target signature blocks, an ICON will appear above the rectangle in the upper right side of display, and a large VDI (visual discrimination indication or reference number) that represents that range will appear on the upper left side of the display. Some variation is expected from one search coil sweep to the next. However, overall consistency over several sweeps will produce an accurate indication of the metal alloy. Multiple targets near each other can be tricky. When unusual variations are noticed, sweep the area from several different directions, hold the toggle, to check for multiple targets.
•Sweep the search coil close to the ground, scrubbing in grass, an inch above rocky, sandy, or coarse grounds, from side to side, overlapping each pass by 50%. Avoid arching at the end of each sweep, maintain about two seconds per pass from left to right and about two seconds returning from right to left. The search coil must remain in motion for metals to respond.
•Ignore the display and listen for a solid sounding, repeatable audio “BEEP” upon several passes of the search coil. Ignore inconsistent, or broken sounds. Solid, repeatable “BEEPs”, after multiple passes indicate a metal target of interest.
•Then look at display. Once a solid and repeatable “BEEP” has been located, sweep over it several times, and look at the display. A narrow tall bar graph in a desired range plus the large VDI number in the upper left side of display, and a desired target ICON will indicate a good metal target worth digging.
pg 18
Complete Guide to Spectra®V3i
• Optional Step (Analyze) Push the toggle forward (away from the grip) sweep over the target several times, and look at the analysis. The Analyze Screen provides a visual of the actual target signal. The Screen provides an indication of the size of the target (distance between the two black lines), and the differences at each frequency. Each of the three frequencies are color coded (22.5 kHz, 7.5 kHz, 2.5 kHz).
Most metal alloys produce a set of smooth bumps similar to a single camel hump, slightly different in height (signal strength) at each primary frequency. Coins on edge or irregular shapes often produce dips before and/or after this hump. “Size” will track search coil sweep speed. Different metal alloys respond at different frequencies. As well, irregularities (dips in normal pattern) at specific frequencies better identifies trash, particularly iron. The sizing rule is shown on the lower left side of display. This size applies to each increment marked with dots across the bottom of the screen. The default shows two inches as the display width. This would indicate that the data shown from the left to right edge of the display was collected within a time interval where the loop moved two inches. Accuracy depends on search coil sweep speed, and consistency.
Next to the large VDI number is a calculation displayed as a percentage (%). 100% is sure target information, and 10% should be considered questionable. If the information is questionable, note the depth. If it is a deeper target (5+ inches) questionable display information is typical and one may still want to dig.
Pinpoint -
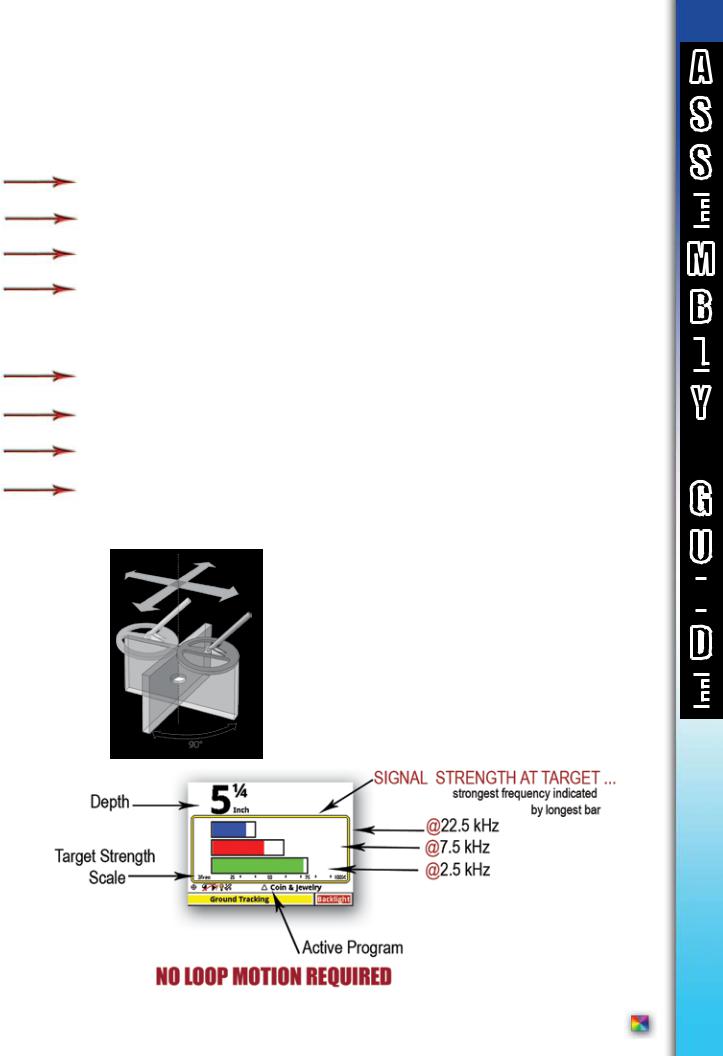
• To Pinpoint exactly where to dig, squeeze and hold the toggle in (towards the grip) and slowly “+” the area where the “BEEP” was heard. Standard Equipment “DD” loop requires special attention to side to side, then forward to back. Pivot 90 degrees and repeat “+” area. Display indicates depth in inches and bars indicates target center. The strongest signal will be the exact center of the target.
NOTE: With multi frequency pinpoint bar option, strongest bar suggest likely target alloy. Nickel, gold, and small targets strongest at 22.5 kHz (top bar), brass strongest at 7.5 kHz (center bar), silver/copper strongest at 2.5 kHz (bottom bar).
The Spectra can be locked into the pinpoint mode, while squeezing the trigger, press and hold ENTER and release the trigger, then release ENTER. Pinpoint mode will then remain until trigger is squeezed and released twice. Note, it is normal for the pinpoint mode threshold to gradually wander up or down over relatively short periods of time. Pinpoint is not intended for prolonged searching.
pg 19
B A S I
 C
C
M
E

N U
Complete Guide to Spectra® V3i
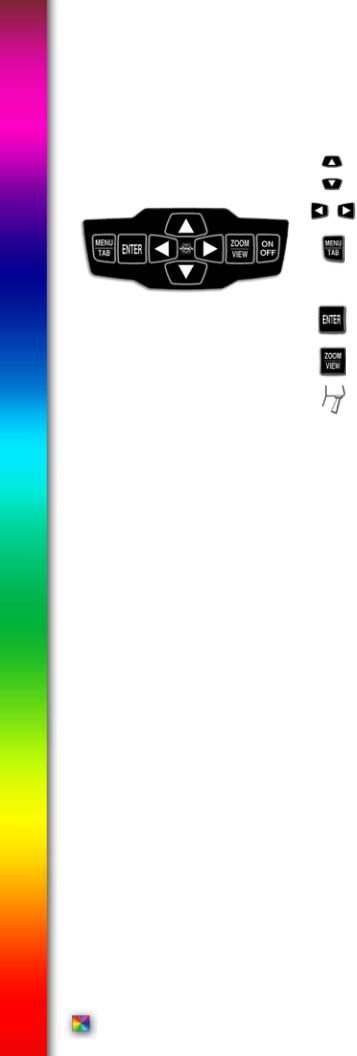
NAVIGATION -
UP/DOWN moves the Cursor vertical to select from a list.
SIDE/SIDE moves the highlighted selection horizontally.
MENU/TAB brings up menu or moves the Cursor to the next item or selection on the screen. Selection is highighted.
MENU/TAB x2 brings up information screen. Includes backlight and advanced menu (see page 11).
ENTER selects the option.
ZOOM/VIEW increases text size or provides more detailed Menu.
BACKUP or ESCAPE squeeze and release trigger from any Menu or control.
Live Controls
•The LIVE CONTROLS (Like Backlight) across the bottom of the display offer quick and easy “on the fly” adjustment of all the normal metal detector controls. Use ARROW LEFT & RIGHT to highlight a feature, then ARROW UP & DOWN to adjust, ENTER to activate or deactivate. No need to enter a MENU. Adjustments are instant, like having control knobs.
•Maximize Live Controls by holding ZOOM and pressing ARROW Up X1 or X2.
•Minimize or hide Live Controls by holding ZOOM and pressing ARROW Down X1, X2, or X3.
•Minimize or hide Live Controls when few further adjustments are expected allowing a better target screen size. To bring them back anytime on the fly Minimized or Full Size, hold ZOOM and press ARROW UP.
•The selection of live controls and the order in which they appear changes depending on which Program is selected. In other words COIN & JEWELRY has different Live Controls and a different order compared to PROSPECTING. Live controls can be selected, rearranged, and changed in their appearance (Expert Menu).
•Personal preference selections within the Expert Menu will automatically export to the Live Controls and Six Block Menu. For example selecting a different method of making Discrimination adjustments within the Expert Menu will automatically install that same specific method in the Live Controls and Six Block Menu.
•The COIN & JEWELRY program initially offers the most popular options and arrangement one would expect to find on most high-end general use metal detectors.
pg 20
 Loading...