


 Owner’s Guide
MXT PRO
White’s Electronics, Inc. -
Manufacturers of the World’s Finest Metal Detectors

Congratulations and thank you for choosing
White’s MXT Pro.
The MXT series, which by design marry “versatility & high performance” with “simplicity of use”, is a wildly successful metal detector design. I’m proud to put my name on the MXT Pro. As well, I’m proud the MXT is grouped among a handful of landmark metal detector designs. Among the highest tribute, success in the field has earned the MXT “benchmark status” for which all other metal detectors are judged.
Listening to successful MXT users, the MXT Pro adds the three things MXT users have been asking for, Backlight, Multiple Tone ID, and Ground GRAB, a convenient way to update ground tracking from a locked setting or temporarily lock ground tracking for multiple passes over questionable signals.
This instruction manual will give you a good understanding of the basics. There are no substitutes for field experience. Practice using your MXT Pro and then study this manual further. Before long, you may well be teaching the experts a thing or two.
It is with pride we put our “American Made Label” on every metal detector we build. At our facility here in Sweet Home, Oregon, USA, we’ve been proudly designing, building from scratch, and distributing worldwide, the world’s finest metal detectors for nearly 60 years.
It has always been my philosophy to keep our people in Sweet Home, Oregon working by keeping our customers happy. I’m proud of our metal detectors and the people here at White’s who build them for you.
Happy Hunting!
President
White’s Electronics, Inc.
“I am proud to say
all White’s Metal Detectors are built in Sweet Home, Oregon USA”

|
MXT Pro Table of Contents |
MXT Pro Table of Contents |
|
Chapter 1 Assembly..................................................................................................... |
7 |
Assembly Instructions................................................................................................ |
.8 |
Chapter 2 Batteries................................................................................................... |
9 |
Standard Battery Holder.............................................................................................. |
9 |
Using the Standard Battery Holder.............................................................................. |
9 |
Battery Check.............................................................................................................. |
9 |
Optional Accessory Rechargable Battery.................................................................... |
10 |
Chapter 3 MXT Pro Basic Controls & Quick Start............................................. |
....11 |
Control Summary........................................................................................................ |
11 |
Mode Toggle............................................................................................................... |
.11 |
Gain Control................................................................................................................ |
11 |
DUAL Control.............................................................................................................. |
11 |
Threshold Control....................................................................................................... |
.11 |
TRAC Control.............................................................................................................. |
11 |
“Music Notes” Tone ID............................................................................................... |
..12 |
Ground Grab......................................................................................................... |
.......12 |
“Light Bulb” Backlight................................................................................................. |
..12 |
Trigger (On Handgrip)............................................................................................. |
.....12 |
Quick Start.......................................................................................................... |
.........13 |
Chapter 4 Display......................................................................................... |
.........14 |
Tone Selection............................................................................................................ |
14 |
Coin & Jewelry................................................................................................... |
..........14 |
Relic............................................................................................................................ |
14 |
Prospecting............................................................................................................ |
.....14 |
Low Battery................................................................................................................. |
.14 |
Coin & Jewlery.......................................................................................................... |
.14 |
VDI Numbers....................................................................................................... |
.....14 |
Display Blocks.......................................................................................................... |
15 |
Display Text/Labels........................................................................................... |
........15 |
Depth Indication..................................................................................................... |
...15 |
Relic............................................................................................................................ |
16 |
VDI Numbers............................................................................................................ |
16 |
Display Blocks.......................................................................................................... |
16 |
Display Text/Labels.................................................................................................. |
.17 |
Depth Indication....................................................................................................... |
.17 |
Prospecting............................................................................................................... |
.18 |
VDI Numbers............................................................................................................ |
18 |
% Iron Targets.......................................................................................................... |
.18 |
GND (Ground) Number............................................................................................ |
.19 |

MXT Pro Table of Contents
|
Chapter 5 Detailed Controls......................................................................................... |
20 |
|
Mode Toggle................................................................................................................ |
20 |
|
Coin & Jewelry.......................................................................................................... |
20 |
|
Trigger (on handgrip)............................................................................................... |
20 |
|
DUAL Control........................................................................................................... |
21 |
|
“Music Notes” Tone ID............................................................................................. |
21 |
|
Relic........................................................................................................................... |
21 |
|
Trigger (on handgrip)............................................................................................... |
21 |
|
DUAL Control........................................................................................................... |
22 |
|
“Music Notes” Tone ID.............................................................................................. |
22 |
|
Prospecting............................................................................................................... |
22 |
|
Trigger (on handgrip)............................................................................................... |
22 |
|
DUAL Control........................................................................................................... |
22 |
|
“Music Notes” Tone ID.............................................................................................. |
23 |
|
Concerning All Modes................................................................................................. |
23 |
|
TRAC Toggle............................................................................................................... |
23 |
|
Ground..................................................................................................................... |
23 |
|
Lock......................................................................................................................... |
.23 |
|
Salt........................................................................................................................... |
23 |
|
Summary.................................................................................................................. |
24 |
|
GAIN Control............................................................................................................... |
24 |
|
OVERLOAD............................................................................................................. |
24 |
|
DUAL Control.............................................................................................................. |
26 |
|
Coin & Jewelry & Relic............................................................................................. |
26 |
|
Prospecting.............................................................................................................. |
26 |
|
GAIN VS SAT........................................................................................................ |
27 |
|
THRESHOLD.............................................................................................................. |
28 |
|
Silent Search............................................................................................................ |
28 |
|
Chapter 6 Searching.............................................................................................. |
29 |
|
Pinpoint Technique........................................................................................................... |
29 |
|
Optional Accessory “DD” Search Coils............................................................................. |
29 |
|
Headphones, Optional...................................................................................................... |
30 |
|
“Coin & Jewelry” Field Use & Tuning Tips......................................................................... |
31 |
|
Options........................................................................................................................... |
31 |
|
“Relic” Field Use & Tuning Tips......................................................................................... |
32 |
|
Options........................................................................................................................... |
33 |
|
“Prospecting” Field Use & Tuning Tips.............................................................................. |
34 |
|
Options........................................................................................................................... |
35 |
|
Chapter 7 Information................................................................................................... |
36 |
|
Cleaning................................................................................................................................. |
36 |
|
Weather.................................................................................................................................. |
36 |
|
Storage................................................................................................................................... |
36 |
|
Precautions............................................................................................................................. |
36 |
|
Service.................................................................................................................................... |
37 |
|
Warranty................................................................................................................................. |
38 |

Chapter 1 MXT Pro Assembly
Assembly
WASHERS
BETWEEN EACH
LOOP EAR &
CLEVIS
LOOP OR
SEARCH COIL
CABLE RETAINER CAMLOCK
Twist and insert each end of handle (provided) through top of shipping carton into second flap.
(CARRY CARTON)
CLEVIS
LOWER ROD
LOOP
CABLE
Trigger behind display has multifunction capability depending on which of the three
modes you select.
“S” ROD |
ELBOW |
|
CABLE |
CUP STRAP |
|
ELBOW CUP |
||
RETAINER |
||
|
FOAM PADS |
|
|
INSIDE ELBOW |
|
|
CUP |
LOOP
CONNECTOR
Assembly shown on MXT 300

Chapter 2 MXT Pro Assembly
Assembly Instructions
1.Remove all parts from shipping carton and check the assembly page to make sure all parts are present.
2.There are rubber washers between clevis/lower rod and loop ears. Use only nonmetallic washers, fiber bolt, and thumb nut to secure loop/search coil to clevis/lower rod.
3.Unlock “S” rod camlock and insert clevis/lower rod into curved “S” rod so that stainless steel spring clip buttons line up and lock into one of the adjustment holes in the curved “S” rod. Turn camlock to secure.
The second or third adjustment holes are suitable for average size adults. Individuals 6’ or taller should use the fully extended position. Individuals well over 6’ tall should purchase the optional Tall Man Rod.
4.Unravel loop cable and wind the cable around the clevis and rod assembly, first revolution over the top of the rod. Wind cable all the way to the top of the curved “S” rod, about five revolutions. Use the black cable retainers, one near the loop, and one near the top of the curved “S” rod, to hold the loop cable in place.
5.Unlock control box rod camlock and insert curved “S” rod so that stainless steel spring clip buttons line up and lock into the rod on top of the control box. The “S” rod is designed to curve up toward the display. However, those who prefer to sweep the loop close to their feet may desire to assemble the “S” rod to curve down toward the ground. Turn camlock to secure. Plug loop connector into control box, screw lock ring to secure.
6.Grip the instrument by the handle, with your arm in the elbow cup with strap secure, and sweep the loop/ search coil over the floor. If the instrument fit feels uncomfortable, adjust the elbow cup by removing and repositioning the bolt/thumb nut and installing
in one of the optional positions. If necessary, readjust clevis/lower rod length with the spring clip buttons so that the search coil can be held near the floor without requiring stooping over.
7.Remove the protective paper from the two black elbow cup foam pads. Carefully align pads on the inside of the elbow cup, one on each side of the center rod, and press firmly into place.
8.Adjust the elbow cup strap so that it is loose enough for you to slide your arm in and out without loosening each time you want to set the detector down. The elbow cup strap provides extra leverage and control. However, some prefer not to use it.
9.Install battery as described in the next section, decal facing down, with plastic tab and steel contacts facing toward inside of battery compartment.
10.It should be noted at this point that the detector might not work as expected indoors due to the high degree of metals used in modern construction. It is best to tune and practice out-of-doors to ensure
stable, predictable results. Additionally, freshlyburied targets will not produce the normal depth and discrimination results of targets that have been naturally lost and settled in the ground. Due to the abnormality caused by digging a hole in the ground matrix, and the sophistication of the ground rejection circuitry, it may take a number of years for freshly buried targets to respond at true depths and discrimination accuracy. The best way to determine true detection depth is in real search conditions.
Batteries
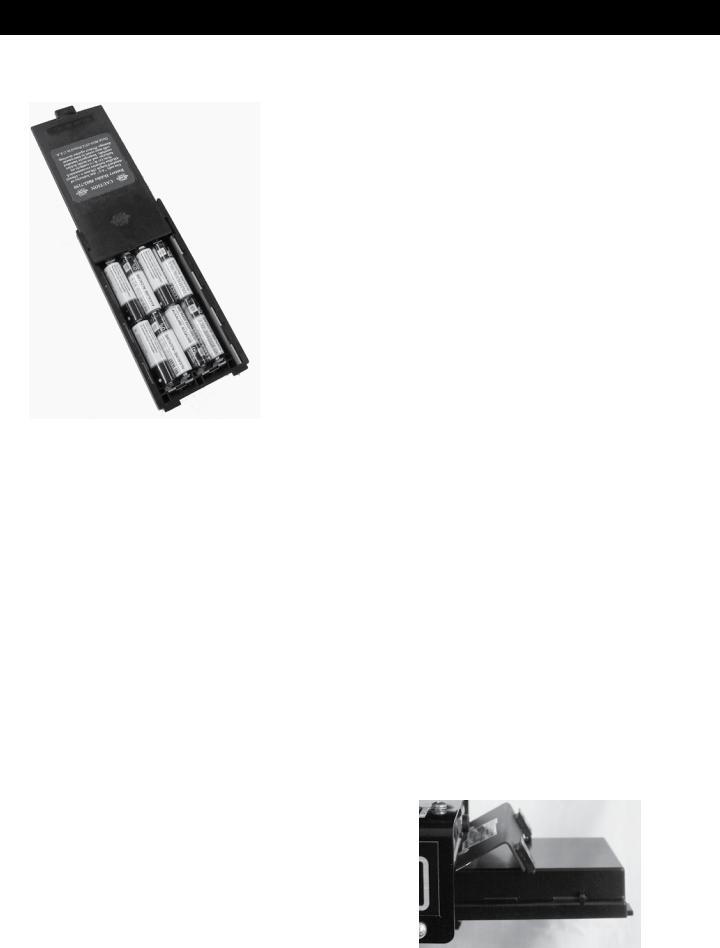
Standard Battery Holder
1.Slide open the battery holder lid (decal side of battery holder) by applying gentle upward pressure on the tab of the door so that it unlocks. Slide the door away from the battery box exposing the cell positions.
2.Remove any old cells from the holder. Note the (+) and (-) positions of each cell and the (+) and (-) for each position marked inside the cell tray. Install new “AA” cells noting carefully the correct (+) and (-) positions. If the cells are installed incorrectly, the detector may require service by an Authorized Service Center.
3.Slide the door closed so that it snaps securely.
4.Insert the battery holder into the detector so that the decal is facing down, with the battery holder door tab and metal contact points facing toward the inside of the battery compartment. Close the battery compartment door and secure the two latches on the bottom of the case. Hook the front of each latch first, and then press down on the rear.
Chapter 1 MXT Pro Batteries
Using the
Standard Battery Holder
1.The standard battery holder holds eight “AA” cell batteries equaling 12 volts total. Alkaline batteries are recommended for use with this model. During normal searching conditions you can expect about 40 hours of hunting time from a quality set of eight alkaline batteries.
2.Non-alkaline batteries can be used in this holder. When non-alkaline batteries or rechargeable “AA” cells are used, detecting time (before replacement/ recharge) may be reduced to about 30-35 hours.
3.The battery voltage appears automatically on the display when the Gain is used to turn the MXT Pro “ON”. Once the batteries become weak (8 volts) “Lo Bat” will automatically appear on the display during searching. At that point the batteries should be replaced. Alkaline batteries provide some reserve time after “Lo Bat” appears, rechargeable batteries do not.
4.The battery compartment opens by gently pulling down on the front of each of the two latches (on the bottom of the control box) releasing the catch and hinging open the door.
Headphone use prolongs all battery life. Battery life will vary a great deal with temperature, number of target signals, battery type, brand, and shelf life. Alkaline Batteries may be used (in a pinch) well into the “Lo Bat” indication. Rechargeable batteries cannot. When traveling far from home it is always a good idea to carry 8 extra penlight alkaline batteries with you.
Backlight use will slightly reduce battery life, 10% at the lowest brightness, 20% at medium, and 30% at the highest setting.
Chapter 2 MXT Pro Batteries
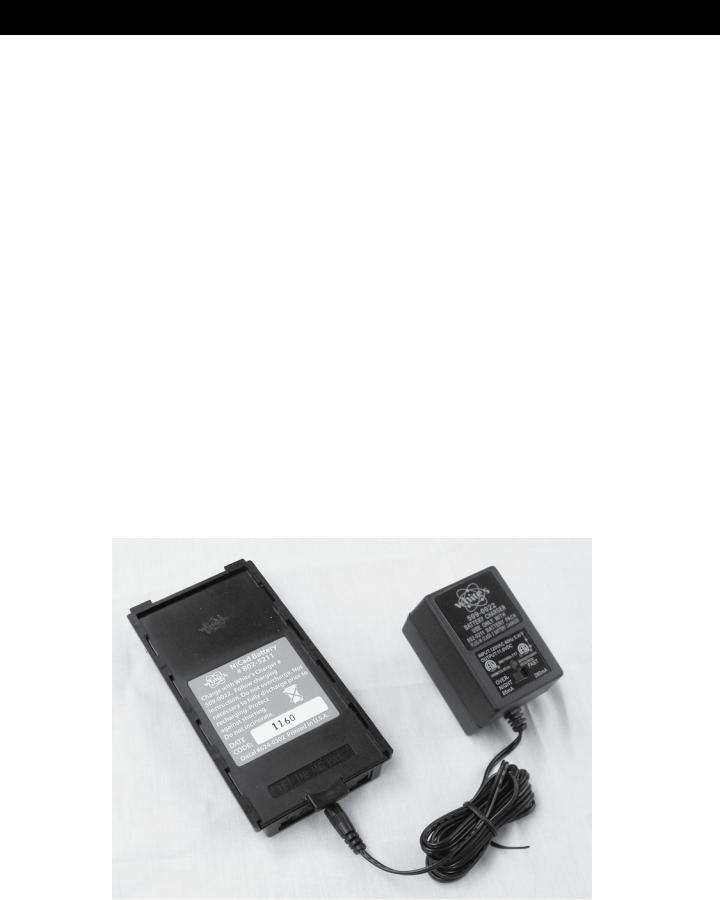
Rechargeable Battery (Opt.)
A rechargeable battery system is not standard equipment with your MXT Pro, however, two different high quality systems are available.
White’s rechargeable battery #802-5211, and charger #509-0022 are the recommended standard system and offer quick charge and overnight charge options. (QUICK CHARGE IS FOR USA ONLY. It is not available on 220-240 volt.)
White’s Premium system, #509-0037 NiMH Charger, #802-5285 NiMH Stand, and #802-5281 NiMH rechargeable battery offers extended search times, the latest Nickel Metal Hydride capabilities for the MXT Pro.
Non-rechargeable batteries will start to drop in voltage as soon as they are put into use and then steadily diminish in voltage till they no longer provide adequate power. The optional Nicad rechargeable
battery pack, however, will diminish slowly (plateau) in somewhat of a flat line and then, near the end of their useful life, very quickly decline. Regardless of the battery used, for long search periods, backup cells are always suggested.
Rechargeable batteries deliver fairly constant voltage until they require a recharge. If you use them well beyond low, they may be damaged, will deteriorate more quickly than if you only use them till their voltage starts to drop significantly. Therefore, rechargeable batteries should be taken out of service and recharged as soon as you notice “Lo Bat” on the display.
Rechargeable batteries (depending upon the type) may not provide the same amount of continuous use per recharge compared to “one use life” set of quality
alkaline batteries.
10
Chapter 3 MXT Pro Basic Controls & Quick Start
MXT Pro
Control Summary
MODE Toggle |
|
|
|
|
|
|
|
|
|
|
|
|
|
|
|
||
|
|
|
|
|
|
|
||
|
|
|
|
|
|
|||
|
|
|
|
|
|
|||
Three position switch for setting |
|
|
|
|
||||
operating mode. Coin & Jewelry, Relic, |
|
|
|
|
||||
Prospecting. |
|
|
|
TRAC Toggle |
||||
|
|
|
|
|
|
|
|
|
GAIN Control |
|
|
|
|
|
|
Three position switch selects Ground Mineral Tracking, |
|
|
|
|
||||||
Turns the MXT Pro ON/OFF and adjusts |
|
|
|
Ground (for most searching), Salt (for salt water beach- |
||||
the signal strength of targets, ground, |
|
|
|
es or conductive alkali ground types), or Lock (to Lock |
||||
and electrical interference. |
|
|
|
or hold a particular ground setting). |
||||
DUAL Control |
|
|
|
|
|
|||
|
|
|
|
|
||||
In Coin & Jewelry and Relic Modes |
|
|
|
THRESHOLD Control |
||||
|
|
|
||||||
establishes the level of trash metal |
|
|
|
Establishes the slight background sound “faint hum” or |
||||
rejection (Discrimination). In the |
|
|
|
edge of sound that is heard continuously during search- |
||||
Prospecting Mode establishes |
|
|
|
ing. Once this edge of sound has been located some |
||||
Self Adjusting Threshold (SAT), |
|
|
|
operators prefer to adjust slightly counterclockwise of |
||||
the speed at which the THRESHOLD |
|
|
|
it to achieve silent search, no continuous background |
||||
“hum” recovers from the affects of |
|
|
|
hum, during searching. |
||||
inconsistencies in ground mineralization. |
|
|
|
|
||||
11
Chapter 3 MXT Pro Basic Controls & Quick Start
MXT Pro
Display Controls
Trigger Switch has three positions;
1. Center (Primary Search)
2. Squeeze and Held (Pinpoint)
3. Forward (Locks Pinpoint)
4. Prospecting Mode Only, Trigger Squeezed and held, or pushed forward and locked, temporarily disables ground tracking (same function as holding Grab)
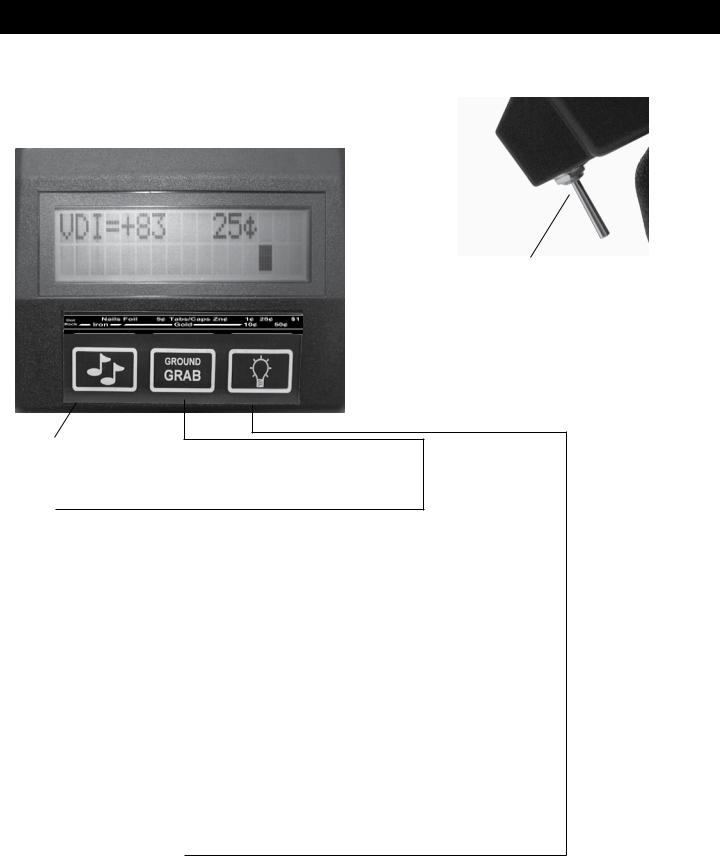
“MUSICAL NOTES”
Selects different types of variable tone or pitch options.
GRAB
1.When TRAC control is set to Ground or Salt, Hold GRAB to hold the current ground setting (disable tracking) for multiple search coil passes over a week or small target signal, thus avoid tracking out such weak target signals.
2.When TRAC control is set to Lock, press and release GRAB to update the ground rejection level to the (continuously monitored) current ground rejection (tracking level). This update is where the ground rejection would have been had the TRAC control been set to the Ground or Salt setting continuously. Grab is a far more convenient way to update the Locked tracking level. Instead of having to reach over and switch TRAC, from LOCK to an active position, reestablish a usable ground setting, and then switch TRAC back to LOCK. With GRAB you simply press and release the key right under your thumb, and you have updated to current ground conditions. Note, last used TRAC position before Locking (Salt or Ground) determines the ground balance range available to Grab. If Ground was the last TRAC position used, Grab will grab the best available setting within the Ground Range of rejection. If Salt was the last used TRAC position, grab will grab the best available tracking level well into the conductive salt range.
“Light Bulb” Backlight
Select and adjust the display backlight level for use in low light conditions. Minor additional battery life cost.
12
 Loading...