


Prizm™ II • III • IV * V
Prizm™
manufactured by
®
White’s Electronics, Inc.
1011 Pleasant Valley Road
Sweet Home, OR 97386
USA
Visit our site on the World Wide Web
www.whiteselectronics.com
for the latest information on products, services, Local Dealers and treasure hunting news.
Part Number 621-0476 |
|
|

Prizm™ II • III • IV • V

|
Prizm™ II • III • IV * V |
Guide to this Manual |
|
Assembly........................................................................................................ |
4 |
Batteries.......................................................................................................... |
6 |
Getting Started - Prizm II, III, IV............................................................... |
8 |
Prizm™ II Controls........................................................................... |
10 |
Prizm™ III Controls.......................................................................... |
12 |
Prizm™ IV Controls......................................................................... |
14 |
Prizm™ V Controls........................................................................... |
16 |
Displays........................................................................................................... |
18 |
Optional Accessories.................................................................................. |
19 |
Service............................................................................................................. |
21 |
Warranty......................................................................................................... |
24 |
Target Recovery........................................................................................... |
27 |
Notes................................................................................................................ |
28 |
® |
|
White’s Electronics, Inc. |
|
1011 Pleasant Valley Road |
|
Sweet Home, OR 97386 |
|
USA |
|

Prizm™ II • III • IV • V
To Assemble
1.Remove all parts from shipping carton (see diagram next page).
2.Use nonmetallic washers (between round search coil and clevis fiber rod), and fiber bolt and thumbnut to secure search coil to fiber rod.
3.Unlock Camlock on “S” rod, insert fiber rod into curved rod, line up buttons into one of adjustment holes. Twist Camlock to LOCK.
4.Unravel search coil cable and wind around rods (first revolution over top of rod). Plug search coil cable connector into control box. Screw finger tight to secure. Secure cable to fiber rod near search coil (first revolution) with small hook and loop strap provided. Allow slight cable slack (prior to first revolution) to allow search coil tilting.
5.Grip by handle, with arm in elbow cup, and sweep search coil over floor. If necessary for comfort, unlock camlock, compress buttons and reposition fiber rod. If necessary, elbow cup is also adjustable for comfort.
6.A large nylon strap is provided. When woven through the slots in the arm cup, additional leverage is provided. Insert smoothest section first (left slot for right-handed individuals, right slot for left-hand- ed individuals) hook and loop facing up. Fold tab at end of rougher loop into “T” to lock this end. Insert opposite end through second slot so arm can be inserted and removed from arm cup without readjustment of strap.

Prizm™ II • III • IV * V
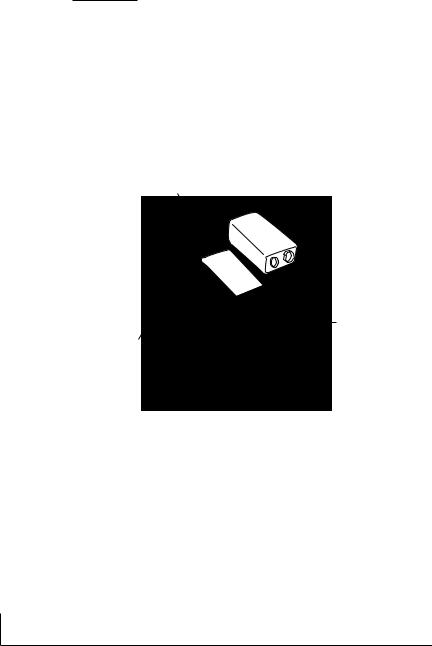
Assembly Diagram
Search Coil
Fiber Bolt
Search Coil Cable
Thumbnut
Non-metallic
Washers
Fiber Rod
Camlock Handle
Search Coil Cable
to Control Box Connector
Large Nylon Strap
Display
Control Buttons
“S” Rod
Elbow Cup
Prizm™ II • III • IV • V
Batteries
1.Open battery door by pressing elongated button on back of display and flipping open door.
2.Install two 9-volt alkaline batteries taking note of (+) and (-) positions (only fit one way), close door.
3.Press ON/OFF button.
Battery Door
|
Battery |
|
Battery |
Search Coil Cable to Con- |
Display |
|
|
trol Box Connector |
|
4. Batteries that are weak, or become weak during use, will automatically indicate Low Batt. with a battery icon on the left center portion of the display. Replace with two good quality alkaline 9-volt transistor batteries. Low volume beep, without a Low Bat display indication, requires only the one battery on the headphone jack side of the compartment be replaced.
5. One may expect about 20 hours of continuous searching with two good quality alkaline batteries. Battery life will vary with inter-

Prizm™ II • III • IV * V
mittent use, temperature, control settings, target indications, battery quality, battery condition upon purchase, and shelf life. One may add or subtract as much as 50% depending upon the above variables. It is always wise to carry back up batteries when traveling far from home.
6. Good quality rechargeable transistor 9-volt batteries may be purchased separately for use in your Prizm. Typically rechargeable transistor 9-volts will fall short of 20 hour continuous search time by as much as 30%. Expensive types may exceed this alkaline life rating. Either way their rechargeable option is desirable for avid (everyday) searching. White’s Electronics, Inc. has chosen not to compete in the transistor 9-volt rechargeable battery market. We would suggest common reputable brands and retailers for such systems.
Prizm™ II • III • IV • V
Getting Started (Prizm™ II, III, IV, V)
1.Once assembled with good batteries installed, press ON/ OFF.
2.Due to the many metals used in modern construction it is best to use and practice outdoors.
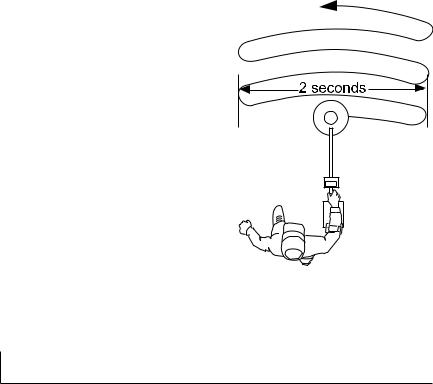
3.Sweep the round search coil from side to side over ground evenly (near to or touching ground surface) keeping it very close to the ground throughout each pass and overlapping each pass as if mopping a floor. About two seconds per pass from left to right, and two seconds returning from right to left is necessary for the Prizm to perform as designed. Sweeping too slowly (significantly less
than two seconds per pass) will deter good performance. It is also necessary for the round search coil to be moving (sweeping) for the Prizm to detect and identify metals. Once an interesting signal has been located, (Step #6) the P/P (pinpoint) button can be used to allow much slower search coil movement isolating exactly where to dig.
4. Solid repeatable beeps and repeatable display after several passes indicates an interesting
metal target.
5. Broken, sputter, or inconsistent beeps and display, indicates
Prizm™ II • III • IV * V
likely uninteresting metal targets. Ignore these targets.
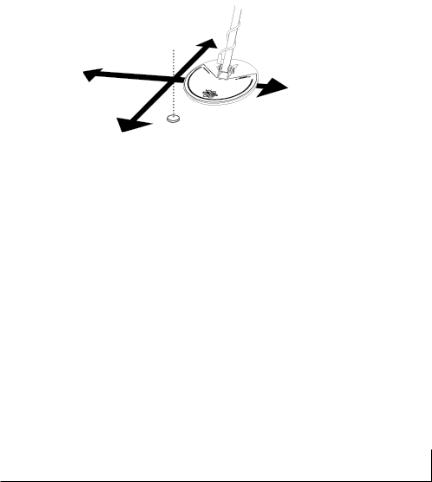
6.Once a solid repeatable beep and display indication are located, press P/P button and “X” area to pinpoint exactly where to dig. Press P/P again to continue searching.
7.Sweeping the round search coil over the ground, recognizing solid repeatable beeps and display indications from broken or inconsistent ones, pinpointing, and digging all take practice. Be patient. To speed the learning curve bury a nail, coin, and other items an inch or two in the ground and practice locating, recognizing the different sounds and display indications, and pinpointing.
8.You must have permission to search both public and private property from the owners or person in charge of managing the property. In most cases, you can locate the owner through City Hall or the County Seat. It is important for the future of metal detecting that you take care in digging. Unsightly holes are dangerous to people and livestock as well as detrimental to continued use of detectors. Fill all holes and remove all trash you encounter. Some areas have restrictions on the size and type of digging tool you may use which may present additional challenges. Check with your Dealer, Area Detecting Club, Local Police, or Parks & Recreations Department.
9.Known and marked historical sites are certainly “Off Limits” to metal detector use. Educate yourself, follow the laws in your area, and always aid Law Enforcement and Archeologists to further promote this great hobby. With research and thought,

Prizm™ II • III • IV • V
Prizm™ II Controls
1. ON/OFF turns the Power ON and OFF. Batteries that are weak, or become weak during use, will automatically indicate Low Batt. with a battery icon on the left center portion of the display. Replace with two good quality alkaline 9-volt transistor batteries. Remove batteries for storage beyond two weeks.
2. SENS (sensitivity) adjusts the responsiveness to metals, ground, and external electrical interference. The Sensitivity level is continuously shown on the display. The further to the right the fill towards taller bars, the higher the selected sensitivity setting. Use the SENS Up arrow button to increase, down arrow button to decrease. Use the highest level that behaves predictably. Use lower levels for areas the Prizm™ behaves unpredictably or is unstable (false signals without the presence of metal). Areas of high power electrical lines or extremely mineralized soil conditions will likely require lower SENS levels. Areas of little electrical activity, and dry beach sand, usually allow high SENS settings, and thus more detection depth. Standard settings work well in typical conditions.
3. P/P activates pinpoint mode for better item location. P/P can also be used for searching when iron and steel is desired as well as all other metals. Once P/P has been pressed (tapped) all types of metals respond with a beep that is basically the same. No adjustments can be made while in the P/P mode. Press a second time prior to continued searching to return the Prizm to Discrimination, which varies the beep according to the DISC setting. Holding the P/P button during pinpointing allows automatic return to Discrimination searching when released. P/P status shown on display center.
 Loading...