


MW29000TB0
Whirlpool MW29000TB0, MW29000TU0, MW29000TW0, XW29000TB0, XW29000TW0 Use And Care Manual
...
Wh_ol
SUPERFICIEDETRABAJOPARALAVANDERIA
SURFACEDETRAVAILPOURBUANDERIE
Table of Contents /Indice / Table des mati_res
WORKSURFACE SAFETY ............................... 1
INSTALLATION REQUIREMENTS ................. 2
Tools and Parts ............................................. 2
Location Requirements ................................. 2
INSTALLATION INSTRUCTIONS ................... 3
WORKSURFACE CARE .................................. 3
WARRANTY ...................................................... 4
°o D
laundry0
customlaundryopdons /,_
LAUNDRYWORKSURFACE
; ..... ;_ , ......
w
SEGURIDAD DE LA SUPERFICIE DE
TRABAJO .......................................................... 6
REQUISITOS DE INSTALACION .................... 6
Piezae y herramientas ................................... 6
Requisitos de ubicacion ................................ 6
INSTRUCCIONES DE INSTALACION ............ 7
CUlDADO DE LA SUPERFICIE
DE TRABAJO ................................................... 7
GARANTiA ....................................................... 8
SleCURITle DE LA SURFACE DE TRAVAIL ... 9
EXIGENCES D'INSTALLATION ...................... 9
Outillage et pieces ......................................... 9
Exigences d'emplacement ........................... 9
INSTRUCTIONS D'INSTALLATION .............. 10
ENTRETIEN DE LA SURFACE
DE TRAVAIL ................................................... 10
GARANTIE ..................................................... 11
___AG TM
J
WORKSURFACESAFETY
Your safety and the safety of others are very important.
We have provided many important safety messages in this manual and on your appliance. Always read and obey all safety
messages.
This is the safety alert symbol.
This symbol alerts you to potential hazards that can kill or hurt you and others.
All safety messages will follow the safety alert symbol and either the word "DANGER" or "WARNING."
These words mean:
You can be killed or seriously injured if you don't immediately
follow instructions.
You can be killed or seriously injured if you don't follow
instructions.
All safety messages will tell you what the potential hazard is, tell you how to reduce the chance of injury, and tell you what can
happen if the instructions are not followed.
W10101296A
INSTALLATIONREQUIREMENTS
Gather the required tools and parts before starting installation.
Read and follow the instructions provided with any tools listed
here.
Tools Required
• Measuring tape
• Level
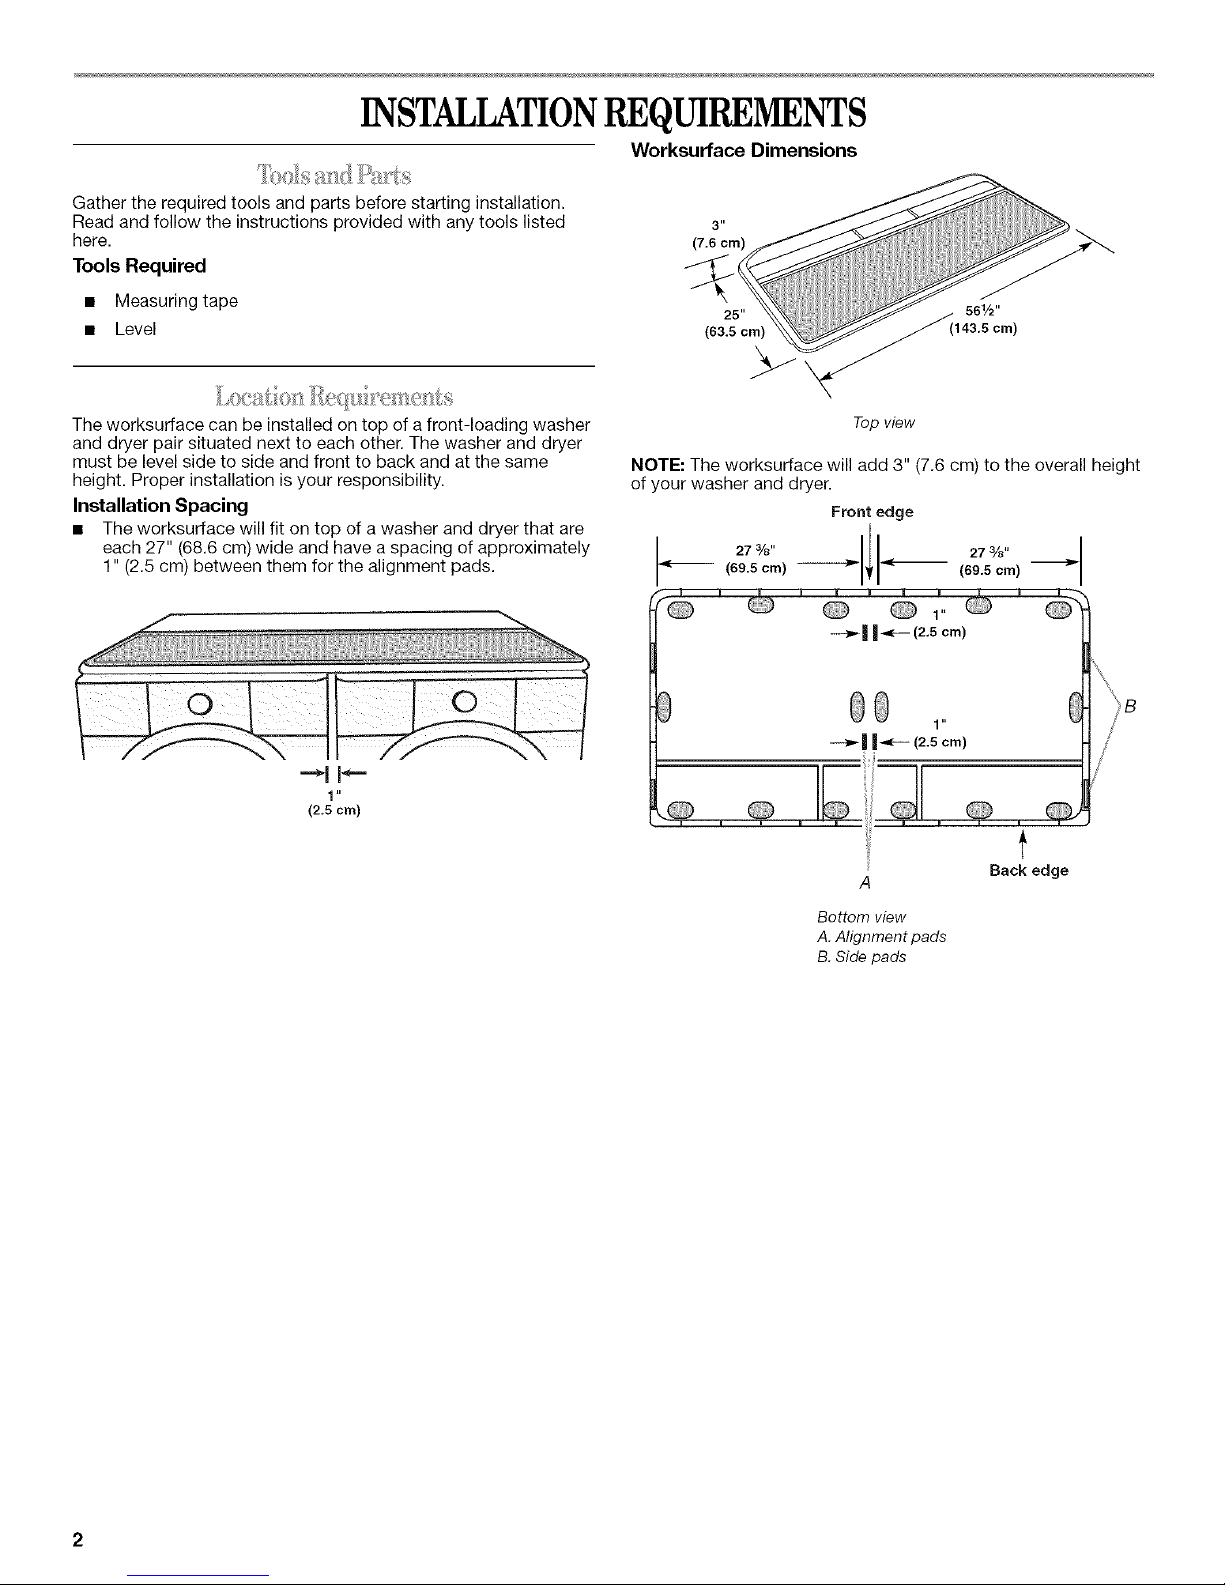
Worksurface Dimensions
25"
(63.5 cm)
>-\
The worksurface can be installed on top of a front-loading washer
and dryer pair situated next to each other. The washer and dryer
must be level side to side and front to back and at the same
height. Proper installation is your responsibility.
Installation Spacing
• The worksurface will fit on top of a washer and dryer that are
each 27" (68.6 cm) wide and have a spacing of approximately
1" (2.5 cm) between them for the alignment pads.
1 u
(2.5cm)
Top view
NOTE: The worksurface will add 3" (7.6 cm) to the overall height
of your washer and dryer.
Front edge
!
27 3/8" | 27 3/8"
(69.5 cm) _ _ "_-- (69.5 cm) --_="
•....-J_| |-4r-- (2,5 cm)
Back edge
Bottom view
A. Alignment pads
B. Side pads

INSTALLATIONINSTRUCTIONS
1. Remove the rubber mat(s) from the top of the worksurface and
set aside.
4. Place the worksurface on top of the washer and dryer. Holding
the front edge up, hook the back edge over the back of the
washer and dryer. Center it left to right so that the alignment
pads fit in the space between the washer and dryer.
5. Check that the top of the washer and the bottom of the rubber
mat(s) are clean and set in place on top of the worksurface.
6. Dispose of/recycle all packaging materials.
Excessive Weight Hazard
Use two or more people to move and uninstall washer.
Failure to do so can result in back or other injury.
Excessive Weight Hazard
Use two or more people to move and uninstall dryer.
Failure to do so can result in back or other injury.
2,
Check the spacing between your washer and dryer. If
necessary, move your washer or dryer so that there is a space
of approximately 1" (2.5 cm) between them.
3.
Check that the washer and dryer are level front to back and
side to side and the difference in height is no more than 3/8"
(0,95 cm). Place a level on both the washer and dryer to
determine any difference in height. If necessary, adjust the
washer or dryer feet.
1 "
(2.5 cm)
WORKSURFACECARE
The worksurface can be used for sorting, treating and folding
laundry and for storing various laundry products.
IMPORTANT: The worksurface is not intended for ironing. Using
an iron on the worksurface could cause it to become discolored.
Cleaning the Worksurface
• Use a soft damp cloth or sponge to wipe up any spills.
Occasionally wipe the worksurface to keep it looking new,
• Use mild soap and water or a household cleaner and a soft
brush on the worksurface; do not use abrasive products.
NOTE: Refer to your model's Use and Care Guide for tools
required and leveling instructions.
WHIRLPOOLCORPORATIONLAUNDRYPRODUCTWARRANTY
ONE YEAR LIMITED WARRANTY
For one year from the date of purchase, when this product is operated and maintained according to instructions attached to or
furnished with the product, Whirlpool or Whirlpool Canada (hereafter "Whirlpool") will pay for factory specified replacement parts and
repair labor to correct defects in materials or workmanship. Service must be provided by a Whirlpool designated service company.
ITEMS WHIRLPOOL WILL NOT PAY FOR
1. Service calls to correct the installation of your product, to instruct you how to use your product, to replace or repair house fuses or
to correct house wiring or plumbing.
2. Repairs when your product is used for other than normal, single-family household use.
3. Damage resulting from accident, alteration, misuse, abuse, fire, flood, acts of God, improper installation, installation not in
accordance with electrical or plumbing codes, or use of products not approved by Whirlpool.
4. Replacement parts or repair labor costs for units operated outside the United States or Canada.
5. Pickup and delivery. This product is designed to be repaired in the home.
6. Repairs to parts or systems resulting from unauthorized modifications made to the product.
7. Expenses for travel and transportation for product service in remote locations.
8. The removal and reinstallation of your product if it is installed in an inaccessible location or is not installed in accordance with
published installation instructions.
DISCLAIMER OF IMPLIED WARRANTIES; LIMITATION OF REMEDIES
CUSTOMER'S SOLE AND EXCLUSIVE REMEDY UNDER THIS LIMITED WARRANTY SHALL BE PRODUCT REPAIR AS PROVIDED
HEREIN. IMPLIED WARRANTIES, INCLUDING WARRANTIES OF MERCHANTABILITY OR FITNESS FOR A PARTICULAR PURPOSE,
ARE LIMITED TO ONE YEAR OR THE SHORTEST PERIOD ALLOWED BY LAW. WHIRLPOOL SHALL NOT BE LIABLE FOR
INCIDENTAL OR CONSEQUENTIAL DAMAGES. SOME STATES AND PROVINCES DO NOT ALLOW THE EXCLUSION OR LIMITATION
OF INCIDENTAL OR CONSEQUENTIAL DAMAGES, OR LIMITATIONS ON THE DURATION OF IMPLIED WARRANTIES OF
MERCHANTABILITY OR FITNESS, SO THESE EXCLUSIONS OR LIMITATIONS MAY NOT APPLY TO YOU. THIS WARRANTY GIVES
YOU SPECIFIC LEGAL RIGHTS AND YOU MAY ALSO HAVE OTHER RIGHTS, WHICH VARY FROM STATETO STATE OR PROVINCE
TO PROVINCE.
Outside the 50 United States and Canada, this warranty does not apply. Contact your authorized Whirlpool dealer to determine if
another warranty applies. If you need service, in the U.S.A., call 1-800-422-1230. In Canada, call 1-800-807-6777. 6/06
Keep this book and your sales slip together for future
reference. You must provide proof of purchase or installation
date for in-warranty service.
Write down the following information about your major product to
better help you obtain assistance or service if you ever need it.
You will need to know your complete model number and serial
number. You can find this information on the model and serial
number label located on the product.
Dealer name
Address
Phone number
Model number
Serial number
Purchase date
 Loading...