


LT5000XSW1
Whirlpool LT5000XSW1, LT5000XSW2, LT5000XSW3, LT5004XSW1, LT5004XSW2 Owner’s Manual
...
! III
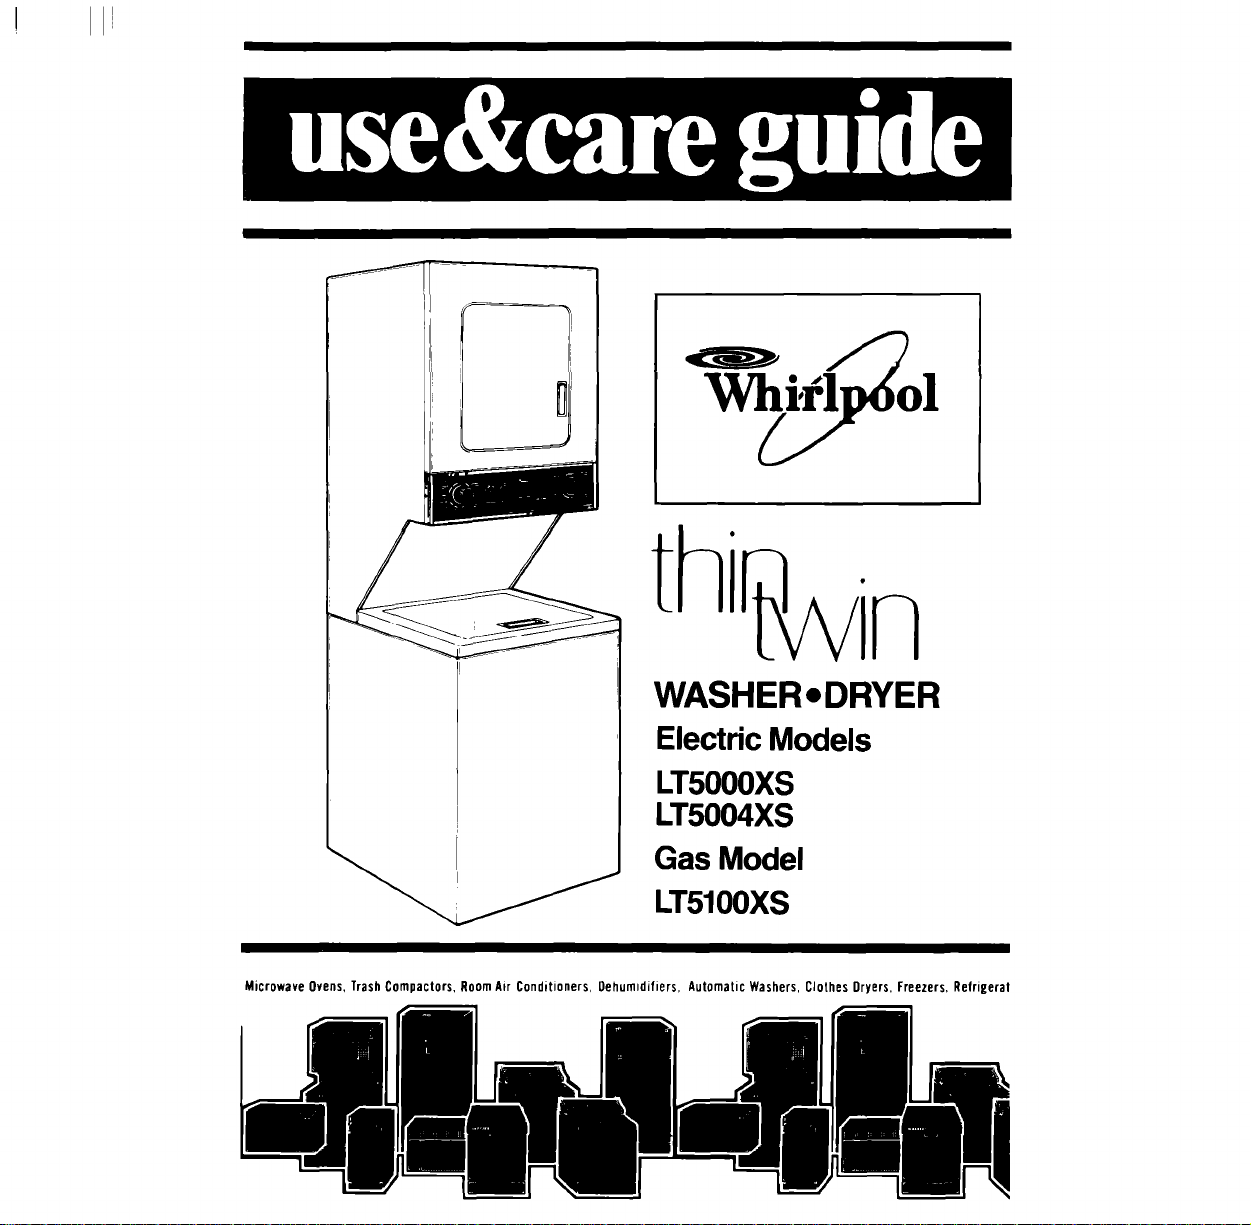
WASHER • DRYER
Electdc Models
LT5000XS
LT5004XS
Gas Model
LT5100XS
Microwave Ovens,TrashCompactors, RoomAir Conditioners, Oehumtdifiers, Automatic Washers, Clothes Dryers, Freezers, Refrigeral
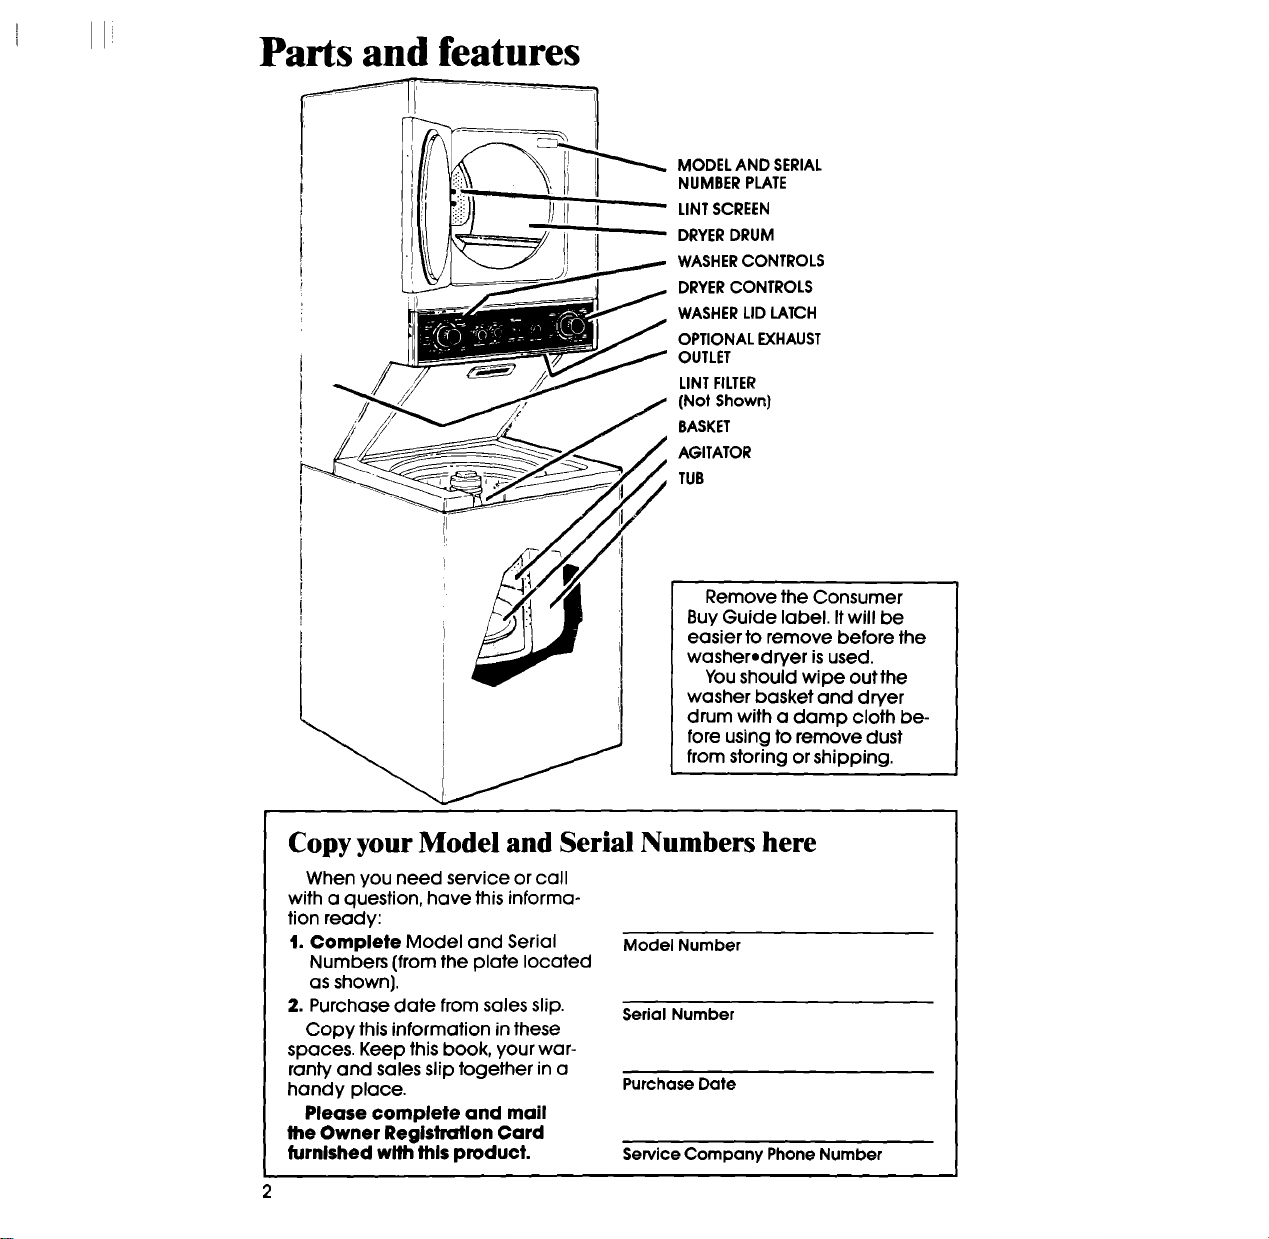
LL Parts and features
MODEL AND SERIAL
NUMBER PLATE
LINT SCREEN
-- DRYERDRUM
WASHERCONTROLS
DRYERCONTROLS
WASHER LID LATCH
OPTIONAL EXHAUST
OUTLET
LINT FILTER
[Not Shown]
BASKET
AGITATOR
TUB
Remove the Consumer
Buy Guide label. Itwill be
easier to remove before the
washerodryer is used.
You should wipe out the
washer basket and dryer
drum with a clamp cloth be-
fore using to remove dust
from storing or shipping.
Copy your Model and Serial Numbers here
When you need service or call
with a question, have this informa-
tion ready:
t. Complete Model and Serial
Numbers (from the plate located
as shown).
2. Purchase date from sales slip.
Copy this information in these
spaces. Keep this book, your war-
ranty and sales slip together in a
handy place.
Please complete and mail
the Owner Reglstratlon Card
furnlshed wlth thls product.
Model Number
Serial Number
Purchase Date
Service Company PhoneNumber
LLI
Contents Page
PARTSANDFEATURES....... 2
BEFORE USING YOUR
WASHER.DRYER ............. 3
IMPORTANT SAFETY
INSTRUCTIONS .............. d
WASHER OPERATING
INSTRUCTIONS .............. 6
Starting Your Washer ....... 6
What Happens in Each
Cycle ................... 8
OTHER OPERATING
INSTRUCTIONS .............. 12
For a Rinse and Spin ....... 12
For a Drain and Spin ....... 12
For a Soak or Pre-Wash .... 12
Cleaning the Lint Filter ..... 13
DRYER OPERATING
INSTRUCTIONS .............. 13
Starting Your Dryer ......... 13
Automatic Cycles ......... 14
@t987 Whirlpool Corporation
Timed Drying .............. 15
Selecting a Cycle ......... 15
Gentle Heat ............... 15
DRYING TIPS ................ 16
FLUFFAIR Setting ........... 16
TUMBLEPRESS®Setting ..... 16
Mixed Loads .............. 16
Drying Times .............. 16
Automatic DRI-MISER®
Control .................. 16
LINT SCREEN ................ 17
LINT REMOVAL ............... 17
CARING FOR YOUR
WASHER.DRYER ............. 18
Cleaning Dryer Interior .... 18
Vacation Care ............ 19
Winterizing ................ 19
IF YOU NEED SERVICE OR
ASSISTANCE ................ 20
WASHER WARRANTY ........ 24
Page
Before using your
THIN TWIN* washer.dryer
For best washing and drying results, you must take some very important
steps before, during and after each load:
1. Prepare and sort each load for washing, (see your "Laundry Guide").
2. Measure and add detergent or soap to washer, (see your "Laundry
Guide").
3. Load the washer properly, (see your "Laundry Guide").
4. Select the water temperature, load size and cycle recommended for
the fabrics before starting the washer, (see pages 6 and 7).
5. Add other laundry aids to the washer according to instructions,
(see your "Laundry Guide").
6. Properly sort the load for drying, (see your "Laundry Guide").
7. Select the right drying cycle and time for the fabrics, (see pages 14-16).
8. Remove and hang or fold items immediately after drying.

Important safety instructions
_ WARNING - To reduce the risk of fire, electric shock, or
Read these Laundry Instructions for important use and
safety information before using your washer/dryer.
NEVER wash or dry items cleanec _,
was_ed, soaked in or spotted with wax,
paint, gasoline, or flammable fluids in
the washer. The fumes can create o
FIRE HAZARD or EXPLOSION. ALWAYS
hand launder and air dry fabrics con-
taining these materials.
NEVER allow children to operate, pla_ '
with, or crawl inside the washer/dryer
Close supervision of children is neces-
sary when the washer/dryer is used
near children.
When discarding an old washer/dryer,
ALWAYS remove the lid and door I_o
prevent accidental entrapmer_t.
NEVER reach into the washer/dryer unr!
all the motion stops. If the lid is opened
while the washer basket is spinning, the
basket will automatically stop Jr,a te_:
seconds.
DO NOT install or store washer/dryer
where it will be exposed to the weather.
DO NOT tamper with the controls.
You are personally responsible for
making sure that your washer/dryer is
Installed, repaired and parts re-
placed by a qualified person.
NEVER use or store flammable fluids
(dry cleaning solvents, gasoline, ker-
osene) in or near your washer/dryer. Do
not add flammable fluids to the wash
water. The substances give off vapors
that can create a FIRE HAZARD or
EXPLOSION.
injury to persons when using your washer/dryer, follow
basic precautions, including the following:
Use only dryer fabric softeners specifi-
cally labeled as not being harmful to
the dryer.
FIRE HAZARD and DAMAGE to mate-
rials can result from:
• drying rubber, rubber-like and heat
sensitive materials with heat.
• allowing lint to build-up inside the
dryer or exhaust system - cleaning
should be done by a qualified
person.
Clean lint screen before or after each
load.
WARNING: If hot water has not been
used recently (usually two weeks or
longer), hydrogen gases may build up
in the water heater and the hot water
pipes. HYDROGEN GAS IS EXPLOSIVE.
To prevent injury or damage, before
using your washer, turn on all hot water
faucets and allow water to run for sev-
eral minutes. This will allow gases to es-
cape. Do not smoke or use any open
flame near the faucet while it is open,
DO NOT let dust, paper, rags, chem-
icals, etc. pile up around or under the
washer/dryer
The washer/dryer must be electrically
grounded. See the "Installation
InstructJons_'
- SAVE THESE INSTRUCTIONS -
4
I:11
Additional Safety Instructions and Your Responsibilities
ALWAYS shut off the gas valve before
leaving on vacation.
ALWAYS unplug the power supply cord
before attempting to service the wash-
er/dryer. Shut off GAS VALVE if yours is a
gas dryer.
• FOR YOUR SAFETY •
IF YOU SMELL GAS:
1. OPEN WINDOWS.
2. DON'T TOUCH ELECTRICAL SWITCHES,
3. EXTINGUISH ANY OPEN FLAME.
4. IMMEDIATELY CALL YOUR GAS
SUPPLIER.
DO NOT machine wash glass fiber
materials. Small particles can stick to
fabrics washed in following loads
and cause skin irritation.
HAZARDOUS FUMES can be formed if
chlorine bleach is used in the same
wash as ammonia or acids such as vin-
egar or rust remover,
ALWAYS store detergent, laundry aids
and other materials in a cool, dry
place where children can't reach them
- in a locked cabinet if possible,
ALWAYS read and follow instructions
on packages of detergent and laundry
aids - especially warnings and
precautions,
NEVER operate the washer/dryer if...
• it is not working right.
• it is damaged.
• parts are missing.
• all panels are not in place.
You are personally responsible for
making sure that your washerldryer:
• is properly maintained.
• is properly installed and leveled in a
well ventilated room on a floor that
can support the weight.*
• is located in an area where the tem-
perature is above 45°F (7.2°C)
because...
- the dryer will not operate properly
at cold temperatures.
- freezing temperatures can dam-
age the washer.
• is connected to the proper electrical
supply, outlet, water supply, plumbing
fixtures, drain, and dryer exhausting
system.*
• is not installed against drapes or
curtains.*
• is used only for jobs normally ex-
pected of home automatic washer/
dryers.
*Refer to the "Installation Instructions"
for complete information.
5
Ili
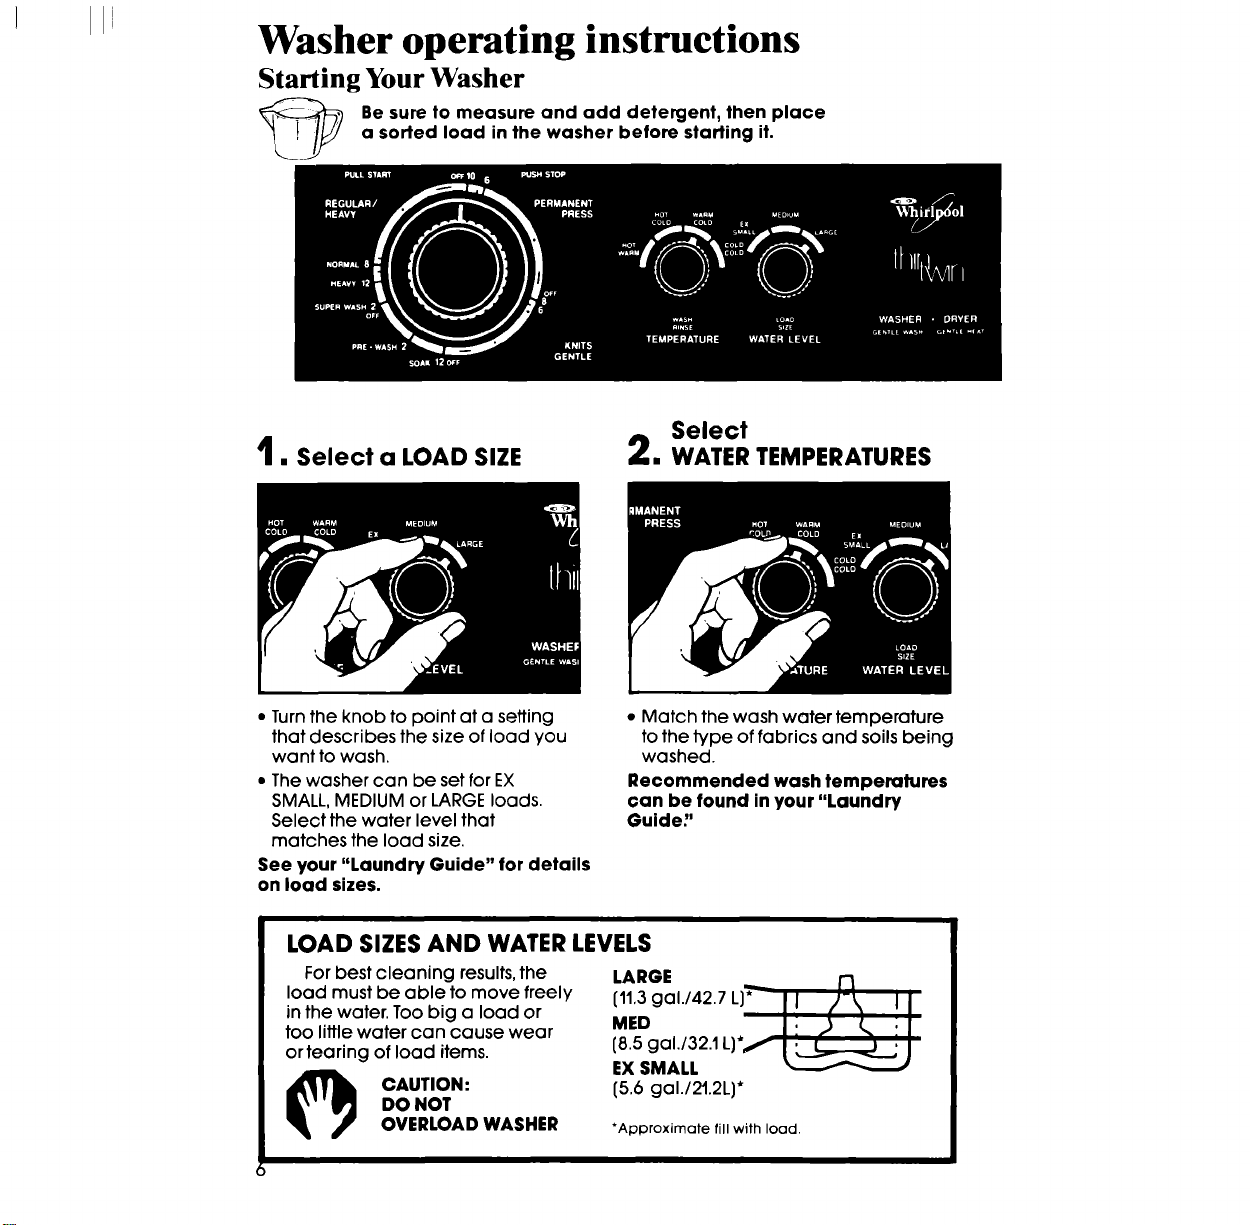
Washer operating instructions
Starting Your Washer
a sorted load in the washer before starting it.
Be sure to measure and add detergent, then place
Select
1. Select a LOAD SIZE
2. WATER TEMPERATURES
• Turn the knob to point at a setting
that describes the size of load you
want to wash.
• The washer can be set for EX
SMALL, MEDIUM or LARGE loads.
Select the water level that
matches the load size.
See your "Laundry Guide" for details
on load sizes.
LOAD SIZES AND WATER LEVELS
• Match the wash water temperature
to the type of fabrics and soils being
washed.
Recommended wash temperatures
can be found in your "Laundry
Guide:'
(11,3 gal./42.7 L)T'--
+'+ liar
MED

II
To hold the washer lid up, lift the
lid until it snaps past the latch.
To release the lid, push the lid
latch up.
Select CYCLE and WASH TIME;
3. Start the washer
A. Push in the Control Knob and
turn itto the right. It must be
pushed in and turned only
clockwise.
Co Start the washer by pulling out
the control knob. The washer
will fill to the level you set with
wash water of the selected
temperature. After filling, the
washer will agitate for the
selected number of minutes.
B, stop on a number in the cycle
you want. The numbers are min-
utes of wash time. The drawing
shows 8 minutes of agitation in
the REGULARNORMAL Cycle.
D°
Tostop the washer at any time,
push in the Control Knob. To
restart the washer, pull out the
Control Knob.
Ili
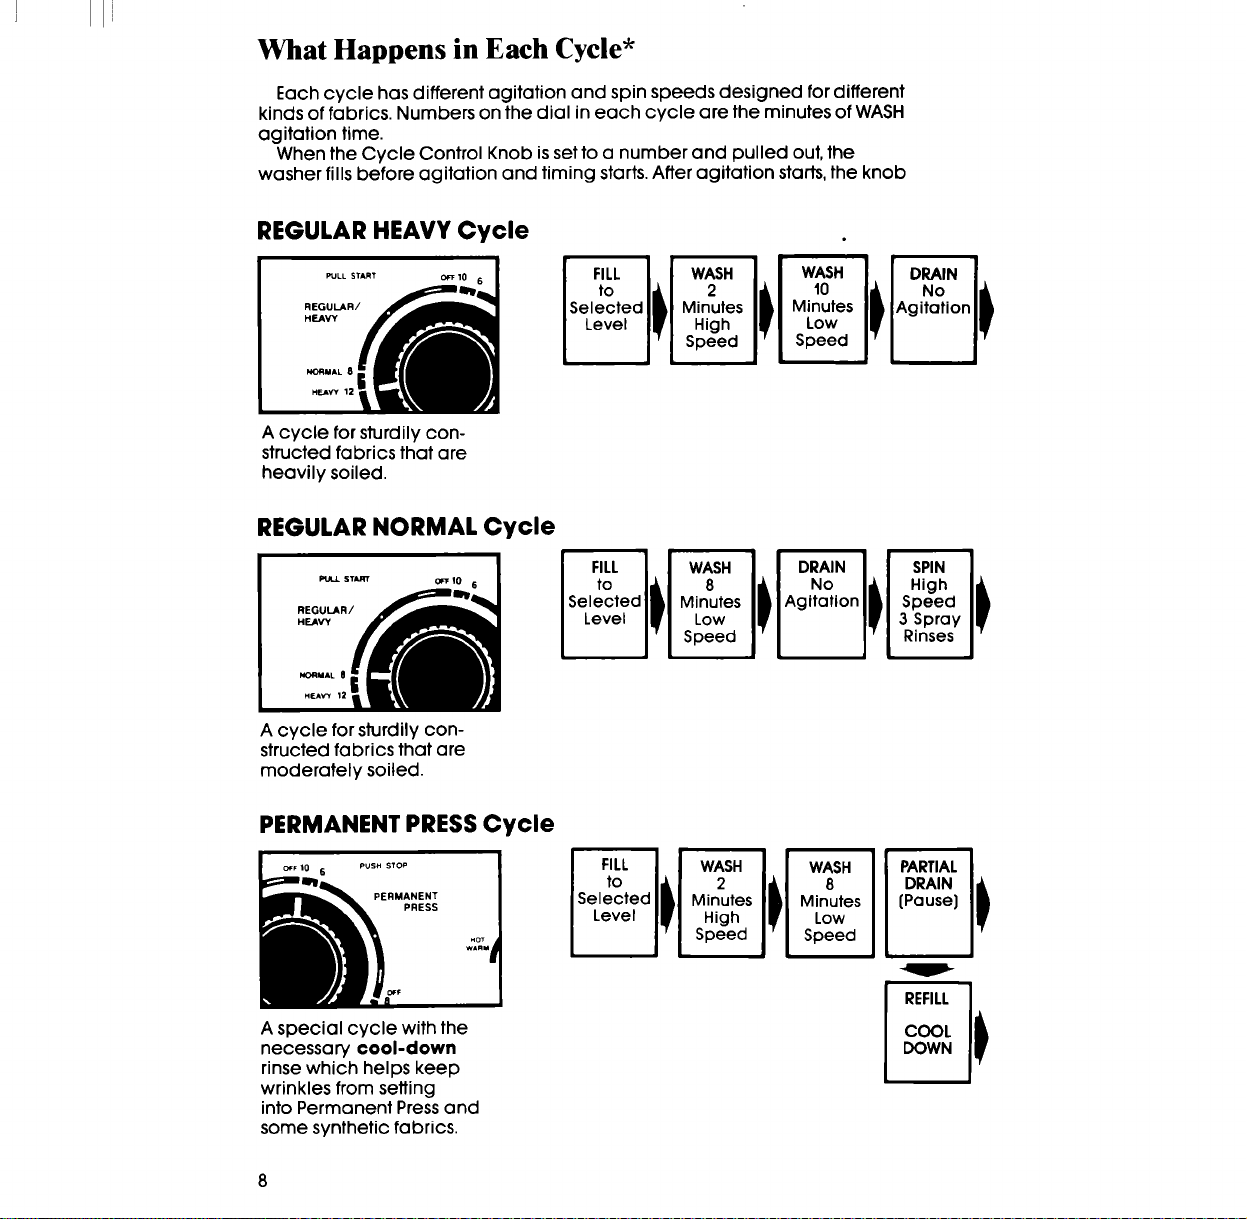
What Happens in Each Cycle*
Each cycle has different agitation and spin speeds designed for different
kinds of fabrics. Numbers on the dial in each cycle are the minutes of WASH
agitation time.
When the Cycle Control Knob is set to a number and pulled out, the
washer fills before agitation and timing starts. After agitation starts, the knob
REGULAR HEAVY Cycle
I FILLII WASHI i WAS"
toilll ill lOSelected Minutes Minutes
I Level II!'1 High IWl Low
j j-j Speed I--I Speed
A cycle for sturdily con-
structed fabrics that are
heavily soiled.
REGULAR NORMAL Cycle
START _ 10 6
REGULAR/
A cycle for sturdily con-
structed fabrics that are
moderately soiled.
PERMANENT PRESS C vcle
off Io 6 Pus_ STOP
PERMANENT
PRESS
M_
wAnM
A special cycle with the
necessary cool-down
rinse which helps keep
wrinkles from setting
into Permanent Press and
some synthetic fabrics.
DRAIN
No
Agitation
DRAIN
(Pause)
PARTIALI_
COOL
DOWN
REFILL I_
 Loading...