


AWZ 475/S


CONTENTS
BEFORE USING THE WASHING MACHINE
PRECAUTIONS AND GENERAL
RECOMMENDATIONS
INSTALLATION
DESCRIPTION OF THE WASHING MACHINE
DOOR
BEFORE THE FIRST WASH CYCLE
PREPARATION OF THE WASHING
DETERGENTS AND ADDITIVES
REMOVING THE FILTER/DRAINING
RESIDUAL WATER
CARE AND MAINTENANCE
TROUBLESHOOTING GUIDE
AFTER-SALES SERVICE
ACCESSORIES
BUILT-IN MODELS

GB 2
BEFORE USING THE WASHING MACHINE
1.Removing the packaging and inspection
•
After unpacking, make sure that the washing
machine is undamaged. If in doubt, do not use the
washing machine. Contact After-Sales Service or
your local retailer.
•
Check that the accessories and supplied parts are
all present.
•
Keep the packaging materials (plastic bags,
polystyrene parts, etc.) out of reach of children,
as they are potentially dangerous.
•
If the appliance was exposed to the cold before
delivery, keep it at room temperature for a few
hours before operating.
2.Remove the transport bolts
•
The washing machine is fitted with transport
bolts to avoid any possible damage to the interior
during transport. Before using the washing
machine, it is imperative that the transport bolts
are removed.
•
After their removal, cover the openings with the
4 enclosed plastic caps.
3.Install the washing machine
•
You are advised not to install the appliance in a
room where the temperature could drop to
below 0°C.
•
Given the weight of the appliance, attention must
be paid to safety standards when it is being moved.
•
When positioning the appliance, make sure that
the power cable is not kinked or compressed and
that it can be easily accessed if required.
•
Remove the protective film from the control
panel (if available on your model).
•
Move the appliance without carrying it by the
worktop.
•
Install the appliance on a solid and level floor
surface, preferably in a corner of the room.
•
Make sure that all four feet are stable and resting
on the floor and then check that the washing
machine is perfectly level (use a spirit level).
•
In case of wooden or so-called “floating floors”
(for instance certain parquet or laminate floors),
place the appliance on a 60 x 60 cm sheet of
plywood at least 3 cm in thickness which is
secured to the floor.
•
If the washing machine is installed on a carpeted
floor, leave sufficient space between the
appliance and the floor to guarantee the free
circulation of air.
4.Water supply
•
Connect the water supply inlet hose in
accordance with the regulations of your local
water company.
•
Water supply: Cold water only (unless
otherwise indicated on
the programme chart)
•
Water tap: 3/4” threaded hose
connector”
•
Water pressure
(flow pressure): 100-1000 kPa (1-10 bar).
•
Use only new hoses to connect the washing
machine to the water supply. Used hoses must
not be used and should be discarded,
5.Drain
•
Connect the drain hose to the siphon or hook it
over the edge of a sink by means of the “U” bend
supplied.
•
If the washing machine is connected to an
integrated drainage system, ensure the latter is
equipped with a vent to avoid simultaneous
loading and draining of water (siphoning effect).
6.Electrical connections
•
Electrical connections must be carried out by a
qualified technician in compliance with the
manufacturer’s instructions and current standard
safety regulations.
•
Voltage, power consumption and electrical
protection data are supplied on the inside of the
appliance door.
•
The washing machine must be connected
exclusively by means of a socket with an earth
connection in accordance with current
regulations. The washing machine must be
earthed by law. The manufacturer declines all
liability for possible damage to property or injury
to persons or pets deriving from failure to
observe the a/m directions.
•
Do not use extension leads or multi sockets.
•
Before any maintenance on the washing machine
disconnect it from the mains supply.
•
After installation, access to the mains plug or to
disconnection from mains supply must be
ensured at all times via a double-pole switch.
•
Do not operate the washing machine if it has
been damaged during transport. Inform the
After-Sales Service.
•
Mains cable replacement is only to be carried out
by After-Sales Service.
•
Use the appliance only for domestic washing and
for its intended applications.
Minimum housing dimensions:
Width: 600 mm
Height: 850 mm
Depth: 600 mm
Please, read these instructions carefully before connecting and using the appliance.
Before connecting the appliance read these instructions carefully. Repairing the
failure arising from inappropriate connections or use of the appliance is not
covered by the guarantee.
GB 3
PRECAUTIONS AND GENERAL
RECOMMENDATIONS
1.Packing
•
The packaging material is entirely recyclable, and
marked with the recycling symbol . Adhere
to local regulations when disposing of packaging
material.
2.Disposing of packaging and scrapping
old washing machines
•
The appliance is built from reusable materials. It
must be disposed of in compliance with current
local waste disposal regulations.
•
Before scrapping, remove all detergent residues
and cut off the power cable so that the washing
machine is made unusable.
•
This appliance is marked according to European
Directive 2002/96/EC on Waste Electrical and
Electronic Equipment (WEEE).
By ensuring that this product is disposed of
correctly, you will help prevent potential
negative consequences for the environment and
human health.
The symbol on the product, or on the
documents accompanying the product, indicates
that this appliance may not be treated as
household waste. Instead it shall be handed over
to the applicable collection point for the recycling
of electrical and electronic equipment.
Disposal must be carried out in accordance with
local environmental regulations for waste disposal.
For more detailed information about treatment,
recovery and recycling of this product, please
contact your local city office, your household
waste disposal service or the shop where you
purchased the product.
3.Safety Instructions
•
The washing machine can only be used indoors.
•
Do not store flammable fluids near the appliance.
•
If you want to place a dryer on top of your
washing machine, first contact our After-Sales
Service or your specialist dealer to verify if this is
possible. Placing a dryer on your washing
machine is only admitted by using an appropriate
stacking kit available through our After-Sales
Service or your specialist dealer.
•
Do not leave the appliance plugged in when not
in use.
•
Turn off the tap when not in use.
•
Before any cleaning and maintenance switch off
the machine or disconnect it from the mains.
•
Never open the door forcibly or use it as a step.
•
Children must not be allowed to play with the
washing machine or to climb into the drum.
•
This appliance is not intended for use by persons
(including children) with reduced physical,
sensory or mental capabilities, or lack of
experience and knowledge, unless they have
been given supervision or instruction concerning
use of the appliance by a person responsible for
their safety.
•
If necessary, the power cable may be replaced
with an identical one obtained from our After-
Sales Service. The power cable must only be
replaced by a qualified technician.
•
Lighters must not be left in pockets.
For washer/dryer models
•
Do NOT dry items that have been washed or
treated with chemical stain removers, cooking
oil, petroleum, acetone, alcohol, petrol, paraffin,
white spirit, wax.
Remove these substances by means of a hot wash
with abundant detergent before drying.
•
Do NOT dry items made from foam rubber,
latex, raincoats, waterproof fabrics, rubber
airbeds, printed objects, clothes or pillows filled
with foam rubber. These materials could melt
and damage other items in the wash or damage
the appliance.
•
The use and quantities of detergent, softener and
bleach must comply with the instructions
reported on the packaging.
•
Never dry unwashed items.
• WARNING!!!
The final part of a drying cycle is
the cooling down phase. Consequently, never
switch off the dryer before the cycle has been
completed. Otherwise, the washing must be
taken out quickly and hung out to allow the heat
to dissipate.
4.Advice on saving energy
•
To achieve the best use of energy, water,
detergent and time use the recommended
maximum load size.
•
Do not exceed the recommended dosages on
the detergent packet.
•
The Eco Flap - a special system in the outlet -
prevents detergent loss from the drum to avoid
detergent loss into the environment.
•
Use the “Pre-wash” programme for heavily soiled
laundry only. Use a programme with no “Pre-
wash” cycle for slightly or normally soiled items;
You save on water, energy and time as a result.
•
Before using the washing machine, treat laundry
with a stain remover or soak dry stained items in
water so as to avoid having to use high
temperature wash programmes.
•
Save energy by using a 60° C instead of a 95° C
wash programme or a 40° C instead of a 60° C
wash programme.
•
Save energy and time by selecting a high spin
speed to reduce the water content in laundry
before using a drying programme (for machines
with adjustable spin speed).
5.EC Declaration of Conformity
•
The appliance conforms to the following
European Standards:
73/23/EEC Low voltage directive
89/336/EEC EMC Directive
93/68/EC CE Marking Directive .
GB 4
INSTALLATION
TRANSPORT/HANDLING
WARNING!!! The washer/dryer version must not be installed behind a
locked door, a sliding door or with a hinged door on the opposite wall to
the washer/dryer itself.
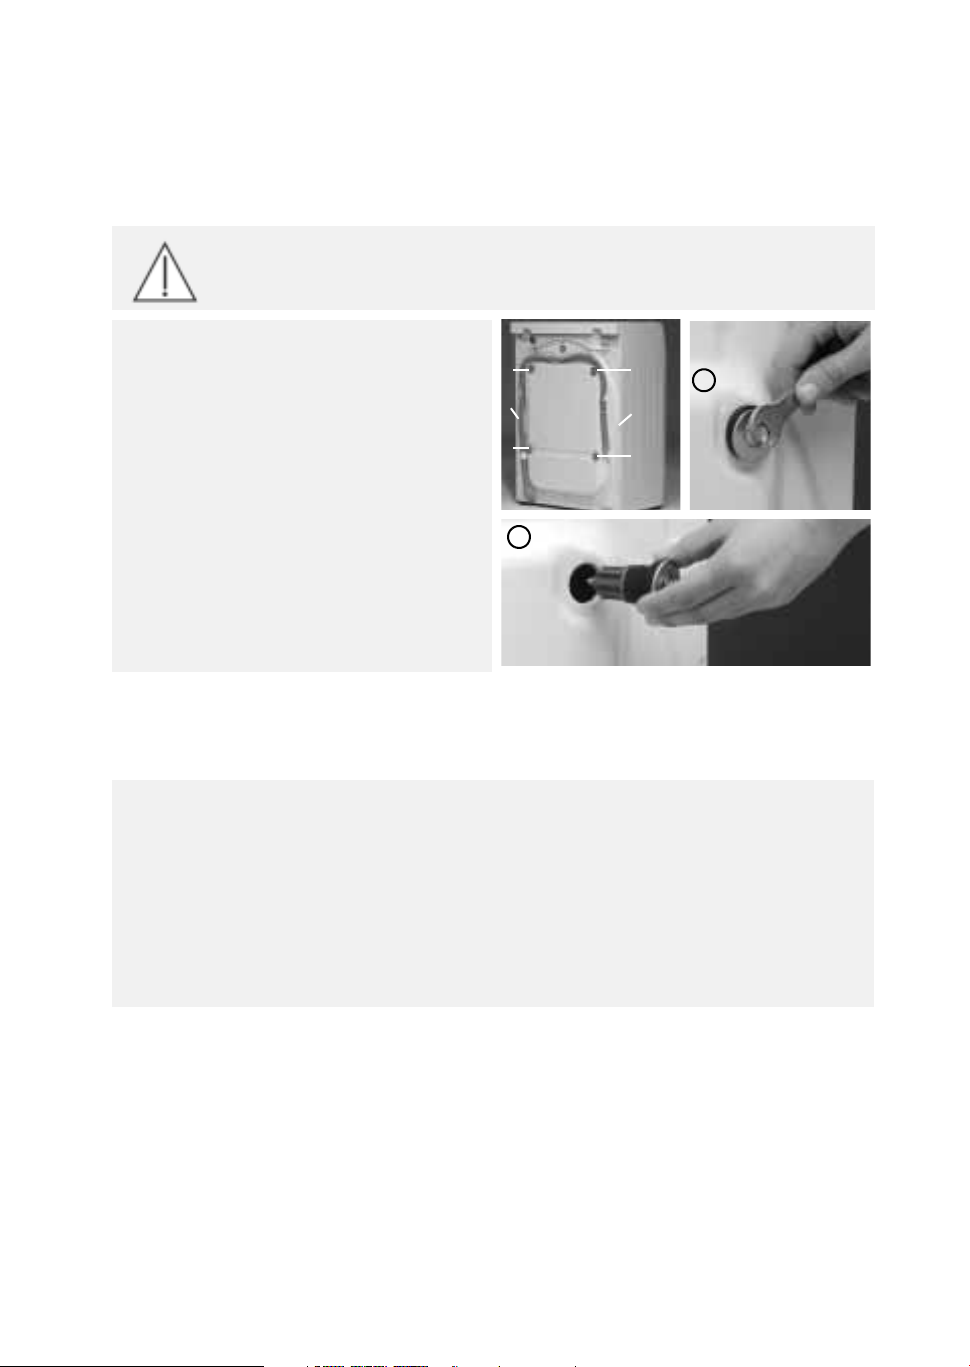
Remove the transport bolts
1.
Loosen the three or four bolts (
A
).
2.
Unscrew the bolts by hand.
3.
Take hold of the bolts and plastic spacers and
remove them. Keep the transport safety bolts for
possible future use.
4.
Close the holes with the plastic covers (supplied
with the documents).
Never lift the appliance by the worktop when transporting.
1.
Unplug the appliance.
2.
Shut off the water tap.
3.
Check that the door and detergent dispenser are properly closed.
4.
Remove the water supply and drain hose from the domestic connection.
5.
Remove any water remaining in the hoses and the appliance (see “Removing The Filter/Draining
Residual Water”).
6.
Pry off the plastic covers with a screwdriver and remove them.
7.
Insert the transit screws following the removal procedure in reverse.
A
B
A
A
A
A
B
1
4
 Loading...