


Whirlpool AWM 4066/1, AWO/D 041, AWM 043, AWM 7100, AWM 6103 INSTALLATION Manual
...10200053a.fm5 Page 1 Tuesday, October 11, 2005 10:07 AM
GB INSTALLATION GUIDE
NOISE, EXCESSIVE VIBRATIONS AND WATER LEAKAGES
CAN BE CAUSED BY INCORRECT INSTALLATION.
NEVER MOVE THE APPLIANCE BY CARRYING IT AT THE
WORKTOP.
•Read this “INSTALLATIONGUIDE” before operating.
•Keep this “INSTALLATION GUIDE” for future reference.
•Read the general recommendations about disposing of packaging in the Instructions for use.
E GUÍA DE INSTALACIÓN
EL RUIDO, LAS VIBRACIONES EXCESIVAS, Y LAS PÉRDIDAS DE
AGUA PUEDEN DEBERSE A UNA INSTALACIÓN INCORRECTA.
NUNCA MUEVA EL APARATO LLEVÁNDOLO A LA
SUPERFICIE DE TRABAJO.
•Lea esta “GUÍA DE LA INSTALACIÓN” antes de accionar el aparato.
•Guarde esta “GUÍA DE LA INSTALACIÓN” para más adelante.
•Lea las recomendaciones generales sobre cómo deshacerse del embalaje en las instrucciones de uso.
P MANUAL DE INSTALAÇÃO
O RUÍDO, AS VIBRAÇÕES EXCESSIV AS E AS FUGAS DE ÁGUA
PODEM SER CAUSADAS POR UMA INSTALAÇÃO INCORRECTA.
NUNCA DESLOQUE A MÁQUINA, TRANSPORTANDO-A PELO
TAMPO.
•Leia este “MANUAL DE INSTALAÇÃO” antes de operar.
•Guarde este “MANUAL DE INSTALAÇÃO” para consultas futuras.
•Leia as recomendações gerais quanto à eliminação da embalagem nas Instruções de utilização.
I GUIDA ALL’INSTALLAZIONE
LA PRESENZA DI RUMORE, VIBRAZIONI ECCESSIVE E
FUORIUSCITE D’ACQUA PUÒ ESSERE DOVUTA AD UNA
INSTALLAZIONE NON CORRETTA.
NON SPOSTARE MAI L’ELETTRODOMESTICO
SOLLEVANDOLO DALLA PARTE DEL PIANO DI LAVORO
•Si prega di leggere attentamente questa “GUIDA ALL’INSTALLAZIONE” prima di mettere in funzione la lavatrice.
•Conservare questa “GUIDA ALL’INSTALAZIONE” per future consultazioni.
•Leggere le raccomandazioni generali sullo smaltimento dell’imballo contenute nelle Istruzioni per l’Uso.
GR Šm•l€}t }l•yŒytŒyt•t
nŠ‹‘|Št ‘q}‹|Šo€•Š€ •‹ymyt‚Š€ •y€ m€y‹‹Š}t ˆ}‹Š‘ ‚qŠ‹}€ ˆy q‹Š•o•nŠ‘ˆ yqŠ oyˆnyt‚}ˆ• }l•yŒytŒyt• ‚•ˆ ‚}Œy•€ˆ}€Œ} qŠŒ} Œ• t‘t•}‘• ŒŠqŠn}Œ†ˆŒyt Œ•ˆ tŒ•ˆ }q€ƒyˆ}€y }‹lyt€yt
•q¥¶¥¯¥°³¤±© ¨-¥¦‡·¸© ¥½¸Ÿ» ¸-» —Šm•l€}t }l•yŒytŒyt•t˜ ´¶-² °©-¸³½¶« ·©¸© ¸¬ ·½·¯©½
••¶¥¸ ·¸© ¥½¸Ÿ» ¸-» —Šm•l€}t }l•yŒytŒyt•t˜ «-¥ ²¥ ¸-» ·½±¦³½°©¤©·¸© ·¸³ ±Ÿ°°³²
•m-¥¦‡·¸© ¸-» «©²-¯Ÿ» ³¨¬«¡©» «-¥ ¸¬² ¥´¢¶¶-…¬ ¸¬» ·½·¯©½¥·¡¥» ·¸-» ³¨¬«¡©» ¼¶ ·¬»
Black Process Plate

10200053a.fm5 Page 2 Tuesday, October 11, 2005 10:07 AM
PARTS SUPPLIED
PIEZAS SUMINISTRADAS
PEÇAS FORNECIDAS
PEZZI FORNITI IN DOTAZIONE
}py‹Œ•‚yŒy qŠ‘ qy‹}’ŠˆŒy€
•Package with small items
Paquete con piezas pequeñas
Embalagem com pequenas peças
Busta con minuteria t½·¯©½¥·¡¥ ±© ±-¯¶‡ ¯³±±‡¸-¥
Instruction for use
Instrucciones de uso
Instruções de utilização
Istruzioni per l’uso
Š¨¬«¡©» ¼¶ ·¬»
 A
A 
4 plastic caps
4 tapas de plástico
4 tampões de plástico
4 tappi in plastica
´°¥·¸-¯‡ ¯¥°¤±±¥¸¥
Wrench
Llave
Chave de porcas
Chiave
•°©-¨¡
 B
B 
 C
C 
•Inlet hose (inside the machine or already installed)
|
Tubo de alimentación (en el interior del tambor o ya |
D |
|
instalado) |
|
|
Mangueira de entrada (no interior da máquina ou já |
|
|
instalada) |
|
|
Tubo di alimentazione (all’interno della lavatrice o |
|
|
già installato) |
|
|
tº° ²¥» ´¥¶³¼ » ²©¶³¤ ±Ÿ·¥ ·¸¬ ·½·¯©½ ¨¬ |
|
|
¸³´³¹©¸¬±Ÿ²³» |
|
• |
“U”-bend (inside the machine or already installed) |
|
|
Codo en “U” (en el interior del aparato o ya |
|
|
instalado) |
E |
|
Cotovelo (no interior da máquina ou já instalado) |
|
|
Gomito per tubo di scarico (all’interno della lavatrice |
|
|
o già installato) |
|
|
lº²¡¥ «-¥ ·º° ²¥ ¥´³¼Ÿ¸©½·¬» ±Ÿ·¥ ·¸¬ ·½·¯©½ |
|
|
¨¬ ¸³´³¹©¸¬±Ÿ²¬ |
|
2 |
|
|
Black Process Plate
10200053a.fm5 Page 3 Tuesday, October 11, 2005 10:07 AM
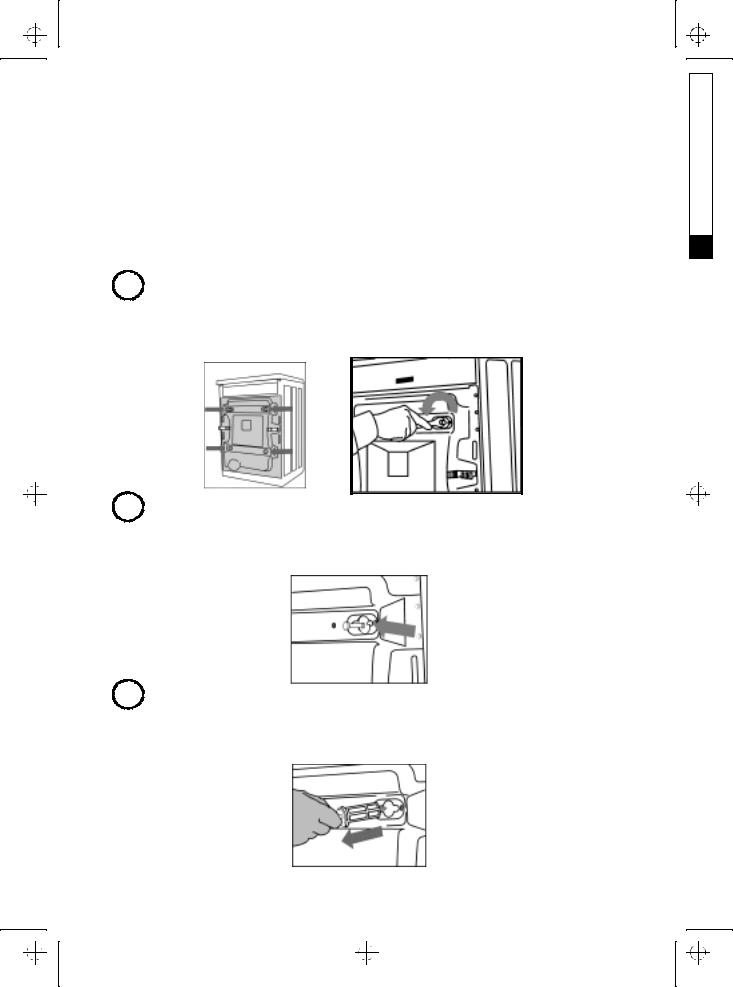
REMOVE TRANSPORT BOLTS!
¡QUITE LOS PERNOS DE TRANSPORTE!
RETIRE OS SUPORTES DE PROTECÇÃO!
RIMUOVERE LE STAFFE DI SICUREZZA PER IL TRASPORTO yƒy€‹}tŒ} Œy ‚qŠ‘oŠˆ€y ‚}ŒyƒŠ‹yt
Important: Not removed transport bolts cause damages to the appliance.
Importante: Si no se quitan los pernos de transporte, el aprato puede sufrir daños.
Importante: Se não retirar t odos os suportes de protecçã o, poderão ocorrer danos na máquina.
Importante: Eventuali staffe di sicurezza non rimosse sono causa di danni alla lavatrice. t¬±¥²¸-¯¢ Œ¥ ±´³½°¢²-¥ ±©¸¥ª³¶‡» ´³½ ¨©² Ÿ¼³½² ¥ª¥-¶©¹©¡ ±´³¶©¡ ²¥ ´¶³¯¥°Ÿ·³½² ¦°‡¦©» ·¸¬ ·½·¯©½
1  Unscrew the four screws (see arrows) with the wrench C supplied.
Desenrosque los cuatro tornillos (ver las flechas) con la herramienta C que se incluye.
Desaperte os quatro parafusos (vide setas) com a chave C fornecida.
Svitare le quattro viti (vedere le frecce) con la chiave C fornita in dotazione. p©¦-¨µ·¸© ¸-» ¸Ÿ··©¶-» ¦¡¨©» ¦°Ÿ´© ¦Ÿ°¬ ±© ¸³ ¯°©-¨¡ & ´³½ ´¥¶Ÿ¼©¸¥-
2  Move the screws to the centre of the holes.
Desplace los tornillos al centro de los agujeros.
Mova os parafusos para o centro dos orifícios.
Portare le viti al centro dei fori.
ƒŸ¶¸© ¸-» ¦¡¨©» ·¸³ ¯Ÿ²¸¶³ ¸º² ¸¶½´µ²
3  Pull out the screws together with the coloured plastic spacer.
Tire de los tornillos junto con el espaciador de plástico coloreado.
Puxe os parafusos juntamente com o espaçador de plástico colorido.
Estrarre le viti assieme al distanziatore colorato in plastica.
Œ¶¥¦ ®¸© ©²¸©°µ» ¸-» ¦¡¨©» ´¶³» ¸¥ Ÿ®º ±© ¸³ ¼¶º±¥¸-·¸¢ ´°¥·¸-¯¢ ¨-¥¼º¶-·¸-¯¢
3
Black Process Plate
10200053a.fm5 Page 4 Tuesday, October 11, 2005 10:07 AM
4 |
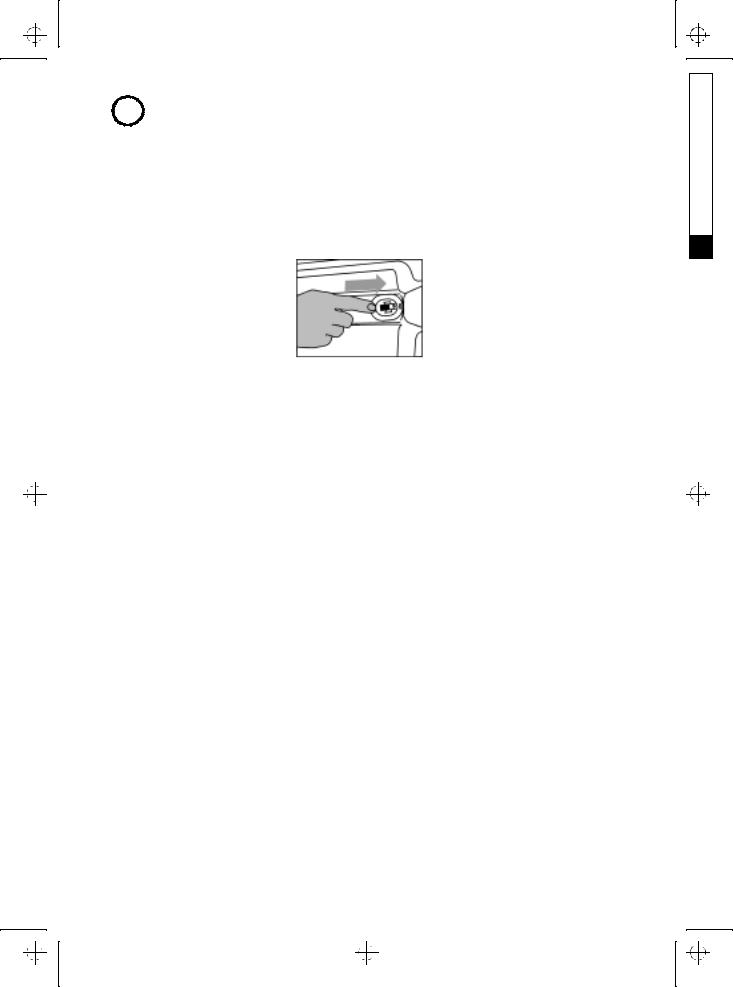
To seal the holes insert the supplied plastic caps B in the wide part of the hole and slide them |
in the direction of the arrow until they click into place.
Para sellar los agujeros introduzca las tapas de plástico suministradas B en la parte ancha del agujero y deslícelas en la dirección de la flecha hasta que hagan “clic”.
Para vedar os orifícios, introduza os tampões de plástico B na parte larga do orifício e façaos deslizar na direcção da seta até ficarem fixos.
Per chiudere i fori, inserire i tappi in plastica B forniti in dotazione nella parte larga del foro e farli scorrere in direzione della freccia finché non scattano in posizione.
l-¥ ²¥ ·ª¶¥«¡·©¸© ¸-» ¸¶¤´©» ¦‡°¸© ¸¥ ´°¥·¸-¯‡ ¯¥°¤±±¥¸¥ | ´³½ ´¥¶Ÿ¼³²¸¥- ·¸³ ´°¥¸¤ ±Ÿ¶³» ¸¬» ¸¶¤´¥» ¯¥- ±©¸¥¯-² ·¸© ¸¥ ´¶³» ¸¬² ¯¥¸©¤¹½²·¬ ¸³½ ¦Ÿ°³½» ±Ÿ¼¶- ²¥ ©ª¥¶±¢·³½² ·¸¬ ¹Ÿ·¬ ¸³½»
Important: Keep the transport bolts and the wrench for further transporting of the appliance and in this case refit the transport bolts in reverse order.
Importante: Guarde los pernos de transporte y la herramienta para futuros transportes del aparato y vuelva a colocarlos en el orden inverso para transportarlo.
Importante: Guarde os suportes de protecção e a chave de porcas para quando for necessário transportar a máquina e, neste caso, monte os suportes de protecção na ordem inversa.
Importante: Conservare le staffe di sicurezza per il trasporto e la chiave per futuri trasporti della lavatrice, in questo caso occorrerà reinserire le staffe di sicurezza in ordine inverso. t¬±¥²¸-¯¢ •¶¥¸ ·¸© ¸¥ ±´³½°¢²-¥ ±©¸¥ª³¶‡» ¯¥- ¸³ ¯°©-¨¡ ·© ´©¶¡´¸º·¬ ´³½ ¼¶©-¥·¸©¡ ²¥ ®¥²¥±©¸¥ªŸ¶©¸© ¸¬ ·½·¯©½ ¯¥- · ¥½¸ ² ¸¬² ´©¶¡´¸º·¬ ¦-¨µ·¸© ¸¥ ±´³½°¢²-¥ ±©¸¥ª³¶‡» ´¶³» ¸¬² ¥²¸¡¹©¸¬ ª³¶‡
ADJUSTMENT OF THE FEET AJUSTE DE LAS PATAS
AJUSTE DOS PÉS
REGOLAZIONE DEI PIEDINI
‹‘n‚€t• Œ†ˆ qŠm€†ˆ
The appliance must be installed on a solid and level floor surface (if necessary use a spirit level). If the appliance is to be installed on a wooden floor, distribute the weight by placing it on a 60 x 60 cm sheet of plywood at least 3 cm in thickness and secure it to the floor.
If the floor is uneven, adjust the 4 levelling feet as required; do not insert pieces of wood etc. under the feet.
El aparato sólo debe instalarse en una superficie sólida y nive lada (si es necesario, utilice un nivel de burbuja). Si el aparato se instala en un suelo de madera, colóquelo sobre un panel de madera contrachapada de 60 cm de lado que tenga un espesor de 3 cm como mínimo y fíjelo al suelo.
Si el suelo es irregular, ajuste las 4 patas de nivelación según se requie ra; no introduzca piezas de madera etc. bajo los pies.
A máquina deve ser instalada numa superfície só lida e nivelada (se necessário, utilize um nível de bolha de ar). Se a máquina for instalada num estrado de madeira, distribua o peso colocando-o numa folha de contraplacado de 60 x 60 cm e com, pelo menos, 3 cm de espessura e fixe-a ao chão.
Se o pavimento for irregular, ajuste os 4 pés de nivelamento co nforme necessário; não coloque blocos de madeira, etc. por baixo dos pés.
La lavatrice deve essere installata su un pavimento piano e stabile (se necessario, utilizzare una livella a bolla d’aria). In caso di installazione su pavimenti con travi in legno, posizionare la lavatrice su un pannello di compensato dalle dimensioni di 60 x 60 cm e dallo spessore di min. 3 cm. Fissare il pannello al pavimento.
Se il pavimento non è a livello, regolare i qu attro piedini nella misura necessaria; non inserire spessori in legno ecc. sotto i piedini.
4
Black Process Plate
 Loading...