


GB |
User and maintenance manual |
S |
Bruksoch underhållsanvisning |
N |
Bruksog vedlikeholdsanvisning |
DK
FIN
Brugerog vedligeholdelsesvejledning
Käyttöja huolto-opas

IMPORTANT SAFETY INSTRUCTIONS
YOUR SAFETY AND THAT
 OF OTHERS IS
 PARAMOUNT
This manual and the appliance itself provide important safety warnings, to be read and observed at all times.
 This is the attention symbol, pertaining to safety, which alerts users to potential risks to themselves and others.
All safety warnings are preceded by the attention symbol and the following terms:
 DANGER:
 WARNING:
indicates a hazardous situation which, if not avoided, will
 cause serious injury.
Indicates
 a hazardous situation which, if not avoided, could cause serious injury.
All safety warnings give specific details of the potential danger/warning present and indicate how to reduce risk of injury, damage and electric shock resulting from improper use of the appliance.
Carefully observe the following instructions:
•Installation and maintenance must be carried out by a qualified technician, in compliance with the manufacturer's instructions and local safety regulations. Do not repair or replace any part of the appliance unless specifically stated in the user manual.
•The appliance must be disconnected from the power supply before carrying out any installation work.
•Earthing of the appliance is compulsory. (Not possible for class II hoods identified by the symbol  on the dataplate).
•The power cable must be long enough for connecting the appliance, once fitted in its housing, to the power supply socket.
•Do not pull the power supply cable in order to unplug the appliance.
•The electrical components must not be accessible to the user after installation.
•Do not touch the appliance with any wet part of the body and do not operate it when barefoot.
•The appliance is not intended for use by persons (including children) with any physical, sensory or mental impairment, or without experience and knowledge of the appliance, unless supervised or previously instructed in its use by those responsible for their safety.
•Do not repair or replace any part of the appliance unless specifically indicated in the manual. All other maintenance services must be carried out by a specialised technician.
•Children must be supervised to ensure they do not play with the appliance.
•When drilling through the wall pay attention not to damage electric connections and/or pipes:
•Air vents must always discharge to the outside.
•The manufacturer rejects all responsibilities for any damage caused by improper use or wrong settings.
•Appropriate maintenance and cleaning ensure the good working order and the best performance of the appliance. Regularly clean all stubborn surface dirt to avoid grease build up. Remove and clean or change the filter regularly.
•Never flame cook food (flambé) under the appliance. Using free flames might cause fire.
•Failure to observe the instructions for cleaning the hood and replacing the filters may result in a fire.
•Exhaust air must not be vented through a flue used for removal of fumes produced by gas combustion appliances or other combustible materials, but must have a separate outlet. All national regulations governing extraction of fumes must be observed.
•If the hood is being used at the same time as other appliances using gas or other combustible materials, the negative pressure of the room must not exceed 4 Pa (4x 10⁻⁵ bars). For this reason ensure that the room is well ventilated.
•Do not leave frying pans unattended when frying, as the frying oil may catch fire.
•Before touching the light bulbs, ensure that they are cold.
•Do not use or leave the hood without the light bulb correctly fitted, as this may cause electric shock.
•The hood is not a worktop, therefore do not place any objects on top of it or overload it.
•During all installation and maintenance operations wear appropriate working gloves.
•This appliance is not suitable for outdoor use.
•When the hob is in use, accessible parts of the hood may become hot.
Scrapping of household appliances
•This appliance is manufactured with recyclable or reusable materials. Dispose of it in accordance with local waste disposal regulations. Before scrapping, cut off the power supply cable.
•For further information on the treatment, recovery and recycling of household electrical appliances, contact your competent local authority, the collection service for household waste or the store where you purchased the appliance.
KEEP THIS BOOKLET
 FOR
FOR
 FUTURE
 CONSULTATION.
GB1
INSTALLATION
After unpacking the appliance, check for any transport damage. In the event of problems, contact the dealer or your nearest After-sales Service. To prevent any damage, only remove the appliance from its polystyrene foam packaging at the time of installation.
PREPARING FOR
 INSTALLATION

 WARNING: this is a heavy product; the hood should only be lifted
 and installed by two or more people.
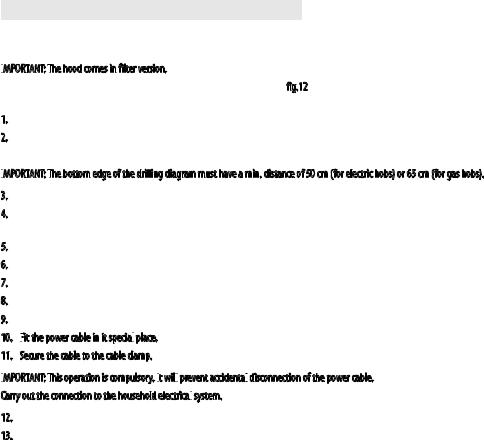
The minimum distance between the support of the cooking pans on top of the cooker and the bottom of the hood must not be less than 50 cm for electric cookers and 65 cm for gas or mixed cookers.
Before installation also check the minimum distances stated in the manual of the cooker.
If the installation instructions for the cooker specify a greater distance between cooker and hood, this distance must be observed.
E
 LECTRICAL
 CONNECTION
Make sure the power voltage specified on the appliance rating plate is the same as the mains voltage. This information may be found on the inside of the hood, under the grease filter.
Power cable replacement (type H05 VV-F 3 x 0,75 mm2) must be carried out by a qualified electrician. Contact an authorized service centre.
If the hood is fitted with an electric plug, connect the plug to a socket complying with current regulations, located in an accessible place after installation. If no plug is fitted (direct wiring to the mains), or if the socket is not located in an accessible place, install a standardised double pole power switch that will enable complete isolation from the mains in case of category III overvoltage conditions, in accordance with installation rules.
GENERAL RECOMMENDATIONS
Before use
Remove cardboard protection pieces, protective film and adhesive labels from accessories.
Check the appliance for any transport damage.
During use
To avoid any damage do not place any weights on the appliance.
Do not expose the appliance to atmospheric agents.
SAFEGUARDING THE ENVIRONMENT
Disposal
 of packing
The packing material is 100% recyclable and is marked with the recycle symbol  . The various parts of the packing must therefore be disposed of responsibly and in full compliance with local authority regulations governing waste disposal.
Scrapping the product
-This appliance is marked in compliance with European Directive 2002/96/EC, Waste Electrical and Electronic Equipment (WEEE).
-By ensuring this product is disposed of correctly, you will help prevent potential negative consequences for the environment and human health, which could otherwise be caused by inappropriate waste handling of this product.
-The symbol  on the product or on the accompanying documentation indicates that it should not be treated as domestic waste but must be taken to an appropriate collection centre for the recycling of electrical and electronic equipment.
GB2
TROUBLESHOOTING GUIDE
The appliance does not work:
•Check for the presence of mains electrical power and if the appliance is connected to the electrical supply.
•Turn off the appliance and restart it to see if the fault persists.
The hood's suction level


 is not sufficient:
•Check the suction speed and adjust as necessary:
•Check that the filters are clean:
•Check the air vents for any obstructions.
The light
light
 does not work;
•Check the light bulb and replace if necessary;
•Check that the light bulb has been correctly fitted;
AFTER-SALES SERVICE
Before calling the After-Sales Service:
1.See if you can solve the problem yourself with the help of the suggestions given in the "Troubleshooting guide".
2.Switch the appliance off and back on again it to see if the fault persists.
If
 after the above checks the fault still
 occurs, get in touch with the nearest After-Sales Service.
Always specify:
•A brief description of the fault;
•The exact type and model of the appliance;
•The service number (number after the word "Service" on the rating plate), located on the inside of the appliance. The service number is also indicated on the guarantee booklet;
•Your full address;
•Your telephone number.
If any repairs are required, please contact an authorised After-sales Service (to guarantee that original spare parts will be used and repairs carried out correctly).
CLEANING
 WARNING
-Never use steam cleaning equipment.
-Disconnect the appliance from the power supply.
IMPORTANT:
 do not use corrosive or abrasive detergents. If
 any of these products accidentally comes into contact with the appliance, clean immediately with a damp cloth.
•Clean the surfaces with a damp cloth. If it is very dirty, add a few drops of washing up detergent to the water. Finish off with a dry cloth. IMPORTANT:
 do not use abrasive sponges or metallic scrapers or scourers. Over time, these can ruin the enamel
 surface.
•Use detergents specifically designed for cleaning the appliance and follow the manufacturer instructions.
IMPORTANT:
 clean the filters at least
 monthly to remove any oil
 or grease residuals.
GB3
MAINTENANCE
 ATTENTION:
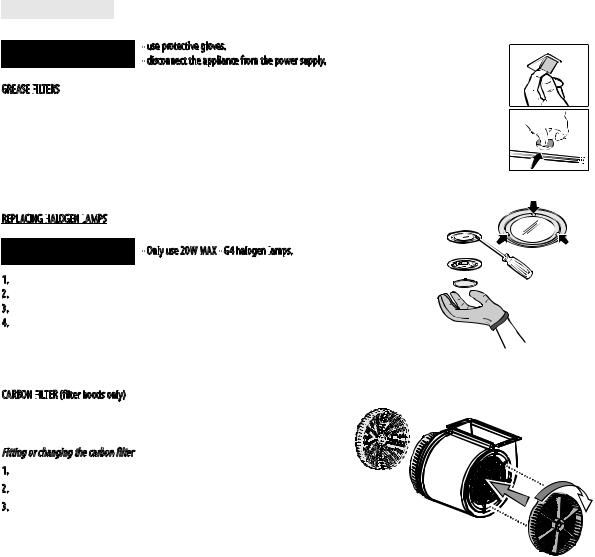
-use protective gloves.
-disconnect the appliance from the power supply.
GREASE FILTERS

The metal grease filter has an unlimited life and should be cleaned once a month by hand or in a dishwasher at low temperature and with a short cycle. Cleaning in a dishwasher may cause discoloring of the grease filter, but its filtering efficiency is unaffected.
Pull out the handle to remove the filter.
Wash the filter and leave it to dry, proceeding in reverse order to refit.
REPLACING HALOGEN
 LAMPS
LAMPS

 ATTENTION: - Only use 20W MAX - G4 halogen lamps.

1. Disconnect the hood from the household power supply.
2. Use a small screwdriver to gently prise (at the three points indicated) the lamp cover off. 3. Remove the burnt-out lamp and fit a new one.
4. Refit (snap-on) the lamp cover.
CARBON FILTER
 (filter hoods only)
It retains the unpleasant odors produced during cooking.
Change the carbon filter every 4 months
Fitting or changing the carbon filter
1. Disconnect the hood from the power supply.
2. Remove the grease filters.
3. Fit one carbon filter each side, covering both protection grilles of the motor impeller. Turn the filters clockwise to secure them to the middle pins.
Proceed in reverse order to remove.
Refit the grease filters.
GB4
MATERIAL SUPPLIED
Remove all the components from the packets. Check that all the components are included.
•Hood assembled with motor, lamps and grease filters fitted (1 or 2 grease filters, depending on the model).
•Instructions for assembly and use
•1 Assembly template
•1 - adapter Torx T10
•1 - adapter Torx T20
•1 deflector
•3 wall plugs Ø 8mm
•3 screws Ø 5x45
•3 screws Ø 3.5x9.5
•1 washer Ø 5.3x2
•1 cable clamp
•Power cable
•2 carbon filters
INSTALLATION - PRELIMINARY ASSEMBLY INSTRUCTIONS
The hood is designed for installation in "Filter version".
Filter
 Version
Air is filtered through the carbon filter/s and recycled into the surrounding environment.
IMPORTANT:
 Check that air recirculation is ensured.
If
 the hood does not have the carbon filter/s, order one/them and fit before use.
Install the hood away from very dirty areas, windows, doors and heat sources.
The hood comes with all the materials necessary for installation on the majority walls/ceilings. However, a qualified technician must ensure that the materials are suitable according to the type of wall/ceiling.
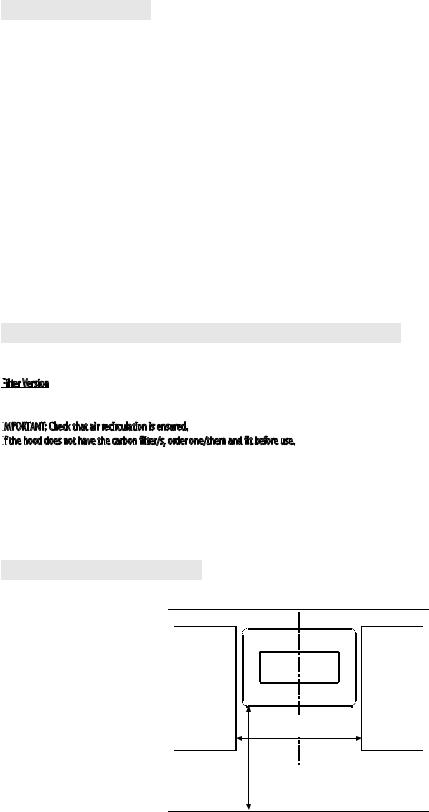
INSTALLATION DIMENSIONS
Adjacent wall units |
630 |
mm min (55cm wide model) |
Adjacent wall units |
880 |
mm min (80cm wide model) |
centre line
65 cm (gas or combi cookers)
50 cm (electric cookers)
hob surface
GB5
INSTALLATION - ASSEMBLY INSTRUCTIONS
The instructions below, to be carried out in the order in which they are numbered, refer to the figures (with the same step numbers) given on the last pages of this manual.
IMPORTANT:
 The
The hood comes in filter version.
The carbon filter is supplied and must be fitted after installation (as shown in fig.12).
1.Mark a vertical centre line on the wall.
2.Place the drilling diagram against the wall (fix it with adhesive tape): the vertical centre line printed on the drilling diagram must match the centre line drawn on the wall, and the bottom edge of the drilling diagram must match the bottom edge of the hood.
IMPORTANT:
 The
The bottom edge of the drilling diagram must have a min. distance of 50 cm (for electric hobs) or 65 cm (for gas hobs).
3.Drill the 3 holes as shown on the drawing.
4.Remove the drilling diagram from the wall, insert the 2 plugs and the 2 screws in the wall, making sure they protrude about 5 mm; insert the third plug in the bottom hole.
5.Fit the plastic grille on the hood air outlet hole
6.Hook the hood on the fixing screws through the special rear perforation.
7.Remove the grease filters.
8.Insert the washer and safety screw in the bottom hole.
9.Secure the hood to the wall by tightening down the fixing screws.
10.Fit
 the power cable in it special
 place.
11.Secure the cable to the cable clamp.
IMPORTANT:
 This
This operation is compulsory. It
 will
will
 prevent accidental
 disconnection of the power cable.
Carry out the connection to the household electrical
 system.
12.Fit the carbon filters over the motor covering. Turn the filters to secure them to the middle pins.
13.Refit the grease filters.
Check hood operation, referring to the section giving a description of the hood and its use.
GB6
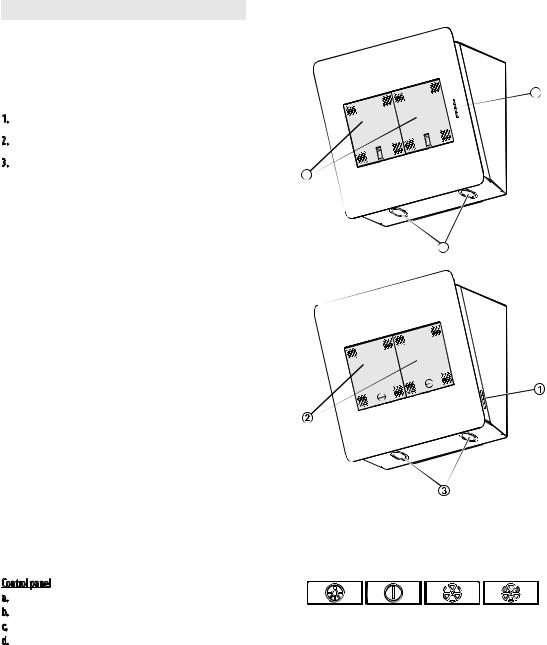
DESCRIPTION AND USE OF HOOD
 1
1
1. Control panel.
2. Grease filters.
3. Halogen lamps.
2
3
Control panel |
|
|
|
|
|
a. |
Lights ON/OFF button |
a |
b |
c |
d |
b. |
Motor ON/OFF and minimum speed (extraction power) selection button |
||||
c. |
Medium speed (extraction power) selection button |
||||
d. |
Maximum speed (extraction power) selection button |
|
|
|
|
GB7
VIKTIGA SÄKERHETSANVISNINGAR
DET ÄR MYCKET
 VIKTIGT
 ATT
ATT DU VÄRNAR OM DIN EGEN
 OCH
OCH
 ANDRAS SÄKERHET.
Detta häfte innehåller en mängd viktiga säkerhetsanvisningar som även återfinns på apparaten. Läs och iaktta alltid dessa.
 Denna symbol indikerar en varning. Symbolen vill göra dig uppmärksam på potentiella risker för dig som användare och andra personer. Samtliga säkerhetsanvisningar föregås av denna symbol samt ett av följande ord:
 FARA:
FARA:
 VARNING:
Överhängande risk för allvarliga personskador om anvisningarna inte iakttas.
Risk för allvarliga personskador om anvisningarna inte iakttas.
Samtliga säkerhetsanvisningar talar om vad de potentiella riskerna består i och hur du gör för att reducera risken för skador och elstötar till följd av ett felaktigt bruk av apparaten.
Iaktta noggrant följande anvisningar:
•Installation och underhåll skall utföras av en behörig fackman i enlighet med tillverkarens anvisningar och lokala säkerhetsbestämmelser. Reparera inte eller byt inte ut några delar på apparaten om det inte rekommenderas i bruksanvisningen.
•Koppla apparaten från elnätet innan installationen påbörjas.
•Enligt lag är det obligatoriskt att ansluta apparaten till jord. (Det är inte möjligt för fläktkåpor ur klass II som är identifierade med symbolen  på egenskapsetiketten).
•Elsladden måste vara såpass lång att apparaten kan anslutas till eluttaget.
•Dra inte i apparatens elsladd för att lossa den från eluttaget.
•De elektriska delarna skall vara oåtkomliga när installationen är klar.
•Vidrör inte apparaten med fuktiga händer och använd den inte när du är barfota.
•Apparaten är inte avsedd att användas av barn eller funktionshindrade personer som saknar erfarenhet eller kunskap om hur den används, såvida de inte övervakas av någon som kan ansvara för deras säkerhet eller som har lärt dem hur apparaten används.
•Reparera inte eller byt ut delar på apparaten om detta inte direkt rekommenderas i instruktionsboken. För andra underhållsarbeten krävs specialutbildad personal.
•Barn måste hållas under uppsikt så att de inte leker med apparaten.
•Se till att du inte skadar eloch/eller röranslutningarna när du borrar i väggen.
•Ventilationskanalerna skall alltid leda ut luften utomhus.
•Tillverkaren frånsäger sig allt ansvar för felaktig användning eller felaktig inställning av vred och knappar.
•Regelbundet underhåll och rengöring av apparaten borgar för en korrekt funktion och optimal prestanda. Ta regelbundet bort alla smutsbeläggningar från ytorna för att förhindra att det ansamlas fett. Ta bort och diska eller byt ut filtret regelbundet.
•Flambera inte under apparaten. Lågorna kan förorsaka brand.
•Underlåtenhet att följa rengöringsanvisningarna för fläktkåpan och byte och rengöring av filtren medför risk för brand.
•Luftutsläppet får inte tömmas i ett rör som används för att evakuera rök som bildas av apparater vid förbränning gas eller andra bränslen, men måste ha ett oberoende utsläpp. Samtliga nationella bestämmelser gällande utsläpp av luft måste följas.
•Om köksfläkten används i närheten av gasdrivna eller andra bränsledrivna apparater får det negativa trycket i rummet inte vara större än 4 Pa (4 x 10⁻⁵ bar). Detta är anledningen till varför du måste försäkra dig om att rummet har god ventilation.
•Lämna inte stekpannor obevakade när du friterar eftersom frityroljan kan fatta eld.
•Försäkra dig om att glödlamporna har svalnat innan du tar på dem.
•Använd inte eller lämna inte köksfläkten utan glödlampor (som skall vara korrekt isatta). Det kan medföra risk för elstötar.
•Köksfläkten är inte avsedd att användas som avställningsyta. Placera därför inga föremål på köksfläkten så att den blir överbelastad.
•Använd skyddshandskar i samband med alla installationsoch underhållsmoment.
•Apparaten är inte avsedd för utomhusbruk.
•När spishällen är i funktion kan fläktkåpans åtkomliga delar bli mycket heta.
Kassering av hushållsapparater
•Denna apparat är tillverkad av material som kan återanvändas eller återvinnas. Skrota din gamla hushållsapparat enligt bestämmelserna om avfallshantering som gäller i ditt land. Innan du skrotar den måste du skära av elsladden så att apparaten blir obrukbar.
•Kontakta berörda lokala myndigheter, renhållningsverket eller din återförsäljare för ytterligare information om hantering, återvinning och återanvändning av hushållsapparater.
SPARA DETTA HÄFTE
 SOM REFERENSMATERIAL.
S8
INSTALLATION
Ta av emballaget och kontrollera att apparaten inte är skadad. Kontakta återförsäljaren eller Service vid problem. Ta loss apparaten från frigolitbasen först när den skall installeras så att risk för skador minimeras.
F
 ÖRBEREDELSE FÖR
 INSTALLATION

 VARNING: Denna apparat är mycket tung och skall
 därför flyttas och installeras av minst två personer.
Avståndet mellan spishällens översta del och köksfläktens nedersta del skall vara minst 50 cm vid elektriska spisar och 65 cm vid gaseller kombispisar. Kontrollera avstånden i spishällens bruksanvisning före installationen.
Om monteringsanvisningarna för matlagningsanordningen anger ett större avstånd, måste hänsyn tas till detta.
ANSLUTNING TILL ELNÄTET


Kontrollera att märkspänningen enligt typskylten motsvarar nätspänningen på installationsplatsen. Typskylten sitter inuti köksfläkten. Den syns när du tar bort fettfiltret.
Eventuella byten av elsladd (typ H05 VV-F) får endast ombesörjas av en behörig elektriker. Vänd dig till en auktoriserad serviceverkstad.
Om apparaten är utrustad med stickkontakt skall apparaten anslutas till ett lättåtkomligt eluttag som uppfyller kraven i gällande lagstiftning. Om stickkontakt saknas (direktanslutning till elnätet) eller om eluttaget inte är lättåtkomligt skall en tvåpolig brytare installeras som uppfyller kraven i gällande lagstiftning. Denna skall säkerställa att nätspänningen frånkopplas helt i händelse av ett spänningssprång i elledningarna av kategori 3 i överensstämmelse med gällande installationsföreskrifter.
ALLMÄNNA RÅD
Innan
 apparaten tas i bruk
Ta bort alla skydd i kartong, plastfilm och klisteretiketter från tillbehören.
Kontrollera att apparaten inte har skadats under transporten.
Vid användning
Placera inga tunga föremål på apparaten eftersom detta kan skada den.
Utsätt inte apparaten för väder och vind.
MILJÖRÅD
Kassering av förpackningsmaterialet
Förpackningsmaterialet kan återvinnas till 100 %, vilket framgår av återvinningssymbolen  . De olika delarna av emballaget skall kasseras enligt bestämmelserna från lokala myndigheter och får inte kastas i naturen.
Kassering av apparaten
-Denna produkt är märkt enligt direktiv 2002/96/EG beträffande kassering av elektriskt och elektroniskt avfall.
-Genom att säkerställa en korrekt kassering av denna produkt bidrar du till att förhindra potentiella, negativa konsekvenser för vår miljö och vår hälsa, vilket däremot kan bli följden om produkten inte hanteras på rätt sätt.
-Symbolen  på apparaten eller den medföljande dokumentationen anger att denna apparat inte får hanteras som vanligt hushållsavfall. Apparaten skall istället lämnas in till en lämplig sopcentral för återvinning av avfall från elektrisk och elektronisk utrustning.
S9
FELSÖKNING
Apparaten fungerar inte:
•Kontrollera att det finns ström och att apparaten är ansluten till elnätet.
•Stäng av och slå på apparaten igen för att undersöka om problemet har löst sig.
Köksfläktens utsugskapacitet är otillräcklig:
•Kontrollera att du har valt önskad fläkthastighet.
•Kontrollera att filtren är rena.
•Kontrollera att luftöppningarna inte är igensatta.
Belysningen fungerar inte:
•Kontrollera om glödlampan behöver bytas ut.
•Kontrollera om glödlampan är korrekt isatt.
SERVICE
Innan
 du kontaktar Service:
1.Undersök om det inte går att lösa problemet på egen hand enligt anvisningarna i avsnittet Felsökning.
2.Stäng av och slå på apparaten igen för att undersöka om problemet har löst sig.
Om problemet kvarstår efter dessa kontroller bör du kontakta närmaste Service.
Lämna alltid följande uppgifter:
•en kort beskrivning av problemet
•exakt apparattyp och -modell
•servicenumret (detta nummer finns efter ordet SERVICE på typskylten) inuti apparaten. Servicenumret finns även i garantihäftet.
•fullständig adress
•telefonnummer.
Om det blir nödvändigt att göra en reparation, vänd dig till en auktoriserad serviceverkstad (detta garanterar att originalreservdelar används och att reparationen görs på korrekt sätt).
RENGÖRING
 VARNING!
-Använd inte ångtvättar.
-Koppla apparaten från elnätet.
VIKTIGT! Använd inte frätande eller slipande rengöringsmedel. Om någon av dessa produkter oavsiktligt skulle komma i kontakt med apparaten skall
 apparaten rengöras omedelbart med en fuktig trasa.
•Rengör ytorna med en fuktig trasa. Tillsätt några droppar diskmedel vid mycket envis smuts. Torka rent med en torr trasa. VIKTIGT! Använd inte slipande svampar, stålull
 eller metallskrapor. De kan med tiden skada de lackerade
 ytorna.
•Använd specifika rengöringsmedel för apparaten och följ tillverkarens anvisningar.
VIKTIGT! Rengör filtren minst en gång i månaden för att ta bort olje- och fettrester.
S10
UNDERHÅLL
 OBSERVERA:
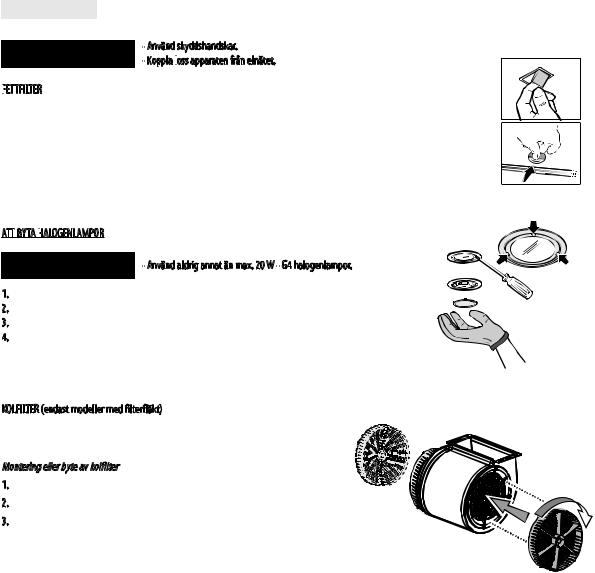
-Använd skyddshandskar.
-Koppla loss
 apparaten från elnätet.
FETTFILTER

Fettfiltret i metall har en obegränsad hållbarhet och bör rengöras en gång i månaden. Filtret kan rengöras för hand eller i diskmaskin med ett kort program och låg temperatur. Fettfiltret kan missfärgas när det maskindiskas, men filtreringseffekten påverkas inte på något sätt.
Dra i handtaget för att ta ut filtret.
Diska filtret och låt det torka. Följ sedan anvisningarna i omvänd ordning och gör på motsatt sätt för att sätta tillbaka filtret.
ATT BYTA HALOGENLAMPOR

 OBSERVERA: - Använd aldrig annat än max. 20 W - G4 halogenlampor.
1. Koppla loss fläkten från elnätet.
2. Bänd försiktigt i de tre markerade punkterna med en liten, platt skruvmejsel och ta ut lampskyddet. 3. Byt den skadade glödlampan genom att dra ut den ur hållaren och sätt i en ny.
4. Sätt tillbaka lampskyddet (det skall klicka på plats).
KOLFILTER (endast modeller med filterfläkt)
Absorberar obehaglig lukt från matlagningen.
Kolfiltret måste bytas var 4:e månad
Montering eller byte av kolfilter
1. Koppla bort fläkten från elnätet.
2. Ta ut fettfiltren.
3. Sätt ett kolfilter på varje sida, täck över bägge skyddsgallren på motorns skovelblad. Vrid filtren medsols för att fästa dem vid mittenstiften.
Proceed in reverse order to remove.
Refit the grease filters.
S11
MEDFÖLJANDE TILLBEHÖR
Ta ut alla delar ur paketen. Kontrollera att alla delar finns med.
•Monterad fläktkåpa med motor, lampor och fettfilter installerade (1 eller 2 fettfilter, beroende på modell).
•Monteringsoch användaranvisningar
•1 Monteringsschablon
•1 - adapter Torx T10
•1 - adapter Torx T20
•1 matosskärm
•3 väggpluggar Ø 8mm
•3 skruvar Ø 5x45
•3 skruvar Ø 3,5x9,5
•1 bricka Ø 5,3x2
•1 kabelklämma
•Nätkabel
•2 kolfilter
INSTALLATION - FÖRSTA MONTERINGSANVISNINGAR
Fläktkåpan är avsedd att endast installeras som "Filterfläkt".
Filterfläkt

Luften filtreras när den passerar genom ett eller flera kolfilter och leds tillbaka till rummet.
VIKTIGT: Kontrollera att luftcirkulationen
 inte hindras.
Om fläktkåpan inte är försedd med kolfilter måste ett sådant/sådana beställas och monteras innan fläktkåpan tas i bruk.
Denna fläktkåpa ska monteras långt från mycket hårt smutsade platser, fönster, dörrar och värmekällor.
Fläktkåpan levereras med alla tillbehör som behövs för att installera den på de flesta väggar/tak. En fackman skall däremot kontrollera att materialen är lämpade för den aktuella väggen/taket.
MONTERINGSDIMENSIONER
Sidoväggskåp |
630 |
mm min (modell med 55cm |
bredd) |
Sidoväggskåp |
880 |
mm min (modell med 80cm |
bredd) |
centrumlinje
65 cm (gasspis eller kombinerad gasoch elspis)
50 cm (elspis)
spishällens yta
S12
 Loading...