

Whirlpool ADG 7642 installation and maintenance instructions

Before using the dishwasher, read the installation and maintenance instructions carefully!
GB
ADG 7642
1. OVERVIEW
Programme selection button
Press the button (repeatedly) until the indicator lamp of the
desired programme lights up (see table 1.1).
At the end of the wash cycle, the last programme selected is
memorized.
Half Load/Multizone
upper or lower rack only
Load the
Factory setting = Wash upper and lower rack (both indicator
lamps light up)
Press once = Wash
Press twice = Wash
At the end of the programme, the most recently selected
setting remains memorised.
If the upper rack is not being washed, the “Wash lower rack”
indicator lamp should be lit.
Power Clean
This function is activated by pressing (short) the button (the
indicator lamp lights up).
High pressure with an additional jet for better washing results
and greater bottom rack load flexibility.
At the end of the programme, the most recently selected
setting remains memorised.
Detergent setting upon initial use and when using a different
type of detergent
Indicator lamp off = Powder/gel detergent (factory setting).
If using combined detergents, press and hold the button for 3
seconds; the indicator lamp lights up = rinse aid and salt
indicators are deactivated.
From water hardness level 5, the salt indicator remains active.
At the end of the programme, the most recently selected
setting remains memorised.
lower rack
upper rack
.
(the indicator lamp lights up)
(the indicator lamp lights up)
Fault indication and wash time display
In normal operation it indicates the remaining time (h:min),
whereas with “Delayed start” selected it indicates the time
remaining until programme start (e. g. h 01). If using a sensor
programme, a dotted line indicates that the calibration process
is underway (lasting up to 20 minutes).
In the presence of a fault indication “F.. / E..”, refer to Section 5
“What to do if...”.
Delayed Start button
Push the button (repeatedly) to delay the start of the programme.
Adjustable from 1 to 24 hours. With each successive touch of the
button, the delayed start indicator increases by 1 hour, and after
“h 24” returns to “h 00”. Then press the START button. The wash
programme will start after the set time.
Start/Resume button
The indicator lamp lights up during operation, flashes when the
programme is interrupted before completion and switches off at
the end of the programme.
Cancel/Off button
Press the button to switch the dishwasher off or to interrupt the
selected programme.
If the Cancel/Off indicator lamp flashes repeatedly, this indicates
a fault: see chapter 5 “What to do if...”.
Salt level indicator and rinse aid level indicator
These light up at the end of the programme if salt or rinse aid
needs topping up.
Only add just before starting a wash cycle.
Table 1.1.
Programme Table
P
1
2
3
4
5
6
1) Programme data obtained in conformity with European standard EN 50242. The data may vary, for example, according to different loads, extra
functions, different settings, water supply temperatures, water hardness and power supply voltage.
2) Programme for energy data label in conformity with EN 50242. - Information for Test Laboratories:
loading comparison test and other tests, contact the following address: “nk_customer@whirlpool.com”.
Programmes
Sensor 40-70°C
Pre-Rinse cold
Quickwash 45°C
2)
Eco
Rapid daily 60°C
Intensive 70°C
50°C
Selectable
options
Description of programme
Normally or heavily soiled crockery,
including pots and pans.
Crockery to be washed later. — — 4.0 0.03
Lightly soiled crockery, with no dried-on
food.
Normally soiled crockery. Energy-saving
programme.
Normally soiled crockery. X — 10.0 1.30 80 ±
Recommended programme for heavily
soiled crockery, especially suitable for
pots and pans.
Detergent
compartment
Consumption
large small Litres kWh Minutes
X X 7-14 0.99-1.80 70-185 ±
X — 11.0 0.80 30 ±
X X 11.0 0.98 170 ±
X X 14.0 1.55 155 ±
for detailed information on the EN/Standard
1)
14 ±
1)
1)
1)
1)
1)
1)
Whirlpool is a registered trademark of Whirlpool USA
5019 396 01198
1
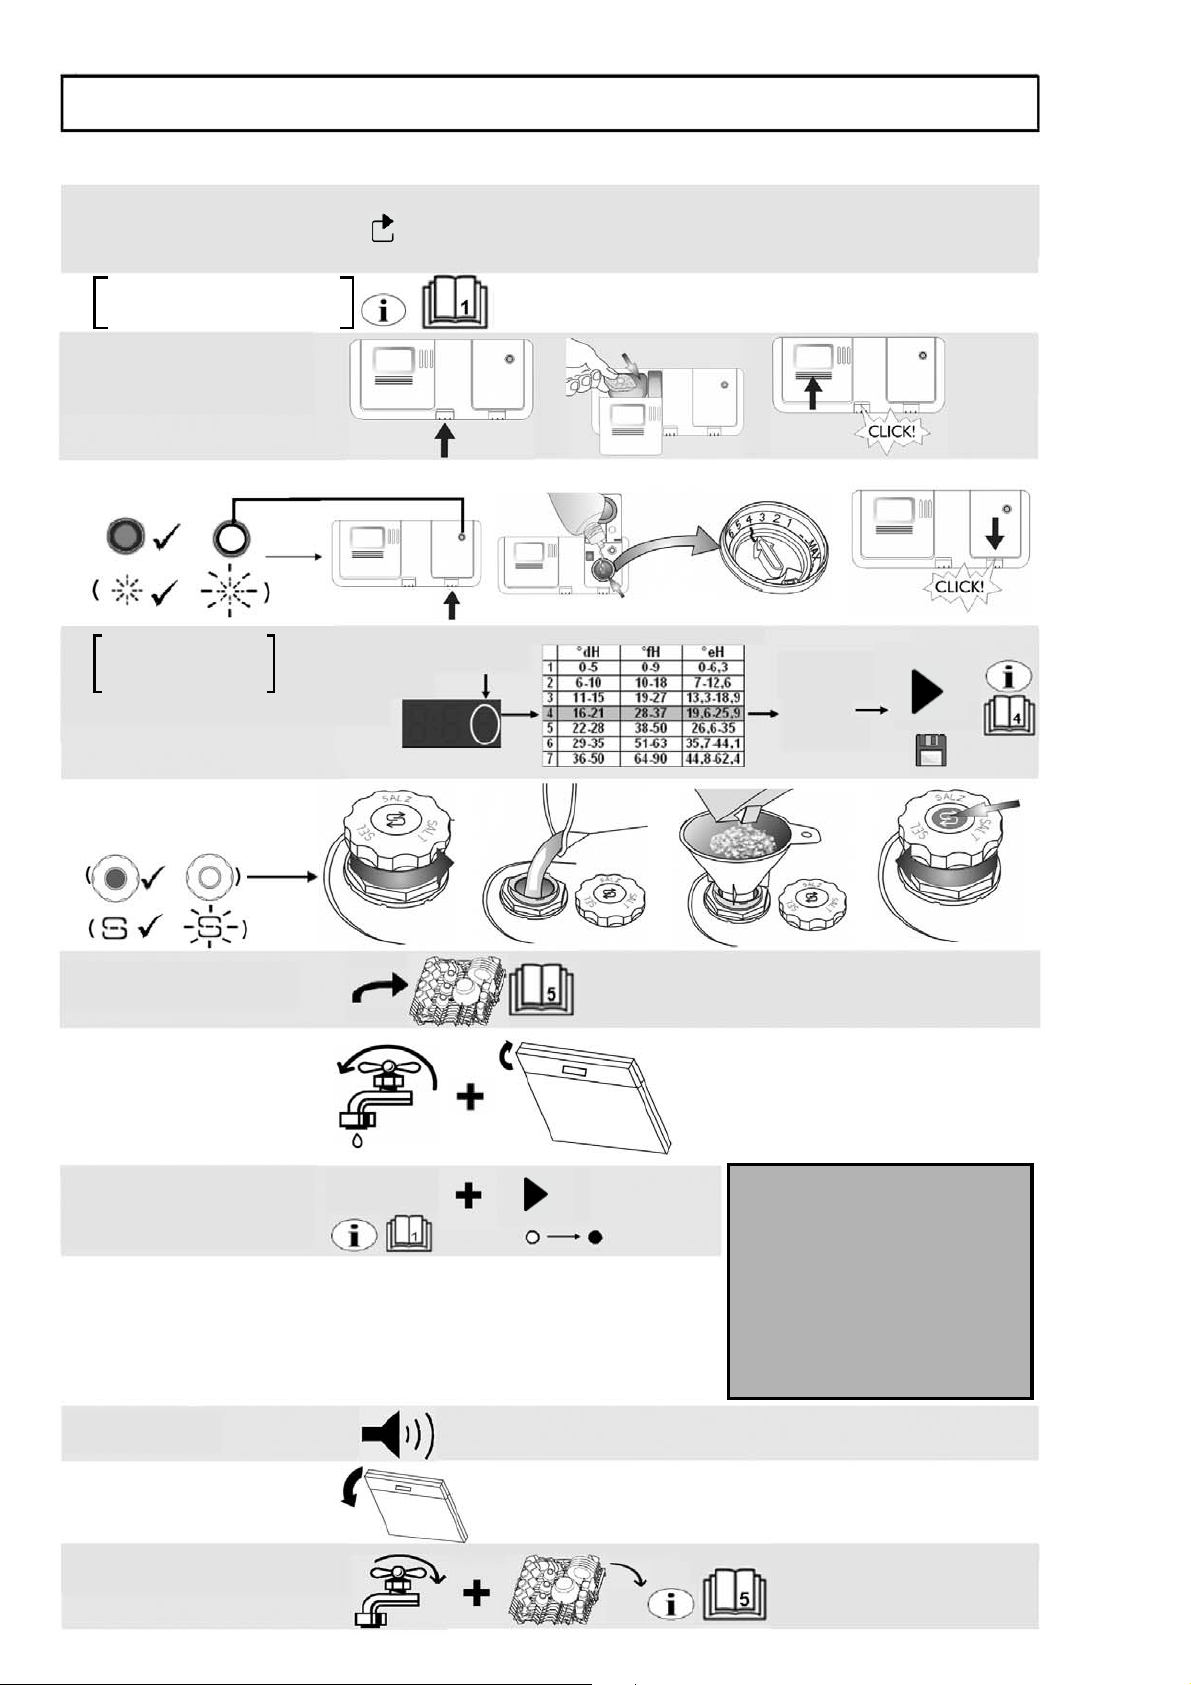
2. QUICK REFERENCE GUIDE
Detailed instructions are given on the following pages; also see section “5. What to do if...”.
1. Switch the
appliance on
2. Select the right type
of detergent
3. Fill the detergent
dispenser
4. Check the rinse aid level
Press and hold the programme
5. Set the water
hardness level
selection button + Start/Resume
button for at least three seconds.
The dishwasher switches on automatically when any button is pressed except for the
button. If no button is pressed within 30 seconds, the appliance switches to
Energy Saving mod
e.
Depending on the dishwasher model
Press the
programme
selection
button
from 1
to 7 times.
Press the
Start/Resume
button
6. Check the salt level
7. Load the racks
8. Turn on the water
tap, close the door
9. Select a programme,
and start
Wash cycle
Programme
selection
button
Start/
Resume
Fill crockery: beware of hot steam! The
start indicator blinks, close the door, press
the Start button again, the programme
resumes from where it had stopped (as
happens after a power shortage as well).
Change the programme
in progress:
- Press the “Cancel/Off” button.
- (Water drains for up to 60
seconds).
- Select a new programme.
- Press the START button.
10.End of programme
11.Open the door
12.Turn off the water tap,
unload the racks
2
3. HOW TO USE THE APPLIANCE
HOW TO FILL THE DETERGENT DISPENSER
Only fill the detergent dispenser prior to starting a wash programme.
specially recommended for dishwashers, observing the manufacturer’s recommended dosage.
Observe the manufacturer’s safety warnings!
Press the left button (button 1) on the dispenser to open the detergent dispenser compartments.
a. Powder/gel/tabs
Fill the detergent dispenser compartments in accordance with the wash programme selected (table 1.1).
Programmes without pre-wash:
Pour the entire recommended dosage into compartment A.
Programmes with pre-wash:
Pour 2/3 of the recommended dosage into the large compartment
and 1/3 into the small compartment B.
A
Dishwasher tabs should be placed, as per the manufacturer’s
recommendations, in compartment A.
If the “Half load” option is selected, detergent dosage should be
reduced by approximately 1/3.
b. Combined action detergents (2 in 1/3 in 1/... etc.)
Dishwasher tabs should be placed, as per the manufacturer’s
recommendations, in compartment A.
Shut and firmly press the detergent compartment lid shut after filling.
Detergents with rinse aid incorporated may be effective only with longer programmes. In the
case of shorter programmes, detergent residue may be a problem (if necessary, use powder
detergent). Detergents with rinse aid incorporated tend to form excess suds.
Large
compartment
A
use detergents
Only
Button
1
compartment
Small
B
The guarantee is not applicable if faults are caused by the use of these products.
HOW TO CHECK/FILL/ADJUST RINSE AID
Not necessary when using a combined action detergent.
a. How to check the rinse aid level
Check the visual indicator C on the dispenser: dark = sufficient rinse aid, clear = add rinse aid.
In the case of appliances with an electric indicator on the
control panel, the rinse aid indicator lights up at the end
of the wash cycle when rinse aid needs to be added.
b. How to fill the rinse aid dispenser
Press the right button on the dispenser (button 2 ) to open
the rinse aid compartment.
Fill the dispenser with rinse aid up to the “max” line
(approx. 150 ml).
Shut the lid again.
Only use rinse aids recommended for use in domestic dishwashers.
If rinse aid is accidentally spilt,
which could cause appliance malfunctioning.
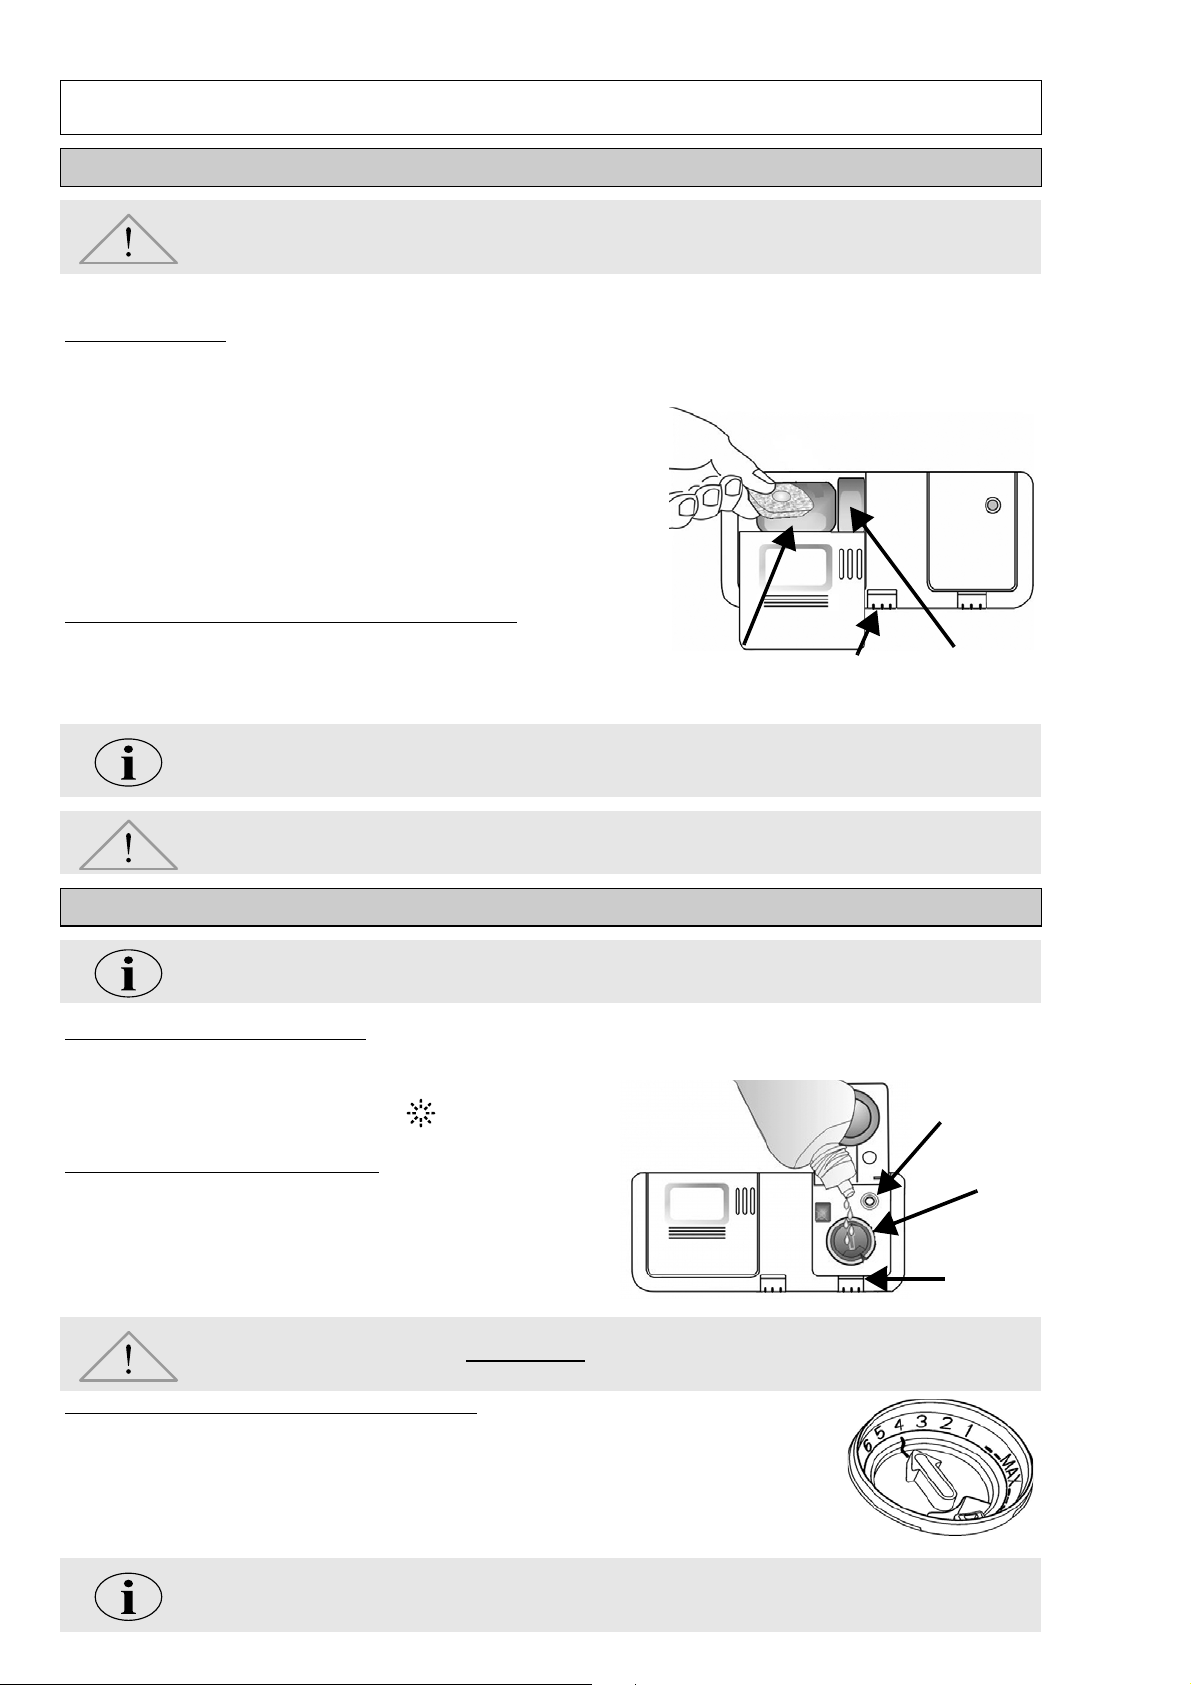
c. How to adjust the rinse aid dosage regulator:
The rinse aid dosage can be adjusted to the detergent used. The lower the setting, the less
rinse aid is dispensed (factory setting: position 4).
Press the button 2 to open the cover.
Using a coin or similar object, turn the arrow to the desired setting.
After adjusting the rinse aid setting, shut the cover again.
immediately
remove it to avoid the formation of excessive suds
Indicator
max
Button
C
2
If the dishes often have whitish streaks: reduce the dosage by turning the dial to a lower setting
(1-3). Dishes did not dry: increase the dosage by turning the dial to a higher setting (5-6). Plastic
dishes have more difficulty drying and a higher rinse aid setting will not improve the situation.
3
 Loading...