

Page 1
Welch Allyn RetinaVue™ 100
Imager Pro
Directions for use
Software version 6.XX
Page 2
© 2018 Welch Allyn. All rights are reserved. To support the intended use of the product described in this publication,
the purchaser of the product is permitted to copy this publication, for internal distribution only, from the media
provided by Welch Allyn. No other use, reproduction, or distribution of this publication, or any part of it, is permitted
without written permission from Welch Allyn. Welch Allyn assumes no responsibility for any injury to anyone, or for
any illegal or improper use of the product, that may result from failure to use this product in accordance with the
instructions, cautions, warnings, or statement of intended use published in this manual.
Software in this product is Copyright 2018 Welch Allyn or its vendors. All rights are reserved. The software is
protected by United States of America copyright laws and international treaty provisions applicable worldwide. Under
such laws, the licensee is entitled to use the copy of the software incorporated with this instrument as intended in
the operation of the product in which it is embedded. The software may not be copied, decompiled, reverseengineered, disassembled, or otherwise reduced to human-perceivable form. This is not a sale of the software or
any copy of the software; all right, title, and ownership of the software remain with Welch Allyn or its vendors.
For information about any Welch Allyn product, contact Welch Allyn Technical Support:
support.
727803, (printed copy)
DIR 80022009 Ver. B
Revision date: 2018-07
Distributed by Welch Allyn, Inc.
Medimaging Integrated Solution Inc. (MiiS)
1F, No. 7, R&D Rd II, Hsinchu Science Park,
Hsinchu, TAIWAN 30076, R.O.C.
Made in Taiwan
This manual applies to the 901103 Fundus Camera
Regulatory Affairs Representative
MedNet GmbH
Borkstrasse 10
48163 Muenster
Germany
http://www.welchallyn.com/
Page 3

Contents
Symbols ................................................................................................... 1
Introduction ............................................................................................. 5
Using the RetinaVue 100 Imager Pro ................................................... 11
iii
Intended use ........................................................................................................ 5
About warnings and cautions ............................................................................... 5
General warnings, cautions, and notes ................................................................ 6
Controls and connectors ...................................................................................... 8
Unpack the system ............................................................................................ 11
Docking station .................................................................................................. 17
First time set up of the RetinaVue 100 Imager Pro .......................................... 18
RetinaVue 100 Imager Pro Home screen .......................................................... 20
Create a new patient on the RetinaVue 100 Imager Pro camera ....................... 22
About the Auto and Manual Exam modes ......................................................... 25
Adaptive software in the Auto exam mode for software 6.10.02 and higher .... 27
Perform an eye exam using the Auto exam mode ............................................ 28
Perform a manual image capture while in Auto exam mode ............................. 34
Skip an image capture while in Auto exam mode .............................................. 35
Perform a manual image capture while in Manual exam mode ......................... 36
Review patient exams on the RetinaVue 100 Imager Pro ................................. 37
Transfer patient exams from the RetinaVue 100 Imager Pro to a computer ..... 39
Use the RetinaVue 100 Imager Pro SD Card to transfer patient exams to a
computer ............................................................................................................ 40
Troubleshooting .................................................................................... 41
Maintenance .......................................................................................... 47
Clean and disinfect ............................................................................................. 47
RetinaVue 100 Imager Pro Specifications ........................................... 49
Enable the RetinaVue Network ........................................................... 51
To change the camera configuration from the RV100 Pro to the RV100 (USB or
Wireless): .......................................................................................................... 51
To change the camera configuration from the RV100 (USB or Wireless) to the
RV100 Pro: ........................................................................................................ 52
Viewing or changing the RetinaVue 100 Imager Pro settings ........... 53
Power down the RetinaVue 100 Imager ............................................................ 54
Sleep mode ........................................................................................................ 55
Set the date and time ........................................................................................ 57
Page 4

iv Contents Welch Allyn RetinaVue™ 100 Imager Pro
Set the Device Access Code ............................................................................ 58
General compliance and standards ..................................................... 63
EMC compliance ................................................................................................ 63
Emissions and immunity information ................................................................. 64
Navigation controls ............................................................................... 67
Navigation controls in the Training mode ........................................................... 67
Navigation controls in the Exam mode .............................................................. 68
Navigation controls in the Settings mode .......................................................... 69
Navigation controls in the Review mode ........................................................... 69
Image Pre-acquisition controls (Auto mode) ..................................................... 71
Controls (Post-acquisition) ................................................................................ 71
Exam summary controls (Post-acquisition and Review modes) ....................... 73
Update the RetinaVue 100 Imager Pro software to version 6.XX and
above ...................................................................................................... 75
RetinaVue 100 and 100 Imager Pro Accessories ............................... 77
Page 5
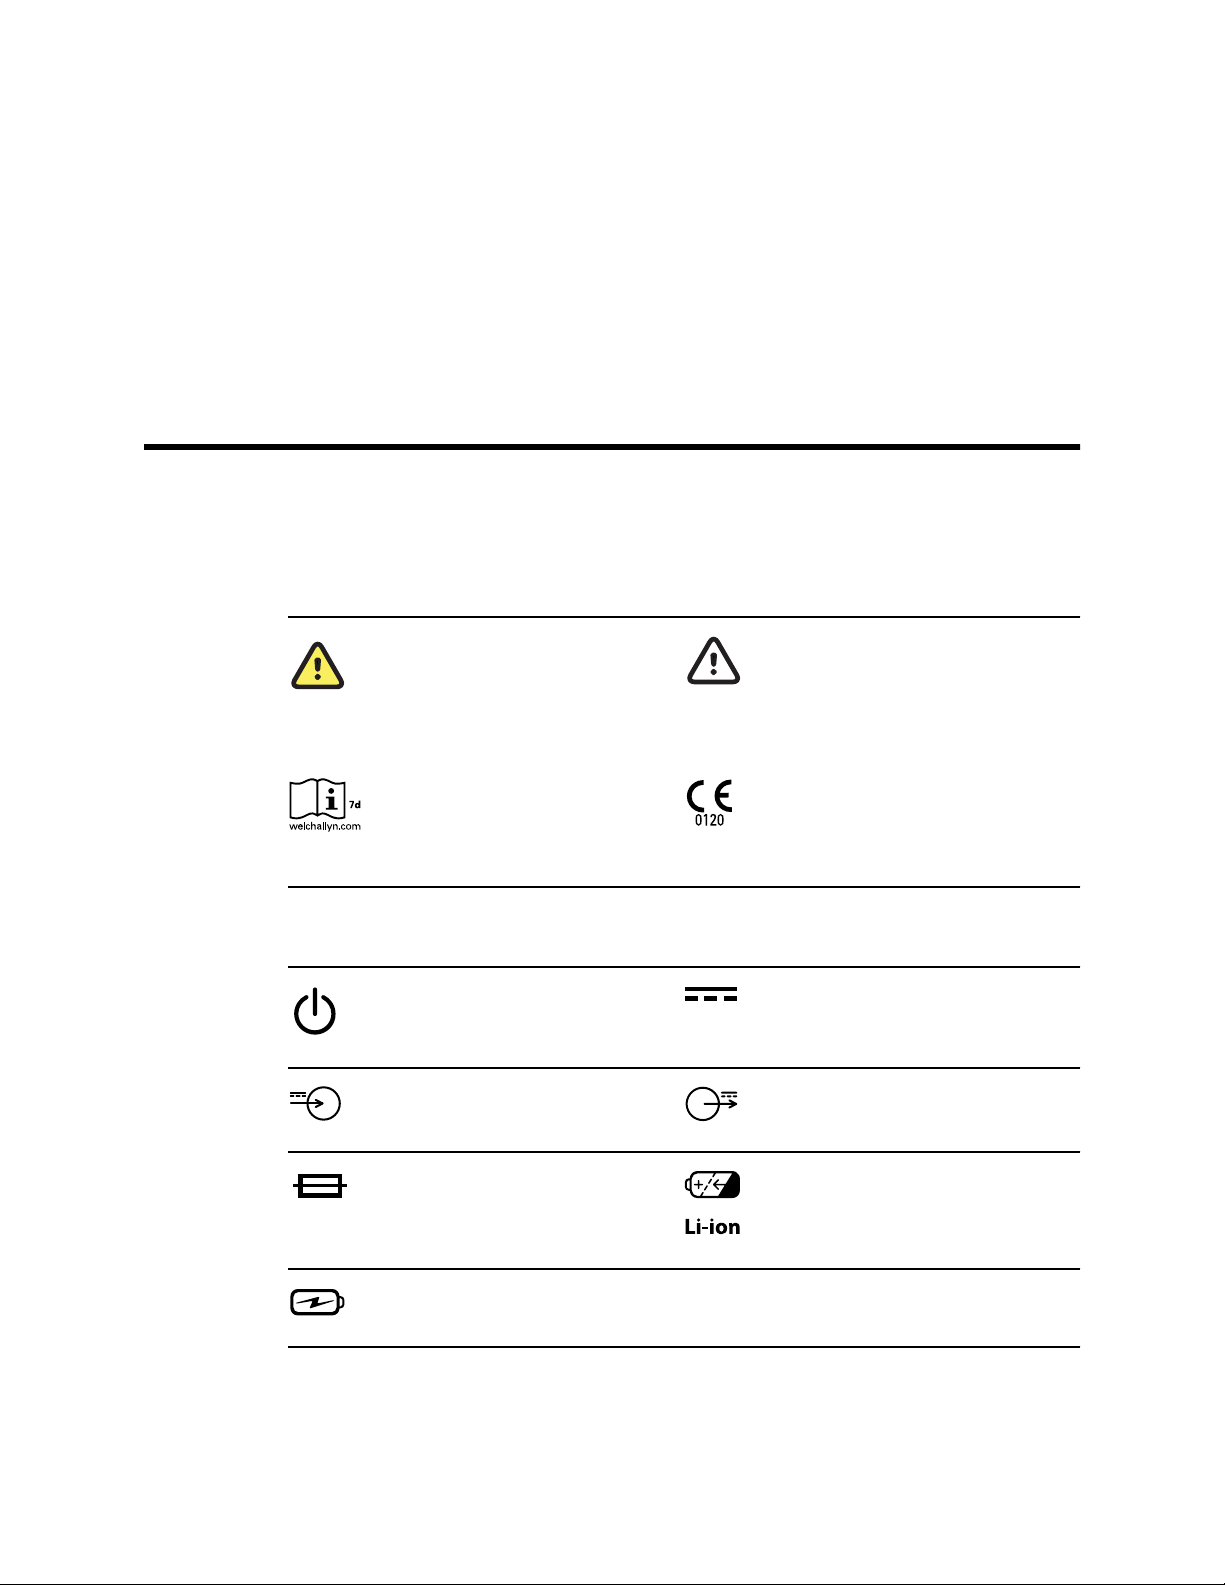
Symbols
Documentation symbols
For information on the origin of these symbols, visit http://www.welchallyn.com/
symbolsglossary for the Welch Allyn symbols glossary.
1
Power symbols
WARNING The warning statements in
this manual identify conditions or
practices that could lead to illness, injury,
or death. Warning symbols will appear
with a grey background in a black and
white document.
Consult directions for use (DFU). A copy
of the DFU is available on this website. A
printed copy of the DFU can be ordered
from Welch Allyn for delivery within 7
calendar days.
Power button
Rated power input, DC Rated power output, DC
Fuse Rechargeable battery
Caution The caution statements in this
manual identify conditions or practices
that could result in damage to the
equipment or other property, or loss of
data.
Meets essential requirements of the
European Medical Device Directive 93/
42/EC.
Direct current (DC)
Battery Charging - Non-AC powered
Page 6
2 Symbols Welch Allyn RetinaVue™ 100 Imager Pro
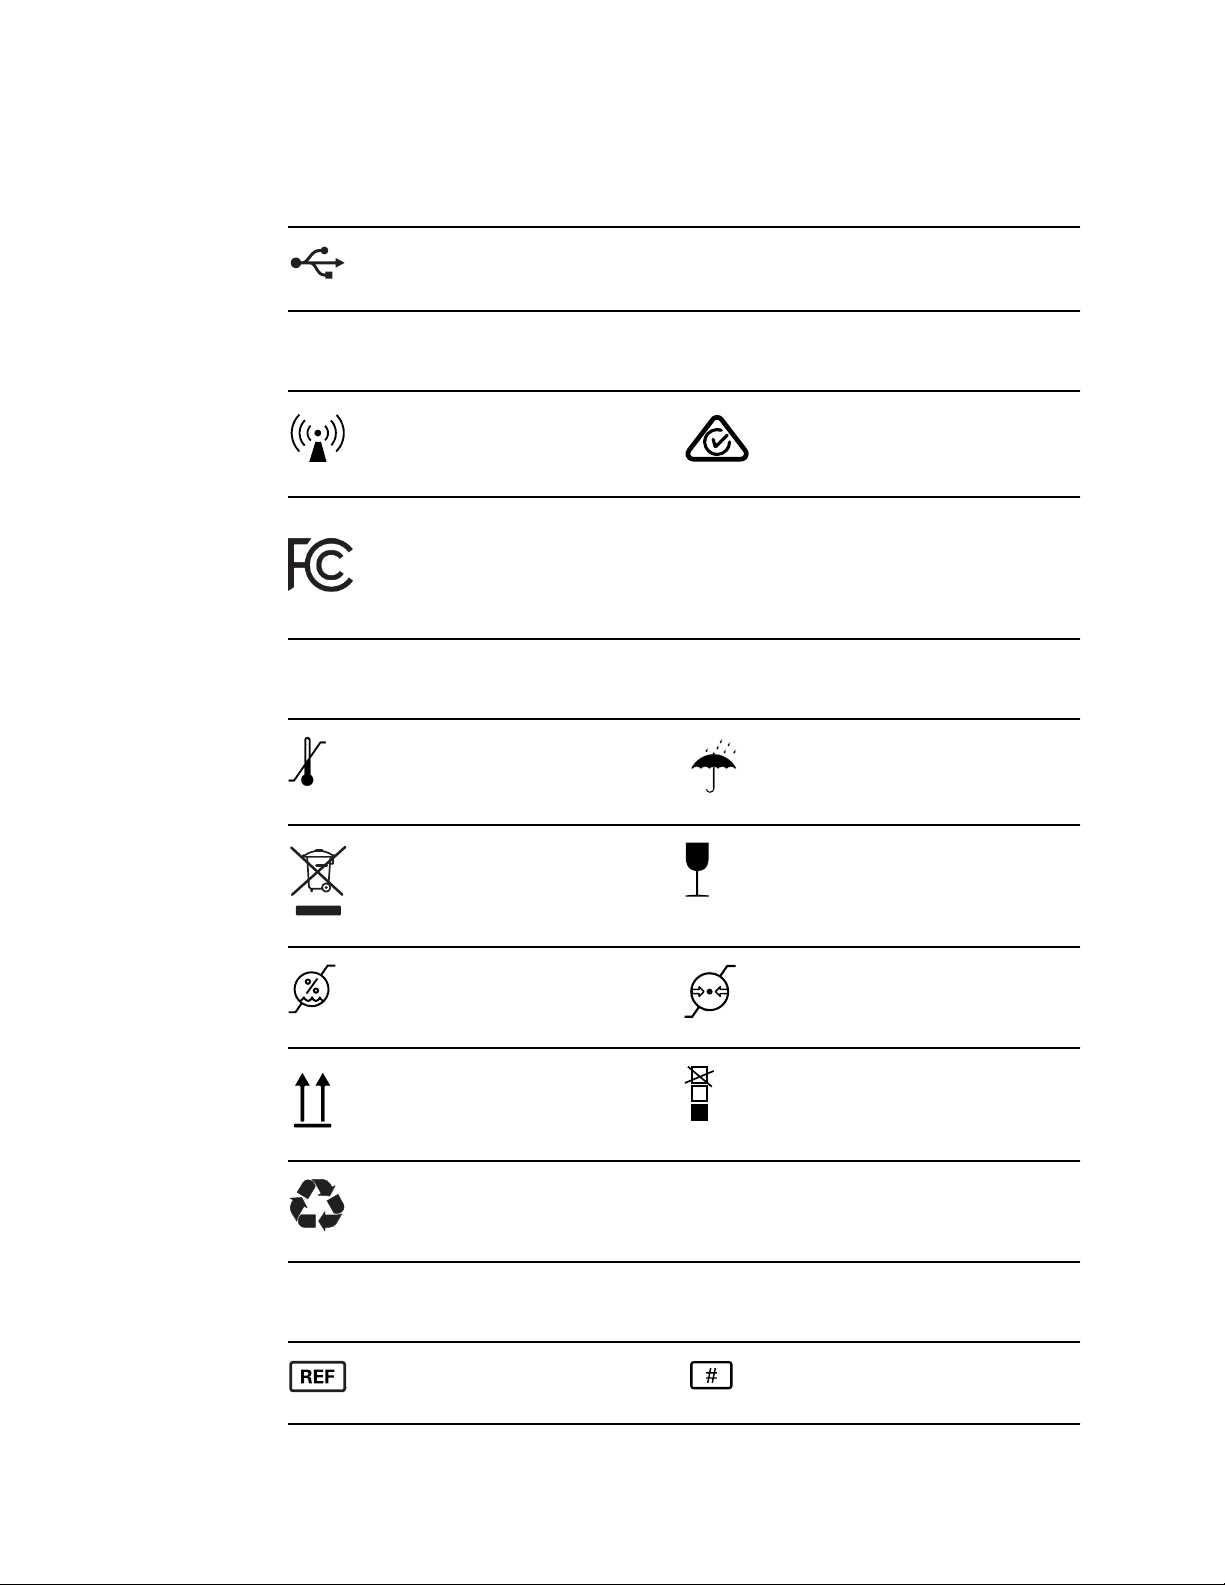
Connectivity symbols
USB
Wireless radio symbols
Non-ionizing electromagnetic radiation Australian Communications and Media
Authority (ACMA) Radio Compliance
Mark (RCM)
FCC ID
The identification number assigned by
the Federal Communication Commission
2AFB3WA-WEC100
IC ID
Industry Canada identification number.
The equivalent governing body to the FCC
in the United States
21375-WAWEC100
CAN ICES-3 (B)/NMB-3(B)
Shipping, storing, and environment symbols
Temperature limit
Separate collection of Electrical and
Electronic Equipment. Do not dispose as
unsorted municipal waste.
Humidity limitation
This way up Stacking limit by number
Keep Dry
Fragile
Atmospheric pressure limitation
Recyclable
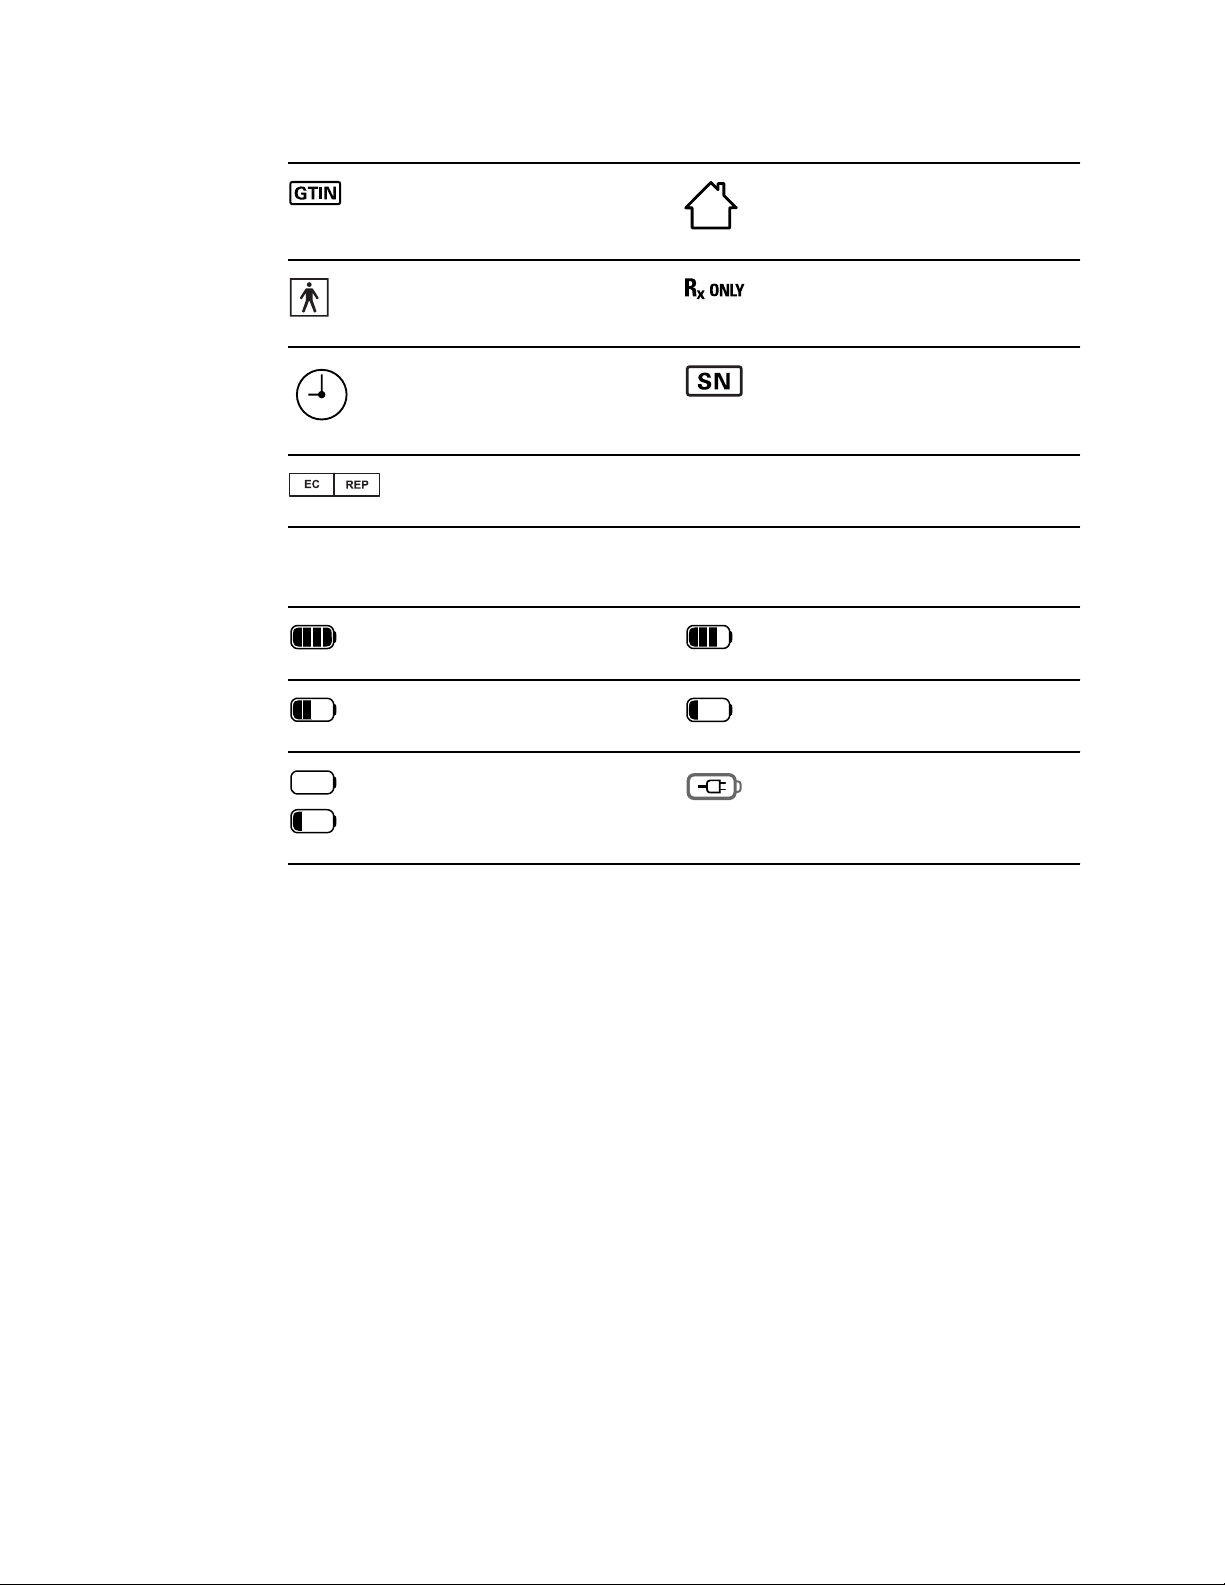
Miscellaneous symbols
Product Identifier
Reorder Number
Page 7
Directions for use Symbols 3
Global Trade Item Number For indoor use only
Type BF applied part Prescription only or "For Use by or on the
order of a licensed medical professional"
Clock; time switch; timer Serial Number
Authorized Representative in the
European Community
Battery charge level indicators
Device is running on battery and charge
is between 75 and 100 percent.
Device is running on battery and charge
is below 50 percent.
Device is running on battery and charge
is below 10 percent. Device blinks with
alternating icons.
Device is running on battery and charge
is below 75 percent.
Device is running on battery and charge
is below 25 percent.
Device is connected to a power supply
and is docked.
Page 8

4 Symbols Welch Allyn RetinaVue™ 100 Imager Pro
Page 9

Introduction
Intended use
The Welch Allyn RetinaVue 100 Imager is a digital hand-held eye-fundus camera used to
record digital photographs of the fundus (including retina, macula and optic disc) of the
human eye and surrounding area.
5
Prescription only or "For Use by or on the order of a licensed medical professional".
Note It is the responsibility of the health care provider to protect patient health
information and to meet regulatory and HIPAA compliance. The images on
the RetinaVue 100 Imager Pro may contain identifiable patient information
and it is the responsibility of the health care provider to ensure that data
safeguards are implemented to protect patient health information.
For information on configuring the RetinaVue 100 Imager Pro device to connect to the
RetinaVue Network system, contact Welch Allyn support to discuss setting up a
RetinaVue Network account.
About warnings and cautions
Warning and caution statements can appear on the RetinaVue 100 Imager device, the
packaging, the shipping container, or in this Directions for use.
The RetinaVue 100 Imager is safe for patients and clinicians when used in accordance
with the instructions and the warning and caution statements presented in this
Directions for use.
Before using the device, you must familiarize yourself with all warnings and cautions,
with the steps to power up the device, and with the sections of this Directions for use
that pertain to your use of the device. Specific warnings and cautions are also found
throughout this manual.
Failure to understand and observe any warning statement in this manual could lead
•
to patient injury or illness.
• Failure to understand and observe any caution statement in this manual could lead to
damage to the equipment or other property, or loss of patient data.
Page 10
6 Introduction Welch Allyn RetinaVue™ 100 Imager Pro
General warnings, cautions, and notes
WARNING Exposure to the RetinaVue 100 Imager flash, in rare cases,
may contribute to migraines or temporary visual disturbances, particularly in
patients with a history of light sensitivity or migraines. Multiple flashes per
eye in a single exam may increase the likelihood of occurrence.
WARNING Clean and disinfect the eye cup after each patient to avoid the
risk of cross-contamination.
WARNING Operating the device in the presence of a flammable
anesthetic mixture with air, oxygen, or nitrous oxide; in oxygen-enriched
environments; or in any other potentially explosive environment may cause
a fire and explosion hazard.
WARNING Do not use batteries from other sources. This may result in
excessive temperatures, fire, or explosion.
WARNING To prevent fire or electrical shock, do not expose the device to
rain or moisture.
CAUTION When manually entering patient information, do not use the
same patient identifier for multiple patients. This may result in inaccurate
data association.
CAUTION Avoid subjecting the device to vibration or shock.
CAUTION Avoid using the device in a dusty environment.
CAUTION Keep the power cord away from any heat source.
CAUTION Do not sterilize the device.
CAUTION All servicing of this equipment is to be performed by Welch
Allyn, Inc. or by a center approved by Welch Allyn, Inc.
CAUTION This device needs to be installed and put into service according
to the EMC information provided herein.
CAUTION Portable and mobile RF communications equipment can affect
the RetinaVue 100 Imager performance.
CAUTION Input overload can occur in proximity to defibrillator or
electrocautery devices.
CAUTION This device is not protected against the ingress of water and
should not be used in the presence of liquids which may enter the device.
CAUTION Results deleted on the device cannot be recovered.
CAUTION Do not modify this equipment without authorization of the
manufacturer.
CAUTION Do not use the device in direct sunlight. Strong ambient light
may affect results.
Page 11
Directions for use Introduction 7
CAUTION Within the patient environment, only connect the equipment
(the RetinaVue 100 Imager) to computers or laptops that have passed the
safety standard for information technology equipment IEC 60601-1, EN
60601-1, ANSI/AAMI ES 60601-1 to ensure the safety of the USB electrical
connection. Outside the patient environment, only connect the equipment
(the RetinaVue 100 Imager) to computers or laptops that have passed the
safety standard for information technology equipment IEC 60950-1, EN
60950-1, UL 60950-1 to ensure the safety of the USB electrical connection.
CAUTION Do not turn off the device while saving data from a patient test.
Turning off the device while saving patient data may delete the data.
CAUTION Do not use the device adjacent to or stacked with other
equipment. If the device is used adjacent or stacked with other equipment,
the device should be observed to verify normal operation in the
configuration in which it will be used.
CAUTION Do not submerge the device in liquid or allow liquid to enter the
interior of the device.
CAUTION Do not use automatic cleansing machines or sterilization.
CAUTION Consult the cleaning agent and germicidal cleaner agent
manufacturer instructions for their proper use and germicidal efficacy prior
to their use.
CAUTION Only use the cleaning or germicidal cleaner agent types listed or
damage may occur.
Note The RetinaVue 100 Imager can be used on patients with eye implants and
intraocular lenses. While the RetinaVue 100 Imager can be used on
patients with cataracts and other eye opacities, the use of the RetinaVue
100 Imager may result in a lower quality image due to the increased
reflection of the flash off the patient's intraocular lens.
Page 12
8 Introduction Welch Allyn RetinaVue™ 100 Imager Pro
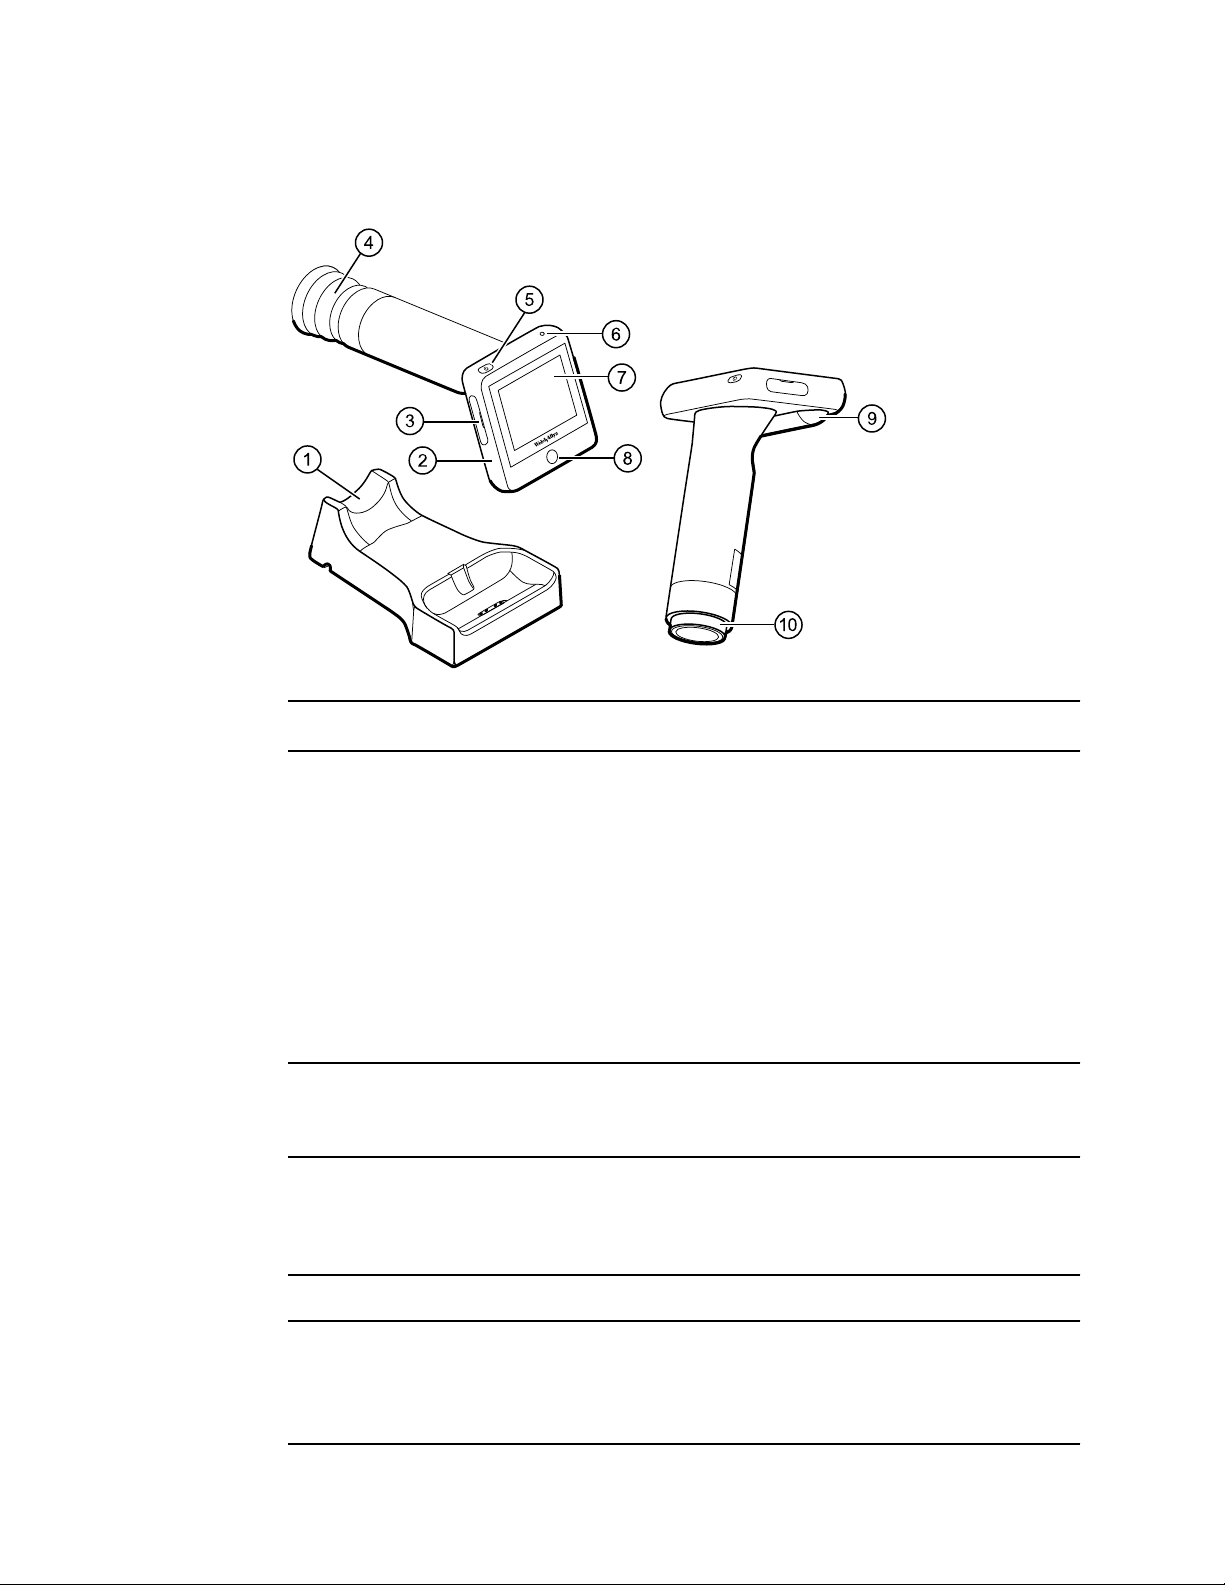
Controls and connectors
No. Feature Description
1
Docking station Charges the RetinaVue 100 Imager Pro and enables data transfer
to a computer. Connect to an electrical outlet or to the “Always
On” USB port of a computer.
Note
2 RetinaVue 100 Imager device
3 SD Card port/service port SD Card slot. Insert SD Card for data storage.
4 Eye cup Blocks ambient light during testing
Digital hand-held eye-fundus camera used to record digital
photographs of the fundus of the human eye and surrounding
area.
Note The service port under the SD Card cover is for
USB ports supply power only when the
computer is on. However, many newer
computers contain a yellow “Always On” USB
port that can supply power even when the
computer is sleeping, hibernating, or turned
off. See you computer manufacturer's user
documentation for instructions on changing the
power management options and for identifying
the “Always On” USB port.
factory use only and is not for customer use.
5 Power button
• Push button to turn the device on and off.
• Push button to bring the device out of Sleep mode.
• Push button to launch a dialogue box with three options:
○ Power off
○ Sleep
Page 13

Directions for use Introduction 9
No. Feature Description
○ Cancel
6 Power indicator
7 LCD touchscreen 3.5” color HD LCD touchscreen. Displays information for charging,
8 Home button Press the Home button to navigate to the Home screen (workflow
9 Battery cover Covers the battery compartment
10 Bezel Area to which the eye cup attaches
• When the LED light is green, it indicates that the device is
docked and is fully powered.
• When the LED light is amber, it indicates that the device is
docked and is in the process of charging.
• When the device is not docked the LED is off.
testing, and adjustments to the device.
selection) from any screen on the device.
Page 14

10 Introduction Welch Allyn RetinaVue™ 100 Imager Pro
Page 15
Using the RetinaVue 100 Imager Pro
View images saved to the RetinaVue 100 Imager Pro on the LCD touchscreen. The
images saved on the SD card are in unencrypted (.jpg) format and a DICOM (.dcm)
format. To view images on a computer, use photo viewer software.
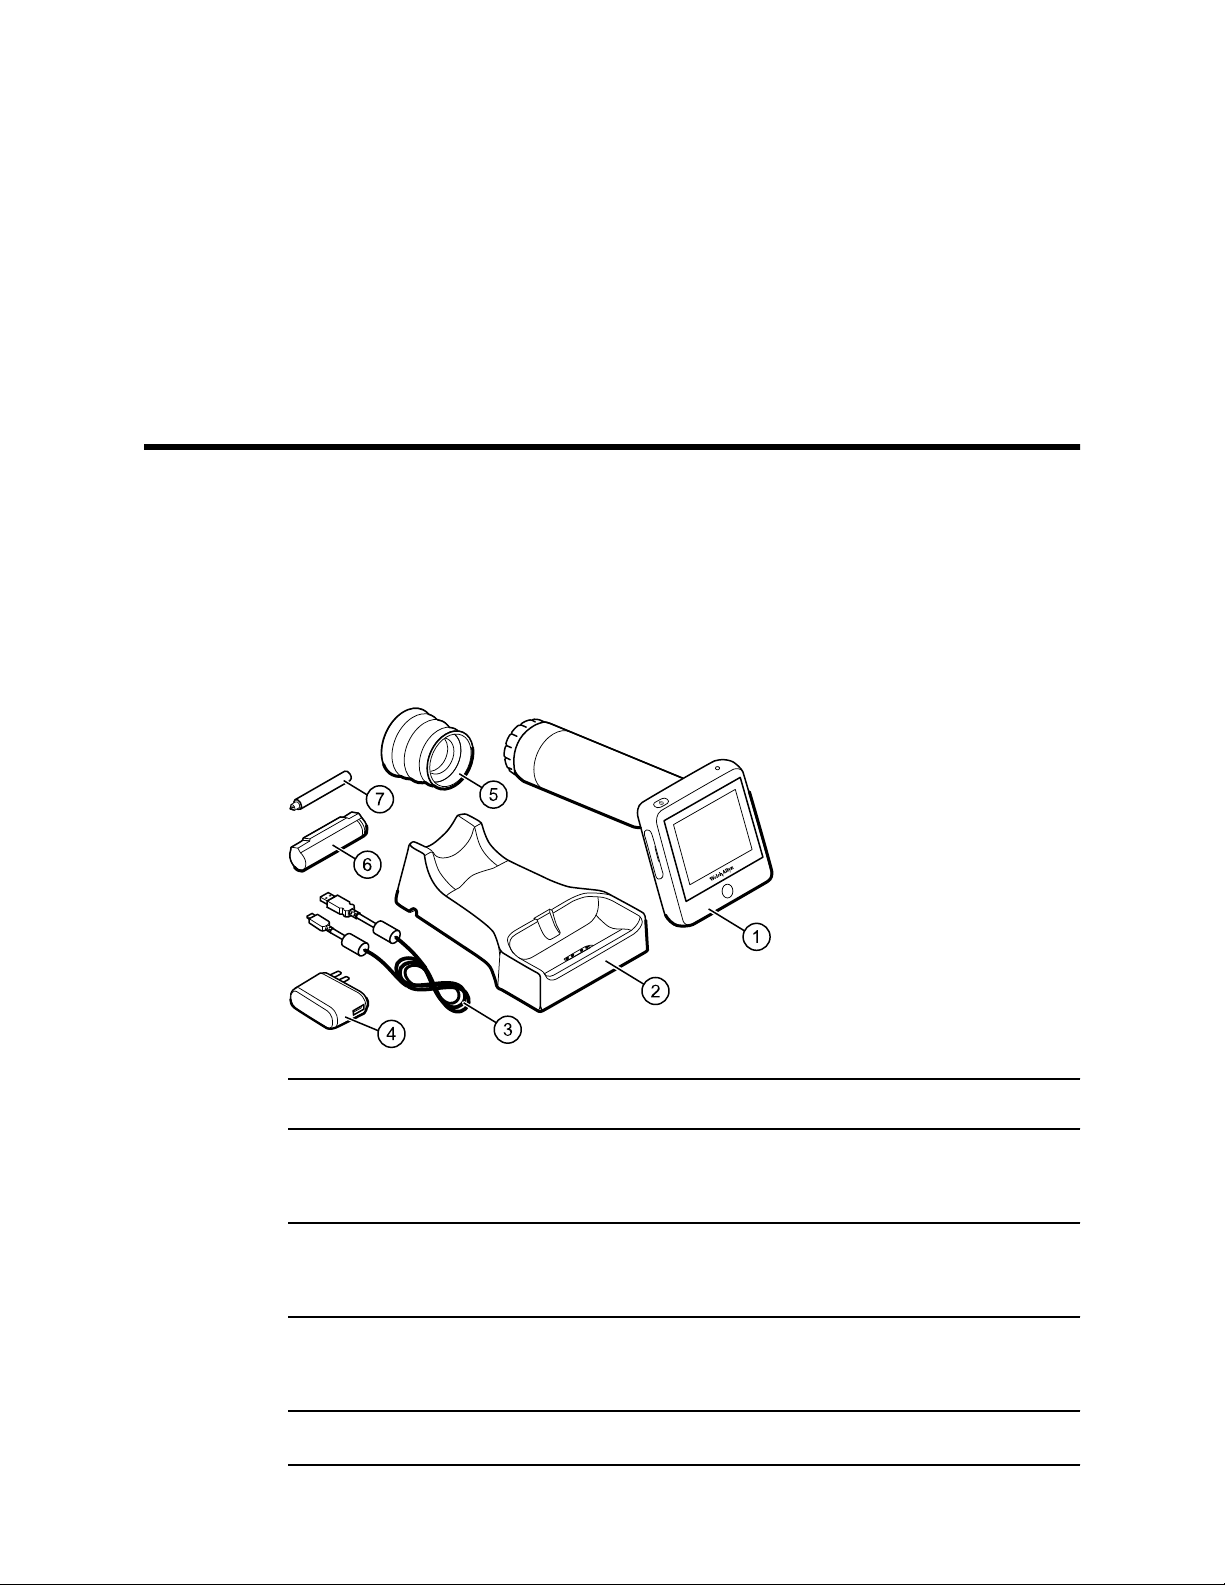
Unpack the system
The RetinaVue 100 Imager Pro device is packaged with the following items. Confirm that
all items are included.
11
Number Item Description
Digital hand-held eye-fundus camera used to record digital
1 RetinaVue 100 Imager Pro device
2 Docking station
3 USB cable
4 Wall adapter plug Connects to USB cable. Match to region-specific AC wall outlet.
photographs of the fundus of the human eye and surrounding
area.
Charges the RetinaVue 100 Imager Pro device and enables USB
data transfer to a computer or laptop. Connect to region-specific
AC wall outlet.
Connects the docking station to a computer or laptop to transfer
results. Connects the docking station to the wall adapter plug for
AC charging.
Page 16
12 Using the RetinaVue 100 Imager Pro Welch Allyn RetinaVue™ 100 Imager Pro
Number Item Description
5 Eye cup Blocks ambient light during testing
6 Battery Rechargeable lithium ion battery
7 Screwdriver Phillips screwdriver to remove battery cover screws
Not shown
Not shown SD Card SD Card installed in the SD Card slot for data storage
Not shown Lens spray RetinaVue 100 Imager lens cleaner
Not shown Lens cloth RetinaVue 100 Imager lens cleaning cloth
RetinaVue 100 Imager Pro Directions
for use
If any item is missing, contact Welch Allyn Technical Support: www.welchallyn.com/
service. We recommend that you save the shipping box and packing materials in case
you need to store or ship the system.
Battery installation and replacement
Use the device on battery power once the battery is installed and charged. The battery is
charged through contact pins on the device and the docking station.
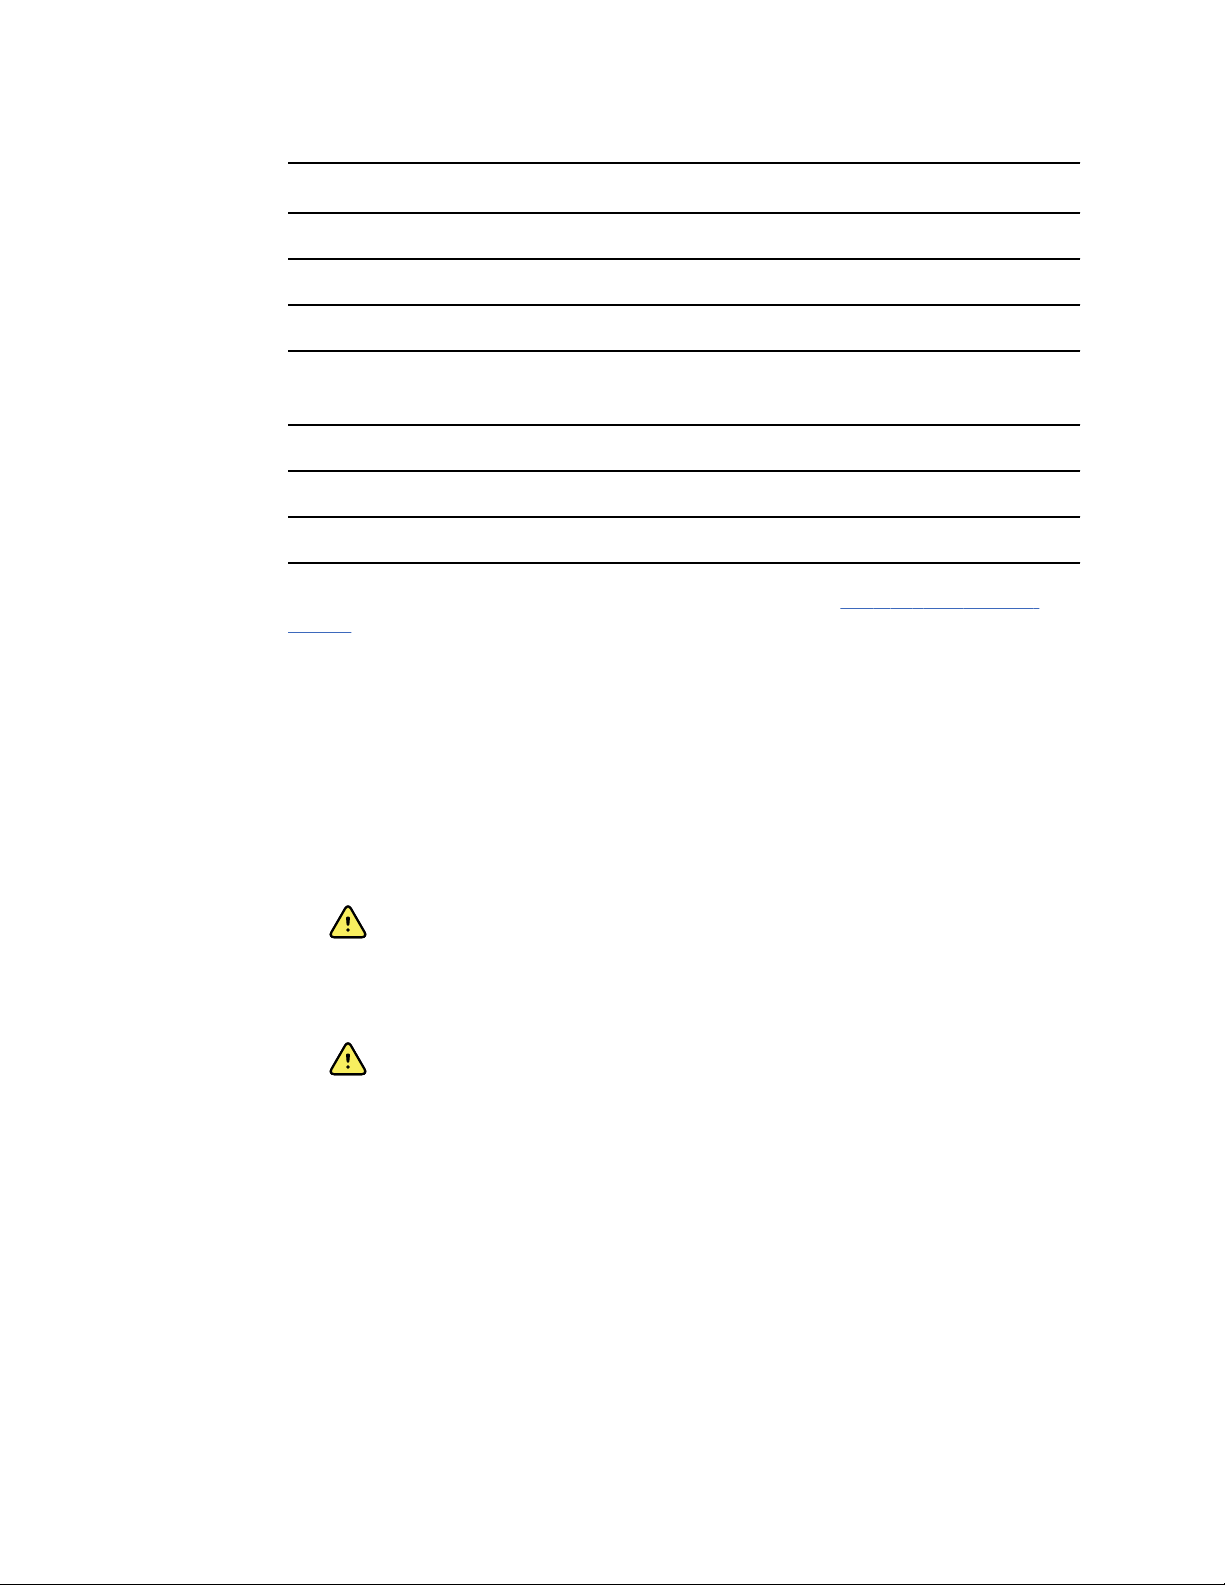
Install the battery/replace the battery
Set the RetinaVue 100 Imager on a flat, clean surface with the LED display facing down.
WARNING Personal injury risk. Improper handling of the battery can lead
to heat generation, smoke, explosion, or fire. Do not short-circuit, crush,
incinerate, or disassemble the battery. Never dispose of batteries in refuse
containers. Always recycle batteries according to national or local
regulations.
This document. The Directions for use (DFU) is also available on
the Welch Allyn web site.
WARNING Use only Welch Allyn approved accessories, and use them
according to the manufacturer’s directions for use. Using unapproved
accessories with the camera can affect patient and operator safety and can
compromise product performance and accuracy, and void the product
warranty.
1. Loosen the screw at the left side of the battery cover.
2. Loosen the screw at the right side of the battery cover.
3. Push in the battery cover tab and then lift up the battery cover. Slide open the
battery cover by tilting the cover upward.
Page 17
Directions for use Using the RetinaVue 100 Imager Pro 13
4. For first-time setup of the RetinaVue 100 Imager, insert the battery into the battery
compartment. For battery replacement, remove the existing battery and then insert
the new replacement battery into the battery compartment.
a. This procedure applies to first-time setup of the RetinaVue 100 Imager. Insert
the battery into the battery compartment. Match the polarity of the battery to the
+ and - markings on the RetinaVue 100 Imager.
b. This procedure only applies to battery replacement. Remove the existing battery
from the battery compartment and insert the new replacement battery into the
battery compartment. Match the polarity of the battery to the + and - markings
on the RetinaVue 100 Imager.
5. Rotate the raised flat edge of the battery until it sets in the back notch of the battery
compartment.
6. Insert the two battery cover tabs into the slot, then push in the tab to close the
battery compartment.
7. Tighten the screw at the left side of the battery cover.
8. Tighten the screw at the right side of the battery cover.
Page 18

14 Using the RetinaVue 100 Imager Pro Welch Allyn RetinaVue™ 100 Imager Pro
Note Do not over-tighten the screws.
Eye cup
The eye cup blocks ambient light during testing and covers the patient's eye socket to
allow them to best focus on the green fixation lights. The eye cup works on the patient's
left and right eye.
Set up the eye cup for a patient exam
1. Remove the lens cap from the RetinaVue 100 Imager.
2. Slide the eye cup over the bezel on the RetinaVue 100 Imager.
3. Use the eye cup to cover the patient's examined eye and allow them to focus on the
green fixation lights.
Page 19
Directions for use Using the RetinaVue 100 Imager Pro 15
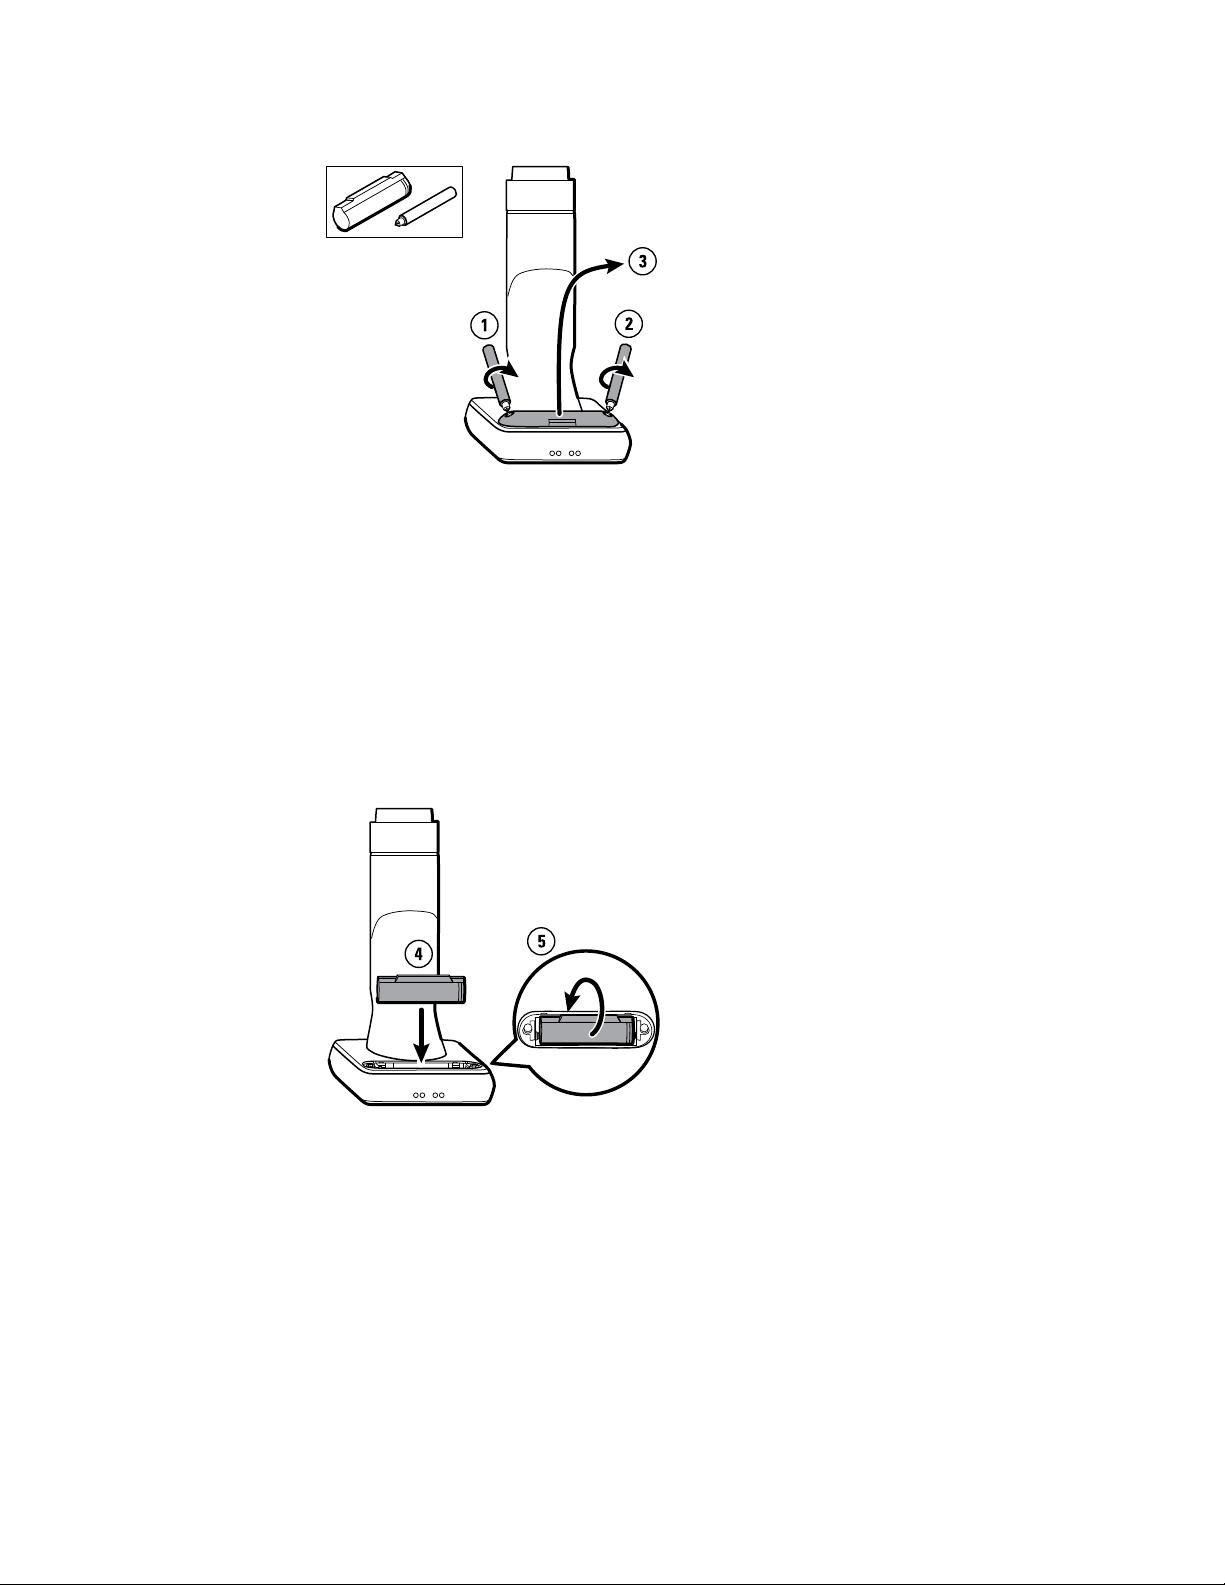
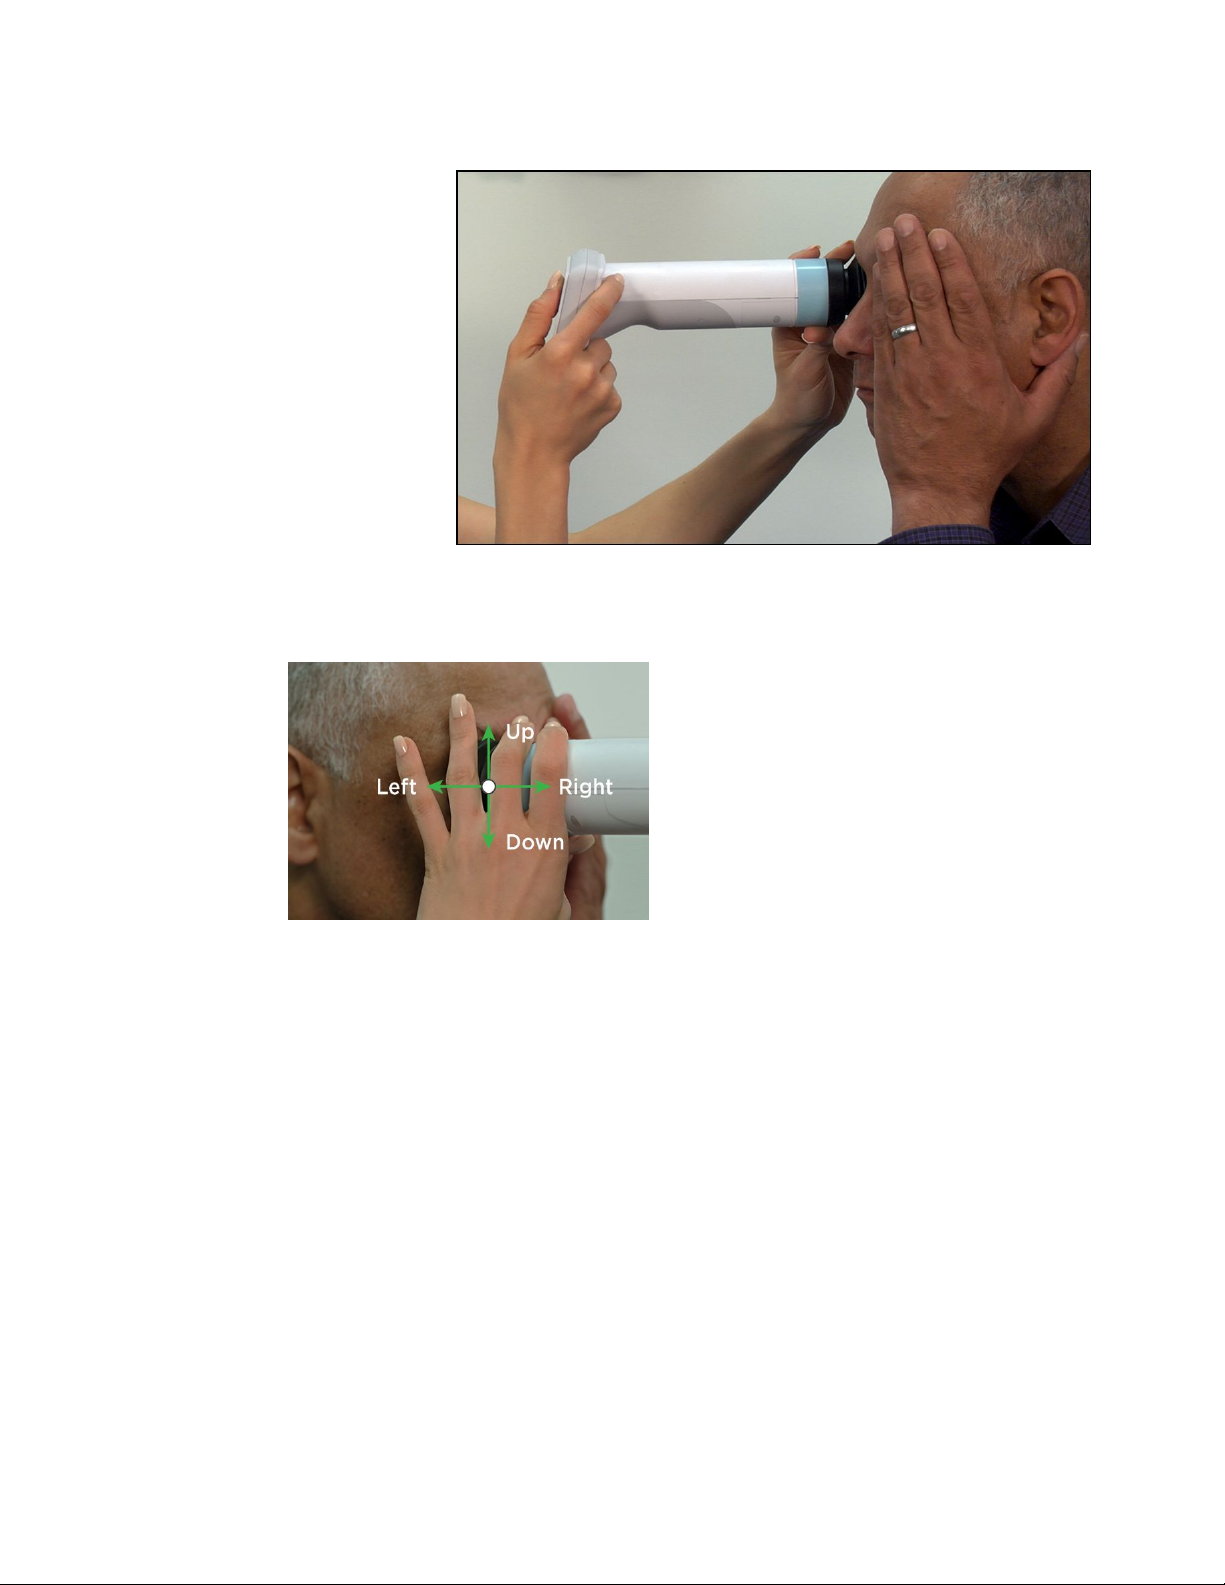
Hold the RetinaVue 100 Imager for a patient exam
The RetinaVue 100 Imager must be held level and in line with your patient’s eye.
There are two recommended techniques to properly hold the RetinaVue 100 Imager for a
quick and successful retinal exam:
Telescope Grip
Page 20
16 Using the RetinaVue 100 Imager Pro Welch Allyn RetinaVue™ 100 Imager Pro
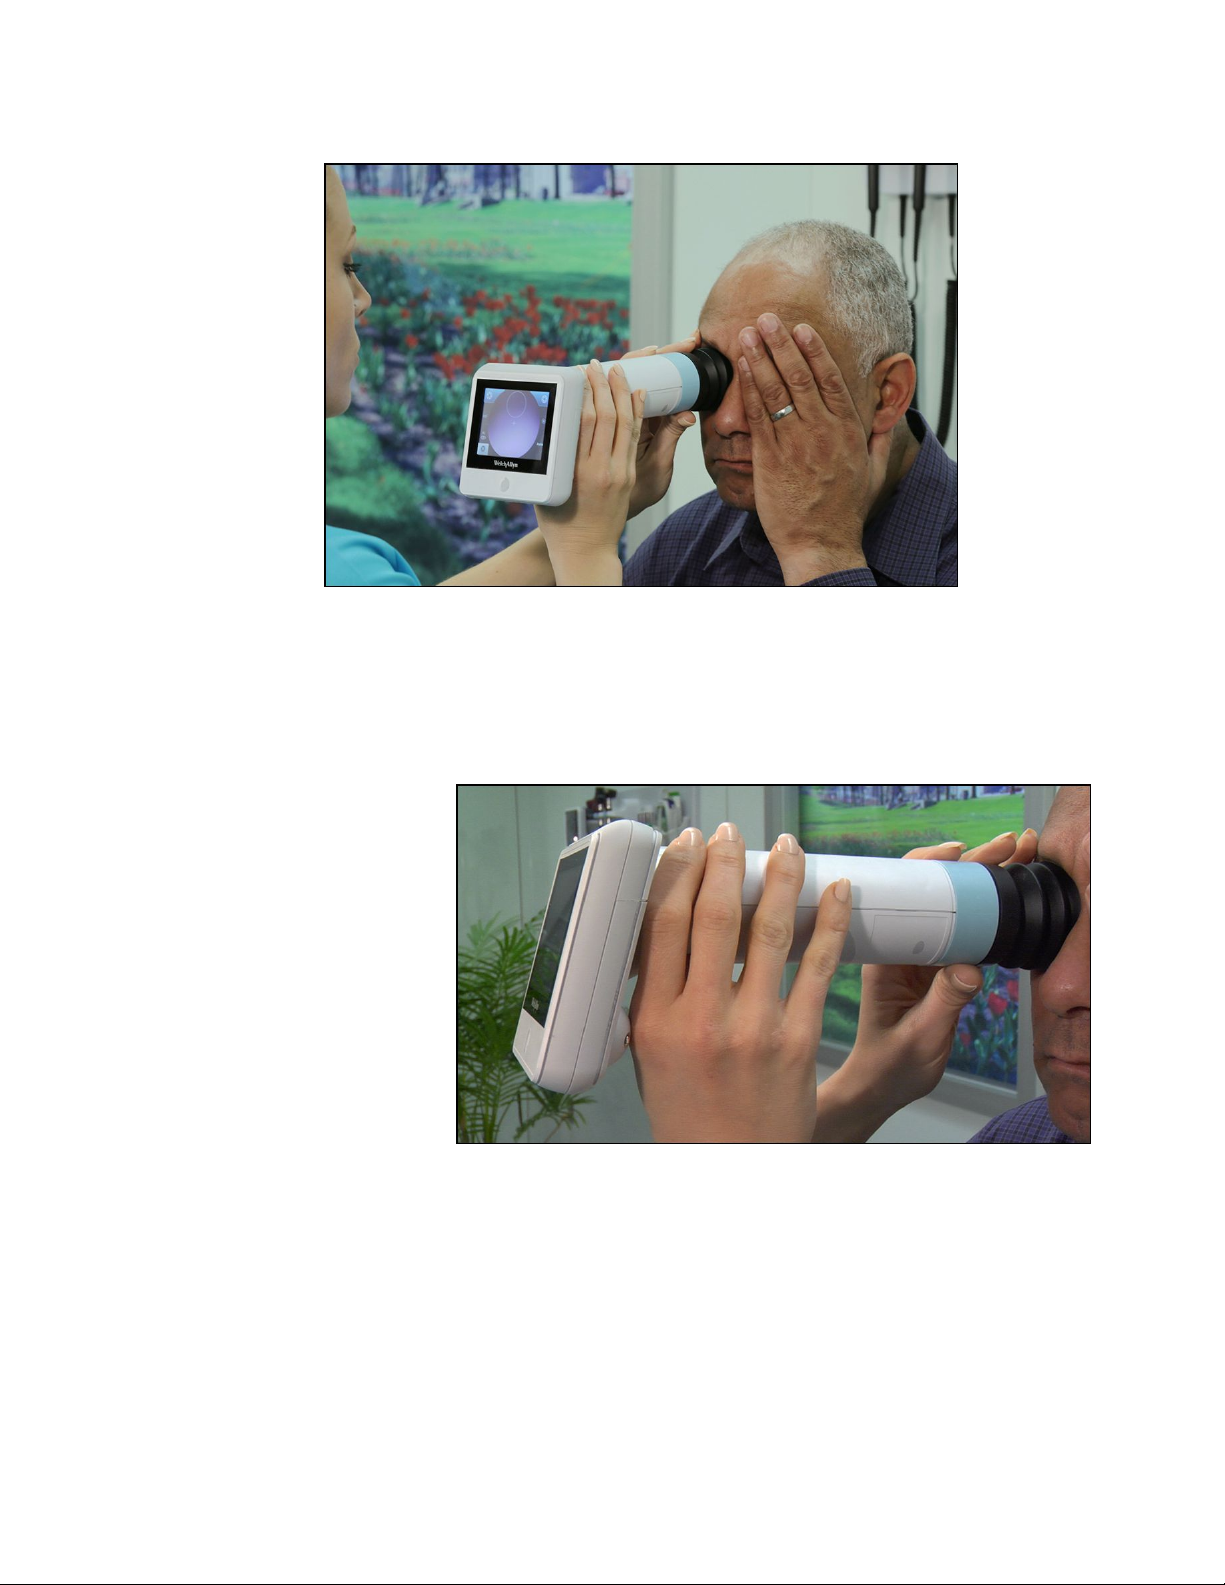
Smart phone Grip
Make micro adjustments with your guide hand to fine tune the focus of the RetinaVue
100 Imager.
Guide (Patient End) Hand
Hold the patient end of the RetinaVue 100 Imager with just the thumb and forefinger.
Use the small and ring finger to steady the RetinaVue 100 Imager by anchoring them
gently on the patient’s forehead.
Page 21
2
3
Directions for use Using the RetinaVue 100 Imager Pro 17
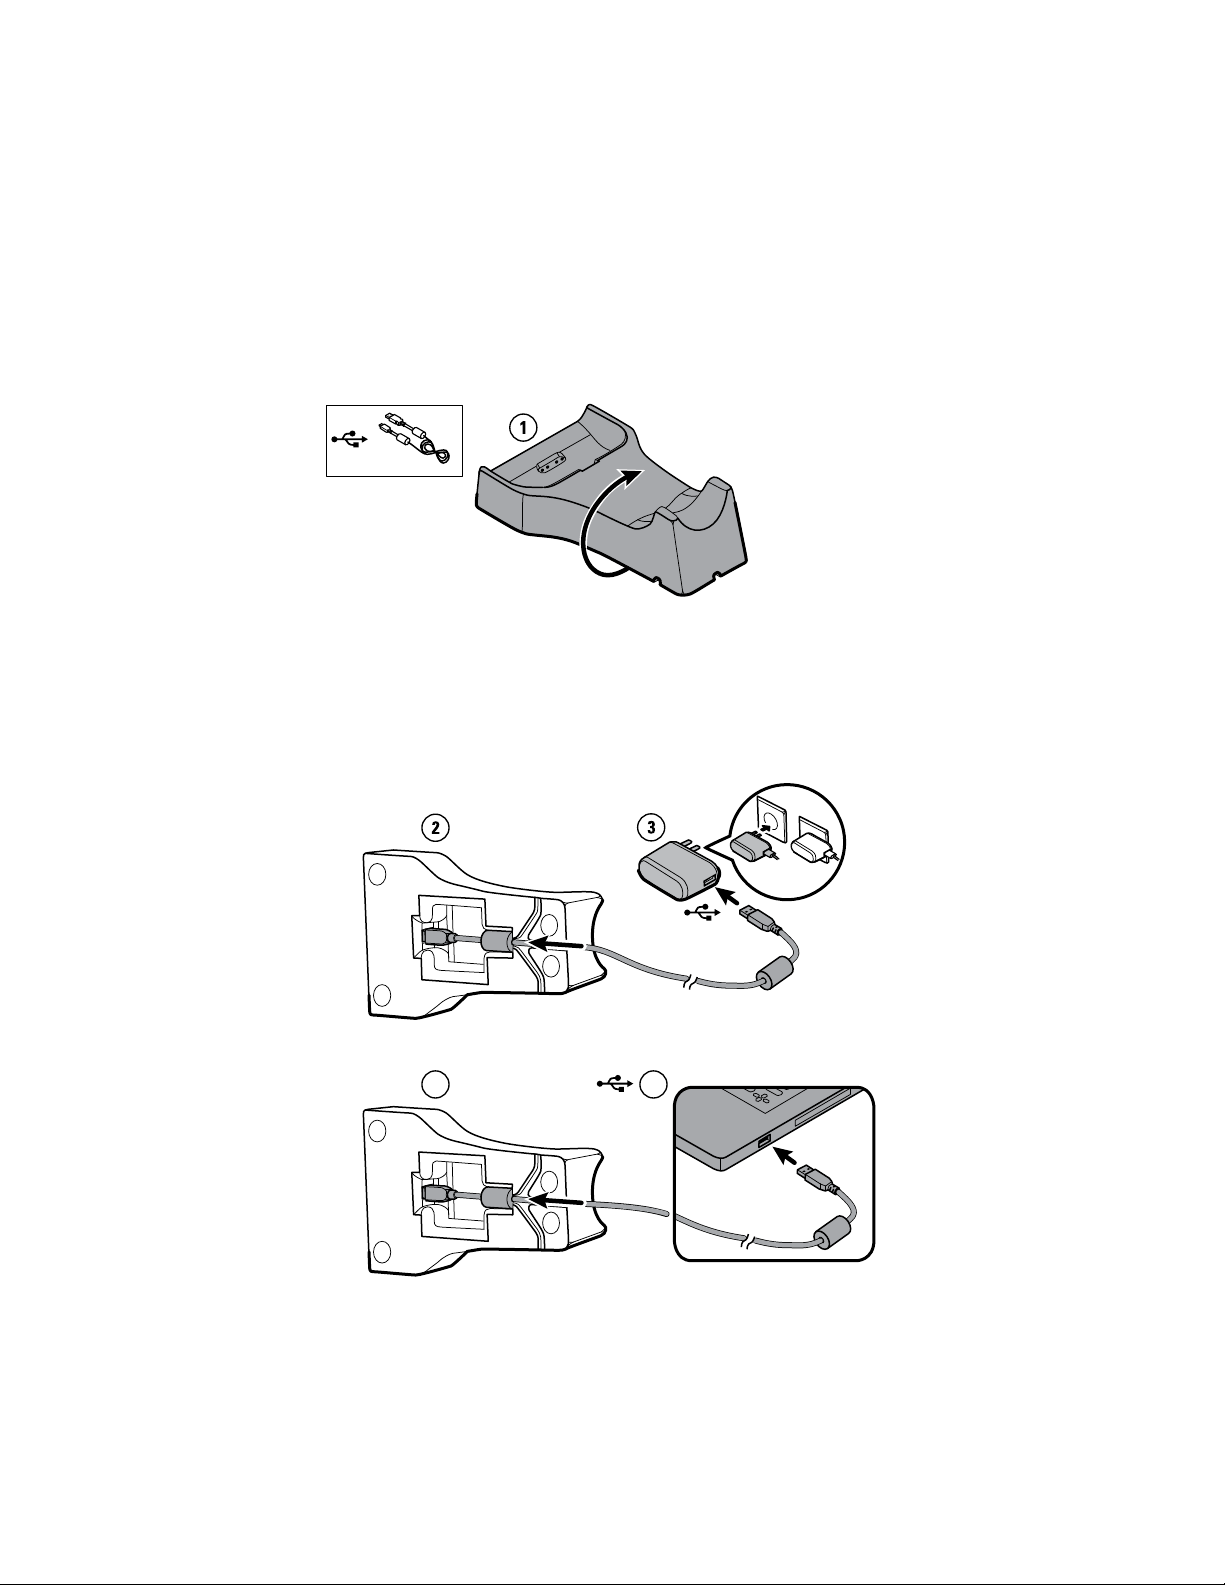
Docking station
Place the device into the docking station to charge the device or to connect and transfer
data to a computer or laptop.
Set up the docking station for charging
1. Turn the docking station over.
2. Connect the USB cable to the docking station.
3. Either plug the USB cable into the wall adapter plug and then plug the wall adapter
into an AC outlet, or plug the USB cable into the “Always On” USB port on a
computer.
a. Plug the USB cable into the wall adapter plug and then plug the wall adapter into
an AC outlet.
b. (Optional) Plug the USB cable into the “Always On” USB port on a computer.
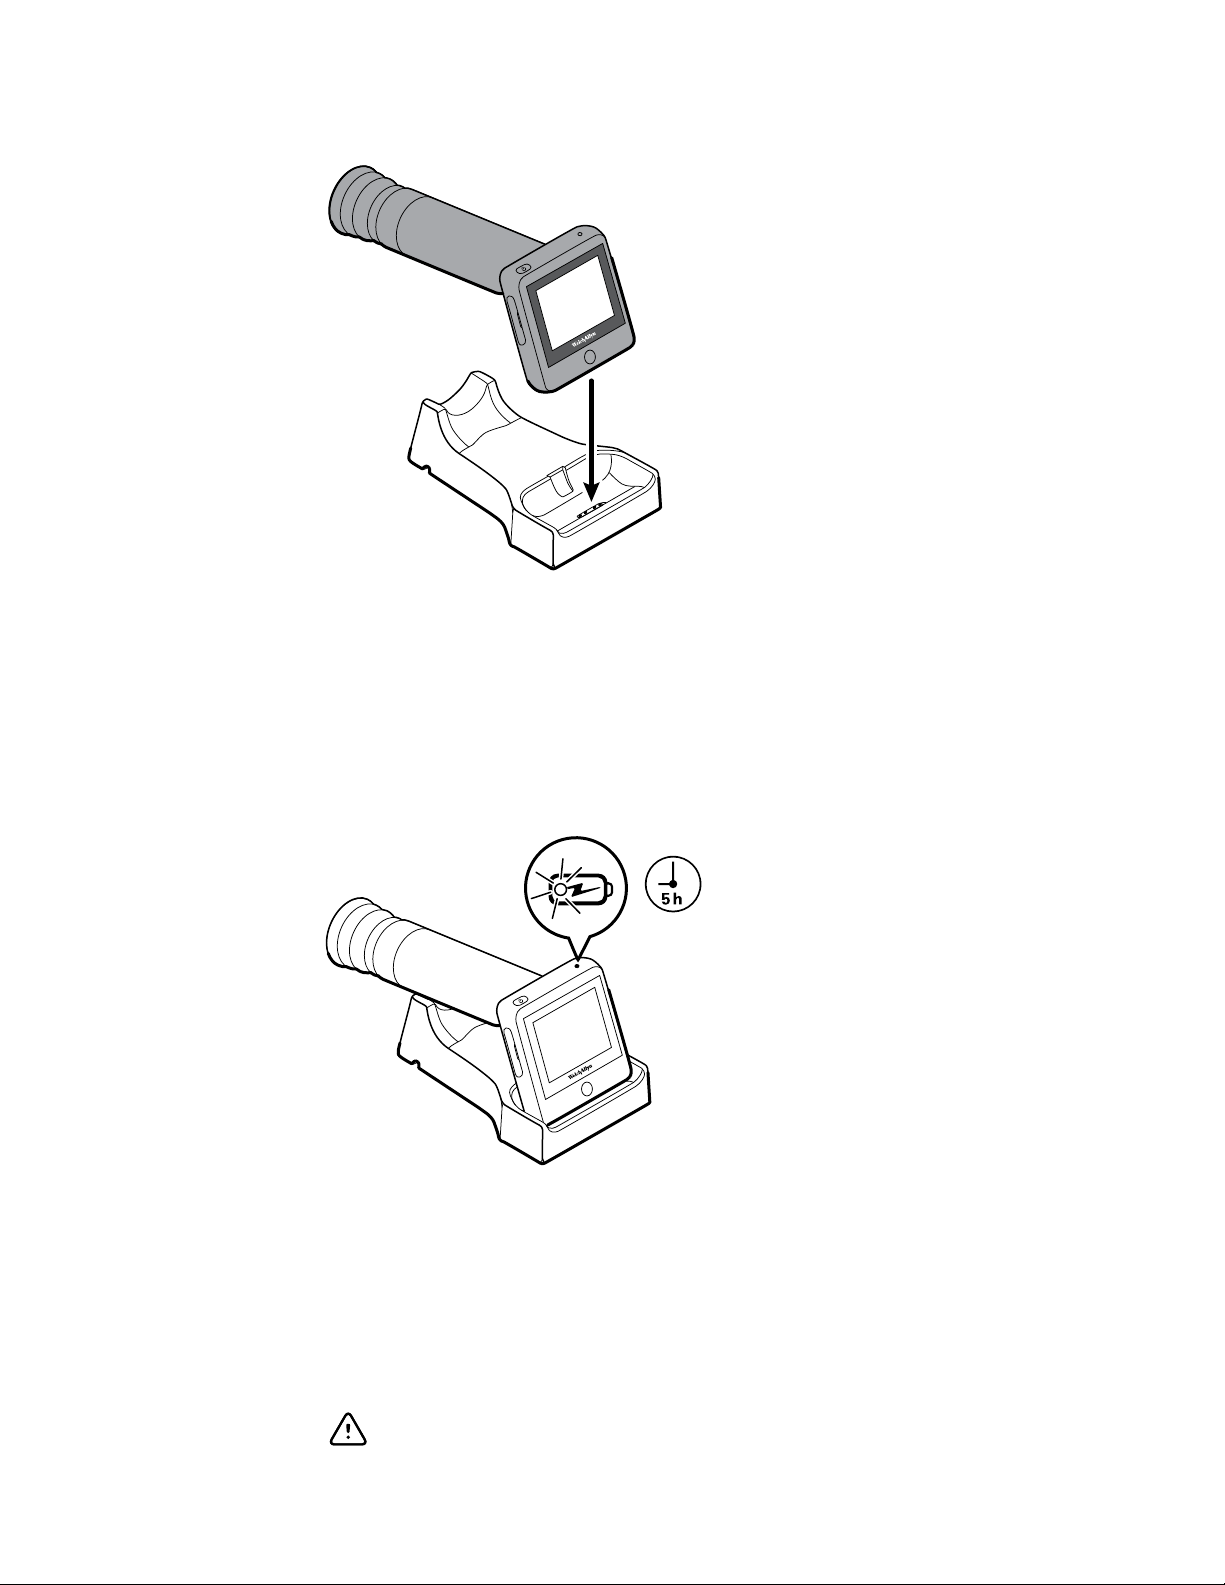
4. Place the RetinaVue 100 Imager on the docking station charger with the contact pins
of the RetinaVue 100 Imager touching the contact pins of the docking station
charger.
Page 22
18 Using the RetinaVue 100 Imager Pro Welch Allyn RetinaVue™ 100 Imager Pro
5. Before the first use, allow the RetinaVue 100 Imager to charge for 5 hours on the
docking station charger.
Note The power indicator light turns amber to indicate that the
RetinaVue 100 Imager is in the processing of charging. If the
power indicator light does not turn on, ensure that the
contact pins of the RetinaVue 100 Imager are touching the
contact pins of the docking station charger and reseat the
RetinaVue 100 Imager into the docking station. Charging is
impacted if the pins are not properly touching.
Note The removal of the plug from the socket provides the means
of isolation from the mains power supply. The user is
reminded to keep this means of disconnection easily
accessible in case of emergency.
First time set up of the RetinaVue 100 Imager Pro
The RetinaVue 100 Imager Pro runs a brief diagnostic self-test each time it powers up.
CAUTION Always use the RetinaVue 100 Imager Pro with an adequately
charged and properly functioning battery.
Page 23

Directions for use Using the RetinaVue 100 Imager Pro 19
1. Press to power up the RetinaVue 100 Imager Pro.
As the device is powering up, the RetinaVue 100 Imager Pro displays the Welch
Allyn logo and the model number. After powering up, the Home screen appears.
Note If the battery is in a discharged state, the time and date need
to be set.
2. Touch (up) or (down) to adjust the hour, minute (Min), Continent, and
Location. Use the radio buttons to select the 24-hour or 12-hour format. Touch
(Back) to return to the Settings screen.
3. Touch Date.
4. Touch (up) or (down) to adjust the day, month, and year in the DD/MM/
YY format. Touch (Back) to return to the Settings screen.
Page 24
20 Using the RetinaVue 100 Imager Pro Welch Allyn RetinaVue™ 100 Imager Pro
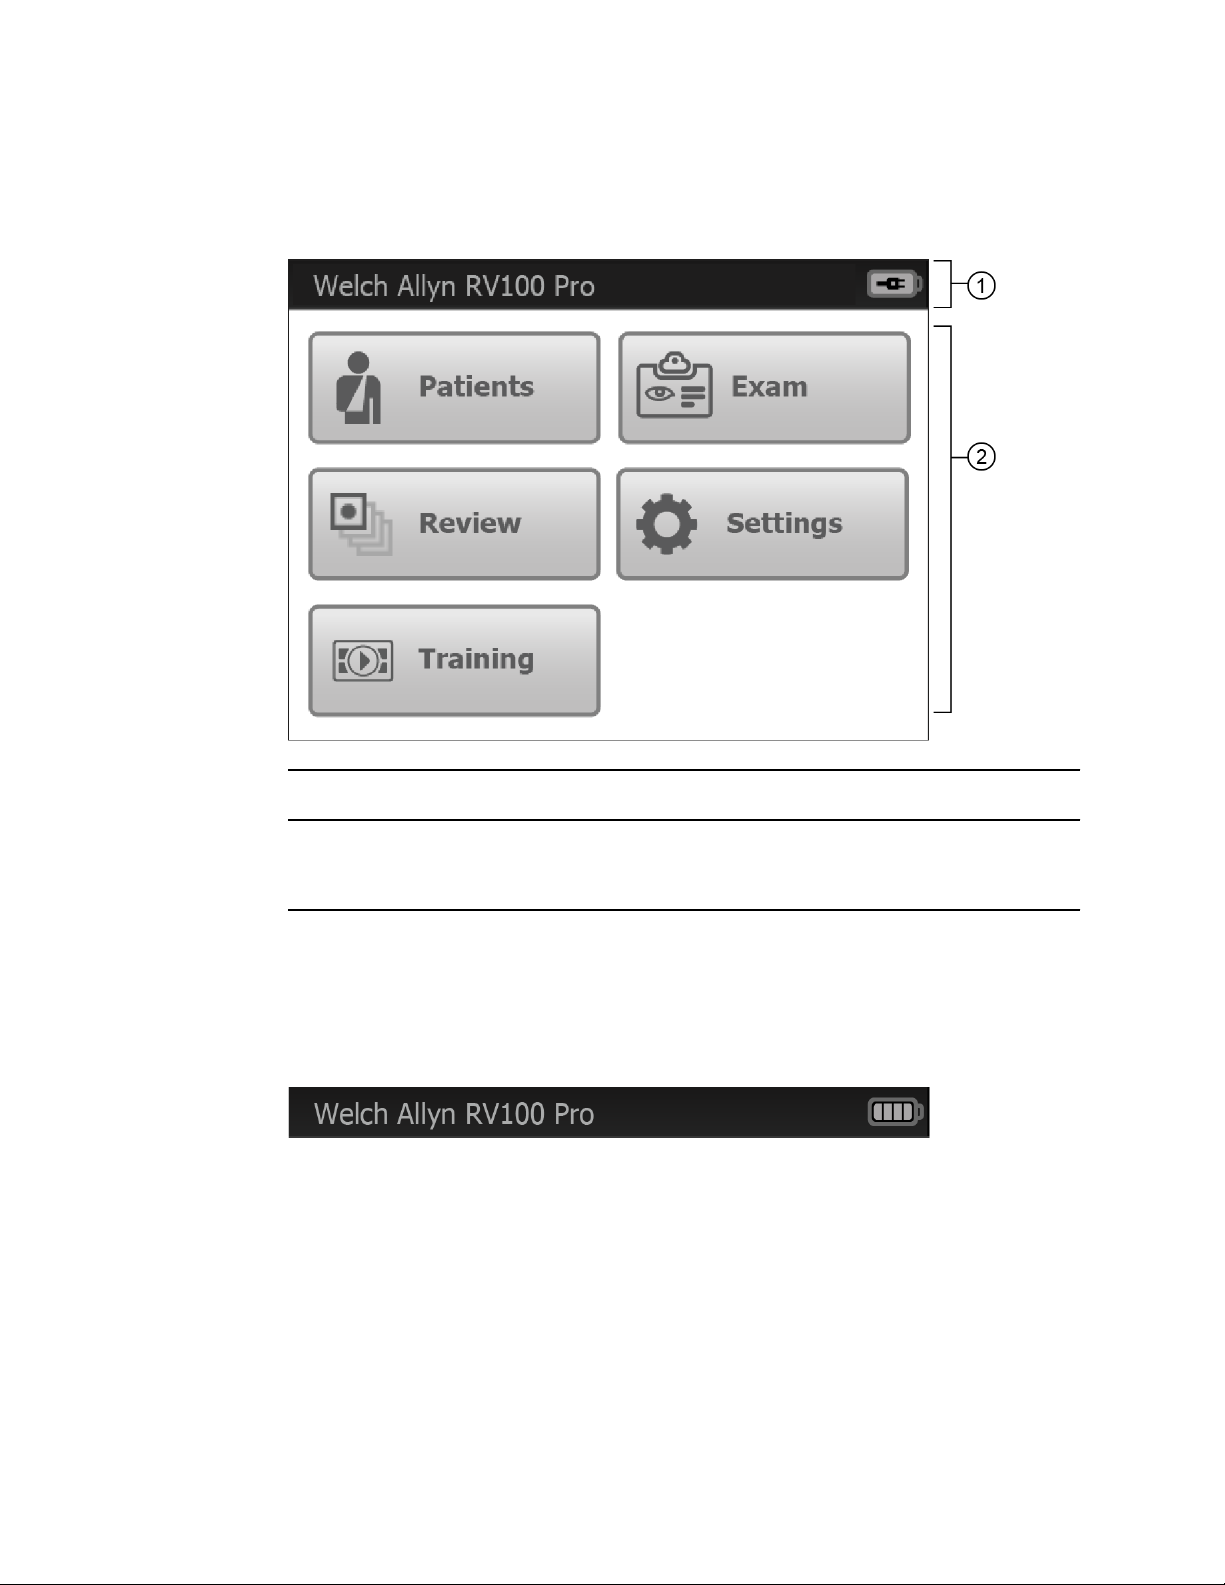
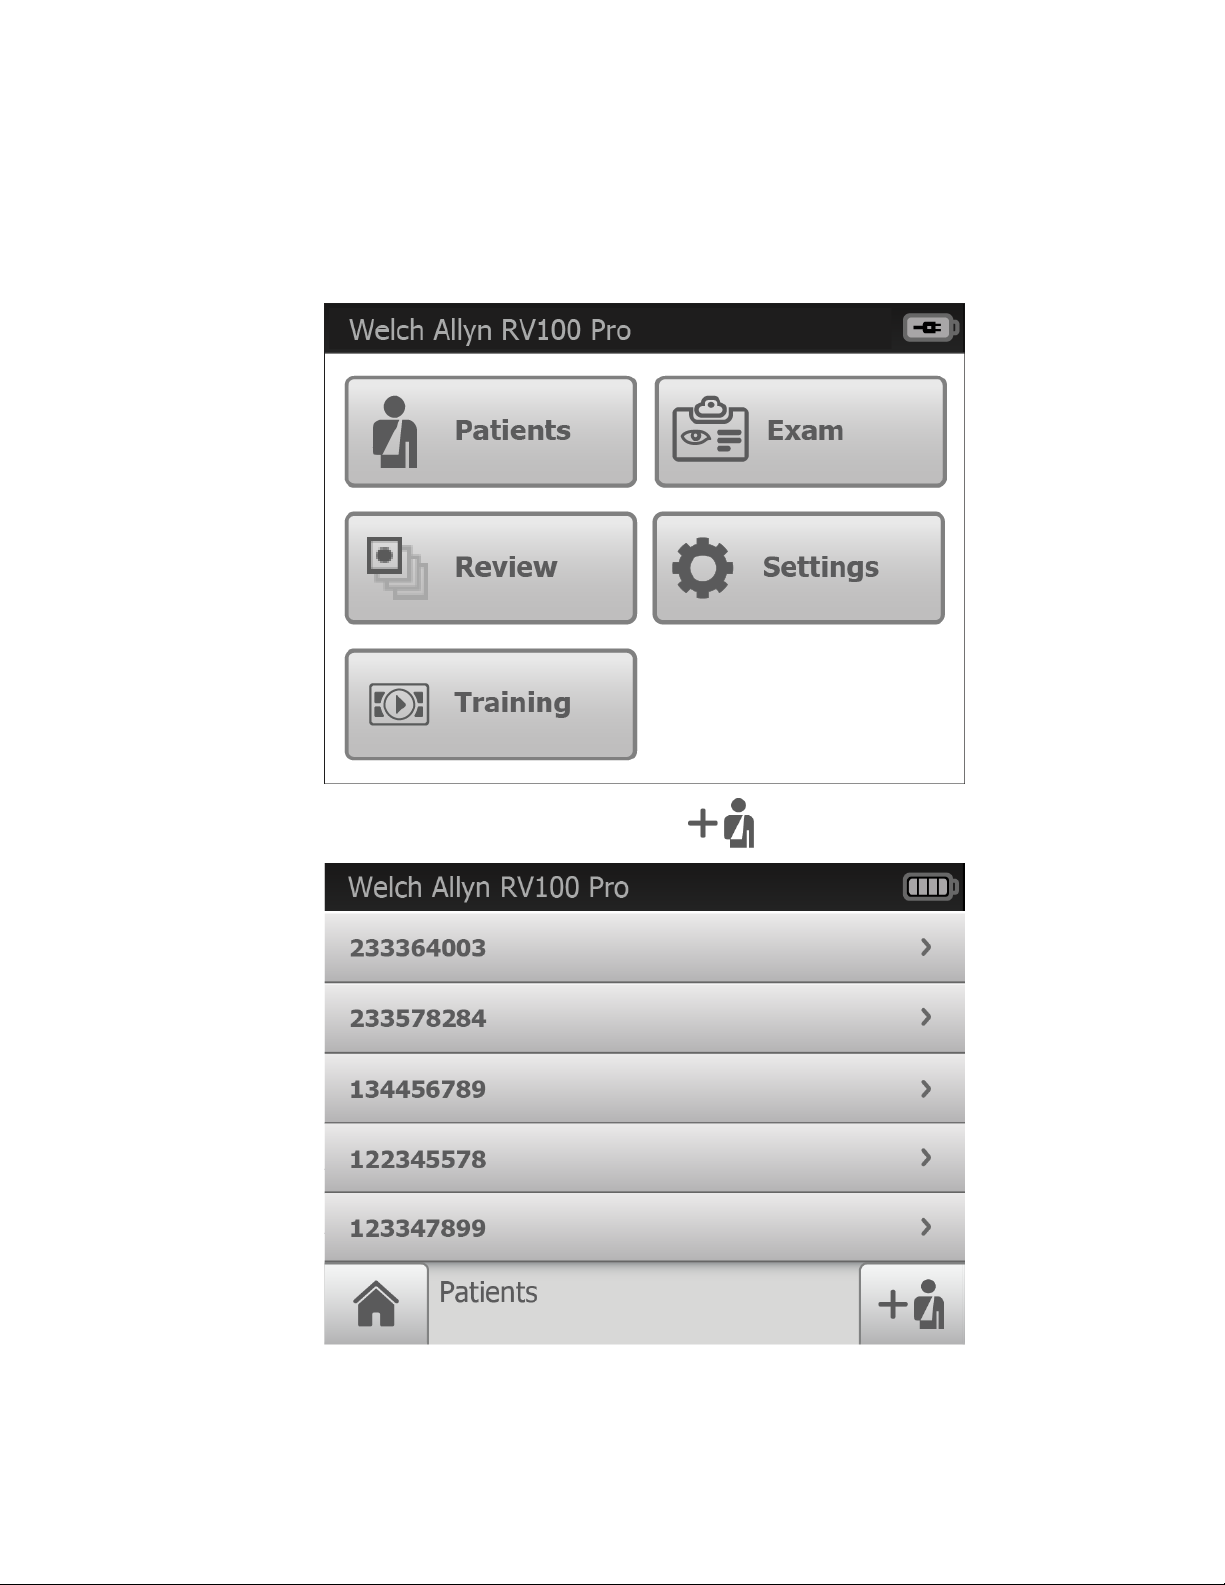
RetinaVue 100 Imager Pro Home screen
The RetinaVue 100 Imager Pro Home screen includes the following areas:
Item Area
1 Device status
2 Content
Device Status Area
The Device Status Area, located at the top of the Home screen, displays the Battery
condition and the device model number. Estimated battery capacity is displayed in a
charged or discharged status format.
In the Exam Summary and Review screens, the Device Status Area displays:
•
the device model number
• the battery condition
Content Area
The Content Area includes four workflow selection buttons and a Training button.
Touching one of the five buttons navigates to the next screen associated with that
workflow or training.
Patients: Presents a list of patients created on the RetinaVue 100 Imager Pro until
•
the exams are completed.
• Exam: The Exam workflow provides a guided approach to image capture. To
maintain consistent and complete exam submissions, a prescribed image acquisition
Page 25

Directions for use Using the RetinaVue 100 Imager Pro 21
sequence is used to complete an exam. The Exam workflow also presents controls,
status, and previews of images.
• Review: Presents images and exams from a list of patient IDs contained on the
RetinaVue 100 Imager Pro .
• Settings. Provides controls to view or change the following:
○
Volume
○
Time
○
Date
○
Advanced settings:
– Device access code
– Advanced settings code
– Format SD
– Restore factory defaults
○
Exam setup
– 1-image (Macula-centered)
– 2-image (Macula and Optic Disc-centered)
○
Camera configuration
Switch between RV100/RV100 Pro
– RV100 Pro
Unencrypted images only (no RetinaVue Network compatibility)
– RV100
RetinaVue Network required (USB or Wireless)
– Export log
○
About
– Software version
○
Regulatory Information
• Training: Provides demonstrations and interactive training exercises on the
RetinaVue 100 Imager Pro. Short video clips and interactive training help you practice
the three key steps necessary to master the RetinaVue 100 Imager Pro.
Page 26
22 Using the RetinaVue 100 Imager Pro Welch Allyn RetinaVue™ 100 Imager Pro
Create a new patient on the RetinaVue 100 Imager Pro camera
1. From the Home screen, touch Patients.
2. After the Patients screen appears, touch (New patient).
The New Patient screen appears.
Page 27

Directions for use Using the RetinaVue 100 Imager Pro 23
The Patient ID field is the only Required field and is noted with a red asterisk. Once
added, the required Patient ID will appear in the top left of the Pre-acquisition screen
as the camera enters the Pre-acquisition mode.
CAUTION When manually entering patient information, do
not use the same patient identifier for multiple patients. This
may result in inaccurate data association.
3. Touch within the Patient ID field to launch the on-screen keyboard. Enter the Patient
ID and touch OK.
4. (Optional) Touch within the Patient's Last name, First name, or Middle initial to enter
the patient's last name, first name and middle initial. Touch OK.
5. (Optional) Enter the patient's Date of Birth. Touch within the DOB/Gender field to
launch the on-screen keyboard and to enter the patient's Date of Birth. Touch OK.
6. (Optional) Enter the patient's gender using the radio button to select male (M) or
female (F).
7. Once all the required fields are complete, touch OK to open a new exam. The Pre-
acquisition screen appears.
Page 28

24 Using the RetinaVue 100 Imager Pro Welch Allyn RetinaVue™ 100 Imager Pro
Note The Patient ID appears in the top left of the Pre-acquisition
screen.
8. Refer to the topic Perform an eye exam using the Auto exam mode for instructions
on performing exams and acquiring images.
Page 29

Directions for use Using the RetinaVue 100 Imager Pro 25
About the Auto and Manual Exam modes
Auto Mode
Manual Mode
Auto Mode is the default image capture mode. Available automatic features include:
Image capture
•
• Focus
• Flash brightness
• Sequential image capture order of the right and left eye
• Navigation to the image Inspection screen
In addition to the automatic features, manual capture, manual focus adjustment, and manual flash
brightness adjustment are also available. (Manual focus adjustment and flash brightness are
accessed from the Capture settings screen.)
Page 30

26 Using the RetinaVue 100 Imager Pro Welch Allyn RetinaVue™ 100 Imager Pro
Manual mode contains advanced image capture options.
Note
Available manual features include:
• Focus adjustment (values range from -1 to +1)
• Flash brightness adjustment (values range from -2 to +2)
• Sequential image capture order of the right and left eye
• Image capture
A manual touch of the capture button is required to obtain an image.
Page 31

Directions for use Using the RetinaVue 100 Imager Pro 27
Adaptive software in the Auto exam mode for software
6.10.02 and higher
Auto exam mode
first stage
Auto exam mode
second stage
Once the view is in-fundus, the adaptive software will enlarge the on-screen diamond at specific
time intervals.
Note
Note
As the image capture sequence continues, the diamond on the LCD touchscreen increases in size.
The best image quality is obtained while the diamond is at the beginning smallest
size.
The diamond will reset to its smallest size each time the view moves out of the
fundus.
Page 32

28 Using the RetinaVue 100 Imager Pro Welch Allyn RetinaVue™ 100 Imager Pro
Perform an eye exam using the Auto exam mode
Auto exam mode is the default image capture mode.
Available automatic features include:
• Image capture
• Focus adjustment
• Flash brightness adjustment
• Sequential image capture order of the right and left eye
• Navigation to the image Inspection screen
○
In addition to automatic image capture, manual capture is also available.
Note To ensure that the patient's pupils sufficiently dilate to at least 3.5 mm
diameter, adjust the room lighting to the lowest possible level. If
necessary, have the patient sit in a dark room for 5 minutes to dilate their
pupils.
Note While the RetinaVue 100 Imager Pro can be used on patients with
cataracts and other eye opacities, the use of the RetinaVue 100 Imager Pro
may result in a lower quality image due to the increased reflection of the
flash off the patient's intraocular lens.
• Ensure that the SD card is installed into the RetinaVue 100 Imager Pro.
• Ask your patient to remove their glasses, contacts can remain in place.
• Ensure that the patient sits on the edge of an exam table and stand in front of the
patient to take the image.
Alternatively, ask the patient to sit in a chair and sit directly across from the patient
with your legs together on the same side as the examined eye.
• Ask the patient to sit up straight and hold their head in a stationary position during
the entire procedure.
Page 33

Directions for use Using the RetinaVue 100 Imager Pro 29
• Ensure that the patient is sitting in a position that allows for a straight and level
approach of the RetinaVue 100 Imager Pro into the patient's eyes. A stable approach
minimizes the loss of the view of the eye and repeated image capture attempts.
• Keep the RetinaVue 100 Imager Pro lens the same height as the patient's examined
eye.
• Approach the patient from directly in front of the examined eye.
• Make slight, micro adjustments with your guide hand to fine tune the position of the
RetinaVue 100 Imager Pro. Do not use your hand on the LCD side to make minor
adjustments.
Note For additional information about techniques to capture the highest quality
image, see the Technique guide and the Training video that came with the
RetinaVue 100 Imager Pro.
1. Press the power button .
Note To conserve power, the RetinaVue 100 Imager Pro enters
Sleep mode if it remains idle for approximately 2 minutes.
Touch the LCD screen, press the power button, or press the
Home button to wake up the RetinaVue 100 Imager Pro from
Sleep mode.
Note After 10 minutes of inactivity in Sleep mode, the RetinaVue
100 Imager Pro powers down. Press the power button to
activate the RetinaVue 100 Imager Pro.
2. From the Home screen, touch Exam.
The Preacquisition screen appears.
3. (Optional), If necessary, touch (Settings) to adjust the illumination, or the
focus. Touch the up or down arrows in the Advanced image capture settings and
touch OK.
Page 34

30 Using the RetinaVue 100 Imager Pro Welch Allyn RetinaVue™ 100 Imager Pro
4. Touch Start to enter the Image acquisition mode and begin the first exam of the
patient's right eye (R1).
The Exam acquisition screen appears.
5. Hold the patient end of the RetinaVue 100 Imager Pro two to three inches directly in
front of the patient's examined eye. Continue forward to compress the eye cup
against the examined eye.
WARNING Clean and disinfect the eye cup after each
patient to avoid the risk of cross-contamination.
6. Direct the patient to focus on the green fixation lights inside the barrel of the
RetinaVue 100 Imager Pro.
Note Instruct the patient to cover, but not close, their unexamined
eye. This will help the patient to focus on the green fixation
lights.
Page 35

Directions for use Using the RetinaVue 100 Imager Pro 31
7. Look for a white circular reflection at the top of the eye's image on the LCD
touchscreen. This is your initial target.
8. Guide the green circle on the RetinaVue 100 Imager Pro LCD touchscreen towards
the initial target by slowly moving the RetinaVue 100 Imager Pro towards the eye.
Page 36

32 Using the RetinaVue 100 Imager Pro Welch Allyn RetinaVue™ 100 Imager Pro
9. Once the reflection has filled the screen, push slightly forward until a “bubble”
appears.
10. Keep the RetinaVue 100 Imager Pro in line. Slightly adjust the RetinaVue 100 Imager
Pro away from any shadows that appear.
11. Move the patient end of the RetinaVue 100 Imager Pro toward the bubble.
12. Align the bubble inside the diamond icon.
Page 37

Directions for use Using the RetinaVue 100 Imager Pro 33
13. An audible tone alerts you that the image has been captured.
The acquired image appears on the LCD touchscreen for review in about five
seconds.
14. Touch (Accept) to begin the second exam of the patient's left eye (L1) and wait
at least 1 minute before repeating the steps until the second image is automatically
captured.
• (Optional) If the 2-image, Macula +Optic Disc-center exam setup is selected in
Advanced settings, wait at least 1 minute before repeating the steps until all the
images are automatically captured (R1, L1, R2, L2 and up to 4 additional images).
Page 38

34 Using the RetinaVue 100 Imager Pro Welch Allyn RetinaVue™ 100 Imager Pro
Note Touch to review the current image. Images with a red
X ( ) denote low quality images. Touch (navigates
to the Acquisition screen) or touch (navigates to the
Pre-acquisition screen) to dispose of an image and then
touch
image.
15. When the sequential image capture is complete and the images contain a green or
yellow quality acceptance check mark, proceed to the Exam summary screen.
Note To add missing patient context information touch and
then touch
existing patient's name from within the Patients screen to
select that patient. Touch Save to save the exam images.
(Add image) to begin a capture of another
to create a new patient, or touch on an
Perform a manual image capture while in Auto exam mode
1. From the Pre-acquisition screen, touch Start.
2. Touch or (image capture) to manually capture an image.
An audible tone alerts you that the image has been captured. The acquired image
appears on the LCD touchscreen for review in about five seconds.
Page 39

Directions for use Using the RetinaVue 100 Imager Pro 35
Skip an image capture while in Auto exam mode
1. From the Home screen, touch Exam.
The Pre-acquisition screen appears.
2. Touch (Next) or touch , or , or (Image Order) to skip to
the next image in the sequence.
3. Touch Start to enter Image acquisition mode and begin the exam of the patient's
eye using the next image in the sequence. The Exam acquisition screen appears.
4. If this is the last image in the sequence, touch (Accept) on the Image inspection
screen and navigate to the Exam summary screen. If an image is missing in the 1image, Macula-centered Exam setup, touch Override to access the Save button and
to save the image. Or, touch Override to access the Save button and to save
multiple images in the 2-image, Macula + Optic Disc-centered Exam setup.
Page 40

36 Using the RetinaVue 100 Imager Pro Welch Allyn RetinaVue™ 100 Imager Pro
Perform a manual image capture while in Manual exam mode
1. From the Home screen, touch Exam.
The Pre-acquisition screen appears.
2. Touch MANUAL to enter Image acquisition mode and begin the exam of the
patient's eye.
The Exam acquisition screen appears.
Page 41

Directions for use Using the RetinaVue 100 Imager Pro 37
3. (Optional), If necessary, touch to adjust illumination, or touch to adjust the
focus.
4. Hold the patient end of the RetinaVue 100 Imager two to three inches directly in
front of the patient's examined eye. Continue forward to compress the eye cup
against the examined eye.
5. Direct the patient to focus on the green fixation lights inside the barrel of the
RetinaVue 100 Imager.
6. Look for a white circular reflection at the top of the eye's image on the LCD
touchscreen. This is your initial target.
7. Guide the green circle on the RetinaVue 100 Imager LCD touchscreen towards the
initial target by slowly moving the RetinaVue 100 Imager towards the eye.
8. Once the reflection has filled the screen, push slightly forward until a “bubble”
appears.
9. Move the patient end of the RetinaVue 100 Imager toward the bubble.
10. Align the bubble inside the diamond icon.
11. Touch or (image capture) to manually capture an image.
An audible tone alerts you that the image has been captured. The acquired image
appears on the LCD touchscreen for review in about five seconds.
Review patient exams on the RetinaVue 100 Imager Pro
1. From the Home screen, touch Review. The Review screen appears.
Page 42

38 Using the RetinaVue 100 Imager Pro Welch Allyn RetinaVue™ 100 Imager Pro
2. Touch on a patient's ID to review the patient demographics (Patient summary
screen) and to view images associated with a patient.
3. Any saved images appear on the Exam summary screen.
4. After the review is complete, touch (Back) to return to the Review screen and
then touch (Home) to return to the Home screen.
Page 43

Directions for use Using the RetinaVue 100 Imager Pro 39
Transfer patient exams from the RetinaVue 100 Imager Pro to a computer
1. Place the RetinaVue 100 Imager Pro into the cradle and ensure that the cradle is
connected to a computer by the USB cable.
2. Power on the computer and the RetinaVue 100 Imager Pro.
3. If using a computer on a network, enter your credentials.
Note It is the responsibility of the health care provider to protect
patient health information and to meet regulatory and HIPAA
compliance. The images on the RetinaVue 100 Imager Pro
may contain identifiable patient information and it is the
responsibility of the health care provider to ensure that data
safeguards are implemented to protect patient health
information.
4. Within a few seconds, an Autoplay pop-up window appears on the computer screen,
indicating that a new storage volume (the RetinaVue 100 Imager Pro camera's SD
card) was detected.
5. Click on the storage volume. Click on the folder with the Patient ID that you created
previously on the RetinaVue 100 Imager Pro camera.
6. Double-click on the .jpg image to open an exam image in your installed photo viewer
program.
7. Select the image and copy the image and paste it into the desired location.
Page 44

40 Using the RetinaVue 100 Imager Pro Welch Allyn RetinaVue™ 100 Imager Pro
Use the RetinaVue 100 Imager Pro SD Card to transfer patient exams to a computer
1. Power down the RetinaVue 100 Imager Pro and remove the SD Card.
2. Insert the SD Card into an open SD Card reader port on the computer.
3. Within a few seconds, an Autoplay pop-up window appears on the compter screen,
indicating that a new storage volume (the RetinaVue 100 Imager Pro camera's SD
card) was detected.
Note It is the responsibility of the health care provider to protect
patient health information and to meet regulatory and HIPAA
compliance. The images on the RetinaVue 100 Imager Pro
may contain identifiable patient information and it is the
responsibility of the health care provider to ensure that data
safeguards are implemented to protect patient health
information.
4. Click on the storage volume. Click on the folder with the Patient ID that you created
previously on the RetinaVue 100 Imager Pro camera.
5. Transfer the exam images from the SD Card to the computer.
6. Select the image and copy the file from the SD Card and paste it into the desired
location.
Page 45

Troubleshooting
CAUTION A defective device should not be used. A device with parts
which may be broken or missing, visibly worn, distorted, or contaminated
should be replaced immediately.
To correct an error, follow these instructions or contact Welch Allyn Technical Support:
www.welchallyn.com/service.
41
Troubleshooting image quality
Good quality image
Problem
Partial blink Ask the patient to keep his or her eye open.
Solution
Page 46

42 Troubleshooting Welch Allyn RetinaVue™ 100 Imager Pro
Problem Solution
Dark semi-circle on top Move the patient side of the RetinaVue 100 Imager
down and away from dark semi-circle.
Dirty lens Clean the lens with an appropriate cleaning cloth.
Error messages
Error message/problem
There is no SD card inserted. Please insert an SD card to continue. Insert SD card.
SD card access error Check the write-protection switch on the SD card
The space left in the SD card is not enough. Please replace the SD
card.
Update file extraction failed. Power off device and restart. Check the write-protection switch on the SD card
Failed saving files to the SD card. Check the write-protection switch on the SD card
Solution
and ensure that it is in the forward position.
Reinsert SD card to ensure the card is seated
correctly.
Replace the SD card with a formatted SD card.
and ensure that it is in the forward position.
Reinsert SD card to ensure the card is seated
correctly.
If the SD card does not have sufficient space,
remove all files (except the update image) from the
SD card. Perform the update again.
and ensure that it is in the forward position.
Reinsert or replace the SD card and click Retry.
Page 47

Directions for use Troubleshooting 43
Error message/problem Solution
Camera is docked. Remove camera from docking station to access
camera functions.
The battery is running low. Please recharge. When the battery charge level is below 25 percent,
Remove the camera from the docking station.
the low battery error message appears. Place the
camera into the docking station to charge the
battery.
To reduce the likelihood of a low battery charging
state, ensure that the USB cable is plugged into a
"Always On" USB port on the computer.
If the low battery message continues to display after
the camera is docked in the docking station for
several hours and while it is plugged into a USB port
of your computer, plug the USB cable into an
"Always On" USB port on the computer. (Only
"Always On" USB ports continue to charge the
camera when the computer enters sleep mode or
power-saving mode.)
Note See you computer manufacturer's
user documentation for
instructions on changing the
power management options and
for identifying the "Always On"
USB port.
The battery level is too low to acquire any image. Please recharge
now.
When the battery charge level is below ten percent
and the battery icon blinks, the low battery error
message appears. Place the camera into the docking
station to charge the battery.
Problem Solution
Battery is not installed. Camera will not charge. The power
indicator LED light on the camera blinks between green and amber
when placed in the docking station.
Battery is installed with the polarity reversed. Camera will not
charge. The power indicator LED light on the camera blinks
between green and amber when placed in the docking station.
The power indicator light does not turn on when the camera is set
into the docking station. Charging is impacted if the pins are not
properly touching.
The Windows® operating system may display the Scan and fix or
Continue without scanning message once the camera is set in the
cradle or when the USB cable is removed from the laptop or PC.
Install the battery and check to ensure that the
polarity on the battery matches the + and - polarity
on the device.
Re-install the battery and check to ensure that the
polarity on the battery matches the + and - polarity
on the device. Set the camera into the docking
station and wait for the power indicator LED light to
turn amber indicating that the device is charging.
Ensure that the contact pins of the camera are
touching the contact pins of the docking station
charger. If necessary, reseat the camera into the
docking station.
Select Scan and fix if this Windows message
appears in situations when the camera is connected
to a laptop or PC by the USB cable.
Page 48

44 Troubleshooting Welch Allyn RetinaVue™ 100 Imager Pro
Problem Solution
The Windows® operating system may display the Autoplay
notification popup dialogue box each time the camera is placed
into the docking station when the USB cable is connected to the
laptop or PC.
Reset the codes and data
By default, the AutoPlay notification is displayed
when a USB storage device is connected to the
laptop or PC. To disable this notification, select
Control Panel > AutoPlay from the Windows
Start menu. Uncheck the Use AutoPlay for all media
and devices checkbox. Click Save.
®
Problem
Locked out of the RetinaVue 100 Imager Pro.
Cannot recall the Device access code or the Advanced settings
code.
Solution
CAUTION Resetting the codes
will result in a loss of any images
and patient data stored on the
RetinaVue 100 Imager Pro.
When the Please enter access code screen appears,
press and hold the Home button for approximately 10
seconds. Touch Confirm at the dialogue screen
prompt Reset all the settings to defaults?
Page 49

Directions for use Troubleshooting 45
Problem Solution
Note
Touch OK at the All settings were restored to
factory defaults confirmation dialogue screen.
The reset process typically takes a
few minutes to cycle through the
complete reset. During the reset
process, it is normal for the
Confirm button to remain active
before the reset confirmation
dialogue screen appears. Do not
remove the SD card or power off
the device.
Page 50

46 Troubleshooting Welch Allyn RetinaVue™ 100 Imager Pro
Page 51

Maintenance
Clean and disinfect
CAUTION Never submerge the RetinaVue 100 Imager in water or any
other liquid.
CAUTION Never use abrasive cleaning agents, thinners or benzene for
cleaning and never immerse the instrument in water or other cleaning
liquids.
47
CAUTION Never insert a sharp object into the device or any open surface
on the RetinaVue 100 Imager.
CAUTION Do not use unapproved cleaning or disinfection agents. Use of
these agents may cause damage to components.
CAUTION When cleaning the device and the docking station charger,
avoid using cloths or solutions that include quaternary ammonium
compounds (ammonium chlorides) or glutaraldehyde-based disinfectants.
CAUTION Do not use bleach solutions of any kind when cleaning metal
electrical contacts. They will damage the docking station charger and the
device.
Note Clean on a routine basis according to your facility's protocols and standards
or local regulations.
The RetinaVue 100 Imager has been tested to verify that it is compatible with the
approved cleaning agents.
Cleaning the RetinaVue 100 Imager lens
Wipe the surface of the lens with a cleaning cloth or a lens cleaning tissue such as
Thorlabs Inc.. Avoid touching the lens except when cleaning is required.
Cleaning the RetinaVue 100 Imager and eye cup
Power off the RetinaVue 100 Imager before cleaning it.
Use a pre-moistened wipe or soft cloth slightly moistened with an approved cleaner to
gently clean the RetinaVue 100 Imager and eye cup.
Page 52

48 Maintenance Welch Allyn RetinaVue™ 100 Imager Pro
Cleaning the docking station charger
Use a pre-moistened wipe or soft cloth slightly moistened with an approved cleaner to
gently clean the docking station charger.
Disinfecting the RetinaVue 100 Imager, eye cup, and docking station charger
Note Disinfect according to your facility's protocols and standards or local
regulations.
Use a pre-moistened wipe or soft cloth slightly moistened with an approved disinfectant
to disinfect the RetinaVue 100 Imager, eye cup, and docking station charger. Follow the
manufacturers recommendations.
Approved cleaning agents
Use only the following approved cleaning agents on the RetinaVue 100 Imager, eye cup,
and docking station charger:
• 70 percent isopropyl alcohol
• CaviWipes
•
Sani-Cloth® Plus
•
Super Sani-Cloth
®
The RetinaVue 100 Imager has been tested to verify these instructions as being capable
of preparing the RetinaVue 100 Imager for re-use. You must ensure that cleaning and
disinfection as actually performed by your personnel, with your equipment and materials,
achieves the desired result. This may require validation and routine monitoring of your
actual process.
Page 53

RetinaVue 100 Imager Pro Specifications
Specifications
49
View Angle
Diopter -20 ~ +20D (Typical)
Dimensions L 8.8 inches (224.2 mm) × W 4.2 inches (106.7 mm) × H 4.1 inches (105.2 mm)
Weight 565 Grams ±5%
Search Fundus
Lighting
Camera flash light Natural White Light Emitting Diode (LED)
Captures Auto capture and Manual capture
Camera Resolution 2048 x 1536 pixels
LCD Monitor 3.5 inch Full Color TFT-LCD
Image Format Unencrypted JPEG/DICOM (standalone use)
Interface Micro USB
RetinaVue 100
Imager Pro File
Transfer
45 Degree (Typical)
Infrared LED
Docking station, micro USB cable to a computer
SD Card transfer to a computer SD Card Reader
File Storage SD Card, default 8GB. Supports 8GB to 32GB by FAT32 format.
Supports 1,200 exams
Supports up to 200 patients
Power Source Rechargeable Lithium Battery 3.6V / 3350mAh
External Power Source: 100~240 VAC, 50/60 Hz
Power Adapter
Spec.
Charger Station
Input Spec.
Input Spec. : 100~240 VAC, 50/60 Hz, 0.2A - 0.1A; Output Spec. : 5V DC, 2A
5V DC, 1.2A
Page 54

RetinaVue 100 Imager Pro Specifications Welch Allyn RetinaVue™ 100 Imager Pro
50
Operating Time
Charging Time 5 hours (through the docking station using a Welch Allyn approved battery)
All specifications are subject to change.
3 hours at 5 minutes working mode.
The device enters Sleep mode if idle for 2 minutes.
Once the device is idle for 2 minutes it enters Sleep mode and if it remains idle in Sleep mode for
another 10 minutes the device powers down.
Operating environment
Criterion Environmental conditions
Temperature + 10 °C to + 35 °C
Relative humidity 30 % to 90 %
Atmospheric pressure 800 hPa to 1060 hPa
Storage environment
Criterion
Environmental conditions
Temperature − 10 °C to + 55 °C
Relative humidity 10 % to 95 %
Atmospheric pressure 700 hPa to 1060 hPa
Transportation environment
Criterion
Temperature − 40 °C to + 70 °C
Relative humidity 10 % to 95 %
Atmospheric pressure 500 hPa to 1060 hPa
Device lifetime
The lifetime of the device is five (5) years. The manufacture date of the device can be
found on the device labels.
Welch Allyn will service RetinaVue 100 Imager Pro devices that are within their lifetime.
Firmware updates and support may require an annual subscription service after the initial
one (1) year warranty period. The expected battery life is at least one (1) year. If the
RetinaVue 100 Imager Pro device fails to hold a charge, a new battery can be ordered.
Environmental conditions
Page 55

Enable the RetinaVue Network
Note The RetinaVue 100 Imager Pro model is a stand alone camera with
unencrypted images and is designed for use independent of the Welch
Allyn RetinaVue Network.
Note Account registration with the Welch Allyn RetinaVue Network is required to
use the RetinaVue 100 Imager camera with wireless or USB connectivity.
To change to a RetinaVue 100 Imager camera configuration with encrypted
images and a USB or wireless connection to the Welch Allyn RetinaVue
Network:
• In North America, please call the following number: 865.622.8380 from 8:00
AM – 5 PM EST to create an account with the Welch Allyn RetinaVue
Network. For additional inquires use the following link:
www.welchallyn.com/support.
• In the Australian region, contact Australia Technical Support at the following
number: 1800 650 083 from 08:30 – 17:00 Monday – Friday AEDT. For
additional inquires use the following link: techsupport.au@welchallyn.com.
51
To change the camera configuration from the RV100 Pro to the RV100 (USB or Wireless):
1. Touch Settings.
2. Touch Advanced settings.
3. Touch Camera configuration.
4. To convert the RV100 Pro to a RV100, touch RV100 to use the RetinaVue Imager
camera with encrypted images and with the RetinaVue Network:
a. Touch Yes at the prompt: I already have an account.
b. Touch OK at the prompt: Saved exams stored on this camera will be
discarded.Note: This prompt only appears if saved exams have not been
transferred.
c. At the RetinaVue 100 Imager camera set up screen, select whether your camera
will be used with Wi-Fi or USB connectivity.
• For Wi-Fi set up, touch the RetinaVue Network - Wi-Fi radio button and see the
RetinaVue 100 Imager Directions for use topic First time selection of Wi-Fi
connectivity workflow for instructions on setting up the camera for a wireless
connection to the RetinaVue Network Customer Portal.
Page 56

52 Enable the RetinaVue Network Welch Allyn RetinaVue™ 100 Imager Pro
• For USB set up, touch the RetinaVue Network - USB radio button and see the
manual Software installation instructions for instructions on downloading the
RetinaVue Network software application onto your PC.
To change the camera configuration from the RV100 (USB or Wireless) to the RV100 Pro:
1. Touch Settings.
2. Touch Advanced settings.
3. Touch Camera configuration.
Note The RetinaVue 100 Imager Pro camera provide a means to
revert back to the RetinaVue 100 Imager Pro model at this
point in the configuration.
4. Touch RV100 Pro to convert the RV100 to the RV100 Pro and to use the RetinaVue
100 Imager Pro camera with unencrypted images without using the RetinaVue
Network:
a. Touch OK at the prompt: Saved exams stored on this camera will be
discarded.Note: This prompt only appears if saved exams have not been
transferred.
b. At the RetinaVue 100 Imager camera set up screen, touch the RV100 Pro radio
button to revert back the RetinaVue 100 Imager Pro model.
Page 57

Viewing or changing the RetinaVue 100 Imager Pro settings
To view or change the settings
Touch Settings. Modify the settings as desired.
• Touch Volume.
53
Touch (up) or (down) to adjust the device sound volume. Touch (Back)
to return to the Settings screen.
•
Touch Time.
Touch (up) or (down) to adjust the hour, minute (Min), Continent, and
Location. Use the radio buttons to select the 24-hour or 12-hour format. Touch
(Back) to return to the Settings screen.
•
Touch Date.
Touch (up) or (down) to adjust the day, month, and year in the DD/MM/YY
format. Touch (Back) to return to the Settings screen.
Touch Advanced settings.
Modify the settings as desired
•
Device access code. Set the Device access numeric code, retype the code to
confirm, and touch OK to return to the Advanced Settings screen.
• Advanced settings code. Set the Advanced settings numeric code, retype the code
to confirm, and touch OK to return to the Advanced Settings screen.
• Format SD. Touch OK to format the SD card to the default settings and touch OK
again to return to the Advanced Settings screen.
• Restore factory defaults. Touch Confirm to reset the device to the default settings
and touch OK to return to the Advanced Settings screen.
• Exam setup. Touch Exam setup. Touch 1-image (Macula-centered) to use the one
image per eye exam workflow or touch 2-image (Macula and Optic Disc-centered) to
use the two images per eye exam workflow . Touch (Back) to return to the
Settings screen.
Page 58

54 Viewing or changing the RetinaVue 100 Imager Pro settings Welch Allyn RetinaVue™ 100 Imager Pro
• Camera configuration. Touch Camera configuration. Touch RV100 Pro to use the
RetinaVue 100 Pro Imager with unencrypted images only without the RetinaVue
Network. See the topic Enable the device with the RetinaVue Network for further
instructions on configuring the device.
• Export log. The log files are exported to the SD card. Touch OK to return to the
Advanced Settings screen. Touch (Back) to return to the Settings screen.
• Touch About to view the software version. Touch OK.
• Regulatory Information. Touch Regulatory Information to view Regulatory
Information. Touch (Back) to return to the Settings screen.
Touch (Home) to return to the Home screen.
Power down the RetinaVue 100 Imager
1. Press .
2. A dialogue box appears with three options:
• Power Off
• Sleep
• Cancel
Page 59

Directions for use Viewing or changing the RetinaVue 100 Imager Pro settings 55
3. Touch one of the options.
Sleep mode
To conserve power, the RetinaVue 100 Imager enters Sleep mode if approximately 2
minutes have passed since the last screen press.
To bring the RetinaVue 100 Imager out of Sleep mode, use any of these methods:
1.
2. Touch the LCD touchscreen.
3. Press the Home button.
The RetinaVue 100 Imager will power off, go into Sleep mode, or return to the prior
screen, depending on the option you choose.
Touch the power button.
Note Lifting or moving the RetinaVue 100 Imager also brings the RetinaVue 100
Enter Sleep mode
1. Press .
Imager out of Sleep mode.
Page 60

56 Viewing or changing the RetinaVue 100 Imager Pro settings Welch Allyn RetinaVue™ 100 Imager Pro
2. A dialogue box appears with three options:
• Power Off
• Sleep
• Cancel
3. Touch Sleep.
The RetinaVue 100 Imager enters Sleep mode.
Exit sleep mode
1. Perform one of these options: (1) Press , (2) touch the LCD touchscreen, or (3)
press the Home button.
Page 61

Directions for use Viewing or changing the RetinaVue 100 Imager Pro settings 57
Note Lifting or moving the RetinaVue 100 Imager also brings the
RetinaVue 100 Imager out of Sleep mode.
2. After performing one of the options, the RetinaVue 100 Imager will awaken from
Sleep mode, or return to the prior screen.
Set the date and time
Before first use, set the date and time
1. Follow the steps in the Battery installation and replacement section to install the
battery and then press and hold the power button to turn the device on.
2. Touch Settings on the RetinaVue 100 Imager Home screen.
:
3. Touch Time. Touch (up) or (down) to adjust the hour, minute, Continent,
and location.
Note The default time appears in the 24-hour format. Use the
radio buttons to select the 24-hour or 12-hour format.
Page 62

58 Viewing or changing the RetinaVue 100 Imager Pro settings Welch Allyn RetinaVue™ 100 Imager Pro
4. Touch (Back) to return to the Settings screen.
5. Touch Date. Touch (up) or (down) to adjust the day, month, and year in
the DD/MM/YY format.
6. Touch (Back) to return to the Settings screen.
7. Touch (Home) to return to the RetinaVue 100 Imager Home screen.
Set the Device Access Code
Note Setting the Device Access Code before first use provides additional
security features in the RetinaVue 100 Imager Pro to prevent unintended
access to patient information by unauthorized individuals.
1. Follow the steps in the Battery installation and replacement section to install the
battery and then press and hold the power button to turn the device on.
2. Remove the RetinaVue 100 Imager Pro from the docking station charger.
3. Touch Settings on the RetinaVue 100 Imager Pro Home screen.
Page 63

Directions for use Viewing or changing the RetinaVue 100 Imager Pro settings 59
4. Touch Advanced Settings.
5. Touch Device Access Code to enter an access code for the RetinaVue 100 Imager
Pro.
6. Use the touchscreen numeric keypad to enter an access code into the Access code
field and then retype the same code into Access code (retype) field.
Note The access code password can contain a minimum of 1-digit
and a maximum of 18-digits. Characters are only numeric
from 0 through 9.
7. Touch OK to accept the code and touch OK again at the confirmation screen to
return to the Advanced Settings screen.
8. Touch (Back) to return to the Settings screen.
9. Touch (Home) to return to the RetinaVue 100 Imager Pro Home screen.
Reset the Device access code
Note See the Troubleshooting section if you cannot recall your RetinaVue 100
Imager Pro access code and need to erase the access code.
1. Remove the RetinaVue 100 Imager Pro from the docking station charger.
2. If you are not already logged in, enter the existing access code for the RetinaVue 100
Imager Pro.
3. Touch Settings on the RetinaVue 100 Imager Pro Home screen.
4. Touch Advanced Settings.
5. Touch Device access code.
6. Touch Reset to clear the existing access codes.
Page 64

60 Viewing or changing the RetinaVue 100 Imager Pro settings Welch Allyn RetinaVue™ 100 Imager Pro
7. Use the touchscreen numeric keypad to enter an access code into the Access code
field and then retype the same code into the Access code (retype) field.
Note The access code password can contain a minimum of 1-digit
and a maximum of 18-digits. Characters are only numeric
from 0 through 9.
Note Alternatively, after the code reset, touch (Back),
(Back), and (Home) to return to the RetinaVue 100
Imager Pro Home screen without using a Device access
code.
8. Touch OK to accept the code and touch OK again at the confirmation screen to
return to the Advanced Settings screen.
9. Touch (Back) to return to the Settings screen.
10. Touch (Home) to return to the RetinaVue 100 Imager Pro Home screen.
Reset the Advanced settings code
Note See the Troubleshooting section if you cannot recall your RetinaVue 100
Imager Pro Advanced settings code or the Device access code and need to
erase the code.
1. Remove the RetinaVue 100 Imager Pro from the docking station charger.
2. If the RetinaVue 100 Imager Pro is set with a Device access code (in addition to the
Advanced settings code) and you are not already logged in, enter the existing Device
access code.
3. Touch Settings on the RetinaVue 100 Imager Pro Home screen.
4. Touch Advanced Settings.
5. Enter the existing Advanced settings code for the RetinaVue 100 Imager Pro.
6. Touch Advanced settings code.
7. Touch Reset to clear the existing Advanced settings codes.
8. Use the touchscreen numeric keypad to enter a code into the Advanced settings
code field and then retype the same code into the Advanced settings code (retype)
field.
Page 65

Directions for use Viewing or changing the RetinaVue 100 Imager Pro settings 61
Note The Advanced settings code password can contain a
minimum of 1-digit and a maximum of 18-digits. Characters
are only numeric from 0 through 9.
Note Alternatively, after the code reset, touch (Back),
(Back), and (Home) to return to the RetinaVue 100
Imager Pro Home screen without using an Advanced setting
code.
9. Touch OK to accept the code and touch OK again at the confirmation screen.
10. Touch (Back) to return to the Settings screen.
11. Touch (Home) to return to the RetinaVue 100 Imager Pro Home screen.
Page 66

62 Viewing or changing the RetinaVue 100 Imager Pro settings Welch Allyn RetinaVue™ 100 Imager Pro
Page 67

General compliance and standards
The RetinaVue 100 Imager complies with the following standards:
IEC 60601-1:2005/A1:2012 (EN 60601-1:2006/A1:2013)
IEC 60601-1-2 : 2014 (EN 60601-1-2 : 2015)
ISO 15004-1:2006
63
ISO 15004-2:2007
ISO 10940:2009
ISO 10993-1 : 2009
Directive 2002/96/EC-WEEE:
Disposal of noncontaminated electrical and electronic equipment
This product and its accessories must be disposed of according to local laws and
regulations. Do not dispose of this product as unsorted municipal waste. Prepare this
product for reuse or separate collection as specified by Directive 2002/96/EC of the
European Parliament and the Council of the European Union on Waste Electronic and
Electrical Equipment (WEEE). If this product is contaminated, this directive does not
apply.
For more specific disposal or compliance information, see www.welchallyn.com/weee,
or contact Welch Allyn Customer Service at +44 207 365 6780.
EMC compliance
Special precautions concerning electromagnetic compatibility (EMC) must be taken for all
medical electrical equipment. This device complies with IEC 60601-1-2 : 2014 (EN
60601-1-2 : 2015).
All medical electrical equipment must be installed and put into service in accordance
•
with the EMC information provided in this Directions for use.
• Portable and mobile RF communications equipment can affect the behavior of
medical electrical equipment.
The 901103 Imager complies with all applicable and required standards for
electromagnetic interference.
It does not normally affect nearby equipment and devices.
•
• It is not normally affected by nearby equipment and devices.
Page 68

64 General compliance and standards Welch Allyn RetinaVue™ 100 Imager Pro
• However, it is good practice to avoid using the 901103 Imager in extremely close
proximity to other equipment.
• It is not safe to operate the 901103 Imager in the presence of high-frequency
surgical equipment.
Emissions and immunity information
Electromagnetic emissions
The 901103 is intended for use in the electromagnetic environment specified below. The customer or user of the 901103
should assure that it is used in such an environment.
Emissions test Compliance Electromagnetic environment - guidance
RF emissions
CISPR 11
RF emissions
CISPR 11
Harmonic emissions
IEC 61000-3-2
Voltage fluctuations/
flicker emissions
IEC 61000-3-3
a
The 901103 contains a 5-GHz orthogonal frequency-division multiplexing transmitter or a 2.4-GHz frequency hopping
spread-spectrum transmitter for the purpose of wireless communication. The radio is operated according to the
requirements of various agencies, including FCC 47 CFR 15.247 and R&TTE Directive (1995/5/EC). The transmitter is
excluded from the EMC requirements of 60601-1-2, but should be considered when addressing possible interference
issues between this and other devices.
Group 1 The 901103 uses RF energy only for its internal function. Therefore, its
RF emissions are very low and are not likely to cause any interference
in nearby electronic equipment.
Class B
Class A
Complies
The 901103 is suitable for use in all establishments, including domestic
establishments and those directly connected to the public low voltage
power supply network that supplies buildings used for domestic
purposes.
WARNING This equipment/system is intended for
use by healthcare professionals only. This
equipment/ system may cause radio interference or
may disrupt the operation of nearby equipment a. It
may be necessary to take mitigation measures, such
as re-orienting or relocating the 901103 or shielding
the location.
Electromagnetic immunity
The 901103 is intended for use in the electromagnetic environment specified below. The customer or the user of the
901103 should assure that it is used in such an environment.
Immunity test IEC 60601 test level Compliance level Electromagnetic environment - guidance
Electrostatic discharge
(ESD)
IEC 61000-4-2
Electrical fast
transient/burst
IEC 61000-4-4
Surge ± 1 kV differential
±8 kV contact
±15 kV air
±2 kV for power supply
lines
±1 kV for input/output
lines
mode
±8 kV contact
±15 kV air
±2 kV for power supply
lines
±1 kV for input/output
lines
± 1 kV differential
mode
Floors should be wood, concrete or ceramic
tile. If floors are covered with synthetic
material, the relative humidity should be at
least 30%.
Mains power quality should be that of a typical
commercial or hospital environment.
Mains power quality should be that of a typical
commercial or hospital environment.
Page 69

Directions for use General compliance and standards 65
Electromagnetic immunity
IEC 61000-4-5 ± 2 kV common mode ± 2 kV common mode
Voltage dips, short
interruptions and
voltage variations on
power supply input
lines
IEC 61000-4-11
100% dip in 0.5 cycle
100% dip in 1 cycles
30% dip in 25 cycles
100% interruption in
250 cycles
100% dip in 0.5 cycle
100% dip in 1 cycles
30% dip in 25 cycles
100% interruption in
250 cycles
Mains power quality should be that of a typical
commercial or hospital environment. If the user
of the 901103 requires continued operation
during power mains interruptions, it is
recommended that the 901103 be powered
from an uninterruptible power supply or a
battery.
Electromagnetic immunity
The 901103 is intended for use in the electromagnetic environment specified below. The customer or the user of the
901103 should assure that it is used in such an environment.
Immunity test IEC 60601 test level Compliance level Electromagnetic environment - guidance
Portable and mobile RF communications
equipment should be used no closer to any part
of the 901103, including cables, than the
recommended separation distance calculated
from the equation applicable to the frequency
of the transmitter.
Recommended separation distance
Conducted RF
IEC 61000-4-6
3 Vrms
150 kHz to 80 MHz
3 Vrms
d= (1.17)
Radiated RF
3 V/m 80 MHz to 1 GHz 3 V/m
d= (1.17) 80 to 800 MHz
IEC 61000-4-3
d= (2.33) 800 MHz to 2,7 GHz
whereP is the maximum output power rating of
the transmitter in watts (W) andd is the
recommended separation distance in meters
(m). Field strengths from fixed RF transmitters,
as determined by an electromagnetic site
surveya, should be less than the compliance
level in each frequency rangeb. Interference
may occur in the vicinity of equipment marked
with the following symbol:
Note1: At 80 MHz and 800 MHz, the higher frequency range applies.
Note 2: These guidelines may not apply in all situations. Electromagnetic propagation is affected by absorption and
reflection from structures, objects, and people.
a
Field strengths from fixed transmitters, such as base stations for radio (cellular/cordless) telephones and land mobile
radios, amateur radio, AM and FM radio broadcast, and TV broadcast cannot be predicted theoretically with accuracy. To
assess the electromagnetic environment due to fixed RF transmitters, an electromagnetic site survey should be
considered. If the measured field strength in the location in which the 901103 is used exceeds the applicable RF
Page 70

66 General compliance and standards Welch Allyn RetinaVue™ 100 Imager Pro
Electromagnetic immunity
compliance level above, the 901103 should be observed to verify normal operation. If abnormal performance is observed,
additional measures may be necessary, such as reorienting or relocating the 901103.
b
Over the frequency range 150 kHz to 80 MHz, field strengths should be less than 3 V/m.
Recommended separation distances between portable and mobile RF communications
equipment and the 901103
The 901103 is intended for use in an electromagnetic environment in which radiated RF disturbances are controlled. The
customer or user of the 901103 can help prevent electromagnetic interference by maintaining a minimum distance
between portable and mobile RF communications equipment (transmitters) and the 901103 as recommended below,
according to the maximum output power of the communications equipment.
Separation distance according to frequency of transmitter (m)
Rated max. output
power of transmitter
(W)
0.01 0.11667 0.11667 0.23333
0.1 0.36894 0.36894 0.73785
1 1.1667 1.1667 2.3333
10 3.6894 3.6894 7.3785
100 11.667 11.667 23.3333
For transmitters rated at a maximum output power not listed above, the recommended separation distanced in meters
(m) can be estimated using the equation applicable to the frequency of the transmitter, where P is the maximum output
power rating of the transmitter in watts (W) according to the transmitter manufacturer.
Note 1: At 80 MHz and 800 MHz, the separation distance for the higher frequency range applies.
Note 2: These guidelines may not apply in all situations. Electromagnetic propagation is affected by absorption and
reflection from structures, objects, and people.
150 kHz to 80 MHz
d= (1.17)
80 MHz to 800 MHz
d= (1.17)
800 MHz to 2.7 GHz
d= (2.23)
Page 71

Navigation controls
Navigation controls in the Training mode
67
From the
Video screen appears.
Note Navigation controls change with each mode.
Touch anywhere within the RetinaVue 100 Imager touchscreen to display the training
navigation controls. The navigation controls appear within the middle of the RetinaVue
100 Imager touchscreen.
The navigation controls for the Interactive Training video include:
Step back to beginning: Touch
section.
Step back to previous scene: Touch to navigate to the previous scene within the
training section.
Home:
navigates to the Home screen.
Home screen touch Training. The RetinaVue 100 Imager Interactive Training
to navigate to the first scene within the training
Displays the RetinaVue 100 Imager workflow selection buttons and
Play: Touch to resume the training.
Skip forward to next scene: Touch to navigate to the next scene within the
training section.
Skip forward to last: Touch to navigate to the last scene within the training
section.
Note
In addition to the control buttons, touch anywhere within the RetinaVue
100 Imager touchscreen to pause the training or to display the training
navigation controls.
Page 72

68
Navigation controls Welch Allyn RetinaVue™ 100 Imager Pro
Navigation controls in the Exam mode
The Navigation area is located at the bottom of the RetinaVue 100 Imager screen.
Navigation controls change with the mode. The navigation controls for Pre-, post-, and
acquisition in Exam mode include:
Pre-acquisition
1-image
Macula-centered
2-image
Macula + Optic Disc-centered
Home: Displays the RetinaVue 100 Imager workflow selection buttons and
navigates to the Home screen.
Next:
acquisition sequence or to the next step in a sequence of steps.
Image acquisition navigation: Navigates to the image acquisition position within the
prescribed sequence. Provides a visual representation of the prescribed sequential
acquisition, including the right eye ( ) and the left eye ( ).
Provides a status of acquired images for acceptance or dismissal.
Acquisition
Exit:
Post-acquisition
Discard image:
Acquisition screen.
Navigates to the next image acquisition within a prescribed image
Navigates to the Pre-acquisition screen.
Navigates to the Pre-acquisition screen. Or Navigates to the
Page 73

Directions for use
Navigation controls 69
Accept image: Navigates to the Exam summary screen when the last exam in the
sequence has been accepted. Also navigates to Pre-acquisition screen if there are more
images to be captured.
Image inspection: Navigates to the Image inspection screen.
Add image:
Navigates to the Acquisition screen
Navigation controls in the Settings mode
The navigation controls for the Settings mode include the back, home, and advance to
next buttons. The primary navigation area is located at the bottom of the RetinaVue 100
Imager screen. While on the Settings screen, the > (Advance to next screen) button
navigates to the next dialogue. The button is located on the same line as the setting.
Back: Navigates to a previous dialogue or step.
Home:
navigates to the Home screen.
>: (Advance to next screen) Navigates to a next dialogue while on the Settings screen.
Displays the RetinaVue 100 Imager workflow selection buttons and
Navigation controls in the Review mode
The navigation controls for the Review mode include the back, home, advance to next
screen, and image quality buttons. The primary navigation area is located at the bottom
of the RetinaVue 100 Imager screen. In addition, the > (Advance to next screen) button
navigates to an image. The button is located on the same line as the patient's name on
the Review screen. The image quality button also navigates to an image. The button is
located below the patient's name on the Exam summary screen.
Back: Navigates to a previous dialogue or step.
Home:
navigates to the Home screen.
>: (Advance to next screen) Navigates to an image while on the Review screen.
Good quality green: From the Exam summary screen, touch the good quality icon
to navigate to the image on the Post-acquisition screen.
Acceptable quality yellow: From the Exam summary screen, touch the
acceptable quality icon to navigate to the image on the Post-acquisition screen.
Displays the RetinaVue 100 Imager workflow selection buttons and
Page 74

70 Navigation controls Welch Allyn RetinaVue™ 100 Imager Pro
Unacceptable quality red: From the Exam summary screen, touch the
unacceptable quality icon to navigate to the image on the Post-acquisition screen.
Page 75

Directions for use
Image Pre-acquisition controls (Auto mode)
From the Home screen touch Exam. The Exam Pre-acquisition screen appears.
Navigation controls 71
No. Feature No. Feature
START enters automatic image acquisition
1.
mode.
2.
3.
(Image Acquisition Settings) navigates to
the Capture settings screen. Adjust the flash
brightness (-2 to +2) or the focus settings (-1 to
+1).
(Image Order) skips to the
next image in the sequence.
Controls (Post-acquisition)
On the Post-acquisition screen, images with a green check ( ) are of good quality
(scores of 40 +), images with a yellow check ( ) are of acceptable quality (scores of
4.
5.
6.
Navigates to the Home screen.
MANUAL switches to advanced image capture
options.
(Next) skips to the next image acquisition within
a prescribed image acquisition sequence or navigates to
the Exam summary screen if the last image has been
acquired.
20 — 39), and those with a red x ( ) are of unacceptable quality (scores of 0 — 19).
Page 76

Navigation controls Welch Allyn RetinaVue™ 100 Imager Pro
72
Use the RetinaVue 100 Imager touchscreen inspection control to navigate to the
Inspection screen, then zoom in or out with a pinch or pull. Touch (Back) to
navigate to the Post-acquisition screen. Or, touch (Trash) and then touch Delete at
the dialogue screen: Do you wish to discard this image and acquire again? to confirm the
discard and to return to the Acquisition screen to acquire again. Touch (Add
image) to navigate to the Acquisition screen and take an additional image.
Note The initial captured image is saved.
Touch (Discard) then touch Yes at the dialogue: Do you wish to discard this
image? to discard the image. Alternatively, touch No at the dialogue screen to return to
the Post-acquisition screen to save the initial captured image.
On the Post-acquisition screen, touch (Trash) and then touch Delete at the dialogue
screen: Do you wish to discard this image and acquire again? to confirm the discard and
to return to the Acquisition screen to acquire again.
Touch (Accept) to accept the image and to navigate to the next image. Or touch
(Accept) to navigate to the Exam summary screen once the last image of the exam
is acquired.
Page 77

Directions for use
Navigation controls 73
Exam summary controls (Post-acquisition and Review modes)
Exam summary from the Post-acquisition screen
From the Post-acquisition screen, touch (Accept) to navigate to the Exam summary
screen. Each image on the Exam summary screen contains a quality score and status.
Touch
Quality scores of 40+.
Touch (Acceptable quality yellow) to view that image. Image accepted, quality OK.
Quality scores ranging from 20 – 39.
Touch (Unacceptable quality red) to view that image. Image rejected. Quality
scores ranging from 0 – 19.
Note To add missing patient context information touch .
Touch to create a new patient, or touch on an existing patient's ID from within
the Patients screen.
Touch SAVE to accept all images and to return to the Home screen.
(Good quality green) to view that image. Image accepted, good quality.
CAUTION Captured images require patient context before the images can
be saved.
Page 78

74 Navigation controls Welch Allyn RetinaVue™ 100 Imager Pro
If an image is missing touch Override to access the Save button and to save a single
image in the 1-image, Macula-centered Exam setup, or touch Override to save multiple
images in the 2-image, Macula + Optic Disc-centered Exam setup.
Exam summary from the Review screen
Touch Review.
Touch on a patient's ID. The Exam summary screen appears for that patient.
Touch (Good quality green), (Acceptable quality yellow), or
(Unacceptable quality red) to view the image. Touch (Patient) to review patient
demographics on the Patient summary screen. Touch
Review screen. Touch (Home) to return to the Home screen.
(Back) to return to the
Page 79

Update the RetinaVue 100 Imager Pro software to version 6.XX and above
CAUTION Do NOT remove the SD Card or the power source from the
device during boot up.
Take note of the current software version:
75
1. Touch Settings.
2. Touch About to view the software version.
Before you begin, you will need the following :
•
A computer with an Internet connection.
• The docking station charger with a USB cable connected to the power source.
• The RetinaVue 100 Imager Pro containing the SD card that you plan to update.
(Alternatively, you can use a blank, formatted, 8GB to 32GB SD Card to transfer the
downloaded software update to the RetinaVue 100 Imager Pro).
1. Ensure that any patient data that you want to save is transferred by docking the
RetinaVue 100 Imager Pro into the docking station charger with a USB cable
connected to a laptop or PC.
2. Remove the RetinaVue 100 Imager Pro from the docking station charger, touch
Settings then touch Advanced settings.
3. Touch Format SD.
4. Touch OK.
5. Power down the RetinaVue 100 Imager Pro and remove the SD Card.
6. Insert the SD Card into an open SD Card reader port on the computer.
7. Download the software update and transfer the software update to a computer.
8. Transfer the software update from the computer to the SD Card.
Page 80

Update the RetinaVue 100 Imager Pro software to version 6.XX and above Welch Allyn RetinaVue™ 100 Imager Pro
76
Note Use a safe eject method when ejecting the SD card to
ensure a complete software transfer to the SD card.
(Options include right-clicking on the Start Menu > Open
Windows Explorer> right-click on SD card> click Eject. Or,
click on the Taskbar> Show hidden icons > clickSafely
Remove Hardware and Eject Media> click Eject SDHC).
If an eject menu is not available with your system settings,
wait until the files have completely copied before manually
ejecting the SD Card.
9. Remove the SD Card from the computer.
10. Insert the SD Card into the RetinaVue 100 Imager Pro.
11. Place the RetinaVue 100 Imager Pro on the docking station charger, connect the
docking station charger via a USB cable to the power source, and then power up the
RetinaVue 100 Imager Pro.
Note The update process typically takes a few minutes to cycle
through the complete update. During the update process, it
is normal to see both a blank screen and an update screen
that appear several times before the RetinaVue 100 Imager
Pro automatically reboots.
12. After the RetinaVue 100 Imager Pro boots up to the Home screen, confirm the
software update.
a. Touch Settings.
b. Touch About to view the software version.
13. Touch OK.
You are ready to use the updated software.
Troubleshooting software updates
Note The RetinaVue 100 Imager Pro boots up normally after a successful
software update, however if a software update fails, the RetinaVue 100
Imager Pro displays a failed update error message.
Power loss during software update:
•
If a power loss occurs during the software update or if there are hardware issues,
the RetinaVue 100 Imager Pro posts a blank screen. Remove the battery, reinstall it,
and restart RetinaVue 100 Imager Pro. By performing this power cycle, the
RetinaVue 100 Imager Pro reverts to a previous version of software. Repeat the
steps to perform the update again.
Corrupted software files:
If the software update on the SD Card is corrupted, the RetinaVue 100 Imager Pro
•
displays a failed update error message indicating that the RetinaVue 100 Imager Pro
is unable to load the software from the SD Card. Remove the SD Card, reformat it on
a PC. Repeat the steps to perform the update again.
Update extraction file error
If the RetinaVue 100 Imager Pro displays the failed update error message, Update file
extraction failed. Power off device and restart, the SD Card does not have sufficient
space. Remove all files (except the update image) from the SD Card. Perform the update
again.
Page 81

RetinaVue 100 and 100 Imager Pro Accessories
Miscellaneous items
Part number Description
77
RV100PRO-B RetinaVue 100 Imager Pro with lithium-ion battery
RV100-B RetinaVue 100 Imager with lithium-ion battery
RV100-6 RetinaVue 100 Imager with lithium-ion battery and Australian plug
RV100PRO-6 RetinaVue 100 Imager Pro with lithium-ion battery and Australian plug
106401 Charging Dock for Welch Allyn RetinaVue 100 Imager; 100-240 V,
50-60 Hz
106405
106406 Replacement USB Cable for Welch Allyn RetinaVue 100 Imager
106507
106508
106509
Battery for Welch Allyn RetinaVue 100 Imager; Lithium-Ion 3.6V /
3350mAh
Power supply wall adapter for Welch Allyn RetinaVue 100 Imager.
100-240 V, 50-60 Hz; IEC Plug Type B (US)
Power supply wall adapter for Welch AllynRetinaVue 100 Imager.
100-240 V, 50-60 Hz; IEC Plug Type C (EU)
Power supply wall adapter for Welch Allyn RetinaVue 100 Imager.
100-240 V, 50-60 Hz; IEC Plug Type G (UK)
106530
106710 RetinaVue 100 Imager Lens cap
106711 RetinaVue 100 Imager Battery cover
Power supply wall adapter for Welch Allyn RetinaVue 100 Imager.
100-240 V, 50-60 Hz; IEC Plug Type I (AU)
Page 82

78 RetinaVue 100 and 100 Imager Pro Accessories Welch Allyn RetinaVue™ 100 Imager Pro
Part number Description
236200-2 Welch Allyn RetinaVue 100 Imager replacement screwdriver for
battery cover. #1 Phillips Screwdriver w/ Logo
723481 Laptop for RetinaVue Network
724224 RetinaVue 100 Imager camera case
723484 Lens spray
723671 Lens cloth
Applied parts
Part number Description
106404 Reusable Eye Cups for Welch Allyn RetinaVue 100 Imager: Qty. 5
Service
Part number
S1-RV100-1 Welch Allyn Partners in Care Comprehensive Partnership Program
SV-RV100-2 Welch Allyn Partners in Care Comprehensive Partnership Program
SV-RV100-3 Welch Allyn Partners in Care Comprehensive Partnership Program
S1-RV100-1P
S1-RV100-2P
S1-RV100-3P
Literature/Documentation
Description
Service for RetinaVue 100 Imager; 1 year
Service for RetinaVue 100 Imager; 2 years
Service for RetinaVue 100 Imager; 3 years
Welch Allyn Partners in Care Comprehensive Partnership Program
Premium Service for RetinaVue 100 Imager; 1 year
Welch Allyn Partners in Care Comprehensive Partnership Program
Premium Service for RetinaVue 100 Imager; 2 years
Welch Allyn Partners in Care Comprehensive Partnership Program
Premium Service for RetinaVue 100 Imager; 3 years
Part number
411492 RetinaVue 100 Imager Directions for use
727803 RetinaVue 100 Imager Pro Directions for use
Description
Page 83

Directions for use RetinaVue 100 and 100 Imager Pro Accessories 79
Part number Description
724146 RetinaVue 100 Imager Technique guide
Page 84

Material No.
727803
 Loading...