

Page 1

OPERATORS MANUAL
Operators Manual
Machine Type:
PD22I / PD22P
Peristaltic Dispenser
PD22I / PD22P
PD22 I P OM 1.01 EN Ver 1.01 Date 24-08-2006 Page 1 of 21
Page 2

OPERATORS MANUAL
1 DECLARATION OF CONFORMITY ............................................................................... 3
2 PD22 I / PD22 P IMPORTANT NOTICE......................................................................... 4
3 CAUTION........................................................................................................................ 5
4 GENERAL INFORMATION............................................................................................. 6
4.1 UNP ACKING AND INSPECTION ....................................................................................................................6
4.2 THE PERISTALTIC PRINCIPLE ......................................................................................................................6
4.3 INST ALLATION ............................................................................................................................................7
4.4 ADDRESSING OF FILLING STATION..............................................................................................................8
5 CONTROL...................................................................................................................... 9
5.1 DISPENSER HEAD .......................................................................................................................................9
Machine Type:
PD22I / PD22P
6 DISPENSING WITH PD22............................................................................................ 10
6.1 VESSEL PLACEMENT ................................................................................................................................10
6.2 TUBES ......................................................................................................................................................11
6.3 NATURE OF FILL MEDIA............................................................................................................................11
6.4 PRIMING TUBES........................................................................................................................................12
6.5 DRIP .........................................................................................................................................................12
6.6 HARD FEED ..............................................................................................................................................12
7 TUBE ASSEMBLY........................................................................................................ 13
7.1 ASSEMBLY OF Y-CONNECTORS.................................................................................................................13
7.2 PLACING TUBES IN THE PUMP HEAD.........................................................................................................14
8 PROGRAMMING .......................................................................................................... 16
8.1 PROGRAMMING PRINCIPLE.......................................................................................................................16
8.2 PD22 PARAMETERS..................................................................................................................................16
9 CLEANING A ND MAINTENA NCE................................................................................ 18
9.1 DAILY CLEANING......................................................................................................................................18
9.2 STERILIZATION.........................................................................................................................................18
9.3 MAINTENANCE.........................................................................................................................................18
10 INTERFACE............................................................................................................... 19
10.1 PD22 I INTERFACE................................................................................................................................19
10.2 PD22 P INTERFACE ...............................................................................................................................20
11 CHANGE OF VOLTAGE............................................................................................ 21
PD22 I P OM 1.01 EN Ver 1.01 Date 24-08-2006 Page 2 of 21
Page 3
®
y
OPERATORS MANUAL
Machine Type:
PD22I / PD22P
1 Declaration of conformity
We Flexicon A/S
Frejasvej 2-6
DK-4100 Ringsted
declare on our sole responsibility that the product:
Peristaltic Dispenser - PD22I / PD22P
Model
Serial
Suppl
Year
to which this declaration relates is in conformity with the f ollowing standard(s):
DS/EN ISO 12100 Safety of machinery - Basic Concepts, g eneral
Principles of design
DS/EN 60204 Safety of machinery – Electrical equipment of
machines
according to the provisions in the Directives:
98/37/EC On the approximation of the laws of t he Member
States relating to machinery.
73/23/EEC On the harmonization of the laws of Member
States relating to electrical equipment designed
for use within certain voltage limits
2004/108/EC On the approximation of the laws of t he Member
States relating to electromagnetic compatibility
Ringsted, August 2006 Mads Ulric Jensen
Signature.
Flexicon a s
denmark
PD22I / PD22P
YYMM XXXX
230V/50Hz/350W
2006
PD22 I P OM 1.01 EN Ver 1.01 Date 24-08-2006 Page 3 of 21
Page 4

OPERATORS MANUAL
2 PD22 I / PD22 P IMPORTANT NOTICE
There are 2 versions of the PD22. The PD22 I (individual) and the PD22 P (Panelmount). They
share the same functions and program ming routines.
The only differences are installation and connections.
For this 2 sections have been added, describing how to connect and install a PD22 P.
For the remainder of th is m anual t he PD22 will be designated as follows:
PD22: for general descriptions covering bot h versions.
PD22 I: for descriptions specific to the ”I” version.
PD22 P: for descriptions specific to the ”P” version.
Machine Type:
PD22I / PD22P
PD22 I P OM 1.01 EN Ver 1.01 Date 24-08-2006 Page 4 of 21
Page 5

OPERATORS MANUAL
3 CAUTION
This manual should be read before using t he PD22.
Explanations to the pictograms:
Warning against touching/Warning against opening:
Warning against high voltage:
Machine Type:
PD22I / PD22P
When operating the PD22, make sure that the dispenser head is closed.
The mains switch is used for emergency stopping .
The PD22 should only be used for dosing and filling of liquid fluids.
The PD22 must be placed on a stable bed plate and in such a way, that it is not exposed to
great humidity, high temperatures or other abnormal operating - environm ents. I t is not to be
used in explosion hazardous environments.
It is prohibited to maintain or clean the PD22, when it is connected t o the power supply.
It is prohibited for unauthor ised per sonnel to open the cover of the PD22's electrical parts.
Always remember that the PD22 must be earthed by way of the switch.
Handle the filling needles with caution.
The pump must not run dry.
The pump needs a filling nozzle with cut off valve.
PD22 I P OM 1.01 EN Ver 1.01 Date 24-08-2006 Page 5 of 21
Page 6

OPERATORS MANUAL
4 GENERAL INFORMATION
4.1 Unpacking and inspection
PD22I is a peristaltic filler in the Flexicon Multi Filling System ( FMFS). The PD22 can not do
fillings by itself, but m ust be connected to Flexicons control unit, the MC12, or to a PC with
RS485 multidrop communication.
Please check that all ordered items have been received and that no items were damaged
during transport. In case of any defects or omissions, please contact Flexicon A/S or your
supplier immediately.
When ordering spare parts or accessories for the PD22, please state the serial number
stamped. The serial number is stamped on the label on the bottom of the PD22.
Please check that the connected mains plug is of the correct type with the correct earthed
switch. If this is not the case, the cor r ect type of plug must be mounted with the following
connections.
Yellow/green - earth
Blue - neutral
Brown - phase
ALWAYS REMEMBER that this machine must be earthed.
Machine Type:
PD22I / PD22P
4.2 The peristaltic principle
PD22I operates with a peristaltic dispenser head (tube pump), where the liquid only comes into
contact with the flexible tube, the tube connections and the filling needle. The tubes are usually
made of silicone, but other mat er ials can also be used.
The dispenser head is designed in such a way that sterilized tubes can be assembled in the
head without affecting the sterilit y. Flexicons tubes are produced of raw materials medically
approved by for instance the FDA. The tubes are delivered in sealed packages and are
provided with a batch number which makes it possible to trace the tubes all the way back to t he
raw material source.
For this reason the PD22 is specially suited for aseptic applicat ions and for preventing crosscontamination among different pr oducts.
The dispenser head is self-priming, and the dispenser head itself can stand to be run dry. It is
recommended not to let the dispenser head be r un dr y for a long period WITH CONNECTED
TUBES, since this will lead to particle release.
A peristaltic dispenser head is not suitable for viscous products.
PD22 I P OM 1.01 EN Ver 1.01 Date 24-08-2006 Page 6 of 21
Page 7
OPERATORS MANUAL
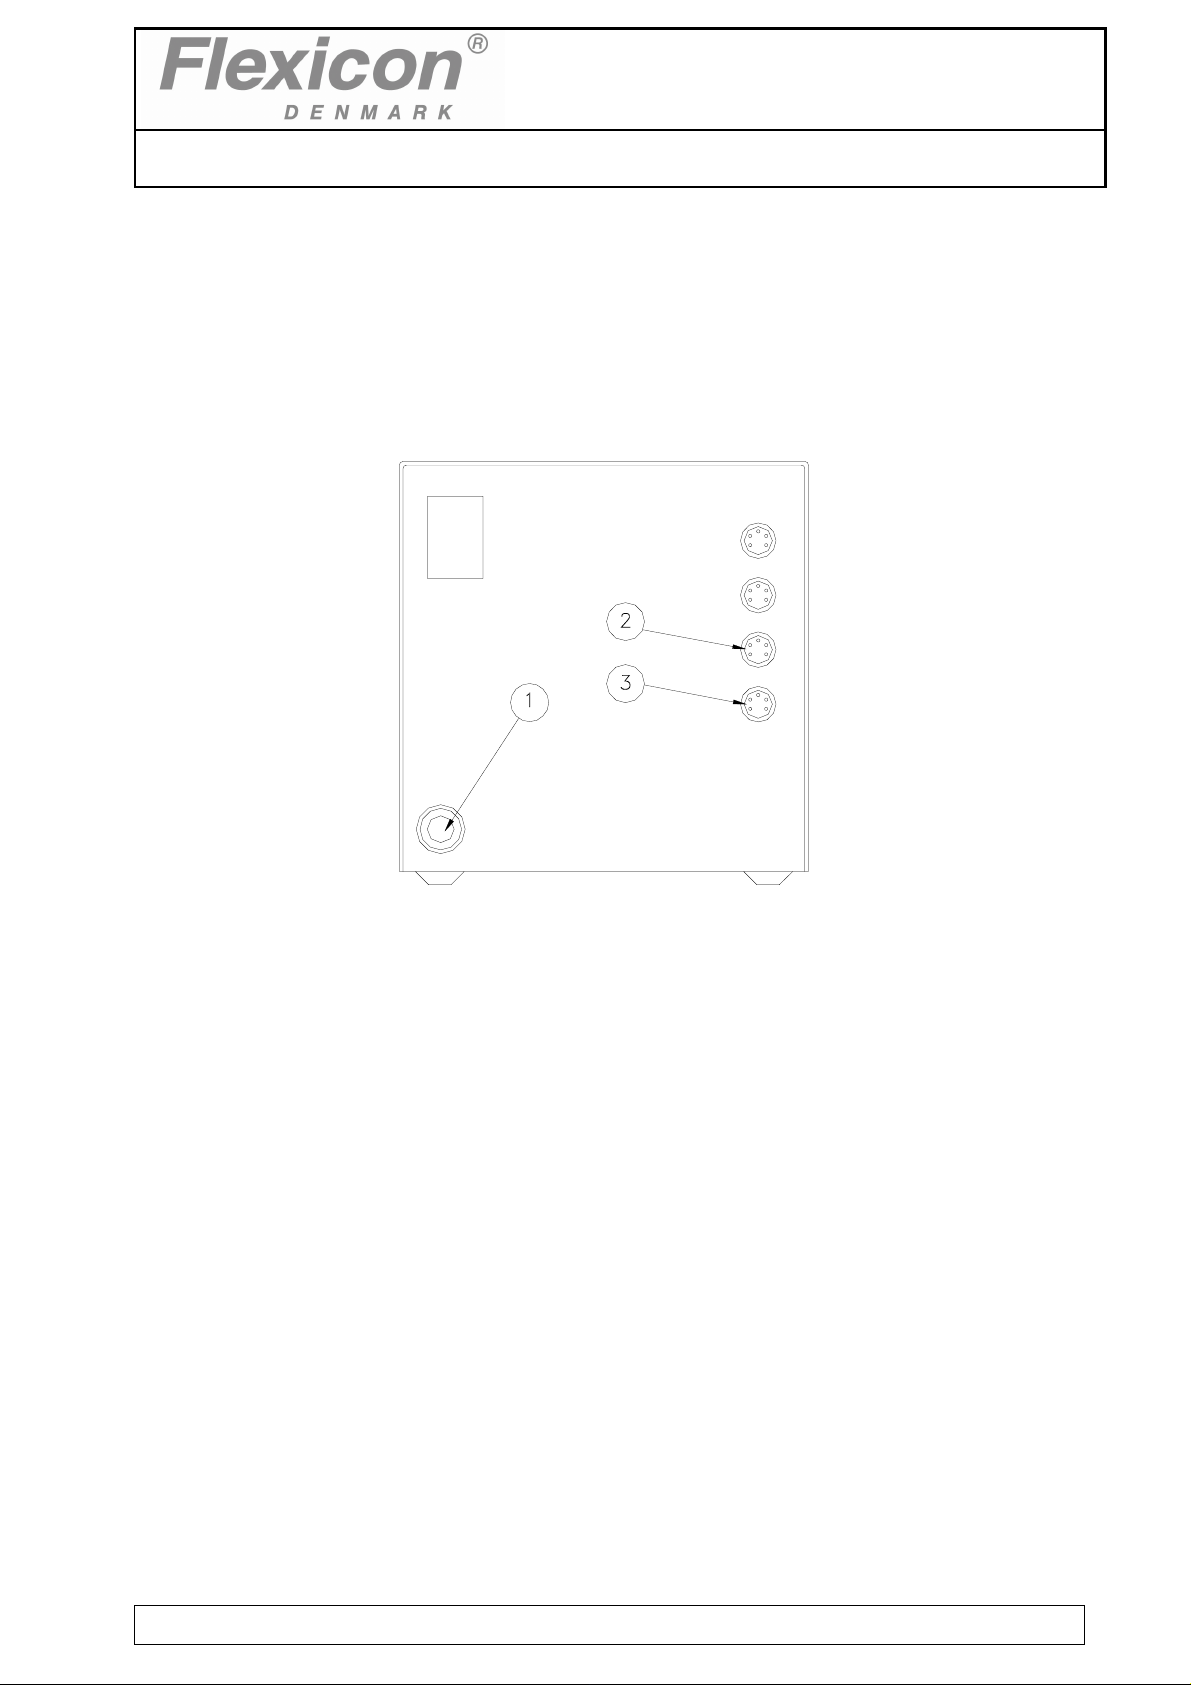
4.3 Installation
4.3.1 PD22I Installation
PD22I must be placed on a stable bedplate, and all electrical connections are on its rear.
Machine Type:
PD22I / PD22P
Fig. 4.1
The cable with plug (1) is connected to an earthed switch.
The communication cable from MC12 (type 3) comes fitted with two 4-pin DIN plugs. One is
connected to the "net 1" socket ( 2) on t he PD22I, and the other plug is connected to the "net "
socket on MC12.
The terminator supplied with MC12 (4-pin blind DIN plug) is connected t o the "net 2" (3) socket
on PD22I.
Should the system be operating more than one PD22I, the "net 2" socket (3) is to be connected
to the "net 1" socket (2) on t he next PD22I by a communication cable (type 3). The terminator is
connected to the last PD22I on the line.
Address "1" is the factory setting of PD22I. In case you want to change this setting, please
consult section 1.4 in this manual.
PD22I is now ready to be switched on and to be programmed from the MC12.
PD22 I P OM 1.01 EN Ver 1.01 Date 24-08-2006 Page 7 of 21
Page 8

OPERATORS MANUAL
4.3.2 PD22P Installation
PD22P must be placed either in frame delivered or otherwise in a suspension fram e.
All electrical connections are on the rear side.
The power supply is mounted with 0 in pin 14, earth in pin 15 and phase in pin 16.
The communication cable from MC12P is mounted in pin 1-3.
Should the system be operating more than one PD22P, the communication lines are connected
in parallel in pin 1-3 in all units.
Address "1" is the factory setting of PD22P. In case you want to change this sett ing, please
consult section 1.4 in this manual.
PD22P is now ready to be switched on and to be programmed from the MC12P.
Machine Type:
PD22I / PD22P
4.4 Addressing of filling station
Address 1 2 3 4 5 6 7 8 9 10 11 12 13 14 15 16
SW1 1 0 1 0 1 0 1 0 1 0 0 1 0 1 1 0
SW2 1 1 0 0 1 1 0 0 1 1 0 1 1 0 0 0
SW3 1 1 1 1 0 0 0 0 1 1 1 0 0 0 0 0
SW4 1 1 1 1 1 1 1 1 0 0 0 0 0 0 0 0
Fig. 4.2
Address "1" is the factory setting of PD22.
If the PD22 is one of several filling stations in a system, none of the stations m ay have the
same address and it must therefor e be changed.
Change of address is perfor m ed via a dip-switch placed at the bottom of the PD22. This change
may only be carried out when the machine is turned off at the main isolat or.
Addresses between 1 and 16 may be chosen, and Fig. 4.2 shows the various combinations.
PD22 I P OM 1.01 EN Ver 1.01 Date 24-08-2006 Page 8 of 21
Page 9

OPERATORS MANUAL
5 CONTROL
5.1 Dispenser head
The dispenser head can work with six different tube diameters.
The dispenser head works with two parallel tubes which are squeezed by six rollers mounted on
ball bearings. The rollers in the two sections are offset in order to eliminate pulsing.
Machine Type:
PD22I / PD22P
Fig. 5.1
1. power Lig hts when the machine is on.
2. online Lights when communicating with MC12.
3. overload Lights when the PD22 is overloaded.
4. prime Pushbutton for tube priming.
PD22 I P OM 1.01 EN Ver 1.01 Date 24-08-2006 Page 9 of 21
Page 10

OPERATORS MANUAL
6 DISPENSING WITH PD22
For optimal dispensing with the PD22, the f ollowing should be observed:
6.1 Vessel placement
6.2 Tubes
6.3 Nature of fill media
6.4 Priming tubes
6.5 Drip
6.6 Hard feed
Machine Type:
PD22I / PD22P
6.1 Vessel Placement
In order to build up adequate pressure and r educe friction, it is recommendable to place the
vessel containing fill media at the same level as pump head or preferably above the pump head
level. Placing the vessel higher than pump head level provides positive product support and
may reduce the calibration interval. It is also recommended to place the vessel as close as
possible to the pump on suction side.
Suction side Pressure side
Preferred Placement
of container
Pump Head
Flexicon
Normal Placement
of container
Fig. 6.1
PD22 I P OM 1.01 EN Ver 1.01 Date 24-08-2006 Page 10 of 21
Page 11

OPERATORS MANUAL
6.2 Tubes
Tube size:
Tubes must be selected according to the application and volume to be filled. Use the table
shown below for choice of tubes according to minimum volume t o be filled.
PD22 can operate with six different tube dimensions chosen according t o the volume to be
dispensed.
The tubes are designated by their inter nal diam et ers (i.d.) in millimetres. This value is always
used as designation for the individual tube, and this is also the value to be entered in function 2
at the MC12 master controller.
PD22P can operate with the tubes listed in the table below.
In order to obtain stable and good results, the choice of tube may be made according to the
following guidelines:
Machine Type:
PD22I / PD22P
Flexicon part no. Tube dimension Min. volume recommended
84-201-030 3.0 mm i.d. 10 ml
84-201-050 5.0 mm i.d. 20 ml
84-201-065 6.5 mm i.d. 50 ml
84-201-080 8.0 mm i.d. 85 ml
84-201-100 10.0 mm i.d. 150 ml
84-201-125 12.5 mm i.d. 250 ml
Above mentioned tubes are silicone tubes and supplied by Flexicon A/S. These can be
sterilised by autoclaving.
Tubes must be cut in the right length in order t o achieve optim ised dispensing. It is
recommendable that the tubes are of such length that can allow placing the vessel close to the
pump head.
The tube ends must always be kept below the liquid level of the suct ion vessel in order to keep
the tubes from sucking air.
Avoid having tubes close to the bottom of product vessel.
6.3 Nature of fill media
The peristaltic dispensers are not suitable f or viscous products. For viscous product can
another type of dispenser from Flexicon be used. I n t he case t hat the PD22 should be used and
the product is of viscous nature, then heating the product before dispensing with PD22 is
recommended.
Another consideration is the surface t ension of liquid. Product with high surf ace t ension t ends to
produce drip. Due to this fact it is difficult to have sufficient cut off after every individual
dispensing. When filling with small volumes and high surface t ension pr esent drips are often
produced and constitute inaccuracy.
PD22 I P OM 1.01 EN Ver 1.01 Date 24-08-2006 Page 11 of 21
Page 12

OPERATORS MANUAL
Filling with large volume and high surface tension might have tendency to suck air back in the
filling line.
6.4 Priming tubes
In order to evacuate air from t he t ubes and prepare the tubes for filling, it is necessary to prime
the tubes. Priming must be done adequately and continued until the tube material hysteresis
disappears as well as any air bubbles.
6.5 Drip
When dispensing very small volumes, t he last drop of the filling const itu t es a big part of the
total filling. Therefor it is necessary to take necessary measures for avoiding the last dr op. For
small volumes a dumping nozzle system can be applied to eliminate the last drop of filling.
When dispensing with very large volumes, the shape of nozzle and the filling speed required
may not always be compatible. For this reason consideration should be done if using non- r et urn
valve or forced back-suction is necessary.
Flexicon dispensers offer back-suction (reversing) after every individual dispensing.
Machine Type:
PD22I / PD22P
6.6 Hard Feed
When dispensing with small tubes, counter pressure on the pressure side of pum p head m ight
constitute inaccuracy and instability in filling (hard feed). In some cases the problem can be
resolved by using a larger tube on the pressure side (after Y-connect or ) .
PD22 I P OM 1.01 EN Ver 1.01 Date 24-08-2006 Page 12 of 21
Page 13

OPERATORS MANUAL
7 TUBE ASSEMBLY
7.1 Assembly of Y-connectors
Since the dispenser head of PD22 is fitted with a double rot or, two suction tubes are used all
the way through the dispenser head. These two suction tubes are joined by a Y-connector just
behind the dispenser head.
Machine Type:
PD22I / PD22P
Fig. 7.1
The chosen tube is joint by a Y-connector as shown in Fig. 7.1. Since the Y- connectors are
made from polypropylene, the total tube system can be st er ilized in an autoclave.
Standard Flexicon Y-connectors:
Size Order No.
Ø 4 mm 84-010-004
Ø 6 mm 84-010-006
Ø 8 mm 84-010-008
Ø 10 mm 84-010-010
Ø 12 mm 84-010-012
Ø 14 mm 84-010-014
PD22 I P OM 1.01 EN Ver 1.01 Date 24-08-2006 Page 13 of 21
Page 14

OPERATORS MANUAL
7.2 Placing tubes in the pump head
After selecting a suitable tube diameter and after fitting the tubes with Y- connector and filling
needle, assemble the tubes in the dispenser head.
Machine Type:
PD22I / PD22P
Fig. 7.2
Open the dispenser head by turning the two locking pins ( 1) over the tube bridge (2), after
which the tube bridge can be lifted up.
It will now be possible to remove the tube lock (3) fr om its dowel pin.
1
3
6.5
Fig. 7.3
2
PD22 I P OM 1.01 EN Ver 1.01 Date 24-08-2006 Page 14 of 21
Page 15

OPERATORS MANUAL
Mount he correct tube lock (1) on its dowel pin and place the tubes (2) in the dispenser head.
The Y- connect or must be situated to the right of the dispenser head.
It is important that the tubes are situated in the two notches (3).
Now place the tube bridge in its tracks and engage the two locking pins.
Machine Type:
PD22I / PD22P
Fig. 7.4
The tube ends must always be kept below the liquid level of the suct ion vessel in order to keep
the tubes from sucking air.
PD22 I P OM 1.01 EN Ver 1.01 Date 24-08-2006 Page 15 of 21
Page 16

OPERATORS MANUAL
8 PROGRAMMING
8.1 Programming principle
In the following, a parameter will be the value of a single function, i.e. volume, tube diam eter or
velocity. Programming is done from a master controller like MC12P from Flexicon.
A program will be a complete set of parameters which together will constitute the PD22 work
instructions.
The actual programming will be made on the MC12 and refe r ence is m ade t o the MC12
manual.
Machine Type:
PD22I / PD22P
8.2 PD22 parameters
1. Volume
Value: ml
Range: 10 - 9999 ml
PD22 can dispense from 10 to 9999 ml, but for volumes exceeding approx. 1000 ml, the
capacity will drop significantly.
If the volume is changed, a recalibration should be made.
2. Tubes
Value: Inside diameter (i.d.) in mm
Range: 3.0 - 5.0 - 6.5 - 8. 5 - 10. 0 - 12.5
The tubes can be measured with the supplied tube gauge.
If the tube is changed, a new calibration must always be made.
3. Velocity
Value: Revolutions per minute (rpm)
Range: 30 - 250 rpm
If the velocity is changed, a recalibration should be m ade.
4. Acceleration/deceleration
Value: An integral number
Range: 1 - 100
The acceleration and the deceleration will always be the same. The lowest value (1) will give
the slowest acceleration, and the highest value (100) will give the fast est acceleration.
If the acceleration is changed, a r ecalibration should be made.
5. Reversing (back suction)
Value: An integral number
Range: 0 - 10
PD22 I P OM 1.01 EN Ver 1.01 Date 24-08-2006 Page 16 of 21
Page 17

OPERATORS MANUAL
If the rotor is moved a litt le backwards (reversing) after the completion of fillings, a minor back
suction will be created. This can prevent dripping from t he filling needle.
The value "0" will give no reversing, but the value "10" will give maximum r evers ing.
ALWAYS make a recalibration if the reversing value is altered.
For other programming possibilit ies, reference is made to the MC12 manual.
Machine Type:
PD22I / PD22P
PD22 I P OM 1.01 EN Ver 1.01 Date 24-08-2006 Page 17 of 21
Page 18

OPERATORS MANUAL
9 CLEANING AND MAINTENANCE
9.1 Daily cleaning
As PD22 is not in direct contact with the dispensed product, daily cleaning will not be necessary
except for the normal routine cleaning of production equipment.
Liquids must NOT be splashed onto the PD22. It m ay only be cleaned with a damp paper towel
or a firmly wrung cloth.
The cabinet is made of stainless steel and anodized aluminium, and normal cleaning agents
such as alcohol and isopropanol may be used.
Machine Type:
PD22I / PD22P
9.2 Sterilization
If PD22 is placed in an aseptic environment, the st er ilization m ay be made as descr ibed in
section 5.1, or you may sterilize PD22 by gases observing the following precautions.
If you use gases that might injure and corrode contacts and other metals, air slots and sockets
MUST be covered with tape.
9.3 Maintenance
As all movable parts in PD22 are maintenance-free, no maintenance is required apart from
normal cleaning of the eq uipm ent .
Should service be needed, please contact Flexicon A/S or your supplier.
PD22 I P OM 1.01 EN Ver 1.01 Date 24-08-2006 Page 18 of 21
Page 19

OPERATORS MANUAL
10 INTERFACE
10.1 PD22 I Interface
Machine Type:
PD22I / PD22P
Fig. 10.1
(1) External 1:
PIN 1:
PIN 2: OUTPUT, +24 VDC, MAX. 500 MA.
PIN 3: GROUND.
PIN 4:
PIN 5: STATUS OUTPUT, MAX. +24VDC, 100 mA Pin 5 is complementary to pin 4.
(2) External 2:
PIN 1:
PIN 2: OUTPUT, +24 VDC, MAX. 500 MA.
PIN 3: GROUND.
PIN 4:
PIN 5:
(3) Net 1
INPUT FOR START SIGNAL
+5 - 50 VDC, min. 100 msec. positive-edge- t rigged.
STATUS OUTPUT, MAX. +24 VDC, 100 mA.
Pin 4 is grounded via an open collector during filling.
INPUT FOR DISABLING.
+5 - 50 VDC. if this pin is activated, the drive will be disabled (no dispensing).
STATUS OUTPUT, MAX. +24 VDC, 100 MA.
Pin 4 is grounded via an open collector during filling.
STATUS OUTPUT, MAX. + 24 VDC, 100 MA.
Pin 5 is complementary to pin 4.
This socket is reserved for ( RS-485) network communication.
(4) Net 2
PD22 I P OM 1.01 EN Ver 1.01 Date 24-08-2006 Page 19 of 21
This socket is reserved for ( RS-485) network communication.
Page 20

OPERATORS MANUAL
10.2 PD22 P Interface
1 2 3 4 5 6 7 8 9 10 11 12 13 14 15 16
Flexnet
External 1
1 - 3
4 - 6
External 2
7 - 9
Prime
10 - 11
Machine Type:
Safety
Mains Power
12 - 13
14 - 16
Short Circuit
PD22I / PD22P
Fig. 10.2
(1) Flexnet 1-3:
pin 1. Flexnet /data (pin 1 on flexnet DIN connector)
pin 2. Flexnet gnd (pin 3 on flexnet DIN connector)
pin 3. Flexnet data. (pin 4 on flexnet DIN connector)
(2) External 4-9:
pin 4. Start signal. +5 to +50 Vdc. Positive edge triggered.
pin 5. +24 Vdc output
pin 6. Ground
pin 7. Status output signal. Open collector. Grounded when drive is active
pin 8. Status output signal. Open collector. Grounded when drive is not active
pin 9. Disable signal. +5 to +50 Vdc. Dispensing disabled when active.
(3) Prime 10-11:
pin 10. Prime (ground)
pin 11. /Prime (dr ive priming when connected to ground)
PD22 I P OM 1.01 EN Ver 1.01 Date 24-08-2006 Page 20 of 21
Page 21

OPERATORS MANUAL
11 CHANGE OF VOLTAGE
Machine Type:
PD22I / PD22P
Fig. 11.1
The PD22I can be converted to accept another supply voltage. The conversion can be made
inside the machine by moving the cables of the transformer clamps.
COPYRIGHT
*********
Copyright (c) 2006 Flexicon A/S. All rights to this manual belong to Flexicon A/S. Neither the
complete manual nor parts of it may be translated, copied, printed or published in any form or
by any means without permission in writing from Flexicon A/S
Flexicon A/S is convinced that the inform ation of this manual is correct, but Flexicon A/S
cannot be held responsible for it.
Flexicon A/S reserves the right to update and amend this manual without previous notice.
Flexicon A/S is under no obligation to update manuals alr eady published.
PD22 I P OM 1.01 EN Ver 1.01 Date 24-08-2006 Page 21 of 21
 Loading...