

Page 1

INDUSTRIAL HOISTS
INSTALLATION AND OPERATOR'S GUIDE
GUIDE D'INSTALLATION ET OPERATEUR
TM
Page 2

.................................1
...............................21
Page 3
Warnings and Cautions
General Safety Precautions
As you read these instructions, you will see
WARNINGS, CAUTIONS, NOTICES and NOTES.
Each message has a specific purpose. WARNINGS
are safety messages that indicate a potentially hazardous situation, which, if not avoided could result in
serious injury. CAUTIONS are safety messages that
indicate a potentially hazardous situation which, if not
avoided, could result in minor or moderate injury. A
CAUTION may also be used to alert against unsafe
practice. CAUTIONS and WARNINGS identify the
hazard, indicate how to avoid the hazard, and advise
of the probable consequence of not avoiding the hazard. NOTICES are messages to avoid property damage. NOTES are additional information to help you
complete a procedure. PLEASE WORK SAFELY!
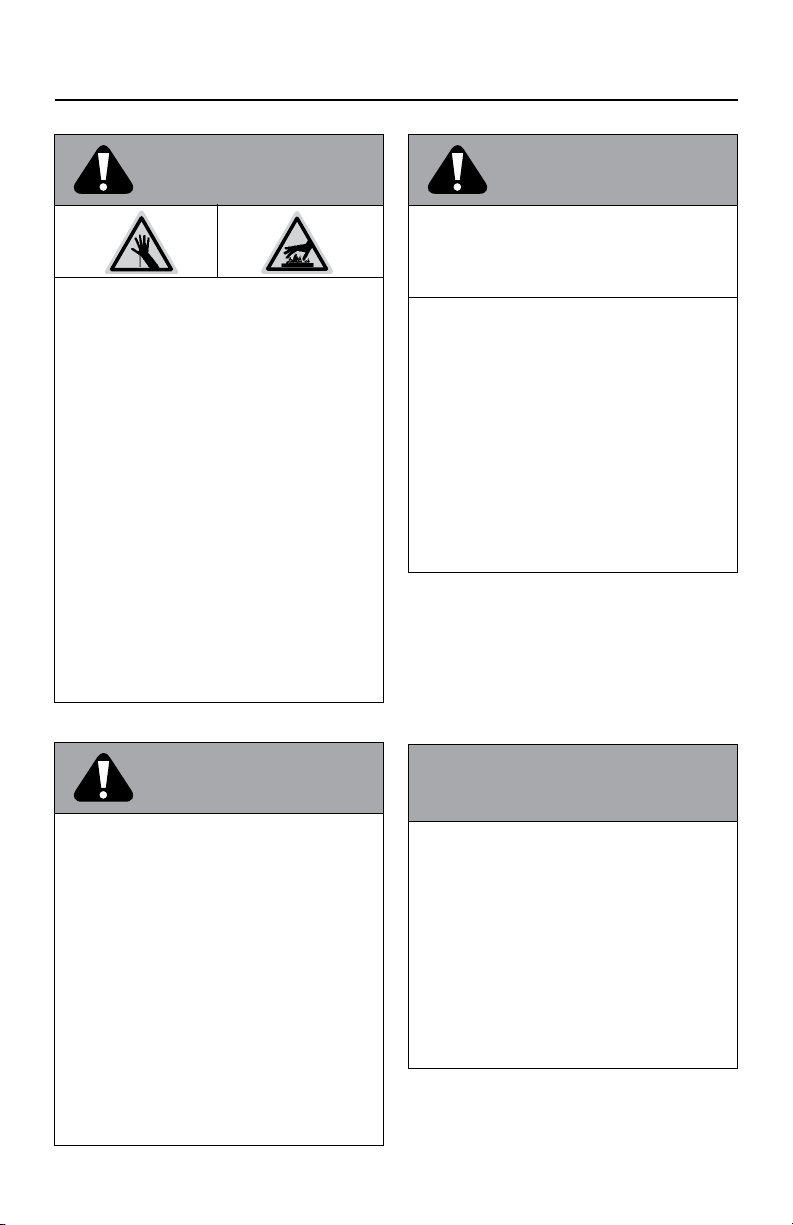
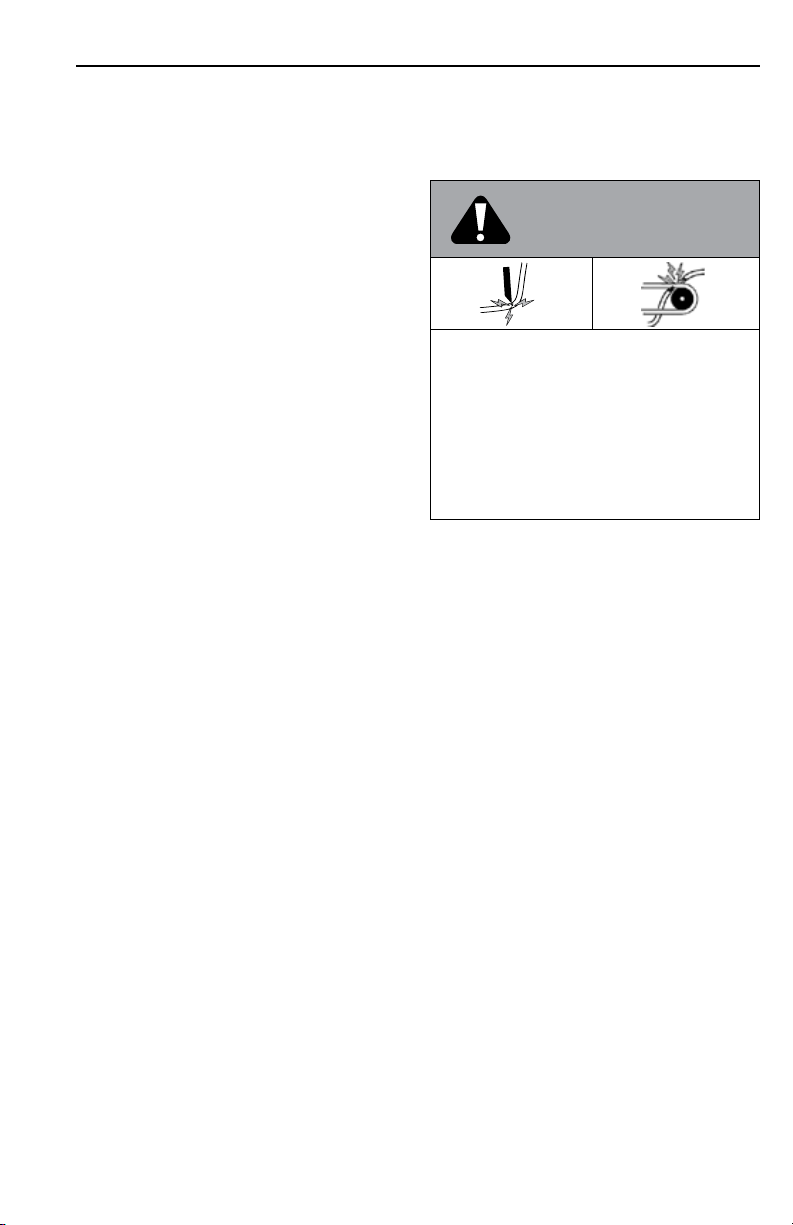
WARNING
MOVING PARTS ENTANGLEMENT
HAZARD
Failure to observe these instructions could
lead to severe injury or death.
WARNING
CHEMICAL AND FIRE HAZARD
Failure to observe these instructions could
lead to severe injury or death.
• Never operate hoist in an environment
containing explosive or combustible material.
• Always remove jewelry and wear eye
protection.
• Never lean over battery while making
connections.
• Always verify area is clear of fuel lines, fuel
tank, brake lines, electrical wires, etc. when
drilling.
• Never route electrical cables:
- Across any sharp edges.
- Through or near moving parts.
- Near parts that become hot.
• Always insulate and protect all exposed
wiring and electrical terminals.
• Always install terminal boots as directed in
installation instructions.
To avoid injury to hands or fingers:
• Always keep hands clear of rope, hook loop,
and hook during installation, operation and
when spooling in or out.
• Always use extreme caution when handling
hook and rope during spooling operations.
• Always use supplied hook strap whenever
spooling rope in or out, during installation,
and during operation.
• Always disconnect all wires from battery,
before beginning work.
• Always disconnect negative terminal first and
reconnect negative terminal last.
WARNING
FALLING OR CRUSHING HAZARD
Failure to observe these instructions could
lead to severe injury or death.
• Never use hoist to lift or move persons.
• Always use the size of rope specified in the
product data sheet.
1
1
Page 4

General Safety Precautions
CAUTION CAUTION
MOVING PARTS ENTANGLEMENT
HAZARD
Failure to observe these instructions could
lead to minor or moderate injury.
General Safety:
• Always know your hoist. Take time to fully
read this Installation and Operations Guide
in order to understand your hoist and its
operation.
• Never operate this hoist if you are under 16
years of age.
• Never operate this hoist when under the
influence of drugs, alcohol or medication.
• Never exceed hoist or rope rated capacity.
Double line using a snatch block to reduce
hoist load.
Installation Safety:
• Always choose a mounting location that is
sufficiently strong to withstand the maximum
lifting capacity of your hoist.
• Always use factory approved mounting
hardware, components, and accessories.
• Always use grade 5 or better mounting
hardware.
• Never weld mounting bolts.
• Always use care when using longer bolts
than those supplied from factory. Bolts
that are too long can damage the base
and/or prevent the hoist from being mounted
securely.
• Always mount the hoist and attach the hook
to the rope’s end loop before connecting the
electrical wiring.
• Always spool the rope onto the drum in the
direction specified by the drum rotation label
and/or documentation. This is required for
the automatic brake to function properly.
• Always prestretch wire rope and respool
under load before use. Tightly wound wire
rope reduces chances of “binding”, which can
damage the rope.
MOVING PARTS ENTANGLEMENT
HAZARD
Failure to observe these instructions could
lead to minor or moderate injury.
Hoisting Safety:
• Always inspect, rope, hook, and slings
before operating hoist. Damaged
components must be replaced before
operation. Protect parts from damage.
• Always report any malfunction, unusual
performance, or damage to the hoist.
• Never leave remote control plugged into
hoist when rigging or when the hoist is not
being used.
• Never hook rope back onto itself. This
damages the rope.
• Always remove any element or obstacle that
may interfere with safe operation of the hoist.
• Always take time to use appropriate rigging
techniques for a hoist lift.
• Never hoist with less than 5 wraps of rope
around the drum, the rope could come loose
from the drum.
• Never touch rope or hook while in tension or
under load.
• Never touch rope or hook while someone
else is at the control switch or during hoisting
operation.
• Always stand clear of rope and load and
keep others away while hoisting.
• Always be aware of stability of vehicle and
load during hoisting. Alert all bystanders of
any unstable condition.
• Always keep remote control lead clear of the
drum, rope and rigging. Inspect for cracks,
pinches, frayed wires or loose connections.
Replace remote control if damaged.
• Always pass remote control through a
window to avoid pinching lead in door when
using remote inside a vehicle.
• Never swing or twist loads.
• Never leave suspended load unattended.
2
Page 5
WARNING CAUTION
CUT AND BURN HAZARD
Failure to observe these instructions could
lead to minor or moderate injury.
To avoid injury to hands and fingers:
• Always wear heavy leather gloves when
handling wire rope.
• Never let rope slip through your hands.
• Always be aware of possible hot surface
at hoist motor, drum or rope during or after
hoist use.
• Never mount controller in an area where it
may be used as a step or where tools will be
hung or placed on it.
• Always avoid damage to terminals located
on top surface of the enclosure.
• Always keep tools and other electrically
conductive equipment away from terminals
at all times.
General Safety Precautions
MOVING PARTS ENTANGLEMENT
HAZARD
Failure to observe these instructions could
lead to minor or moderate injury.
• Always use a hook with a latch
• Always insure hook latch is closed and not
supporting load.
• Never apply load to hook tip or latch. Apply
load only to the center of hook.
• Never use a hook whose throat opening has
increased, or whose tip is bent or twisted.
WARNING
Failure to observe these instructions could
lead to property damage, severe injury, or
death.
• Never exceed the maximum recommended
hydraulic pressure or flow for any of the
components used.
• Always connect the hoist to the hydraulic
system as shown in the hydraulic schematic.
• Always use the correct type of control valve
as shown in the hydraulic schematic.
• Always Stand clear of hydraulic lines
during operation.
• Always install hydraulic components
in accordance with manufacturer’s
recommendations.
NOTICE
AVOID HOIST AND EQUIPMENT
DAMAGE
• Never “jog” rope under load. Shock loads
can momentarily exceed capacity of rope and
hoist.
• Never use hoist to secure a load during
transport.
• Never submerge hoist in water.
• Always store the remote control in a
protected, clean, dry area.
Page 6
WARN Industrial Hoists
What is a Hoist?
WARN Industries produces a large family of hoists
and winches. But what makes a hoist different
than a winch?
Hoists and winches look alike. Both consist of a
motor, a rotating drum with wire rope, reduction
gears, a base, and usually an electrical control
system. However, hoists and winches are used for
different purposes.
Hoists are used to lift a load into the air while
winches are used to pull a load horizontally across
the ground. Because a load that is suspended
in the air creates unique hazards, hoists are
engineered to higher safety standards. And unlike
winches, the operator of a hoist may not unwind
cable by “free spooling” or disengaging the motor
from the gear train.
Mechanical Brake
The mechanical brake generates heat when
loads are lowered and the wire rope is powered
out. Care must be taken to avoid overheating the
mechanical brake.
With heavier loads allow more time for the brake
to cool between uses.
Whine or chatter associated with a new
mechanical brake is normal and typically
disappears with use.
OVERHEATING THE MECHANICAL BRAKE
MAY RESULT IN PERMANENT DAMAGE TO,
OR FAILURE OF, THE BRAKE. REPLACE ANY
DAMAGED BRAKE COMPONENTS BEFORE
RESUMING USE OF THE HOIST.
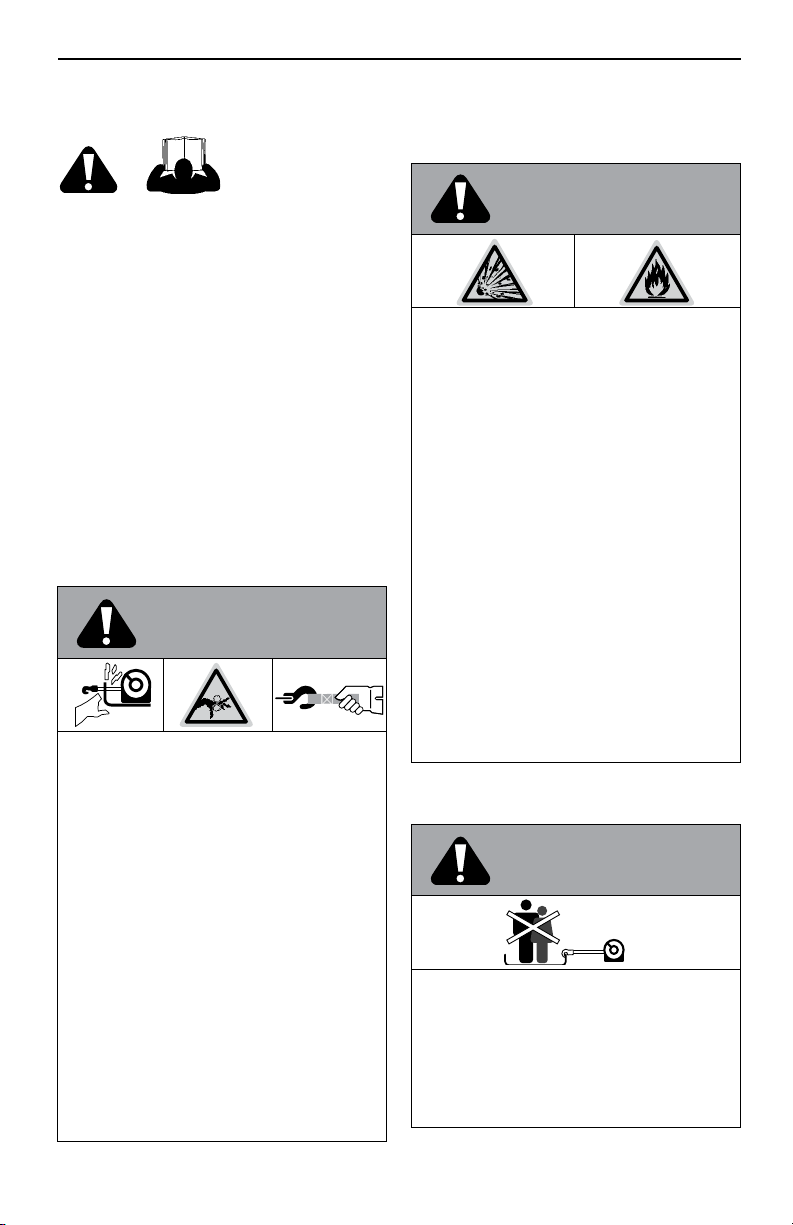
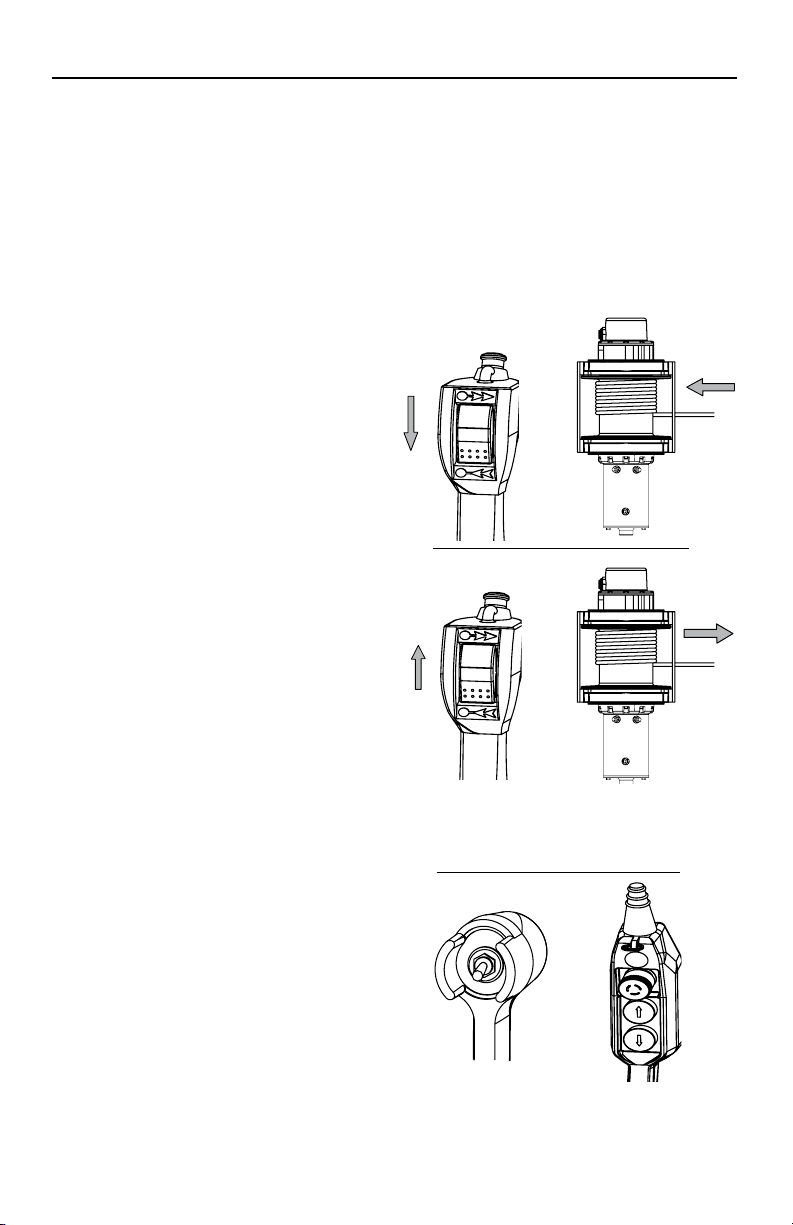
Remote Control
Switch operation
Do not leave the remote plugged into the hoist
when not in use. Leaving the remote plugged in
may result in unexpected activation of the hoist
and/or battery drain.
line in (raise load)
line out (lower load)
Heavy duty water
resistant remote
control pendant
Standard remote
control pendant
4 77
CE remote control
pendant features a
locking emergency
stop button.
Page 7

WARN Industrial Hoists
Pre-Install Checklist
1 Check to see that you have received the
following:
• The hoist
• The controller
• The remote control pendant
• The hoist mounting hardware
2 Upon removing hoist from packaging, check
for damage including bent or cracked tie rods,
tie bars, or housings. Correct any damage
before installing hoist.
3 Make sure the environment surrounding hoist
and controller is free of :
• Combustible vapors
• Chemical fumes
• Oil vapors
• Corrosive material
4 Make sure that the air temperature
surrounding the hoist and controller stays
within 120° F (49° C) and -20° F (-29° C).
5 Make sure that the mounting structure can
withstand the full rated pull of the hoist.
6 Make sure that the hoist boom or lift structure
will not deform under twice the full rated load
of the hoist.
Mounting the Hoist
Use the supplied fasteners whenever possible or
SAE Grade 5 (8.8 metric) bolts of the same thread
size. Both tie rods or tie bars must be in place.
Flat washers and lock washers should be used
between the bolt heads and mounting surface.
For thru bolt drum supports:
There should be 1 to 4 threads protruding
above the square nut. Bolts that are too long
may damage drum supports while bolts that are
too short will not provide adequate strength.
Flat washers and lock washers should be used
between bolt heads and mounting surface.
For threaded drum supports:
Bolts that are too long may damage the drum
supports and/or fail to anchor the hoist tightly.
Bolts that are too short will not provide adequate
strength. The length of the bolt must allow it to
extend between 15/16 inch (24 mm) and 1-3/8
inch (35 mm) into the base of the hoist.
1 Make sure that the mounting surface is flat
within +/-0.020 in. (0.50 mm). If the surface
is not flat, use shim stock as needed to avoid
straining the hoist.
2 Torque all mounting bolts to the recommended
values on the product data sheet.
3 Use the mounting hole locations provided on
the product data sheet.
Page 8
WARN Industrial Hoists
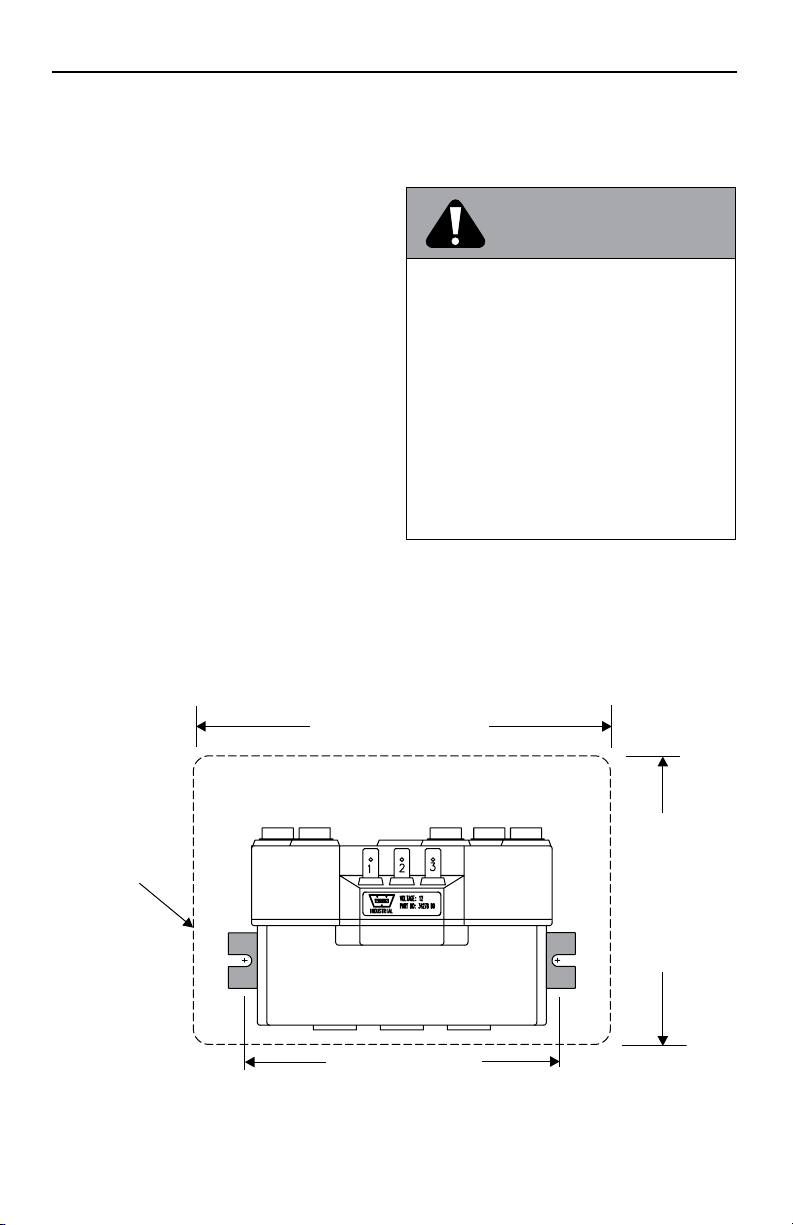
5.25 in (133 mm)
Foot print
of controller
cover
6.7 in (170 mm)
4.6 ni (116 mm)
Mounting the Controller (Electric Hoists)
1 Remove the screws holding cover to controller
bracket.
2 Mount the controller in an upright or vertical
orientation so that water will not collect in the
cover.
3 Mount controller in a location free of excessive
vibration. Use lock washers to prevent
mounting nuts from loosening.
4 Mount controller so it is protected from
damage by tools or heavy objects.
5 The controller can be mounted in a location
exposed to the weather; but it should be
protected from the possibility of damage from
tools or heavy objects.
6 Use the mounting dimensions shown.
FIRE HAZARD
Failure to observe these instructions could
lead to severe injury or death.
• Never mount controller in an area where it
may be used as a step or where tools will be
hung or placed on it.
• Always avoid damage to terminals located
on top surface of the enclosure.
• Always keep tools and other electrically
conductive equipment away from terminals
at all times.
WARNING
Mounting dimensions for typical controller
6 75
Page 9
Electric Cable Connections
See illustrations on following page.
Connection guidelines:
• Use #2 gauge battery cable for all power
connections. Excess cable length can
result in a voltage drop causing poor hoist
performance.
• Minimize cable length where possible. When
cables longer than 10 feet (3m) are needed,
use size #0 cable.
• Route cables along protected areas to avoid
wear and damage.
• Use insulating boots on all exposed terminal
connections to prevent electrical shorting.
Slide terminal boots onto cables before
connecting cables to terminals.
• Use splice connectors to attach the motor
thermal-switch wires.
• Connect the F1, F2, A and ground cables
as shown for clockwise models. For
counterclockwise models, the F1 controller
terminal must be connected to the F2 motor
terminal, and the F2 controller terminal must
be connected to the F1 motor terminal.
• Make sure all electrical connections are
clean and tight.
• It is recommended that a power-cut off
switch be installed in an easily accessible
location. This will provide power shut-off
during servicing and act as an added safety
feature. Use a 300 amp switch.
• It is recommended that a 300 amp circuit
breaker be installed in the positive (+) cable
near the battery to protect against short
circuits.
WARN Industrial Hoists
WARNING
CHEMICAL AND FIRE HAZARD
Failure to observe these instructions could
lead to severe injury or death.
• Never route electrical cables:
- Across any sharp edges.
- Through or near moving parts.
- Near parts that become hot.
Page 10
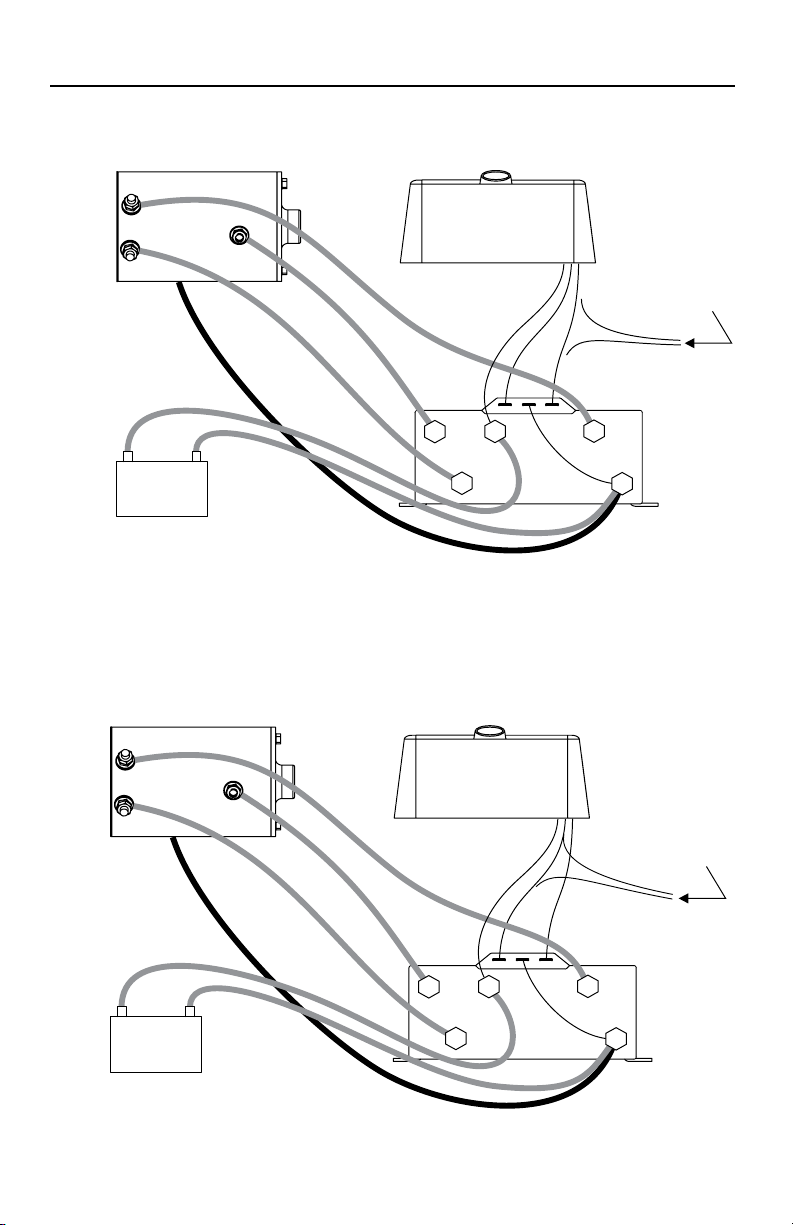
WARN Industrial Hoists
Series wound motor
F2
A
F1
+
_
ground cable
Controller cover
white
A
+
F1
black
23
of motor cut in here
X
green
1
brown
Battery
Connections for series-wound DC motors (3 terminals)
Drum rotation: Clockwise viewed from motor end.
Series wound motor
F2
A
F1
+
_
ground cable
Controller cover
white
A
+
F1
green
23
1
wires from bottom
of motor cut in here
X
black
Controller
brown
_
Thermal switch
wires from bottom
Controller
F2
_
Thermal switch
F2
Battery
Connections for series-wound DC motors (3 terminals)
Drum rotation: Counter clockwise viewed from motor end.
8 73
Page 11
WARN Industrial Hoists
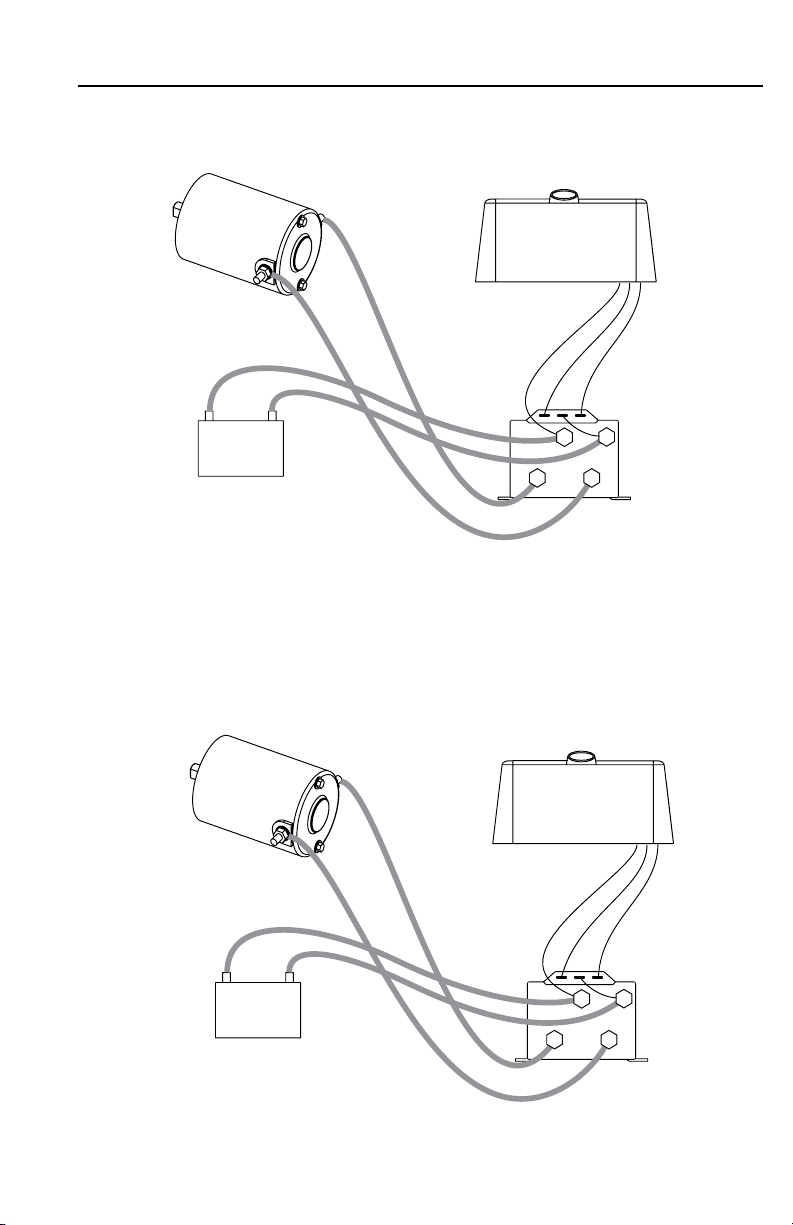
#1
#2
Permanent
Controller Cover
magnet motor
white
green
black
3
2
1
_
+
#2
#1
+
Battery
_
Controller
Connections for permanent-magnet DC motors (2 terminals)
Drum rotation: Clockwise viewed from motor end.
#2
#1
Permanent
magnet motor
Controller Cover
white
black
green
3
2
1
_
+
#2
#1
+
Battery
_
Controller
Connections for permanent-magnet DC motors (2 terminals)
Drum rotation: Counter clockwise viewed from motor end.
Page 12
WARN Industrial Hoists
Hydraulic Hoists: General Information
NOTE: The hydraulic system diagram and
component descriptions are provided for general
reference. Consult a knowledgeable hydraulics
representative for specific recommendations on
component selection, interconnection, layout, and
best practice.
The pressure rating of the hoist motor is
determined by a) the maximum allowable
pressure at the motor inlet port and b) the
maximum allowable pressure drop across the
motor. Pressure drop is defined as the difference
between the inlet port pressure and the outlet
port pressure at the hoist motor. Exceeding the
maximum inlet pressure may damage the hoist
motor. Exceeding the maximum pressure drop
may cause failure of hoist components.
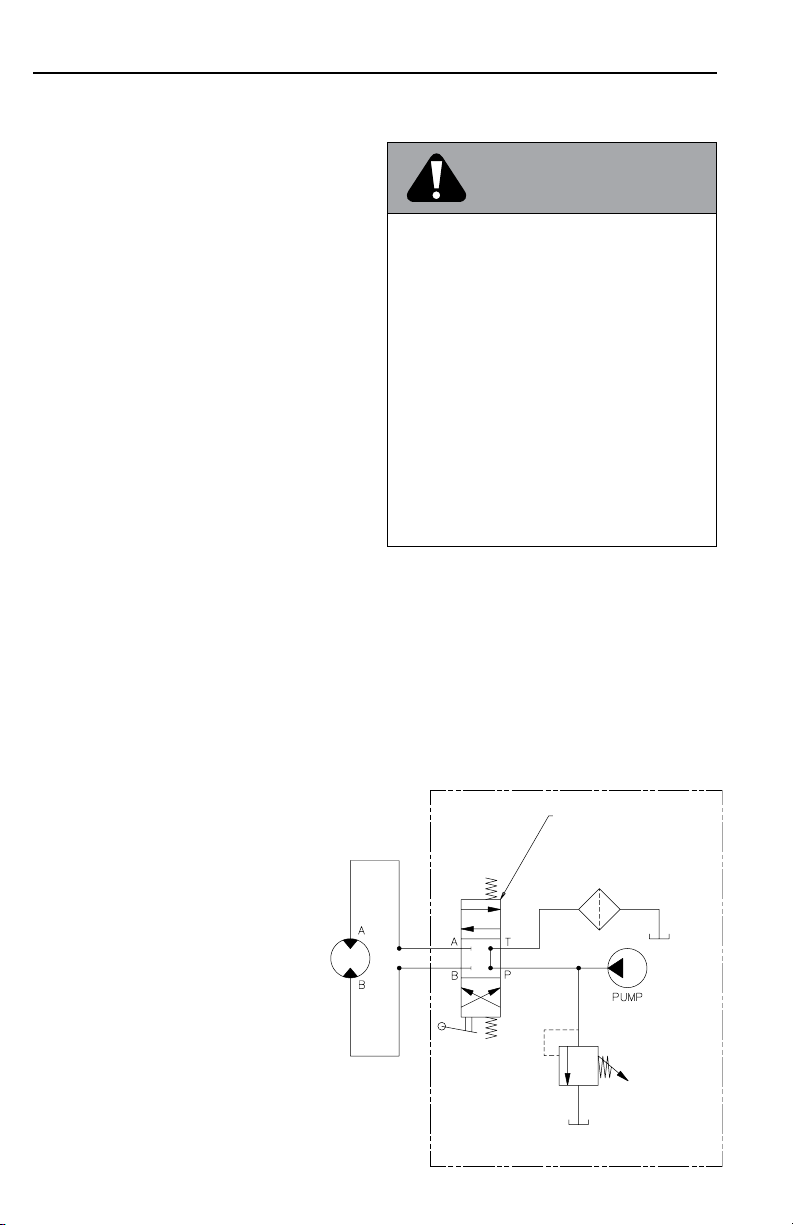
Failure to observe these instructions could
lead to property damage, severe injury, or
death.
• Never exceed the maximum recommended
hydraulic pressure or flow for any of the
components used.
• Always connect the hoist to the hydraulic
system as shown in the hydraulic schematic.
• Always use the correct type of control valve
as shown in the hydraulic schematic.
• Always Stand clear of hydraulic lines
during operation.
• Always install hydraulic components
in accordance with manufacturer’s
recommendations.
WARNING
The recommended operating temperature range
of the hydraulic motor is 100ºF to150ºF (38ºC
to 66ºC). The maximum operating temperature
range is -6ºF to 180ºF (-21ºC to 82ºC). Do NOT
exceed the flow rating of the hydraulic motor.
See the product data sheet for specific hydraulic
specifications.
Installation Final
Check:
• Recheck mounting hardware for
loose bolts, etc…
• Be sure all hydraulic system
components and connections
are correct.
• Be sure all hydraulic connections
are secure.
• Check motor rotation: The drum
should rotate in the direction
indicated by the drum rotation
label on top of the drum support.
If drum rotates in opposite direction,
recheck hydraulic and electrical
connections.
MOTOR
HYDRAULIC FLUID: The hydraulic fluid used
with the hoist must be an extreme pressure,
anti-wear hydraulic oil with oxidation and
corrosion inhibitors. It must contain a foam
suppressant, and have a viscosity rating of
100-300 SUS at 60ºF to 115ºF (15ºC to 46ºC).
The recommended nominal filtration level is 10
microns or finer.
Hydraulic Schematic
CONTROL VALVE
3-POSITION, 4-WAY,
SPRING RETURN
(CYLINDER SPOOL)
CUSTOMER SUPPLIED
COMPONENTS
10 71
Page 13
WARN Industrial Hoists
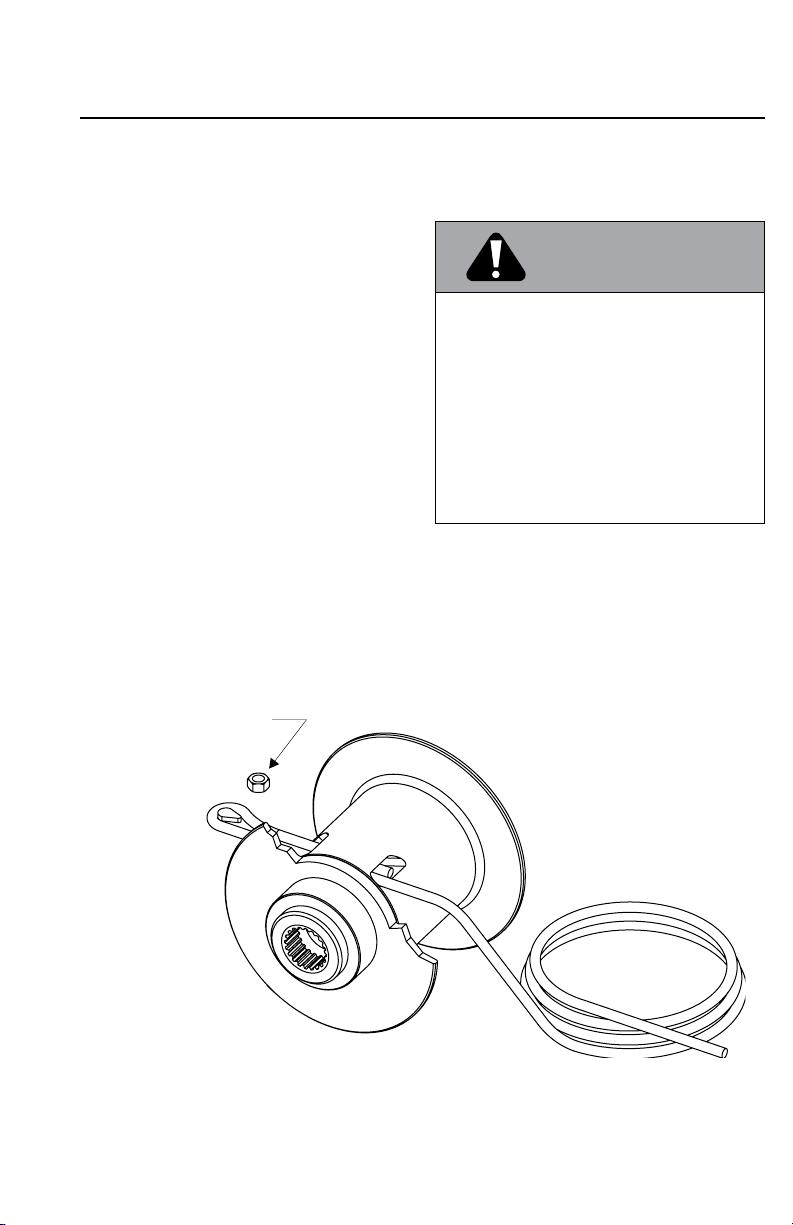
hex nut 7/16 in. (11 mm)
Installing the Wire Rope
1 Insert rope though slot in drum as shown.
2 Form a loop and reinsert end into slot. The
“live” or load carrying portion of rope must be
closest to drum flange.
3 Insert the wedge or hex nut (7/16 in.) supplied
with the hoist into loop and pull live end of rope
to seat the wedge or hex nut into slot. The end
of the rope must remain visible in the slot as
shown. The wedge locks the rope in the slot.
4 With end of rope securely installed, carefully
wind rope evenly onto drum. Keep rope under
tension at all times.
5 Always maintain a minimum of five (5) wraps
of rope on the drum. Fewer wraps may cause
the end of the rope to pull free of the drum and
drop the load.
CAUTION
Failure to observe these instructions
could lead to moderate injury and property
damage.
• Always install rope in the direction specified
on the drum rotation label, or brake will not
function.
• Always use rope specified on the product
data sheet.
• Always install rope according to the
illustration below.
Anchoring wire rope on drum
Page 14

Safe Operating Guidelines
Avoid the following:
WARN Industrial Hoists
WARNING
NEVER:
• Never place any part of your body or clothing
near rotating or moving parts. Rotating drum
with rope under tension can create a pinch
point.
• Never handle ropes or operate hoist without
wearing eye protection and heavy gloves.
• Never stand close to hoist when operating. If
rope breaks it can fly back with tremendous
force.
• Never lift, pull, or otherwise transport people
with hoist.
• Never lift, pull, support or otherwise transport
loads over people.
• Never attempt to lift loads greater than rated
capacity of the hoist.
• Never raise a load until it jams and causes the
drum and motor to stall.
• Never allow a crane to “two block.”
NOTE: The three conditions above produce
excess loading on the hoist which may cause
hoist, rope or structural failure resulting in
a dropped load. Excess loads can create
undetectable damage, which may cause the
hoist to fail even when lifting loads within its
rated capacity.
• Never allow hydraulic system, electric motor or
mechanical brake to overheat.
• Never touch rope or rigging while lifting a load,
while anyone is at controls, or while operating
hoist.
• Never put rope around an object and hook it
back on itself. This will damage the rope.
• Never use hoist with less than five (5) wraps
of rope around hoist drum. The cable anchor is
not designed to hold the rated load. The rope
may pull free and drop the load with fewer than
Failure to observe these instructions could
lead to property damage, severe injury or
death.
Always watch for hazards from the cable,
drum pinch points, falling loads, and rope or
rigging under tension.
five wraps of rope on the hoist drum.
• Never let the rope slip through your hands.
• Never attempt to lift an off-center load of
any kind. This can cause the load to swing
dangerously. Make sure the load is directly
under the hoist.
• Never allow the load to swing or twist while
suspended.
• Never allow the load to bear against the
hook latch.
• Never leave a suspended load unattended.
• Never lift using the point of the hook. Make
sure the load is bearing on the saddle of the
hook.
• Never operate the hoist when flammable
materials or vapors are present. Electrical
devices produce arcs that can cause a fire or
explosion.
• Never operate the hoist when you are tired,
distracted, in a hurry, or under the influence
of drugs, alcohol, or medication that affects
alertness or judgement.
12 69
Page 15

WARN Industrial Hoists
Do the following:
ALWAYS:
• Always take your time to assess your
situation and plan your lift carefully.
• Always, prior to a lift, inspect mounting
structure, hoist, slings and/or other
accessories signs of damage. Replace
damaged components prior to a lift.
• Always know the weight of the load and
make sure the rigging, hoist, and mount will
carry the weight.
• Always verify that the load is directly under
the hoist, the rope is not tangled or kinked,
and that all people are standing clear of
the load.
• Always wear leather gloves.
• Always take up any slack in the rope slowly.
Begin the lift slowly. If there is any evidence
of overloading, immediately lower the load
and correct the situation.
• Always avoid shock loads to the hoist by
lifting rapidly or bouncing a load.
• Always make sure the hook latch is
functioning properly. Replace damaged
hook latch before operating hoist.
• Always make sure the rope spools in the
right direction. Hoists are equipped with
an automatic brake and will not function if
the rope spools off the drum in the wrong
direction. NOTE: The rope spooling
direction will accidentally be reversed if rope
is run all the way out and re-spooled in with
control switch in power out” direction.
• Always inspect and carefully rewind rope
after each use. Cuts, kinks, or frayed areas
reduce the tensile strength of rope. Replace
rope if damaged.
• Always keep the remote control away from
drum, rope, or rigging.
• Always inspect the remote control pendant
and cable for damage before using hoist.
• Always inspect hydraulic system or
electrical connections before using hoist.
• Always stand clear of the rope and load
during hoist operation.
• Always make sure that other hoist operators
understand the potential hazards and have
been trained in proper use of the hoist.
• Always make sure that the controller and
hoist assembly are installed, operated,
adjusted, and serviced by qualified
personnel familiar with its construction and
operation.
• Always verify that load limiting devices are
working properly.
Additional Guidelines:
• If the load must be immersed in any liquid
or dusty solid material, use a sling chain or
other rigging to allow the hook to remain
above the surface at all times.
• For additional information, refer to the
operation section of American National
Standard ANSI/ASME B30.16 and B30-9
(rigging) and the operation section of
Department of Energy Hoisting and Rigging
Standards DOE-STD-1090-99.
Page 16

Periodic Preventive Maintenance
WARN Industrial Hoists
• Keep hoist free of dirt, oil, grease, water and
other substances.
• Check all mounting bolts and make sure
they are tightened to the recommended
torque values on the product data sheet.
Replace any damaged fasteners.
• Periodically check all connections to be sure
they are tight and free of corrosion.
• Check rope for visible damage every time
hoist is operated. Examples of damage are:
cuts, knots, mashed or frayed portions, and
broken strands. Replace rope immediately
if damaged. Failure to replace a damaged
rope could result in breakage.
Preventive Maintenance Schedule
Maintenance activity
Check fasteners
After first
operation
X X
• Regularly check brake for slippage or drift.
This is detected visually when hoist is under
load. If hoist drum continues to turn after
controls are released, brake may need to
be replaced.
• Periodically clean and grease brake
assembly. This will ensure proper
performance and extend the life of the hoist.
If hoist seems to labor or get excessively hot
during the lowering of loads, the brake will
need to be serviced or replaced.
• Check motor brushes periodically and
replace when necessary.
NOTE: Only the motor bushes and brake
assembly require periodic replacement.
Before
each
use
Semi-annually or after each
25 hours of operation
Check electrical or
hydraulic connections
Spool out and check
rope
Clean and grease
brake assembly
Check motor brushes
Visual check of hoist
and control
X X
X
X
X
X X X
14 67
Page 17
WARN Industrial Hoists
Trouble Shooting: Electric Hoists
PERSONAL INJURY
Failure to observe these instructions could
lead to severe injury or death.
• Never lean over battery while making
connections.
• Always disconnect all wires from battery,
before beginning work.
• Always disconnect negative terminal first
and reconnect negative terminal last.
• Always remove jewelry and wear eye
protection.
Problem Possible cause Corrective action
WARNING
Hoist won’t
operate in either
direction or
motor doesn’t
operate
Hoist will powerout but not
power-in
Power is not
connected -orEmergency on/off
switch (optional) is
in “off” position
Power to remote
pendant has been
interrupted
Failure in remote
control pendant
switch or wiring
Failure of components or wiring
inside controller
A) Check wiring connections. Check for 12v
(24v) at positive (+) terminal on controller.
Check for voltage at F1, F2 and A terminals
with remote switch in either direction. B)
Check position of emergency on/off switch.
Check for 12v (24v) at center pin of remote
socket on controller. Check continuity of remote lead connector from center pin to either
side pin with remote control pendant on/off
switch in both positions. Replace remote
control pendant if there is no continuity.
Check for 12v (24v) at center pin of remote
socket on controller. Check continuity of remote lead connector from center pin to either
side pin with remote control pendant on/off
switch in both positions. Replace remote
control pendant if there is no continuity.
Check for 12v (24v) at center pin of remote
socket on controller. Check continuity of remote lead connector from center pin to either
side pin with remote control pendant on/off
switch in both positions. Replace remote control pendant if there is no continuity. If none
of these corrective actions resolves problem,
return controller to Warn Industrial for service.
Page 18

WARN Industrial Hoists
Problem Possible cause Corrective action
Hoist will
power-in but
not power-out
Motor tries to
power-out but
hoist stalls or
locks-up
Hoist operates in both
directions but
will not lift rated
load
Hoist slows
down and stalls
during powerout
Hoist vibrates
badly or is
noisy during lifting or lowering
of load
Power to remote
control pendant
has been interrupted
Load brake failure Service or replace load brake.
Low voltage at
hoist
Brake needs
service
Brake needs
servicing
Mounting surface
is not flat. Tie rod
or tie bar is bent
Check for 12v (24v) at center pin of remote
socket on controller. Check continuity of remote lead connector from center pin to either
side pin with remote control pendant on/off
switch in both positions. Replace remote
control pendant if there is no continuity
A) Be sure wiring cable size guidelines have
been met. B) Check condition of battery. C)
Check all power wiring and connections for
corrosion. Clean and tighten connections.
Service or replace load brake.
Service or replace load brake.
Check to make sure mounting surface is flat
to within +/- 0.020 in. (0.50 mm). Replace tie
rod or tie bar if necessary. Check for bent or
cracked housings.
16 65
Page 19

WARN Industrial Hoists
Trouble Shooting: Hydraulic Hoists
NOTE: Hydraulic system failures typically follow
the same pattern: a gradual or sudden loss of
pressure or flow resulting in a loss of motor
power. Any one of the system components
may be at fault. Refer to the table for general
recommendations. If necessary, consult a
knowledgeable hydraulics representative.
NOTE: See product data sheet for hydraulic
specifications.
PERSONAL INJURY
Failure to observe these instructions could
lead to severe injury or death.
Never use a relief valve that exceeds the
hydraulic motor pressure rating. Use of this
valve can overload the hoist.
Problem Possible cause Corrective action
WARNING
Hoist won’t operate
in either direction
Hoist will power-out
but not power-in
Hoist will power-in
but not power-out
or stalls during
power-out
Hoist operates in
both directions but
will not lift rated
load
Hoist vibrates
badly or is noisy
during lifting or
lowering of load
No hydraulic pressure
Geartrain, brake, or motor
failure
Brake assembled incorrectly
Load brake failure Service or repair load brake
Low system pressure or
excessive system back
pressure
Brake needs servicing Service or replace load brake
Mounting surface is not
flat. Tie rod or tie bar is
bent.
Check hydraulic system schematic
and connections
Send hoist to authorized Warn Industrial service center for repair
Repair or replace brake assembly
Check system pressure at motor inlet
and outlet ports
Check to make sure mounting
surface is flat to within +/- 0.020 in.
(0.50 mm). Replace tie rod or tie
bar if necessary. Check for bent or
cracked housings.
Page 20

WARN Industrial Hoists
Customer Support
Should you have any questions about this product or these instructions, please call WARN’s customer
service through the numbers below, Monday thru Friday between 7:00 AM and 4:00 PM Pacific Time
for assistance. Or for e-mail support, visit our web site www.WARN.com and click on customer
service section.
NOTE: Only qualified persons should repair the hoist.
United States International
Phone: 503-722-1200 or
800-543-9276 (US only)
FAX: 503-722-3000 FAX: 503-722-3005
Phone 503-722-3008
18 63
Page 21

WARN Industrial Hoists
WARN® Commercial Products Limited One (1) Year Warranty Statement
Warn Industries, Inc. (WARN) warrants to the original purchaser that the mechanical components and electrical
components of the “WARN” Products specified below will be free of defects in material and workmanship for a
period of one (1) year from the original date of purchase. This Warranty applies only to the original purchaser
of the Products. To obtain any warranty service, you must provide WARN with proof of purchase and date of
purchase acceptable to WARN, such as a copy of your purchase receipt. This warranty does not cover the
removal or reinstallation of the Product. WARN will, at its option, repair, replace or refund the purchase price of
a defective Product or component, provided you return the defective Product or component during the warranty
period, transportation charges prepaid, to Warn Industries Service Department or a Factory Authorized Service
Center. Attach your name, address, telephone number, a description of the problem, and a copy of your
receipt and original bill of sale bearing the WARN serial number of the defective Product and date of purchase.
This warranty does not apply (i) to parts or components excluded below, or (ii) if the Product has been
damaged by accident, abuse, misuse, collision, overloading, modification, misapplication, improper installation,
or improper service. This warranty is void if any WARN serial number has been removed or defaced.
THE WARRANTY SET FORTH ABOVE IS THE ONLY WARRANTY. THERE ARE NO OTHER
WARRANTIES, EXPRESS OR IMPLIED, INCLUDING BUT NOT LIMITED TO IMPLIED WARRANTIES OF
MERCHANTABILITY OR FITNESS FOR A PARTICULAR PURPOSE.
ANY IMPLIED WARRANTY WHICH BY LAW MAY NOT BE EXCLUDED IS LIMITED IN DURATION TO ONE
(1) YEAR FROM THE DATE OF ORIGINAL RETAIL PURCHASE OF THE PRODUCT.
WARN SHALL NOT BE LIABLE FOR SPECIAL, INDIRECT, INCIDENTAL OR CONSEQUENTIAL DAMAGES
(INCLUDING, BUT NOT LIMITED TO, LOST PROFITS, DOWN TIME OR LOSS OF USE) UNDER ANY
LEGAL THEORY, EVEN IF WARN WAS ADVISED OF THE POSSIBILITY OF SUCH DAMAGES.
Some states do not allow the exclusion of implied warranties or the exclusion or limitation of liability for
incidental or consequential damages, or limitations on how long an implied warranty lasts, so the above
limitation or exclusion may not apply to you. This warranty gives you specific legal rights. You may also have
other rights that vary from state to state.
WARN reserves the right to change Product design without notice. In situations in which WARN has changed
a Product design, WARN shall have no obligation to upgrade or otherwise modify previously manufactured
Products.
No WARN dealer, agent or employee is authorized to make any modification, extension or addition to this
warranty.
Warranty inquires and Products returned for warranty service should be sent to:
WARN INDUSTRIES, INC.
Customer Service Department
12900 SE Capps Road
Clackamas, OR 97015
1-800-543-WARN (1-800-543-9276)
Products covered by this warranty Products not covered by this warranty
Commercial winch products Finish and wire rope for commercial winches
Commercial hoist products Finish and wire rope for commercial hoist products
Commercial accessory products Finish and wire rope
Page 22

20 61
Page 23
Précautions de sécurité générales
Avertissements et Mises en Garde
AVERTISSEMENT
Les directives suivantes comprennent des indications intitulées AVERTISSEMENT, ATTENTION,
AVIS et REMARQUE. Chacune a un objectif bien
précis : AVERTISSEMENT présente des consignes
de sécurité décrivant un danger potentiel qui peut
entraîner des blessures graves. ATTENTION comprend des consignes de sécurité signalant un danger
potentiel qui peut entraîner des blessures légères
ou modérées. ATTENTION sert aussi à décrire une
utilisation dangereuse. ATTENTION et AVERTISSEMENT identifient un danger, indiquent comment
l’éviter et montrent ses conséquences possibles si on
l’ignore. AVIS présente des consignes concernant les
dommages matériels potentiels. REMARQUE donne
des renseignements additionnels qui permettent
d’accomplir une procédure. PRIÈRE DE TRA-
VAILLER PRUDEMMENT !
AVERTISSEMENT
DANGER DE HAPPEMENT PAR DES
PIÈCES MOBILES
Le non-respect des consignes peut entraîner
des blessures graves ou la mort.
RISQUES ASSOCIÉS AUX PRODUITS
CHIMIQUES ET RISQUE D’INCENDIE
Le non-respect des consignes peut
entraîner des blessures graves ou la mort.
• Ne jamais faire fonctionner le palan dans
un environnement contenant des matériaux
explosifs ou combustibles.
• Toujours retirer les bijoux et porter des
lunettes de sécurité.
• Ne jamais se pencher au-dessus de la
batterie en procédant aux connexions.
• Avant de percer, toujours s’assurer que
la zone ne contient pas de conduites de
carburant, de réservoir de carburant, de
conduites de frein, de câblage électrique, etc.
• Ne jamais installer les câbles électriques :
- sur des bords tranchants,
- par ou à proximité de pièces mobiles;
- à proximité de pièces pouvant devenir
chaudes.
• Toujours isoler et protéger tous les fils et
bornes électriques exposés.
• Toujours installer les capuchons de borne
de la manière indiquée dans les instructions
d’installation.
Pour éviter de se blesser les mains ou les doigts
:
• Toujours garder les mains éloignées du câble,
de la boucle du crochet et du crochet durant
l’installation et l’utilisation du palan.
• Toujours faire très attention en manipulant le
crochet et le câble pendant les manœuvres de
déroulement.
• Toujours utiliser un cordon du crochet pour
enrouler ou dérouler le câble.
• Toujours débrancher tous les fils de la batterie
avant de commencer le travail.
• Toujours débrancher la borne négative en
premier et rebrancher la borne négative en
dernier.
AVERTISSEMENT
DANGER DE CHUTE OU D’ÉCRASEMENT
Le non-respect des consignes peut entraîner
des blessures graves ou la mort.
• Ne jamais utiliser le palan pour soulever ou
transporter des personnes.
• Toujours utiliser un câble de la taille spécifiée
sur la fiche de données de produit.
Page 24

Précautions de sécurité générales
ATTENTION ATTENTION
DANGER DE HAPPEMENT PAR DES
PIÈCES MOBILES
Le non-respect des instructions peut
entraîner des blessures mineures ou
modérées.
Consignes de sécurité générales :
• Toujours se familiariser avec le palan. Prendre
le temps de bien lire le manuel d’installation
et d’utilisation afin de comprendre l’appareil et
son fonctionnement.
• Les personnes âgées de moins de 16 ans ne
doivent jamais faire fonctionner cet appareil.
• Ne jamais faire fonctionner l’appareil
sous l’effet de drogues, de l’alcool ou de
médicaments.
• Ne jamais dépasser la capacité du palan
ou du câble indiqué sur la fiche technique
du produit. Un câblage double avec poulie
ouvrante permet de réduire la charge subie
par le treuil.
Consignes de sécurité se rapportant à
l’installation :
• Toujours choisir une surface de montage
suffisamment résistante pour supporter la
capacité de levage maximale du palan.
• Toujours utiliser un matériel de montage, des
composants et des accessoires homologués
par le fabricant.
• Toujours utiliser un matériel de montage de
catégorie 8 ou supérieure.
• Ne jamais souder les boulons de montage.
• Toujours faire attention quand on utilise des
boulons plus longs que ceux fournis par le
fabricant. Des boulons trop longs peuvent
endommager la base ou empêcher le palan
d’être monté de manière sûre.
• Toujours monter le palan et fixer le crochet
à la boucle d’extrémité du câble avant de
raccorder le câblage électrique.
• Toujours enrouler le câble sur le tambour
dans le sens spécifié par l’autocollant de
rotation ou la documentation du palan. Cela
est nécessaire pour que le frein automatique
fonctionne correctement.
• Toujours étirer au préalable le câble et
l’enrouler sous charge avant de l’utiliser. Un
câble enroulé de manière serrée réduit le
risque qu’il coince et soit endommagé.
DANGER DE HAPPEMENT PAR DES
PIÈCES MOBILES
Le non-respect des instructions peut
entraîner des blessures mineures ou
modérées.
• Toujours inspecter le câble, le crochet et
les élingues avant de faire fonctionner le
palan. Tout composant endommagé doit
être remplacé avant l’utilisation. Protéger les
pièces de dommages potentiels.
• Toujours signaler toute défectuosité, tout
fonctionnement inhabituel ou dommage subi
par le palan.
• Ne jamais laisser la télécommande branchée
sur le palan durant le câblage ou quand le
palan n’est pas utilisé.
• Ne jamais accrocher le câble à lui-même.
Cela l’endommagerait.
• Toujours s’assurer que tout objet ou obstacle
pouvant gêner la bonne utilisation du palan
est écarté.
• Toujours prendre le temps d’utiliser des
techniques de câblage adaptées avant
d’utiliser le palan pour soulever.
• Ne jamais utiliser le palan avec moins de 5
spires de câble enroulées autour du tambour.
Le câble pourrait se dérouler du tambour.
• Ne jamais toucher le câble ou le crochet
lorsque le câble est tendu ou sous charge.
• Ne jamais toucher le câble ou le crochet
lorsqu’une autre personne est à l’interrupteur
de commande ou durant le fonctionnement
du palan.
• Ne jamais toucher le câble ou le crochet
lorsque la télécommande est branchée sur le
palan.
• Toujours se tenir à l’écart du câble et de
la charge et ne jamais laisser personne
s’approcher durant l’utilisation.
• Toujours être conscient de la stabilité du
véhicule et de la charge durant le levage.
Alerter les personnes alentour en cas de
situation instable.
• Toujours garder le fil de la télécommande à
l’écart du tambour, du câble et du câblage.
S’assurer qu’il n’y a pas de fissures, de
points de pincement, de fils effilochés ou
de connexions desserrées. Remplacer la
télécommande en cas de dommages.
22 59
Page 25
Palans WARN Industries
ATTENTION ATTENTION
RISQUE DE COUPURE ET DE
BRÛLURE
Le non-respect des instructions peut
entraîner des blessures mineures ou
modérées.
Pour éviter de se blesser les mains et les
doigts :
• Toujours porter des gants de cuir épais
durant la manipulation du câble d’acier.
• Ne jamais laisser le câble glisser dans les
mains.
• Toujours penser aux surfaces chaudes au
niveau du moteur du palan, du tambour
ou du câble durant ou après l’utilisation du
palan.
• Ne jamais monter le contrôleur dans un
endroit où il risque de servir de marchepied
ou pour poser ou suspendre des outils.
• Toujours éviter d’endommager les bornes
situées sur la surface supérieure de
l’enceinte.
• Toujours maintenir les outils et autres
matériels conducteurs d’électricité à l’écart
des bornes en permanence.
DANGER DE HAPPEMENT PAR DES
PIÈCES MOBILES
Le non-respect des instructions peut
entraîner des blessures mineures ou
modérées.
• Ne jamais appliquer la charge sur l’extrémité
ou le loquet du crochet. Appliquer la charge
uniquement au centre du crochet.
• Ne jamais utiliser un crochet dont l’ouverture
de la gorge a augmenté ou dont l’extrémité
est courbée ou tordue.
• Toujours utiliser un crochet muni d’un loquet
• Toujours s’assurer que le loquet du crochet
est fermé et qu’il ne soutient aucune charge.
• Si l’on manie la télécommande de l’intérieur
d’un véhicule, toujours faire passer la
télécommande par une fenêtre pour éviter de
pincer le fil.
• Ne jamais laisser la charge se balancer
ou tourner sur elle-même quand elle est
suspendue.
• Ne jamais laisser une charge suspendue sans
surveillance.
AVERTISSEMENT
AVIS
ÉVITER D’ENDOMMAGER LE PALAN ET
L’ÉQUIPEMENT
• Ne jamais « secouer » le câble sous
charge. Les charges de choc peuvent
momentanément dépasser de loin la capacité
du câble et du palan.
• Ne jamais se servir du palan pour maintenir
une charge pendant le transport.
• Ne jamais submerger le palan dans l’eau.
• Toujours ranger la télécommande dans un
endroit sûr, propre et sec.
Le non-respect des consignes peut entraîner
des dommages matériels, des blessures
graves ou la mort.
• Ne jamais dépasser la pression hydraulique
ou le débit maximal recommandé pour l’un
quelconque des composants utilisés.
• Toujours connecter le treuil au système
hydraulique tel qu’indiqué sur le schéma
hydraulique.
• Toujours utiliser le bon type de distributeur
tel qu’indiqué sur le schéma hydraulique.
• Toujours se tenir à l’écart des conduites
hydrauliques lorsque le treuil est en marche.
• Toujours installer les composants
hydrauliques conformément aux
recommandations du fabricant.
Page 26

Palans WARN Industries
Qu’est-ce qu’un Palan ?
WARN Industries produit de nombreux types de
palans et de treuils. Quelle est la différence entre
un palan et un treuil ?
Les palans et les treuils se ressemblent. Tous
deux ont un moteur, un tambour rotatif avec un
câble, des réducteurs, une base et généralement
un circuit de commande électrique. Toutefois,
les palans et les treuils sont utilisés à des fins
différentes.
Les palans servent à soulever une charge en
l’air alors que les treuils sont utilisés pour tirer
une charge horizontalement sur le sol. Étant
donné qu’une charge suspendue en l’air crée des
dangers uniques, les palans sont construits selon
des normes de sécurité plus élevées. En outre, à
la différence des treuils, l’opérateur d’un palan ne
peut pas dérouler le câble « en roue libre » ou en
désengageant le moteur du train d’engrenages.
Frein Mécanique
Le frein mécanique génère de la chaleur quand
les charges sont abaissées et le câble déroulé.
Prendre soin d’éviter la surchauffe du frein
mécanique.
Avec les charges plus lourdes, laisser plus de
temps au frein pour refroidir entre les utilisations.
Le sifflement ou broutement associé à un
frein mécanique neuf est normal et disparaît
généralement à l’usage.
LA SURCHAUFFE DU FREIN MÉCANIQUE
PEUT ENTRAÎNER DES DOMMAGES
PERMANENTS OU LA DÉFAILLANCE DU
FREIN. REMPLACER TOUT COMPOSANT DE
FREIN ENDOMMAGÉ AVANT DE REPRENDRE
L’UTILISATION DU PALAN.
Télécommande
Utilisation de l’interrupteur
Ne pas laisser la télécommande branchée dans
le palan lorsque celui-ci n’est pas en usage. Une
télécommande qui reste branchée risque de
provoquer l’activation imprévue du palan et/ou de
vider la batterie.
enrouler le câble
(lever la charge)
dérouler le câble
(baisser la charge)
Télécommande résistant à
l’eau à usage intensif
Télécommande
standard
24 57
La télécommande CE
comprend un bouton
d’arrêt d’urgence
verrouillable.
Page 27

Palans WARN Industries
Liste de Contrôle Avant
l’installation
1 Vérifier que les composants suivants ont bien
été reçus :
• Le palan
• Le contrôleur
• La télécommande
• Le matériel de montage du palan
2 Lors du déballage du palan, contrôler s’il y a
eu des dommages, notamment des barres
d’accouplement, tirants, logements ou boîtiers
faussés ou fissurés. Corriger tout dommage
avant d’installer le palan.
3 S’assurer que l’environnement du palan et du
contrôleur est exempt de :
• Vapeurs combustibles
• Fumées chimiques
• Vapeurs d’huile
• Matières corrosives
4 S’assurer que la température de l’air ambiant
entourant le palan et le contrôleur reste entre
-29° C et 49° C.
5 S’assurer que la structure de montage peut
supporter la pleine traction nominale du palan.
6 S’assurer que la flèche ou la structure de
levage du palan ne se déformera pas sous
deux fois la pleine charge nominale du palan.
Montage du Palan
Utiliser autant que possible les fixations qui sont
fournies ou des boulons classe 8.8 métrique
de même taille de filetage. Les deux barres
d’accouplement ou tirants doivent être en place.
Utiliser des rondelles plates et des rondelles de
blocage entre les têtes de boulon et la surface de
montage.
Pour les supports de tambour à boulons
traversants :
De 1 à 4 filets doivent dépasser de l’écrou carré.
Des boulons trop longs risquent d’endommager
les supports de tambour et des boulons trop
courts ne seront pas assez solides. Utiliser des
rondelles plates et des rondelles de blocage entre
les têtes de boulon et la surface de montage.
Pour les supports de tambour filetés :
Des boulons trop longs risquent d’endommager
les supports de tambour ou de ne pas bien ancrer
le palan. Des boulons trop courts ne seront pas
assez solides. La longueur des boulons doit les
faire pénétrer de 24 à 35 mm dans la base du
palan.
1 S’assurer que la surface de montage est plane
à +/-0,50 mm. Si la surface n’est pas plane,
utiliser un dispositif de calage au besoin pour
éviter de déformer le palan.
2 Serrer tous les boulons de montage aux
couples recommandés sur la fiche de données
de produit.
3 Utiliser les emplacements de trous de montage
indiqués sur la fiche de données de produit.
Page 28

Palans WARN Industries
Montage du Contrôleur (Palans Électriques)
1 Enlever les vis fixant le couvercle au support
du contrôleur.
2 Monter le contrôleur verticalement de façon
à ce que l’eau ne s’accumule pas dans le
couvercle.
3 Monter le contrôleur dans un endroit qui n’est
pas soumis à des vibrations intenses. Utiliser
des rondelles de blocage pour empêcher les
écrous de montage de se desserrer.
4 Monter le contrôleur de façon à ce qu’il soit
protégé contre les outils ou autres objets
lourds.
5 Le contrôleur peut être monté dans un endroit
exposé aux intempéries, mais il doit être
protégé contre les risques de dommages
causés par les outils ou autres objets lourds.
6 Utiliser les dimensions de montage indiquées.
AVERTISSEMENT
RISQUE D’INCENDIE
Le non-respect des consignes peut
entraîner des blessures graves ou la mort.
• Ne jamais monter le contrôleur dans un
endroit où il risque de servir de marchepied
ou pour poser ou suspendre des outils.
• Toujours éviter d’endommager les bornes
situées sur la surface supérieure de
l’enceinte.
• Toujours maintenir les outils et autres
matériels conducteurs d’électricité à l’écart
des bornes en permanence.
Dimensions de montage d’un contrôleur type
26 55
Page 29

Palans WARN Industries
Connexions des fils Électriques
Voir les illustrations à la page suivante.
Consignes relatives aux connexions :
• Utiliser du fil de batterie de Ø 32 pour toutes
les connexions d’alimentation. Une longueur
de fil excessive peut résulter en une chute
de tension et entraîner des performances
médiocres.
• Minimiser la longueur des fils autant que
possible. Quand des fils de plus de 3 m de
long sont nécessaires, utiliser du fil de Ø 52.
• Poser les fils le long d’endroits protégés pour
éviter qu’ils soient usés ou endommagés.
• Utiliser des capuchons d’isolation sur
toutes les connexions de bornes exposées
pour éviter les courts-circuits. Glisser les
capuchons de bornes sur les fils avant de
les brancher aux bornes.
• Utiliser des connecteurs épissés pour
raccorder les fils du thermorupteur du
moteur.
• Raccorder les fils F1, F2, A et de masse
comme illustré pour les modèles à droite.
Pour les modèles à gauche, la borne F1 du
contrôleur doit être raccordée à la borne F2
du moteur et la borne F2 du contrôleur à la
borne F1 du moteur.
• S’assurer que toutes les connexions
électriques sont propres et bien serrées.
• Il est recommandé d’installer un sectionneur
de puissance dans un endroit d’accès
facile. Cela fournit un sectionneur durant
l’utilisation et sert de dispositif de sécurité
supplémentaire. Utiliser un interrupteur de
300 A.
• Il est recommandé d’installer un coupecircuit de 300 A dans le fil positif (+) près de
la batterie pour protéger contre les courtscircuits.
AVERTISSEMENT
RISQUES ASSOCIÉS AUX PRODUITS
CHIMIQUES ET RISQUE D’INCENDIE
Le non-respect des consignes peut entraîner
des blessures graves ou la mort.
• Ne jamais installer les câbles électriques :
- sur des bords tranchants;
- par ou à proximité des pièces mobiles;
- à proximité de pièces pouvant devenir
chaudes.
Page 30

Palans WARN Industries
noir
2
3
1
brun
Connexions pour les moteurs c.c. à enroulements série (3 bornes)
Rotation du tambour: Vu dans le sens horaire de fin de moteur
noir
1
2
3
brun
Connexions pour les moteurs c.c. à enroulements série (3 bornes)
Rotation du tambour: Compteur affiché dans le sens horaire de fin
de moteur
28 53
Page 31

Palans WARN Industries
#2
#1
Moteur
à
aimant permanent
+
_
Batterie
Couvercle de
Contr leur
2 1
3
+
#2
noir
_
#1
Contr leur
Connexions pour les moteurs c.c. à aimant permanent (2 bornes)
Rotation du tambour: Vu dans le sens horaire de fin de moteur
#2
#1
Moteur
à
aimant permanent
Couvercle de
Contr leur
noir
2
1
3
+
Batterie
_
#2
_
+
#1
Contr leur
Connexions pour les moteurs c.c. à aimant permanent (2 bornes)
Rotation du tambour: Compteur affiché dans le sens horaire de fin
de moteur
Page 32

Palans WARN Industries
COMPOSANTS FOURNIS PAR LE CLIENT
MOTEUR
DISTRIBUTEUR
À 3 POSITIONS ET 4 VOIES
RAPPEL PAR RESSORT
(TIROIR CYLINDRIQUE)
POMPE
Palans Hydrauliques: Généralités
REMARQUE : le schéma du circuit hydraulique
et la description des composants sont donnés
à titre de référence générale. Consulter un
représentant qualifié en hydraulique pour obtenir
des recommandations spécifiques en matière de
sélection des composants, d’interconnexion, de
disposition et de meilleures pratiques.
La pression nominale du moteur du treuil est
déterminée par a) la pression maximale admissible à
l’orifice d’entrée du moteur et b) la chute de pression
maximale admissible dans le moteur. On définit la
chute de pression comme étant la différence entre
la pression à l’orifice d’entrée et la pression à l’orifice
de sortie du moteur du treuil. Le fait de dépasser la
pression d’entrée maximale peut endommager le
moteur du treuil. Le dépassement de la chute de
pression maximale peut causer la défaillance des
composants du treuil.
La plage de température de fonctionnement
recommandée pour le moteur hydraulique est de
38 à 66 ºC. La plage maximale est de -21 à 82 ºC.
NE PAS dépasser le débit nominal du moteur
hydraulique. Consulter la fiche technique du produit
pour les spécifications hydrauliques précises.
Vérification Finale
de l’installation:
• Revérifier le matériel de montage
au cas où il y aurait des boulons
desserrés, etc…
• S’assurer que tous les composants
et raccords du système hydraulique
sont en bon état.
• S’assurer que tous les raccords
hydrauliques sont bien serrés.
• Vérifier la rotation du moteur : Le
tambour doit tourner dans le sens
indiqué par l’étiquette de rotation
du tambour collée sur le haut du
support de tambour. Si le tambour
tourne dans le sens opposé,
revérifier les raccords hydrauliques
et électriques.
Le non-respect des consignes peut entraîner
des dommages matériels, des blessures
graves ou la mort.
• Ne jamais dépasser la pression hydraulique
• Toujours connecter le treuil au système
• Toujours utiliser le bon type de distributeur
• Toujours se tenir à l’écart des conduites
• Toujours installer les composants
FLUIDE HYDRAULIQUE : le fluide hydraulique
utilisé avec le treuil doit être une huile hydraulique
antiusure pour pressions extrêmes contenant
des inhibiteurs d’oxydation et de corrosion. Il doit
contenir un agent antimousse et posséder une
viscosité de 100 à 300 SUS pour une température
de 15 à 46 ºC. On recommande un niveau de
filtration nominal de 10 microns ou moins.
AVERTISSEMENT
ou le débit maximal recommandé pour l’un
quelconque des composants utilisés.
hydraulique tel qu’indiqué sur le schéma
hydraulique.
tel qu’indiqué sur le schéma hydraulique.
hydrauliques lorsque le treuil est en marche.
hydrauliques conformément aux
recommandations du fabricant.
Schéma Hydraulique
30 51
Page 33

Installation du Câble d’acier
1 Insérer le câble dans la fente du tambour tel
qu’indiqué.
2 Faire une boucle et insérer de nouveau
l’extrémité dans la fente. La portion de câble
active ou portant la charge doit être la plus
proche de l’embase du tambour.
3 Insérer la cale ou l’écrou hexagonal (7/16 po.)
fourni avec le palan dans la boucle et tirer
l’extrémité active du câble afin d’enchâsser
la cale ou l’écrou hexagonal dans la fente.
L’extrémité du câble doit rester visible dans la
fente tel qu’indiqué. La cale verrouille le câble
dans la fente.
4 L’extrémité du câble étant bien fixée, enrouler
soigneusement le câble sur le tambour de
façon uniforme. Maintenir le câble sous
tension en permanence.
5 Toujours laisser 5 spires de câble sur le
tambour au minimum. A défaut, l’extrémité
du câble pourrait se détacher du tambour et
entraîner la chute de la charge.
Palans WARN Industries
ATTENTION
Le non-respect de ces instructions peut
entraîner des blessures modérées et des
dommages matériels.
• Toujours installer le câble dans le sens indiqué
par l’autocollant de rotation apposé sur le
tambour, sinon le frein ne fonctionnera pas.
• Toujours utiliser un câble de la taille spécifiée
sur la fiche de données de produit.
• Toujours installer le câble conformément à
l’installation ci-dessous.
Ancrage du câble sur le tambour
Page 34

Palans WARN Industries
Consignes de Sécurité de l’utilisation
NE JAMAIS :
• Ne jamais placer une partie du corps ou
d’un vêtement près des pièces rotatives
ou mobiles. Le tambour en rotation avec le
câble sous tension peut créer un point de
pincement.
• Ne jamais manipuler des câbles ou
faire fonctionner le palan sans porter de
protection oculaire et des gants épais.
• Ne jamais se tenir près du palan pendant le
fonctionnement. Si le câble se rompt, il peut
revenir en arrière avec grande force.
• Ne jamais utiliser le palan pour soulever,
tirer ou transporter des personnes.
• Ne jamais soulever, tirer ou transporter des
charges au-dessus de personnes.
• Ne jamais tenter de soulever des charges
supérieures à la capacité nominale du palan.
• Ne jamais soulever une charge jusqu’à ce
qu’elle se bloque ou que le tambour et le
moteur calent.
• Ne jamais laisser une grue atteindre une
position de double blocage.
Remarque : les trois conditions ci-dessus
produisent une charge excessive sur le
palan qui peut entraîner une défaillance du
palan, du câble ou de nature structurelle,
entraînant la chute de la charge. Les
charges excessives peuvent produire des
dommages indécelables pouvant entraîner
la défaillance du palan même s’il lève
des charges dans la limite de sa capacité
nominale.
• Ne jamais laisser surchauffer le circuit
hydraulique, le moteur électrique ou le frein
mécanique.
• Ne jamais toucher le câble ou le câblage
pendant le levage d’une charge, pendant
que quelqu’un est aux commandes ou
pendant le fonctionnement du palan.
AVERTISSEMENT
Le non-respect de ces consignes peut
entraîner des dommages matériels, des
blessures graves ou la mort.
Toujours faire attention aux dangers posés par
le câble, les points de pincement, les chutes de
charge et le câble ou le câblage sous tension.
• Ne jamais enrouler le câble autour d’un
objet ou l’accrocher à lui-même. Cela
l’endommagerait.
• Ne jamais utiliser le palan avec moins de
5 spires de câble enroulées autour du
tambour. L’ancrage du câble n’est pas conçu
pour retenir la charge nominale. Le câble
peut se détacher et entraîner la chute de
la charge avec moins de 5 spires de câble
enroulées autour du tambour.
• Ne jamais laisser le câble glisser dans les
mains.
• Ne jamais tenter de soulever une charge
quelconque si elle est décalée. Cela peut
provoquer le balancement dangereux de
la charge. S’assurer que la charge est
directement sous le palan.
• Ne jamais laisser la charge se balancer
ou tourner sur elle-même quand elle est
suspendue.
• Ne jamais laisser la charge peser sur le
loquet du crochet.
• Ne jamais laisser une charge suspendue
sans surveillance.
• Ne jamais soulever une charge en utilisant
la pointe du crochet. S’assurer que la charge
pèse sur le talon du crochet.
• Ne jamais utiliser le palan en présence de
matériaux ou de vapeurs inflammables.
Les appareils électriques produisent des
arcs pouvant causer un incendie ou une
explosion.
32 49
Page 35

Palans WARN Industries
• Ne pas utiliser le palan si l’on est fatigué,
distrait, pressé ou après avoir consommé de
la drogue, de l’alcool ou des médicaments
affectant les facultés ou le jugement.
TOUJOURS :
• Toujours prendre le temps d’évaluer la
situation et préparer le levage avec soin.
• Avant un levage, toujours vérifier l’état de
la structure de montage, du palan, des
élingues et autres accessoires. Remplacer
les composants endommagés avant un
levage.
• Toujours connaître le poids de la charge
et vérifier que le câblage, le palan et la
monture supportent le poids.
• Toujours vérifier que la charge se trouve
directement sous le palan, que le câble n’est
pas entortillé ou tordu et que personne ne se
trouve à proximité de la charge.
• Toujours porter des gants de cuir.
• Toujours éliminer le mou du câble lentement.
Commencer le levage lentement. S’il semble
y avoir surcharge, abaisser immédiatement
la charge et corriger le problème.
• Toujours éviter les charges de choc
exercées sur le palan quand on soulève
rapidement la charge ou fait rebondir la
charge.
• Toujours s’assurer que le loquet de crochet
fonctionne correctement. Remplacer un
loquet de crochet endommagé avant
d’utiliser le palan.
• Toujours s’assurer que le câble s’enroule
dans le bon sens. Les palans sont équipés
d’un frein automatique et ne fonctionneront
pas si le câble se déroule du tambour dans
le mauvais sens.
REMARQUE : le sens d’enroulement du
câble s’inverse accidentellement si le câble
est complètement déroulé puis enroulé de
nouveau avec l’interrupteur de commande
en position de déroulement.
• Toujours inspecter et rembobiner
minutieusement le câble après chaque
utilisation. Les endroits coupés, tordus ou
effilochés réduisent la solidité du câble.
Remplacer le câble s’il est endommagé.
• Toujours garder la télécommande à l’écart
du tambour, du câble et du câblage.
• Toujours vérifier l’état de la télécommande et
de son fil avant d’utiliser le palan.
• Toujours inspecter les connexions
hydrauliques ou électriques avant d’utiliser
le palan.
• Toujours se tenir à l’écart du câble et de la
charge durant l’utilisation du palan.
• Toujours s’assurer que les autres opérateurs
du palan comprennent les dangers potentiels
et ont été formés à l’utilisation correcte
du palan.
• Toujours s’assurer que l’ensemble
contrôleur et palan est installé, utilisé,
réglé et entretenu par du personnel qualifié
familiarisé avec sa construction et son
fonctionnement.
• Toujours vérifier que les dispositifs limiteurs
de charge fonctionnent correctement.
Consignes complémentaires :
• Si la charge doit être immergée dans un
liquide ou une matière solide poudreuse,
utiliser une chaîne d’élinguage ou un autre
dispositif approprié pour que le crochet reste
au-dessus de la surface en permanence.
• Pour tout renseignement complémentaire, se
reporter à la section d’utilisation des normes
ANSI/ASME B30.16 et B30-9 (câblage) de
l’American National Standard et à la section
d’utilisation DOE-STD-1090-99 des normes
de treuillage et de câblage du Department
of Energy.
Page 36

Palans WARN Industries
Maintenance Préventive Périodique
• Garder le palan exempt de saleté, de
graisse, d’eau et autres substances,
• Vérifier tous les boulons de montage et
s’assurer qu’ils sont serrés aux couples
recommandés sur la fiche de données
de produit. Remplacer toute fixation
endommagée.
• Contrôler périodiquement toutes les
connexions pour s’assurer qu’elles sont bien
serrées et non corrodées.
• Vérifier visuellement l’intégrité du câble
chaque fois que le palan est utilisé.
Exemples de dommages : coupures,
nœuds, portions écrasées ou effilochées et
torons cassés. Remplacer le câble d’acier
immédiatement s’il est endommagé. Toute
négligence à cet égard peut entraîner une
rupture du câble.
Programme de maintenance préventive
• Vérifier régulièrement que le frein ne
glisse pas. Si le tambour continue à
tourner après que les commandes ont été
lâchées, il se peut que le frein ait besoin
d’être remplacé.
• Nettoyer et graisser périodiquement
le frein pour s’assurer qu’il fonctionne
correctement et prolonger la vie utile
du palan. Si le palan semble peiner ou
devenir excessivement chaud lorsque les
charges sont abaissées, le frein a besoin
d’entretien ou d’être remplacé.
• Vérifier périodiquement les balais du
moteur et les remplacer si nécessaire.
REMARQUE : seuls les balais de
moteur et le frein doivent être remplacés
périodiquement
Activité de
maintenance
Après
la première
utilisa-
Avant
chaque
utilisation
Tous les semestres ou
toutes les 25 heures
de fonctionnement
tion
Vérifier les fixations X X
Vérifier les connexions
électriques ou
hydrauliques
Dérouler et vérifier le
câble
Nettoyer et graisser
le frein
Vérifier les balais du
moteur
Vérifier à l’oeil nu le
palan et la commande
X
X
X X X
34 47
X
X
X
Page 37

Palans WARN Industries
Dépannage : Palans Électriques
AVERTISSEMENT
BLESSURES
Le non-respect des consignes peut entraîner des blessures graves ou la mort.
• Ne jamais se pencher au-dessus de la batterie en procédant aux connexions
• Toujours débrancher tous les fils de la batterie avant de commencer le travail.
• Toujours débrancher la borne négative en premier et rebrancher la borne négative en dernier.
• Toujours retirer les bijoux et porter des lunettes de sécurité.
Problème Cause possible Mesure corrective
Le palan ne
fonctionne dans
aucun sens ou
le moteur ne
fonctionne pas
Le palan
déroule mais
n’enroule pas
L’alimentation
n’est pas connectée -oul’interrupteur
marche/arrêt
d’urgence (en
option) est en
position d’arrêt
L’alimentation
de l’interrupteur
à distance a été
coupée.
Défaillance de
l’interrupteur de la
télécommande ou
de son câblage
Défaillance des
composants ou
du câblage à
l’intérieur du con-
trôleur
A) Vérifier les connexions des fils. Vérifier
qu’il y a 12 V (24 V) à la borne positive (+) du
contrôleur. Vérifier la tension aux bornes F1,
F2 et A avec l’interrupteur à distance dans
un sens ou l’autre. B) Vérifier la position de
l’interrupteur marche/arrêt d’urgence.
Vérifier qu’il y a 12 V (24 V) à la broche
centrale de la prise de télécommande du
contrôleur. Vérifier la continuité du connecteur
du fil de télécommande entre la broche
centrale et l’une des broches latérales avec
l’interrupteur de la télécommande dans les
deux positions. Remplacer l’interrupteur de la
télécommande s’il n’y a pas continuité.
Vérifier qu’il y a 12 V (24 V) à la broche
centrale de la prise de télécommande du
contrôleur. Vérifier la continuité du connecteur
du fil de télécommande entre la broche
centrale et l’une des broches latérales avec
l’interrupteur de la télécommande dans les
deux positions. Remplacer la télécommande
s’il n’y a pas continuité.
Vérifier qu’il y a 12 V (24 V) à la broche
centrale de la prise de télécommande du
contrôleur. Vérifier la continuité du connecteur
du fil de télécommande entre la broche
centrale et l’une des broches latérales avec
l’interrupteur de la télécommande dans les
deux positions. Remplacer la télécommande
s’il n’y a pas continuité. Si aucune de ces
actions ne résout le problème, renvoyer le
contrôleur à Warn Industries pour service.
Page 38

Palans WARN Industries
Problème Cause possible Mesure corrective
Vérifier qu’il y a 12 V (24 V) à la broche
Le palan
enroule mais
ne déroule pas
Le moteur
essaie de
dérouler mais
le palan cale ou
se bloque
L’alimentation de
l’interrupteur de la
télécommande a
été coupée
Défaillance du
frein
centrale de la prise de télécommande du
contrôleur. Vérifier la continuité du connecteur
du fil de télécommande entre la broche
centrale et l’une des broches latérales avec
l’interrupteur de la télécommande dans les
deux positions. Remplacer la télécommande
s’il n’y a pas continuité.
Effectuer l’entretien du frein ou le remplacer.
Le palan fonctionne dans
les deux sens
mais refuse
de soulever
une charge
nominale
Le palan
ralentit et
cale durant le
déroulement
Le palan vibre
violemment
ou fait du
bruit lorsqu’il
soulève ou
abaisse les
charges
Tension insuf-
fisante au palan
Le frein a besoin
d’entretien
Le frein a besoin
d’entretien
La surface de
montage n’est
pas plane. Barre
d’accouplement
ou tirant faussé
A) S’assurer que les consignes concernant
la taille du câble électrique ont été suivies. B)
Vérifier l’état de la batterie. C) Vérifier que le
câble électrique et les connexions ne sont pas
corrodés. Nettoyer et serrer les connexions.
Effectuer l’entretien du frein ou le remplacer.
Effectuer l’entretien du frein ou le remplacer.
S’assurer que la surface de montage est
plane à 0,50 mm près. Remplacer la barre
d’accouplement ou le tirant si nécessaire.
Vérifier que les boîtiers ne sont ni faussés ni
fissurés.
36 45
Page 39

Palans WARN Industries
Dépannage : Palans Hydrauliques
REMARQUE : Les défaillances du circuit
hydraulique se passent généralement de
la même manière : une perte graduelle ou
soudaine de pression ou de débit résultant en
une perte de puissance du moteur. N’importe
lequel des composants du circuit peut en être
la cause. Se reporter au tableau pour connaître
les recommandations générales. Si nécessaire,
consulter un représentant expert en circuits
hydrauliques.
REMARQUE : voir la fiche de données de produit
pour les caractéristiques hydrauliques.
Problème Cause possible Mesure corrective
AVERTISSEMENT
BLESSURES
Le non-respect des consignes peut
entraîner des blessures graves ou la mort.
Ne jamais utiliser un clapet de décharge qui
dépasse la pression nominale du moteur hydraulique. Sinon, le palan risque la surcharge.
Le palan ne fonctionne dans aucun
sens
Le palan déroule
mais n’enroule pas
Le palan enroule
mais ne déroule
pas ou cale durant
le déroulement
Le palan fonctionne dans les
deux sens mais
refuse de soulever
une charge nominale
Le palan vibre
violemment ou fait
du bruit lorsqu’il
soulève ou abaisse
les charges
Pas de pression
hydraulique
Défaillance du train
d’engrenages, du frein ou
du moteur
Frein mal assemblé Réparer ou remplacer le frein.
Défaillance du frein de
charge
Pression insuffisante ou
contre-pression excessive
dans le circuit
Le frein a besoin
d’entretien
La surface de montage
n’est pas plane. Barre
d’accouplement ou tirant
faussé.
Vérifier le schéma et les connexions
du circuit hydraulique.
Envoyer le palan à un centre de
service Warn Industries autorisé pour
réparation.
Effectuer l’entretien ou réparer le
frein de charge.
Vérifier la pression du circuit à
l’orifice d’entrée du moteur ou aux
orifices de sortie.
Effectuer l’entretien ou remplacer le
frein de charge.
S’assurer que la surface de montage
est plane à 0,50 mm près. Rem-
placer la barre d’accouplement ou
le tirant si nécessaire. Vérifier que
les boîtiers ne sont ni faussés ni
fissurés.
Page 40

Palans WARN Industries
Service à la Clientèle
Pour toute question au sujet de ce produit ou de ces instructions, appeler le service à la clientèle
de WARN aux numéros ci-dessous, entre 7h00 et 16h00 (heure normale du Pacifique), du lundi au
vendredi, pour assistance. Pour recevoir une assistance technique par courrier électronique, visiter le
site Web www.WARN.com et cliquer sur la section du service à la clientèle.
États-Unis International
Tél : 503-722-1200 ou 800-543-9276
(États-Unis seulement)
TÉLÉCOPIE : 503-722-3000 TÉLÉCOPIE : 503-722-3005
Téléphone 503-722-3008
38 43
Page 41

Palans WARN Industries
Garantie limitée d’un (1) an des produits industriels WARN®
Warn Industries, Inc. (WARN) garantit à l’acheteur initial les composants mécaniques et électriques des
produits WARN spécifiés ci-dessous contre tout défaut de matière première ou vice de fabrication pendant
une période d’un an à partir de la date d’achat initiale. Cette garantie ne s’applique qu’a l’acheteur initial des
produits. Pour bénéficier du service de garantie, vous devez présenter à WARN une preuve d’achat et une
date d’achat acceptables pour Warn, par exemple une copie de la facture d’achat. Cette garantie ne couvre
pas le retrait ou la réinstallation du produit. WARN pourra, à sa discrétion, réparer, remplacer ou rembourser
le prix d’achat d’un produit ou composant défectueux, à condition que le produit ou composant défectueux soit
renvoyé, en port payé, durant la période de garantie, au service entretien et réparations de Warn Industries
ou à un centre de service agréé par l’usine. Veuillez joindre vos nom, adresse et numéro de téléphone, une
description du problème ainsi qu’une copie du reçu et de la facture d’achat d’origine indiquant le numéro de
série WARN du produit défectueux et la date d’achat.
Cette garantie ne s’applique pas pour (i) les pièces ou composants exclus ci-dessous ou (ii) au cas où le
produit a été endommagé pour cause d’accident, abus, mauvaise utilisation, collision, surcharge, modification,
mauvaise application, mauvaise installation ou mauvais entretien. Cette garantie est nulle si l’un des numéros
de série de WARN a été supprimé ou oblitéré.
LA GARANTIE STIPULÉE CI-DESSUS CONSTITUE LA SEULE GARANTIE DONNÉE. IL N’EXISTE
AUCUNE AUTRE GARANTIE, EXPLICITE OU IMPLICITE, Y COMPRIS, MAIS SANS Y ÊTRE LIMITÉ,
TOUTE GARANTIE IMPLICITE DE VALEUR COMMERCIALE ET D’UTILITÉ POUR SERVIR À UN OBJET
QUELCONQUE.
TOUTE GARANTIE IMPLICITE NE POUVANT ÊTRE EXCLUE DE PAR LA LOI EST LIMITÉE DANS SA
DURÉE À UN AN À PARTIR DE LA DATE D’ACHAT INITIAL AU DÉTAIL DU PRODUIT.
WARN NE POURRA ÊTRE TENU RESPONSABLE DES DOMMAGES SPÉCIAUX, INDIRECTS,
ACCESSOIRES OU CONSÉCUTIFS (Y COMPRIS, MAIS NON DE FAÇON LIMITATIVE, PERTE DE
BÉNÉFICES, MANQUE À GAGNER OU INCAPACITÉ D’UTILISER LE PRODUIT) EN VERTU D’UNE
THÉORIE JURIDIQUE QUELCONQUE, MÊME SI WARN A ÉTÉ AVERTI DU RISQUE QUE DE TELS
DOMMAGES POURRAIENT SE PRODUIRE.
Certaines juridictions ne permettent pas l’exclusion des garanties implicites ou l’exclusion ou la limitation
de responsabilité pour les dommages indirects ou accessoires, ou les limitations sur la durée des garanties
implicites. Il se peut donc que la limitation ou l’exclusion ci-dessus ne s’applique pas à vous. Cette garantie
vous accorde des droits juridiques spécifiques. Il se peut que vous ayez d’autres droits pouvant varier d’un
pays à l’autre.
WARN se réserve le droit de modifier ses produits sans préavis. Dans les cas où WARN aurait modifié ses
produits, WARN ne sera pas tenu de mettre à niveau ou modifier de quelque façon les produits fabriqués
précédemment.
Aucun distributeur, agent ou employé de WARN n’est habilité à effectuer une quelconque modification,
extension ou addition à la présente garantie.
Les demandes concernant la garantie et les produits renvoyés pour service de garantie doivent être
envoyés à :
WARN INDUSTRIES, INC.
Customer Service Department
12900 SE Capps Road
Clackamas, OR 97015
1-503-722-3005 – Fax international
Produits couverts par cette garantie Produits non couverts par cette garantie
Treuils industriels Finition et câble d’acier pour treuils industriels
Palans industriels Finition et câble d’acier pour palans industriels
Accessoires industriels Finition et câble d’acier
Page 42

40 41
Page 43

Precauciones generales de seguridad
Advertencias y Precauciones
Al leer estas instrucciones, verá ADVERTENCIAS,
PRECAUCIONES, AVISOS y NOTAS. Cada mensaje
tiene un propósito específico. Las ADVERTENCIAS
son mensajes de seguridad que describen una
situación de posible peligro que puede resultar en
lesiones de gravedad. Las PRECAUCIONES son
mensajes de seguridad que indican una situación
de posible peligro que puede resultar en lesiones
menores o de moderada gravedad. Una PRECAUCIÓN puede usarse también para describir
una práctica peligrosa. Las PRECAUCIONES y
ADVERTENCIAS identifican el peligro, indican cómo
evitarlo y advierten de las posibles consecuencias si
no se evita dicho peligro. Los AVISOS son mensajes
referentes a posibles daños a la propiedad. Las
NOTAS proporcionan información adicional que le
ayudará a llevar a cabo un procedimiento determinado. ¡POR FAVOR, TRABAJE SIEMPRE DE
FORMA SEGURA!
PELIGRO DE INCENDIO O DE
EXPOSICIÓN A PRODUCTOS QUÍMICOS
De no seguirse estas instrucciones, podrían
producirse lesiones de gravedad o incluso la
muerte.
• No opere nunca la grúa donde haya material
• No lleve nunca puestos joyas o collares, y
• No se apoye nunca en la batería si está
• Si se va a perforar, verifique siempre que
• No instale nunca cables eléctricos:
ADVERTENCIA
• Ponga aislamiento y proteja siempre los
PELIGRO DE ENREDARSE EN LAS
PIEZAS MÓVILES
De no seguirse estas instrucciones, podrían
producirse lesiones de gravedad o incluso
la muerte.
Para evitar daños en las manos:
• Durante la instalación y la operación,
mantenga siempre las manos alejadas del
cable y del gancho.
• Tome siempre medidas extremas de
precaución al manejar el gancho y el cable
durante las maniobras de enrollado y
desenrollado.
• Use siempre una correa de gancho cuando
vaya a enrollar o desenrollar el cable.
• Desconecte siempre todos los cables de la
batería antes de comenzar a trabajar.
• Desconecte siempre el borne negativo
primero y vuelva a conectar el borne negativo
en último lugar.
• Instale siempre cubiertas para los terminales,
PELIGRO DE CAÍDA O APLASTAMIENTO
De no seguirse estas instrucciones, podrían
producirse lesiones de gravedad o incluso la
muerte.
• No utilice nunca la grúa para levantar o
• Use siempre el tamaño de cable especificado
ADVERTENCIA
explosivo o combustible.
lleve siempre protección ocular.
haciendo conexiones.
en el área no haya tuberías o tanques de
combustible, tuberías de sistema de frenado,
cables eléctricos, etc.
Por bordes que puedan resultar cortantes.
A través o en las proximidades de piezas
móviles.
Cerca de piezas que puedan ponerse
calientes.
cables y terminales eléctricos que queden
expuestos.
tal y como se indica en las instrucciones de
instalación.
ADVERTENCIA
desplazar personas.
en la hoja técnica del producto.
Page 44

Precauciones generales de seguridad
PRECAUCIÓN PRECAUCIÓN
PELIGRO DE ENREDARSE EN LAS
PIEZAS MÓVILES
De no seguirse estas instrucciones, podrían
producirse lesiones menores o de moderada
gravedad.
• Tenga siempre presente cómo funciona la
grúa. Tómese su tiempo para leer toda esta
Guía de instalación y operación para poder
comprender el funcionamiento y la operación
de la grúa.
• No opere nunca esta grúa si tiene menos de
16 años de edad.
• No opere nunca esta grúa si se encuentra
bajo los efectos de las drogas, el alcohol o los
medicamentos.
• No exceda nunca la capacidad de la grúa o
del cable, indicadas en la hoja técnica del
producto. Emplee un cable doble utilizando
una polea pasteca para reducir la carga del
cabrestante.
• Elija siempre un lugar de montaje que sea
lo suficientemente sólido para soportar la
capacidad de carga máxima de la grúa.
• Use siempre piezas de montaje, componentes
y accesorios aprobados por el fabricante.
• Utilice siempre piezas de montaje de grado 5 o
superior.
• No suelde nunca los pernos de montaje.
• Tenga precaución siempre cuando use pernos
más largos que los suministrados por el
fabricante. Unos pernos de longitud excesiva
pueden dañar la base o hacer que el montaje
de la grúa no resulte seguro.
• Monte la grúa y acople el gancho al bucle
final del cable siempre antes de conectar el
cableado eléctrico.
• Enrolle y desenrolle el cable al tambor siempre
en la dirección especificada en la etiqueta de
rotación del mismo o en la documentación.
Esto es necesario para que el freno automático
funcione correctamente.
• Realice siempre un estiramiento previo del
cable y vuelva a enrollarlo con carga antes
de usarlo. Un cable bien enrollado reduce las
posibilidades de tener “dobleces”, que pueden
dañar el cable.
• No permita nunca que la carga oscile ni gire
mientras esté suspendida.
• No deje nunca desatendida una carga en
suspensión.
PELIGRO DE ENREDARSE EN LAS
PIEZAS MÓVILES
De no seguirse estas instrucciones, podrían
producirse lesiones menores o de moderada
gravedad.
• Inspeccione siempre el cable, el gancho
y las eslingas antes de poner la grúa en
funcionamiento. Los componentes dañados
deberán reemplazarse antes de la operación.
Evite que las piezas resulten dañadas.
• Notifique de inmediato cualquier
funcionamiento defectuoso o inusual que
observe, o cualquier daño a la grúa.
• No deje nunca el control remoto conectado a
la grúa cuando se estén haciendo maniobras
o cuando no se esté usando la grúa.
• No enganche nunca el cable sobre sí mismo.
Esto lo deterioraría.
• Retire siempre cualquier elemento u obstáculo
que pueda provocar inseguridad en la
operación de la grúa.
• Tómese siempre su tiempo para asegurar la
carga con técnicas apropiadas antes de elevar
la carga.
• No accione nunca la grúa si no hay al menos
5 vueltas de cable alrededor del tambor. El
cable podría soltarse.
• No toque nunca el cable ni el gancho mientras
éstos se encuentren en tensión o con carga.
• No toque nunca el cable ni el gancho si hay
alguien cerca del interruptor de control, o si la
grúa está en funcionamiento.
• No toque nunca el cable ni el gancho si el
control remoto está conectado a la grúa.
• Manténgase siempre alejado del cable y de
la carga, y no deje que otros se acerquen
cuando la grúa esté en funcionamiento.
• Tenga siempre presente la estabilidad del
vehículo y de la carga al usar la grúa. Alerte
a todas las personas presentes de cualquier
posible inestabilidad.
• Mantenga siempre el cable del control remoto
alejado del tambor, del cable y del cordaje.
Inspeccione la posible existencia de grietas,
pellizcos, cables deshilachados o conexiones
sueltas. Reemplace el control remoto si se
encuentra defectuoso.
• Cuando use el control remoto dentro de un
vehículo, pase siempre el control remoto a
través de una ventana para evitar que se
pellizque el cable con la puerta.
42 39
Page 45

Precauciones generales de seguridad
PRECAUCIÓN PRECAUCIÓN
PELIGRO DE CORTES Y QUEMADURAS
De no seguirse estas instrucciones, podrían
producirse lesiones menores o de moderada
gravedad.
• Lleve puestos siempre guantes gruesos de
cuero para manipular el cable.
• Nunca deje que el cable se deslice por sus
manos.
• Tenga siempre en cuenta que las superficies
del motor, del tambor y del cable de la grúa
pueden estar calientes durante o después del
uso de la misma.
• No monte el controlador bajo ninguna
circunstancia en un área en la que pueda
usarse como escalón o en la que puedan
colgarse o ponerse herramientas.
• Evite siempre dañar los terminales situados
en la parte superior de la cubierta.
• Mantenga siempre las herramientas y otros
equipos conductores de electricidad alejados
de los terminales.
PELIGRO DE ENREDARSE EN LAS
PIEZAS MÓVILES
De no seguirse estas instrucciones, podrían
producirse lesiones menores o de moderada
gravedad.
• Utilice siempre un gancho con seguro.
• Verifique siempre que el seguro del gancho
esté cerrado y que no soporte la carga.
• No aplique nunca una carga a la punta
del gancho o al seguro. Aplique la carga
únicamente al centro del gancho.
• No use nunca un gancho cuya abertura haya
aumentado o cuya punta esté doblada o
retorcida.
ADVERTENCIA
De no seguirse estas instrucciones, podrían
producirse daños a la propiedad, lesiones de
gravedad o la muerte.
• No exceda nunca la presión o el flujo hidráulicos
recomendados para cualquiera de los
componentes utilizados.
• Conecte siempre el cabrestante al sistema
hidráulico, como se muestra en el esquema
hidráulico.
• Use siempre el tipo correcto de válvula de control,
como se muestra en el esquema hidráulico.
• Manténgase siempre alejado de las líneas
hidráulicas durante la operación del cabrestante.
• Instale siempre los componentes hidráulicos
según lo indicado por las recomendaciones del
fabricante.
AVISO
EVITE DAÑOS AL EQUIPO Y A LA
GRÚA
• No desplace nunca el cable en pequeñas
sacudidas cuando esté con carga. Las
cargas repentinas pueden exceder
momentáneamente la capacidad del cable y
de la grúa.
• Nunca utilice la grúa para amarrar una carga
durante su transporte.
• No sumerja nunca la grúa en agua.
• Guarde siempre el control remoto en un área
protegida, limpia y seca.
Page 46

Grúas WARN Industries
¿Qué es una Grúa?
WARN Industries produce muchos tipos de grúas
y cabrestantes. Pero, ¿en qué se diferencia una
grúa de un cabrestante?
Las grúas y los cabrestantes tienen un aspecto
parecido. Ambos tienen un motor, un tambor
giratorio con un cable, engranajes de reducción,
una base y, generalmente, un sistema de
control eléctrico. Sin embargo, las grúas y
los cabrestantes se emplean para diferentes
propósitos.
Las grúas se usan para levantar una carga en
el aire, mientras que los cabrestantes se utilizan
para arrastrar una carga horizontalmente por
un terreno. Debido a que una carga que está
suspendida en el aire supone particulares
peligros, las grúas se diseñan con unas normas
de seguridad más exigentes. Asimismo, al
contrario que en los cabrestantes, el operador de
una grúa no puede desenvolver el cable mediante
un “desenrollado libre”, ni neutralizar el motor con
el tren de engranajes.
Freno Mecánico
Control Remoto
Operación del interruptor
No deje el control remoto conectado a la grúa
cuando no se esté utilizando. Si se deja el control
conectado, puede producirse una activación
inesperada o gastarse la batería.
entrada de cable
(elevación de carga)
salida de cable
(descenso de carga)
El freno mecánico genera calor cuando se bajan
las cargas y se desenrolla el cable. Debe tenerse
cuidado para no sobrecalentar el freno mecánico.
Con cargas más pesadas, deje que transcurra
más tiempo entre uso y uso para que pueda
enfriarse el freno.
Los chirridos o ruidos asociados con un freno
mecánico nuevo son normales y, generalmente,
desaparecerán con el uso.
EL SOBRECALENTAMIENTO DEL FRENO
MECÁNICO PUEDE RESULTAR EN DAÑO
PERMANENTE AL FRENO U OCASIONAR
UN MAL FUNCIONAMIENTO DEL MISMO.
REEMPLACE TODO COMPONENTE DEL
FRENO QUE ESTÉ DAÑADO ANTES DE
VOLVER A USAR LA GRÚA.
Control remoto semiimpermeable y de
gran resistencia
Control remoto con la
Control remoto
estándar
44 37
aprobación CE que
cuenta con un botón de
bloqueo para paradas de
emergencia.
Page 47

Grúas WARN Industries
Lista de Comprobación
Previa a la Instalación
1 Compruebe que tiene lo siguiente:
• La grúa
• El controlador
• El control remoto
• Las piezas de montaje de la grúa
2 Cuando vaya a sacar la grúa de su embalaje,
compruebe que no haya elementos dañados,
como varillas de conexión, barras de conexión
o cubiertas protectoras que estén dobladas o
agrietadas. Corrija cualquier daño existente
antes de instalar la grúa.
3 Verifique que el entorno de la grúa y el
controlador estén libres de:
• Vapores de combustible.
• Humos de productos químicos
• Vapores de aceite.
• Materiales corrosivos
4 Verifique que la temperatura del aire que
rodea a la grúa y al controlador no rebasa los
límites de 49° C y -29° C.
5 Verifique que la estructura de montaje puede
soportar la totalidad de la tracción nominal de
la grúa.
6 Verifique que el brazo de la grúa o la
estructura de alzado no se deforma cuando se
la somete a una carga dos veces superior a la
carga nominal de la grúa.
Montaje de la Grúa
Use los aseguradores suministrados donde sea
posible o pernos de grado 5 SAE (8,8 métrico)
del mismo tamaño de rosca. Las dos varillas
o barras de seguridad deben estar en su sitio.
Deberán ponerse arandelas planas y arandelas
de seguridad entre las cabezas de los pernos y la
superficie de montaje.
Para los soportes del tambor de los pernos
pasantes:
Deberá haber de 1 a 4 vueltas de rosca
sobresaliendo por encima de la tuerca cuadrada.
Si los pernos son demasiado largos pueden
dañar los soportes del tambor, mientras que los
pernos demasiado cortos no proveerán el agarre
adecuado. Deberán ponerse arandelas planas y
arandelas de seguridad entre las cabezas de los
pernos y la superficie de montaje.
Para los soportes roscados del tambor:
Los pernos que son demasiado largos pueden
dañar los soportes del tambor o no ser capaces
de anclar la grúa fuertemente. Si los pernos
son demasiado cortos no proveerán el agarre
adecuado. El perno deberá sobresalir entre 24
mm (15/16 pulg.) y 35 mm (1-3/8 pulg.) en la base
de la grúa.
1 Verifique que la superficie de montaje este
nivelada dentro la tolerancia de +/-0,50 mm
(0,020 pulg.). Si la superficie no está plana,
use los calzos que sean necesarios para evitar
la deformación de la grúa.
2 Apriete todos los pernos de montaje con el par
de giro recomendado en la hoja técnica del
producto.
3 Use las perforaciones de montaje indicadas en
la hoja técnica del producto.
Page 48

Grúas WARN Industries
Montaje del Controlador (Grúas Eléctricas)
1 Quite los tornillos que aguantan la cubierta a
la abrazadera del controlador.
2 Monte el controlador orientado verticalmente,
de forma que no se pueda acumular agua en
la cubierta.
3 Monte el controlador en un lugar donde no se
vea afectado por vibraciones excesivas. Use
arandelas de seguridad para evitar que se
aflojen las tuercas de montaje.
4 Monte el controlador de forma que quede
protegido mientras se usan herramientas u
objetos pesados.
5 El controlador puede montarse en un lugar
expuesto a las inclemencias del tiempo, pero
deberá estar protegido de herramientas y
objetos pesados.
6 Use las dimensiones de montaje indicadas.
PELIGRO DE INCENDIO
De no seguirse estas instrucciones, podrían
producirse lesiones graves e incluso la
muerte.
• No monte el controlador bajo ninguna
• Evite siempre dañar los terminales situados en
• Mantenga siempre las herramientas y otros
ADVERTENCIA
circunstancia en un área que pueda usarse
como escalón o en la que puedan colgarse o
ponerse herramientas.
la parte superior de la cubierta.
equipos conductores de electricidad alejados
de los terminales.
Dimensiones de montaje para un controlador típico
46 35
Page 49

Conexiones para Cables Eléctricos
Consulte las ilustraciones que vienen en la
página siguiente.
Pautas de conexión:
• Use cables de batería del calibre 2 para
todas las conexiones eléctricas. Un cable
excesivamente largo puede resultar en una
caída de voltaje, lo que puede ocasionar un
funcionamiento inadecuado de la grúa.
• Reduzca la longitud de los cables en la
medida de lo posible. Cuando sea necesario
que la longitud de los cables sea superior a
3 metros (10 pies), use cables del calibre 0.
• Para evitar desgaste y daños, pase los
cables por áreas protegidas.
• Para evitar cortocircuitos, use manguitos
aislantes en todas las conexiones de
terminal que queden expuestas. Ponga los
manguitos aislantes en los cables antes de
conectarlos a los terminales.
• Use empalmes para acoplar los cables del
interruptor termal del motor.
• Conecte los cables F1, F2, A y de conexión
a tierra según lo indicado por los modelos
de sentido de las agujas del reloj. Para los
modelos de sentido contrario a las agujas
del reloj, el terminal del controlador F1 debe
conectarse al terminal del motor F2, y el
terminal del controlador F2 debe conectarse
al terminal del motor F1.
• Compruebe que las conexiones eléctricas
estén limpias y apretadas.
• Se recomienda la instalación de un
interruptor de corriente en un lugar
fácilmente accesible. Esto posibilitará
el corte de la corriente durante el
mantenimiento y podrá funcionar como
dispositivo de seguridad adicional. Emplee
un interruptor de 300 amperios.
• Se recomienda la instalación de un
cortacircuitos de 300 amperios en el cable
positivo (+) próximo a la batería para
proteger contra cortocircuitos.
PELIGRO DE INCENDIO O DE
EXPOSICIÓN A PRODUCTOS QUÍMICOS
De no seguirse estas instrucciones, podrían
producirse lesiones graves e incluso la
muerte.
• No instale nunca cables eléctricos:
ADVERTENCIA
- Por bordes que puedan resultar cortantes.
- A través o en las proximidades de piezas
móviles.
- Cerca de piezas que puedan ponerse
calientes.
Grúas WARN Industries
Page 50

Grúas WARN Industries
negro
3
2
1
marr
n
Conexiones para motores de CC de la serie Wound (3 terminales)
Rotaci n de tambor: Hacia la derecha visto desde el final de motor
negro
3
2
1
marr
n
Conexiones para motores de CC de la serie Wound (3 terminales)
Rotaci n de tambor: Contrarrestar en sentido horario visto desde
el final de motor
48 33
Page 51

Grúas WARN Industries
#2
#1
Motor de imán
permanente
+
Bateria
_
Cubierta del
Controlador
2
3
+
#2
negro
1
_
#1
Controlador
Conexiones para motores de CC de imán permanente (2 terminales)
Rotaci n de tambor: Hacia la derecha visto desde el final de motor
#2
#1
Motor de imán
permanente
Cubierta del
Controlador
negro
2
3
1
+
Bateria
_
#2
_
+
#1
Controlador
Conexiones para motores de CC de imán permanente (2 terminales)
Rotaci n de tambor: Contrarrestar en sentido horario visto desde
el final de motor
Page 52

COMPONENTES SUMINISTRADOS
POR EL CLIENTE
MOTOR
VÁLVULA DE CONTROL
RETORNO DE MUELLE DE
3 POSICIONES Y 4 VÍAS
(CARRETE DEL CILINDRO)
BOMBA
Grúas Hidráulicas: Información General
NOTA: El diagrama del sistema hidráulico y las
descripciones de componentes se proveen como
referencia general. Consulte a un técnico hidráulico
si desea recomendaciones específicas sobre la
selección de componentes, las conexiones, la
disposición y los mejores métodos de operación.
La presión nominal del motor del cabrestante
se determina mediante: a) la presión máxima
permisible en el puerto de entrada al motor, y b) la
caída de presión máxima permisible en el motor.
La caída de presión se define como la diferencia
entre la presión del puerto de entrada y la presión
del puerto de salida en el motor del cabrestante. Si
se excede la presión de entrada máxima, se puede
dañar el motor del cabrestante. Si se excede la
caída de presión máxima, se pueden producir fallos
en los componentes del cabrestante.
Los límites de temperatura de operación
recomendados del motor hidráulico son 38ºC
a 66ºC (100ºF a 150ºF). Los límites máximos
de temperatura de operación son -21ºC a 82ºC
(-6ºF a 180ºF). NO exceda el flujo nominal del
motor hidráulico. Consulte las especificaciones
hidráulicas que vienen en la hoja técnica
del producto.
Comprobación Final
de la Instalación
• Vuelva a comprobar las piezas de
montaje por si hubiera pernos
sueltos, etc.
• Verifique que todos los componentes
del sistema hidráulico y las conexiones
son los correctos.
• Verifique que todas las conexiones
hidráulicas estén aseguradas.
• Compruebe la rotación del motor: El
tambor deberá girar en la dirección
indicada en la etiqueta de rotación del
tambor situada en el soporte del mismo.
Si gira en la dirección contraria, revise
las conexiones hidráulicas y eléctricas.
De no seguirse estas instrucciones, podrían
producirse daños a la propiedad, lesiones de
gravedad o la muerte.
• No exceda nunca la presión o el flujo hidráulicos
• Conecte siempre el cabrestante al sistema
• Use siempre el tipo correcto de válvula de control,
• Manténgase siempre alejado de las líneas
• Instale siempre los componentes hidráulicos
FLUIDO HIDRÁULICO: El fluido hidráulico
empleado en el cabrestante debe ser un aceite
hidráulico resistente al desgaste, con inhibidores
contra la oxidación y la corrosión, y apto para
presión extrema. Debe contener una espuma
supresora y tener una clasificación de viscosidad
de 100 a 300 SSU a una temperatura de 15°C a
46°C (60ºF a 115ºF). El nivel de filtración nominal
recomendado es de 10 micrones o más fino.
ADVERTENCIA
recomendados para cualquiera de los
componentes utilizados.
hidráulico, como se muestra en el esquema
hidráulico.
como se muestra en el esquema hidráulico.
hidráulicas durante la operación del cabrestante.
según lo indicado por las recomendaciones del
fabricante.
Esquema Hidráulico
Grúas WARN Industries
50 31
Page 53

Grúas WARN Industries
Instalación del Cable de Tracción
1 Inserte el cable por la ranura del tambor, tal y
como se muestra en la ilustración.
2 Haga un bucle y vuelva a insertar el extremo
en la ranura. La porción de cable “activa” o
que va a tirar de la carga deberá ser la más
próxima al saliente del tambor.
3 Inserte en el bucle la cuña o la tuerca
hexagonal (11 mm [7/16 pulg.]) suministrada
con la grúa, y tire del extremo activo del cable
para asentar la cuña o la tuerca hexagonal
en la ranura. El extremo del cable deberá
permanecer visible en la ranura, tal y como se
muestra. La cuña bloquea el cable en
la ranura.
4 Con el extremo del cable instalado con
seguridad, enrolle parejamente el cable en
el tambor. Mantenga el cable tenso en todo
momento.
5 Mantenga siempre un mínimo de cinco (5)
vueltas de cable enrollado en el tambor. Con
menos vueltas, el cable podría soltarse del
tambor, cayendo así la carga.
De no seguirse estas instrucciones, podrían
producirse lesiones moderadas y daños a la
propiedad.
• Instale siempre el cable en la dirección
especificada en la etiqueta de rotación
del tambor o, de lo contrario, el freno no
funcionará.
• Use siempre el tamaño de cable especificado
en la hoja técnica del producto.
• Instale el cable siempre de acuerdo a lo
indicado en la ilustración que aparece a
continuación.
PRECAUCIÓN
Anclaje del cable en el tambor
Page 54

Instrucciones de Operación
Evite lo siguiente:
Grúas WARN Industries
NUNCA:
• No ponga nunca ninguna parte de su cuerpo
o de su ropa en las proximidades de piezas
rotatorias o móviles. La rotación del tambor
con el cable en tensión puede crear un
punto de pinzamiento.
• No maneje nunca el cable ni use la grúa sin
llevar puesta protección ocular y guantes de
trabajo.
• No permanezca nunca cerca de la grúa
cuando esté en funcionamiento. Si se rompe
el cable, puede salir despedido hacia usted
con gran fuerza.
• No levante, arrastre ni transporte nunca
gente con la grúa.
• No levante, arrastre ni transporte cargas
nunca por encima de personas.
• No intente nunca elevar cargas que
sobrepasen la capacidad nominal de la grúa.
• No alce nunca una carga hasta que se atore
y haga que el motor se atasque.
• No permita nunca que se toquen las poleas
de la grúa, o la polea y el gancho.
• Nota: Las tres circunstancias mencionadas
producen un exceso de carga en la grúa que
puede ocasionar un fallo en la grúa, el cable
o la estructura, lo cual puede resultar en el
desplome de la carga. El exceso de carga
puede ocasionar daños no aparentes que,
a su vez, pueden hacer que la grúa falle
incluso elevando cargas que no sobrepasen
la capacidad nominal.
• No permita nunca el sobrecalentamiento del
sistema hidráulico, el motor eléctrico o el
freno mecánico.
• No toque nunca el cable o el cordaje cuando
esté levantando una carga, cuando haya
alguien cerca de los controles o cuando se
esté operando la grúa.
• No ponga nunca cable alrededor de un
objeto para engancharlo sobre sí mismo.
Esto deterioraría el cable.
ADVERTENCIA
De no seguirse estas instrucciones, podrían
producirse daños a la propiedad, lesiones
de gravedad o incluso la muerte.
Esté atento siempre a posibles peligros que
puedan provenir del cable, los puntos pinzados,
las caídas de cargas y la tensión del cable o
cordaje.
• No use nunca la grúa con menos de cinco
(5) vueltas de cable en el tambor. El anclaje
del cable no ha sido diseñado para soportar
la carga nominal. Con menos de cinco
vueltas de cable en el tambor, el cable
puede soltarse y dejar caer la carga.
• Nunca deje que el cable se deslice por sus
manos.
• No intente nunca alzar una carga que no
esté bien centrada. Esto puede hacer que la
carga oscile peligrosamente. Verifique que
la carga esté situada directamente bajo la
grúa.
• No permita nunca que la carga oscile ni gire
mientras esté suspendida.
• No permita nunca que la carga se apoye
contra el seguro del gancho.
• No deje nunca desatendida una carga en
suspensión.
• No alce nunca una carga con la punta del
gancho. Verifique que la carga se va a alzar
con el interior del gancho.
• No haga funcionar nunca la grúa en
presencia de materiales o emanaciones
inflamables. Los aparatos eléctricos
producen arcos que pueden provocar una
explosión o un incendio.
• No opere una grúa cuando se encuentre
cansado, distraído, apurado o bajo los
efectos de las drogas, el alcohol o una
medicación que pueda afectar a su aptitud
para realizar dicha actividad.
52 29
Page 55

Grúas WARN Industries
Haga lo siguiente
SIEMPRE:
• Tómese su tiempo siempre para evaluar
la situación y planifique la operación de
elevación cuidadosamente.
• Antes de proceder a la elevación,
inspeccione siempre la estructura de
montaje, la grúa, las eslingas y otros
accesorios para detectar posibles daños.
Reemplace los componentes dañados antes
de usar la grúa.
• Conozca siempre el peso de la carga y
verifique que el cordaje, la grúa y el montaje
serán capaces de soportar el peso.
• Verifique siempre que la carga se encuentre
directamente bajo la grúa, que el cable no
se encuentre enredado o retorcido y que
todas las personas presentes estén alejadas
de la carga.
• Lleve puestos siempre guantes de cuero.
• Enrolle siempre el cable suelto lentamente,
si lo hay. Empiece a elevar la carga
lentamente. Si hay alguna evidencia de
sobrecarga, baje la carga inmediatamente y
corrija la situación.
• Evite siempre elevar la carga rápidamente o
a trompicones para no cargar violentamente
la grúa.
• Verifique siempre que el seguro del gancho
funcione correctamente. Reemplace el
seguro del gancho si está dañado antes de
operar la grúa.
• Verifique siempre que el cable se desplaza
en el sentido correcto. Las grúas están
equipadas con un freno automático que
no funcionará si el tambor del cable gira
en el sentido equivocado. NOTA: El
sentido de avance del cable se invertirá
accidentalmente si el cable se desenrolla
completamente y se vuelve a enrollar con
el interruptor de control en el sentido de
desenrollado.
• Inspeccione y enrolle siempre
cuidadosamente el cable después de uso.
Los cortes, los retorcimientos y las áreas
deshilachadas reducen la resistencia del
cable. Reemplace el cable si está dañado.
• Mantenga siempre el control remoto alejado
del tambor, el cable y el cordaje.
• Inspeccione siempre el control remoto y
el cable del mismo para detectar posibles
daños antes de usar la grúa.
• Inspeccione siempre el sistema hidráulico y
las conexiones eléctricas antes de usar la
grúa.
• Manténgase siempre alejado del cable y de
la carga durante la operación de la grúa.
• Verifique siempre que otros operadores de
la grúa entiendan los posibles peligros y que
estén capacitados para usar correctamente
la máquina.
• Verifique siempre que quien se encargue
de instalar, operar, ajustar y mantener el
controlador y el ensamblaje de la grúa sea
personal calificado que esté familiarizado
con su construcción y operación.
• Verifique siempre que los dispositivos de
limitación de carga funcionan correctamente.
Pautas adicionales:
• Si la carga va a estar inmersa en algún
líquido o material sólido y polvoriento, use
una cadena de eslinga u otro cordaje para
permitir que el gancho permanezca por
encima de la superficie en todo momento.
• Si desea información más detallada,
consulte la sección de operación de
American National Standard ANSI/ASME
B30.16 y B30-9 (cordaje) y la sección de
operación de Department of Energy Hoisting
and Rigging Standards DOE-STD-1090-99.
Page 56

Grúas WARN Industries
Mantenimiento Preventivo Periódico
• Procure que la grúa no tenga suciedad,
aceite, grasa, agua ni otras sustancias.
• Compruebe todos los pernos de montaje y
verifique que están apretados con el par de
giro indicado en la hoja técnica del producto.
Reemplace todo asegurador que esté
dañado.
• Compruebe periódicamente que todas las
conexiones estén bien apretadas y sin
corrosión.
• Compruebe que no haya daños aparentes
cada vez que vaya a usar la grúa. Ejemplos
de daños pueden ser: cortes, nudos,
porciones aplastadas o deshilachadas,
o hilos rotos. Reemplace el cable de
inmediato si está dañado. De no hacerse
así, se correrá el riesgo de que se rompa.
Programa de mantenimiento preventivo
• Compruebe regularmente que el freno no
patina. Si el tambor continúa girando una
vez liberados los controles, podría ser
necesario reemplazar el freno.
• Limpie y engrase el conjunto del freno
periódicamente. Esto asegurará el
correcto funcionamiento de la grúa y
prolongará su vida útil. Si la grúa se
calienta excesivamente al bajar las cargas,
se deberá dar mantenimiento al freno o
reemplazarlo.
• Revise las escobillas del motor
periódicamente y reemplácelas cuando sea
necesario.
NOTA: Solamente los cojinetes del motor
y el conjunto del freno requieren ser
reemplazados periódicamente.
Actividad de mantenimiento
Comprobar aseguradores
Comprobar las conexiones
eléctricas e hidráulicas
Desenrollado y comprobación
del cable
Limpieza y engrasado del
conjunto del freno
Comprobar las escobillas del
motor
Comprobación visual de la
grúa y el control
Tras la
primera
operación
Antes
de cada
uso
Cada seis meses o cada
25 horas de operación
X X
X X
X
X X X
54 27
X
X
Page 57

Grúas WARN Industries
Resolución de Problemas: Grúas Eléctricas
ADVERTENCIA
DAÑOS PERSONALES
De no seguirse estas instrucciones, podrían producirse lesiones de gravedad o incluso la muerte.
• No se apoye nunca en la batería si está haciendo conexiones.
• Desconecte siempre todos los cables de la batería antes de comenzar a trabajar.
• Desconecte siempre el borne negativo primero y vuelva a conectar el borne negativo en último lugar.
• No lleve nunca puestas joyas o collares, y lleve siempre protección ocular.
Problema Posible causa Acción correctiva
La grúa no
desplaza el
cable en ninguna dirección
o el motor no
funciona
La grúa desenrolla el cable,
pero no lo
enrolla
La fuente de
alimentación no
está conectada,
o el interruptor de
encendido/apagado se encuentra
en la posición de
“apagado”
La alimentación
del interruptor
remoto se ha visto
interrumpida
Fallo en el
interruptor o el cableado del control
remoto
Fallo de los
componentes o
el cableado en el
interior del controlador
A) Revise las conexiones del cableado.
Verifique que haya 12 V (24 V) en el terminal
positivo (+) del controlador. Verifique que
haya voltaje en los terminales F1, F2 y A con
el interruptor remoto en ambas direcciones.
B) Compruebe la posición del interruptor de
emergencia.
Verifique que haya 12 V (24 V) en la clavija
central de la toma del control remoto del
controlador. Compruebe la continuidad del
conector del cable del control remoto desde
la clavija central a ambas clavijas laterales,
con el interruptor del control remoto en las
dos posiciones. Reemplace el control remoto
si no hay continuidad.
Verifique que haya 12 V (24 V) en la clavija
central de la toma del control remoto del
controlador. Compruebe la continuidad del
conector del cable del control remoto desde
la clavija central a ambas clavijas laterales,
con el interruptor del control remoto en las
dos posiciones. Reemplace el control remoto
si no hay continuidad. Si ninguna de estas
acciones resuelve el problema, devuelva el
controlador a Warn Industries para que lo
reparen.
Page 58

Grúas WARN Industries
Problema Posible causa Acción correctiva
La grúa enrolla
el cable, pero
no lo desenrolla
El motor intenta
desenrollar,
pero la grúa
se atasca o se
bloquea
La grúa funciona en ambos sentidos,
pero no puede
levantar cargas
inferiores a la
nominal
La grúa va
más lenta y se
atasca durante
el desenrollado
La alimentación
del interruptor del
control remoto se
ha visto interrumpida
Fallo del freno
Se está suminist-
rando bajo voltaje
a la grúa
Hace falta reparar
el freno
Verifique que haya 12 V (24 V) en la clavija
central de la toma del control remoto del
controlador. Compruebe la continuidad del
conector del cable del control remoto desde
la clavija central a ambas clavijas laterales,
con el interruptor del control remoto en las
dos posiciones. Reemplace el control remoto
si no hay continuidad.
Repare o reemplace el freno.
A) Compruebe que se hayan usado cables
de acuerdo a lo recomendado. B) Compruebe la condición de la batería. C) Com-
pruebe que no haya corrosión en cables y
conexiones. Limpie y apriete las conexiones.
Repare o reemplace el freno.
La grúa vibra
anormalmente
o hace
demasiado
ruido durante
el alzado o
descenso de la
carga
Hace falta reparar
el freno
La superficie
donde se montó la
grúa no es plana.
La varilla o la
barra de conexión
está doblada
Repare o reemplace el freno.
Verifique que la superficie de montaje sea
plana, con una tolerancia de +/- 0,50 mm
(0,020 pulg.). Reemplace la varilla o barra de
conexión si es necesario. Verifique que no
haya cubiertas dobladas o agrietadas.
56 25
Page 59

Grúas WARN Industries
Resolución de Problemas: Grúas Hidráulicas
NOTA: Los fallos en el sistema hidráulico siguen
generalmente la misma pauta: una pérdida
gradual o repentina de presión o de flujo que
resulta en una pérdida de potencia en el motor.
Cualquiera de los componentes del sistema
puede estar fallando. Consulte la tabla para
seguir las recomendaciones generales. Si es
necesario, consulte a un técnico hidráulico
capacitado.
NOTA: Consulte las especificaciones hidráulicas
que vienen en la hoja técnica del producto.
DAÑOS PERSONALES
De no seguirse estas instrucciones, podrían
producirse lesiones de gravedad o incluso la
muerte.
No use nunca una válvula de alivio que
exceda la presión hidráulica nominal del motor. El uso de esta válvula puede sobrecargar
la grúa.
Problema Posible causa Acción correctiva
ADVERTENCIA
La grúa no enrolla
ni desenrolla
La grúa desenrolla
pero no enrolla
La grúa enrolla
pero no desenrolla o se atasca al
desenrollar
La grúa funciona
en ambos sentidos
pero no puede
levantar cargas
inferiores a la
nominal
La grúa vibra anormalmente o hace
demasiado ruido
durante el alzado
o descenso de la
carga
No hay presión hidráulica Compruebe el esquema y las conex-
Fallo en el tren de
engranajes, el freno o el
motor
Se ha montado el freno
incorrectamente
Fallo del freno de carga
Presión baja del sistema
o presión de retorno excesiva del sistema
Hace falta reparar el freno Dé mantenimiento o reemplace el
La superficie donde se
montó la grúa no es plana.
La varilla o la barra de
conexión está doblada.
iones del sistema hidráulico
Mande la grúa a un centro de servicio autorizado de Warn Industries
para su reparación
Repare o reemplace el conjunto del
freno
Dé mantenimiento o repare el freno
de carga
Compruebe la presión del sistema
en la entrada del motor y los puertos
de salida
freno de carga
Verifique que la superficie de montaje sea plana, con una tolerancia de
+/- 0,50 mm (0,020 pulg.). Reemplace la varilla o barra de conexión si
es necesario. Verifique que no haya
cubiertas dobladas o agrietadas.
Page 60

Grúas WARN Industries
Servicio de Atención al Cliente
En caso de que tuviera alguna pregunta sobre este producto o estas instrucciones, puede llamar al
servicio de atención al cliente de Warn a los números indicados a continuación, de lunes a viernes y
de 7 de la mañana a 4 de la tarde (hora del Pacífico de los EE.UU.). O bien, si desea comunicarse por
correo electrónico, visite nuestro sitio Web www.WARN.com y haga clic en la sección de servicio de
atención al cliente.
Estados Unidos Internacional
Teléfono: 503-722-1200 o 800-543-9276
(EE.UU. solamente)
FAX: 503-722-3000 FAX: 503-722-3005
Teléfono: 503-722-3008
58 23
Page 61

Grúas WARN Industries
Declaración de garantía limitada de un (1) año de los productos comerciales
de WARN®
Warn Industries, Inc. (WARN) garantiza al comprador original, por el periodo de un (1) año a partir de la fecha
original de compra, que los componentes mecánicos y eléctricos de los productos “WARN” especificados
más adelante en este documento están libres de defectos de mano de obra y de material. Esta garantía es
válida solamente para el comprador original de los productos. Para obtener cualquier servicio bajo garantía,
tendrá que presentar prueba y fecha de compra aceptable para WARN, así como copia del recibo de compra.
Esta garantía no cubre desinstalar o reinstalar el producto. WARN reparará, reemplazará o reembolsará,
a su discreción, el precio de compra del producto o componente defectuoso al devolverse tal producto o
componente defectuoso al departamento de servicio de Warn Industries o a un centro de servicio autorizado
por la fábrica durante el período vigente de la garantía, con los cargos de transporte prepagados. Adjunte su
nombre, dirección, número de teléfono, descripción del problema y una copia del recibo y factura de venta
originales con el número de serie de WARN del producto defectuoso, así como con la fecha de compra.
Esta garantía no es válida (I) para piezas o componentes excluidos más adelante en este documento o
(II) si el producto ha sido dañado por accidente, abuso, uso incorrecto, colisión, sobrecarga, modificación,
aplicación incorrecta, instalación inapropiada o servicio inapropiado. Esta garantía será anulada si cualquier
número de serie de WARN falta o se ha deteriorado.
LA GARANTÍA ESTABLECIDA ANTERIORMENTE EN ESTE DOCUMENTO ES LA ÚNICA EXISTENTE.
NO EXISTEN OTRAS GARANTÍAS, EXPLÍCITAS O IMPLÍCITAS, INCLUIDAS, AUNQUE SIN CARÁCTER
EXCLUYENTE, GARANTÍAS IMPLÍCITAS DE COMERCIALIDAD O APTITUD PARA UN PROPÓSITO EN
PARTICULAR.
TODA GARANTÍA IMPLÍCITA QUE POR LEY NO PUEDA SER EXCLUIDA ESTÁ LIMITADA A UN (1) AÑO
DE DURACIÓN A PARTIR DE LA FECHA DE COMPRA AL POR MENOR ORIGINAL DEL PRODUCTO.
WARN NO ASUME RESPONSABILIDAD ALGUNA POR DAÑOS ESPECIALES, INDIRECTOS O
ACCIDENTALES (INCLUIDOS, AUNQUE SIN CARACTER EXCLUYENTE, LUCRO CESANTE,
INTERRUPCIÓN DE OPERACIONES O PÉRDIDA DE USO) BAJO CUALQUIER TEORÍA LEGAL, INCLUSO
EN EL CASO QUE WARN HUBIERA SIDO NOTIFICADA DE LA POSIBILIDAD DE TALES DAÑOS.
La limitación o exclusión anterior podría no ser válida debido a que algunos estados no permiten excluir las
garantías implícitas, o excluir o limitar la responsabilidad por daños accidentales o indirectos, o limitar la
duración de la garantía implícita. Esta garantía le ofrece derechos legales especiales. También podría tener
otros derechos que varían de estado a estado.
WARN se reserva el derecho de cambiar el diseño del producto sin notificación previa. En los casos en que
WARN haya cambiado el diseño de un producto, WARN no asume responsabilidad alguna de actualizar o
modificar de otra forma los productos previamente fabricados.
Ningún concesionario, agente o empleado de WARN está autorizado para modificar, extender o añadir a esta
garantía.
Las preguntas sobre la garantía y devoluciones de productos para recibir servicio bajo garantía se deberán
enviar a:
WARN INDUSTRIES, INC.
Customer Service Department
12900 SE Capps Road
Clackamas, OR 97015 (EE.UU.)
1-800-543-WARN (1-800-543-9276)
Productos cubiertos por esta garantía Productos no cubiertos por esta garantía
Productos de cabrestantes comerciales Acabado y cable para cabrestantes comerciales
Productos de grúas comerciales Acabado y cable para productos de grúas comerciales
Productos accesorios comerciales Acabado y cable
Page 62

60 21
Page 63

Allgemeine Sicherheitsmaßnahmen
Warnhinweise und Vorsichtsmaßnahmen
ACHTUNG
In diesem Handbuch befinden sich WARNHINWEISE,
VORSICHTSMASSNAHMEN, WICHTIGE ANMERKUNGEN und HINWEISE. Jeder dieser Punkte
hat einen besonderen Zweck. WARNHINWEISE sind
Sicherheitshinweise, die auf eine möglicherweise
gefährliche Situation hinweisen, die zu schweren
Verletzungen führen kann. VORSICHTSMASSNAHMEN sind Sicherheitshinweise, die auf eine
möglicherweise gefährliche Situation hinweisen, die zu
leichten oder mäßigen Verletzungen führen kann. Eine
VORSICHTSMASSNAHME kann auch auf unsichere
Praktiken hinweisen. VORSICHTSMASSNAHMEN
und mit dem Signalwort „Achtung” gekennzeichnete
WARNHINWEISE beschreiben die Gefahr, weisen
auf Möglichkeiten zur Vermeidung der Gefahr hin und
geben Aufschluss über die möglichen Folgen, wenn
diese Gefahr nicht vermieden wird. Das Signalwort
WICHTIG weist auf Anmerkungen zu möglichen
Sachschäden hin. HINWEISE sind zusätzliche
Informationen, die Ihnen helfen sollen, ein bestimmtes
Verfahren durchzuführen. BITTE UNBEDINGT ALLE
SICHERHEITSMASSNAHMEN BEACHTEN!
ACHTUNG
GEFAHR DURCH BEWEGLICHE TEILE
Die Nichtbeachtung dieser Anweisungen kann
zu schweren oder tödlichen Verletzungen
führen.
• Während der Installation, des Betriebs und beim
Ab- und Aufspulen immer den Kontakt mit dem
Drahtseil, der Öse und dem Haken vermeiden.
• Vorsicht beim Umgang mit Haken und Drahtseil
während des Spulvorgangs!
• Beim Auf- und Abspulen immer den
mitgelieferten Hakengurt verwenden.
• Vor Beginn der Arbeit sind alle Kabel von der
Batterie zu trennen.
• Die negative Anschlussklemme muss stets
zuerst abgenommen und zuletzt wieder
angeschlossen werden.
CHEMISCHE UND BRANDGEFAHREN
Die Nichtbeachtung dieser Anweisungen kann
zu schweren oder tödlichen Verletzungen
führen.
• Die Hebevorrichtung darf in der Nähe von
explosivem oder leicht entzündlichem Material
nicht in Betrieb genommen werden.
• Schmuckstücke immer ablegen und stets
Augenschutz tragen.
• Beim Anschluss der Kabel nie über die Batterie
lehnen.
• Immer sicherstellen, dass sich in dem
Bereich, in dem gebohrt werden soll,
keine Kraftstoffleitungen, Kraftstofftanks,
Bremsleitungen, elektrischen Kabel usw.
befinden.
• Elektrische Kabel niemals
- über scharfe Kanten hinweg verlegen.
- durch oder in der Nähe von beweglichen
Teilen verlegen.
- in der Nähe von Teilen verlegen, die heiß
werden können.
• Frei liegende Drähte und elektrische
Anschlüsse sind immer zu isolieren und zu
schützen.
• Schutzmanschetten sind immer gemäß den
Installationsanweisungen anzubringen.
ACHTUNG
STURZ- ODER QUETSCHGEFAHR
Die Nichtbeachtung dieser Anweisungen kann
zu schweren oder tödlichen Verletzungen
führen.
• Hebevorrichtung niemals als Lift oder zur
Beförderung von Personen verwenden.
• Nur Drahtseile der auf dem Datenblatt
angegebenen Größe verwenden.
Page 64

Allgemeine Sicherheitsmaßnahmen
VORSICHT VORSICHT
GEFAHR DURCH BEWEGLICHE TEILE
Die Nichtbeachtung dieser Anweisungen kann
zu leichten oder mäßigen Verletzungen führen.
• Sie sollten stets mit dem Betrieb und allen
Komponenten der Hebevorrichtung vertraut
sein. Installations- und Bedienungsanleitung der
Hebevorrichtung daher vollständig lesen.
• Nur Personen, die mindestens 16 Jahre alt sind,
dürfen diese Hebevorrichtung in Betrieb nehmen.
• Hebevorrichtung niemals unter Alkohol-, Drogenoder Medikamenteneinfluss in Betrieb nehmen.
• Die auf dem Datenblatt angegebene Zuglast der
Hebevorrichtung bzw. des Seils darf niemals
überschritten werden. Zur Reduzierung der
Last sind eine Umlenkrolle und ein zweifach
geschertes Seil erforderlich.
• Die Befestigungsstelle sollte immer fest genug
sein, um der maximalen Nennleistung der
Hebevorrichtung standhalten zu können.
• Nur vom Hersteller zugelassene
Befestigungsteile, Komponenten und Zubehörteile
verwenden.
• Die Metallteile müssen stets mindestens Grade 5
entsprechen.
• Keine Schweißbolzen verwenden.
• Vorsicht bei der Verwendung von Bolzen, die
länger als die im Lieferumfang enthaltenen
Bolzen sind. Zu lange Bolzen können den Sockel
beschädigen und/oder eine sichere Befestigung
der Hebevorrichtung verhindern.
• Vor Anschluss der Elektrik ist die Hebevorrichtung
immer fest zu installieren und der Haken an der
Endschlaufe zu befestigen.
• Seil immer in der auf dem Etikett bzw. in den
Unterlagen angegebenen Richtung auf die
Trommel spulen. Diese Maßnahme ist für die
ordnungsgemäße Funktion der Automatikbremse
unerlässlich.
• Drahtseil vor Inbetriebnahme immer erst
dehnen und unter Last neu aufspulen. Ein fest
aufgespultes Drahtseil reduziert das Risiko,
dass sich die Drahtseillagen lockern und hängen
bleiben oder Schäden verursachen.
• Ein Schaukeln oder Drehen der Last während des
Hebebetriebs ist zu vermeiden.
• Eine angehobene Last darf nie unbeaufsichtigt
sein.
GEFAHR DURCH BEWEGLICHE TEILE
Die Nichtbeachtung dieser Anweisungen kann
zu leichten oder mäßigen Verletzungen führen.
• Seil, Haken und Schlingen müssen vor
Inbetriebnahme der Hebevorrichtung geprüft
werden. Beschädigte Komponenten sind vor
Inbetriebnahme auszutauschen. Alle Einzelteile
sind vor Schäden zu schützen.
• Fehlfunktionen, ungewöhnliche
Leistungsmerkmale oder Schäden an der
Hebevorrichtung sind stets sofort zu melden.
• Fernsteuerung beim Abspannen oder bei
Nichtgebrauch der Hebevorrichtung entfernen.
• Drahtseil niemals am Drahtseil einhaken. Dadurch
wird das Drahtseil beschädigt.
• Gegenstände oder Hindernisse, die einen
sicheren Betrieb der Hebevorrichtung
beeinträchtigen könnten, sind zu entfernen.
• Vorsicht beim Abspannen in Vorbereitung des
Hebevorgangs!
• Der Betrieb der Hebevorrichtung mit weniger als
5 Drahtseilwicklungen um die Trommel wird nicht
empfohlen. Das Drahtseil könnte sich von der
Trommel lösen.
• Niemals Seil oder Haken berühren, wenn diese
unter Spannung stehen.
• Während des Betriebs der Hebevorrichtung
– oder wenn jemand anderes die Steuerung
der Hebevorrichtung übernommen hat – weder
Drahtseil noch Haken berühren.
• Bei angeschlossener Fernsteuerung weder
Drahtseil noch Haken berühren.
• Abstand zum Drahtseil und der Last einhalten
und andere Personen während des Betriebs der
Hebevorrichtung fern halten.
• Das Betriebspersonal muss sich der Stabilität
von Fahrzeug und Last während des Betriebs
der Hebevorrichtung bewusst sein. In der Nähe
befindliche Personen müssen über instabile
Zustände informiert werden.
• Fernsteuerungskabel immer von der Trommel,
dem Drahtseil und beim Abspannen fern halten.
Auf rissige, geknickte oder ausgefranste Drähte
oder lockere Anschlüsse achten. Beschädigte
Fernsteuerungen austauschen.
• Bei Verwendung der Fernsteuerung im Fahrzeug
die Fernsteuerung immer durch das Fenster
reichen, um ein Quetschen des Kabels in der Tür
zu vermeiden.
62 19
Page 65

Hebevorrichtungen von WARN Industries
VORSICHT
SCHNITTVERLETZUNGS- UND
VERBRENNUNGSGEFAHR
Die Nichtbeachtung dieser Anweisungen kann
zu leichten oder mäßigen Verletzungen führen.
• Bei der Handhabung des Drahtseils stets
schwere Lederhandschuhe tragen.
• Drahtseil nie durch die Hände gleiten lassen.
• Während des Betriebs und nach Verwendung
der Hebevorrichtung immer auf möglicherweise
heiße Flächen in der Nähe des Motors, der
Trommel oder des Drahtseils achten.
• Das Handsteuergerät darf nicht im Trittbereich
oder in der Nähe von Aufbewahrungsorten für
Werkzeuge angebracht werden.
• Schäden an den Anschlüssen oben auf dem
Gehäuse sind stets zu vermeiden.
• Werkzeuge und andere elektrisch leitende
Geräte sind immer von den Anschlüssen fern zu
halten.
VORSICHT
GEFAHR DURCH BEWEGLICHE TEILE
Die Nichtbeachtung dieser Anweisungen kann
zu leichten oder mäßigen Verletzungen führen.
• Immer Haken und Riegel verwenden.
• Immer sicherstellen, dass der Riegel
geschlossen ist und keine Last trägt.
• Hakenspitze oder Riegel nicht belasten. Nur die
Hakenmitte belasten.
• Verworfene Haken bzw. Haken mit einer
verbreiterten Durchlassöffnung nicht verwenden.
HINWEIS
ACHTUNG
Die Nichtbeachtung dieser Anweisungen
kann zu Sachschäden bzw. schweren oder
tödlichen Verletzungen führen.
• Der für die verwendeten Komponenten
empfohlene Hydraulikhöchstdruck bzw. -fluss
darf nie überschritten werden.
• Die Winde muss stets wie im Schaltbild
angegeben an das Hydrauliksystem
angeschlossen werden.
• Es sollte stets das im Schaltbild angegebene
Regelventil verwendet werden.
• Während des Windenbetriebs ist stets
Abstand von den Hydraulikleitungen zu halten.
• Hydraulikkomponenten sind stets gemäß den
Empfehlungen des Herstellers zu installieren.
SO LASSEN SICH SCHÄDEN AN DER
HEBEVORRICHTUNG UND AN DEN
GERÄTEN VERMEIDEN:
• Drahtseil unter Last immer nur langsam
einziehen. Schocklasten können die
Leistungsfähigkeit des Drahtseils und der
Hebevorrichtung kurzzeitig überschreiten.
• Hebevorrichtung nicht zur Sicherung der Last
während des Transports verwenden.
• Hebevorrichtung niemals in Wasser eintauchen.
• Fernsteuerung an einem geschützten,
sauberen, trockenen Ort aufbewahren.
Page 66

Hebevorrichtungen von WARN Industries
Was ist eine
Hebevorrichtung?
WARN Industries stellt zahlreiche unterschiedliche
Hebevorrichtungen und Winden her. Was aber
unterscheidet eine Hebevorrichtung von einer
Winde?
Hebevorrichtungen und Winden sehen sich sehr
ähnlich. Beide verfügen über einen Motor, eine
sich drehende Trommel mit einem Drahtseil,
ein Untersetzungsgetriebe, einen Sockel und
in der Regel auch eine elektrische Steuerung.
Hebevorrichtungen und Winden werden jedoch für
unterschiedliche Zwecke eingesetzt.
Hebevorrichtungen werden zum Anheben von
Lasten in die Luft und Winden zum horizontalen
Ziehen von Lasten über den Boden verwendet. Da
eine in der Luft hängende Last besondere Risiken
birgt, unterliegen Hebevorrichtungen strengeren
Sicherheitsnormen. Im Gegensatz zu Winden
sind bei Hebevorrichtungen ein Abspulen im
Freilauf und ein Auskuppeln nicht möglich.
Mechanische Bremse
Fernsteuerung
Schalterbetrieb
Die Fernsteuerung sollte beim Nichtgebrauch
nicht an die Hebevorrichtung angeschlossen
sein. Die Nichtbeachtung dieser Anweisung
kann zu einer unerwarteten Aktivierung der
Hebevorrichtung und/oder einem Entladen der
Batterie führen.
Seil aufspulen
(Last anheben)
Seil abspulen
(Last senken)
Beim Absenken der Last und Abspulen des
Drahtseils erzeugt die mechanische Bremse
Wärme. Daher ist Vorsicht geboten, damit sich die
mechanische Bremse nicht überhitzt.
Bei schwereren Lasten sollte sich die Bremse
zwischen den Einsätzen abkühlen können.
Geräuschbildung bei Verwendung einer neuen
mechanischen Bremse ist normal und legt sich in
der Regel im Laufe der Zeit.
EINE ÜBERHITZUNG DER MECHANISCHEN
BREMSE KANN ZU PERMANENTEN SCHÄDEN
AN DER BREMSE ODER ZU EINEM VERSAGEN
DER BREMSE FÜHREN. BESCHÄDIGTE
BREMSENKOMPONENTEN SIND VOR
DER ERNEUTEN INBETRIEBNAHME DER
HEBEVORRICHTUNG AUSZUTAUSCHEN.
Robuste,
wasserbeständige
Fernsteuerung
Standardmäßige
Fernsteuerung
64 17
CE-Fernsteuerung
mit verriegelbarem
Notausschalter
Page 67

Hebevorrichtungen von WARN Industries
Checkliste vor
Installation
1 Der Erhalt der folgenden Komponenten ist
sicherzustellen:
• Hebevorrichtung
• Handsteuergerät
• Fernsteuerung
• Metallteile zur Befestigung der
Hebevorrichtung
2 Bei der Entnahme der Hebevorrichtung aus
der Verpackung ist sie auf Schäden sowie
verbogene oder gerissene Spurstangen,
Zuganker oder Gehäuse zu prüfen. Schäden
müssen vor Installation der Hebevorrichtung
ausgebessert werden.
3 Folgende Substanzen sind aus dem
Umfeld der Hebevorrichtung und des
Handsteuergeräts zu entfernen:
• Leicht entzündliche Dämpfe
• Chemische Dämpfe
• Öldämpfe
• Ätzendes Material
4 Die Lufttemperatur im Umfeld der
Hebevorrichtung und des Handsteuergeräts
muss zwischen 49 °C und -29 °C liegen.
5 Der Aufbau muss die gesamte Nennzugkraft
der Hebevorrichtung tragen können.
6 Weder der Ausleger der Hebevorrichtung noch
der Aufbau dürfen sich unter dem Doppelten
der gesamten Nennlast der Hebevorrichtung
verbiegen.
Installation der
Hebevorrichtung
Nach Möglichkeit sollten die im Lieferumfang
enthaltenen Schrauben oder Bolzen mit der
gleichen Gewindegröße (SAE 5 oder M8,8)
verwendet werden. Sowohl die Spurstangen
als auch die Zuganker müssen sich in Position
befinden. Flache Unterlegscheiben und
Sicherungsscheiben sollten zwischen den
Schraubköpfen und der Montagefläche eingesetzt
werden.
Für angeschraubte Trommelstützen:
1 bis 4 Gewindedrehungen sollten über der
quadratischen Mutter hervorstehen. Zu lange
Bolzen können die Trommelstützen beschädigen.
Zu kurze Bolzen hingegen liefern nicht die
erforderliche Stabilität. Flache Unterlegscheiben
und Sicherungsscheiben sollten zwischen den
Schraubköpfen und der Montagefläche eingesetzt
werden.
Für Trommelstützen mit Gewinde:
Zu lange Bolzen können die Trommelstützen
beschädigen und/oder die Hebevorrichtung nicht
fest genug verankern. Zu kurze Bolzen hingegen
liefern nicht die erforderliche Stabilität. Die Bolzen
müssen so lang sein, dass sie 24 bis
35 mm in den Sockel der Hebevorrichtung
hineinragen.
1 Die Montagefläche sollte bis auf 0,5 mm eben
sein. Bei unebenen Flächen ist nach Bedarf
ein Beilagenblech zu verwenden, damit die
Hebevorrichtung nicht übermäßig belastet
wird.
2 Alle Schrauben sind auf die auf dem
Datenblatt empfohlenen Drehmomente
festzuziehen.
3 Die Positionen der Montageöffnungen sind auf
diesem Datenblatt ebenfalls notiert.
Page 68

Hebevorrichtungen von WARN Industries
Installation des Handsteuergeräts
(bei elektrischen Hebevorrichtungen)
1 Entfernen Sie die Schrauben in der Abdeckung
der Gerätehalterung.
2 Das Handsteuergerät wird vertikal (aufrecht)
angebracht, damit sich kein Wasser in der
Abdeckung ansammeln kann.
3 Am besten eignet sich eine Stelle ohne
starke Vibrationen. Verwenden Sie
Sicherungsscheiben, damit sich die Schrauben
nicht lockern.
4 Das Handsteuergerät sollte so angebracht
werden, dass es vor Schäden durch
Werkzeuge oder schwere Gegenstände
geschützt ist.
5 Das Handsteuergerät darf an dem Wetter
ausgesetzten Stellen befestigt werden, sollte
in diesem Fall jedoch vor möglichen Schäden
durch Werkzeuge oder schwere Gegenstände
geschützt werden.
6 Beachten Sie bei der Installation die u.a.
Abmessungen.
BRANDGEFAHR
Die Nichtbeachtung dieser Anweisungen
kann zu schweren oder tödlichen
Verletzungen führen.
• Das Handsteuergerät darf nicht im
Trittbereich oder in der Nähe von
Aufbewahrungsorten für Werkzeuge
angebracht werden.
• Schäden an den Anschlüssen oben auf dem
Gehäuse sind stets zu vermeiden.
• Werkzeuge und andere elektrisch leitende
Geräte sind immer von den Anschlüssen fern
zu halten.
ACHTUNG
Montageabmessungen für ein typisches Handsteuergerät
66 15
Page 69

Hebevorrichtungen von WARN Industries
Elektrische Kabelanschlüsse
Siehe Angaben auf der nächsten Seite.
Richtlinien für den Anschluss:
• Für alle Stromanschlüsse ist ein
entsprechendes Batteriekabel (AWG 2)
zu verwenden. Zu lange Kabel können zu
einem Spannungsabfall und somit zu einer
schlechteren Hebeleistung führen.
• Kabel sind daher so kurz wie möglich
zu halten. Wenn eine Länge von mehr
als 3 m erforderlich ist, sollten Kabel der
entsprechenden Stärke verwendet werden
(AWG 0).
• Verlegen Sie die Kabel in geschützten
Bereichen, um Abnutzung und Schäden zu
vermeiden.
• Isoliermanschetten auf allen exponierten
Anschlüssen verhindern elektrische
Kurzschlüsse. Schieben Sie diese
Manschetten vor dem Anschluss über die
Kabel.
• Die Kabel des Schutzschalters
gegen Überhitzung werden mit einem
Spleißanschluss am Motor befestigt.
• F1, F2, A und das Erdungskabel werden
wie abgebildet für rechtsdrehende Modelle
angeschlossen. Bei linksdrehenden
Modellen wird der Anschluss F1 auf dem
Handsteuergerät mit dem Anschluss F2 auf
dem Motor und der Anschluss F2 auf dem
Handsteuergerät mit dem Anschluss F1 auf
dem Motor verbunden.
• Achten Sie darauf, dass alle elektrischen
Anschlüsse sauber sind und fest sitzen.
• Die Installation eines Notausschalters
an einer leicht zugänglichen Stelle wird
empfohlen. So kann die Stromversorgung
im Rahmen einer Wartung ausgeschaltet
und eine zusätzliche Sicherheitsvorrichtung
angebracht werden. Der Schalter sollte eine
Stromaufnahme von 300 A aufweisen.
• Die Installation eines 300-A-Trennschalters
an einem positiven (+) Kabel in der Nähe der
Batterie wird zum Schutz vor Kurzschlüssen
empfohlen.
CHEMISCHE UND BRANDGEFAHREN
Die Nichtbeachtung dieser Anweisungen
kann zu schweren oder tödlichen
Verletzungen führen.
• Elektrische Kabel niemals
ACHTUNG
- über scharfe Kanten hinweg verlegen.
- durch oder in der Nähe von beweglichen
Teilen verlegen.
- in der Nähe von Teilen verlegen, die heiß
werden können.
Page 70

Hebevorrichtungen von WARN Industries
schwarz
2
3
1
braun
Anschlüsse für Gleichstrom-Reihenschlussmotoren (3)
Trommel-rotation: im uhrzeigersinn vom motor ende angezeigt
schwarz
23
1
braun
Anschlüsse für Gleichstrom-Reihenschlussmotoren (3)
Trommel-rotation: Zähler im uhrzeigersinn vom motor ende
angezeigt
68 13
Page 71

Hebevorrichtungen von WARN Industries
Dauermagnetmotor
#1
+
_
Batterie
#2
Steuerungsabdeckung
23
1
_
+
#2
#1
Steuerung
Anschlüsse für Dauermagnet-Gleichstrommotoren (2)
Trommel-rotation: im uhrzeigersinn vom motor ende angezeigt
Dauermagnetmotor
#2
Steuerungsabdeckung
#1
2
1
3
+
Batterie
_
#2
_
+
#1
Steuerung
Anschlüsse für Dauermagnet-Gleichstrommotoren (2)
Trommel-rotation: Zähler im uhrzeigersinn vom motor ende
angezeigt
Page 72

hex nut 7/16 in. (11 mm)
Hebevorrichtungen von WARN Industries
VOM KUNDEN ZU STELLENDE
KOMPONENTEN
MOTOR
REGELVENTIL
3 POSITIONEN, 4 WEGE,
FEDERBELASTUNG
(CLOSED CENTER)
PUMPE
Hydraulische Hebevorrichtungen: Allgemeine
Informationen
HINWEIS: Die Abbildung und Beschreibungen der
Komponenten für hydraulische Systeme sind nur als
allgemeine Richtlinien zu betrachten. Spezifische
Empfehlungen zu Komponenten, Anschlüssen,
Aufbau und besten Praktiken erhalten Sie bei einem
erfahrenen Hydraulikexperten.
Die Druckwerte des Motors richten sich nach (a)
dem maximal zulässigen Druck am Motoreingang
und (b) dem maximal zulässigen Druckabfall
am Motor. Der Druckabfall ist als Differenz
zwischen dem Eingangsdruck (P1) und dem
Ausgangsdruck (P2) am Motor der Winde definiert.
Bei Überschreiten des maximalen Eingangsdrucks
kann der Windenmotor beschädigt werden. Bei
Überschreiten des maximal zulässigen Druckabfalls
können Komponenten der Winde ausfallen.
Die empfohlene Betriebstemperatur des
Hydraulikmotors liegt zwischen 38 und 66 °C. Der
maximale Betriebstemperaturbereich liegt zwischen
-21 und +82 °C. DIE LEISTUNGSGRENZE
DES HYDRAULIKMOTORS DARF NICHT
ÜBERSCHRITTEN WERDEN! Die hydraulischen
Spezifikationen entnehmen Sie bitte dem
entsprechenden Datenblatt.
Prüfung nach
Abschluss der
Installation:
• Die Metallteile zur Befestigung sind
auf lockere Schrauben usw. zu prüfen.
• Alle Komponenten wurden richtig
installiert und die Anschlüsse des
Hydrauliksystems richtig vorgenommen.
• Sicherstellen, dass alle
Hydraulikanschlüsse fest sitzen.
• Motordrehung: Die Trommel sollte
sich in die auf dem Etikett oben auf
der T
rommel angegebenen Richtung
drehen. Ist dies nicht der Fall, sind
die hydraulischen und elektrischen
Anschlüsse erneut zu prüfen.
ACHTUNG
Die Nichtbeachtung dieser Anweisungen
kann zu Sachschäden bzw. schweren oder
tödlichen Verletzungen führen.
• Der für die verwendeten Komponenten
empfohlene Hydraulikhöchstdruck bzw. -fluss
darf nie überschritten werden.
• Die Winde muss stets wie im Schaltbild
angegeben an das Hydrauliksystem
angeschlossen werden.
• Es sollte stets das im Schaltbild angegebene
Regelventil verwendet werden.
• Während des Windenbetriebs ist stets
Abstand von den Hydraulikleitungen zu halten.
• Hydraulikkomponenten sind stets gemäß den
Empfehlungen des Herstellers zu installieren.
HYDRAULIKÖL: Das für die Winde verwendete
Hydrauliköl muss hohen Drücken Stand halten, die
Komponenten vor Verschleiß schützen und Additive
zum Schutz vor Oxidation und Rost enthalten. Es
muss zudem einer Schaumbildung vorbeugen
können und bei 15-46 °C einen Viskositätsindex
zwischen 100-300 SSU aufweisen. Der empfohlene
Filternennwert liegt bei höchstens 10 Mikron.
Hyraulikschaltbild
70 11
Page 73

Hebevorrichtungen von WARN Industries
Installation des Drahtseils
1 Das Drahtseil wird gemäß der Abbildung durch
den Schlitz in der Trommel eingeführt.
2 Bilden Sie eine Schlaufe und führen Sie
das Ende wieder in den Schlitz zurück. Der
lasttragende Abschnitt des Seils muss dem
Trommelflansch am nächsten liegen.
3 Führen Sie den Keil bzw. die im Lieferumfang
der Hebevorrichtung enthaltene
Sechskantmutter (7/16 Zoll) in die Schlaufe
ein und ziehen Sie das lasttragende Ende
des Seils so an, dass der Keil bzw. die
Sechskantmutter im Schlitz zu sitzen kommt.
Das Ende des Seils muss gemäß der
Abbildung im Schlitz sichtbar sein. Mit dem
Keil wird das Seil im Schlitz verankert.
4 Wenn das Seilende fest sitzt, wickeln Sie das
Drahtseil vorsichtig und gleichmäßig auf die
Trommel. Halten Sie das Drahtseil zu jeder
Zeit gespannt.
5 Lassen Sie immer mind. fünf (5)
Drahtseilwicklungen auf der Trommel. Bei
Nichtbeachtung dieser Anweisung kann sich
das Seilende von der Trommel lösen und die
Last herunterfallen.
VORSICHT
Die Nichtbeachtung dieser Anweisungen
kann zu mäßigen Verletzungen oder
Sachschäden führen.
• Drahtseil nur in die auf dem Etikett auf der
Trommel angegebene Richtung verlegen.
Sonst funktioniert die Bremse nicht.
• Nur Drahtseile der auf dem Datenblatt
angegebenen Größe verwenden.
• Das Drahtseil ist gemäß der nachfolgenden
Abbildung anzubringen.
Drahtseil an der Trommel verankern
Page 74

Hebevorrichtungen von WARN Industries
Bedienungsanleitung
Richtlinien für einen sicheren Betrieb
• Gliedmaßen und Kleidungsstücke sind stets
von sich drehenden oder beweglichen Teilen
fern zu halten. Die sich drehende Trommel
kann mit einem gespannten Seil eine
Quetschgefahr darstellen.
• Bei der Handhabung von Drahtseilen
und beim Betrieb der Hebevorrichtung
müssen immer Augenschutz und schwere
Handschuhe getragen werden.
• Beim Betrieb ist stets ein Sicherheitsabstand
zur Hebevorrichtung einzuhalten. Falls
das Seil reißt, kann es mit hoher Kraft
zurückschnellen.
• Die Hebevorrichtung darf nicht zum
Anheben, Ziehen oder Transportieren von
Personen verwendet werden.
• Die Winde darf nicht zum Anheben, Ziehen
oder Transportieren von Lasten über
Personen hinweg verwendet werden.
• Lasten, die über die Nennkapazität der
Hebevorrichtung hinausgehen, dürfen nicht
angehoben werden.
• Lasten dürfen nicht bis zum Anschlag
angehoben werden, da dadurch die Trommel
und der Motor stehen bleiben.
• Ein Kran darf nie als Hubende eingesetzt
werden.
• Hinweis: In den drei o.a. Situationen wird
die Hebevorrichtung zu stark belastet.
Dies kann zu einem Versagen der
Hebevorrichtung bzw. des Aufbaus oder
zu einem Seilriss und Lastabsturz führen.
Zu schwere Lasten können nicht direkt
sichtbare Schäden verursachen, die zum
Versagen der Hebevorrichtung bei Lasten
unterhalb der Nennkapazität führen können.
• Ein Überhitzen des Hydrauliksystems, des
Elektromotors oder der mechanischen
Bremse ist unbedingt zu vermeiden.
• Kontakte mit dem Seil oder dem
Abspanngerät beim Anheben einer Last sind
zu vermeiden, während die Hebevorrichtung
in Betrieb ist und sich jemand am
Handsteuergerät befindet.
Die Nichtbeachtung dieser Anweisungen
kann zu Sachschäden bzw. schweren oder
tödlichen Verletzungen führen.
Auf Gefahren durch Kabel, Quetschpunkte,
abstürzende Lasten und gespannte Seile bzw.
Abspannmanöver achten.
• Das Seil darf nie um einen Gegenstand
• Der Betrieb der Hebevorrichtung mit
• Drahtseil nie durch die Hände gleiten lassen.
• Lasten, die sich nicht direkt unter der
• Ein Schaukeln oder Drehen der Last
• Die Last darf nie auf dem Riegel ruhen.
• Eine angehobene Last darf nie
• Der Hakenpunkt darf nicht zum Heben der
• Die Hebevorrichtung darf in der Nähe von
72 9
ACHTUNG
herum gelegt und wieder in sich selbst
eingehakt werden. Dadurch wird das
Drahtseil beschädigt.
weniger als fünf (5) Drahtseilwicklungen
um die Trommel wird nicht empfohlen. Der
Kabelanker allein kann die Nennlast nicht
tragen. Mit weniger als fünf Wicklungen um
die Trommel kann sich das Seil lösen und
die Last abstürzen.
Hebevorrichtung befinden, dürfen nicht
angehoben werden. Dadurch kann die
Last gefährlich schwingen. Die Last muss
sich stets direkt unter der Hebevorrichtung
befinden.
während des Hebebetriebs ist zu vermeiden.
unbeaufsichtigt sein.
Last verwendet werden. Die Last muss auf
dem Bügel des Hakens ruhen.
leicht entzündlichem Material bzw. leicht
entzündlichen Dämpfen nicht in Betrieb
genommen werden. Elektrische Geräte
können einen Funkenschlag erzeugen,
der wiederum Feuer oder Explosionen
verursachen kann.
Page 75

Hebevorrichtungen von WARN Industries
• Das Personal darf die Hebevorrichtung
nicht bei Ermüdung oder Ablenkung, in
Eile oder unter Alkohol-, Drogen- oder
Medikamenteneinfluss in Betrieb nehmen.
• Die Situation am Einsatzort ist eingehend zu
prüfen und die Aufgabe sorgfältig zu planen.
• Vor dem Anheben der Last müssen der
Aufbau, die Hebevorrichtung, die Schlingen
und/oder das andere Zubehör auf Anzeichen
von Schäden geprüft werden. Beschädigte
Komponenten sind vor dem Anheben
auszutauschen.
• Das Gewicht der Last muss immer bekannt
sein und Abspann- sowie Hebevorrichtung
und Aufbau müssen die Last tragen können.
• Die Last muss sich immer direkt unter der
Hebevorrichtung befinden. Das Seil darf
weder verheddert oder geknickt sein, und es
dürfen sich keine Personen in der Nähe der
Last befinden.
• Stets schwere Lederhandschuhe tragen.
• Das Drahtseil darf nur langsam angespannt
werden. Hebevorgang langsam beginnen.
Bei Anzeichen einer Überlastung muss
die Last sofort gesenkt und das Gewicht
reduziert werden.
• Schockbelastungen durch ein schnelles
Anheben oder Abstoßen der Last sind stets
zu vermeiden.
• Sicherstellen, dass der Riegel des
Hakens ordnungsgemäß funktioniert.
Beschädigte Riegel sind vor Inbetriebnahme
auszutauschen.
• Sicherstellen, dass das Seil in die richtige
Richtung spult. Hebevorrichtungen sind mit
einer automatischen Bremse ausgestattet
und können bei einem Seillauf in die falsche
HINWEIS: Befindet sich der Steuerschalter
in der Abspulposition, ändert sich die
Spulrichtung des Seils, wenn es vollständig
abgespult und dann erneut aufgespult wird.
• Das Seil muss nach jedem Einsatz
geprüft und vorsichtig wieder aufgespult
werden. Risse, Knicke und ausgefranste
Bereiche beeinträchtigen die Seilstärke.
Bei Beschädigung muss das Seil ersetzt
werden.
• Die Fernsteuerung ist immer von der
Trommel, dem Seil und von allen
Abspannmanövern fern zu halten.
• Fernsteuerung und Kabel vor
Inbetriebnahme der Hebevorrichtung auf
Schäden prüfen.
• Hydrauliksystem bzw. elektrische
Anschlüsse immer vor Inbetriebnahme der
Hebevorrichtung prüfen.
• Während des Betriebs ist stets Abstand von
Drahtseil und Last zu halten.
• Das Personal anderer Hebevorrichtungen
muss mit den potenziellen Risiken beim
Umgang mit Anlagen dieser Art und in der
ordnungsgemäßen Verwendung derselben
geschult sein.
• Handsteuergerät und Hebevorrichtung
dürfen nur von entsprechend qualifiziertem
Personal, das mit der Bau- und
Betriebsweise dieser Systeme vertraut ist,
installiert, betrieben, eingestellt und gewartet
werden.
• Sicherstellen, dass
Lastbegrenzungsvorrichtungen
ordnungsgemäß funktionieren.
Zusätzliche Richtlinien:
• Wenn die Last in Flüssigkeit oder staubige
Feststoffe abgesenkt werden muss, ist dazu
ein Anschlagseil oder anderes Abspanngerät
zu verwenden, damit der Haken zu jeder Zeit
über der Oberfläche verweilen kann.
.nedrew nemmoneg beirteB ni thcin gnuthciR
• Weitere Informationen finden Sie im
betriebstechnischen Abschnitt der
ANSI/ASME-Normen B30.16 und B30-9
(unter „Rigging” [Abspannen]) bzw. im
entsprechenden Abschnitt der Norm zu
Hebemanövern und Abspannen des USamerikanischen Energieministeriums DOESTD-1090-99.
Page 76

Hebevorrichtungen von WARN Industries
Regelmäßige Vorbeugende Wartung
• Die Hebevorrichtung muss frei von Schmutz,
Öl, Fett, Wasser und anderen Substanzen
gehalten werden.
• Befestigungsschrauben prüfen und
sicherstellen, dass diese auf die auf dem
Datenblatt empfohlenen Drehmomentwerte
festgezogen wurden. Beschädigte
Schraubelemente sind auszutauschen.
• Elektrische Anschlüsse sind regelmäßig zu
prüfen, damit gewährleistet ist, dass diese
fest sitzen und korrosionsfrei sind.
• Das Seil ist bei Inbetriebnahme der
Hebevorrichtung auf sichtbare Schäden
zu prüfen. Beispiele für Seilschäden
umfassen: Risse, Knoten, Quetschungen
oder ausgefranste Teile sowie abgebrochene
Fasern. Das Seil muss bei Schäden sofort
ausgetauscht werden. Bei Nichtbeachtung
dieser Anweisung kann das beschädigte Seil
reißen.
Zeitplan für die vorbeugende Wartung
Wartungsmaßnahme
Nach dem
ersten
Einsatz
• Die Bremse muss regelmäßig auf Schlupf
geprüft werden. Wenn sich die Trommel
auch nach Loslassen der Steuerung dreht,
muss die Bremse u.U. ausgetauscht werden.
• Die Bremse sollte regelmäßig gereinigt und
geschmiert werden. Diese Maßnahmen
gewährleisten eine ordnungsgemäße
Leistung und einen langjährigen Einsatz der
Hebevorrichtung. Wenn beim Absenken der
Last Schwierigkeiten aufzutreten scheinen
oder die Hebevorrichtung zu heiß wird,
muss die Bremse entweder gewartet oder
ausgetauscht werden.
• Die Motorschleifbürsten sind regelmäßig zu
prüfen und nach Bedarf auszutauschen.
HINWEIS: Nur Motorschleifbürsten und
Bremse müssen regelmäßig ausgetauscht
werden.
Vor
jedem
Einsatz
Halbjährlich bzw. nach
25 Betriebsstunden
Schrauben prüfen
Elektrische bzw.
hydraulische
Anschlüsse prüfen
Seil abspulen und
prüfen
Bremse reinigen und
schmieren
Motorschleifbürsten
prüfen
Sichtprüfung der
Hebevorrichtung und
Steuerung
X X
X X
X
X
X
X X X
74 7
Page 77

Hebevorrichtungen von WARN Industries
Fehlersuche und -behebung: Elektrische Hebevorrichtungen
ACHTUNG
VERLETZUNGSGEFAHR
Die Nichtbeachtung dieser Anweisungen kann zu schweren oder tödlichen Verletzungen führen.
• Beim Anschluss der Kabel nie über die Batterie lehnen.
• Vor Beginn der Arbeit sind alle Kabel von der Batterie zu trennen.
• Die negative Anschlussklemme muss stets zuerst abgenommen und zuletzt wieder angeschlossen
werden.
• Schmuckstücke immer ablegen und stets Augenschutz tragen.
Problem
Hebevorrichtung lässt
sich in keine
Richtung in Betrieb nehmen
bzw. Motor
lässt sich nicht
einschalten.
Hebevorrichtung spult das
Seil ab, aber
nicht auf.
Mögliche
Ursache
Die Vorrichtung
wurde nicht an die
Stromversorgung
angeschlossen
bzw. der Notausschalter (wahlweise
erhältlich) befindet
sich in der AUSPosition.
Stromversorgung
zur Fernsteuerung
wurde unterbrochen.
Fehler im Fernschalter bzw. in
der Verkabelung.
Komponentenfehler oder Verkabelungsfehler im
Handsteuergerät.
Behebung
A) Verkabelung prüfen. Sicherstellen, dass
24 V am positiven (+) Anschluss am Handsteuergerät anliegen. Spannung an den
Anschlüssen F1, F2 und A prüfen (beide
Richtungen [Fernsteuerung]). B) Position des
Notausschalters prüfen.
Sicherstellen, dass 24 V am mittleren Pol des
Fernanschlusses am Handsteuergerät anliegen. Durchgang des Fernsteuerungskabelanschlusses vom mittleren Pol zu den jeweiligen
Polen an der Seite prüfen (beide Richtungen
[Fernsteuerung]). Fernsteuerungsschalter bei
fehlendem Durchgang austauschen.
Sicherstellen, dass 24 V am mittleren Pol
des Fernanschlusses am Handsteuergerät
anliegen. Durchgang des Fernsteuerungskabelanschlusses vom mittleren Pol zu den
jeweiligen Polen an der Seite prüfen (beide
Richtungen [Fernsteuerung]). Fernsteuerung
bei fehlendem Durchgang austauschen.
Sicherstellen, dass 24 V am mittleren Pol
des Fernanschlusses am Handsteuergerät
anliegen. Durchgang des Fernsteuerungskabelanschlusses vom mittleren Pol zu den
jeweiligen Polen an der Seite prüfen (beide
Richtungen [Fernsteuerung]). Fernsteuerung bei fehlendem Durchgang austauschen.
Wenn sich diese Probleme nicht anhand
der o.a. Maßnahmen beheben lassen, muss
das Handsteuergerät zur Wartung an WARN
Industrial zurückgeschickt werden.
Page 78

Hebevorrichtungen von WARN Industries
Problem
Hebevorrichtung spult das
Seil auf, aber
nicht ab.
Motor versucht
den Abspulvorgang, aber
die Hebevorrichtung sperrt
nach kurzer
Zeit oder bleibt
stehen.
Hebevorrichtung lässt
sich in beide
Richtungen
betreiben, kann
die Nennlast
aber nicht
heben.
Hebevorrichtung
verlangsamt
sich und bleibt
beim Abspulen des Seils
schließlich
ganz stehen.
Mögliche
Ursache
Stromversorgung
zum Fernsteuerungsschalter
wurde unterbrochen.
Bremsversagen.
Niederspannung
an der Hebevorrichtung.
Bremse muss
gewartet werden.
Behebung
Sicherstellen, dass 24 V am mittleren Pol
des Fernanschlusses am Handsteuergerät
anliegen. Durchgang des Fernsteuerungskabelanschlusses vom mittleren Pol zu den
jeweiligen Polen an der Seite prüfen (beide
Richtungen [Fernsteuerung]). Fernsteuerung
bei fehlendem Durchgang austauschen.
Bremse warten oder austauschen.
A) Sicherstellen, dass Kabel der vorgeschriebenen Größe verwendet wurden. B)
Zustand der Batterie prüfen. C) Alle Kabel und
Anschlüsse auf Korrosion prüfen. Anschlüsse
säubern und festziehen.
Bremse warten oder austauschen.
Hebevorrichtung schwingt
stark bzw.
Heben und
Senken der
Last erfolgt
unter starker
Geräuschbildung.
Bremse muss
gewartet werden.
Hebevorrichtung
wurde nicht auf
einer flachen
Stelle angebracht.
Verbogene
Zuganker oder
Spurstangen.
Bremse warten oder austauschen.
Sicherstellen, dass die Montagefläche bis auf
0,50 mm eben ist. Spurstange bzw. Zuganker
nach Bedarf austauschen. Auf verbogene
oder gerissene Gehäuse prüfen.
76 5
Page 79

Hebevorrichtungen von WARN Industries
Fehlersuche und -behebung: Hydraulische
Hebevorrichtungen
HINWEIS: Probleme bei hydraulischen Systemen
folgen in der Regel dem gleichen Muster: ein
allmählicher bzw. plötzlicher Druckverlust bzw.
eine Abnahme des Ölflusses mit Verlust der
Motorleistung. Jede Systemkomponente kann
die Ursache für diese Fehlersituation darstellen.
Allgemeine Hinweise finden Sie in der Tabelle.
Bei Bedarf setzen Sie sich mit einem erfahrenen
Hydraulikexperten in Verbindung.
HINWEIS: Die hydraulischen Spezifikationen
entnehmen Sie bitte dem entsprechenden
Datenblatt.
VERLETZUNGSGEFAHR
Die Nichtbeachtung dieser Anweisungen
kann zu schweren oder tödlichen
Verletzungen führen.
Keine Überdruckventile verwenden, deren
Leistungswerte über den Drucknennwerten
des Hydraulikmotors liegen. Eine Verwendung eines solchen Ventils kann die Hebevorrichtung überlasten.
ACHTUNG
Page 80

Hebevorrichtungen von WARN Industries
Kundendienst
Bei Fragen zu diesem Produkt oder diesen Anweisungen setzen Sie sich bitte montags bis freitags
zwischen 07.00 und 16.00 Uhr PST (16.00 bis 1.00 Uhr MEZ) mit dem Kundendienst von WARN unter
den folgenden Telefonnummern in Verbindung. Unterstützung per E-Mail erhalten Sie über unsere
Website unter www.warn.com. Klicken Sie dort auf den Abschnitt mit dem Titel „Customer Service”.
USA International
Tel.: +1 503-722-1200 oder
+1 800-543-9276 (nur USA)
Fax: +1 503-722-3000 Fax: +1 503-722-3005
Tel.: +1 503-722-3008
78 3
Page 81

Hebevorrichtungen von WARN Industries
Erklärung über die begrenzte Garantie für 1 Jahr für kommerzielle Produkte von
WARN®
Warn Industries, Inc. (WARN) garantiert dem Erstkäufer, dass die mechanischen und elektrischen
Komponenten des im Folgenden näher bezeichneten „WARN”-Produkts für die Frist eines (1) Jahres ab
Datum des Erstkaufs frei von Material- und Herstellungsfehlern sind. Diese Garantie gilt ausschließlich für
den Erstkäufer der Produkte. Für den Erhalt von Serviceleistungen im Rahmen dieser Garantie muss WARN
ein Nachweis des Kaufs und Kaufdatums (z.B. Beispiel eine Kopie der Quittung) vorgelegt werden, der von
WARN akzeptiert wird. Diese Garantie deckt weder den Aus- noch den Einbau des Produkts. WARN wird das
defekte Produkt nach eigenem Ermessen reparieren oder ersetzen bzw. den Kaufpreis des defekten Produkts
bzw. der defekten Komponente rückerstatten, wenn das defekte Produkt bzw. die defekte Komponente
innerhalb der Garantiefrist mit freigemachter Sendung an die Kundendienstabteilung von Warn Industries
bzw. an ein von WARN zugelassenes Kundendienstzentrum eingeschickt wird. Der Sendung müssen Name,
Anschrift und Telefonnummer des Käufers sowie eine Beschreibung des Problems und eine Kopie des Belegs
und der Original-Kaufquittung (mit WARN-Seriennummer des defekten Produkts und Kaufdatum) beiliegen.
Diese Garantie erstreckt sich nicht auf (i) Teile oder Komponenten, die im Folgenden ausgeschlossen sind,
oder (ii) ist ungültig, wenn das Produkt durch Unfall, Missbrauch, falschen Gebrauch, Kollision, Überladung,
Modifikation, falsche Anwendung, falschen Einbau oder unsachgemäße Wartung beschädigt wurde. Diese
Garantie ist nichtig, wenn die WARN-Seriennummer entfernt oder unkenntlich gemacht wurde.
DIE BESCHRIEBENE GARANTIE IST DIE EINZIGE GARANTIE. ES GELTEN KEINE ANDEREN
GARANTIEN, WEDER AUSDRÜCKLICH NOCH STILLSCHWEIGEND, EINSCHLIESSLICH, JEDOCH
NICHT AUSSCHLIESSLICH, STILLSCHWEIGENDER GARANTIEN DER MARKTGÄNGIGKEIT ODER DER
EIGNUNG FÜR EINEN BESTIMMTEN ZWECK.
ALLE STILLSCHWEIGENDEN GARANTIEN, DIE VON GESETZ WEGEN NICHT AUSGESCHLOSSEN
WERDEN DÜRFEN, SIND AUF DIE FRIST VON EINEM (1) JAHR AB DATUM DES ERSTKAUFS DES
PRODUKTS BESCHRÄNKT.
WARN HAFTET UNTER KEINEN RECHTSUMSTÄNDEN FÜR BESONDERE, INDIREKTE, ZUFÄLLIGE
ODER FOLGESCHÄDEN (EINSCHLIESSLICH, JEDOCH NICHT AUSSCHLIESSLICH, ENTGANGENER
GEWINNE, AUSFALLZEITEN ODER NUTZUNGSAUSFÄLLE). DIESE HAFTUNG ERFOLGT AUCH DANN
NICHT, WENN WARN VON DER MÖGLICHKEIT SOLCHER SCHÄDEN UNTERRICHTET WURDE.
In manchen Ländern ist der Ausschluss stillschweigender Garantien bzw. der Ausschluss oder die
Beschränkung der Haftung für zufällige oder Folgeschäden bzw. Beschränkungen der Dauer einer solchen
stillschweigenden Haftung gesetzlich nicht zulässig, so dass die oben beschriebene Beschränkung bzw. der
entsprechende Ausschluss auf den Käufer u.U. nicht zutrifft. Der Käufer hat im Rahmen dieser Garantie
spezifische Rechte. Er kann je nach Land weitere Rechte haben.
WARN behält sich das Recht vor, Änderungen am Produktdesign ohne vorherige Mitteilung vorzunehmen.
In Fällen, in denen WARN das Design eines Produkts geändert hat, ist WARN nicht verpflichtet, früher
hergestellte Produkte aufzurüsten oder anderweitig zu modifizieren.
WARN-Händler, -Vertreter und -Mitarbeiter sind nicht befugt, diese Garantie auf irgendeine Weise zu ändern,
zu erweitern oder auszudehnen.
Fragen zur Garantie und zur Reparatur eingeschickter Produkte sollten per Post an die folgende Anschrift
eingereicht werden:
WARN INDUSTRIES, INC.
Customer Service Department
12900 SE Capps Road
Clackamas, OR 97015, USA
+1 800-543-9276
Von dieser Garantie abgedeckte Produkte Von dieser Garantie nicht abgedeckte Produkte
Kommerzielle Windenprodukte Lackierungen und Drahtseile für kommerzielle Winden
Kommerzielle Hebevorrichtungen Lackierungen und Drahtseile für kommerzielle
Hebevorrichtungen
Kommerzielles Zubehör Lackierung
en und Drahtseile
79
Page 82

Warn Industries, Inc.
12900 S.E. Capps Road
Clackamas, OR USA 97015-8903
1-503-722-1200 FAX: 1-503-722-3000
www.warn.com
Customer Service/Service Clients: 1-800-543-9276
International Sales Support/Les Ventes Inernationales
Soutlennent: 1-503-722-3008
© 2009 Warn Industries, Inc. WARN®, the WARN logo are registered
Trademarks of Warn Industries, Inc. WARN® et le logo WARN sont des marques
Deposes de Warn Industries, Inc. Specifications subject to change without notice.
PN72561A3
 Loading...