

Page 1
PAGE 1 99387 Rev. A0
WINCH USER GUIDE
WARN® 5000 Utility Winch
Part Number: 99963, 99964
English ..................................................1
Spanish .............................................. 15
French ................................................ 29
Page 2
PAGE 2 99387 Rev. A0
Your safety, and the safety of others, is very important. To help you make informed decisions about safety, we have provided
installation and operating instructions and other information on labels and in this guide. This information alerts you to potential hazards
that could hurt you or others. It is not poss ible to warn you about all potential hazard s associated with this product, you must use your
own good judgment.
CARELESS WINCH INSTALLATION AND OPERATION CAN RESULT IN SERIOUS INJURY OR EQUIPMENT DAMAGE. READ
AND UNDERSTAND ALL SAFETY PRECAUTIONS AND OPERATING INSTRUCTIONS BEFORE INSTALLING AND OPERATING
THIS PRODUCT.
This guide identifies potential hazards and has important safety messages that help you and others avoid personal injury or death.
WARNING and CAUTION are signal words that identify the level of hazard. These signa l words mean:
WARNING signals a hazard that
could
cause serious injury or death, if you do not follow recommendations.
CAUTION signals a hazard that
may
cause minor to moderate injury, if you do not follow recommendations.
This guide uses
NOTICE
to call attention to important mechanical information, and Note: to emphasize general information worthy of
special attention
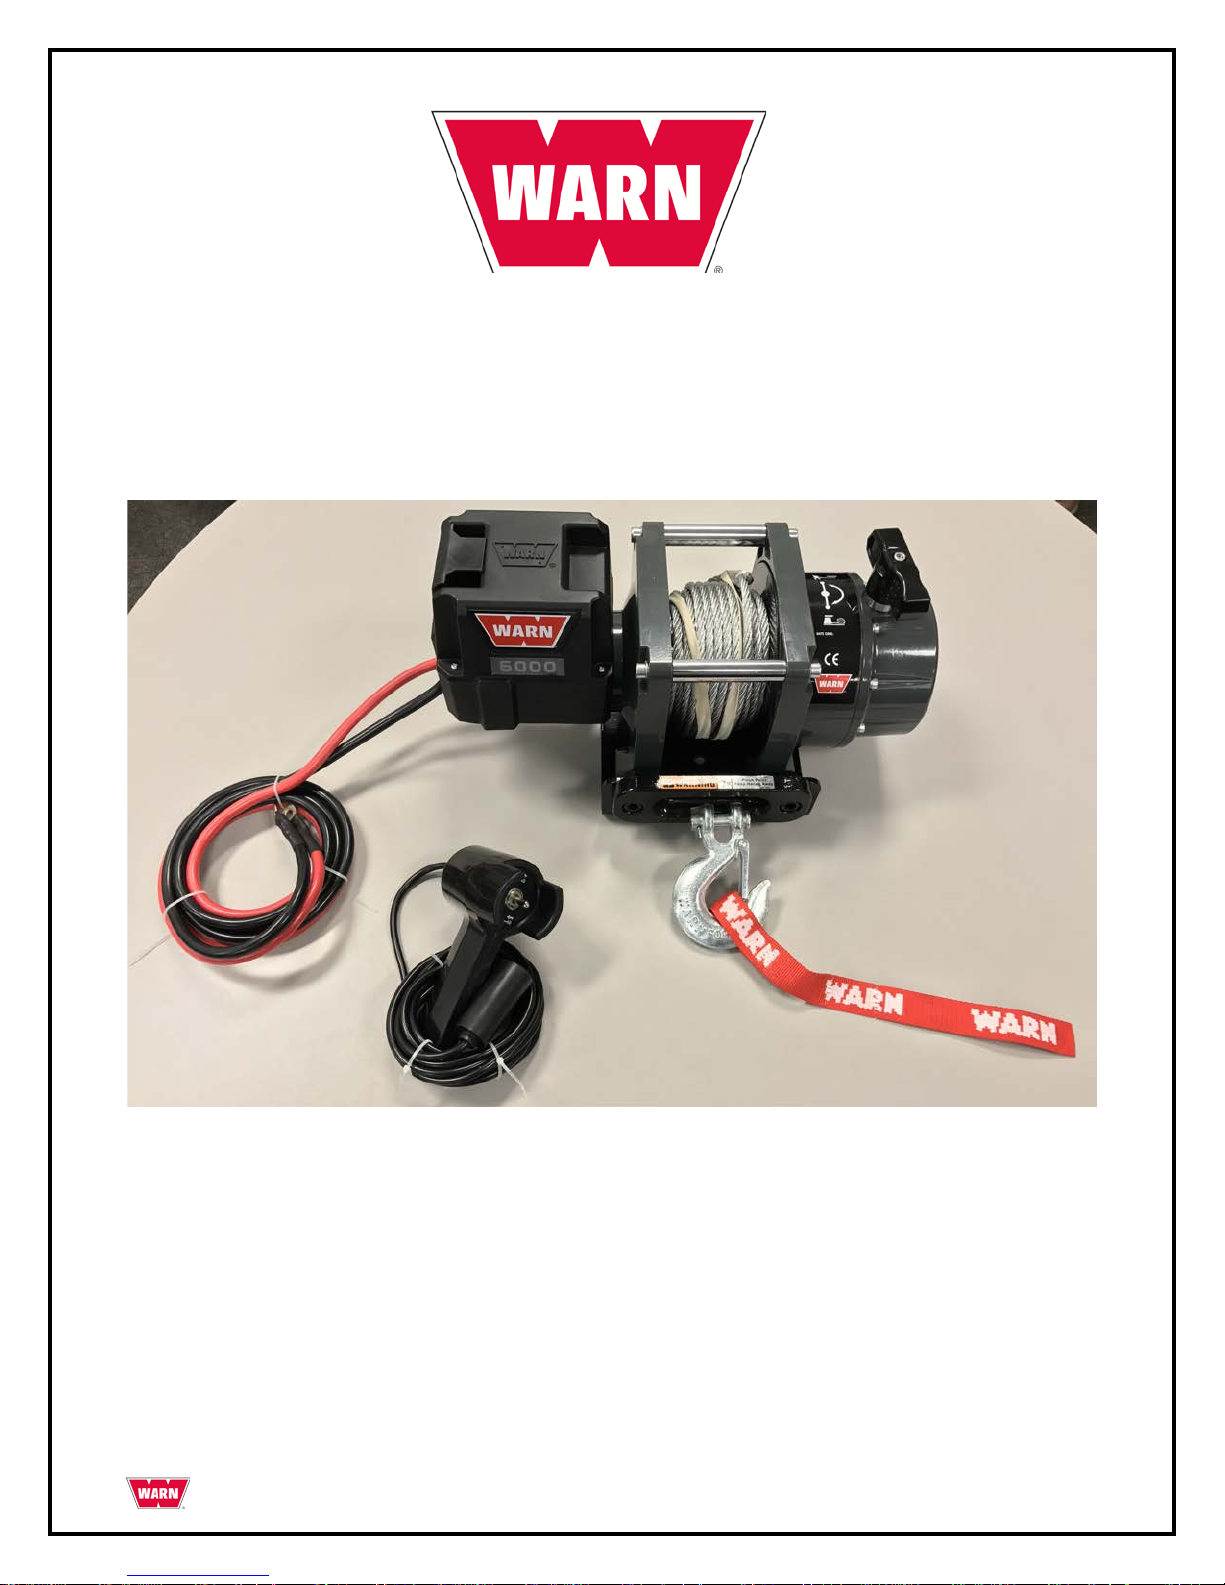
Product Description: WARN® 5000 Utility Winch
The WARN® 5000 Utility Winch is a powerful pulling tool. Powered by a 12 volt DC power source this
compact winch has a pulling capacity of 5000 pound / 2268 kilos.
The unit has a 12’ remote control for power in and power out operation, 60’ of 1/4” wire rope and clasp hook.
A freespooliong clutch is a standard option.
Introduction
Thank you for choosing WARN® for your utility winch needs. All WARN® products have been designed and
manufactured for many years of problem-free operation. For future reference please record the following
information:
Model/Part Number: Date of Purchase:
Before you begin
Read the instructions completely to familiarize yourself with the installation process.
Review all the notices, cautions and warnings to make sure the kit will be installed correctly and safely.
Page 3
PAGE 3 99387 Rev. A0
Safety Precautions
The following are general safety precautions that every winch operator should know. Taking precedence over
any specific rule listed here, however, is the most important rule of all—USE COMMON SENSE.
A few minutes spent reading these rules can make an operator aware of dangerous practices to avoid and
precautions to take for his own safety and the safety of others. Frequent examinations and periodic
inspections of the equipment as well as conscientious observance of safety rules may save lives as well as
time and money.
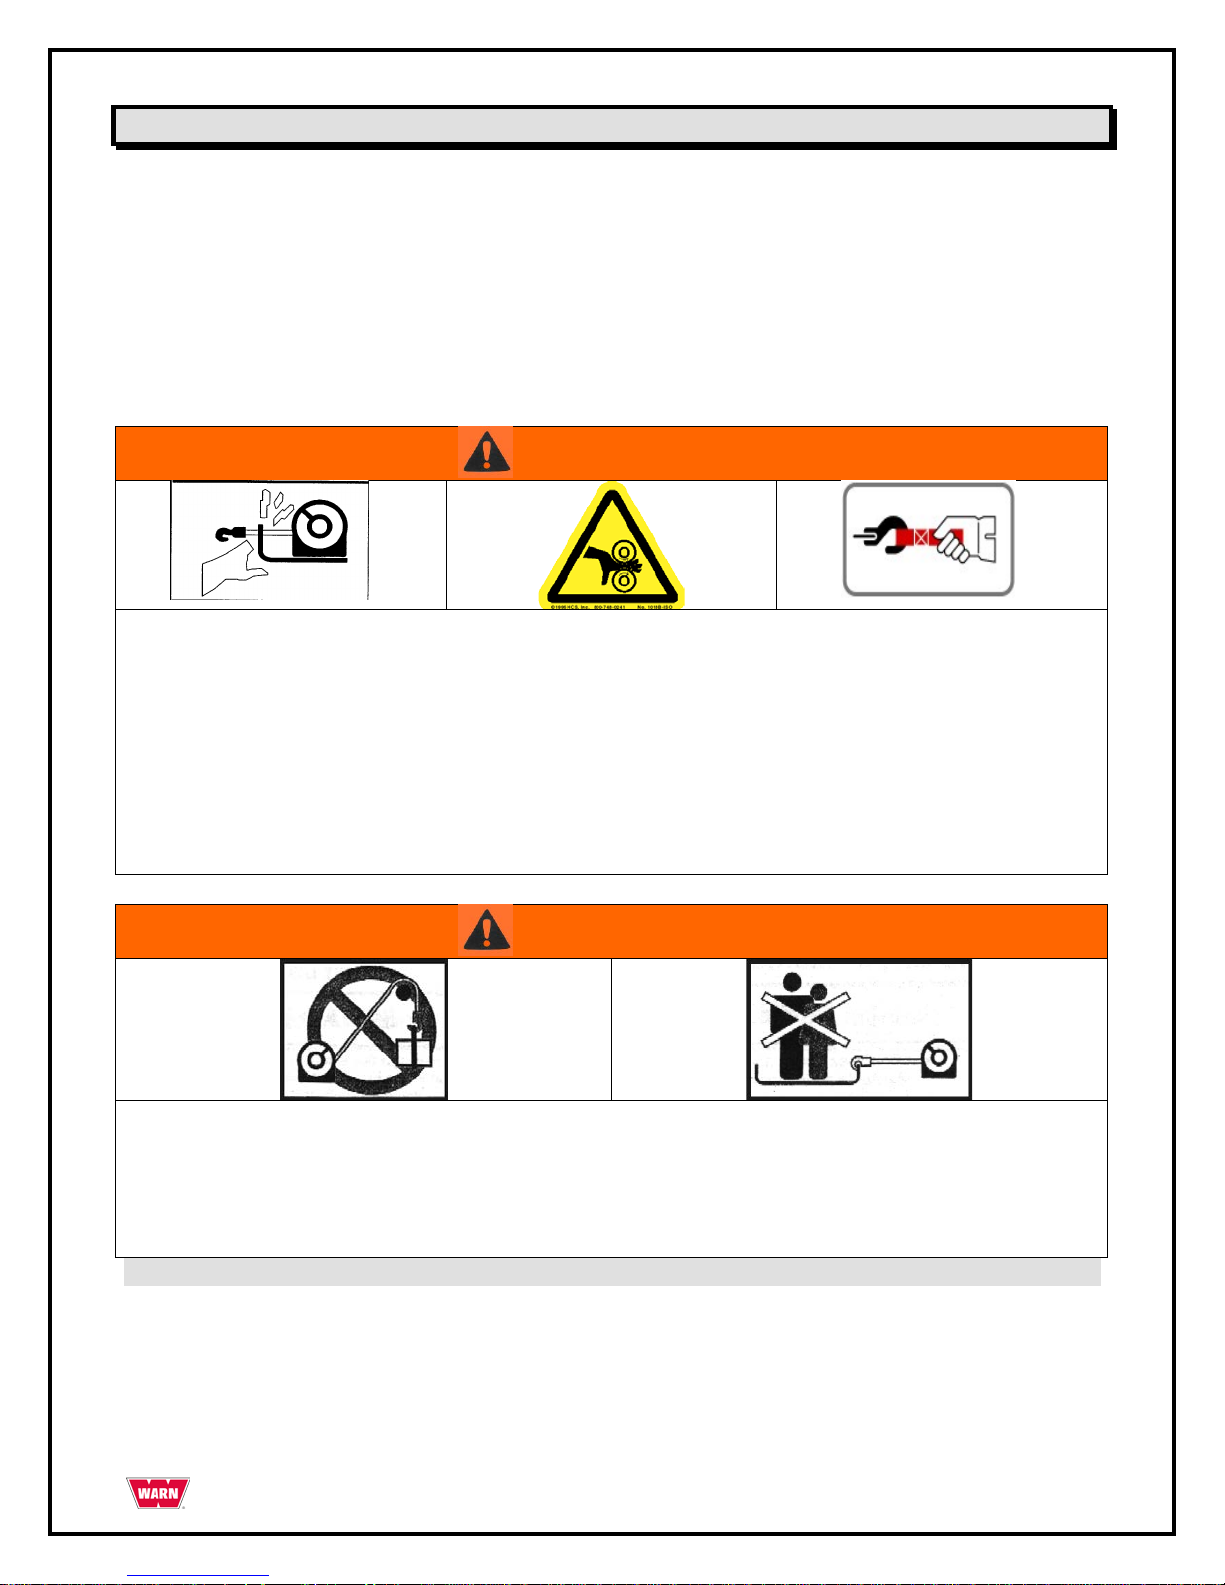
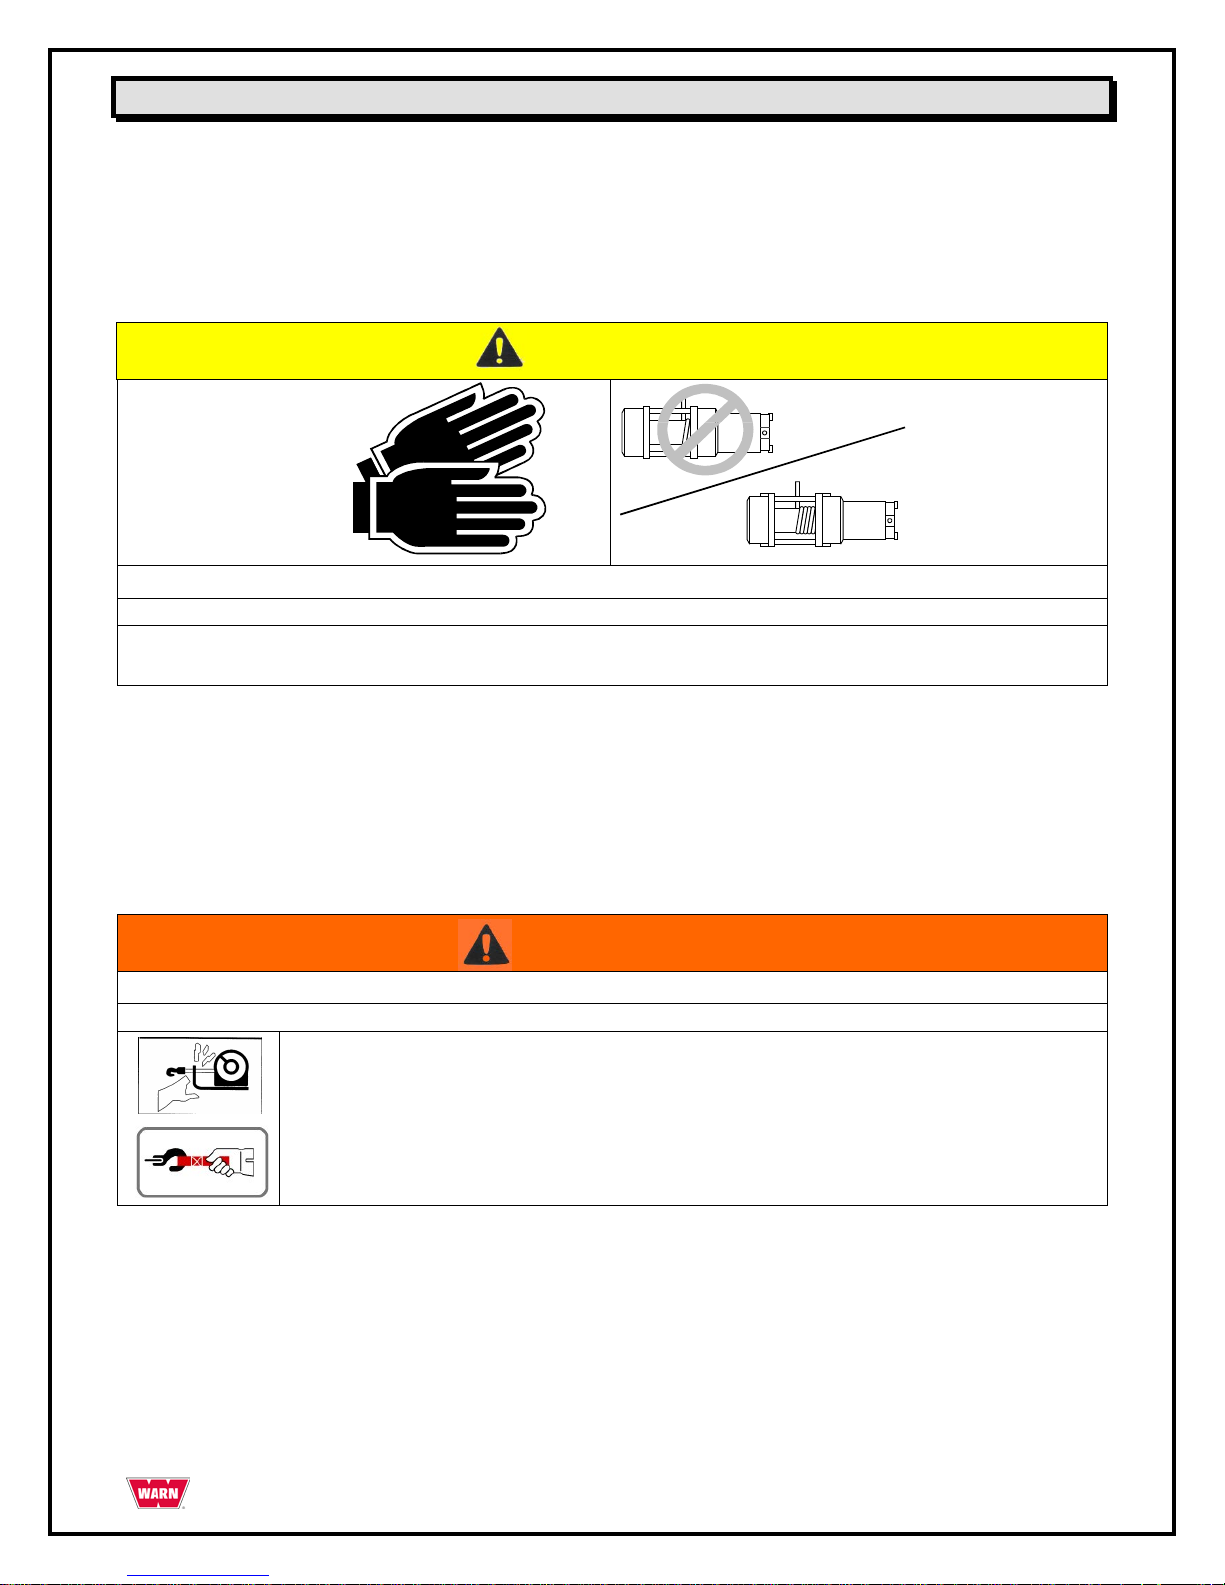
WARNING
MOVING PARTS ENTANGLEMENT HAZARD
Failure to observe these instructions could lead to severe injury or death.
To avoid injury to hands or fingers.
• Always keep hands clear of wire rope, hook loop, hook and fairlead opening during installation, operation and when
spooling in or out.
• Always use extreme caution when handling hook and wire rope during spooling operations.
• Always use supplied hook strap whenever spooling wire rope in or out, during installation or operation to avoid injury
to hands or fingers.
WARNING
FALLING OR CRUSHING HAZARD
Failure to observe these instructions could lead to severe injury or death.
• Never use as an overhead hoist, or to suspend a load.
• Never use to lift or move persons.
Page 4

PAGE 4 99387 Rev. A0
Safety Precautions - continued
CAUTION
MOVING PARTS ENTANGLEMENT HAZARD
Failure to observe these instructions could lead to minor to moderate injury.
General Safety:
• Always Know Your Winch: Take time to fully read and understand the included Installation and Operations guide,
and Basic Guide to Winching Techniques, in order to understand your winch and the winching op e r a ti on.
• Never operate this winch if you are under 16 years of age.
• Never operate this winch when unde r the influence of drugs, alcohol or med i ca ti on.
• Never exceed winch or wire rope rated capacity. Double line using a snatch block to reduce winch load.
Installation Safety:
• Always choose a mounting location that is sufficiently str ong to wit hs t a nd t he ma x i mum pulling capacity of your
winch.
• Always use factory approved switches, remote controls, accessories and installation components.
• Always use grade 5 or better hardware, never weld bolts and never use longer bolts than those supplied from
factory.
• Always complete winch mounting and attachment of hook to hook loop before wiring winch during installation.
• Always position fairlead with WARNING label on top.
• Always spool the wire rope onto the drum as indicated by the drum rotation label on the winch.
Required for automatic brake to work (if winch is so equipped) and for correct installation orientation.
• Always prestretch wire rope and respool under load before use. Tightly wound wire rope reduces chances of
"binding", which is wire rope working its way down into a loosely wound wire rope layer, and catching or damaging
itself.
Winching Safety:
• Always inspect winch installation and wire rope and hook condition before operating winch. Frayed, kinked or
damaged wire rope must be replaced immediately. Loose or damaged winch installation must be corrected
immediately.
• Never hook wire rope back onto itself. This damages the wire rope. Always use a choker chain, wire choker rope or
tree trunk protector on the anchor.
• Always prior to winching, remove any element that may interfere with safe winch operation.
• Always take your time when rigging for a winch pull.
• Always be certain the anchor you select will withstand the load, and the strap or chain will not slip.
• Never engage or disengage clutch if winch is under load, wire rope is in tension or wire rope drum is moving
• Always unspool as much wire rope as possible when rigging. Double line or pick distant anchor point.
• Never winch with less than 5 wraps of wire rope around the drum, the wire rope could come loose from the drum.
• Always stand clear of wire rope and load during operation.
• Never touch wire rope or hook while in tension or under load.
• Never touch wire rope or hook while someone else is at the control switch or during winching operation.
• Never touch wire rope or hook while remote control is plugged into winch.
• Always stand clear of wire rope and load and keep others away while winching.
• Always require operator and bystanders to be aware of stability during winching of vehicle and/or load.
• Always keep remote control lead clear of the drum, wire rope and rigging. Inspect for cracks, pinches, frayed wires
or loose connections. Replace if damaged.
Page 5

PAGE 5 99387 Rev. A0
Safety Precautions - continued
CAUTION
CUT AND BURN HAZARD
Failure to observe these instructions could lead to minor to moderate injury.
To avoid injury to hands and fingers:
• Always wear heavy leather gloves when handling a wire rope.
• Never let wire rope slip through your hands.
• Always be aware of possible hot surface at winch motor, drum or wire rope during or after winch use.
CAUTION
Moving Parts Entanglement Hazard
Failure to observe these instructions could lead to minor to moderate injury.
•
Never apply load to hook tip or lat ch. A pply load only to t he center of hook.
• Never use a hook whose throat opening has increased, or whose tip is bent or twisted.
NOTICE
AVOID WINCH AND EQUIPMENT DAMAGE
• Always avoid continuous side pulls, which can pile up wire rope at one end of the drum. This can damage your wire
rope or winch.
• Always ensure the clutch is fully engaged or Disengaged.
• Never use winch to tow other vehicles. Shock loads can momentarily exceed capacity of wire rope & winch
• Always use care to not damage your frame when anchoring your vehicle during a winching operation.
• Never "jog" wire rope under load. Shock loads can momentarily exceed capacity of wire rope and winch.
• Never use winch to secure a load during transport.
• Never submerge winch in water.
• Always store the winch in a protected, clean, dry area.
Part number & Cord ends for the WARN® 5000
PART NUMBERS
99964
12v DC 5000# Utility Winch - US
99963
12v DC 5000# Utility Winch - International
Page 6
PAGE 6 99387 Rev. A0
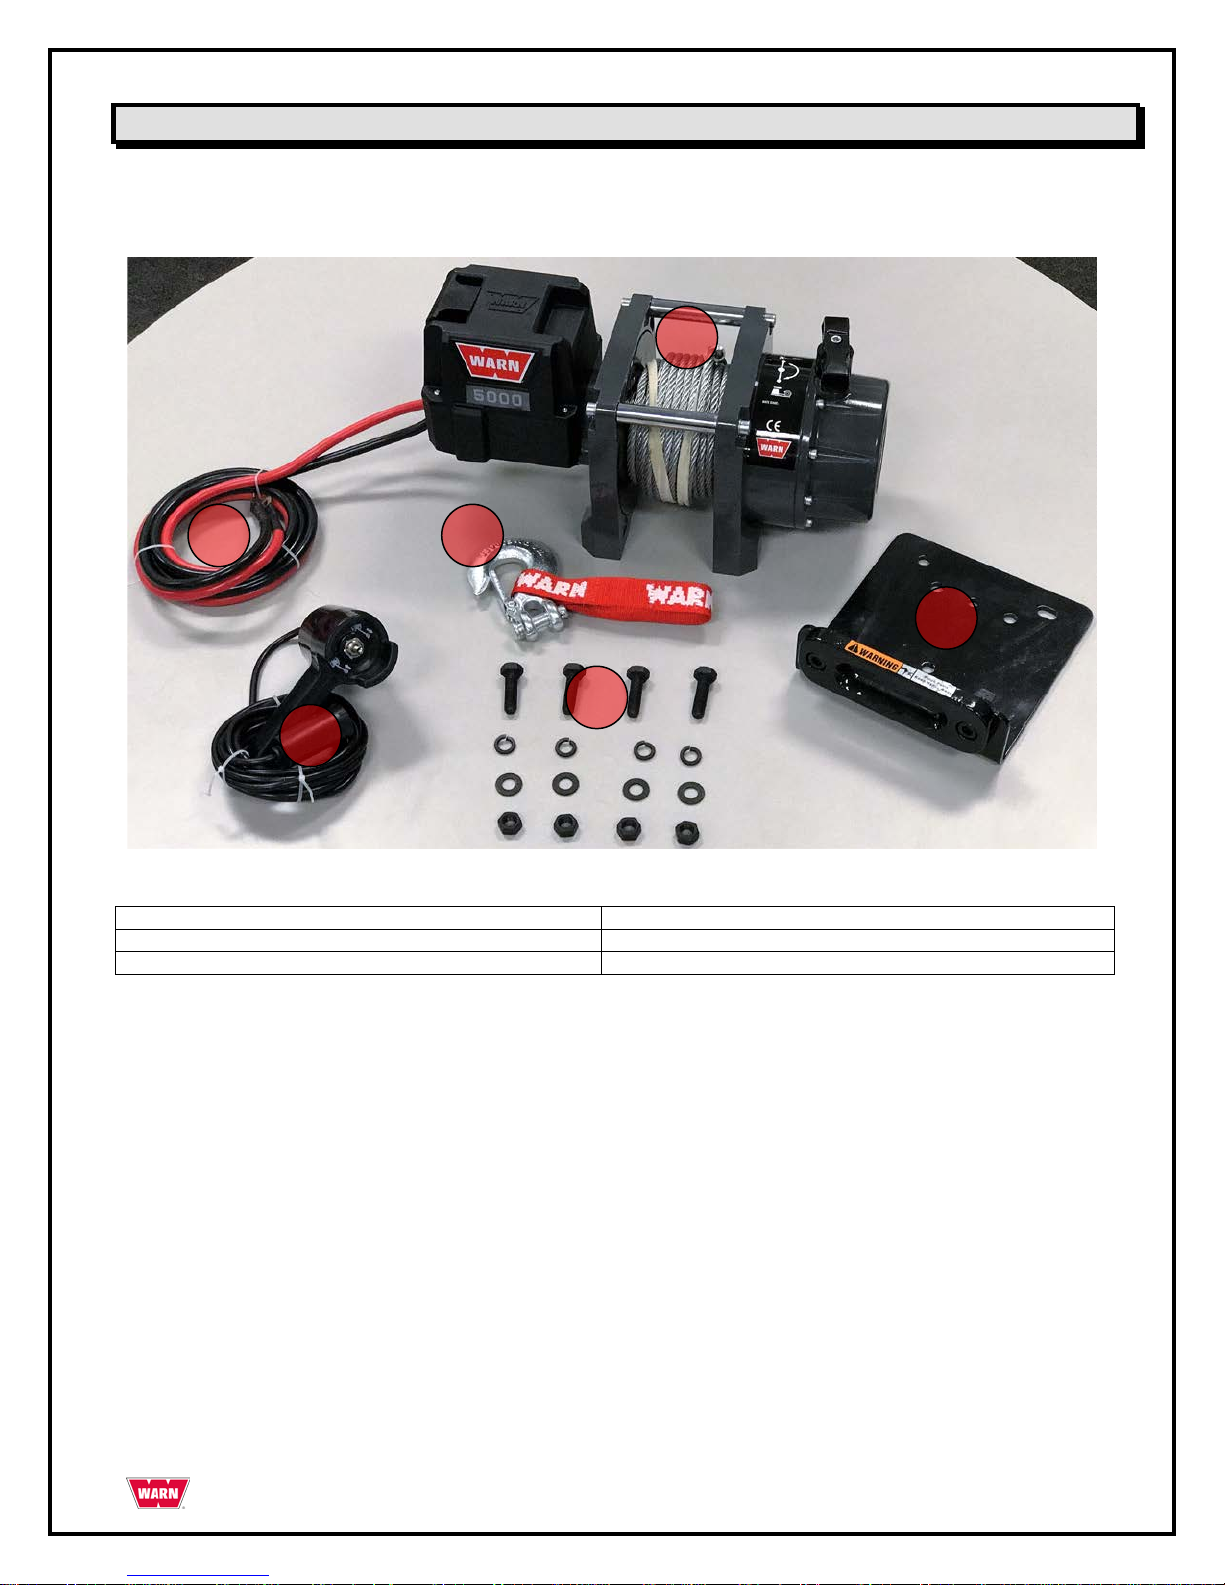
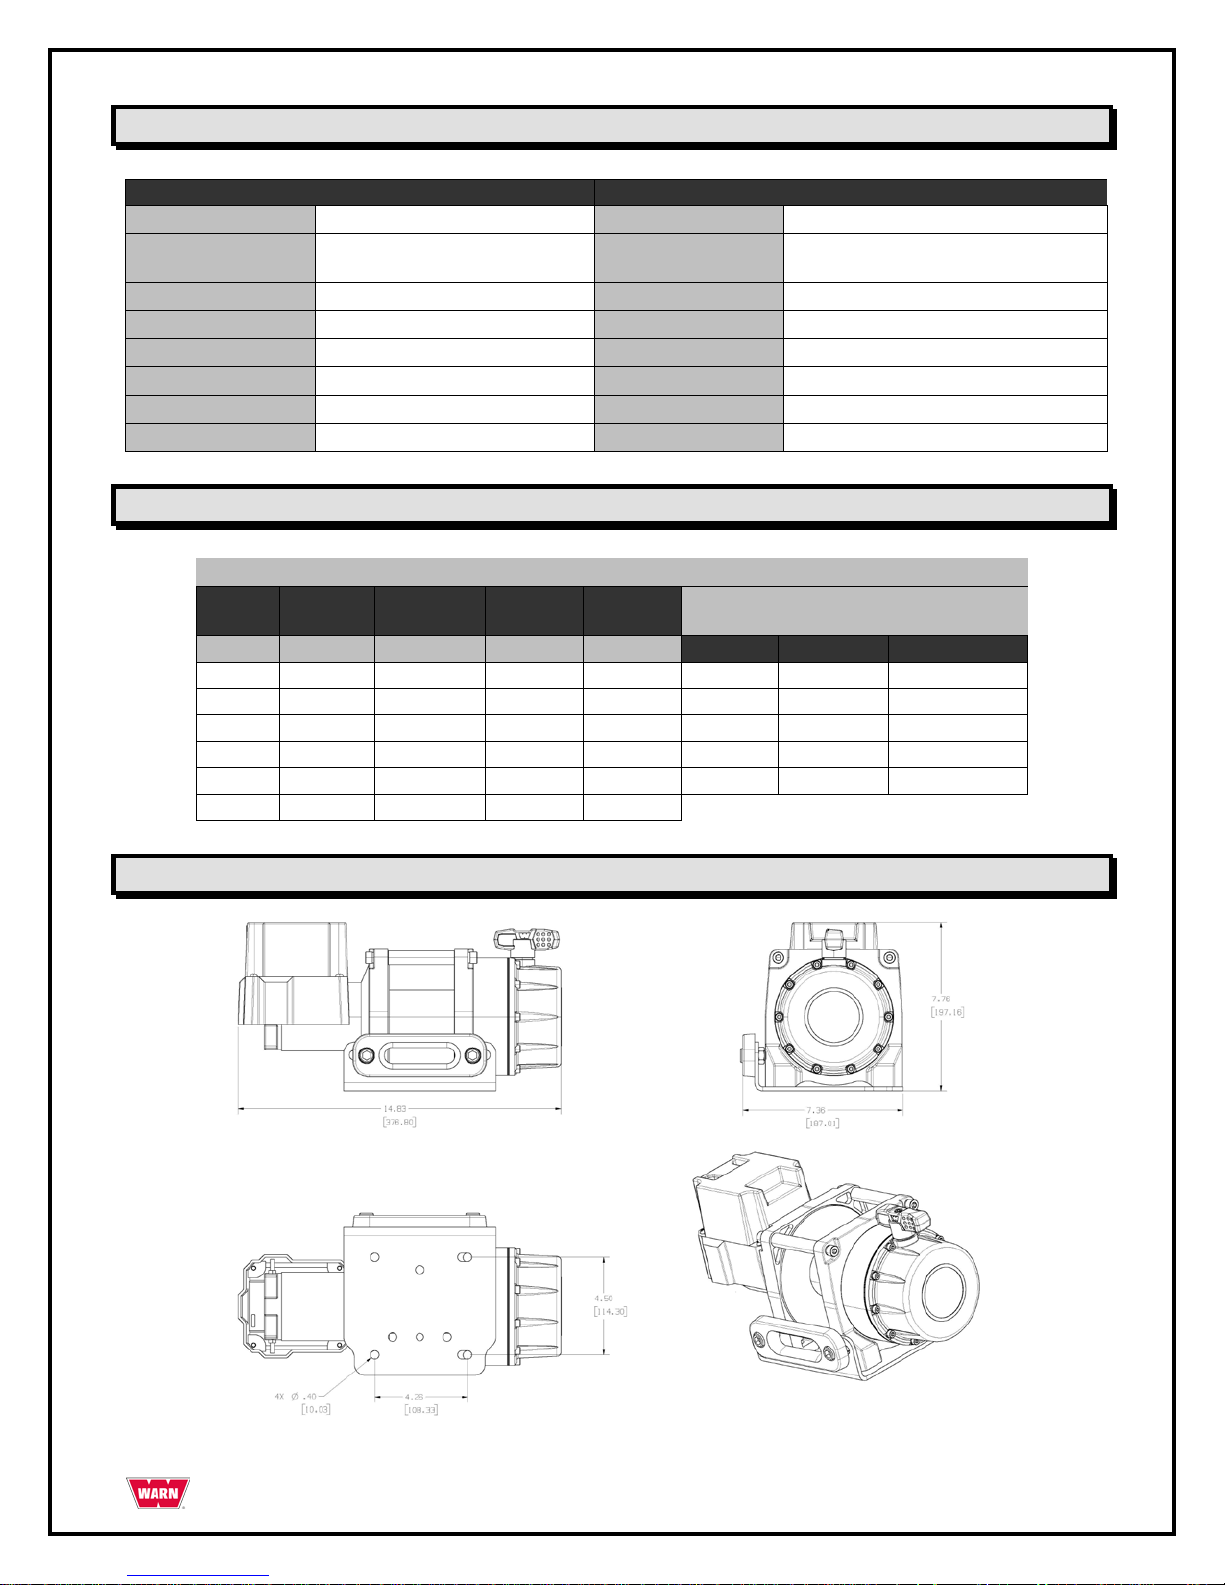
Parts List
The WARN® 5000 Utility Winch consists of the follo wing main components.
1. WARN 5000 Winch Unit
2. Remote with 12’(3.7 m) Lead
3. Fairlead
4. 2 – 6’ (1.8 m) x 6 gauge cable
5. Latch Hook and Hook Strap
6. Mounting Hardware
1
2
3
4 5 6
Page 7
PAGE 7 99387 Rev. A0
Specification Data for the WARN® 5000
FEATURES
Pulling Capacity
5000lbs. (2268 kg)
Brake
Dynamic and mechanical br aking
Switch Type
Remote with 12’ (3.7 m)
Lead
Warranty
1 year limited
Motor
Permanent Magnet
Wire Rope
1/4" (6.35 mm) X 60' (18.3 m)
HP
1.9 HP 3.0" Diameter
Drum Diameter
2.5" (6.35 cm)
Power
12 volt DC
Fairlead
Hawse
Gear Train
3-Stage planetary
Hole Pattern
4 holes
Gear Ratio
216:1
Electrical Leads
2 – 6’ (1.8 m) x 6 gauge cable
Clutch
Lever- Multi-directional
Weight
42 lbs. (19.1 kg.)
Performance Data for the WARN® 5000
PERFORMANCE DATA: 5000
Load
Current
Speed
Pulling Power by Wire Rope
Layer
Lbs.
Kg
Amps
Ft/min
M/min
Layer
lbs.
kg
0 0 40
13.8
4.2 1 5000
2268
1000
453.6
81
10.9
3.3 2 4280
1941
2000
907.2
118
9.3
2.8 3 3750
1701
3000
1360.8
152
8.1
2.5 4 3341
1515
4000
1814.4
188
6.8
2.1 5 3020
1369
5000
2268
220
5.4
1.6
Dimensional Data for the WARN® 5000
Page 8
PAGE 8 99387 Rev. A0
Winch Installation to fixed location
CAUTION
Winch Failure Hazard
Failure to observe these instructions could lead to minor or moderate injury.
Always choose a mounting location that is sufficiently strong to withstand the loads you
intend to winch
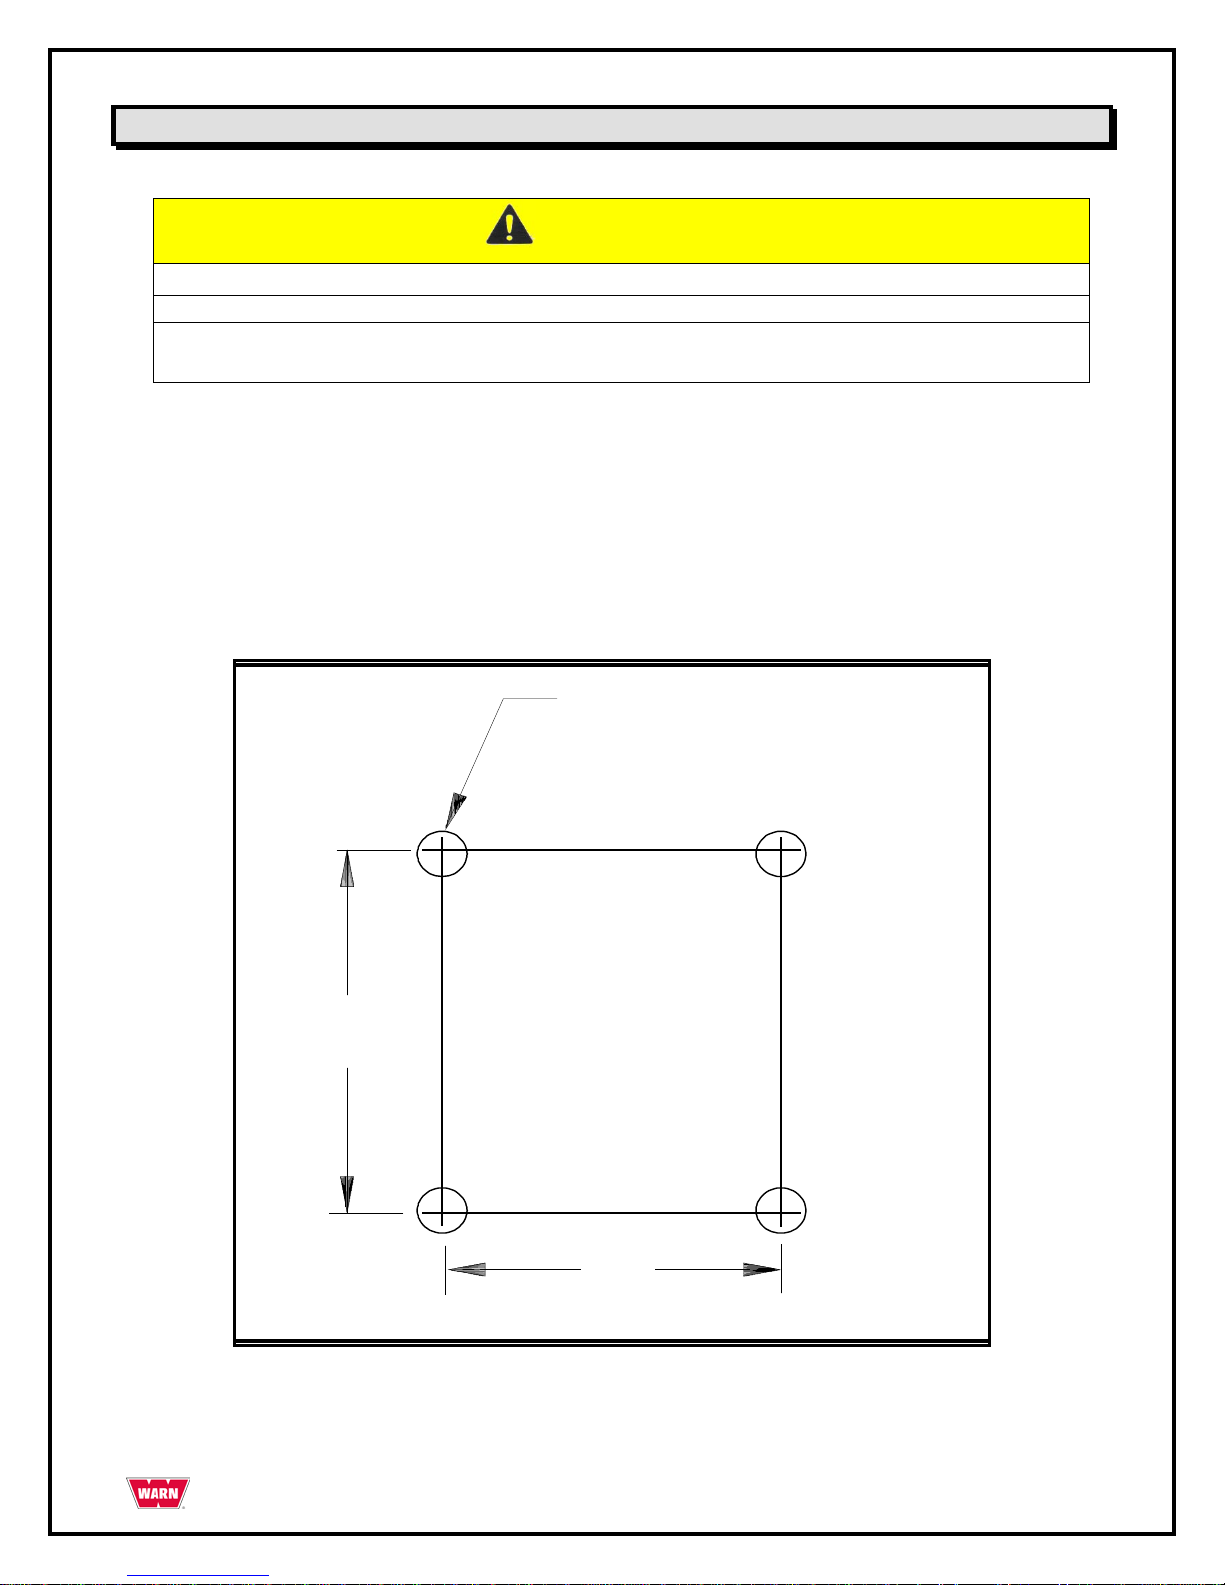
The 5000 can be mounted to a fixed location by utilizing the mounting hole pattern for the winch unit.
First, choose a mounting location that is sufficiently strong enough to withstand the loads you intend
to winch.
Next, drill four holes to the dimensions specified in the drawing below.
Mounting Plate Hole Pattern
3/8" [9.52 mm] DIA (4 plcs)
4.5"
[114mm]
4.25"
[107.95
mm]
Page 9
PAGE 9 99387 Rev. A0
Winch Installation to a fixed location- continued
To secure the winch, alwa ys use:
▫ A flat, secure mounting location at least 3/16 in. (4.8 mm) thick steel.
▫ 3/8 in. lockwasher x 4.
▫ 3/8-16 x 1in. long, hex head capscrew, Grade 5 or better x 4.
▫ Torque mounting bolts to 30-35 ft-lbs (41-47 Nm).
Bolt length may need to be longer than specified above depending upon the thickness of the material the
winch is mounted to.
Wiring Instructions
WARNING
Shock & Fire Hazard
Failure to observe these instructions could lead to severe injury or death.
Never route electrical cables across sharp edges
Never route electrical cables through or near moving parts.
Always read and follow all wiring instructions included in operators guide.
Always insulate and protect all exposed wiring and electrical terminals
Install battery cables with red lead connected to the positive terminal of battery, and black lead to
the negative terminal of battery.
Verify that all wiring connections are clean and tight.
Before using the winch, verify the following:
Wiring to all components is correct.
There are no exposed wiring or terminals, cover any existing exposures with insulator plate,
terminal boots, heat shrink tubing or electrician’s tape.
Page 10
PAGE 10 99387 Rev. A0
Operating Instructions
USING THE REMOTE CONTROL
The remote pendant control is hard wired to the winch and can be operated in the remo te position away from
the winch unit or with the pendant docked in the carrier plate.
Press the black power-out button to spool wire rope off of the drum, or press the white power-in button to
spool wire rope onto the drum.
POWER-OUT
POWER-IN
Page 11
PAGE 11 99387 Rev. A0
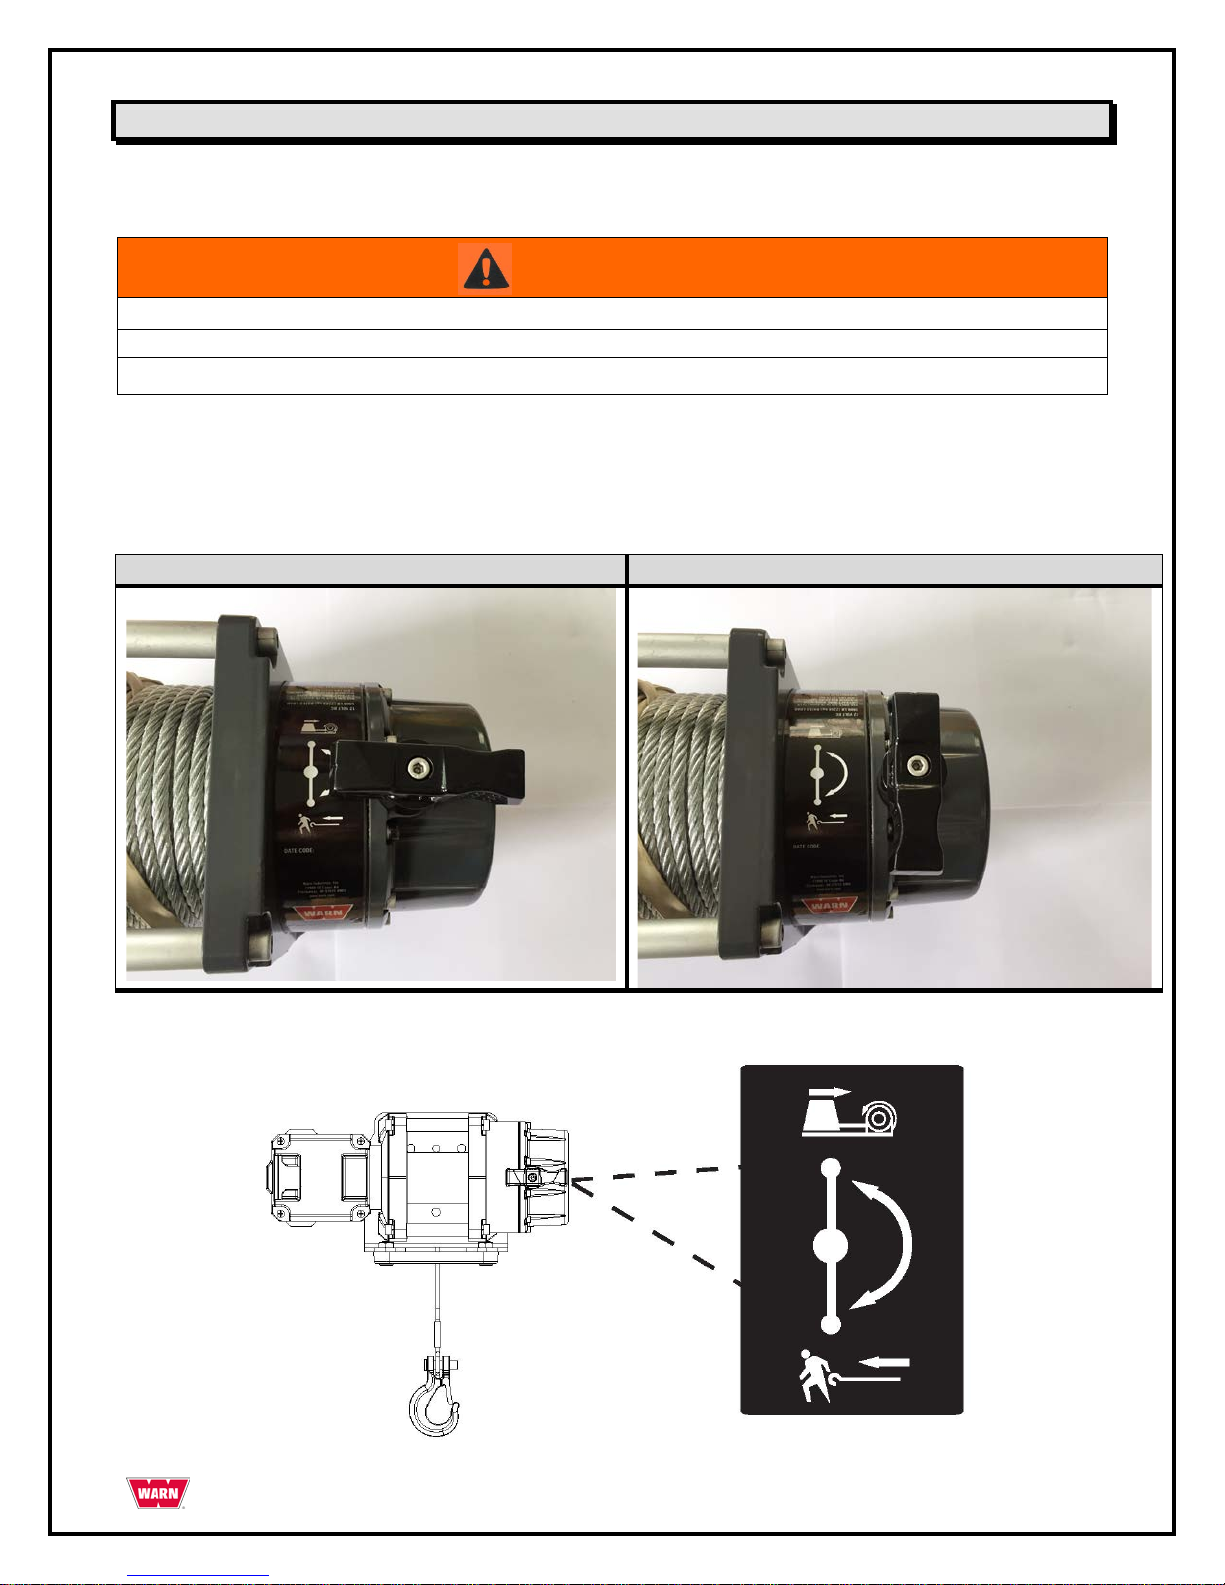
Operating Instructions - continued
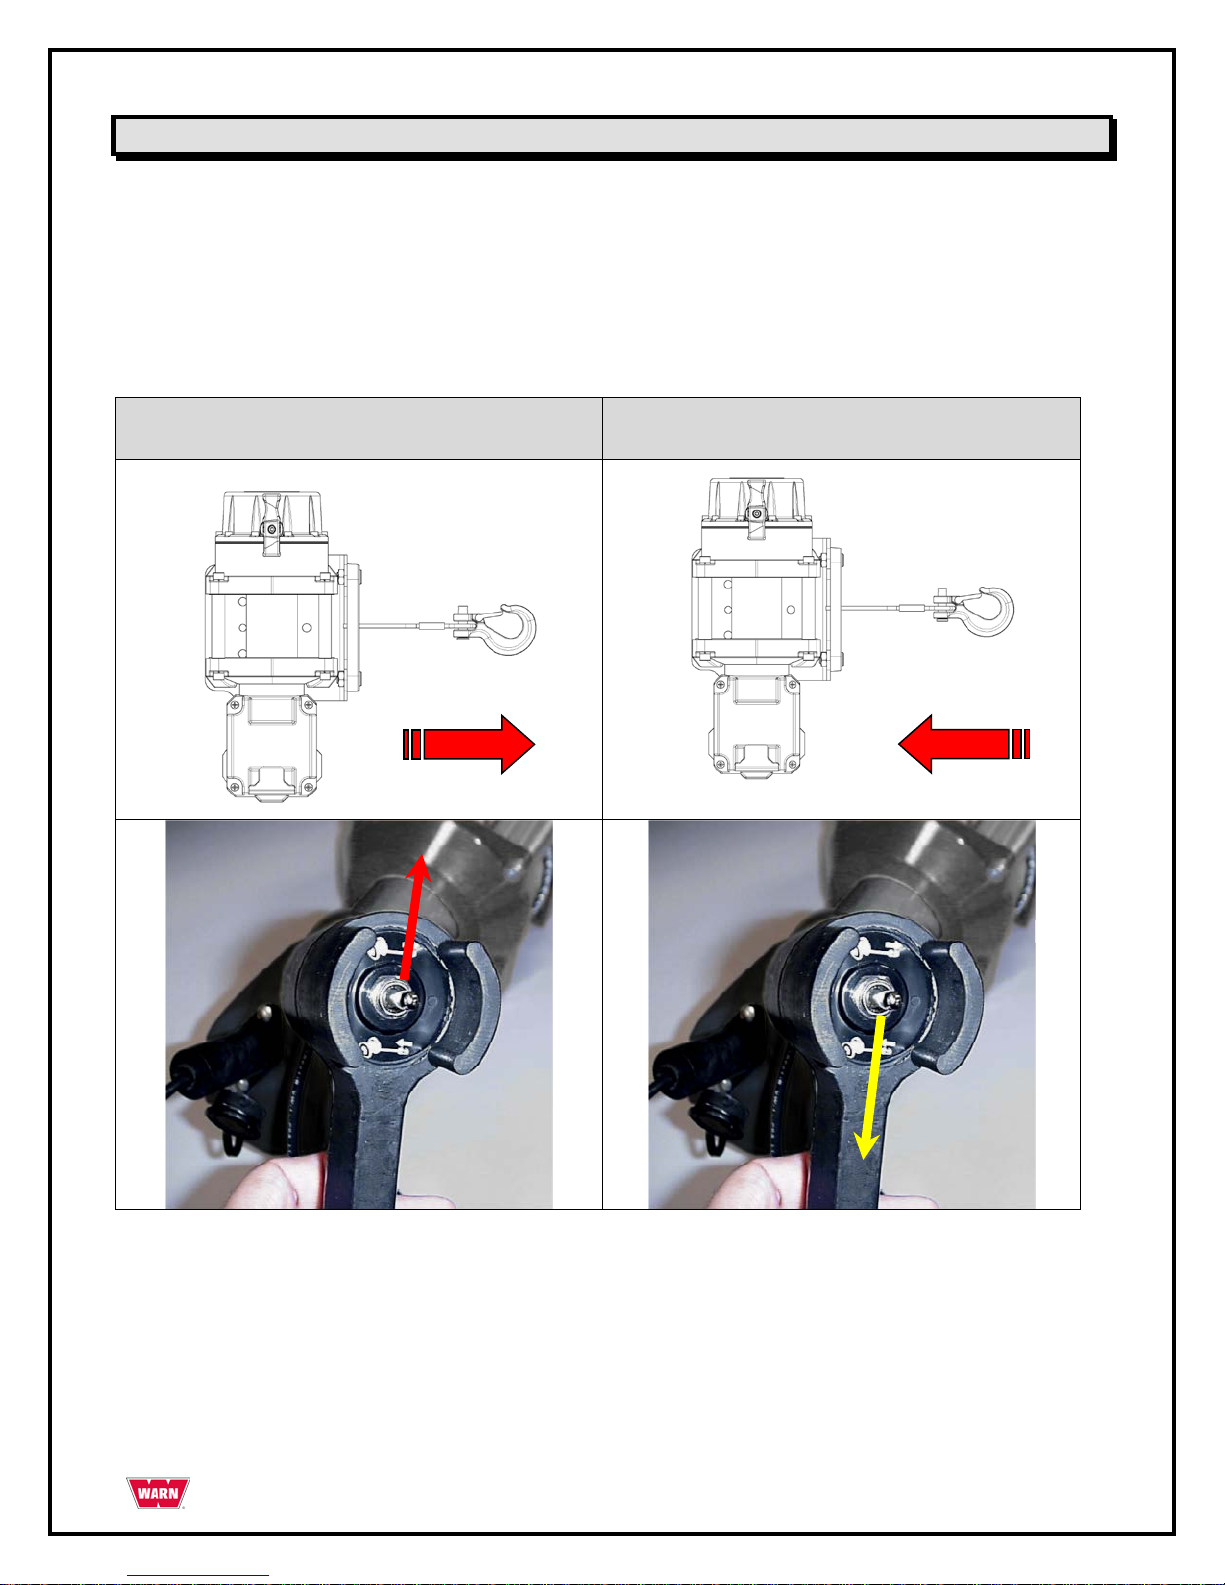
CLUTCH OPERATION
WARNING
Winch Function Hazard
Failure to observe these instructions could lead to injury or property damage
Never engage or disengage the clutch if the winch is underload or wire rope is under tension.
When the clutch is engaged the gear train is coupled to the wire rope drum and power may be transferred
from the winch motor. When the clutch is in freespool the gear train and wire rope drum a re uncoupled
allowing the drum to rotate freely. The clutch lever, located on top of the motor, controls the clutch position.
To prevent damage, always fully engage or fully disengage the clutch lever.
Engaged
Disengage - Freespool
Page 12
PAGE 12 99387 Rev. A0
Operating Instructions - continued
SPOOLING OUT
Freespooling is generally the quickest and easiest way to spool out wire rope. Before freespooling wire rope
out from the winch, power out enough rope to remove any tension the wire rope may be under before
disengaging the clutch. Now freespool by manually spooling out enough wire rope for the winching
operation.
CAUTION
Personal Injury Hazard
Failure to observe these instructions could lead to minor or moderate injury.
Always wear leather gloves when handling wire rope
Never winch with less than 5 wraps of wire rope around the drum.
STRETCHING THE WIRE ROPE
The life of a wire rope is directly related to the care and use it receives. During its first use, a new wire rope
must be spooled onto its drum under a load of at least 500 lb. (227kg). Spool out the entire wire rope length
leaving 5 wraps on the drum, then power in the wire rope under a load of 500 lb. (227kg) or more. This will
stretch new wire rope and create a good wire wrap around the drum. Failure to do so may result in the outer
wire wraps drawing into the inner wraps, binding, and damaging the wire rope.
WARNING
Moving Parts Entanglement Hazard
Failure to observe these instructions could lead to severe injury or death.
ALWAYS keep hands clear of the wire rope, hook loop, hook and fairlead ope ning
during installation, operation and when spooling in or out.
ALWAYS use supplied hook strap whenever spooling the wire rope in or out, during
installation, or operation to avoid injury to hands or fingers.
Page 13

PAGE 13 99387 Rev. A0
Operating Instructions - continued
SPOOLING IN UNDER LOAD
The wire rope must al ways spool onto the bottom of the drum as indicated by decal on the winch.
Power in the wire rope evenly and tightly on the drum. This prevents the outer wire wraps from
drawing into the inner wraps, binding and damaging the wire rope.
Avoid shock loads when spooling, by using the control switch intermittently to take up wire rope
slack. Shock loads can momentarily far exceed the winch and wire rope ratings.
SPOOLING IN UNDER NO LOAD
Assisted: Have your assistant hold the hoo k with the hook strap putting as much constant tension
on the wire rope as possible. While keeping tension, the assistant should walk toward the winch
while you operate the control switch spooling in the wire rope. Release the switch when the hook is
a minimum of 4 ft (1.2m) from the fairlead opening. Spool in the remainder for storage.
Unassisted: Arrange the wire rope to be spooled so it will not kink or tangle when spooled. Be sure
any wire rope on the drum is tightly and evenly layered. Spool enough wire rope to complete the next
full layer on the drum. Tighten and straighten the layer. Repeat process until the hook is a minimum
of 4ft (1.2m) from the fairlead. Spool in the remainder for storage.
SPOOLING REMAINDER FOR STORAGE
Keep hands clear of the wir e rope, hook and fairlead opening. Always use the hook strap to hold hook when
spooling under no load. Carefully power in the remaining wire rope, jogging the control switch to take up the
last of the slack. Secure t he hook to a suitable anchor point near the winch. Be careful not to overtighten or
damage may occur to the wire rope or a nchor point
.
RIGGING
Always spool out as much wire rope as possible when preparing rigging. Pick an anchor as far away
as is practical; this provides the winch with its greatest pulling power.
Rigging a double line with a snatch block will reduce the load on the winch to half without significant
loss of spooling speed.
Natural anchors such as trees, stumps and rocks are the handiest when available. Attach the choker
chain, wire choker rope or tree trunk protector on the anchor as low as possible to avoid pulling the
anchor down. If several possible anchors are available but they are not strong enough individually, it
may be practical to attach a wire or chain choker around several anchors to form a strong collective
anchor point.
Page 14

PAGE 14 99387 Rev. A0
Operating Instructions - continued
OVERLOADING/OVERHEATING
This winch is rated for intermittent duty. It should not be operated with the motor slowed down to a low
RPM. When the motor approaches stall speed, a very rapid heat build-up occurs which may cause motor
damage. Double line rigging will reduce the amperage draw from the motor allowing longer continual use
(see rigging section).
Maintenance & Warranty
MAINTENANCE
No lubrication is required for the life of the winch.
Inspect the wire rope before and after each winching operation. Replace when damaged.
WARRANTY
See separate sheet packed with wi nch
-Or-
If warranty sheet is lost or misplaced contact:
Warn Industries, Inc.
Customer Service Dept.
12900 SE Capps Rd
Clackamas, OR 97015-8903.
United States:
Phone: 503.722.1200 or (800) 543-9276 (US only)
Fax: 503.722-3000
International:
Phone: 503.722.3008
Fax: 503.722.3005
© 2017 Copyright Warn Industries, Inc. All r ights reserved.
Page 15

PAGE 15 99387 Rev. A0
GUÍA DEL CABRESTANTE PARA EL USUARIO
Cabrestante de uso genera l WARN® 5000
Nº DE REFERENCIA: 99964, 99963
Page 16

PAGE 16 99387 Rev. A0
Su seguridad y la seguridad de los demás es muy importante. Para ayudarle a tomar decisiones informadas sobre seguridad, se
proporcionan instrucciones de instalación y operación, y otra información en etiquetas Esta información le alerta sobre posibles peligr os
que puedan afectarle a usted y a otros. N o es posible advertirle s obre todos los posib les peligros que puedan estar relac ionados con el
uso de este producto, por lo que deberá utilizarlo usando el sentido común.
LA INSTALACIÓN Y OPERACIÓN INCORRECTAS DEL CABRESTANTE PUEDEN RESULTAR EN LESIONES GRAVES O DAÑOS
AL EQUIPO. LEA TODAS LAS PRECAUCIONES DE SEGURIDAD E INSTR U CC ION ES DE OPER AC IÓN AN TES D E INST ALAR Y
PONER EN FUNCIONAMIENTO ESTE PRODUCTO.
Esta guía identifica posibles peligros y b rinda importantes mensajes de seguridad que le ayudarán a usted y a otros a evitar daños
personales o la muerte. Las palabras ADVERTENCIA y PRECAUCIÓN indican el grado de peligro. He aquí su significado:
ADVERTENCIA indica un peligro que
puede
ocasionar daños personales de gravedad o la muerte si no se siguen las
recomendaciones.
PRECAUCIÓN indica un peligro que
puede
ocasionar daños personales leves o moderados si no se siguen las
recomendaciones.
Esta guía emplea la palabra
AVISO
para llamar la atención sobre importante información de carácter mecánico, y la palabra Nota: para
poner énfasis sobre información general digna de especial atención.
Descripción del producto: Cabrestante de uso general WARN® 5000
El cabrestante de uso general 5000 de WARN es una poderosa herramienta de arrastre. Accionado por una
fuente de energía de 12 voltios de CC, este compacto cabrestante tiene una capacidad de tiro de 2268 kilos
(5000 libras).
La unidad cuenta con un interruptor de control remoto para operaciones de enrollado y desenrollado, 18,3 m
(60 pies) de cable de 6,35 mm (1/4 pulg.) de diámetro y un gancho con seguro. El embrague para enrollado
manual es una opción estándar.
Introducción
Gracias por su adquisición del modelo de WARN para sus necesidades generales de arrastre e izado. Todos
los productos de WARN se han diseñado y manufacturado para una operación sin problemas durante muchos
años. Para refere ncia futura, guarde la siguiente información en un lugar seguro:
Modelo/Nº de referencia: Fecha de compra:
Antes de comenzar
Lea las instrucciones en su totalidad para familiarizarse con el proceso de instalación.
Revise todos los avisos, precauciones y advertencias para asegurarse de que el conjunto se instala
correcta y seguramente.
Page 17

PAGE 17 99387 Rev. A0
Precauciones de seguridad
A continuación se indican algunas precauciones generales de seguridad que toda persona que vaya a usar el
cabrestante debe conocer. La norma más importante, por encima de todas las demás: USE EL SENTIDO
COMÚN.
Unos pocos minutos empleados en leer estas normas pueden hacer que el operario tome conciencia de
acciones peligrosas que deben evitarse y de las precauciones a tomar para su propia seguridad y la seguridad
de los demás. Las revisiones frecuentes y las inspecciones periódicas del equipo, así como un seguimiento
consciente de las reglas de seguridad pueden salvar vidas, y también ahorrar tiempo y dinero.
ADVERTENCIA
PELIGRO DE ENREDO EN LAS PIEZAS MÓVILES
De no seguirse estas instrucciones podrían producirse lesiones graves o la muerte.
Para evitar daños en las manos.
--Mantenga siempre las manos alejadas del cable, del bucle del gancho, del gancho y de la abertura de la guía durante la
instalación, la operación, y en el enrollado y desenrollado.
• Use siempre precaución extrema en el manejo del gancho y el cable durante las operaciones de enrollado y
desenrollado.
• Use siempre la correa del gancho suministrada cuando vaya a enrollar o desenrollar el cable durante la instalación o la
operación para evitar lesiones en las manos.
ADVERTENCIA
PELIGRO DE CAÍDA O APLASTAMIENTO
De no seguirse estas instrucciones podrían producirse lesiones graves o la muerte.
• No utilice nunca el cabrestante como grúa vertical, ni para suspender una carga.
• No utilice nunca el cabrestante para levantar o desplazar personas.
Page 18

PAGE 18 99387 Rev. A0
Precauciones de seguridad – Continuación
PRECAUCIÓN
PELIGRO DE ENREDO EN LAS PIEZAS MÓ VILES
De no seguirse estas instrucciones podrían producirse lesiones menores o de poca gravedad.
Seguridad general:
• Sea siempre consciente del funcionamie nto del cabrestante: Tómese su tiempo para leer y comprender completamente la guía de
Instalación y operaciones, y la Guía básica de técnicas del cabrestante, que vienen con el mismo, para poder comprender el
funcionamiento del cabrestante.
• No haga funcionar nunca este cabrestante si usted es menor de 16 años de edad.
• No haga funcionar nunca el cabrestante si se encuentra bajo la
influencia de drogas, alcohol o medicamentos.
• No exceda nunca la capacidad nominal del cabrestante ni del ca ble de tiro. Emplee un cable doble utilizando una polea pasteca
para reducir la carga del cabrestante.
Seguridad para la instalación:
• Elija siempre una ubicación de montaje que sea lo suficientemente sólida para soportar la capacidad de carga máxima del
cabrestante.
• Utilice siempre interruptores, controles remotos, accesorios y componentes de instalación que estén aprobados de fábrica.
• Utilice siempre tornillería de grado 5 o superior, pernos que nunca hayan sido soldados y no utilice nunca pernos que sean más
largos que los suministrados por la fábrica.
• Complete siempre el montaje y acoplamiento del gancho del cabrestante al bucle del gancho antes de cablear el cabrestante
durante la instalación.
• Ponga siempre la guía del ca ble con la etiqueta de ADVERTENCIA en su parte superior.
• Enrolle y desenrolle el cable en el tambor siempre según lo
indicado por la etiqueta de rotación del tambor del cabrestante. Es necesario para que funcione el freno automático (si viene con el
cabrestante) y para una orientación correcta de la instalación.
• Realice siempre un estiramiento previo del cable y vuelva a enrollarlo c on carga antes de usarlo. Un cable bien enrollado reduce el
riesgo de “agarrotamiento”, que consiste en el cable enrollándose en una capa de cable que está enrollada flojamente, y
enganchándose o dañándose a sí mismo.
Seguridad en el enrollado y desenrollado:
• Revise siempre la instalación del cabrestante y el estado del cable antes de su uso. Si el cable está deshilachado, retorcido o
dañado, deberá reemplazarse de inmediato. Cualquier pieza instalada que esté suelta o dañada deberá corregirse de inmediato.
• No enganche nunca el cable sobre sí mismo. Esto deterioraría el cable. Utilice una cadena o un cable de estrangulación, o un
protector de tronco de árbol en el anclaje.
• Antes del enrollado, no olvide nunca retirar cualquier elemento que pueda interferir con una operación del cabrestante segura.
• Tómese su tiempo siempre cuando utilice un cabrestante.
• Verifique siempre que el anclaje seleccionado soportará la carga y que la correa o la cadena no se deslizará.
• Nunca embrague ni desembrague si el cabrestante está soportando una carga, si el cable está en tensión o si el tambor del cable
está en movimiento.
• Siempre desenrolle tanto cable como sea posible al prepararse para el maniobrado. Emplee un cable doble o elija un punto de
anclaje distante.
• No accione nunca el cabrestante si no hay al menos 5 vueltas de cable alrededor del
tambor. El cable podría soltarse del tambor ya que el dispositivo de sujeción del cable al tambor no es apto para soportar una carga.
• Manténgase siempre alejado del cable y de la carga durante el accionamiento del cabrestante.
• No toque nunca el cable ni el gancho mientras éstos estén en tensión o con carga.
• No toque nunca el cable ni el gancho si hay alguien cerca del interruptor de control, o si el cabrestante está en funcionamiento.
• No toque nunca el cable ni el gancho si el control remoto está enchufado al cab restante.
• Manténgase siempre alejado del cable y de la carga, y no deje que otros se acerquen mientras el cabrestante esté en
funcionamiento.
• Haga que el operario y otras personas presentes sean conscientes de la estabilidad durante la operación del cabrestante en el
manejo del vehículo o la carga.
• Mantenga siempre el cable del c ontr ol remoto alejado del tambor, del cable y del maniobrado. Inspeccione la posible existencia de
grietas, pellizcos, cables deshilachados o conexiones sueltas. Reemplácelo si está dañado.
Page 19

PAGE 19 99387 Rev. A0
Precauciones de seguridad - Continuación
PRECAUCIÓN
PELIGRO DE CORTES Y QUEMADURAS
De no seguirse estas instrucciones podrían producirse lesiones menores o de poca gravedad.
Para evitar daños en las manos:
• Lleve puestos siempre guantes gruesos de cuero para manejar el cable.
• Nunca deje que el cable se deslice por sus manos.
• Tenga siempre en cuenta que las superficies del motor, del tambor o del cable del cabrestante pueden estar
calientes durante o después del uso del mismo.
PRECAUCIÓN
Peligro de enredo en las piezas móviles
De no seguirse estas instrucciones podrían producirse lesiones menores o de poca gravedad.
• No aplique nunca la carga a la punta del gancho o al seguro del mismo. Aplique la carga únicamente en el centro
del gancho.
• No utilice nunca un gancho cuya abertura haya aumentado, o cuya punta esté doblada o retorcida
AVISO
EVITE DAÑOS AL EQUIPO Y AL CABRESTANTE
• Evite siempre los tirones laterales continuos ya que pueden apilar el cable en un extremo del tambor. Esto puede
dañar el cable o el cabrestante.
• Compruebe siempre que se ha embragado o desembragado completamente.
• No utilice nunca el cabrestante para remolcar otros vehículos. Las cargas repentinas pueden exceder
momentáneamente la capacidad del cable y el cabrestante.
• Sea precavido siempre para no dañar la estructura cuando vaya a anclar su vehículo en una operación con el
cabrestante.
• No desplace nunca el cable en pequeñas sacudidas cuando esté con carga. Las cargas repentinas pueden exceder
momentáneamente la capacidad del cable y el cabrestante.
• Nunca utilice el cabrestante para amarrar una carga durante el transporte.
• No sumerja nunca el cabrestante en agua.
• Guarde siempre el cabrestante en un área protegida, limpia y seca.
Número de referencia y terminales del cable para el modelo WARN 5000
NÚMEROS DE REFERENCIA
99964
Cabrestante de uso general 5000 12 V CC
99963
Cabrestante de uso general 5000 12 V CC - Internacional
Page 20

PAGE 20 99387 Rev. A0
Lista de piezas
El cabrestante de us o general 5000 de WARN consta de los s i guientes componentes princi pales.
1. Unidad de cabrestante WARN 5000
2 Remoto con guía de 3,7 m (12 pies)
3 Guía: Escoben
4. 2 cables de 1,8 m (6 pies) y calibre 6
5. Gancho de retenci ón, con corr ea
6. Accesorios de montaje
1
2 3 4 5 6
Page 21

PAGE 21 99387 Rev. A0
Especificaciones para el modelo WARN 5000
CARACTERÍSTICAS
Capacidad de tracción
2268 kg (5000 lb)
Freno
Frenado dinámico y mecánico
Tipo de interruptor
Remoto con guía de 3,7 m (12 pies)
Garantía
Limitada de 1 año
Motor
Imán permanente
Cable
6,35 mm (1/4 pulg) X 18,3 m (60
pies)
CV
1,9 CV 7,62 cm (3 pulg) de
diámetro
Diámetro del tambor
6,03 cm (2,375 pulg)
Potencia
12 voltios de CC
Guía
Escoben
Tren de engranajes
Planetario de 3 fases
Esquema de los
orificios
3 orificios
Relación de
transmisión
216:01
Conexiones eléctrica s
2 cables de 1,8 m (6 pies) y calibre 6
Embrague
Palanca - Multidireccional
Peso
19,1 kg (42 lb)
Especificaciones técnicas para el modelo WARN 5000
ESPECIFICACIONES TÉCNICAS: 5000
Carga
Corriente
Velocidad
Potencia de tiro por capa de cable
libras
Kg
Amperios
pies/min
m/min
Capa
libras.
kg
0 0 40
13.8
4.2
1
5000
2268
1000
453.6
81
10.9
3.3
2
4280
1941
2000
907.2
118
9.3
2.8
3
3750
1701
3000
1360.8
152
8.1
2.5
4
3341
1515
4000
1814.4
188
6.8
2.1
5
3020
1369
5000
2268
220
5.4
1.6
Dimensiones del modelo WARN 5000
Page 22

PAGE 22 99387 Rev. A0
Instalación del cabrestante en una ubicación fija
PRECAUCIÓN
Peligro del fallo del cabrestante
De no seguirse estas instrucciones podrían producirse lesiones menores o de poca
gravedad.
Elija un lugar de montaje que sea lo suficientemente resistente para soportar las cargas que
desee elevar con el cabrestante.
El modelo 5000 puede montarse en una ubicación fija usando el patrón de agujeros de montaje para la
unidad del cabrestante. Elija un lugar de montaje que sea lo suficientemente resistente como para
soportar las cargas que desee desplazar.
A continuación, haga 4 taladros según las dimensiones especificadas en la ilustración siguiente.
Esquema de los orificios de la placa para el montaje
3/8" [9.52 mm] DIA (4 plcs)
4.5"
[114mm]
4.25"
[107.95mm]
Page 23

PAGE 23 99387 Rev. A0
Instalación del cabrestante en una ubicación fija - Continuación
Para asegurar el cabrestante utilice siempre:
▫ Un lug ar plano y seguro para el montaje de por lo menos 4,8 mm (3/16 pulg) de grosor.
▫ Una arandela de bloqueo de 1/4 pulg. x 4.
▫ Un t ornillo de cabeza hexagonal de 3/8-16 x 1 pulg. de largo, de grado 5 ó mejor x 4.
▫ Apriete los pernos de montaje con un par de torsión de 41-47 Nm (30-35 pies-lbs).
Es posible que la longitud del perno deba ser más larga que la espe cificada anteriormente, dependiendo del
grosor del material en el que esté montado el cabrestante.
Instrucciones de cableado
ADVERTENCIA
Peligro de electrocución
De no seguirse estas instrucciones podrían producirse lesiones de gravedad o la muerte.
No pase los cables eléctricos por bordes agudos.
No pase los cables eléctricos por partes móviles o cerca de ellas.
Lea y siga todas las instrucciones de cableado que se incluyen en el manual de
operaciones.
Ponga aislamiento y proteja los cables y terminales eléctricos que estén expuestos.
Instale los cables de la batería, con el rojo conectado al terminal positivo de la misma y el negro al
terminal negativo.
Compruebe que las conexiones de los cables estén limpias y apretadas
Antes de utilizar el cabrestante, compruebe lo siguiente:
Que el cableado de todos los componentes sea correcto.
Que no haya cables o terminales expue stos. Cubra aquellos que estén expuestos con hoja
aislante, funda de terminal, entubación por contracción al calor o cinta adhesiva de electricista.
Page 24

PAGE 24 99387 Rev. A0
Instrucciones de op eración
CÓMO USAR EL CONTROL REMOTO COLGANTE
El control remoto colgante está conectado al cabrestante por cable y puede operarse alejado de la unidad del
cabrestante o con el control acoplado a la placa transportadora.
Pulse el botón negro para desenrollar el cable del tambor, o pulse el botón blanco para enrollar el cable en el
tambor.
DESENROLLADO
ENROLLADO
Page 25

PAGE 25 99387 Rev. A0
Instrucciones de op eración - Continuación
ACCIONAMIENTO DEL EMBRAGUE
ADVERTENCIA
Peligro durante el funcionamient o d el c a br es t a nte
De no seguirse estas instrucciones podrían producirse lesiones de gravedad o la
muerte.
No embrague ni desembrague nunca si el cabrestante se encuentra con carga o si el cable tiene
tensión.
Cuando el embrague está activado, el sistema de engranajes se acopla al tambor del cable y, en estas
condiciones, puede transferirse movimiento desde el motor del cabrestante. Cuando el embrague está en el
modo de enrollado libre, el sistema de engranajes y el tambor del cable están desengranados, lo que permite
que el tambor gire libremente. La palanca del embrague, situada en la parte superior del motor, controla la
posición del mismo. Para evitar daños, engrane y desengrane siempre completamente la palanca del
embrague.
Activado
Desactivado – Enrollado libre
Page 26

PAGE 26 99387 Rev. A0
Instrucciones de op eración - Continuación
DESENROLLADO
Generalmente, el desenrollado manual es la forma más rápida y sencilla de sacar el cable ha cia afuera. Antes
de proceder al desenrollado manual, saque suficiente cable a fin de eliminar cualquier tensión en la que
pueda estar sometido el mismo antes de desembragar. A continuación, proceda al desenrollado manual,
sacando manualmente suficiente cable para la operación.
PRECAUCIÓN
Peligro de lesiones
De no seguirse estas instrucciones podrían producirse lesiones menores o de poca
gravedad.
Lleve puestos siempre guantes gruesos de cuero para manipular el cable.
No accione el cabrestante si no hay al menos 5 vueltas de cable alrededor del tambor.
TENSIÓN DEL CABLE
La vida útil del cable está directamente relacionada con la forma en que se utiliza y se cuida el mismo.
Durante su primer uso, un cable nuevo debe enrollarse en su tambor bajo una carga de por lo menos 227 kg
(500 libras). Desenrolle todo el cable dejando 5 vueltas en el tambor y a continuación, enrolle el cable bajo
una carga de 227 kg (500libras) o más. Esto tensará el cable nuevo y creará un correcto enrolla do del mismo
alrededor del tambor. De no hacerse así, las vueltas exteriores se podr ían trabar con las vueltas interiores
produciendo atascamientos y daños en el cable.
ADVERTENCIA
Peligro de enredo en las piezas móviles
De no seguirse estas instrucciones podrían producirse lesiones de gravedad o la muerte.
Mantenga siempre las manos alejadas del cable, del bucle del gancho, del gancho y
de la abertura de la guía durante la instalación, la operación, y en el enrollado y
desenrollado.
Utilice siempre la correa del gancho suministrada cuando vaya a enrollar o
desenrollar el cable, o durante la instalación o la operación, para evitar daños en las
manos.
Page 27

PAGE 27 99387 Rev. A0
Instrucciones de op eración - Continuación
ENROLLADO CON CARGA
El cable debe enrollarse alrededor del tambor en el sentido indicado por la marca de rotación que hay
en el cabrestante.
Enrolle el cable uniformemente y bien tensado alrededor del tambor. Esto evita que las vueltas más
externas del cable se traben con las vueltas internas, lo cual puede ocasionar atascamientos y daños
al cable.
Evite las sacudidas de la carga cuando esté enrollando; para ello, utilice el interruptor de control de
forma intermitente a fin de tensar y hacer entrar las porciones del cable que puedan quedar flojas.
Las sacudidas de la carga pueden sobrepasar momentáneamente la capacidad nominal del
cabrestante y del cable.
ENROLLADO SIN CARGA
Con asistencia: Pida a su ayudante que sujete el gancho y la correa del mismo, tensando el cable
de forma constante y tanto como sea posible. Manteniendo tenso el cable, el ayudante debe caminar
hacia el cabrestante mientras usted acciona el interruptor de control para enrollar el cable. Suelte el
interruptor cuando el gancho esté a una distancia mínima de 1,2 m (4 pies) de la abertura de la guía.
Luego, enrolle la parte final del cable para su almacenamiento.
Sin asistencia: Disponga el cable de forma que no se doble ni se trabe al enrollarlo. Aseg úre se de
que el cable ya enrollado alrededor del tambor esté bien tenso y dispuesto en capas uniformes.
Enrolle el cable lo suficiente para formar la siguiente capa completa alred edor del tambor. Tense y
enderece la capa. Repita este proceso hasta que el gancho quede a una distancia mínima de 1,2 m (4
pies) de la guía para el cable. Luego, enrolle la parte final del cable para su almacenamiento.
ENROLLADO DE LA PARTE FINAL PARA EL ALMACENAMIE NTO
No toque el cable, el gancho ni la abertura de la guía. Siempre utilice la correa del gancho para sujetar el
mismo al enrollar el cable cuando no haya carga. Con mucho cuidado, vaya enrollando la parte final del cable
activando y desactivando repetidamente el interruptor de control a fin de enrollar la parte floja final. Fije el
gancho en un punto de anclaje a decuado cercano al cabrestante. Asegúrese de no tensar en exceso ya que
ello podría dañar el cable o el punto de anclaje.
MANIOBRADO
Siempre desenrolle cuanto más cable sea posible al prepararse para el maniobrado. Elija el punto
más alejado posible de fijación; esto proporciona al cabrestante mayor capacidad de tracción.
El uso de línea de doble cable y una polea reduce la carga del cabrestante a la mitad sin pérdida
significativa de la velocidad de enrollado.
Los puntos de anclaje naturales como, por ejemplo, árboles , tocones y rocas, son los más cómodos
cuando están disponible s. Acople una cadena o un cable de estrangulación, o un protector de tronco
de árbol al punto de anclaje, a la menor altura posible, para evitar derribarlo. Si hay varios puntos de
anclaje disponibles pero no son lo suficientemente resistentes por separado, puede acoplar un cable
o una cadena de estrangulación alrededor de var ios puntos a fin de formar un punto de ancl aje
“colectivo” lo suficientemente resistente.
Page 28

PAGE 28 99387 Rev. A0
Instrucciones de op eración - Continuación
SOBRECARGA/SOBRECALENTAMIENTO
El cabrestante está indicado para un servicio intermitente. No se debe poner en funcionamiento con el motor
reducido a bajas RPM. Cuando el motor se aproxima a la velocidad crítica, se genera calor muy
rápidamente, lo que puede ocasionar daños al motor. El uso de línea de doble cable reducirá los
amperios del motor, permitiendo un uso continuo mayor (vea la sección del maniobrado).
Mantenimiento y garantía
MANTENIMIENTO
No se requiere lubricación durante la vida útil del cabrestante.
Inspeccione el cable de tiro antes y después de cada operación efectuada con el cabrestante. Si presenta
daños, sustitúyalo.
GARANTÍA
Vea la hoja adicional incluida con el cabrestante
-o-
Si la hoja de la garantía se ha perdido, póngase en contacto con
Warn Industries, Inc.
Customer Service Dept.
12900 SE Capps Rd
Clackamas, OR 97015-8903.
Estados Unidos:
Teléfono: 503.722.1200 ó (800) 543-9276 (EE.UU. solamente)
Fax: 503.722-3000
Internacional:
Teléfono: 503.722.3008
Fax: 503.722.3005
© 2017 Copyright Warn Industries, Inc. All ri g hts reserved.
Page 29

PAGE 29 99387 Rev. A0
GUIDE DE L'UTILISATEUR DU TREUIL
Treuil utilitaire WARN® 5000
Numéro de pièce : 99964, 99963
Page 30

PAGE 30 99387 Rev. A0
Votre sécurité et celle des autres est très importante. Pour vous permettre de prendre des décisions éc lairées dans le domaine de la
sécurité, nous vous avons fourni des instructions relatives à l'installation et à l'utilisation du produit ainsi que d'autres informations
figurant sur des étiquettes apposées sur le prod uit. Ces informations attirent l'attention sur les dang ers potentiels pouvant vous affecter
ainsi qu'autrui. Nous ne sommes pas en mesure de vous mettre en gar de contre tous les dangers potentiels associés à ce produit. Il vous
incombe par conséquent de faire preuve de jugement.
TOUTE INSTALLATION OU UTILISATION IMPRUDENTE DU TREUIL PEUT ENTRAÎNER DES BLESSURES GRAVES OU
ENDOMMAGER L'ÉQUIPEMENT. PRENDRE SOIN DE LIRE ET DE BIEN ASSIMILER LES CONSIGNES DE SÉCURITÉ ET
D'UTILISATION DU PRODUIT AVANT D E L 'IN ST ALLER ET DE L'UTILISER.
Ce guide identifie les dangers potentiels et comporte des consignes de sécurité importantes qui permettent, à vous et à autrui, d'éviter
les risques de blessures graves ou de mort. Les termes AVERTISSEMENT et ATTENTION sont des indicateurs du niveau de danger.
Signification des indicateurs :
Le terme AVERTISSEMENT souligne un danger potentiel qui
peut
entraîner des blessures graves ou la mort si vous ne
suivez pas les consign es.
Le terme ATTENTION souligne un danger potentiel
susceptible
d'entraîner des blessures mineures ou modérées si
vous ne suivez pas l es consignes.
Ce guide utilise le terme
AVIS
pour attirer votre attention s ur des informations mécaniques importantes, et le terme Remarque : pour
souligner des informations générales qui méritent une attention particulière.
Description du produit : Treuil utilitaire WARN ® 5000
Le treuil utilitaire WARN® 5000 est un puissant outil de traction. Alime nté par une source de 12 volts c.c., ce
treuil compact possède une capacité de traction de 2268 kilos.
L'appareil est doté d'une télécommande permettant d'enrouler et dérouler le câble, d'un câble de 18,3 m de
long et 6,35 mm de diamètre et d'un crochet avec fermoir de sécurité. L'embrayage à déroulement en roue
libre fait partie de l'équipement standard.
Introduction
Merci d'avoir choisi le treuil utilitaire WARN®. Tous les produits WARN® ont été conçus et fabriqués de
manière à assurer un fonctionnement sans problèmes pendant des années. Prière de noter les informations
suivantes à titre de référence :
Numéro de modèle/pièce : Date d'achat :
Avant de commencer
Lire les instructions intégralement afin de se familiariser avec la procédure d'installation.
Prière de relire tous les avis, mises en garde et avertissements pour s'assurer que le kit est installé
correctement et en toute sécurité.
Page 31

PAGE 31 99387 Rev. A0
Mesures de sécurité
Voici quelques mesures générales de sécurité que tout utilisateur du treuil se doit de connaître. Cependant,
au-delà de toute consigne, la règle la plus importante à suivre est celle-ci : FAIRE PREUVE DE BON SENS.
Les quelques minutes consacrées à la lecture de ces consignes permettront à tout opérateur d'être conscient
des pratiques dangereuses à éviter et des précautions qu'il pourra prendre pour assurer sa sécurité et celle
d'autrui. Une vérification fréquente ainsi que des inspections périodiques de l'équipement et l'application
consciencieuse des consignes de sécurité pourront permettre de sauver des vies et d'économiser temps et
argent.
AVERTISSEMENT
DANGER DE HAPPEMENT PAR DES PIÈCES MOBILES
Le non-respect des instructions peut entraîner des blessures graves, voire mortelles.
Pour éviter de se blesser les mains ou les doigts :
• Toujours garder les mains éloignées du câble, de la boucle du crochet, du crochet et de l'ouverture du guide-câble
durant l'installation et l’utilisation du treuil et l'enroulement ou le déroulement du câble.
• Toujours faire très attention durant la manipulation du crochet et du câble pendant les manœuvres de déroulement.
• Toujours utiliser le cordon du crochet fourni pour enroule r ou d é r oule r le câble, durant l'insta l la t i on ou l'uti l isation, pour
éviter de se blesser les mains ou les doigts.
AVERTISSEMENT
DANGER DE CHUTE OU D'ÉCRASEMENT
Le non-respect des instructions peut entraîner des blessures graves, voire mortelles.
• Ne jamais utiliser l'appareil comme palan aérien ou pour suspendre une charge.
• Ne jamais utiliser l'appareil pour soulever ou transporter des personnes.
Page 32

PAGE 32 99387 Rev. A0
Mesures de sécurité - Suite
ATTENTION
DANGER DE HAPPEMENT PAR DES PIÈCES MOBILES
Le non-respect des instructions peut entraîner des blessures mineures ou modérées.
Consignes de sécurité générales :
• Toujours se familiariser avec le treuil : Prendre le temps de bien lire et comprendre le manuel d’installation et
d’utilisation ainsi que le manuel de base des techniques de treuillage inclus avec le treuil afin de se familiariser avec
l’appareil et son fonctionnement.
• Les personnes âgées de moins de 16 ans ne doivent jamais faire fonctionner cet appareil.
• Ne jamais faire fonctionner l'appareil sous l'effet de drogues, de l'alcool ou de médicaments.
• Ne jamais excéder la capacité nominale du treuil ou du câble d'acier. Un câblage double avec poulie ouvrante
permet de réduire la charge subie par le treuil.
Consignes de sécurité se rapportant à l’installation :
• Toujours choisir une surface de montage suffisamment résistante pour supporter la capacité de traction maximale
du treuil.
• Toujours utiliser des interrupteurs, télécommandes, accessoires et composants d'installation homologués par le
fabricant.
• Toujours utiliser un matériel de catégorie 5 ou supérieur, ne jamais souder les boulons ni utiliser des boulons plus
longs que ceux fournis par le fabricant.
• Toujours achever le montage du treuil et la fixation du crochet à sa boucle avant d'effectuer le câblage du treuil
durant l'installation.
• Toujours positionner le guide-câble avec l'étiquette d'AVERTISSEMENT sur le dessus.
• Toujours enrouler le câble sur le tambour tel qu'indiqué par l'autocollant de rotation apposé sur le treuil.
Nécessaire pour que le frein automatique puisse fonctionner (le cas échéant) et pour assurer une installation dans le
bon sens.
• Toujours étirer au préalable le câble d'acier et l'enrouler sous charge avant de l'utiliser. Un câble enroulé de manière
serrée permet de réduire le risque qu’il coince, c’est-à-dire que si le câble s’enroule de façon lâche, il peut s’enchevêtrer
et s’endommager lui-même.
Consignes de sécurité concernant le treuillage :
• Toujours inspecter l'installation du treuil et l'état du câble métallique avant de faire fonctionner le treuil. Tout câble
effiloché, tordu ou endommagé doit être remplacé immédiatement. Toute installation de treuil desserrée ou
endommagée doit être corrigée immédiatement.
• Ne jamais accrocher le câble à lui-même. Cela l’endommagerait. Toujours util i s e r une cha îne ou un câble à nœud
coulant, ou bien une protection de tronc d'arbre sur le point d'ancrage.
• Toujours s'assurer que tous les obstacles potentiels sont écartés, avant de commencer le treuillage.
• Toujours prendre le temps de bien procéder au câblage avant d'utiliser le treuil.
• Toujours s'assurer que le point d'ancrage choisi peut supporter la charge et que la sangle ou la chaîne ne glisse pas.
• Ne jamais essayer d'embrayer ou de débrayer si le treuil est sous charge, si le câble est en tension ou si le tambour
est en train de tourner.
• Toujours dérouler autant de câble que possible avant de procéder au câblage. Utiliser une ligne double ou choisir un
point d’ancrage distant.
• Ne jamais utiliser le treuil avec moins de 5 spires de câble enroulées autour du tambour, car le câble pourrait se
dérouler du tambour, étant donné que l'ancrage du câble n'est pas conçu pour retenir une charge.
• Toujours se tenir à l'écart du câble et de la charge durant l'utilisation.
• Ne jamais toucher le câble ou le crochet lorsque le câble est tendu ou sous charge.
• Ne jamais toucher le câble ou le crochet lorsqu'une autre personne est à l'interrupteur de commande ou durant le
fonctionnement du treuil.
• Ne jamais toucher le câble ou le crochet lorsque la télécommande est branchée sur le treuil.
• Toujours se tenir à l'écart du câble et de la charge durant l'utilisation et ne jamais laisser personne s'approcher.
• Toujours exiger de l'opérateur et des personnes présentes d'être conscients de la stabilité du véhicule ou de la
charge.
• Toujours garder la télécommande à l'écart du tambour, du câble et du câblage. S'assurer qu’il n’y a pas de fissures,
de points de pincement, de fils effilochés ou de connexions desserrées. Remplacer en cas de dommages.
Page 33

PAGE 33 99387 Rev. A0
Mesures de sécurité - Suite
ATTENTION
RISQUE DE COUPURE ET DE BRÛLURE
Le non-respect des instructions peut entraîner des blessures mineures ou modérées.
Pour éviter de se blesser les mains ou les doigts :
• Toujours porter des gants de cuir résistants durant la manipulation du câble d’acier.
• Ne jamais laisser le câble glisser dans les mains.
• Toujours penser aux surfaces chaudes au niveau du moteur du treuil, du tambour ou du câble durant ou après
l’utilisation du treuil.
ATTENTION
Danger de happement par des pièces mobiles
Le non-respect des instructions peut entraîner des blessures mineures ou modérées.
• Ne jamais appliquer la charge sur l'extrémité du crochet ou le loquet. Appliquer la charge au centre du crochet
seulement.
• Ne jamais utiliser un crochet dont la gorge s'est élargie ou dont l'extrémité est courbée ou tordue
AVIS
ÉVITER D'ENDOMMAGER LE TREUIL ET L'ÉQUIPEMENT
• Toujours éviter de tirer continuellement sur le côté, ce qui a pour effet d'empiler le câble sur l'une des extrémités du
tambour. Cela peut endommager le câble ou le treuil.
• Toujours s'assurer d'avoir complètement embrayé ou complètement débrayé.
• Ne jamais se servir du treuil pour remorquer d'autres véhicules. Les charges de choc peuvent momentanément
dépasser de loin la capacité du treuil du câble.
• Toujours faire attention à ne pas endommager le cadre si l'on décide d'arrimer le véhicule pour pouvoir travailler
avec le treuil.
• Ne jamais « secouer » le câble sous charge. Les charges de choc peuvent momentanément dépasser de loin la
capacité du treuil et du câble.
• Ne jamais se servir du treuil pour maintenir une charge pendant le transport.
• Ne jamais submerger le treuil dans l'eau.
• Toujours ranger le treuil dans un endroit sûr, propre et sec.
Numéros de pièce et extrémités de cordon du WARN 5000
NUMÉROS DE PIÈCE
99964
Treuil utilitaire 12 V c.c. nº 5000
99963
Treuil utilitaire (international) 12 V c.c nº 5000
Page 34

PAGE 34 99387 Rev. A0
Liste des pièces
Le treuil utilitaire WARN® 5000 comprend les composants principaux suiv ants.
1. Treuil WARN 5000
2. Télécommande à fil de 3,7 m (12 pi)
3 Guide-câble
4. Câble de 1,8 m (6 pi), calibre 6 (2)
5. Crochet avec loquet et sangle de crochet
6. Matériel de montage
1 2 3
4 5 6
Page 35

PAGE 35 99387 Rev. A0
Spécifications techniques du WARN 5000
CARACTÉRISTIQUES
Capacité de traction
2268 kg (5000 lb)
Frein
Système de freinage mécanique
dynamique
Type d'interrupteur
Télécommande à fil de 3,7 m (12 pi)
Garantie
Limitée d'un an
Moteur
Aimant permanent
Câble
18,3 m X 6,35mm (1/4 po x 60 pi)
Puissance
0,45 kW (1,9 CV), 7,62 cm de
diamètre
Diamètre du
tambour
6,35 cm (2,5 po)
Alimentation
12 V c.c.
Guide-câble
Ecubier
Train d’engrenages
Planétaire à 3 étages
Disposition des
trous
4 trous
Rapport de
démultiplication
216/01
Fils électriques
Câble de 1,8 m (6 pi), calibre 6 (2)
Embrayage
Levier multidirectionnel
Poids
19,1 kg (42 lb)
Données de performance du WARN 5000
DONNÉES DE PERFORMANCE : 5000
Charge
Courant
Vitesse
Puissance de traction, couche de câble
Lbs.
Kg
Intensité
(A)
pi/min
M/min
Couche
lbs.
kg
0 0 40
13.8
4.2
1
5000
2268
1000
453.6
81
10.9
3.3
2
4280
1941
2000
907.2
118
9.3
2.8
3
3750
1701
3000
1360.8
152
8.1
2.5
4
3341
1515
4000
1814.4
188
6.8
2.1
5
3020
1369
5000
2268
220
5.4
1.6
Données dimensionnelles du WARN 5000
Page 36

PAGE 36 99387 Rev. A0
Installation du treuil sur un emplacement fixe
ATTENTION
Danger de défaillance du treuil
Le non-respect des instructions peut entraîner des blessures mineures ou
modérées.
Toujours choisir une surface de montage suffisamment résistante pour supporter les charges
qui seront halées.
Le 5000 peut être installé sur un emplacement fixe au moyen des trous de montage du treuil. Choisir tout
d'abord une surface de montage suffisamment résistante pour supporter les charges qui seront halées.
Percer ensuite 4 trous selon les dimensions spécifiées sur le dessin ci-dessous.
Disposition des trous de la plaque de montage
3/8" [9.52 mm] DIA (4 plcs)
4.5"
[114mm]
4.25
"
[107.95mm]
Page 37

PAGE 37 99387 Rev. A0
Installation du treuil sur un emplacement fixe-suite
Pour fixer le treuil, toujours se servir des éléments suivants :
▫ Une surface de montage plate et sûre en acier d'une épaisseur d'au moins 4,8 mm.
▫ 4 rondelles d'arrêt de 3/8 po.
▫ 4 vis à tête hexagonale de 3/8-16 x 1 po de long, catégorie 5 ou supérieure.
▫ Visser les boulons de fixation à un couple de 41 à 47 Nm.
Il se peut que les boulons doivent être plus longs que spécifiés ci-dessus selon l'épaisseur du matériau auquel
est fixé le treuil.
Installation du Câblage
AVERTISSEMENT
Risque de choc électrique
Le non-respect des consignes peut entraîner des blessures graves ou la mort.
Ne faites pas passer les câbles électriques sur des bords tranchants.
Ne faites pas passer les câbles électriques à travers des pièces mobiles ou à proximité.
Lisez et suivez toutes les instructions de câblage indiquées dans le manuel de
l'utilisateur.
Isolez et protégez tous les fils et bornes électriques exposés.
Raccordements electrique : câble rouge connecté à la borne positive, câble noir connecté à la borne
négative.
Assurez-vous que toutes les connexions sont propres et bien serrées.
Avant d’utiliser le treuil, veuillez vérifier les points suivants :
Le câblage de tous les composants est correct.
Aucun câble ni aucune borne n'est exposé. Couvrez-les sinon à l’aide de plaques isolantes, capuchons,
gaines thermorétrécissables ou ruban isolant.
Page 38

PAGE 38 99387 Rev. A0
Mode d'emploi
UTILISATION DE LA TÉLÉCOMMANDE CÂBLÉE
La télécommande est câblée au treuil et peut être actionnée à distance du treuil ou en la rangeant dans la
plaque de support.
Appuyer sur le bouton noir pour dérouler le câble ou sur le bouton blanc pour enrouler le câble sur le tambour
DÉROULER
ENROULER
Page 39

PAGE 39 99387 Rev. A0
Mode d'emploi - suite
FONCTIONNEMENT DE L'EMBRAYAGE
AVERTISSEMENT
Danger lié au fonctionnement du treuil
Le non-respect des instructions peut entraîner des blessures ou des dommages
matériels.
Ne jamais essayer d'embrayer ou de débrayer si le treuil est sous charge ou si le câble est sous
tension.
Lorsque l’embrayage est en prise, le train d'engrenages est couplé au tambour du câble et l’entraînement
peut alors être transféré du moteur du treuil. Lorsque l'embrayage est en mode de déroulement en roue libre,
le train d'engrenages et le tambour se découplent, ce qui permet au tambour de tourner librement. Le levier
d'embrayage, situé en haut du moteur, contrôle la position de l'embrayage. Pour éviter tout dommage,
tourner complètement le levier d'embrayage dans l'une ou l'autre position.
Embrayage
Désembrayage - Roue libre
Page 40

PAGE 40 99387 Rev. A0
Mode d'emploi - suite
DÉROULEMENT DU CÂBLE
Le déroulement en roue libre constitue généralement la façon la plus rapide et la plus facile de dérouler le
câble. Avant de mettre le treuil en roue libre pour dérouler le câble, dérouler au moteur une quantité
suffisante de câble avant de débrayer pour soulager le câble de toute tension. On peut alors dérouler
manuellement une qua ntité suffisante de câble pour pouvoir travailler avec le treuil.
ATTENTION
Risque de blessures
Le non-respect des instructions peut entraîner des blessures mineures ou modérées.
Toujours porter des gants de cuir durant la manipulation du câble d'acier.
Ne jamais utiliser le treuil avec moins de 5 spires de câble enroulées autour du tambour.
ÉTIREMENT DU CÂBLE
La durée de vie d’un câble est liée directement à son entretien et à son utilisation. Lors de sa première
utilisation, un câble neuf doit être enroulé sur so n tambour sous une charge d’au moins 227 kg. Dérouler
entièrement le câble de façon à ne laisser que 5 spires sur le tambour, puis enrouler le câble sous une charge
de 227 kg ou plus. Ceci permet d’étirer un câble neuf et de bien l’enrouler sur le tambour. Sinon, les spires
extérieures risquent de s'enfoncer dans les spires intérieures, ce qui peut coincer et endommager le câble.
AVERTISSEMENT
Danger de happement par des pièces mo bi les
Le non-respect des consignes peut entraîner des blessures graves ou la mort.
TOUJOURS garder les mains éloignées du câble, de la boucle du crochet, du crochet
et de l'ouverture d u guide-câble durant l'installation et l’utilisation du treuil et
l'enroulement ou le déroulement du câble.
TOUJOURS utiliser le cordon du crochet fourni pour enrouler ou dérouler le câble,
durant l'installation ou l'utilisation, pour éviter de se blesser les mains ou les doigts.
Page 41

PAGE 41 99387 Rev. A0
Mode d'emploi - suite
ENROULEMENT SOUS CHARGE
Le câble d'acier doit toujours être enroulé sur la partie inférieure du t ambour tel qu'indiqué par
l'autocollant apposé sur le treuil.
Enrouler mécaniquement le câble sur le tambour de manière uniforme et serrée. Cela empêche les
spires extérieures de s’enfoncer dans les spires intérieures, ce qui peut coincer et endommager le
câble.
Pour éviter les charges de choc durant l’enroulement du câble, actionner l’interrupteur de commande
de manière intermittente afin d'éliminer le mou du câble. Les charges de choc peuvent
momentanément dépasser de loin la capacité du treuil et du câble.
ENROULEMENT À VIDE
Enroulement assisté : Demander à un assi stant de tenir le crochet avec une corde ou un chiffon en
appliquant une tension aussi constante que possible sur le câble. Tout en maintenant la tension, il
devra se déplacer en direction du treuil pendant l'actionnement de l'interrupteur de commande pour
enrouler le câble. Relâcher l’interrupteur lorsque le crochet parvient à une distance minimum de
1,2 m de l’ouverture du gui de-câble. Enrouler le reste du câble.
Enroulement non assisté : Arranger le câble à enrouler de manière à ce qu’il ne s’entortille ni ne
s’emmêle pendant le rembobinage. S'assurer que le câble est enroulé sur le tambour de manière
uniforme et serrée. Enrouler une quantité suffisante de câble pour compléter une couche entière sur
le tambour. Serrer et étaler de manière égale la couche de câble. Refaire de même jusqu’à ce que le
crochet soit à au moins 1,2 m du guide-câble. Enrouler le reste du câble.
ENROULEMENT DU RESTE DU CÂBLE POUR LE RANGER
Éloigner les mains du câble, du crochet et de l'ouverture du guide-câble. Toujours utiliser un chiffon ou un
cordon pour tenir le crochet lorsque le câble est enroulé à vide. Enrouler mécaniquement le reste du câble
avec soin, en actionnant l’interrupteur de commande par petits coups afin d’éliminer le mou restant. Fixer le
crochet à un point d'ancrage approprié près du treuil. Éviter de trop tendre pour ne pas endommager le câble
ou le point d'ancrage
.
CÂBLAGE
Toujours dérouler autant de câble que possible avant de procéder au câblage. Choisir un point
d'ancrage approprié aussi distant que possible. Cela assure au treuil une puissance de traction
maximum.
Un câblage double avec poulie ouvrante permet de réduire de moitié la charge subie par le treuil sans
perte sensible de vitesse de rembobinage.
Des ancrages naturels tel qu’arbres, souches et rochers sont très utiles lorsqu’ils sont disponibles.
Attacher une chaîne ou câble à nœud coulant ou une protection de tronc d'arbre sur le point
d’ancrage aussi bas que possible pour éviter de tirer le point d’ancrage ver s le bas. Si plusieurs
ancrages sont disponibles mais qu’ils ne sont pas assez solides individuellement, il peut être prat iq ue
de les réunir en faisant un nœud coulant avec un câble ou une chaîne afin de constituer un puissant
point d’ancrage collectif.
Page 42

PAGE 42 99387 Rev. A0
Mode d'emploi - suite
SURCHARGE/SURCHAUFFE
Ce treuil est conçu pour un service intermittent. Ne pas le faire fonctionner avec le moteur tournant à bas
régime. Lorsque le moteur du treuil atteint une vitesse si faible qu’il peut caler, il se met à
surchauffer très rapidement, ce qui peut l’endommager. Un câblage double permet de réduire la
consommation de courant du moteur, ce qui permet une utilisation continue prolongée (voir la
section Câblage).
Entretien et garantie
ENTRETIEN
Aucune lubrification n’est nécessaire pendant la durée de service du treuil.
Inspecter le câble avant et après chaque utilisation du treuil. Le remplacer s’il est endommagé.
GARANTIE
Voir la feuille emballée avec l e tr eui l
-ou-
Si la feuille de garantie est per due ou introuvable, contacter :
Warn Industries, Inc.
Customer Service Dept.
12900 SE Capps Rd
Clackamas, OR 97015-8903.
États-Unis :
Tél : 503.722.1200 ou (800) 543-9276 (États-Unis seulement)
Télécopie : 503.722.3000
International :
Tél : 503.722.3008
Télécopie : 503.722.3005
© 2017 Copyright Warn Industries, Inc. All ri g hts reserved.
 Loading...