

Page 1

1
Introduction and Overview
The Wacom® DTU-710™ Interactive Pen Display combines an LCD monitor with a
Wacom tablet.
This gives you a direct point-and-draw-on-screen interface that can be used with a
Personal Computer (PC) or Macintosh computer. DTU-710's basic components include
a Wacom tablet internally mounted behind a 17.0" diagonal TFT color LCD monitor, and
Wacom's pen.
Your DTU-710 Interactive Pen Display offers a number of significant advantages over a
standard monitor:
■
Reduced power consumption
■
Reduced heat generation
■
Requires less work space
■
Flicker free and easier on the eyes
■
Integrated input and display
■
Pressure-sensitive drawing directly on the display screen.
This manual describes how to install DTU-710 hardware and software. It also describes
how to use DTU-710 and the pen.
Note that the computer treats the two parts of
DTU-710 (the LCD monitor and the Wacom tablet)
as separate pieces of hardware.
Therefore, the installation process is completed in two stages. First, you will install the
LCD monitor portion of DTU-710. In the second stage you will install DTU-710's tablet
functionality.
You can find information on using the Wacom Tablet Control Panel for customizing your
tablet and pen settings in the online Help, located under the
Help
menu in the Wacom
Tablet Control Panel.
The following are not included with this product:
■
Information about your specific computer hardware
■
Information about your operating system
■
Information about application software.
Please refer also to your computer hardware, operating system, or software application
manuals.
To use the pressure-sensitivity of the pen with your favorite drawing application, refer to
instructions in that application's manuals.
English
Page 2
2
CAUTION
WARNING
■
Do not use DTU-710 Interactive Pen Display in a facility control system
that requires extremely high reliability;
it may cause other electronic devices
to malfunction, or other devices may cause DTU-710 to malfunction. Where
use is prohibited, power off DTU-710 to prevent the possibility of it causing
other electronic devices to malfunction. Wacom does not accept any liability
for direct or consequential damages. For details, please refer to your Warranty,
located at the inside back cover of this manual.
■
Only use the AC adaptor that came with DTU-710.
If a different type of AC
adaptor is used, DTU-710 will not work properly or it may be damaged.
Using a
different type of AC adaptor also has the potential to result in fire.
Use of
a different AC adaptor will void your warranty.
■
If the LCD screen has been damaged, DO NOT touch any liquid that may
be leaking from it;
this liquid is an irritant. In case of contact with skin, eyes,
or mouth, rinse immediately with running water for at least 15 minutes or more.
If contact is made with the eyes or mouth, also consult a physician.
■
Prevent your children from swallowing the pen nib or side switch knob.
The pen nib or side switch knob may accidentally be pulled out if children are
biting on them.
■
HIGH VOLTAGE. Do not open DTU-710. It has the risk of electric shock.
Precautions on Use and Handling
Be sure to follow all instructions, cautions, and warnings found within this manual.
Failure to do so could cause the loss of data or damege of your computer. Failure to do
so could also void your warranty, in which case Wacom shall have no responsibility for
such loss or damage and to repair or replace the product.
■
When adjusting the tilt angle of DTU-710, be careful to avoid catching
your finger in the gap of the movable portion of the stand.
■
Be sure to use a grounded power source when applying power to
DTU-710.
■
Do not lift DTU-710 by the stand;
this may damage the stand mechanism.
When lifting or moving DTU-710, always do so by grasping the main body
casing.
Page 3
3
■
Do not put heavy articles on DTU-710;
this may damage the display screen
or stand.
■
Do not place heavy article on DTU-710 cabling, repeatedly bend the
cables, or apply heavy stress on the cable connectors;
this may damage the
unit or your cabling.
CAUTION
■
This product is for use with a VGA or DVI graphics card;
using an
inappropriate graphics card may damage DTU-710.
■
Do not connect or disconnect the DVI video cable or power cable while
DTU-710 and your computer is turned on;
it may damage the LCD display or
computer video card.
■
Do not disassemble DTU-710 or pen.
This may cause DTU-710 or pen to
malfunction. In this case, Wacom shall have no responsibility to repair or replace
the product.
■
Do not use or store DTU-710 where:
- Temperature changes are severe (e.g., outdoors or inside a vehicle).
- DTU-710 and pen are exposed to direct sunlight or heat from a heating appliance.
- DTU-710 and pen are exposed to water or any other kind of liquid.
- Temperature or humidity exceeds the specifications.
■
Do not block the ventilation holes in the rear panel;
this may overheat and
damage DTU-710.
■
Do not use DTU-710 in a dusty environment;
It may damage the unit.
■
Do not scratch the cover glass of DTU-710.
Avoid placing sharp objects on
the glass surface.
■
Do not use detergent to clean the cover glass of DTU-710;
this may alter the
surface friction and deteriorate the handwriting feel.
Page 4

4
Table of Contents
Introduction and Overview .............................................................1
Precautions on Use and Handling .................................................2
Table of Contents ..........................................................................
4
Checking Packed Components ...................................................5
Connect DTU-710 to a computer ................................................6
Tablet Driver Installation
..............................................................8
Uninstalling The DTU-710 .............................................................
9
Customizing The DTU-710 – The Basics
.............................................. 10
Opening the Wacom Tablet Control Panel
Control Panel Basics
Control Panel Detail
s
Calibrating the DTU-710
DTU-710 Component Functions ............................................16
Front View
Rear Vie
w
Using an Alternate Mount or Stan
d
Using the Pen ............................................................................19
Pen
Using a Pen
Removing the Side Switch
Adjusting the LCD Monitor .........................................................22
Factory Presets, Multi-sync, and User Settings
Working with OSD (On Screen Display) Menu
Adjusting Pitch and Phase
(VGA only)
Power Saving
Caring for DTU-710 ...................................................................26
Cleaning
Replacing the Pen Tip
Troubleshooting .........................................................................27
Display Troubleshooting
Pen Tablet Troubleshootin
g
Specifications ...........................................................................34
Obtaining Technical Support .....................................................
36
Page 5
5
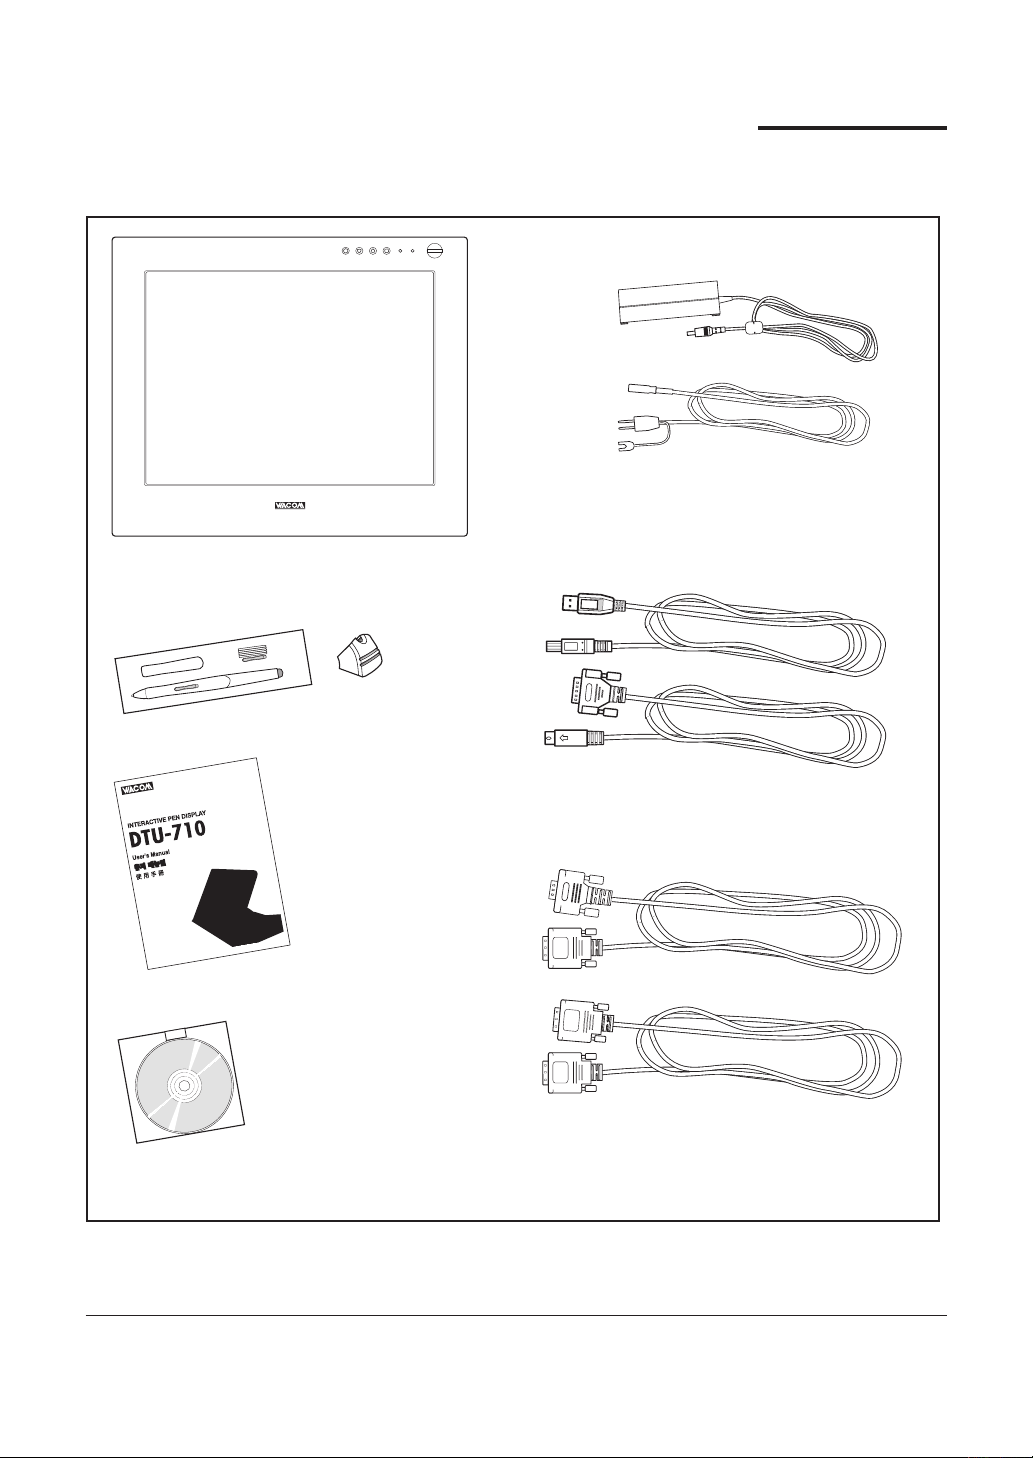
Checking Packed Components
In your package you will find the following items:
USB Cable and RS-232C Cable*
DVI-DVI Cable and DVI-VGA Cable*
DTU-710 main unit
Pen with Pen Stand
User's Guide
Wacom Tablet CD
Contains the driver software.
(Windows/Macintosh)
AC Adaptor and Cable
*
For DTU-710 only. Do not use with other devices.
Please retain the package box for use when storing or shipping DTU-710.
Some package configurations includ an additional CD containing bundled software applications.
Page 6

6
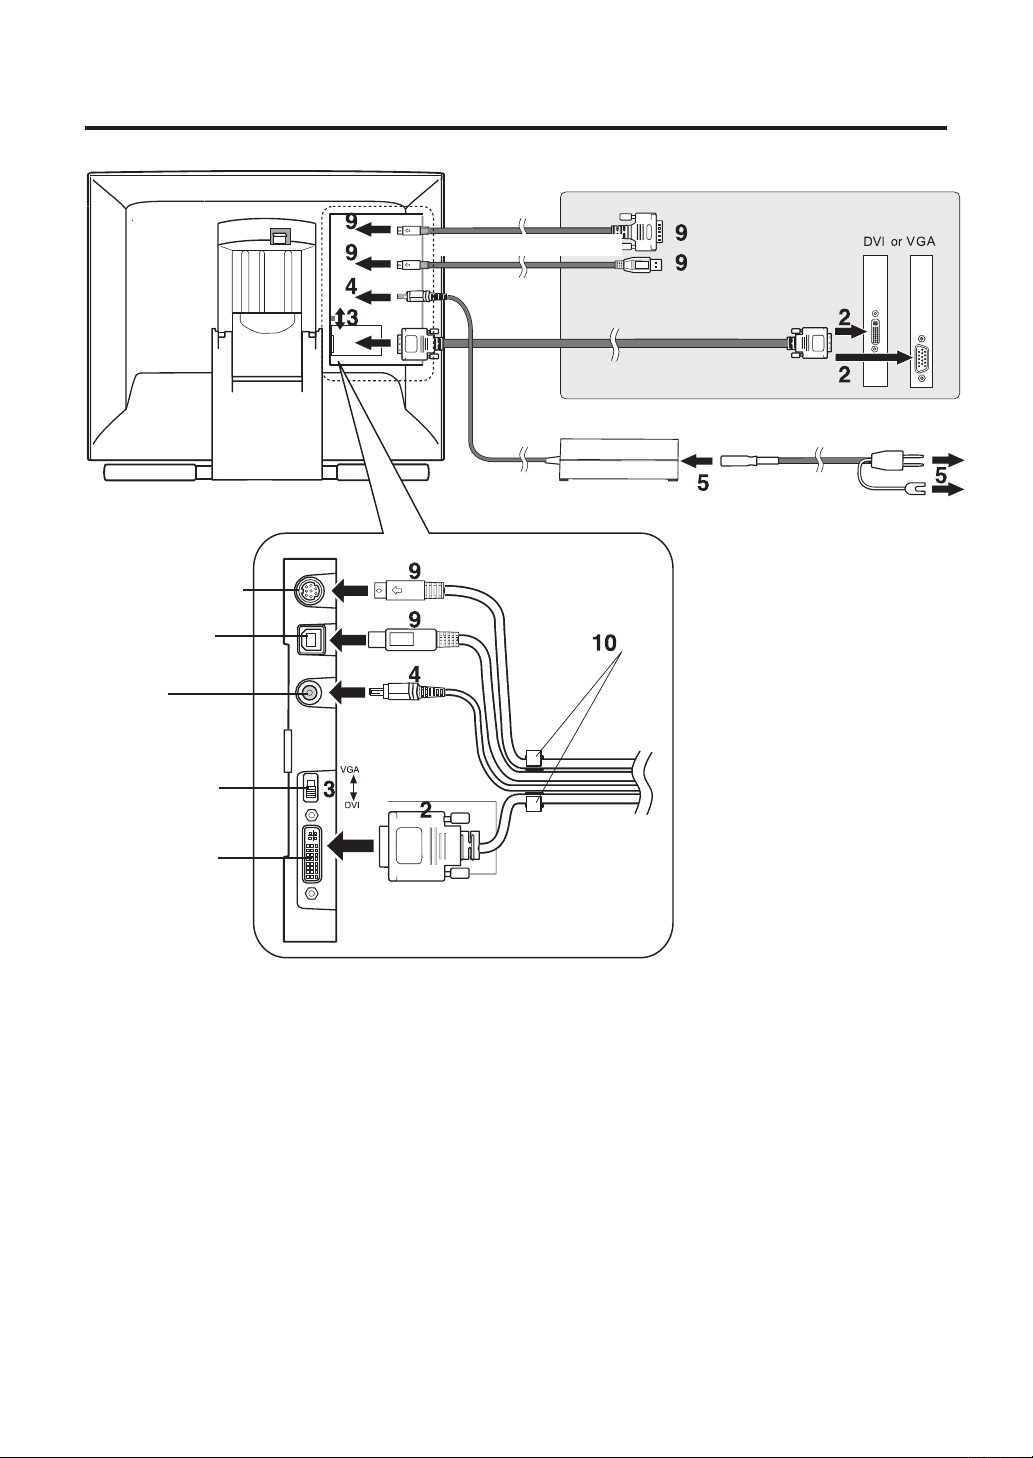
Connect DTU-710 to a computer
1.
Turn off your computer. The cover in the rear of DTU-710 is made to slide in the
direction of "▶", and is removed.
2.
Connect the DVI-to-DVI cable or DVI-to-VGA cable between DTU-710 and your
computer.
3.
Set the DVI/VGA switch. Move it up for analog (VGA) mode, and move it down for
digital (DVI) mode.
4.
Connect the AC adaptor to DTU-710.
5.
Connect the AC adaptor power cable and plug the adaptor into an AC outlet.
Be sure to connect an earth cable.
6.
Turn on the power switch of DTU-710. The power lamp will light blue, and then
turns orange.
7.
Turn on your computer to start your operating system.
8.
The maximum resolution of DTU-710 is 1280 x 1024, True Color . As necessary,
configure the monitor control panel settings for the proper size and color resolution.
The number of colors is constrained by the performance of your computer or
graphics card. Refer to the documentation of the manufacturer for details.
If you are using analog (VGA) mode, you may also want to fine-tune the display.
Please refer to Adjusting the LCD Monitor on page 22 for more information.
9.
To install the Wacom tablet software, turn off your computer and connect the USB
cable or serial data cable.
10.
Fix cables to a cable guides. Shut the connector cover is and take out the cables
from the hole of the cover.
11.
Install tablet software. Refer to
Tablet Software Installation for Windows and
Macintosh on
page 8
.
CAUTION
■
Do not use any cable that did not come with DTU-710; use of an improper cable
may damage DTU-710.
■
Make sure your graphics card has a VGA or DVI connector, and that you correctly
set the DTU-710 Analog (VGA)/Digital (DVI) switch for the graphics card you are
using. The use of an improper video card may damage DTU-710.
■
Do not connect or disconnect the video or power cable while DTU-710 or your
computer are turned on; this can damage the LCD display or computer video card.
■
Never connect or disconnect the DVI video cable or power cable while your computer
or DTU-710 is powered on. This can damage the LCD display or video card.
Connect DTU-710 to a computer as adisplay.
Page 7
7
2
DVI-I connector
DVI/VGA switch
to AC outlet
Ground
Rear Panel of your computer
Connect one cable only.
RS-232C connector
Cable guides
USB connector
DC input
DVI-DVI or DVI-VGA cable
To USB port
To serial port
Video card
Page 8

8
Tablet Driver Installation
Before you install the tablet software of DTU-710, you need to connect the USB cable
or the serial data cable (Windows only) of DTU-710 to your computer. After connecting
it, you turn on DTU-710 and your computer.
Windows:
1.
First turn on the DTU-710. Then turn your computer on and login, allowing
the operating system to fully load. The DTU-710 will automatically register as
a USB device.
Windows 98SE: The ADD NEW H ARDWARE WIZARD will display.
Follow the prompts, selecting the default options. If prompted to install
drivers for t h e U S B H u m a n Interface Device, i n s e r t t h e Windows
98SE C D , clic k O K , an d e n ter th e l ocatio n o f the Windows C A B
files (e.g., D:\WIN98). Note that the files may be located on your hard disk in
the C:\WINDOWS\OPTIONS\CABS folder.
2.
Ins e r t the DTU-710 t a b l et driver CD into t h e CD-ROM drive. T he
DTU- 7 1 0 menu s h o uld auto m a tically d isplay. If t h e menu d o e s not
disp l a y, d o u b l e-cli c k on th e I NSTAL L ic o n (loca t e d on t h e CD).
Click on t he I NSTALL PEN TAB LET but ton and foll ow the prompts
to install the driver software.
Macintosh:
1.
Fi rst turn on the DTU-710. Then turn on your computer and allow the
operating system to fully load. The DTU-710 will automatically register
as a USB device. Disable any virus protection programs and close all open
applications before installing the software.
2.
Insert the DTU-710 tablet driver CD into your computerʼs CD-ROM drive.
Double-click on the INSTALL icon located on the CD. Click on the INSTALL
PEN TABLET button and follow the prompts to install the driver software.
3.
After the software installation has been completed, make sure you can use
your pen on the DTU-710 display to move the screen cursor.
Be sure to check the Read Me file for late-breaking news. If you have trouble
installing the DTU-710, see the Troubleshooting section beginning on page 27 of
this manual.
Next Steps:
Be sure to adjust the tablet calibration to precisely align the screen cursor position with
the location of the pen tip. Refer to
Calibrating the DTU-710
on page 14. To learn more
about Using the DTU-710, proceed to
Customizing The DTU-710 - The Basics
and to
Using The Pen.
Page 9

9
Important
Uninstalling The DTU-710
Follow the appropriate procedure below to remove the DTU-710 Interactive Pen Display
and software from your system.
Windows XP:
When you remove the Wacom tablet driver software from your
system, any other Wacom tablet connected to your computer
will no longer operate with full Wacom tablet functionality.
1.
Click START. In the start menu, select CONTROL PANEL. Then select ADD
OR REMOVE PROGRAMS.
2.
In the ADD OR REMOVE PROGRAMS window, choose the pen display tablet
option and click on the CHANGE/REMOVE button. Follow the prompts to
remove the software driver.
3.
When the pen tablet driver has been removed, shut down your system, power
off your computer, and turn off the DTU-710. When your computer and the
DTU-710 are off, disconnect the DTU-710 from your computer.
Windows 98SE, Me, or 2000:
1.
Click the Windows START button. Then choose SETTINGS and CONTROL
PANEL.
2.
In the CONTROL PANEL window, double-click on the ADD/REMOVE
PROGRAMS icon. In the dialog box that appears, choose the pen display tablet
option.
3.
Click on the ADD/REMOVE... button and follow the prompts to remove the
software driver.
4.
When the pen tablet driver has been removed, shut down your system, power
off your computer, and turn off the DTU-710. When your computer and the
DTU-710 are off, disconnect the DTU-710 from your computer.
Macintosh OS X, v10.2.6 or greater:
1.
From the FINDER, choose APPLICATIONS from the GO menu and open the
tablet folder.
2.
Double-click on the REMOVE TABLET icon and select the REMOVE
TABLET SOFTWARE button.
3.
After the removal is completed, click OK.
4.
Shut down your computer and turn off the DTU-710. When your computer and
the DTU-710 are off, disconnect the DTU-710 from your computer.
Page 10

10
Customizing The DTU-710 – The Basics
The Wacom Tablet Control Panel makes it easy to customize your Interactive Pen
Display and the pen.
Note
If more than one pen display tablet is installed on your system, the
control panel will change the settings for the tablet that was last
used before opening the control panel.
Opening the Wacom Tablet Control Panel
To open the control panel, use the DTU-710 pen on the pen display tablet:
Windows:
Click on the Windows START button and choose ALL
PROGRAMS. (For versions other than Windows XP, choose the
PROGRAMS group.)Then select WACOM TABLET and choose the WACOM
TABLET option.
Macintosh:
Open SYSTEM PREFERENCES from either the Dock, the Apple
menu, or from the APPLICATIONS folder. Then double-click on the WACOM
TABLET icon.
Page 11

11
Control Panel Basics
Enables the eraser function
for a pen with an eraser.
Uncheck this box if your pen
does not have an eraser.
Selects the side switch button functions for pens
equipped with a side switch. See page 12.
If more than one pen display tablet is installed on your system, the control panel
will change the settings for the tablet that was last used before opening the control
panel.
Closes the
control panel.
Customizes the amount of
pressure needed to erase
with the eraser.See page
13.
Customizes the amount of
pressure needed to click
or draw with the pen.See
page 12.
When checked, an
audible “click” sound will
be heard whenever a pen
click occurs and your
computer speakers are
turned on.
Displays information
about the control
panel and driver.
Software driver version.
Returns the
PEN tab settings
to their factory
defaults.
Adjusts the size
of the doubleclick area.
See page 20.
Depending on the pen that came with your product configuration, there
may be more options displayed on the control panel than are actually
present on the pen. When customizing your pen, choose those options
that match the buttons on the pen you are working with.
Open the Tablet control panel to begin customizing your product. Experiment with
different settings to find what works best for you. Any changes you make will take effect
immediately, but you can always click DEFAULT to return to the factory settings.
Additionally, your keyboard tab and arrow keys can be used to navigate the control
panel.
Customizing The Pen
Note
Page 12

12
Control Panel Details
Pen Tip Feel & Eraser Feel
Move the Tip or Eraser Feel slider to adjust the sensitivity of the pen tip or eraser.
To create broad brush strokes or to click with a light touch, use a soft tip setting. For
maximum control while drawing thin lines, use a firmer setting.
Side switch
The pen side switches and Cordless Mouse buttons each have a pull-down menu
that allow you to choose the function that will be performed when the button is
pressed. The following list describes the available functions. Some options,
however, are not available for all buttons.
•
Left-Click
(Windows),
Click
(Macintosh)
this option simulates a left mouse button click.
•
Right-Click
(Windows & Macintosh)
this simulates a right mouse button click.
•
Middle-Click
(Windows & Macintosh)
simulates a middle mouse button click.
•
Left Double-Click
(Windows),
Double-Click
(Macintosh)
simulates a left mouse button double-click. For easier double-clicking, use this
function instead of tapping twice with your pen.
•
Left Click-Lock
(Windows),
Click-Lock
(Macintosh)
simulates holding down the left mouse button. Press the tool button once to
initiate click lock. Press the button again to release click lock. Click lock is
useful for dragging objects or selecting blocks of text.
•
Keystroke
enables you to simulate a series of keystrokes. Selecting this option displays
the define keystroke dialog box, where you can enter a keystroke or keystroke
sequence to play back. Keystroke combinations can include letters, numbers,
function keys (such as F3) and modifier keys
(such as SHIFT, ALT, or CTRL
for Windows, or SHIFT, OPTION, COMMAND, and CTONTROLl for Macintosh).
•
Pressure Hold
sets the button so that, when pressed, the pressure is locked at the current
pressure level until the button is released. For example, you can paint with
pressuresensitivity until you reach the bush size that you like.
Customizing DTU-710 – The Basics
Page 13

13
•
Mode Toggle
toggles between Pen Mode and Mouse Mode.
•
Ink Toggle
(pen and Macintosh OS X )
lets you use your pen to toggle the Ink Anywhere function of Inkwell on and off.
Note that Ink must be turned on for this button function to work.
•
Erase
works like the eraser on a pencil in graphic applications that support the Erase
function.
•
MODIFIER
Enables you to assign modifier key(s) (such as SHIFT or CTRL). Many
applications use modifier keys to constrain the size or placement of objects.
Selecting this option displays the DEFINE MODIFIER dialog box where you
can assign one or more modifier key functions.
Select the CLICK box plus one or
more modifier key options if you
want a mouse click to happen
whenever you press the tool
button.
Macintosh:
The available
options will be SHIFT, CONTROL,
OPTION, COMMAND, and CLICK.
Page 14

14
Calibrating the DTU-710
1.
From the WACOM TABLET Control Panel, select the CALIBRATION tab.
If you are working with multiple monitors, select the Monitor that corresponds to the
tablet's LCD display. (Only monitors that are set to one of the resolutions supported
by the DTU-710 will appear in the list.)
2.
Click on the CALIBTRATE... button to display the monitor calibration screen.
Cross-hairs
Adjustment pattern
for phase and pitch.
See
Adjusting Pitch
and Phase (VGA
Only)
on page 26 for
details.
Customizing DTU-710 – The Basics
You will need to calibrate the pen display tablet in order to align the screen cursor
position with the position of the pen on the display screen. This is required to
adjust for parallax caused by the display screen cover glass. Set the DTU-710 in
its working position, then follow the procedure below.
Page 15

15
3.
Hold the pen as you normally do, and use the pen tip to click on the cross-hairs in the
upper-left corner.
4.
Then click on the cross-hairs that are displayed in the lower-right corner. (For
Windows systems, you will need to click APPLY or OK for the changes to take effect.)
5.
Test the alignment and click OK to accept the calibration. Click TRY AGAIN to
recalibrate.
Be sure to read the directions in the calibration screen for detailed instructions and
additional options. The calibration setting applies to all applications.
To calibrate two pen display tablets, first touch the pen to tablet #1 and open the control
panel without touching the pen to tablet #2. In the control panel, select the correct
monitor and calibrate tablet #1. Close the control panel, touch the pen to tablet #2, and
again open the control panel without touching the pen to tablet #1. Select the correct
monitor and calibrate tablet #2.
If more than one pen display tablet is installed on your system, the
control panel will change the settings for the tablet that was last used
before opening the control panel.
Note
Page 16

16
As the tablet portion of DTU-710 emits electromagnetic waves at a certain frequency, if another tablet
is closely placed to DTU-710, the screen cursor may jitters or jumps around. To solve this problem,
place the tablet away from DTU-710.
Front View
As properties of LCD panel display, you may notice the followings. They do not mean the LCD is
defective.
- When exerting hard downward pressure on the display, a moir pattern may temporarily appear.
- A very small number of pixels may appear in incorrect color.
- If an image area has fine striping (such as screen stripes), it may flicker or display a moir pattern or
pooling image.
- When a still image is displayed for a long period of time, an afterimage may remain for a short period
of time.
POWER Switch
Turns the power to the unit on or off.
POWER
STATUS
ENTER
EN
-
MENU
*2
DTU-710 Component Functions
POWER Lamp
Lights blue when power has been supplied
to both the DTU-710 and the computer and
a video signal is present.
Glows orange when no video signal is
received by the DTU-710. (e.g., Your
computer is turned off, starting up, or has
entered a power management mode in
which video signals are not sent.)
STATUS Lamp
Lights blue when the pen is in the active
area of the pen display tablet and the pen
tip, side switch, or eraser are pressed. Note
that the USB cable must be plugged into an
active USB port before the LED will light.
ENTER Button
Press this button when you select or exit an
item in the OSD*1 menu. ☞ P 22
- (minus) Button, + (plus) Button
In the OSD*1 menu, Use these buttons to select an option that can then be
activated. After activating a selected option, press the + button to increase a
selected item value, and press the - button to decrease it.
MENU Button
Opens and closes the
OSD*1 menu.
Integrated Tablet and LCD Screen
The LCD monitor*2 and tablet sensor function*3 as an
integrated input and output device.
The LCD resolution is 1280 x 1024 pixels at 16,194,277
colors. The tablet sensor reports coordinates, pressure,
switch, and eraser information.
*3
*1
On Screen Display.
☞
P. 22
Page 17

17
Connector Panel Cover
To remove, slide it to the right.
Stand
The stand can be used to
adjust the tilt angle of the unit
from low (16°from horizontal)
to high (72° from horizontal).
Stand Adjustment Lever
Pull this lever to adjust the
stand. Release the lever to
lock the stand in place.
Be sure to adjust the tilt angle of the stand to the low tilt position
before packaging DTU-710. If you do not close the stand, the
notched mechanism may be damaged during transportation and
storage. Do not lift the unit by the stand; this may damage the
stand mechanism. When lifting or moving the unit, always do so
by grasping the main body casing.
Be careful to avoid
catching your finger in
the gap of the movable
portion of the stand.
CAUTION
Rear View
Important
Page 18

18
CAUTION
When attaching DTU-710 onto
an alternate mounting platform,
be sure to follow all instructions
in the documentation supplied
by the platform manufacturer.
If improperly installed, the unit
could fall and be damaged.
Using an Alternate Mount or Stand
unscrew
1.
Turn off your computer and
power off DTU-710. Then
disconnect all cables from
DTU-710.
2.
Protect the display screen
surface by spreading a soft
cloth onto a flat table and
placing DTU-710 face down
on the cloth.
3.
Remove the four screws
and lift the adjustable stand
assembly away from the body
of DTU-710.
4.
Using the appropriate screws
for your mounting platform,
firmly attach DTU-710 to the
alternate mounting platform.
5.
Rettach the cabling.
If you will be using DTU-710 in an installation that requires the use of an alternate
mounting platform, you can remove the adjustable stand from DTU-710 and mount the
pen display onto a VESA conforming mount arm or stand.
A VESA mounting platform will require mount screws that are 4 mm wide with a 0.7
mm pitch (M4 Regular), and a maximum screw clearance depth of 15 mm. Exceeding
the screw clearance depth of 15 mm will damage DTU-710 internal components.
To remove the adjustable stand and attach DTU-710 to a different mounting platform:
DTU-710 Component Functions
Page 19

19
Pen
Using the Pen
Pen Tip
When the pen tip is within proximity (5 mm or 0.2 in) of the active area, the tablet
reports:
- The x, y coordinates of the pen tip.
- The pressure applied to the pen tip.
- Whether a side switch is on or off.
When pressure is applied to the pen tip, the tip switch is turned on and the pen
simulates a mouse button click.
Eraser
To use the eraser, hold the pen upside down. When the eraser is within proximity
of the active area, the tablet reports the x, y coordinates and the pressure applied to
the eraser.
The eraser can be used as an eraser or assigned to another function, depending on
the application. The tablet distinguishes the tip switch from the eraser switch.
Side Switch and Second Side Switch
These switches are programmable, and can be used to perform the same click and
double-click functions as the tip switch. The switches are turned on when pressed,
and are otherwise turned off. Please refer to the online Help for more information
on side switch settings.
Tip Switch
Eraser
Side Switch
Second Side Switch
Eeasar
Hold the pen as you would a pencil. Make sure the side switch is in a convenient location
where you can press it with your thumb or forefinger, but won't accidentally press it
while drawing.
Page 20

20
Using a Pen
If the screen cursor is not aligned with the pen tip, you will need
to calibrate DTU-710.
Clicking
Tap DTU-710 screen once with the pen tip, or touch the pen to the display screen with
enough pressure to generate a mouse click.
Double-Clicking
Press the upper side switch (Windows systems) or quickly tap DTU-710 screen
twice in the same place with the pen tip. Double-clicking is easier when the pen
is perpendicular to the tablet screen.
Dragging
Select an object, then slide the pen tip across DTU-710 screen to move the object.
Erasing
In supporting applications, the pen's eraser works like the eraser on a pencil. In
text applications, use the eraser to select text, then lift the eraser from the tablet to
delete the text.
Removing the Side Switch
Rubber Grip
Sectional
Pointing and Selecting
Move the pen above DTU-710 screen to position the screen cursor. The cursor instantly
jumps to the new location (absolute positioning). Press the pen tip on DTU-710 screen to
make a selection.
Note
If you prefer to remove the side switch:
1.
Firmly clasp the switch in the middle and pull out. (Press in on the rubberized grip in
order to better grasp the switch.)
Using a Pen
Page 21

21
Do not remove the switch by prying it from either end as
this may damage your Pen.
2.
Remove the pen tip cone by turning it counterclockwise.
To reinstall the side switch,
reverse the above procedure.
Important
3.
Pull the grip forward over the pen tip. NEVER adjust the trimmer capacitor that became
visible as it is fine tuned. When using the pen without the side switch, always istall the
optional grip in order to protect the trimmer capacitor.
4.
Install the optional grip by aligning the pen case rails with the grooves inside the grip
and pushing the grip over the pen tip.
5.
Replace the pen tip cone by turning it clockwise onto the pen.
Page 22

22
Adjusting the LCD Monitor
Factory Presets, Multi-sync, and User Settings
Factory Presets:
To display images with the best quality (based on the incoming
signal), DTU-710 comes with a number of factory default standard display modes.
Multi-Sync:
When connected as a VGA display, DTU-710 attempts to automatically
synchronize to the incoming signal. Multi-Sync functions if the horizontal frequency is
between 30 to 80 kHz and the vertical frequency is between 50 to 75 Hz. If DTU-710
does not automatically synchronize with the incoming signal, you can use the OSD
Reset Auto Adjust option to initiate display synchronization. If necessary, further
screen display adjustments can be manually made using the On Screen Display (OSD)
controls.
User Settings:
When you manually set the display using the On Screen Display (OSD)
function, the settings are stored within DTU-710 for use the next time the unit receives
a similar signal. This is applicable to all display modes.
Working with OSD (On Screen Display) Menu
To open the main MENU,
press the MENU ( ) button.
Use the + (
) or - ( ) buttons to select an option. When the option you want to adjust
is highlighted, press the ENTER (
) button. The current settings and adjustment submenu for that option will appear.
Use the + ( ) or - ( ) buttons to adjust the option settings.
When you have made your changes,
press the ENTER (
) button to save.
To
exit,
press the MENU ( ) button. All settings are automatically saved when the OSD
menu closes.
Contrast
Brightness
Select to increase
or decrease image
brightness.
注意 : 色温度 ( ▶P.19)
でダイレクトを選択し
ている場合は変更でき
ません。
Phase (VGA only)
Pitch
(VGA only)
Select to reduce or
eliminate vertical
distortion lines.
☞
P24
To automatically
adjust, use the Reset
option.
Select to increase or
decrease image contrast.
注意 : 色温度 ( ▶P.19)
でダイレクトを選択し
ている場合は変更でき
ません。
Select to red
uce or
eliminate horizontal
distortion lines.
☞
P24
To automatically
adjust, use the RESET
option.
Page 23

23
Vertical Center
Color
Provides settings for
9300°, 6500°, and 5000°
Kelvin.
Also provides a User
option that enables you
to adjust red, blue and
green independently.
Selecting DIRECT displays the received signal
as it is without any adjustment. Choose a setting
to work with and press Enter to activate your
selection. You can
change the user setting
by selecting the icon ' '.
In the User
Adjustment window,
change red, blue and
green to calibrate color.
To exit, select the icon ' '.
Horizontal Center(VGA only)
Menu Position
Reset
Backlight
Language
Provides two options:
Use Auto Adjust to
reset only the image
parameters. Use Recall
to reset all screen options
to the factory default.
Selecting the exit (
) icon exits the Reset
window without resetting anything.
Selects to increase or
decrease the backlight
brightness level.
Select to choose a
language option for the
OSD: English, Deutsch,
Francais, Espanol,
Italiano, or Japanese.
Select to move the screen
image left or right.
To automatically adjust,
use the Reset option.
Select to move the OSD
menu around the display.
(VGA only)
Select to move the screen
image up or down.
To automatically adjust,
use the Reset option.
Remote Wake Up
オンにすると、
EnergyStarの規格を
満たさなくなります。
Page 24

24
Adjusting Pitch and Phase
(VGA only)
1.
From the Wacom Tablet Control Panel, select the CALIBRATION tab.
If you are working with multiple monitors, be sure the display corresponding
to the DTU-710 is selected in the MONITOR menu.
2.
Click on the CALIBRATE... button to display the monitor calibration screen.
Adjustment pattern
Adjusting the LCD Monitor
Some computers and video cards may not allow the multi-sync function to fully
work when DTU-710 is first connected. If some portion of the text appears
blurred, adjust the pitch and phase by following the procedure below. For crisp
images, set the DTU-710 resolution of your video card to 1280 x 1024.
Page 25

25
3.
Using the OSD controls, open the OSD Menu and select the PITCH icon.
4.
Adjust the Pitch level so the pattern of fine vertical stripes displays evenly.
5.
In the OSD Menu, select the Phase icon and adjust the Phase level so the
adjustment pattern shows clearly.
6.
After completing the adjustments press the ENTER ( ) button and MENU ( )
button to exit the OSD Menu.
Click on the Cancel button or press ESC to exit the calibration screen.
Power Saving
(1280 x 1024 resolution under Windows only): You can also adjust
Pitch and Phase in the closing Windows display.
If the pitch is not calibrated, ve rtical moire a ppears in th e
darkened area. And if the phase is not calibrated, the darkened
area riffles.
Hint
DTU-710 conforms to VESA and Energy Star power saving guidelines. When
using DTU-710 with a VESA DPMS Display Power Management Signaling
(DPMS) compliant computer or graphics card, the display will automatically
comply with the below power saving parameters.
Power Saving Mode
H-sync V-sync Video
Power Consumption
Power Lamp
Power ON Yes Yes Active 37W max. Blue
Standby mode No Yes Blanked 2W max. Orange/Blue
Suspend mode Yes No Blanked 2W max. Orange/Blue
OFF mode No No Blanked 1W max. Orange
Page 26

26
To insert a new nib:
To remove the old nib:
Prevent your children from swallowing the pen nib or side switch. The pen nib
or side switch may accidentally be pulled out if children are biting on them.
CAUTION
Slide it straight into the barrel of
the pen. Firmly push the nib until it
stops. The new nib will slide into the
correct position.
Clasp it with a pair of tweezers
or similar instrument and pull
the old nib straight out of the
pen.
Caring for DTU-710
Cleaning
Replacing the Pen Tip
T
o clean the DTU-710 casing,
use a soft cloth with mild detergent (such
as dish washing liquid) diluted with water. Do not use paint thinner, benzine,
alcohol, or other organic solvents to clean DTU-710 casing or pen.
To clean the display screen,
use a soft, dry cloth. If necessary, slightly
moisten the cloth with water and try again. When cleaning, apply only a light
amount of pressure to the display screen and do not make the surface wet. Do
not use detergent to clean the display screen; this may damage the coating on the
screen. Please note that damage of this kind is not covered by the manufacturer's
warranty.
The pen tip will wear with normal use. When the nib gets too short, you can
replace it with one of the extra nibs that came with your pen. If the pen tip wears
and becomes angular, it may damage the coating on the cover glass of DTU-710
Interactive Pen Display. To avoid this, periodic nib replacement is recommended.
Page 27

27
Problem Hint
●
The following message appears
briefly on your display screen:
■
The input signal frequency is incorrectly set or not
compatible with the DTU-710. Connect a different display
and set the refresh rate (vertical frequency) to some value
between 50 and 75 Hz. If your video card driver supports
djustment of the horizontal frequency, make sure it is set to
some value between 30 and 80 kHz.
■
The resolution is set too high (1280 x 1024, maximum).
■
The refresh rate is set too high (75 Hz maximum).
■
Set the display properties to detect plug and play monitors.
●
The following message ppears
briefly on your display screen:
●
The power LED is lit orange or
flashes orange and blue.
■
Check the video cable for bent or broken connector pins.
Then properly connect the video cable.
■
Your computer may be in a power management mode.
Touch the pen tip to the display screen, move the mouse, or
depress any key on your keyboard.
■
Verify that the graphics card is properly installed.
●
The following message ppears
briefly on your display screen:
■
Check that your computer is turned on.
■
Verify that you are using the video cable that came with
DTU-710.
■
Check that the DTU-710 video cable is fully connected.
■
Check the video cable and any video adaptors for bent or
broken connector pins. Then properly connect the video
cable and any necessary adaptors.
Troubleshooting
If you encounter problems with DTU-710 display, refer to the following tables. Your
problem may be described here, and you can try the solution offered.
For additional information about color issues, refer to the documentation that came with
your operating system or applications.
Display Troubleshooting
General Display Problems
Page 28

28
Problem Hint
●
No display. The power LED is off.
■
Check that the AC power adaptor is plugged into both the
pen display tablet and an active power outlet, and that the
DTU-710 power switch is turned on.
●
No display. The power LED is lit
blue.
■
Check the contrast, brightness, and backlight cntrols.Adjust
as necessary, or open the OSD menu, go to the RESET menu
and select the RECALL option.
●
The image appears multiple times
on the display.
■
Do not extend the video signal cable. Do not use an input
selector switch box.
●
When a still image is displayed
for a long period of time without
refreshing the screen, an afterimage
remains for a short period of time.
■
Use a screen saver or other power management feature.
●
The color white does not display as
white.
■
Verify that the display is operating at the factory default
settings. If that is not sufficient, then adjust color as necessary.
For details on color management, refer to your operating
system and application documentation.
■
Verify that the video cable and connector are fully connected.
Problem Hint
●
The display ripples or flickers.
■
Open the OSD menu, go to the RESET menu, and select the
AUTO ADJUST option. Then, if necessary, manually adjust
pitch and phase.
■
Verify that the display adaptor or video card matches the
specifications for the DTU-710.
■
Adjust the refresh rate in the Display Properties control
panel.
●
The display is not clear.
■
As necessary, adjust contrast or brightness, pitch and phase.
■
Set the display resolution of your video card to 1280 x 1024.
●
The display and LCD panel are not
lined up. The display size is not
correct.
■
Open the OSD menu, go to the RESET menu, and select the
RECALL option.
■
As necessary, adjust pitch and phase, and horizontal and
vertical position. Note that some video cards may not show
the display in proper sizing.
●
The display ripples or shows a
moire pattern. The display color is
not even.
■
Open the OSD menu, go to the RESET menu, and select the
RECALL option.
■
As necessary, adjust PITCH and PHASE. ☞ P.24
VGA Problems
Troubleshooting
Page 29

29
Problem Hint
●
The computer does not have an
available USB port.
■
Check if there is an available USB port on a USB hub. If
none are available, you will need to add a USB hub or USB
card.
●
The tablet power LED is off.
■
Make sure the pen display tablet power switch is turned on.
■
Check that the AC power adaptor is plugged into both the pen
display tablet and an active power outlet.
■
Always be sure to use only the power adaptor that came with
the pen display tablet; other adaptors may cause damage to
your product.
●
The pen works only in mouse
mode, and does not draw with
pressure sensitivity.
■
The tablet driver software was not installed or did not load
properly.
■
Make sure the tablet driver software is installed and functioning.
■
Install the driver software for the pen tablet in accordance
with the instructions found in the Installation section of this
manual.
●
The pen selects everything or will
not stop drawing.
■
Open the tablet control panel and go to the PEN tab.
Move the TIP FEEL slider toward FIRM.
●
Double-clicking is difficult.
■
Be sure you are quickly tapping the display screen twice
in the same place on the pen display tabletʼs active area.
Using the side switch (when equipped) to double-click is a
recommended method.
■
Try increasing the DOUBLE-CLICK DISTANCE.
■
Try using a lighter TIP FEEL.
Windows: You might also consider turning on the Web style
interface so that you can navigate using a single click of the
pen.
●
The eraser selects everything or
will not stop erasing.
■
Open the tablet control panel and go to the PEN tab. Move
the ERASER FEEL slider toward FIRM.
●
There is a delay at the beginning of
pen strokes when using the pen for
drawing or selecting.
■
Try decreasing the DOUBLE-CLICK DISTANCE.
●
The pen tip does not function.
■
Be sure you are using the pen (modelUP-911E) that originally
came with your pen display tablet. Other pens may not
function properly on the DTU-710 pen display tablet.
■
Make sure the status LED lights blue when the tip is pressed.
Verify also that the USB cable is plugged in; the LED will not
light if the USB cable is not plugged into an active port. If the
LED does not light, you may have defective hardware.
Pen Tablet Troubleshooting
General Problems
Page 30

30
Problem Hint
●
You have to press hard with the pen
when clicking or drawing.
■
Open the tablet control panel and go to the PEN tab. Move
the TIP FEEL slider toward SOFT.
●
The side switch does not work.
■
Be sure you are using the pen (model UP-911E) that
originally came with your pen display tablet. Other pens may
not function properly on the DTU-710 pen display tablet.
■
Be sure you press the side switch when the pen tip is in
proximity – do this without pressing down on the pen tip.
■
From the tablet control panel, verify that the side switch is set
to the proper function you are expecting to occur.
■
Make sure the status LED lights blue when you press the
side switch. Verify also that the USB cable is plugged in; The
LED will not light if the USB cable is not plugged into an
active port. If the LED does not light, you may have defective
hardware .
●
The pen tip and screen cursor do
not properly line up.
■
Open the tablet control panel and select the CALIBRATE tab.
Continue with Calibrating the DTU-710 on page 14.
●
The screen cursor moves but it does
not jump to the pen tip location.
When the pen is placed on the
display screen, and it does not
follow the pen tip when the pen is
moved across the display.
■
Make sure the pen tablet driver has loaded properly by
opening the tablet control panel. If the driver did not load,
you will see an error message. If an error message appears,
reboot your computer. If the problem persists, refer to the
appropriate Installation instructions for your platform and
reinstall the pen tablet software.
■
If you have customized the side switch (when equipped)
on your pen to toggle between pen mode and mouse mode,
make sure that your pen display tablet is operating in pen
mode. See Button Functions, beginning on page 12, for more
information.
●
The line you are drawing does not
line up with the location of the
screen cursor in paint applications.
■
To function properly, some applications require that the pen
is set to pen mode. Make sure the pen has not been toggled to
mouse mode.
■
If the pen is set to pen mode and the problem still exists,
then you may have a corrupted preferences file. Follow the
instructions in the next tip to create a new preferences file.
●
The screen cursor jumps back
when using your regular mouse or
trackball.
■
When the pen is not in use, place it on the pen rest, in the
pen storage compartment, or at some location near the pen
display tablet, but not on the display. Leaving your pen
on the pen display tablet may interfere with screen cursor
positioning when using other input devices.
Troubleshooting
Page 31

31
Problem Hint
●
If you have tried the previous
solutions, and the screen cursor
and pen tip still do not line up, the
preferences file may be corrupted.
Follow the procedure for your
platform to delete the preferences
file.
■
Windows: Do a Search or Find for the TABLET.DAT file
and delete it. The file should be located in your Windows or
Windows\System32 folder. Then restart your computer. When
the pen tablet driver loads, it will create a new preferences file
with the factory default settings. Recalibrate the unit.
■
Macintosh OS X: For a single user, delete the tablet
preferences by first choosing your HOME folder from the GO
menu. Then open your home LIBRARY folder. Within your
home LIBRARY folder, open the PREFERENCES folder and
delete the COM.WACOM.TABLETPREFERENCES file.
Log out, then log back in. When the tablet driver loads it will
create a new preferences file with the factory defaults.
For multiple users, delete all tablet preferences by first
opening the main APPLICATIONS folder. Then open the
TABLET folder and run the REMOVETABLET utility. When
the utility starts, click on the REMOVE ALL PREFERENCE
FILES button. Log out, then log back in. When the tablet
driver loads, it will create new preferences files with the
factory defaults.
Note: Do not manually remove the WACOM
TABLET.PREFPANE file from the main LIBRARY
PREFERENCEPANES folder. This file is only to be removed
when uninstalling the tablet software driver, and then only
when using the REMOVETABLET utility.
●
When using the pen display tablet
on a multiple monitor system, you
cannot use the pen to control the
other monitor(s).
■
You can use your pen to control the other monitors in mouse
mode. To use mouse mode, first set the penʼs side switch
button (when equipped) to MODE TOGGLE.... Then use
the switch to toggle between pen mode and mouse mode.
See
Customizing the Pen
on page 11 and Button Functions,
beginning on page 12.
●
The computer does not go to sleep.
■
When you are not using the pen, remove it from the pen
display tablet surface or the tablet will continue to send data,
keeping the computer awake.
●
The screen cursor moves erratically
or jumps around on the display
screen when another tablet is
connected to your computer.
■
The tablet portion of the DTU-710 emits electromagnetic
waves at a certain frequency. If another tablet is too closely
placed to the DTU-710 it may interfere with screen cursor
positioning. If this occurs, move the tablet further away from
the DTU-710.
Page 32

32
Problem Hint
●
Windows 98SE or Me:
When working with multiple
monitors, the screen cursor
positioning is incorrect after
moving into the unmapped area of
the virtual desktop.
■
On a multiple monitor system, the pen display tablet is
mapped to the virtual desktop (a rectangular area covering all
monitors). If your video display areas do not form a rectangle
because they are different sizes or they are not evenly aligned,
the screen cursor positioning will be incorrect after moving
into the unmapped area of the virtual desktop. To reestablish
the correct screen cursor position, lift the pen out of tablet
proximity and bring it back into proximity over an area of the
pen display tablet that is mapped to a display area.
●
Windows 98SE or Me:
Your pen does not function inside a
full screen DOS window.
■
You must use a mouse when working in a full screen DOS
window.
●
After pressing CTRL+ALT+DEL,
the screen cursor cannot be
controlled with your pen.
■
When the CLOSE PROGRAM dialog box (Windows 98SE
or Me) is active, the pen tablet will not work. Use your mouse
or keyboard to continue. When this dialog box is closed, you
can again use your pen to control the screen cursor.
●
Windows XP:
After installing the pen display
tablet on a system with multiple
users, the pen tablet only works on
the primary user desktop.
■
Reboot the system after installing the pen display tablet on a
system with multiple users.
Windows-Specific Problems
Troubleshooting
Page 33

33
Macintosh-Specific Problems
Problem Hint
●
At startup, a dialog box appears
telling you that either the driver
failed to load or the tablet
preferences have not yet been
created.
■
The pen tablet was not detected at startup. Make sure the
USB interface cable is securely connected and that the status
LED on the tablet turns on when the pen tip is pressed against
the tabletʼs active area.
●
The pen display tablet works
correctly when initially installed
under OS v10.2.7 or 10.2.8, but
fails to work after restart.
■
There may be a problem in the KEXT.CACHE file.
1. Unplug the pen display tabletʼs USB cable from your
computer. (Be sure to unplug only the USB cable.) Then
uninstall the tablet driver. See Uninstalling the DTU-710 on
page 41 for details.
2. Within your computerʼs OS X SYSTEM folder, select
(highlight) the LIBRARY folder. Then access folder
information by typing COMMAND+i.
3. Select and unlock OWNERSHIP & PERMISSIONS. Then
change the owner from “system” to “yourself (userʼs name)”.
Now lock it back up, entering you administrator password
when prompted.
4. Open the LIBRARY folder. Delete the EXTENSIONS.
KEXTCACHE and EXTENSIONS.MKEXT files.
5. Empty the trash.
6. Again select the LIBRARY folder and access the folder
information.
7. Again select and unlock OWNERSHIP & PERMISSIONS.
Then change the owner from “yourself (userʼs name)” to
“system” and lock it back up.
8. Close the window and restart your computer. When the
system is ready, plug the pen display tabletʼs USB cable back
into your computer.
Install the pen tablet driver and test the unit. It should work
normally when you restart your computer.
Page 34

34
General Specifications
Physical dimensions (WxDxH): 418x362x57mm (excluding the stand)
Weight: 6.2kg (including the stand)
Main Unit input Voltage: DC12V
Power consumption: 37W or less (DC12V)
Operating temp. & humidity: 5 to 35 deg. C, 20 to 80%RH (non condensing)
Storage temp. & humidity:
-
10 to 60deg. C, 20 to 90%RH (non condensing)
(maximum storage humidity is 38% at 60 deg.C,
and maximum storage temperature is 42 deg. C at
90% humidity)
LCD Display
Display: a-Si TFT active matrix LCD
Screen size: 17 inch
Resolution (75Hz Max.) 1280x1024 pixels (SXGA), 1024x768 pixels
(XGA), 800x600 pixels (SVGA), 640x480 pixels
(VGA)
Pixel pitch: 0.264(W) x 0.264(H)mm
Color depth: 253 levels: 16,194,277 colors
Signal Inputs: Analog RGB / Digital signals (DVI 1.0)
Synchronous frequency: Horizontal 30 to 80kHz,
Vertical 50 to 75Hz
All scan modes are non-interlaced.
Refresh Rate 50 to 75Hz
Plug and Play DDC2B
On a TFT liquid crystal display, a very small number of pixels may be permanently illuminated or
not illuminated at all. This does not mean that the display is defective.
Specifications
Page 35

35
Power Adaptor
Input voltage: 100 to 240 VAC, 50/60 Hz
Output voltage: 12 VDC, 4.16 A
Pen (UP-911E)
Pen tip travel: 0.1 mm (0.004 in) or less
Eraser tip travel: 2 mm (0.08 in), approximately
Physical dimensions, weight: 14.0 x 159.0 mm, 16g (0.63 x 6.26 in, 0.56 oz)
Side switch type: Rocker switch
Pen Accessories
Extra nib: PSI-A021
Pen holder: PST-A026
Tablet
Reading technology: Electromagnetic reasonance method
Active area: 337.9 x 270.3mm
Resolution:
100
lpmm (0.01mm) max.
Accuracy: +/-0.5mm, four corners ( 7 mm wide, 25 mm
long from each corner of four "L" shaped areas)
to be +/-1.0mm
Maximum reading height: 5mm
Maximum report rate: 133 points/sec., max
Pressure levels: 512 levels
Communication interface: USB or RS-232C serial
Page 36

36
Obtaining Technical Support
If you have a problem with DTU-710, first check the appropriate setup chapter in this
guide to make sure the unit is installed correctly. Then review the Troubleshooting
section within this manual and the online Help; your problem may be described there
and you can try the solution offered. You can also check the product FAQs (Frequently
Asked Questions) on the Wacom web site.
Asia
Tel: ++81-3-3371-1595 (English)
Fax: ++81-3-3371-1468 (English)
Email: asia-pacific@wacom.co.jp Sales and Support (English)
web site: http://ap.wacom.co.jp (English)
Support Staff
If you think your DTU-710 Interactive Pen Display is not working properly, contact the
Wacom authorized distributors in your area (Check your area distributor on the Wacom
web site: http://ap.wacom.co.jp ), or contact us as the following:
Page 37

Copyright © WACOM Company, Limited, 2004
All rights reserved. No part of this manual may be reproduced except for your express personal use. WACOM reserves the right to
revise this publication without obligation to provide notification of such changes. WACOM does its best to provide current and accurate
information in this manual. However, WACOM reserves the right to change any specifications and product configurations at its discretion,
without prior notice and without obligation to include such changes in this manual.
TRADEMARKS
WACOM is a registered trademark of WACOM Company, Limited. Macintosh is a registered trademarks of Apple Computer, Inc., registered in the U.S. and other countries. Microsoft, Windows are either registered trademarks or trademarks of Microsoft Corporation in the
United States and/or oth er countries. Any additional company and product names mentioned in this documentation may be trademarked
and/or registered as trademarks. Mention of third-party products is for information purposes only and constitutes neither an endorsement
nor a recommendation. WACOM assumes no responsibility with regard to the performance or use of these products.
 Loading...