

Page 1
Installation Guide & User’s Manual
Installations- und Benutzerhandbuch
Guide d’installation et Manuel d’utilisation
Page 2

DTU-1931A
Installation Guide & User’s Manual
Version 1.2, July 22, 2009
Copyright © Wacom Co., Ltd., 2009
All rights reserved. No part of this manual may be reproduced except for your express personal use.
Wacom reserves the right to revise this publication without obligation to provide notification of such changes.
Wacom does its best to provide current and accurate information in this manual. However, Wacom reserves
the right to change any specifications and product configurations at its discretion, without prior notice and
without obligation to include such changes in this manual.
The above date indicates the date when the Wacom Pen Display Installation Guide & User’s Manual was
prepared by Wacom. However, the date of release to the users of the “Manual” is simultaneous with the
introduction into the market of the applicable Wacom product.
DuoSwitch is a trademark, and Wacom is a registered trademark of Wacom Co., Ltd.
Microsoft, Windows, and Vista are either registered trademarks or trademarks of Microsoft Corporation in the
United States and/or other countries. Apple, the Apple logo, and Macintosh are trademarks of Apple
Computer, Inc., registered in the U.S. and other countries.
Any additional company and product names mentioned in this documentation may be trademarked and/or
registered as trademarks. Mention of third-party products is for informational purposes only and constitutes
neither an endorsement nor a recommendation. Wacom assumes no responsibility with regard to the
performance or use of these products.
DTU-1931A
Installations- und Benutzerhandbuch
Version 1.2, 22. Juli 2009
Copyright © Wacom Co., Ltd., 2009
Alle Rechte vorbehalten. Kein Teil dieses Handbuchs darf außer für Ihren eigenen Bedarf vervielfältigt werden.
Wacom behält sich das Recht vor, ohne vorherige Ankündigung Änderungen an diesem Dokument durchzuführen.
Wacom ist stets bestrebt, in diesem Handbuch nur aktuelle und exakte Informationen zu veröffentlichen. Dennoch
behält sich Wacom das Recht vor, Spezifikationen und Produktkonfigurationen nach eigenem Ermessen ohne
vorherige Mitteilung und ohne Aufnahme in dieses Handbuch zu ändern.
Das obige Datum bezeichnet das Datum, an dem das Installations- und Benutzerhandbuch zum Wacom
Interactive Pen Display von Wacom vorbereitet wurde. Das Veröffentlichungsdatum des Handbuchs entspricht
jedoch dem Datum der Markteinführung des jeweiligen Wacom Produkts.
DuoSwitch ist eine Marke und Wacom ist eine eingetragene Marke von Wacom Co., Ltd.
Microsoft, Windows und Vista sind eingetragene Marken oder Marken der Microsoft Corporation in den USA
und/oder anderen Ländern. Apple, das Apple-Logo und Macintosh sind Marken von Apple Computer, Inc. in
den USA und anderen Ländern.
Alle weiteren in diesem Handbuch erwähnten Firmen- und Produktnamen können Marken und/oder eingetragene
Marken sein. Die Erwähnung von Produkten von Drittherstellern dient Informationszwecken und stellt weder eine
Billigung noch eine Empfehlung dar. Wacom übernimmt keinerlei Verantwortung hinsichtlich der Leistung und
der Verwendung dieser Produkte.
DTU-1931A
Guide d'installation et Manuel d'utilisation
Version1.2, 22 juillet 2009
Copyright © Wacom Co., Ltd, 2009
Tous droits réservés. La reproduction totale ou partielle du présent manuel est interdite, sauf pour votre usage
personnel. Wacom se réserve le droit de modifier la présente publication sans avertissement préalable.
Wacom tente, dans la mesure du possible, de fournir des informations à jour et précises dans le présent
manuel. Toutefois, Wacom se réserve le droit de modifier toute caractéristique et configuration du produit,
sans avertissement préalable et sans obligation d'intégrer ces modifications dans le présent manuel.
La date figurant ci-dessus correspond à la date à laquelle le Guide d'installation et Manuel d'utilisation du pen
display Wacom a été élaboré par Wacom. Cependant, la diffusion du « Manuel » auprès des utilisateurs
interviendra à la même date que la mise sur le marché du produit Wacom correspondant.
DuoSwitch est une marque commerciale et Wacom est une marque déposée de Wacom Co., Ltd.
Microsoft, Windows et Vista sont des marques commerciales, déposées ou non, de Microsoft Corporation
aux États-Unis et/ou dans d'autres pays. Apple, le logo Apple et Macintosh sont des marques commerciales
d'Apple Computer, Inc., déposées aux États-Unis et dans d'autres pays.
Tout autre nom de société et de produit mentionné dans la présente documentation peut être une marque
commerciale, déposée ou non. Les produits de fabricants tiers ne sont mentionnés qu'à titre d'information
et ne constituent en aucun cas un engagement ou une recommandation de notre part. Wacom décline toute
responsabilité quant aux performances ou à l'utilisation de ces produits.
Page 3
Installation Guide & User’s Manual
Page 4

Page 5

INTRODUCTION AND OVERVIEW
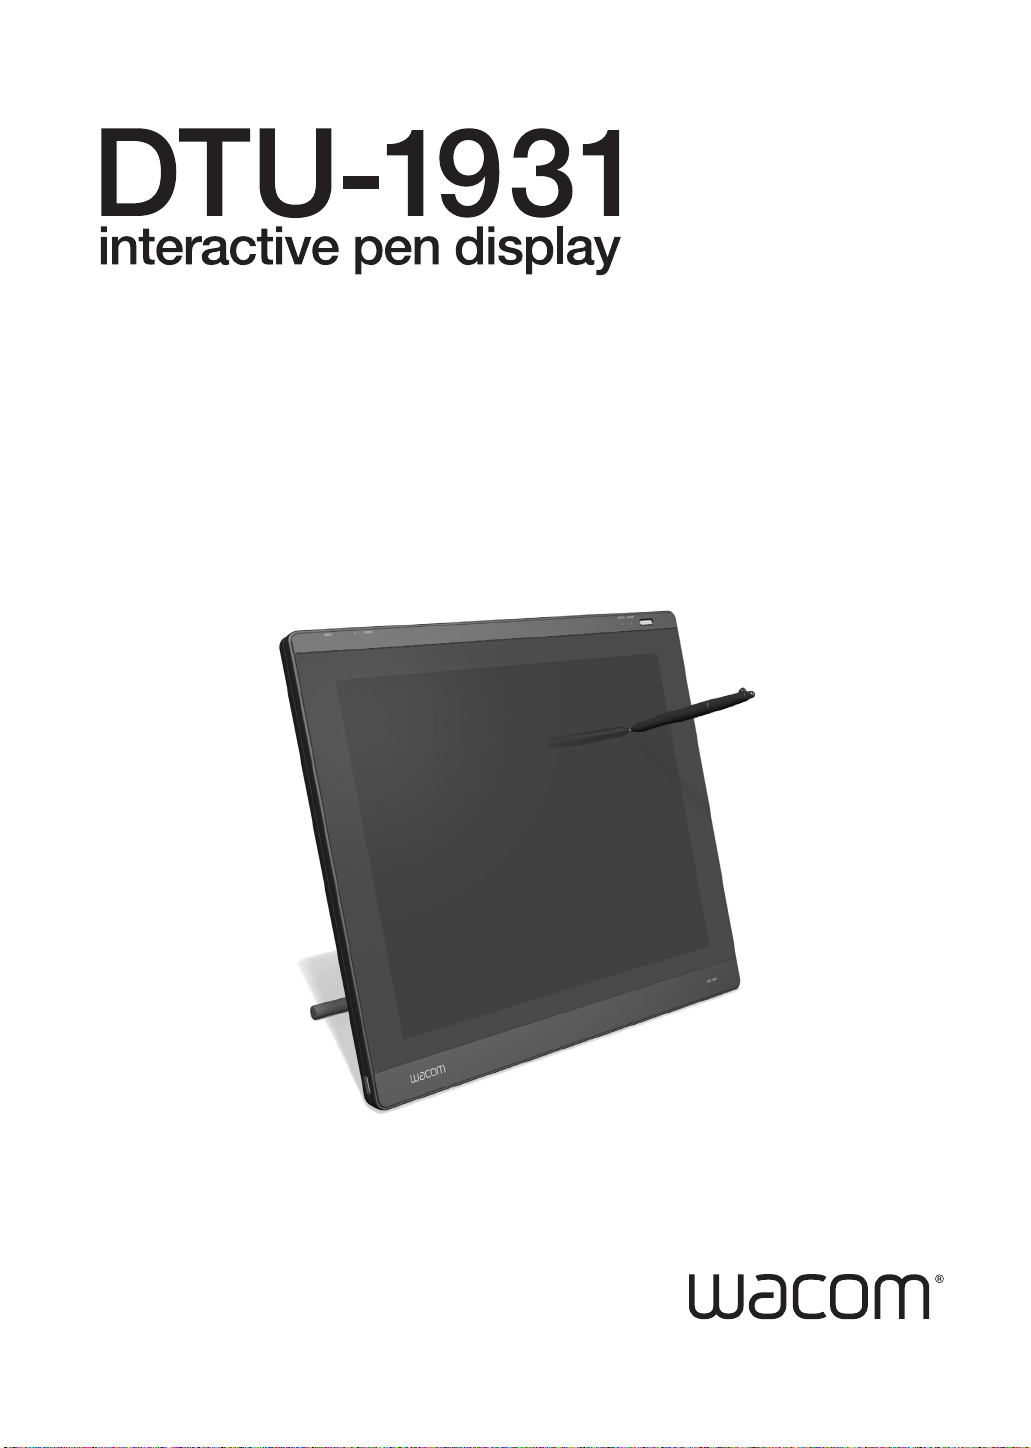
The Wacom® DTU-1931 pen display combines the benefits of a Liquid Crystal Display (LCD) with
the control, comfort, and productivity of Wacom’s cordless, battery-free pen technology. This gives
you a direct pen-on-screen interface for your computer.
The basic components of the DTU-1931 include a Wacom pen tablet internally mounted behind a
19.0" diagonal TFT color display, and a Wacom pen.
The display and tablet sensor function as an integrated output and input device. The display
supports resolutions up to 1280 x 1024 pixels at 16.7 million colors. The tablet sensor reports pen
coordinates, pressure, and switch information.
The DTU-1931 also comes equipped with a video pass-thru (
simultaneously connect a monitor or projector to the pen display.
This manual describes how to install and use your DTU-1931.
The computer treats the DTU-1931 pen display as two separate devices (the display and the
pen tablet). Therefore, the installation process is completed in two stages:
• First install the DTU-1931 as a display.
• Then install the DTU-1931 as a pen tablet.
Both stages require hardware and software installations and adjustments. Please follow all
instructions carefully.
IMPORTANT: You MUST install the Wacom pen tablet driver software for correct pen-on-
screen functionality.
DVI-I OUT) port, enabling you to
To learn about using the Wacom Tablet control panel to customize your pen display tablet and pen
settings on Windows or Macintosh computers, see Customizing on page 21.
The following information is not included with this product: information about your specific computer
hardware or operating system, or information about your application software. Your best source for
this information is the set of manuals and discs that came with your hardware, operating system, or
application.
Wacom’s philosophy is to continually improve all of its products. As a result, engineering changes
and improvements are made from time to time. Therefore, some changes, modifications, and
improvements may not be covered in this manual.
Introduction and overview
Page 1
Page 6
PRECAUTIONS
To ensure the safe usage of your product, be sure to follow all instructions, cautions, and warnings
found within this manual. Failure to do so could cause the loss of data or damage to your computer.
Failure to do so could also void your warranty, in which case Wacom shall have no responsibility to
repair or replace the product.
WARNING
CAUTION
WARNING
Exercise due care and diligence whenever engaging in a described action.
This symbol indicates an item that, if disregarded, may lead
to loss of human life or serious injury.
This symbol indicates an item that, if disregarded, may lead
to human injury or damage to personal property.
This symbol indicates an item that, if disregarded, may lead
to loss of human life or serious injury.
PHYSICAL LOCATION
W
ARNING
Do not use the DTU-1931 pen display in a facility control system that requires
extremely high reliability; it may cause other electronic devices to malfunction, or other
devices may cause the pen display to malfunction. Where use is prohibited, power off the
DTU-1931 to prevent the possibility of it causing other electronic devices to malfunction.
Wacom does not accept any liability for direct or consequential damages. For details,
please refer to your Warranty located at the end of this guide.
ENVIRONMENT
Temperature and humidity
• Operating temperature and humidity: 5° to 35°C, 20 to 80% RH
• Storage temperature and humidity: -10° to 60°C, 20 to 90% RH
CAUTION
C
AUTION
Do not use or store the pen display where:
• Temperature changes are severe or exceed specifications (e.g., outdoors or inside a
vehicle).
• The pen display and pen are exposed to direct sunlight or heat from an appliance, or
are exposed to water or any other kind of liquid.
Do not use the pen display in a dusty environment; this may damage the unit.
Precautions
Page 2
Page 7
USAGE
Hg
WARNING
C
AUTION
CAUTION
C
AUTION
CAUTION
HANDLING
W
ARNING
W
ARNING
W
ARNING
W
ARNING
CAUTION
AUTION
C
CAUTION
C
AUTION
CAUTION
Only use the power adapter that came with the DTU-1931. If a different type of power
adapter is used, the DTU-1931 will not work properly or may be damaged. Using a
different type of power adapter also has the potential to result in fire. Use of a
different power adapter will void your warranty.
Be sure to use a grounded power source when applying power to the DTU-1931.
Do not connect or disconnect the video or power cables while the DTU-1931 or your
computer are turned on; this may damage the display or computer video card. In this
case, Wacom shall have no responsibility to repair or replace the product.
This product is for use with a VGA or DVI video card; using an inappropriate video
card may damage the DTU-1931.
Do not block the rear panel ventilation holes; this may overheat and damage the unit.
When not using the DTU-1931 for long periods of time, unplug the power adapter
from the AC outlet.
High Voltage. Do not open or disassemble the DTU-1931 pen display. There is a
risk of electrical shock when the casing is open. This will also void your warranty and
Wacom shall have no responsibility to repair or replace the product.
If the LCD screen has been damaged, DO NOT touch any liquid that may be leaking
from it; this liquid is an irritant. In case of contact with skin, eyes, or mouth, rinse
immediately with running water for at least 15 minutes or more. If contact is made with the
eyes or mouth, also consult a physician.
– LAMP(S) INSIDE THIS PRODUCT CONTAIN MERCURY AND MUST
BE RECYCLED OR DISPOSED OF ACCORDING TO LOCAL, STATE OR
FEDERAL LAWS.
The DTU-1931 pen display has a backlight which contains mercury (Hg). Be sure to
dispose of properly, and to manage any disposal of this unit in accordance with your local
ordinances and laws.
Prevent children from swallowing the pen tip or side switch. The pen tip or side
switch may accidentally be pulled out if children are biting on them.
Do not disassemble the pen. This may cause the device to malfunction. In this case,
Wacom shall have no responsibility to repair or replace the product.
Do not scratch the display screen. Avoid placing sharp objects on the display screen
surface.
When adjusting the tilt angle of the pen display, be careful to avoid catching your
finger in the gap of the movable portion of the stand.
Do not lift the DTU-1931 by the stand; this may damage the stand mechanism.
When lifting or moving the pen display, always do so by grasping the main body casing.
Avoid intensive shock or vibration to the DTU-1931 or the pen. Hitting or dropping the
pen display may damage the display screen or other components.
Precautions
Page 3
Page 8
CAUTION
CAUTION
CAUTION
C
AUTION
C
AUTION
Do not put heavy articles on the pen display or push against it with a strong force;
this may damage the display screen or bend the stand.
Do not place heavy articles on the DTU-1931 cabling, repeatedly bend the cables
sharply, or apply heavy stress to the cable connectors; this may damage the unit or
cabling.
If the pen tip becomes sharp or angular, it may damage the coating on the display
screen. Replace the pen tip if necessary.
Do not use any organic solvent (e.g., alcohol) or even mild detergent to clean
the display screen. Use of these cleaners can damage the coating on the screen.
Please note that damage of this kind is not covered by the manufacturer's warranty.
• Before cleaning, always disconnect your product from the AC power source.
• To clean the display screen, use an anti-static cloth or a slightly damp cloth.
When cleaning, apply only a light amount of pressure to the display screen and do
not make the surface wet.
• To clean the pen display casing or pen, use a soft cloth with mild detergent (such as
dish washing liquid) diluted with water.
Do not expose the DTU-1931 to high voltage electrostatic discharges or to a buildup of an electrostatic charge on the LCD screen. This may result in a temporary
discoloration and blotching of the display. If discolorations occur, leave the display on and
the discolorations should disappear within a few hours.
Reuse, recycling and recovery. You are urged to recycle this product when replacing it
with a newer product or when it has outlived its useful life by bringing it to an appropriate
collection point for recyclable materials in your community or region. By doing this, you
can help improve the environment of your community as well as minimize the potential
negative effects created, should any hazardous substance that may possibly be present
within waste material reach the environment during the disposal process.
Within the European Union, users are required not to dispose of Waste Electrical and
Electronic Equipment (WEEE) as unsorted municipal waste, according to the Directive
2002/96/EC of the European Parliament and of the Council of 27 January 2003, or the
corresponding local laws of the Member States. Products for which this is applicable will
be marked with the WEEE symbol shown at the beginning of this note unless this is not
feasible because of the size or the function of the product. Wacom products are subject to
the Directive 2002/96/EC and therefore you should always collect them separately and
bring them to the appropriate collection point in your community or region.
Precautions
Page 4
Wacom pen display products comply with the European Union RoHS Directive
2002/95/EC (RoHS Directive).
Page 9

CONTENTS
Introduction and overview 1 . . . . . . . . . . . . . . . . . . . . . . . . . . . . . . . . . . . . . . . . .
Precautions . . . . . . . . . . . . . . . . . . . . . . . . . . . . . . . . . . . . . . . . . . . . . . . . . . . . .2
Physical location . . . . . . . . . . . . . . . . . . . . . . . . . . . . . . . . . . . . . . . . . . . . . .2
Environment . . . . . . . . . . . . . . . . . . . . . . . . . . . . . . . . . . . . . . . . . . . . . . . . . .2
Usage . . . . . . . . . . . . . . . . . . . . . . . . . . . . . . . . . . . . . . . . . . . . . . . . . . . . . .3
Handling . . . . . . . . . . . . . . . . . . . . . . . . . . . . . . . . . . . . . . . . . . . . . . . . . . . . .3
Your new DTU-1931 . . . . . . . . . . . . . . . . . . . . . . . . . . . . . . . . . . . . . . . . . . . . . . .7
Package contents . . . . . . . . . . . . . . . . . . . . . . . . . . . . . . . . . . . . . . . . . . . . . .7
Pen display components . . . . . . . . . . . . . . . . . . . . . . . . . . . . . . . . . . . . . . . .8
Front view . . . . . . . . . . . . . . . . . . . . . . . . . . . . . . . . . . . . . . . . . . . . . . . .8
Rear View . . . . . . . . . . . . . . . . . . . . . . . . . . . . . . . . . . . . . . . . . . . . . . . .9
Adjusting display incline . . . . . . . . . . . . . . . . . . . . . . . . . . . . . . . . . . . . . . . .10
Installation . . . . . . . . . . . . . . . . . . . . . . . . . . . . . . . . . . . . . . . . . . . . . . . . . . . . . 11
System requirements . . . . . . . . . . . . . . . . . . . . . . . . . . . . . . . . . . . . . . . . . . 11
Step1: LCD monitor installation . . . . . . . . . . . . . . . . . . . . . . . . . . . . . . . . . .12
LCD monitor cabling diagram . . . . . . . . . . . . . . . . . . . . . . . . . . . . . . . .13
Step 2: Pen tablet installation . . . . . . . . . . . . . . . . . . . . . . . . . . . . . . . . . . . .16
USB cable installation . . . . . . . . . . . . . . . . . . . . . . . . . . . . . . . . . . . . . .16
Pen tablet cabling diagram . . . . . . . . . . . . . . . . . . . . . . . . . . . . . . . . . .16
Software installation . . . . . . . . . . . . . . . . . . . . . . . . . . . . . . . . . . . . . . .17
Working with your DTU-1931 . . . . . . . . . . . . . . . . . . . . . . . . . . . . . . . . . . . . . .18
Setting up your work area . . . . . . . . . . . . . . . . . . . . . . . . . . . . . . . . . . . . . .18
Using the pen . . . . . . . . . . . . . . . . . . . . . . . . . . . . . . . . . . . . . . . . . . . . . . . .19
Pen components . . . . . . . . . . . . . . . . . . . . . . . . . . . . . . . . . . . . . . . . . .19
Basic pen operations . . . . . . . . . . . . . . . . . . . . . . . . . . . . . . . . . . . . . .20
Customizing . . . . . . . . . . . . . . . . . . . . . . . . . . . . . . . . . . . . . . . . . . . . . . . . . . .21
Opening the control panel . . . . . . . . . . . . . . . . . . . . . . . . . . . . . . . . . . . . . .21
Learning more . . . . . . . . . . . . . . . . . . . . . . . . . . . . . . . . . . . . . . . . . . . . . . .21
Customization basics . . . . . . . . . . . . . . . . . . . . . . . . . . . . . . . . . . . . . . . . . .22
Calibrating the DTU-1931 . . . . . . . . . . . . . . . . . . . . . . . . . . . . . . . . . . .23
Adjusting the display . . . . . . . . . . . . . . . . . . . . . . . . . . . . . . . . . . . . . . . . . .24
Factory presets, auto-sync, and user settings . . . . . . . . . . . . . . . . . . .24
On Screen Display (OSD) settings . . . . . . . . . . . . . . . . . . . . . . . . . . . .24
Adjusting pitch and phase (VGA only) . . . . . . . . . . . . . . . . . . . . . . . . .27
Power saving . . . . . . . . . . . . . . . . . . . . . . . . . . . . . . . . . . . . . . . . . . . .27
Troubleshooting . . . . . . . . . . . . . . . . . . . . . . . . . . . . . . . . . . . . . . . . . . . . . . . .28
Testing the DTU-1931 . . . . . . . . . . . . . . . . . . . . . . . . . . . . . . . . . . . . . . . . .28
Testing your pen . . . . . . . . . . . . . . . . . . . . . . . . . . . . . . . . . . . . . . . . . . . . . .30
Display troubleshooting . . . . . . . . . . . . . . . . . . . . . . . . . . . . . . . . . . . . . . . .31
General display problems . . . . . . . . . . . . . . . . . . . . . . . . . . . . . . . . . . .31
VGA problems . . . . . . . . . . . . . . . . . . . . . . . . . . . . . . . . . . . . . . . . . . . .32
Pen tablet troubleshooting . . . . . . . . . . . . . . . . . . . . . . . . . . . . . . . . . . . . . .33
General problems . . . . . . . . . . . . . . . . . . . . . . . . . . . . . . . . . . . . . . . . .33
Windows-specific problems . . . . . . . . . . . . . . . . . . . . . . . . . . . . . . . . .36
Macintosh-specific problems . . . . . . . . . . . . . . . . . . . . . . . . . . . . . . . . .36
Technical support options . . . . . . . . . . . . . . . . . . . . . . . . . . . . . . . . . . . . . .37
Obtaining driver downloads . . . . . . . . . . . . . . . . . . . . . . . . . . . . . . . . . . . . .38
Appendix . . . . . . . . . . . . . . . . . . . . . . . . . . . . . . . . . . . . . . . . . . . . . . . . . . . . . .39
Caring for the DTU-1931 . . . . . . . . . . . . . . . . . . . . . . . . . . . . . . . . . . . . . . .39
Cleaning . . . . . . . . . . . . . . . . . . . . . . . . . . . . . . . . . . . . . . . . . . . . . . . .39
Replacing the pen tip . . . . . . . . . . . . . . . . . . . . . . . . . . . . . . . . . . . . . .39
Using an alternate mount or stand . . . . . . . . . . . . . . . . . . . . . . . . . . . . . . . .40
Pen and digital ink capabilities in Windows Vista . . . . . . . . . . . . . . . . . . . . .41
Contents
Page 5
Page 10

About the Windows Vista Tablet PC Input Panel . . . . . . . . . . . . . . . . . 42
Uninstalling the DTU-1931 . . . . . . . . . . . . . . . . . . . . . . . . . . . . . . . . . . . . . 43
Product specifications . . . . . . . . . . . . . . . . . . . . . . . . . . . . . . . . . . . . . . . . . 44
General specifications . . . . . . . . . . . . . . . . . . . . . . . . . . . . . . . . . . . . . 44
Display . . . . . . . . . . . . . . . . . . . . . . . . . . . . . . . . . . . . . . . . . . . . . . . . . 44
Pen tablet . . . . . . . . . . . . . . . . . . . . . . . . . . . . . . . . . . . . . . . . . . . . . . 44
Power adapter . . . . . . . . . . . . . . . . . . . . . . . . . . . . . . . . . . . . . . . . . . . 45
Pen (Model UP-817E) . . . . . . . . . . . . . . . . . . . . . . . . . . . . . . . . . . . . . 45
Ordering parts and accessories . . . . . . . . . . . . . . . . . . . . . . . . . . . . . . . . . 45
Radio and television interference . . . . . . . . . . . . . . . . . . . . . . . . . . . . . . . . 46
Federal Communications Commission (FCC) notice . . . . . . . . . . . . . . 46
Industry Canada (Canada only) . . . . . . . . . . . . . . . . . . . . . . . . . . . . . 47
CE declaration . . . . . . . . . . . . . . . . . . . . . . . . . . . . . . . . . . . . . . . . . . . 47
Warranty (Worldwide, Except for Europe, Africa and Middle East) . . . . . . . 48
Warranty (Europe, Africa and Middle East) . . . . . . . . . . . . . . . . . . . . . . . . 50
Contents
Page 6
Page 11
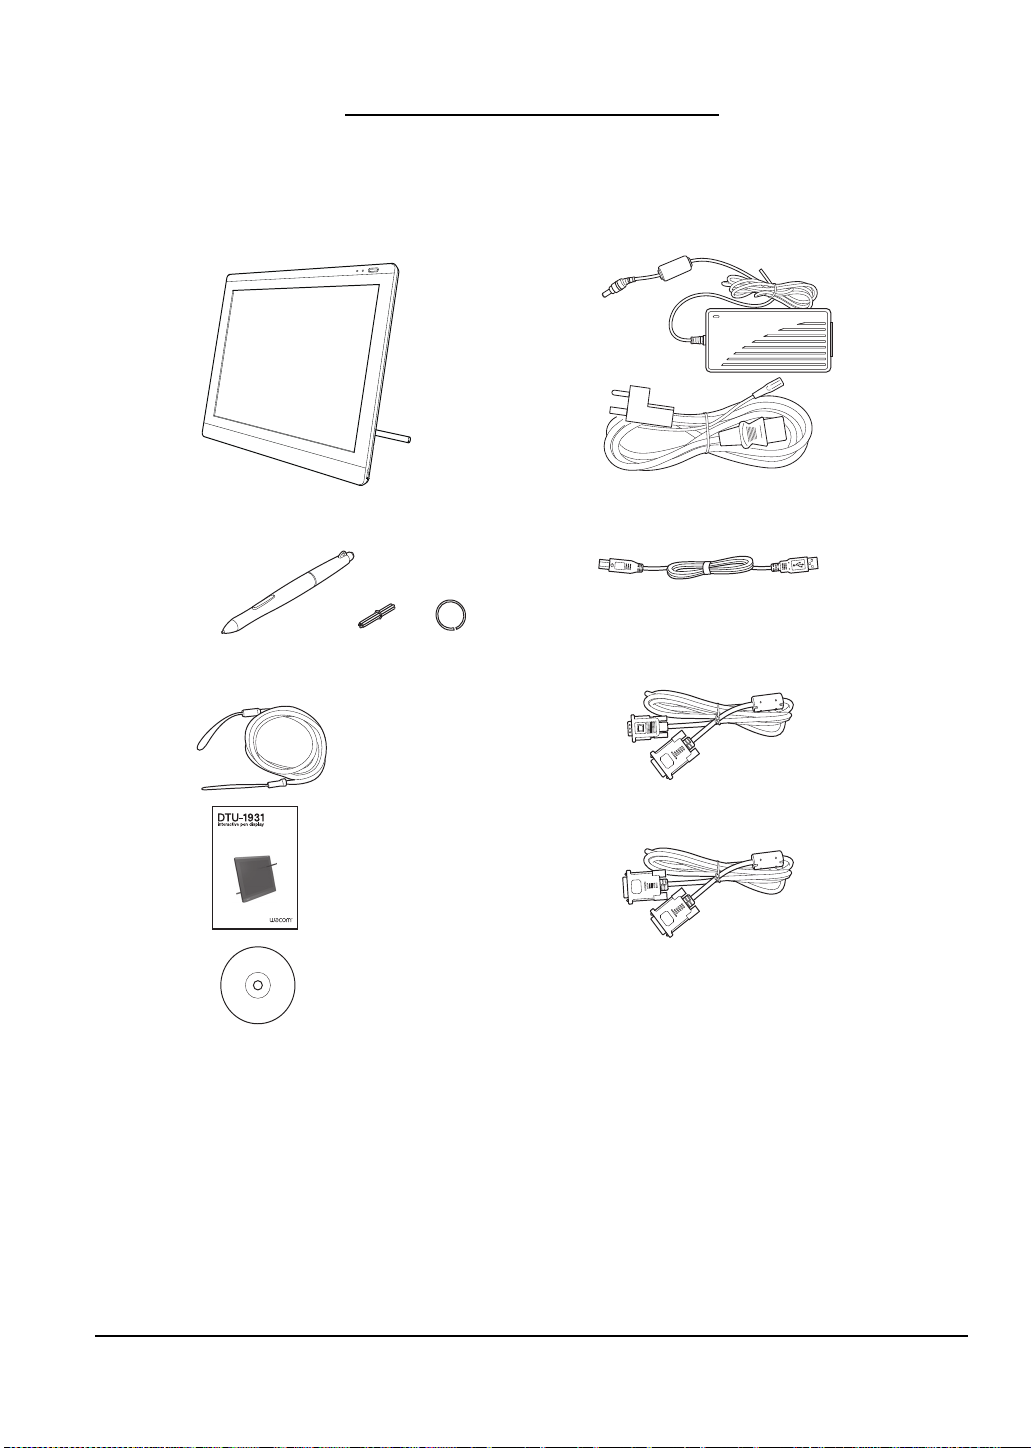
YOUR NEW DTU-1931
DTU-1931 pen display
Power adapter and power cable
(POW-A104 and SCD-A060, SCD-A061, or
SCD-A062 (depending on region))
Pen with replacement nibs
and nib removal tool (UP-817E)
USB cable (STJ-A275)
Installation Guide & User’s Manual
(this manual)
Installation CD
(contains the driver software)
Pen tether (PKB-A025)
DVI to DVI cable (STJ-A273)
Analog RGB cable (STJ-A274)
PACKAGE CONTENTS
Carefully unpack all items and place them on a stable desktop or work surface. Verify the contents
are complete.
InstallationGuide&UserʼsManual
Installations-undBenutzerhandbuch
GuidedʼinstallationetManueldʼutilisation
Notes:
Images not shown to scale.
Some product configurations may come with different pens having no side switches or eraser.
Some configurations may include additional CDs or DVDs containing application software. To install these
applications, review the instructions that came with those CDs or DVDs.
Retain the package box for use when storing or shipping the DTU-1931.
Your new DTU-1931
Page 7
Page 12
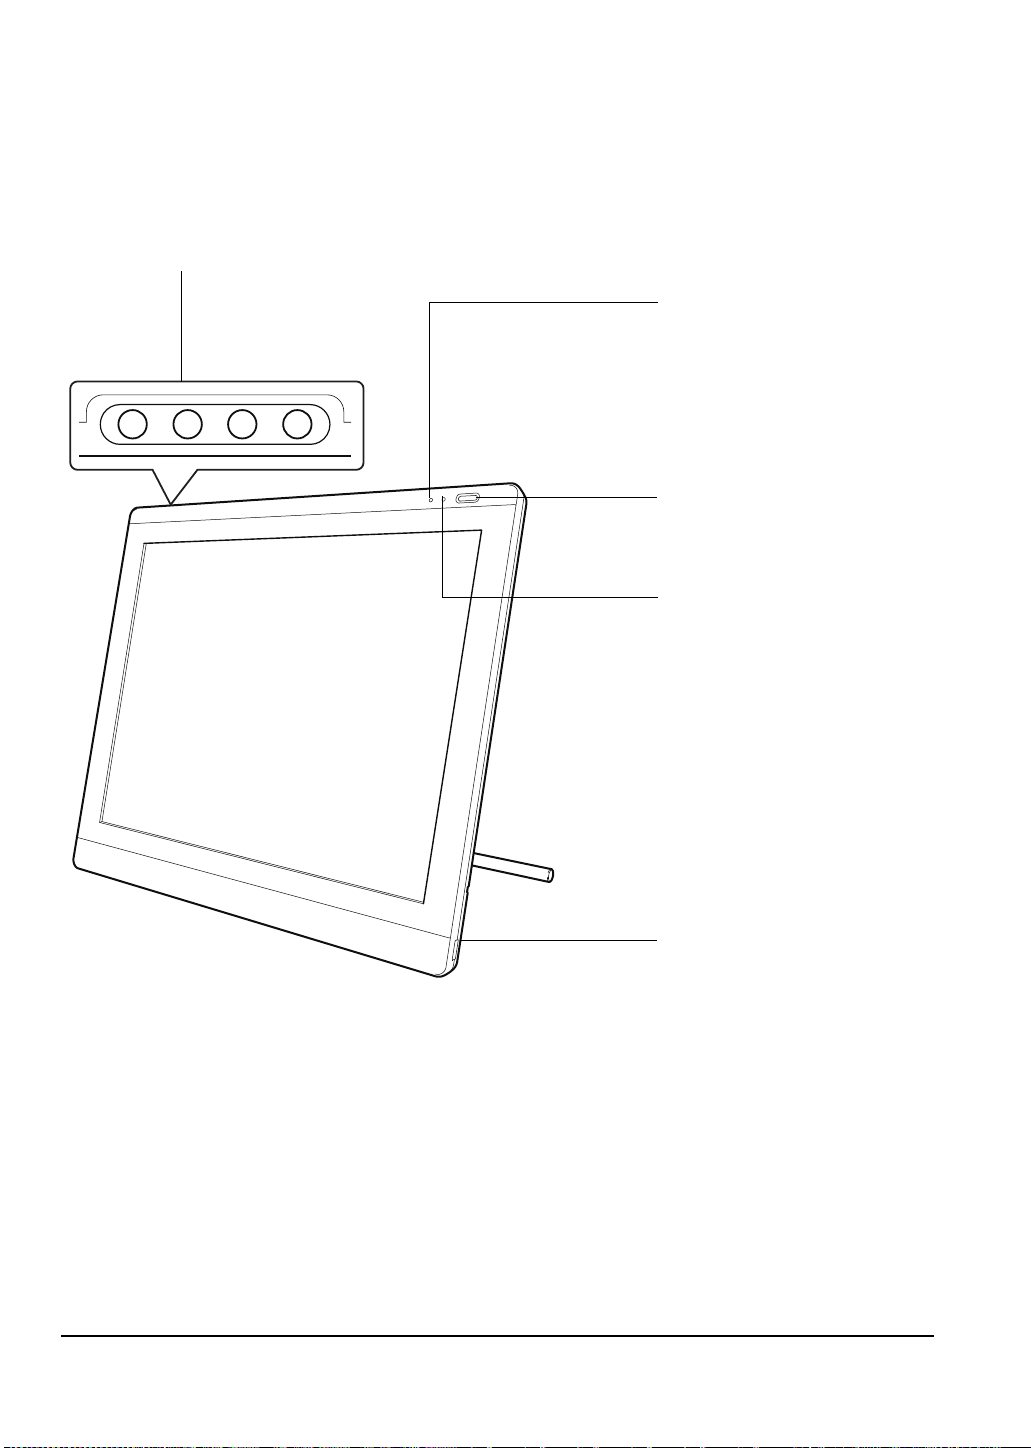
PEN DISPLAY COMPONENTS
On Screen Display (OSD) controls
These controls enable you to adjust a variety
of display settings. See Adjusting the
display on page 24.
Status LED
Lights blue when the pen is in
the active area of the pen display
tablet and the pen tip is pressed.
The USB cable must also be
plugged into an active USB port
before the LED will light.
Power switch
Turns power to the unit on or off.
Power LED
Lights blue when power has
been supplied to the DTU-1931
and a video signal is present.
Glows orange when no video
signal is detected by the
DTU-1931. (e.g., Your computer
is turned off, starting up, or has
entered a power management
mode in which video signals are
not sent.)
Use the integrated USB ports
(one located on each side of the
unit) to connect a USB device
(e.g., a USB Flash Drive or a
USB remote controller).
Be sure to fully install the
DTU-1931 hardware and
software before connecting any
other devices to the unit.
Familiarize yourself with the many features and components of your product.
FRONT VIEW
Your new DTU-1931
Page 8
Page 13
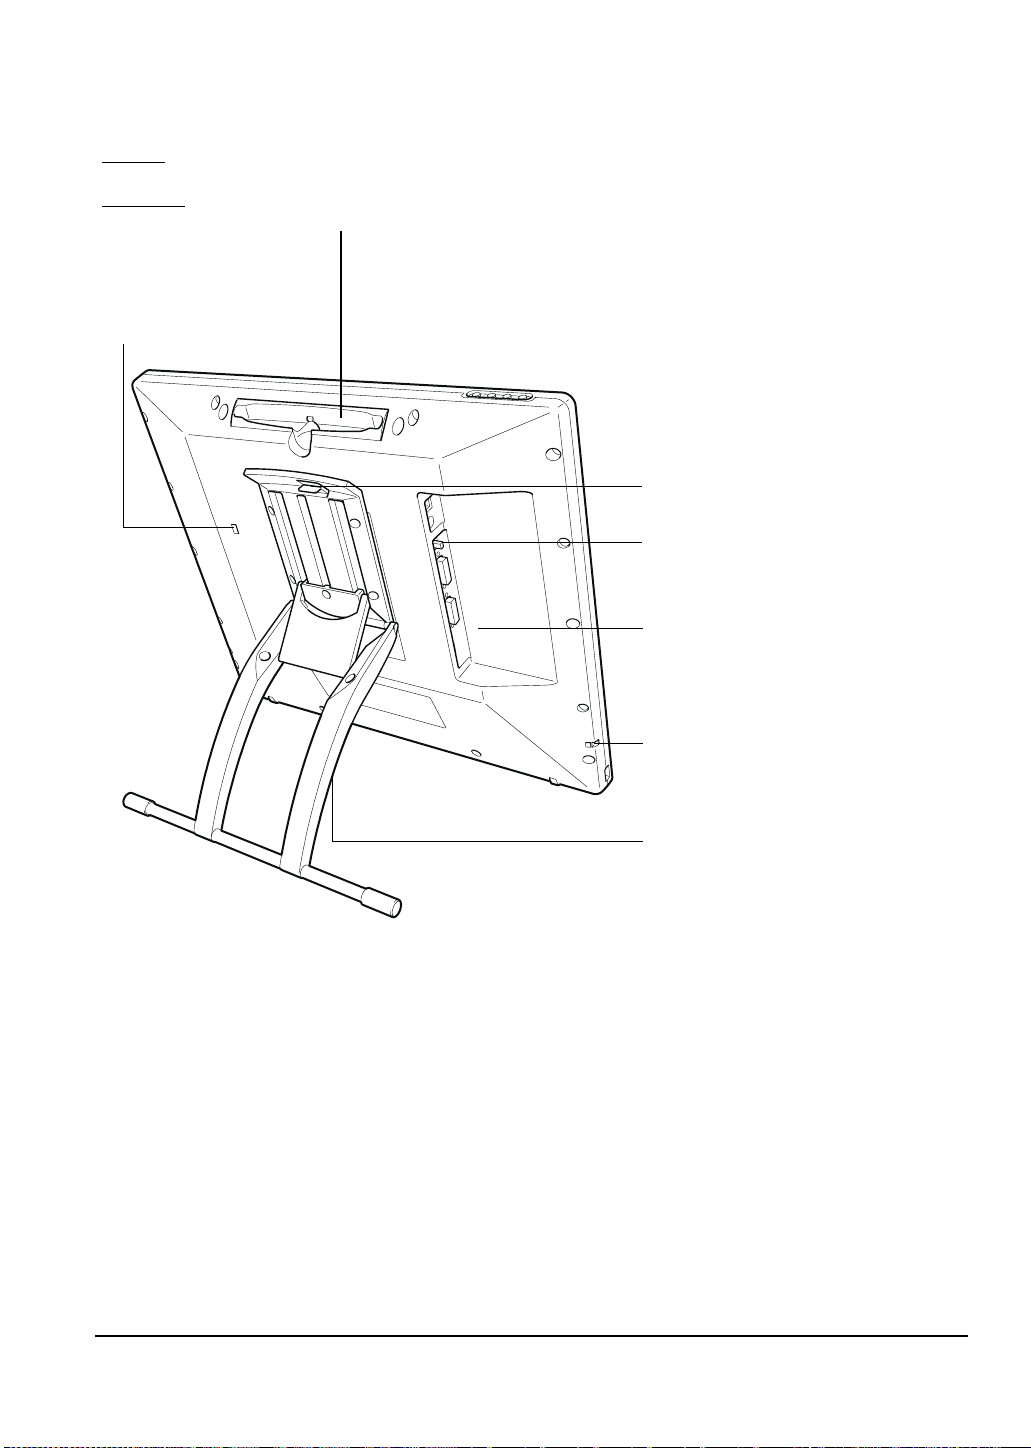
REAR VIEW
Kensington security slot
Allows easy attachment of a
security cable.
Pen storage compartment
To store
, insert one end of the pen into either side of the compartment.
Then gently press the other end of the pen into the compartment.
To r emo ve
, press in on either end of the pen. This will pop the opposite end
out of the compartment so you can remove the pen.
Stand adjustment lever
DVI/VGA (digital/analog) switch
Set this switch for the video connection
you will be using.
Video, USB, and power connectors
Stand
Adjusts the tilt angle of the unit.
See Adjusting display incline on
page 10.
Pen tether attachment point
If using a pen tether, connect it to the
attachment point located on the left or
right side of the unit.
IMPORTANT: Always store the pen display on a stable surface or in its original packing carton when
not in use. Be sure to adjust the stand to the low tilt position before packaging the DTU-1931. If you
do not close the stand, the notched mechanism may be damaged during transportation and storage.
Do not lift the unit by the stand; this may damage the stand mechanism. When lifting or moving the
DTU-1931, always do so by grasping the main body casing.
Your new DTU-1931
Page 9
Page 14
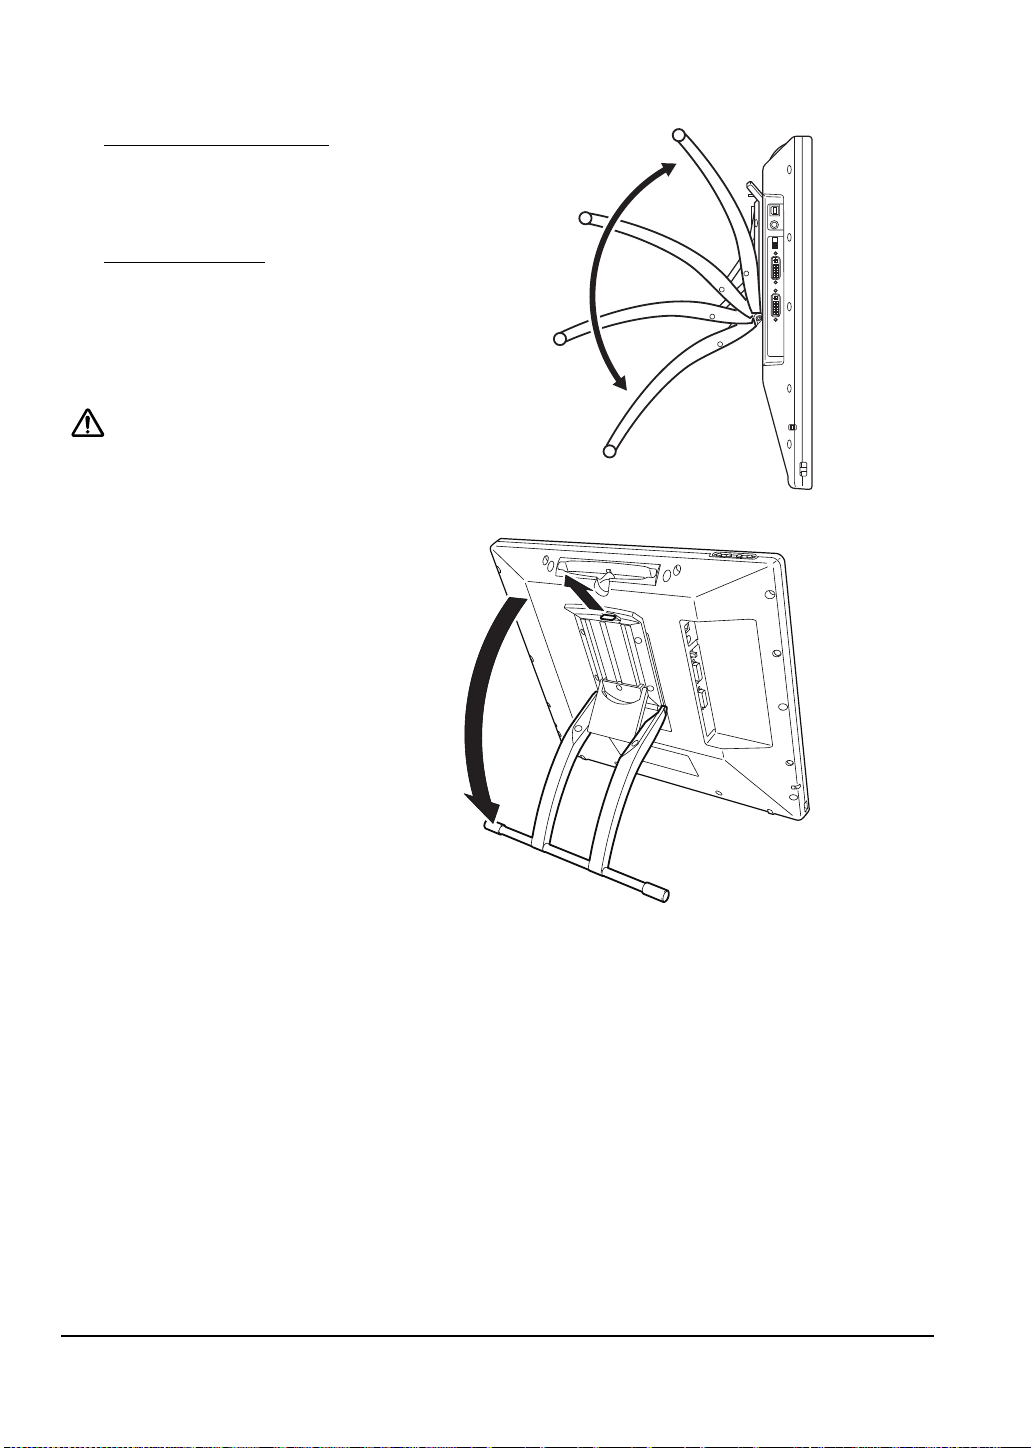
ADJUSTING DISPLAY INCLINE
• To open the display stand, pull up on
the adjustment lever and swing the
stand out to the desired incline.
Release the lever to lock the stand in
place.
• To close the stand, pull up on the
adjustment lever and gently move
the stand back into the closed
position until the latch catches.
Release the lever to lock the stand in
place.
CAUTION
Be careful to avoid catching your finger
in the gap of the movable portion of the
stand.
Your new DTU-1931
Page 10
Page 15

INSTALLATION
SYSTEM REQUIREMENTS
Before installing the DTU-1931, make sure your computer meets the following minimum system
requirements:
• PC. Windows Vista™, Vista X64, XP, or XP x64. VGA or DVI video connector, available USB
port, and CD-ROM drive.
• Macintosh. OS X, v10.4 or greater. VGA or DVI video connector, available USB port, and
CD-ROM drive. ADC connectors require an ADC to DVI adapter, not included.
The DTU-1931 supports both analog (VGA) and digital (DVI) video signals. If updating your video
card, complete the video card hardware and software installation before connecting the DTU-1931.
If you have another display that is compatible with your video card, you can connect that display to
the card in order to verify the video card is operating correctly.
Although you can quickly connect the DTU-1931 to either a VGA or DVI video card, connecting to a
DVI video card generally results in optimum performance.
Notes:
Depending on the capabilities of your video card and operating system, you may be able to set up the
DTU-1931 as a mirrored, extended, or independent display. Refer to your video card documentation for
more information on its capabilities.
When you are working with more than one monitor, the DTU-1931 will map to the monitors based upon
how your system is configured. By default, if you are in mirror mode, the pen tablet will map to the entire
space on each monitor. See your hardware and operating system documentation for details on
configuring your computer and operating system for use with multiple monitors.
A display toggle function is available for use with multiple monitor systems. This enables you to toggle the
screen cursor between the DTU-1931 pen display and your other monitors. For more information, see the
electronic Software User’s Manual.
The DTU-1931 can be used alone or with another display. You may connect a second device, such as a
monitor or LCD projector, to the DTU-1931 DVI-I
mirror the image on the DTU-1931. Complete the DTU-1931 installation before connecting a projection
device to the unit.
OUT port. When using this port, the second device will
There are two primary steps to the installation process:
• Step1: LCD monitor installation
• Step 2: Pen tablet installation
Be sure to follow ALL instructions carefully.
Installation
Page 11
Page 16
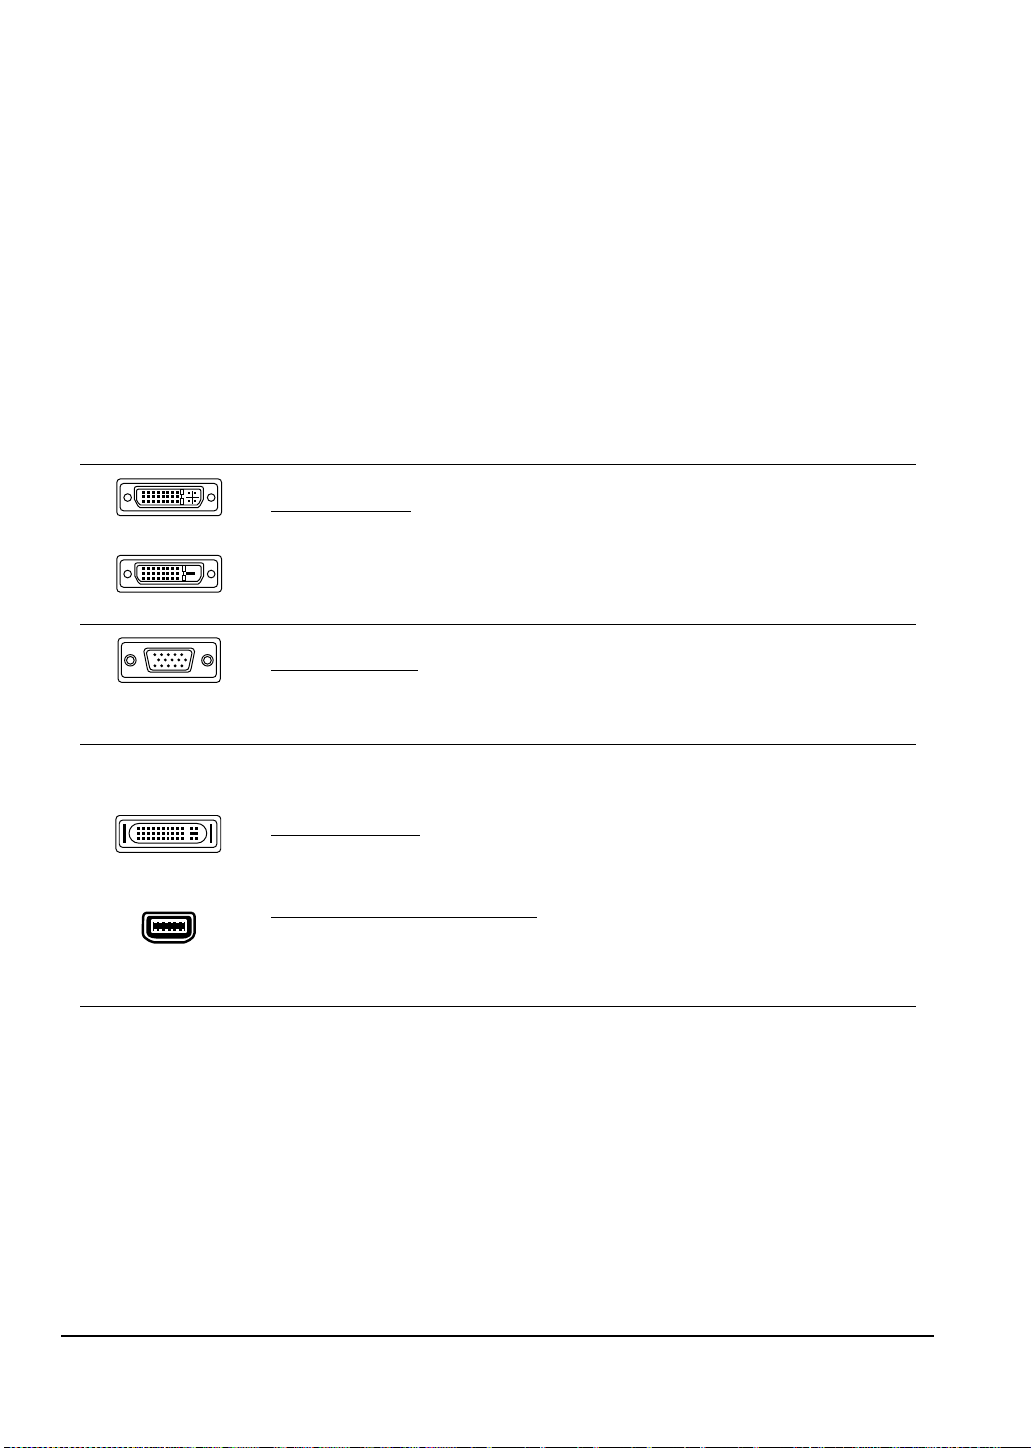
STEP1: LCD MONITOR INSTALLATION
DVI-I connector
DVI-D connector
VGA connector
Apple ADC
connector
Mini-VGA port
In this step, the DTU-1931 is installed as a monitor on your system.
IMPORTANT: Do not connect the USB data cable until instructed to do so.
• Turn off your computer.
Caution: Never connect or disconnect the video or power cables while your computer or
DTU-1931 are powered on – this can damage the display or video card.
• If your computer has only one video connector, you will need to unplug your previous monitor or
add a second video card. Determine if your computer has an analog (VGA) or digital (DVI)
connector and set the DVI/VGA switch for the video connection you are using. See – A – in the
connection diagram on page 13.
• Making sure to tighten the thumbscrews on the connectors, follow the instructions below for
your video connector. See – B –
For DVI operation, connect the DTU-1931 DVI to DVI video cable between the
DVI
IN connector located on the pen display unit and the DVI-D or DVI-I
connector on your video card.
For VGA operation, connect the DTU-1931analog RGB video cable between the
DVI
IN connector located on the pen display unit and the VGA connector on your
video card.
If connecting to an Apple ADC or mini-VGA connection, you will need to obtain
an appropriate adapter. Adapters can be purchased at various retail outlets.
For ADC operation
the ADC to DVI adapter. Then connect the other end of the DTU-1931 cable to
the DVI
to the ADC connector on your video card.
For an Apple mini-VGA connector
RGB cable into the mini-VGA port adapter. Then connect the DVI end of the
DTU-1931 cable to the DVI
the mini-VGA port end to the mini-VGA port on your video card.
IN connector on the pen display unit. Next connect the ADC adapter end
, plug one end of the DTU-1931 DVI to DVI video cable into
, plug the VGA end of the DTU-1931 analog
IN connector on the pen display unit. Next connect
• Connect the power adapter to the DTU-1931. See – C – on the next page.
• Then connect the adapter’s power cable and plug the adapter into an AC outlet. See – D –
• Turn on the DTU-1931. The power LED will light orange.
Installation
Page 12
Page 17
LCD MONITOR CABLING DIAGRAM
CAUTION
Make sure your video card has a VGA or DVI connector, and that you correctly set the DVI/VGA switch
for the video connector you are using.
Do not attach the USB data cable until instructed to do so.
– A –
DVI/VGA switch
Use the DVI-I OUT port to
connect a second device,
such as a projector or
monitor, that mirrors the pen
display.
Fully install the DTU-1931
hardware and software
before connecting a
projection device to the unit.
– B –
Analog RGB cable
or
DVI to DVI cable
VGA or DVI
video card
DVI IN
Rear panel
of computer
– C –
DC input
To AC outlet
Power adapter
– D –
CAUTION
Do not connect or disconnect the video or power cables while the DTU-1931 or your computer are
turned on – this can damage the display or computer video card.
Use only the power adapter that came with the DTU-1931; use of an improper power adapter may
damage the unit.
Make sure that the display refresh rate does not exceed 75 Hz.
Analog (VGA)
Digital (DVI)
Installation
Page 13
Page 18

• Next, turn on your computer.
For Windows systems
the DTU-1931 to be identified as a DTU-1931 display and if you want to install the color
calibration profile for the DTU-1931, follow the instructions below to update the display driver:
: The DTU-1931 will automatically install as a default monitor. If you want
1. Open the C
ONTROL PANEL folder.
• For Windows Vista, under APPEARANCE and PERSONALIZATION select ADJUST
CREEN RESOLUTION.
S
• For Windows XP, open the DISPLAY PROPERTIES control panel and select the
S
ETTINGS tab.
Note: If you have more than one monitor and you need help in determining which display
corresponds to the DTU-1931, click the I
corresponding to the DTU-1931.
DENTIFY MONITORS button. Select the display number
2. Click the ADVANCED SETTINGS... button.
3. Select the M
4. Select the D
ONITOR tab and click the PROPERTIES button.
RIVER tab and click the UPDATE DRIVER... button. An update driver dialog or
Wizard will appear.
5. Insert the Installation CD. If the Wacom Tablet installation menu displays, close it.
Windows Vista
:
• Select the option BROWSE MY COMPUTER FOR DRIVER SOFTWARE.
• Enter the drive letter for the Installation CD and click NEXT.
• After the installation is complete, close any open control panel windows.
Windows XP
:
• The Wizard will ask if Windows can search for software. Choose NO, NOT THIS TIME
and click N
EXT.
• Select the option INSTALL FROM A LIST OR SPECIFIC LOCATION (ADVANCED), and click
N
EXT.
• Select the option DON’T SEARCH. I WILL CHOOSE THE DRIVER TO INSTALL and click
N
EXT.
• Select the DTU-1931 pen display option and then click the HAVE DISK... button.
Enter the letter of your CD-ROM drive (e.g.,
E:\), and click OK.
• Follow the prompts to continue. (If the HARDWARE INSTALLATION dialog box displays,
click C
ONTINUE ANYWAY to accept the driver.) After the installation is complete, click
the F
INISH button and close any open control panel windows.
For Macintosh systems
management system during the tablet software installation process. To activate this color profile
for use with the pen display, you may need to select the DTU-1931 profile in the system’s
ColorSync Utility control panel. For details, see the color management information in your
operating system and application documentation.
, a DTU-1931 color profile will be added to your computer’s color
Installation
Page 14
Page 19

• As necessary, configure the display control panel settings for the proper size and color
resolution. The maximum (native) resolution of the DTU-1931 is 1280 x 1024 pixels.
The display size and color resolution may be constrained by the capabilities of your video card.
See the video card manufacturer’s documentation for details.
Windows
: If you are using the DTU-1931 as a secondary display, you may first need to enable
the DTU-1931 in your Display Properties control panel.
• To fine-tune the display, refer to Adjusting the display, beginning on page 24. If using analog
(VGA) mode, see also Adjusting pitch and phase (VGA only) on page 27.
• After the LCD monitor portion of the DTU-1931 is working to your satisfaction, move on to Step
2: Pen tablet installation to install the pen tablet portion of the DTU-1931.
• For troubleshooting tips, see page 28.
Notes:
Each DTU-1931 LCD panel is produced under very stringent quality standards. Production techniques
cannot guarantee an absolutely perfect TFT display, and some panels may exhibit a certain number of
pixels that show an incorrect color. See the specifications on page 44 for more information.
If an image has fine striping (such as screen stripes), it may appear to flicker or display a moiré pattern.
Do not apply excessive pressure on the display surface, it may cause the appearance of a moiré or pooling
pattern. If this occurs, use less pressure on the display screen when working with the pen.
When a still image is displayed for a long period of time, an after-image may remain for a short time.
To prevent this, Wacom recommends using a screen saver or other power management feature.
IMPORTANT: To extend the life of the backlight, set your computer’s power management to
turn off the display when it is not in use for extended periods of time.
Installation
Page 15
Page 20
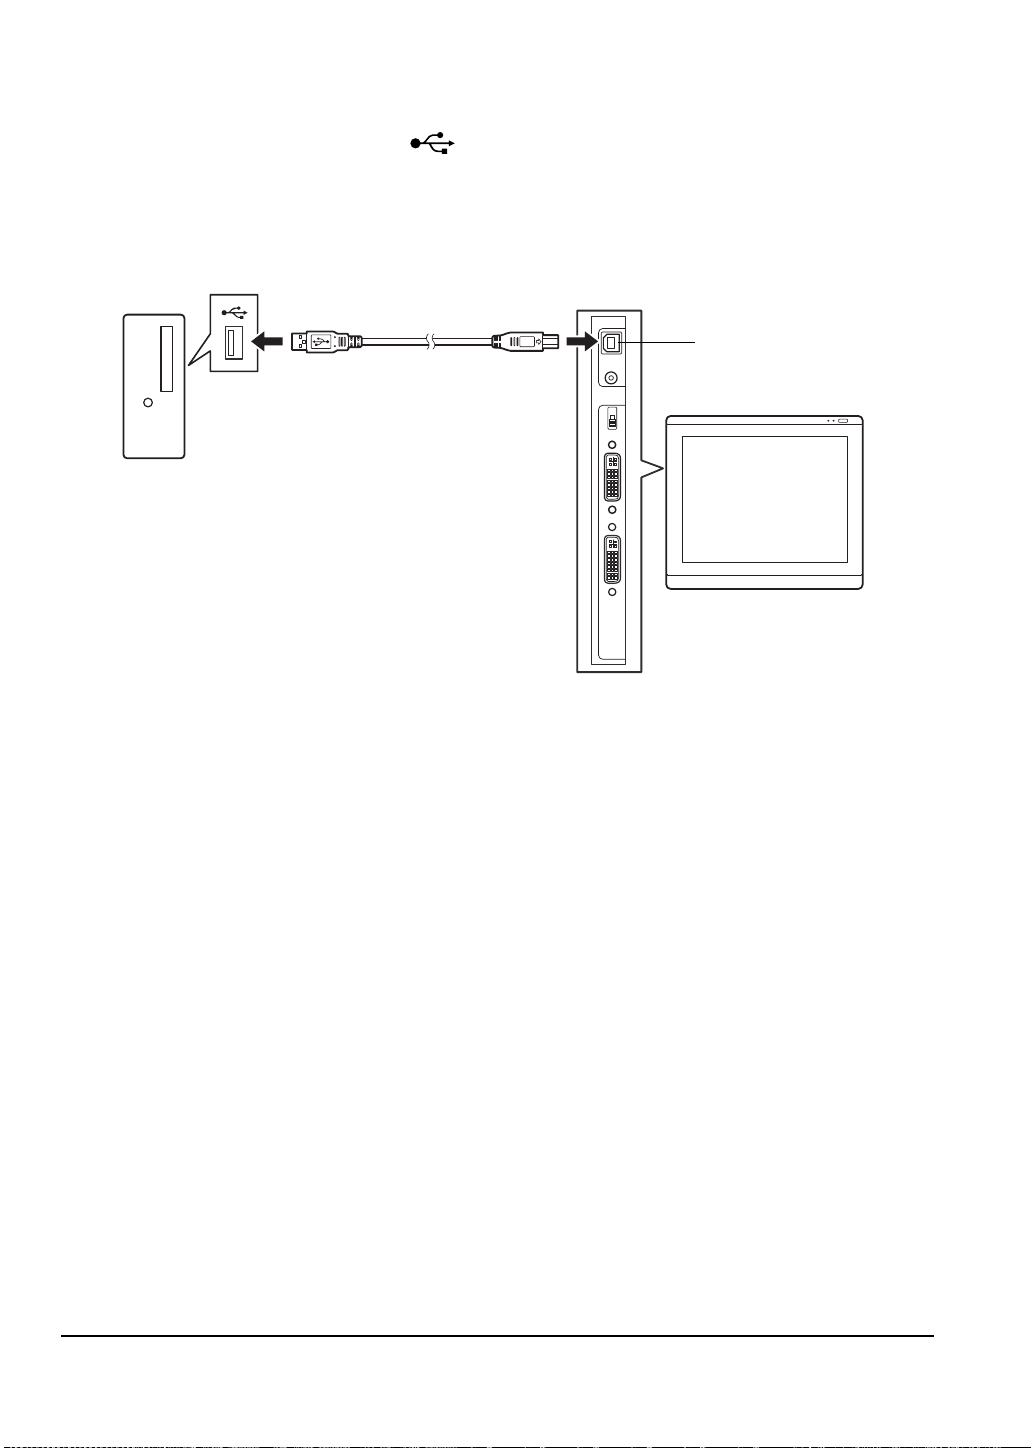
STEP 2: PEN TABLET INSTALLATION
– E –
To USB port
Your computer
USB port
USB CABLE INSTALLATION
Plug the square end of the USB cable into the DTU-1931 port labeled USB. Plug the other end into
an available USB port on your computer or on a USB hub attached to your computer. See – E – in
the diagram below.
Next, move on to the Software installation on page 17.
PEN TABLET CABLING DIAGRAM
Installation
Page 16
Page 21

SOFTWARE INSTALLATION
IMPORTANT: You MUST install the Wacom pen tablet driver software for correct pen-on-
screen functionality.
To install the tablet software:
• Save your work and close all open applications. Temporarily disable any virus protection
programs.
• Insert the Installation CD into your computer’s CD-ROM drive. If the software installer menu
does not automatically display, double-click on the Install icon located on the CD.
• Click on the INSTALL TABLET link and follow the prompts to install the driver software.
• Reactivate your virus protection program.
• After completing the software installation, make sure you can use your pen on the DTU-1931
display to move the screen cursor.
When you place the pen tip on the display screen, the screen cursor should immediately jump
to a corresponding position approximately beneath the pen tip. Lift the pen tip and place it on
the display screen surface in a different location – the screen cursor should again jump to the
new position. This is known as absolute positioning, and enables you to position the screen
cursor without having to drag your pen across the display screen surface.
• Be sure to check the Read Me file for updated information. If you have trouble installing the
DTU-1931, see the Troubleshooting section beginning on page 28.
Notes:
Driver installation automatically activates the new pen input functions available within Microsoft Windows
Vista and Office 2007 (except for Windows Vista Home Basic). Visit the Wacom web site at
www.wacom.com/vista for additional information on using your Wacom pen in Windows Vista.
User-specific preferences are supported. After logging in, each user can customize their personal settings
in the Wacom Tablet control panel. Switching to another user will automatically load the settings for that
user.
To uninstall the tablet driver
If the pen display tablet does not respond properly or you lose cursor control, the tablet preferences may
be corrupted. You can delete the current preference settings and return the tablet to its factory default
condition. On a Windows system, run the TABLET PREFERENCE FILE UTILITY. Access the utility by clicking
on the Windows
PREFERENCE FILE UTILITY.
START icon and selecting ALL PROGRAMS. Then select WACOM TABLET and TABLET
, see Uninstalling the DTU-1931 on page 43.
Next, adjust the pen display tablet calibration to precisely align the screen cursor to the pen tip.
See Calibrating the DTU-1931 on page 23.
Installation
Page 17
Page 22

WORKING WITH YOUR DTU-1931
As you work with the DTU-1931 pen display you can rest your hand lightly on the display screen,
just as if it were a drawing board or sheet of paper.
Because the DTU-1931 surface will be a little higher than your desk, consider adjusting the height of
your desk or chair to assure comfortable use of the device.
SETTING UP YOUR WORK AREA
To minimize fatigue, organize your work area so you can work comfortably. Position your
DTU-1931, the pen, and your keyboard for easy access without unnecessary reaching. The pen
display and any other displays should be positioned so you can view them comfortably with a
minimum of eyestrain.
• Take short breaks between tasks to stretch and relax your muscles.
• Use a gentle grip when working with the pen.
• Alternate tasks throughout the day.
• Maintain a good posture at all times. Minimize awkward postures and repetitive movements
that cause discomfort.
• Change your position if you feel any discomfort due to your work position.
Note: Wacom makes no representation, promise or guarantee that Wacom products will cure or prevent, in
whole or in part, mouse-induced repetitive stress symptoms, injuries or conditions. Individual results may
vary. Always obtain competent medical advice to determine the most appropriate treatment for your
specific situation.
Tips:
Be careful that you do not pull the cables out of their connections by accidentally moving the DTU-1931
too far from the computer.
The pen tether can be used to ensure your pen stays with your pen display tablet. Simply loop one end of
the tether through the tether hole located on the pen (if so equipped), and the other end of the tether
through the tether connection point located on the left or right side of the tablet.
The DTU-1931 can also be mounted to articulated arms or other third-party stands meeting the VESA 100
specification for display stands. For details, see Using an alternate mount or stand on page 40.
Working with your DTU-1931
Page 18
Page 23
USING THE PEN
Eraser: When equipped and the eraser is brought within 5 mm (0.2 inch)
of the display, the tablet reports the pen location. Pressure information is
reported as you press down on the eraser. By default, the eraser function
is set to E
RASE.
Some non-eraser pens may be configured with a pen tether connection
point.
DuoSwitch (side switch): When equipped, make sure
the programmable switch is in a convenient location
where you can toggle it with your thumb or forefinger but
not accidentally press it while writing or drawing. You can
use the switch whenever the pen tip is within 5 mm
(0.2 inch) of the display screen surface; you do not need
to touch the pen tip to the display surface. Toggle the
switch in either direction to activate the button functions.
By default, the upper switch is set to D
OUBLE CLICK and
the lower switch is set to R
IGHT CLICK.
Pen tip (replaceable nib): The pen is activated as soon
as it is brought within 5 mm (0.2 inch) of the pen display
screen. This allows you to position the screen cursor
without touching the pen tip to the display screen.
When pressure is applied to the pen tip, the pen
simulates a primary mouse button click. The tip click
pressure can be adjusted in the Wacom Tablet control
panel.
Notes:
When the pen is not in use, place it in the pen storage compartment, or lay it flat on your desk.
To maintain the sensitivity of your pen, do not store the pen in a container where it will rest on its tip.
Some product configurations may come with a pen that has no DuoSwitch or eraser. In that case, you
can ignore all explanations within this guide regarding the side switch or eraser.
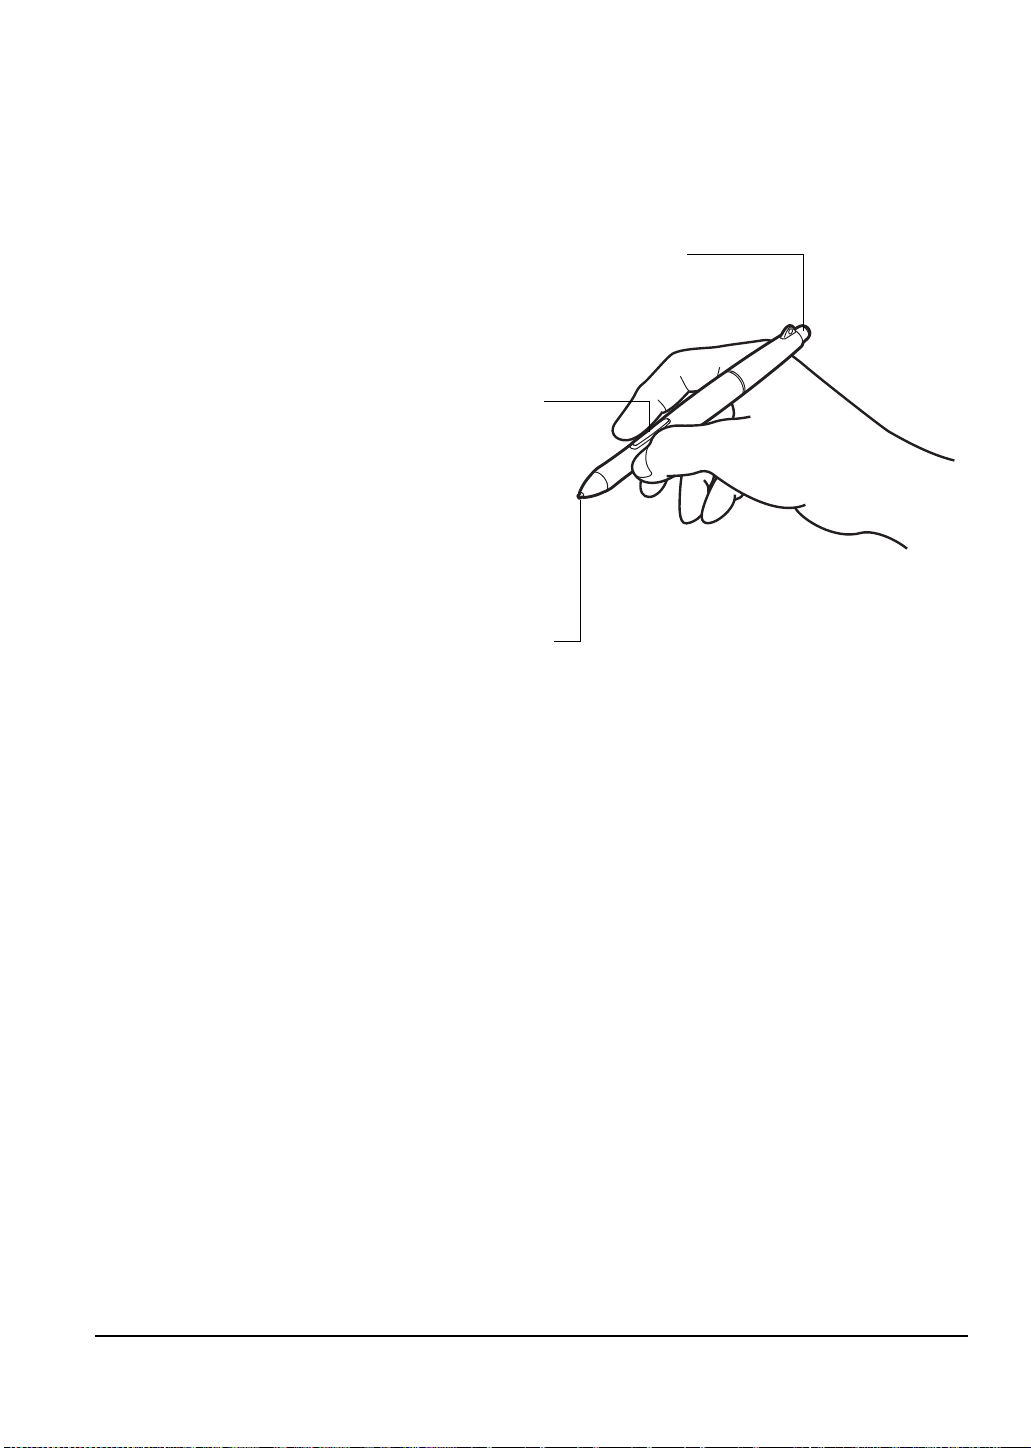
The pen is cordless, battery-free, and senses the amount of pressure you apply to the tip. Hold the
pen like you would a normal pen or pencil. As you work with the DTU-1931, you can rest your hand
lightly on the display screen, just as if it were a drawing board or sheet of paper. You can tilt the pen
in any way that feels most comfortable for drawing.
PEN COMPONENTS
IMPORTANT: Use only the pen that came with your DTU-1931 pen display. Other pens
may not function properly. Also, the DTU-1931 pen tip is specifically designed for use with
the DTU-1931 pen display – the tips on other pens could damage the protective coating on
the pen display screen.
For information on customizing the pen settings, see Customizing on page 21.
Working with your DTU-1931
Page 19
Page 24

BASIC PEN OPERATIONS
Pointing and selecting: Move the pen slightly above the DTU-1931 display
screen to position the screen cursor; you do not need to touch the display
surface. The cursor jumps to the location where you place the pen. Press the
pen tip on the display screen to make a selection.
Note: You must calibrate the pen display tablet to correctly align the screen cursor with
the pen tip. (See Calibrating the DTU-1931 on page 23.) If the screen cursor does not
jump to a position close to the pen tip when you place the pen on the display screen, then
the pen tablet driver may not be installed or is not loading. Install the pen tablet driver
software if necessary. Otherwise, see Troubleshooting, beginning on page 28.
Clicking: Tap the display screen once with the pen tip, or touch the pen to the
display screen with enough pressure to register a click.
Windows tip: To make navigating with the pen easier, configure Windows to select when
the pen is over an icon and to launch the icon with a single click. To turn on this feature,
first open a folder.
For Windows Vista, From the ORGANIZE pull-down menu choose FOLDER AND SEARCH
OPTIONS. From the GENERAL tab select SINGLE-CLICK TO OPEN AN ITEM (POINT TO SELECT).
For Windows XP
G
ENERAL tab select SINGLE-CLICK TO OPEN AN ITEM (POINT TO SELECT).
Double-clicking: Press the upper side switch, or quickly tap the
display screen twice in the same place with the pen tip.
Double-clicking is easier when the pen is perpendicular to the tablet
screen. See the electronic Software User’s Manual for information
on fine-tuning the double-click area.
Dragging: Select an object, then slide the pen tip across the display screen to
move the object.
, from the TOOLS pull-down menu choose FOLDER OPTIONS.... From the
Using the side switch: The pen may be equipped with a DuoSwitch. This switch has two
programmable functions that can be selected by rocking the switch in either direction. You can use
the DuoSwitch whenever the pen tip is within 5 mm (0.2 inch) of the display screen surface; you do
not need to touch the pen tip to the display surface in order to use the switch. By default, the upper
switch is set to D
OUBLE CLICK, and the lower switch is set to RIGHT CLICK.
Drawing and writing with pressure sensitivity: The pen responds to the nuance and inflection of
your hand movements, enabling you to create natural-looking pen and brush strokes within
applications that support this feature. To draw and write with pressure, select a pressure-sensitive
tool from your application’s tool palette. As you work on the screen surface, use various amounts of
downward pressure on the tip of the pen. Press lightly for thin lines or softer color. Press harder for
thick lines or dense color.
Erasing: In supporting applications, the pen’s eraser works like the eraser on a
pencil. In text applications, use the eraser to select text, then lift the eraser
from the tablet to delete the text.
Working with your DTU-1931
Page 20
Page 25

CUSTOMIZING
After you master the basics of using your pen on the DTU-1931 pen display, you may want to
customize the way the pen works. The Wacom Tablet control panel makes it easy to customize the
DTU-1931 and pen.
OPENING THE CONTROL PANEL
To open the control panel, use the DTU-1931 pen on the pen display tablet:
Windows. Click on the Windows
Then select W
Macintosh. Open S
or from the A
ACOM TABLET and choose the WACOM TABLET PROPERTIES option.
YSTEM PREFERENCES from either the Dock, the Apple menu,
PPLICATIONS folder. Then click on the WACOM TABLET icon.
START button and choose ALL PROGRAMS.
After opening the control panel, see Customization basics on page 22.
Note: User-specific preferences are supported. After logging in, each user can customize their personal
settings in the Wacom Tablet control panel. Switching to another user will automatically load the settings
for that user.
LEARNING MORE
See the electronic Software User’s Manual for detailed information on customizing the DTU-1931.
To view the manual, open the Wacom Tablet control panel and click on the H
To read the Software User’s Manual before installing the pen display, first insert the Installation CD
into your computer’s CD-ROM drive. When the software menu appears, select the U
option.
You will need Adobe Reader or another .pdf viewer to view the manual.
ELP button.
SER’S MANUAL
Customizing
Page 21
Page 26
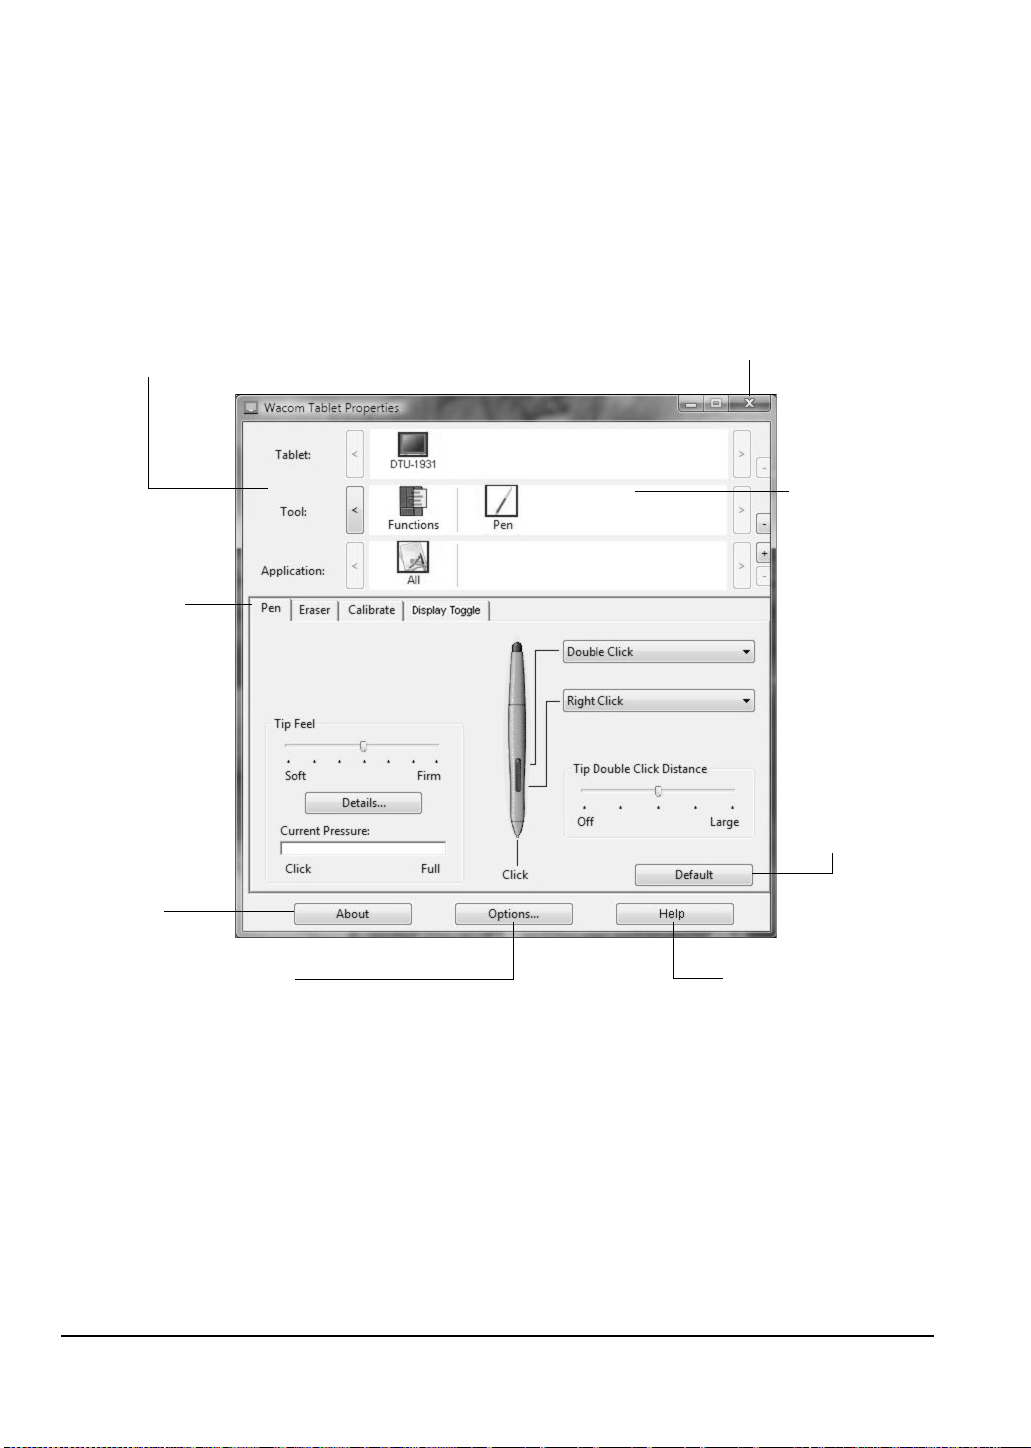
CUSTOMIZATION BASICS
The upper portion of the control panel displays icons representing
your T
ABLET, TOOL, and APPLICATIONs with custom tool settings.
Tabs display
customizable
settings for the
selected T
OOL.
Displays a dialog
box containing
information about
the pen display
tablet and tablet
software, including
an option to access
the D
IAGNOSTICS
dialog box.
Displays advanced options.
Closes the control panel.
Choose P
EN to
customize your
pen settings.
Choose
FUNCTIONS to
customize the
Radial Menu
settings.
For information
on working with
the Radial Menu,
see the Software
User’s Manual.
Resets the
selected tab
to its default
settings.
Displays the electronic
Software User’s Manual.
This manual only covers the basics of customizing the DTU-1931. For detailed information see the
electronic Software User’s Manual.
Use the Wacom Tablet control panel to customize your product. When you open the control panel,
an icon for the pen is displayed in the T
To customize the pen, make your changes to the tab controls. Experiment with different settings to
find what works best for you. Any changes you make will take effect immediately, but you can
always click D
Note: Application-specific settings are for advanced users. This topic is covered in the Software User’s
Manual.
EFAULT to return to the factory settings.
OOL list and the appropriate tabs are displayed.
Customizing
Page 22
Page 27
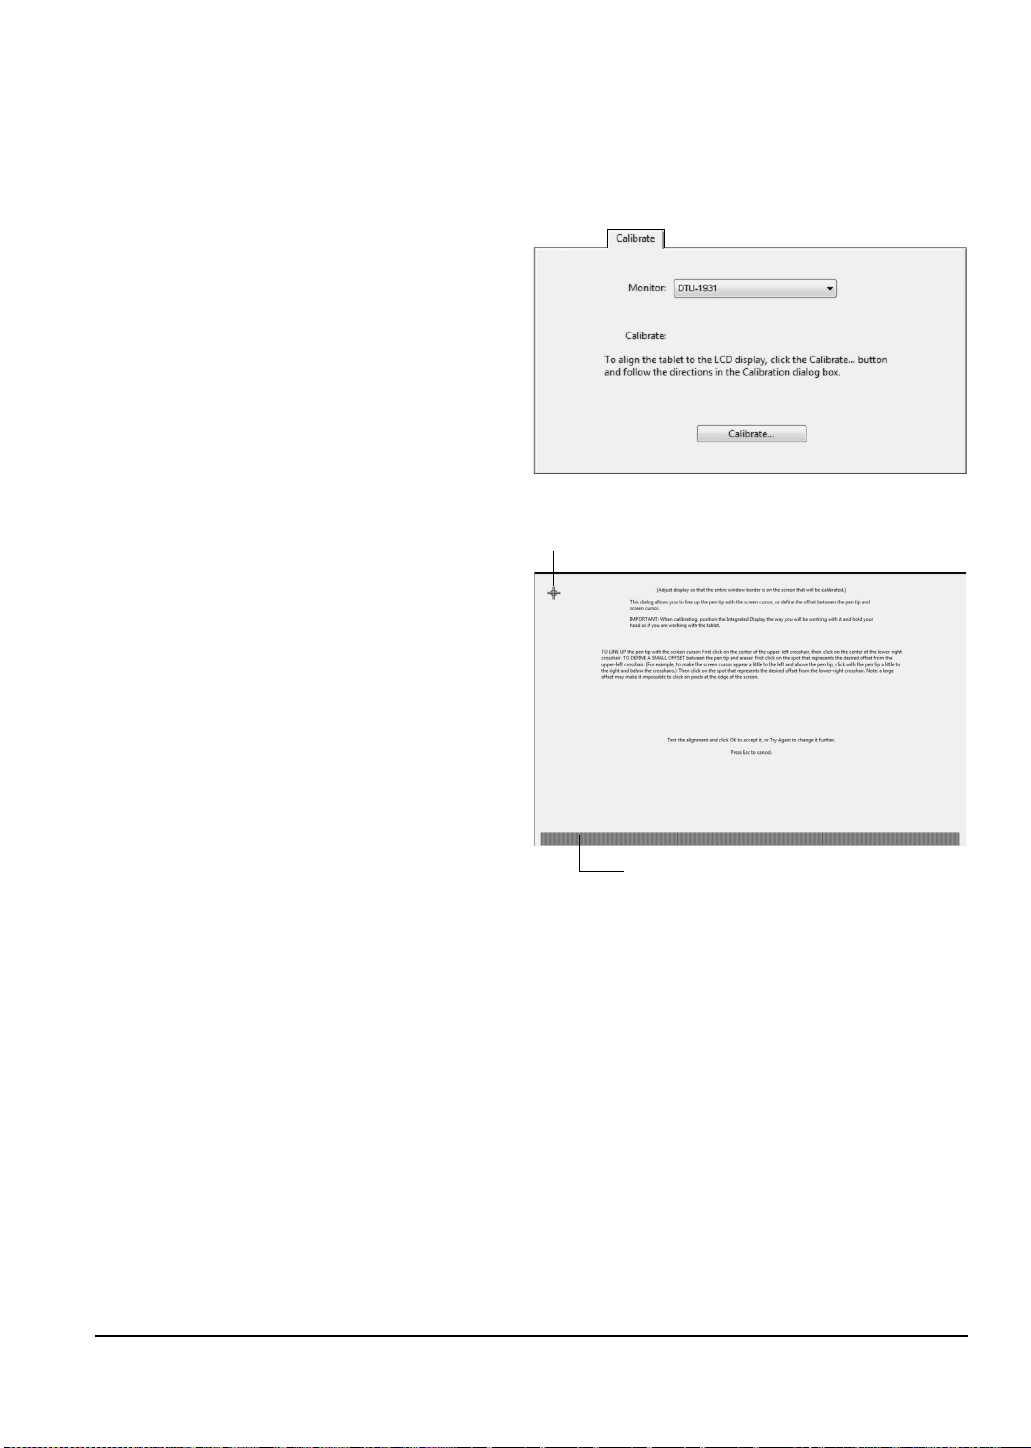
CALIBRATING THE DTU-1931
IMPORTANT: When using a VGA
connection, make sure the display is
properly adjusted before calibrating the
tablet. See Adjusting pitch and phase
(VGA only) on page 27, and Adjusting the
display beginning on page 24.
• In the Wacom Tablet control panel, select the
P
EN from the TOOL list and then select the
CALIBRATE tab.
• If you are working with multiple monitors, select
the MONITOR corresponding to the DTU-1931
display. (Only monitors that are set to one of the
resolutions supported by the DTU-1931 will
appear in the list.)
• Click on the C
ALIBRATE... button to activate the
calibration screen.
• Hold the pen and position your head as you
normally do when working with the pen display.
Use the pen tip to click on the center of the
crosshairs in the upper-left corner.
• Then click on the center of the crosshairs that
are displayed in the lower-right corner.
• Test the alignment by positioning the pen at a
few different points on the display. Click OK to
accept the calibration. Click T
RY AGAIN to
recalibrate.
Be sure to read the directions in the calibration
screen for detailed instructions and additional
options. The calibration setting applies to all
applications.
Note: If more than one pen display tablet is
installed on your system, be sure to select the
unit you are working with from the control panel’s
T
ABLET list.
Crosshairs
Adjustment pattern for pitch and phase.
See Adjusting pitch and phase (VGA
only) on page 27 for details.
Tip: If you prefer to see the screen cursor slightly offset from the actual position of the pen tip, calibrate
by clicking on a spot showing that offset from the crosshairs. For example, to have the screen cursor
appear 1/10th of an inch above and to the left of the pen tip, calibrate by clicking on a spot 1/10th of an
inch below and to the right of the crosshairs.
You must calibrate the pen display tablet in order to align the screen cursor with the position of the
pen on the display screen. This is required to adjust for parallax caused by the display screen cover
glass and coating. Set the DTU-1931 in its working position, then follow the procedure below.
Customizing
Page 23
Page 28

ADJUSTING THE DISPLAY
1. M ENU button
Press to open or exit the OSD menu.
2. Selection buttons
Use these buttons to select an option. When the option you want to adjust is highlighted, press the E
NTER
button. The current settings and adjustment sub-menu for that option will appear. Note that some settings
may not be available when in DVI mode.
Use the + or – buttons to select and adjust the option settings. (Press the + button to increase a selected
item value. Press the – button to decrease it.)
After making changes, press the E
NTER button to save.
See the following pages for a detailed description of menu options.
E
NTER button
Activates the selected
OSD menu option.
–
+
FACTORY PRESETS, AUTO-SYNC, AND USER SETTINGS
Factory presets: For optimal display quality, set your video card to the DTU-1931’s native
resolution of 1280 x 1024 pixels (SXGA). See page 44 for signal specifications.
Auto-sync: The DTU-1931 automatically synchronizes to the incoming signal. The auto-sync
function sets the horizontal and vertical screen position, as well as pitch and phase. Auto-sync will
function when the horizontal frequency is between 30 to 80 kHz, and the vertical frequency is
between 50 to 75 Hz.
If the DTU-1931 does not automatically synchronize with the incoming signal, you can use the OSD
A
UTO ADJUST option to initiate display synchronization. Further screen display adjustments can be
manually made using the OSD controls.
Color calibration: Changing the color, color temperature, contrast, brightness, or backlight from
their default settings will invalidate the ICC color profile that was included on the Installation CD.
ON SCREEN DISPLAY (OSD) SETTINGS
The OSD function enables you to optimize a variety of display settings at the touch of a button.
Make adjustments using the OSD controls located on the upper left edge of the unit.
Note: After changing a setting, the OSD menu will automatically close after a few moments of inactivity.
You can also press the M
OSD menu closes and will be used the next time the unit receives a similar video signal. This is applicable
to all display modes. If you make changes to the display appearance and cannot return to the original
settings, use the R
Customizing
Page 24
ENU button to close the OSD menu. All settings are automatically saved when the
ESET option to return the DTU-1931 to its original factory defaults.
Page 29
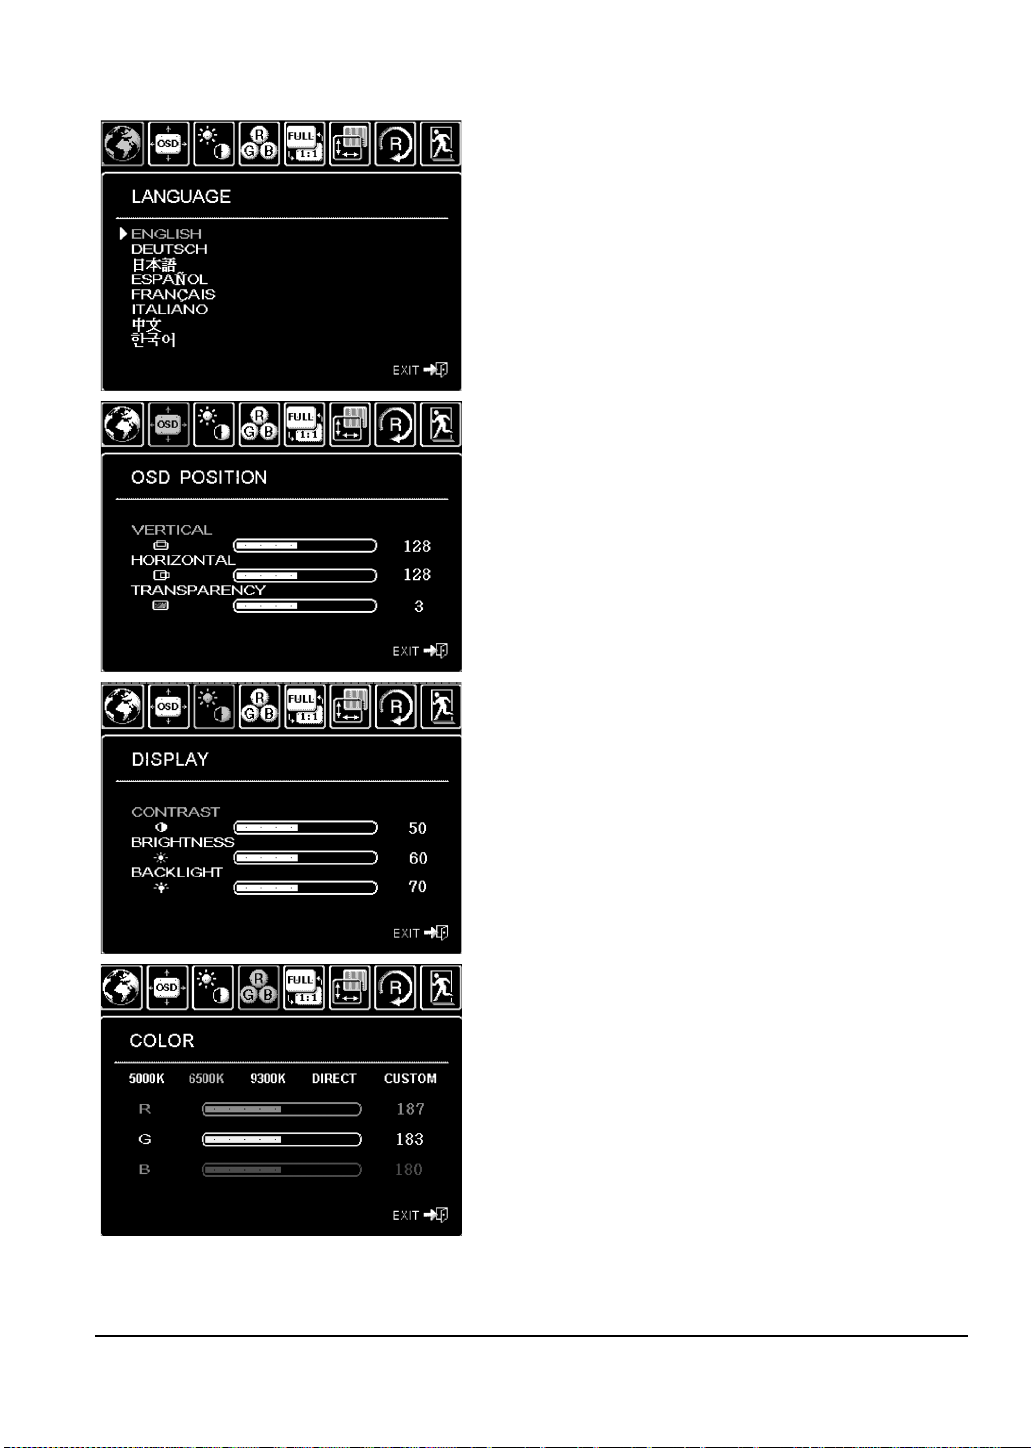
When you open the On Screen Display, the menu options are displayed.
LANGUAGE menu options allow you to choose the language
in which the OSD menu will be displayed.
OSD P
OSITION menu options include:
•V
ERTICAL. Adjusts the vertical position of the OSD menu
window.
•H
ORIZONTAL. Adjusts the horizontal position of the OSD
menu window.
•T
RANSPARENCY. Changes the opaqueness of the OSD
menu background.
DISPLAY menu options include:
•B
RIGHTNESS. Increases or decreases the image
brightness.
•C
ONTRAST. Increases or decreases image contrast.
Note that changes in contrast may affect color accuracy.
•B
ACKLIGHT. Increases or decreases the backlight
brightness level.
C
OLOR menu options include:
• 5000K, 6500K, 9300K. Enables you to adjust the pen
display color temperature, in degrees Kelvin.
•D
IRECT displays the colors directly from the video card
without any adjustment.
•C
USTOM enables you to independently adjust the RED,
G
REEN, and BLUE display colors.
Note: Any manual changes you make to the color settings
will invalidate the DTU-1931 color profile.
Customizing
Page 25
Page 30
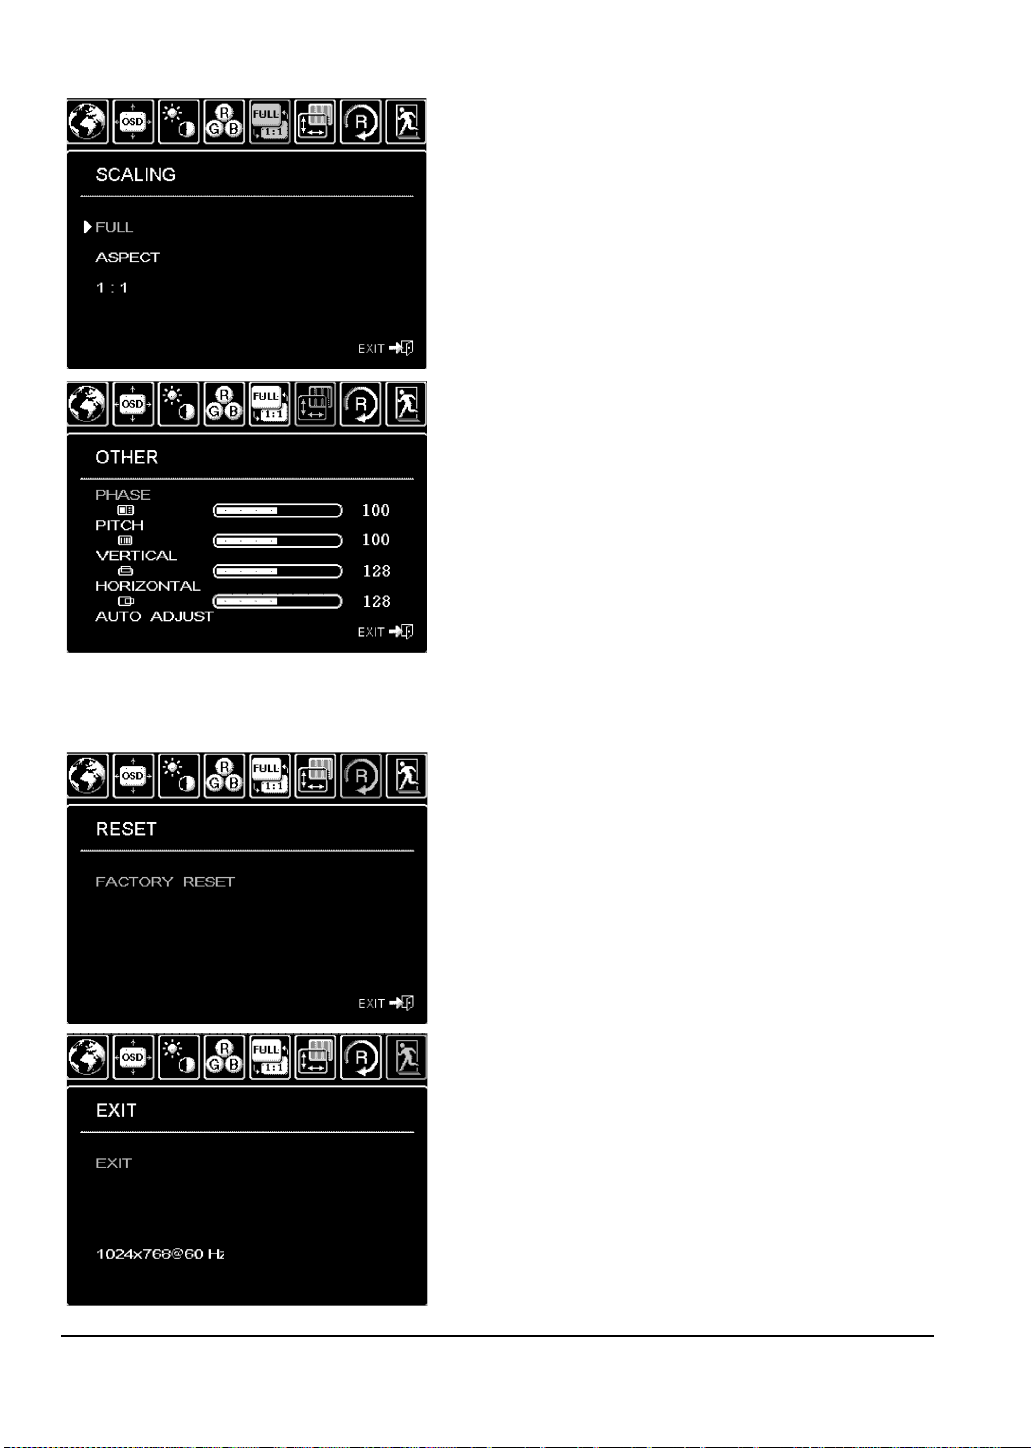
SCALING menu options include:
•F
ULL. Resizes the image to fill the whole screen.
•A
SPECT. Resizes the image to fill as much of the screen
as possible while maintaining the correct aspect ratio.
• 1:1. Displays the image at the actual resolution.
O
THER menu options include:
•P
HASE. (VGA only.) Synchronizes the signal timing of
the pen display to that of your graphics card. Use this
adjustment when you experience an unstable or
flickering image, or horizontal distortion lines.
•P
ITCH. (VGA only.) Changes the display data frequency
to match that of your graphics card. Use this adjustment
when you experience an unstable or flickering image, or
vertical distortion lines.
•V
ERTICAL. (VGA only.) Changes the vertical position of
the image. To automatically adjust, use the A
UTO ADJUST
option.
•H
ORIZONTAL. (VGA only.) Changes the horizontal
position of the image. To automatically adjust, use the
A
UTO ADJUST option.
•A
UTO ADJUST. (VGA only.) Choose this function to
automatically optimize the display screen image.
RESET returns the display parameters of the current mode to
their factory default settings.
E
XIT dismisses the OSD without making changes.
Customizing
Page 26
Page 31

ADJUSTING PITCH AND PHASE (VGA ONLY)
Some computers and video cards may not allow the auto-sync function to fully work when the
DTU-1931 is first connected. If some portion of text appears blurred, use the A
automatically synchronize to the incoming signal (see the description about auto-sync on page 24).
If the image is still blurred, adjust pitch and phase by following the procedure below. For optimum
display quality, set your video card to the DTU-1931’s native resolution of 1280 x 1024.
• In the Wacom Tablet control panel, select the
C
ALIBRATE tab.
• If you are working with multiple displays,
be sure the display corresponding to the
DTU-1931 is selected in the MONITOR menu.
• Click on the C
calibration screen.
• Using the OSD controls, open the OSD menu
and select the PITCH option. Then adjust the
pitch level so that the pattern of fine vertical
stripes displays evenly. (For details on
changing the OSD settings, see On Screen
Display (OSD) settings on page 24.)
• In the OSD menu, select the P
Adjust the phase level so that the adjustment
pattern shows clearly.
• After completing these adjustments, press the
E
NTER and MENU buttons to exit the OSD
menu.
• Click on the C
exit the calibration screen.
ALIBRATE... button to activate the
HASE option.
ANCEL button or press ESC to
UTO ADJUST option to
Adjustment pattern for pitch and phase.
POWER SAVING
The DTU-1931 conforms to VESA power saving guidelines.
When using the DTU-1931 with a Display Power Management Signaling (DPMS) compliant
computer or video card, the display will automatically comply with the below power saving
parameters.
When these power-saving functions are in effect, the screen display is darker than usual.
Computer mode H-sync V-sync Video Power consumption Power lamp
Power ON Yes Yes Active 37W, max. Blue
Standby mode No Yes Blanked 2W, max. Blue/Orange*
Suspend mode Yes No Blanked 2W, max. Blue/Orange*
OFF mode No No Blanked 1W, max. Orange
* Depending on the specifications and settings of your computer and video card, the power light may only
change to orange when in standby and suspend modes.
Customizing
Page 27
Page 32

TROUBLESHOOTING
Most of the time your pen display tablet will work flawlessly. But if you are having trouble, Wacom
recommends you do the following:
1. If the Wacom tablet driver failed to load properly, first perform the recommended action in any
error message that may appear on your screen. If that does not solve the problem, review the
troubleshooting procedures in this chapter.
2. If the DTU-1931 does not function properly, refer to the troubleshooting sections on the
following pages. See also Display troubleshooting on page 31, or look in the Pen tablet
troubleshooting on page 33. Your problem may be described there and you can try the solution
offered.
3. Open the Wacom pen display Read Me file for any information updates.
4. If you are having a compatibility conflict between the DTU-1931 and a new hardware or
software product, see Obtaining driver downloads on page 38 for information on downloading
an updated software driver. Wacom periodically updates the software driver to maintain
compatibility with new products.
5. Check the FAQs (Frequently Asked Questions) on the Wacom web site for your region.
6. If you have tried the suggestions in this guide and still cannot resolve the problem, then contact
Wacom for Technical Support. See the Technical support options on page 37 and the Read Me
file for information on where to obtain support for your region.
TESTING THE DTU-1931
1. If the DTU-1931 power LED does not light, check the following:
• First verify that the green light on the power adapter is on. If the light is not on, check that
the power cable is properly connected to the power adapter and to an active AC outlet.
• Check that the power adapter cable is securely connected to the DTU-1931 and that the
DTU-1931 power switch is turned on. The DTU-1931 power LED will glow orange or blue
whenever the DTU-1931 is on.
IMPORTANT: Use only the AC adapter that came with your pen display. Other adapters
may cause damage to your product.
2. If there is no display:
• Make sure that your computer is turned on. The power LED will light blue when the proper
video signal is received. It will glow orange if there is no video signal or if the computer is in
a power saving mode.
• Verify that the DTU-1931 is connected to an active VGA or DVI connector and that the
DVI/VGA switch is set to the correct video setting.
• Check that your video card has been properly installed and is functional. If you have
another display that is compatible with your video card, you can connect that display to the
card in order to verify that the video card is operating correctly.
Troubleshooting
Page 28
Page 33

3. Verify that the tablet and pen are working:
• Press the pen tip against the display and verify that the status LED lights blue.
• If the LED does not light, verify that the DTU-1931’s USB cable is plugged into an active
USB port. If the DTU-1931 is plugged into a USB hub, try plugging it directly into the USB
port on your computer.
• Be sure that the USB port to which you are connecting has not been disabled. It may be
necessary to check your system BIOS setting to verify that you have connected the
DTU-1931 to an active USB port.
• The status LED will light blue when the DTU-1931 is registered as a USB device and the
pen tip is pressed against the display.
4. Check the pen. If you cannot make a selection on the display screen with the pen:
• Test the pen by pressing the pen tip or eraser (when equipped) against the surface of the
pen display tablet. The tablet status LED should light blue.
• Now, without applying pressure to the pen tip but keeping the pen within 5 mm (0.2 inch) of
the pen display tablet surface, press the side switch (when equipped). The status LED
should again light blue.
• If the status LED does not light blue for these tests, be sure you are using the correct pen
that came with your DTU-1931.
• See Testing your pen on page 30 for detailed information.
If you are still having problems, you may have a defective pen or pen display.
Troubleshooting
Page 29
Page 34

TESTING YOUR PEN
If the pen does not work as you expect, it is a good idea to first check the assigned functions or
reset the pen to its default conditions. A quick way to reset a pen to its default settings is to remove
it from the T
back onto the display screen surface and the pen will be re-added to the T
settings.
Open the Wacom Tablet control panel and click on the A
appears, click on the D
dialog box displays dynamic information about the pen display tablet and pen. This information is
used when testing the pen display tablet and your pen.
If more than one pen display unit is connected to your system, be sure to select the unit for which
you are testing in the T
Note: When testing your pen buttons, if a button is set to RADIAL MENU or OPEN/RUN..., that function will
occur when the button is pressed. In this case you may want to change that button’s function before
testing.
1. While observing the POINTING DEVICE INFO column, bring your pen within 5 mm (0.2 inch) of the
display screen. A value for P
2. Move your tool along the tablet surface. The X and Y D
tool position.
3. Test your pen switches. The DTU-1931 status LED should light blue each time you click with
the pen tip, press the side switch, or press the pen’s eraser to the display screen.
• Press on the display screen surface with the pen tip – the SWITCHES state and PRESSURE
• Next, press the side switch (when equipped) without pressing the tip to the tablet – the
OOL list by clicking on the list’s [ – ] button. After the pen has been removed, place it
OOL list with its default
BOUT button. In the dialog box that
IAGNOSE... button to open the DIAGNOSTICS dialog box. The DIAGNOSTICS
ABLET INFO column.
ROXIMITY, the DEVICE NAME, and DEVICE TYPE should be displayed.
ATA values should change to reflect the
value should change. (P
RESSURE should change from approximately 0% with no pressure
applied to approximately 100% when full pressure is applied.)
S
WITCHES state should change. Do this for both positions of the DuoSwitch.
Tip = 1, DuoSwitch (lower position) = 2, DuoSwitch (upper position) = 3, Eraser = 1
• Press the pen eraser (when equipped) to the display screen – the SWITCHES state and
P
RESSURE value should change. (PRESSURE should change from approximately 0% with no
pressure applied to approximately 100% when full pressure is applied.)
4. When you are done, click on the C
LOSE button to exit the dialog box.
Troubleshooting
Page 30
Page 35

DISPLAY TROUBLESHOOTING
If you encounter problems with the DTU-1931 display, refer to the following tables; your problem
may be described here and you can try the solution offered. For additional information about color
issues, see the documentation that came with your operating system or applications.
GENERAL DISPLAY PROBLEMS
No display. The power
LED is off.
No display. The power
LED is lit blue.
The power LED is lit
orange.
A ‘no signal go to power
save’ message appears
briefly on your display
screen.
A ‘cable disconnect go to
power save’ message
appears briefly on your
display screen.
An ‘out of range’
message appears briefly
on your display screen.
A ‘set refresh range’
message appears briefly
on your display screen.
The image appears
multiple times on the
display.
• Verify that the AC power cable is connected, and that the
DTU-1931 power switch is turned on.
• Check the contrast, brightness, and backlight controls.
Adjust as necessary. Or, open the OSD menu and select the
R
ESET option.
• Your computer may be in a power management mode.
Touch the pen tip to the display screen, move the mouse, or
depress any key on your keyboard.
• Turn off both your computer and the DTU-1931 pen display
tablet. Check the video cable for bent or broken connector pins.
Then properly connect the video cable and turn on the
DTU-1931 and your computer.
• Verify that the DVI/VGA switch is properly set. Restart your
computer after changing the position of the switch.
• Verify that the video card is properly installed.
• Check that your computer is turned on.
• Verify that you are using the video cable that came with the
DTU-1931.
• Check that the DTU-1931 video cable is fully connected.
• Turn off both your computer and the DTU-1931 pen display.
Check the video cable and any video adapters for bent or broken
connector pins. Then properly connect the video cable and any
necessary adapters.
• The input signal frequency is incorrectly set or not compatible
with the DTU-1931. Set the refresh rate (vertical frequency)
between 50 and 75 Hz. If your video card driver supports
adjustment of the horizontal frequency, make sure it is set to
some value between 30 and 80 kHz. On a single monitor system
you will need to connect a different display to change the refresh
rate.
• The resolution is set too high (1280 x 1024, maximum).
• The refresh rate is set too high (75 Hz maximum).
• Set the display properties to detect plug and play monitors.
• The maximum refresh rate is 75 Hz. Set the refresh rate (vertical
frequency) to some value between 50 and 75 Hz.
• Do not extend the video cable. Do not use an input selector
switch box.
Troubleshooting
Page 31
Page 36

When a still image is
displayed for a long
period of time without
refreshing the screen, an
after-image remains for a
short period of time.
Color quality is
inaccurate.
The color white does not
display as white.
VGA PROBLEMS
• Use a screen saver or other power management feature.
• Open the OSD menu and select the RESET option.
• Be sure the DTU-1931 color profile has been installed and is
selected as the profile for use with your operating system and
applications.
• Any changes to the contrast setting should be made in small
increments as changes in contrast may affect color accuracy.
• Be sure the DTU-1931 color profile has been installed and is
selected as the profile for use with your operating system and
applications.
• Verify that the display is operating at the factory default settings.
If that is not sufficient, then adjust color as necessary. For details
on color management, refer to your operating system and
application documentation.
• Verify that the video cable and connector are fully connected.
The display ripples or
flickers.
The display is not clear.
Text or other portions of
the screen appear
blurred.
The display and LCD
panel are not lined up.
The display size is not
correct.
The display ripples or
shows a moiré pattern.
The display color is not
even.
• Open the OSD menu and select the AUTO ADJUST option.
Then, if necessary, manually adjust pitch and phase.
• Verify that the display adapter or video card matches the
specifications for the DTU-1931.
• Adjust the refresh rate in the Display Properties control panel.
• Set the display resolution of your video card to 1280 x 1024.
• Turn off the DTU-1931, then turn it back on.
• Open the OSD menu and select the AUTO ADJUST option.
If necessary, manually adjust the brightness, pitch, and phase
settings.
• Open the OSD menu and select the AUTO ADJUST option.
• As necessary, adjust pitch and phase, and horizontal and vertical
position. Note that some video cards may not show the display
in proper sizing.
• Open the OSD menu and select the AUTO ADJUST option. If this
does not solve the problem, select the R
display back to the factory default settings.
ESET option to set the
• As necessary, adjust pitch and phase.
Troubleshooting
Page 32
Page 37

PEN TABLET TROUBLESHOOTING
If you encounter problems with the DTU-1931 pen display tablet, see the following tables.
Your problem may be described here, and you can try the solution offered. Be sure you refer to the
DTU-1931 Read Me file for the latest information.
For additional information, visit Wacom’s web site at http://www.wacom.com/productsupport.
GENERAL PROBLEMS
The computer does not
have an available USB
Check if there is an available USB port on a USB hub. If not
available you will need to add a USB hub or USB card.
port.
A USB device plugged
into one of the pen
display’s integrated USB
ports does not function.
1. Make sure the pen display itself is properly connected to a
working USB port on your computer.
2. Then be sure the pen display is powered on and that the power
LED lights blue. The DTU-1931 contains a powered USB hub
and the integrated USB ports will not work when the power is off.
3. If the USB device does not work, try plugging it into a USB port
directly on your computer.
4. If your USB device is still not functioning properly, please contact
the manufacturer for that particular device.
The pen display power
LED is off.
Make sure the pen display power switch is turned on.
Check that the AC power adapter is plugged into both the pen display
and an active power outlet.
Use only the power adapter that came with the pen display; other
adapters may cause damage to your product.
The pen works only in
mouse mode, and does
not draw or write with
pressure sensitivity.
The tablet driver software was not installed or did not load properly.
Make sure the tablet driver software is installed and functioning.
Install the pen tablet driver software in accordance with the
instructions found in the Installation section of this guide.
The pen does not draw
or write with pressure
sensitivity.
Some applications require that you turn on the pressure capabilities
within the application or selected tool before the pen will respond as
a pressure-sensitive tool.
Verify also that your application supports pressure sensitivity.
Clicking is difficult. Open the Wacom Tablet control panel and go to the P
The pen selects
everything or will not
stop drawing.
Try using a lighter T
Open the Wacom Tablet control panel and go to the P
Move the T
IP FEEL slider toward FIRM or select DETAILS... and
increase the C
IP FEEL.
LICK THRESHOLD setting. If this does not help, see
Testing your pen on page 30.
Double-clicking is
difficult.
Be sure you are quickly tapping the display screen twice in the same
place on the pen display tablet’s active area. Wacom recommends
using the side switch to double-click.
Open the Wacom Tablet control panel and go to the P
Try increasing the T
F
EEL.
IP DOUBLE CLICK DISTANCE or using a lighter TIP
Windows: Try setting your system to launch programs with a single
click. See Basic pen operations on page 20.
The eraser (when
equipped) selects
everything or will not
stop erasing.
Open the Wacom Tablet control panel and go to the E
Move the E
button and increase the C
RASER FEEL slider toward FIRM, or select the DETAILS...
LICK THRESHOLD setting. If this does not
help, see Testing your pen on page 30.
EN tab.
EN tab.
EN tab.
RASER tab.
Troubleshooting
Page 33
Page 38

You notice a delay at the
beginning of pen or
inking strokes.
You have to press hard
with the pen when
clicking, drawing, or
writing.
The pen tip does not
function.
The pen tip and screen
cursor do not properly
line up.
Changing the function
settings for the pen has
no effect.
The pen side switch
does not work.
The screen cursor
moves but it does not
jump to the pen tip
location when the pen is
placed on the display
screen, and it does not
follow the pen tip when
the pen is moved across
the display.
Open the Wacom Tablet control panel and go to the PEN tab.
Try decreasing the T
work, try dragging the T
IP DOUBLE CLICK DISTANCE. If that does not
IP DOUBLE CLICK DISTANCE slider to the OFF
position in order to turn off double-click assist.
Open the Wacom Tablet control panel and go to the P
Move the T
and decrease the S
IP FEEL slider toward SOFT, or select the DETAILS... button
ENSITIVITY and CLICK THRESHOLD settings.
EN tab.
Be sure you are using the pen that originally came with your
DTU-1931. Other pens may not function properly on the pen display.
Check the control panel’s P
EN tab and verify that a CLICK function is
assigned to the pen tip.
Make sure the status LED lights blue when the tip is pressed. If the
LED does not light, verify that the USB cable is plugged into an
active port on your computer or on a USB hub.
If the LED still does not light, you may have defective hardware (see
Troubleshooting on page 28).
Open the Wacom Tablet control panel and select the C
ALIBRATE tab.
Continue with Calibrating the DTU-1931 on page 23.
Make sure you change the settings for the pen and application that
you are using. See the electronic Software User’s Manual for details
on working with application-specific settings.
Be sure you are using the pen that originally came with your
DTU-1931. Other pens may not function properly on the pen display.
Be sure to press the side switch when the pen tip is within 5 mm
(0.2 inch) of the pen display’s active area – do this without pressing
down on the pen tip.
In the Wacom Tablet control panel, verify that the side switch is set to
the proper function you are expecting to occur for the application and
tool you are using.
Check also the S
IDE SWITCH MODE. If CLICK & TAP is selected, you
will need to first press the side switch then touch the pen tip to the
tablet surface in order to perform a click function.
Make sure the status LED lights blue when you press the side switch.
If not, verify that the USB cable is plugged into an active USB port on
your computer or on a USB hub; the LED will not light if the USB
cable is not plugged into an active port.
If the LED does not light, you may have defective hardware (see
Troubleshooting on page 28).
Make sure the Wacom tablet driver has loaded properly by opening
the Wacom Tablet control panel. If the driver did not load you will see
an error message. If an error message appears, reboot your
computer. If the problem persists, refer to the Installation instructions
and reinstall the Wacom tablet software. (For Macintosh, you must
restart your computer after installing the Wacom tablet driver for
proper tablet operation.)
If you have customized the side switch on your pen to toggle between
pen mode and mouse mode, make sure that your pen display is
operating in pen mode.
Troubleshooting
Page 34
Page 39

When using the pen
display tablet on a
multiple monitor system,
you cannot use the pen
to control the other
monitor(s).
The line you are drawing
does not line up with the
location of the screen
cursor.
You suspect the pen
tablet preferences may
be corrupted, or want to
make certain that all
settings are at their
factory defaults.
The computer does not
go to sleep.
The screen cursor jumps
back when using your
regular mouse or
trackball.
The screen cursor
moves erratically or
jumps around on the
display screen when
another tablet is
connected to your
computer.
Set a pen button to D
ISPLAY TOGGLE, and then press that button to
cycle between pen control for the DTU-1931 and your other displays.
See the electronic Software User’s Manual for details on working with
D
ISPLAY TOGGLE.
You can also use your pen to control the other monitors in mouse
mode. To use mouse mode, first set the pen’s DuoSwitch to M
T
OGGLE.... Then use the switch to toggle between pen mode and
ODE
mouse mode.
To function properly, some applications require that the pen is set to
pen mode. Make sure the pen has not
been toggled to mouse mode.
If the pen is set to pen mode and the problem still exists, then you
may have a corrupted preferences file. Follow the instructions in the
next tip to create a new preferences file.
Delete the pen tablet preferences as follows:
Windows: Click the
Then select W
In the dialog box that appears, click on the R
F
ILE button to delete the preferences for the current user. To delete
preferences for multiple users, click on the R
F
ILES button. Note that administrator rights are required to delete
START icon and select ALL PROGRAMS.
ACOM TABLET and TABLET PREFERENCE FILE UTILITY.
EMOVE MY PREFERENCE
EMOVE ALL PREFERENCE
preferences for all users. Relaunch any currently open tablet-aware
applications that you may be running.
Macintosh: For a single user, delete the tablet preferences by first
choosing your H
home L
P
IBRARY folder. Within your home LIBRARY folder, open the
REFERENCES folder and delete the com.wacom.wacomtablet.prefs
OME folder from the GO menu. Then open your
file. Log out, then log back in. When the tablet driver loads it will
create a new preferences file with the factory defaults.
For multiple users, delete all tablet preferences by first opening the
main A
run the R
the R
PPLICATIONS folder. Then open the WACOM TABLET folder and
EMOVE WACOM TABLET utility. When the utility starts, click on
EMOVE ALL PREFERENCE FILES button. The tablet driver will be
restarted, creating new preferences files with the factory defaults.
Recalibrate the tablet.
Note: Do not manually remove the WACOM TABLET.PREFPANE file from
the main L
removed when uninstalling the tablet software driver, and then only
when using the R
IBRARY PREFERENCEPANES folder. This file is only to be
EMOVE WACOM TABLET utility.
When you are not using the pen, remove it from the pen display
surface or the pen display will continue to send data, keeping the
computer awake.
When the pen is not in use, place it in the pen storage compartment,
or at some location near the pen display – but not on the display.
Leaving your pen on the display may interfere with screen cursor
positioning when using other input devices.
The tablet portion of the DTU-1931 emits electromagnetic waves at a
certain frequency. If another tablet is too closely placed to the
DTU-1931 it may interfere with screen cursor positioning. If this
occurs, move the tablet further away from the DTU-1931.
Troubleshooting
Page 35
Page 40

WINDOWS-SPECIFIC PROBLEMS
After changing right- and
left-handed settings in
Restart Windows for your Wacom tool settings to be correctly
recognized.
the computer’s mouse
control panel, the pen tip
no longer functions
properly.
MACINTOSH-SPECIFIC PROBLEMS
At startup, a dialog box
appears telling you that
either the driver failed to
load or the tablet
preferences have not yet
been created.
Inkwell does not work
correctly with the pen
display.
The pen display tablet was not detected at startup. Make sure the
USB interface cable is securely connected to an active USB port on
your computer or to a USB hub. Make sure that the pen display
power LED is on. If this does not correct the problem, see
Troubleshooting on page 28.
From the G
S
YSTEM PROFILER. Select USB from the HARDWARE section of the
C
ONTENTS list. A Wacom USB pen display model should be listed.
O menu, select the UTILITIES folder and launch the
If a pen display model is not listed, check the pen display’s USB
cable connection or try plugging the pen display into a different USB
port.
If you are still having problems, go to the U
D
ISK UTILITY program, and run REPAIR DISK PERMISSIONS from the
F
IRST AID tab. If this does not help, contact Wacom for Technical
Support. See Technical support options on page 37.
There may be a problem with the Inkwell preferences. Remove the
damaged preference files as follows. They will be recreated when
you enable handwriting recognition.
1. Open the System Preferences pane, choose S
select I
NK. Then turn off handwriting recognition.
2. From the G
P
REFERENCES folders. Remove the following preferences:
• com.apple.ink.framework.plist
• com.apple.ink.inkpad.plist
• com.apple.ink.inkpad.sketch
3. Go back to S
handwriting recognition.
4. Test the Inkwell function using your Wacom pen display tablet
and pen.
5. If this procedure does not resolve your problem with Inkwell,
contact Apple Support for further assistance. Wacom is not the
software manufacturer for Inkwell and we are limited in our
abilities to support a third party software application.
TILITIES folder, open the
HOW ALL and
O menu, choose your HOME. Open the LIBRARY and
YSTEM PREFERENCES and INK, and then enable
Troubleshooting
Page 36
Page 41

TECHNICAL SUPPORT OPTIONS
If you have a problem with your DTU-1931 pen display, first check the appropriate Installation
section in this guide to make sure the unit is installed correctly. Then review the Troubleshooting
procedures.
If you cannot find the answer in this guide, you may find updated information about your problem in
the appropriate Read Me file for your platform (located on the Installation CD).
You can also check the product FAQs (Frequently Asked Questions) on the Wacom web site for
your region.
If you have an Internet connection you can download the latest software drivers from the Wacom
web site for your region. See Obtaining driver downloads on page 38.
If you cannot solve the problem and you think your Wacom product is not working properly, contact
the Wacom support staff for the area where your product was purchased. See the Wacom tablet
Read Me file, located on the Installation CD, for contact information.
When you call, you should be at your computer with the following information available:
• This manual.
• Pen display serial number. (Look at the label on the back of the unit.)
• Driver version number. (See the Installation CD or click on the Wacom Tablet control panel
About button.)
• The make and model of your computer, and operating system version number.
• The make, model, and connection type of your video card.
• A list of peripheral devices attached to your computer.
• The software application and version you were using when the problem occurred.
• The exact wording of any error message that appeared on your screen.
• What happened and what you were doing when the problem occurred.
• How you tried to solve the problem.
Troubleshooting
Page 37
Page 42

OBTAINING DRIVER DOWNLOADS
Wacom periodically updates the pen tablet software driver to maintain compatibility with new
products. If you are having a compatibility problem between your DTU-1931 pen display and a new
hardware or software product, it may be helpful to download a new Wacom tablet software driver
(when available) from the Internet.
USA, Canada, Central and South America
Worldwide Web: http://www.wacom.com/productsupport Driver downloads.
Europe, Middle East and Africa
Worldwide Web: http://www.wacom.eu Software updates.
Anonymous FTP Site: ftp://ftp.wacom.eu/pub/ Software updates.
Japan
Worldwide Web: http://tablet.wacom.co.jp Software updates.
(Japanese)
Asia Pacific (English)
Worldwide Web: http://www.wacom-asia.com Software updates.
(English)
China
Worldwide Web: http://www.wacom.com.cn Software updates.
(Simplified Chinese)
Korea
Worldwide Web: http://www.wacomkorea.com Software updates.
(Korean)
Taiwan
Worldwide Web: http://www.wacom.com.tw Software updates.
(Traditional Chinese)
Troubleshooting
Page 38
Page 43

APPENDIX
To remove the old nib:
Clasp it with a Wacom nib removal tool,
pair of tweezers, needle-nosed pliers, or
similar instrument and pull the old nib
straight out of the pen.
To insert a new nib:
Slide it straight into the barrel of the pen.
Firmly push the nib until it stops. The new
nib will slide into the correct position.
WARNING
Prevent children from swallowing the pen nib or side switch. The pen nib or side switch may accidentally
be pulled out if children are biting on them.
Replace the pen nib when it gets too short –
less than 1 mm (0.04 inch).
CARING FOR THE DTU-1931
Keep the pen and the DTU-1931 LCD screen surface clean. Dust and dirt particles can stick to the
pen and cause excessive wear to the display screen surface. Regular cleaning will help prolong the
life of your LCD screen surface and pen.
Keep the DTU-1931 and pen in a clean, dry place and avoid extremes in temperature.
Room temperature is best. The DTU-1931 and pen are not made to come apart. Taking apart the
product will void your warranty.
IMPORTANT: Take care to never spill liquids onto the pen display or pen. Be especially
careful of getting the display, or pen buttons and tip wet – they contain sensitive electronic
parts that will fail if liquids enter them.
CLEANING
To clean the DTU-1931 casing or the pen, use a soft, damp cloth; you can also dampen the cloth
using a very mild soap diluted with water. Do not use paint thinner, benzine, alcohol, or other
solvents to clean the unit casing or pen.
To clean the display screen
only a light amount of pressure to the display screen and do not make the surface wet. Do not use
detergent to clean the display screen; this may damage the coating on the screen. Please note that
damage of this kind is not covered by the manufacturer’s warranty.
REPLACING THE PEN TIP
The pen tip (nib) will wear with normal use. Excessive pressure will cause it to wear sooner. A worn
nib may damage the coating on the DTU-1931 display screen. To avoid this, periodic tip
replacement is recommended.
When the nib gets too short or develops a sharp edge, you can replace it with one of the extra nibs
that came with the pen.
, use an anti-static cloth or a slightly damp cloth. When cleaning, apply
IMPORTANT: When not in use, place the pen in the pen storage compartment, or lay it flat
on your desk. To maintain the sensitivity of your pen, do not store the tool in a container
where it will rest on its tip.
Appendix
Page 39
Page 44

USING AN ALTERNATE MOUNT OR STAND
To remove the adjustable stand and
attach the pen display to a different
mounting platform:
1. Turn off your computer and power off
the DTU-1931. Then disconnect all
cables from between the unit and
your computer.
2. Protect the display screen surface by
spreading a soft cloth onto a flat
table and placing the DTU-1931 face
down on the cloth.
3. Remove the four screws and lift the
adjustable stand assembly away
from the body of the unit.
4. Using the appropriate screws for
your mounting platform, firmly attach
the DTU-1931 to the alternate
mounting platform.
5. Refer to the Installation instructions,
beginning on page 11, and reattach
the cabling.
CAUTION
When attaching the DTU-1931 onto an alternate
mounting platform, be sure to follow all instructions
in the documentation supplied by the platform
manufacturer. If improperly installed, the unit could
fall, resulting in damage to the unit or physical injury.
If you will be using the DTU-1931 in an installation that requires the use of an alternate mounting
platform, you can remove the adjustable stand from the unit and mount the pen display onto any
mount arm or stand conforming to the VESA 100 mm standard.
Mounting screws that are 4 mm wide with a 0.7 mm pitch (M4 Regular), with a screw clearance
depth of 15 mm are required. Exceeding the clearance depth of 15 mm will damage the pen display
internal components.
Appendix
Page 40
Page 45

PEN AND DIGITAL INK CAPABILITIES IN WINDOWS VISTA
Microsoft Windows Vista provides extensive support for pen* and touch input. When using the
DTU-1931 with a computer running Windows Vista, your experience is enhanced by powerful note
taking, handwriting recognition, fast navigation, and other digital inking options designed to give you
quick, intuitive results with the Wacom pen.
• Note taking. Use your Wacom pen to jot notes and capture quick sketches in Windows
Journal. Journal simulates a physical notebook, but with the advantages of digital note taking –
you can choose from a variety of pen, marker, and highlighter tools. Journal also includes a
powerful search engine that can even locate your handwritten content.
• Handwriting recognition. Because Windows Vista includes powerful handwriting recognition
capabilities, you can use your Wacom pen to quickly enter handwritten information anywhere
the computer accepts typed input. You can convert your handwritten content to typed text at
any time.
• Gestures. Use your Wacom pen to make simple gestural movements on the pen display to
trigger customizable actions for navigation, editing, and other functions. To customize your
gestures, select the F
• Digital Ink in Microsoft Office 2007. Use your Wacom pen to full advantage with the
enhanced digital mark-up and inking tools available in Microsoft Office 2007 applications
running on Windows Vista. Found on the R
provide a consistent set of inking options. For quick access, you can add specific inking tools to
the Quick Access Toolbar located at the top of each application.
Note that the following workarounds in the pen tablet driver improve drawing performance in Vista:
• The Vista Pen Flicks and ‘press-and-hold-to-right-click’ features are disabled in graphics
applications using the Wintab API.
• There is no pressure sensitivity in Journal and other Vista Ink features when both the Flicks and
‘press-and-hold-to-right-click’ features are disabled in the Vista P
panel.
LICKS tab in the PEN AND INPUT DEVICES control panel.
EVIEW tab within applicable applications, these tools
EN AND INPUT DEVICES control
* Pen features supported in all versions of Windows Vista except Vista Home Basic.
Appendix
Page 41
Page 46

ABOUT THE WINDOWS VISTA TABLET PC INPUT PANEL
The Input Panel enables you to use handwriting or an on-screen keyboard to directly enter text with
your Wacom pen. There are different ways to launch the Input Panel:
• Click on the Input Panel icon which appears when you move the screen cursor into a text entry
area.
• Click on the Input Panel tab, located by default on the left edge of the display screen.
• Click on the Tablet PC Input Panel icon located on the Windows taskbar. If the icon is not
visible, right-click on the taskbar, select T
To customize the Input Panel:
1. First open the Input Panel and then click on T
2. Select O
3. Customize the Input Panel settings for the way you like to work.
To learn more about using your Wacom pen in Microsoft Windows Vista and Office 2007, study the
documentation that came with your system and Microsoft Office applications. Be sure to take
advantage of the Windows Vista training tools, including the Tablet PC tutorial, available from
Microsoft.
You can visit also the Wacom web site at www.wacom.com/vista for additional information on
working with your Wacom pen in Windows Vista.
PTIONS to open the Input Panel Options dialog box.
OOLBARS, and TABLET PC INPUT PANEL.
OOLS in the menu bar.
Appendix
Page 42
Page 47

UNINSTALLING THE DTU-1931
Follow the appropriate procedure below to remove the Wacom tablet software and the DTU-1931
from your system.
IMPORTANT: When you remove the Wacom tablet software from your system, your Wacom
tablet will no longer operate with full tablet functionality but will continue to function as a
mouse device.
Windows:
1. Click on the Windows
2. In the C
ONTROL PANEL window for
• Windows Vista: click on UNINSTALL A PROGRAM. In the dialog box that appears, choose the
W
ACOM TABLET option and click on the UNINSTALL button.
• Windows XP or XP x64: select ADD OR REMOVE PROGRAMS. In the ADD OR REMOVE
P
ROGRAMS window, choose WACOM TABLET and click on the REMOVE button.
3. Follow the prompts to remove the tablet driver. (If prompted, enter your administrator login
name and password.)
4. When the driver has been removed, shut down your system, power off your computer, and turn
off the DTU-1931. When your computer and the DTU-1931 are off, disconnect the DTU-1931
from your computer.
Macintosh:
1. Fr om th e G
2. Double-click on the R
button. Enter your administrator login name and password.
3. After the removal is completed, click OK.
4. Shut down your computer and turn off the DTU-1931. When your computer and the DTU-1931
are off, disconnect the DTU-1931 from your computer.
O menu, choose APPLICATIONS and open the WACOM TABLET folder.
START button and open the CONTROL PANEL.
EMOVE WACOM TABLET icon and select the REMOVE TABLET SOFTWARE
Appendix
Page 43
Page 48

PRODUCT SPECIFICATIONS
GENERAL SPECIFICATIONS
Physical dimensions (W x D x H) 452.0 x 398.0 x 55.5 mm (17.8 x 15.7 x 2.2 in), excluding stand
Weight 7.05 kg (15.5 lb), including stand
Input voltage 12 VDC
Power consumption 37W or less
Operating temperature and humidity 5° to 35° C, 20 to 80% RH (non-condensing)
Storage temperature and humidity -10° to 60° C, 20 to 90% RH (non-condensing)
(maximum storage humidity is 38% at a temperature of 60° C, and
maximum storage temperature is 42° C at a humidity of 90%)
Certification and compliance FCC part 15 class B & Subpart C, Industry Canada Class B, CE,
DISPLAY
Display a-Si TFT active matrix LCD
Screen size 19.0 in, diagonal
Resolution 1280 x 1024 (SXGA), 1024 x 768 pixels (XGA),
Synchronization range 50 to 75 Hz vertical, 30 to 80 kHz horizontal
Pixel pitch 0.294 x 0.294 mm (0.012 x 0.012 in)
Color depth 16.7 million
Luminance
Contrast ratio 1300:1, typical
Plug and Play DDC2B, DDC/CI, and other DVI standards
LCD quality Each DTU-1931 LCD panel is produced under very stringent
VCCI Class B, EDID 1.3, C-tick, BSMI, MIC, CCC, GOST-R, CB,
J-MOSS, The European Union RoHS Directive 2002/95/EC,
Chinese RoHS
800 x 600 pixels (SVGA), 640 x 480 pixels (VGA)
270 cd/m
quality standards. Production techniques cannot guarantee an
absolutely perfect TFT display. Wacom does not allow any pixel to
be always white or always black. A small number of pixels (4 or
less) are allowed to show a wrong color for some parts of the color
spectrum. This does not mean the display is defective.
2
(typical)
PEN TABLET
Reading technology Electromagnetic resonance method
Active area 378.3 x 303.1 mm (14.91 x 11.94 in)
Resolution 0.01 mm/point (2540 lpi)
Accuracy ±0.5 mm (±0.02 in), average
Reading height 5 mm (0.2 in)
Maximum report rate 133 points/sec.
Pressure levels 512 levels
Communication interface USB v2.0
Integrated USB hub USB v2.0
Powered hub with two external ports, 500 mA per port
Appendix
Page 44
Page 49

POWER ADAPTER
Input voltage 100 to 240 VAC, 50/60 Hz
Output voltage 12 VDC, 5.0 A (max)
PEN (MODEL UP-817E)
Pressure levels 512
Pen tip travel 0.2 mm (0.008 in) or less
Physical dimensions (L x D) 147.5 x 12.5 mm (5.81 x 0.49 in)
Weight 12 g (0.42 oz), approximately
Side switch type Rocker switch
ORDERING PARTS AND ACCESSORIES
To purchase parts and accessories, refer to the Wacom tablet Read Me file and see who to call for
your region.
You can also do the following:
To purchase parts and accessories in the USA or Canada, call 1.888.884.1870 (toll-free) or visit
Wacom’s web site at http://www.WacomDirect.com (USA only).
To purchase parts and accessories in Europe, call +49 (0)180.500.03.75 or send an email to
spareparts@wacom.eu. Or, visit www.wacom.eu/solutionstore. You can also contact your local
dealer, distributor, or technical support using the appropriate number for your region.
To purchase parts and accessories in other countries, please contact your local dealer or
distributor.
Please note that not all parts and accessories may be available in all regions.
Appendix
Page 45
Page 50

RADIO AND TELEVISION INTERFERENCE
The equipment described in this manual generates, uses, and can radiate radio-frequency energy. If it is not
installed and used properly – that is, in strict accordance with applicable instructions – it may cause
interference with radio and television reception.
FEDERAL COMMUNICATIONS COMMISSION (FCC) NOTICE
This device complies with Part 15 of the FCC Rules. Operation is subject to the following two conditions:
(1) this device may not cause harmful interference, and (2) this device must accept any interference received,
including interference that may cause undesired operation.
This equipment has been tested and found to comply with the limits for a Class B digital device, pursuant to
Part 15 of FCC Rules. These limits are designed to provide reasonable protection against harmful interference
in a residential installation.
This equipment generates, uses and can radiate radio frequency energy and, if not installed and used in
accordance with the instructions, may cause harmful interference to radio communications. However, there is
no guarantee that interference will not occur in a particular installation.
You can determine whether the equipment is causing interference by powering it off. If the interference stops, it
was probably caused by the equipment.
If the equipment does cause interference to radio or television reception, you may be able to correct the
interference by using one or more of the following measures:
• Rotate the television or radio antenna until the interference stops.
• Move the equipment farther away from the television or radio.
• Plug the equipment and computer into an outlet that is on a different circuit from the television or radio.
If necessary, consult your Wacom dealer or an experienced radio/television technician for help.
Changes or modifications to this product not authorized by Wacom could void the FCC Certification and negate
your authority to operate the product.
Appendix
Page 46
Page 51

INDUSTRY CANADA (CANADA ONLY)
Industry Canada, Class B
“This Class (B) digital apparatus complies with Canadian ICES-003”
“Cet appareil numérique de la classe (B) est conforme à la norme NMB-003 du Canada.”
CE DECLARATION
The DTU-1931 pen display has been tested and found to comply with the following harmonized European
Norms:
• EN 55022: 1998+A1:2000+A2:2003 Class B
• EN 61000-3-2: 2006
• EN 61000-3-3: 1995+A1:2001+A2:2005
• EN 55024: 1998+A1:2001+A2:2003
- IEC61000-4-2: 1995+A1:1998+A2:2000
- IEC61000-4-3: 2006
- IEC61000-4-4: 2004
- IEC61000-4-5: 2005
- IEC61000-4-6: 2003
- IEC61000-4-11: 2004
Based on the results of these tests, Wacom declares that the above mentioned device conforms to the EMS
Directive 2004/108/EC.
The device must be installed and operated always in strict accordance to the instructions given in this manual.
Any changes or modifications to this product that were not specially authorized by Wacom will invalidate this
declaration.
Appendix
Page 47
Page 52

WARRANTY
(WORLDWIDE, EXCEPT FOR EUROPE,
AFRICA AND MIDDLE EAST)
LIMITED WARRANTY
Wacom warrants the product, to the original consumer purchaser, except for the Software and consumable
items such as the pen nibs, to be free from defects in materials and workmanship under normal use and
service for a period of two (2) years, from the date of original retail purchase, as evidenced by a copy of the
receipt and registration with Wacom within 30 days of purchase.
The Software is licensed “as is.” Wacom makes no warranty with respect to its quality or performance.
Wacom cannot guarantee you uninterrupted service or the correction of any errors.
Upon discovery of a defect in the product, except in the Software, within the Warranty Period, you should
contact Wacom Technical Support via telephone, email, or fax to obtain an RMA (Return Merchandise
Authorization) number and instructions for shipping the product to a service location designated by Wacom.
You should send the product, shipping charges prepaid, to the designated service location, accompanied by
the return authorization number, your name, address and telephone number, proof of purchase date, and a
description of the defect. Wacom will pay for return shipping by United Parcel Service or by an equivalent
service as chosen by Wacom.
Wacom’s sole obligation and entire liability under this warranty shall be, at Wacom’s option, either the repair or
replacement of the defective product or parts thereof of which Wacom is notified during the Warranty Period;
provided, however, that you are responsible for (i) the cost of transportation of the product to the designated
service location and (ii) any loss or damage to the product resulting from such transportation.
Wacom shall have no responsibility to repair or replace the product if the failure of the product has resulted
from accident, abuse, misuse, negligence, or unauthorized modification or repair, or if it has been handled or
stored other than in accordance with Wacom’s storage instructions.
Any descriptions, drawings, specifications, samples, models, bulletins, or similar material, used in connection
with the sale of the product, shall not be construed as an express warranty that the product will conform or
comply with your requirements.
EXCEPT FOR THE LIMITED WARRANTY DESCRIBED ABOVE, THERE ARE NO OTHER WARRANTIES
MADE BY WACOM ON THIS PRODUCT. NO ORAL OR WRITTEN INFORMATION OR ADVICE GIVEN BY
WACOM, ITS DEALERS, DISTRIBUTORS, AGENTS, OR EMPLOYEES SHALL CREATE A WARRANTY OR
IN ANY WAY INCREASE THE SCOPE OF THIS WARRANTY, AND YOU MAY NOT RELY ON ANY SUCH
INFORMATION OR ADVICE. THIS WARRANTY GIVES YOU SPECIFIC LEGAL RIGHTS, AND YOU MAY
ALSO HAVE OTHER RIGHTS WHICH VARY FROM STATE TO STATE.
WACOM LIMITS THE DURATION OF ANY LEGALLY IMPLIED WARRANTIES INCLUDING IMPLIED
WARRANTIES OF MERCHANTABILITY OR FITNESS FOR A PARTICULAR PURPOSE, TO THE DURATION
OF WACOM’S EXPRESS WARRANTY. SOME STATES DO NOT ALLOW LIMITATIONS ON HOW LONG AN
IMPLIED WARRANTY LASTS, SO THE ABOVE LIMITATION MAY NOT APPLY TO YOU.
NEITHER WACOM NOR ANYONE ELSE WHO HAS BEEN INVOLVED IN THE CREATION, PRODUCTION,
OR DELIVERY OF THIS PRODUCT SHALL BE LIABLE FOR ANY DIRECT, CONSEQUENTIAL, OR
INCIDENTAL DAMAGES (INCLUDING DAMAGES FOR LOSS OF BUSINESS PROFITS, BUSINESS
INTERRUPTION, LOSS OF BUSINESS INFORMATION AND THE LIKE) ARISING OUT OF THE USE OF OR
INABILITY TO USE SUCH PRODUCT, EVEN IF WACOM HAS BEEN ADVISED OF THE POSSIBILITY OF
SUCH DAMAGES. SOME STATES DO NOT ALLOW THE EXCLUSION OR LIMITATION OF INCIDENTAL OR
CONSEQUENTIAL DAMAGES, SO THE ABOVE LIMITATION OR EXCLUSION MAY NOT APPLY TO YOU.
In the event that any of the above limitations are held unenforceable, Wacom’s liability for any damages to you
or any party shall not exceed the purchase price you paid, regardless of the form of any claim.
This Limited Warranty is governed by the laws of the United States of America and the state of Washington.
This Limited Warranty is valid for and only applies to products purchased and used inside the United States
(and its territories or possessions) and Canada.
Appendix
Page 48
Page 53

WARRANTY SERVICE IN THE U.S.A. AND CANADA
To obtain Warranty service within the U.S. or Canada contact:
Wacom Technical Support
Phone: 1.360.896.9833
Fax: 1.360.896.9724
Inquiry form: http://www.wacom.com/productsupport/email.cfm
E-mail: support@wacom.com
WARRANTY SERVICE OUTSIDE OF THE U.S.A. AND CANADA
For products purchased or used outside of the United States and Canada, the warranty period is one (1) year
from the date of original purchase. Upon discovery of a defect in the product, except in the Software, within the
Warranty Period you should contact your local dealer or distributor. If an authorized Wacom repair center is not
available in your local country you will be responsible for all transportation costs including duties and taxes to
and from the Wacom repair center. In all other respects, the terms of the warranty as set forth above apply to
such sales.
Should you have any questions about this Agreement, or if you desire to contact Wacom for any reason, please
contact in writing:
In North and South America contact:
Wacom Technology Corporation
1311 SE Cardinal Court
Vancouver, Washington 98683
U.S.A.
Appendix
Page 49
Page 54

WARRANTY
(EUROPE, AFRICA AND MIDDLE EAST)
SOFTWARE LICENSE AGREEMENT
Important Notice to Customers
This product contains copyrighted computer programs (“software”) which are the inalienable intellectual
property of Wacom Europe GmbH (“Wacom”). This software is both integrated within the product and also
contained on the accompanying data carrier. The purchase of this product from your dealer does not include
Wacom's software and the associated rights of usage. Wacom grants you, the user, the right to use the
software solely in accordance with the conditions of this software license agreement. By purchasing this
product you agree to the terms of this license.
ENTITLEMENT TO USE THE SOFTWARE
Wacom grants the customer a personal, non-exclusive license to use the software solely in combination with
this product and for the proper operation of this product. This license may be transferred only in connection with
this product.
The use of this software includes solely the permanent or temporary, complete or partial copying of the
software by means of loading, displaying, executing, transmitting or saving for the purpose of executing the
commands and data it contains or of observing, examining or testing the functions of the software.
The customer may not license, lease or loan the software to a third party, nor allow a third party to access the
software in any other way. The customer may not without prior written authorization from Wacom copy, modify,
transmit or edit the software, apart from the actions of copying necessary to create a backup copy and for the
purposes outlined in section 2 above.
The customer may not decompile the software; if the software contains interfaces to software which is not
supplied by Wacom, Wacom shall make the necessary information available to the customer upon request,
provided that the customer can prove his/her entitlement to use the software and that he/she agrees to pay the
copying and postage costs.
LIMITED WARRANTY
Wacom warrants to you as the original end-user that the product hardware is free from defects in materials and
workmanship under normal use and service for a period of TWO (2) YEARS after the date of purchase
(excluding consumable items such as the pen nibs), provided that they are unused at the time of such
purchase. Wacom further warrants to you the accompanying data media against defects in materials and
workmanship for a period of SIX (6) MONTHS after the date of purchase.
The Software is licensed and distributed “AS IS”. Wacom makes no warranties, expressed or implied, with
respect to its quality, performance, merchantability and fitness for a particular purpose (including related
manuals and documentation). Wacom cannot guarantee you uninterrupted service or the correction of any
errors.
Upon discovery of a defect in the product, except in the Software, within the applicable Warranty Period, you
should return them in the original packaging to the place of your original purchase, together with your name,
address, telephone number, a description of the problem and a copy of the original invoice. You are
responsible for any loss or damage to the product resulting from such transportation. Wacom’s sole obligation
and entire liability under this warranty shall be, at Wacom’s option, either the repair or the replacement of
product or parts thereof that prove defective and that were returned within the applicable Warranty Period.
Appendix
Page 50
Page 55

Wacom shall have no responsibility to repair or replace the product if (a), in the opinion of Wacom, the failure of
the product has resulted from accident, abuse, misuse, negligence, misapplication, or unauthorized
modification or repair, or (b) the product has been handled or stored other than in accordance with Wacom’s
storage instructions, or (c) the failure is due to normal wear and tear, or (d) you fail to fulfill your obligations as
described above.
In case that any claim presented under warranty is found upon investigation to be either outside the duration or
the scope of this warranty, or in case that the product is found to be not defective, then the cost of such
investigation and repair shall be borne by you.
Any descriptions, drawings, specifications, samples, models, bulletins, or similar material, used in connection
with the sale of the product, shall not be construed as an express warranty that the product will conform or
comply with your requirements.
Should any provision of this agreement be declared invalid, that provision shall be treated as separate from the
agreement, and the agreement shall remain in force without limitation in all other respects.
If this product is found to be defective, the purchaser may be entitled to institute legal proceedings against the
seller on grounds of liability for deficiency. The statutory rights indicated with regard to the seller are not limited
in any way by this warranty. Rather, this warranty affords the purchaser rights in addition to those indicated in
the present text.
This limited warranty shall apply if the seller's corporate domicile is in the European Union or in Iceland,
Norway, Jersey, Switzerland, Russia, the Ukraine, Rumania, Bulgaria, Croatia, Serbia, Tunisia, Turkey, Syria,
the Lebanon, Jordan, Israel, Egypt, the United Arab Emirates, Iran or South Africa.
This Limited Warranty and Liability is governed by the laws of the Federal Republic of Germany.
Should you have any questions about this Agreement, or if you desire to contact Wacom for any reason, please
contact in writing:
Wacom Europe GmbH
Europark Fichtenhain A9
47807 Krefeld
GERMANY
Appendix
Page 51
Page 56

This page intentionally left blank.
Appendix
Page 52
Page 57

Installations- und Benutzerhandbuch
Page 58

Page 59

EINFÜHRUNG UND ÜBERSICHT
Das Wacom® DTU-1931 Pen Display vereint in sich die Vorzüge eines LCD-Bildschirms (Liquid
Crystal Display) und die Kontrolle, den Komfort sowie die Produktivität, die die kabel- und batterielose
Stifttechnologie von Wacom bietet. Dadurch erhalten Sie eine Schnittstelle zu Ihrem Computer, die Sie
direkt mit dem Stift auf dem Bildschirm bedienen können.
Zu den Grundkomponenten des DTU-1931 gehören ein Wacom Stifttablett, das von innen hinter ein
TFT-Farbdisplay mit 19 Zoll Bildschirmdiagonale montiert ist, sowie ein Wacom Stift.
Das Display und der Tablett-Sensor arbeiten als integriertes Ausgabe- und Eingabegerät. Das
Display unterstützt Auflösungen bis zu 1280 x 1024 Pixel bei 16,7 Mio. Farben. Der Tablett-Sensor
überträgt die Koordinaten des Stiftes sowie Informationen über den Druck und den Schalter.
Das DTU-1931 ist darüber hinaus mit einem Video-Durchgangsanschluss (
sodass Sie gleichzeitig einen Bildschirm oder Projektor an das Pen Display anschließen können.
Im vorliegenden Handbuch wird die Installation und Verwendung des DTU-1931 beschrieben.
Für den Computer stellt das DTU-1931 Pen Display zwei getrennte Geräte dar (Display und
Stifttablett). Deshalb wird der Installationsvorgang in zwei Stufen durchgeführt:
• Installieren Sie das DTU-1931 zuerst als Bildschirm
• Installieren Sie das DTU-1931 anschließend als Stifttablett.
In beiden Phasen sind eine Hard- und Softwareinstallation sowie entsprechende Anpassungen
durchzuführen. Halten Sie sich genau an die Anweisungen.
WICHTIG: Sie MÜSSEN die Treibersoftware für das Wacom Stifttablett installieren, damit
der Stift auf dem Bildschirm richtig funktioniert.
DVI -I-A
USGANG
) ausgestattet,
Informationen zum Anpassen der Einstellungen für das Pen Display Tablet und den Stift auf
Windows- oder Macintosh-Computern über das Wacom Tablett-Kontrollfeld finden Sie unter
Konfigurieren auf Seite 21.
Die folgenden Informationen sind in diesem Produkt nicht enthalten: Informationen zu Ihrer
Computerhardware und Ihrem Betriebssystem sowie Informationen zu Ihren Anwendungsprogrammen.
Die beste Informationsquelle hierfür sind die Handbücher und Datenträger, die mit Ihrer Hardware, dem
Betriebssystem bzw. der Anwendung geliefert wurden.
Die Philosophie von Wacom ist es, alle Produkte kontinuierlich zu verbessern. Aus diesem
Grund werden regelmäßig technische Neuerungen and Verbesserungen vorgenommen.
Einige Änderungen und Verbesserungen werden deshalb nicht in diesem Benutzerhandbuch
berücksichtigt.
Einführung und Übersicht
Seite 1
Page 60

VORSICHTSMAßNAHMEN
Beachten Sie alle Anweisungen, Vorsichtshinweise und Warnungen in diesem Handbuch, damit der
sichere Gebrauch des Produkts gewährleistet ist. Die Nichtbeachtung kann zu Datenverlust oder
Beschädigungen an Ihrem Computer führen. Bei Nichtbeachtung erlischt möglicherweise Ihr
Garantieanspruch. In diesem Fall übernimmt Wacom keine Verantwortung für die Reparatur oder
den Ersatz des Produkts.
WARNUNG
ACHTUNG
W
ARNUNG
Gehen Sie mit der gebotenen Sorgfalt vor, wenn Sie eine der beschriebenen
Handlungen ausführen.
Dieses Symbol weist auf Informationen hin, bei deren
Nichtbeachtung es zu schwerwiegenden Gesundheitsschäden
oder zum Tode kommen kann.
Dieses Symbol weist auf Informationen hin, bei deren
Nichtbeachtung es zu Gesundheits- oder Sachschäden
kommen kann.
Dieses Symbol weist auf Informationen hin, bei deren
Nichtbeachtung es zu schwerwiegenden Gesundheitsschäden
oder zum Tode kommen kann.
VERWENDUNGSORT
W
ARNUNG
Setzen Sie das DTU-1931 Pen Display nicht in Einrichtungskontrollsystemen ein,
für die extrem hohe Zuverlässigkeit erforderlich ist. Dabei können Fehlfunktionen bei
anderen elektronischen Geräten auftreten oder andere Geräte können Fehlfunktionen des
Pen Displays verursachen. Schalten Sie das DTU-1931 an Standorten aus, an denen der
Einsatz verboten ist, damit die Gefahr von Fehlfunktionen anderer elektronischer Geräte
vermieden wird. Wacom übernimmt keinerlei Verantwortung für unmittelbare Schäden
oder Folgeschäden. Nähere Informationen entnehmen Sie bitte der Garantie, die Sie am
Ende dieses Handbuchs finden.
BETRIEBSUMGEBUNG
Temperatur und Luftfeuchtigkeit
• Temperatur und Luftfeuchtigkeit bei Betrieb: 5° bis 35° C, 20 bis 80 % relative
Luftfeuchtigkeit
• Temperatur und Luftfeuchtigkeit bei Lagerung: -10° bis 60° C, 20 bis 90 % relative
Luftfeuchtigkeit
A
CHTUNG
CHTUNG
A
Verwenden und lagern Sie das Pen Display nicht unter folgenden Bedingungen:
• Bei größeren bzw. außerhalb der Spezifikationen liegenden Temperaturschwankungen
(z. B. außerhalb geschlossener Räume oder in einem Fahrzeug.
• An Orten, an denen das Pen Display und der Stift direkter Sonneneinstrahlung oder
Wärme eines anderen Geräts, Wasser und anderen Flüssigkeiten ausgesetzt sind.
Setzen Sie das Pen Display nicht in einer staubigen Umgebung ein. Dadurch kann das
Gerät beschädigt werden.
Vorsichtsmaßnahmen
Seite 2
Page 61

VERWENDUNG
Hg
WARNUNG
A
CHTUNG
ACHTUNG
A
CHTUNG
A
CHTUNG
Verwenden Sie nur das Netzteil, das mit dem DTU-1931 ausgeliefert wurde. Wird ein
anderes Netzteil verwendet, funktioniert das DTU-1931 nicht ordnungsgemäß oder kann
beschädigt werden. Bei Einsatz eines anderen Netzgeräts besteht darüber hinaus
auch Brandgefahr. Für den Fall, dass ein anderes Netzgerät verwendet wird, erlischt
der Garantieanspruch.
Verwenden Sie für die Stromversorgung des DTU-1931 ausschließlich eine geerdete
Stromquelle.
Schließen Sie das Bildschirm- und das Netzkabel nicht an und ziehen Sie diese
auch nicht ab, wenn das DTU-1931 bzw. Ihr Computer noch eingeschaltet ist.
Dadurch können das Display oder die Grafikkarte des Computers beschädigt werden.
In diesem Fall übernimmt Wacom keine Verantwortung für die Reparatur oder den Ersatz
des Produkts.
Dieses Gerät ist auf den Einsatz einer VGA- oder DVI-Grafikkarte ausgelegt.
Der Einsatz einer nicht geeigneten Grafikkarte kann zu Beschädigungen des DTU-1931
führen.
Bedecken Sie die Lüftungsöffnungen an der Rückseite des Geräts nicht. Das Gerät
kann dadurch überhitzen und beschädigt werden.
Wenn Sie längere Zeit nicht mit dem DTU-1931 arbeiten, ziehen Sie den Netzteilstecker
aus der Steckdose.
HANDHABUNG
WARNUNG
W
ARNUNG
W
ARNUNG
W
ARNUNG
A
CHTUNG
ACHTUNG
ACHTUNG
ACHTUNG
ACHTUNG
Hochspannung. Öffnen oder zerlegen Sie niemals das DTU-1931 Pen Display. Bei
offenem Gehäuse besteht die Gefahr eines Stromschlags. Darüber hinaus erlischt
dadurch Ihr Garantieanspruch und Wacom übernimmt keinerlei Verantwortung für die
Reparatur oder den Ersatz des Produkts.
Wenn der LCD-Bildschirm beschädigt ist, berühren Sie KEINESFALLS eventuell
austretende Flüssigkeit. Die Flüssigkeit verursacht Hautreizungen. Wenn sie dennoch
mit Haut, Augen oder Mund in Berührung kommt, spülen Sie die betreffende Stelle sofort
mindestens 15 Minuten lang unter fließendem Wasser ab. Suchen Sie bei Kontakt mit
Augen und Mund außerdem einen Arzt auf.
MÜSSEN GEMÄSS KOMMUNAL-, LANDES- ODER STAATSGESETZEN
RECYCELT ODER ENTSORGT WERDEN.
Die Hintergrundbeleuchtung des DTU-1931 Pen Display enthält Quecksilber (Hg).
Stellen Sie eine ordnungsgemäße Entsorgung des Geräts entsprechend der örtlich
geltenden Bestimmungen und Gesetze sicher.
Bewahren Sie den Stift und Zubehörteile außerhalb der Reichweite von Kindern auf.
Wenn Kinder auf den Stift beißen, besteht die Gefahr, dass sich die Spitze oder der
Seitenschalter lösen.
Nehmen Sie den Stift nicht auseinander.
des Geräts. In diesem Fall übernimmt Wacom keine Verantwortung für die Reparatur oder
den Ersatz des Produkts.
Achten Sie darauf, dass der Bildschirm nicht verkratzt wird.
Gegenstände auf die Oberfläche des Bildschirms.
Verstellen Sie den Neigungswinkel am Pen Display mit Vorsicht: in dem Spalt zwischen
dem umklappbaren Teil des Standfußes könnten Sie leicht Ihre Finger einklemmen.
Heben Sie das DTU-1931 nicht am Standfuß hoch, da dies den Ständermechanismus
beschädigen könnte.
fassen Sie das Gerät bitte stets am Gehäuse an.
Vermeiden Sie heftige Erschütterungen des DTU-1931 oder des Stiftes. Wenn Sie
das Interactive Pen Display heftigen Stößen aussetzen oder es fallen lassen, können der
Bildschirm und andere Bauteile beschädigt werden.
– LAMPEN IN DIESEM PRODUKT ENTHALTEN QUECKSILBER UND
Dies verursacht möglicherweise Fehlfunktionen
Stellen Sie keine scharfen
Wenn Sie das Pen Display heben oder transportieren möchten,
Vorsichtsmaßnahmen
Seite 3
Page 62

ACHTUNG
A
CHTUNG
ACHTUNG
ACHTUNG
ACHTUNG
Stellen Sie keine schweren Gegenstände auf das Pen Display und stoßen Sie nicht
mit Gewalt dagegen. Dadurch kann der Bildschirm beschädigt oder der Standfuß
verbogen werden.
Stellen Sie keine schweren Gegenstände auf die Kabel des DTU-1931, knicken Sie die
Kabel nicht wiederholt und üben Sie keinen starken Druck auf die Kabelanschlüsse
aus.
Dadurch können das Gerät oder die Kabel beschädigt werden.
Wenn die Stiftspitze scharf oder kantig wird, kann die Oberfläche des Bildschirms
beschädigt werden. Ersetzen Sie die Stiftspitze gegebenenfalls.
Verwenden Sie zum Reinigen des Bildschirms weder organische Lösungsmittel
(z. B. Alkohol) noch milde Reinigungsmittel. Durch diese Mittel kann die Beschichtung
des Bildschirms beschädigt werden. Beachten Sie, dass derartige Schäden nicht unter
die Garantiebestimmungen des Herstellers fallen.
• Trennen Sie das Gerät vor der Reinigung immer von der Stromversorgung.
• Reinigen Sie den Bildschirm mit einem antistatischen oder leicht angefeuchteten
Tuch. Üben Sie bei der Reinigung nur minimalen Druck auf den Bildschirm aus
und achten Sie darauf, dass die Oberfläche nicht durchnässt wird.
• Verwenden Sie zur Reinigung des Gehäuses und des Stiftes des Pen Displays
ein weiches Tuch und ein mildes, mit Wasser verdünntes Reinigungsmittel
(z. B. Geschirrspülmittel).
Setzen Sie das DTU-1931 niemals elektrostatischen Entladungen mit hoher Spannung
oder dem Aufbau von elektrostatischer Ladung am LCD-Bildschirm aus.
Dadurch
können am Display vorübergehend Fehlfarben und Flecken entstehen. Wenn Fehlfarben
auftreten, lassen Sie das Display eingeschaltet. Die Fehlfarben sind nach wenigen Stunden
wieder verschwunden.
Wiederverwendung, Recycling und Reparatur. Wenn Sie das Gerät durch ein neueres
austauschen oder die Nutzungsdauer des Geräts abgelaufen ist, sind Sie aufgefordert,
das Produkt bei der nächsten Recycling-Sammelstelle abzugeben. Entsprechende
Sammelstellen stehen in jeder Gemeinde zur Verfügung. Sie leisten dadurch einen
aktiven Beitrag zum Umweltschutz in Ihrer Gemeinde und tragen dazu bei, dass keinerlei
in dem Gerät vorhandene Schadstoffe bei der Entsorgung in die Umwelt gelangen.
Gemäß EU-Richtlinie 2002/96/EG, die am 27. Januar 2003 vom Europäischen Parlament
und vom Europarat erlassen wurde (WEEE), und laut Vorschriften in den einzelnen
Mitgliedsstaaten ist die Entsorgung von Elektro- und Elektronikschrott im normalen
Hausmüll untersagt. Produkte, auf die diese Richtlinie zutrifft, sind mit dem Symbol
zur Kennzeichnung von Elektro- und Elektronikgeräten am Anfang dieses Hinweises
versehen, es sei denn, diese Kennzeichnung ist aufgrund des Formats oder der Funktion
des Produkts nicht möglich. Wacom Produkte unterliegen der Richtlinie 2002/96/EG. Die
Geräte sollten daher stets getrennt gesammelt und der entsprechenden
Entsorgungsstelle in Ihrer Region oder Gemeinde zugeführt werden.
Wacom Pen Display-Produkte entsprechen der RoHS-Richtlinie 2002/95/EG
(RoHS-Richtlinie) der Europäischen Union.
Vorsichtsmaßnahmen
Seite 4
Page 63

INHALT
Einführung und Übersicht . . . . . . . . . . . . . . . . . . . . . . . . . . . . . . . . . . . . . . . . .1
Vorsichtsmaßnahmen . . . . . . . . . . . . . . . . . . . . . . . . . . . . . . . . . . . . . . . . . . . . .2
Verwendungsort . . . . . . . . . . . . . . . . . . . . . . . . . . . . . . . . . . . . . . . . . . . . . . .2
Betriebsumgebung . . . . . . . . . . . . . . . . . . . . . . . . . . . . . . . . . . . . . . . . . . . . .2
Verwendung . . . . . . . . . . . . . . . . . . . . . . . . . . . . . . . . . . . . . . . . . . . . . . . . . .3
Handhabung . . . . . . . . . . . . . . . . . . . . . . . . . . . . . . . . . . . . . . . . . . . . . . . . .3
Das Gerät DTU-1931 . . . . . . . . . . . . . . . . . . . . . . . . . . . . . . . . . . . . . . . . . . . . . .7
Packungsinhalt . . . . . . . . . . . . . . . . . . . . . . . . . . . . . . . . . . . . . . . . . . . . . . . .7
Komponenten des Pen Displays . . . . . . . . . . . . . . . . . . . . . . . . . . . . . . . . . .8
Vorderansicht . . . . . . . . . . . . . . . . . . . . . . . . . . . . . . . . . . . . . . . . . . . . .8
Rückansicht . . . . . . . . . . . . . . . . . . . . . . . . . . . . . . . . . . . . . . . . . . . . . .9
Einstellen der Display-Neigung . . . . . . . . . . . . . . . . . . . . . . . . . . . . . . . . . .10
Installation . . . . . . . . . . . . . . . . . . . . . . . . . . . . . . . . . . . . . . . . . . . . . . . . . . . . . 11
Systemvoraussetzungen . . . . . . . . . . . . . . . . . . . . . . . . . . . . . . . . . . . . . . .11
Schritt 1: Installieren des LCD-Bildschirms . . . . . . . . . . . . . . . . . . . . . . . . .12
Kabeldiagramm für den LCD-Bildschirm . . . . . . . . . . . . . . . . . . . . . . .13
Schritt 2: Installieren des Stifttabletts . . . . . . . . . . . . . . . . . . . . . . . . . . . . . .16
Anbringung des USB-Kabels . . . . . . . . . . . . . . . . . . . . . . . . . . . . . . . .16
Kabeldiagramm für das Stifttablett . . . . . . . . . . . . . . . . . . . . . . . . . . . .16
Softwareinstallation . . . . . . . . . . . . . . . . . . . . . . . . . . . . . . . . . . . . . . . .17
Arbeiten mit dem DTU-1931 . . . . . . . . . . . . . . . . . . . . . . . . . . . . . . . . . . . . . . .18
Einrichten des Arbeitsbereiches . . . . . . . . . . . . . . . . . . . . . . . . . . . . . . . . .18
Verwenden des Stiftes . . . . . . . . . . . . . . . . . . . . . . . . . . . . . . . . . . . . . . . . .19
Komponenten des Stiftes . . . . . . . . . . . . . . . . . . . . . . . . . . . . . . . . . . .19
Grundfunktionen des Stiftes . . . . . . . . . . . . . . . . . . . . . . . . . . . . . . . . .20
Konfigurieren . . . . . . . . . . . . . . . . . . . . . . . . . . . . . . . . . . . . . . . . . . . . . . . . . . 21
Öffnen des Kontrollfeldes . . . . . . . . . . . . . . . . . . . . . . . . . . . . . . . . . . . . . . .21
Weitere Informationen . . . . . . . . . . . . . . . . . . . . . . . . . . . . . . . . . . . . . . . . .21
Grundlegende Anpassungen . . . . . . . . . . . . . . . . . . . . . . . . . . . . . . . . . . . .22
Kalibrieren des DTU-1931 . . . . . . . . . . . . . . . . . . . . . . . . . . . . . . . . . .23
Einstellen des Displays . . . . . . . . . . . . . . . . . . . . . . . . . . . . . . . . . . . . . . . .24
Standardeinstellungen, Auto-Sync und Benutzereinstellungen . . . . . .24
On Screen Display (OSD)-Einstellungen . . . . . . . . . . . . . . . . . . . . . . .24
Pitch- und Phase-Einstellungen (nur VGA) . . . . . . . . . . . . . . . . . . . . . .27
Energiesparmaßnahmen . . . . . . . . . . . . . . . . . . . . . . . . . . . . . . . . . . .27
Fehlerbehebung . . . . . . . . . . . . . . . . . . . . . . . . . . . . . . . . . . . . . . . . . . . . . . . .28
Testen des DTU-1931 . . . . . . . . . . . . . . . . . . . . . . . . . . . . . . . . . . . . . . . . .28
Testen des Stiftes . . . . . . . . . . . . . . . . . . . . . . . . . . . . . . . . . . . . . . . . . . . . .30
Fehlerbehebung für das Display . . . . . . . . . . . . . . . . . . . . . . . . . . . . . . . . .31
Allgemeine Display-Probleme . . . . . . . . . . . . . . . . . . . . . . . . . . . . . . . .31
VGA-Probleme . . . . . . . . . . . . . . . . . . . . . . . . . . . . . . . . . . . . . . . . . . .32
Fehlerbehebung für das Stifttablett . . . . . . . . . . . . . . . . . . . . . . . . . . . . . . .33
Allgemeine Probleme . . . . . . . . . . . . . . . . . . . . . . . . . . . . . . . . . . . . . .33
Windows-spezifische Probleme . . . . . . . . . . . . . . . . . . . . . . . . . . . . . .36
Macintosh-spezifische Probleme . . . . . . . . . . . . . . . . . . . . . . . . . . . . .37
Optionen für den technischen Kundendienst . . . . . . . . . . . . . . . . . . . . . . . .38
Abrufen von Treiber-Downloads . . . . . . . . . . . . . . . . . . . . . . . . . . . . . . . . . .39
Inhalt
Seite 5
Page 64

Anhang . . . . . . . . . . . . . . . . . . . . . . . . . . . . . . . . . . . . . . . . . . . . . . . . . . . . . . . 40
Warten des DTU-1931 . . . . . . . . . . . . . . . . . . . . . . . . . . . . . . . . . . . . . . . . 40
Reinigen . . . . . . . . . . . . . . . . . . . . . . . . . . . . . . . . . . . . . . . . . . . . . . . 40
Austauschen der Stiftspitze . . . . . . . . . . . . . . . . . . . . . . . . . . . . . . . . . 40
Verwenden alternativer Ständer oder Halterungen . . . . . . . . . . . . . . . . . . . 41
Stift- und Freihandfunktionen in Windows Vista . . . . . . . . . . . . . . . . . . . . . 42
Informationen zum Tablet PC-Eingabebereich in Windows Vista . . . . 43
Deinstallieren des DTU-1931 . . . . . . . . . . . . . . . . . . . . . . . . . . . . . . . . . . . 44
Technische Daten . . . . . . . . . . . . . . . . . . . . . . . . . . . . . . . . . . . . . . . . . . . . 45
Allgemeine Spezifikationen . . . . . . . . . . . . . . . . . . . . . . . . . . . . . . . . . 45
Display . . . . . . . . . . . . . . . . . . . . . . . . . . . . . . . . . . . . . . . . . . . . . . . . . 45
Stifttablett . . . . . . . . . . . . . . . . . . . . . . . . . . . . . . . . . . . . . . . . . . . . . . . 45
Netzgerät . . . . . . . . . . . . . . . . . . . . . . . . . . . . . . . . . . . . . . . . . . . . . . . 46
Stift (Modell UP-817E) . . . . . . . . . . . . . . . . . . . . . . . . . . . . . . . . . . . . . 46
Bestellen von Teilen und Zubehör . . . . . . . . . . . . . . . . . . . . . . . . . . . . . . . 46
Störungen des Radio- und Fernsehempfangs . . . . . . . . . . . . . . . . . . . . . . 47
FCC-Hinweis (Federal Communications Commission) . . . . . . . . . . . . 47
Industry Canada (nur Kanada) . . . . . . . . . . . . . . . . . . . . . . . . . . . . . . 48
CE-Erklärung . . . . . . . . . . . . . . . . . . . . . . . . . . . . . . . . . . . . . . . . . . . . 48
Garantie (außer für Europa, Afrika und den Nahen Osten) . . . . . . . . . . . . 49
Garantie (Europa, Afrika und Naher Osten) . . . . . . . . . . . . . . . . . . . . . . . . 51
Inhalt
Seite 6
Page 65

DAS GERÄT DTU-1931
DTU-1931 Pen Display
Netzgerät und Netzkabel
(POW-A104 und SCD-A060, SCD-A061,
oder SCD-A062 (abhängig von Region))
Stift mit Ersatzspitzen und Werkzeug
zur Spitzenentfernung (UP-817E)
USB-Kabel (STJ-A275)
Installations- und Benutzerhandbuch
(dieses Handbuch)
Installations-CD
(enthält die Treibersoftware)
Stiftschnur (PKB-A025)
Kabel DVI an DVI (STJ-A273)
Analoges RGB-Kabel (STJ-A274)
PACKUNGSINHALT
Packen Sie alle Elemente vorsichtig aus und legen Sie sie auf einen Tisch oder eine andere
stabile Arbeitsfläche. Vergewissern Sie sich, dass der hier aufgeführte Packungsinhalt vollständig
vorhanden ist.
InstallationGuide&UserʼsManual
Installations-undBenutzerhandbuch
GuidedʼinstallationetManueldʼutilisation
Hinweise:
Die Abbildungen sind nicht maßstabgerecht.
Manche Produktkonfigurationen enthalten andere Stifte ohne Seitenschalter oder Radierer.
Im Lieferumfang einiger Konfigurationen sind unter Umständen zusätzliche CDs oder DVDs mit
Anwendungssoftware enthalten. Zur Installation dieser Anwendungen lesen Sie die diesen CDs
oder DVDs beiliegenden Anleitungen.
Bewahren Sie den Verpackungskarton zum Lagern oder Transportieren des DTU-1931 auf.
Das Gerät DTU-1931
Seite 7
Page 66

KOMPONENTEN DES PEN DISPLAYS
OSD-Steuerelemente
Über diese Steuerelemente können Sie eine Reihe
von Einstellungen für die Anzeige vornehmen.
Siehe Einstellen des Displays auf Seite 24.
Statusanzeige
Leuchtet blau, wenn sich der
Stift im aktiven Bereich des
Pen Display Tablets befindet
und die Stiftspitze gedrückt wird.
Das USB-Kabel muss ebenfalls
an einen aktiven USB-Anschluss
angeschlossen werden, bevor
die LED-Anzeige leuchtet.
Netzschalter
Schaltet die Stromversorgung
der Einheit ein bzw. aus.
LED-Betriebsanzeige
Leuchtet blau, wenn die
Stromversorgung zum
DTU-1931 eingeschaltet
und ein Bildschirmsignal
vorhanden ist.
Leuchtet orange, wenn kein
Bildschirmsignal empfangen
wird. (Z. B. wenn Ihr Computer
ausgeschaltet ist, hochfährt
oder in einem
Energieverwaltungsmodus läuft,
in dem keine Bildschirmsignale
gesendet werden.)
An die integrierten USBAnschlüsse (je einer auf beiden
Geräteseiten) können Sie USBGeräte anschließen (z. B. ein
USB-Flash-Laufwerk oder eine
USB-Fernbedienung).
Sie müssen zunächst die
Hardware und Software
des DTU-1931 vollständig
installieren, bevor Sie andere
Geräte daran anschließen
können.
Machen Sie sich mit den zahlreichen Funktionen und Komponenten des Produkts vertraut.
VORDERANSICHT
Das Gerät DTU-1931
Seite 8
Page 67

RÜCKANSICHT
KensingtonSicherheitsschlitz
Ermöglicht das mühelose
Anbringen eines
Sicherheitskabels.
Stiftfach
Zur Aufbewahrung
setzen Sie ein Ende des Stiftes in einen Teil des Stiftfachs ein.
Drücken Sie anschließend vorsichtig das andere Ende des Stiftes in das Fach.
Zur Entnahme
drücken Sie auf ein beliebiges Ende des Stiftes. Das andere Ende
des Stiftes springt aus dem Fach, so dass Sie ihn entnehmen können.
Einstellhebel des Standfußes
DVI/VGA (Digital/Analog)-Schalter
Stellen Sie mit diesem Schalter den
verwendeten Bildschirmanschluss ein.
Video-, USB- und Stromanschlüsse
Aufstellvorrichtung
Zur Einstellung des Neigungswinkels
des Geräts. Siehe Einstellen der
Display-Neigung auf Seite 10.
Verbindungspunkt für Stiftschnur
Wenn Sie eine Stiftschnur benutzen
möchten, müssen Sie diese an der
Aufhängung links oder rechts vom
Gerät anbringen.
WICHTIG:
Stellen Sie das Pen Display immer auf eine stabile Unterlage oder lagern Sie es im Karton
der Originalverpackung. Stellen Sie sicher, dass der Standfuß auf den niedrigsten Neigungswinkel
eingestellt ist, bevor Sie das DTU-1931 verpacken. Wenn Sie den Standfuß nicht schließen, kann
möglicherweise während des Transports oder der Lagerung der Feststellmechanismus beschädigt
werden.
Heben Sie das Gerät nicht am Standfuß an, da dies den Ständermechanismus beschädigen
könnte. Wenn Sie das DTU-1931 heben oder bewegen möchten, fassen Sie das Gerät bitte stets
am Gehäuse an.
Das Gerät DTU-1931
Seite 9
Page 68

EINSTELLEN DER DISPLAY-NEIGUNG
•
Zum Öffnen des Display-Ständers
ziehen Sie den Einstellhebel nach
oben und klappen Sie den Ständer
in den gewünschten Neigungswinkel.
Lassen Sie den Hebel wieder los,
damit der Ständer in der gewünschten
Position fixiert wird.
•
Zum Schließen des Ständers ziehen
Sie den Einstellhebel nach oben und
klappen Sie den Ständer vorsichtig in
die geschlossene Position zurück, bis
er einrastet. Lassen Sie den Hebel
wieder los, damit der Ständer in der
gewünschten Position fixiert wird.
ACHTUNG
Passen Sie auf, dass Ihr Finger nicht
in den beweglichen Zwischenraum der
Aufstellvorrichtung gerät.
Das Gerät DTU-1931
Seite 10
Page 69

INSTALLATION
SYSTEMVORAUSSETZUNGEN
Stellen Sie vor der Installation des DTU-1931 sicher, dass Ihr Computer die folgenden
Mindestsystemanforderungen erfüllt:
• PC: Windows Vista™, Vista X64, XP oder XP x64. VGA- oder DVI-Bildschirmanschluss,
freier USB-Port und CD-ROM-Laufwerk.
• Macintosh: OS X, v10.4 oder höher. VGA- oder DVI-Bildschirmanschluss, freier USB-Port
und CD-ROM-Laufwerk. Für ADC-Stecker ist ein ADC-zu-DVI-Adapter erforderlich, der nicht
im Lieferumfang enthalten ist.
Das DTU-1931 unterstützt sowohl analoge (VGA) als auch digitale (DVI) Videosignale. Wenn Sie
Ihre Grafikkarte aktualisieren, führen Sie zunächst die Hardware- und Softwareinstallation für die
Grafikkarte durch und schließen Sie erst dann das DTU-1931 an. Wenn Sie über ein weiteres
Display verfügen, das mit der Grafikkarte kompatibel ist, können Sie dieses Display mit der Karte
verbinden und prüfen, ob die Grafikkarte ordnungsgemäß funktioniert.
Das DTU-1931 kann problemlos an VGA- oder DVI-Grafikkarten angeschlossen werden. Sie erzielen
jedoch in der Regel eine optimale Leistung, wenn es an eine DVI-Grafikkarte angeschlossen ist.
Hinweise:
Je nach Leistungsfähigkeit der Grafikkarte und des Betriebssystems kann das DTU-1931 als gespiegeltes,
erweitertes oder unabhängiges Display eingerichtet werden. Nähere Informationen zur Leistungsfähigkeit
der Grafikkarte finden Sie in der Dokumentation zur Grafikkarte.
Wenn Sie mit mehreren Monitoren arbeiten, erfolgt die Projektion vom DTU-1931 auf die Monitore gemäß
der Konfiguration Ihres Systems. Im Spiegelmodus wird das Stifttablett standardmäßig auf den gesamten
Bereich jedes Bildschirms projiziert. Weitere Informationen über die Konfiguration Ihres Computers und
Betriebssystems für die Verwendung mit mehreren Bildschirmen finden Sie in der Dokumentation zu Ihrer
Hardware und Ihrem Betriebssystem.
Eine Displaywechselfunktion steht für die Verwendung mit mehreren Bildschirmen zur Verfügung. Diese
ermöglicht ein Wechseln des Bildschirmcursors zwischen dem DTU-1931 Pen Display und anderen
Bildschirmen. Weitere Informationen finden Sie im elektronischen Benutzerhandbuch für die Software.
Das DTU-1931 kann geräteunabhängig oder mit einem anderen Display benutzt werden. Falls gewünscht,
können Sie ein zweites Gerät wie etwa einen Bildschirm oder einen LCD-Projektor an den DVI-I-A
des DTU-1931 anschließen. Bei Nutzung dieses Anschlusses werden die Anzeigedaten des DTU-1931
auf dem zweiten Gerät gespiegelt. Führen Sie die Installation des DTU-1931 vollständig durch, bevor Sie
ein Projektionsgerät an das Gerät anschließen.
USGANG
Der Installationsvorgang ist in zwei Hauptschritte gegliedert:
• Schritt 1: Installieren des LCD-Bildschirms
• Schritt 2: Installieren des Stifttabletts
Befolgen Sie alle Anweisungen sorgfältig.
Installation
Seite 11
Page 70

SCHRITT 1: INSTALLIEREN DES LCD-BILDSCHIRMS
DVI-I-Stecker
DVI-D-Stecker
VGA-Anschluss
ADC-Stecker
von Apple
Mini-VGAAnschluss
In diesem Schritt installieren Sie das DTU-1931 als Bildschirm auf Ihrem System.
WICHTIG
: Schließen Sie das USB-Datenkabel erst an, wenn Sie dazu aufgefordert werden.
• Schalten Sie Ihren Computer aus.
Achtung: Das Bildschirm- oder das Netzkabel darf weder angeschlossen noch abgezogen
werden, während Ihr Computer oder das DTU-1931 eingeschaltet sind – dadurch könnten das
Display oder die Grafikkarte beschädigt werden.
• Wenn Ihr Computer nur über einen Bildschirmanschluss verfügt, müssen Sie den derzeit
angeschlossenen Bildschirm vom Computer trennen oder eine zweite Grafikkarte hinzufügen.
Überprüfen Sie, ob der Computer über einen analogen (VGA) oder digitalen (DVI) Anschluss
verfügt und stellen Sie den DVI/VGA-Schalter auf die entsprechende Bildschirmverbindung ein.
Siehe – A – im Verkabelungsdiagramm auf Seite 13.
• Befolgen Sie abgestimmt auf den Anschluss Ihres Bildschirms die unten aufgeführten
Anweisungen. Ziehen Sie abschließend in jedem Fall die Schrauben an den Steckern an.
Siehe – B –.
Bei DVI-Betrieb: Stellen Sie mit dem DVI-zu-DVI-Bildschirmkabel des DTU-1931
eine Verbindung zwischen dem DVI-Eingang am Pen Display und dem DVI-Doder DVI-I-Anschluss der Grafikkarte her.
Bei VGA-Betrieb
1931 eine Verbindung zwischen dem DVI-Eingang am Pen Display und dem
VGA-Anschluss der Grafikkarte her.
: Stellen Sie mit dem analogen RGB-Bildschirmkabel des DTU-
Wenn Sie eine Verbindung zu einem Apple-ADC- oder Mini-VGA-Anschluss
herstellen möchten, benötigen Sie einen geeigneten Adapter. Adapter können
im Einzelhandel erworben werden.
Bei ADC-Betrieb: Schließen Sie ein Ende des DVI-zu-DVI-Bildschirmkabels des
DTU-1931 an den ADC-zu-DVI-Adapter an. Schließen Sie dann das andere Ende
des Kabels an den DVI-Eingang am Pen Display an. Anschließend verbinden Sie
den ADC-Adapter mit dem ADC-Anschluss der Grafikkarte.
Bei einem Mini-VGA-Anschluss (Apple): Schließen Sie das VGA-Ende des
analogen RGB-Kabels des DTU-1931 an den Mini-VGA-Anschlussadapter an.
Schließen Sie dann das DVI-Ende des Kabels an den DVI-Eingang am Pen
Display an. Verbinden Sie anschließend das Mini-VGA-Ende mit dem Mini-VGAAnschluss der Grafikkarte.
• Schließen Sie das Netzteil an das DTU-1931 an. Siehe – C – auf der folgenden Seite.
• Schließen Sie dann das Netzkabel an den Adapter und den Adapter an eine Steckdose an.
Siehe – D –
• Schalten Sie das DTU-1931 ein. Die LED-Betriebsanzeige leuchtet orange.
Installation
Seite 12
Page 71

KABELDIAGRAMM FÜR DEN LCD-BILDSCHIRM
ACHTUNG
Stellen Sie sicher, dass Ihre Grafikkarte über einen VGA- oder DVI-Anschluss verfügt und Sie den
DVI/VGA-Schalter in die richtige Stellung für den verwendeten Grafikanschluss bringen.
Schließen Sie das USB-Datenkabel erst an, wenn Sie dazu aufgefordert werden.
– A –
DVI-/VGA-Schalter
Verwenden Sie den DVI-IAusgang zum Anschluss
eines zweiten Geräts (z. B.
Projektor oder Bildschirm),
auf dem das Bild des Pen
Displays gespiegelt wird.
Installieren Sie zunächst
vollständig die Hardware
und Software des DTU-1931,
bevor Sie ein Projektionsgerät
an das Gerät anschließen.
– B –
Analoges RGB-Kabel
oder
DVI-zu-DVI-Kabel
VGA oder DVI
Grafikkarte
DVI-EINGANG
Rückseite des
Computers
– C –
Gleichstrom-Eingang
Netzanschluss
Netzgerät
– D –
ACHTUNG
Schließen Sie das Bildschirm- oder das Netzkabel nicht an und ziehen Sie diese auch nicht ab, wenn
das DTU-1931 bzw. Ihr Computer eingeschaltet ist. Dadurch können das Display oder die Grafikkarte des
Computers beschädigt werden.
Verwenden Sie nur das im Lieferumfang des DTU-1931 enthaltene Netzgerät. Der Einsatz eines
ungeeigneten Netzgeräts kann das Gerät beschädigen.
Stellen Sie sicher, dass die Bildwiederholfrequenz 75 Hz nicht übersteigt.
Analog (VGA)
Digital (DVI)
Installation
Seite 13
Page 72

• Schalten Sie danach Ihren Computer ein.
Für Windows-Systeme
Wenn Sie das DTU-1931 als DTU-1931-Display angeben und das Farbkalibrierungsprofil für
das DTU-1931 installieren möchten, befolgen Sie zum Aktualisieren des Display-Treibers die
folgenden Anweisungen:
: Das DTU-1931 wird automatisch als Standardmonitor installiert.
1. Öffnen Sie die S
YSTEMSTEUERUNG.
• Wählen Sie bei Windows Vista unter DARSTELLUNG und ANPASSUNG die Option
B
ILDSCHIRMAUFLÖSUNG ANPASSEN.
• Doppelklicken Sie bei Windows XP auf ANZEIGEEIGENSCHAFTEN und wählen Sie die
Registerkarte E
Hinweis:
das DTU-1931 steht, klicken Sie auf die Schaltfläche I
für das DTU-1931 aus.
Wenn Sie mehr als ein Anzeigegerät verwenden und nicht sicher sind, welches Gerät für
2. Klicken Sie auf die Schaltfläche ERWEITERTE EINSTELLUNGEN.
3. Wählen Sie die Registerkarte M
4. Wählen Sie die Registerkarte T
Ein Dialogfeld oder Assistent zum Aktualisieren des Treibers wird angezeigt.
5. Legen Sie die Installations-CD ein. Wenn das Installationsmenü für das Wacom Tablett
angezeigt wird, schließen Sie es.
Windows Vista
INSTELLUNGEN.
:
DENTIFIZIEREN
ONITOR
und klicken Sie auf die Schaltfläche E
REIBER
und klicken Sie auf die Schaltfläche A
. Wählen Sie das Anzeigegerät
IGENSCHAFTEN
KTUALISIEREN
.
.
• Wählen Sie die Option AUF DEM COMPUTER NACH TREIBERSOFTWARE SUCHEN.
• Geben Sie den Laufwerksbuchstaben für die Installations-CD ein und klicken Sie
auf W
EITER.
• Schließen Sie nach Abschluss der Installation alle noch geöffneten
Systemsteuerungsfenster.
Windows XP
:
• Sie werden vom Assistenten gefragt, ob Windows nach Software suchen soll.
Wählen Sie N
EIN, DIESMAL NICHT und klicken Sie auf WEITER.
• Wählen Sie die Option SOFTWARE VON EINER LISTE ODER BESTIMMTEN QUELLE
INSTALLIEREN (FÜR FORTGESCHRITTENE BENUTZER) und klicken Sie auf WEITER.
• Wählen Sie die Option NICHT SUCHEN, SONDERN DEN ZU INSTALLIERENDEN TREIBER
SELBST WÄHLEN und klicken Sie auf WEITER.
• Wählen Sie die Option für das DTU-1931 Pen Display und klicken Sie dann auf die
Schaltfläche D
ein (z. B. E:\) und klicken Sie auf OK.
ATENTRÄGER. Geben Sie den Buchstaben des CD-ROM-Laufwerks
• Befolgen Sie die angezeigten Anweisungen. (Wenn das Dialogfeld
H
ARDWAREINSTALLATION angezeigt wird, klicken Sie auf INSTALLATION FORTSETZEN,
damit der Treiber angenommen wird.) Klicken Sie nach Abschluss der Installation
auf die Schaltfläche F
Systemsteuerungsfenster.
Auf Macintosh-Systemen
Installation der Tablettsoftware ein Farbprofil für das DTU-1931 hinzugefügt. Damit dieses
Farbprofil für die Verwendung mit dem Pen Display aktiviert wird, müssen Sie gegebenenfalls
im Kontrollfeld des Dienstprogramms „ColorSync“ das Profil „DTU-1931“ auswählen. Weitere
Angaben hierzu finden Sie in den Informationen zur Farbverwaltung in Ihrem Betriebssystem
und in der Anwendungsdokumentation.
ERTIG STELLEN und schließen Sie alle noch geöffneten
wird dem Farbverwaltungssystem des Computers während der
Installation
Seite 14
Page 73

• Konfigurieren Sie gegebenenfalls in der Systemsteuerung die Einstellungen für die Anzeige
hinsichtlich der richtigen Größe und Farbauflösung. Die maximale (geräteeigene) Auflösung
des DTU-1931 beträgt 1280 x 1024 Pixel. Die Größe der Anzeige und die Farbauflösung kann
durch die Eigenschaften Ihrer Grafikkarte eingeschränkt werden. Nähere Informationen hierzu
finden Sie in der Herstellerdokumentation der Grafikkarte.
Windows
: Wenn Sie das DTU-1931 als zweites Display verwenden, müssen Sie das DTU-1931
zunächst in der Systemsteuerung in den Eigenschaften für die Anzeige aktivieren.
• Informationen zur Feinabstimmung der Anzeige finden Sie unter Einstellen des Displays ab
Seite 24. Weitere Informationen zur Verwendung des analogen Modus (VGA) finden Sie unter
Pitch- und Phase-Einstellungen (nur VGA) auf Seite 27.
• Wenn der LCD-Bildschirm des DTU-1931 zufriedenstellend arbeitet, fahren Sie bei Schritt 2:
Installieren des Stifttabletts fort, um das Stifttablett des DTU-1931 zu installieren.
• Tipps zur Fehlerbehebung finden Sie unter Seite 28.
Hinweise:
Jedes einzelne DTU-1931 LCD-Display wird unter Einhaltung strenger Qualitätsstandards hergestellt.
Herstellungsbedingt kann kein absolut perfektes TFT-Display garantiert werden und bei manchen Displays
kann eine bestimmte Anzahl von Pixeln eine falsche Farbe aufweisen. Weitere Informationen finden Sie in
den technischen Daten auf Seite 45.
Wenn ein Bild feine Streifen aufweist (wie Bildschirmstreifen), ist ein Flimmern oder ein Moiré-Muster
zu sehen.
Üben Sie keinen übermäßigen Druck auf die Display-Oberfläche aus. Dadurch kann ein Moiré- oder
Pooling-Muster entstehen. Wenn ein solches Muster auftritt, sollten Sie bei der Arbeit mit dem Stift weniger
stark auf den Bildschirm drücken.
Wird über einen längeren Zeitraum ein statisches Bild angezeigt, könnte kurzfristig ein so genanntes Nachbild
zurückbleiben. Zur Vermeidung dieses Problems empfiehlt Wacom den Einsatz eines Bildschirmschoners oder
einer Energieverwaltungsfunktion.
WICHTIG: Um die Lebensdauer der Hintergrundbeleuchtung zu verlängern, sollten Sie
die Energieverwaltung Ihres Computers so einstellen, dass das Display bei längerer
Nichtbenutzung ausgeschaltet wird.
Installation
Seite 15
Page 74

SCHRITT 2: INSTALLIEREN DES STIFTTABLETTS
– E –
Zum USB-Anschluss
Ihr Computer
USB-Anschluss
ANBRINGUNG DES USB-KABELS
Verbinden Sie das quadratische Ende des USB-Kabels mit dem Anschluss des DTU-1931, der mit
USB gekennzeichnet ist. Schließen Sie das andere Kabelende an einen freien USB-Anschluss des
Computers oder an einen Hub an, der direkt am Computer angeschlossen ist. Siehe – E – im
Verkabelungsdiagramm unten.
Fahren Sie danach wie unter Softwareinstallation auf Seite 17 beschrieben fort.
KABELDIAGRAMM FÜR DAS STIFTTABLETT
Installation
Seite 16
Page 75

SOFTWAREINSTALLATION
WICHTIG: Sie MÜSSEN die Treibersoftware für das Wacom Stifttablett installieren, damit
der Stift auf dem Bildschirm richtig funktioniert.
So installieren Sie die Tablettsoftware:
•
Speichern Sie Ihre Arbeit und schließen Sie alle Anwendungen. Deaktivieren Sie vorübergehend
alle Virenschutzprogramme.
• Legen Sie die Installations-CD für das Wacom Stifttablett in das CD-ROM-Laufwerk Ihres
Computers ein. Wenn das Installationsmenü nicht automatisch angezeigt wird, doppelklicken
Sie auf das Installationssymbol auf der CD-ROM.
• Klicken Sie auf die Verknüpfung TABLETT INSTALLIEREN und befolgen Sie die Anweisungen zur
Installation der Treibersoftware.
• Aktivieren Sie das Virenschutzprogramm erneut.
• Überprüfen Sie nach der Installation der Software, ob Sie den Bildschirmcursor mit dem Stift
auf dem Display des DTU-1931 bewegen können.
Wenn Sie die Stiftspitze auf den Bildschirm setzen, sollte der Bildschirmcursor sofort an die
entsprechende Stelle unter der Stiftspitze springen. Heben Sie die Stiftspitze an und setzen
Sie sie auf eine andere Stelle der Bildschirmoberfläche. Der Bildschirmcursor sollte an die neue
Position springen. Dies wird als absolute Positionierung bezeichnet und ermöglicht Ihnen, den
Bildschirmcursor zu positionieren, ohne den Stift über die Bildschirmoberfläche des Displays
zu ziehen.
• Lesen Sie unbedingt die Liesmich-Datei, damit Sie über die neuesten Entwicklungen informiert
sind. Falls bei der Installation des DTU-1931 Probleme auftreten, lesen Sie den Abschnitt
Fehlerbehebung ab Seite 28.
Hinweise:
Durch die Treiberinstallation werden die neuen Stifteingabefunktionen von Microsoft Windows Vista
und Office 2007 (mit Ausnahme von Windows Vista Home Basic) automatisch aktiviert. Auf der Wacom
Website unter www.wacom.com/vista finden Sie weitere Informationen zur Verwendung Ihres Wacom
Stiftes unter Windows Vista.
Benutzerspezifische Einstellungen werden unterstützt. Nach der Anmeldung kann jeder Benutzer seine
persönlichen Einstellungen im Kontrollfeld für das Wacom Tablett anpassen. Nach dem Wechseln zu einem
anderen Benutzer werden die Einstellungen für diesen Benutzer automatisch geladen.
Zur Deinstallation des Tablett-Treibers siehe Deinstallieren des DTU-1931 auf Seite 44.
Wenn das Pen Display Tablet nicht korrekt reagiert oder sich der Cursor nicht kontrollieren lässt, sind
möglicherweise die Tablett-Voreinstellungen beschädigt. Sie können die aktuellen Voreinstellungen
löschen und die Standardeinstellungen des Tabletts wiederherstellen. Führen Sie unter Windows das
T
ABLETT-VOREINSTELLUNGSDATEI-DIENSTPROGRAMM aus. Sie können über die Windows-Schaltfläche
S
TART und die Option ALLE PROGRAMME auf das Dienstprogramm zugreifen. Klicken Sie dann auf
T
ABLETT und TABLETT-VOREINSTELLUNGSDATEI-DIENSTPROGRAMM.
Kalibrieren Sie als Nächstes das Pen Display Tablet so, dass die Position des Bildschirmcursors
genau mit der Position der Stiftspitze übereinstimmt. Siehe Kalibrieren des DTU-1931 auf Seite 23.
Installation
Seite 17
Page 76

ARBEITEN MIT DEM DTU-1931
Bei der Arbeit mit dem DTU-1931 Pen Display können Sie Ihre Hand auf dem Bildschirm wie auf
einem Zeichenbrett oder einem Blatt Papier leicht auflegen.
Da die Oberfläche des DTU-1931 etwas höher liegt als Ihr Schreibtisch, sollten Sie die Höhe von
Schreibtisch oder Tisch so anpassen, dass Sie bequem mit dem Gerät arbeiten können.
EINRICHTEN DES ARBEITSBEREICHES
Richten Sie Ihren Arbeitsbereich so ein, dass Sie bequem arbeiten können, damit Sie nicht so
schnell ermüden. Achten Sie darauf, dass DTU-1931, Stift und Tastatur leicht erreichbar sind.
Wählen Sie für das Pen Display und andere Displays eine günstige Position, die Ihre Augen nicht
überanstrengt.
• Legen Sie kurze Pausen für muskelentspannende Dehnübungen ein.
• Halten Sie den Stift beim Arbeiten locker in der Hand.
• Sorgen Sie für Abwechslung in Ihren täglichen Tätigkeiten.
• Achten Sie stets auf eine bequeme Haltung. Vermeiden Sie unbequeme Sitzhaltungen und
monotone Bewegungen.
• Ändern Sie die Arbeitsposition, wenn sie unbequem wird.
Hinweis:
vollständigen oder teilweisen Heilung oder Vorbeugung von durch das Arbeiten mit der Maus entstehende
RSI (Repetitive Stress Injury)-Symptome, -Verletzungen oder -Zustände beitragen können. Die Ergebnisse
können je nach Benutzer variieren. Wenden Sie sich an einen Arzt, wenn Sie kompetente medizinische Hilfe
für eine spezifische Situation benötigen.
Tipps:
Bewegen Sie das DTU-1931 nicht zu weit vom Computer weg, damit die Kabel nicht versehentlich aus den
Verbindungen gezogen werden.
Mit der Stiftschnur sorgen Sie dafür, dass Ihr Stift stets am Pen Display Tablet bedienbereit ist. Ziehen
Sie ein Schnurende einfach durch die Stiftöffnung (falls vorhanden) hindurch und das andere Schnurende
durch die Öse links oder rechts am Tablett.
Das DTU-1931 kann auch auf einem Gelenkarm oder auf Ständern von Drittanbietern befestigt werden,
die die VESA 100-Spezifikation für Displayständer erfüllen. Weitere Informationen finden Sie unter
Verwenden alternativer Ständer oder Halterungen auf Seite 41.
Wacom kann in keiner Weise versprechen oder garantieren, dass Wacom Produkte zur
Arbeiten mit dem DTU-1931
Seite 18
Page 77

VERWENDEN DES STIFTES
Radierer (falls vorhanden): Wenn der Radierer in die Nähe (bis 5 mm) des
Displays gebracht wird, übermittelt das Tablett die Position des Stiftes. Die
Druckinformationen werden übermittelt, wenn Sie den Radierer auf die Oberfläche
drücken. Standardmäßig ist für den Radierer die Funktion R
ADIEREN eingestellt.
Einige Stifte ohne Radierer verfügen möglicherweise über eine Öse
für die Schnur.
DuoSwitch (Seitenschalter) (falls vorhanden): Die
programmierbare Taste sollte so ausgerichtet sein, dass
Sie diese bequem mit Ihrem Daumen oder Zeigefinger
bedienen können. Vermeiden Sie jedoch eine Haltung,
die beim Schreiben oder Zeichnen zu versehentlichem
Drücken der Tasten führen kann. Sie können den
Schalter verwenden, wenn sich die Stiftspitze in der
Nähe (bis 5 mm) der Bildschirmoberfläche befindet.
Sie müssen die Stiftspitze nicht auf die Oberfläche
aufsetzen. Sie können die jeweiligen Funktionen der
Taste durch Verstellen der Seitentaste aktivieren.
Standardmäßig ist für den oberen Schalter D
OPPELKLICK
und für den unteren R
ECHTER MAUSKLICK festgelegt.
Stiftspitze (austauschbare Spitze): Der Stift wird
aktiviert, sobald er sich etwa 5 mm über dem Bildschirm
des Pen Displays befindet. Dadurch können Sie den
Bildschirmcursor platzieren, ohne das Tablett mit der
Stiftspitze berühren zu müssen.
Durch Ausüben von Druck auf die Stiftspitze wird ein
Klick mit der primären Maustaste simuliert. Der Druck
der Spitze beim Klicken kann im Kontrollfeld des Wacom
Tabletts angepasst werden.
Hinweise:
Wenn der Stift nicht in Gebrauch ist, setzen Sie ihn in das Stiftfach oder legen Sie ihn flach auf den
Tisch. Stellen Sie den Stift nie in einem Behälter oder anderswo auf seiner Spitze aufrecht ab, damit
seine Druckempfindlichkeit erhalten bleibt.
Bei manchen Produktkonfigurationen ist kein DuoSwitch oder Radierer vorgesehen. Wenn dies für Ihr
Gerät zutrifft, können Sie alle Erläuterungen in diesem Handbuch zu dem Seitenschalter oder Radierer
ignorieren.
Der Stift ist kabellos, besitzt keine Batterien und reagiert auf den Druck, den Sie auf die Stiftspitze
ausüben. Halten Sie den Stift wie einen normalen Kugelschreiber oder Bleistift. Bei der Arbeit mit dem
DTU-1931 können Sie Ihre Hand auf dem Bildschirm wie auf einem Zeichenbrett oder einem Blatt
Papier leicht aufsetzen. Neigen Sie den Stift beim Zeichnen in der für Sie bequemsten Position.
KOMPONENTEN DES STIFTES
WICHTIG: Verwenden Sie nur den Stift, der mit Ihrem DTU-1931 Pen Display geliefert
wurde. Andere Stifte funktionieren möglicherweise nicht ordnungsgemäß. Die Stiftspitze
des DTU-1931 wurde darüber hinaus speziell für die Verwendung mit dem DTU-1931 Pen
Display entwickelt – die Spitzen anderer Stifte können die schützende Beschichtung des
Bildschirms beschädigen.
Weitere Informationen zum Anpassen der Stifteinstellungen finden Sie unter Konfigurieren auf
Seite 21.
Arbeiten mit dem DTU-1931
Seite 19
Page 78

GRUNDFUNKTIONEN DES STIFTES
Zeigen und Auswählen: Bewegen Sie den Stift knapp über dem Bildschirm
des DTU-1931, um den Bildschirmcursor zu positionieren. Das Berühren der
Displayoberfläche ist nicht notwendig. Der Cursor springt auf die Position, auf
die Sie den Stift setzen. Sie können eine Auswahl vornehmen, indem Sie mit der
Stiftspitze auf den Bildschirm drücken.
Hinweis:
Bildschirmcursors genau mit der Position der Stiftspitze übereinstimmt. (Siehe
des DTU-1931
Stiftspitze springt, wenn Sie mit dem Stift den Bildschirm berühren, ist der StifttablettTreiber möglicherweise noch nicht installiert oder nicht geladen. Installieren Sie falls nötig
die Software für den Stifttablett-Treiber. Lesen Sie anderenfalls unter
ab Seite 28 nach.
Klicken:
Sie den Stift fest genug auf den Bildschirm, um einen Klick auszuführen.
Windows: Um das Navigieren mit dem Stift zu vereinfachen, konfigurieren Sie Windows
so, dass ein Element markiert wird, wenn der Stift darüber bewegt wird, und dass das
Element durch einmaliges Klicken aufgerufen wird. Um diese Funktion zu aktivieren,
müssen Sie zuerst einen Ordner öffnen.
Windows Vista: Wählen Sie im Menü O
Wählen Sie auf der Registerkarte A
(M
Windows XP: Wählen Sie im Menü EXTRAS die Option ORDNEROPTIONEN. Wählen Sie auf
der Registerkarte ALLGEMEIN die Option ÖFFNEN DURCH EINFACHEN KLICK (MARKIEREN
DURCH ZEIGEN).
Ziehen: Markieren Sie ein Objekt. Lassen Sie dann die Stiftspitze über den
Bildschirm gleiten, um das Objekt zu verschieben.
Sie müssen das Pen Display Tablet erst kalibrieren, damit die Position des
auf Seite 23.) Wenn der Bildschirmcursor nicht an eine Stelle nahe der
Tippen Sie den Bildschirm einmal kurz mit der Stiftspitze an oder drücken
ARKIEREN DURCH ZEIGEN
).
Doppelklicken:
berühren Sie den Bildschirm zweimal an der gleichen Stelle mit
der Stiftspitze. Sie können leichter doppelklicken, wenn Sie den Stift
senkrecht auf das Tablett halten. Informationen zur Feineinstellung des
Doppelklickbereichs finden Sie im elektronischen Benutzerhandbuch
für die Software.
Kalibrieren
Fehlerbehebung
RGANISIEREN
LLGEMEIN
die Option O
die Option Ö
RDNER- UND SUCHOPTIONEN
FFNEN DURCH EINFACHEN KLICK
Drücken Sie auf den oberen Seitenschalter oder
.
Verwenden des Seitenschalters:
Der Stift verfügt möglicherweise über einen DuoSwitch. Dieser
Schalter hat zwei programmierbare Funktionen, die sich durch Drücken des Schalters nach oben bzw.
nach unten auswählen lassen. Sie können den DuoSwitch immer dann verwenden, wenn die Stiftspitze
nicht mehr als 5 mm von der Oberfläche des Bildschirms entfernt ist. Sie müssen die Stiftspitze nicht auf
die Displayoberfläche aufsetzen, um den Schalter zu verwenden. Standardmäßig ist für den oberen
Schalter D
Zeichnen und Schreiben mit Druckempfindlichkeit:
OPPELKLICK
und für den unteren Schalter R
ECHTER MAUSKLICK
festgelegt.
Der Stift reagiert auf jede Nuance und
Bewegung Ihrer Hand, so dass in den Anwendungen, die diese Funktion unterstützen, natürlich
wirkende Stift- und Pinselstriche entstehen. Für druckempfindliches Zeichnen und Schreiben wählen
Sie ein druckempfindliches Werkzeug in der Werkzeugpalette des Grafikprogramms aus. Üben Sie
beim Arbeiten auf der Bildschirmoberfläche unterschiedlich starken Druck auf die Stiftspitze aus.
Drücken Sie leichter auf, um dünne Linien oder weichere Farben zu erzeugen. Drücken Sie fester
auf, um dicke Linien oder mehr Farbdeckung zu erhalten.
Radieren: Bei unterstützenden Anwendungen funktioniert der Radierer des
Stiftes genauso wie der Radierer an einem Bleistift. Bei Textanwendungen
können Sie mit dem Radierer ganze Textabschnitte markieren. Wenn Sie den
Radierer anschließend vom Tablett nehmen, wird der markierte Text gelöscht.
Arbeiten mit dem DTU-1931
Seite 20
Page 79

KONFIGURIEREN
Wenn Sie die Grundlagen des Umgangs mit dem Stift auf dem DTU-1931 Pen Display beherrschen,
können Sie die Arbeitsweise des Stiftes an Ihre Bedürfnisse anpassen. Über das Kontrollfeld
des Wacom Tabletts ist die Anpassung des DTU-1931 und des Stiftes einfach und problemlos
zu handhaben.
ÖFFNEN DES KONTROLLFELDES
Verwenden Sie den Stift des DTU-1931 auf dem Pen Display Tablet, um das Tablettkontrollfeld
zu öffnen:
Windows: Klicken Sie auf S
Wählen Sie dann W
ACOM TABLETT und die Option WACOM TABLETT-EIGENSCHAFTEN aus.
Macintosh: Öffnen Sie S
oder im Ordner P
ROGRAMME. Klicken Sie dann auf das Symbol für das WACOM TABLETT.
TART und wählen Sie ALLE PROGRAMME
YSTEMEINSTELLUNGEN im Apple-Menü, im Dock-Menü
Lesen Sie nach Öffnen des Kontrollfeldes weiter unter Grundlegende Anpassungen auf Seite 22.
Hinweis:
seine persönlichen Einstellungen im Kontrollfeld für das Wacom Tablett anpassen. Nach dem Wechseln
zu einem anderen Benutzer werden die Einstellungen für diesen Benutzer automatisch geladen.
Benutzerspezifische Einstellungen werden unterstützt. Nach der Anmeldung kann jeder Benutzer
WEITERE INFORMATIONEN
Nähere Informationen zur Anpassung des DTU-1931 finden Sie im elektronischen Benutzerhandbuch
für die Software.
Um das Handbuch anzuzeigen, öffnen Sie das Kontrollfeld für das Wacom Tablett und klicken auf
die Schaltfläche H
Um das elektronische Benutzerhandbuch für die Software vor dem Installieren des Pen Displays
zu lesen, legen Sie die Installations-CD für das Wacom Stifttablett in das CD-ROM-Laufwerk des
Computers ein. Wenn das Softwaremenü angezeigt wird, wählen Sie die Option B
Zum Anzeigen des Benutzerhandbuchs benötigen Sie Adobe Reader oder einen anderen PDF-Viewer.
ILFE.
ENUTZERHANDBUCH
.
Konfigurieren
Seite 21
Page 80

GRUNDLEGENDE ANPASSUNGEN
Im oberen Teil des Kontrollfeldes werden Symbole für TABLETT, WERKZEUG
und A
NWENDUNGEN mit benutzerdefinierten Einstellungen angezeigt.
Registerkarten
zeigen anpassbare
Einstellungen für
das ausgewählte
W
ERKZEUG an.
Zeigt ein Dialogfeld
mit Informationen
über das Pen
Display Tablet und
die Tablettsoftware
an, einschließlich
einer Option für
den Zugriff auf
das Dialogfeld
D
IAGNOSE.
Zeigt erweiterte Optionen an.
Schließt das Kontrollfeld.
Wählen Sie
S
TIFT, um die
Stifteinstellunge
n anzupassen.
Wählen Sie
F
UNKTIONEN
, um
die Einstellungen
des Radialmenüs
anzupassen.
Informationen
über die Arbeit
mit dem
Radialmenü
finden Sie im
Benutzerhandbu
ch für die
Software.
Stellt die
Standardeinstell
ungen für die
gewählte
Registerkarte
wieder her.
Zeigt das elektronische
Handbuch für die
Software an.
In diesem Handbuch werden nur grundlegende Anpassungen des DTU-1931 behandelt. Nähere
Informationen finden Sie im elektronischen Benutzerhandbuch für die Software.
Verwenden Sie das Kontrollfeld für das Wacom Tablett, um Ihr Gerät anzupassen. Wenn Sie das
Kontrollfeld öffnen, werden ein Symbol für den Stift in der W
Registerkarten angezeigt.
Passen Sie die Einstellungen für den Stift mit den Steuerelementen auf der Registerkarte an.
Experimentieren Sie mit verschiedenen Einstellungen, um die für Sie am besten geeigneten
herauszufinden. Alle Änderungen treten sofort in Kraft. Sie können jedoch jederzeit auf S
klicken, um die Standardeinstellungen wiederherzustellen.
Hinweis: Anwendungsspezifische Einstellungen sollten nur von erfahrenen Benutzern angepasst werden.
Dieses Thema wird im Benutzerhandbuch für die Software behandelt.
ERKZEUGLISTE
sowie die entsprechenden
TANDARD
Konfigurieren
Seite 22
Page 81

KALIBRIEREN DES DTU-1931
WICHTIG: Wenn eine VGA-Verbindung
verwendet wird, müssen Sie vor der
Kalibrierung des Tabletts sicherstellen, dass
das Display korrekt eingestellt ist. Siehe
Pitch- und Phase-Einstellungen (nur VGA)
auf Seite 27 und Einstellen des Displays ab
Seite 24.
• Wählen Sie im Kontrollfeld des Wacom Tabletts
in der W
ERKZEUGLISTE den STIFT und wählen Sie
anschließend die Registerkarte KALIBRIEREN.
• Wenn Sie mit mehreren Bildschirmen arbeiten,
wählen Sie unter B
ILDSCHIRM
die für das
DTU-1931 zutreffende Option aus. (Nur Monitore,
die mit einer vom DTU-1931 unterstützten
Auflösung arbeiten, werden in der Liste angezeigt.)
• Klicken Sie auf die Schaltfläche KALIBRIEREN,
um das Kalibrierungsfenster aufzurufen.
• Halten Sie den Stift und Ihren Kopf wie gewohnt.
Klicken Sie mit der Stiftspitze auf die Mitte des
Fadenkreuzes in der linken oberen Ecke.
• Klicken Sie danach auf die Mitte des
Fadenkreuzes in der rechten unteren Ecke.
• Testen Sie die Ausrichtung, indem Sie den Stift auf
verschiedene Punkte des Displays setzen. Klicken
Sie auf OK, um die Kalibrierung anzunehmen.
Klicken Sie auf E
RNEUT VERSUCHEN
, um erneut
zu kalibrieren.
Detaillierte Anweisungen und Hinweise
auf zusätzliche Optionen erhalten Sie im
Kalibrierungsfenster. Die Kalibrierungseinstellungen
beziehen sich auf alle Anwendungen.
Hinweis: Wenn mehr als ein Pen Display Tablet
auf Ihrem System installiert ist, müssen Sie
die verwendete Einheit in der T
ABLETTLISTE
des Kontrollfeldes auswählen.
Fadenkreuz
Testbild für Phase und Pitch (nur VGA)
Weitere Informationen finden Sie unter
Pitch- und Phase-Einstellungen (nur
VGA) auf Seite 27.
Tipp: Wenn Sie den Cursor lieber im Verhältnis zur Stiftspitze leicht versetzt verwenden möchten,
klicken Sie auf einen Punkt, der den gewünschten Abstand zum Fadenkreuz darstellt. Wenn Sie z. B.
den Bildschirmcursor 2,5 mm über und links von der Stiftspitze verwenden möchten, klicken Sie auf
einen Punkt 2,5 mm unter und rechts neben der Stiftspitze.
Sie müssen das Pen Display Tablet kalibrieren, um den Bildschirmcursor auf die Position des Stiftes
auf dem Bildschirm abzustimmen. Dies ist notwendig, um die durch die Glasauflage des Bildschirms
verursachte Brechung auszugleichen. Stellen Sie das DTU-1931 in Arbeitsposition auf und gehen Sie
wie unten erläutert vor.
Konfigurieren
Seite 23
Page 82

EINSTELLEN DES DISPLAYS
1. M ENÜTASTE
Zum Öffnen oder Schließen des
OSD-Menüs drücken.
2. Auswahltasten
Mit diesen Tasten wählen Sie eine Option. Wenn die Option, deren Einstellung Sie ändern möchten, markiert
ist, drücken Sie die EINGABETaste. Die aktuellen Einstellungen sowie ein Untermenü für diese Option werden
angezeigt. Manche Optionen sind im DVI-Modus nicht verfügbar.
Verwenden Sie die Tasten + oder –, um die Einstellungen auszuwählen und anzupassen.
(Mit der Taste + erhöhen Sie den Wert für das ausgewählte Element, mit der Taste – verringern Sie ihn.)
Drücken Sie zum Übernehmen der Änderungen die E
INGABETASTE.
Eine genaue Beschreibung der Menüoptionen finden Sie auf den folgenden Seiten.
E
INGABEtaste
Aktiviert die im OSD-Menü
ausgewählte Option.
–
+
STANDARDEINSTELLUNGEN, AUTO-SYNC UND BENUTZEREINSTELLUNGEN
Standardeinstellungen: Um eine optimale Anzeigequalität zu erzielen, stellen Sie für die
Grafikkarte die native Auflösung des DTU-1931 von 1280 x 1024 Pixel (SXGA) ein. Informationen
zu Eingangssignalspezifikationen finden Sie auf Seite 45.
Auto-Sync: Das DTU-1931 synchronisiert sich automatisch mit dem eingehenden Signal. Die AutoSync-Funktion stellt die horizontale und die vertikale Bildlage, Pitch und Phase ein. Die Auto-SyncFunktion ist aktiv, wenn die Horizontalfrequenz zwischen 30 und 80 kHz und die Vertikalfrequenz
zwischen 50 und 75 Hz liegt.
Wenn sich das DTU-1931 nicht automatisch mit dem eingehenden Signal synchronisiert, können
Sie mit der OSD-Option (On Screen Display) A
Anzeige vornehmen. Mit den Steuerelementen des OSD-Menüs können Sie weitere Einstellungen
manuell anpassen.
Farbkalibrierung:
Durch Änderung der Standardeinstellungen von Farbe, Farbtemperatur, Kontrast,
Helligkeit oder Hintergrundbeleuchtung wird das ICC-Farbprofil, das auf der Installations-CD enthalten
war, ungültig.
ON SCREEN DISPLAY (OSD)-EINSTELLUNGEN
Mit der OSD-Funktion können Sie zahlreiche Einstellungen für die Anzeige durch einfaches Drücken
eines Schalters verbessern. Mithilfe der OSD-Bedienelemente oben links am Gerät können Sie
Anpassungen vornehmen.
UTOMATISCH ANPASSEN die Synchronisierung der
Hinweis:
automatisch geschlossen. Sie können auch die M
das OSD-Menü geschlossen wird, werden alle Einstellungen automatisch gespeichert und das nächste Mal
verwendet, wenn das Gerät ein ähnliches Videosignal empfängt. Dies gilt für alle Display-Modi. Wenn Sie
Änderungen an der Darstellung der Anzeige vorgenommen haben und nicht mehr zu den ursprünglichen
Einstellungen zurückkehren können, können Sie für das DTU-1931 mit der Option Z
ursprünglichen Standardeinstellungen wiederherstellen.
Konfigurieren
Seite 24
Nach der Änderung einer Einstellung wird das OSD-Menü nach einigen Sekunden Nichtgebrauch
ENÜTASTE
drücken, um das OSD-Menü zu schließen. Wenn
URÜCKSETZEN
die
Page 83

Wenn Sie das OSD-Menü öffnen, werden die Menüoptionen angezeigt:
SPRACHE lässt Sie die Sprache des OSD-Menüs festlegen.
OSD P
OSITION
: Folgende Menüoptionen stehen zur Verfügung:
•VERTIKAL. Passt die vertikale Position des
OSD-Menüfensters an.
•H
ORIZONTAL. Passt die horizontale Position des
OSD-Menüfensters an.
•T
RANSPARENZ. Ändert die Undurchsichtigkeit des
OSD-Menühintergrunds.
DISPLAY: Folgende Menüoptionen stehen zur Verfügung:
•H
ELLIGKEIT. Erhöht oder vermindert die Bildhelligkeit.
•K
ONTRAST. Erhöht oder vermindert den Bildkontrast.
Beachten Sie, dass Änderungen des Kontrasts die
Farbgenauigkeit beeinflussen können.
•B
ELEUCHTUNG. Erhöht oder vermindert die Helligkeit des
Hintergrunds.
F
ARBE: Folgende Menüoptionen stehen zur Verfügung:
• 5000K, 6500K, 9300K. Ermöglicht die Anpassung
der Farbtemperatur des Pen Displays, in Kelvin.
•D
IRECT zeigt die Farben direkt von der Videokarte ohne
weitere Einstellungen an.
•I
NDIV. (benutzerdefiniert) ermöglicht die getrennte
Anpassung der Anzeigefarben R
OT, GRÜN und BLAU.
Hinweis: Durch manuelle Änderungen an den
Farbeinstellungen wird das Farbprofil des DTU-1931
ungültig.
Konfigurieren
Seite 25
Page 84

SKALIERUNG: Folgende Menüoptionen stehen zur Verfügung:
•V
OLL (Vollbild). Passt die Bildgröße an den gesamten
Bildschirm an.
•P
ROP. (Seitenverhältnis). Passt das Bild unter
Beibehaltung des Höhen/Breiten-Verhältnisses an den
gesamten Bildschirm an.
• 1:1. Zeigt das Bild in der tatsächlichen Auflösung an.
A
NDERE: Folgende Menüoptionen stehen zur Verfügung:
•P
HASE. (Nur VGA.) Synchronisiert die Signalzeit des
Pen Displays mit der Grafikkarte. Verwenden Sie diese
Anpassung, wenn ein instabiles bzw. flimmerndes Bild
oder horizontale Verzerrungslinien auftreten.
•P
ITCH. (Nur VGA.) Passt die Anzeigedatenfrequenz an
Ihre Grafikkarte an. Verwenden Sie diese Anpassung,
wenn ein instabiles bzw. flimmerndes Bild oder vertikale
Verzerrungslinien auftreten.
•V
ERTIKAL. (Nur VGA.) Ändert die vertikale Bildposition.
Für eine automatische Anpassung wählen Sie die Option
A
UTO (Automatisch anpassen).
•H
ORIZONTAL
. (Nur VGA.) Ändert die horizontale Bildposition.
Für eine automatische Anpassung wählen Sie die Option
A
UTO
(Automatisch anpassen).
•A
UTO
(Automatisch anpassen). (Nur VGA.) Wählen
Sie diese Funktion, um das Anzeigebild automatisch
zu optimieren.
ZURÜCKSETZEN setzt die Anzeigeparameter des aktuellen
Modus auf die werkseitigen Standardeinstellungen zurück.
S
CHLIESSEN beendet das OSD-Menü, ohne Änderungen
vorzunehmen.
Konfigurieren
Seite 26
Page 85

PITCH- UND PHASE-EINSTELLUNGEN (NUR VGA)
Bei manchen Computern und Grafikkarten wird die Auto-Sync-Funktion möglicherweise nicht
korrekt ausgeführt, wenn das DTU-1931 zum ersten Mal angeschlossen wird. Wenn Bereiche des
Texts verschwommen sind, verwenden Sie die Option A
Signal automatisch zu synchronisieren (eine Beschreibung von Auto-Sync finden Sie auf Seite 24).
Wenn das Bild immer noch verschwommen ist, passen Sie den horizontalen und vertikalen
Punktabstand (Pitch und Phase) an, indem Sie wie unten beschrieben vorgehen. Um eine optimale
Anzeigequalität zu erzielen, stellen Sie für die Grafikkarte die native Auflösung des DTU-1931 von
1280 x 1024 Pixel ein.
• Wählen Sie im Kontrollfeld des Wacom
Tabletts die Registerkarte K
• Wenn Sie mit mehreren Displays arbeiten,
muss im Menü M
entsprechende Display ausgewählt sein.
• Klicken Sie auf die Schaltfläche KALIBRIEREN,
um das Kalibrierungsfenster aufzurufen.
• Öffnen Sie mithilfe der Bedienelemente das
OSD-Menü und wählen Sie die Option PITCH.
Passen Sie den horizontalen Punktabstand
an, so dass das Muster der feinen vertikalen
Streifen gleichmäßig angezeigt wird. (Nähere
Informationen zum Ändern der OSDEinstellungen finden Sie unter On Screen
Display (OSD)-Einstellungen auf Seite 24.)
• Wählen Sie im OSD-Menü die Option P
aus. Stellen Sie den Phasenwert so ein, dass
das Testmuster klar angezeigt wird.
• Wenn Sie die Einstellungen angepasst
haben, drücken Sie die E
und anschließend die M
das OSD-Menü zu verlassen.
• Klicken Sie auf die Schaltfläche A
oder drücken Sie die E
Fenster für die Bildschirmkalibrierung zu
schließen.
ONITOR das dem DTU-1931
ALIBRIEREN.
HASE
INGABETASTE
ENÜTASTE, um
BBRECHEN
SC-Taste, um das
UTOMATISCH ANPASSEN, um das eingehende
Testbild für Phase und Pitch (nur VGA)
ENERGIESPARMAßNAHMEN
Das DTU-1931 entspricht den Richtlinien zur Einsparung von Energie nach VESA.
Bei Verwendung des DTU-1931 in Kombination mit einem DPMS-tauglichen Computer (Display Power
Management Signaling) bzw. einer entsprechenden Grafikkarte, entspricht der Bildschirm folgenden
Energiesparparametern.
Sind diese Energiesparfunktionen in Kraft, ist der Bildschirm dunkler als gewöhnlich.
Computermodus H-Sync V-Sync Video Leistungsverbrauch LED-
Ein Ja Ja Aktiv max. 37 W Blau
Standby-Modus Nein Ja Leer max. 2 W Blau/Orange*
Suspend-Modus Ja Nein Leer max. 2 W Blau/Orange*
AUS Nein Nein Leer max. 1 W Orange
* Je nach den spezifischen Einstellungen Ihres Computers und der Grafikkarte kann die Betriebsanzeige auch
nur im Standby- und Suspend-Modus orange leuchten.
Betriebsanzeige
Konfigurieren
Seite 27
Page 86

FEHLERBEHEBUNG
In der Regel arbeitet Ihr Pen Display Tablet einwandfrei. Sollten trotzdem einmal Probleme auftreten,
empfiehlt Ihnen Wacom folgende Maßnahmen:
1. Falls der Wacom Tabletttreiber nicht ordnungsgemäß geladen wurde, befolgen Sie zunächst die
Anweisungen in den Fehlermeldungen auf dem Bildschirm. Wenn sich das Problem auf diesem
Weg nicht lösen lässt, lesen Sie die Anleitungen zur Fehlerbehebung in diesem Kapitel.
2. Wenn das DTU-1931 nicht richtig funktioniert, schlagen Sie in den Abschnitten zur Fehlerbehebung
auf den folgenden Seiten nach. Lesen Sie auch unter
oder unter
beschrieben und Sie können es mit dem erwähnten Lösungsvorschlag beheben.
3. Die neuesten Informationen zur Fehlerbehebung finden Sie in der Liesmich-Datei für das
Wacom Pen Display.
4. Informationen zum Herunterladen eines aktualisierten Softwaretreibers bei Kompatibilitätskonflikten
zwischen dem DTU-1931 und einem neuen Hardware- oder Softwareprodukt finden Sie unter
Abrufen von Treiber-Downloads
um die Kompatibilität mit neuen Produkten zu gewährleisten.
5. Lesen Sie die FAQ-Seite (häufig gestellte Fragen) auf der Wacom Website für Ihre Region.
6. Wenn Sie anhand der Vorschläge in diesem Handbuch das Problem nicht lösen können,
nehmen Sie Kontakt zum technischen Kundendienst von Wacom auf. Informationen darüber,
wo Sie Unterstützung für Ihre Region erhalten, finden Sie unter Optionen für den technischen
Kundendienst auf Seite 38 und in der Liesmich-Datei.
Fehlerbehebung für das Stifttablett
auf Seite 39. Wacom aktualisiert die Softwaretreiber regelmäßig,
auf Seite 33 nach. Vielleicht wird Ihr Problem dort
TESTEN DES DTU-1931
1. Überprüfen Sie Folgendes, wenn die LED-Betriebsanzeige des DTU-1931 nicht leuchtet:
• Überprüfen Sie zunächst, ob das grüne Licht am Netzadapter aufleuchtet. Ist dies nicht der
Fall, überprüfen Sie, ob das Netzkabel ordnungsgemäß mit dem Netzadapter und einer
Strom führenden Netzsteckdose verbunden ist.
• Überprüfen Sie, ob das Netzgerätkabel fest am DTU-1931 angeschlossen und der
Netzschalter des DTU-1931 eingeschaltet ist. Die LED-Betriebsanzeige des DTU-1931
leuchtet orange oder blau, sobald das DTU-1931 eingeschaltet ist.
Fehlerbehebung für das Display
auf Seite 31
WICHTIG: Verwenden Sie nur den Netzadapter, der mit dem Pen Display geliefert wurde.
Bei Verwendung anderer Netzteile könnte Ihr Produkt beschädigt werden.
2. Falls keine Anzeige erfolgt:
•
Vergewissern Sie sich, dass der Computer eingeschaltet ist. Die LED-Betriebsanzeige
leuchtet blau, wenn ein ordnungsgemäßes Grafiksignal empfangen wird. Sie leuchtet orange,
wenn kein Grafiksignal vorhanden ist oder sich der Computer in einem Energiesparmodus
befindet.
• Vergewissern Sie sich, dass das DTU-1931 mit einem aktiven VGA- oder DVI-Anschluss
verbunden und der
DVI/VGA-Schalter auf die richtige Grafikeinstellung gestellt ist.
• Überprüfen Sie, ob die Grafikkarte ordnungsgemäß installiert ist und funktioniert. Wenn Sie
über ein weiteres Anzeigegerät verfügen, das mit der Grafikkarte kompatibel ist, können Sie
dieses Gerät an die Karte anschließen und prüfen, ob die Grafikkarte korrekt funktioniert.
Fehlerbehebung
Seite 28
Page 87

3. Überprüfen Sie, ob das Tablett und der Stift funktionieren:
• Drücken Sie die Spitze des Stiftes auf das Display und kontrollieren Sie, ob die LED-
Statusanzeige blau leuchtet.
• Wenn die LED-Anzeige nicht leuchtet, überprüfen Sie, ob das USB-Kabel des DTU-1931
mit einem aktiven USB-Anschluss verbunden ist. Wenn das DTU-1931 mit einem USB-Hub
verbunden ist, schließen Sie es direkt an den USB-Anschluss an Ihrem Computer an.
•
Vergewissern Sie sich, dass der USB-Anschluss, den sie verwenden, nicht deaktiviert ist.
Möglicherweise müssen Sie in den BIOS-Einstellung des Systems prüfen, ob das DTU-1931
an einen aktiven USB-Anschluss angeschlossen wurde.
• Die LED-Statusanzeige leuchtet blau, wenn das DTU-1931 als USB-Gerät registriert ist und
die Stiftspitze gegen das Display gedrückt wird.
4. Überprüfen Sie den Stift.
können:
Wenn Sie mit dem Stift keine Auswahl auf dem Bildschirm vornehmen
• Testen Sie den Stift, indem Sie die Stiftspitze oder den Radierer (falls vorhanden) auf die
Oberfläche des Pen Display Tablets drücken. Die LED-Statusanzeige des Tabletts sollte
blau leuchten.
• Halten Sie nun die Stiftspitze ohne Druck auszuüben innerhalb eines Bereichs von 5 mm
über der Oberfläche des Pen Display Tablets und drücken Sie den Seitenschalter (falls
vorhanden). Die LED-Statusanzeige an Ihrem Tablett muss wieder blau aufleuchten.
• Wenn die LED-Statusanzeige bei diesen Tests nicht blau leuchtet, stellen Sie sicher, dass
Sie mit dem im Lieferumfang des DTU-1931 enthaltenen Stift arbeiten.
• Nähere Informationen erhalten Sie unter Testen des Stiftes auf Seite 30.
Falls die Probleme weiterhin bestehen, sind Stift oder Pen Display möglicherweise defekt.
Fehlerbehebung
Seite 29
Page 88

TESTEN DES STIFTES
Wenn der Stift nicht wie erwartet funktioniert, sollten Sie zuerst die zugewiesenen Funktionen
prüfen oder die Standardeinstellungen des Stiftes wiederherstellen. Sie können einen Stift schnell
auf die Standardeinstellungen zurücksetzen, indem Sie ihn durch Klicken auf die Schaltfläche [ – ]
aus der W
Display-Fläche. Der Stift wird mit seinen Standardeinstellungen wieder in die W
aufgenommen.
Öffnen Sie das Kontrollfeld des Wacom Tabletts und klicken Sie auf die Schaltfläche I
im anschließend angezeigten Dialogfeld auf die Schaltfläche D
D
IAGNOSE
Tablet und den Stift angezeigt. Diese Informationen werden beim Testen von Pen Display Tablet und
Stift verwendet.
Wenn mehrere Pen Display-Geräte an Ihr System angeschlossen sind, achten Sie darauf, dass Sie
in der Spalte T
ERKZEUGLISTE entfernen. Nachdem er entfernt wurde, platzieren Sie ihn erneut auf der
ERKZEUGLISTE
NFO
. Klicken Sie
IAGNOSTIZIEREN
zu öffnen. Im Dialogfeld D
ABLETT-INFO das Gerät auswählen, für das Sie den Stift testen.
Hinweis: Wenn beim Testen der Stifttasten einer Taste RADIALMENÜ oder ÖFFNEN/AUSFÜHREN zugewiesen
ist, wird bei Tastendruck diese Funktion ausgeführt. In diesem Fall sollten Sie die Funktion der Taste vor
dem Test ändern.
IAGNOSE
werden dynamische Informationen über das Pen Display
, um das Dialogfeld
1. Achten Sie auf die Spalte P
den Bildschirm. Es sollten Werte für den A
OINTING DEVICE INFO
KTIONSBEREICH
und halten Sie den Stift innerhalb von 5 mm über
sowie G
ERÄTENAME
und G
ERÄTETYP
angezeigt werden.
2. Führen Sie Ihr Werkzeug über die Tablettoberfläche. Die Werte der X- und Y-DATEN sollten sich
entsprechend der Position des Werkzeuges ändern.
3. Testen Sie die Stiftschalter. Die LED-Anzeige des DTU-1931 sollte blau aufleuchten, wenn Sie
mit der Stiftspitze klicken, den Seitenschalter betätigen oder den Radierer des Stiftes auf den
Bildschirm drücken.
• Drücken Sie mit der Stiftspitze auf die Bildschirmoberfläche: der SCHALTERZUSTAND und der
D
RUCKWERT sollten sich ändern. (Der Wert für DRUCK sollte sich von ungefähr 0 % ohne
Druckausübung auf etwa 100 % bei voll ausgeübtem Druck ändern.)
• Betätigen Sie anschließend den Seitenschalter (falls vorhanden), ohne die Spitze auf das
Tablett zu drücken. Der Zustand der T
beide Positionen der DuoSwitch-Taste aus.
Spitze = 1, Seitentaster (unterer Taster) = 2, Seitentaster (oberer Taster) = 3, Radierer = 1
ASTEN sollte sich ändern. Führen Sie diesen Test für
• Drücken Sie dann den Radierer des Stiftes (falls vorhanden) auf den Bildschirm. Der
S
CHALTERZUSTAND und der DRUCKWERT sollten sich ändern. (Der Wert für DRUCK sollte
sich von ungefähr 0 % ohne Druckausübung auf etwa 100 % bei voll ausgeübtem Druck
ändern.)
4. Klicken Sie nach Abschluss dieses Vorgangs zum Beenden des Dialogfensters auf die Schaltfläche
S
CHLIEßEN
.
Fehlerbehebung
Seite 30
Page 89

FEHLERBEHEBUNG FÜR DAS DISPLAY
Wenn Probleme mit dem DTU-1931 Display auftreten, sehen Sie in den folgenden Tabellen nach.
Möglicherweise wird ihr Problem dort beschrieben und kann mit dem angegebenen Lösungsvorschlag
behoben werden. Weitere Informationen zu Farbproblemen finden Sie in der Dokumentation zum
Betriebssystem bzw. zu den Anwendungen.
ALLGEMEINE DISPLAY-PROBLEME
Keine Anzeige. Die LEDBetriebsanzeige leuchtet
nicht auf.
Keine Anzeige. Die LEDBetriebsanzeige leuchtet
blau.
Die LED-Betriebsanzeige
leuchtet orange.
Auf dem Bildschirm wird
kurz die Meldung „Kein
Signal, Wechsel in
Energiesparmodus“
angezeigt.
Auf dem Bildschirm wird
kurz die Meldung „Kabel
getrennt, Wechsel in
Energiesparmodus“
angezeigt.
Auf dem Bildschirm wird
kurz die Meldung
„Außerhalb des
Bereichs“ angezeigt.
Auf dem Bildschirm
wird kurz die Meldung
„Wiederholfrequenzbereich
einstellen“ angezeigt.
• Stellen Sie sicher, dass das Netzkabel korrekt angeschlossen
und der Netzschalter am DTU-1931 eingeschaltet ist.
• Prüfen Sie die Einstellungen für Kontrast, Helligkeit und
Hintergrundbeleuchtung.
Passen Sie sie nach Bedarf an oder öffnen Sie das OSD-Menü
und wählen Sie die Option Z
URÜCKSETZEN.
• Der Computer befindet sich möglicherweise in einem
Energieverwaltungsmodus.
Berühren Sie den Bildschirm mit der Stiftspitze, bewegen Sie
die Maus oder drücken Sie eine Taste auf der Tastatur.
• Schalten Sie den Computer und das DTU-1931 Pen Display
Tablet aus. Prüfen Sie das Bildschirmkabel auf verbogene oder
abgebrochene Verbindungsstifte. Schließen Sie danach das
Bildschirmkabel korrekt an und schalten Sie das DTU-1931 und
den Computer ein.
• Stellen Sie sicher, dass der DVI/VGA-Schalter richtig eingestellt
ist. Starten Sie den Computer neu, wenn Sie den Schalter
umgestellt haben.
• Stellen Sie sicher, dass die Grafikkarte richtig installiert ist.
• Überprüfen Sie, ob der Computer eingeschaltet ist.
• Vergewissern Sie sich, dass Sie das mit dem DTU-1931
mitgelieferte Bildschirmkabel verwenden.
• Stellen Sie sicher, dass das Bildschirmkabel des DTU-1931
richtig angeschlossen ist.
• Schalten Sie den Computer und das DTU-1931 Pen Display aus.
Überprüfen Sie das Bildschirmkabel und die Bildschirmadapter
auf abgeknickte oder gebrochene Pins. Schließen Sie dann
das Bildschirmkabel und die entsprechenden Adapter
ordnungsgemäß an.
• Die Eingangssignalfrequenz ist falsch eingestellt oder mit dem
DTU-1931 nicht kompatibel. Stellen Sie die Wiederholfrequenz
(vertikale Frequenz) auf einen Wert zwischen 50 und 75 Hz ein.
Wenn der Grafikkartentreiber die Anpassung der horizontalen
Frequenz unterstützt, stellen Sie diese auf einen Wert zwischen
30 und 80 kHz ein. Bei einem System mit nur einem Bildschirm
müssen Sie ein anderes Display anschließen, um die
Wiederholfrequenz zu ändern.
• Die Auflösung ist zu hoch eingestellt (max. 1280 x 1024).
• Die Wiederholfrequenz ist auf einen zu hohen Wert eingestellt
(maximal 75 Hz).
• Stellen Sie die Anzeigeeigenschaften so ein, dass Ihr System
Plug & Play-Bildschirme erkennt.
• Die maximale Wiederholfrequenz beträgt 75 Hz. Stellen Sie die
Wiederholfrequenz (vertikale Frequenz) auf einen Wert zwischen
50 und 75 Hz ein.
Fehlerbehebung
Seite 31
Page 90

Das Bild wird mehrfach
im Display angezeigt.
Wenn ein sich nicht
bewegendes Bild für
eine lange Zeit am
Bildschirm angezeigt
wird, ohne dass die
Anzeige aktualisiert wird,
kann für kurze Zeit ein
so genanntes Nachbild
bleiben.
Die Farbqualität ist
ungenau.
Die Farbe Weiß wird
nicht weiß angezeigt.
VGA-PROBLEME
Die Anzeige läuft
wellenförmig oder
flimmert.
Die Anzeige ist unscharf.
Text- oder andere
Bereiche des
Bildschirms sind
verschwommen.
Das Display und die
LCD-Anzeige sind nicht
abgeglichen. Die
Anzeigegröße ist nicht
korrekt.
Die Anzeige läuft
wellenförmig oder weist
ein Moiré-Muster auf.
Die Farbe der Anzeige
ist nicht gleichmäßig.
Ziehen Sie nicht am Bildschirmkabel. Verwenden Sie keinen
Umschalter für die Eingabeauswahl.
Setzen Sie einen Bildschirmschoner oder eine andere Funktion
zur Energieverwaltung ein.
Öffnen Sie das OSD-Menü und wählen Sie die Option
Z
URÜCKSETZEN.
Stellen Sie sicher, dass das Farbprofil des DTU-1931 installiert
und zur Verwendung mit dem Betriebssystem und den
Anwendungen ausgewählt ist.
Änderungen an der Kontrasteinstellung sollten nur in kleinen
Schritten erfolgen, da Kontraständerungen die Farbgenauigkeit
beeinflussen können.
Stellen Sie sicher, dass das Farbprofil des DTU-1931 installiert
und zur Verwendung mit dem Betriebssystem und den
Anwendungen ausgewählt ist.
Überprüfen Sie, ob das Display mit den Standardeinstellungen
korrekt arbeitet. Bleibt das Problem weiterhin bestehen,
passen Sie die Farben wie erforderlich an. Einzelheiten
zur Farbverwaltung finden Sie in der Dokumentation zum
Betriebssystem und den Anwendungen.
Stellen Sie sicher, dass Bildschirmkabel und -stecker richtig
angeschlossen sind.
• Öffnen Sie das OSD-Menü und wählen Sie die Option
A
UTOMATISCHE ANPASSUNG.
Passen Sie den horizontalen und vertikalen Punktabstand
(Pitch und Phase) gegebenenfalls manuell an.
• Stellen Sie sicher, dass der Display-Adapter bzw. die Grafikkarte
den Spezifikationen für das DTU-1931 entspricht.
• Passen Sie die Wiederholfrequenz in der Systemsteuerung in
den Eigenschaften für die Anzeige an.
• Stellen Sie die Auflösung für die Grafikkarte auf 1280 x 1024 ein.
• Schalten Sie das DTU-1931 aus und anschließend wieder ein.
• Öffnen Sie das OSD-Menü und wählen Sie die Option
A
UTOMATISCHE ANPASSUNG.
Passen Sie die Helligkeit sowie den horizontalen und vertikalen
Punktabstand (Pitch und Phase) gegebenenfalls manuell an.
• Öffnen Sie das OSD-Menü und wählen Sie die Option
A
UTOMATISCHE ANPASSUNG.
•
Passen Sie gegebenenfalls den horizontalen und vertikalen
Punktabstand (Pitch und Phase) sowie die horizontale und vertikale
Position an. Beachten Sie, dass bei bestimmten Grafikkarten die
Anzeige nicht in der richtigen Größe dargestellt wird.
• Öffnen Sie das OSD-Menü und wählen Sie die Option
A
UTOMATISCHE ANPASSUNG. Wenn das Problem dadurch nicht
behoben ist, wählen Sie die Option Z
Display auf seine werkseitigen Einstellungen zurückzusetzen.
URÜCKSETZEN, um das
• Passen Sie gegebenenfalls den horizontalen und vertikalen
Punktabstand (Pitch und Phase) an.
Fehlerbehebung
Seite 32
Page 91

FEHLERBEHEBUNG FÜR DAS STIFTTABLETT
Wenn Probleme mit dem DTU-1931 Pen Display Tablet auftreten, sehen Sie in der folgenden
Tabelle nach. Möglicherweise ist Ihr Problem hier beschrieben und Sie können es mithilfe des
Lösungsvorschlags beheben. Die neuesten Informationen zur Fehlerbehebung finden Sie in der
Liesmich-Datei für das DTU-1931.
Weitere Informationen erhalten Sie auf der Wacom Website unter
http://www.wacom.com/productsupport.
ALLGEMEINE PROBLEME
Der Computer hat
keinen verfügbaren
USB-Anschluss.
Ein USB-Gerät, das an
einem der integrierten
USB-Anschlüsse des Pen
Displays angeschlossen
ist, funktioniert nicht.
Die LED-Betriebsanzeige
des Pen Displays leuchtet
nicht auf.
Der Stift arbeitet nur
im Mausmodus
und unterstützt kein
druckempfindliches
Zeichnen oder
Schreiben.
Der Stift unterstützt kein
druckempfindliches
Zeichnen oder
Schreiben.
Das Klicken ist
schwierig.
Der Stift wählt alles
aus oder zeichnet
unaufhörlich.
Prüfen Sie, ob an einem USB-Hub ein USB-Anschluss verfügbar ist.
Wenn dies nicht der Fall ist, müssen Sie einen USB-Hub anschließen
oder eine USB-Karte installieren.
1. Stellen Sie sicher, dass das Pen Display selbst richtig an einen
funktionsfähigen USB-Anschluss Ihres Computers angeschlossen
ist.
2. Vergewissern Sie sich, dass das Pen Display eingeschaltet ist
und die LED-Betriebsanzeige blau leuchtet. Das DTU-1931 ist
mit einem aktiven USB-Hub ausgestattet. Wenn der Strom
ausgeschaltet ist, können die integrierten USB-Anschlüsse
daher nicht funktionieren.
3. Wenn das USB-Gerät nicht funktioniert, versuchen Sie, es direkt
an einen USB-Anschluss an Ihrem Computer anzuschließen.
4. Wenn das USB-Gerät immer noch nicht ordnungsgemäß
funktioniert, wenden Sie sich an den Hersteller des jeweiligen
Geräts.
Stellen Sie sicher, dass das Pen Display eingeschaltet ist.
Überprüfen Sie, ob das Netzgerät mit dem Pen Display und einer
aktiven Steckdose verbunden ist.
Verwenden Sie nur das Netzgerät, das mit dem Pen Display geliefert
wurde. Durch andere Netzgeräte kann das Produkt möglicherweise
beschädigt werden.
Die Treibersoftware für das Tablett wurde nicht installiert oder nicht
korrekt geladen.
Stellen Sie sicher, dass die Treibersoftware für das Tablett installiert
ist und richtig funktioniert.
Installieren Sie die Treibersoftware für das Stifttablett entsprechend
der Anweisungen im Abschnitt Installation dieses Handbuchs.
Bei manchen Anwendungen muss die Funktion für das
druckempfindliche Zeichnen zuerst aktiviert werden. Andernfalls
reagiert unter Umständen nicht der Stift, sondern das zuvor
ausgewählte Werkzeug mit Druckempfindlichkeit.
Stellen Sie außerdem sicher, dass Ihre Anwendung
Druckempfindlichkeit unterstützt.
Öffnen Sie das Kontrollfeld des Wacom Tabletts und gehen Sie
zur Registerkarte S
Empfindlichkeit der S
TIFT. Versuchen Sie es mit einer geringeren
TIFTSPITZE.
Öffnen Sie das Kontrollfeld des Wacom Tabletts und gehen Sie
zur Registerkarte S
E
MPFINDLICHKEIT DER STIFTSPITZE in Richtung HART oder wählen Sie
D
ETAILS und erhöhen Sie die Einstellung für KLICKSCHWELLENWERT.
TIFT. Ziehen Sie den Schieberegler unter
Wenn dies nicht hilft, lesen Sie weiter unter Testen des Stiftes auf
Seite 30.
Fehlerbehebung
Seite 33
Page 92

Probleme beim
Doppelklicken.
Der Radierer (falls
vorhanden) wählt
alles aus bzw. radiert
unaufhörlich.
Beim Beginn von Stiftund Pinselstrichen
bemerken Sie eine
Verzögerung.
Beim Klicken, Zeichnen
oder Schreiben muss ich
den Stift fest aufdrücken.
Die Spitze des Stiftes
funktioniert nicht.
Die Spitze des Stiftes
und der Bildschirmcursor
laufen nicht völlig
synchron.
Änderungen der
Funktionseinstellungen
für den Stift sind
wirkungslos.
Sie müssen das Tablett zwei Mal an derselben Stelle auf dem aktiven
Bereich des Pen Display Tablets antippen. Wacom empfiehlt, den
Seitenschalter zum Doppelklicken zu verwenden.
Öffnen Sie das Kontrollfeld des Wacom Tabletts und gehen Sie
zur Registerkarte S
S
TIFTSPITZE oder verwenden Sie eine geringere EMPFINDLICHKEIT DER
S
TIFTSPITZE.
Windows:
Stellen Sie Ihr System so ein, dass Programme mit einem
einfachen Klick aufgerufen werden. Siehe
TIFT. Erhöhen Sie den DOPPELKLICKABSTAND DER
Grundfunktionen des Stiftes
auf Seite 20.
Öffnen Sie das Kontrollfeld des Wacom Tabletts und wechseln
Sie zur Registerkarte R
R
ADIEREREMPFINDLICHKEIT in Richtung HART oder wählen Sie
die Schaltfläche D
K
LICKSCHWELLENWERT. Wenn dies nicht hilft, lesen Sie weiter unter
ADIERER. Ziehen Sie den Schieberegler
ETAILS und erhöhen Sie die Einstellung für
Testen des Stiftes auf Seite 30.
Öffnen Sie das Kontrollfeld des Wacom Tabletts und gehen Sie
zur Registerkarte S
D
OPPELKLICKABSTAND DER STIFTSPITZE. Wenn dies nicht weiterhilft,
ziehen Sie den Schieberegler D
in die Stellung A
TIFT. Versuchen Sie es mit einem geringeren
OPPELKLICKABSTAND DER STIFTSPITZE
US, um die Unterstützung des Doppelklicks
auszuschalten.
Öffnen Sie das Kontrollfeld des Wacom Tabletts und gehen Sie
zur Registerkarte S
E
MPFINDLICHKEIT DER STIFTSPITZE in Richtung WEICH oder klicken
Sie auf die Schaltfläche D
für E
MPFINDLICHKEIT und KLICKSCHWELLENWERT.
TIFT. Ziehen Sie den Schieberegler unter
ETAILS und erhöhen Sie die Einstellung
Verwenden Sie nur den Stift, den Sie zusammen mit dem DTU-1931
erhalten haben. Andere Stifte können möglicherweise nicht mit dem
Pen Display verwendet werden.
Überprüfen Sie, ob im Kontrollfeld auf der Registerkarte S
Stiftspitze der M
AUSKLICK zugewiesen wurde.
TIFT für die
Achten Sie darauf, ob die LED-Statusanzeige beim Drücken auf die
Stiftspitze blau aufleuchtet. Wenn die LED-Anzeige nicht leuchtet,
überprüfen Sie, ob das USB-Kabel mit einem aktiven USB-Anschluss
am Computer oder mit einem USB-Hub verbunden ist.
Wenn die LED-Anzeige noch immer nicht leuchtet, ist möglicherweise
die Hardware defekt (siehe
Fehlerbehebung
auf Seite 28).
Öffnen Sie das Wacom Tablett-Kontrollfeld und wählen Sie die
Registerkarte K
ALIBRIEREN. Fahren Sie mit Kalibrieren des DTU-1931
auf Seite 23 fort.
Vergewissern Sie sich, dass Sie die Einstellungen sowohl für
den Stift als auch für die verwendete Anwendung ändern. Nähere
Informationen über das Arbeiten mit anwendungsspezifischen
Einstellungen finden Sie im elektronischen Benutzerhandbuch für
die Software.
Fehlerbehebung
Seite 34
Page 93

Der Stiftseitenschalter
funktioniert nicht.
Der Bildschirmcursor
bewegt sich, springt
jedoch nicht an die Stelle,
an der die Stiftspitze
den Bildschirm berührt.
Außerdem folgt er nicht
der Stiftspitze, wenn der
Stift über die Anzeige
bewegt wird.
Wenn das Pen Display
Tablet auf einem
System mit mehreren
Bildschirmen verwendet
wird, können Sie mit
dem Stift die anderen
Bildschirme nicht
bedienen.
Linien werden nicht
genau dort gezeichnet,
wo sich der
Bildschirmcursor
befindet.
Verwenden Sie nur den Stift, den Sie zusammen mit dem DTU-1931
erhalten haben. Andere Stifte können möglicherweise nicht mit dem
Pen Display verwendet werden.
Der Seitenschalter muss gedrückt werden, wenn sich die Stiftspitze
innerhalb von 5 mm über dem aktiven Bereich des Pen Displays
befindet, ohne die Tablettoberfläche zu berühren.
Öffnen Sie das Kontrollfeld des Wacom Tabletts und überprüfen Sie,
ob der Seitenschalter auf die gewünschte Anwendungs- und
Werkzeugfunktion eingestellt ist.
Überprüfen Sie auch den S
T
IPPEN aktiviert ist, müssen Sie zunächst den Seitenschalter drücken
EITENSCHALTERMODUS. Wenn KLICKEN &
und dann mit der Stiftspitze die Tablettoberfläche berühren, um eine
Klickfunktion auszuführen.
Achten Sie darauf, dass die LED-Statusanzeige beim Drücken
des Seitenschalters blau aufleuchtet. Wenn dies nicht der Fall ist,
überprüfen Sie, ob das USB-Kabel an einem aktiven USB-Anschluss
Ihres Computers oder an einem USB-Hub angeschlossen ist. Ist das
USB-Kabel nicht mit einem aktiven Anschluss verbunden, leuchtet
auch die LED nicht auf.
Wenn die LED-Anzeige nicht leuchtet, ist möglicherweise die Hardware
defekt (siehe
Fehlerbehebung
auf Seite 28).
Stellen Sie sicher, dass der Wacom Tablett-Treiber ordnungsgemäß
geladen wurde, indem Sie das Wacom Tablett-Kontrollfeld öffnen.
Wenn der Treiber nicht geladen wurde, wird eine Fehlermeldung
angezeigt. Wenn eine Fehlermeldung angezeigt wird, starten Sie
den Computer neu. Wenn das Problem weiterhin auftritt, lesen Sie
die Anweisung zur Installation und installieren Sie die Wacom
Tablettsoftware erneut. (Bei einem Macintosh müssen Sie den
Computer nach der Installation des Wacom Tablett-Treibers neu
starten, damit das Tablett ordnungsgemäß funktioniert.)
Wenn Sie den Seitenschalter am Stift so angepasst haben, dass Sie
vom Stiftmodus zum Mausmodus wechseln können, stellen Sie sicher,
dass das Pen Display im Stiftmodus arbeitet.
Belegen Sie eine Stifttaste mit der Funktion D
ISPLAYWECHSEL und
drücken Sie dann diese Taste, um zwischen der Stiftsteuerung
für das DTU-1931 und anderen Displays umzuschalten. Nähere
Informationen über das Arbeiten mit D
ISPLAYWECHSEL finden Sie
im elektronischen Benutzerhandbuch für die Software.
Weitere Bildschirme können Sie auch mit dem Stift im Mausmodus
bedienen. Um in den Mausmodus zu gelangen, stellen Sie zuerst
den DuoSwitch auf M
ODUSWECHSEL.... Wechseln Sie dann mit dem
Schalter vom Stiftmodus zum Mausmodus.
In einigen Programmen muss der Stift auf Stiftmodus eingestellt sein,
um richtig zu funktionieren. Stellen Sie sicher, dass der Stift nicht
auf
Mausmodus eingestellt ist.
Wenn der Stift auf Stiftmodus eingestellt ist und das Problem dennoch
auftritt, ist möglicherweise Ihre Voreinstellungsdatei beschädigt.
Gehen Sie vor, wie im nächsten Tipp beschrieben, um eine neue
Voreinstellungsdatei zu erstellen.
Fehlerbehebung
Seite 35
Page 94

Sie vermuten, dass die
Stifttablettvoreinstellunge
n beschädigt sind oder
möchten alle
Einstellungen auf die
Standardeinstellungen
zurücksetzen.
Der Computer
schaltet nicht in den
Ruhezustand um.
Der Bildschirmcursor
springt bei Verwendung
von normaler Maus oder
Trackball zurück.
Der Bildschirmcursor
bewegt sich unregelmäßig
oder springt willkürlich,
wenn ein weiteres Tablett
an den Computer
angeschlossen wird.
Löschen Sie die Stifttablettvoreinstellungen wie folgt:
Windows:
Klicken Sie dann auf T
D
IENSTPROGRAMM
auf die Schaltfläche M
Klicken Sie auf S
ABLETT
. Klicken Sie im daraufhin eingeblendeten Dialogfeld
EINE VOREINSTELLUNGSDATEI ENTFERNEN
TART
und wählen Sie A
und T
ABLETT-VOREINSTELLUNGSDATEI
LLE PROGRAMME
, um
.
-
die Voreinstellungen für den aktuellen Benutzer zu löschen. Um die
Voreinstellungen für mehrere Benutzer zu löschen, klicken Sie auf die
Schaltfläche A
LLE VOREINSTELLUNGSDATEIEN ENTFERNEN
. Beachten
Sie, dass zum Löschen der Voreinstellungen für alle Benutzer
Administratorrechte erforderlich sind. Starten Sie alle derzeit geöffneten
und u. U. ausgeführten Anwendungen neu, die das Tablett erkennen.
Macintosh: Löschen Sie für einen einzelnen Benutzer die
Tablettvoreinstellungen, indem Sie zuerst im Menü G
P
RIVAT klicken. Öffnen Sie den Ordner LIBRARY. Öffnen Sie im Ordner
L
IBRARY den Ordner PREFERENCES und löschen Sie die Datei
EHE ZU auf
com.wacom.wacomtablet.prefs. Melden Sie sich ab und dann
wieder an. Beim Laden des Tabletttreibers wird eine neue
Voreinstellungsdatei mit den Standardeinstellungen erzeugt.
Bei mehreren Benutzern löschen Sie alle Tablettvoreinstellungen,
indem Sie den Ordner P
Ordner W
T
ABLETT ENTFERNEN
ACOM TABLETT
klicken Sie auf die Schaltfläche A
ROGRAMME
und führen Sie das Dienstprogramm W
öffnen. Öffnen Sie danach den
ACOM
aus. Wenn das Dienstprogramm gestartet wurde,
LLE VOREINSTELLUNGEN ENTFERNEN
.
Der Tabletttreiber wird neu gestartet und es werden neue
Voreinstellungsdateien mit den Standardeinstellungen erzeugt.
Kalibrieren Sie das Tablett erneut.
Hinweis: Entfernen Sie die Datei WACOM TABLET.PREFPANE aus dem
Hauptordner LIBRARY PREFERENCEPANES nicht manuell. Diese Datei darf
nur beim Deinstallieren des Softwaretreibers für das Tablett und auch
dann nur mit dem Dienstprogramm W
werden.
ACOM TABLETT ENTFERNEN entfernt
Entfernen Sie den Stift von der Oberfläche des Pen Displays, wenn
er nicht benutzt wird. Andernfalls sendet das Pen Display weiterhin
Daten und verhindert den Ruhezustand des Computers.
Wenn der Stift nicht in Gebrauch ist, setzen Sie ihn in das Stiftfach
oder legen Sie ihn in der Nähe des Pen Display Tablets, aber nicht
auf dem Display ab. Wenn Sie einen Stift auf dem Display lassen,
kann es bei der Arbeit mit anderen Eingabegeräten zu Reaktionen
des Bildschirmcursors kommen.
Das Tablett des DTU-1931 sendet elektromagnetische Wellen einer
bestimmten Frequenz aus. Wenn sich ein anderes Tablett zu nahe am
DTU-1931 befindet, kann es die Positionierung des Bildschirmcursors
stören. Falls dies auftritt, bewegen Sie das Tablett weiter vom DTU-1931
weg.
WINDOWS-SPEZIFISCHE PROBLEME
Nach einer Änderung von
rechts- und linkshändiger
Mausbedienung in der
Systemsteuerung des
Computers funktioniert
die Stiftspitze nicht mehr
richtig.
Fehlerbehebung
Seite 36
Starten Sie Windows erneut, damit die Werkzeugeinstellungen
korrekt erkannt werden.
Page 95

MACINTOSH-SPEZIFISCHE PROBLEME
Beim Start erhalten
Sie die Meldung, dass
entweder der Treiber
nicht geladen werden
konnte oder noch keine
Voreinstellungen für das
Tablett existieren.
Inkwell funktioniert mit
dem Pen Display nicht
korrekt.
Beim Start wurde kein Stifttablett gefunden. Überprüfen Sie, ob das
USB-Schnittstellenkabel sicher mit einem aktiven USB-Anschluss
am Computer oder mit einem USB-Hub verbunden ist. Überprüfen
Sie, ob die LED-Betriebsanzeige des Pen Displays leuchtet. Wenn
Ihr Problem damit nicht behoben ist, lesen Sie Fehlerbehebung auf
Seite 28.
Wählen Sie im Menü G
starten Sie den S
H
ARDWARE
den Eintrag USB. Daraufhin sollte auf der rechten Seite
EHE ZU
den Ordner D
YSTEM PROFILER
IENSTPROGRAMME
. Wählen Sie in der Liste I
und
NHALT
unter
ein Wacom USB Pen Display aufgeführt sein. Wenn kein Pen Display
aufgeführt ist, prüfen Sie die USB-Kabelverbindung des Pen Displays
oder schließen Sie es an einen anderen USB-Anschluss an.
Wenn die Probleme weiterhin auftreten, rufen Sie den Ordner
D
IENSTPROGRAMME
und führen Sie Z
E
RSTE HILFE
auf, öffnen Sie das F
UGRIFFSRECHTE REPARIEREN
ESTPLATTENDIENSTPROGRAMM
auf der Registerkarte
aus. Falls sich das Problem dadurch nicht beheben lässt,
wenden Sie sich an den technischen Kundendienst von Wacom. Siehe
Optionen für den technischen Kundendienst
auf Seite 38.
Dieses Problem kann auf beschädigte Inkwell-Voreinstellungsdateien
zurückzuführen sein. Entfernen Sie die beschädigten
Voreinstellungsdateien. Diese werden beim Aktivieren der
Handschrifterkennung neu erstellt. Gehen Sie wie folgt vor:
1. Wählen Sie im Menü S
EINBLENDEN
und dann INK. Schalten Sie die Handschrifterkennung
YSTEMEINSTELLUNGEN
die Option A
LLE
aus.
2. Wählen Sie im Menü GEHE ZU die Option PRIVAT. Öffnen Sie
die Ordner L
IBRARY und PREFERENCES. Löschen Sie folgende
Voreinstellungen:
• com.apple.ink.framework.plist
• com.apple.ink.inkpad.plist
• com.apple.ink.inkpad.sketch
3. Kehren Sie zu S
Sie die Handschrifterkennung.
4. Testen Sie die Inkwell-Funktion mit dem Wacom Pen Display
Tablet und Stift.
5. Wenn diese Vorgehensweise das Problem mit Inkwell nicht behebt,
wenden Sie sich an den Apple-Kundendienst. Wacom ist nicht der
Hersteller der Inkwell-Software. Wir können nur sehr eingeschränkt
Unterstützung für Software von Drittanbietern bieten.
YSTEMEINSTELLUNGEN
und INK zurück und aktivieren
Fehlerbehebung
Seite 37
Page 96

OPTIONEN FÜR DEN TECHNISCHEN KUNDENDIENST
Wenn Sie Schwierigkeiten mit dem DTU-1931 Pen Display haben, sehen Sie zunächst im Abschnitt
Installation
ist. Überprüfen Sie anschließend die Verfahren zur
Wenn Ihnen die Informationen in diesem Handbuch nicht weiter helfen, finden Sie die Lösung zu
Ihrem Problem möglicherweise in der entsprechenden Liesmich-Datei für Ihre Plattform (auf der
Installations-CD). Außerdem können Sie die Wacom Website für Ihre Region besuchen und dort die
FAQ-Informationen zum jeweiligen Produkt lesen.
Benutzer mit einer Internetverbindung können die neuesten Softwaretreiber von der Wacom
Website für Ihre Region herunterladen. Siehe Abrufen von Treiber-Downloads auf Seite 39.
Wenn Sie das Problem nicht lösen können und denken, dass Ihr Wacom Produkt nicht richtig
funktioniert, wenden Sie sich an die Mitarbeiter des Wacom Kundendiensts für das Land, in dem
Sie das Produkt erworben haben. Kontaktinformationen finden Sie in der Liesmich-Datei für das
Wacom Tablett. Diese befindet sich auf der Installations-CD.
Wenn Sie uns anrufen, sollten Sie sich an Ihrem Computer befinden und folgende Informationen
bzw. Unterlagen griffbereit haben:
• Dieses Handbuch
•
• Nummer der Treiberversion (Sie finden sie auf der Installations-CD für das Wacom Stifttablett
• Hersteller und Modell Ihres Computers und Versionsnummer des Betriebssystems
• Ausführung, Modell und Anschlusstyp Ihrer Grafikkarte.
• Liste der am Computer angeschlossenen Peripheriegeräte
• Anwendung (einschl. Versionsnummer), bei der das Problem auftrat
• Den genauen Wortlaut aller auf dem Bildschirm angegebenen Fehlermeldungen.
• Was passiert ist und was Sie gerade getan haben, als das Problem auftrat.
• Wie Sie versucht haben, das Problem zu beheben.
dieses Handbuchs nach, damit Sie sicherstellen können, dass das Gerät richtig installiert
Fehlerbehebung
Seriennummer des Pen Displays (Sehen Sie auf dem Etikett auf der Rückseite des Geräts nach.)
bzw. wenn Sie im Kontrollfeld des Wacom Tabletts auf die Schaltfläche Info klicken.)
.
Fehlerbehebung
Seite 38
Page 97

ABRUFEN VON TREIBER-DOWNLOADS
Wacom aktualisiert die Softwaretreiber für das Stifttablett regelmäßig, um die Kompatibilität mit
neuen Produkten zu gewährleisten. Bei Kompatibilitätsproblemen zwischen Ihrem DTU-1931
Pen Display und einem neuen Hardware- oder Softwareprodukt empfiehlt es sich, einen neuen
Softwaretreiber für das Wacom Tablett (falls verfügbar) aus dem Internet herunterzuladen.
USA, Kanada, Mittel- und Südamerika
Internet: http://www.wacom.com/productsupport Treiber-Downloads
Europa, Naher Osten und Afrika
Internet: http://www.wacom.eu Softwareaktualisierungen
Anonyme FTP-Seite: ftp://ftp.wacom.eu/pub/ Softwareaktualisierungen
Japan
Internet: http://tablet.wacom.co.jp Softwareaktualisierungen
(Japanisch)
Südostasien (Englisch)
Internet: http://www.wacom-asia.com Softwareaktualisierungen
(Englisch)
China
Internet: http://www.wacom.com.cn Softwareaktualisierungen
(Chinesisch, vereinfacht)
Korea
Internet: http://www.wacomkorea.com Softwareaktualisierungen
(Koreanisch)
Taiwan
Internet: http://www.wacom.com.tw Softwareaktualisierungen
(Chinesisch, traditionell)
Fehlerbehebung
Seite 39
Page 98

ANHANG
So entfernen Sie die alte Spitze:
Fassen Sie die Spitze mit einem Wacom Werkzeug
zum Entfernen von Stiftspitzen, einer Zange, einer
spitzen Pinzette oder einem ähnlichen Werkzeug
und ziehen Sie sie gerade aus dem Stift heraus.
So befestigen Sie eine neue Spitze:
Schieben Sie die neue Spitze gerade in den
Kolben des Stiftes. Drücken Sie die Spitze fest
hinein, bis ein Widerstand zu spüren ist. Die
neue Spitze gleitet in die richtige Position.
W
ARNUNG
Bewahren Sie Stiftspitze und den Seitenschalter außerhalb der Reichweite von Kindern auf. Wenn
Kinder auf die Stiftspitze oder den Seitenschalter beißen, besteht die Gefahr, dass sich diese Bestandteile
lösen und verschluckt werden.
Tauschen Sie die Stiftspitze aus, wenn
diese zu kurz wird (unter 1 mm).
WARTEN DES DTU-1931
Halten Sie den Stift und die DTU-1931 LCD-Bildschirmoberfläche sauber. Staub- und Schmutzpartikel
können am Stift kleben bleiben und die Bildschirmoberfläche stark abnutzen. Durch regelmäßiges
Reinigen wird die Lebensdauer der LCD-Bildschirmoberfläche und des Stiftes verlängert.
Bewahren Sie das DTU-1931 und den Stift an einem sauberen, trockenen Ort auf und vermeiden
Sie starke Temperaturschwankungen. Zimmertemperatur ist am besten geeignet. Das DTU-1931
und der Stift sollten nicht auseinander genommen werden. Wenn Sie das Gerät auseinander
bauen, erlischt Ihr Garantieanspruch.
WICHTIG:
Dies gilt besonders für das Display, die Stifttasten und die Stiftspitze. Alle diese Komponenten
enthalten empfindliche elektronische Teile, die keinesfalls feucht werden dürfen, da sie sonst
ihren Dienst versagen.
REINIGEN
Verwenden Sie ein weiches, feuchtes Tuch, um das Gehäuse und den Stift des DTU-1931 zu
reinigen. Sie können das Tuch auch mit sehr mildem Seifenwasser befeuchten. Verwenden Sie
keine Farbverdünner, Benzin, Alkohol oder andere Lösungsmittel, um das Gehäuse des Geräts
oder den Stift zu reinigen.
Reinigen Sie den Bildschirm mit einem antistatischen oder leicht angefeuchteten Tuch. Üben Sie bei der
Reinigung nur minimalen Druck auf den Bildschirm aus und achten Sie darauf, dass die Oberfläche
nicht durchnässt wird. Verwenden Sie zum Reinigen des Bildschirms kein Reinigungsmittel, da dadurch
die Beschichtung des Bildschirms beschädigt werden kann. Beachten Sie, dass derartige Schäden
nicht unter die Garantiebestimmungen des Herstellers fallen.
AUSTAUSCHEN DER STIFTSPITZE
Die Stiftspitze unterliegt normaler Abnutzung. Übermäßiger Druck führt zu einem schnelleren
Abnutzen der Spitze. Eine abgenutzte Stiftspitze kann die Beschichtung des Bildschirms des
DTU-1931 beschädigen. Tauschen Sie die Stiftspitze regelmäßig aus, um dies zu verhindern.
Wenn die Spitze zu kurz wird oder sich eine scharfe Kante bildet, können Sie sie durch eine der im
Lieferumfang enthaltenen Austauschspitzen ersetzen.
Das Pen Display oder der Stift sollten nie mit Flüssigkeiten in Berührung kommen.
WICHTIG: Wenn der Stift nicht in Gebrauch ist, setzen Sie ihn in das Stiftfach oder legen
Sie ihn flach auf den Tisch. Stellen Sie den Stift nie in einem Behälter oder anderswo auf
seiner Spitze aufrecht ab, damit seine Druckempfindlichkeit erhalten bleibt.
Anhang
Seite 40
Page 99

VERWENDEN ALTERNATIVER STÄNDER ODER HALTERUNGEN
So entfernen Sie den verstellbaren Standfuß und
befestigen das Pen Display an einer anderen
Halterung:
1. Schalten Sie den Computer aus und trennen
Sie das DTU-1931 vom Netz. Ziehen Sie
anschließend alle Kabel zwischen dem Gerät
und dem Computer ab.
2. Schützen Sie die Oberfläche des Bildschirms,
indem Sie ein weiches Tuch auf einem ebenen
Tisch ausbreiten und das DTU-1931 mit der
Oberfläche nach unten darauf legen.
3. Entfernen Sie die vier Schrauben und heben
Sie die Aufstellvorrichtung vom Gerät.
4. Schrauben Sie das DTU-1931 mit geeigneten
Schrauben fest an der alternativen Halterung
an.
5. Lesen Sie die Anweisungen zur Installation
ab Seite 11 und schließen Sie die Kabel wieder
an.
ACHTUNG
Wenn Sie das DTU-1931 an einer anderen Halterung
befestigen möchten, halten Sie sich an die Anweisungen
in der Dokumentation des Halterungsherstellers. Wenn
das Gerät nicht richtig montiert ist, kann es herunterfallen
und es können Schäden am Gerät oder Verletzungen
verursacht werden.
Wenn der Einsatz des DTU-1931 eine andere Halterung erfordert, können Sie den verstellbaren
Standfuß vom Gerät abmontieren und das Pen Display an eine Wandhalterung oder einen Ständer
montieren, die bzw. der dem Vesa-Standard 100 mm entspricht.
Es sind Befestigungsschrauben mit 4 mm Breite, 0,7 mm Gewindesteigung (M4 Normal) und 15 mm
Schraubtiefe erforderlich. Wenn die Schraubtiefe von 15 mm überschritten wird, werden interne
Komponenten des Pen Displays beschädigt.
Anhang
Seite 41
Page 100

STIFT- UND FREIHANDFUNKTIONEN IN WINDOWS VISTA
Microsoft Windows Vista bietet umfangreiche Unterstützung für die Stift*- und Toucheingabe. So
finden Sie für Ihr DTU-1931 unter Windows Vista leistungsfähige Funktionen zum Speichern von
Notizen, zur Handschrifterkennung und zur schnellen Navigation sowie zusätzliche Stiftoptionen,
mit denen Sie Ihren Wacom Stift schnell und intuitiv einsetzen und optimale Ergebnisse erzielen
können.
• Notizen. Mit Ihrem Wacom Stift können Sie in Windows-Journal Notizen machen und Skizzen
zeichnen. Journal funktioniert wie ein herkömmliches Notizbuch, nutzt aber die Vorteile digitaler
Notizen. Sie können aus einer Vielzahl von Stift- und Markierungswerkzeugen auswählen.
Darüber hinaus verfügt Windows-Journal über eine leistungsfähige Suchmaschine, die auch
handgeschriebene Texte durchsuchen kann.
• Handschrifterkennung. Dank der leistungsfähigen Windows Vista-Funktionen zur
Handschrifterkennung können Sie mit Ihrem Wacom Stift überall dort, wo der Computer die
Eingabe von Inhalten erlaubt, schnell und einfach handgeschriebene Informationen eingeben.
Handgeschriebener Text kann jederzeit in „gedruckten“ Text umgewandelt werden.
• Stiftbewegungen. Sie können mit Ihrem Wacom Stift durch einfache Stiftbewegungen auf dem
Pen Display frei konfigurierbare Navigations-, Bearbeitungs- und andere Aktionen auslösen.
Klicken Sie zum Konfigurieren von Stiftbewegungen im Dialogfeld S
auf die Registerkarte B
EWEGUNGEN.
• Stiftunterstützung in Microsoft Office 2007. Die in Microsoft Office 2007-Anwendungen unter
Windows Vista zur Verfügung stehenden erweiterten Werkzeuge für das digitale Schreiben und
Zeichnen ermöglichen eine optimale Ausschöpfung des Potenzials Ihres Wacom Stiftes. Diese
Werkzeuge, die Sie auf der Registerkarte Ü
bieten alle einen einheitlichen Satz von Optionen für den Umgang mit digitalen Stiften. Die Stiftund Freihandfunktionen, auf die Sie häufiger zugreifen, können Sie der Symbolleiste für den
Schnellzugriff am oberen Rand der einzelnen Anwendungen hinzufügen.
Beachten Sie, dass die folgenden Problemlösungen in den Treiber des Stifttabletts implementiert
wurden, um die Zeichnungsleistung in Vista zu verbessern:
BERARBEITEN der jeweiligen Anwendung finden,
• Die Vista-Funktionen Stiftbewegungen und Gedrückthalten für Rechtsklick sind in den
meisten Grafikanwendungen mit Wintab-API deaktiviert.
• In der Funktion Journal und in anderen Vista Freihand-Funktionen ist die Druckempfindlichkeit
deaktiviert, wenn im Vista-Kontrollfeld S
und Gedrückthalten für Rechtsklick deaktiviert sind.
TIFT- UND EINGABEGERÄTE die Funktionen Bewegungen
TIFT- UND EINGABEGERÄTE
* Diese Stiftfunktionen werden von allen Windows Vista-Versionen mit Ausnahme von Vista Home Basic unterstützt.
Anhang
Seite 42
 Loading...