

Volkswagen Beetle 2014 Owner's Manual
Side view
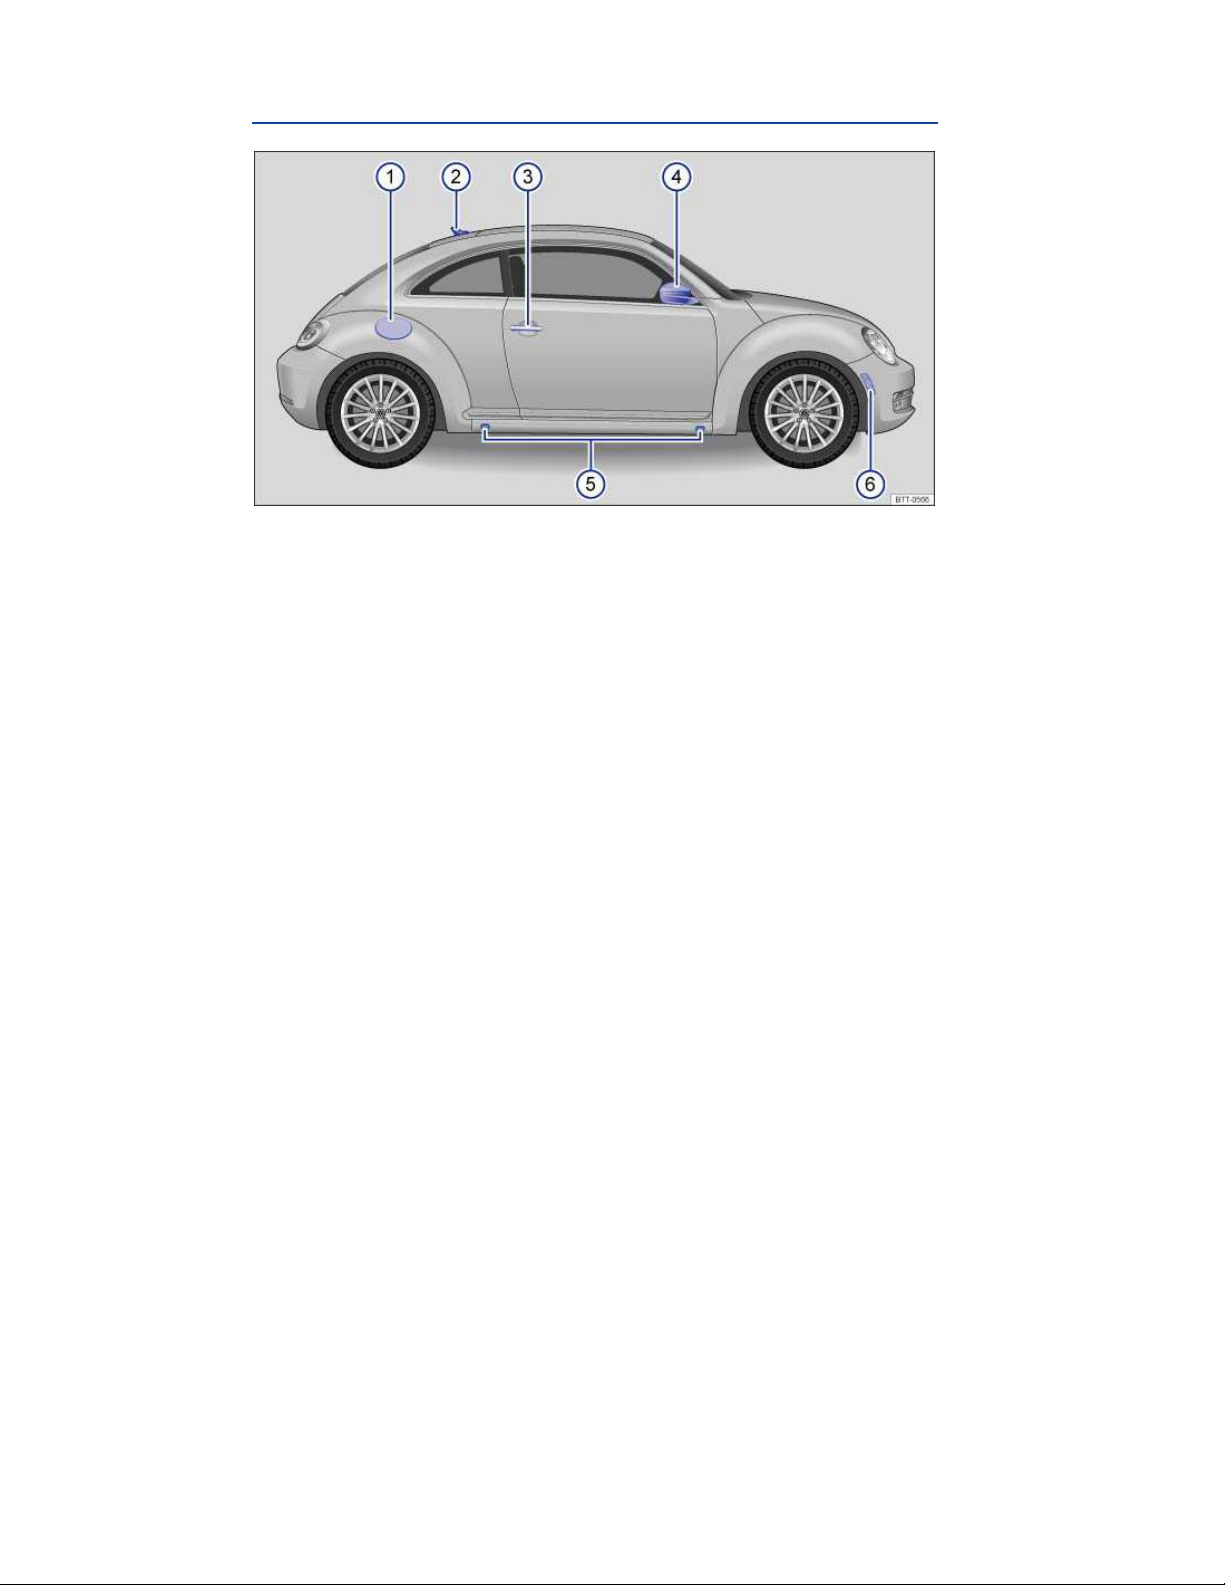
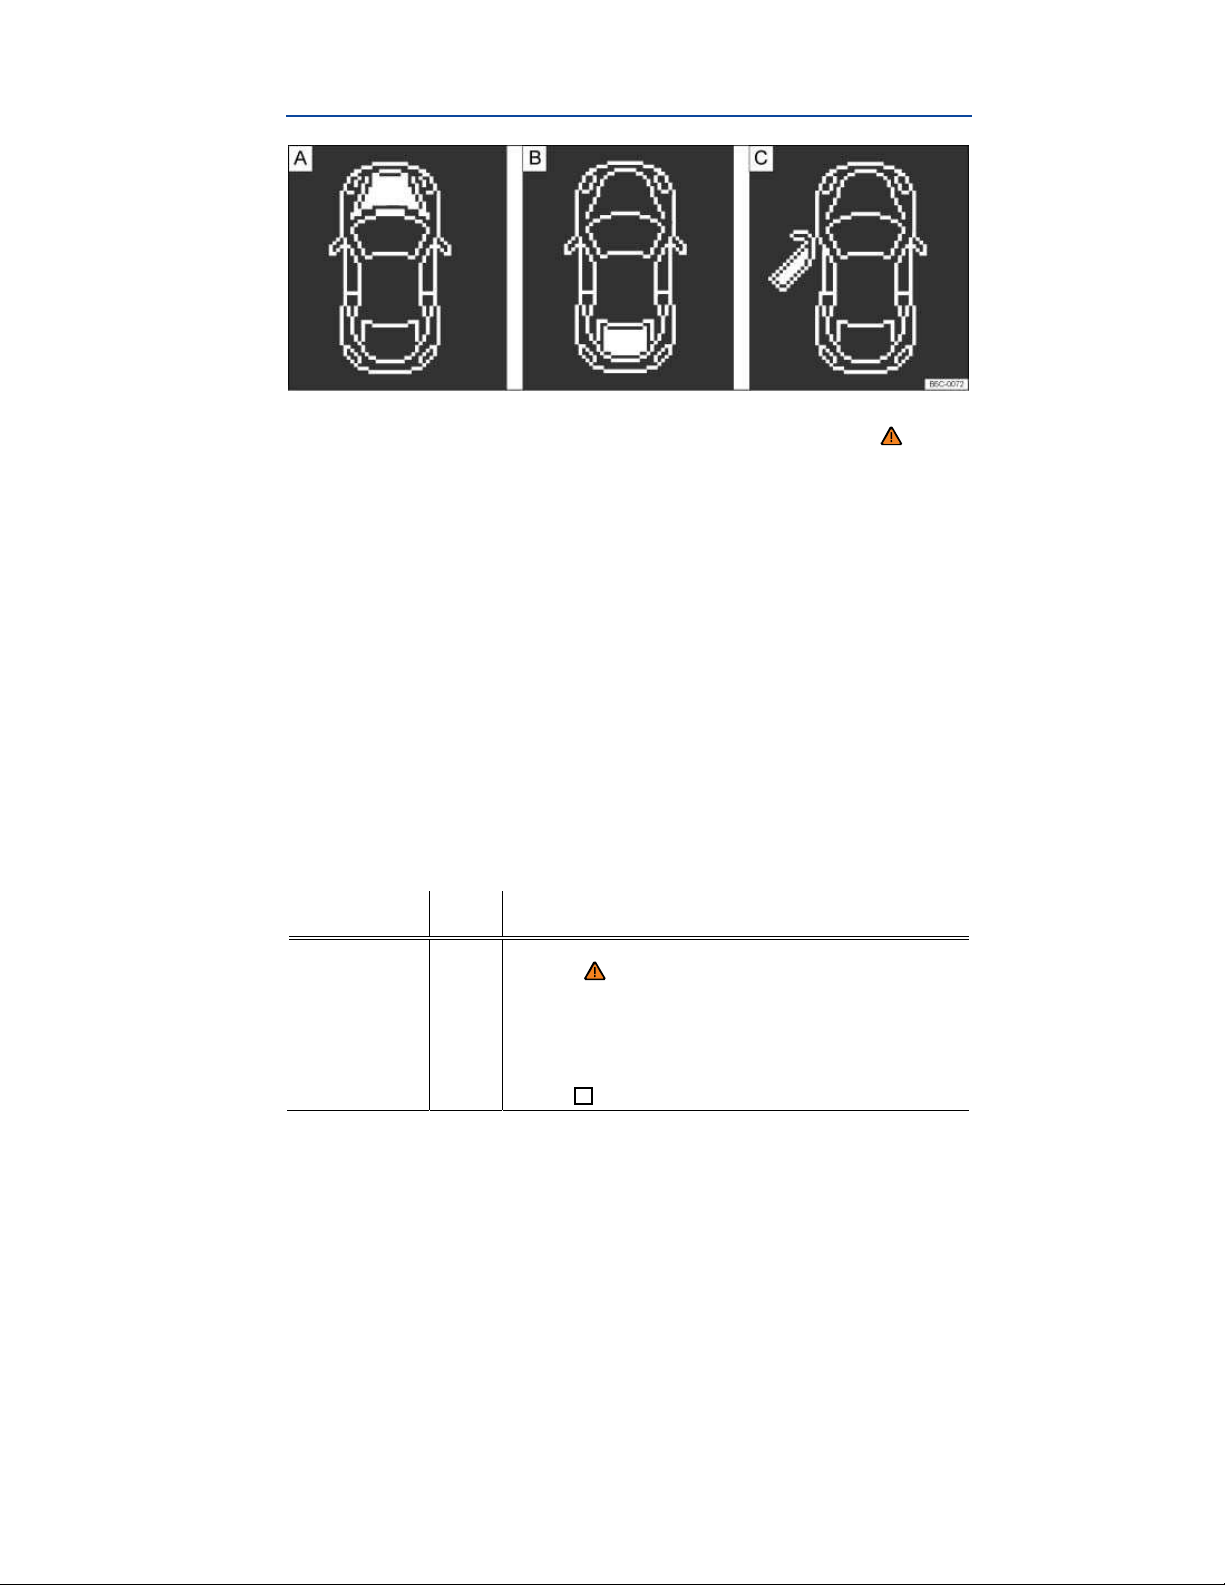
Fig. 1 Vehicle side overview.
Key to fig. 1:
(1) Fuel filler flap
(2) Roof antenna
(3) Outside door handle
(4) Outside mirror
– Additional turn signal light
(5) Lift points for the jack
(6) Side marker light
Front view
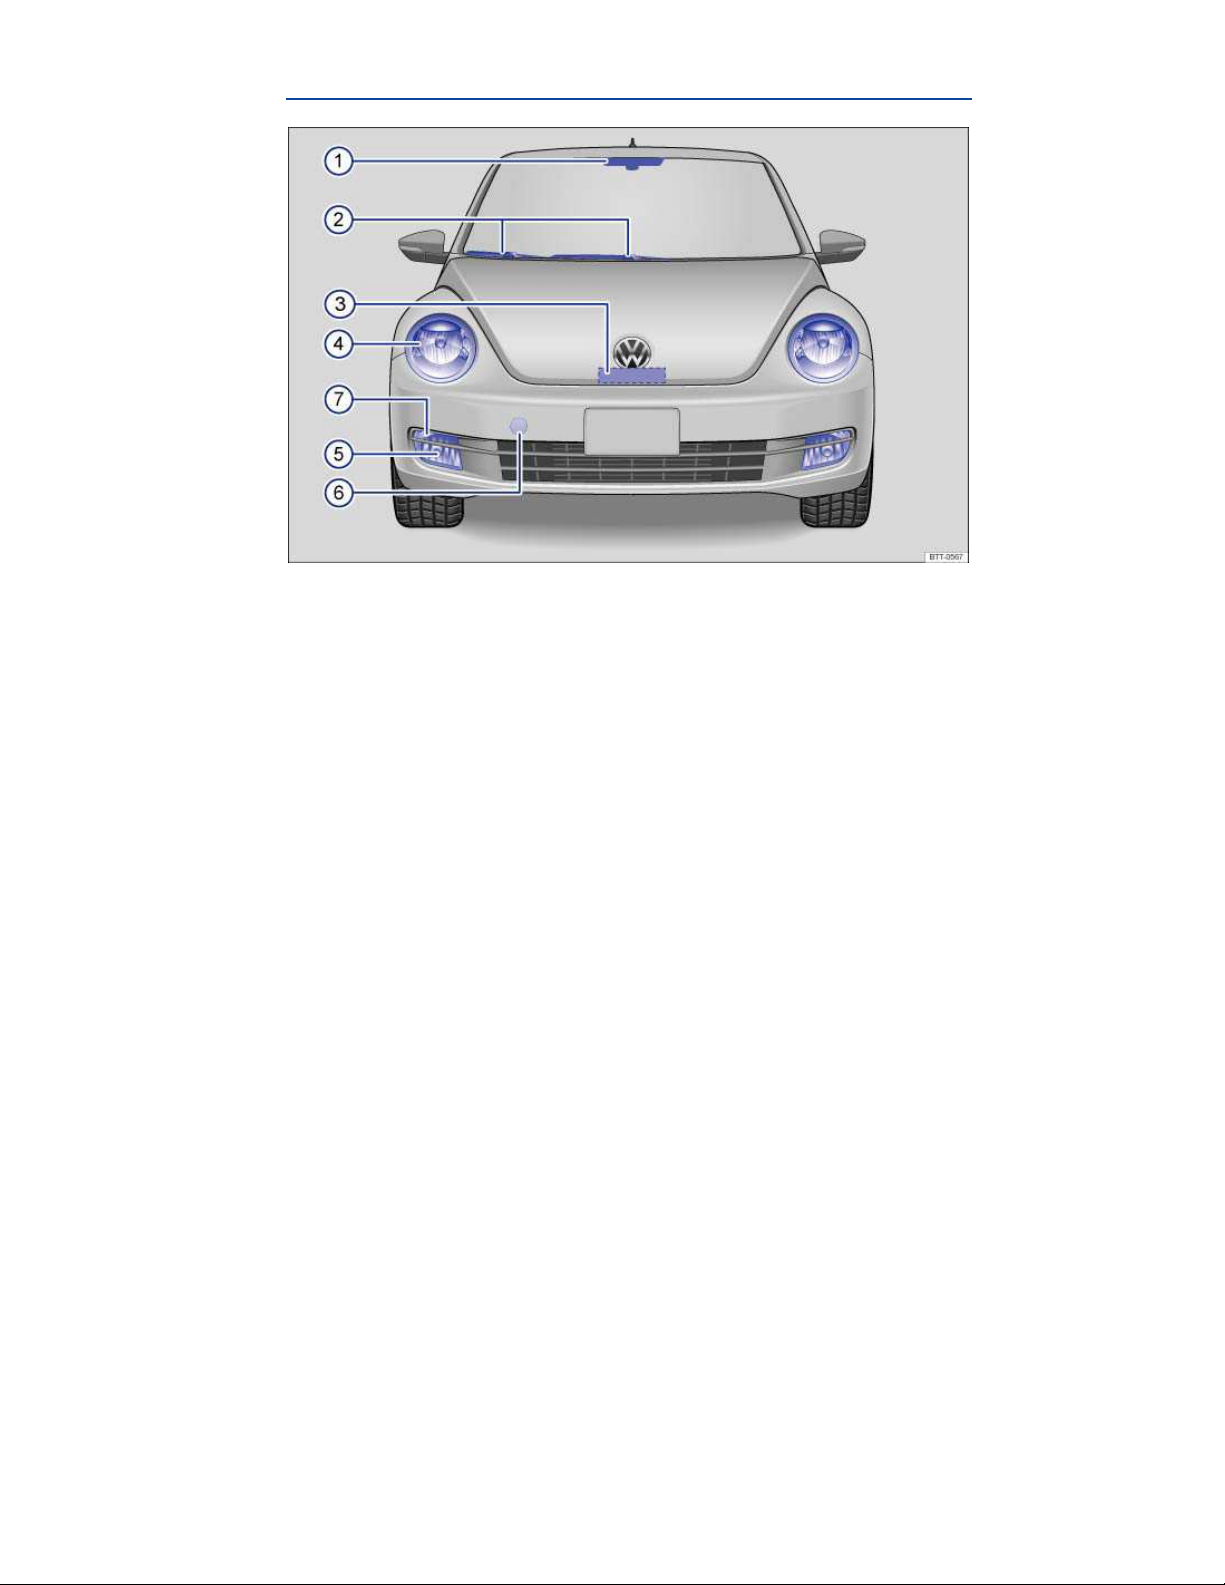
Fig. 2 Vehicle front overview.
Key to fig. 2:
(1) Inside mirror with sensor on mirror base for:
– Rain sensor (if equipped)
– Low-light sensor (if equipped)
(2) Windshield wipers
(3) Engine hood release
(4) Headlights (on both left and right)
(5) Fog lights/static cornering lights (on both left and right, if equipped)
(6) Threaded hole for the front towing eye (behind cover)
(7) Turn signals (on both left and right)
Rear view
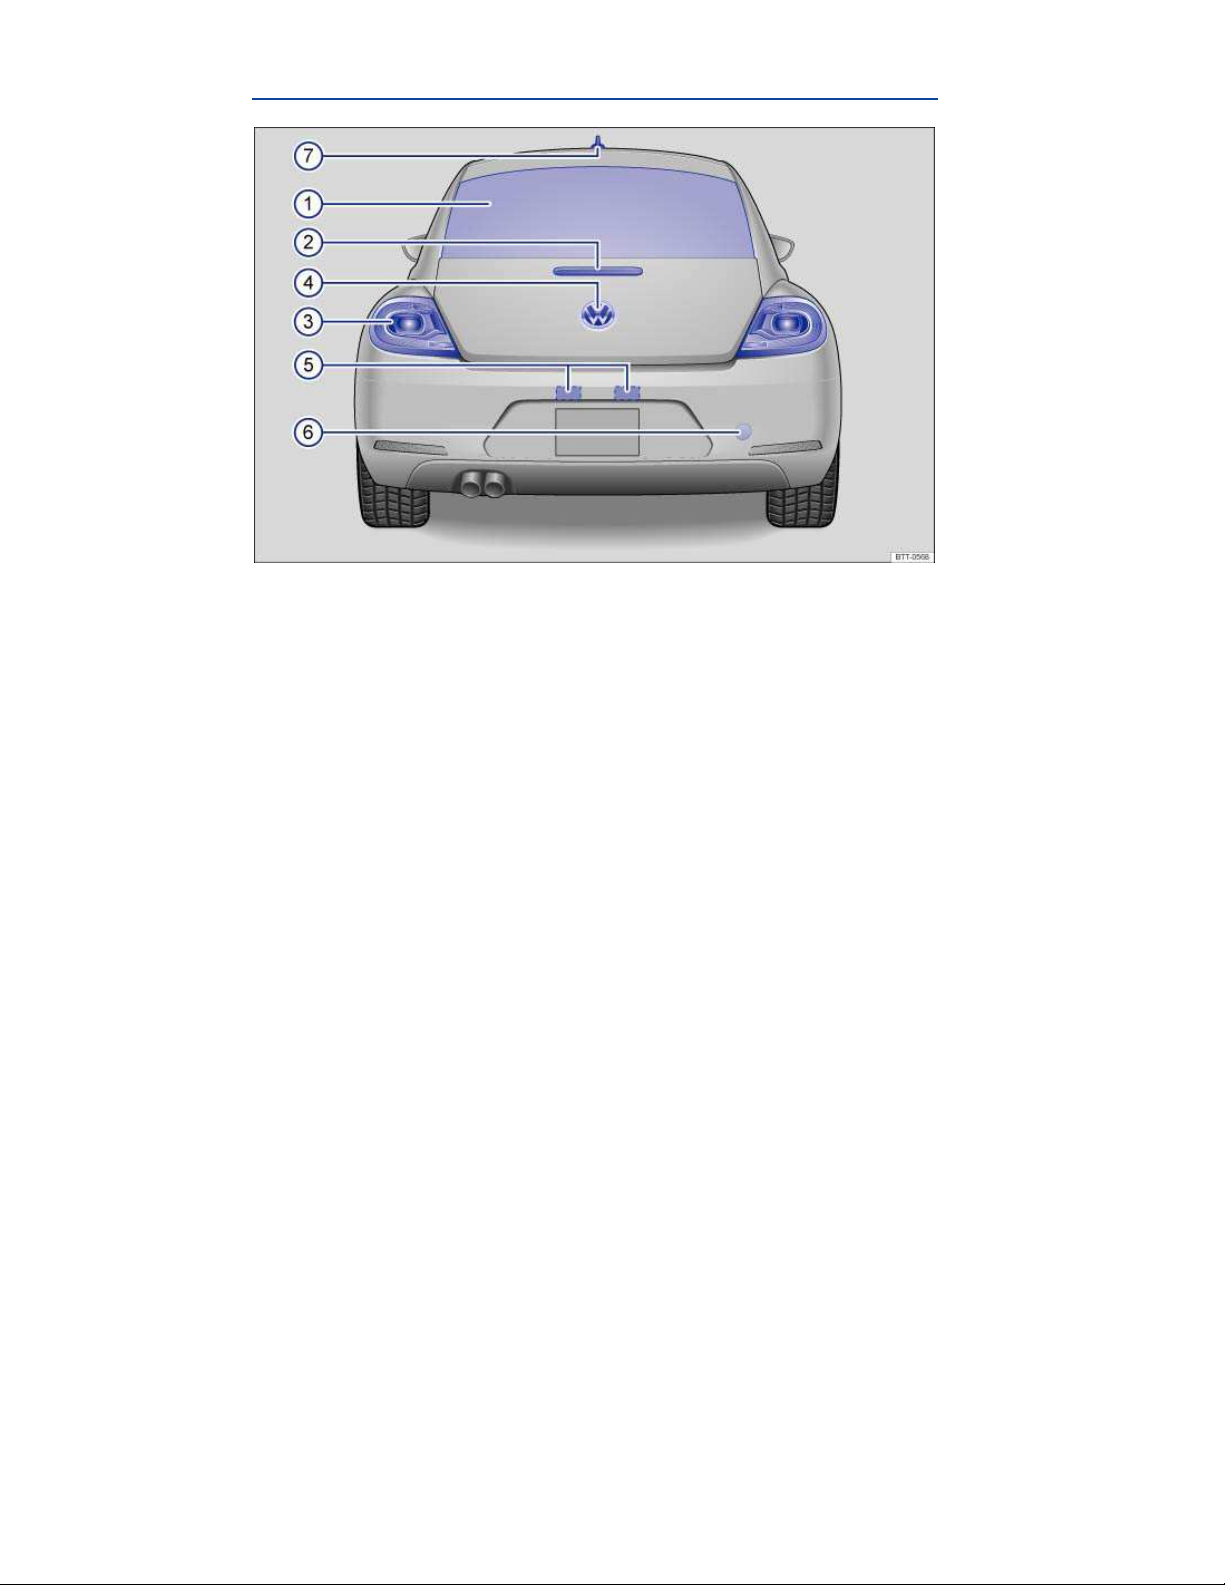
Fig. 3 Vehicle rear overview.
Key to fig. 3:
(1) Rear window
– Rear window defroster
(2) High-mounted brake light
(3) Taillights (on both left and right)
(4) Volkswagen emblem. Area for:
– Rear hatch release
– Rear Assist camera (if equipped)
(5) License plate lights
(6) Threaded hole for the rear towing eye (behind cover)
(7) Roof antenna
Driver door overview
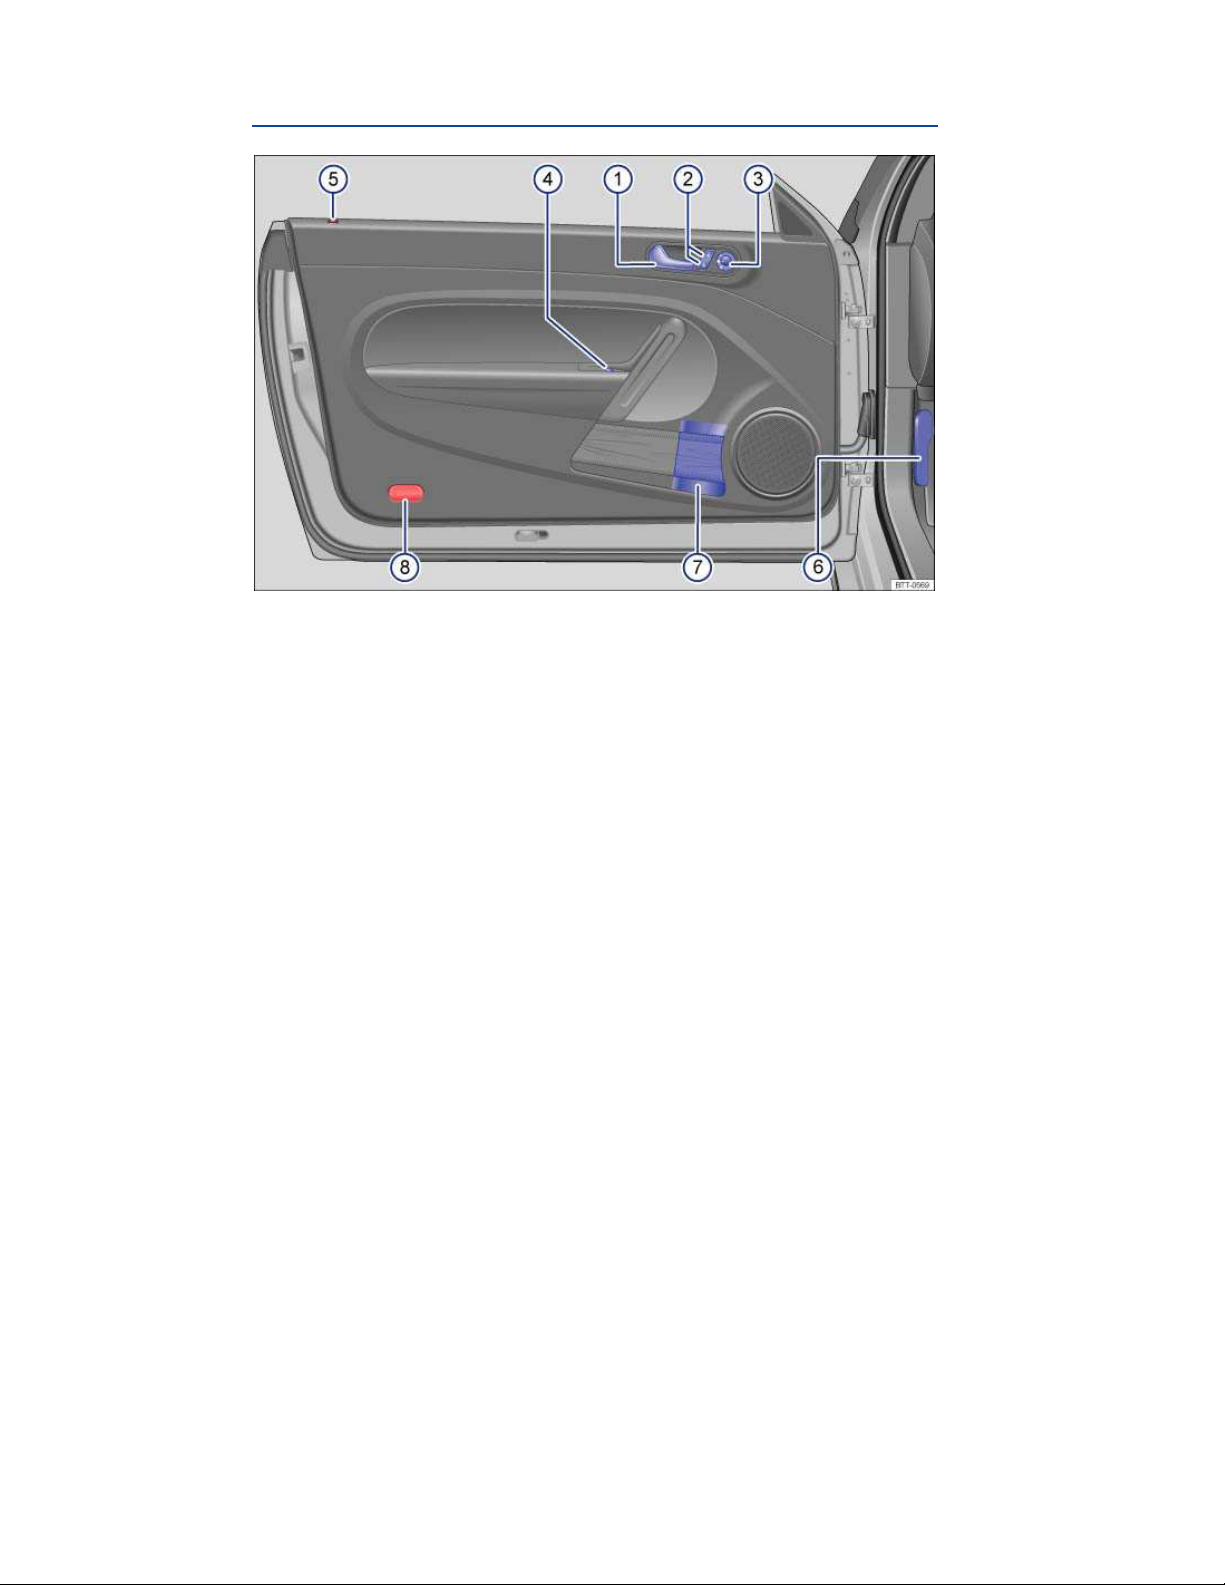
Fig. 4 Overview of controls in the driver door.
Key to fig. 4:
(1) Door handle
(2) Power locking button for locking and unlocking the vehicle
(3) Knob for adjusting the outside mirrors
– Adjusting outside mirrors – –
– Outside mirror heating
(4) Buttons for operating the power windows
(5) Indicator light for the power locking system
(6) Lever for releasing the engine hood
(7) Bottle holder
(8) Reflector
Driver side overview
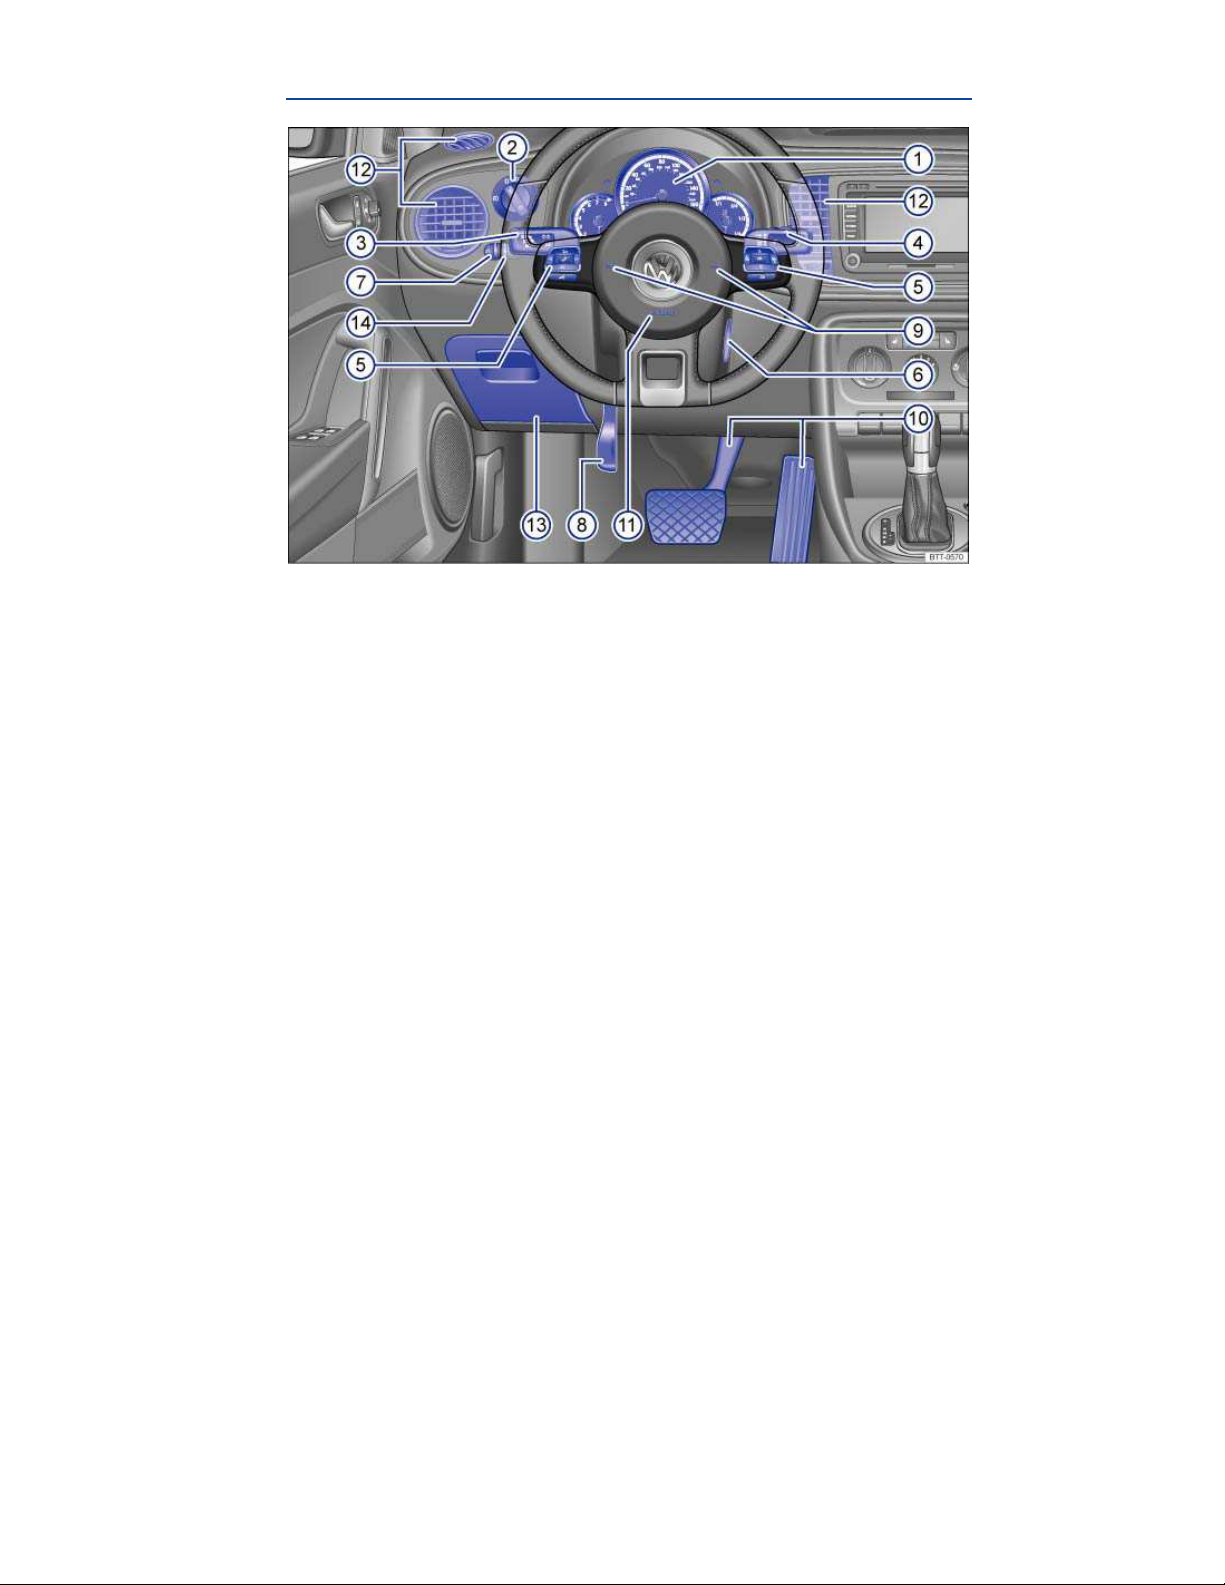
Fig. 5 Driver side overview.
Key to ⇒ fig. 5:
(1) Instrument cluster:
– Instruments
– Display
– Warning and indicator lights
(2) Headlight switch
– Off position
– Automatic headlight control
– Low beams
– Fog lights (if equipped)
(3) Lever for
– High beams
– Headlight flasher
– Turn signals
– Cruise Control System (CCS) – – – –
(4) Windshield wiper and washer lever
– Windshield wiper
HI GH
–
– Intermittent operation for windshield wipers º
– Windshield wiper
OF F
– “One-tap wiping” 1x
– Windshield wiper
– Automatic wipe/wash for windshield
– Lever with buttons for the Volkswagen Information System , /
(5) Multi-function steering wheel controls (if equipped)
LOW
AUTO
(if equipped)

– Volume setting for radio, navigation system notifications, or telephone calls , /
– Mute switching for radio or activation of voice control
– Audio, Navigation
– Control buttons for the Volkswagen Information System # ∃, ,
(6) Ignition switch (vehicles without Keyless Access) or location for the emergency start feature for
the Keyless Access locking and starting system
(7) Dimmer control for the instrument and switch illumination
(8) Lever for adjustable steering wheel
(9) Horn (only works when the ignition is switched on)
(10) Pedals
(11) Driver front airbag
(12) Air vents – –
(13) Storage compartment
(14) Switch for background lighting (in the doors) and headlight range adjustment (if equipped)
Center console overview
Applicable only in the United States
Upper center console
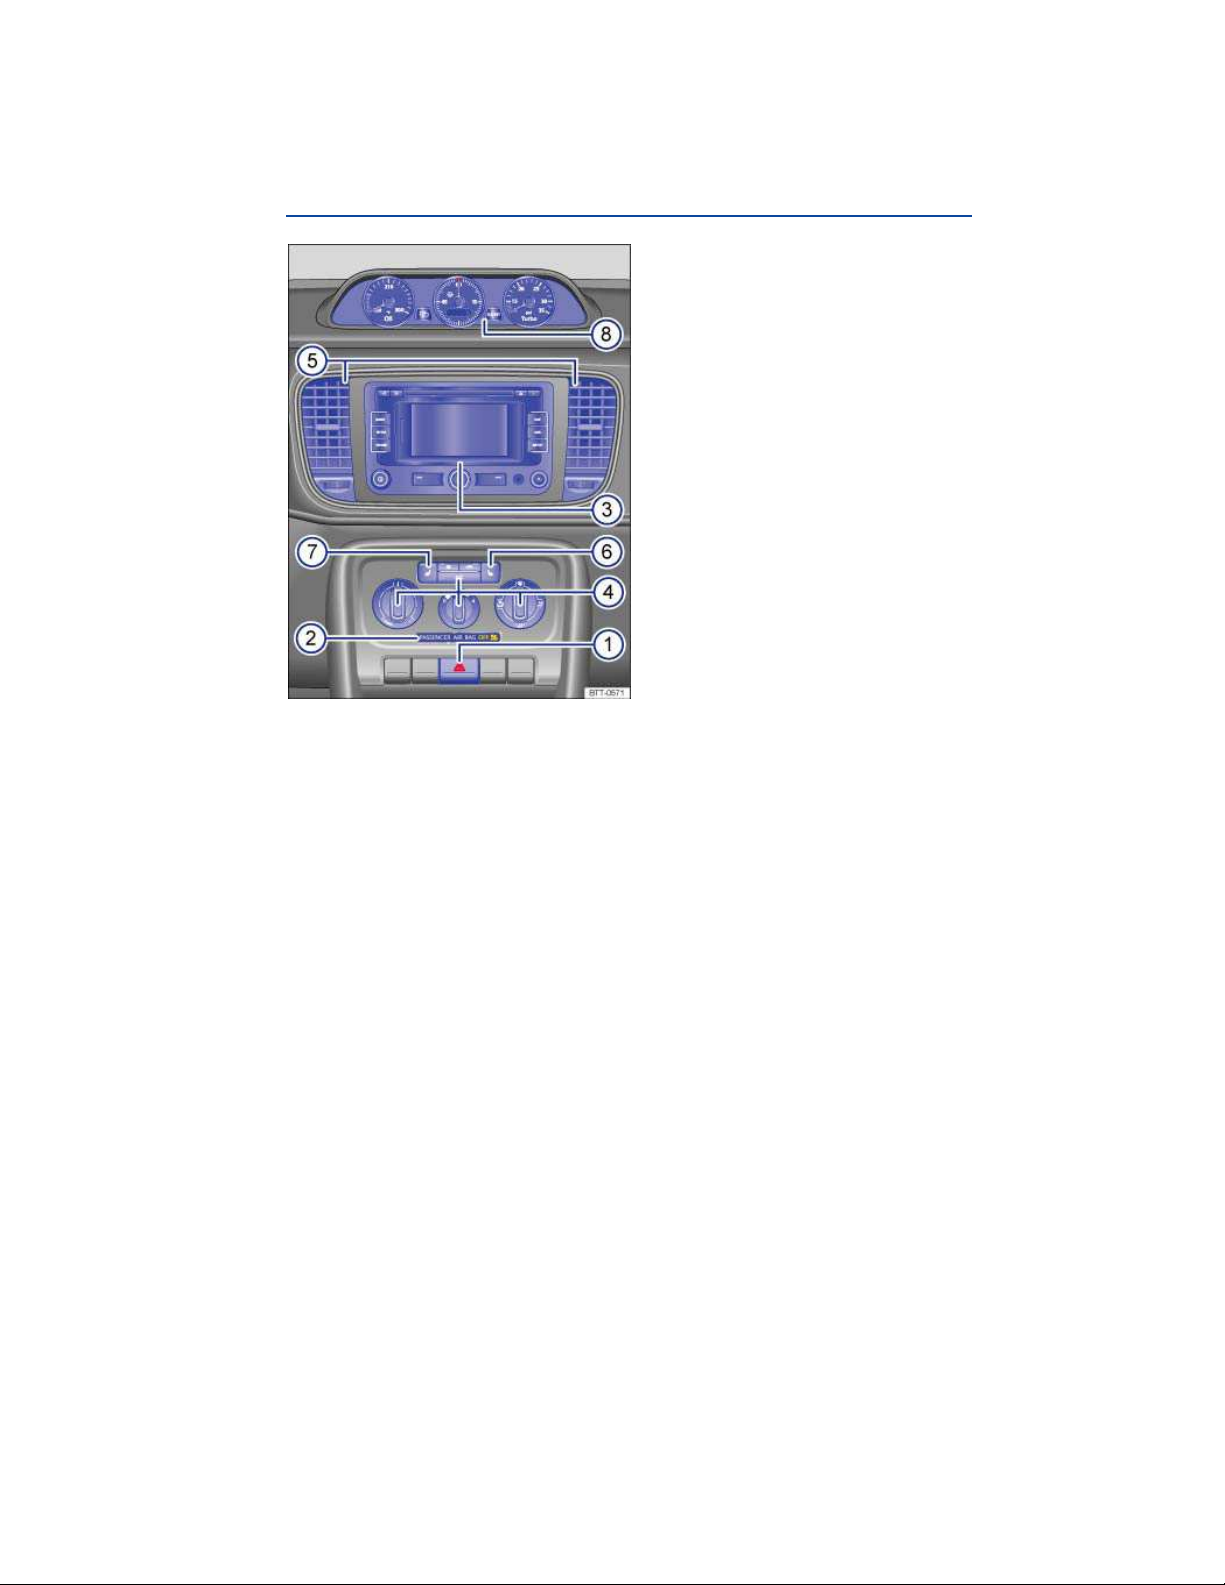
Fig. 6 Overview of the upper center console.
Key to fig. 6:
(1) Switch for emergency flashers
(2) PASSENGER AIR BAG
(3) Radio or Radio & Navigation system (factory-installed) ⇒ booklet
⇒ booklet
(4) Controls for:
– Manual A/C
– Climatronic
(5) Air vents – –
(6) Passenger seat heating button
(7) Driver seat heating button
(8) Additional instruments (if equipped)
Navigation system
light (front airbag for front seat passenger)
OF F
Radio
or
Applicable only in Canada
Upper center console
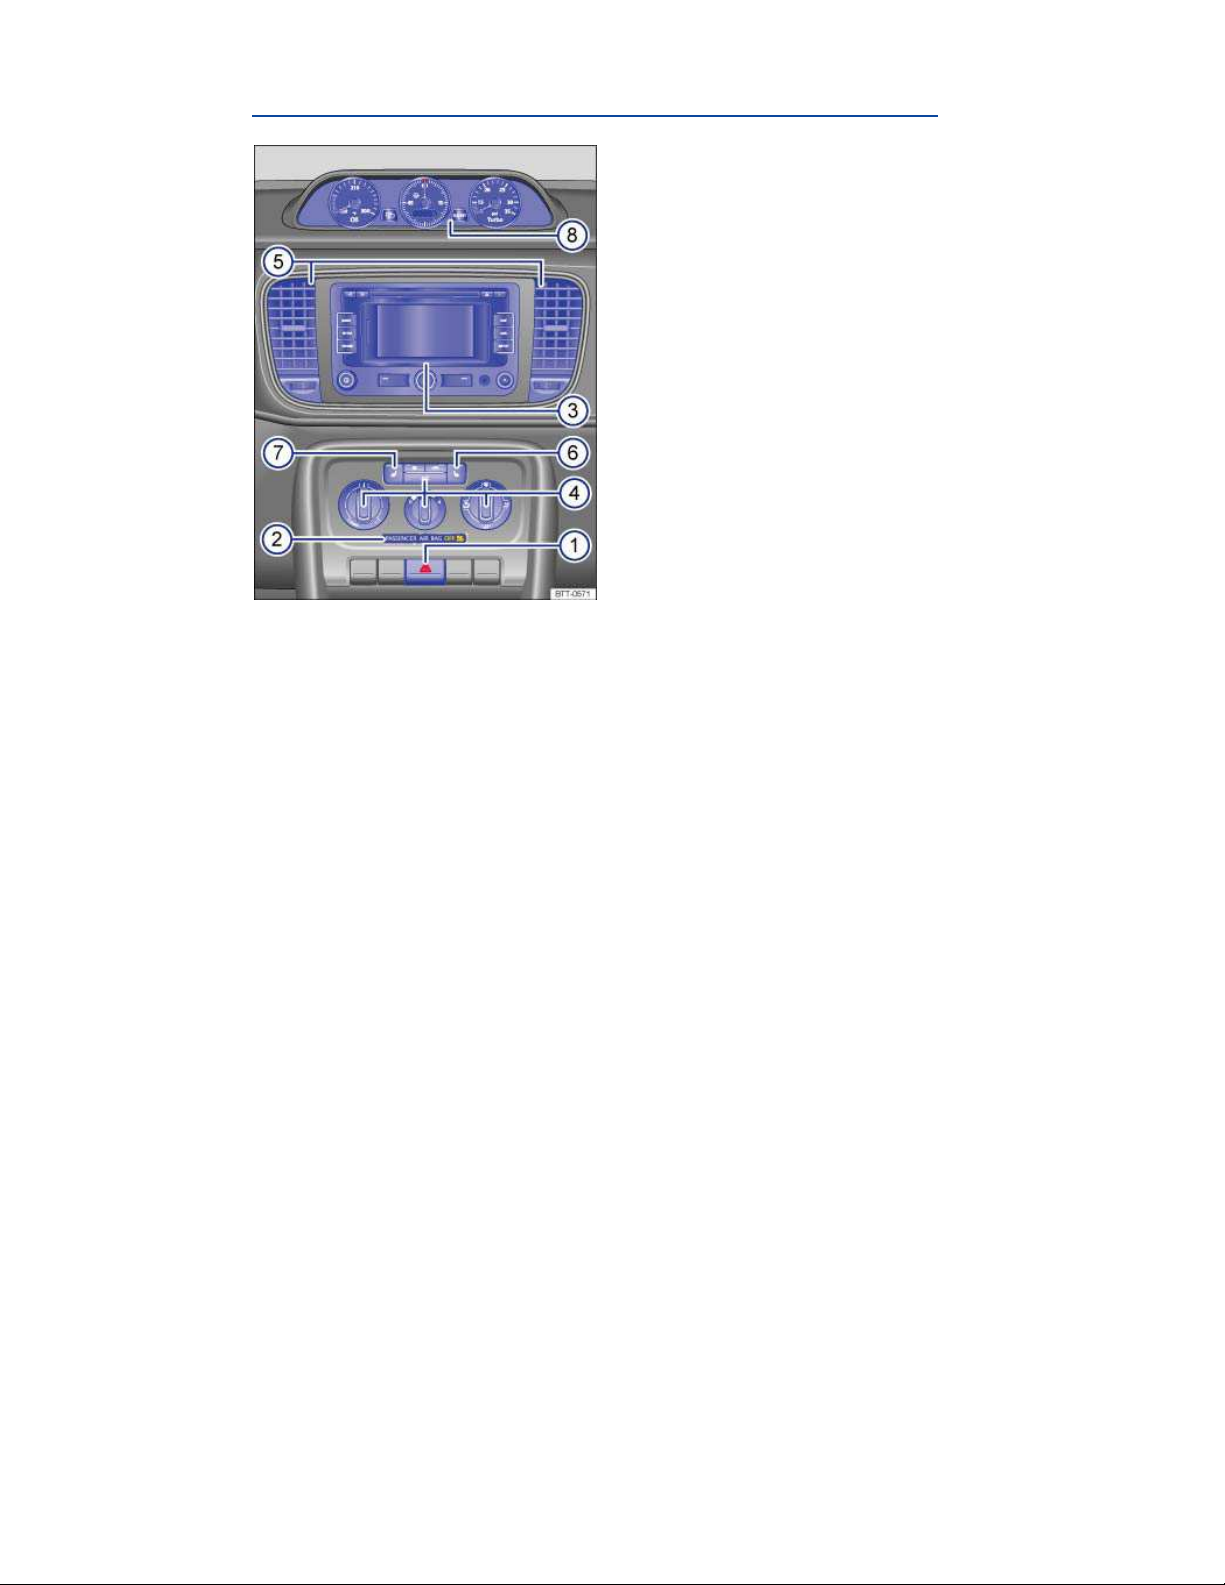
Fig. 7 Overview of the upper center console.
Key to ⇒ fig. 7:
(1) Switch for the emergency flashers
(2) PASSENGER AIR BAG
(3) Radio or Radio & Navigation system (factory-installed) ⇒ booklet
⇒ booklet
(4) Controls for:
– Manual A/C
(5) Air vents – –
(6) Passenger seat heating button
(7) Driver seat heating button
(8) Additional instruments (if equipped)
Navigation system
light (front airbag for front seat passenger)
OF F
Radio
or
Lower center console
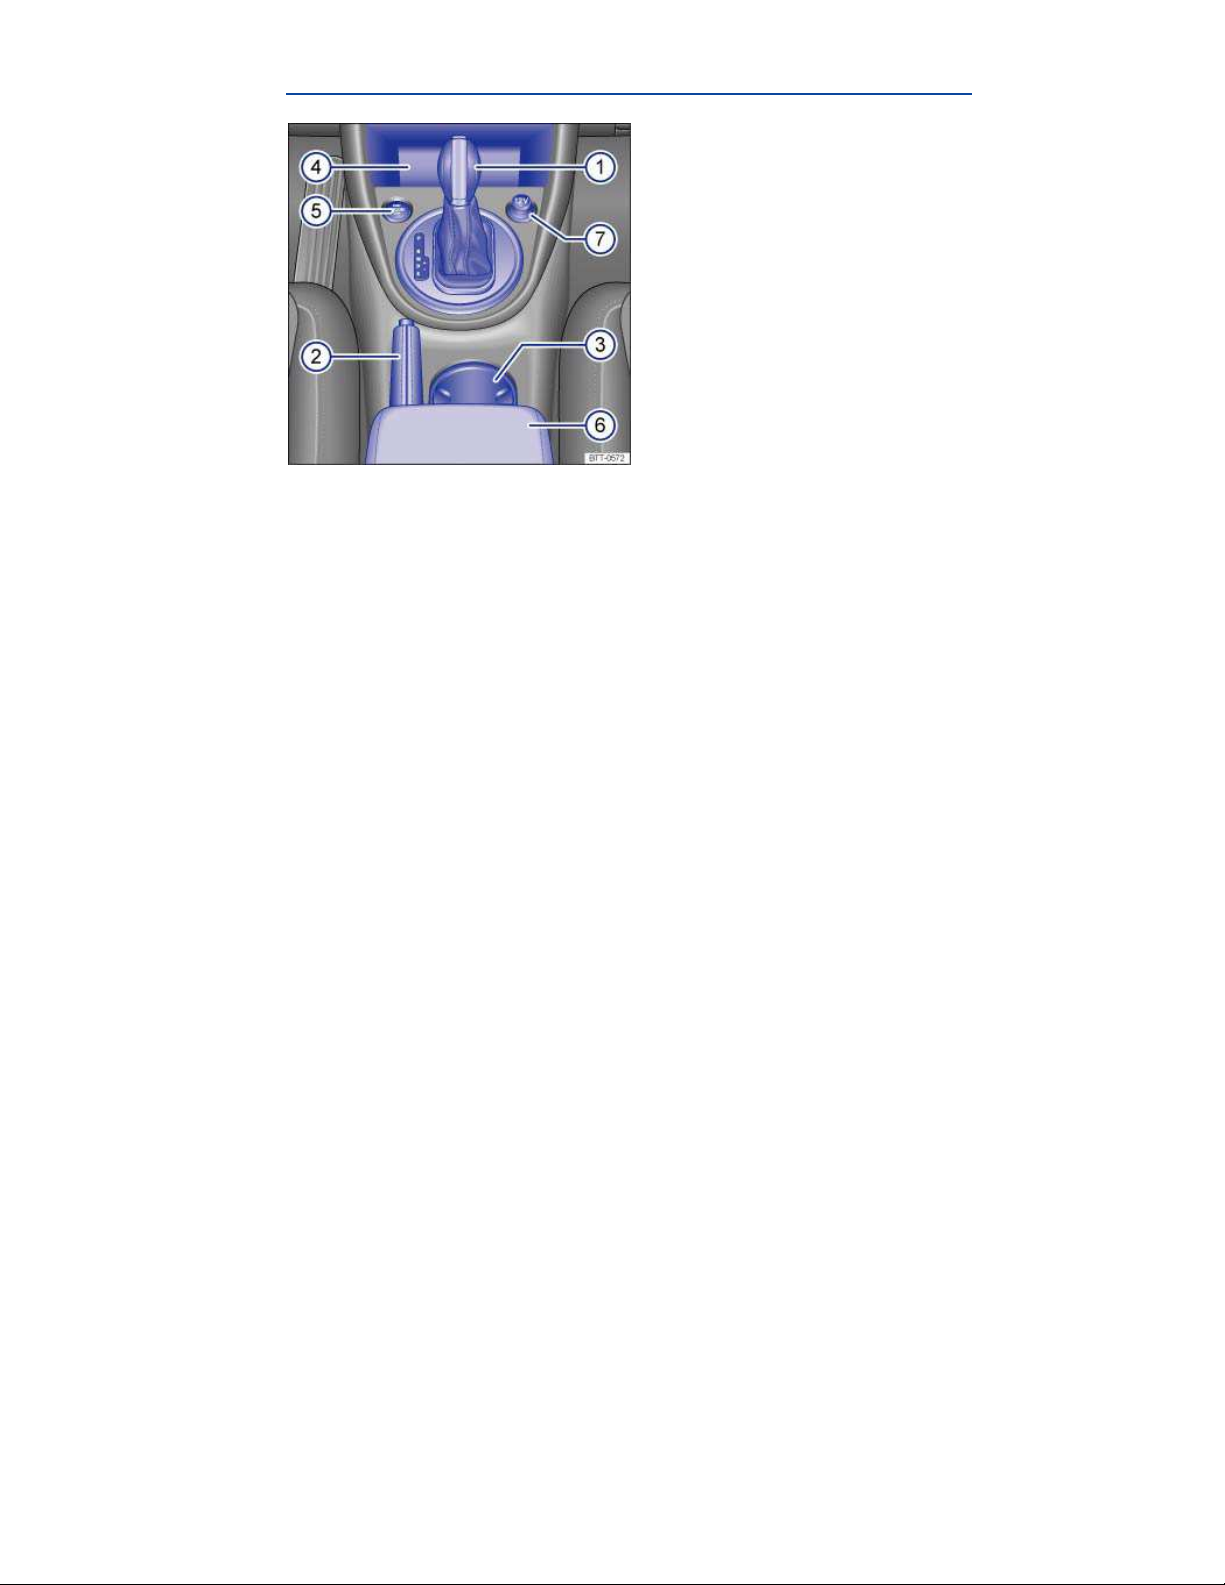
Fig. 8 Overview of the lower center console.
Key to fig. 8:
(1) Lever for:
– Manual transmission
– Automatic transmission
(2) Parking brake lever
(3) Storage compartment with cup holders in the center console
(4) Storage compartment
(5) Starter button for the Keyless Access locking and starting system (if equipped)
(6) Center armrest with storage compartment (if equipped)
(7) 12 Volt socket
Applicable only in the United States
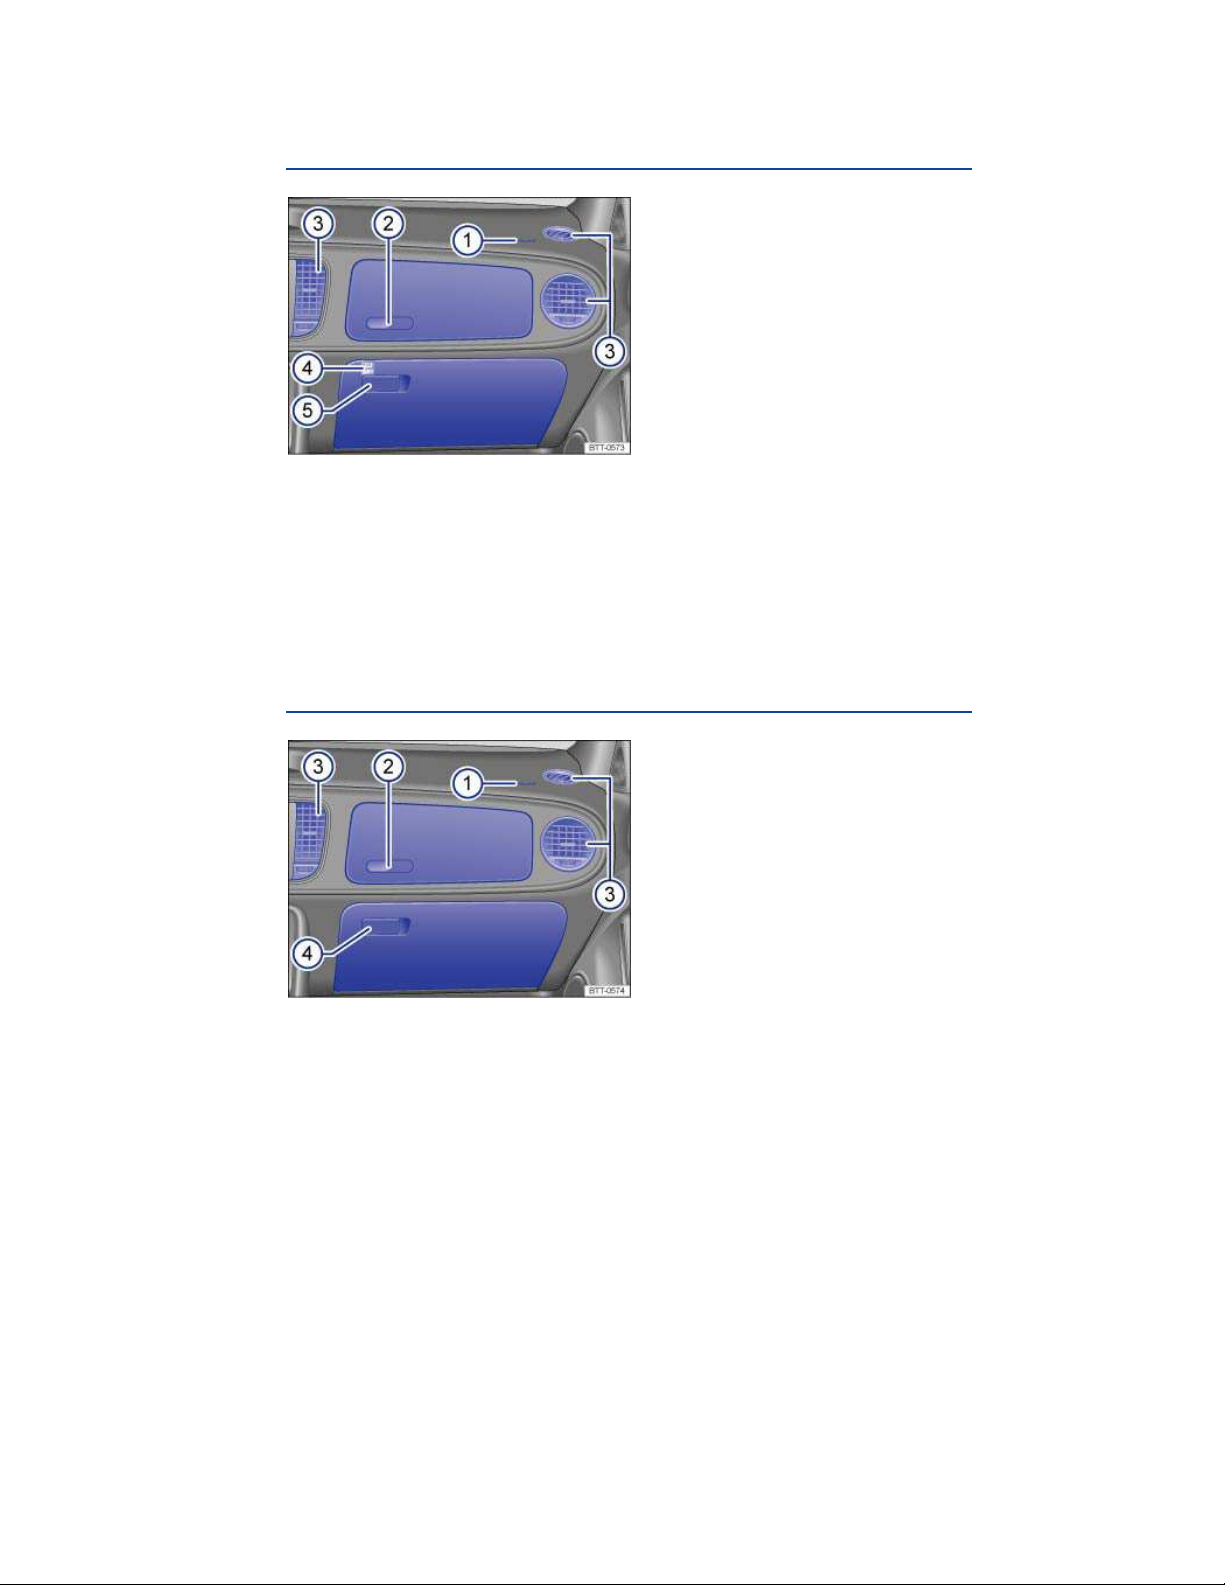
Front passenger side overview
Fig. 9 Overview of the front passenger side.
Key to fig. 9:
(1) Passenger front airbag location in the instrument panel (approximate)
(2) Opening handle for the upper glove compartment (if equipped)
(3) Air vents – –
Inside the lower glove compartment: SET button for Tire Pressure Monitoring System
(4)
(5) Opening handle for the lower glove compartment
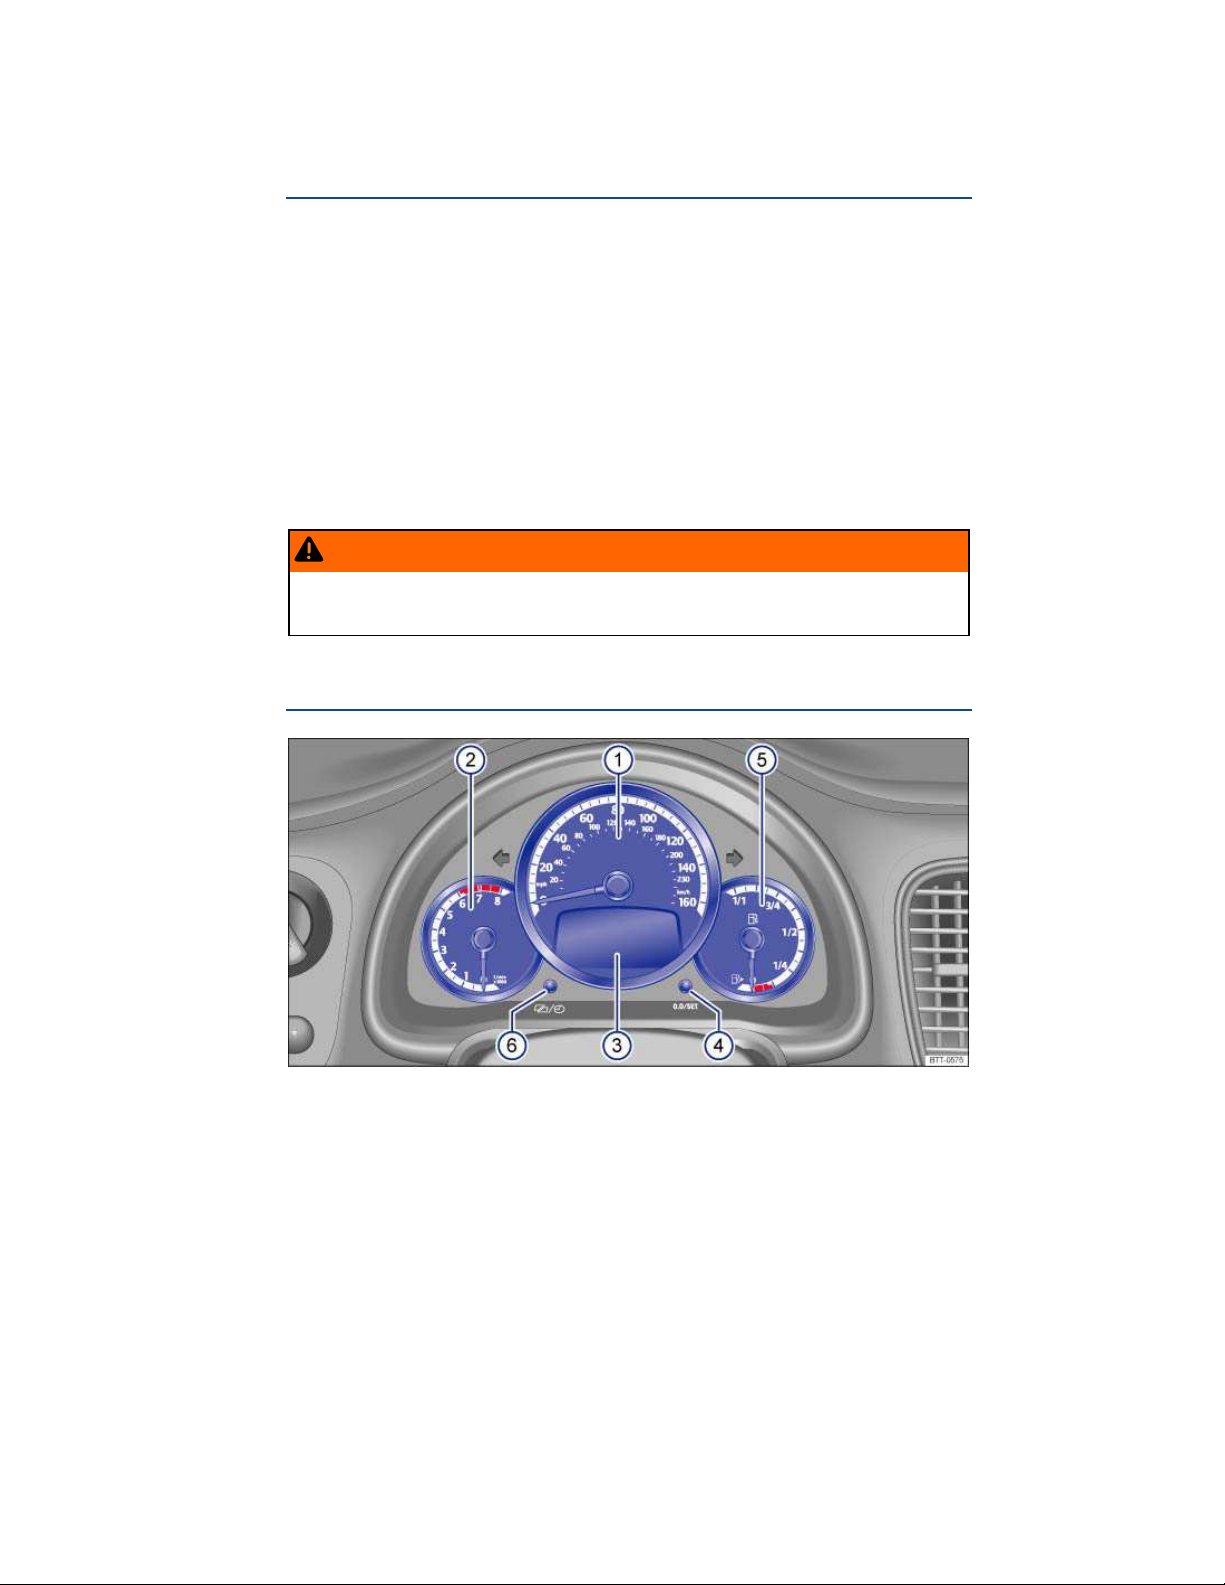
Applicable only in Canada
Front passenger side overview
SET
Fig. 10 Overview of the front passenger side.
Key to ⇒ fig. 10:
(1) Passenger front airbag location in the instrument panel (approximate)
(2) Opening handle for the upper glove compartment (if equipped)

(3) Air vents – –
(4) Opening handle for the lower glove compartment

Symbols on the roof console
Symbol Meaning
Interior and reading lights
Power sunroof
3-button module (if equipped) ⇒ booklet
Mobile Phone Package
Instrument cluster
Introduction
In this section you’ll find information about:
Instrument overview
Additional instruments
Displays and warning lights (Basic version)
Displays (Premium version)
Displays (Premium version)
Service reminder display
More information:
Warning and indicator lights
Volkswagen Information System
Shifting
Service reminder information ⇒ booklet
WARNING
Driving on today's roads demands the full attention of the driver at all times. Driver distraction causes accidents, collisions and serious personal injury!
Never use the buttons in the instrument cluster while driving.
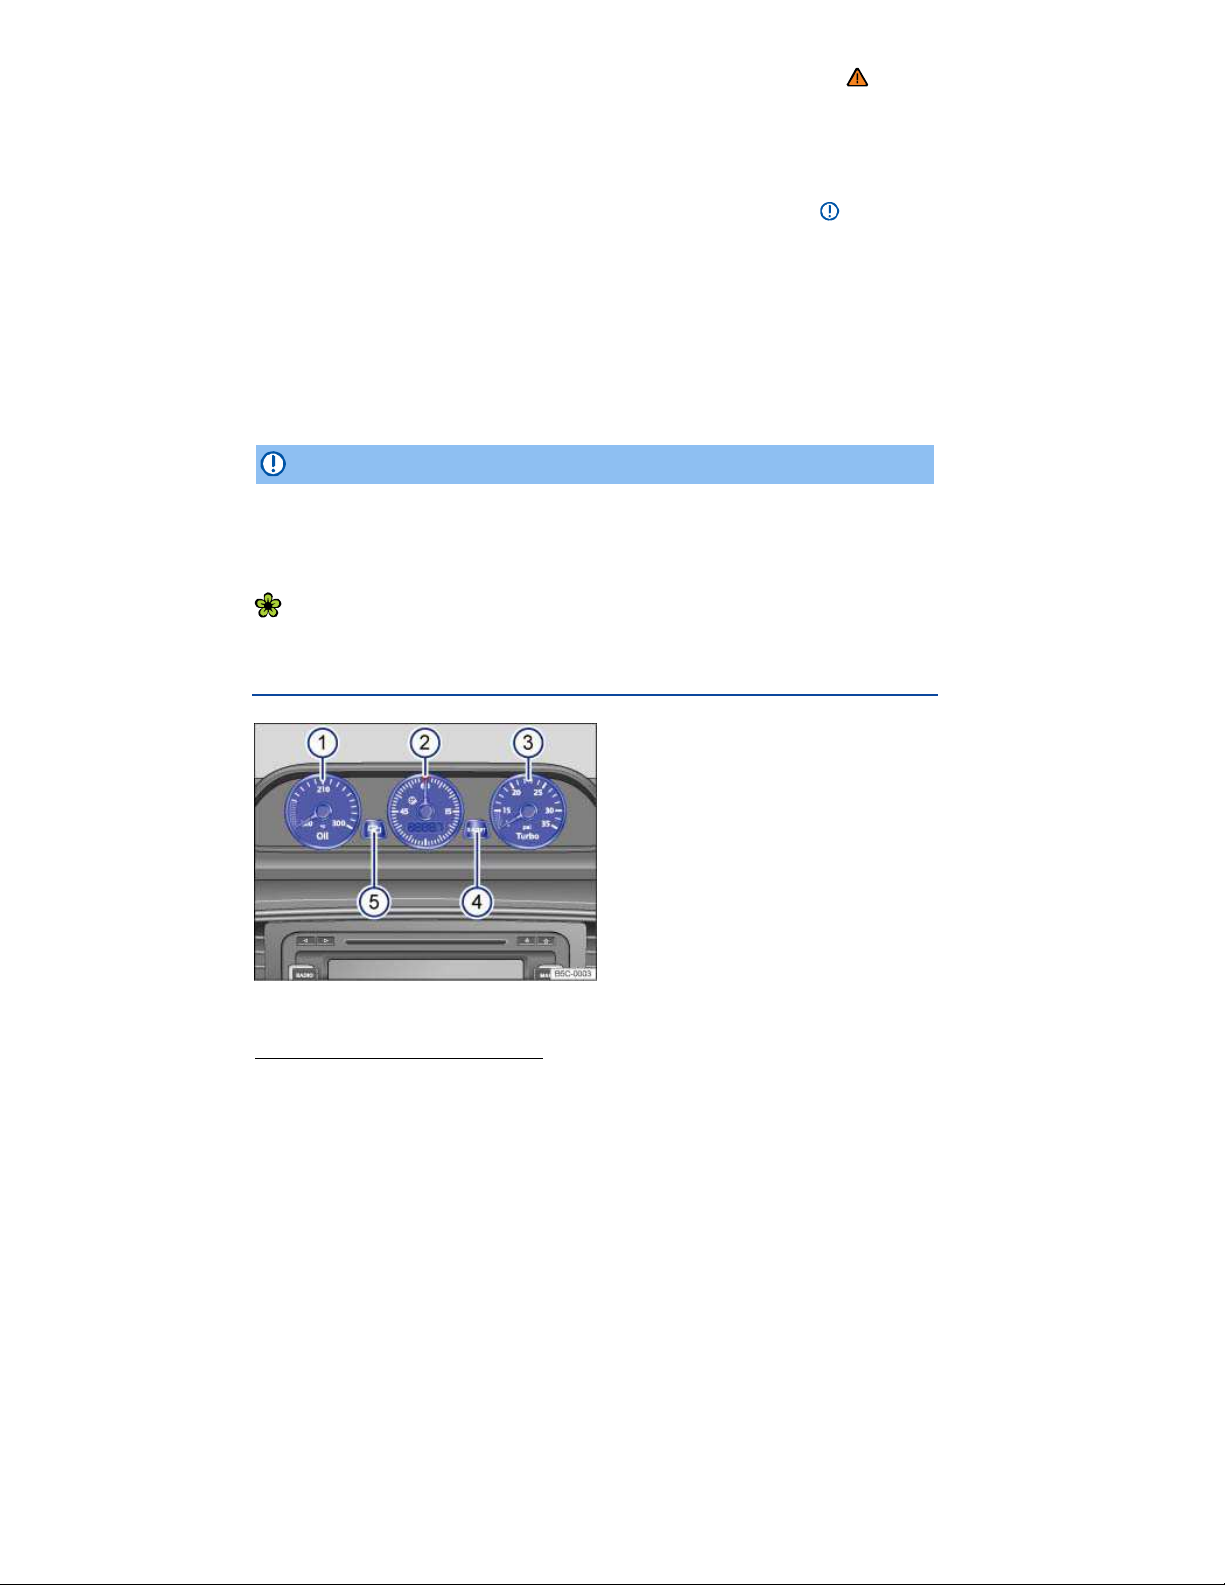
Instrument overview
Warranty and Maintenance
Fig. 11 Instrument cluster in the instrument panel.
Please first read and note the introductory information and heed the WARNINGS
Instrument explanations ⇒
(1) Speedometer.
(2) Tachometer (thousands of revolutions per minute when the engine is running).
The red zone at the end of the scale indicates maximum permissible engine rpm (revolutions
per minute) for all gears after the break-in period. Before reaching the red zone, select the next
higher gear or selector level position D, or ease your foot off the accelerator ⇒
(3) Displays, Displays and warning lights (Basic version), Displays (Premium version), Displays
(Premium version).
(4) Reset button for the trip odometer display (trip).
– Push the button for about 1 second to reset to zero.
(5) Fuel gauge, Refueling.
(6) Button for setting the clock1.
– With the ignition on, push the button to highlight the hour or the minutes in the clock
display.
– To advance the clock, push the button
– Push the button again to finish setting the clock.
fig. 11:
.
(4). Press and hold the button to fast forward.
NOTICE
To help prevent engine damage, always avoid high engine speeds, full throttle acceleration
and heavy engine loads when the engine is cold.
To help prevent engine damage, the tachometer needle should only enter the red zone
(warning zone) briefly.
Upshifting early into the next higher gear saves fuel and reduces engine noise.
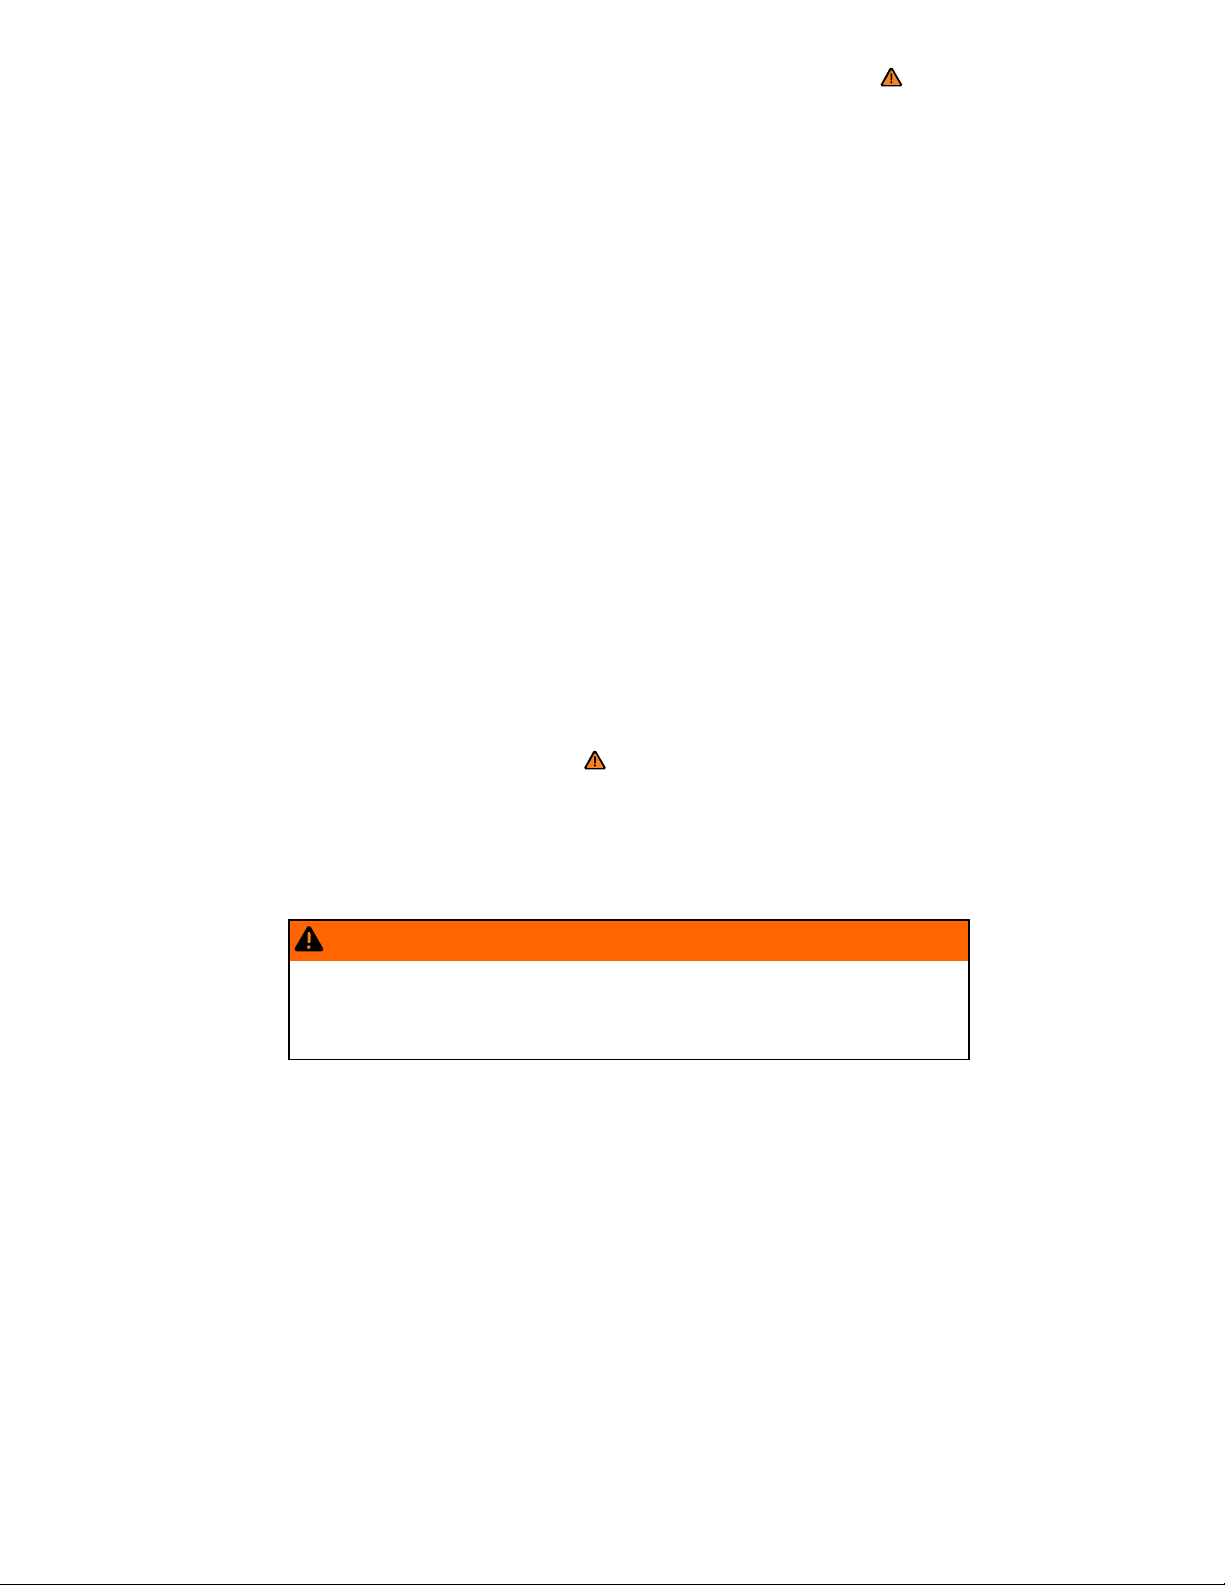
Additional instruments
Fig. 12 Above the center console: Engine oil temperature indicator 1, stopwatch 2, and boost pressure indica-
tor 3.
1
On appropriately equipped vehicles, the clock can also be set via the Settings menu in the instrument
cluster display ⇒ page 37, Settings menu (Premium version).
Please first read and note the introductory information and heed the WARNINGS
Instrument explanations ⇒
(1) Engine oil temperature indicator
The engine has reached operating temperature when the needle moves into the center of the
gauge under normal driving conditions. The needle may move farther to the right on the gauge
with a heavier engine load at high outside temperatures. This is not a cause for concern as long
as the indicator light or does not light up or flash in the instrument cluster, Warning and
indicator lights, Warning and indicator lights.
(2) Stopwatch
– Analog stopwatch that measures up to 60 seconds.
– Digital stopwatch with hour, minute and second display (one tenth of a second intervals are
shown up to 59 minutes and 59 seconds when the ignition is switched on).
– Digital display with stop function selected.
– Digital clock display with hours and minutes. If the timing function is not active, the digital
clock will display after the ignition is switched on.
(3) Boost pressure indicator
The boost pressure indicator shows the pressure in the boost pressure duct between the su-
percharger or turbocharger and the engine. The farther right that the indicator points on the
gauge, the higher the pressure in the boost pressure duct and the greater the output from the
engine. The word “Turbo” on the gauge indicates the system is charged.
(4) Start / Stop / Reset button
– Stopwatch mode (STOP-WATCH): press the button once to start timing and press a se-
cond time to stop. Press the button again to resume timing.
– Speed-dependent stopwatch mode (TIME-SINCE-START): the stopwatch starts automati-
cally with an audible chime when you begin driving. Press once to stop the watch.
– Press and hold longer than 2 seconds: the stopwatch resets.
– When the digital clock (CLOCK) is displayed, you can switch between a 12-hour and 24-hour
display by pressing the button.
(5) Button for stopwatch mode or digital clock
You can switch between stopwatch modes and the digital clock display using the set button .
After selecting the stopwatch in the display, the mode displays briefly, followed by the last time
that a time was recorded.
– Stopwatch mode (STOP-WATCH).
– Speed-dependent stopwatch mode (TIME-SINCE-START). The stopwatch starts automati-
cally with an audible chime when you begin driving. An LED in the stopwatch comes on to
indicate that this mode is active ⇒
– Digital clock display (CLOCK).
If the ignition is switched off while the timing function is active, the display will remain active for about
2 hours. If the timing function was not active when the ignition was switched off, the digital clock display will turn off after about 30 seconds.
The display will remain on for about 2 hours if you press the or button within about 30 seconds
after switching the ignition off.
fig. 12:
.
WARNING
Rapid acceleration can cause skidding and loss of traction, especially on slippery roads,
resulting in a loss of vehicle control, collisions, and serious personal injury.
Only use the stopwatch feature or fast acceleration if visibility, weather, road, and traffic
conditions permit and other drivers will not be endangered by your driving and the vehicle's
acceleration.
WARNING
Driving on today's roads demands the full attention of the driver at all times. Driver distraction causes accidents, collisions and serious personal injury!
Never set the stopwatch when the vehicle is moving.
NOTICE
To help prevent engine damage, always avoid high engine speeds, full throttle acceleration and
heavy engine loads when the engine is cold.
The digital clock is set using the buttons in the instrument cluster, Instrument overview.
Displays and warning lights (Basic version)
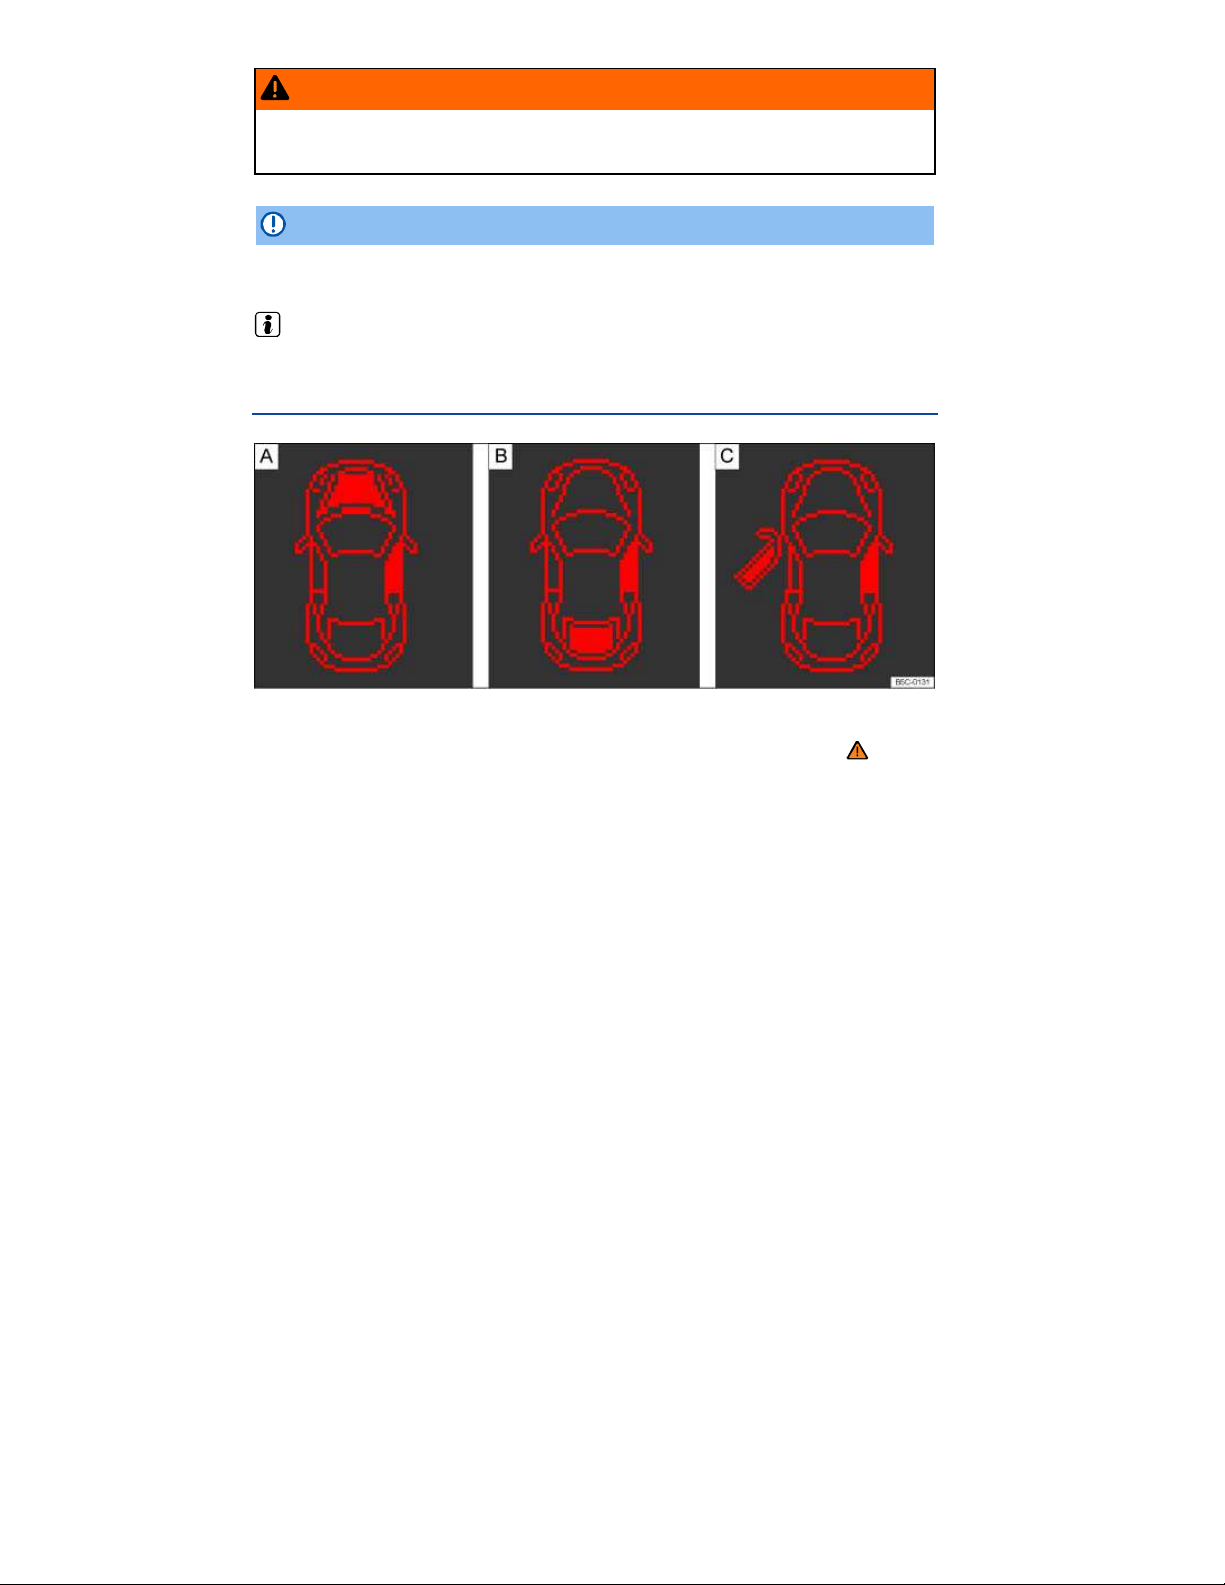
Fig. 13 In the instrument cluster display (examples): A: Open engine hood, B: Open rear hatch, C: Open
driver door.
Please first read and note the introductory information and heed the WARNINGS
Depending on the vehicle model, different information may be shown in the instrument cluster display
fig. 11 (3).
⇒
Odometer displays
Time
Outside temperature
Open door, engine hood, or rear hatch ⇒
Selector lever position, Shifting
Gear recommendation, Shifting
Service reminder display, Service reminder display
fig. 13
Warnings and information
All symbols and information in the display are shown in red. The red color of the letters, numbers and
symbols used in the display does not indicate a malfunction.
The status of various vehicle functions and components is monitored when the ignition is switched on
and while driving. Malfunctions are indicated by red and yellow warning lights in the instrument cluster,

but outside the display itself (Warning and indicator lights). In some cases, they may also be signaled
acoustically.
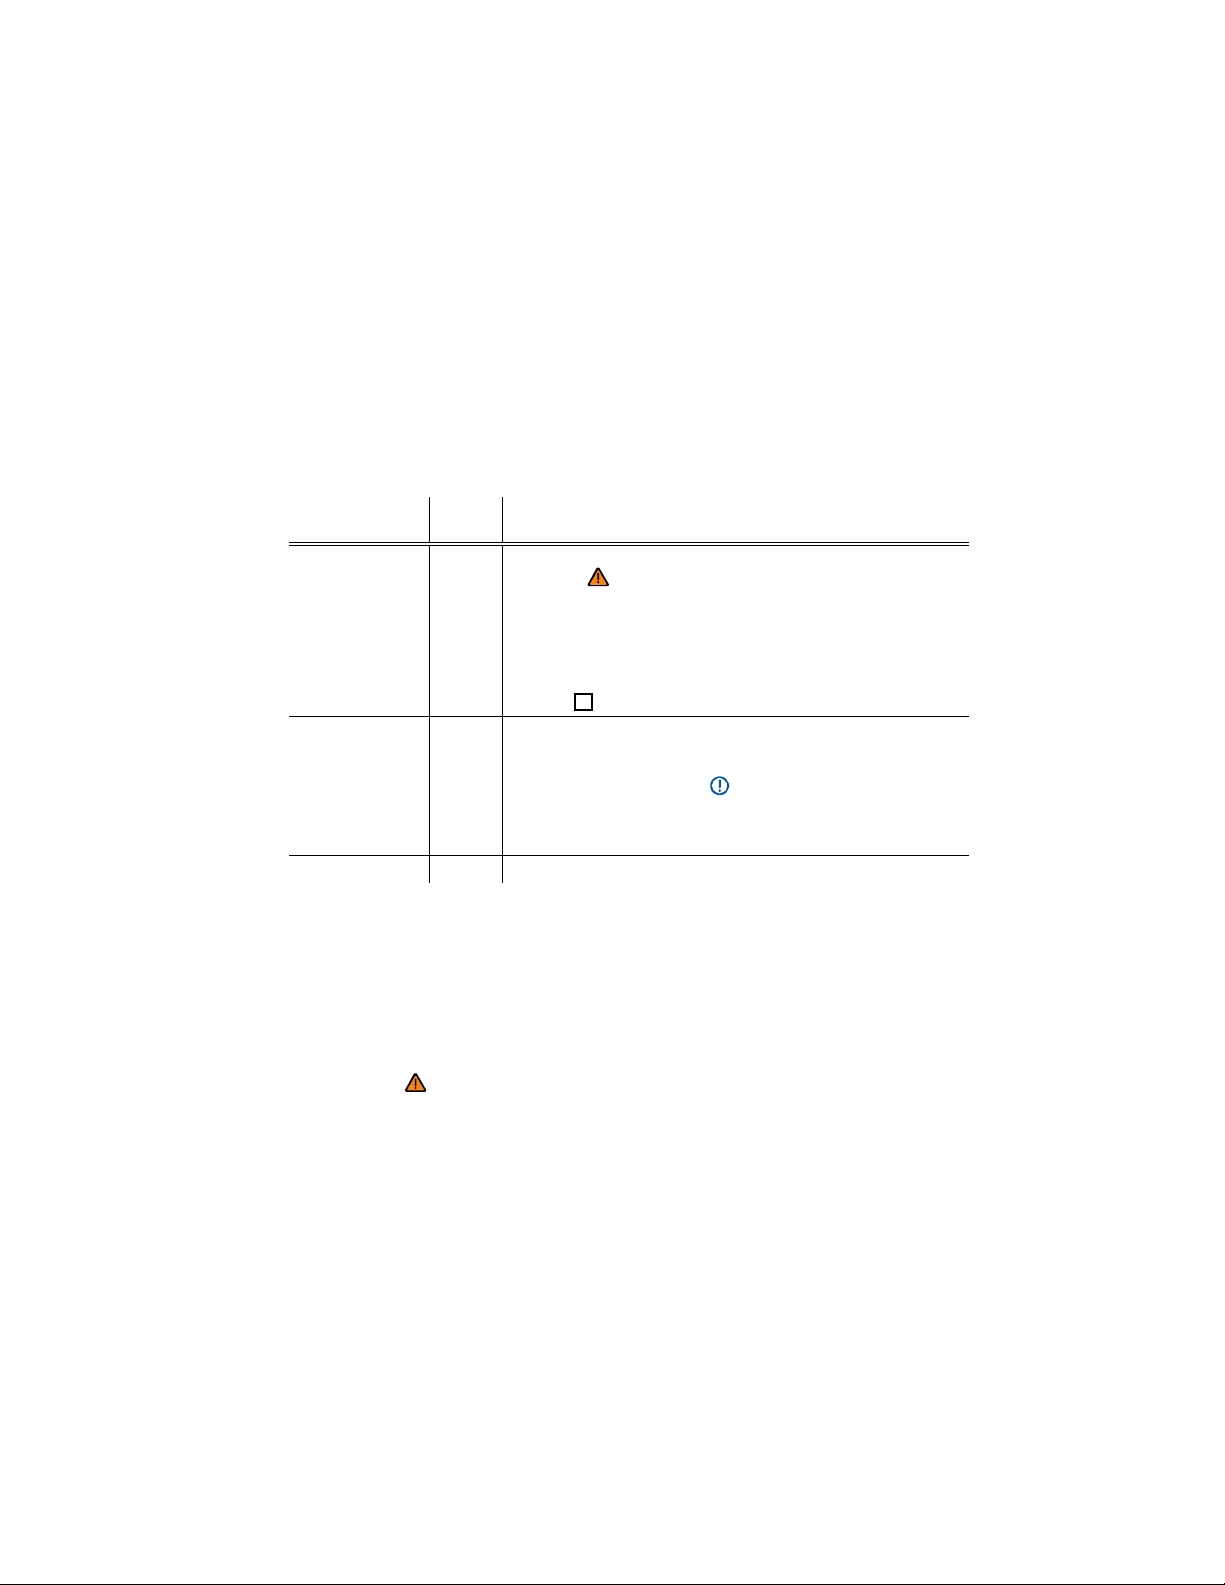
Type of
notification
Priority 1 warning
light
Priority 2 warning
light
Warning
Yellow Light flashing or continuously lit – sometimes with acoustic warn-
Explanation
light
Red Light flashing or lit – sometimes with acoustic warnings.
Stop! ⇒ .
Check malfunction and take corrective action. Contact an authorized
Volkswagen dealer or an authorized Volkswagen Service Facility for
assistance if necessary.
ings.
Malfunctions or low operating fluid levels may cause vehicle dam-
age and vehicle breakdown ⇒
Check malfunction as soon as possible. Contact an authorized
Volkswagen dealer or an authorized Volkswagen Service Facility for
assistance if necessary.
.
Odometer displays
The odometer indicates the total distance driven by the vehicle.
The trip odometer shows the distance driven since the last time the trip odometer was reset. The last
digit indicates 1/10 mile (100 meters).
Outside temperature display
At outside temperatures below about +39 °F (+4 °C), a “snowflake symbol” (icy road warning) appears
in the display. The symbol flashes at first, then stays on until the outside temperature rises above
+43 °F (+6 °C) ⇒
When the vehicle is not moving or when you are driving at very low speeds, the temperature displayed
may be slightly higher than the actual outside temperature.
The measurement range is from -40 °F (-40 °C) to +122 °F (+50 °C).
.
Selector lever positions
The selector lever position is shown both on the side of the selector lever and in the instrument cluster
display. The respective gear may also be shown in the instrument cluster display in Drive D and Sport
Drive S, as well as in Tiptronic® mode.
Gear recommendation
When the vehicle is moving, a fuel economy gear recommendation may appear in the instrument
cluster display, Shifting.
WARNING
Failure to heed warning lights can cause the vehicle to break down in traffic and result in a
collision and serious personal injury.
Never ignore warning lights or text WARNINGS.
Always stop the vehicle as soon as it is safe to do so.
Park the vehicle at a safe distance from moving traffic and where no part of the hot cata-
lytic converter and exhaust system can come into contact with flammable materials under the
vehicle, such as dry grass, brush, spilled fuel, etc.
A broken down vehicle presents a high accident risk for itself and others. Switch on
emergency flashers and set up a warning triangle to warn oncoming traffic.
WARNING
Roads and bridges may be dangerously icy even if the outside air temperature is above freezing.
If you use the outside temperature display to tell you about frost conditions, remember
that roads can even ice over at temperatures above +39 °F (+4 °C). Always remember: even if
the “snowflake symbol” (icy road warning) is not displayed, there could still be black ice on
the road.
Never rely exclusively on the outside temperature display.
NOTICE
Failure to heed warning lights or text WARNINGS can result in vehicle damage.
For displays without warning and information messages, malfunctions are only signaled with
warning and indicator lights, Warning and indicator light, Warning and indicator lights.
Applicable only in the United States
Displays (Premium version)
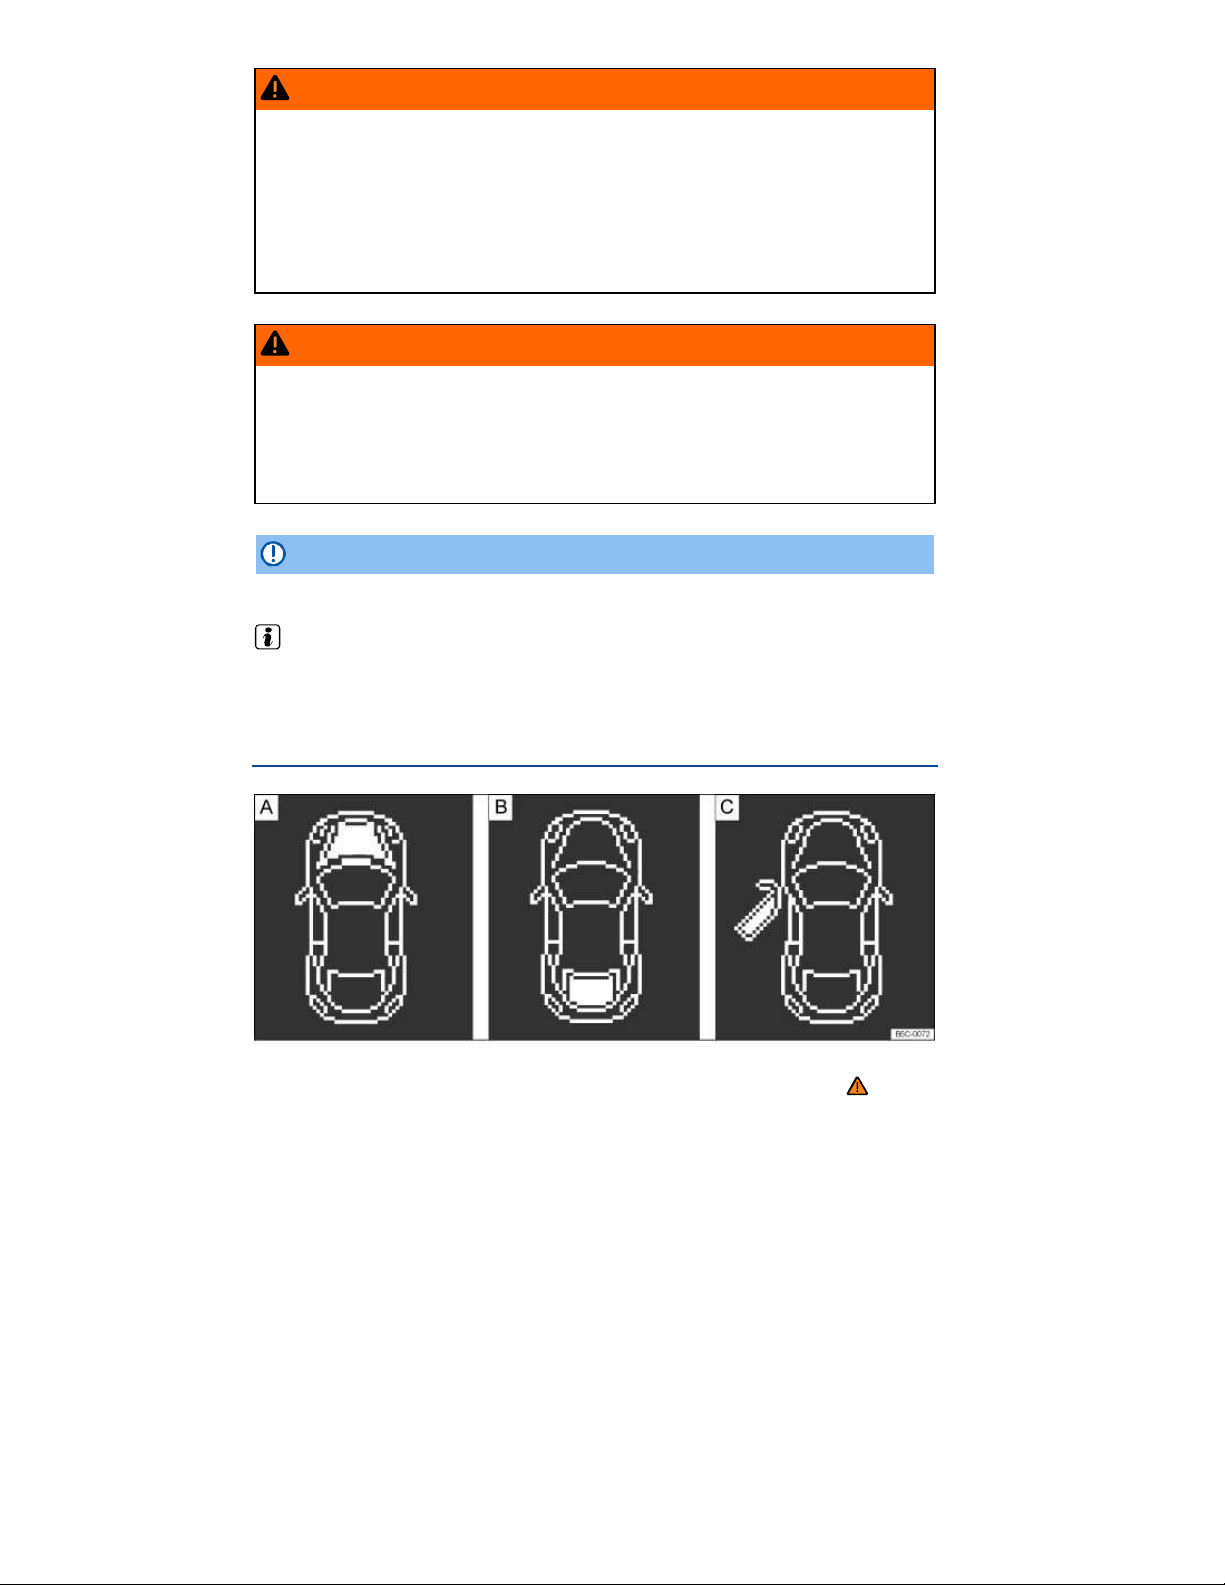
Fig. 14 In the instrument cluster display: A: Open engine hood, B: Open rear hatch, C: Open driver door.
Please first read and note the introductory information and heed the WARNINGS
Depending on the vehicle model, different information may be shown in the instrument cluster display
O
⇒
fig. 11 (3).
Warning and information texts
Odometer displays
Time
Outside temperature
Compass display
Open door, engine hood, or rear hatch ⇒
fig. 14
Selector lever position, Shifting
Gear recommendation, Shifting
Multi-Function Indicator (MFI) and menus for different settings, Volkswagen Information System
Service reminder display, Service reminder display
Warning and information texts
The status of various vehicle functions and components is monitored when the ignition is switched on
and while driving. Malfunctions are indicated by red and yellow warning symbols with text messages in
the instrument cluster display (⇒ page Error! Bookmark not defined., Warning and indicator lights).
In some cases, they may also be signaled acoustically. The display can vary depending on the instrument cluster model.
Type of
notification
Priority 1 warning
message
Symbol
Explanation
color
Red Symbol flashing or lit – sometimes with acoustic warnings.
Stop! ⇒ !
Check malfunction and take corrective action. Contact an authorized
Volkswagen dealer or an authorized Volkswagen Service Facility for
assistance if necessary.
Menus cannot be accessed when a priority 1 warning message is
displayed. The warning message will turn off automatically after a
few seconds. You can confirm and turn off some warning messages
Priority 2 warning
message
using the
Yellow Symbol flashing or continuously lit – sometimes with acoustic warn-
ings.
or button.
K
Malfunctions or low operating fluid levels may cause vehicle dam-
age and vehicle breakdown ⇒
.
Check malfunction as soon as possible. Contact an authorized
Volkswagen dealer or an authorized Volkswagen Service Facility for
assistance if necessary.
Information text – Information about various vehicle situations.
Odometer displays
The odometer indicates the total distance driven by the vehicle.
The trip odometer (Trip) shows the distance driven since the last time the trip odometer was reset.
The last digit indicates 1/10 mile (100 meters).
Outside temperature display
At outside temperatures below about +39 °F (+4 °C), a “snowflake symbol” (icy road warning) appears
in the display. The symbol flashes at first, then stays on until the outside temperature rises above
+43 °F (+6 °C) ⇒ .
When the vehicle is not moving or when you are driving at very low speeds, the temperature displayed
may be slightly higher than the actual outside temperature.
The measurement range is from -40 °F (-40 °C) to +122 °F (+50 °C).
Compass display (if applicable)
On vehicles equipped with compass display, the current compass direction is indicated in the instrument cluster display when the ignition and navigation system are switched on.
Selector lever positions
The selector lever position is shown both on the side of the selector lever and in the instrument cluster
display. The respective gear may also be shown in the instrument cluster display in Drive D and Sport
Drive S, as well as in Tiptronic
®
mode.
Gear recommendation
When the vehicle is moving, a fuel economy gear recommendation may appear in the instrument
cluster display, Shifting.
WARNING
Failure to heed warning lights and instrument cluster text messages can cause the vehicle to
break down in traffic and result in a collision and serious personal injury.
Never ignore warning lights or text WARNINGS.
Always stop the vehicle as soon as it is safe to do so.
Park the vehicle at a safe distance from moving traffic and where no part of the hot cata-
lytic converter and exhaust system can come into contact with flammable materials under the
vehicle, such as dry grass, brush, spilled fuel, etc.
A broken down vehicle presents a high accident risk for itself and others. Switch on
emergency flashers and set up a warning triangle to warn oncoming traffic.
WARNING
Roads and bridges may be dangerously icy even if the outside air temperature is above freezing.
If you use the outside temperature display to tell you about frost conditions, remember
that roads can even ice over at temperatures above +39 °F (+4 °C). Always remember: even if
the “snowflake symbol” (icy road warning) is not displayed, there could still be black ice on
the road.
Never rely exclusively on the outside temperature display.
NOTICE
Failure to heed warning lights or text WARNINGS can result in vehicle damage.
The instrument cluster displays and their arrangement may vary depending on the vehicle model
and engine. For displays without warning and information messages, malfunctions are only signaled
with indicator lights.
If there are multiple warning messages, the symbols are displayed for several seconds in order of
importance. The symbols are displayed until the cause has been corrected.
Applicable only in Canada
O
Displays (Premium version)
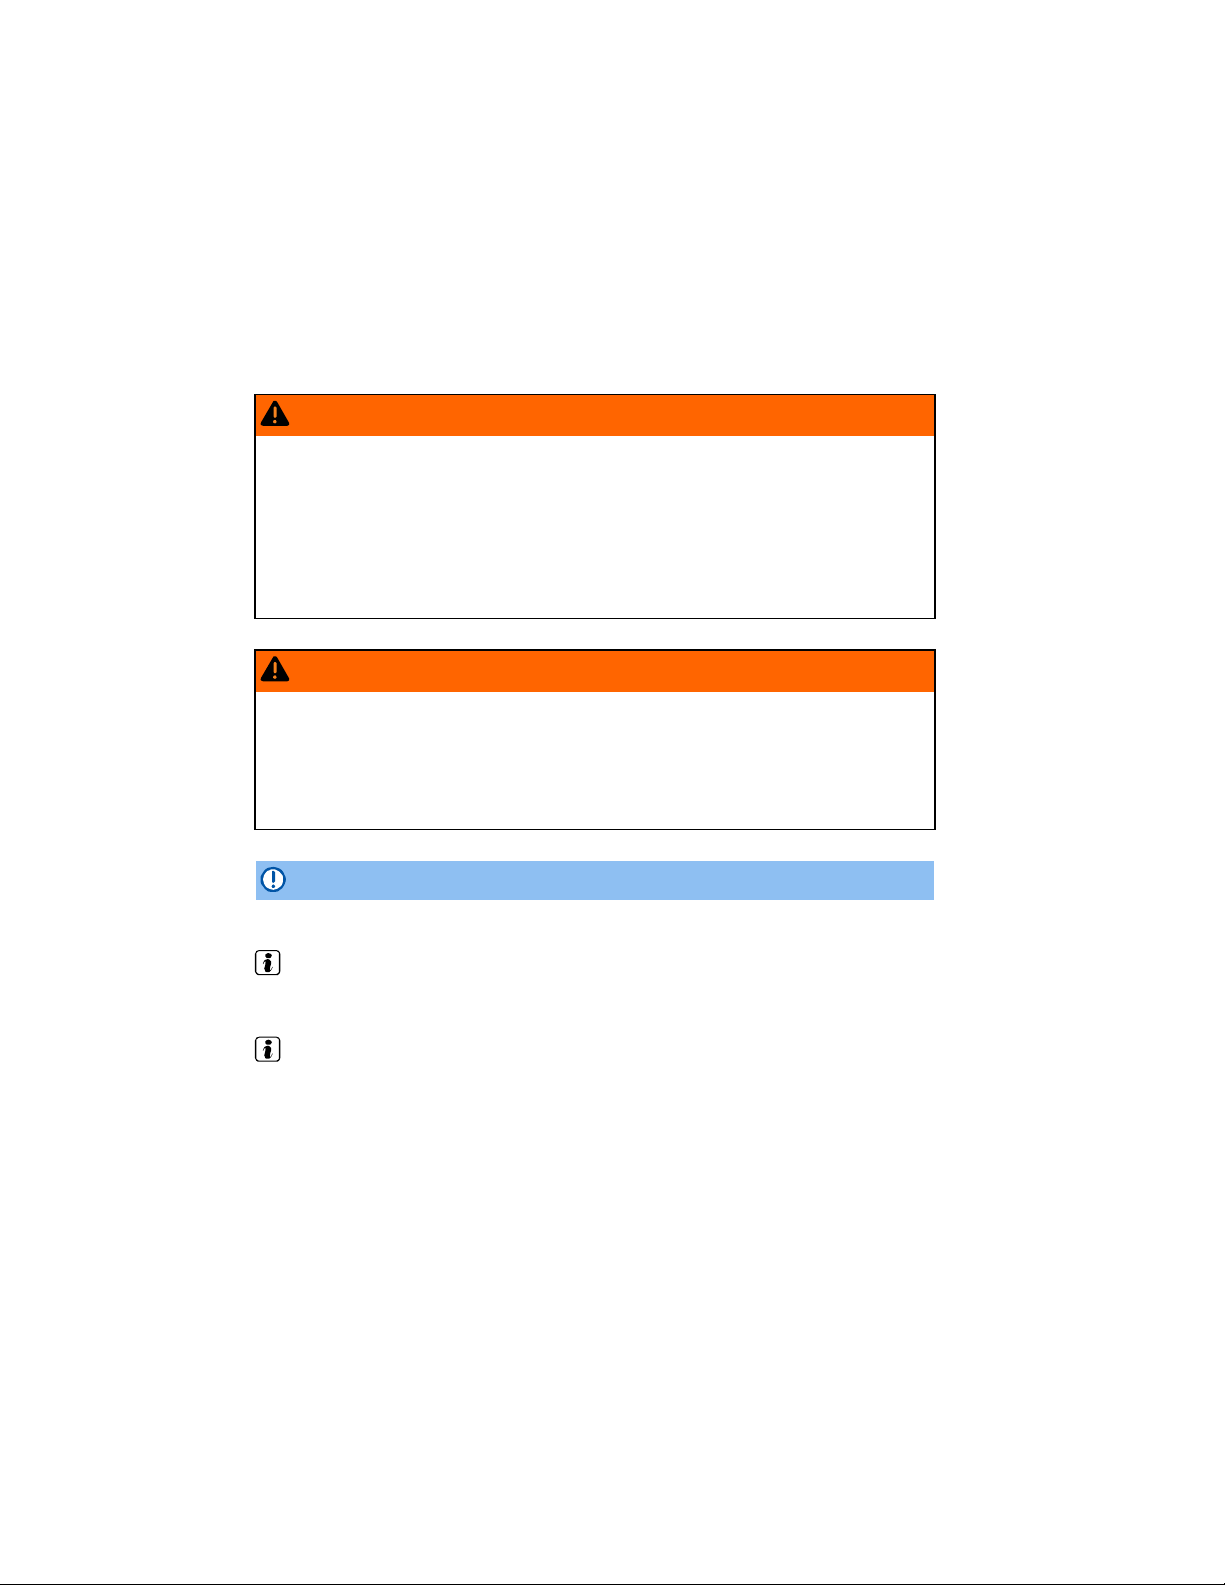
Fig. 15 In the instrument cluster display: A: Open engine hood, B: Open rear hatch, C: Open driver door.
Please first read and note the introductory information and heed the WARNINGS
Depending on the vehicle model, different information may be shown in the instrument cluster display
⇒ fig. 11 (3).
Warning and information texts
Odometer displays
Time
Outside temperature
Compass display
Open door, engine hood, or rear hatch ⇒ fig. 15
Selector lever position, Shifting
Gear recommendation, Shifting
Multi-Function Indicator (MFI) and menus for different settings, Volkswagen Information System
Service reminder display, Service reminder display
Alternative speed display
Warning and information texts
The status of various vehicle functions and components is monitored when the ignition is switched on
and while driving. Malfunctions are indicated by red and yellow warning symbols with text messages in
the instrument cluster display (⇒ page 18, Warning and indicator lights). In some cases, they may also
be signaled acoustically. The display can vary depending on the instrument cluster model.
Type of
notification
Priority 1 warning
message
Symbol
Explanation
color
Red Symbol flashing or lit – sometimes with acoustic warnings.
Stop! ⇒ !
Check malfunction and take corrective action. Contact an authorized
Volkswagen dealer or an authorized Volkswagen Service Facility for
assistance if necessary.
Menus cannot be accessed when a priority 1 warning message is
displayed. The warning message will turn off automatically after a
few seconds. You can confirm and turn off some warning messages
using the
or button.
K

Type of
notification
Priority 2 warning
message
Information text – Information about various vehicle situations.
Symbol
color
Yellow Symbol flashing or continuously lit – sometimes with acoustic warn-
Explanation
ings.
Malfunctions or low operating fluid levels may cause vehicle dam-
age and vehicle breakdown ⇒
Check malfunction as soon as possible. Contact an authorized
Volkswagen dealer or an authorized Volkswagen Service Facility for
assistance if necessary.
.
Odometer displays
The odometer indicates the total distance driven by the vehicle.
The trip odometer (Trip) shows the distance driven since the last time the trip odometer was reset.
The last digit indicates 1/10 mile (100 meters).
Outside temperature display
At outside temperatures below about +39 °F (+4 °C), a “snowflake symbol” (icy road warning) appears
in the display. The symbol flashes at first, then stays on until the outside temperature rises above
+43 °F (+6 °C) ⇒
When the vehicle is not moving or when you are driving at very low speeds, the temperature displayed
may be slightly higher than the actual outside temperature.
The measurement range is from -40 °F (-40 °C) to +122 °F (+50 °C).
.
Compass display (if applicable)
On vehicles equipped with compass display, the current compass direction is indicated in the instrument cluster display when the ignition and navigation system are switched on.
Selector lever positions
The selector lever position is shown both on the side of the selector lever and in the instrument cluster
display. The respective gear may also be shown in the instrument cluster display in Drive D and Sport
Drive S, as well as in Tiptronic® mode.
Gear recommendation
When the vehicle is moving, a fuel economy gear recommendation may appear in the instrument
cluster display, Shifting.
Alternative speed display (mph or km/h)
The alternative speed display shows the current vehicle speed in units other than the units shown on
the vehicle’s speedometer. For example, if the speedometer shows mph, the alternative speed display
shows a digital readout of the current vehicle speed in km/h. This feature can be especially helpful
when driving in countries where speed limit signs are posted in units other than those shown on the
vehicle’s speedometer.
Start the engine.
Press the button 3 times. The odometer display in the instrument cluster display flashes.
Press the button once. Instead of the odometer reading, “mph” or “km/h” will be shown briefly.
This activates the alternative speed display. To deactivate, follow the same procedure.
WARNING
Failure to heed warning lights and instrument cluster text messages can cause the vehicle to
break down in traffic and result in a collision and serious personal injury.
Never ignore warning lights or text WARNINGS.
Always stop the vehicle as soon as it is safe to do so.
Park the vehicle at a safe distance from moving traffic and where no part of the hot cata-
lytic converter and exhaust system can come into contact with flammable materials under the
vehicle, such as dry grass, brush, spilled fuel, etc.
A broken down vehicle presents a high accident risk for itself and others. Switch on
emergency flashers and set up a warning triangle to warn oncoming traffic.
WARNING
Roads and bridges may be dangerously icy even if the outside air temperature is above freezing.
If you use the outside temperature display to tell you about frost conditions, remember
that roads can even ice over at temperatures above +39 °F (+4 °C). Always remember: even if
the “snowflake symbol” (icy road warning) is not displayed, there could still be black ice on
the road.
Never rely exclusively on the outside temperature display.
NOTICE
Failure to heed warning lights or text WARNINGS can result in vehicle damage.
The instrument cluster displays and their arrangement may vary depending on the vehicle model
and engine. For displays without warning and information messages, malfunctions are only signaled
with indicator lights.
If there are multiple warning messages, the symbols are displayed for several seconds in order of
importance. The symbols are displayed until the cause has been corrected.
Service reminder display
Please first read and note the introductory information and heed the WARNINGS
The service appointment reminder is shown in the instrument cluster display ⇒ fig. 11 (3).
For information on maintenance intervals, please see the ⇒ booklet
For vehicles with time- or distance driven-dependent service, only fixed service intervals are displayed.
Service reminder
If service is due in the near future, a service reminder is displayed when the ignition is switched on.
For vehicles without text messages (Basic instrument cluster), a wrench symbol and a miles
(kilometers) indicator are shown in the instrument cluster display. The distance shown in miles
(kilometers) is the maximum distance the vehicle can be driven without having a service completed. A
Warranty and Maintenance
.

clock symbol is also displayed and the number of days until the required service is shown. The display
V
V
switches off after a few seconds.
For vehicles with text messages (Premium instrument cluster), Oil change and Inspection are
shown in the instrument cluster display with the number of miles (km) and days remaining until service
is due.
Service event
For vehicles without text messages, a warning , a warning chime sounds when the ignition is switched
on, and a flashing wrench symbol is displayed for several seconds when service is due. For
vehicles with text messages, Oil change now! or Inspection now! is shown in the instrument
cluster display.
Viewing service message
The current service message can be accessed when the ignition is switched on, the engine is
switched off, and the vehicle is stopped:
For vehicles without text messages: Push the button in the instrument cluster several times
until the wrench symbol appears.
For vehicles with text messages: Select the Settings menu.
In the Service submenu, select the Info menu item.
OR: If the Vehicle status main menu is active, use the arrow buttons to navigate to the service
reminder display.
A minus sign in front of the number of miles (kilometers) or days means that service is overdue.
Resetting the oil change service reminder
If the service was not performed by an authorized Volkswagen dealer or an authorized Volkswagen
Service Facility, the oil change service reminder can be reset as follows:
ehicles with Premium display:
Switch off the ignition.
Press and hold the ./ button in the instrument cluster.
Switch on the ignition.
Release the ./ button.
A confirmation message appears in the display. Confirm request with the
in the windshield wiper lever or the
steering wheel.
button on the multi-function
OK
ehicles with Basic display:
Switch off the ignition.
Push the button in the instrument cluster and hold down.
Switch on the ignition.
Release the button and push the button in the instrument
cluster within about 20 seconds.
Resetting the inspection service reminder
If the service was not performed by an authorized Volkswagen dealer or an authorized Volkswagen
Service Facility, the inspection service reminder can be reset as follows:
V
ehicles with Premium display:
V
Switch off the ignition.
Switch on the emergency flashers.
Press and hold the ./ button in the instrument cluster.
Switch on the ignition.
Release the ./ button.
A confirmation message appears in the display. Confirm request with the
in the windshield wiper lever or the
steering wheel.
button on the multi-function
OK
Switch off the emergency flashers.
ehicles with Basic display:
Switch off the ignition.
Switch on the emergency flashers.
Push the button in the instrument cluster and hold down.
Switch on the ignition.
Release the button and push the button in the instrument
cluster within about 20 seconds.
Switch off the emergency flashers.
The service reminder disappears after a few seconds or after the button on the windshield
wiper lever or the OK button on the multi-function steering wheel has been pushed.
Volkswagen Information System
Introduction
In this section you’ll find information about:
Menu structure – overview (Basic version)
Menu structure – overview (Basic version)
Menu structure – overview (Premium version)
Using the instrument cluster menus
Main menus (Premium version)
MFI menu (Multi-Function Indicator)
Settings menu (Premium version)
Lights & Vision submenu
When the ignition is switched on, you can display different types of information in the instrument
cluster. The menu options vary depending on whether you have a Basic or Premium version of the
Volkswagen Information System. With the Premium instrument cluster display, you can also control
certain vehicle features.
Buttons on the windshield wiper lever operate the menus for Basic instrument cluster. The Premium
version is either operated with the buttons on the windshield wiper lever or with control buttons on the
right side of the multi-function steering wheel, depending on vehicle equipment.
The number of menus in the instrument cluster display depends on the electronics and equipment on
the vehicle.
An authorized Volkswagen dealer or an authorized Volkswagen Service Facility may be able to add or
modify functions depending on your vehicle's equipment.
Some menu items can only be accessed when the vehicle is not moving.
As long as a priority 1 warning message is displayed, no menus can be accessed. To display menus,
press the button on the windshield wiper lever ⇒
steering wheel ⇒ fig. 17.
More information:
Outside mirrors
Driver assistance systems
Radio or Navigation system ⇒ booklet
Mobile phone package ⇒booklet
Radio
Mobile Phone Package
fig. 16 or the OK button on the multi-function
or ⇒booklet
Navigation system
WARNING
Driving on today's roads demands the full attention of the driver at all times. Driver distraction causes accidents, collisions and serious personal injury!
Never access menus when the vehicle is moving.
Emergency starting and starting the engine with a very weak vehicle battery or after the vehicle
battery has been replaced may change or delete system settings (including time, date, and program-

ming). Check the settings and correct as necessary once the vehicle battery has built up a sufficient
charge.
Applicable only in the United States
Menu structure – overview (Basic version)
Please first read and note the introductory information and heed the WARNINGS
Multi-Function Indicator (MFI)
▪ --:-- (travel time)
▪ --.- mpg (current fuel consumption)
▪ avg --- mpg (average fuel consumption)
--- mi (fuel range estimate)
▪
▪ --- mi (route)
▪ avg --- mph (average speed)
▪ -- mph (digital speed display)
▪
--- mph (speed warning)
▪
---°F (digital engine coolant temperature display – red color does not mean that the tempera-
ture is too high)
▪ ---°F (digital outside temperature)
Vehicle status
Applicable only in Canada
Menu structure – overview (Basic version)
Please first read and note the introductory information and heed the WARNINGS
Multi-Function Indicator (MFI)
▪ --:-- (travel time)
▪ --- l/100 km (current fuel consumption)
▪ avg --- l/100 km (average fuel consumption)
▪ --- km (fuel range estimate)
▪ --- km (route)
▪ avg --- km/h (average speed)
▪ -- km/h (digital speed display)
▪ --- km/h (speed warning)
▪ ---°C (digital engine coolant temperature display – red color does not mean that the tempera-
ture is too high)
▪ ---°C (digital outside temperature)
Vehicle status
Menu structure – overview (Premium version)
Please first read and note the introductory information and heed the WARNINGS
Multi-Function Indicator (MFI)
▪ Travel time

▪ Consumption --.- mpg (l/100 km) (current fuel consumption)
▪ Av. consumption --.- mpg (l/100 km) (average fuel consumption)
▪ Range -- mi (km)
▪ Route -- mi (km)
▪ Odometer -- mi (km)
▪ Average speed --- mph (km/h)
▪ --- mph (km/h) (digital speed display)
▪ Oil temperature -- °F (°C)
▪ Coolant temperature -- °F (°C)
▪ Speed warning at --- mph (km/h)
Audio
⇒ booklet
Navigation
Vehicle status
Settings
▪ Language
▪ MFI data
– Travel time
– Curr. consump. (current fuel consumption)
– Avg. consump. (average fuel consumption)
– Route
– Odometer
– Average speed
– Digital speed (digital speed display)
– Oil temp.
– Coolant temp.
– Speed warning
– Back
▪ Lights & Vision
– Coming Home
– Leaving Home
– Back
▪ Time
– Hours
– Minutes
– 24 hr. mode
– Daylight save
– Back
▪ Units
– Temperature
– Consump./distance
– Back
▪ Service
– Info
– Back
▪ Factory setting
Radio
⇒ booklet
or ⇒ booklet
Navigation system
Navigation system
Using the instrument cluster menus
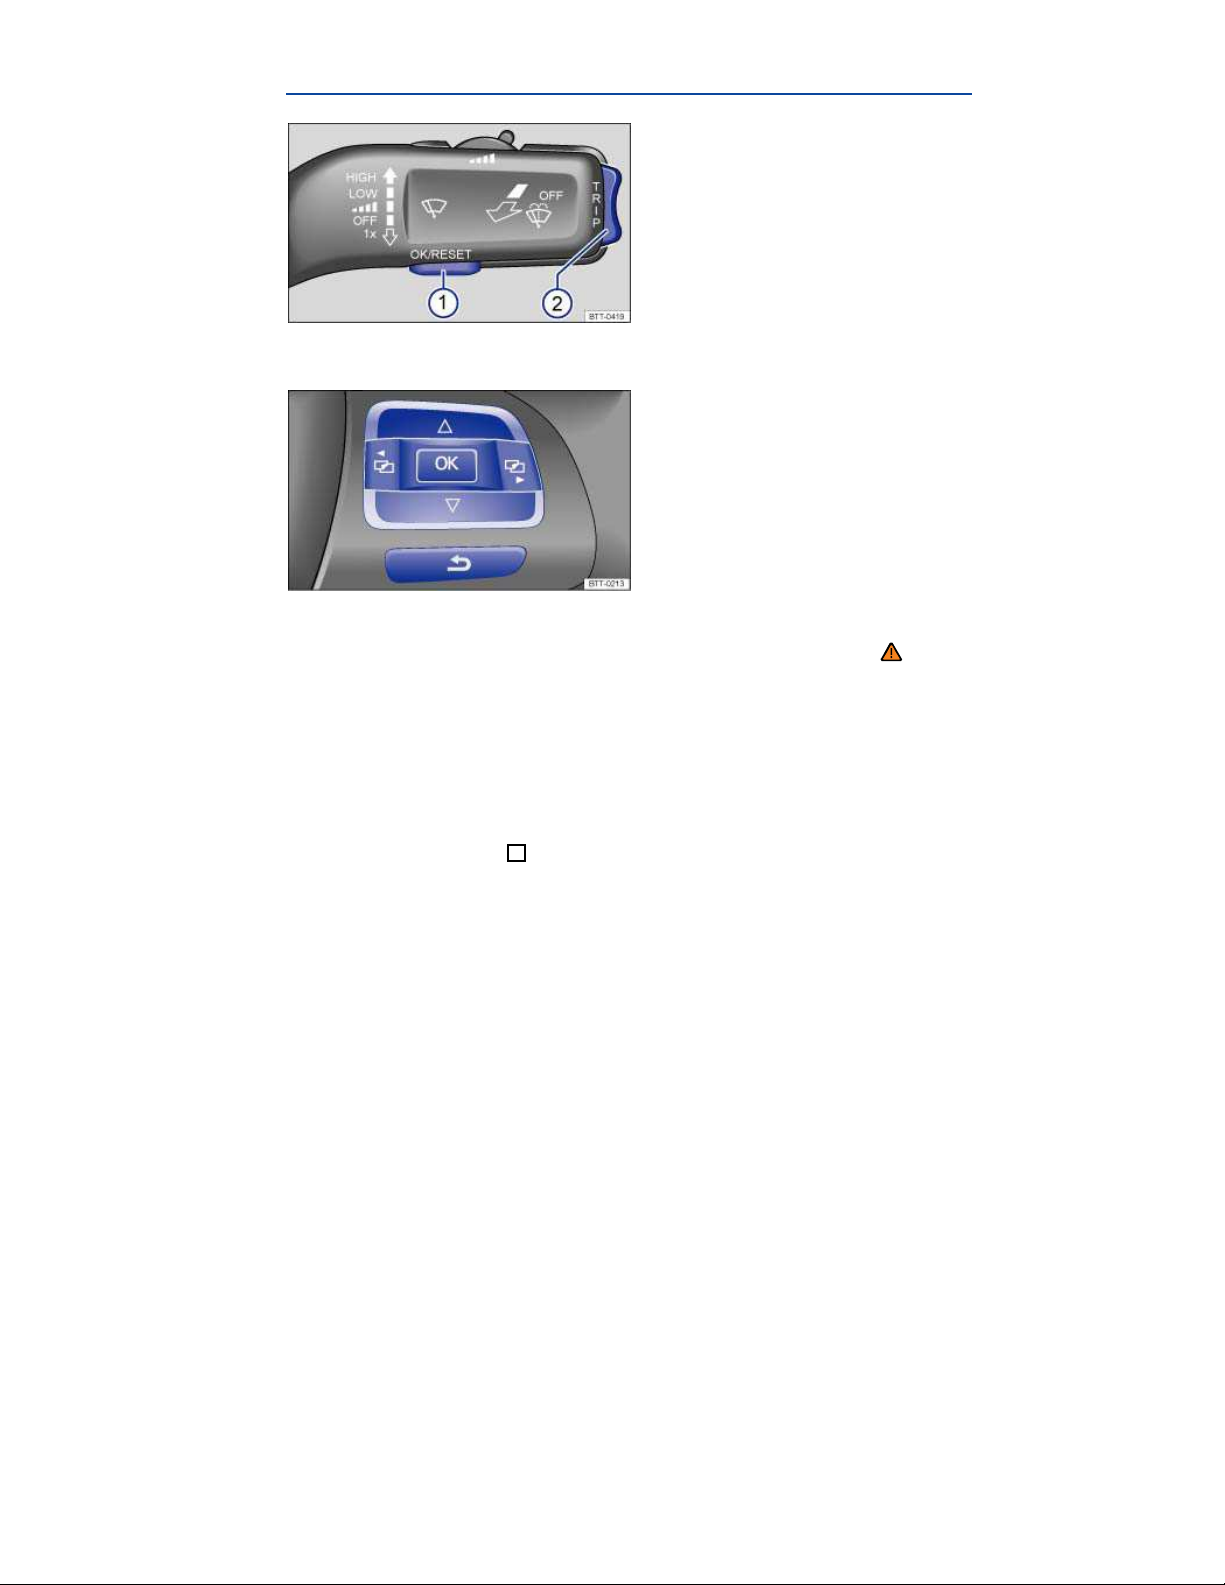
Fig. 16 In vehicles without a multi-function steering wheel: Use button 1 in the windshield wiper lever to
confirm menu items and rocker switch 2 to switch menus.
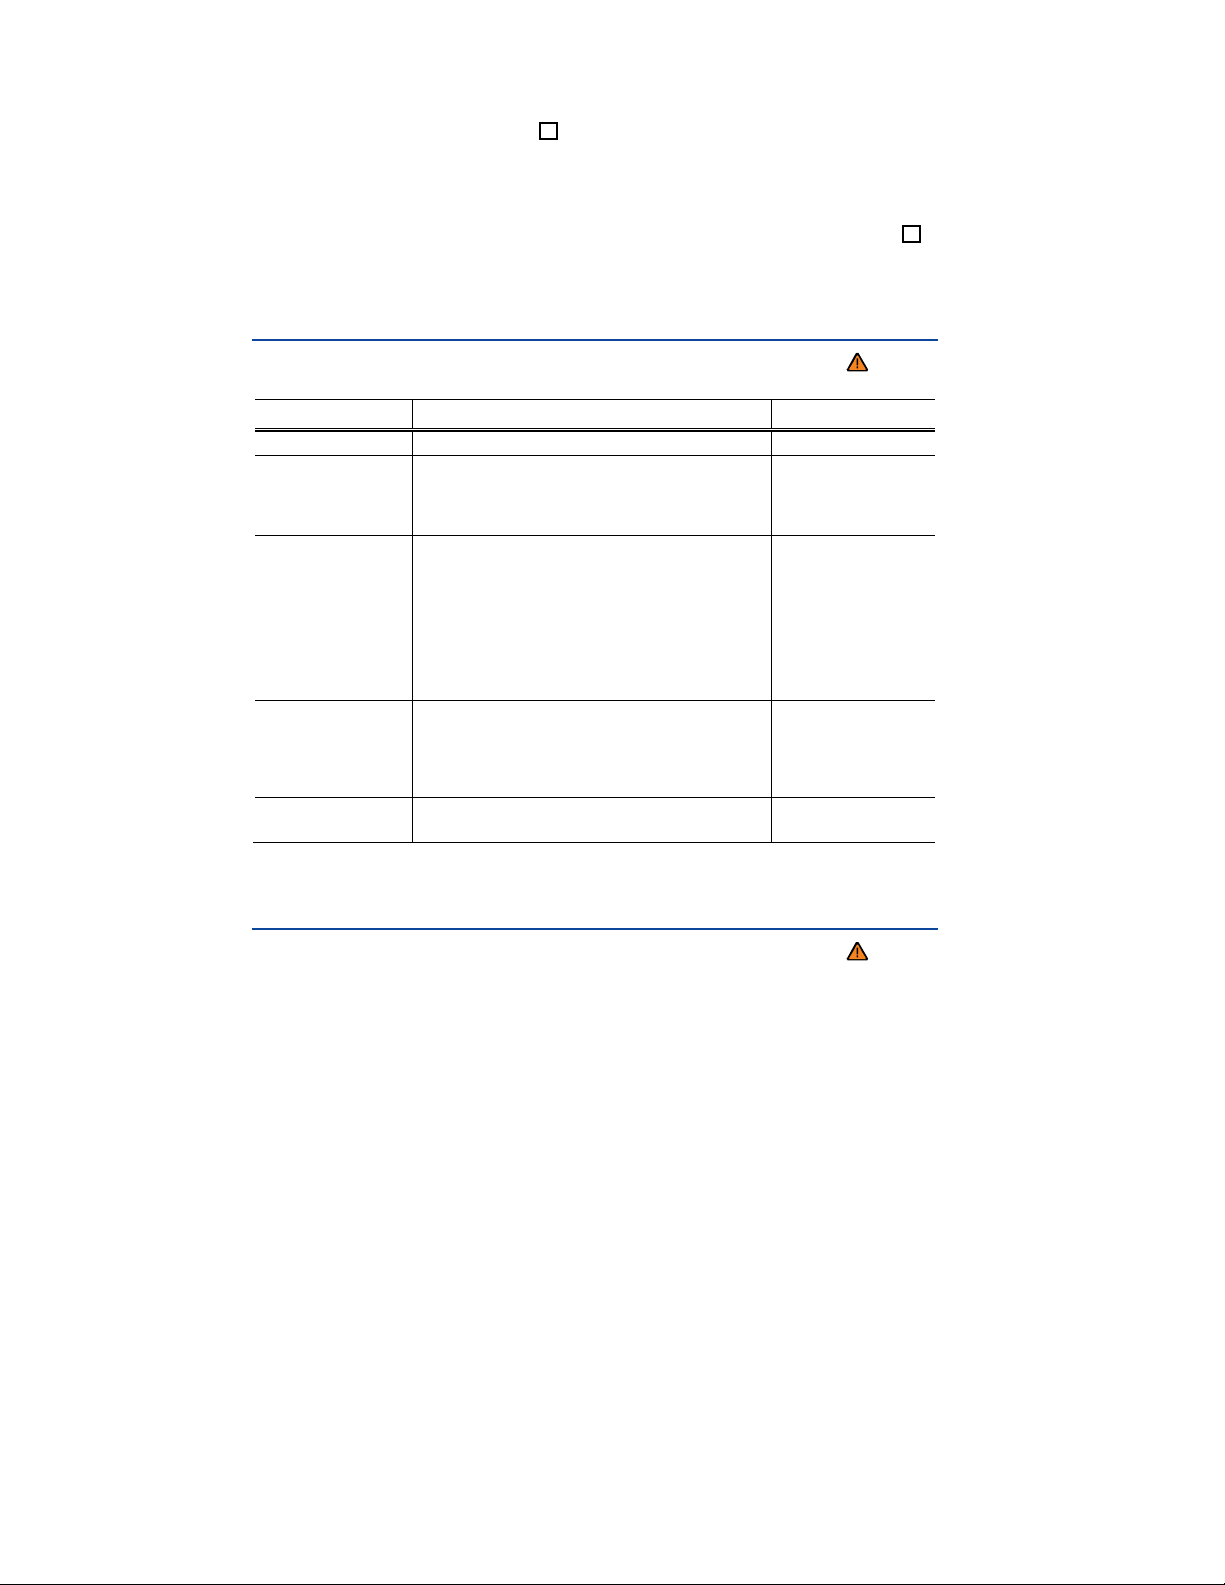
Fig. 17 Right side of the multi-function steering wheel (if equipped): Controls for the menus in the instrument
cluster.
Please first read and note the introductory information and heed the WARNINGS
If your vehicle does not have a multi-function steering wheel with menu controls, the instrument cluster
menus are controlled with buttons on the end of the windshield wiper lever (⇒
menu control multi-function steering wheels, the instrument cluster menus are controlled with buttons
on the right side of the steering wheel ⇒ fig. 17.
Accessing the instrument cluster menus
Switch on the ignition.
If a message or the vehicle icon is displayed, push the rocker switch (2) (⇒ fig. 16) on the end of
the windshield wiper lever or the OK button (⇒
fig. 17) on the right side of the multi-function steering
wheel to display the main menus (on some vehicles, a list of main menus) in the instrument cluster
display.
For operation with windshield wiper lever: To show the main menu, Main menus (Premium version)
or to go back to the main menu from another menu, press and hold the rocker switch ⇒
For operation with multi-function steering wheel: To scroll through the various main menu items,
push the button
# or ∃ several times ⇒ fig. 17.
Displaying a submenu
Windshield wiper lever: Move up and down in a menu by pushing the top or bottom of rocker
switch (2) (⇒ fig. 16) until the menu item / selection you want is highlighted.
Multi-function steering wheel: Press arrow buttons
or until the menu item / selection you want
is highlighted. Press and hold an arrow button to increase or decrease values faster.
fig. 16). On vehicles with
fig. 16 (2).
Selecting a setting
Windshield wiper lever: Press the
Multi-function steering wheel: Push the OK button (⇒
button (1) ()
fig. 17) to select a setting.
Returning to the main menu level
Windshield wiper lever: Use the rocker switch
to select or to toggle between different options within the current menu.
Multi-function steering wheel: Use the arrow down button
button ⇒ fig. 17, or press the button on the multi-function steering wheel.
(2) (⇒ fig. 16) to select Back. Press the button
to select Back and then press the
Main menus (Premium version)
Please first read and note the introductory information and heed the WARNINGS
Menu Function See
MFI
Audio
Navigation
Vehicle status
Settings
Multi-Function Indicator (MFI) information.
Station indicator in radio mode.
Track display in CD mode.
Track display in media mode.
Information displays on the navigation system (if
applicable):
When destination guidance is active, turn arrows
and proximity bars are shown. The illustration is
similar to the symbol display in the navigation
system.
If destination guidance is inactive, driving direction
(compass function) and the current street name are
displayed.
Display current warning and information messages.
This menu item is only displayed when warning or
information messages are available. The number of
available messages is shown in the display.
Example: 1/1 or 2/2.
Set language for messages in the display and
navigation system or set the clock.
⇒ booklet
⇒ booklet
⇒ booklet
Navigation
system
Navigation
system
Radio
OK
or
MFI menu (Multi-Function Indicator)
Please first read and note the introductory information and heed the WARNINGS
The Multi-Function Indicator shows various driving and consumption data.
Single trip and total trip memory
The Multi-Function Indicator has 2 automatic memories: 1 – single trip memory and 2 – total trip
memory. The number of the trip memory is shown at the upper right of the display.
 Loading...