

Page 1

Page 2

MANUAL INSTRUCTION
ИНСТРУКЦИЯ ПО ЭКСПЛУАТАЦИИ
MINI SYSTEM WITH CD/MP-3
МИНИСИСТЕМА C CD/MP3
МОДЕЛЬ VT-3497
Page 3
BEFORE USING, PLEASE READ THE INSTRUCTIONS CAREFULLY
REBOOTING THE SYSTEM
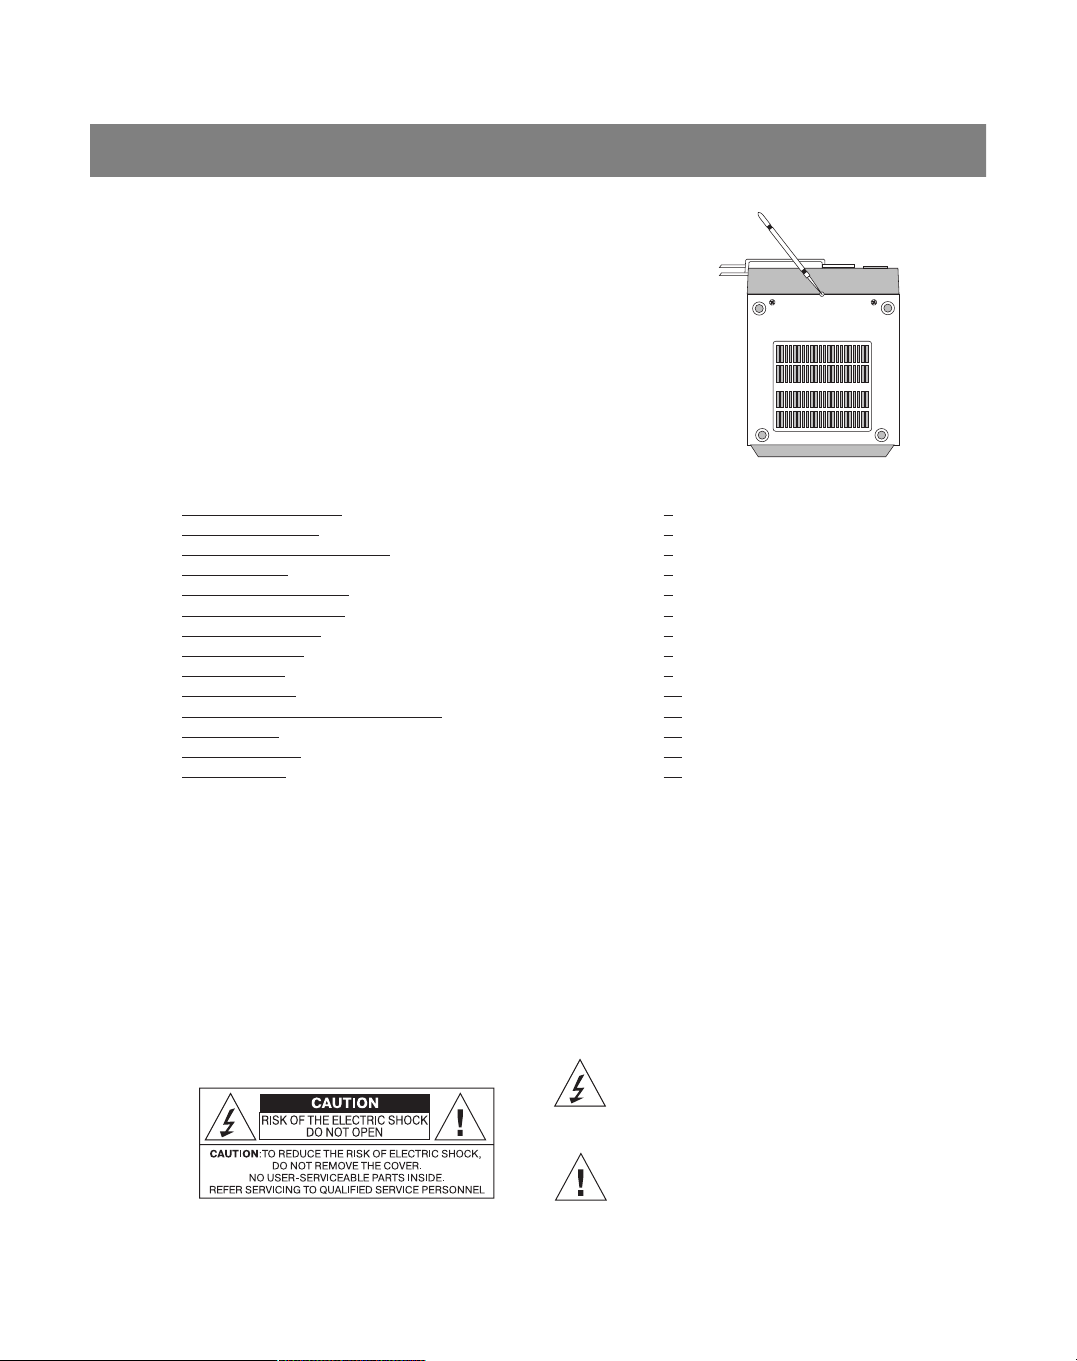
• If the system doesn't turn on, crashes (freezes) or doesn't display infor-
mation properly, use a pointed object to press the system reboot button
(27) in the lower part of the housing to reboot the built-in microcomputer,
as shown in the drawing below.
• Unplug the microsystem from the power outlet and wait several seconds while the built-in microcomputer reboots.
Note: Use a toothpick or pencil to press and hold the OFF button for
several seconds.
CONTENTS P. ¹
Rebooting the system 2
Safety precautions 2
Technical safety precautions 3
Control device 4
Tuning and connection 5
Digital clock and timer
6
The main functions
7
T
uner Functions 8
CD Functions
9
MP3 Functions 10
Cassette player/recorder functions 12
Use and care 13
Troubleshooting 14
Specifications
15
SAFETY PRECAUTIONS
Please note:
• Make sure to connect system to the circuit with voltage similar to the rating label information.
Otherwise it can result in system fire danger.
• Do not expose the system to heating over 35 degrees.
• Avoid installation near heaters and direct sunlight places
• Ensure good air circulation.
• Protect the system from dust, moisture and ingress of water.
• Avoid strong magnetic fields, for example, near TV sets and speakers of other devices.
• Do not use potent chemical agents when cleaning the device.
• Do not grease parts, movable system mechanisms. CD player does not require maintenance.
• Only use the authorized service centers for maintenance.
ENGLISH
2
This sign indicates that the system is
unsafely stressed; there is electric
shock risk.
This sign indicates that there is important information regarding system use
and service.
Page 4
Warning
• To prevent fire or electric shock, do not use the system in the rain or humid weather in a wide-open
place.
• Do not place dripping or flowing vessels (vases) with liquid on the system.
Ventilation
• When using the system for extended periods, normal ventilation is required.
TECHNICAL SAFETY PRECAUTIONS
• This equipment was created and manufactured according to European safety standards, but like
any electronic equipment demands care to ensure quality operation and safety.
• Read the usage instructions before using.
• Make sure that all electric connections (including the outlet, extension cord and connection between
the parts of the equipment) are performed according to the instructions. Unplug the plug from the
power outlet when replacing the power cord.
• If any questions arise with regard to the installation, operation or safety of your system - contact
your trade agent.
• Observe caution when using the glass panels and door of the system.
• Stop using the system if it works sporadically or is damaged. Unplug the system from the power
outlet and contact the trade agent.
• Do not remove any fastened panel, because components may be under voltage.
• Do not leave the system turned on if it is not being used.
• Do not listen with the headphones at high volume, because this can damage your hearing.
• Do not block the ventilation system, for example with curtain or upholstery material. Overheating can
lead to breakage or premature wear and tear on the components of the system.
• Do not use the system in the rain or humid weather in an unprotected place.
First and foremost
• Never allow anyone, especially children, to poke anything into the openings, slots or other open
parts of the system, because this can lead to electric shock.
• Never do any questionable actions when using electric equipment of any type.
• It is better to be safe than sorry!
ENGLISH
3
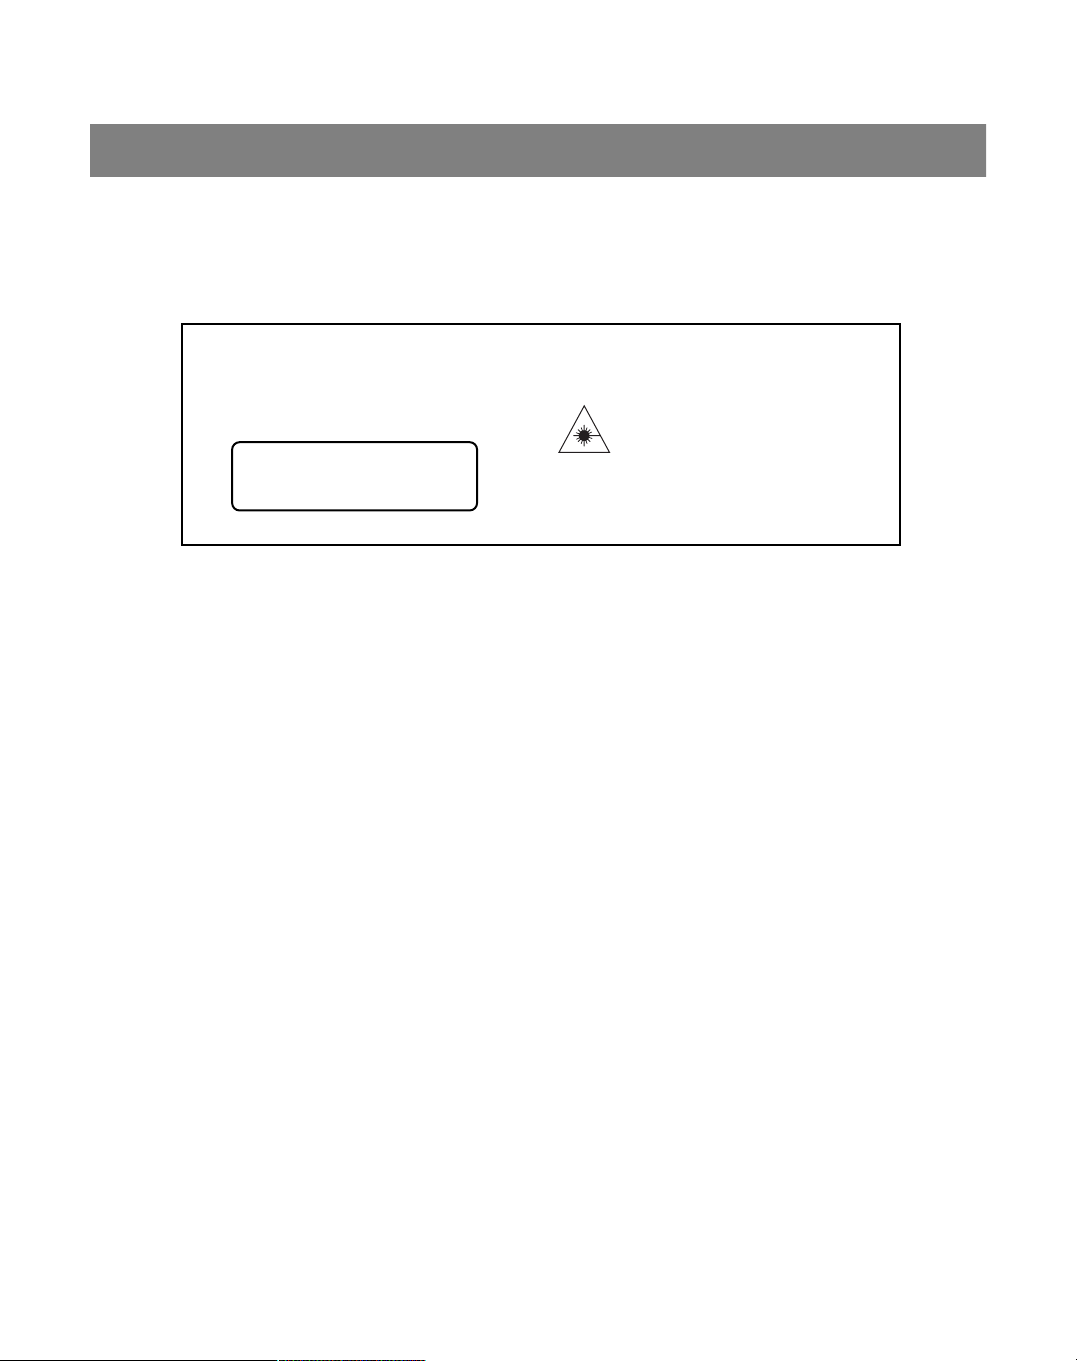
CAREFUL
CLASS 1 LASER DEVICE
Adjusting or performing functions other than
those indicated in the instructions may lead to
risk of exposure to laser radiation.
SAFETY
The system is equipped with a laser. Only qualified personnel can repair the system.
DANGEROUS: INVISIBLE LASER
RADIATION IS PRESENT WHEN THE
SYSTEM IS OPENED AND
UNBLOCKED. AVOID DIRECT CONTACT WITH THE LASER BEAM.
ATTENTION: DANGEROUS LASER RADIATION
UPON OPENING WHEN THE BLOCKER IS NOT
PRESENT.
CLASS 1 LASER DEVICE
LUOKAN 1 LASERLAITE
KLASS 1 LASERAPPARAT
Note: If the system is simultaneously used with fluorescence lamps in the same
premises then it can result in system faulty operation.
Page 5

CONTROL DEVICE
MAIN SYSTEM
ENGLISH
4
Front view
Top viewBottom view
Rear view
Front view
1. Remote control sensor
2. STANDBY MODE Button
3. STANDBY MODE Indicator
4. OPEN / CLOSE Button
5. Play/pause Button
6. STOP Button
7. SEARCH/TUNE - Button
8. SEARCH / TUNE + Button
9. FUNCTION Button
10.RANGE Button
11.EQUALIZER Button
12.REPEAT Button
13. MEMORY Button
14.FIND Button
15.TIMER Button
16.RANDOM Button
17.HEADPHONE Jack
18. VOLUME Button
19.LCD display
20. VOLUME Button
21.CD Door
Rear view
22.Left speaker jack
23.Right speaker jack
24.Power cord
25.FM Antenna
26.Subwoofer Output
N Voltage selector (additional)
Bottom view
27.System overload button
Top view
28.Cassette Door
29. REVERSE Button
30. Button PLAY
31. Button RECORD
32. FORWARD Button
33. / STOP / EJECT Button
34. PAUSE Button
Page 6

REMOTE CONTROL
TUNING AND CONNECTION
REPLACING THE BATTERIES OF THE REMOTE CONTROL
1. Turn over the remote and remove the lid of the battery compartment.
2. Insert one type "CR2025" lithium battery according to polarity as
shown on the battery compartment.
3. Close the lid of the battery compartment.
ANTENNA CONNECTION
FM: Completely extend the FM Antenna (25). If the reception is in
stereo mode, the symbol ((ST)) will light up on the LCD display (19).
AM: This system is equipped with a built-in ferritic antenna. To ensure
the best signal, rotate the housing of the system until you obtain the
best reception.
ENGLISH
5
35. FUNCTION Button
36. Button
37. SEARCH / TUNE - Button
38. SEARCH / TUNE + Button
39. VOLUME + Button
40. Button
41.VOLUME - Button
42.TIMER Button
43.STANDBY MODE Button
44.RANDOM Button
45.PROGRAM Button
46.INTRO Button
47.PRELIMINARY + Button
48.PRELIMINARY - Button
49.Digital 1-9 Buttons
50.EQUALIZER Button
51.REPEAT Button
52. Button
53. Button
54. Button
55. FIND / MONO / STEREO Button
56. RANGE Button
57. MUTE Button
58. Infrared sensor
TECHNICAL SAFETY PRECAUTIONS
Comply with these technical safety precautions when using the batteries in device.
1. Only use the batteries of specified type and dimensions
2. Make sure of correct polarity when installing the batteries. Incorrect polarity can result in device
damage.
3. If this device has not been used for a long time, remove the battery to avoid damage if battery
leaked.
4. Do not try to charge a battery, it can overheat and explode. (Comply with battery manufacturers'
instructions).
Page 7

CONNECTING THE SPEAKERS
1. To connect the speaker wires, press the Right speaker jack (23) and Left speaker jack (22) levers.
2. Make sure that the speaker wires are connected to the speaker jacks, observing polarity. Connect
the left speaker to the L jack and the right speaker to the R jack.
CONNECTING THE HEADPHONES
You can use headphones (not included in the set). Insert a 3.5 mm plug in the HEADPHONE jack (17).
Use an adapter if the plug of your headphones is a different size. When connecting headphones, the
speakers automatically disconnect.
Safety precautions To protect your hearing, follow these recommendations.
• Adjust the volume before listening. After you begin to listen, adjust them to a comfortable level.
• Do not listen through the headphones at very high volume. This can lead to hearing loss.
THE MAIN CONNECTIONS
This system is intended to be used at a voltage of 230 V / 50 Hz. Connecting this system to a grid with a
different voltage can lead to breakage and annul the warranty. If the plug of the power source does not
fit the outlet in your home, have a qualified electrician replace the outlet.
CONNECTING THE SYSTEM TO A POWER OUTLET
1. Completely extend the Power cord (24).
2. Insert the plug of the power cord into the nearest outlet.
3. As soon as you plug the system into a power outlet, its components are in standby mode.
To disconnect the system completely, pull the power cord from the outlet.
DIGITAL CLOCK AND TIMER
INSTALLING THE DIGITAL CLOCK
Insert the plug of the (24) Power cord into a power outlet. The symbol will appear on the LCD
display (19).
1. Press and hold the MEMORY (13) / PROGRAM (45) button for about 2 seconds to set the time
display format.
2. Press the SEARCH - (7) / (37) or SEARCH + (8) / (38) button to select the desired time
display format.
3. Press the MEMORY (13) / PROGRAM (45) button to save the selection. The LCD display (19) will
show two flashing symbols for setting the hour of the current time.
4. Press the SEARCH - (7) / (37) or SEARCH + (8) / (38) buttons to set the hour of the current
time.
5. Press the MEMORY (13) / PROGRAM (45) button to save the set hour. The LCD display (19) will
show two flashing symbols for setting the minutes of the current time.
6. Press the SEARCH - (7) / (37) or SEARCH + (8) / (38) buttons to set the minutes
of the current time.
7. Press the MEMORY (13) / PROGRAM (45) button to save the set minutes and immediately activate
the digital clock.
Note: The time-setting mode will stop if the MEMORY (13) / PROGRAM (45) button is not pressed
within 10 seconds.
After pressing the STANDBY MODE (2) / (36) button to turn off the system, the clock continues
to work.
SETTING THE TIMER
1. Press the STANDBY MODE (2)/ (36) button to turn on the system.
ENGLISH
6
Page 8

2. Press and hold the TIMER (15) / (42) button for 2 seconds until the " ON" symbol appears.
The LCD display (19) will show two flashing symbols to set the time when you want the system to switch
on.
3. Press the SEARCH - (7) / (37) or SEARCH + (8) / (38) button to set the hour when you want
the system to switch on.
4. Press the TIMER (15) / (42) button to save the set hour. The LCD display (19) will show two flashing
symbols to indicate the minute when the system will switch on.
5. Press the SEARCH - (7) / (37) or SEARCH + (8) / (38) button to adjust the minutes of the
switch-on time.
6. Press the TIMER (15) / (42) button to cause the " OFF" symbol to appear. The LCD display (19) will
show two flashing symbols for setting the hour when you want the system to switch off.
7. Repeat points 3-5.
8. Press the TIMER (15) / (42) button to save the settings and cause the "TUNER" symbol to appear on
the LCD display (19).
9. Press the SEARCH - (7) / (37) or SEARCH + (8) / (38) buttons to select the playback mode.
10.Press the TIMER (15) / (42) button to save the playback mode. The LCD display (19) will show the
symbol "VOL 15" for setting the desired volume level.
11.Press the SEARCH - (7) / (37) or SEARCH + (8) / (38) buttons to select the desired volume
level.
12.Press the TIMER (15) / (42) button to turn on the TIMER and cause the " " symbol to appear on
the LCD display (19).
Note: Before setting the timer, the digital clock must first be set correctly.
The setting mode will stop if the MEMORY (13) / PROGRAM (45) buttons are not pressed within 10
seconds.
The timer can be set to turn the system on or off. For this, the digital clock must be correctly set.
If the system is in standby mode, it will automatically switch on at the programmed time in either CD
or TUNER mode.
For example:
For operation in the TUNER mode, there must be a CD inserted in the system.
SETTING STANDBY MODE (AUTOMATIC DISCONNECTION)
When the system is switched on, the automatic switch-off time can be set to 90 - 80 - 70 - 60 - 50 40 - 30 - 20 - 10 minutes. Press the Standby mode (43) button until the desired time appears on the
LCD display (19). The system will switch off after the selected period has elapsed.
Note: If the CD playback time is shorter than the selected period, the music will switch off before the
system disconnects.
THE MAIN FUNCTIONS
SWITCHING ON THE SYSTEM
Press the STANDBY MODE (2) / (36) button to switch on the system. Press the STANDBY MODE (2)
/ (36) button to disconnect the system. The current time will show on the LCD display (19).
SELECTING THE OPERATING MODE
Press the FUNCTION Button (9) / (35) to select the playback mode (CD, Cassette or TUNER).
VOLUME (20) / VOLUME + (39) Button: Press to increase the volume.
VOLUME (18) / VOLUME - (41) Button: Press to decrease the volume.
Note: There are a total of 40 volume levels. The volume level shows on the LCD display (19).
Attention! Listening at high volume can damage your hearing, especially when listening
through headphones.
ENGLISH
7
Page 9

MUTE Button (57):
Switched on: Press to switch off the sound. The sound level appears on the LCD display (19).
Switched off: Press to switch on the sound. The sound level appears on the LCD display (19).
EQUALIZER Button (11) / (50)
Press to select the desired playback sound effect. It will appear on the LCD display (19).
This button allows you to choose the equalizer mode: CLASSICAL, ROCK, POP and JAZZ.
TUNER FUNCTIONS
CONTROLLING THE TUNER MODE
1. Press the STANDBY MODE button (2) / (36) to turn on the system.
2. Press the FUNCTION button (9) / (55) to select the TUNER mode.
3. Press the STANDBY MODE button (2) / (36) to switch off the system.
AUTOMATIC RADIO STATION SEARCH
1. Press and hold the TUNING - (7) / (52) or TUNING + (8) / (40) button to begin searching
for a radio station.
2. Press and hold the TUNING - (7) / (52) or TUNING + (8) / (40) button to begin searching
for the next radio station.
Note: While searching, the sound will be automatically turned off.
The automatic search will find only radio stations with sufficiently strong signals. For radio
stations with weak signals, you need to tune it manually.
MANUAL SEARCHING FOR RADIO STATIONS
1. Press the RANGE (10) / (56) button until the mode that you want appears.
2. Press the TUNING - (7) / (52) or TUNING + (8) / (40) button to tune to the approximate frequency
of the desired radio station. The LCD display (19) will show the current frequency.
3. Repeatedly press the TUNING - (7) / (52) or TUNING + (8) / (40) button to find the desired
frequency.
PROGRAMMING RADIO STATIONS
1. In TUNER mode, select FM or AM reception.
2. Choose a radio station using automatic search or manual tuning.
3. Press the MEMORY (13) / (45) button. The symbol PGM will highlight, and the LCD display (19)
will show a flashing 01.
4. Press the PRELIMINARY - (48) or PRELIMINARY + (47) button until the LCD display (19) shows the
desired memory cell.
5. Press the MEMORY (13) / (45) button once again to program the radio station into the selected
memory cell.
6. To program the next radio station in memory, repeat stages 2-5.
Note: The programming mode stops if the MEMORY (13) / PROGRAM (45) button is not pressed
within 10 seconds.It is possible to program up to 10 FM stations and 10 AM stations
into memory.
CHANGING THE MEMORY CELL POSITIONS
If you need to change the order of radio station memory cells, enter the frequency of the new radio station into the cell. The position of the previous one will change accordingly.
MONO / STEREO Button
Press this button to switch between MONO and STEREO modes.
ENGLISH
8
Page 10
• Stereo radio stations in FM mode will be shown by the ((ST)) symbol on the LCD display (19).
• If you hear unwanted noise when listening to FM stereo, try switching to MONO mode using the
MONO / STEREO (55) button. The ST symbol will disappear from the LCD display (19).
SELECTING A STATION IN THE PROGRAM MEMORY
The PRELIMINARY + (47) button: To select a station in ascending order
The PRELIMINARY - (48) button: To select station in descending order
Digital buttons 0-9: To select the desired station by pressing a number.
CD PLAYER FUNCTIONS
LOADING A COMPACT DISC
1. Press the OPEN / CLOSE (4) button to open the CD Door (21).
2. Insert a CD with the label up using the black CD holder until it comes firmly into place.
3. Press the OPEN / CLOSE (4) button to close the CD Door (21).
CAUTION: TO AVOID MOTORIZED CD DOOR MECHANISM DAMAGE, PLEASE, DON’T CLOSE
IT BY PRESSING ON THE DOOR BY HANDS.
PLAYING COMPACT DISCS
1. Turn on the system.
2. Press the FUNCTION (9) / (35) button to select CD mode.
3. Insert a disc and close the CD Door (21). The CD player will begin to read the data on the disc, then
the LCD display (19) will show the data about the disc time and number of tracks.
4. Press the Playback / Pause (5) / (54) button to begin playback.
5. Press the STOP (6) / (53) button to stop playback.
6. Press the STANDBY MODE (2) / (36) button to switch off the system.
Note: If the disc is properly loaded, the LCD display (19) will show the total number of tracks
and playback time of the disc.
If the disc is lacking or damaged, the LCD display (19) will show the symbol NO DISC
PLAYBACK / PAUSE (5) / (54) button
PLAYBACK: Press to begin playback.
PAUSE: Press to pause playback. The remaining playback time will show on the LCD display (19).
RESUME: If you press this button while the disc is paused, playback will resume with the time elapsed
showing on the LCD display (19).
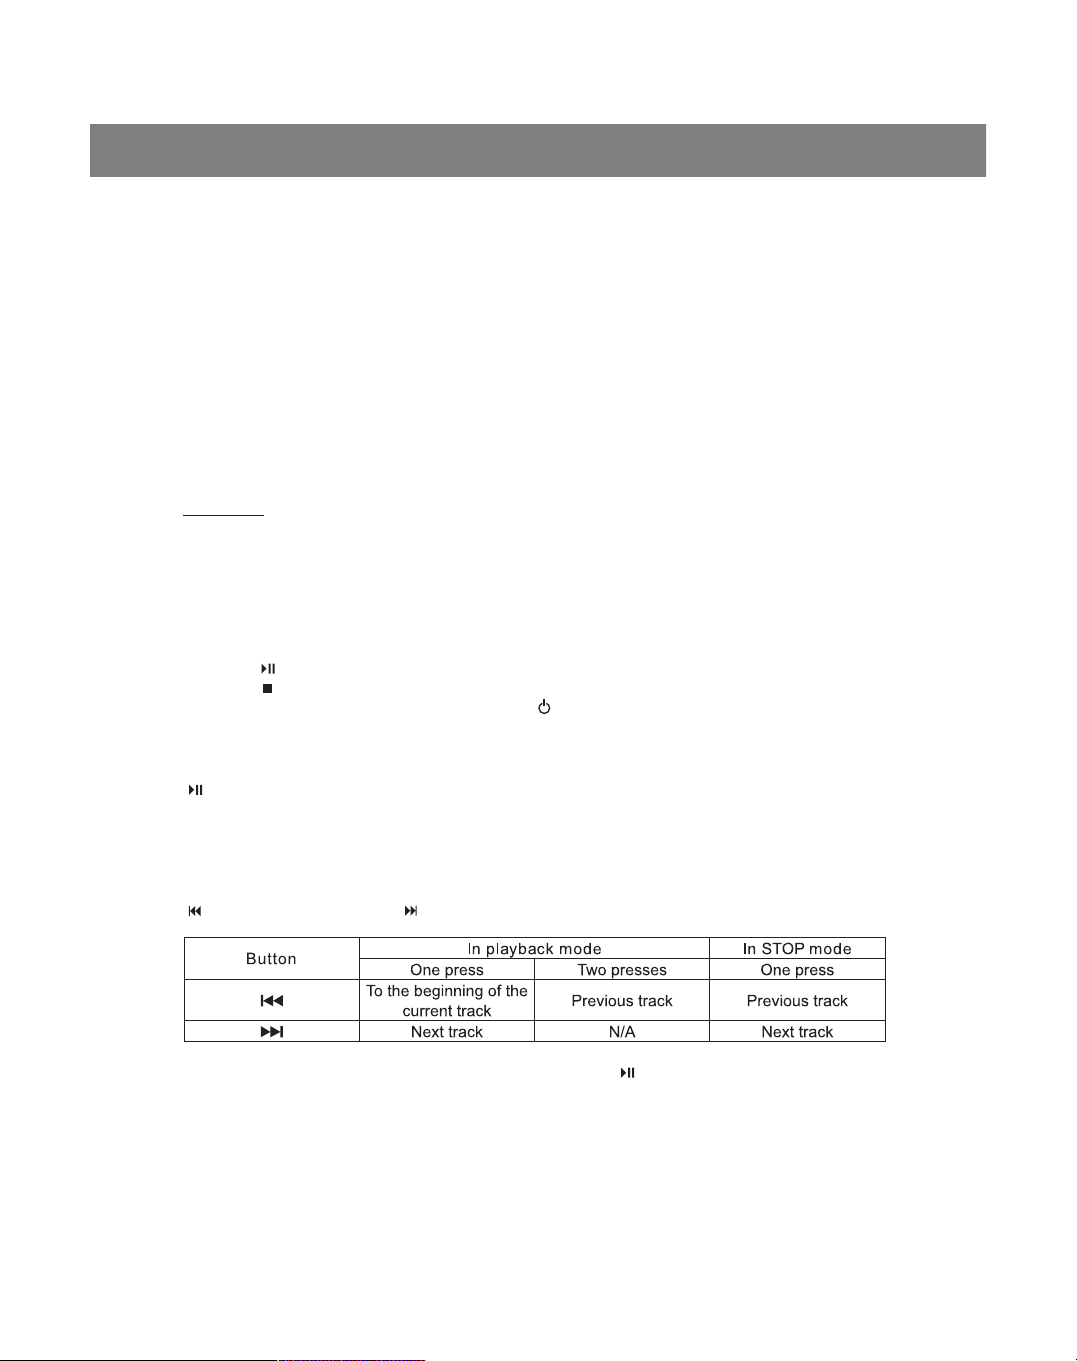
SEARCH - (7) / (37) and SEARCH + (8) / (38) buttons
Press the number of the track using buttons 0 - 9 (49) and the PLAYBACK / PAUSE (5) / (54) to play
the selected track.
REPEAT (12) / (51) button
Repeat track: Press once to play the current track again.
The LCD display (19) will show the REP 1 symbol
Repeat disc: Press twice to play all the tracks on the disc again.
The LCD display (19) will show the REP ALL symbol.
ENGLISH
9
Page 11

Cancel: Press this button until the above-mentioned symbols disappear from the LCD display (19).
RANDOM (16) / (44) button
Beginning: Press once to play tracks in random order. The LCD display (19) will show the RND symbol.
Cancel: Press once again to cancel the function.
INTRO (48) button
Beginning: Press once to switch on the function that gives you a sample of every track on the disc.
The LCD display (19) will show the INTRO symbol.
Cancel: Press once again to return to normal playback mode.
PROGRAMMING PLAYBACK
This function allows you to program the playback sequence of up to 64 tracks.
1. Press the MEMORY (13) / PROGRAM (45) button in stop mode.
The LCD display (19) will show the PGM 00 P - 01 symbol.
2. Press the SEARCH - (7) / (37) and SEARCH + (8) / (38) button to select the desired track.
3. Press the MEMORY (13) / PROGRAM (45) button to enter the track into memory.
4. Repeat stages 2 and 3 to continue to enter tracks into memory.
5. Press the PLAYBACK / PAUSE (5) / (54) button to begin playback of the programmed tracks.
Note: The program will be automatically erased if you program more than 64 tracks.
Press the MEMORY (13) / PROGRAM (45) button to view the programmed tracks.
Clearing tracks from memory
• Press the STOP (6) / (53) button in programming mode.
• Open the CD door by pressing the OPEN / CLOSE (4) button.
ABOUT CD-R / RW DISCS
• Due to changes in the CD-R/RW standard formats, we do not guarantee high quality playback
of such discs.
• Do not label both sides of CD-R/RW discs. This can lead to malfunction in playback.
• Do not use blank CD-R/RW discs because they can be damaged in playback.
MP3 PLAYER FUNCTIONS
LOADING AN MP3 DISC
1. Press the OPEN / CLOSE (4) button to open the CD Door (21).
2. Insert an MP3 disc with the label up using the black-colored holder until it falls firmly into place.
3. Press the OPEN / CLOSE (4) button to close the CD Door (21).
PLAYING COMPACT DISCS
1. Turn on the system.
2. Press the FUNCTION (9) / (35) button to select CD mode.
3. Insert a disc and close the CD Door (21). The MP3 player will begin to read the data on the disc,
then the LCD display (19) will show the data on the playback time of the disc and the number of
tracks.
4. Press the Playback / Pause (5) / (54) button to begin playback.
5. Press the STOP (6) / (53) button to stop playback.
6. Press the STANDBY MODE (2) / (36) button to switch off the system.
Note:
• If the disc is loaded properly, the LCD display (19) will show the total number of tracks and
playback time of the disc.
ENGLISH
10
Page 12

• If the disc is lacking or damaged, the LCD display (19) will show the NO DISC symbol. Playback of
MP3, CD-R/CD-RW depends on the quality of the disc recording.
PLAYBACK / PAUSE (5) / (54) button
Playback: Press once to begin playback.
Pause: Press once during playback to pause. The LCD display (19) will show the time elapsed.
Resume: If you press this button while the disc is paused, playback will resume with the time elapsed
showing on the LCD display (19).
SEARCH - (7) / (37) and SEARCH + (8) / (38) buttons
Press the number of the track using buttons 0 - 9 (49) and the PLAYBACK / PAUSE (5) / (54)
to play the selected track.
REPEAT (12) / (51) button
Repeat track: Press once to play the current track again.
The LCD display (19) will show the REP 1 symbol
Repeat disc: Press twice to play all the tracks on the disc again.
The LCD display (19) will show the REP ALL symbol.
Repeat album: Press this button three times, and the current album will be played again and the
LCD display (19) will show the REPALBUM symbol.
Cancel: Press this button until the above-mentioned symbols disappear from the LCD display (19).
RANDOM (16) / (44) button
Begining: Press once to play tracks in random order. The LCD display (19) will show the RND symbol.
Cancel: Press once again to cancel the function.
INTRO (48) button
Begining: Press once to switch on the function that gives you a sample of every track on the disc.
The LCD display (19) will show the INTRO symbol.
Cancel: Press once again to return to normal playback mode.
PROGRAMMING PLAYBACK
This function allows you to program the playback order of up to 64 tracks.
1. Press the MEMORY (13) / PROGRAM (45) button in stop mode.
The LCD display (19) will show the PGM 00 P - 01 symbol.
2. Press the SEARCH - (7) / (37) and SEARCH + (8) / (38) button to select the desired track.
3. Press the MEMORY (13) / PROGRAM (45) button to enter the track in memory.
4. Repeat stages 2 and 3 to continue to enter tracks into memory.
5. Press the PLAYBACK / PAUSE (5) / (54) button to begin playback of the programmed tracks.
Note: The program will be automatically erased if you program more than 64 tracks.
Press the MEMORY (13) / PROGRAM (45) button to view the programmed tracks.
Clearing tracks from memory
• Press the STOP (6) / (53) button in programming mode.
• Open the CD door by pressing the OPEN / CLOSE (4) button.
ENGLISH
11
Page 13

Searching according to symbol
1. Press the FIND (14) / (55) button. The LCD display (19) will show the and A symbols.
2. Press the SEARCH - (7) / (37) and SEARCH + (8) / (38) buttons to select the desired symbol.
3. Press the PLAYBACK / PAUSE (5) / (54) button to play the selected track.
Note: The list of symbols is from A-Z and 0-9
Searching by album title
1. Press the FIND (14) / (55) button twice. The LCD display (19) will show the MP3 ALBUM symbol.
2. Press the SEARCH - (7) / (37) and SEARCH + (8) / (38) button to select the desired album.
3. Press the PLAYBACK / PAUSE (5) / (54) button to begin playback of the first track
of the selected album.
About CD-R / RW discs
• Due to changes in the CD-R/RW standard format, we do not guarantee high quality playback of such
discs.
• Do not label both sides of CD-R/RW discs. This can lead to malfunction in playback.
• Do not use blank CD-R/RW discs because they can be damaged in playback.
CASSETTE PLAYER/RECORDER FUNCTIONS
SAFETY PRECAUTIONS
• To achieve high quality playback, you must use high-quality cassettes.
For best results use cassettes from well-known manufacturers.
• Use only C-30, C-60 and C-90 type cassettes.
• We do not recommend using type cassettes C-120, because their thin tape can cause mechanical
instability in the cassette mechanism.
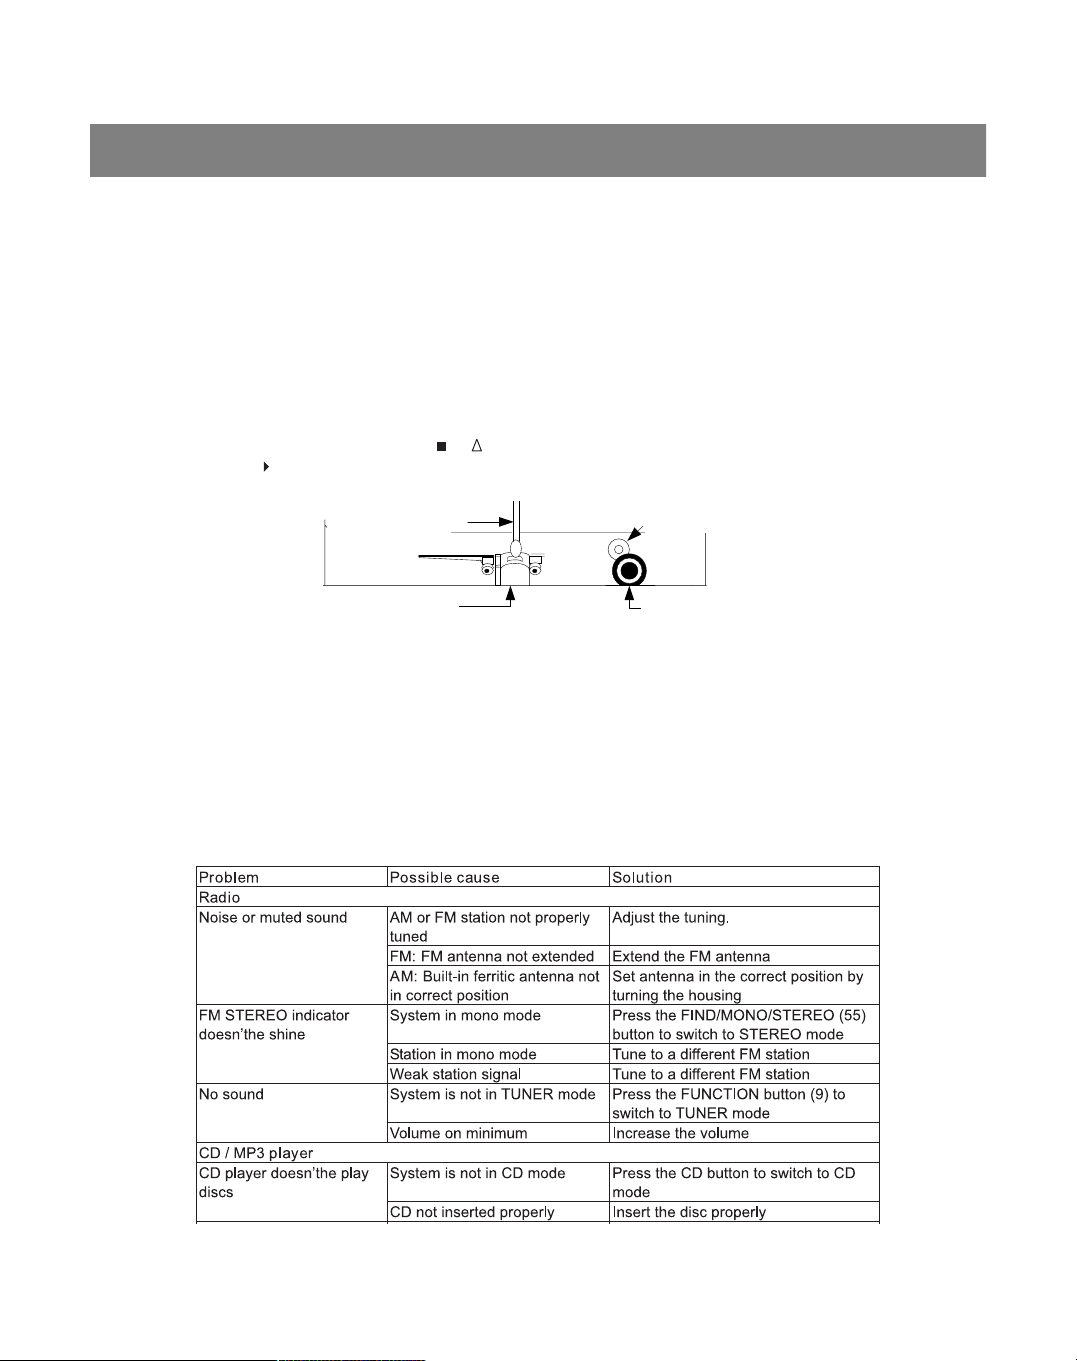
Checking the cassette
Before inserting a cassette in the system, make sure that the tape is tightly wound. Loose tape can wind
around the head mechanism and break it. Use a pencil to tighten the tape as shown in drawing A.
Protection against unwanted recording
• Remove the top tabs on the cassette (as shown in drawing B) to make the cassette unrecordable.
• To re-enable recording on the cassette, cover the hole with adhesive tape as shown in drawing C.
CASSETTE PLAYBACK
1. Turn on the system.
2. Press the FUNCTION (9) / (35) button to select the cassette mode.
The LCD display (19) will show the TAPE symbol.
3. Insert a recorded cassette in the cassette door (28).
4. Press the PLAYBACK (30) button to begin playback.
5. Press the / STOP / EJECT (33) button to stop playback.
6. Press the / STOP / EJECT (33) button to open the cassette door (28).
7. Press the STANDBY MODE (2) / (36) button to switch off the system.
ENGLISH
12
A B C
Page 14

PLAYBACK (30) button
Activation: Press to begin playback of the cassette.
PAUSE (34) button
PAUSE: Press to pause playback.
RESUME: Press to resume playback.
/ STOP / EJECT (33) button
STOP: Press to stop playback.
EJECT: Press to open the cassette door (28).
REVERSE (29) and FORWARD (32) buttons.
Rewinding: Press to wind the tape backward or forward.
Note: When the winding is finished, press the / STOP / EJECT (33) button.
RECORD (31) button
Activation: Press to begin recording.
RECORDING FROM RADIO
1. Insert a blank cassette into the system and close the cassette door (28).
2. Press the FUNCTION (9) / (35) button and select TUNER mode.
3. Press the RANGE (10) / (56) button to select the desired range.
4. Press the TUNING - (7) / (52) or TUNING + (8) / (40) button to select a radio station.
5. Press the RECORD (31) and PLAYBACK (30) buttons to begin recording.
6. Press the / STOP / EJECT (33) button to stop recording.
RECORDING FROM A CD
1. Insert a blank cassette into the system and close the cassette door (28).
2. Press the FUNCTION (9) / (35) button and select CD mode.
3. Insert the disc and close the CD door (21). If necessary, select a track using the SEARCH - (7) /
(37) or SEARCH + (8) / (38) buttons.
4. Press the RECORD (31) and PLAYBACK (30) buttons to begin recording. The LCD display (19)
will show the "SYNC" symbol and playback of the disc will begin automatically.
5. Press the / STOP / EJECT (33) button to stop recording.
RECORDING FROM AN MP3 DISC
1. Insert a blank cassette into the system and close the cassette door (28).
2. Press the FUNCTION (9) / (35) button and select CD mode.
3. Insert the disc and close the CD door (21). If necessary, select a track using the SEARCH - (7) /
(37) or SEARCH + (8) / (38) buttons.
4. Press the RECORD (31) and PLAYBACK (30) buttons to begin recording. The LCD display (19)
will show the "SYNC" symbol and playback of the disc will begin automatically.
5. Press the / STOP / EJECT (33) button to stop recording.
Note: At the end of the tape, the cassette mechanism will automatically stop while playing or recording.
If you press a wrong combination of buttons, this will damage the tape in the cassette
player/recorder.
USE AND CARE
COMPACT DISC
• Handle discs carefully. Hold them only by the edges. Do not touch the recorded side of the disc with
your fingers.
• Do not stick or attach anything to a compact disc.
ENGLISH
13
Page 15
• Periodically clean discs using a soft cloth. Never use aerosols or anti-static products. If necessary,
you can use a special product for cleaning compact discs.
• If you notice disruptions during compact disc playback, it is possible that the disc is dirty
of damaged (scratched).
• When cleaning a disc, wipe it from the center to its edges. Never use circular motion.
• To remove a disc from its box, press on the center of the box and remove the disc by holding
it by its edges.
• Use only a soft cloth to wipe away fingerprints and dust.
CLEANING THE MAGNETIC HEADS
• To avoid electric shock, unplug the system from the power outlet.
• The magnetic head, roller and capstan require periodic cleaning. Dirt, oxides, and metal residue
from the cassette tapes accumulate on these mechanisms, which worsens the quality of playback.
Turn on the system and press the / STOP / EJECT (33) button to open the cassette door (28),
press the PLAYBACK (30), button clean the head, roller and capstan using a soft cloth or cotton
swab soaked in alcohol as shown in the drawing below.
ATTENTION: Never use metal objects next to the cassette
head. Don't let the cloth get entangled in the cassette mechanism.
CLEANING THE SYSTEM
• To avoid electric shock, unplug the system from the power outlet.
• If the housing gets dusty, wipe it with a soft cloth.
• If the housing gets dirty, clean it with a cloth slightly soaked in soapy water. Never use abrasive
materials or products for polishing, because this can damage the outer coating
ATTENTION: When cleaning, don't allow liquid to get inside the housing.
TROUBLESHOOTING
If problems arise, check the following before contacting a service center:
ENGLISH
14
COTTON SWAB
CAPSTAN
MAGNETIC HEAD
PINCH ROLLER
Page 16

SPECIFICATIONS
Radio
Frequency range: AM 522 - 1620 KHz, FM 87.5 - 108 MHz
CD player
System playback: Motorized vertical CD mechanism
Frequency response: 100 - 18000 Hz
Cassette player/recorder
Recording system: DC Bias
Erasing system: Magnetic
Autostop system: Playback / Recording
Audio
Output power: 2 x 5 W @ 10% THD
Headphone resistance: 8 - 32 Om
Speaker columns
Resistance: 4 Ohm
Speakers: 4" woofers + 2" tweeters
Housing: Wood
Front grating: Removable
General
Power source: AC 230V ~ 50Hz
DC 3V - 1 "CR2025" lithium battery (included)
for remote control
Power consumption: 28 W
Size (mm): System: 194(W) x 282(H) x 200(L) mm
Speakers: 150(W) x 273(H) x 170(L) mm
Accessories
Instructions Qty. 1
Remote control Qty. 1
Speaker wires 1 pair
IN ORDER TO DELIVER THE BEST QUALITY, THE SPECIFICATION OF THE UNIT MIGHT
CHANGE WITHOUT SUBJECT OF NOTICE
SERVICE LIFE OF THE UNIT NOT LESS 5 YEARS
ENGLISH
15
Page 17

ПЕРЕД ИСПОЛЬЗОВАНИЕМ, ПОЖАЛУЙСТА, ВНИМАТЕЛЬНО ПРОЧТИТЕ ИНСТРУКЦИЮ
ПЕРЕЗАГРУЗКА СИСТЕМЫ
В случае не включения, заедания или отсутствия правильной
индикации на дисплее, используйте острый предмет для нажатия
кнопки. Перезагрузка системы (27) в нижней части корпуса для
перезагрузки встроенного микрокомпьютера, как показано на рисунке
ниже. Отключите микросистему от электросети и подождите
несколько секунд, пока встроенный микрокомпьютер перезапустится.
Примечание: Используйте зубочистку или карандаш для нажатия и
удерживания несколько секунд кнопки ВЫКЛЮЧАТЕЛЯ.
Содержание Ñòð. ¹
Перезагрузка системы 16
Меры предосторожности 16
Условия техники безопасности при эксплуатации 17
Устройства управления 18
Настройка и соединение 19
Цифровые часы и таймер 20
Основные функции 22
Функции тюнера 22
Функции CD 23
Функции MP3 25
Функции кассетного магнитофона 27
Эксплуатация и уход 28
Устранение неисправностей 30
Спецификации 31
МЕРЫ ПРЕДОСТОРОЖНОСТИ
Пожалуйста, обратите внимание на следующую информацию:
• Система должна быть подключена к сети с тем же напряжением, которое указано на корпусе
системы. В противном случае возникает угроза возгорания системы
• Не подвергайте систему нагреванию свыше 35 градусов.
• Избегайте установки в местах вблизи от обогревателей и участков с прямым солнечным
светом
• Обеспечьте хорошую циркуляцию воздуха.
• Предохраняйте систему от пыли, влажности и попадания воды.
• Избегайте сильных магнитных полей, например возле ТВ и колонок других устройств.
• Не используйте сильнодействующие химические реагенты при чистке устройства.
• Не смазывайте детали, подвижные механизмы системы. CD плеер не требует технического
обслуживания.
• Для технического обслуживания используйте только сертифицированные центры
обслуживания.
16
РУССКИЙ
Этот знак указывает, что система под
опасным напряжением, есть риск
поражения электрическим током.
Этот знак указывает на содержание
важной информации по пользованию
и обслуживанию системы.
Page 18

Предупреждение:
• Для предупреждения угрозы огня или поражения электрическим током, не используйте
систему в дождь или влажную погоду на открытом месте.
• Не помещайте на систему капающие или протекающие сосуды (вазы) с жидкостью.
• При длительном использовании системы необходима нормальная вентиляция.
УСЛОВИЯ ТЕХНИКИ БЕЗОПАСНОСТИ ПРИ ЭКСПЛУАТАЦИИ
• Данное оборудование было создано и произведено в соответствии с европейскими
стандартами безопасности, но, как и любое электронное оборудование требует ухода для
обеспечения качества работы и безопасности.
• Прочитайте инструкцию по эксплуатации перед использованием.
• Убедитесь, что все электросоединения (включая розетки, удлинители и соединения между
частями оборудования) выполнены в соответствии с инструкциями. Отключайте вилку
сетевого шнура от электросети при замене соединительных проводов.
• При каких-либо вопросах по установке, работе или безопасности вашей системы - свяжитесь
с вашим торговым агентом.
• Соблюдайте осторожность при работе со стеклянными панелями и дверцами системы.
• Прекратите эксплуатацию системы, если она функционирует со сбоями либо повреждена,
отключите систему от электросети и свяжитесь с торговым агентом.
• Не снимайте какую-либо закрепленную панель, т.к. компоненты могут находиться под
напряжением.
• Не оставляйте систему включенной в случае если она не используется.
• Не прослушивайте наушники на большой громкости, т.к. это может повредить слух.
• Не препятствуйте вентиляции системы, например занавеской или обивочным материалом.
Перегрев может привести к поломке либо преждевременный износ компонентов системы.
• Не эксплуатируйте систему в дождь или влажную погоду в незащищенном месте.
Прежде всего:
• Никогда не разрешайте, особенно детям, вставлять в отверстия, слоты или другие открытые
части системы какие-либо предметы, т.к. это может привести к поражению электрическим
током.
• Никогда не принимайте сомнительных решений при работе с электрооборудованием любого
òèïà.
• Лучше быть в безопасности, чем потом жалеть!
17
РУССКИЙ
Осторожно!
КЛАСС 1 ЛАЗЕРНОЕ УСТРОЙСТВО
Использование регулировок, выполнение
иных функций, не указанных в инструкции,
может привести к риску, связанному с
излучением лазера.
БЕЗОПАСНОСТЬ
Система снабжена лазером. Только
квалифицированный персонал может
ремонтировать систему.
ОПАСНО: НЕВИДИМОЕ ЛАЗЕРНОЕ
ИЗЛУЧЕНИЕ ПРИ ОТКРЫТИИ И
ОТСУТСТВИИ БЛОКИРОВКИ.
ИЗБЕГАЙТЕ ПРЯМОГО
ПОПАДАНИЯ ЛУЧА ЛАЗЕРА. ВНИМАНИЕ:
ОПАСНОЕ ЛАЗЕРНОЕ ИЗЛУЧЕНИЕ ПРИ
ОТКРЫТИИ И ОТСУТСТВИИ БЛОКИРОВКИ.
CLASS 1 LASER DEVICE
LUOKAN 1 LASERLAITE
KLASS 1 LASERAPPARAT
Примечание: Если в помещении с данной системой одновременно
используется флуоресцентные лампы, то возможны сбои в работе
системы.
Page 19

УСТРОЙСТВА УПРАВЛЕНИЯ
ГЛАВНАЯ СИСТЕМА
18
РУССКИЙ
Вид спереди
Вид сверху
Вид снизу
Вид сзади
Вид спереди
1. Сенсор дистанционного управления
2. Кнопка РЕЖИМ ОЖИДАНИЯ (STANDBY)
3. Индикатор РЕЖИМ ОЖИДАНИЯ (STANDBY)
4. Кнопка ОТКРЫТЬ/ЗАКРЫТЬ Дископриемник
5. Кнопка ВОСПРОИЗВЕДЕНИЕ/ ПАУЗА
6. Кнопка СТОП (STOP)
7. Кнопка ПОИСК/НАСТРОЙКА-
(SEARCH/TUNE -)
8. Кнопка ПОИСК/НАСТРОЙКА+
(SEARCH/TUNE +)
9. Кнопка ФУНКЦИЯ (FUNCTION)
10.Кнопка ДИАПАЗОН(RANGE)
11.Кнопка ЭКВАЛАЙЗЕР (EQUALIZER)
12.Кнопка ПОВТОР
13.Кнопка ПАМЯТЬ
14.Копка НАЙТИ
15.Кнопка ТАЙМЕР
16.Кнопка ПРОИЗВОЛЬНО
17.Разъем для подключения наушников
18. Кнопка понижения громкости
19.ЖК-дисплей
Page 20

ПУЛЬТ ДИСТАНЦИОННОГО УПРАВЛЕНИЯ
НАСТРОЙКА И СОЕДИНЕНИЕ
Замена батареи пульта дистанционного управления
1. Переверните пульт и выдвиньте крышку отсека для батареи.
2. Установите одну литиевую батарею типа "CR2025" согласно
полярности изображенной на батарейном отсеке.
3. Закройте крышку отсека для батареи.
19
РУССКИЙ
20. Кнопка увеличения громкости
21.Дверца CD
Вид сзади
22.Разъем Левой колонки
23.Разъем Правой колонки
24.Шнур питания
25.FM Антенна
26.Выход Сабфувера
N Выбор напряжения (опция)
Вид снизу
27.Кнопка перезагрузки системы
Вид сверху
28.Дверца кассеты
29.Кнопка ПЕРЕМОТКА НАЗАД (REVERSE)
30.Кнопка ВОСПРОИЗВЕДЕНИЕ (PLAY)
31.Кнопка ЗАПИСЬ (RECORD)
32.Кнопка ПЕРЕМОТКА ВПЕРЕД (FORWARD)
33. / Кнопка СТОП/ВЫБРОС (STOP/EJECT)
34.Кнопка ПАУЗА
35.Кнопка ФУНКЦИЯ (FUNCTION)
36.Кнопка
37.Кнопка ПОИСК / НАСТРОЙКА -
38.Кнопка ПОИСК / НАСТРОЙКА +
39.Кнопка ГРОМКОСТЬ +
40.Кнопка настройки радио
41.Кнопка ГРОМКОСТЬ -
42.Кнопка ТАЙМЕР
43.Кнопка РЕЖИМ ОЖИДАНИЯ
44.Кнопка ПРОИЗВОЛЬНО
45.Кнопка ПРОГРАММА
46.Кнопка ИНТРО
47.Кнопка ПРЕДВАРИТЕЛЬНО +
48.Кнопка ПРЕДВАРИТЕЛЬНО -
49.Кнопки Цифровые 1-9
50.Кнопка ЭКВАЛАЙЗЕР
51.Кнопка ПОВТОР
52.Кнопка настройки радио
53.Кнопка
54.Кнопка
55.Кнопка НАЙТИ / MOНO / СТЕРЕО
56.Кнопка ДИАПАЗОН
57.Кнопка НЕТ ЗВУКА
58.Инфракрасный передатчик
МЕРЫ ПРЕДОСТОРОЖНОСТИ
Следуйте этим мерам при использовании батареи в устройстве.
1. Используйте батареи только установленного типа и размера
2. Убедитесь в правильности полярности при установке батареи. Неправильная
полярность может привести к поломке устройства.
3. Если устройство не испольуется долгое время, вытащите батарею для предотвращения
поломки в случае утечки батареи.
4. Не пытайтесь зарядить батарею, она может перегреться и взорваться (Следуйте
инструкциям производителей батарей).
Page 21

Антенное соединение
FM: Полностью расправьте FM Антенну (25). Ели прием будет
происходить в режиме стерео, на ЖК-дисплее (19) загорится символ
((ST)).
AM: Данная система снабжена встроенной ферритовой антенной, для
получения лучшего сигнала вращайте корпус системы.
Подключение колонок
1. Для подключения проводов колонок, нажмите на рычажок Разъема
правого динамика (23) и Разъема левого динамика (22).
2. Убедитесь, что провода колонок подключены к разъемам колонок соблюдая полярность.
Подключите левую колонку к разъему L а правую колонку к разъему R
Подключение наушников
Возможно использование наушников (в комплект не входят). Вставьте 3,5 мм штекер в разъем
НАУШНИКИ (17). Используйте адаптеры, если у наушников штекер другого размера. При
подключении наушников колонки автоматически отключаются.
Меры безопасности
Для защиты слуха следуйте следующим рекомендациям.
• Отрегулируйте громкость звука перед прослушиванием. После начала прослушивания,
отрегулируйте звук по собственному усмотрению.
• Не прослушивайте наушники на очень высокой громкости. Это может привести к потере
слуха.
Основные подключения
Данная система предназначена для использования напряжения питания 230 Вольт / 50 Гц.
Подключение системы к сети с иным напряжением может привести к поломке системы и
аннулированию гарантийного срока. Если вилка питания не подходит к розетке в вашем доме,
замените розетку с помощью квалифицированного электрика.
Подключения к электросети
1. Полностью расправьте Шнур питания (24).
2. Вставьте вилку шнура питания в ближайшую розетку.
3. Как только система подключена к электросети, ее компоненты находятся в режиме ожидания.
Для полного отключения системы выдерните вилку сетевого шнура из розетки.
ЦИФРОВЫЕ ЧАСЫ И ТАЙМЕР
Установка цифровых часов
Подключите вилку Шнура питания (24) к сетевой розетке, на ЖК-дисплее (19) замигает символ
1. Нажмите и удерживайте кнопку ПАМЯТЬ (13) / ПРОГРАММА (45) около 2 секунд для
установки формата отображения времени.
2. Нажимайте кнопки ПОИСК - (7) / (37) или ПОИСК + (8) / (38) до выбора нужного
формата отображения времени.
3. Нажмите кнопку ПАМЯТЬ (13) / ПРОГРАММА (45) для сохранения выбора, после чего на ЖКдисплее (19) появятся два мигающих символа для установки часа текущего времени.
4. Нажимайте кнопки ПОИСК - (7) / (37) или ПОИСК + (8) / (38) для установки часа
текущего времени.
5. Нажмите кнопку ПАМЯТЬ (13) / ПРОГРАММА (45) для сохранения установки часа, после чего
20
РУССКИЙ
Page 22

на ЖК-дисплее (19) появятся два мигающих символа для установки минут текущего времени.
6. Нажимайте кнопки ПОИСК - (7) / (37) или ПОИСК + (8) / (38) для установки минут
текущего времени.
7. Нажмите кнопку ПАМЯТЬ (13) / ПРОГРАММА (45) для сохранения установки минут и
немедленной активации цифровых часов.
Примечание: Операция установки прекратится, если кнопка ПАМЯТЬ (13) / ПРОГРАММА (45) не
нажата в течение 10 секунд.
После нажатия кнопки РЕЖИМ ОЖИДАНИЯ (2) / (36) для отключения системы, часы
продолжат работать.
Установка Таймера
1. Нажмите кнопку РЕЖИМ ОЖИДАНИЯ (2) / (36) для включения системы.
2. Нажмите и удерживайте 2 секунды кнопку ТАЙМЕР (15) / (42) до появления символа
" ON" после чего на ЖК-дисплее (19) появятся два мигающих символа для установки часа
включения системы.
3. Нажимайте кнопки ПОИСК - (7) / (37) или ПОИСК + (8) / (38) для установки часа
включения.
4. Нажмите кнопку ТАЙМЕР (15) / (42) для сохранения установки часа, после чего на ЖК-дисплее
(19) появятся два мигающих символа для символа для установки минут включения системы.
5. Нажимайте кнопки ПОИСК - (7) / (37) или ПОИСК + (8) / (38) для настройки минут
включения системы.
6. Нажмите кнопку ТАЙМЕР (15) / (42) для появления символа выключения системы " OFF"
после чего на ЖК-дисплее (19) появятся два мигающих символа для установки часа времени
выключения системы.
7. Повторите пункты 3-5.
8. Нажмите кнопку ТАЙМЕР (15) / (42) для сохранения установок и появления символа "TUNER"
на ЖК-дисплее (19).
9. Нажимайте кнопки ПОИСК - (7) / (37) или ПОИСК + (8) / (38) для выбора режима
воспроизведения.
10.Нажмите кнопку ТАЙМЕР (15) / (42) для сохранения режима воспроизведения, после чего на
ЖК-дисплее (19) появится символ "VOL 15" для установки желаемого уровня громкости.
11.Нажимайте кнопки ПОИСК - (7) / (37) или ПОИСК + (8) / (38) для выбора желаемого
уровня громкости.
12.Нажмите кнопку ТАЙМЕР (15) / (42) для включения ТАЙМЕРА и появления символа " " на
ЖК-дисплее (19).
Примечание: Для установки Таймера должны быть правильно установлены цифровые часы.
Операция установки прекратится, если кнопка ПАМЯТЬ (13) / ПРОГРАММА (45) не нажата в
течение 10 секунд.
Таймер может быть настроен на включение / выключение системы. Для этого должны быть
правильно настроены цифровые часы.
Если система находится в режиме ожидания, она автоматически включится в
запрограммированное время в одном из режимов (CD èëè ТЮНЕР).
Например: Для работы в режиме ТЮНЕР, в систему должен быть вставлен CD.
Установка Режима ожидания (автоматическое отключение системы)
Когда система включена, время ее автоматического отключения может быть установлено на 9080-70-60-50-40-30-20-10 минут. Нажимайте кнопку Режим ожидания (43) до появления на
ЖК-дисплее (19) желаемого времени. Система отключится через выбранный период времени.
Примечание: Если время воспроизведения CD короче, чем период выбранного времени, музыка
выключится до отключения системы.
21
РУССКИЙ
Page 23

ОСНОВНЫЕ ФУНКЦИИ
ВКЛЮЧЕНИЕ СИСТЕМЫ
Нажмите кнопку РЕЖИМ ОЖИДАНИЯ (2) / (36) для включения системы. Нажмите кнопку
РЕЖИМ ОЖИДАНИЯ (2) / (36) для отключения системы. Текущее время отобразится на ЖКдисплее (19).
ВЫБОР РЕЖИМА РАБОТЫ
Нажмите кнопку ФУНКЦИЯ (9) / (35) для выбора режима воспроизведения (CD, Кассета или
ТЮНЕР).
Кнопка ГРОМКОСТЬ (20) / ГРОМКОСТЬ + (39):
Нажмите для увеличения громкости.
Кнопка ГРОМКОСТЬ (18) / ГРОМКОСТЬ - (41):
Нажмите для уменьшения громкости.
Примечание: Всего 40 уровней настройки громкости звука, уровень громкости отображается на
ЖК-дисплее (19).
Внимание! Прослушивание на высокой громкости может повредить слух пользователя,
особенно при прослушивании в наушниках.
Кнопка НЕТ ЗВУКА (57):
Включено: Нажмите для отключения звука, уровень звука отображается на ЖК-дисплее (19).
Отключено: Нажмите для включения звука, уровень звука отображается на ЖК-дисплее (19).
Кнопка ЭКВАЛАЙЗЕР (11) / (50)
Нажимайте для выбора желаемого звукового эффекта воспроизведения с отображением на ЖКдисплее (19). Эта кнопка обеспечивает выбор режимов эквалайзера: КЛАССИКА, РОК, ПОП И
ДЖАЗ.
ФУНКЦИИ ТЮНЕРА
Управление режимом ТЮНЕР
1. Нажмите кнопку РЕЖИМ ОЖИДАНИЯ (2) / (36) для включения системы.
2. Нажимайте кнопку ФУНКЦИЯ (9) / (55) для выбора режима ТЮНЕР.
3. Нажмите кнопку РЕЖИМ ОЖИДАНИЯ (2) / (36) для выключения системы.
Автоматический поиск радиостанций
1. Нажмите и удерживайте кнопку НАСТРОЙКА - (7) / (52) или НАСТРОЙКА + (8) / (40) для начала
поиска радиостанции.
2. Нажмите и удерживайте кнопку НАСТРОЙКА - (7) / (52) или НАСТРОЙКА + (8) / (40) для начала
поиска следующей радиостанции.
Примечание: Во время поиска звук будет автоматически выключен.
Автоматический поиск находит только радиостанции с достаточно сильным сигналом.
Для радиостанций со слабым сигналом применяется ручная настройка.
Ручной поиск радиостанций
1. Нажимайте кнопку ДИАПАЗОН (10) / (56) до выбора желаемого диапазона.
2. Нажмите кнопку НАСТРОЙКА - (7) / (52) или НАСТРОЙКА + (8) / (40) для настройки на
приблизительную частоту желаемой радиостанции, частота настройки отразится на ЖКдисплее (19).
3. Последовательно нажимайте кнопку НАСТРОЙКА - (7) / (52) или НАСТРОЙКА + (8) / (40) для
настройки на желаемую частоту.
Программирование радиостанций
1. В режиме ТЮНЕР выберите прием FM или AM.
22
РУССКИЙ
Page 24

2. Выберете радиостанцию с помощью автоматического поиска или ручной настройки.
3. Нажмите кнопку ПАМЯТЬ (13) / (45), высветится символ PGM и на ЖК-дисплее (19) замигает
цифра 01.
4. Нажмите кнопку ПРЕДВАРИТЕЛЬНО - (48) или ПРЕДВАРИТЕЛЬНО + (47) пока на ЖК-дисплее
(19) не появится желаемый номер ячейки памяти.
5. Еще раз нажмите кнопку ПАМЯТЬ (13) / (45) для занесения радиостанции в выбранную ячейку
памяти.
6. Для занесения в память последующих радиостанций повторите этапы 2-5.
Примечание: Операция установки прекратится, если кнопка ПАМЯТЬ (13) / ПРОГРАММА (45) не
нажата в течение 10 секунд.
В память можно занести до 10 радиостанций диапазона FM и 10 радиостанций диапазона AM..
Изменение позиций ячеек памяти
Если необходимо поменять порядок ячеек памяти радиостанций, необходимо внести в ячейку
частоту новой радиостанции, позиция предыдущей соответственно изменится.
Кнопка MONO / STEREO
Нажимайте кнопку для переключения между режимами приема МОНО и СТЕРЕО.
• Стерео радиостанции в режиме FM будут отображаться символом ((ST)) на ЖК-дисплее (19).
• В случае если при приеме стерео радиостанции появляются шумы рекомендуется
переключить режим приема на МОНО с помощью кнопки МОНО / СТЕРЕО (55). Символ ST
исчезнет с ЖК-дисплея (19).
Выбор станции в программной памяти
Кнопка ПРЕДВАРИТЕЛЬНО + (47) Для выбора станций в восходящем порядке
Кнопка ПРЕДВАРИТЕЛЬНО - (48) Для выбора станций в нисходящем порядке
Цифровые кнопки 0-9: Для выбора желаемой станции набором номера.
ФУНКЦИИ CD ПЛЕЕРА
Загрузка компакт-диска
1. Нажмите кнопку ОТКРЫТО/ЗАКРЫТО (4) для открытия Дверцы CD (21).
2. Вставьте CD - диск этикеткой наружу используя держатель черного цвета до полной фиксации
диска.
3. Нажмите кнопку ОТКРЫТО / ЗАКРЫТО (4) для закрытия Дверцы CD (21).
ВО ИЗБЕЖАНИИ ПОЛОМКИ МЕХАНИЗМА ПРИВОДА ДВЕРЦЫ CD, НЕ ДОПУСКАЙТЕ
ЗАКРЫВАНИЯ ДВЕРЦЫ РУКАМИ
Проигрывание компакт-дисков
1. Включите систему.
2. Нажмите кнопку ФУНКЦИЯ (9) / (35) для выбора CD режима.
3. Вставьте диск и закройте Дверцу CD (21). CD плеер начнет считывать данные, после чего на
ЖК-дисплее (19) появятся данные о времени диска и количестве треков.
4. Нажмите кнопку Воспроизведение / Пауза (5) / (54) для начала воспроизведения.
5. Нажмите кнопку СТОП (6) / (53) для остановки воспроизведения.
6. Нажмите кнопку РЕЖИМ ОЖИДАНИЯ (2) / (36) для выключения системы.
Примечание: Если диск правильно загружен, на ЖК-дисплее (19) отобразится общее количество
треков и время проигрывания диска.
Если диск отсутствует или поврежден, на ЖК-дисплее (19) будет отображен символ NO DISC
Кнопка ВОСПРОИЗВЕДЕНИЕ / ПАУЗА (5) / (54)
ВОСПРОИЗВЕДЕНИЕ: Нажмите для начала воспроизведения.
ПАУЗА: Нажмите для приостановки воспроизведения, истекшее время воспроизведения
23
РУССКИЙ
Page 25

отобразится на ЖК-дисплее (19).
ВОЗОБНОВИТЬ: При нажатии во время паузы возобновляет воспроизведение с текущего
момента, отображенного на ЖК-дисплее (19).
Кнопки ПОИСК - (7) / (37) и ПОИСК + (8) / (38)
Наберите номер трека кнопками 0 - 9 (49) на пульте и затем ВОСПРОИЗВЕДЕНИЕ / ПАУЗА
(5) / (54) для воспроизведения выбранного трека.
Кнопка ПОВТОР (12) / (51)
ПОВТОР ТРЕКА: Нажмите один раз, и проигрываемый трек будет повторно воспроизведен, на
ЖК-дисплее (19) появится символ REP 1
ПОВТОР ДИСКА: Нажмите два раза, и проигрываемый диск будет повторно воспроизведен, на
ЖК-дисплее (19) появится символ REP ALL.
ОТМЕНА: Нажимайте, пока с ЖК-дисплея (19) не исчезнут вышеуказанные символы.
Кнопка ПРОИЗВОЛЬНО (16) / (44)
НАЧАЛО: Нажмите один раз для проигрывания треков в произвольном порядке, на ЖК-дисплее
(19) появится символ RND.
ОТМЕНА: Нажмите еще раз для отмены функции.
Кнопка ИНТРО (48)
НАЧАЛО: Нажмите один раз для включения функции обзора каждого трека диска, на ЖК-
дисплее (19) появится символ INTRO .
ОТМЕНА: Нажмите еще раз для возврата к нормальному режиму воспроизведения.
Программирование воспроизведения треков
Данная функция позволяет запрограммировать последовательность воспроизведения до 64
треков.
7. Нажмите кнопку ПАМЯТЬ (13) / ПРОГРАММА (45) в режиме стоп, на ЖК-дисплее (19) появится
символ PGM 00 P - 01.
8. Нажмите кнопку ПОИСК - (7) / (37) или ПОИСК + (8) / (38) для выбора желаемого трека.
9. Нажмите кнопку ПАМЯТЬ (13) / ПРОГРАММА (45) для ввода трека в память.
10.Повторите этапы 2 и 3 для прдолжения заполнения ячеек памяти.
11.Нажмите кнопку ВОСПРОИЗВЕДЕНИЕ / ПАУЗА (5) / (54) для начала воспроизведения
запрограммированных треков.
Примечание: Программа будет автоматически стерта, если вы запрограммируете свыше 64
треков.
Нажимайте кнопку ПАМЯТЬ (13) / ПРОГРАММА (45) для просмотра запрограммированных
треков.
Очистка памяти от треков
Нажмите кнопку СТОП (6) / (53) в режиме программирования.
Откройте CD дверцу нажатием кнопки ОТКРЫТЬ / ЗАКРЫТЬ (4).
24
РУССКИЙ
Page 26

Информация о CD-R / RW дисках
• Из-за изменений в стандартах формата CD-R/RW не гарантируется высокое качество их
воспроизведения.
• Не наклеивайте этикетки на обе стороны CD-R/RW дисков. Это может привести к сбоям в
работе CD проигрывателя.
• Не используйте чистые CD-R/RW диски т.к. при чтении возможно повреждение диска.
ФУНКЦИИ MP3 ПЛЕЕРА
Загрузка MP3 диска
4. Нажмите кнопку ОТКРЫТЬ / ЗАКРЫТЬ (4) для открытия Дверцы CD (21).
5. Вставьте MP3 - диск этикеткой наружу используя держатель черного цвета до полной
фиксации диска.
6. Нажмите кнопку ОТКРЫТЬ / ЗАКРЫТЬ (4) для закрытия Дверцы CD (21).
Проигрывание компакт-диска
1. Включите систему.
2. Нажмите кнопку ФУНКЦИЯ (9) / (35) для выбора режима CD.
3. Вставьте диск и закройте Дверцу CD (21). MP3 плеер начнет считывать данные, после чего на
ЖК-дисплее (19) появятся данные о времени диска и количестве треков.
4. Нажмите кнопку Воспроизведение / Пауза (5) / (54) для начала воспроизведения.
5. Нажмите кнопку СТОП (6) / (53) для остановки воспроизведения.
6. Нажмите кнопку РЕЖИМ ОЖИДАНИЯ (2) / (36) для выключения системы.
Примечание: Если диск правильно загружен, на ЖК-дисплее (19) отобразится общее количество
треков и время проигрывания диска.
Если диск отсутствует или поврежден, на ЖК-дисплее (19) отобразится символ NO DISC .
Воспроизведение MP3, CD-R/CD-RW зависит от качества записи диска.
Кнопка ВОСПРОИЗВЕДЕНИЕ / ПАУЗА (5) / (54)
ВОСПРОИЗВЕДЕНИЕ: Нажмите один раз для начала воспроизведения.
ПАУЗА: Нажмите один раз во время воспроизведения для приостановки, истекшее время
воспроизведения отобразится на ЖК-дисплее (19).
ВОЗОБНОВИТЬ: При нажатии во время паузы возобновляет воспроизведение с текущего
момента, отображенного на ЖК-дисплее (19).
Кнопки ПОИСК - (7) / (37) и ПОИСК + (8) / (38)
Наберите номер трека кнопками 0 - 9 (49) на пульте и затем ВОСПРОИЗВЕДЕНИЕ / ПАУЗА
(5) / (54) для воспроизведения выбранного трека.
Кнопка ПОВТОР (12) / (51)
ПОВТОР ТРЕКА: Нажмите один раз, и проигрываемый трек будет повторно воспроизведен, на
ЖК-дисплее (19) появится символ REP 1
ПОВТОР ДИСКА: Нажмите два раза и все треки диска будут повторно воспроизведены, на ЖК-
дисплее (19) появится символ REP ALL
25
РУССКИЙ
Page 27
ПОВТОР АЛЬБОМА: Нажмите три раза, и проигрываемый альбом будет повторно
воспроизведен, на ЖК-дисплее (19) появится символ REP ALBUM
ОТМЕНА: Нажимайте, пока с ЖК-дисплея (19) не исчезнут вышеуказанные символы.
Кнопка ПРОИЗВОЛЬНО (16) / (44)
НАЧАЛО: Нажмите один раз для проигрывания треков в произвольном порядке, на ЖК-дисплее
(19) появится символ RND.
ОТМЕНА: Нажмите еще раз для отмены функции.
Кнопка ИНТРО (48)
НАЧАЛО: Нажмите один раз для включения функции обзора каждого трека диска, на ЖК-
дисплее (19) появится символ INTRO.
ОТМЕНА: Нажмите еще раз для возврата к нормальному режиму воспроизведения.
Программирование воспроизведения треков
Данная функция позволяет запрограммировать последовательность воспроизведения до 64
треков.
18.Нажмите кнопку ПАМЯТЬ (13) / ПРОГРАММА (45) в режиме стоп, на ЖК-дисплее (19)
появится символ PGM 00 P - 01.
19.Нажмите кнопку ПОИСК - (7) / (37) и ПОИСК + (8) / (38) для выбора желаемого трека.
20.Нажмите кнопку ПАМЯТЬ (13) / ПРОГРАММА (45) для ввода трека в память.
21.Повторите этапы 2 и 3 для продолжения заполнения ячеек памяти.
22.Нажмите кнопку ВОСПРОИЗВЕДЕНИЕ / ПАУЗА (5) / (54) для начала воспроизведения
запрограммированных треков.
Примечание: Программа будет автоматически стерта, если вы запрограммируете свыше 64
треков.
Нажимайте кнопку ПАМЯТЬ (13) / ПРОГРАММА (45) для просмотра запрограммированных
треков.
Очистка памяти от треков
Нажмите кнопку СТОП (6) / (53) в режиме программирования.
Откройте CD дверцу нажатием кнопки ОТКРЫТО / ЗАКРЫТО (4).
Поиск по символу
1. Нажмите кнопку НАЙТИ (14) / (55), на ЖК-дисплее (19) появятся символы и A.
2. Нажмите кнопку ПОИСК - (7) / (37) и ПОИСК + (8) / (38) для выбора желаемого символа.
3. Нажмите кнопку ВОСПРОИЗВЕДЕНИЕ / ПАУЗА (5) / (54) для воспроизведения выбранного
трека.
Примечание: Список символов от A-Z è 0-9
Поиск по названию альбома
1. Нажмите кнопку НАЙТИ (14) / (55) дважды, на ЖК-дисплее (19) появится символ MP3 ALBUM.
2. Нажмите кнопку ПОИСК - (7) / (37) и ПОИСК + (8) / (38) для выбора желаемого
альбома.
3. Нажмите кнопку ВОСПРОИЗВЕДЕНИЕ / ПАУЗА (5) / (54) для начала воспроизведения
первого трека выбранного альбома.
Информация о CD-R / RW дисках
• Из-за изменений в стандартах формата CD-R/RW не гарантируется высокое качество их
воспроизведения.
• Не наклеивайте этикетки на обе стороны CD-R/RW дисков. Это может привести к сбоям в
26
РУССКИЙ
Page 28

работе CD проигрывателя.
• Не используйте чистые CD-R/RW диски т.к. при их чтении возможно повреждение диска.
ФУНКЦИИ КАСЕТНОГО МАГНИТОФОНА
МЕРЫ ПРЕДОСТОРОЖНОСТИ
Рекомендуемые кассеты
• Для достижения высокого качества воспроизведения необходимо использовать
высококачественные кассеты. Для достижения лучшего результата используйте кассеты
известных производителей.
• Используйте только кассеты типа С-30, с-60 и С-90 .
• Мы не рекомендуем использовать кассеты типа С-120, т.к. из-за большой длины ленты может
возникнуть механическая нестабильность работы ее механизма.
Проверка кассеты (Провис ленты)
Прежде чем вставлять кассету в систему, убедитесь, что нет провисание магнитофонной ленты,
т.к. лента может обвиться вокруг механизма головки и вызвать поломку. Используйте карандаш
для устранения провиса как это показано на рис. А.
Предохранитель записи - защита от случайной записи
• Удалите предохранитель (как это показано на рис. В) для предотвращения случайного
включения режима записи при нажатии на кнопку записи.
• Для восстановления кассеты заклейте гнездо скотчем, как это показано на рис. С.
Воспроизведение кассеты
1. Включите систему.
2. Нажмите кнопку ФУНКЦИЯ (9) / (35) для выбора режима КАССЕТА, на ЖК-дисплее (19)
появится символ TAPE.
3. Вставьте кассету с записью в Дверцу кассеты (28).
4. Нажмите кнопку ВОСПРОИЗВЕДЕНИЕ (30) для начала воспроизведения.
5. Нажмите кнопку / СТОП / ВЫБРОС (33) для остановки воспроизведения.
6. Нажмите кнопку / СТОП / ВЫБРОС (33) для открытия Дверцы кассеты (28).
7. Нажмите кнопку РЕЖИМ ОЖИДАНИЯ (2) / (36) для выключения системы.
Кнопка ВОСПРОИЗВЕДЕНИЕ (30)
Активация: Нажмите для начала воспроизведения кассеты.
Кнопка ПАУЗА (34)
ПАУЗА: Нажмите для приостановки воспроизведения.
ВОЗОБНОВИТЬ: Нажмите для возобновления воспроизведения.
Кнопка / СТОП / ВЫБРОС (33)
СТОП: Нажмите для остановки воспроизведения.
ВЫБРОС: Нажмите для открытия Дверцы кассеты (28).
27
РУССКИЙ
ðèñ. À
ðèñ. B
ðèñ. C
Page 29

Кнопка НАЗАД (29) и ВПЕРЕД. (32)
Перемотка: Нажмите для перемотки ленты кассеты назад или вперед.
Примечание: По окончании перемотки нажмите кнопку / СТОП / ВЫБРОС (33).
Кнопка ЗАПИСЬ (31)
Активация: Нажмите для начала записи.
Запись с радио
1. Вставьте чистую кассету в систему и закройте Дверцу кассеты (28).
2. Нажмите кнопку ФУНКЦИЯ (9) / (35) и выберите режим ТЮНЕР.
3. Нажмите кнопку ДИАПАЗОН (10) / (56) для выбора желаемого диапазона.
4. Нажмите кнопку НАСТРОЙКА - (7) / (52) или НАСТРОЙКА + (8) / (40) для выбора
радиостанции.
5. Нажмите кнопку ЗАПИСЬ (31) и ВОСПРОИЗВЕДЕНИЕ (30) для начала записи.
6. Нажмите кнопку / СТОП / ВЫБРОС (33) для остановки записи.
Запись с CD
1. Вставьте чистую кассету в систему и закройте Дверцу кассеты (28).
2. Нажмите кнопку ФУНКЦИЯ (9) / (35) и выберите режим CD.
3. Вставьте диск и закройте дверцу CD (21). При необходимости выберите трек с помощью
кнопок ПОИСК - (7) / (37) или ПОИСК + (8) / (38).
4. Нажмите кнопку ЗАПИСЬ (31) и ВОСПРОИЗВЕДЕНИЕ (30) для начала записи, на ЖКдисплее (19) появится символ "SYNC" при этом воспроизведение диска начнется
автоматически.
5. Нажмите кнопку / СТОП / ВЫБРОС (33) для остановки записи.
Запись с MP3 диска
1. Вставьте чистую кассету в систему и закройте Дверцу кассеты (28).
2. Нажмите кнопку ФУНКЦИЯ (9) / (35) и выберите режим CD.
3. Вставьте диск и закройте дверцу СВ (21). При необходимости выберите трек с помощью
кнопок ПОИСК - (7) / (37) или ПОИСК + (8) / (38).
4. Нажмите кнопку ЗАПИСЬ (31) и ВОСПРОИЗВЕДЕНИЕ (30) для начала записи, на ЖКдисплее (19) появится символ "SYNC" при этом воспроизведение диска начнется
автоматически.
5. Нажмите кнопку / СТОП / ВЫБРОС (33) для остановки записи.
Примечание:
• По окончании кассетной ленты, кассетный механизм автоматически остановится во время
воспроизведении или записи.
• Нажатие несоответствующих комбинаций кнопок могут повредить кассетную ленту в
магнитофоне.
ЭКПЛУАТАЦИЯ И УХОД
КОМПАКТ-ДИСК
• Обращайтесь с диском аккуратно. Держите только за края. Не трогайте записанную сторону
диска пальцами рук.
• Ничего не приклеивайте и не прикрепляйте к компакт-диску.
• Периодически чистите диск с помощью тряпки из мягкой материи. Никогда не используйте
аэрозоли или антистатические средства. В случае необходимости приобретите специальное
средство для чистки компакт-дисков.
• Если при воспроизведении компакт-диска наблюдаются сбои или паузы, возможно диск
загрязнен или поврежден (поцарапан).
• При чистке протирайте диск от центра диска к его краям. Никогда не потирайте диск
28
РУССКИЙ
Page 30

круговыми движениями.
• Чтобы извлечь диск из коробки, нажмите на центр коробки и извлеките диск, держа его за
края.
• Отпечатки пальцев и пыль вытирайте только с помощью тряпки из мягкой материи.
ЧИСТКА МАГНИТНЫХ ГОЛОВОК
• Во избежание поражения электрическим током отключите систему от электросети.
• Магнитная головка, ролик и ось требуют периодической чистки. На этих механизмах
собирается грязь, оксиды, металлические частицы от кассетной ленты, что ухудшает
качество воспроизведения. Включите систему и нажмите кнопку / СТОП / ВЫБРОС (33)
для открытия Дверцы кассеты (28), нажмите кнопку ВОСПРОИЗВЕДЕНИЕ (30), очистите
головку, ролик и ось с помощью тряпки из мягкой материи или ваты, смоченных спиртом, как
это показано на рисунке ниже.
ВНИМАНИЕ: Никогда не используйте металлические объекты рядом с кассетной головкой.
Избегайте попадания ткани в кассетный механизм системы.
ЧИСТКА СИСТЕМЫ
• Во избежание поражения электрическим током отключите систему от электросети.
• Если корпус запылился, протрите его мягкой тряпкой.
• Если корпус загрязнился или заляпан, очистите его с помощью тряпки, слегка смоченной в
мыльном растворе. Никогда не используйте абразивные материалы или средства для
полировки, т.к. это может повредить покрытие корпуса
ВНИМАНИЕ: При чистке избегайте попадания жидкости и воды внутрь корпуса.
29
РУССКИЙ
Ватный тампон
Магнитная головка
Прижимной ролик
Îñü
Page 31

УСТРАНЕНИЕ НЕИСПРАВНОСТЕЙ
При возникновении неисправности, прежде чем обращаться в сервисный центр, проверьте
следующее:
30
РУССКИЙ
Page 32

СПЕЦИФИКАЦИИ
Радио
Диапазон частот: AM 522 - 1620 ÊÃö
FM 87.5 - 108 ÌÃö
CD плеер
Система воспроизведения: Вертикальный CD механизм с электроприводом
Диапазон воспроизводимых частот: 100 - 18000 Гц
Кассетный магнитофон
Система записи: DC Bias
Система стирания: Магнитная
Система автоостановки: Воспроизведение / Запись
Аудио
Выходная мощность: 2 x 5 Ватт @ 10% THD
Сопротивление наушников: 8 - 32 Îì
Колонки
Сопротивление: 4 Ом
Динамики: 4" НЧ + 2" ВЧ
Корпус: Деревянный
Передняя решетка: Съемная
Общее
Источник питания : AC 230 Â ~ 50 Ãö
DC 3 В - 1 шт. "CR2025" литиевая батарея (в комплекте)
для пульта дистанционного управления
Потребление мощности 28 Ватт
Размеры (мм) Система: 194(Ш) x 282(В) x 200(Д) мм
Колонки: 150(Ш) x 273(В) x 170(Д) мм
Аксессуары
Инструкция: 1 шт.
Пульт дист. управления: 1 шт.
Провод для колонок: 1 ïàðà
В ПРОЦЕССЕ ПОСТОЯННОГО УСОВЕРШЕНСТВОВАНИЯ ПРОДУКЦИИ, ПРОИЗВОДИТЕЛЬ
ОСТАВЛЯЕТ ЗА СОБОЙ ПРАВО ВНОСИТЬ ИЗМЕНЕНИЯ В ТЕХНИЧЕСКИЕ ХАРАКТЕРИСТИКИ
МИНИСИСТЕМЫ БЕЗ ПРЕДВАРИТЕЛЬНОГО УВЕДОМЛЕНИЯ ПОТРЕБИТЕЛЕЙ
СРОК СЛУЖБЫ МИНИСИСТЕМЫ НЕ МЕНЕЕ 5 ЛЕТ
31
РУССКИЙ
 Loading...