

Page 1

User guide
Page 2

TABLE OF CONTENTS
GETTING STARTED
Buttons and Ports ................................................................................................................ 6
Installing the SIM Card and micro SD Card .............................................................7
Charging the Battery ...........................................................................................................7
Turning Your Phone On/O ............................................................................................ 8
Setting Up Your Phone Out of the Box ..................................................................... 8
Home Screen ......................................................................................................................... 9
Using the Touch Screen ................................................................................................... 9
PERSONALIZING YOUR PHONE
Changing the System Language ................................................................................ 10
Setting Date and Time .....................................................................................................10
Ringtone, Notification and System Sounds ..........................................................10
Volume Adjustment/Silent and Vibrate Modes .....................................................11
Do Not Disturb .......................................................................................................................11
Wallpaper ................................................................................................................................12
Brightness ..............................................................................................................................12
Screen Locks ....................................................................................................................... 13
Screen Pinning .................................................................................................................... 13
THE BASICS
Status Bar .............................................................................................................................. 14
Shortcuts and Widgets ................................................................................................... 16
Folders and Organization...............................................................................................16
Primary Shortcuts .............................................................................................................. 16
Entering Text ........................................................................................................................ 16
Keyboard .................................................................................................................................17
Glide Typing .......................................................................................................................... 18
Google Voice Typing ........................................................................................................ 18
Using Applications ............................................................................................................. 18
GETTING CONNECTED
Connecting to a Wireless Network ........................................................................... 19
2
Page 3

Adding a Wi-Fi Network .................................................................................................. 19
Forgetting a Wi-Fi network...........................................................................................20
Connecting to Bluetooth Devices ............................................................................. 20
Forgetting a Bluetooth Device ......................................................................................21
Connecting to a Computer ............................................................................................21
Using micro SD Card for Storage ...............................................................................21
Sharing Your Phone’s Data Connection ................................................................. 23
MAKING PHONE CALLS
Placing a Call by Dialing ................................................................................................. 24
Ending a Call ....................................................................................................................... 24
Answering or Rejecting a Call .................................................................................... 24
Call History ............................................................................................................................25
Placing a Call from your Contacts List ................................................................... 26
Checking Voice Mail ........................................................................................................ 26
In-Call Options .................................................................................................................... 26
Managing Multi-party Calls ...........................................................................................27
Switching Between Current Calls ..............................................................................27
Setting up a Three Way Call .........................................................................................27
Call Settings .........................................................................................................................27
Voicemail ............................................................................................................................... 28
CONTACTS
Adding a New Contact ................................................................................................... 28
Favorites ................................................................................................................................ 29
Editing a Contact .............................................................................................................. 29
EMAIL
Adding an Email Account ..............................................................................................30
Removing an Account .....................................................................................................30
Responding to Email ....................................................................................................... 30
Composing and Sending an Email............................................................................. 31
Adding a Signature to Email ......................................................................................... 31
Email Settings ...................................................................................................................... 31
3
Page 4

MESSAGING
Sending a Message ......................................................................................................... 32
Replying to a Message ................................................................................................... 32
Forwarding a Message ................................................................................................... 33
Deleting a Message or Thread ................................................................................... 33
Message Settings ............................................................................................................. 33
CALENDAR
Creating an Event ............................................................................................................. 33
Calendar Settings ............................................................................................................. 34
INTERNET BROWSER - GOOGLE CHROME
Opening a Web Page ...................................................................................................... 34
CAMERA
Taking a Photo .....................................................................................................................35
Recording A Video.............................................................................................................35
Camera Setting ...................................................................................................................35
GOOGLE PHOTOS
Sharing Albums, Photos or Videos ........................................................................... 36
Deleting Albums, Photos or Videos.......................................................................... 36
Editing Photos .................................................................................................................... 36
Creating an Animation or Collage ............................................................................. 36
Playing Videos .....................................................................................................................37
MUSIC
Copying Music Files to Your Phone ..........................................................................37
Viewing Your Music Library ...........................................................................................37
VIDEOS
Managing Video Files ...................................................................................................... 38
Deleting a Video ................................................................................................................ 38
4
Page 5

OTHER APPS
Calculator ............................................................................................................................. 38
Clock ....................................................................................................................................... 38
Google Apps ........................................................................................................................ 39
SETTINGS
Wireless and Network ....................................................................................................40
Apps and Notifications .................................................................................................... 41
Battery ..................................................................................................................................... 41
Display ..................................................................................................................................... 41
Sound ....................................................................................................................................... 41
Storage ................................................................................................................................... 41
Security ................................................................................................................................... 41
Location .................................................................................................................................. 41
Accounts ................................................................................................................................ 41
Accessibility .......................................................................................................................... 41
Google ..................................................................................................................................... 41
System .................................................................................................................................... 41
TROUBLESHOOTING
.................................................................................................................................... 42
SOFTWARE UPDATES
....................................................................................................................................44
5
Page 6

GETTING STARTED
Buttons and Ports
7
8
14
1
2 6
5 124
10
9
13
11
3
1
Home Button
2
Back Button
3
Headset Jack
4
USB/Charging Port
5
Microphone
6
Recent Apps Button
7
Front Camera
8
Earpiece
9
Flash
10
Back Camera
11
Power/Lock Key
12
Speaker
13
Volume Keys
14
SIM/Micro SD Card Slot
6
Page 7
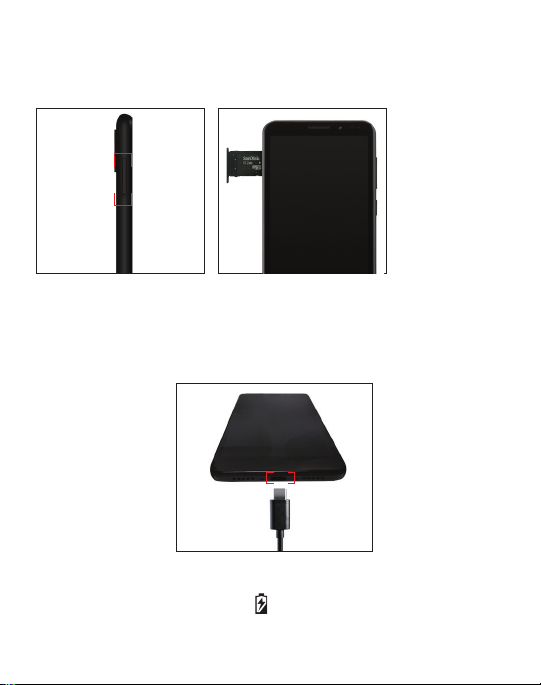
Installing the SIM Card and micro SD Card
Phone should be powered o before installing or removing
SIM or micro SD card.
Charging the Battery
While your phone’s battery should have enough juice out-of-the box
to power on, find a signal and even make a few calls, you should
fully charge the battery as soon as possible.
Connect the included USB cable to both the phone and wall charger.
Plug the wall charger into a standard electrical outlet. If the phone
is on, you will see a charging icon in the status bar.
7
Page 8

If the battery is extremely low, you may not be able to
power on the phone. Wait 20 minutes and try again.
WARNING!
Improper handling of the charging port and use of an incompatible charger
may cause damage to your device and void the warranty.
TIP: Extend your battery’s life:
Conserve battery power by adjusting the following
settings on select applications:
• Lower Screen brightness.
• Reduce Backlight time.
• Turn Bluetooth and Wi-Fi o when not in use.
• Disable GPS when not in use.
• Enable the battery saver feature.
Use only an approved charging accessory to charge your phone.
Turning Your Phone On/Off
To turn your phone on, press and hold the power/lock key.
Follow the prompts.
Setting Up Your Phone Out of the Box
When you turn on your phone for the first time (or after a
reset to factory settings) you will need to set it up before use.
Select your language preference and follow the prompts.
8
Page 9
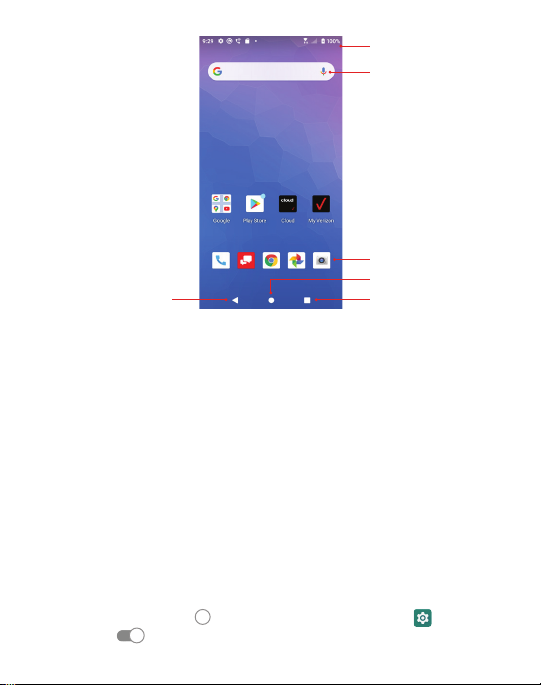
Home Screen
Back
Status Bar
Google Search Bar
Apps Shortcuts
Home Key
Recent Apps
Using the Touch Screen
Your phone’s touch screen allows you to use specific actions to move
around the screen, open menus, select items such as apps, zoom in
and out of websites, take photos, and perform much more with a
variety of touch gestures.
Swipe or Slide – quickly drag your finger across the screen
horizontally or vertically.
Drag – Touch and hold your finger on an item to move it
into a new position.
Pinch – Place two fingers on the screen simultaneously and pinch them
together to zoom in or spread your fingers apart to zoom out.
Rotate the Screen – Rotate your phone sideways to switch
from portrait to landscape mode, and vice versa.
Note: The auto rotate function must be turned on for this to work.
Touch the Home screen
> Advanced >To turn auto-rotate screen ON/OFF.
> swipe up for apps > Settings > Display
9
Page 10
PERSONALIZING YOUR PHONE
Changing the System Language
Touch the Home key > swipe up for apps > Settings
> System > Languages & input > Languages.
To add a system language, touch ‘Add a Language’ and scroll
down the list and touch a language to select it.
(Some languages will have many regions, touch region to select).
Remove a Language:
Click on Language > Remove > Check the box of the languages
you want removed > touch
Setting Date and Time
Touch the Home key > swipe up for apps > Settings
> System > Date & Time.
Date & time and time zone are set automatically
to network-provided time. To set manually:
• Touch Use network-provided time
• Set the date and time manually.
• Touch Use network-provided time zone
• Select a time zone.
• Touch Use local default
• Touch Use 24-hour format
Ringtone, Notification and System Sounds
Touch Home > swipe up for apps > Settings > Sound.
Select a Phone Ringtone
• Touch Phone Ringtone.
• Scroll down the list and select a ringtone.
• Touch OK.
OK
to turn ON/OFF.
10
to turn OFF.
to turn OFF.
to turn ON/OFF.
Page 11
Turn Alarm Sounds On/O:
• Touch the Home key > swipe up for apps > Settings > Sound.
Turn Default Alarm Sound On/O:
• Settings
• Touch None to turn it OFF or select a Ringtone > Ok to turn it ON.
Turn Other Sounds On/O:
• Touch the Home key > swipe up for apps > Settings
> Sound > Advanced.
• Scroll down until you see “Other sounds and vibrations”
and select this option.
• Touch
> Sound > Advanced > Default Alarm Sound
the icon next to each option to turn It ON or OFF.
.
Volume Adjustment/Silent and Vibrate Modes
To adjust volume:
• Touch the Home key > swipe up for apps > Settings > Sound.
• Drag slider below Media Volume, Alarm Volume, Ring Volume
to adjust.
To set Silent and Vibrate Modes:
• Touch Home key
• Drag sliders to the left to turn Silent ON. Ring volume will
automatically go to vibrate.
• Or, lower the Volume Keys on the side of the phone until you
feel the phone vibrate. Touch it again to enter Silent Mode.
> swipe up for apps > Settings > Sound.
Do Not Disturb
Use Do Not Disturb Mode to limit interruptions.
• Touch the Home key
> Sound > Do Not Disturb.
• Touch See All Exceptions
> swipe up for apps > Settings
11
Page 12
• Exceptions Only Allows – only notifications marked
Exceptions will work.
• Touch
Restrict notifications:
• Touch
• Schedule when notifications are ON or OFF.
• Default duration: - Touch
• Event rule > enter rule name > Ok.
• Schedules - Touch square to turn ON/OFF, touch settings > Edit to
set days, start time and end time, and preferences to set specific
time periods during which Do Not Disturb mode is on.
• Touch
next to each option to turn it ON/OFF.
next to each option to turn it ON/OFF.
to select duration.
to delete a rule.
Wallpaper
You can customize the wallpaper on the home screen and lock screen.
• Touch and hold an “empty” space on the home screen.
• Touch WALLPAPERS.
• For Gallery images, touch Photos, select picture, move, pinch
or spread to choose the part of the image you want to use.
• Touch SET WALLPAPER.
Brightness
• Touch the Home key > swipe up for apps
> Settings > Display > Brightness Level.
• Slide your finger to adjust the brightness.
You can also select ADAPTIVE Brightness and your phone
will automatically adjust the brightness level.
12
Page 13

Screen Locks
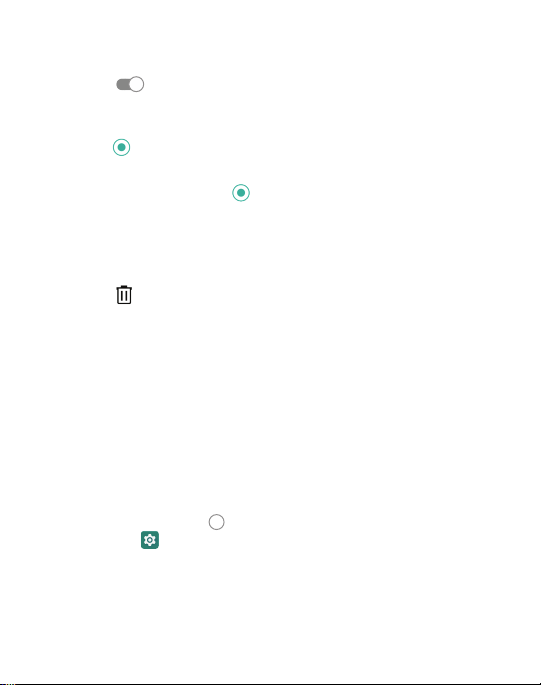
You can secure your phone by using a screen lock.
When enabled, you will use your finger to draw a pattern
or enter a PIN number password to unlock your phone’s screen.
• Touch the Home key
> Settings > Security > Screen lock.
• Touch None, Swipe, Pattern, PIN or Password.
• Touch None to disable screen lock.
• Touch Swipe to enable and allow unlocking by swiping
black area on the screen.
• Touch Pattern to create a pattern that you will draw
on the screen to unlock it.
• Touch PIN or Password to create a PIN or Password
that must be entered to unlock the screen.
• For Pattern, PIN or Password, select your preference for notifications
and their contents to show the phone is locked. Press Done.
Note:
It is important to remember your Pattern, PIN or Password.
If you forget it, you will have to reset your phone to factory state,
this process will erase all data stored in your phone.
> swipe up for apps
Screen Pinning
You can use Screen Pinning to keep one app in view,
preventing other users from switching onto other apps
and accessing any personal information.
• Touch the Home key
> Settings > Security > Screen Pinning.
• Touch the ON/OFF Switch
If you have a screen lock pin set up, you can add in a required
Note:
unlock pattern/PIN/Password to unpin a screen as additional security.
> swipe up for apps
.
13
Page 14
THE BASICS
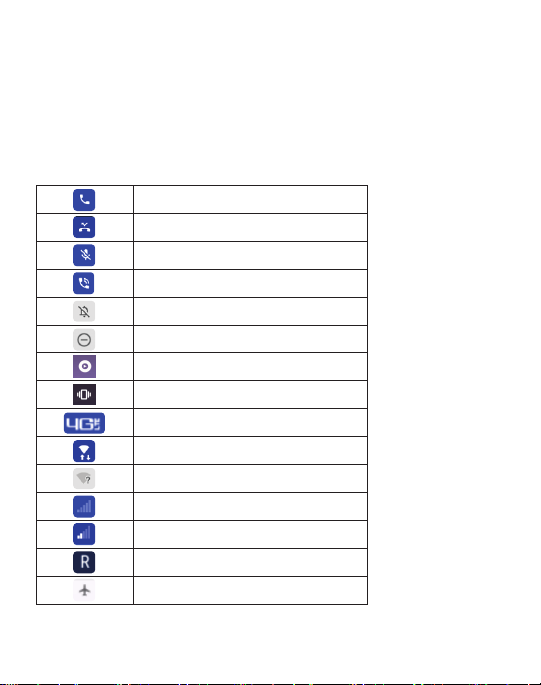
Status Bar
The Status Bar on the top of the screen provides
both phone and service status icons.
Call
Missed Call
Microphone Muted
Speaker
Silent Mode
Alarm Only
YT Music Playing
Vibrate Mode
4G LTE Connected
Wi-Fi Connected
No Connected Wi-Fi
No Signal
Signal Strength Roaming
Roaming
Airplane Mode
14
Page 15

Network Warning
No SIM Card
Uploading
Downloading
Mobile HotSpot On
USB Connected
Bluetooth Connected
Bluetooth File Reception
Headset Connected
Headset With Microphone
Internal Storage Full
Data
15
Page 16

Shortcuts and Widgets
• To create an app shortcut, touch and hold any preloaded
or downloaded app and drag it onto the home screen.
• To select a widget, touch any empty area
on the home screen and select widgets.
• Touch and hold a widget or app to drag it to the home screen.
• To move an app or widget, touch, hold and drag it
to the desired location.
• To remove a widget or shortcut to an app,
touch and drag it to “Remove”.
Folders and Organization
Create folders on your home screen to organize shortcuts to your apps.
Touch and drag an application on top of another application to create
a folder. Once a folder is created, you can name it and drag other
applications into it. You can move folders in the same manner
as you move applications.
Primary Shortcuts
On the bottom of the home screen is a customizable area for your
primary applications. You can keep up to five applications here.
Drag applications in or out of this area to customize.
Entering Text
Enter text using the onscreen keyboard. Most applications open it
automatically. In others, you can open the keyboard by touching where
you wish to type. Touch the Back key to hide the on screen keyboard.
Or, use Google voice to enter text via speech.
16
Page 17

To enable additional keyboards:
• Touch the Home key > swipe up for apps > Settings
> System > Languages & Input > Virtual Keyboard
> Manage Keyboards.
• Select a keyboard in the list by touching it to enable/disable it.
Keyboard
The Google board is similar to a computer keyboard layout.
Touch a letter to enter it.
As you type, suggested words will appear. Touch one to select it.
To use upper case touch
Touch it again to return to lower case.
Touch the back key
Touch
Touch
for numbers and symbols. Touch for symbols.
to access emojis.
. Double tap to lock upper case.
to delete text.
17
Page 18

Glide Typing
The Google Keyboard allows you to slide your finger across the letters
to spell the word.
To enable Gesture Typing:
• Touch and hold the comma (,) > Android Keyboard
Settings (AOSP) > Gesture Typing.
• Touch Enable Gesture Typing to turn ON/OFF.
• Slide your finger from letter to letter to spell a word.
Do not lift your finger until you have completed spelling a word.
Google Voice Typing
Use voice recognition to convert speech to text.
You must be connected to mobile data or Wi-Fi.
• Touch the microphone
• When “Try saying something” appears,
speak what you would like to type.
• Tap the microphone
on the keyboard.
again to end recording.
Using Applications
Selected applications are preinstalled on your phone.
There are many more available in the Play Store.
Play Store
Play Store is the application store for Android phones.
Browse through to find Applications. When you find an app you want,
download it and follow the installation instructions. You can also
uninstall, update, and manage your downloaded apps.
Open an App
Simply touch an app to open it.
18
Page 19

Uninstall an App
• Touch and hold an app icon.
• Touch the App Info window that appears.
• Touch UNINSTALL. Touch OK or CANCEL.
Note:
Many preinstalled apps cannot be uninstalled.
GETTING CONNECTED
Connecting to a Wireless Network
Wi-Fi allows you to connect to the internet when you are not
within range of a wireless network or when you want to
conserve your wireless data.
• Touch the Home key > swipe up for apps
> Settings > Network & Internet > Wi-Fi.
• Touch the switch to turn Wi-Fi ON/OFF
• When Wi-Fi is on, you will see a list of available Wi-Fi networks.
• Touch a network to connect. If the network you select is secure,
you will be prompted to enter a password. Touch Connect.
Adding a Wi-Fi Network
You can manually add a Wi-Fi network when it does
not appear in the list of available networks.
• Touch the Home key
> Settings > Network & Internet > Wi-Fi.
• Make sure Wi-Fi is ON.
• Touch Add Network.
• Enter the network SSID and other required network information.
• Touch Save.
> swipe up for apps
19
.
Page 20

Forgetting a Wi-Fi network
• Touch the Home key > swipe up for apps
> Settings > Network & Internet > Wi-Fi.
• Touch network > Remove.
Connecting to Bluetooth Devices
Connect with other Bluetooth devices that are located within
a distance of approximately 30 feet. Bluetooth devices must
be paired in order to connect.
• Touch the Home key
> Connected devices > Connection preference > Bluetooth.
• Touch the switch to turn Bluetooth ON/OFF
> Pair new device.
• When Bluetooth is ON, the will appear in the status bar.
Pairing Your Phone with Another Bluetooth Device:
• Make sure Bluetooth is turned ON.
• To easily identify your phone, you can change the name.
• Touch Home
> Connected devices.
• Touch (Device name) > Rename this device.
• Enter a name and touch RENAME to continue.
• Your phone will scan for and display the names
of all available Bluetooth devices in the area.
Touch > Refresh if you want your phone to scan again.
• Touch the name of the device you want to pair with.
The Bluetooth passkey, if required, may be fixed for some devices.
Note:
Try 0000 or 1234, or refer to the instructions that came with the device.
> swipe up for apps > Settings
> swipe up for apps > Settings
20
Page 21

Forgetting a Bluetooth Device
• Touch the Home key > swipe up for apps
> Settings > Bluetooth.
• Touch the Setting icon next to the device you want to forget.
• Touch FORGET.
Connecting to a Computer
Using the supplied USB cable, connect your phone to a computer
to share files such as music, photos and other data.
• Connect your phone and computer via a USB cable.
• Touch Home key
> Connected Devices > USB.
• Select one of the following options:
• Transfer files
• USB Tethering
• MIDI
• PTP
• No data transfer
• Firewall update
Before using MTP, be sure Windows Media Player 11
Note:
or higher is installed on your computer.
> swipe up for apps > Settings
Using micro SD Card for Storage
You can use portable storage via a micro SD card to store
media and other data.
When you install a new micro SD card, the phone will
mount the card as portable storage.
To install, locate the card slot on the side of the phone.
Carefully insert the card into the slot as shown on page 7.
21
Page 22

To set up the card for storage:
• Touch the Home key
> swipe up for apps
> Settings > Storage.
• Touch the SD card name in the PORTABLE storage section.
• You can choose to “Use as Portable Storage”
or “Use as Phone Storage”
• If you Select “Use as Portable Storage”, select next,
and then select done.
• If you Select “Use as Phone Storage”, select next
and then click “Erase and Format”.
WARNING!
Once erased, data cannot be retrieved.
The formatting procedure erases all data on the micro SD card.
You will be prompted to move your photos, files and other data from the
phone’s internal storage to the SD card. Select MOVE NOW or MOVE
LATER and touch next. Follow onscreen instructions to continue.
Move Data Between SD card and Internal Storage
• Touch the Home key
> swipe up for apps
> Settings > Storage.
• Touch PHONE or the SD card name.
• Touch Migrate Data.
• Eject.
When you move data between the phone’s internal memory and external
Note:
SD card, the destination becomes the default for new apps and other data
such as photos and videos.
To remove an SD Card from Your Phone:
It is important to perform a safe removal of an SD card.
• Touch Home
> swipe up for apps > Settings > Storage.
• Touch SD card Name under Device Storage.
• Touch Remove SD Card.
22
Page 23

IMPORTANT!
to the phone’s internal storage.
• Touch Eject.
• When the screen indicates the card is safely ejected,
To reformat your SD Card as Portable Storage:
Before reformatting, be sure you move data and apps
to the phone’s internal storage.
• Touch Home
• Touch the name of the SD Card.
• Touch Format as Portable.
• Touch Format.
IMPORTANT!
This data cannot be retrieved.
Before removing, be sure to move data and apps
you can physically remove it from the phone.
> swipe up for apps > Settings > Storage.
The reformatting process will erase all data on the micro SD card.
Sharing Your Phone’s Data Connection
You can share your phone’s mobile data connection with a computer
via a USB connection or via a Wi-Fi hotspot with up to eight devices.
Data charges may apply.
To share Via Bluetooth Tethering:
• Connect your phone to a computer via a USB cable.
• Touch the Home key
> Network & Internet > Hotspot and Tethering.
• Turn on bluetooth Tethering. A new network connection
will be established on your computer.
> swipe up for apps > Settings
23
Page 24

To share Via USB:
• Connect your phone to a computer via a USB cable.
• Touch the Home key
> Wireless & Network > More > Tethering & Mobile Hotspot.
• Turn on USB Tethering.
• A new network connection will be established on your computer.
To Share Via a Wi-Fi Hotspot:
• Touch the Home key
> Network & Internet > Hotspot and Tethering.
• Choose “Mobile Hotspot” and turn it on.
Follow the onscreen prompts to setup the external
devices to use the available mobile hotspot.
• On another device, locate your phone on the list of available
Wi-Fi networks and connect to use your phone’s mobile data.
• To disconnect, switch to the OFF position.
> swipe up for apps > Settings
> swipe up for apps > Settings
MAKING PHONE CALLS
Placing a Call by Dialing
• Touch > .
• Enter the phone number.
• Touch
Ending a Call
• Touch to end the call.
Answering or Rejecting a Call
When you receive a call, the incoming call screen will open and display
the caller ID information. Once the call is received, you can:
below the keyboard to dial.
24
Page 25

Answer the call:
• If the Phone Screen is active, press ANSWER.
• If the Phone screen is locked, touch
Reject the Call:
• If the phone screen is active, press Decline.
• If the phone screen is locked, slide
Reject the Call with a Text message:
You can reject the call and send either a preset or custom text message.
• If the phone Screen is active, touch call number to
access full options” then slide up
• If the Phone screen is locked, Slide up
and slide up.
down.
.
.
Call History
Call History is a list of all calls placed and received, including missed
calls. It oers a convenient way to dial a number, return a call or add
a number to your Contacts.
• Touch
• Or, touch
To place a call from Call History:
• Open Call History.
• Touch the number for information about the call
or touch
To add a Contact from Call History:
• Open Call History.
• Touch
• Touch
• Touch to Create new Contact.
• To add the number to an existing contact, touch a contact in the list.
> > Call History.
> Recents in the tab at the bottom of the screen.
to call the number.
in front of the number.
at the top right on the screen to create new contact.
25
Page 26

Placing a Call from your Contacts List
• Touch > at the tab at the bottom of the screen.
• Touch a contact to place a call.
• Or place a call from contacts in the FAVORITES tab.
Checking Voice Mail
• Touch > .
• Touch and hold the “1” key on the keypad.
When prompted, enter your voicemail password.
• Follow the voice prompts to listen to messages
and manage your mailbox.
In-Call Options
While on a call, there are a number of options available:
• Touch
• Touch
(for example, a PIN number for your voicemail).
• Touch to mute or unmute the microphone.
• Touch
• Touch
that is already on hold.
• Touch
• Touch
to make a second call, while placing the first call on hold.
to go to keypad for when you need to enter a number
to turn the speaker ON/OFF.
to put current call on hold and switch to another call
to merge separate calls into a single conference call.
to end current call.
26
Page 27

Managing Multi-Party Calls
With Call Waiting and Three-way Calling, you can switch between two
calls or set up a conference call.
Call Waiting and Three Way calling are network supported services.
Note:
Options may vary. Additional charges may occur. Contact your service
provider for additional information.
Switching Between Current Calls
When on a call, your phone screen will alert you that another
call is coming in and display Caller ID detail on the screen.
• Swipe up to answer the call. This action puts the first call on hold.
• To switch between the calls touch phone number on screen
to switch between calls.
• Touch
• To Reject SWIPE
• Swipe
send a preset message to the caller.
on the call you are on to end it.
down.
up to reject the incoming call and
Setting up a Three Way Call
• While on a call, touch and dial the second number.
The first call will be placed on hold.
• When the second party answers, touch
• To end, touch
.
to connect both parties.
Call Settings
You can set the order in which your contacts are displayed.
• Touch
• Touch SORT BY or NAME FORMAT to customize.
> > Settings > Display Options.
27
Page 28

Sound and Vibrations
• Touch
• Touch Phone ringtone to select the desired ringtone.
• Touch Vibrate for Calls
• Touch Advanced Dialpad tones
audible sounds when you touch the keypad.
> > Settings > Sounds and Vibration.
to turn ON/OFF.
to turn ON/OFF
Voicemail
• Press Home > > > Settings > Voicemail > Advanced Settings.
• SERVICE is your carrier.
• Tap SETUP > Voicemail Number to edit/view the voicemail number.
• Tap
• Touch Advanced > Check Vibrate to enable for voicemail notification.
> > Settings > Voicemail > Notifications to set up a
notification ringtone for new voicemails.
CONTACTS
Add new contacts and synchronize them with your Google account and
other accounts.
To access contacts:
Touch the Home key
Adding a New Contact
• Touch the Home key > swipe up for apps > Contacts .
• Touch the
• Enter the contact name, phone numbers, email address,
and any additional information.
> swipe up for apps > Contacts .
sign on the lower right.
28
Page 29

Favorites
You can designate frequently used contacts as FAVORITES
and find them quickly.
To add a Contact to Favorites:
• Touch the Home key
• Select a Contact and tap the
To remove a Contact from Favorites:
• Touch the Home key
• Select a Contact and tap the
> swipe up for apps > Contacts .
at the top of the screen.
> swipe up for apps > Contacts .
at the top of the screen.
Editing a Contact
• Touch the Home key > swipe up for apps > Contacts .
• Tap a contact and then touch SAVE.
• Edit the contact and touch
To set a Ringtone for a Contact:
• Touch the Home key
• Tap the
• Touch SET RINGTONE.
• Scroll through the selections and choose your preferred ringtone.
• Touch OK.
To delete a Contact:
• Touch the Home key
• Touch the contact you want to remove.
• Tap the
• Touch DELETE.
• You will be prompted to confirm by touching DELETE.
.
.
.
> swipe up for apps > Contacts .
> swipe up for apps > Contacts .
29
Page 30
EMAIL
You can add multiple email accounts to your Orbic phone.
Adding an Email Account
• Touch the Home key > swipe up for apps > Settings
> Accounts > Add Account.
• Tap the type of account you want to add.
• Follow on screen prompts to enter information about the account.
Most accounts require username and password.
You may have to obtain some information from
your system administrator or IT support.
Removing an Account
• Touch the Home key > Settings > Accounts.
• Tap the Account you wish to remove.
• Touch REMOVE ACCOUNT.
• You will be prompted to confirm by touching REMOVE ACCOUNT.
Or touch CANCEL to keep the account.
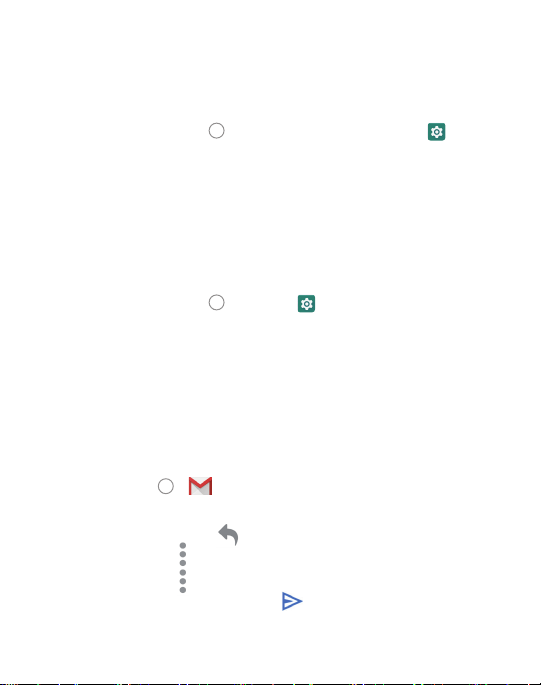
Responding to Email
You can reply to or forward an email you receive.
You can also delete email messages.
• Touch Home
• Touch an email to respond to or forward.
• To reply to sender, tap
• To Reply All tap
• To Forward, tap
• Compose your message and hit
> .
.
and select Reply All.
and select Forward.
.
30
Page 31

Composing and Sending an Email
• Open the Google folder from the home screen
and select the GMAIL application
• Touch
• If you have more than one email address set up, tap the
sender line to select the account you wish to send from.
• Enter a contact name or email address in the To field.
• To send to multiple recipients, separate each with a comma.
• You can also touch
• To send a copy or blind copy, touch the
cc/bcc fields and enter contacts.
• Enter email subject and compose the email.
• Tap
• Tap
.
to add recipients from your Contacts.
to attach files, images or other content.
to send the email message.
.
to open
Adding a Signature to Email
You can add plain text, such as your name and contact information,
as a signature for every email you send.
• Touch Home
• Tap
• Tap an email account > Mobile Signature.
• Enter the information and touch OK.
> .
> Settings .
Email Settings
Customize your email settings.
Settings apply to all email accounts you have set up.
Note:
• Touch Home > .
• Tap
• Customize based on your preferences.
> Settings > General Settings.
31
Page 32

MESSAGING
Messaging allows you to exchange text messages (SMS)
and multimedia messages (MMS).
• Touch Home
You can compose a new message, open an existing message
thread or search for a message.
• Tap
• Tap an existing message thread to open a conversation.
• Tap
Sending a Message
• On the messaging screen Tap .
• Touch the To field to add recipients:
• Enter a recipient’s number or contact name.
• Touch
• Touch
• Type your message in the text message field. If you want to
send a MMS, tap
• Tap
Replying to a Message
• On the messaging screen, tap the message you wish to respond to.
• Type your message in the text field. If you want to send a MMS,
• Tap
++ and scroll down to select an attachment.
tap
> .
to compose a new SMS or MMS.
to search for a message using keywords.
to add recipients from your contacts.
> to create new group.
++ and scroll down to select an attachment.
to send your message.
to send your response.
32
Page 33
Forwarding a Message
• In the messaging app, touch and hold a message.
• Tap forward message and click arrow in top right corner.
• Touch search, enter a recipient’s number or contact name.
• Touch
• Edit the content, if necessary.
• Tap
to add recipient’s from your contacts.
to send.
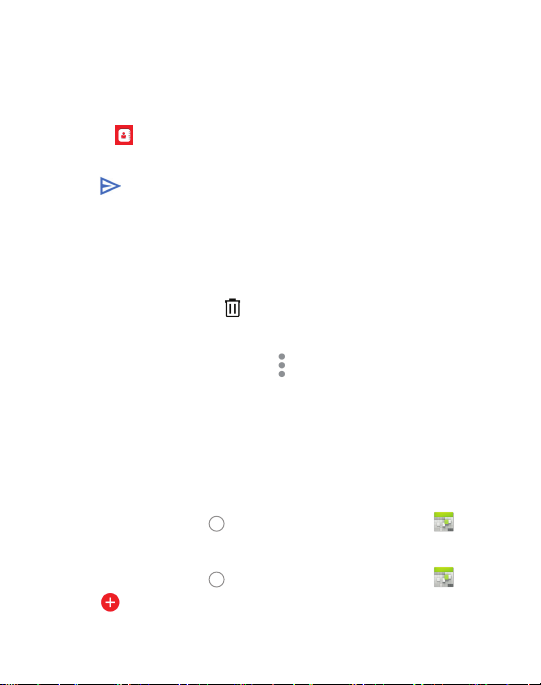
Deleting a Message or Thread
• On the messaging screen, tap and hold a
message or thread you want to delete.
• Select Delete conversation > Delete .
• Select delete message .
Message Settings
• From the message screen, Tap and select Customize,
based on your preferences.
CALENDAR
The calendar on your phone works with both Google Calendar™
and Microsoft Exchange Active Sync.
To open calendar:
• Touch the Home key
Creating an Event
• Touch the Home key > swipe up for apps > Calendar .
• Tap
• Tap Event and enter the details for your event.
.
> swipe up for apps > Calendar .
33
Page 34

Deleting and Sharing an Event
• Select the event you want to delete or share.
• Tap on it to open the details screen.
• Tap
• Tap Delete or Forward to share.
.
Calendar Settings
• Touch the Home key > swipe up for apps > Calendar .
• Tap
• Scroll down and tap
• Make your selections to customize the calendar.
on upper left of the screen.
Settings.
INTERNET BROWSER - GOOGLE CHROME
Use Google Chrome to view web pages and search for information
on the internet.
• Touch Home
The last web page you viewed will be displayed. Google Chrome will also
open when you tap a web link, for instance, in an email or text message.
Opening a Web P age
• Tap the address bar on the screen.
• Enter the web address (aka URL) or, enter terms you want to search.
• Tap to open a web page or search results.
> Chrome .
34
Page 35

CAMERA
Taking a Photo
• Touch Home > .
• Aim the camera at the subject. Tap the area of the screen
where you want the camera to focus, or allow the camera
to autofocus on the center of the image.
• Tap
Note:
WARNING! Keep a safe distance when using the flash.
Do not point the flash toward the eyes of people or animals.
Recording a Video
You can record videos using either the front or rear camera.
• Touch Home
• Tap the camera icon on the lower right to switch to video mode .
• Touch the red button to stop recording.
Note:
during the recording.
Camera Setting
Before capturing a photo or video, you can adjust the
camera settings, based on your preferences.
• Touch Home
to take the picture. You can also use the volume keys to
take a photo.
Pinch or spread out your fingers to zoom IN/OUT.
> .
Pinch or spread out your fingers to zoom IN/OUT before or
> Settings
> Camera > ... on top left corner
.
35
Page 36

GOOGLE PHOTOS
Your photos and videos are stored in the Google Photos app.
Sign in to your Google account to use these features.
• Touch the Home key
• Tap Assistant for help creating albums, photo books, and collages.
• Tap Albums to view photos and videos within an Album.
Sharing Albums, Photos or Videos
• Tap an Album, Photo or Video to select it.
• Tap
and select how you want to share the items.
Deleting Albums, Photos or Videos
• Press and hold an Album, Picture or Video to select it.
• Tap on other items you want to delete.
• Tap
> Remove to Trash.
Editing Photos
• Tap a photo to view it in full screen.
• Tap
• Select from list for available options to edit selected picture.
.
Creating an Animation or Collage
• Open the photo gallery and tap > Animation or Collage.
• Tap the images you wish to include.
• Tap create.
For a Collage, select 2–9 photos. For an Animation, select 3–50 photos.
Note:
> swipe up for apps > Photos .
36
Page 37

Playing Videos
• From your gallery, tap the thumbnail of a video
and it will begin playing.
• Tap the video to view playback controls.
MUSIC
Touch the Home key > swipe up for apps > Play Music .
Copying Music Files to Your Phone
• Connect your phone to your computer via a USB cable.
• If prompted, Tap Media Device (PTP) as the connection type.
• Copy music files from your computer to the phone’s storage
of a micro SD card.
You can also download music files using Google Play Music
(a subscription is required).
Viewing Your Music Library
• Touch the Home key > swipe up for apps > Files .
• Tap
• If you subscribe to Google Play Music, tap Home
> Audio.
swipe up for apps > Play Music
> > Music library.
>
VIDEOS
With Google Play Movies & TV, you can buy or rent videos.
You must be signed into your Google account.
• Touch the Home key
> swipe up for apps > Play Movies .
37
Page 38

Managing Video Files
• Touch the Home key > swipe up for apps > Play Movies .
• Tap Library.
• Tap Movie or TV Shows.
Deleting a Video
You can remove a video from your device, without deleting it
from your account.
• Touch the Home key
• Tap Library.
• Tap Movies or TV Shows.
• Select the video you wish to remove.
• Tap
> Remove from Device.
> swipe up for apps > Play Movies .
OTHER APPS
Calculator
• Touch the Home key > swipe up for apps > Calculator .
• While in portrait mode, tap or swipe left on the blue side bar
for more options. Or, turn the phone to landscape view.
Clock
With the Clock app, you can set times, set alarms and
check the time for destinations around the world.
• Touch the Home key
Set an Alarm
• Touch the Home key
• Tap
• Tap
.
.
> swipe up for apps > Clock .
> swipe up for apps > Clock .
38
Page 39

• Select alarm options and OK.
Using World Time
• Touch the Home key
• Tap
• Touch the Globe icon
Stopwatch and Countdown Timer
Stopwatch allows you to record lap times and Countdown allows you
to set a timer and countdown to zero.
• Touch the Home key
• Tap
• Tap
.
for stopwatch.
for countdown timer.
> swipe up for apps > Clock .
and enter a location in the search bar.
> swipe up for apps > Clock .
Google Apps
Many of these apps can be found in the Google folder
on the home screen .
Chrome™
Drive
Access your files from other devices. Sign in with your Google account.
Duo
Gmail™
Google
Maps
Photos
Play Movies and TV
latest movies and TV shows.
Play Music – Listen to music on your phone and your Google account.
Play Store
YouTube™
– Use Chrome to browse the Internet.
– Store files on Google Drive with up to 15GB of free storage.
– Make high quality video calls.
– Send and receive email.
– Use Google search to get all of the information you need.
– Find the best route to get wherever you are going.
– Manage photos on your phone and your Google account.
– Purchase/Rent, download and watch the
– Find and download apps, games and more.
– View video clips or upload your own.
39
Page 40

SETTINGS
You can access tools needed to customize and configure your phone.
• Touch the Home key
Wireless and Network
Wi-Fi Turn Wi-Fi On/O and configure settings.
Advanced Calling Toggle advanced calling (HD Voice) on/o
Mobile Network Manage mobile data, data roaming, and set access
point names.
Data Usage Turn Data Saver ON/OFF. When o, background apps
will not be able to access data. Tap Unrestricted Data Access to
allow some apps to have unrestricted data connection access,
even when Data Saver is On.
• Mobile Data -Turn mobile Data ON/OFF.
• Cellular Data Usage - Check data usage levels during
a time period
Monitor data usage for specific apps.
• Billing Cycle - Set the reset date of your data cycle.
You can also set up data usage warning and limits.
• Wi-Fi Data usage - Monitor the Wi-Fi data usage of apps.
• Network Restrictions - Select Wi-Fi networks that are metered.
Some apps will notify.
Tethering & Mobile Hotspot Use hotspot and tethering to provide
internet to other devices through your mobile data connection.
View Verizon Account
VPN Configure and manage Virtual Private Networks.
Airplane Mode Airplane Mode allows you to use Wi-Fi,
but disables the cellular network.
Bluetooth Configure Bluetooth settings, and connected devices.
(you must set up the time period)
> swipe up for apps > Settings .
.
40
Page 41

Apps and Notifications Manage the apps on your phone.
Tap an app for information about the app, quit an app, check
data usage, and manage notifications.
Battery View the battery level and change settings to optimize
battery life. You can also see what apps are using the battery.
Display Set your preferences for brightness, select a wallpaper,
set active screen time, auto screen rotation, font size and more.
Sound Set your preferences for various sounds including media,
alarm and ring volume, vibrate mode, and Do No Disturb preferences.
Storage Check memory storage on your phone and micro SD card.
Choose a default location for new data, photos and voice recordings.
Security Protect your phone with screen locks and/or encryption.
Location Activate location services.
Accounts Manage your accounts and add users.
Accessibility Adjust accessibility settings to assist users
who have impaired vision, hearing or reduced dexterity.
• Touch Home > swipe up for apps > Settings > Accessibility.
• Tap a category and set the desired options.
Google
Manage setting for Google apps and services on your device.
System Set date, time and how it is displayed. View system
updates status.
41
Page 42

TROUBLESHOOTING
ISSUE
Poor reception
Echo or Noise
on a Call
Unable to
Use or Select
Certain features
POSSIBLE
CAUSE
The network signal is
weak in the current
location. This may be
especially true while
inside a building,
in a basement or
surrounded by
tall buildings.
The network is busy.
For example, this
sometimes happens
during peak times or
at large events.
You are too far
from a cell site.
Poor network linking.
Poor local telephone
line quality.
Your service provider
may not support
these features,
or you may not
have signed up for
these services.
POSSIBLE
SOLUTION
Move to another
location.
Try again after
a short time.
Check on coverage
areas with your
service provider.
End the call
and redial.
End the call
and redial.
Contact your
service provider.
42
Page 43

Battery
Not Charging
Phone does
not turn on
Unable to
connect to
the Network
Phone crashes,
reboots, freezes
Battery or Charger
is damaged.
The phone’s
temperature is below
32°F or above 112°F.
Poor contact
between the charger
and battery.
Battery has
been depleted.
Poor signal.
You are outside
the network
coverage area.
SIM card is invalid or
improperly inserted.
Some downloaded
third party software
is not compatible
with your phone.
Contact the
manufacturer.
Move the phone/
battery to a less
extreme environment.
Check
connectors.
Recharge the battery.
Move to another
location.
Check on coverage
areas with your
service provider.
Check SIM
installation or contact
your service provider.
Uninstall the
software that may be
causing the issue.
Make sure you
have downloaded
the latest
software updates
Power the phone o
and restart. Or, reset
to factory status.
43
Page 44

Software Updates
All software updates are automatically sent to your device.
You will receive an alert when an update is available.
You can also manually check for available system updates:
• Touch Home
> System updates.
Google and Android are trademarks of Google LLC.
> swipe up for apps > Settings
44
Page 45

45
Page 46

User guide
 Loading...