

Page 1
SCAMSET
COLOUR VID EO INTERC OM DOORP HONE SYSTEM
VIDEOINTERCOMSYSTEEM MET LCD-KLEURENSCHERM
SYSTÈME INTERCOM VIDÉO AVEC ÉCRAN COULEUR LCD
VIDEOPORTERO A COL OR
FARB-VIDEO-TÜRSPRECHANLAGE
INTERCOMUNICADOR DE VÍDEO COM I MAGEM A CORES
USER MANUAL 5
GEBRUIKERSHANDLEIDING 9
MODE D'EMPLOI 13
MANUAL DEL USUARIO 17
BEDIENUNGSANLEITUNG 21
MANUAL DO UTILIZADOR 25
Page 2
SCAMSET
A
EN
monitor: parts
ES
monitor: piezas
NL
monitor: onderdel en
DE
monitor: teile
FR
moniteur: parties
PT
monitor: compon entes
B
EN
outdoor camera: parts
ES
cámara par a uso en exter iores: piez as
NL
buitencamera: onderd el en
DE
Außenkamera: Teile
FR
caméra extérieur e: parties
PT
câmara ex ter ior: componentes
V. 02 – 30/10/2013 2 ©Velleman nv
Page 3
SCAMSET
C
EN
monitor: installation
ES
monitor: instalació n
NL
monitor: installatie
DE
Monitor: Installat ion
FR
moniteur: installation
PT
monitor: instalação
D
NL
Buitencamera: installatie
DE
Außenkamera: Installation
FR
caméra extérieur e: installation
PT
câmara ex ter ior: instalação
EN outdoor camera: installation ES cámara par a uso en exter iores:
V. 02 – 30/10/2013 3 ©Velleman nv
instalación
Page 4
SCAMSET
E
EN
monitor back panel:
ES
panel trasero del monito r:
NL
achterpaneel monitor:
DE
Rücksei te des Moni tors:
FR
panneau arrière du moniteur:
PT
painel traseiro do monitor:
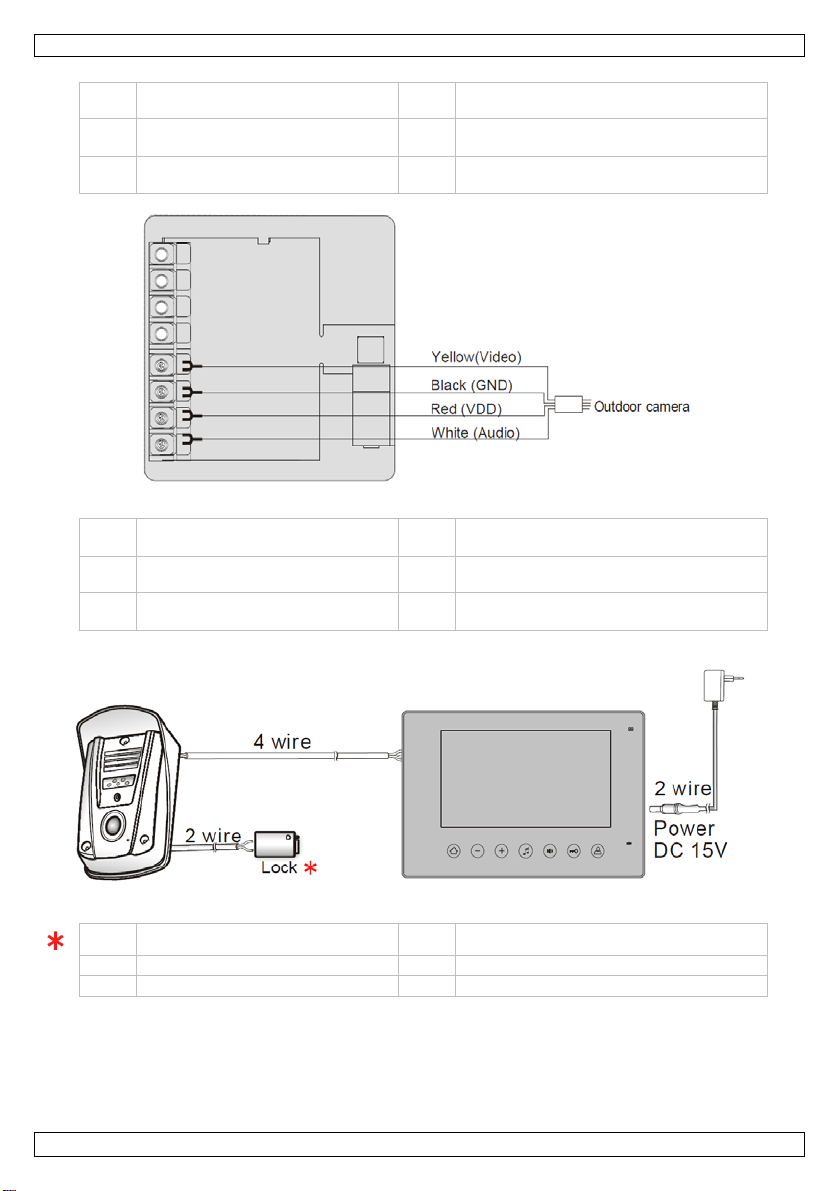
F
EN
monitor to ou t door came r a:
ES
monitor a c ámara para uso en
NL
monitor naar de buitencamera:
DE
Monitor auf Außenkamera:
FR
moniteur vers caméra extérieure:
PT
monitor para a câmara exterior:
EN
door lock not included
ES
abrepuertas no incl.
wiring diagram
aansluitschema
diagramme de connexion
esquema de conexión
Schaltplan
di ag r ama da cab lagem
wiring diagram
aansluitschema
diagramme de connexion
exteriores: esquema de conexión
Schaltplan
di ag r ama da cab lagem
NL deurslot niet meegeleverd DE Türöffner nicht mitgeliefert
FR gâche de porte non incl. PT fechadura da porta não incluída
V. 02 – 30/10/2013 4 ©Velleman nv
Page 5
SCAMSET
wh en d amage to housing or cables is noticed. Do not at tempt to
USER MANU AL
1. Introduction
To all residents of the European Union
Important environmental information about this product
Thank you for choosing Perel! Please read the manual thoroughly before br inging this devi ce into service.
If the device was damaged in transit, don't install or use it and contact your dealer.
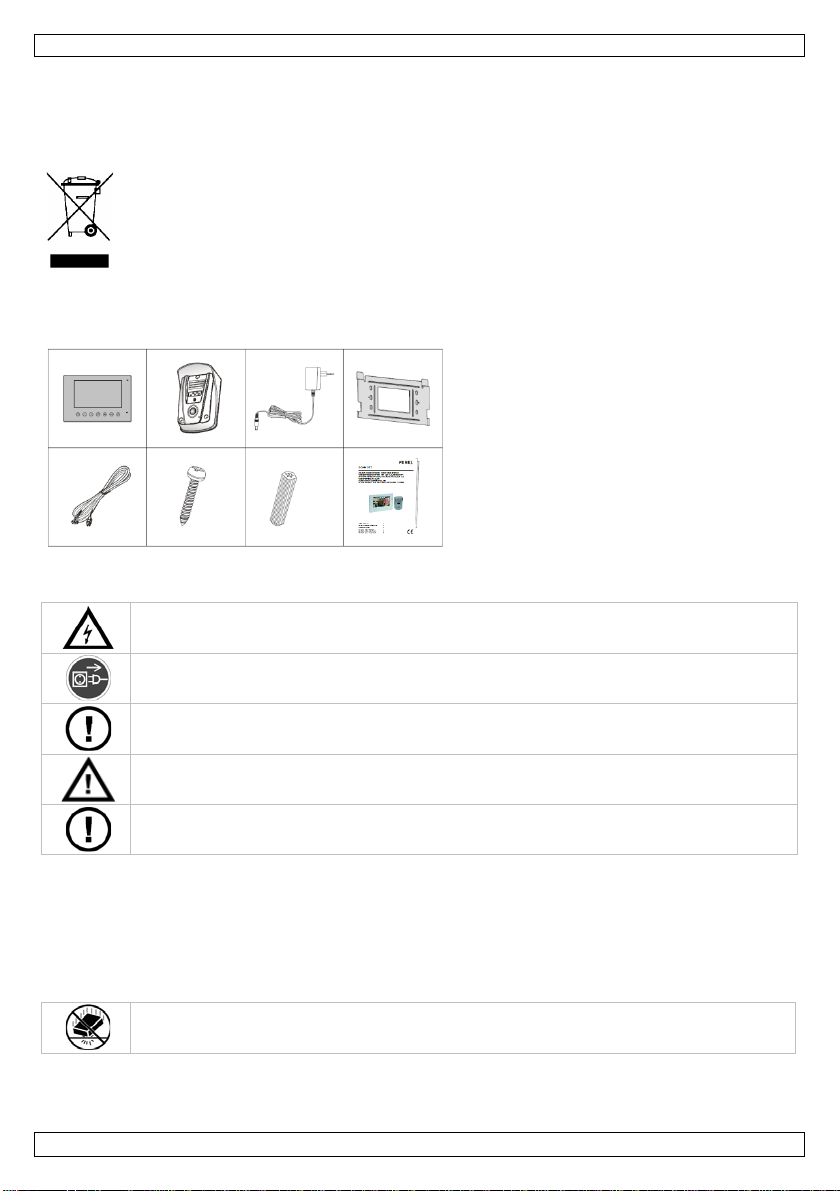
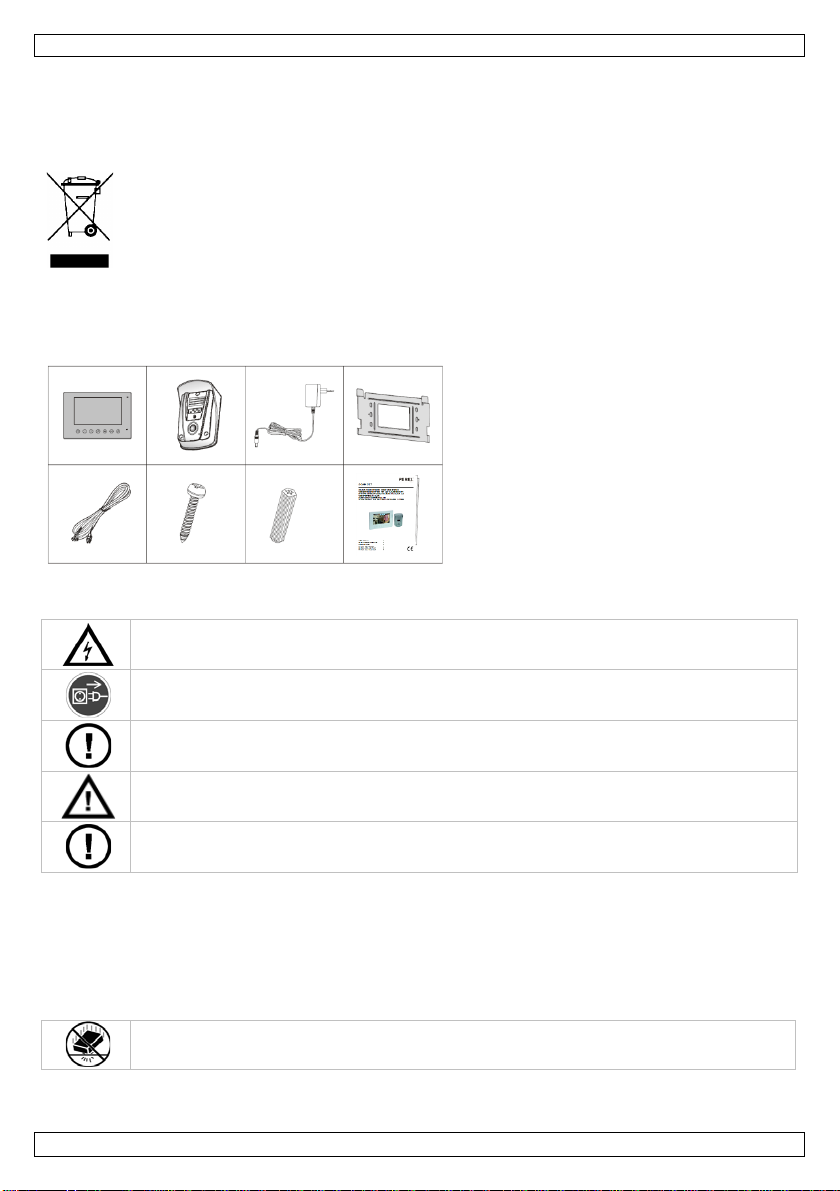
Package contents
This symbol on th e d evice or the pac kage indicates that disposal of the device after its lifecycle
could harm the environment. Do not dispose of the unit (or batteries) as unsorted municipal
waste; it sho uld be taken to a specialized company for recycling. This device should be
returned to your distributor o r to a local recycling service. Respect the local environmental
rules.
If in doubt, cont a ct your local waste disposal authorities.
2. Safety Instructions
DO NOT disassemble or open the cover under any circumstances. Touching live wires can
cause life-thre a tening electroshocks.
Always disconnect mains power when device not in use or when servicing or maintenance
activities are performed. Handle the power cord by the plug only.
There a r e no user-serviceable parts insid e the devi ce. Refer to an authorized dealer for
service and/or spare parts.
Have the device installed/repaired by qualified personnel.
Do not use th e device
servi ce th e device yourself but contact an authorised dealer.
• Do not crimp the power cord and protect it against damage. Have an authorised dealer replace it if
necessary.
• Make sure that the available voltage does not exceed the voltage stated in the specifications o f this
manual.
3. General G uidel ines
Refer to the Velleman® Service and Quality Warranty on the last pages of this manual.
Protect this device from sh o cks and abuse. Avoi d brute force when operati n g the device.
• All modi f ications of the devi ce are forb idden for safety reas ons. Damag e caused by u ser modi f ications
to the device is not covered b y the warran ty.
• Damage caused by disregard of certain guidelines in this manual is not covered by the warranty and
V. 02 – 30/10/2013 5 ©Velleman nv
Page 6

SCAMSET
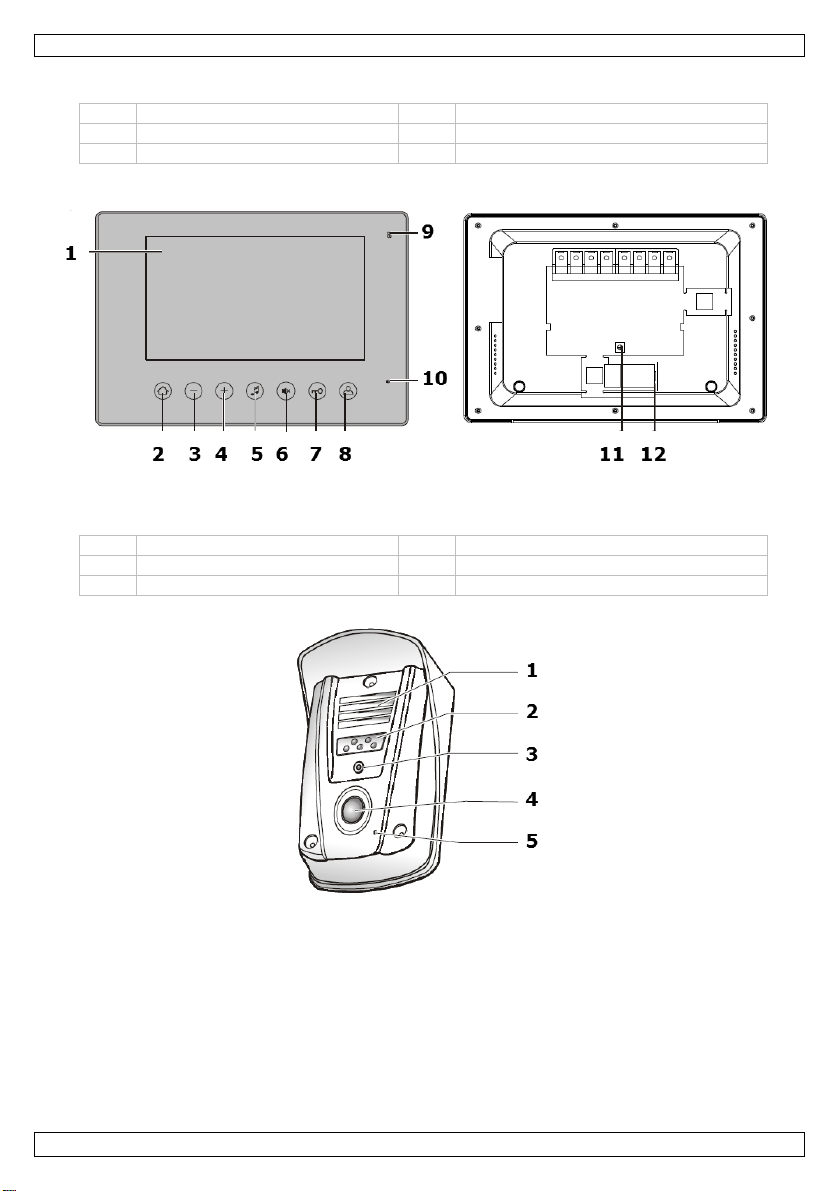
1
display
7
door unlock button
2
8
3
9
4
up button
10
mute indicator
5
bell tone selector
11
intercom volume control
6
mute button
12
power in
1
2
3
camera
4
call b u t ton
5
microphone
the dealer will not accept r esponsib il ity for any ensuing d ef ects or probl ems.
• Do not switch the d evice on immed iately after it has been exposed to changes in temperature.
Protect the device against damage by leaving i t swi tch ed off until it has reached room temperature.
• Familiarise yo urself with the functions of the device before actually using it. Do not allow operation
by unqualified people. Any damage that may occur will most probably be due to unprofessional use
of the de vice.
• Mechani cal wear and LE Ds are not covered by warranty.
4. Features
• camera with IR LEDs for night vision
• two-way audio intercom
• 7" LCD colour display
• door can be opened through the monitor with optional electrical door lock: HAA272
• elec tr ica l d oor lock (1 2 V / 1 A): HAA 272 (not incl.).
5. Overview
Refer to the illustrations on page 2 of this manual.
Image A - monitor
menu button
down button
Image B - Outdoor Camera
monitor/intercom button
microphone
speaker
infrared led
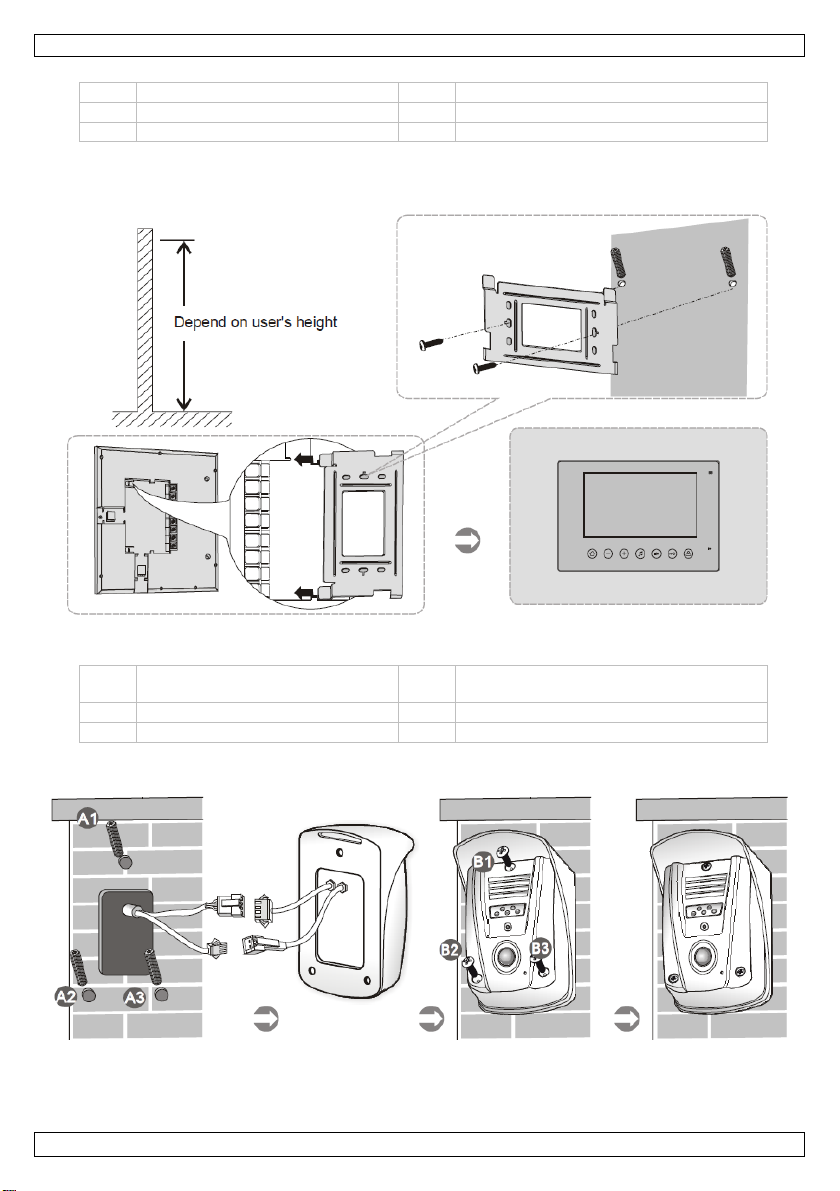
6. Installation
6.1 Monitor
See i mage C on page 3.
Wiring diagram: see image E on page 4.
1. Select a suitable installation location (depending on user height, location of the outdoor camera...).
2. D rill the holes using the bracket as a template.
3. Attach the bracket using the included wall anchors and screws.
4. Connect the wires to the connectors on the back panel as shown on the wiring diagram.
5. Connect the power adapter to the back of the monitor.
6. Attach the monitor t o the b r acket.
7. You also need to conne ct th e cable fr om th e monitor to the outdoor camera. If necessary, drill a
whole that will hold this cable.
Note: Intercom Volume
You can adjust the intercom volume if necessary. The potentiometer for the intercom volume is on the
back panel. To test the volume, you need to connect the monitor to the outdoor camera.
6.2 Outdoor Came ra
See i mage D on page 3.
Wiring diagram: see image F on page 4.
1. Select a suitable installation po sition.
2. D rill the holes using the camera brack et as a template.
V. 02 – 30/10/2013 6 ©Velleman nv
Page 7
SCAMSET
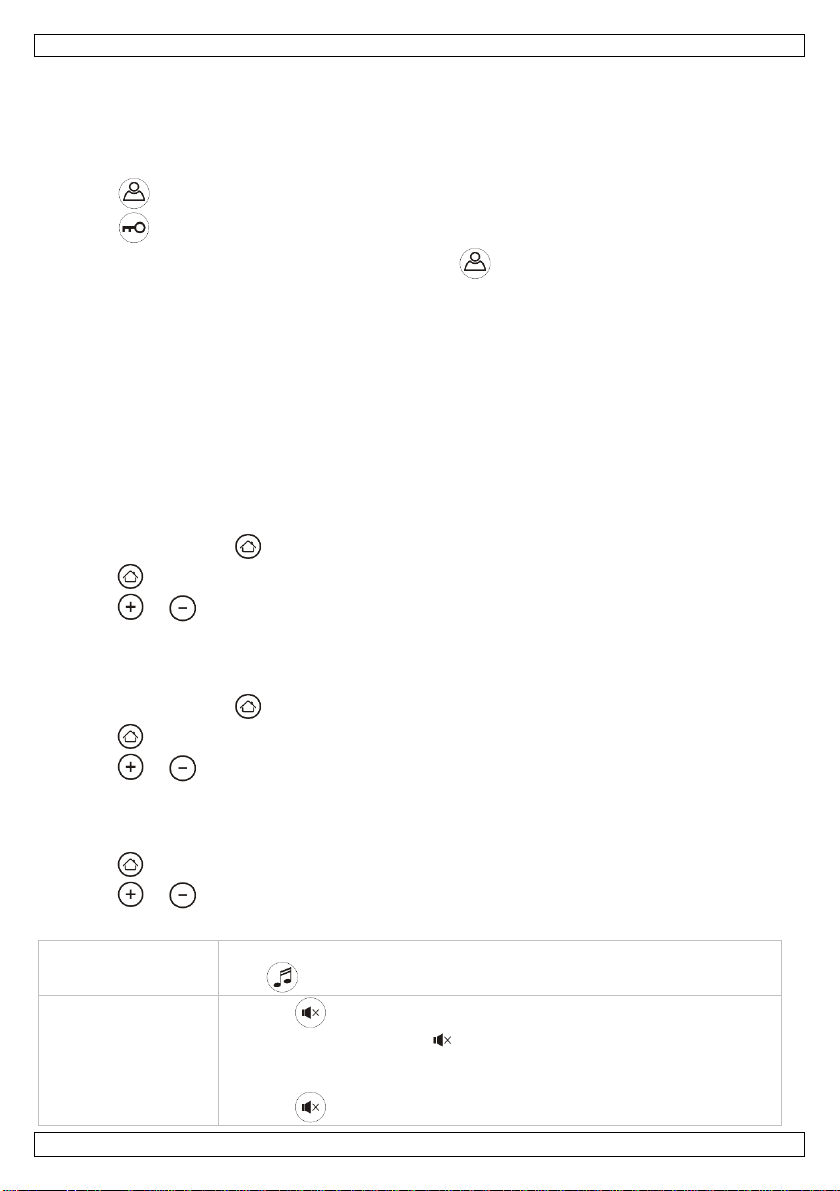
Bell tone
The monitor has several bell tones.
Mute
3. Connect the wires to the monitor and electrical lock as shown on the wiring diagram.
4. Attach the brac ket as shown, using the included wall anchors and screws.
7. Operation
• When a visitor presses the call button on the outdoor camera, the bell tone sounds and the display
switch es on.
• Press to sp eak to the visitor.
• Press to open the door .
• When you have finished speaking to the visitor, press again.
The display switches off automatically.
8. Settings on the Monitor
8.1 Menu Settings
On the menu of the monitor, you can change the following settings:
• Brightness: sets the imag e b rightness.
• Contrast: sets the image contrast.
• Saturation: sets the image satur a tion.
• Audio: sets the volume on the monitor.
To adjust the volume on the intercom, use the potentiometer on the back panel of the monitor.
Using the menu
• To switch on the monitor, press the doorbell on the outdoor camera.
• On the monitor, press to enter the menu.
• Press to select the setting you want to change.
• Press or to change the setting.
• The menu d isappears automatically after a few seconds.
Reset
To reset all settings:
• On the monitor, press to enter the menu.
• Press to select Reset.
• Press or to reset the device.
Exit
The menu d isappears automatically after a few seconds.
You can also exit the menu manually, as follows:
• Press to sel ect Exit.
• Press or to exit the menu.
8.2 Button Settings
Press to browse through the tones and set another tone.
• Press to mute the b ell.
• While mute is acti ve, the LED on the device flashes.
• When someone calls at the door, the display switches on without a bell
tone.
• Press again to cancel mute.
V. 02 – 30/10/2013 7 ©Velleman nv
Page 8

SCAMSET
telep hone cabl e
4-wire telephone cabl e (10 m included)
power supply
15 VDC / 1 A ( incl.)
operating temperature
-10 °C to +50 °C
monitor
current consumption: < 500 mA
type: 7" LCD colour
pixel s : 480 x 234
controls: brightness, contrast, saturation, volume, camera on/off, doo r
camera
type: pinhole
viewing angle: 50°
IR LEDS: 5
door unlock function
output voltage: 12 VDC
maximum load: 1 kohm
dimensions
monitor: 216 x 148 x 25 mm
cam er a: 73 x 12 3 x 44 mm
weight
mon itor: ± 460 g
9. Cleaning and Maintenance
• The electric power supply cables must not show any damage. Have a qualif ied technician mainta in
the device.
• There a r e no user-serviceable parts.
• Wipe the device regularly with a dry, lint-free cloth. Do not use a lcohol or solvents.
10. T ec hnical Speci fications
unlock
IP rating: IP22
camera: ± 240 g
Use this device with original accessories only. Velleman nv cannot be held respons ible in the
event of damage or injury resulting from (inc orrect) use of this device.
For more info concerning this product and the latest version of this manual, please visit our
website www.perel.eu.
The information in this manual is subject to change without prior notice.
© COPYRIGHT NOTICE
The copyright to this manual is owned by Velleman nv. All worldwid e rights reserved. No part
of this man ual may be copied, reprodu ced , translated or red uced to any electronic medium or otherwise
without the prior written consent of the copyright holder.
V. 02 – 30/10/2013 8 ©Velleman nv
Page 9
SCAMSET
. Raak geen kabels aan die onder stroom staan, om
Er zijn geen door de gebr uiker vervang b a r e ond erdel en in dit toestel. Voor onderhoud en/ of
Gebruik het toestel niet in dien de b ehuizin g of de b ekab eling beschadigd is. Probeer in geen
GEBRUIKERSHANDLEIDING
1. Inleiding
Aan alle ingezetenen van de Eur opese Un ie
Belangrijke milieu-informatie betreffen de dit product
verwijdering.
Dank u voor uw aankoop! Lees deze handleiding grondig voor u het toestel in gebruik neemt. Werd het
toestel beschadigd tijdens het tran sp ort, installeer het dan niet en raad pleeg uw dealer.
Inhoud
Dit symbool op het toestel of de ver p a kking geeft aan dat, als het na zijn l evenscyclus wordt
weggeworpen, dit toestel schade kan toebrengen aan het mili eu. Gooi dit toestel (en eventuele
batterijen) niet bij het gew one h uishoudelijke afval; het moe t b ij een gespeciali seer d bedri j f
terechtkomen voor recy clage. U moet d it toestel naar uw verdel er of naar een lokaal
recycla g epunt b rengen . Respecteer de p laatseli j ke milieuwetgeving.
Hebt u vragen, contacteer dan de plaatselijke auto riteiten betreffende de
2. Veiligheidsinstructies
Demon teer of open dit toestel NOOIT
dodelijke elektroschokken te vermijden.
Trek de stekker uit het stopc ontact voordat u het toestel reinigt of als u het niet gebruikt.
Houd de voedingskabel altijd vast bij de stekker en niet bij de kabel.
reserveonderdelen, contact eer uw dealer .
Laat de detector in stal leren/repar er en door een technicus.
geval het toestel zelf te r epareren maar contacteer uw verdeler .
• Zorg ervoor dat het stroomsnoer niet gekneld of geplooid is en bescherm het tegen beschadiging.
Laat uw dealer zo nodig een n ieuwe kabel plaatsen.
• De beschikbare netspanning mag niet hoger zijn dan de spanning in de specificaties achteraan de
handleiding.
3. Algemene richtlijn en
Raadpleeg de Velleman® service- en kwaliteitsgarantie achteraan deze handleiding.
Bescherm tegen sch ok ken. Vermijd brute kr ach t tijdens de bed iening.
• Om veiligheidsredenen mag u geen wijzigingen aanbrengen. Schade door wijzigi n gen die de
gebruiker heeft aangebracht aan h et toestel valt niet onder de ga r a ntie.
V. 02 – 30/10/2013 9 ©Velleman nv
Page 10

SCAMSET
1
scherm
7
ontgrendelingsknop
2
menuknop
8
monitor-/gespreksknop
3
omlaagknop
9
microfoon
4
om hoogknop
10
mute-indicator
5
instelknop beltoon
11
instelknop gespreksvolume
6
mute-kno p
12
voedingsingang
1
luidspreker
2
infraroo dled
3
camera
4
gespreksknop
5
microfoon
• De gar a ntie g el d t niet voor scha d e door het negeren van bepaalde rich tli j nen in deze handleidin g en
uw deal er zal de verantw oordeli jkheid afwi j zen voor defec ten of pr oblemen di e hier rechtstreeks
verband mee houden.
• Het i s b eter om het to estel niet onmidd ell ijk in te sch a kelen nadat het werd b lootg esteld aan
temper atuurschommelingen. Om besch ad igin g te vermijd en, moet u wa ch ten tot het toestel
kamertemperatu ur heef t b ereikt.
• Leer eerst d e functies van het toestel kennen voor u het gaat gebruiken. Ongeschoolde personen
mogen dit toestel niet gebruiken. Meestal is beschadiging h et gevolg van onp rofessioneel g ebruik van
het t oestel.
• De leds en mechanisch e sch a d e vall en niet onder de garantie.
4. Eigenschappen
• camera met IR-leds voor nachtzicht
• 2-wegs audio- en videotransmissie
• 7" LCD-kleurenscherm
• de deur kan via de monitor ontgrend eld worden met h et optionel e elektrische d eurslot: HAA272
• option eel elektrisch deu r sl ot (12 V / 1 A): HAA 272 (niet meeg elev.).
5. Omschrijving
Raadpleeg de afbeeldingen op pagina 2 van deze handleiding.
Afb. A - monitor
Afb. B - Buitencamera
6. Installatie
6.1 Monitor
Zie afb. C op pagina 3.
Aansl uitschema : zie af b . E op pagina 4.
1. Kies een geschikte montag ep laats (afhankelijk van d e g eb ruikershoogte, montageplaats van d e
buitencamera, ...).
2. Gebruik de montagebeugel als sjabloon om de bevestigingsgaten te boren.
3. Bevestig de beugel met de meeg eleverde muurpluggen en schroeven.
4. Verbind de snoeren met de connectoren op het achterpaneel (zie aansluitschema).
5. Sluit de netadapter aan op de achterkant van de monitor.
6. Bevestig de monitor aan de mont agebeugel.
7. Verbind ook de kab el van de moni tor met de buitencamera. Boor indien nodi g een gat om deze
kabel te bevestigen.
Opmerking: Volumeregeling
Indien nodi g kunt u het gespreksvolume in stellen. De potentiometer om het gespreksvol ume in te
stellen, bevind t zich op het achterp a neel. Verbin d de monitor met de b uitencamer a, om he t volume te
testen.
V. 02 – 30/10/2013 10 ©Velleman nv
Page 11

SCAMSET
6.2 Buitencamera
Zie afb. D op pagina 3.
Aansluitschema: zie afb. F o p pagina 4.
1. Kies een geschikte mont ageplaats.
2. Gebruik de beugel als sjabloon om de bevestigin gsgaten te boren.
3. Verbind de snoeren met de monitor en het elektr ische deurslot (zie aansluitschema).
4. Bevestig de mont agebeugel met de meeg eleverde muurpluggen en schroeven (zie af b .)
7. Gebruik
• Wanneer de oproepkn op op de buitencamera wordt ingedr ukt, weerklinkt de beltoon en verschijn t
het beeld van de bezoeker op de monitor.
• Druk op om met de bezoeker te praten.
• Druk op om de deu r te op enen.
• Druk na het gesprek nogmaals op .
Het scherm schakelt automatisch uit.
8. Instellingen op de monitor
8.1 Instellingenmenu
Op het menu van de monitor, kunt u de volgende instellingen wijzigen:
• Helderheid: instelling van de beeldhelderheid.
• Contrast: instelling van het beeldcontrast.
• Verzadiging: instelling van de beeldverzadiging.
• Audio: volumeregeling op de monitor.
Gebruik de potenti ometer op het achterp aneel van de monit or, o m het gesp r eksvolume i n te stellen.
Het menu gebruiken
• Dru k op de deurb el op de buitencamera, om de monitor in te schakelen.
• Op de monitor, druk op om het menu te openen.
• Druk op om de in stelling te selecteren di e u wil t aanpassen.
• Druk op of om de instelling te wijzigen.
• Na enkele seconden ver dwijnt het menu automatisch van het scherm.
Resetten
All e i nstelli ngen ter ugzetten:
• Op de monitor, druk op om het menu te openen.
• Druk op om de op tie Reset te sel ecter en.
• Druk op of om het toestel te resetten .
Het menu verlaten
Na enkele seconden verdwijnt het menu automatisch van het scherm.
U kunt het menu ook handmatig verlaten als volgt:
• Druk op om de op tie Exit te selecteren.
• Druk op of om het menu te verlaten.
V. 02 – 30/10/2013 11 ©Velleman nv
Page 12

SCAMSET
Beltoon
De monitor heeft verschillende beltonen.
Mute
fun ctie geacti veer d is.
telefoonkabel
4-aderige telefoonkab el (10 m meegeleverd)
voeding
15 VDC / 1 A (meeg elev.)
werktemperatuur
-10 °C tot +50 °C
monitor
stroomverbruik: < 500 mA
type: 7" LCD-kleurenscherm
pixel s : 480 x 234
instellingen: helderheid, contrast, verzadiging, volume, de camera in-
camera
type: pinhole
kijkhoek: 50°
IR-leds: 5
IP-norm: IP22
maximale belasting: 1 kohm
afmetingen
monitor: 216 x 148 x 25 mm
cam er a: 73 x 12 3 x 44 mm
gewicht
mon itor: ± 460 g
camera: ± 240 g
8.2 Knopinstellingen
Druk op om d o or de b eltonen te bladeren en een andere beltoon in te
stellen.
• Druk op om de beltoon te onderdrukken.
• De led op het toestel knipp ert wanneer d e mu te-
• Wanneer er ieman d aanbelt, verschi j nt het beeld van de bezoeker op de
m on i t or ma a r zon d e r be ltoon.
• Druk nogmaals op om het geluid opnieuw in te schakelen.
9. Reiniging en ond erhoud
• De voedingskabel s mogen niet beschadig d zij n. Laat het toestel onderh oud en d o or een geschoold e
technicus.
• Er zijn geen door de gebr uiker te vervang en onderd el en.
• Maak het toestel gereg eld schoon met een droge, niet pluizende d oek. G ebruik geen alcohol of
oplosmiddelen.
10. Technische specificaties
/uitschakelen, deur ontgrendelen
deurontgrendelingsfunctie uitgangsspanning: 12 VDC
Gebruik dit toestel enkel met origi nele accessoires. Velleman nv is niet aansprakelijk voor
schade of kwetsuren bij (verkeerd) g ebruik van dit toestel.
Voor meer info rmatie over dit product en de laatste versie van deze h a ndleiding, zi e
www.perel.eu.
De informatie in deze handleidin g kan te allen tijde worden gewi j zigd zonder voorafgaand e
kennisgeving.
© AUTEURSRECHT
Velleman nv heeft h et auteursrecht voor deze han dleiding. Alle wereldwij de rechten
voorbehouden. Het is niet toegestaan om deze handleiding of gedeelten ervan over te nemen, te
kopiëren, te vertalen, te bewerken en op te slaa n op een elektronisch medium zonder voorafgaande
schriftelijke toeste mmin g van de r echthebbende.
V. 02 – 30/10/2013 12 ©Velleman nv
Page 13

SCAMSET
l’appareil s’il n’est pas utilisé et avant le nettoyage ou l 'entretien. Ti rer
MODE D 'E M PLOI
1. Introduction
Aux résidents de l'Unio n européenn e
Informations environnementales importantes concernant ce produit
En cas de questions, contacter les autorités locales pour élimination.
Nous vous remercions de votre achat ! L ire le présent mode d'emploi attentivement avant la mise en
servi ce d e l'appareil. Si l'app areil a été endommagé pendant le transport, ne pas installer et consulter
votre reven d eur.
Contenu
Ce symbole sur l'appareil ou l'emballage indique que l'éliminatio n d'un appareil en fin de vie
peut polluer l'envi ronnement. Ne pas jeter un ap pareil él ectr ique ou él ectronique (et d es p iles
éventuelles) parmi les déchets muni cipaux non sujets au tri sélectif; un e d échèterie traitera
l'appareil en question. R envoyer cet appareil à votre fournisseur ou à u n servi ce d e recyclage
local . Il convient de respecter la réglementation l ocal e r elative à la pro tection de
l'environnement.
2. Consignes de sécurité
NE JAMAIS désassembler ni ouvrir le boîtier. Toucher un câble sous tension peut causer des
él ectrochocs mortels.
Toujours débrancher
sur la fiche pour débrancher l'appareil ; non pas sur le câble.
Il n’y a au cune pièce réparable par l’utilisateu r . Commander des pièces d e r echange
éventuelles chez votre r evendeur.
Confier l' installation et la réparatio n de l'appareil à du personnel qualifié.
Ne pas utiliser l'ap pareil si le boîtier ou le câb lage est endommagé. Ne pas essayer de
réparer l'appareil soi-même, contacter votre reven deur.
• Ne pas sertir le cord on d’ alimentation et protéger des do mmages. Demand er à votre reven d eur de le
remplacer si nécessair e.
• La tension réseau ne peut pas dépasser la tension mentionnée dans les spécifications à la fin de ce
mode d'emploi.
3. Directives générales
Se référ er à l a garan tie de service et de qualité Velleman ® en fin de ce mode d'emploi.
Protéger l’appareil des chocs. Traiter l'appareil avec circonspection pendant l’opération.
• Il est interdit de modifier l'appareil pour des raisons de sécurité. Les domma ges o ccasionnés par d es
V. 02 – 30/10/2013 13 ©Velleman nv
Page 14

SCAMSET
1
afficheur
7
bouton d'ouverture de la gâche
2
bouton menu
8
bouton moniteur/d'appel
3
bouton fléché vers le b as
9
microphone
4
bouton fléché vers le haut
10
indicateur de sourdine
5
sélecteu r d e sonnerie
11
réglage du volume d'appel
6
bouton de sourdine
12
entrée d 'alimentation
1
haut-parleur
2
LED à infrarouge
3
caméra
4
bouton d'appel
5
microphone
modifications par le client ne tombent pas sous la garantie.
• Les dommages occasionnés par des modi f ications à l'appar eil par l e cl ient, ne tombent pas s ous la
garan tie et votre revendeur déclinera toute respon sab ilité pour les problèmes et l es d éf auts qui en
résultent.
• Ne pas br ancher immédi atement l’appa r eil après exp osi tion à des variations de te mpérature. A f in
d’évi ter des dom mages, attendre jusq u’à ce que l’appareil ait atteint la tempéra ture a mbiante avant
de l’utiliser.
• Se fami l iariser avec le foncti onn ement de l'appareil avant de l'utiliser . Seules d es p ersonnes
qualifiées sont autorisées à utiliser cet appareil. La plupart des dégâts sont causés par un usage non
professionnel de l'appareil.
• Les LEDs et l’usure mécanique ne tombent pas sous la garantie.
4. Caractéristiques
• caméra à LEDs IR pour une vision nocturne
• transmissio n audio-vidéo à 2 voies
• écran couleur LCD "7
• il est p ossible de déverrouiller la p orte par le moniteur avec la gâche de porte électrique optionnelle :
HAA272 (non incl.)
• gâche de porte électrique optionnel le (12 V / 1 A) : HAA272 (non in cl.).
5. Description
Se référ er aux figures en page 2 de ce mode d'emploi.
Figure A - moniteur
Figure B - Caméra extérieure
6. Installation
6.1 Moniteur
Voir fig. C à la page 3.
Diagramme de connexion : voir fig. E à la page 4.
1. Sélectionner un emplacement de montage approprié (selon l'hauteur d'utilisateur, emplacement de
la caméra extérieur e...).
2. Utiliser le support comme gabarit pour forer les trous de montage.
3. Fixer le sup p ort au mu r avec les chevill es et vis livrées.
4. Raccorder les fils aux connecteurs situés sur le panneau arrière (voir diagramme de connexion).
5. Raccorder l'adaptateur réseau au dos du moniteur.
6. Fixer le moniteur au support de montage.
7. Connecter également l e câb le du moniteur à la caméra extérieure. Si nécessaire, f orer un trou pour
fixer le câble.
Remarque : Volume d'appel
Si nécessair e, il est possible d'aju ster le volu me d'a p pel. Le potentiomètre pour régler le volu me d 'appel ,
se situ e su r le pannea u arrière. Connecter le moniteur à la caméra extérieure, pour tester l e vol ume.
V. 02 – 30/10/2013 14 ©Velleman nv
Page 15

SCAMSET
6.2 Caméra extérieure
Voir fig. D à la page 3.
Diagramme de connexion : vo ir fig. F à la page 4.
1. Sélectionner un emplacement de mont age approprié.
2. Utiliser le support comme gabarit pour forer les trous de montage.
3. Connecter les f i ls au moniteur et la gâche électr ique (v oi r diagr amme de connexion).
4. Fixer le sup p ort avec les chevilles et vis livrées (voir fig.).
7. Emploi
• Lorsqu'un visiteur appuie sur la touche d'appel se trouvant sur la caméra extérieure, la sonnerie
retentit et le moniteur affiche l'image du visiteur.
• Appuyer sur pour parler au visiteur.
• Appuyer sur pour ouvrir la porte.
• Après la conversation, appuyer à nouveau sur .
L'afficheur s'éteint automatiquement.
8. Réglages sur le moniteur
8.1 Réglages du menu
Sur le menu du moniteur, il est possible de changer les réglages suivants :
• Luminosité : réglage de la luminosité de l’image.
• Contras te : régl a g e du contr a ste de l'i mag e.
• Saturation : régl ag e d e la saturation de l 'image.
• Audio : réglage du volume sur le moniteur.
Utiliser le potentiomètre sur le p anneau arrièr e du moniteu r, pour a juster le volume d'ap p el.
Utiliser le menu
• Appuyer sur sonn ette de porte se trouvant sur la caméra extérieure.
• Sur le moniteur, appuyer sur pour accéder au menu;
• Appuyer sur pour sélectionner le régla g e à modifi er.
• Appuyer sur ou pour modif ier le réglage.
• Le menu disparaît automatiquement de l'afficheur après quelques secondes.
Réinitialisation
Pour restaurer tous les réglages :
• Sur le moniteur, appuyer sur pour accéder au menu.
• Appuyer sur pour sélectio nner l'option Reset (réinitia lisation).
• Appuyer sur ou pour réinit ia lise r l'a p p ar e il.
Quitter le menu
Le menu disparaît automatiquement de l'afficheur après quelques secondes.
Il est ég alement possib le de quitter le menu manuellement.
• Appuyer sur pour sélectio nner l'option Exit.
• Appuyer sur ou pour quitter le menu.
V. 02 – 30/10/2013 15 ©Velleman nv
Page 16

SCAMSET
Sonnerie
Le moniteur comporte plusieurs sonneries.
Sourdine
câble téléphonique
câble téléphonique à 4 conducteurs (10 m incl.)
alimentatio n
15 VCC / 1 A (i ncl.)
tempér ature de service
de -10 °C à +50 °C
moniteur
consommation de courant : < 500 mA
type: écran couleur LCD 7"
pixel s : 480 x 234
réglages : luminosité, contraste, saturati on, volu me, a llumer/éteindre la
caméra
type: sténopé
angle de vue: 50°
LEDs IR : 5
indic e IP : IP22
charge maximale : 1 kohm
dimensions
mon iteu r : 216 x 148 x 25 mm
caméra : 73 x 123 x 44 mm
poids
moniteur : ± 460 g
caméra : ± 240 g
8.2 Réglages de boutons
Appuyer sur pour naviguer dans les sonneries et pour régler une autre
sonnerie.
• Presser sur pour mettre la sonnerie en sourdine.
• La LED sur l'appare il cligno te lorsque la fonction sourdine est activée.
• Lorsque quelqu'un sonne à la porte, l'afficheur s'allume mais aucune
sonner ie ne retentit.
• Pour annuler la mise en sourdine, appuyer à nouveau sur .
9. Nettoyage et entretien
• Les câbles d'alimentation él ectr iques ne peu vent pas être en dommagés. Confier l'entreti en à un
technicien qualifié.
• Il n’y a aucune pièce réparable par l’utilisateur.
• Essuyer régulièrement l’ap pareil avec un ch iffon sec non pelucheux. Éviter l’usag e d’al cool et de
solvants.
10. Spécifications techniques
caméra, déverrouiller la porte
fonction de
déverrouillage de porte
N'employer cet appareil qu'avec des accessoires d'ori gine. La SA Velleman ne peu t, dans la
mesure conforme au dro it applicable être tenue responsable des dommages ou lésions
(directs ou indirects) pouvant résulter de l’utilisation de cet appareil.
Pour plus d’information con cernan t cet articl e et la dernière version de ce mode d'emp loi,
visiter notre site web www.perel.eu.
Les spécifications et le contenu de ce mode d'emploi peuvent être modifiés sans avis
préalable.
© DROITS D’AUTEUR
SA Velleman est l’ayant droit des droits d’auteur pour ce mode d'emploi. Tous droits mondiaux
réservés. Toute reproduction, traduction, copie ou diffusion, intégrale ou partielle, du contenu de ce
mode d'emploi par quelque procédé ou sur tout support électronique que ce soit est in terdi te sans
l’accord préalable écrit de l’ayant droit.
V. 02 – 30/10/2013 16 ©Velleman nv
tensi on d e sortie : 12 Vcc
Page 17

SCAMSET
desm onte ni abra la tapa b aj o ninguna circunstan cia. Puede sufrir un a p eligrosa descarga
Desconecte siempre el aparato de la r ed eléctrica si no va a usarlo durante un largo período
ice el aparato si la caja o los cabl es están d añ ados. No utilice este aparato si l a caja o
MANUAL D E L USUARIO
1. Introducción
A los ciudadanos de la Unión Europea
Importantes informaciones sobre el medio ambiente c oncerniente a este producto
¡Gracias por elegi r Perel! Lea atentamente las instrucciones del manual antes de usar el aparato. Si el
aparato ha sufrido algún daño en el transporte no lo instale y póngase en contacto con su distribuidor.
incluye
Este sí mbolo en e ste apara to o el embalaje indica que, si tira las muestras inservibles, podrían
dañar el medi o ambiente. No ti re este aparato (n i las pilas, si las hu bi er a) en la basura
doméstica; debe ir a una empresa especializada en reciclaje. Devuelva este aparato a su
distribuidor o a la unidad de reciclaje lo cal. Respete las leyes locales en relación con el medio
ambiente.
Si tiene dudas, contacte con las autoridades locales para residuos.
2. Instrucciones de seguridad
NO
eléctrica al tocar un cable conec tado a la red eléctrica.
de ti empo y antes de su l impieza o man tenimiento. Ti re siempre del enchufe pa r a
desconectar el cabl e de red, nunca del propio cable.
El usuario no habrá de efectuar el mantenimiento de ninguna pieza. Contacte con su
distribuidor si necesita piez as de recambio.
La instalac ión y el mantenimiento deben ser realiz ados por personal especializ ado.
No util
el cable están dañ ad os. La rep aración debe ser realizada por personal especializado.
• No aplaste el cable de alimentación y protéjalo contra posibles daños. Si es necesario, pid a a su
distribuidor reemplazar el cable de alimentació n.
• Asegúr ese d e q ue la tensión de red no sea mayor que la tensión i ndicada en las especi f icaciones.
3. Norma s gene ra les
Véase la Garantía de servi cio y calidad V elleman® al fina l de este manual del usuario.
No agite el aparato. Evite usar excesiva fu er za dur ante el manejo y la instalación.
• Por razones de seguridad, las modificaciones no autorizadas del aparato están prohibidas. Los daños
• Los daños causados por descuido de las inst rucciones de seguridad de e ste manual inval idarán su
V. 02 – 30/10/2013 17 ©Velleman nv
causados por modifica ciones n o au torizadas, no están cubiertos por la gar antía.
garantía y su distribuidor no será responsable de ningún daño u otros problemas resultantes.
Page 18

SCAMSET
1
pantalla
7
botón abrepuertas
2
botón del menú
8
botón monitor / v i d e oport ero
3
tecla de dirección abajo (DOWN)
9
micrófono
4
tecla de dirección arriba (UP)
10
indicador de silencio (mute)
5
11
6
12
1
altavoz
2
LE D IR
3
cámara
4
5
• No conecte el aparato si ha estado expuesto a grandes cambios de temperatura. Espere hasta que el
aparat o l legue a la temperatura ambien te.
• Familiarícese co n el func ionamiento del aparato antes de utilizarlo . Sólo personas cualificadas pueden
manejar e ste aparato. La may oría de los daños son causados por un uso inadecuado.
• El desgaste mecá ni co y los LEDs no están cubiertos por la garant ía.
4. Características
• cámara con LEDs IR para visión nocturna
• vide oportero con audio de 2 vías
• pantalla LCD a col or de 7"
• es posible desbloquear la puerta por el monit or con abrep uer tas elé ctrico opcional: HAA 2 72
• abre puer ta s e léctri co (12 V / 1 A): HAA272 (no inc l .).
5. Descripción
Véase las figuras en la página 2 de este manual del usuari o.
Imagen A - monitor
selector de tono de llamada
Imagen B - cámara para uso en exteriores
botón de silencio (mute)
ajuste del volu me del videoportero
entrada de alimentación
botón de llamada
micrófono
6. Instalación
6.1 Monitor
Véase imagen C en l a pági n a 3.
Esquema d e conexión: V éa se imagen E en la p ágina 4.
1. Seleccione un lugar de montaje adecuado (depende de la altura del usuario, el lugar de montaje de
la cámara, etc. )
2. Utilice e l soporte como plantilla y taladre los agujeros.
3. Fije el soporte con los tacos y lo s tornillo s incluidos.
4. Conecte los hilos a los con ectores de la parte trasera (véase esquema de conexión).
5. Conecte el ad aptador de r ed a la parte trasera del monitor.
6. Fije el monitor al so porte.
7. Conecte el cable del monitor a l a cámara para uso en exteriores. Si fuera necesario, tal a d re un
agujero para man tener el cable sujeto.
Observac ión: Volumen del videoportero
Si f uera necesario, es posible aju star el vol umen del videoportero. El potenciómetro para aju star el
volumen del videoportero está en la parte tras er a . Para probar el volu men, conect e el monitor a l a
cámara par a uso en exteriores.
6.2 Cámara para uso en exteriores
Véase imagen D en la página 3.
Esquema d e conexión: V éa se imagen F en la págin a 4.
1. Seleccione un lugar de montaje adecuado.
2. Utilice e l soporte de la cámara como plantilla y taladre los agujeros.
V. 02 – 30/10/2013 18 ©Velleman nv
Page 19

SCAMSET
Tono de llamada
El ap arato está equi p ado con varios tonos de llamado.
3. Conecte los hilos al monitor y el abrepu er ta s eléctrico (véase esquema de conexión).
4. Fije el soporte con los tacos y lo s tornillo s incluidos como se indica en el dibujo.
7. Funcionamiento
• En cuanto un visitante pulse el botón de llamada, la unidad interior emitirá una señal acústica y la
pantalla se activará.
• Pulse para hablar con el visitante.
• Pulse para abrir la p uerta.
• Despu és d e haber terminado l a conversación, vuelva a p ulsar .
La pantalla se desactiva autom áticamente.
8. Ajustes del monitor
8.1 Ajustes del menú
En el menú del monitor, puede cambiar lo siguiente:
• Brightness: ajustar el brillo de la imagen.
• Contrast: aju star el contraste de la imagen.
• Saturation: ajustar la saturación de l a imagen .
• Audio: ajustar el volumen del monitor.
Para aju star el volumen del videoportero: utilice el potenciómetro de la parte trasera d el monitor.
Utilizar el menú
• Para activar el monitor, pulse el timbre d e la cámara para uso en exteriores.
• En el monitor, pulse para entrar en el menú.
• Pulse para seleccionar el ajuste desead o.
• Pulse o para cambiar el ajuste.
• El menú desaparece automáticamente después de unos segundos.
Reinicialización
Restablecer los ajustes de fábrica:
• En el monitor, pulse para entrar en el menú.
• Pulse para seleccionar « Reset » (reinicializar).
• Pulse o para reinicializar el aparato.
Exit
El menú desaparece automáticamente después de unos segundos.
También, es posible salir del menú de manera manual:
• Pulse para seleccionar « Exit » (salir).
• Pulse o para salir del menú.
8.2 Configuración de los botones
V. 02 – 30/10/2013 19 ©Velleman nv
Pulse para d esplazarse y sel eccionar otr o tono de ll amada.
Page 20

SCAMSET
Silenciar (Mute)
cable telefónico
cable telefónico de 4 hilos (10 m incl.)
alimentació n
15 VDC / 1 A ( incl.)
temper atura de
de -10 °C a +50 °C
monitor
consumo de corriente: < 500 mA
tipo: pantalla LCD de 7"
píxel e s : 480 x 23 4
ajustes: br i llo, contrast e, satu r ación, v olumen, acti var /desactivar la cámara,
ángulo de visión: 50°
LEDs IR: 5
grado de protección IP: IP22
función abrepuertas
tensió n de salida: 12 VDC
carga máx. : 1 kohm
peso
mon itor: ± 460 g
cámara: ± 240 g
• Pulse para silenc iar el timbre.
• El LED parpad eará mientr as esté acti vad a esta función.
• Si alguien toca el timbr e, la pantall a se activa sin tono de llamada.
• Vuelva a pulsar para desactivar la función « mute ».
9. Li mp ieza y mant enimient o
• No dañe los cables de alimentació n. El mantenimiento debe ser realizado por un técnico cualificado .
• El usuario no habrá de efectuar el mantenimiento de ninguna pieza.
• Limpie e l aparato regularmente con un paño húmedo sin pelusas. No utilice a lcohol ni disolventes.
10. Especificaciones
funcionamiento
desbloquear la puerta
cámara tipo: pinhole
dimensiones monitor: 216 x 148 x 25 mm
cám ar a: 73 x 12 3 x 44 mm
Util ice este aparato sólo con los accesorios originales. Vel leman NV no será responsable de
daños ni lesiones causados por un uso (indebido) de este aparato.
Para más infor mación sobr e este producto y la versión más reciente de este manual del
usuario, visite nuestra página www.perel.eu.
Se pued en modificar las especificaciones y el contenido de este manual sin previo aviso.
© DERECHOS DE AUTOR
Velleman NV dispone de los der echos de auto r para este manual del u suario . Todos los
derechos mundiales reservados. Está estrictamente prohibido reproducir, traducir, copiar, editar y
guar d a r este manual d el usuario o par tes d e ello si n previo permiso escrito del derech o hab iente.
V. 02 – 30/10/2013 20 ©Velleman nv
Page 21

SCAMSET
Verwenden Sie d a s Gerät nicht wenn das Geh äuse oder das K ab el beschädigt i st. Lassen Sie
BEDIENUNGSANLEITUNG
1. Einführung
An alle Einwohner der Europäischen Union
Wichtige Umweltinformationen über dieses Produkt
Falls Zweifel bestehen, wenden Sie sich für Entsorgungsrichtlinien an Ihre örtliche Behörde.
An alle Einwohner der Europäischen Union Lesen Sie diese Bedienungsanleitung vor Inbetriebnahme
sorgfältig durch. Überprüfen Sie, ob Transp ortschäden vorliegen. Soll te dies d er Fall sein, verwenden Sie
das Gerät nicht und wenden Sie sich an Ihren Händler.
Lieferumfang
Dieses Symbol auf dem Produkt oder der Verpackung zeigt an, dass die Entsorgung dieses
Produktes nach seinem Lebenszyklus der Umwelt Schaden zufügen kann. Entsorgen Sie die
Einheit (oder verwendeten B atterien) nicht als unsortiertes Hausmüll; die Einheit oder
ver wend eten Ba tter ien müssen von einer spezia lisierten Firma zwecks Recyclin g entsorgt
werden. Diese Einheit muss an den Händler oder ein örtliches Recycling-Unternehmen
retourniert werden. Resp ektieren S ie die örtlichen Umweltvorschriften.
2. Sicherheitshinweise
KEINESFALLS. Das Berühren von unter Spannung stehenden Leitungen könnte zu
lebensgefährlichen elektrischen Schlägen führen.
Trennen Sie das Gerät bei Nichtbenutzung und vor jeder Reinigung vom Netz. Fassen Sie
dazu den Netzstecker an der Grifffläche an und ziehen Sie nie an der Netzleitung.
Es gibt keine zu wartenden Tei le. Bestellen Sie eventu elle Ersat zteile bei I hrem Fachhändl er.
Lassen Sie das Gerät von einem Fachmann installieren und warten.
di eses Gerät von ein em Fa chman n repar ieren.
• Achten Sie darauf, dass die Netzleitung nicht gequetscht werden kann. Bei Beschädigungen soll eine
Fachkraf t das K ab el ersetzen.
• Vergewissern Sie sich, dass die anzuschließende Netzspannung nicht höher ist als die Netzspannung
beschrieben in di eser B edienung sanleitung.
3. All g e me ine Richtl inien
Siehe Velleman® Service- und Qualitätsgarantie am Ende dieser Bedienungsanleitung.
Vermei den Sie Erschütterungen . Wenden Sie bei der Bedienung kein e Gewal t an.
• Eigenmächtige Veränderungen sind aus Sicherheitsgründen verboten. Bei Schäden verursacht durch
V. 02 – 30/10/2013 21 ©Velleman nv
Page 22

SCAMSET
1
Display
7
Türöffner-Taste
2
Menü-Taste
8
Monitor/Sprechanlage-Taste
3
Cursor nach unten
9
Mikrofon
4
Cursor nach oben
10
Stummschaltanzeige
5
Rufton-Wahltaste
11
Lautstärkeregelung für die
6
Stummschalttaste
12
Stromversorgungseingang
1
Lautsprecher
2
IR-LED
3
Kamera
4
Ruftaste
5
Mikrofon
eigenmächtige Änderungen erlischt der Garantieanspruch.
• Bei Schäden, die durch Nichtbeachtung der Bedienungsanleitung verursacht werden, erlischt der
Garantieanspruch. Für daraus resultierende Folgeschäden übernimmt der Hersteller keine Haftung.
• Das Gerät bei Temperaturschwankungen nicht sofort einschalten. Schützen Sie das Gerät vor
Beschädigung, i ndem Si e es ausgeschaltet lassen bis es di e Zimmertemperatur erreicht hat.
• Nehmen Sie das Gerät erst in Betrieb, nachdem Sie sich mit seinen Funktionen vertraut gemacht
haben. Lassen Sie das Gerät nicht von Personen bedienen, die sich nicht mit dem Gerät auskennen.
Meist ist die B e schädigung des Ger ä tes das Ergebnis von unfachmännischer Bedienung.
• Die LEDs und mechanische Abnutzung fallen nicht unter die Garantie.
4. Eigenschaften
• Kamera mit IR -LEDs für N a chtsi cht
• Gegensprechanlage mit 2-Wege-Audioübertragung
• 7" LCD-Farbdisplay
• die Tür kann über Monitor mit optionalem elektrischem Türöffner entr iegelt werden : H A A272
• el ekt ronisches Türschloss (12 V / 1 A): HAA 272 (nicht mitgeliefer t).
5. Beschreibung
Si ehe Abbil dungen, S eite 2 dieser Bedi enungsanleitung.
Abbildung A - Monitor
Inneneinheit
Abbildung B - Außenkamera
6. Installation
6.1 Monitor
Siehe Abb. C, Seite 3.
Schaltplan: Siehe Abb. E, Se ite 4.
1. Wählen Sie einen geeigneten Installationsort aus (abhängig von den vorhandenen Gegebenheiten:
Höhe des Benutzers, Montageort der Außenkamera, usw.).
2. Verwenden S ie die Halterung al s Schablone un d bohren S ie die Löcher.
3. Befesti g en Sie die Halterung mit den mitgeli ef erten Dübeln und Schr auben.
4. Verbinden Sie die Kabel mit den Anschlüssen auf der Rückseite (Siehe Schaltplan)
5. Verbinden Sie das Netzteil mit d er Rückseite des Monit ors.
6. Befesti g en Sie den Moni tor an der Halterung.
7. Verbinden Sie das Monitorkabel mit der Außenkamera. Wenn nötig, bohren Sie ein Loch, um das
Kabel festzuhalten.
Bemerkung: Lautstärke der Inneneinheit.
Wenn nötig, können Sie die Lautstärke der Inneneinheit regeln. Das Potentiometer für die Regelung der
Lautstärke der Inneneinheit befindet sich auf der Rückseite. Um die Lautstärke zu testen, verbinden Sie
den Monitor mit der Außenkamera.
V. 02 – 30/10/2013 22 ©Velleman nv
Page 23

SCAMSET
6.2 Außenkamera
Siehe Abbildung D, Seite 3.
Schaltplan: Siehe Abb. F, Se ite 4.
1. Wählen Sie einen geeigneten Montageort aus.
2. Verwenden S ie die Halterung al s Schablone un d bohren S ie die Löcher.
3. Verbinden Sie die Kabel mit dem Monitor und den Türöffner (Siehe Schaltplan)
4. Befesti g en Sie die Halterung mit den mitgelieferten Dübeln und Schrauben (siehe Abb.).
7. Betrieb
• Wenn ein Besucher die Ruftaste an der Außeneinheit drückt, so wird ein Rufton ausgegeben und der
Bildschirm eingeschaltet.
• Drü cken Si e die Taste , um mit dem Besucher zu sprechen.
• Drücken Sie , um die Tür zu öffnen.
• Haben Sie d a s Gespr ech beendet, dann d rücken S ie die T aste wieder.
Das B i ld erlischt auto matisch.
8. Einstellungen für den Monitor
8.1 Menü-Einstellungen
Im Menü können Sie folgende Änderungen vornehmen:
• Brightness: die Helligkeit e instellen.
• Contrast: den Kontrast einstellen.
• Saturation: die Sättigung einstellen.
• Audio: die Lautstärke des Monito rs einstellen.
Möchten Sie die Lautstärke an der I nnenei nheit regeln, so verwenden Sie das Potentiometer auf der
Rücksei te des Monitors.
Das Menü
• Um den Monitor einzuschalten, drücken Sie die Türklingel an der Außenkamera.
• Drü cken Si e die Taste am Monitor, um in das Menü zu gelangen.
• Drü cken Si e die Taste , um die gewünschte Einstellung auszuwählen.
• Drü cken Si e die Taste oder , um die Einstellung zu ändern.
• Das Menü wird automatisch verlassen, wenn nach einigen Sekunden keine Taste gedrückt wird.
Reset (Rüc k setzung)
Das Gerät auf Werkseinstellungen zurücksetzen:
• Am Moni tor, dr ücken Sie die Taste , um in das Menü zu gelangen.
• Drü cken Si e die Taste um « Reset » auszuwählen.
• Drü cken Si e die Taste oder , um das Gerät auf Werkseinstellungen zurückzusetzen.
Exit (das Menü verlassen)
Das Menü wird automatisch verlassen, wenn nach einigen Sekunden keine Taste gedrückt wird.
Sie können das Menü auch manuell verlassen:
• Drü cken Si e die Taste um « Exit » auszuwählen.
• Drücken Sie auf oder , um das Menü zu verlassen.
V. 02 – 30/10/2013 23 ©Velleman nv
Page 24

SCAMSET
Ruftöne
Das Monitor verfügt über verschieden Ruftöne.
Mute
Telefonkabel
4-Draht-Tel efonkab el (10 m mitgeli ef ert)
Netzteil
15 VDC / 1 A (mitg el iefert)
Betriebstemperatur
-10 °C bi s +50 °C
Monitor
Stromverbrauch: < 500 mA
Typ: 7" LCD-Bildschirm
Pixel: 480 x 234
Wiedergabesteuerung: Helligkeit, Kontrast, Sättigung, Lautstärke, die
Kamera
Typ: pinhole
Blickwinkel: 50°
IR-LEDs: 5
IP-Schutzart: IP22
max. Belastung: 1 kohm
Abmessungen
Monitor: 216 x 148 x 25 mm
Kam e ra: 73 x 123 x 4 4 mm
Gewicht
Mon itor: ± 460 g
Kamera: ± 240 g
8.2 Einstellung der Tasten
(Stummschalten)
Drü cken Si e die Taste um durch die verschiedene Ruftöne zu scrollen
und wählen Sie einen anderen Ton aus.
• Drü cken Si e die Taste , um den Rufton stummzuschalten.
• Ist diese Funktion eingeschaltet, dann blinkt die LED .
• Drückt ein Besucher die Ruftaste, dann wird der Bildschirm eingeschaltet
aber wird kein Rufton ausgegeben.
• Drü cken Si e wieder di e Taste , um diese Funktion auszuschalten.
9. Reinigung und Wartung
• Sorgen Sie dafür, dass die Netzkabel ni cht beschädigt sind. Lassen Sie das Gerät von einer Fachkraft
installieren.
• Es gibt keine zu wartenden Tei le.
• Verwenden Sie zur Reinigung ein feuchtes, fusselfreies Tuch. Verwenden Sie auf keinen Fall Alkohol
oder irgendwelche Lösungsmittel.
10. Technische Daten
Kamera ein-/ausschalten, Türöffner
Türöffner-Funktion Ausgangsspannung: 12 VDC
Verwenden Sie dieses Gerät n ur mit originellen Zubehörteilen . Velleman NV übernimmt keine
Haftung für Sch a den oder Verletzun gen bei (falscher) Anwendung dieses Gerätes.
Für mehr Informationen zu diesem Produkt und die neueste Version dieser
Bedienungsanleitung, s iehe www.perel.eu.
Alle Änderungen ohne vorherige Ankündigung vorbehalten.
© URHEBERRECHT
Velleman NV besitzt das Urheberrecht für diese B edienungsanleitung. Alle weltw eiten Rechte
vorbehalten. Ohne vorherig e schri ftliche Geneh migung des Urheber s ist es nicht gestattet, diese
Bedienungsanleitung ganz oder in Teilen zu reproduzieren, zu kopieren, zu übersetzen, zu bearbeiten
oder zu speichern.
V. 02 – 30/10/2013 24 ©Velleman nv
Page 25

SCAMSET
Desligue sempr e a f icha da tomada qu ando o aparelho não estiver a ser us ado ou qu an do
Não utilizar o aparelho se verificar q ue o exter ior ou os cabos estão danificados. Não tente
MANUAL D O UT I L IZADOR
1. Introdução
Aos cidadãos da União Europeia
Importantes informações sobre o meio ambiente no que respeita a este produto
Agradecem os o facto de t er escolhido a Perel! L eia atentamente as instruções do manual antes de usar o
aparelho. Caso o aparelho tenha sofrido algum dano durante o transporte não o instale e entre em
con t ac t o com o se u distr ibu i d or .
conteúdo da embalagem
Este símbolo no aparelho ou na embalagem indica que, enquanto desperdícios, poderão causar
danos n o meio ambiente. Não deite o aparelho (nem as pilhas, se as houver) no lixo
doméstico; dirija-se a uma empre sa especializada em reciclagem. Devolva o aparelh o ao seu
distribuidor ou ao posto de reciclagem lo cal. Respeite a legislação local relativa ao meio
ambiente.
Em caso de dúvidas, co ntacte c om as autoridades locais para os resíduos.
2. Instruções de segurança
NUNCA desm ont e ou abra a t ampa do dispositi vo em quaisquer circunstâ nci a s. Tocar em
cabos ligados à corrente pode provocar choques eléctricos m ortais.
estiver em a dec orrer quaisquer opera ções de manuten ção. Segu re sempr e na ficha par a o
desligar o cabo da rede, nunca no próprio cabo.
O utilizador não terá de fazer a manutenção das peças. Contact e o seu distribuid or ca so
necessite de pe ça s de substituição.
O dispositivo deve ser instalado /reparado por pessoal qualificado.
proceder à reparaçã o do aparelho. Contacte um distribuidor autorizado.
• Não danif ique o cabo de ali mentação e proteja-o c ontra possíveis danos causados por um a qualquer
superfície afiada. Caso seja necessário, peça ao seu d istribuid or para su bstituir o cabo de
alimentação.
• Certifique-se que a tensão de rede não é sup erior à ten são in d icada nas especi f icações.
3. Normas gerais
Consulte a Garantia de serviço e qualidade Velleman® na parte final deste manual do utilizador.
Proteja o aparelho de quedas e má utilização. Evite u sar f orç a excessiva ao utilizar o
• Por razões de segurança, estão proíbidas quaisquer modificações do aparelho desde que não
aparelho.
autoriza das. Os danos provoca dos por modificações não a utori zad as, não estão cobertos pela
V. 02 – 30/10/2013 25 ©Velleman nv
Page 26

SCAMSET
1
ecrã 7 botão para destrancar porta
2
botão MENU
8
botão do monitor/in tercom unicador
3
botão para baixo
9
microfone
4
botão para cima
10
indicador da opção s em som
5
selector de toque
11
con trolo do volume do
6
botão de silêncio
12
alimentação
1
2
3
camera
4
botão de chamada
5
microfone
garantia.
• Dan os causad os pelo não cumpr iment o das normas de segurança refer idas neste manual anulam a
garantia e o seu distribuidor não será responsável por qualquer danos ou outros problemas daí
resultantes.
• Não li g ue o aparelho depois de exposto a variações de temper atura. Para evitar danos, espere que o
aparelho ating e a temperatura ambiente.
• Familiarize-se com o funcionamento do aparelho antes de o utilizar. O aparelho só deve ser
manuseado por pess o a s qualificadas. Os d a nos que possam ocorr e r serão provavelmente causados
por uma ut ilização nã o profissional do aparelho.
• Os componentes mecânicos e os LEDs não estã o c obertos pela gar a ntia.
4. Características
• câmara c o m LE Ds IR para visão noctu r na
• intercomunicador áudio em duas vias
• ecrã LCD 7" a c or es
• a porta pod er á ser ab er ta através do monitor através d e fechadura el ectrónica opcional: HAA272
• fechadura electrónica (12 V / 1 A): HAA272 (não incl.).
5. Descrição
Ver as figuras d a p ágina 2 deste manu al do uti lizador.
Figura A - monitor
intercomunicador
Figura B - Câmara Exterior
alto-falante
led in f r av er me lh o
6. Instalação
6.1 Ecrã
Ver figura C na página 3
Di agrama da cabl age: ver fig ura E na página 4.
1. Escolha um local de instalação apropriado (dependendo da altura do utilizado r, lo calização da
câmara exterior...)
2. Faça os furos usando o suporte c o mo mold e.
3. Fixe o suporte usando as buch as e os paraf usos incluíd os.
4. Ligue os cabos nos conectores do p ainel traseiro conforme in dicado no diagrama .
5. Ligue o adaptador no pa in el t raseiro do monitor .
6. Fixe o m on itor ao s u p or t e .
7. N ecessita também de ligar o cabo do monitor à câ mara exterior. Caso seja n ecessário, faça um fora
para a passagem deste cabo.
Nota: Volume do Intercomunicador
Pode reg ula r o v ol ume do inter comunicad or se for necessário. O p otenciómetro do volume do
intercomunicador encontra-se no painel traseiro. Para testar o vo lume, necessita de ligar o monito r à
câmara exterior.
V. 02 – 30/10/2013 26 ©Velleman nv
Page 27

SCAMSET
6.2 Câmara Exterior
Ver figura D n a p ágina 3
Di agrama da cabl agem: ver figura F na página 4.
1. Escolha um local de instalação apropriado.
2. Faça os furos usando o suporte c o mo mold e.
3. Lig ue os cabos ao monitor e à f ech ad ura el éctrica conforme ind icado no diagr ama.
4. Fixe o suporte co mo in dicado na figura usando as bu chas e os parafusos incluídos.
7. Utilização
• Quando uma visita pressiona o botão de chamada na câm ar a exterior, a campaínha toca e o monit or
é activado.
• Pressione para fal ar com a visita.
• Pressione p ar a ab rir a porta.
• Ao terminar de falar com a visita, pressione novamente.
O monitor é desligado automaticamente.
8. Defin ições do M oni to r
8.1 Opções de Menu
No menu do moni tor, pode alterar as segu intes defi nições:
• Brilho: ajusta o brilho da imagem.
• Contraste: ajusta o contraste d a imagem.
• Saturação: ajusta a satu ração da imagem.
• Áudio: permite ajustar o vol ume no monitor .
Para ajustar o volume no in tercomuni cador , us e o potencióme tro no pa inel traseiro do monitor.
Usar o menu
• Para li gar o monitor, pressione a campaín ha na câmara exterior.
• No m oni tor , p r es sion e para aceder ao menu.
• Pressione para seleccionar a opçã o que p retende alterar.
• Pressione ou para alterar a opção.
• O menu desaparece automaticamente após alguns segundos.
Reinicializar
Apagar tod as as definições:
• No menu, pressione par a aceder ao menu.
• Pressione para seleccionar L impar.
• Pressione ou para apagar as definições do dispositivo.
Exit
O menu desaparece automaticamente após alguns segundos.
Também pode sair do menu manualmente, da seguinte forma:
• Pressione para seleccionar Sair.
• Pressione ou para sai r do menu.
V. 02 – 30/10/2013 27 ©Velleman nv
Page 28

SCAMSET
Toque de campaínha
O monitor dipõe de vários toques de campaínha.
Sem som
alimentação
15 VDC / 1 A ( incl.)
temper atura de
de -10 °C a +50 °C
monitor
consumo de corrente: < 500 mA
tipo: LCD 7" a cores
píxei s : 480 x 234
comandos: brilho, contraste, satu r ação, volume, câmara ON/O FF, destrancar
camera
tipo: orifício
LEDs IR: 5
grau de protecção IP: IP22
função para destrancar
tensão de saída: 12 VDC
carga máxima: 1 kohm
dimensões
monitor: 216 x 148 x 25 mm
cam er a: 73 x 12 3 x 44 mm
peso
mon itor: ± 460 g
camera: ± 240 g
8.2 Funções
Pressione para aceder aos vários t oques e escolher outro toque.
• Pressione para silen ciar a campaínha.
• Quando a op ção sem s o m es tá activa, o LED do dispositivo acende.
• Quando alg uém toca à porta, o dispositivo dispara sem to ca r a
campaínha.
• Pressione para cancelar a opção sem som.
9. Limpeza e m an utenção
• Não danif ique os cab os de alimentação. Cont acte um técnico especi alizado para instal ar o aparelho.
• O utilizador não deverá fazer a manutenção das peças.
• Li mpe o aparelho regul armente com um pano seco sem p êlos. Evite o uso de á lcool ou dissolventes.
10. Especificações
cabo de telefone cabo de telefone de 4 fios (10 m incluído)
funcionamento
porta
ângulo de visão: 50°
portas
Util ize este aparel ho apenas com acessório s originais. A Vel leman NV não será responsável
por quaisquer danos ou lesões causados pelo uso (indevido) do aparelho.
Para mai s informaç ão sobre este pr oduto e para aceder à ver são mais recente deste man ual
do utilizador, visite a nossa página www.perel.eu.
Podem alterar-se as especificações e o conteúdo deste manual sem aviso prévi o.
© DIREITOS DE AUTOR
A Velleman NV detém os direitos de autor d este manual do utilizador. Todos os direitos
mundiais reservados. É estritamente proibido reproduzir, traduzir, copiar, editar e gravar este manual
do utilizador ou partes deste sem prévia autorização escrita por parte da detentora dos direitos.
V. 02 – 30/10/2013 28 ©Velleman nv
Page 29

Velleman® Service and Quality Warranty
Since its foundation in 1972, Velleman® acquired extensive experience in the
electronics world and currently distributes its products in over 85 countries.
All our products fulfil strict quality requirements and legal stipulations in the EU. In
order to ensure the quality, our products regularly go through an extra quality
check, both by an internal quality department and by specialized external
organisations. If, all precautionary measures notwithstanding, problems should
occur, please make appeal to our warranty (see guarantee conditions).
General Warranty Conditions Concerning Consumer Products (for EU):
• All consumer products are subject to a 24-month warranty on production flaws
and defective material as from the original date of purchase.
• Velleman® can decide to replace an article with an equivalent article, or to refund
the retail value totally or partially when the complaint is valid and a free repair or
replacement of the article is impossible, or if the expenses are out of proportion.
You will be delivered a replacing article or a refund at the value of 100% of the
purchase price in case of a flaw occurred in the first year after the date of purchase
and delivery, or a replacing article at 50% of the purchase price or a refund at the
value of 50% of the retail value in case of a flaw occurred in the second year after
the date of purchase and delivery.
• Not covered by warranty:
- all direct or indirect damage caused after delivery to the article (e.g. by oxidation,
shocks, falls, dust, dirt, humidity...), and by the article, as well as its contents (e.g.
data loss), compensation for loss of profits;
- consumable goods, parts or accessories that are subject to an aging process
during normal use, such as batteries (rechargeable, non-rechargeable, built-in or
replaceable), lamps, rubber parts, drive belts... (unlimited list);
- flaws resulting from fire, water damage, lightning, accident, natural disaster,
etc.…;
- flaws caused deliberately, negligently or resulting from improper handling,
negligent maintenance, abusive use or use contrary to the manufacturer’s
instructions;
- damage caused by a commercial, professional or collective use of the article (the
warranty validity will be reduced to six (6) months when the article is used
professionally);
- damage resulting from an inappropriate packing and shipping of the article;
- all damage caused by modification, repair or alteration performed by a third party
without written permission by Velleman®.
• Articles to be repaired must be delivered to your Velleman® dealer, solidly
packed (preferably in the original packaging), and be completed with the original
receipt of purchase and a clear flaw description.
• Hint: In order to save on cost and time, please reread the manual and check if the
flaw is caused by obvious causes prior to presenting the article for repair. Note that
returning a non-defective article can also involve handling costs.
• Repairs occurring after warranty expiration are subject to shipping costs.
• The above conditions are without prejudice to all commercial warranties.
The above enumeration is subject to modification according to the article
(see article’s manual).
Velleman® service- en kwaliteitsgarantie
Velleman® heeft sinds zijn oprichting in 1972 een ruime ervaring opgebouwd in de
elektronicawereld en verdeelt op dit moment producten in meer dan 85 landen. Al
onze producten beantwoorden aan strikte kwaliteitseisen en aan de wettelijke
bepalingen geldig in de EU. Om de kwaliteit te waarborgen, ondergaan onze
producten op regelmatige tijdstippen een extra kwaliteitscontrole, zowel door onze
eigen kwaliteitsafdeling als door externe gespecialiseerde organisaties. Mocht er
ondanks deze voorzorgen toch een probleem optreden, dan kunt u steeds een
beroep doen op onze waarborg (zie waarborgvoorwaarden).
Algemene waarborgvoorwaarden consumentengoederen (voor Europese
Unie):
• Op alle consumentengoederen geldt een garantieperiode van 24 maanden op
productie- en materiaalfouten en dit vanaf de oorspronkelijke aankoopdatum.
• Indien de klacht gegrond is en een gratis reparatie of vervanging van een artikel
onmogelijk is of indien de kosten hiervoor buiten verhouding zijn, kan Velleman®
beslissen het desbetreffende artikel te vervangen door een gelijkwaardig artikel of
de aankoopsom van het artikel gedeeltelijk of volledig terug te betalen. In dat geval
krijgt u een vervangend product of terugbetaling ter waarde van 100% van de
aankoopsom bij ontdekking van een gebrek tot één jaar na aankoop en levering, of
een vervangend product tegen 50% van de kostprijs of terugbetaling van 50 % bij
ontdekking na één jaar tot 2 jaar.
• Valt niet onder waarborg:
- alle rechtstreekse of onrechtstreekse schade na de levering veroorzaakt aan het
toestel (bv. door oxidatie, schokken, val, stof, vuil, vocht...), en door het toestel,
alsook zijn inhoud (bv. verlies van data), vergoeding voor eventuele winstderving.
- verbruiksgoederen, onderdelen of hulpstukken die onderhevig zijn aan
veroudering door normaal gebruik zoals bv. batterijen (zowel oplaadbare als nietoplaadbare, ingebouwd of vervangbaar), lampen, rubberen onderdelen,
aandrijfriemen... (onbeperkte lijst).
- defecten ten gevolge van brand, waterschade, bliksem, ongevallen,
natuurrampen, enz.
- defecten veroorzaakt door opzet, nalatigheid of door een onoordeelkundige
behandeling, slecht onderhoud of abnormaal gebruik of gebruik van het toestel
strijdig met de voorschriften van de fabrikant.
- schade ten gevolge van een commercieel, professioneel of collectief gebruik van
het apparaat (bij professioneel gebruik wordt de garantieperiode herleid tot 6
maand).
- schade veroorzaakt door onvoldoende bescherming bij transport van het
apparaat.
- alle schade door wijzigingen, reparaties of modificaties uitgevoerd door derden
zonder toestemming van Velleman®.
• Toestellen dienen ter reparatie aangeboden te worden bij uw Velleman®verdeler. Het toestel dient vergezeld te zijn van het oorspronkelijke aankoopbewijs.
Zorg voor een degelijke verpakking (bij voorkeur de originele verpakking) en voeg
een duidelijke foutomschrijving bij.
• Tip: alvorens het toestel voor reparatie aan te bieden, kijk nog eens na of er geen
voor de hand liggende reden is waarom het toestel niet naar behoren werkt (zie
handleiding). Op deze wijze kunt u kosten en tijd besparen. Denk eraan dat er ook
voor niet-defecte toestellen een kost voor controle aangerekend kan worden.
• Bij reparaties buiten de waarborgperiode zullen transportkosten aangerekend
worden.
• Elke commerciële garantie laat deze rechten onverminderd.
Bovenstaande opsomming kan eventueel aangepast worden naargelang de
aard van het product (zie handleiding van het betreffende product).
Garantie de service et de qualité Velleman®
Depuis 1972, Velleman® a gagné une vaste expérience dans le secteur de
l’électronique et est actuellement distributeur dans plus de 85 pays.
Tous nos produits répondent à des exigences de qualité rigoureuses et à des
dispositions légales en vigueur dans l’UE. Afin de garantir la qualité, nous
soumettons régulièrement nos produits à des contrôles de qualité supplémentaires,
tant par notre propre service qualité que par un service qualité externe. Dans le
cas improbable d’un défaut malgré toutes les précautions, il est possible d’invoquer
notre garantie (voir les conditions de garantie).
Conditions générales concernant la garantie sur les produits grand public
(pour l’UE) :
• tout produit grand public est garanti 24 mois contre tout vice de production ou de
matériaux à dater du jour d’acquisition effective ;
• si la plainte est justifiée et que la réparation ou le remplacement d’un article est
jugé impossible, ou lorsque les coûts s’avèrent disproportionnés, Velleman®
s’autorise à remplacer ledit article par un article équivalent ou à rembourser la
totalité ou une partie du prix d’achat. Le cas échéant, il vous sera consenti un
article de remplacement ou le remboursement complet du prix d’achat lors d’un
défaut dans un délai de 1 an après l’achat et la livraison, ou un article de
remplacement moyennant 50% du prix d’achat ou le remboursement de 50% du
prix d’achat lors d’un défaut après 1 à 2 ans.
• sont par conséquent exclus :
- tout dommage direct ou indirect survenu à l’article après livraison (p.ex.
dommage lié à l’oxydation, choc, chute, poussière, sable, impureté…) et provoqué
par l’appareil, ainsi que son contenu (p.ex. perte de données) et une indemnisation
éventuelle pour perte de revenus ;
- toute pièce ou accessoire nécessitant un remplacement causé par un usage
normal comme p.ex. piles (rechargeables comme non rechargeables, intégrées ou
remplaçables), ampoules, pièces en caoutchouc, courroies… (liste illimitée) ;
- tout dommage qui résulte d’un incendie, de la foudre, d’un accident, d’une
catastrophe naturelle, etc. ;
- out dommage provoqué par une négligence, volontaire ou non, une utilisation ou
un entretien incorrect, ou une utilisation de l’appareil contraire aux prescriptions du
fabricant ;
- tout dommage à cause d’une utilisation commerciale, professionnelle ou
collective de l’appareil (la période de garantie sera réduite à 6 mois lors d’une
utilisation professionnelle) ;
- tout dommage à l’appareil qui résulte d’une utilisation incorrecte ou différente que
celle pour laquelle il a été initialement prévu comme décrit dans la notice ;
- tout dommage engendré par un retour de l’appareil emballé dans un
conditionnement non ou insuffisamment protégé.
- toute réparation ou modification effectuée par une tierce personne sans
l’autorisation explicite de SA Velleman® ; - frais de transport de et vers Velleman®
si l’appareil n’est plus couvert sous la garantie.
• toute réparation sera fournie par l’endroit de l’achat. L’appareil doit
nécessairement être accompagné du bon d’achat d’origine et être dûment
conditionné (de préférence dans l’emballage d’origine avec mention du défaut) ;
• tuyau : il est conseillé de consulter la notice et de contrôler câbles, piles, etc.
avant de retourner l’appareil. Un appareil retourné jugé défectueux qui s’avère en
bon état de marche pourra faire l’objet d’une note de frais à charge du
consommateur ;
• une réparation effectuée en-dehors de la période de garantie fera l’objet de frais
de transport ;
• toute garantie commerciale ne porte pas atteinte aux conditions susmentionnées.
La liste susmentionnée peut être sujette à une complémentation selon le type
de l’article et être mentionnée dans la notice d’emploi.
Garantía de servicio y calidad Velleman®
Desde su fundación en 1972 Velleman® ha adquirido una amplia experiencia
como distribuidor en el sector de la electrónica en más de 85 países. Todos
nuestros productos responden a normas de calidad rigurosas y disposiciones
legales vigentes en la UE. Para garantizar la calidad, sometemos nuestros
productos regularmente a controles de calidad adicionales, tanto a través de
nuestro propio servicio de calidad como de un servicio de calidad externo. En el
caso improbable de que surgieran problemas a pesar de todas las precauciones,
es posible recurrir a nuestra garantía (véase las condiciones de garantía).
Condiciones generales referentes a la garantía sobre productos de venta al
público (para la Unión Europea):
• Todos los productos de venta al público tienen un perìodo de garantìa de 24
meses contra errores de producción o errores en materiales desde la adquisición
original;
• Si la queja está fundada y si la reparación o sustitución de un artìculo no es
posible, o si los gastos son desproporcionados, Velleman® autoriza reemplazar el
artículo por un artículo equivalente o reembolsar la totalidad o una parte del precio
de compra. En este caso, usted recibirá un artículo de recambio o el reembolso
Page 30

completo del precio de compra si encuentra algún fallo hasta un año después de la
compra y entrega, o un artículo de recambio al 50% del precio de compra o el
reembolso del 50% del precio de compra si encuentra un fallo después de 1 año y
hasta los 2 años después de la compra y entrega.
Por consiguiente, están excluidos entre otras cosas:
- todos los daños causados directa o indirectamente al aparato (p.ej. por oxidación,
choques, caída,...) y a su contenido (p.ej. pérdida de datos) después de la entrega
y causados por el aparato, y cualquier indemnización por posible pérdida de
ganancias;
- partes o accesorios, que estén expuestos al desgaste causado por un uso
normal, como por ejemplo baterías (tanto recargables como no recargables,
incorporadas o reemplazables), bombillas, partes de goma, etc. (lista ilimitada);
- defectos causados por un incendio, daños causados por el agua, rayos,
accidentes, catástrofes naturales, etc.;
- defectos causados a conciencia, descuido o por malos tratos, un mantenimiento
inapropiado o un uso anormal del aparato contrario a las instrucciones del
fabricante;
- daños causados por un uso comercial, profesional o colectivo del aparato (el
período de garantía se reducirá a 6 meses con uso profesional);
- daños causados por un uso incorrecto o un uso ajeno al que está previsto el
producto inicialmente como está descrito en el manual del usuario;
- daños causados por una protección insuficiente al transportar el aparato.
- daños causados por reparaciones o modificaciones efectuadas por una tercera
persona sin la autorización explícita de Velleman®;
- se calcula gastos de transporte de y a Velleman® si el aparato ya no está
cubierto por la garantía.
• Cualquier artìculo que tenga que ser reparado tendrá que ser devuelto a su
distribuidor Velleman®. Devuelva el aparato con la factura de compra original y
transpórtelo en un embalaje sólido (preferentemente el embalaje original). Incluya
también una buena descripción del fallo;
• Consejo: Lea el manual del usuario y controle los cables, las pilas, etc. antes de
devolver el aparato. Si no se encuentra un defecto en el artículo los gastos podrían
correr a cargo del cliente;
• Los gastos de transporte correrán a carga del cliente para una reparación
efectuada fuera del período de garantía.
• Cualquier gesto comercial no disminuye estos derechos.
La lista previamente mencionada puede ser adaptada según el tipo de
artículo (véase el manual del usuario del artículo en cuestión).
Velleman® Service- und Qualitätsgarantie
Seit der Gründung in 1972 hat Velleman® sehr viel Erfahrung als Verteiler in der
Elektronikwelt in über 85 Ländern aufgebaut.
Alle Produkte entsprechen den strengen Qualitätsforderungen und gesetzlichen
Anforderungen in der EU. Um die Qualität zu gewährleisten werden unsere
Produkte regelmäßig einer zusätzlichen Qualitätskontrolle unterworfen, sowohl von
unserer eigenen Qualitätsabteilung als auch von externen spezialisierten
Organisationen. Sollten, trotz aller Vorsichtsmaßnahmen, Probleme auftreten,
nehmen Sie bitte die Garantie in Anspruch (siehe Garantiebedingungen).
Allgemeine Garantiebedingungen in Bezug auf Konsumgüter (für die
Europäische Union):
• Alle Produkte haben für Material- oder Herstellungsfehler eine Garantieperiode
von 24 Monaten ab Verkaufsdatum.
• Wenn die Klage berechtigt ist und falls eine kostenlose Reparatur oder ein
Austausch des Gerätes unmöglich ist, oder wenn die Kosten dafür
unverhältnismäßig sind, kann Velleman® sich darüber entscheiden, dieses Produkt
durch ein gleiches Produkt zu ersetzen oder die Kaufsumme ganz oder teilweise
zurückzuzahlen. In diesem Fall erhalten Sie ein Ersatzprodukt oder eine
Rückzahlung im Werte von 100% der Kaufsumme im Falle eines Defektes bis zu 1
Jahr nach Kauf oder Lieferung, oder Sie bekommen ein Ersatzprodukt im Werte
von 50% der Kaufsumme oder eine Rückzahlung im Werte von 50 % im Falle
eines Defektes im zweiten Jahr.
• Von der Garantie ausgeschlossen sind:
- alle direkten oder indirekten Schäden, die nach Lieferung am Gerät und durch
das Gerät verursacht werden (z.B. Oxidation, Stöße, Fall, Staub, Schmutz,
Feuchtigkeit, ...), sowie auch der Inhalt (z.B. Datenverlust), Entschädigung für
eventuellen Gewinnausfall.
- Verbrauchsgüter, Teile oder Zubehörteile, die durch normalen Gebrauch dem
Verschleiß ausgesetzt sind, wie z.B. Batterien (nicht nur aufladbare, sondern auch
nicht aufladbare, eingebaute oder ersetzbare), Lampen, Gummiteile, Treibriemen,
usw. (unbeschränkte Liste).
- Schäden verursacht durch Brandschaden, Wasserschaden, Blitz, Unfälle,
Naturkatastrophen, usw.
- Schäden verursacht durch absichtliche, nachlässige oder unsachgemäße
Anwendung, schlechte Wartung, zweckentfremdete Anwendung oder
Nichtbeachtung von Benutzerhinweisen in der Bedienungsanleitung.
- Schäden infolge einer kommerziellen, professionellen oder kollektiven
Anwendung des Gerätes (bei gewerblicher Anwendung wird die Garantieperiode
auf 6 Monate zurückgeführt).
- Schäden verursacht durch eine unsachgemäße Verpackung und
unsachgemäßen Transport des Gerätes.
- alle Schäden verursacht durch unautorisierte Änderungen, Reparaturen oder
Modifikationen, die von einem Dritten ohne Erlaubnis von Velleman®
vorgenommen werden.
• Im Fall einer Reparatur, wenden Sie sich an Ihren Velleman®-Verteiler. Legen
Sie das Produkt ordnungsgemäß verpackt (vorzugsweise die Originalverpackung)
und mit dem Original-Kaufbeleg vor. Fügen Sie eine deutliche Fehlerbeschreibung
hinzu.
• Hinweis: Um Kosten und Zeit zu sparen, lesen Sie die Bedienungsanleitung
nochmals und überprüfen Sie, ob es keinen auf de Hand liegenden Grund gibt, ehe
Sie das Gerät zur Reparatur zurückschicken. Stellt sich bei der Überprüfung des
Gerätes heraus, dass kein Geräteschaden vorliegt, könnte dem Kunden eine
Untersuchungspauschale berechnet.
• Für Reparaturen nach Ablauf der Garantiefrist werden Transportkosten
berechnet.
• Jede kommerzielle Garantie lässt diese Rechte unberührt.
Die oben stehende Aufzählung kann eventuell angepasst werden gemäß der
Art des Produktes (siehe Bedienungsanleitung des Gerätes).
Garantia de serviço e de qualidade Velleman®
Desde a sua fundação em 1972 Velleman® tem adquirido uma amplia experiencia
no sector da eletrónica com uma distribuição em mais de 85 países.
Todos os nossos produtos respondem a exigências rigorosas e a disposições
legais em vigor na UE. Para garantir a qualidade, submetemos regularmente os
nossos produtos a controles de qualidade suplementares, com o nosso próprio
serviço qualidade como um serviço de qualidade externo. No caso improvável de
um defeito mesmo com as nossas precauções, é possível invocar a nossa
garantia. (ver as condições de garantia).
Condições gerais com respeito a garantia sobre os produtos grande público
(para a UE):
• qualquer produto grande público é garantido 24 mês contra qualquer vício de
produção ou materiais a partir da data de aquisição efectiva;
• no caso da reclamação ser justificada e que a reparação ou substituição de um
artigo é impossível, ou quando os custo são desproporcionados, Velleman®
autoriza-se a substituir o dito artigo por um artigo equivalente ou a devolver a
totalidade ou parte do preço de compra. Em outro caso, será consentido um artigo
de substituição ou devolução completa do preço de compra no caso de um defeito
no prazo de 1 ano depois da data de compra e entrega, ou um artigo de
substituição pagando o valor de 50% do preço de compra ou devolução de 50% do
preço de compra para defeitos depois de 1 a 2 anos.
• estão por consequência excluídos:
- todos os danos directos ou indirectos depois da entrega do artigo (p.ex. danos
ligados a oxidação, choques, quedas, poeiras, areias, impurezas…) e provocado
pelo aparelho, como o seu conteúdo (p.ex. perca de dados) e uma indemnização
eventual por perca de receitas;
- consumíveis, peças ou acessórios sujeitos a desgaste causado por um uso
normal, como p.ex. pilhas (recarregáveis, não recarregáveis, incorporadas ou
substituìveis), lâmpadas, peças em borracha correias… (lista ilimitada);
- todos os danos que resultem de um incêndio, raios, de um acidente, de una
catastrophe natural, etc.;
- danos provocados por negligencia, voluntária ou não, uma utilização ou
manutenção incorrecta, ou uma utilização do aparelho contrária as prescrições do
fabricante ;
- todos os danos por causa de uma utilização comercial, profissional ou colectiva
do aparelho ( o período de garantia será reduzido a 6 meses para uma utilização
profissional);
- todos os danos no aparelho resultando de uma utilização incorrecta ou diferente
daquela inicialmente prevista e descrita no manual de utilização;
- todos os danos depois de uma devolução não embalada ou mal protegida ao
nível do acondicionamento.
- todas as reparações ou modificações efectuadas por terceiros sem a autorização
de SA Velleman®;
- despesas de transporte de e para Velleman® se o aparelho não estiver coberto
pela garantia.
• qualquer reparação será fornecida pelo local de compra. O aparelho será
obrigatoriamente acompanhado do talão ou factura de origem e bem
acondicionado (de preferência dentro da embalagem de origem com indicação do
defeito ou avaria);
• dica: aconselha-mos a consulta do manual e controlar cabos, pilhas, etc. antes
de devolver o aparelho. Um aparelho devolvido que estiver em bom estado será
cobrado despesas a cargo do consumidor;
• uma reparação efectuada fora da garantia, será cobrado despesas de transporte;
• qualquer garantia comercial não prevalece as condições aqui mencionadas.
A lista pode ser sujeita a um complemento conforme o tipo de artigo e estar
mencionada no manual de utilização.
Imported for PEREL by Velleman nv
Legen Heirweg 33, 9890 Gavere, Belgium
Made in PRC
www.perel.eu
 Loading...