

Page 1
Manual
MoRoS GPRS 1.3
Okt-07
Page 2

Page 3

Copyright © October 07 INSYS MICROELECTRONICS GmbH
Any duplication of this manual is prohibited. All rights on this documentation and the
devices are with INSYS MICROELECTRONICS GmbH Regensburg.
Restrictions of guarantee
This handbook contains a concise description. The compilation of the text has been made
with the utmost care. Despite all efforts, there may be deviations compared with the actual functions. No guarantee can therefore be given for the accuracy of the contents. We
can neither take over a legal responsibility nor any liability for incorrect information and
their consequences. Suggestions for improvements and comments are gladly accepted.
Trademarks
The use of a trademark not shown below is not an indication that it is freely available for
use.
MNP is a registered trademark of Microcom Inc.
IBM PC, AT, XT are registered trademarks of International Business Machine Corporation.
INSYS ® is a registered trademark of INSYS MICROELECTRONICS GmbH.
Windows™ is a registered trademark of Microsoft Corporation.
Publisher:
INSYS MICROELECTRONICS GmbH
Waffnergasse 8
D-93047 Regensburg, Germany
Phone: +49 (0)941/56 00 61
Fax: +49 (0)941/56 34 71
e-mail: insys@insys-tec.de
Internet: http://www.insys-tec.de
Subject to technical changes as well as correction.
Date: Oct-07
Item: 31-22-03.103
Version: 2.0
Language: EN
Page 4

Contents
1 Safety.................................................................................................................6
2 Scope of Delivery............................................................................................... 8
3 Usage According to the Regulations ................................................................. 9
4 Technical Data ................................................................................................. 10
4.1 Physical Features.............................................................................................................. 10
4.2 Technological Features .................................................................................................... 11
5 Display and Control Elements ......................................................................... 12
5.1 Meaning of the Displays .................................................................................................. 13
5.2 Function of the Control Elements .................................................................................... 14
6 Connections..................................................................................................... 15
6.1 Front Panel Connections .................................................................................................. 15
6.2 Terminal Connections on the Top.................................................................................... 16
6.3 Terminal Connections on the Bottom ............................................................................. 17
6.4 Pin Assignment of the Serial Interface ............................................................................ 18
7 Function Overview .......................................................................................... 19
8 Meaning of the Symbols and the Formatting in this Manual .........................21
9 Mounting......................................................................................................... 22
10 Initial Operation .............................................................................................. 26
11 Operating Principle.......................................................................................... 28
11.1 Operating the Web Interface........................................................................................... 28
11.2 Control Elements of the Web Interface of the MoRoS GPRS 1.3 .................................... 29
11.2.1 Main Menu / Start Page.................................................................................................29
11.2.2 Menu Basic Settings ....................................................................................................... 30
11.2.3 GSM/GPRS Menu............................................................................................................. 32
11.2.4 Menu DNS ......................................................................................................................... 32
11.2.5 Menu Dial-in ..................................................................................................................... 34
11.2.6 Menu Dial-out .................................................................................................................. 35
11.2.7 Menu Port forwarding ................................................................................................... 36
11.2.8 Menu Inputs...................................................................................................................... 36
11.2.9 Menu Outputs .................................................................................................................. 38
11.2.10 Menu System.................................................................................................................... 38
12 Functions ......................................................................................................... 41
12.1 Basic Settings ................................................................................................................... 41
12.1.1 Web Interface (User Name, Password, Remote Configuration) .........................41
12.1.2 Set IP Addresses or Retrieve via DHCP .......................................................................42
12.1.3 Setting up the DHCP Server ..........................................................................................42
12.1.4 Setting up the Serial Ethernet Gateway.................................................................... 44
12.2 DNS ................................................................................................................................... 44
12.2.1 Setting up DNS Forwarding .......................................................................................... 44
12.2.2 Setting up the Dynamic DNS Update......................................................................... 45
12.3 GSM/GPRS ........................................................................................................................ 46
12.3.1 Enter SIM card PIN........................................................................................................... 46
12.3.2 Set the daily login and logout ...................................................................................... 46
12.3.3 Set Network Mask ........................................................................................................... 47
4
Okt-07
Page 5

Contents
12.4 Dial-in ............................................................................................................................... 47
12.4.1 Set the Dial-In Server...................................................................................................... 47
12.4.2 Automatic callback ......................................................................................................... 48
12.5 Dial-out 50
12.5.1 Set the Dial-Out Server .................................................................................................. 50
12.5.2 Set up Leased Line Operation ....................................................................................... 51
12.5.3 Set up a Periodical Dial-out Connection Setup........................................................ 52
12.5.4 Setting up a Dialing Filter.............................................................................................. 52
12.6 Port Forwarding ............................................................................................................... 53
12.6.1 Creating a Port Forwarding Rule................................................................................. 53
12.6.2 Defining the Exposed Host ........................................................................................... 54
12.7 Proxy................................................................................................................................. 54
12.7.1 Configuring the MoRoS GPRS 1.3 Proxy Server ....................................................... 54
12.7.2 Set up an URL Filter ......................................................................................................... 55
12.8 Inputs................................................................................................................................ 55
12.8.1 Query the State of the Inputs.......................................................................................55
12.8.2 Set up a Dial-out Connection via Switch Input........................................................ 56
12.8.3 Trigger SMS Dispatch through Input 1...................................................................... 56
12.9 Outputs............................................................................................................................. 57
12.9.1 Query the Output States ............................................................................................... 57
12.9.2 Switch Outputs ................................................................................................................ 57
12.10 System Configuration ...................................................................................................... 57
12.10.1 Display System Messages ............................................................................................. 57
12.10.2 Downloading the Last System Messages.................................................................. 58
12.10.3 Setting the Time and the Time Zone.......................................................................... 58
12.10.4 Synchronizing the Time via the NTP Server.............................................................. 58
12.10.5 Reset.................................................................................................................................... 59
12.10.6 Updating the Firmware of the MoRoS GPRS 1.3 ..................................................... 60
12.10.7 Download the Configuration File from the MoRoS GPRS 1.3 .............................. 62
12.10.8 Uploading the Configuration File to the MoRoS GPRS 1.3 ................................... 62
13 Waste Disposal ................................................................................................64
13.1 Repurchasing of legacy systems...................................................................................... 64
14 Licenses............................................................................................................65
14.1 GNU GENERAL PUBLIC LICENSE ........................................................................................ 65
14.2 GNU LIBRARY GENERAL PUBLIC LICENSE.......................................................................... 68
14.3 Other Licenses .................................................................................................................. 73
15 International Safety Instructions .................................................................... 76
15.1 Safety Precautions ........................................................................................................... 76
15.2 Compliance with FCC Rules and Regulations .................................................................. 77
16 Tables and Diagrams ....................................................................................... 79
16.1 List of Tables..................................................................................................................... 79
16.2 List of Diagrams................................................................................................................ 79
17 Glossary ........................................................................................................... 81
Okt-07 5
Page 6
Safety MoRoS GPRS 1.3
1 Safety
Moisture und liquids from the environment may seep
into the interior of the device.
Risk of death through shock hazard when touching it!
The MoRoS GPRS 1.3 may not be used in wet or damp
environments, or in or very close to water. Install the device at a dry location, protected from water spray. Switch
the power supply off before you do any work on a device
which may have been in contact with moisture.
Overvoltage.
Fire hazard!
The modem must be secured with a suitable fuse against
overvoltage.
Danger!
Danger!
Warning!
Short circuits and damage due to improper repairs and
opening of maintenance areas.
Fire, breakdown and risk of injury!
Only trained personnel are allowed to open the MoRoS
GPRS 1.3 and to repair it.
Note
Damage of the device due to overvoltage!
Voltage peaks from the power supply may damage the
device.
Install suitable overvoltage protection.
Note
Damage due to chemicals!
Ketones and chlorinated hydrocarbons dissolve the plastic housing and damage the surface of the device.
Never let the device come into contact with ketones (e.g.
acetone) or chlorinated hydrocarbons, such as dichloromethane.
6
Page 7

MoRoS GPRS 1.3 Safety
7
Page 8

Scope of Delivery MoRoS GPRS 1.3
2 Scope of Delivery
The scope of delivery for the MoRoS GPRS 1.3 includes all accessories listed below. Please
check if all accessories are included in the box. If a part is missing or damaged, please
contact your distributor.
1 MoRoS GPRS 1.3
1 Manual
1 Quick Installation Guide
The scope of delivery of the MoRoS GPRS 1.3 does not include optional accessories. The
following parts are available from your distributor or from INSYS MICROELECTRONICS:
GSM antenna for external wall
GSM antenna with magnetic base
Patch antenna
8
Page 9

MoRoS GPRS 1.3 Usage According to the Regulations
3 Usage According to the Regulations
The MoRoS GPRS 1.3 may only be used for the purposes specified in the function overview. In addition, it may be used for the following purposes:
• Usage and mounting in an industrial cabinet.
• Switching and data transmission functions in machines according to the
machine directive 2006/42/EG.
• Usage as data transmission device for a PLC.
The MoRoS GPRS 1.3 may not be used for the following purposes and used or operated
under the following conditions:
• Controlling or switching of machines and systems which do not comply
with the directive 2006/42/EG.
• Usage, controlling, switching and data transmission in machines or sys-
tems which are operated in explosive atmospheres.
• Controlling, switching and data transmission of machines, which may in-
volve risks to life and limb due to their functions or when a breakdown occurs.
9
Page 10
Technical Data MoRoS GPRS 1.3
4 Technical Data
4.1 Physical Features
All specified data was measured with a nominal input voltage, at full load, and an ambient temperature of 25 °C. The threshold value tolerances are subject to typical fluctuations.
Physical Feature Value
Operating voltage 10.0.60 V DC voltage
Power input sleep 2.5 W
Power input connection 3.5 W
Level inputs Level HIGH = 4-12V
Overvoltage.
Fire hazard!
The MoRoS GPRS 1.3 must be secured with a suitable
fuse against overvoltage.
Level LOW = 0-1 V
Danger!
Current consumption of an active input
against GND (internal 5V)
Switch output, maximum switch voltage 30 V (DC) / 42V (AC)
Switch output, maximum current load 1 A (DC) / 0.5 A (AC)
Transmitted output:
EGSM 850 and 900: Class 4
GSM 1800 and 1900: Class 1
Weight 8.82 oz
Dimensions (Width x Depth x Height) 2.17 in x 4.33 in x 2.95 in
Temperature range 0 °C – 55 °C
Maximum allowed humidity 95% non-condensing
Protection class Housing IP40, Terminals IP20
Table 1: Physical Features
Typically 0.5 mA
2 W
1 W
10
Page 11

MoRoS GPRS 1.3 Technical Data
4.2 Technological Features
Technological Feature Description
Supported mobile communication standards
Quadband GSM/GPRS module - GSM fre-
GPRS multislot class 12, coding scheme 1
to 4; SMS, CSD,
850, 900, 1800, 1900 Mhz
quencies
Support PBCCH
SIM card reader Support for 1.8 V and 3.3 V SIM cards
Mobile Station Class B
Table 2: Technological Features
11
Page 12
Display and Control Elements MoRoS GPRS 1.3
5 Display and Control Elements
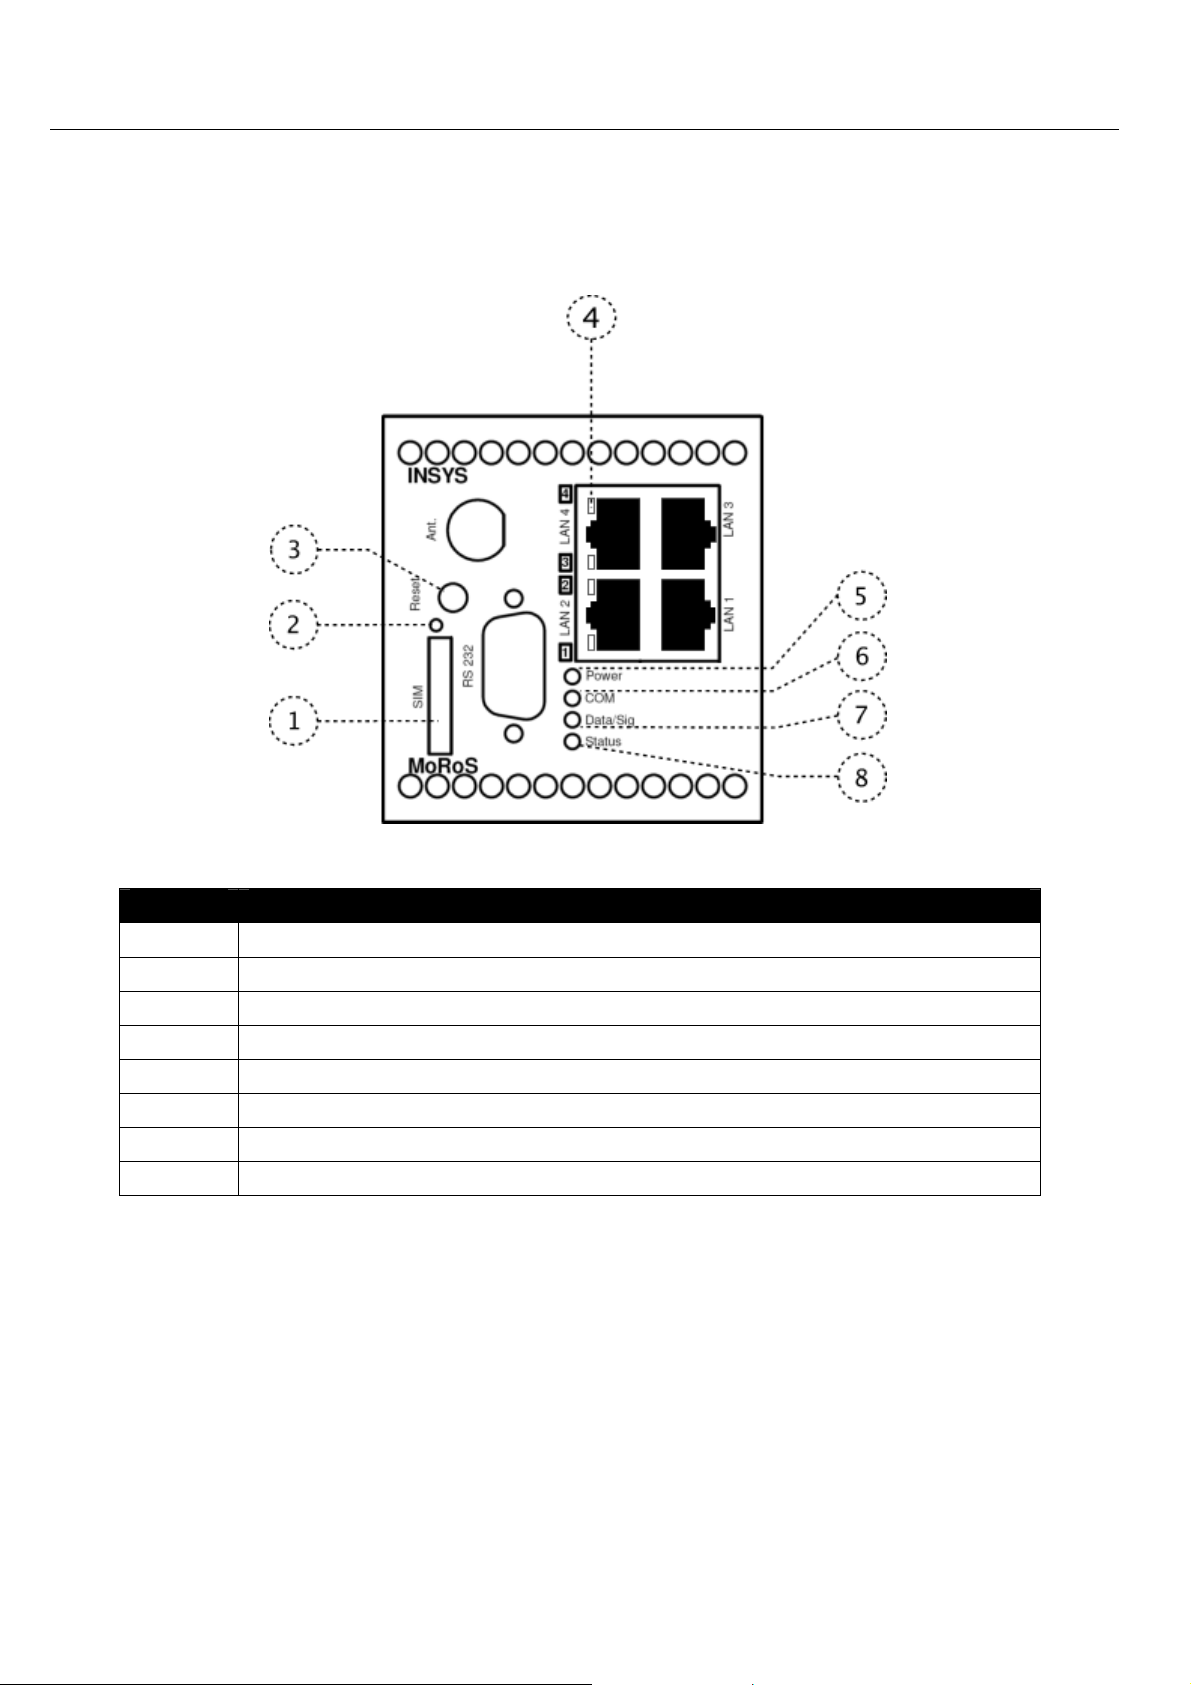
Figure 1: LEDs on the front panel
Position Description
1 SIM card holder
2 SIM card holder eject button
3 Reset key
4 4 switch port status LEDs
5 Power LED
6 COM LED
7 Data/signal LED
8 Status LED
Table 3: Description of the LEDs on the front panel of the device
12
Page 13

MoRoS GPRS 1.3 Display and Control Elements
5.1 Meaning of the Displays
Description Display Meaning
Switch port status LED
(default setting)
LED yellow
LED green
LED blinks
Link with 10 Mbit/s
Link with 100 Mbit/s
Data traffic
Power LED LED green Supply voltage available
Data/signal LED
LED off, LED COM off
LED blinks, LED COM off
No field strength
Signal field strength dis-
play (see Table 5)
PPP data traffic
LED blinks, LED COM orange
COM LED LED green
LED orange
Connection is being estab-
lished.
Connection is established
(PPP).
Status LED LED red Initialization phase or
firmware update active, or
failure.
Table 4: Meaning of the LED displays
Blinking interval LED sig-
Priority Signal quality
nal
Always on 25 .. 31 Optimum
16.7 Hz 23 .. 24 Very good
7.1 Hz 21 .. 22
3.8 Hz 19 .. 20 Good
2.6 Hz 17 .. 18 Poor
Off <17 or 99 (not detectable) Insufficient
Table 5: Blinking code of the data/signal LED
13
Page 14

Display and Control Elements MoRoS GPRS 1.3
5.2 Function of the Control Elements
Description Operation Meaning
Reset key Press once for a short time. Resets the MoRoS GPRS 1.3
via software and restarts it.
(Soft reset)
Reset key Press at least 3 seconds. Resets the hardware of the
MoRoS GPRS 1.3 and restarts
it.
(Hard reset)
Reset key Press three times for a short
time within 2 seconds.
Deletes all settings of the
MoRoS GPRS 1.3 and resets
the device to the factory defaults.
SIM card holder eject
Press with a pointed object. Ejects the SIM card holder.
button
Table 6: Description of the functions and meaning of the control elements
14
Page 15

MoRoS GPRS 1.3 Connections
6 Connections
6.1 Front Panel Connections
Figure 2: Connections on the front panel of the device
Position Description
1 GSM antenna connection (FME plug)
2 Switch port for Ethernet connection
3 Serial Interface (RS232 jack)
Table 7: Description of the connections on the front panel of the device
15
Page 16

Connections MoRoS GPRS 1.3
6.2 Terminal Connections on the Top
Figure 3: Connections on the top of the device
Terminal Description Description
1 OUT 1-NC Output 1 normally closed
2 OUT 1 Output 1
3
4 OUT 2-NC Output 2 normally closed
6 OUT 2 Output 2
6 OUT 2-NO Output 2 normally open
Table 8: Description of the connections on the top of the device
OUT 1-NO Output 1 normally open
16
Page 17
MoRoS GPRS 1.3 Connections
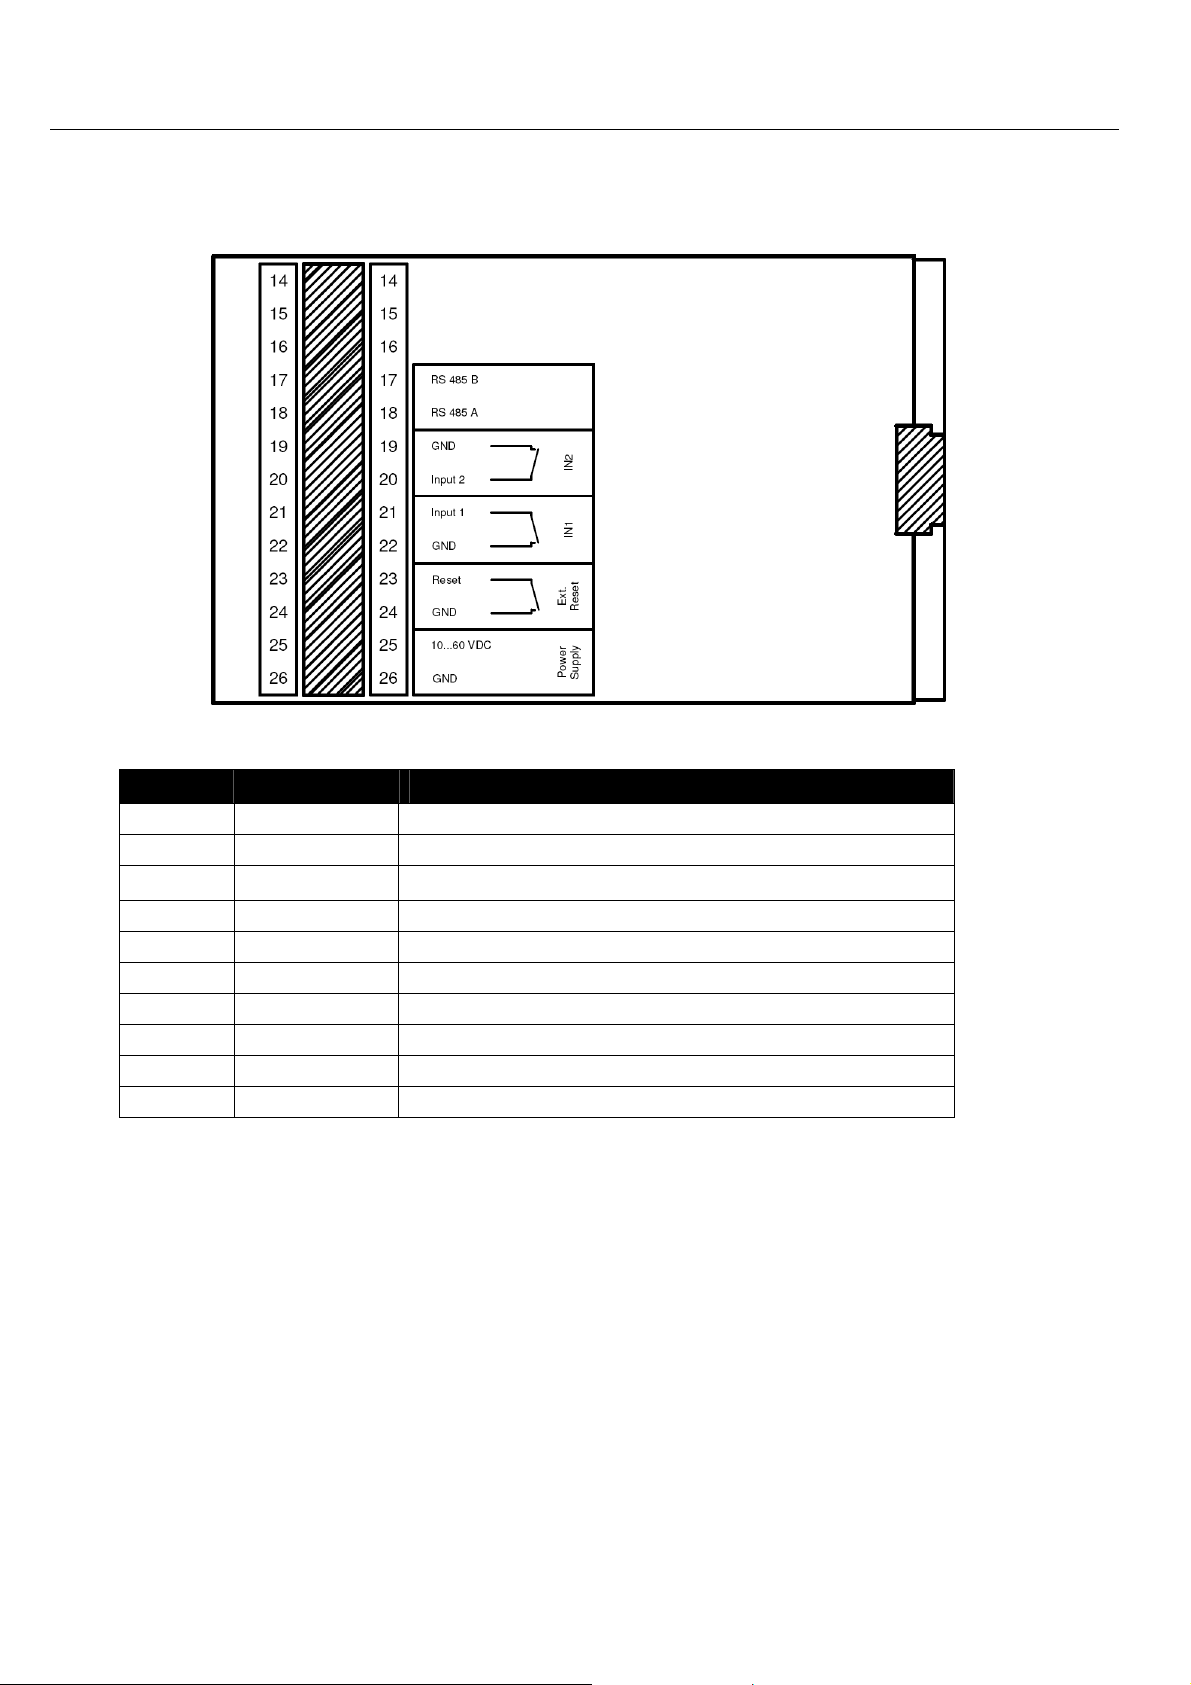
6.3 Terminal Connections on the Bottom
Figure 4: Connections on the bottom of the device
Terminal Description Description
17 RS 485B Reserved for future applications
18 RS 485A Reserved for future applications
19
20 Input 2 Input 2
21 Input 1 Input 1
22 GND Ground
23 Reset Reset input
24 GND Ground
25 10 ... 60VDC Power supply 10V - 60V DC
26 GND Ground
Table 9: Description of the connections on the bottom of the device
GND Ground
17
Page 18
Connections MoRoS GPRS 1.3
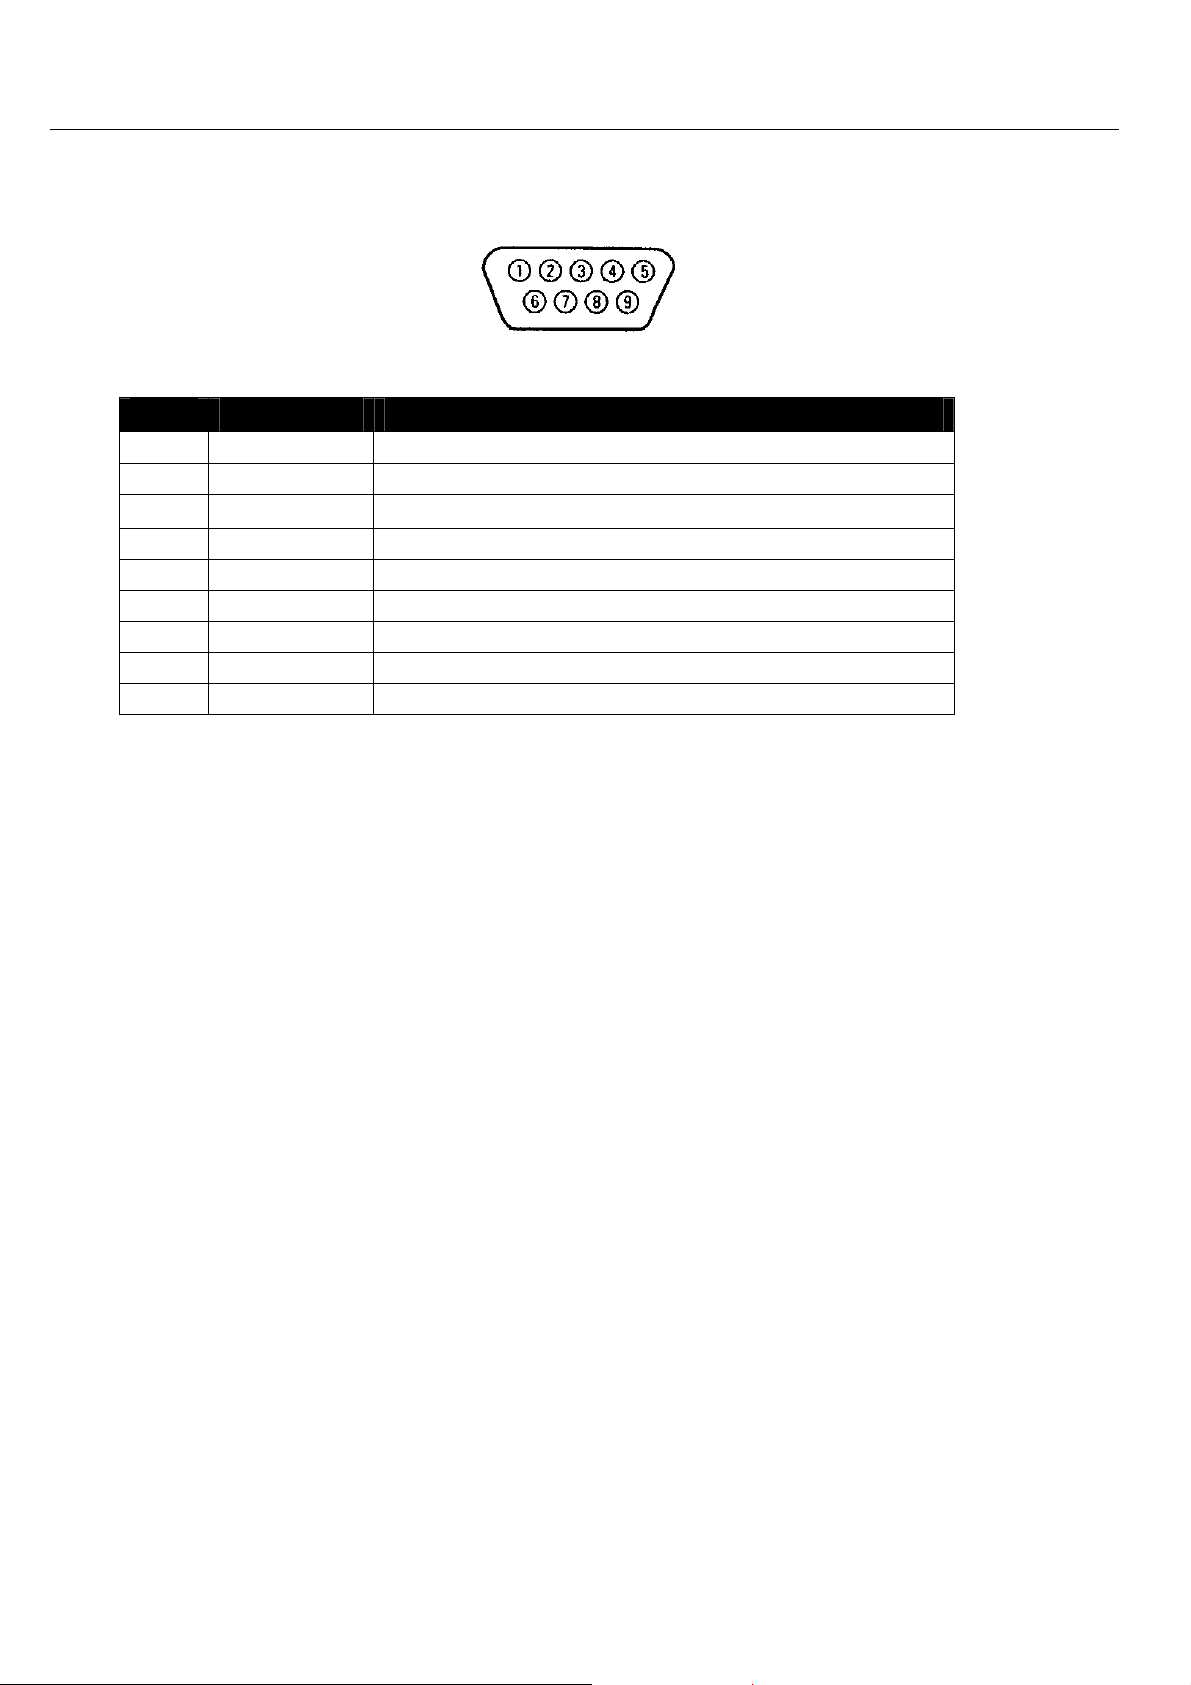
6.4 Pin Assignment of the Serial Interface
Figure 5: 9-pin Sub-D jack at the device
Pin Signal Description
1 DCD Data Carrier Detect
2 RXD Receive Data
3
4 DTR Data Terminal Ready
5 GND Ground
6 DSR Data set ready
7 RTS Request to send
8 CTS Clear To Send
9 RI Ring Indication
Table 10: Description of the pin allocation of the Sub-D jack
TXD Transmit Data
18
Page 19

MoRoS GPRS 1.3 Function Overview
7 Function Overview
The MoRoS GPRS 1.3 offers the following functions:
• Configuration over web interface
All functions of the MoRoS GPRS 1.3 can be configured and set via a web
interface. The access to the web interface is protected with a user name
and password query. The TCP port which is used to access the web interface can be set freely.
• Serial Ethernet gateway
The MoRoS GPRS 1.3 can output arriving data from a certain network port
at the serial interface. Also, data arriving at the serial interface are sent to
an IP remote terminal. Together with the INSYS VCOM driver, the Serial
Ethernet gateway enables the transparent transmission of a serial connection via a network.
• NAT and Port forwarding
The MoRoS GPRS 1.3 is a router, which can also send data packets via NAT
and port forwarding. According to defined rules, the MoRoS GPRS 1.3 will
send incoming IP packets to definable ports and port areas at IP addresses
and ports in the LAN.
• Dial-in PPP server
The MoRoS GPRS 1.3 may be used as a PPP dial-in server. Similar to an
Internet provider, a caller can establish a PPP connection to the MoRoS
GPRS 1.3, to access the network behind it.
• Establishing a PPP connection via an incoming call (callback)
The MoRoS GPRS 1.3 identifies calls and will automatically establish a PPP
connection to a previously determined remote terminal (e.g. an Internet
provider). The caller who triggers the connection setup can identify himself via a PPP authentification method or his phone number.
• Automatic dialing of a PPP terminal (dial-out)
The MoRoS GPRS 1.3 will establish a connection to a PPP terminal (e.g.
Internet provider), as soon as it registers outgoing network traffic. You can
use rules to define which network traffic or network participant may trigger the connection setup.
• PPP Leased line operation
The MoRoS GPRS 1.3 can establish and maintain a constant connection via
a dial-up line. This makes it possible to communicate with a network via a
dial-up connection such as a "leased line".
• Periodic PPP connection setup
The MoRoS GPRS 1.3 can establish and terminate a PPP connection time-
controlled. Fixed times can be set for the connection setup and termination.
19
Page 20

Function Overview MoRoS GPRS 1.3
• SMS dispatch via pulses at the switch input
A particular SMS to a particular recipient can be triggered via the number
of pulses at the alarm input 1.
• Digital switch outputs and inputs
The MoRoS GPRS 1.3 has two potential-free switch outputs, which can be
used to switch other functions in an application. The MoRoS GPRS 1.3 also
has digital inputs, which are used to establish connections or to send messages via SMS.
• Time synchronization via NTP
The MoRoS GPRS 1.3 can synchronize its system time via the Network Time
Protocol with an NTP server in the Internet. The system time will thus always be current and the internal clock need not be set manually. In addition, the time and the date can be set manually, if no NTP server is available.
• HTTP and HTTPS proxy with URL filter
The proxy may be used to limit the access to web addresses for applica-
tions in the local network of the MoRoS GPRS 1.3. The MoRoS GPRS 1.3
supports the HTTP and HTTPS protocols.
Konventionen MoRoS GPRS 1.3
• Downloadable log files
The system messages of the MoRoS GPRS 1.3 can be downloaded as text
files via the web interface.
• Downloadable configuration files
The configuration of the MoRoS GPRS 1.3 can be downloaded as file. The
files can be used as backup copy to configure the MoRoS GPRS 1.3 after a
factory reset, or for convenient loading of a similar configuration into different MoRoS GPRS 1.3.
• Firmware update via web interface
The firmware of the MoRoS GPRS 1.3 can be updated via the web interface.
20
Page 21

Meaning of the Symbols and the Formatting in this
MoRoS GPRS 1.3
8 Meaning of the Symbols and the Formatting in this
Manual
This section describes the definition, formatting and symbols used in this manual. The
various symbols are meant to help you read and find the information relevant to you.
Bold print: This will tell you what the following steps will result in
Manual
An arrow will indicate prerequisites which must be fulfilled to be able to
1. One individual action step: This tells you what you need to do at this point.
Alternative results and steps are marked with an arrow. This will tell you how
After that, there will be a detailed explanation why you could perform the
following steps to be able to reach the objective indicated first.
process the subsequent steps in a meaningful way. You will also learn
which software or which equipment you will need.
The steps are numbered for better orientation.
A result which you will receive after performing a step will be marked with
a check mark. At this point, you can check if the previous steps were successful.
Additional information which you should take under consideration are
marked with a circled "i". At this point, we will indicate possible error
sources and tell you how to avoid them.
to reach the same results performing different steps, or what you could do if
you didn't reach the expected results at this point.
21
Page 22
Mounting MoRoS GPRS 1.3
9 Mounting
This chapter describes how to mount the MoRoS GPRS 1.3 to a DIN rail, connect it to
the power supply and disassemble it again.
Exposed electrical components!
Risk of death through electric shock hazard!
Prior to the installation, switch the power of the cabinet
off and secure it against being switched on again.
Moisture und liquids from the environment may seep
into the interior of the MoRoS GPRS 1.3.
Risk of death through shock hazard when touching it!
The MoRoS GPRS 1.3 may not be used in wet or damp
environments, or in or very close to water. Install the device at a dry location, protected from water spray. Switch
the power supply off before you do any work on a device
which may have been in contact with moisture.
Danger!
Danger!
Note
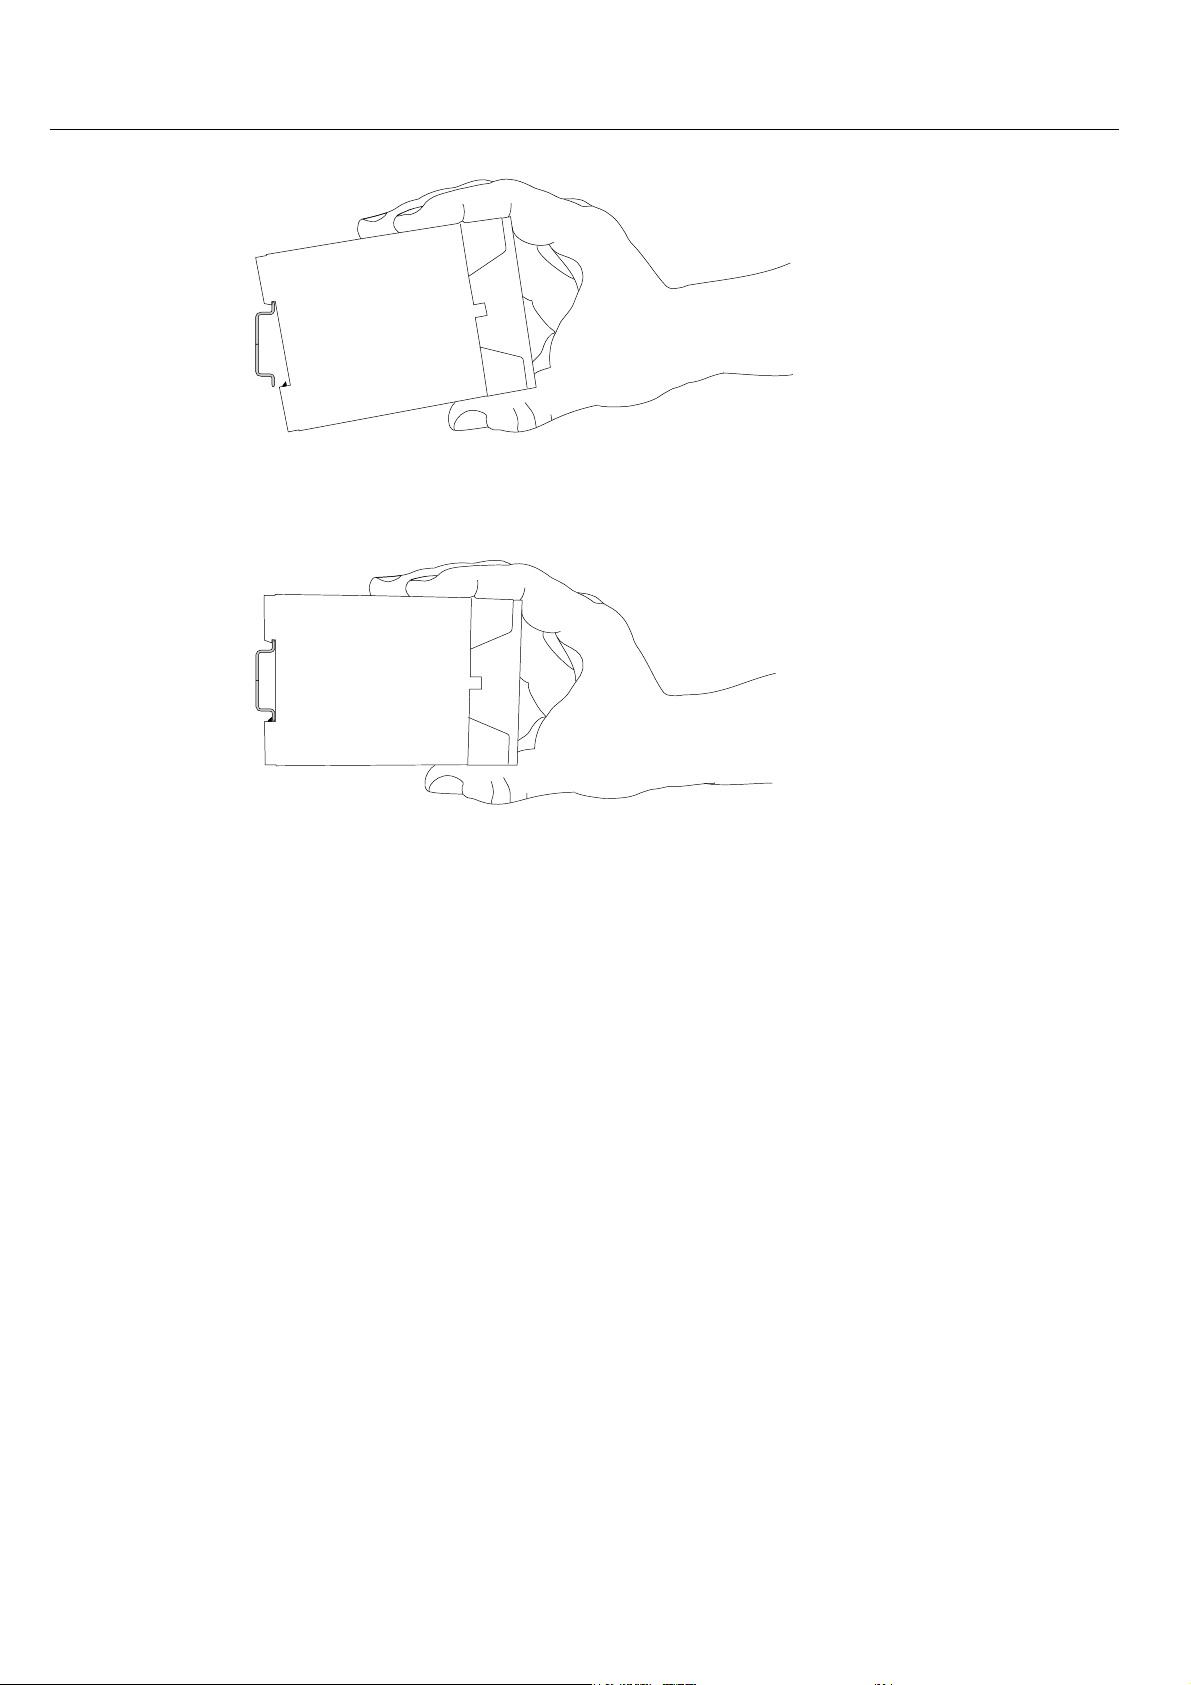
Mount the device to the DIN rail
1. Position the device at the DIN rail as seen in the following diagram. There
Instructions on how to mount the MoRoS GPRS 1.3 to a DIN rail:
are two snap-in hooks at the outer edge of the DIN rail groove of the MoRoS
GPRS 1.3.
Hook them into place behind the upper edge of the DIN rail when connecting
the device.
The device could be destroyed if the wrong power supply
is used.
If the MoRoS GPRS 1.3 is used with a power supply which
has a larger voltage than the allowed operational voltage of the MoRoS GPRS 1.3, the device is destroyed.
Make sure that you use the suitable power supply. The
chapter "Technical Data" has the information about the
correct voltage range for the MoRoS GPRS 1.3.
22
Page 23
MoRoS GPRS 1.3 Mounting
2. Lift the MoRoS GPRS 1.3 perpendicular to the DIN rail until the plastic spring
of the third, flexible snap-in hook engages in the DIN rail.
Connecting the power supply
The device has already been mounted to the DIN rail.
The MoRoS GPRS 1.3 is now completely mounted.
The power supply is connected and switched off.
1. Connect the ground lead of the power supply to the terminal "GND".
2. Connect the plus pole of the power supply to the terminal for the power
supply.
23
Page 24
Mounting MoRoS GPRS 1.3
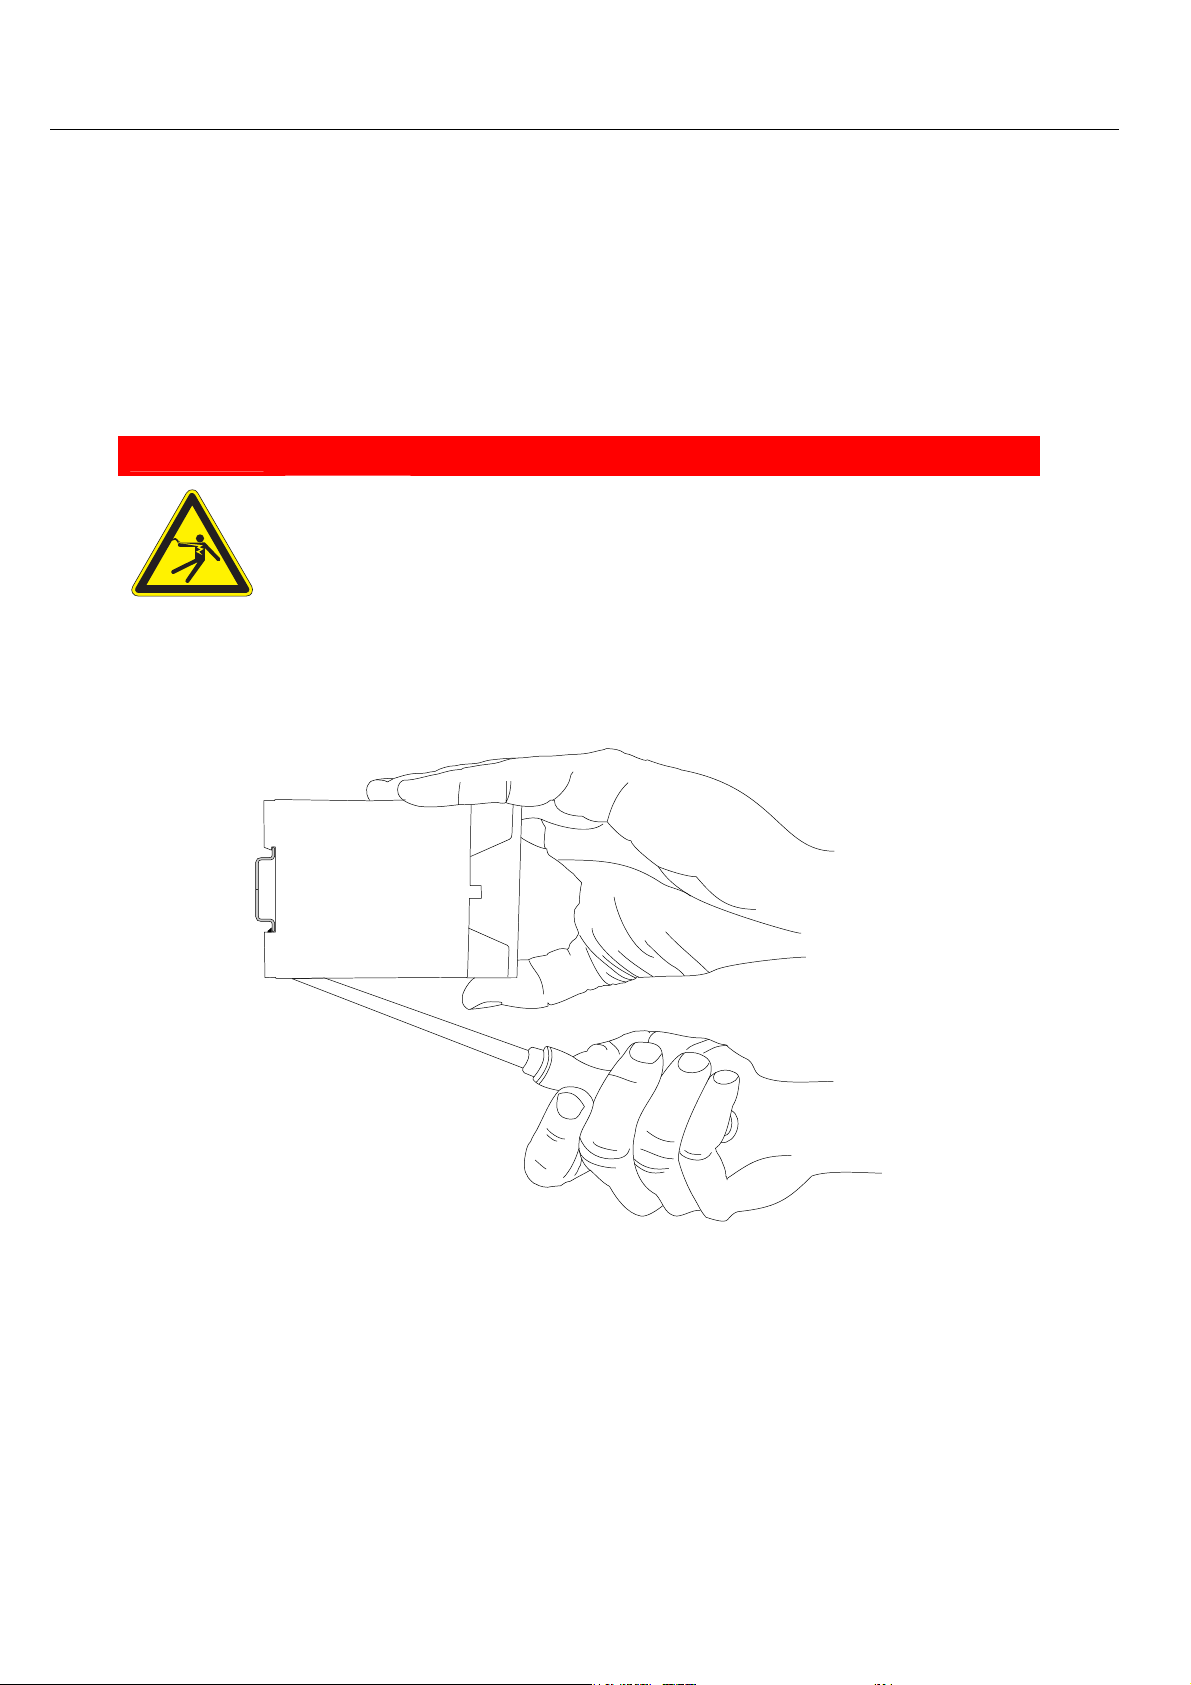
Disassemble the device from the DIN rail
You will need a Philips screwdriver with a 4.5 mm blade.
The power supply of the cabinet is switched off and secured against being
All cables at the MoRoS GPRS 1.3 are disconnected.
1. Insert the Philips screwdriver into the flexible snap-in hook of the MoRoS
Instructions on how to disassemble the MoRoS GPRS 1.3 from a DIN rail in a
cabinet:
switched off accidentally.
Exposed electrical components!
Risk of death through electric shock hazard!
GPRS 1.3 as shown in the diagram.
Prior to the disassembly, switch the power off and secure
it against being switched on again.
Danger
2. Turn the Philips screwdriver into the direction of the MoRoS GPRS 1.3 as
shown in the diagram.
24
Page 25
MoRoS GPRS 1.3 Mounting
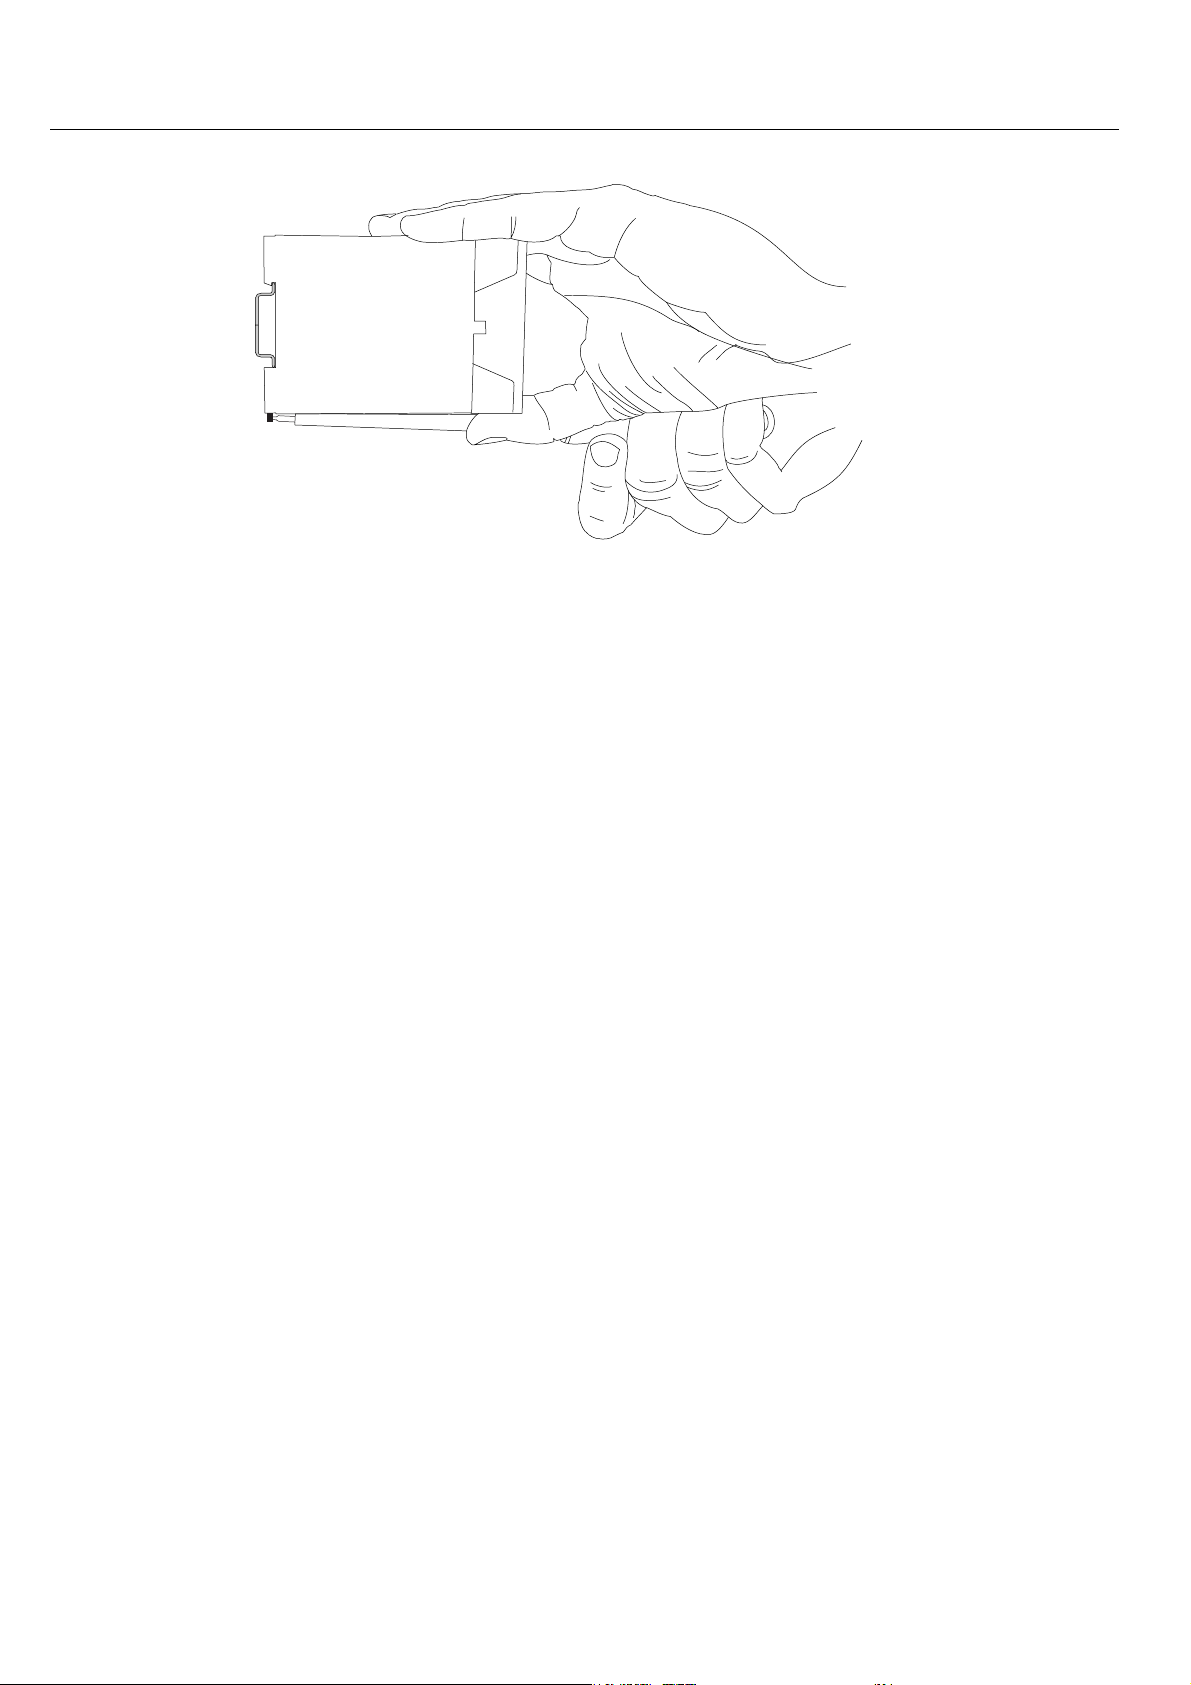
3. While you hold the plastic spring of the snap-in hook stretched apart, pull
4. De-hook the MoRoS GPRS 1.3 and take it off, perpendicularly to the DIN rail.
The plastic spring of the snap-in hook is pulled apart.
the MoRoS GPRS 1.3 away from the DIN rail.
25
Page 26

Initial Operation MoRoS GPRS 1.3
10 Initial Operation
This chapter describes how to activate the MoRoS GPRS 1.3, i.e. how to connect the
MoRoS GPRS 1.3 to a PC, and how to prepare it for the configuration.
Connect the MoRoS GPRS 1.3 to a GSM antenna and a PC
The power supply of the MoRoS GPRS 1.3 is switched off.
You will need Cat. 5 network patch cables.
You will need a network card at the PC.
You will need a suitable GSM antenna (available from IN-
1. Locate the RJ45 jack of the network card at the PC.
2. Make sure not to use the ISDN jack, but the jack of the network card, which
3. Plug one end of the network cable into the RJ45 jack of the PC network card,
4. Connect the GSM antenna to the antenna jack of the MoRoS GPRS 1.3.
Insert the SIM card into the MoRoS GPRS 1.3.
How to connect the MoRoS GPRS 1.3 to a PC via a network cable interface.
SYS MICROLECTRONICS).
you want to use to configure the MoRoS GPRS 1.3.
and the other end into a network jack at the MoRoS GPRS 1.3 switch.
How to insert the SIM card into the MoRoS GPRS 1.3.
The power supply of the MoRoS GPRS 1.3 is switched off.
You will need a working SIM card of your mobile provider.
You will also need the according PIN.
You will need a pointed object to operate the eject button of the SIM card
holder, e.g. a screwdriver with a 1.5 mm blade.
1. Press the eject button of the SIM card holder with the pointed object.
2. Remove the SIM card holder.
3. Insert your SIM card into the card holder.
4. Insert the SIM card holder together with the SIM card into the MoRoS GPRS
26
The SIM card holder will slide a little bit further out of the housing.
The SIM card will only fit into the SIM card holder in one position.
Make sure that the SIM card does not extend over the card holder.
1.3. The contacts of the SIM card must face the left housing wall.
Page 27

MoRoS GPRS 1.3 Initial Operation
5. Using one finger, carefully push the SIM card holder with the inserted SIM
card into the housing, until the card holder snaps into place.
6. Switch the power supply of the MoRoS GPRS 1.3 back on.
MoRoS GPRS 1.3 configuration
The MoRoS GPRS 1.3 is connected to the PC.
The power supply of the MoRoS GPRS 1.3 is switched on.
You have the required access rights to change the IP address of the network
card to which the MoRoS GPRS 1.3 is connected.
1. Change the IP address of the network card to which the MoRoS GPRS 1.3 is
connected to an address which starts with 192.168.1.
As an alternative, you may also configure your network card to "Automatic
address allocation". The integrated DHCP server of the MoRoS GPRS 1.3 will
then allocate an address from the according address range to your network
card.
2. Open an Internet browser and point it to the URL "http://192.168.1.1".
If you see the message in your browser window that the page with this ad-
3. Enter the user name "insys"
Do not use the address 192.168.1.1. This is the IP address of the MoRoS
GPRS 1.3, set as factory default. For example, use 192.168.1.2 as IP address
for the network card in your PC.
The web browser will load the start page of the MoRoS GPRS 1.3.
dress cannot be found, follow the following steps: Check if your MoRoS GPRS
1.3 receives power. If yes, most probably the wrong IP address is set in the
MoRoS GPRS 1.3. In this case, reset your device to the factory defaults by
pressing the reset key three times for a short time and repeat step 2.
A dialogue will prompt you to enter a user name and password for authentification.
and the password "moros".
User name and password are set as factory defaults. If the registration at
the web interface does not work with the data entered, just reset your MoRoS GPRS 1.3 to the factory defaults:
Press the reset key at the MoRoS GPRS 1.3 three times within one second
and repeat this instruction from step 2.
You should now see the start page of the web interface.
The MoRoS GPRS 1.3 is successfully installed and ready for configuration.
27
Page 28

Operating Principle MoRoS GPRS 1.3
11 Operating Principle
This chapter describes the basis procedures to operate and configure a MoRoS GPRS 1.3.
It will also give you an overview of the control elements of the web configuration. To
help you find the necessary control elements for your configuration tasks, later chapters
will refer to the figures of the interface in this chapter.
The MoRoS GPRS 1.3 is configurated and operated with the help of a web-based interface. The interface itself is displayed and operated using a web browser such as Mozilla
Firefox or Microsoft Internet Explorer.
11.1 Operating the Web Interface
The web interface allows easy configuration of the MoRoS GPRS 1.3 with the help
of a web browser. All functions of the MoRoS GPRS 1.3 can be configured via the interface. The operation is mostly self-explanatory. The interface also provides an
online help feature, which describes the meaning of possible settings of the MoRoS
GPRS 1.3.
Configuration and settings of the MoRoS GPRS 1.3 with the web interface.
The MoRoS GPRS 1.3 is connected to a network and switched on.
A PC, which is physically connected to the same network as the MoRoS
The PC is configured in a way that it is also logically connected to the Mo-
A new generation web browser such as Mozilla Firefox or Microsoft Inter-
1. Start the web browser.
2. Enter the IP address of the MoRoS GPRS 1.3 in the address line.
How to configure the MoRoS GPRS 1.3 with the web interface.
GPRS 1.3.
RoS GPRS 1.3 in the same network. The first three digits of the IP address of
the PC and the MoRoS GPRS 1.3 must be identical. For example, the MoRoS
GPRS 1.3 has the IP address 192.168.1.1. and the PC has the IP address
192.168.1.2.
net Explorer is installed on the PC.
The factory default IP address of the MoRoS GPRS 1.3 is 192.168.1.1.
A dialogue will prompt you to enter the user name and the password for
authentification.
3. Enter the user name and the password and click OK.
28
The default factory setting of the web interface for the
User name is "insys; the
Password is "moros".
Page 29

MoRoS GPRS 1.3 Operating Principle
4. Use the menu on the left side to select the area, in which you want to
5. Enter the required settings.
6. Click on the button OK (e.g. page 30, Figure 7, position 1) on the according
The start page of the web interface is displayed.
change settings.
configuration page to save the settings.
After you completed the configuration changes, always click the button
OK. Otherwise the settings will be lost as soon as you switch to another
page or close the browser.
11.2 Control Elements of the Web Interface of the MoRoS GPRS
1.3
In the following, the individual pages of the web interface are displayed. These illustrations should help you find the different settings in the interface.
11.2.1 Main Menu / Start Page
29
Page 30

Operating Principle MoRoS GPRS 1.3
Figure 6: Web interface MoRoS GPRS 1.3
11.2.2 Menu Basic Settings
Figure 7: Web interface MoRoS GPRS 1.3 - Menu "Basic settings", Page "Web interface"
30
Page 31

MoRoS GPRS 1.3 Operating Principle
Figure 8: Web interface MoRoS GPRS 1.3 - Menu "Basic settings", Page "IP addresses (LAN)"
Figure 9: Web interface MoRoS GPRS 1.3 - Menu "Basic settings", Page "Serial Ethernet gateway"
31
Page 32

Operating Principle MoRoS GPRS 1.3
11.2.3 GSM/GPRS Menu
Figure 10: Web interface MoRoS GPRS 1.3 - Menu "GSM/GPRS"
11.2.4 Menu DNS
32
Page 33

MoRoS GPRS 1.3 Operating Principle
Figure 11: Web interface MoRoS GPRS 1.3 - Menu "DNS", Page "DNS"
Figure 12: Web interface MoRoS GPRS 1.3 - Menu "DNS", Page "Dynamic DNS update"
33
Page 34

Operating Principle MoRoS GPRS 1.3
11.2.5 Menu Dial-in
Figure 13: Web interface MoRoS GPRS 1.3 - Menu "Dial-in"
34
Page 35

MoRoS GPRS 1.3 Operating Principle
11.2.6 Menu Dial-out
Figure 14: Web interface MoRoS GPRS 1.3 - Menu "Dial-out"
35
Page 36

Operating Principle MoRoS GPRS 1.3
11.2.7 Menu Port forwarding
Figure 15: Web interface MoRoS GPRS 1.3 - Menu "Port forwarding"
11.2.8 Menu Inputs
Figure 16: Web interface MoRoS GPRS 1.3 - Menu "Inputs", Page "Status inputs"
36
Page 37

MoRoS GPRS 1.3 Operating Principle
Figure 17: Web interface MoRoS GPRS 1.3 - Menu "Inputs", Page "Dial-out"
Figure 18: Web interface MoRoS GPRS 1.3 - Menu "Inputs", Page "SMS dispatch"
37
Page 38

Operating Principle MoRoS GPRS 1.3
11.2.9 Menu Outputs
Figure 19: Web interface MoRoS GPRS 1.3 - Menu "Outputs"
11.2.10 Menu System
Figure 20: Web interface MoRoS GPRS 1.3 - Menu "System", Page "System data"
38
Page 39

MoRoS GPRS 1.3 Operating Principle
Figure 21: Web interface MoRoS GPRS 1.3 - Menu "System", Page "Time"
Figure 22: Web interface MoRoS GPRS 1.3 - Menu "System", Page "Reset"
Figure 23: Web interface MoRoS GPRS 1.3 - Menu "System", Page "Firmware or configuration update"
Figure 24 Web interface MoRoS GPRS 1.3 - Menu "System", Page "Configuration download"
39
Page 40

Operating Principle MoRoS GPRS 1.3
Figure 25: Web interface MoRoS GPRS 1.3 - Menu "System", Page "Proxy"
40
Page 41

MoRoS GPRS 1.3 Functions
12 Functions
12.1 Basic Settings
12.1.1 Web Interface (User Name, Password, Remote Configuration)
The web interface is used to configure the MoRoS GPRS 1.3. It is protected from unauthorized access by a user name and password query. As a standard, the web interface can
be accessed from a computer from the internal network. If the remote configuration is
activated, you can also access the web interface from the external network. You can define the port, at which the interface can be accessed from the internal and the external
network of the MoRoS GPRS 1.3.
Configuration with the web interface
User name and password are entered in the menu "Basic setting" on the page
"Web interface" (Figure 7, page 30 above, position 3).
The remote configuration is activated via the checkbox "Activate remote configuration" (Figure 7, page 30 above, position 4).
The Web interface port is defined in the entry field "Web interface port"
(Figure 7, page 30 above, position 5). As default, port 80 is set for the web interface of the MoRoS GPRS 1.3.
Save the settings by clicking "OK" (Figure 7, page 30 above, position 1).
41
Page 42

Functions MoRoS GPRS 1.3
12.1.2 Set IP Addresses or Retrieve via DHCP
It must be possible to access the MoRoS GPRS 1.3 in the LAN at a certain IP address. Either manually enter a static IP address, or prompt the MoRoS GPRS 1.3 to retrieve the IP
address during each system start and cyclically from another DHCP server in the LAN.
Configuration with the web interface
To set the static IP address, select "Static IP address" in the menu "Basic settings" on the page "IP addresses", using the radio buttons (Figure 8, page 31
above, position 1).
In the entry field "IP address" (Figure 8, page 31 above, position 2) enter the IP
address of the MoRoS GPRS 1.3 in the LAN and the network mask .
To retrieve a dynamic IP address from another DHCP server in the LAN, select
the radio button "Activate DHCP client" (Figure 8, page 31, above, position 1).
Save the settings by clicking "OK" (Figure 8, page 31 above, Position 7).
The MAC address of the MoRoS GPRS 1.3 can be found in the entry fields for
the IP address and the network mask under "MAC address" (Figure 8, page 31
above, position 3) on this page.
12.1.3 Setting up the DHCP Server
On request, the DHCP server of the MoRoS GPRS 1.3 can automatically allocate other devices in the LAN an address. This automatically allocated, dynamic IP addresses are only
valid for a certain time. The validity of the IP addresses allocated by the DHCP server are
controlled via the "Lease time". If there is already a DHCP server in the network, in which
the MoRoS GPRS 1.3 is used, this function must absolutely be disabled in the MoRoS
GPRS 1.3.
Configuration with the web interface
To set up the DHCP server, activate the checkbox "Activate DHCP server" in the
menu "Basic settings" on the page "IP addresses" (Figure 8, page 31 above, position 8).
In the entry field "First IP address" (Figure 8, page 31 above, position 4), enter
the first IP address of the address range, from which the DHCP server of the
MoRoS GPRS 1.3 allocates addresses in the LAN. In the entry field "Last IP address" (Figure 8, page 31 above, position 5), enter the last IP address of the address range. The IP address range of the DHCP server must be located in the
same network as the IP address of the MoRoS GPRS 1.3.
In the entry field "Lease time" (Figure 8, page 31 above, position 4), enter a Va-
lidity period in seconds for the IP addresses to be allocated from the DHCP
server. The default value is 3.600 seconds.
Save the settings by clicking "OK" (Figure 8, page 31 above, position 7).
Further down on the page, you can view the IP addresses allocated by the
DHCP server, and their "Lease time" (validity period) (Figure 8, page 31 above,
position 6).
42
Page 43

MoRoS GPRS 1.3 Functions
43
Page 44

Functions MoRoS GPRS 1.3
12.1.4 Setting up the Serial Ethernet Gateway
The serial Ethernet gateway enables the addressing of serial end devices from the local
network of the MoRoS GPRS 1.3 or from a remote network, which are connected to the
serial interface of the MoRoS GPRS 1.3. The data which is sent to a configurable network
port of the MoRoS GPRS 1.3 is output at the serial interface of the MoRoS GPRS 1.3. In the
variant Pro, the serial interface can also be used to connect a redundant communication
device. In this case, the interface can not be used as serial Ethernet gateway.
Configuration with the web interface
To set up the serial Ethernet gateway, activate the checkbox "Activate serial
Ethernet gateway" in the menu "Basic settings" on the page "Serial Ethernet
gateway" (Figure 9, page 31 above, position 1).
The port, which the serial Ethernet gateway uses to accept a TCP connection,
is entered in the entry field "Port" (Figure 9, page 31 above, position 6).
The speed of the serial interface is set in the entry field "Speed (in Bit/s)"
(Figure 9, page 31 above, position 2).
The data flow control (RTS/CTS handshake) is set in the entry field "Flow control" (Figure 9, page 31 above, position 3). If the connected serial device does
not support the RTS/CTS lines, you must deactivate the flow control.
The data format of the serial interface is set in the entry field "Data bits"
(Figure 9, page 31 above, position 9).
To use the control lines DCD and DTR, activate the checkbox "Use control
lines" (Figure 9, page 31 above, position 8).
To reset the control lines after the connection is terminated, activate the
checkbox "Reset control lines after the connection was terminated" (Figure 9,
page 31 above, position 4).
To automatically terminate a TCP connection, if no data transfer occurs any
more, set a value in seconds in the entry field "Timeout" (Figure 9, page 31
above, position 5). If no data transfer occurs for the time set, the TCP connection, which was established by a computer to the serial Ethernet gateway, is
closed. To ensure that the connection is never terminated, set the value Zero.
The value Zero is the default setting.
Save the settings by clicking "OK" (Figure 9, page 31 above, position 7).
12.2 DNS
12.2.1 Setting up DNS Forwarding
You may use the MoRoS GPRS 1.3 as DNS relay server. When the MoRoS GPRS 1.3 is configured as DNS server at the locally connected network devices, the MoRoS GPRS 1.3 will
either forward the DNS queries to the previously configured DNS servers in the Internet,
or will use the IP addresses sent during the PPP connection setup as DNS server.
Configuration with the web interface
To make sure that the MoRoS GPRS 1.3 uses the DNS servers sent during the
44
Page 45

MoRoS GPRS 1.3 Functions
PPP connection setup, enter the address 127.0.0.1 in the menu "DNS" in the
entry field "First DNS server address" (Figure 11, page 33 above, position 2), as
recommended in the basic setting. Network clients, which retrieve their IP address as well as the DNS configuration via DHCP from the MoRoS GPRS 1.3,
will receive the IP address of the MoRoS GPRS 1.3 as the first DNS server.
For the MoRoS GPRS 1.3 to be able to forward the DNS queries to defined
name servers, enter the addresses of the according name servers in the entry
fields "First DNS server address" and "Second DNS server address" (Figure 11,
page 33 above, position 2).
Save the settings by clicking "OK" (Figure 11, page 33 above, position 3).
12.2.2 Setting up the Dynamic DNS Update
The MoRoS GPRS 1.3 can forward the IP address, which it was allocated during the dial-in
into the Internet, to a DynDNS provider, so it can be reached from the Internet with a
domain name. This means that the network behind the MoRoS GPRS 1.3 can always be
reached with the same domain name from the Internet, also for dynamically allocated IP
addresses (if the allocated IP address for incoming connections is not protected). The
MoRoS GPRS 1.3 will update the IP address connected to the domain name at the
DynDNS provider during each dialup. For this function, you will need an account with a
DynDNS provider.
Configuration with the web interface
To set up the dynamic DNS update, activate the checkbox "Activate dynamic
DNS update" in the menu "DNS" on the page "Dyn. DNS update" (Figure 12,
page 33 above, position 1).
Select a DynDNS provider from the dropdown menu "DynDNS provider"
(Figure 12, page 33 above, position 2).
To define your own DynDNS server, select the entry field "Custom server" in
the dropdown menu "DynDNS provider" (Figure 12, page 33 above, position 2),
and enter a DynDNS server in this field (Figure 12, page 33 above, position 6).
Enter the domain name that needs to be updated in the entry field "Domain
name" (Figure 12, page 33 above, position 3).
Enter the user name and password of your DynDNS account in the entry fields
"User name" and "Password" (Figure 12, page 33 above, position 5).
Save your settings by clicking "OK" (Figure 12, page 33 above, position 4).
45
Page 46

Functions MoRoS GPRS 1.3
12.3 GSM/GPRS
12.3.1 Enter SIM card PIN
For the MoRoS GPRS 1.3 to log into the mobile network and to establish connections via
GSM and GPRS, it will need the PIN of the inserted SIM card (if the SIM card is protected
by a PIN).
Configuration with the web interface
Enter the PIN of the inserted SIM card in the menu "GSM / GPRS" in the entry
field "PIN" (Figure 10, page 32 above, position 3). To confirm the correct entry,
enter the PIN once more into the field "Repeat PIN" (Figure 10, page 32 above,
position 3).
Save the settings by clicking "OK" (Figure 10, page 32 above, position 9).
Possible locking of the SIM card!
If a wrong PIN is entered, the SIM card may be locked,
resulting in the MoRoS GPRS 1.3 not being able to log
into the mobile network.
When entering or changing the PIN, make sure that you
enter the correct PIN for the SIM card. The SIM card may
be unlocked using the according PUK. To unlock the SIM
card with the PUK, you will need a mobile phone in
which you can insert the locked SIM card and enter the
PUK.
Note!
12.3.2 Set the daily login and logout
Within 24 hours, the MoRoS GPRS 1.3 can log into and out of the mobile network at certain times via a time controller. This enables you to limit the connection to certain times.
Using periodic login and logout, you will increase the availability of the MoRoS GPRS 1.3,
which may otherwise be impaired by several circumstances, which require a re-login into
the network. We recommend using this function.
Configuration with the web interface
Enter the desired login time in the menu "GSM/GPRS" in the entry field "Daily
login at" (Figure 10, page 32 above, position 5) in the format "hh:mm" ein.
Enter the desired logout time in the menu "GSM/GPRS" in the entry field
"Daily login at" (Figure 10, page 32 above, position 5) in the format "hh:mm"
ein.
Activate the checkbox "Activate daily login and logout" to turn the function
on.
46
Page 47

MoRoS GPRS 1.3 Functions
Save the settings by clicking "OK" (Figure 10, page 32 above, position 9).
12.3.3 Set Network Mask
You can determine, into which mobile network the MoRoS GPRS 1.3 should log into. Your
SIM card must support roaming. The MoRoS GPRS 1.3 can then connect to the strongest
available network at the location, with a certain preferred network (which may not necessarily the strongest available network), or exclusively with the network of a certain
provider. If you determine a "preferred provider", the MoRoS GPRS 1.3 will attempt to
always connect to a network of this provider. If the connection attempt to the network of
the preferred provider fails, the MoRoS GPRS 1.3 will connect to the best available network of any provider.
Configuration with the web interface
To select the type of network, use the radio buttons in the menu "GSM /
GPRS" (Figure 10, page 32 above, position 11) to choose if the MoRoS GPRS 1.3
should log into the strongest network, to a preferred provider and its network,
or exclusively into the network of a provider determined by you.
To ensure that the MoRoS GPRS 1.3 gives preference to the network of a cer-
tain provider when logging in, use the radio buttons in the menu "GSM /
GPRS" (Figure 10, page 32 above, position 11) to select the option "Preferably
log into this provider". Enter the number of the provider in the entry field
(Figure 10, page 32 above, position 6). You can obtain the number of the provider using the link under the question mark next to "Read provider list from
modem ..." (Figure 10, page 32 above, position 10). To read the data, a SIM
card must be inserted and the MoRoS GPRS 1.3 must be logged into a
GSM/GPRS network.
To ensure that the MoRoS GPRS 1.3 logs exclusively into the network of a cer-
tain provider, use the radio buttons in the menu "GSM / GPRS" (Figure 10,
page 32 above, position 11) to select the option "Exclusively log into this provider". Enter the number of the provider in the entry field (Figure 10, page 32
above, position 6). You can obtain the number of the provider using the link
under the question mark next to "Read provider list from modem ..." (Figure
10, page 32 above, position 10).
Save the settings by clicking "OK" (Figure 10, page 32 above, position 9).
12.4 Dial-in
12.4.1 Set the Dial-In Server
You can use the MoRoS GPRS 1.3 as dial-in server or incoming PPP server. The dial-in
function allows for computers to connect remotely via modem through the MoRoS GPRS
1.3 to the network behind the MoRoS GPRS 1.3. Similar to the dial-in at an Internet provider, users will authenticate themselves via user name and password at the MoRoS
GPRS 1.3. To authenticate the PPP users, the methods PAP or CHAP are available. Suc-
47
Page 48

Functions MoRoS GPRS 1.3
cessfully authenticated users can establish a PPP connection to access the network of the
MoRoS GPRS 1.3.
Configuration with the web interface
To activate the dial-in server, select the radio button "Activate dial-in" in the
Menu "Dial" (Figure 13, page 34, above, position 2).
Define the number of ring tones, after which the MoRoS GPRS 1.3 will answer
the call. Enter the number of ring tones until going off-hook into the entry
field "Ring tones until call acceptance". (Figure 13, page 34, above, position 4)
You can define an idle time, after which the dial-in connection is closed as
soon as no data transfer occurs any more. Enter the time in seconds in the entry field "Idle time" (Figure 13, page 34, above, position 3). If the connection
should remain established although there is an idle time, enter the value "0".
As an option, you can define the IP addresses of the end points of the PPP
connection, if these addresses have already been allocated to one of the net-
works of the {{{PRODUKTBEZEICHNUNG}} or at a remote network (Figure 13,
page 34, above, position 7 and 8). As default, the IP address of the {{{PRODUKTBEZEICHNUNG}} is 192.168.254.1. The standard address of the remote
terminal is 192.168.254.2.
To use PPP authentification based on user names and passwords, activate the
checkbox "Authentification for dial-in" (Figure 13, page 34, above, position 5).
If you deactivate this checkbox, any caller may establish a PPP connection.
To a turn the NAT function off and on, use the checkbox „Activate NAT“
(Figure 13, page 34, above, Position 14). The NAT function for Dial-IN is activated by default. For some configarations it is usesful to deactivate this function, e. g. when a device from withih the LAN of the MoRoS GPRS 1.3 requestes
a connection to the in-dialing device and this device answers the request on
one port with a connection from another port.
Save the settings, by clicking "OK" (Figure 13, page 34, above, position 10).
12.4.2 Automatic callback
You can trigger an automatic callback to a predefined destination phone number of the
MoRoS GPRS 1.3 with a data call or a phone call. You can set authorized callers for these
numbers. The callers can identify themselves via the PPP authentification methods PAP
or CHAP, or via their CLIP phone number. The connection, which is then established by
the MoRoS GPRS 1.3, must first be configured in the menu "Dial-out" (Figure 14, page 35
above, position 1). Only connections to the preconfigured dial-out destination are possible.
Configuration with the web interface
To trigger a dial-out connection through a caller, activate the checkbox "Activate automatic callback" (Figure 13, page 34, above, position 11). The dial-out
connection, which is triggered through a caller, must first be configured in the
menu "Dial-out" (Figure 14, page 35, above, position 1).
To enable callers to trigger a connection, they must either identify themselves
48
Page 49

MoRoS GPRS 1.3 Functions
via PPP authentification or their phone numbers. In the radio button selection
(Figure 13, page 34, above, position 10), choose either "After successful PPP
authentification" or "After a call from one these numbers".
Save the settings, by clicking "OK" (Figure 13, Page 34, above, Position 9).
49
Page 50

Functions MoRoS GPRS 1.3
12.5 Dial-out
12.5.1 Set the Dial-Out Server
You can use the MoRoS GPRS 1.3 as dial-out server. The MoRoS GPRS 1.3 will automatically establish a PPP connection to a remote terminal, when the network traffic occurs in
the direction of the network of the terminal. The network traffic which may trigger a
connection setup can be limited by rules. This optional "Dialing filter" will ensure that
only packets from/to certain IP addresses or from/to certain ports trigger the dial-out
connection. This dial-out connection can be compared with the dial-in of a PC into the
Internet. Only after this dial-in, it will be possible to transfer IP data (e.g. web contents)
or to remotely access devices in the local network of the MoRoS GPRS 1.3, for example.
Configuration with the web interface
To turn on the dial-out server, select "Yes" in the option "Activate dial-out" of
the menu "Dial-out" (Figure 14, page 35 above, position 2).
For a GSM-CSD connection, enter the phone number of the PPP terminal (e.g.
the Internet provider) in the entry field "Phone number" for destination A
(Figure 14, page 35 above, position 3). You may enter a further phone number
(or "*99***1#" for a GPRS connection, see below) for destination B. The MoRoS
GPRS 1.3 will always use the destination which was last used for successfully
establishing a PPP connection. If the connection to destination x does not
work, the MoRoS GPRS 1.3 will attempt to reach the other destination, and
vice versa.
For a GPRS connection, enter "*99***1#" into the entry field at "Phone number"
for destination A (Figure 14, page 35 above, position 3). For destination A, enter the APN of your mobile provider into the field "Access Point Name" (Figure
14, page 35 above, position 18), which is used to establish a GPRS connection.
You can enter one more APN for destination B. As an alternative, you may also
define a GSM-CSD connection with a traditional phone number for destination B.
Enter the User name and password for the PPP dial-in destinations A and B
(Figure 14, page 35 above, position 3).
Select the PPP authentification method (PAP or CHAP) to be used for destinations A and B in the selection "Authentification" (Figure 14, page 35 above, position 4).
Enter a value for "Idle time" to define how long the connection will remain established, if no data transfer takes place. Enter the required time into the
field "Idle time" (Figure 14, page 35 above, position 5) in seconds.
To maintain the connection for an unlimited time, enter the value "0".
Enter a value in the field Maximum connect time to limit the duration of a
connection. If you enter a maximum connection time, the connection will be
closed after this time period has expired. To keep the connection open, without any time restrictions (until the connection is terminated for other reasons), enter the value "0" in the field "Maximum connection time" (Figure 14,
page 35, above, position 6).
Save the settings by clicking "OK" (Figure 14, page 35, above, position 10).
50
Page 51

MoRoS GPRS 1.3 Functions
12.5.2 Set up Leased Line Operation
You can set up the MoRoS GPRS 1.3 to permanently maintain a PPP connection. This operating mode is interesting for private networks with no minute charges, or for billing
models, for which only the transmitted data volume is charged for (e.g. GRPS networks).
In this operating mode, the MoRoS GPRS 1.3 will immediately establish the connection
after the system start. The MoRoS GPRS 1.3 checks the connection periodically on its
function. The connection check can be performed either via a DNS query of a host name
or via PING at a host.
Configuration with the web interface
To set up a leased line, activate the checkbox "Immediately establish and
maintain a connection" in the menu "Dial-out" (Figure 14, page 35, above, position 16).
If necessary, enter another time in minutes for the connection checkup in the
entry field "Interval of the connection setup" (Figure 14, page 35, above, position 7). The default setting is 60 minutes. If a closed connection is determined
after this time, the MoRoS GPRS 1.3 will attempt to re-establish the connection after one minute. If the attempt fails, there will be another attempt after
5 minutes. The next attempt will take place after 30 minutes; if this attempt
fails as well, the MoRoS GPRS 1.3 will attempt to re-establish the connection
every 60 minutes.
Select the method for the connection check in the selection "Connection check
type" (Figure 14, page 35, above, position 15) and enter a host name or an "IP
address". The two methods have a different effect. A failed DNS request terminates a possibly existing connection and re-establishes the connection. A
failed ping will make sure that the connection is re-initiated, if it was closed
after the last data packet or ping. The existing connection is not terminated, if
the ping is not responded to.
Save the settings, by clicking "OK" (Figure 14, page 35, above, position 10).
51
Page 52

Functions MoRoS GPRS 1.3
12.5.3 Set up a Periodical Dial-out Connection Setup
The MoRoS GPRS 1.3 can establish and terminate the previously configured dial-out
connection time-controlled. The dial-out connection is established and terminated daily
at a certain time.
This function will trigger individual events; no blocking time or similar is defined. Example: If a logout is defined for 2 pm and an automatic login at 4 pm, other events within
this period could also trigger a connection setup (dial-out), e.g. a simple packet according
to the dialing filter. The connection is also automatically terminated after an automatic
log, if the configured "Idle time" has expired, for example.
Configuration with the web interface
To establish a connection daily at a certain time, activate the checkbox "Establish a connection daily at" in the menu "Dial-out" (Figure 14, page 35, above,
position 14) and enter a time for the connection setup in the entry fields for
hours and minutes.
To terminate a connection daily at a certain time, activate the checkbox "Terminate a connection daily at" in the menu "Dial-out" (Figure 14, page 35,
above, position 14) and enter a time for the termination of the connection in
the entry fields for hours and minutes.
Save the settings, by clicking "OK" (Figure 14, Page 35, above, Position 10).
12.5.4 Setting up a Dialing Filter
To avoid unnecessary costs due to undesired dial-out events, a dialing filter may be activated as an option. With this dialing filter, the network traffic which could trigger a dialout event can be restricted. After a dial-out connection is established, however, all participants in the network may access the dial-out connection and transmit IP data.
Certain ports or IP addresses may be authorized or forbidden. For example, if a participant is allowed to trigger the dial-out connection using a specific IP address, then all
other IP addresses are automatically blocked for triggering a connection, which have not
been specifically permitted. If by mistake a port or an address are declared both allowed
and forbidden, then the MoRoS GPRS 1.3 will remove the entries for the forbidden ports
and addresses, which intersect with allowed entries, during the saving process. The allowed ports will be maintained.
Configuration with the web interface
To activate the dialing filter, mark the checkbox "Activate dialing filter" (Figure
14, page 35 above, position 12).
To only allow connections from individual ports, enter the allowed ports in
the field "Packets from this port may initiate a connection" (Figure 14, page
35, above, Position 9). As an alternative, you may also exclude certain ports by
entering port numbers in the fields of "Packets from these ports may not initiate a connection". Analogously, you may allow or forbid connections to certain destination ports.
To only allow connections from individual IP addresses, enter the allowed IP
addresses in the field "These computers may initiate a connection" (Figure 14,
52
Page 53

MoRoS GPRS 1.3 Functions
page 35, above, position 11). As an alternative, you may also exclude certain IP
addresses by entering the IP address in the fields at "These computers may
not initiate a connection". Analogously, you may allow or forbid connections
to certain IP addresses.
Save the settings, by clicking "OK" (Figure 14, Page 35, above, Position 10).
12.6 Port Forwarding
12.6.1 Creating a Port Forwarding Rule
When including the Internet as communication network, private and public IPs are distinguished. To be able to access the private IP addresses from the Internet, which are
mostly used in local networks, the technologies NAT and port forwarding are used. In the
Internet, only the public IP address of the MoRoS GPRS 1.3 can be reached. This IP address
can be used to also access the local end terminals in the network of the MoRoS GPRS 1.3
from the Internet, if NAT and port forwarding are used.
The MoRoS GPRS 1.3 allows port forwarding. The MoRoS GPRS 1.3 routes incoming packets from outside of the network to certain computers within the network. Outgoing
packets of these connections from the network are being routed back to their destinations outside of the network. At certain ports, the MoRoS GPRS 1.3 routes incoming data
packets to one port of a certain destination address. You can use rules to define which
packets from the outside are routed to which addresses and ports in the network. This
means that you can make certain services available to computers in the network, using
the phone network.
Configuration with the web interface
To activate port forwarding, mark the checkbox "Port forwarding" in the
menu "Dial-out" (Figure 15, page 36 above, position 2).
To create a forwarding rule, select the protocol (TCP or UDP) and the port
range for the incoming packets at the MoRoS GPRS 1.3. Enter an IP address for
the routing destination in the entry field "To IP address" and a port in the entry field "To port"; this is the address and the port where the packets are
routed to.
To delete an already created rule, activate the check box "Delete" (Figure 15,
page 36 above, position 6) and then click on "OK" (Figure 15, page 36 above,
position 5).
To deactivate an already created rule, deactivate the check box "Active"
(Figure 15, page 36 above, position 6) and then click on "OK" (Figure 15, page
36 above, position 5).
The rules in the list are processed from top to bottom. If two rules contradict
each other (for example, the same port is used twice), only the rule which is
further up in the list will be processed.
53
Page 54

Functions MoRoS GPRS 1.3
12.6.2 Defining the Exposed Host
As an option, the MoRoS GPRS 1.3 can forward all packets which do not comply with any
port forwarding rule, to a predefined computer in the LAN, also called "Exposed Host" (for
example, for diagnostic purposes). The setting for the "Exposed Host" is in principle a
port forwarding rule without criteria, which therefore applies to all packets. The "Exposed Host" contains all packets which have not been requested by the local network of
the MoRoS GPRS 1.3 or which have not been forwarded to a participant in the local network by a port forwarding rule. If no "Exposed Host" is configured, these incoming packets are discarded.
Configuration with the web interface
To define an "Exposed Host", enter the IP address of a computer in the LAN in
the entry field "Exposed Host" in the menu "Dial-out" (Figure 15, page 36
above, position 4). This IP address must be accessible to all ports from the outside.
Save the settings by clicking "OK" (Figure 15, page 36 above, position 5).
12.7 Proxy
12.7.1 Configuring the MoRoS GPRS 1.3 Proxy Server
The MoRoS GPRS 1.3 provides a proxy server. It does not serve as a cache for frequently
accessed websites. It is used to delay the connection timeouts for dialing connections
that load slowly (e.g. via modem) and to filter undesired URLs. (e.g. www.xyz.xx).
The proxy supports the HTTP and HTTPS protocols.
Configuration with the web interface
To switch the proxy server of the MoRoS GPRS 1.3 on, activate the checkbox
"Activate proxy server" in the menu "System" on the page "Proxy" (Figure 25,
page 40 above, position 1).
In the entry field "Proxy server port" (Figure 25, page 40 above, position 2), enter the port, which you want to use to access the proxy server from the internal network at the IP address of the MoRoS GPRS 1.3.
To terminate connections after a certain time, which seem to be inactive, you
can adjust the time in the entry field "Timeout for inactive connections"
(Figure 25, page 40 above, position 3).
To avoid overloading the MoRoS GPRS 1.3, you can restrict the number of clients which can connect to the MoRoS GPRS 1.3 at the same time. Enter the
maximum number of simultaneously authorized clients in the entry field
"Maximum number of authorized clients (Figure 25, page 40 above, position
4).
To increase the availability of the proxy you can define a minimum number of
proxy server processes. Enter the desired number of proxy server processes
that are always running on the MoRoS GPRS 1.3 into the entry field "Minimum
54
Page 55

MoRoS GPRS 1.3 Functions
number of free proxy servers".
To avoid overloading the MoRoS GPRS 1.3 with proxy requests, you can define
a maximum number of proxy server processes. For each client request, an individual proxy server process is started on the MoRoS GPRS 1.3. Enter the desired maximum number of simultaneous proxy server processes in the entry
field "Maximum number of free proxy servers" (Figure 25, page 40 above, position 5). If more requests are received than available as proxy servers, the additional requests are rejected.
Save the settings by clicking "OK" (Figure 25, page 40 above, position 7).
12.7.2 Set up an URL Filter
With the help of the URL filter, the proxy of the MoRoS GPRS 1.3 can restrict possible
URLs, which can be accessed by computers from the internal network of the MoRoS GPRS
1.3. This will allow only access to URLs which are entered in the filter list. All other URLs
are blocked. To allow access to the Internet only via the proxy, the firewall must be activated. Without the firewall, the access to any URLs would be possible just by bypassing
the proxy.
At the clients (e.g. a web browser on a PC), which establish connections via the proxy, the
IP address of the proxy must be defined.
Configuration with the web interface
To switch the URL filter on, activate the checkbox "Activate filter" (Figure 25,
page 40 above, position 9).
To enter an authorized URL which is accessible from the internal network, enter the desired URL in the entry fields "Authorized URLs" (Figure 25, page 40
above, position 8).
To delete an URL from the list, delete the text of the URL from the list (Figure
25, page 40 above, position 8).
Save the settings by clicking "OK" (Figure 25, page 40 above, position 7).
12.8 Inputs
12.8.1 Query the State of the Inputs
The MoRoS GPRS 1.3 has digital inputs, which may trigger a PPP connection setup or
sending messages via SMS. The inputs are closed when connected with GND. They are
opened when there is no connection with GND. The states of the two inputs can be queried via the web interface.
Configuration with the web interface
To query the states of the inputs, click on the button "Update" in the menu
"Inputs" on the page "Input states" (Figure 16, page 36 above, position 3). Af-
55
Page 56

Functions MoRoS GPRS 1.3
ter the page has been reset, you can view the states of the inputs on the same
page next to "Input 1:" and "Input 2:" (Figure 16, page 36, above, position 2).
12.8.2 Set up a Dial-out Connection via Switch Input
The MoRoS GPRS 1.3 can establish a preconfigured dial-out connection, after the input
IN2 is closed for 4 seconds, i.e. connected to "GND". When activating the input, a dial-out
is performed as configured in the according menu. The connection will remain as long as
the connection configuration allows.
Configuration with the web interface
To trigger a dial-out connection by closing IN2, activate the checkbox "Trigger
a dial-out connection through input IN2 ..." (Figure 17, page 37 above, position
1) .
Save the settings by clicking "OK" (Figure 17, page 37 above, position 2).
12.8.3 Trigger SMS Dispatch through Input 1
The MoRoS GPRS 1.3 can send an SMS to a phone number when closing the input 1.
There are two pulse types: a long pulse with a duration of a minimum of 4 seconds, and
individual pulses, which are shorter than 1 second.
The long pulse triggers the SMS message for the simple alarm. The short pulses trigger
the dispatch of the SMS messages for the according number of pulses.
SMS messages can be up to 140 characters long.
Dial-out and dial-in connections have priority over the sending of SMS. If a request to
send an SMS arrives during a connection, this SMS will only be sent after the existing
connection is terminated. If several SMS requests arrive during a connection, they are
buffered and then sent after the termination of the connection, individually and in succession.
Configuration with the web interface
To switch the sending of SMS messages on, first activate the checkbox "SMS
dispatch when changing ..." (Figure 18, page 37 above, position 1).
To make sure that the sending of SMS works, enter the number of an SMS ser-
vice center in the entry field "SCN (Service Center Number)" (Figure 18, page
37 above, position 8). If your MoRoS GPRS 1.3 is connected to a telphone system, enter the number for getting an outside line together with the service
center number.
If necessary (not for GSM/GPRS), select the SMS protocol of your SMS service
center in the dropdown menu "SMS protocol" (Figure 18, page 37 above, position 2). Your SMS service center provider will tell you which protocol to use.
To send a message through an individual, 4 second pulse, enter a destination
phone number in the entry field "Phone number" (Figure 18, page 37 above,
position 3). The number format depends on the requirements of the service
56
Page 57

MoRoS GPRS 1.3 Functions
center. Request further details on the number format of the destination
phone number by your sms service center operator. Enter the SMS message
text in the entry field (Figure 18, page 37 above, position 4).
To send a message for a number of short, 1 second, pulses scroll further down
on the page "SMS dispatch" to the entry field for the desired number of pulses.
Enter (e.g. for a short pulse) a destination phone number in the entry field
"Phone number" (Figure 18, page 37 above, position 5). Enter the SMS message text in the entry field (Figure 18, page 37 above, position 6).
Save the settings by clicking "OK" (Figure 18, page 37 above, position 7).
12.9 Outputs
12.9.1 Query the Output States
The MoRoS GPRS 1.3 has digital outputs, whose status you can query and change via the
web interface.
Configuration with the web interface
To query the states of the outputs, click on the button "Update" in the menu
"Outputs" on the page "Output states" (Figure 19, page 38 above, position 3).
You can see the state of the outputs next to the text "Output 2:" after you reloaded the page. (Figure 19, page 38 above, position 2).
12.9.2 Switch Outputs
The switch outputs of the MoRoS GPRS 1.3 can be updated via the web interface.
Configuration with the web interface
To switch the states of the outputs, use the radio buttons to select "Open" or
"Closed" for each output in the menu "Outputs" on the page "Output states"
(Figure 19, page 38 above, positions 4 and 5).
Save the settings by clicking "OK" (Figure 19, Page 38, above, Position 6).
12.10 System Configuration
12.10.1 Display System Messages
The MoRoS GPRS 1.3 displays system data such as firmware version, serial number,
hardware version or firmware checksum, together with short system messages about
events and errors on the system data page. For analysis purposes, you can see the detailed messages of the MoRoS GPRS 1.3 on the web interface.
57
Page 58

Functions MoRoS GPRS 1.3
Configuration with the web interface
To view the detailed system messages via the web interface, click on the arrow next to the text "Display the detailed system log" (Figure 20, page 38
above, position 3).
12.10.2 Downloading the Last System Messages
The MoRoS GPRS 1.3 displays short system messages (Figure 20, page 38 above, position
5) about events and errors on the page "System data". For analysis purposes, you can
download the last messages of the MoRoS GPRS 1.3 in a file which contains all system
messages.
Configuration with the web interface
To download the system messages of the MoRoS GPRS 1.3, click on the arrow
next to the text "Downloading the last system messages" (Figure 20, page 38
above, position 4).
12.10.3 Setting the Time and the Time Zone
The MoRoS GPRS 1.3 has an internal clock to control time-controlled events. This clock
must be set to ensure that time-controlled events are processed precisely to the desired
time, and that system messages are dated correctly.
Configuration with the web interface
To set the time and the date, enter the values for day, month, year, hour and
minutes in the entry fields "DD MM YYYY hh mm" (Figure 21, page 39 above,
position 3).
Select your Time zone and activate automatic daylight-saving as an option.
Save the settings by clicking "OK" (Figure 21, page 39 above, position 1).
12.10.4 Synchronizing the Time via the NTP Server
The clock of the MoRoS GPRS 1.3 can be updated automatically via an NTP server from
the Internet. During each connection setup, the MoRoS GPRS 1.3 will attempt to synchronize the time from the specified NTP server. In contrast to the time, the time zone
must be manually adjusted to the location of the MoRoS GPRS 1.3.
Configuration with the web interface
To synchronize the time and the date via NTP server, activate the checkbox
"Time synchronization via" and enter the name of an NTP server or its IP address in the entry field (Figure 21, page 39 above, position 2).
Set up the time zone of the location of the MoRoS GPRS 1.3, by selecting it
from the dropdown menu "Time zone" (Figure 21, page 39 above, position 4).
58
Page 59

MoRoS GPRS 1.3 Functions
Save the settings by clicking "OK" (Figure 21, page 39 above, position 1).
12.10.5 Reset
You can reset the MoRoS GPRS 1.3 via the web interface or by pressing the reset key on
the front of the device. You can simply restart your device or reset all settings to the factory defaults. Use the reset key to trigger a restart of the MoRoS GPRS 1.3 by pressing it
once, at a minimum for three seconds. Pressing the reset key three times for a short time
within two seconds loads the factory defaults of the MoRoS GPRS 1.3.
Configuration with the web interface
To restart the MoRoS GPRS 1.3, use the radio buttons "Restart"" in the menu
"System" on the page "Reset" (Figure 22, page 39 above, position 2). Click on
OK (Figure 22, page 39 above, position 1) to perform the restart.
To restart the MoRoS GPRS 1.3 and to reload the factory defaults at the same
time , use the radio buttons "Load basic settings and restart"" in the menu
"System" on the page "Reset" (Figure 22, page 39 above, position 2). Click on
OK (Figure 22, page 39 above, position 1) to perform the restart and to reset
the MoRoS GPRS 1.3 to the factory default.
59
Page 60

Functions MoRoS GPRS 1.3
12.10.6 Updating the Firmware of the MoRoS GPRS 1.3
You can update the firmware of the {{PRODUKTBEZEICHNUNG}}}. The firma is a combination of operating system and programs, in which the functions of the {{PRODUKTBEZEICHNUNG}}} are implemented. To update the firmware, you will need two files
with a new firmware, which you may receive from your sales partner, or from INSYS MICROELECTRONICS.
Function loss due to faulty update!
During a connection termination during the update and
a following restart, the MoRoS GPRS 1.3 may loose its
function.
As long as the red LED at the MoRoS GPRS 1.3 lights up,
you are not permitted to perform any actions at the web
interface, you should not pull the power plug and you
should not perform a reset.
After a failed update, do not restart the MoRoS GPRS 1.3,
but call the INSYS MICROELECTRICS support.
Loss of availability!
Through a firmware update, your MoRoS GPRS 1.3 may
use its earlier configuration. Your MoRoS GPRS 1.3 can
then only be accessed from the local network via its
standard IP address 192.168.1.1.
Note
Note
Perform critical updates only locally, read the file "ReadMe.txt" that comes with the firmware, or contact the
INSYS MICROELECTRONICS support.
Complete update of the MoRoS GPRS 1.3 firmware
You have access to the web interface.
If you access the web interface of the MoRoS GPRS 1.3 via a dial-up connec-
You have ensured that the power supply of the MoRoS GPRS 1.3 can not be
You have both firmware files; one file with the name "ulmage" and a sec-
The following steps must be performed to update the firmware of a MoRoS
GPRS 1.3.
tion, the connection must be maintained long enough to perform the uploads. The option "Maximum connection time" should be set to "0" for the
update, also for the "Idle time".
switched off during the update procedure.
ond one with the name "uRamDisk". The files can be found on the PC from
which you want to perform the update.
60
Page 61

MoRoS GPRS 1.3 Functions
You have read the included file "ReadMe.txt".
1. Write down the most important settings from the web interface of the MoRoS GPRS 1.3.
2. In the menu "System", switch to the page "Update" (Figure 23, page 39,
3. Click on Browse ... and select the file "ulmage".
4. Click on OK, to start the update.
Not in all cases will the configuration file of the old firmware be compatible
with the new configuration after the update. Read the file "ReadMe.txt",
which you have received together with the firmware files. If the old and the
new configuration file are compatible, you can download the old configuration prior to the update and use it at a later date.
above).
A page with a security query is displayed.
5. Confirm the query with Yes.
The update procedure starts. The time until the file is completely transmitted to the MoRoS GPRS 1.3 varies, depending on the firmware size.
The browser waits.
During the update, the status LED at the MoRoS GPRS 1.3 lights up red.
61
Page 62

Functions MoRoS GPRS 1.3
After the completed update, a page is displayed which confirms the successful update procedure. Do not perform any action at the web interface
until this page is displayed.
6. Proceed with the second file "uRamdisk" as with the first file, without performing a restart. Repeat the steps from step 3.
7. In the menu "System", switch to the page "Reset" and select "Restart".
8. It may be necessary to reload the default settings after the restart, to have a
12.10.7 Download the Configuration File from the MoRoS GPRS 1.3
The new firmware is now active.
correct configuration, in case the old configuration is incompatible to the
new one.
You can download the configuration of the {{PRODUKTBEZEICHNUNG}}} via the web interface. With this file, you can configure other, equal devices, or safely store a functioning configuration.
Configuration with the web interface
To download the configuration of the MoRoS GPRS 1.3, click on the blue arrow in the menu "System" on the page "Download" (Figure 24, page 39 above,
position 2). The browser will prompt you to save the file.
12.10.8 Uploading the Configuration File to the MoRoS GPRS 1.3
You may upload a previously downloaded configuration file to the MoRoS GPRS 1.3, to
replace the current configuration of the MoRoS GPRS 1.3 by the settings in the file.
Uploading the configuration file of the MoRoS GPRS 1.3
You have a configuration file for your version of the MoRoS GPRS 1.3.
1. In the web interface of the MoRoS GPRS 1.3, under "System", switch to the
page "Update" (Figure 23, page 39, above).
2. Click on Browse ... and select the configuration file (e.g. configuration.bin).
3. Click on OK, to start the upload.
62
Page 63

MoRoS GPRS 1.3 Functions
A page with a security query is displayed.
4. Confirm the query with Yes.
The update procedure of the configuration starts.
After the completed upload, a page is displayed which confirms the successful update procedure.
5. In the menu "System", switch to the page "Reset" and select "Restart".
The new configuration is now active.
63
Page 64

Waste Disposal MoRoS GPRS 1.3
13 Waste Disposal
13.1 Repurchasing of legacy systems
According to the new WEEE guidelines, the repurchasing and recycling of legacy systems
for our clients is regulated as follows:
Please send those legacy systems to the following address, carriage prepaid:
Frankenberg-Metalle
Gärtnersleite 8
D-96450 Coburg
This regulation applies to all devices which were delivered after August 13, 2005.
64
Page 65

MoRoS GPRS 1.3 Licenses
14 Licenses
The software technologies and programs of the firmware used in the MoRoS GPRS 1.3 are partly bound
to the following licenses. The source code of the firmware components of the MoRoS GPRS 1.3 which
are bound to these licenses may be obtained from INSYS MICROELECTRONICS on request.
14.1 GNU GENERAL PUBLIC LICENSE
Version 2, June 1991
Copyright (C) 1989, 1991 Free Software Foundation, Inc.
51 Franklin Street, Fifth Floor, Boston, MA 02110-1301, USA
Everyone is permitted to copy and distribute verbatim copies of this license document, but changing it is
not allowed.
Preamble
The licenses for most software are designed to take away your freedom to share and change it. By contrast, the GNU General Public License is intended to guarantee your freedom to share and change free
software--to make sure the software is free for all its users. This General Public License applies to most
of the Free Software Foundation's software and to any other program whose authors commit to using it.
(Some other Free Software Foundation software is covered by the GNU Lesser General Public License
instead.) You can apply it to your programs, too.
When we speak of free software, we are referring to freedom, not price. Our General Public Licenses are
designed to make sure that you have the freedom to distribute copies of free software (and charge for
this service if you wish), that you receive source code or can get it if you want it, that you can change the
software or use pieces of it in new free programs; and that you know you can do these things.
To protect your rights, we need to make restrictions that forbid anyone to deny you these rights or to ask
you to surrender the rights. These restrictions translate to certain responsibilities for you if you distribute
copies of the software, or if you modify it.
For example, if you distribute copies of such a program, whether gratis or for a fee, you must give the
recipients all the rights that you have. You must make sure that they, too, receive or can get the source
code. And you must show them these terms so they know their rights.
We protect your rights with two steps: (1) copyright the software, and (2) offer you this license which
gives you legal permission to copy, distribute and/or modify the software.
Also, for each author's protection and ours, we want to make certain that everyone understands that
there is no warranty for this free software. If the software is modified by someone else and passed on,
we want its recipients to know that what they have is not the original, so that any problems introduced by
others will not reflect on the original authors' reputations.
Finally, any free program is threatened constantly by software patents. We wish to avoid the danger that
redistributors of a free program will individually obtain patent licenses, in effect making the program proprietary. To prevent this, we have made it clear that any patent must be licensed for everyone's free use
or not licensed at all.
The precise terms and conditions for copying, distribution and modification follow.
TERMS AND CONDITIONS FOR COPYING, DISTRIBUTION AND MODIFICATION
0. This License applies to any program or other work which contains a notice placed by the copyright
holder saying it may be distributed under the terms of this General Public License. The "Program", below, refers to any such program or work, and a "work based on the Program" means either the Program
or any derivative work under copyright law: that is to say, a work containing the Program or a portion of it,
65
Page 66

Licenses MoRoS GPRS 1.3
either verbatim or with modifications and/or translated into another language. (Hereinafter, translation is
included without limitation in the term "modification".) Each licensee is addressed as "you".
Activities other than copying, distribution and modification are not covered by this License; they are outside its scope. The act of running the Program is not restricted, and the output from the Program is covered only if its contents constitute a work based on the Program (independent of having been made by
running the Program). Whether that is true depends on what the Program does.
1. You may copy and distribute verbatim copies of the Program's source code as you receive it, in any
medium, provided that you conspicuously and appropriately publish on each copy an appropriate copyright notice and disclaimer of warranty; keep intact all the notices that refer to this License and to the
absence of any warranty; and give any other recipients of the Program a copy of this License along with
the Program.
You may charge a fee for the physical act of transferring a copy, and you may at your option offer warranty protection in exchange for a fee.
2. You may modify your copy or copies of the Program or any portion of it, thus forming a work based on
the Program, and copy and distribute such modifications or work under the terms of Section 1 above,
provided that you also meet all of these conditions:
a) You must cause the modified files to carry prominent notices stating that you changed the files
and the date of any change.
b) You must cause any work that you distribute or publish, that in whole or in part contains or is
derived from the Program or any part thereof, to be licensed as a whole at no charge to all third
parties under the terms of this License.
c) If the modified program normally reads commands interactively when run, you must cause it,
when started running for such interactive use in the most ordinary way, to print or display an announcement including an appropriate copyright notice and a notice that there is no warranty (or
else, saying that you provide a warranty) and that users may redistribute the program under
these conditions, and telling the user how to view a copy of this License. (Exception: if the Program itself is interactive but does not normally print such an announcement, your work based on
the Program is not required to print an announcement.)
These requirements apply to the modified work as a whole. If identifiable sections of that work are not
derived from the Program, and can be reasonably considered independent and separate works in themselves, then this License, and its terms, do not apply to those sections when you distribute them as separate works. But when you distribute the same sections as part of a whole which is a work based on the
Program, the distribution of the whole must be on the terms of this License, whose permissions for other
licensees extend to the entire whole, and thus to each and every part regardless of who wrote it.
Thus, it is not the intent of this section to claim rights or contest your rights to work written entirely by
you; rather, the intent is to exercise the right to control the distribution of derivative or collective works
based on the Program.
In addition, mere aggregation of another work not based on the Program with the Program (or with a
work based on the Program) on a volume of a storage or distribution medium does not bring the other
work under the scope of this License.
3. You may copy and distribute the Program (or a work based on it, under Section 2) in object code or
executable form under the terms of Sections 1 and 2 above provided that you also do one of the following:
a) Accompany it with the complete corresponding machine-readable source code, which must be
distributed under the terms of Sections 1 and 2 above on a medium customarily used for software interchange; or,
b) Accompany it with a written offer, valid for at least three years, to give any third party, for a
charge no more than your cost of physically performing source distribution, a complete machinereadable copy of the corresponding source code, to be distributed under the terms of Sections 1
and 2 above on a medium customarily used for software interchange; or,
c) Accompany it with the information you received as to the offer to distribute corresponding
source code. (This alternative is allowed only for noncommercial distribution and only if you received the program in object code or executable form with such an offer, in accord with Subsection b above.)
The source code for a work means the preferred form of the work for making modifications to it. For an
executable work, complete source code means all the source code for all modules it contains, plus any
associated interface definition files, plus the scripts used to control compilation and installation of the
66
Page 67

MoRoS GPRS 1.3 Licenses
executable. However, as a special exception, the source code distributed need not include anything that
is normally distributed (in either source or binary form) with the major components (compiler, kernel, and
so on) of the operating system on which the executable runs, unless that component itself accompanies
the executable.
If distribution of executable or object code is made by offering access to copy from a designated place,
then offering equivalent access to copy the source code from the same place counts as distribution of the
source code, even though third parties are not compelled to copy the source along with the object code.
4. You may not copy, modify, sublicense, or distribute the Program except as expressly provided under
this License. Any attempt otherwise to copy, modify, sublicense or distribute the Program is void, and will
automatically terminate your rights under this License. However, parties who have received copies, or
rights, from you under this License will not have their licenses terminated so long as such parties remain
in full compliance.
5. You are not required to accept this License, since you have not signed it. However, nothing else
grants you permission to modify or distribute the Program or its derivative works. These actions are prohibited by law if you do not accept this License. Therefore, by modifying or distributing the Program (or
any work based on the Program), you indicate your acceptance of this License to do so, and all its terms
and conditions for copying, distributing or modifying the Program or works based on it.
6. Each time you redistribute the Program (or any work based on the Program), the recipient automatically receives a license from the original licensor to copy, distribute or modify the Program subject to
these terms and conditions. You may not impose any further restrictions on the recipients' exercise of the
rights granted herein. You are not responsible for enforcing compliance by third parties to this License.
7. If, as a consequence of a court judgment or allegation of patent infringement or for any other reason
(not limited to patent issues), conditions are imposed on you (whether by court order, agreement or otherwise) that contradict the conditions of this License, they do not excuse you from the conditions of this
License. If you cannot distribute so as to satisfy simultaneously your obligations under this License and
any other pertinent obligations, then as a consequence you may not distribute the Program at all. For
example, if a patent license would not permit royalty-free redistribution of the Program by all those who
receive copies directly or indirectly through you, then the only way you could satisfy both it and this License would be to refrain entirely from distribution of the Program.
If any portion of this section is held invalid or unenforceable under any particular circumstance, the balance of the section is intended to apply and the section as a whole is intended to apply in other circumstances.
It is not the purpose of this section to induce you to infringe any patents or other property right claims or
to contest validity of any such claims; this section has the sole purpose of protecting the integrity of the
free software distribution system, which is implemented by public license practices. Many people have
made generous contributions to the wide range of software distributed through that system in reliance on
consistent application of that system; it is up to the author/donor to decide if he or she is willing to distribute software through any other system and a licensee cannot impose that choice.
This section is intended to make thoroughly clear what is believed to be a consequence of the rest of this
License.
8. If the distribution and/or use of the Program is restricted in certain countries either by patents or by
copyrighted interfaces, the original copyright holder who places the Program under this License may add
an explicit geographical distribution limitation excluding those countries, so that distribution is permitted
only in or among countries not thus excluded. In such case, this License incorporates the limitation as if
written in the body of this License.
9. The Free Software Foundation may publish revised and/or new versions of the General Public License
from time to time. Such new versions will be similar in spirit to the present version, but may differ in detail
to address new problems or concerns.
Each version is given a distinguishing version number. If the Program specifies a version number of this
License which applies to it and "any later version", you have the option of following the terms and conditions either of that version or of any later version published by the Free Software Foundation. If the Program does not specify a version number of this License, you may choose any version ever published by
the Free Software Foundation.
10. If you wish to incorporate parts of the Program into other free programs whose distribution conditions
are different, write to the author to ask for permission. For software which is copyrighted by the Free
Software Foundation, write to the Free Software Foundation; we sometimes make exceptions for this.
Our decision will be guided by the two goals of preserving the free status of all derivatives of our free
software and of promoting the sharing and reuse of software generally.
67
Page 68

Licenses MoRoS GPRS 1.3
NO WARRANTY
11. BECAUSE THE PROGRAM IS LICENSED FREE OF CHARGE, THERE IS NO WARRANTY FOR
THE PROGRAM, TO THE EXTENT PERMITTED BY APPLICABLE LAW. EXCEPT WHEN OTHERWISE STATED IN WRITING THE COPYRIGHT HOLDERS AND/OR OTHER PARTIES PROVIDE THE
PROGRAM "AS IS" WITHOUT WARRANTY OF ANY KIND, EITHER EXPRESSED OR IMPLIED, INCLUDING, BUT NOT LIMITED TO, THE IMPLIED WARRANTIES OF MERCHANTABILITY AND FITNESS FOR A PARTICULAR PURPOSE. THE ENTIRE RISK AS TO THE QUALITY AND PERFORMANCE OF THE PROGRAM IS WITH YOU. SHOULD THE PROGRAM PROVE DEFECTIVE, YOU ASSUME THE COST OF ALL NECESSARY SERVICING, REPAIR OR CORRECTION.
12. IN NO EVENT UNLESS REQUIRED BY APPLICABLE LAW OR AGREED TO IN WRITING WILL
ANY COPYRIGHT HOLDER, OR ANY OTHER PARTY WHO MAY MODIFY AND/OR REDISTRIBUTE
THE PROGRAM AS PERMITTED ABOVE, BE LIABLE TO YOU FOR DAMAGES, INCLUDING ANY
GENERAL, SPECIAL, INCIDENTAL OR CONSEQUENTIAL DAMAGES ARISING OUT OF THE USE
OR INABILITY TO USE THE PROGRAM (INCLUDING BUT NOT LIMITED TO LOSS OF DATA OR
DATA BEING RENDERED INACCURATE OR LOSSES SUSTAINED BY YOU OR THIRD PARTIES OR
A FAILURE OF THE PROGRAM TO OPERATE WITH ANY OTHER PROGRAMS), EVEN IF SUCH
HOLDER OR OTHER PARTY HAS BEEN ADVISED OF THE POSSIBILITY OF SUCH DAMAGES.
14.2 GNU LIBRARY GENERAL PUBLIC LICENSE
Version 2, June 1991
Copyright (C) 1991 Free Software Foundation, Inc.
51 Franklin St, Fifth Floor, Boston, MA 02110-1301, USA
Everyone is permitted to copy and distribute verbatim copies
of this license document, but changing it is not allowed.
[This is the first released version of the library GPL. It is numbered 2 because it goes with version 2 of
the ordinary GPL.]
Preamble
The licenses for most software are designed to take away your freedom to share and change it. By contrast, the GNU General Public Licenses are intended to guarantee your freedom to share and change
free software--to make sure the software is free for all its users.
This license, the Library General Public License, applies to some specially designated Free Software
Foundation software, and to any other libraries whose authors decide to use it. You can use it for your
libraries, too.
When we speak of free software, we are referring to freedom, not price. Our General Public Licenses are
designed to make sure that you have the freedom to distribute copies of free software (and charge for
this service if you wish), that you receive source code or can get it if you want it, that you can change the
software or use pieces of it in new free programs; and that you know you can do these things.
To protect your rights, we need to make restrictions that forbid anyone to deny you these rights or to ask
you to surrender the rights. These restrictions translate to certain responsibilities for you if you distribute
copies of the library, or if you modify it.
For example, if you distribute copies of the library, whether gratis or for a fee, you must give the recipients all the rights that we gave you. You must make sure that they, too, receive or can get the source
code. If you link a program with the library, you must provide complete object files to the recipients so
that they can relink them with the library, after making changes to the library and recompiling it. And you
must show them these terms so they know their rights.
Our method of protecting your rights has two steps: (1) copyright the library, and (2) offer you this license
which gives you legal permission to copy, distribute and/or modify the library.
Also, for each distributor's protection, we want to make certain that everyone understands that there is no
warranty for this free library. If the library is modified by someone else and passed on, we want its recipients to know that what they have is not the original version, so that any problems introduced by others
68
Page 69

MoRoS GPRS 1.3 Licenses
will not reflect on the original authors' reputations.
Finally, any free program is threatened constantly by software patents. We wish to avoid the danger that
companies distributing free software will individually obtain patent licenses, thus in effect transforming
the program into proprietary software. To prevent this, we have made it clear that any patent must be
licensed for everyone's free use or not licensed at all.
Most GNU software, including some libraries, is covered by the ordinary GNU General Public License,
which was designed for utility programs. This license, the GNU Library General Public License, applies to
certain designated libraries. This license is quite different from the ordinary one; be sure to read it in full,
and don't assume that anything in it is the same as in the ordinary license.
The reason we have a separate public license for some libraries is that they blur the distinction we usually make between modifying or adding to a program and simply using it. Linking a program with a library,
without changing the library, is in some sense simply using the library, and is analogous to running a
utility program or application program. However, in a textual and legal sense, the linked executable is a
combined work, a derivative of the original library, and the ordinary General Public License treats it as
such.
Because of this blurred distinction, using the ordinary General Public License for libraries did not effectively promote software sharing, because most developers did not use the libraries. We concluded that
weaker conditions might promote sharing better.
However, unrestricted linking of non-free programs would deprive the users of those programs of all
benefit from the free status of the libraries themselves. This Library General Public License is intended to
permit developers of non-free programs to use free libraries, while preserving your freedom as a user of
such programs to change the free libraries that are incorporated in them. (We have not seen how to
achieve this as regards changes in header files, but we have achieved it as regards changes in the actual functions of the Library.) The hope is that this will lead to faster development of free libraries.
The precise terms and conditions for copying, distribution and modification follow. Pay close attention to
the difference between a "work based on the library" and a "work that uses the library". The former contains code derived from the library, while the latter only works together with the library.
Note that it is possible for a library to be covered by the ordinary General Public License rather than by
this special one.
TERMS AND CONDITIONS FOR COPYING, DISTRIBUTION AND MODIFICATION
0. This License Agreement applies to any software library which contains a notice placed by the copyright holder or other authorized party saying it may be distributed under the terms of this Library General
Public License (also called "this License"). Each licensee is addressed as "you".
A "library" means a collection of software functions and/or data prepared so as to be conveniently linked
with application programs (which use some of those functions and data) to form executables.
The "Library", below, refers to any such software library or work which has been distributed under these
terms. A "work based on the Library" means either the Library or any derivative work under copyright
law: that is to say, a work containing the Library or a portion of it, either verbatim or with modifications
and/or translated straightforwardly into another language. (Hereinafter, translation is included without
limitation in the term "modification".)
"Source code" for a work means the preferred form of the work for making modifications to it. For a library, complete source code means all the source code for all modules it contains, plus any associated
interface definition files, plus the scripts used to control compilation and installation of the library.
Activities other than copying, distribution and modification are not covered by this License; they are outside its scope. The act of running a program using the Library is not restricted, and output from such a
program is covered only if its contents constitute a work based on the Library (independent of the use of
the Library in a tool for writing it). Whether that is true depends on what the Library does and what the
program that uses the Library does.
1. You may copy and distribute verbatim copies of the Library's complete source code as you receive it,
in any medium, provided that you conspicuously and appropriately publish on each copy an appropriate
copyright notice and disclaimer of warranty; keep intact all the notices that refer to this License and to the
absence of any warranty; and distribute a copy of this License along with the Library.
You may charge a fee for the physical act of transferring a copy, and you may at your option offer warranty protection in exchange for a fee.
69
Page 70

Licenses MoRoS GPRS 1.3
2. You may modify your copy or copies of the Library or any portion of it, thus forming a work based on
the Library, and copy and distribute such modifications or work under the terms of Section 1 above, provided that you also meet all of these conditions:
• a) The modified work must itself be a software library.
• b) You must cause the files modified to carry prominent notices stating that you changed the files
and the date of any change.
• c) You must cause the whole of the work to be licensed at no charge to all third parties under the
terms of this License.
• d) If a facility in the modified Library refers to a function or a table of data to be supplied by an
application program that uses the facility, other than as an argument passed when the facility is
invoked, then you must make a good faith effort to ensure that, in the event an application does
not supply such function or table, the facility still operates, and performs whatever part of its purpose remains meaningful. (For example, a function in a library to compute square roots has a
purpose that is entirely well-defined independent of the application. Therefore, Subsection 2d requires that any application-supplied function or table used by this function must be optional: if the
application does not supply it, the square root function must still compute square roots.)
These requirements apply to the modified work as a whole. If identifiable sections of that work are not
derived from the Library, and can be reasonably considered independent and separate works in themselves, then this License, and its terms, do not apply to those sections when you distribute them as separate works. But when you distribute the same sections as part of a whole which is a work based on the
Library, the distribution of the whole must be on the terms of this License, whose permissions for other
licensees extend to the entire whole, and thus to each and every part regardless of who wrote it.
Thus, it is not the intent of this section to claim rights or contest your rights to work written entirely by
you; rather, the intent is to exercise the right to control the distribution of derivative or collective works
based on the Library.
In addition, mere aggregation of another work not based on the Library with the Library (or with a work
based on the Library) on a volume of a storage or distribution medium does not bring the other work under the scope of this License.
3. You may opt to apply the terms of the ordinary GNU General Public License instead of this License to
a given copy of the Library. To do this, you must alter all the notices that refer to this License, so that
they refer to the ordinary GNU General Public License, version 2, instead of to this License. (If a newer
version than version 2 of the ordinary GNU General Public License has appeared, then you can specify
that version instead if you wish.) Do not make any other change in these notices.
Once this change is made in a given copy, it is irreversible for that copy, so the ordinary GNU General
Public License applies to all subsequent copies and derivative works made from that copy.
This option is useful when you wish to copy part of the code of the Library into a program that is not a
library.
4. You may copy and distribute the Library (or a portion or derivative of it, under Section 2) in object code
or executable form under the terms of Sections 1 and 2 above provided that you accompany it with the
complete corresponding machine-readable source code, which must be distributed under the terms of
Sections 1 and 2 above on a medium customarily used for software interchange.
If distribution of object code is made by offering access to copy from a designated place, then offering
equivalent access to copy the source code from the same place satisfies the requirement to distribute the
source code, even though third parties are not compelled to copy the source along with the object code.
5. A program that contains no derivative of any portion of the Library, but is designed to work with the
Library by being compiled or linked with it, is called a "work that uses the Library". Such a work, in isolation, is not a derivative work of the Library, and therefore falls outside the scope of this License.
However, linking a "work that uses the Library" with the Library creates an executable that is a derivative
of the Library (because it contains portions of the Library), rather than a "work that uses the library". The
executable is therefore covered by this License. Section 6 states terms for distribution of such executables.
When a "work that uses the Library" uses material from a header file that is part of the Library, the object
code for the work may be a derivative work of the Library even though the source code is not. Whether
this is true is especially significant if the work can be linked without the Library, or if the work is itself a
70
Page 71

MoRoS GPRS 1.3 Licenses
library. The threshold for this to be true is not precisely defined by law.
If such an object file uses only numerical parameters, data structure layouts and accessors, and small
macros and small inline functions (ten lines or less in length), then the use of the object file is unrestricted, regardless of whether it is legally a derivative work. (Executables containing this object code
plus portions of the Library will still fall under Section 6.)
Otherwise, if the work is a derivative of the Library, you may distribute the object code for the work under
the terms of Section 6. Any executables containing that work also fall under Section 6, whether or not
they are linked directly with the Library itself.
6. As an exception to the Sections above, you may also compile or link a "work that uses the Library"
with the Library to produce a work containing portions of the Library, and distribute that work under terms
of your choice, provided that the terms permit modification of the work for the customer's own use and
reverse engineering for debugging such modifications.
You must give prominent notice with each copy of the work that the Library is used in it and that the Library and its use are covered by this License. You must supply a copy of this License. If the work during
execution displays copyright notices, you must include the copyright notice for the Library among them,
as well as a reference directing the user to the copy of this License. Also, you must do one of these
things:
• a) Accompany the work with the complete corresponding machine-readable source code for the
Library including whatever changes were used in the work (which must be distributed under Sections 1 and 2 above); and, if the work is an executable linked with the Library, with the complete
machine-readable "work that uses the Library", as object code and/or source code, so that the
user can modify the Library and then relink to produce a modified executable containing the
modified Library. (It is understood that the user who changes the contents of definitions files in
the Library will not necessarily be able to recompile the application to use the modified definitions.)
• b) Accompany the work with a written offer, valid for at least three years, to give the same user
the materials specified in Subsection 6a, above, for a charge no more than the cost of performing this distribution.
• c) If distribution of the work is made by offering access to copy from a designated place, offer
equivalent access to copy the above specified materials from the same place.
• d) Verify that the user has already received a copy of these materials or that you have already
sent this user a copy.
For an executable, the required form of the "work that uses the Library" must include any data and utility
programs needed for reproducing the executable from it. However, as a special exception, the source
code distributed need not include anything that is normally distributed (in either source or binary form)
with the major components (compiler, kernel, and so on) of the operating system on which the executable runs, unless that component itself accompanies the executable.
It may happen that this requirement contradicts the license restrictions of other proprietary libraries that
do not normally accompany the operating system. Such a contradiction means you cannot use both them
and the Library together in an executable that you distribute.
7. You may place library facilities that are a work based on the Library side-by-side in a single library
together with other library facilities not covered by this License, and distribute such a combined library,
provided that the separate distribution of the work based on the Library and of the other library facilities is
otherwise permitted, and provided that you do these two things:
• a) Accompany the combined library with a copy of the same work based on the Library, uncom-
bined with any other library facilities. This must be distributed under the terms of the Sections
above.
• b) Give prominent notice with the combined library of the fact that part of it is a work based on
the Library, and explaining where to find the accompanying uncombined form of the same work.
8. You may not copy, modify, sublicense, link with, or distribute the Library except as expressly provided
under this License. Any attempt otherwise to copy, modify, sublicense, link with, or distribute the Library
is void, and will automatically terminate your rights under this License. However, parties who have re-
71
Page 72

Licenses MoRoS GPRS 1.3
ceived copies, or rights, from you under this License will not have their licenses terminated so long as
such parties remain in full compliance.
9. You are not required to accept this License, since you have not signed it. However, nothing else
grants you permission to modify or distribute the Library or its derivative works. These actions are prohibited by law if you do not accept this License. Therefore, by modifying or distributing the Library (or any
work based on the Library), you indicate your acceptance of this License to do so, and all its terms and
conditions for copying, distributing or modifying the Library or works based on it.
10. Each time you redistribute the Library (or any work based on the Library), the recipient automatically
receives a license from the original licensor to copy, distribute, link with or modify the Library subject to
these terms and conditions. You may not impose any further restrictions on the recipients' exercise of the
rights granted herein. You are not responsible for enforcing compliance by third parties to this License.
11. If, as a consequence of a court judgment or allegation of patent infringement or for any other reason
(not limited to patent issues), conditions are imposed on you (whether by court order, agreement or otherwise) that contradict the conditions of this License, they do not excuse you from the conditions of this
License. If you cannot distribute so as to satisfy simultaneously your obligations under this License and
any other pertinent obligations, then as a consequence you may not distribute the Library at all. For example, if a patent license would not permit royalty-free redistribution of the Library by all those who receive copies directly or indirectly through you, then the only way you could satisfy both it and this License
would be to refrain entirely from distribution of the Library.
If any portion of this section is held invalid or unenforceable under any particular circumstance, the balance of the section is intended to apply, and the section as a whole is intended to apply in other circumstances.
It is not the purpose of this section to induce you to infringe any patents or other property right claims or
to contest validity of any such claims; this section has the sole purpose of protecting the integrity of the
free software distribution system which is implemented by public license practices. Many people have
made generous contributions to the wide range of software distributed through that system in reliance on
consistent application of that system; it is up to the author/donor to decide if he or she is willing to distribute software through any other system and a licensee cannot impose that choice.
This section is intended to make thoroughly clear what is believed to be a consequence of the rest of this
License.
12. If the distribution and/or use of the Library is restricted in certain countries either by patents or by
copyrighted interfaces, the original copyright holder who places the Library under this License may add
an explicit geographical distribution limitation excluding those countries, so that distribution is permitted
only in or among countries not thus excluded. In such case, this License incorporates the limitation as if
written in the body of this License.
13. The Free Software Foundation may publish revised and/or new versions of the Library General Public License from time to time. Such new versions will be similar in spirit to the present version, but may
differ in detail to address new problems or concerns.
Each version is given a distinguishing version number. If the Library specifies a version number of this
License which applies to it and "any later version", you have the option of following the terms and conditions either of that version or of any later version published by the Free Software Foundation. If the Library does not specify a license version number, you may choose any version ever published by the
Free Software Foundation.
14. If you wish to incorporate parts of the Library into other free programs whose distribution conditions
are incompatible with these, write to the author to ask for permission. For software which is copyrighted
by the Free Software Foundation, write to the Free Software Foundation; we sometimes make exceptions for this. Our decision will be guided by the two goals of preserving the free status of all derivatives
of our free software and of promoting the sharing and reuse of software generally.
NO WARRANTY
15. BECAUSE THE LIBRARY IS LICENSED FREE OF CHARGE, THERE IS NO WARRANTY FOR
THE LIBRARY, TO THE EXTENT PERMITTED BY APPLICABLE LAW. EXCEPT WHEN OTHERWISE
STATED IN WRITING THE COPYRIGHT HOLDERS AND/OR OTHER PARTIES PROVIDE THE LIBRARY "AS IS" WITHOUT WARRANTY OF ANY KIND, EITHER EXPRESSED OR IMPLIED, INCLUDING, BUT NOT LIMITED TO, THE IMPLIED WARRANTIES OF MERCHANTABILITY AND FITNESS
FOR A PARTICULAR PURPOSE. THE ENTIRE RISK AS TO THE QUALITY AND PERFORMANCE OF
THE LIBRARY IS WITH YOU. SHOULD THE LIBRARY PROVE DEFECTIVE, YOU ASSUME THE
COST OF ALL NECESSARY SERVICING, REPAIR OR CORRECTION.
72
Page 73

MoRoS GPRS 1.3 Licenses
n 2 (see below).
Special exception for linking OpenVPN with both OpenSSL and LZO:
16. IN NO EVENT UNLESS REQUIRED BY APPLICABLE LAW OR AGREED TO IN WRITING WILL
ANY COPYRIGHT HOLDER, OR ANY OTHER PARTY WHO MAY MODIFY AND/OR REDISTRIBUTE
THE LIBRARY AS PERMITTED ABOVE, BE LIABLE TO YOU FOR DAMAGES, INCLUDING ANY
GENERAL, SPECIAL, INCIDENTAL OR CONSEQUENTIAL DAMAGES ARISING OUT OF THE USE
OR INABILITY TO USE THE LIBRARY (INCLUDING BUT NOT LIMITED TO LOSS OF DATA OR DATA
BEING RENDERED INACCURATE OR LOSSES SUSTAINED BY YOU OR THIRD PARTIES OR A
FAILURE OF THE LIBRARY TO OPERATE WITH ANY OTHER SOFTWARE), EVEN IF SUCH
HOLDER OR OTHER PARTY HAS BEEN ADVISED OF THE POSSIBILITY OF SUCH DAMAGES
.
14.3 Other Licenses
OpenVPN license:
------------------------
Copyright (C) 2002-2005 OpenVPN Solutions LLC <info@openvpn.net>
OpenVPN is distributed under the GPL license versio
Special exception for linking OpenVPN with OpenSSL:
In addition, as a special exception, OpenVPN Solutions LLC gives permission to link the code of this
program with the OpenSSL library (or with modified versions of OpenSSL that use the same license as
OpenSSL), and distribute linked combinations including the two. You must obey the GNU General Public License in all respects for all of the code used other than OpenSSL. If you modify this file, you may
extend this exception to your version of the file, but you are not obligated to do so. If you do not wish to
do so, delete this exception statement from your version.
LZO license:
-----------------
LZO is Copyright (C) Markus F.X.J. Oberhumer, and is licensed under the GPL.
Hereby I grant a special exception to the OpenVPN project (http://openvpn.net/) to link the LZO library
with the OpenSSL library (http://www.openssl.org).
Markus F.X.J. Oberhumer
OpenSSL License:
------------------------
The OpenSSL toolkit stays under a dual license, i.e. both the conditions of the OpenSSL License and the
original SSLeay license apply to the toolkit. See below for the actual license texts. Actually both licenses
are BSD-style Open Source licenses. In case of any license issues related to OpenSSL please contact
openssl-core@openssl.org.
Copyright (c) 1998-2003 The OpenSSL Project. All rights reserved.
Redistribution and use in source and binary forms, with or without modification, are permitted provided
that the following conditions are met:
1. Redistributions of source code must retain the above copyright notice, this list of conditions and the
following disclaimer.
2. Redistributions in binary form must reproduce the above copyright notice, this list of conditions and the
following disclaimer in
the documentation and/or other materials provided with the distribution.
3. All advertising materials mentioning features or use of this software must display the following acknowledgment:
"This product includes software developed by the OpenSSL Project for use in the OpenSSL Toolkit.
(http://www.openssl.org/)"
4. The names "OpenSSL Toolkit" and "OpenSSL Project" must not be used to endorse or promote products derived from this software without prior written permission. For written permission, please contact
openssl-core@openssl.org.
73
Page 74

Licenses MoRoS GPRS 1.3
5. Products derived from this software may not be called "OpenSSL" nor may "OpenSSL" appear in their
names without prior written permission of the OpenSSL Project.
6. Redistributions of any form whatsoever must retain the following acknowledgment:
"This product includes software developed by the OpenSSL Project for use in the OpenSSL Toolkit
(http://www.openssl.org/)"
THIS SOFTWARE IS PROVIDED BY THE OpenSSL PROJECT ``AS IS'' AND ANY EXPRESSED OR
IMPLIED WARRANTIES, INCLUDING, BUT NOT LIMITED TO, THE IMPLIED WARRANTIES OF
MERCHANTABILITY AND FITNESS FOR A PARTICULAR PURPOSE ARE DISCLAIMED. IN NO
EVENT SHALL THE OpenSSL PROJECT OR ITS CONTRIBUTORS BE LIABLE FOR ANY DIRECT,
INDIRECT, INCIDENTAL, SPECIAL, EXEMPLARY, OR CONSEQUENTIAL DAMAGES (INCLUDING,
BUT NOT LIMITED TO, PROCUREMENT OF SUBSTITUTE GOODS OR SERVICES; LOSS OF USE,
DATA, OR PROFITS; OR BUSINESS INTERRUPTION) HOWEVER CAUSED AND ON ANY THEORY
OF LIABILITY, WHETHER IN CONTRACT, STRICT LIABILITY, OR TORT (INCLUDING NEGLIGENCE
OR OTHERWISE) ARISING IN ANY WAY OUT OF THE USE OF THIS SOFTWARE, EVEN IF ADVISED OF THE POSSIBILITY OF SUCH DAMAGE.
This product includes cryptographic software written by Eric Young (eay@cryptsoft.com). This product
includes software written by Tim Hudson (tjh@cryptsoft.com).
Original SSLeay
---------------------Copyright (C) 1995-1998 Eric Young (eay@cryptsoft.com) All rights reserved.
This package is an SSL implementation written by Eric Young (eay@cryptsoft.com).
The implementation was written so as to conform with Netscape's SSL.
This library is free for commercial and non-commercial use as long as the following conditions are ad-
hered to. The following conditions apply to all code found in this distribution, be it the RC4, RSA, lhash,
DES, etc., code; not just the SSL code. The SSL documentation included with this distribution is covered
by the same copyright terms except that the holder is Tim Hudson (tjh@cryptsoft.com).
Copyright remains Eric Young's, and as such any Copyright notices in the code are not to be removed. If
this package is used in a product, Eric Young should be given attribution as the author of the parts of the
library used. This can be in the form of a textual message at program startup or in documentation (online
or textual) provided with the package.
Redistribution and use in source and binary forms, with or without modification, are permitted provided
that the following conditions are met:
1. Redistributions of source code must retain the copyright notice, this list of conditions and the following
disclaimer.
2. Redistributions in binary form must reproduce the above copyright notice, this list of conditions and the
following disclaimer in the documentation and/or other materials provided with the distribution.
3. All advertising materials mentioning features or use of this software must display the following acknowledgement:
"This product includes cryptographic software written by Eric Young (eay@cryptsoft.com)" The word
'cryptographic' can be left out if the routines from the library being used are not cryptographic related :-).
4. If you include any Windows specific code (or a derivative thereof) from the apps directory (application
code) you must include an acknowledgement: "This product includes software written by Tim Hudson
(tjh@cryptsoft.com)"
THIS SOFTWARE IS PROVIDED BY ERIC YOUNG ``AS IS'' AND ANY EXPRESS OR IMPLIED WARRANTIES, INCLUDING, BUT NOT LIMITED TO, THE IMPLIED WARRANTIES OF MERCHANTABILITY
AND FITNESS FOR A PARTICULAR PURPOSE ARE DISCLAIMED. IN NO EVENT SHALL THE AUTHOR OR CONTRIBUTORS BE LIABLE FOR ANY DIRECT, INDIRECT, INCIDENTAL, SPECIAL, EXEMPLARY, OR CONSEQUENTIAL DAMAGES (INCLUDING, BUT NOT LIMITED TO, PROCUREMENT
OF SUBSTITUTE GOODS OR SERVICES; LOSS OF USE, DATA, OR PROFITS; OR BUSINESS INTERRUPTION) HOWEVER CAUSED AND ON ANY THEORY OF LIABILITY, WHETHER IN CON-
74
Page 75

MoRoS GPRS 1.3 Licenses
TRACT, STRICT LIABILITY, OR TORT (INCLUDING NEGLIGENCE OR OTHERWISE) ARISING IN
ANY WAY OUT OF THE USE OF THIS SOFTWARE, EVEN IF ADVISED OF THE POSSIBILITY OF
SUCH DAMAGE.
The licence and distribution terms for any publically available version or derivative of this code cannot be
changed. i.e. this code cannot simply be copied and put under another distribution licence [including the
GNU Public Licence.]
75
Page 76

International Safety Instructions MoRoS GPRS 1.3
15 International Safety Instructions
The following Siemens safety instructions in English apply to the used GSM/GPRS
engine TC63. Following US FCC specifications, each device must have a sticker
15.1 Safety Precautions
with a note referring to the “FCC ID” attached.
The following safety precautions must be observed during all phases of the operation, usage, service or repair of any cellular terminal or mobile incorporating TC63.
Manufacturers of the cellular terminal are advised to convey the following safety information to users and operating personnel and to incorporate these guidelines into
all manuals supplied with the product. Failure to comply with these precautions violates safety standards of design, manufacture and intended use of the product. Siemens AG assumes no liability for customer’s failure to comply with these precautions.
When in a hospital or other health care facility, observe the restrictions on the use of
mobiles. Switch the cellular terminal or mobile off, if instructed to do so by the
guidelines posted in sensitive areas. Medical equipment may be sensitive to RF energy.
The operation of cardiac pacemakers, other implanted medical equipment and hearing aids can be affected by interference from cellular terminals or mobiles placed
close to the device. If in doubt about potential danger, contact the physician or the
manufacturer of the device to verify that the equipment is properly shielded. Pacemaker patients are advised to keep their hand-held mobile away from the pacemaker, while it is on.
Switch off the cellular terminal or mobile before boarding an aircraft. Make sure it
cannot be switched on inadvertently. The operation of wireless appliances in an aircraft is forbidden to prevent interference with communications systems. Failure to
observe these instructions may lead to the suspension or denial of cellular services to
the offender, legal action, or both.
Do not operate the cellular terminal or mobile in the presence of flammable gases or
fumes. Switch off the cellular terminal when you are near petrol stations, fuel depots, chemical plants or where blasting operations are in progress. Operation of any
electrical equipment in potentially explosive atmospheres can constitute a safety
hazard.
Your cellular terminal or mobile receives and transmits radio frequency energy while
switched on. Remember that interference can occur if it is used close to TV sets, radios, computers or inadequately shielded equipment. Follow any special regulations
and always switch off the cellular terminal or mobile wherever forbidden, or when
you suspect that it may cause interference or danger.
Road safety comes first! Do not use a hand-held cellular terminal or mobile when
driving a vehicle, unless it is securely mounted in a holder for speakerphone operation. Before making a call with a hand-held terminal or mobile, park the vehicle.
Speakerphones must be installed by qualified personnel. Faulty installation or operation can constitute a safety hazard.
76
Page 77

MoRoS GPRS 1.3 International Safety Instructions
IMPORTANT!
Cellular terminals or mobiles operate using radio signals and cellular networks. Because of this, connection cannot be guaranteed at all times under all conditions.
Therefore, you should never rely solely upon any wireless device for essential communications, for example emergency calls.
Remember, in order to make or receive calls, the cellular terminal or mobile must be
switched on and in a service area with adequate cellular signal strength.
Some networks do not allow for emergency calls if certain network services or phone
features are in use (e.g. lock functions, fixed dialing etc.). You may need to deactivate
those features before you can make an emergency call. Some networks require that a
valid SIM card be properly inserted in the cellular terminal or mobile.
15.2 Compliance with FCC Rules and Regulations
The FCC Equipment Authorization Certification for the TC63 reference application is
listed under the
FCC identifier QIPTC63
IC: 267W-TC63
granted to Siemens AG.
The TC63 reference application registered under the above identifier is certified to be
in accordance with the following Rules and Regulations of the Federal Communications (FCC).
Power listed is ERP for Part 22 and EIRP for Part 24
“This device contains GSM and GPRS Class12 functions in the 900 and
1800MHz Band which are not operational in U.S. Territories.
This device is to be used only for mobile and fixed applications. The antenna(s)
used for this transmitter must be installed to provide a separation distance of
at least 20cm from all persons and must not be co-located or operating in
conjunction with any other antenna or transmitter. Users and installers must
be provided with antenna installation instructions and transmitter operating
conditions for satisfying RF exposure compliance. Antennas used for this OEM
module must not exceed 8.4dBi gain (GSM 1900) and 2.9dBi (GSM 850) for
mobile and fixed operating configurations. This device is approved as a module to be installed in other devices.”
Manufacturers of mobile or fixed devices incorporating TC63 modules are advised
to include instructions according to above mentioned RF exposure statements in
their end product user manual.
Please note that changes or modifications not expressly approved by the party responsible for compliance could void the user’s authority to operate the equipment.
If the final product is not approved for use in U.S. territories the application manufacturer shall take care that the 850 MHz and 1900 MHz frequency bands be deactivated and that band settings be inaccessible to end users. If these demands are
not met (e.g. if the AT interface is accessible to end users), it is the responsibility of
the application manufacturer to always ensure that the application be FCC approved regardless of the country it is marketed in. The frequency bands can be set
using the command AT^SCFG="Radio/Band"[,<rbp>][, <rba>].
77
Page 78

International Safety Instructions MoRoS GPRS 1.3
The FCC label of the module must be visible from the outside. If not, the host device is required to bear a second label stating, “Contains FCC ID QIPTC63”.
78
Page 79

MoRoS GPRS 1.3 Tables and Diagrams
16 Tables and Diagrams
16.1 List of Tables
Table 1: Physical Features.................................................................................................................. 10
Table 2: Technological Features....................................................................................................... 11
Table 3: Description of the LEDs on the front panel of the device .......................................... 12
Table 4: Meaning of the LED displays ............................................................................................. 13
Table 5: Blinking code of the data/signal LED .............................................................................. 13
Table 6: Description of the functions and meaning of the control elements ...................... 14
Table 7: Description of the connections on the front panel of the device ............................ 15
Table 8: Description of the connections on the top of the device........................................... 16
Table 9: Description of the connections on the bottom of the device ................................... 17
Table 10: Description of the pin allocation of the Sub-D jack .................................................. 18
16.2 List of Diagrams
Figure 1: LEDs on the front panel.................................................................................................... 12
Figure 2: Connections on the front panel of the device............................................................. 15
Figure 3: Connections on the top of the device............................................................................ 16
Figure 4: Connections on the bottom of the device.................................................................... 17
Figure 5: 9-pin Sub-D jack at the device......................................................................................... 18
Figure 6: Web interface MoRoS GPRS 1.3 ...................................................................................... 30
Figure 7: Web interface MoRoS GPRS 1.3 - Menu "Basic settings", Page "Web interface" 30
Figure 8: Web interface MoRoS GPRS 1.3 - Menu "Basic settings", Page "IP addresses
(LAN)" ...................................................................................................................................................... 31
Figure 9: Web interface MoRoS GPRS 1.3 - Menu "Basic settings", Page "Serial Ethernet
gateway" ................................................................................................................................................ 31
Figure 10: Web interface MoRoS GPRS 1.3 - Menu "GSM/GPRS"............................................. 32
Figure 11: Web interface MoRoS GPRS 1.3 - Menu "DNS", Page "DNS".................................. 33
Figure 12: Web interface MoRoS GPRS 1.3 - Menu "DNS", Page "Dynamic DNS update".. 33
Figure 13: Web interface MoRoS GPRS 1.3 - Menu "Dial-in"..................................................... 34
Figure 14: Web interface MoRoS GPRS 1.3 - Menu "Dial-out".................................................. 35
Figure 15: Web interface MoRoS GPRS 1.3 - Menu "Port forwarding" ................................... 36
Figure 16: Web interface MoRoS GPRS 1.3 - Menu "Inputs", Page "Status inputs" ............. 36
Figure 17: Web interface MoRoS GPRS 1.3 - Menu "Inputs", Page "Dial-out"....................... 37
Figure 18: Web interface MoRoS GPRS 1.3 - Menu "Inputs", Page "SMS dispatch"............. 37
Figure 19: Web interface MoRoS GPRS 1.3 - Menu "Outputs".................................................. 38
Figure 20: Web interface MoRoS GPRS 1.3 - Menu "System", Page "System data" ............. 38
Figure 21: Web interface MoRoS GPRS 1.3 - Menu "System", Page "Time" ........................... 39
Figure 22: Web interface MoRoS GPRS 1.3 - Menu "System", Page "Reset" .......................... 39
79
Page 80

Tables and Diagrams MoRoS GPRS 1.3
Figure 23: Web interface MoRoS GPRS 1.3 - Menu "System", Page "Firmware or
configuration update" ........................................................................................................................ 39
Figure 24 Web interface MoRoS GPRS 1.3 - Menu "System", Page "Configuration
download".............................................................................................................................................. 39
Figure 25: Web interface MoRoS GPRS 1.3 - Menu "System", Page "Proxy".......................... 40
80
Page 81

MoRoS GPRS 1.3 Glossary
17 Glossary
This describes the most important terms and abbreviations of this manual.
AT command: Commands to devices such as modems to set up this device.
CHAP: Challenge Handshake Authentication Protocol; an authentication protocol
often used for -> PPP connections.
DHCP: Dynamic Host Configuration Protocol; DHCP servers can dynamically de-
sign an IP address and other parameters to DHCP clients on request.
Dial-in: MoRoS can be called via a dial-in connection and then create a connec-
tion to the LAN.
Dial-out: MoRoS can use a Dial-up to make calls and to perform Internet connec-
tions, for example.
Gateway: This is a machine that works like a -> Router. In contrast to the router, a
gateway can also route data packets from different hardware networks.
ISP: Internet Service Provider; an ISP can be called using a dial-up connection
(e.g. with an analogue modem or ISDN-TA). The ISP will then provide access to the Internet via this dial-up connection.
LAN: Local Area Network; a network of computers which are located relatively
close to each other.
MAC address: Media Access Control Address. A MAC is a part of an Ethernet interface.
Each Ethernet interface has a unique global number, the MAC address.
PAP: Password Authentication Protocol; an authentication protocol often used
for -> PPP connections.
PPP: Point to Point Protocol; a protocol, which connects two machines via a
serial line to enable the exchange of TCP/IP packets between those two
machines.
Router: This is a machine in a network, which is responsible for the incoming
data of a protocol to be forwarded to the planned destination or sub
network.
Switch: A device that can connect several machines with the Ethernet. In contrast
to a hub, a switch will "think” by itself, i.e. it can remember the MAC addresses connected to a port and directs the traffic more efficiently to the
individual ports.
URL: Uniform Resource Locator; this is the address used by a service to be
found in the web browser. In this manual, an URL is mostly entered as the
IP address of the MoRoS.
WAN: Wide Area Network; a network consisting of computers, which are located
far away from each other.
81
Page 82

82
 Loading...