

Vdo dayton VRM 6200, MS 6200 User Manual

VRM 6200
English
Français
Deutsch
Owner’s manual and mounting instruction
Mode d’emploi et manuel d’installation
Bedienungs- und Einbauanleitung
Gebruiksaanwijzing en inbouwhandleiding
Istruzioni d’uso e d’installazione
Betjeningsvejledning og monteringsanvisning
Nederlands
ItalianoDansk
A
+12V
[A2]
[A4]
[A6] [A8]
[A7]
B
RR FR FL RL

Contents
Contents
General information . . . . . . . . . . . . . . . . . . . . . . . . . . . . . . . . . . . . . . . . 4
Notes on operating instructions. . . . . . . . . . . . . . . . . . . . . . . . . . . . . . . . . 4
Safety instructions . . . . . . . . . . . . . . . . . . . . . . . . . . . . . . . . . . . . . . . . 4
Class 1 laser product . . . . . . . . . . . . . . . . . . . . . . . . . . . . . . . . . . . . . . . 4
Operation . . . . . . . . . . . . . . . . . . . . . . . . . . . . . . . . . . . . . . . . . . . . . . 5
Control elements. . . . . . . . . . . . . . . . . . . . . . . . . . . . . . . . . . . . . . . . . 5
Touchscreen . . . . . . . . . . . . . . . . . . . . . . . . . . . . . . . . . . . . . . . . . . . 6
SD card reader . . . . . . . . . . . . . . . . . . . . . . . . . . . . . . . . . . . . . . . . . . 6
Remote control for the rear zone . . . . . . . . . . . . . . . . . . . . . . . . . . . . . . . . 7
Switching on/off . . . . . . . . . . . . . . . . . . . . . . . . . . . . . . . . . . . . . . . . . 8
TFT monitor . . . . . . . . . . . . . . . . . . . . . . . . . . . . . . . . . . . . . . . . . . . 8
Adjusting the volume . . . . . . . . . . . . . . . . . . . . . . . . . . . . . . . . . . . . . . 9
Main menu . . . . . . . . . . . . . . . . . . . . . . . . . . . . . . . . . . . . . . . . . . . . 9
Video during driving . . . . . . . . . . . . . . . . . . . . . . . . . . . . . . . . . . . . . . 10
Reversing camera . . . . . . . . . . . . . . . . . . . . . . . . . . . . . . . . . . . . . . . . 10
Sound settings . . . . . . . . . . . . . . . . . . . . . . . . . . . . . . . . . . . . . . . . . 10
Rear zone operation . . . . . . . . . . . . . . . . . . . . . . . . . . . . . . . . . . . . . . 11
Radio menu . . . . . . . . . . . . . . . . . . . . . . . . . . . . . . . . . . . . . . . . . . . 12
DVD player . . . . . . . . . . . . . . . . . . . . . . . . . . . . . . . . . . . . . . . . . . . 15
CD audio playback . . . . . . . . . . . . . . . . . . . . . . . . . . . . . . . . . . . . . . . 20
MP3/WMA playback . . . . . . . . . . . . . . . . . . . . . . . . . . . . . . . . . . . . . . 21
iPod playback . . . . . . . . . . . . . . . . . . . . . . . . . . . . . . . . . . . . . . . . . . 22
Displaying JPEG images. . . . . . . . . . . . . . . . . . . . . . . . . . . . . . . . . . . . . 23
Hands-free mode with Bluetooth . . . . . . . . . . . . . . . . . . . . . . . . . . . . . . . 24
Navigation . . . . . . . . . . . . . . . . . . . . . . . . . . . . . . . . . . . . . . . . . . . 25
Settings . . . . . . . . . . . . . . . . . . . . . . . . . . . . . . . . . . . . . . . . . . . . . . 26
SETUP menu. . . . . . . . . . . . . . . . . . . . . . . . . . . . . . . . . . . . . . . . . . . 26
DVD setup menu . . . . . . . . . . . . . . . . . . . . . . . . . . . . . . . . . . . . . . . . 27
Troubleshooting. . . . . . . . . . . . . . . . . . . . . . . . . . . . . . . . . . . . . . . . . . 29
Specifications . . . . . . . . . . . . . . . . . . . . . . . . . . . . . . . . . . . . . . . . . . . 30
Maintenance and care . . . . . . . . . . . . . . . . . . . . . . . . . . . . . . . . . . . . .30
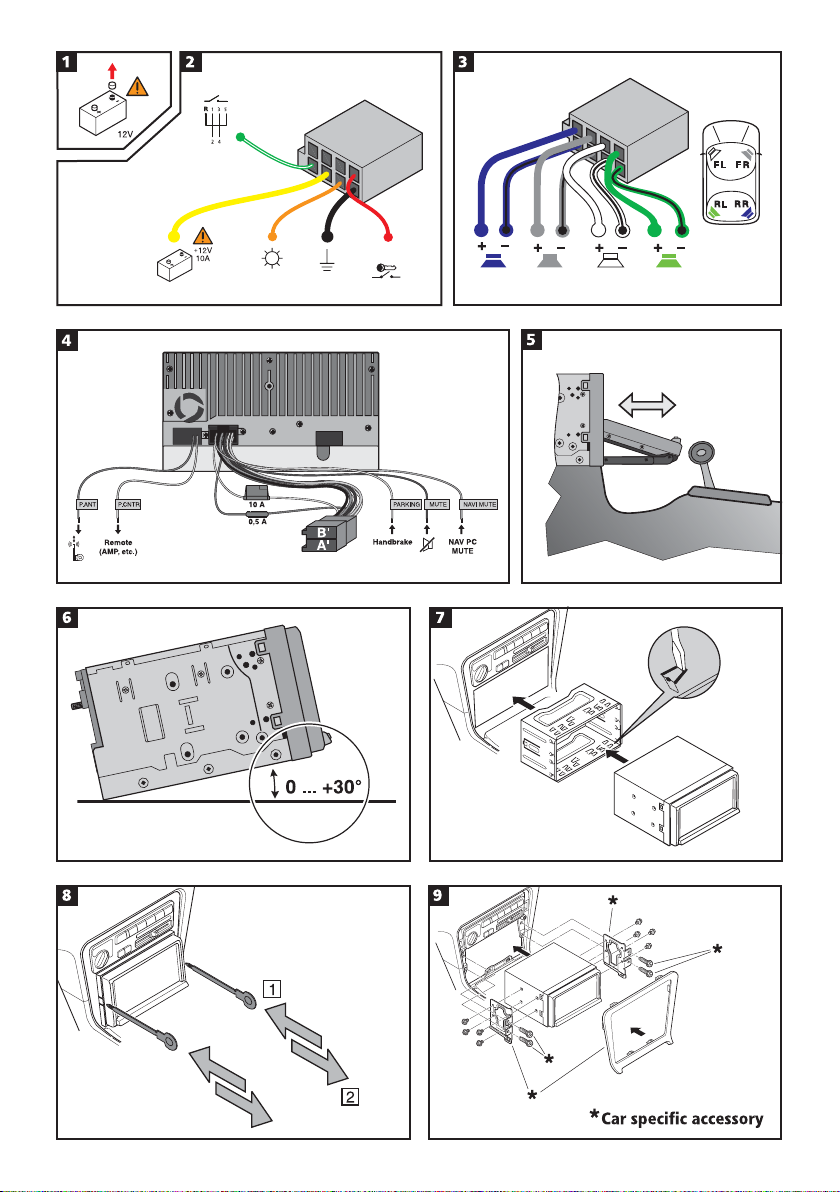
Installation instructions . . . . . . . . . . . . . . . . . . . . . . . . . . . . . . . . . . . . . . 31
IMPORTANT INFORMATION . . . . . . . . . . . . . . . . . . . . . . . . . . . . . . . . . . 31
Taking safety precautions . . . . . . . . . . . . . . . . . . . . . . . . . . . . . . . . . . . 31
Making the electrical connections . . . . . . . . . . . . . . . . . . . . . . . . . . . . . . . 32
Installing the unit. . . . . . . . . . . . . . . . . . . . . . . . . . . . . . . . . . . . . . . . 34
Connecting the unit . . . . . . . . . . . . . . . . . . . . . . . . . . . . . . . . . . . . . .34
3
English

4
Please read this information carefully and follow all the instructions outlined below.
This will ensure reliable operation and durability of your unit.
Keep the packaging and operating instructions in a safe place in order to pass them on to a
subsequent owner in the event of selling the unit at a later date.
General information
Notes on operating instructions
The following reading aids are used to simplify these operating instructions:
asks you to perform an action.
☞
shows the unit’s reaction.
:
provides extra info.
✎
identifies a list.
❑
Safety instructions and warnings contain important information for safe use of the unit.
A
Failure to observe this information may result in material damage or personal injury. Therefore,
please observe this information with particular care.
Safety instructions
Make all inputs via the remote control only when the vehicle is stationary, or have the pas
A
senger make them. Otherwise, you may endanger the occupants and other road users.
Please make certain that all persons using your multimedia system have access to this manual, and
A
that they read the instructions and suggestions concerning system operation prior to use.
Only look at the monitor if it is safe to do so. Find a suitable place to stop should you need to
A
look at the screen for a longer period of time.
A
For safety reasons, the driver should not watch television or operate the multimedia system
while driving. Please note that it is illegal in certain countries to watch or to operate the television
when driving.
A
When setting the volume, please make sure that traffic noises (horns, sirens, emergency vehi
cles, etc.) are still audible.
-
-
Class 1 laser product
A
CAUTION: Any inappropriate use of the device may ex
pose the user to invisible laser rays which exceed the limits
for Class 1 laser products.
A
Do not attempt to open or repair the device yourself.
This work should be performed by an authorised service
agent.
-
CLASS 1
LASER PRODUCT
Operation
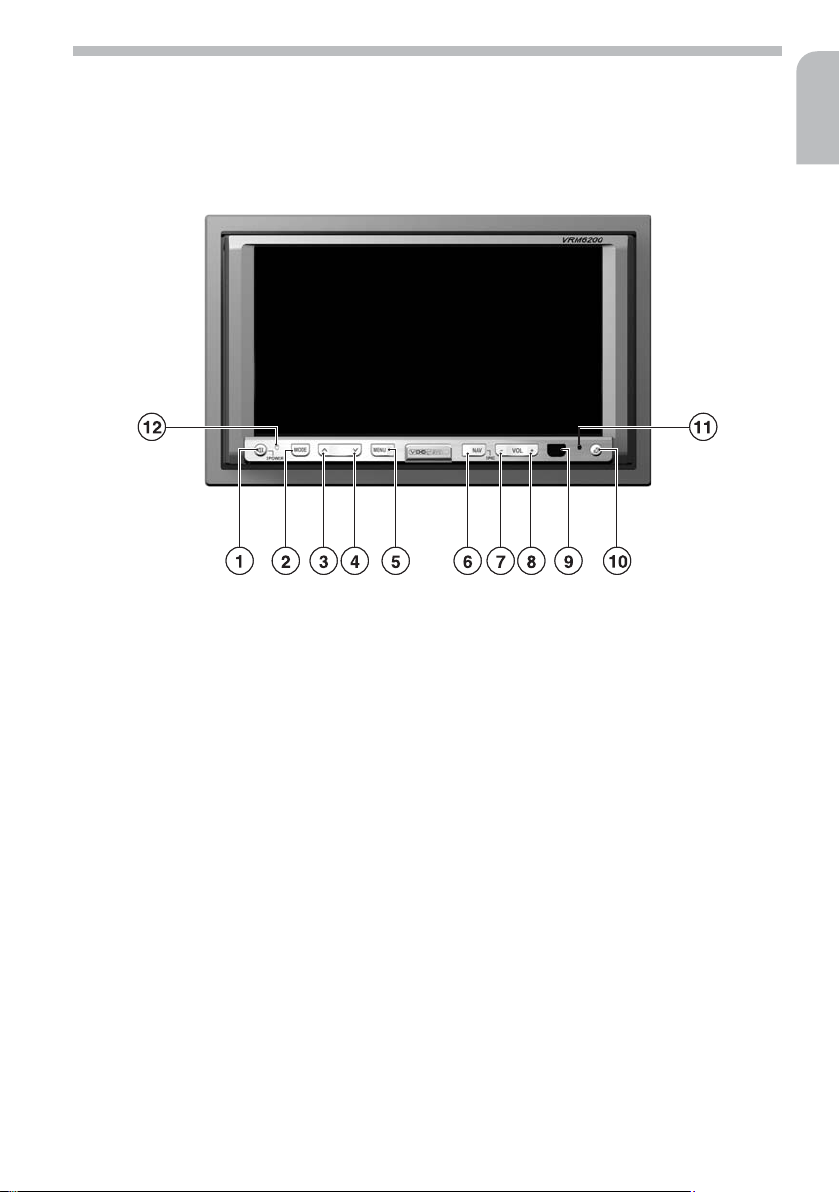
Control elements
The functions of the VRM 6200 can be accessed using the buttons on the TFT monitor or
directly via the touchscreen. In addition, the functions for the rear zone can be controlled
using the supplied remote control when there is a rear monitor connected.
Control elements on the TFT monitor
■
5
English
1. l / POWER . . . . Muting on/off: Press briefly when the unit is switched on.
2. MODE . . . . . . . . . Source switching
3. j . . . . . . . . . . . . Next station/title/menu item
4. k . . . . . . . . . . . . Previous station/title/menu item
5. MENU . . . . . . . . . Call up main menu.
6. NAV . . . . . . . . . . . Switch to navigation system (if connected).
7. VOL – . . . . . . . . . Reduce volume
8. VOL + . . . . . . . . . Increase volume
9. . . . . . . . . . . . . . . Infrared receiver
10. F . . . . . . . . . . . . Press briefly: Open/close monitor fully.
11. . . . . . . . . . . . . . . Microphone for the Bluetooth
12. RESET . . . . . . . . . Unit reset: Press using a pointed object.
Switch on unit: Press briefly when the unit is switched off.
Switch off unit: Press and hold when the unit is switched on.
Press and hold: Swivel monitor until the desired viewing angle is reached.
®
hands-free unit
6
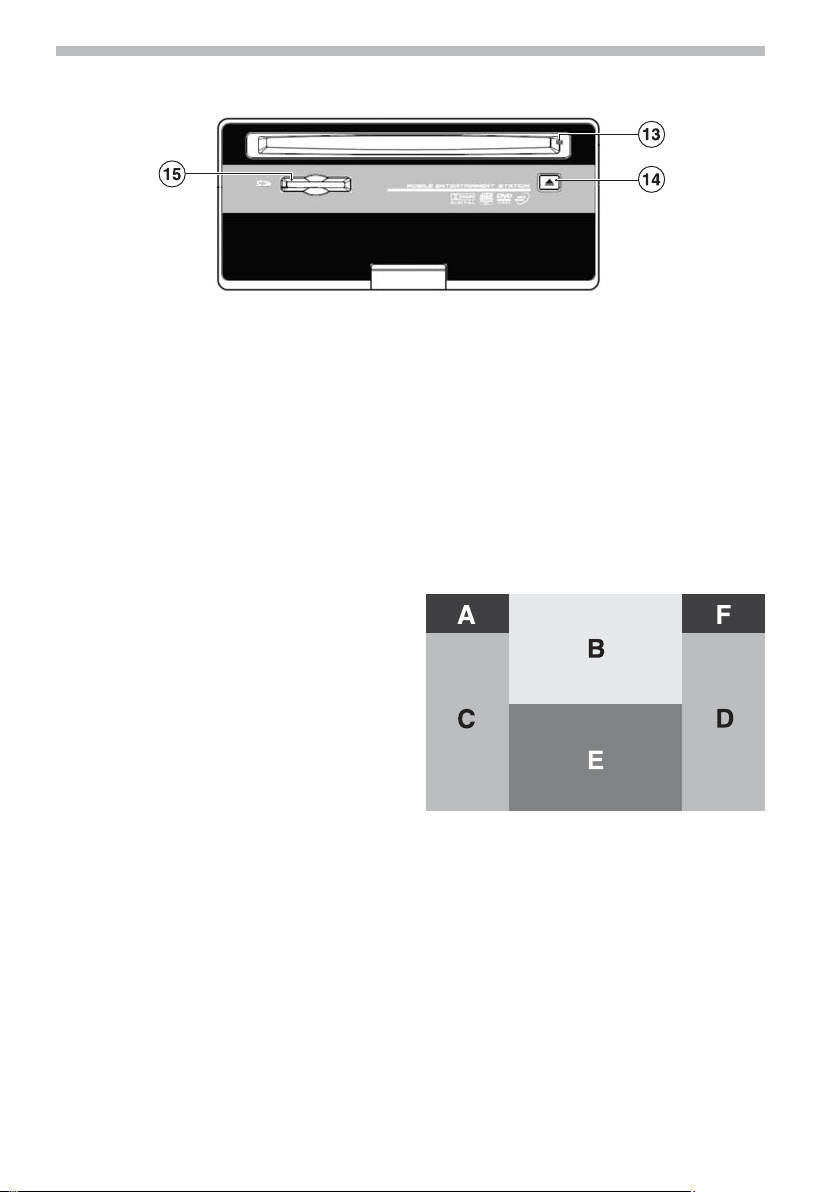
Control elements on the front of the unit
■
Operation
13. . . . . . . . . . . . . . . Disc indicator: Lights up red when a disc is inserted.
14. e . . . . . . . . . . . . . Load/eject disc.
15. . . . . . . . . . . . . . . SD card slot
Lights up green when there is no disc inserted.
Touchscreen
The VRM 6200 is equipped with a touch-sensitive screen. Many of the unit functions can be
controlled using the touchscreen.
■ Function areas
This section describes the function areas of the touchscreen for DVD and VCD playback, display of JPEG images, etc.
A . . . . . . . . . Back to main menu (MAIN)
B . . . . . . . . . Displays current playback infor-
C . . . . . . . . . Select previous chapter/image
D . . . . . . . . . Select next chapter/image
E . . . . . . . . . Display of on-screen control ele
F . . . . . . . . . During DVD/VCD playback: Dis
mation
ments (depending on operating
mode)
-
plays the ‘GOTO’ menu directly.
SD card reader
■
Switching to SD card
The built-in SD card reader can be used to play MP3 and WMA audio files. JPEG images can
also be displayed on the monitor (see “Displaying JPEG images”).
Insert an SD card in the SD card reader.
☞
Press the MODE button on the TFT monitor repeatedly until “SD” is displayed in the upper
☞
section of the screen.
Instructions for using the SD card menu can be found under “MP3/WMA playback”.
✎
Operation
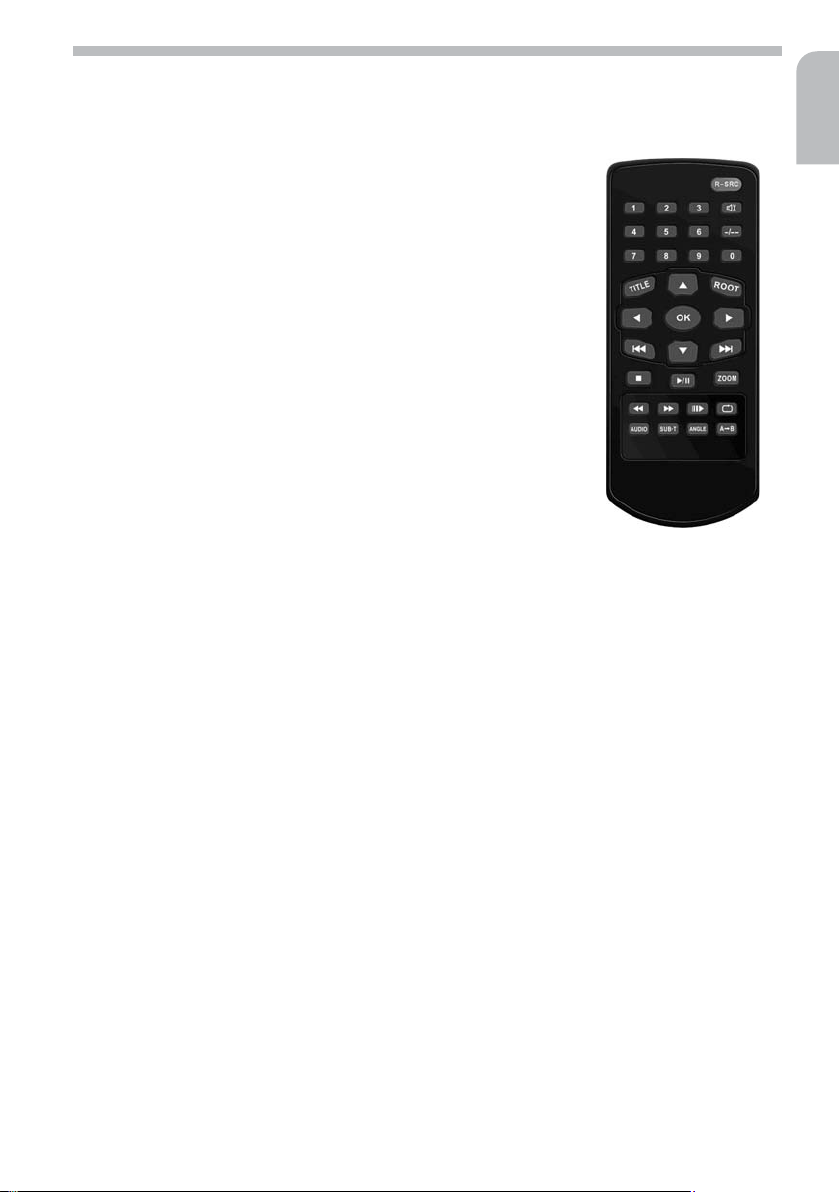
Remote control for the rear zone
If there is a rear monitor connected to the multimedia system, the passengers in the rear of
the vehicle can control the rear zone functions using the remote control.
R-SRC . . . . . Activate/deactivate rear zone and select playback
source for the rear monitor
0 ... 9 . . . . . . Number keys: Direct access to title/chapter/track
l . . . . . . . . Muting on/off
-/-- . . . . . . . . GOTO function for jumping directly to a specific
title/chapter or to a specified time during DVD/VCD
playback.
TITLE. . . . . . . Show DVD title menu.
ROOT . . . . . . DVD: Show DVD main menu.
VCD: Activate/deactivate PBC.
OK . . . . . . . . Start/pause playback /
Confirm selection.
4, 6, 8, 2 . Direction keys: Move cursor left/right/up/down
x . . . . . . . DVD: Next chapter;
VCD/CD/MP3: Next title
JPEG: Next image
y . . . . . . . DVD: Previous chapter;
VCD/CD/MP3: Previous title
JPEG: Previous image
S . . . . . . . . Stop playback
P . . . . . . . . Start/pause playback
ZOOM . . . . . . Set zoom mode
< . . . . . . . . Fast rewind
> . . . . . . . . Fast forward
K . . . . . . . Slow motion on/off
T . . . . . . . Switch on REPEAT and select mode
AUDIO . . . . . Select audio language (depends on DVD)
SUB-T . . . . . . Select language for subtitles (depends on DVD)
ANGLE . . . . . Select camera angle (depends on DVD)
A . . . . . . . Set start and stop markers and then repeat sequence from A to B
7
English

8
Operation
Switching on/off
To switch on the unit:
Press the l POWER button on the TFT monitor.
☞
To switch off the unit:
Press and hold down the l POWER button on the TFT monitor, or
☞
switch off the ignition.
☞
TFT monitor
Opening and closing the monitor
■
Press the F button on the TFT monitor to open or close the monitor.
☞
Setting the viewing angle
■
The viewing angle of the TFT monitor can be set as follows:
Press and hold down the F button until the desired viewing angle is attained,
☞
or:
set the desired viewing angle using the “Screen Tilt” option in the setup menu. See
☞
“Setup menu”.
If the Auto Open function is activated (“AUTO OPEN ON”), the monitor returns to the
✎
vertical position after being switched off. The viewing angle originally selected is restored
after the monitor is switched on again.
■ Auto Open function
The Auto Open function lets you automatically control the opening and closing of the TFT
monitor when switching the unit on/off.
For information on these settings, see “Setup menu”.
■ Monitor mechanism
If there is an object blocking the path of the TFT monitor as it is extending, a protective circuit automatically stops the monitor from extending any further.
In this case, press the F button on the TFT monitor or switch the unit off and then on
☞
again.
■
Setting the display parameters (OSD menu)
Press and hold down the NAV button on the TFT monitor until the OSD menu for the display
☞
parameters appears.
Select the desired parameter using the 8 or 2 buttons on the remote control.
☞
Set the values using the VOL– and VOL+ buttons on the TFT monitor or the 4 or 6 buttons
☞
on the remote control.
For the radio, DVD, SD card reader, iPod, Bluetooth and NAV sources, only the “BRIGHT”
✎
parameter (brightness) can be set.
Operation
Adjusting the volume
Press the VOL– or VOL+ button on the TFT monitor to adjust the volume.
☞
If the button is held down, the volume changes continuously.
✎
When setting the volume, please make sure that traffic noises (horns, sirens, emergency vehi
A
cles, etc.) are still audible.
MUTE function
Press the l button on the TFT monitor.
☞
This mutes the unit.
:
Press the l button again to deactivate the mute function.
☞
The mute function can also be deactivated by adjusting the volume with the VOL–- or VOL+
✎
buttons.
If the muting signal of a mobile phone is connected to the unit, the unit is automatically
✎
muted during a telephone call.
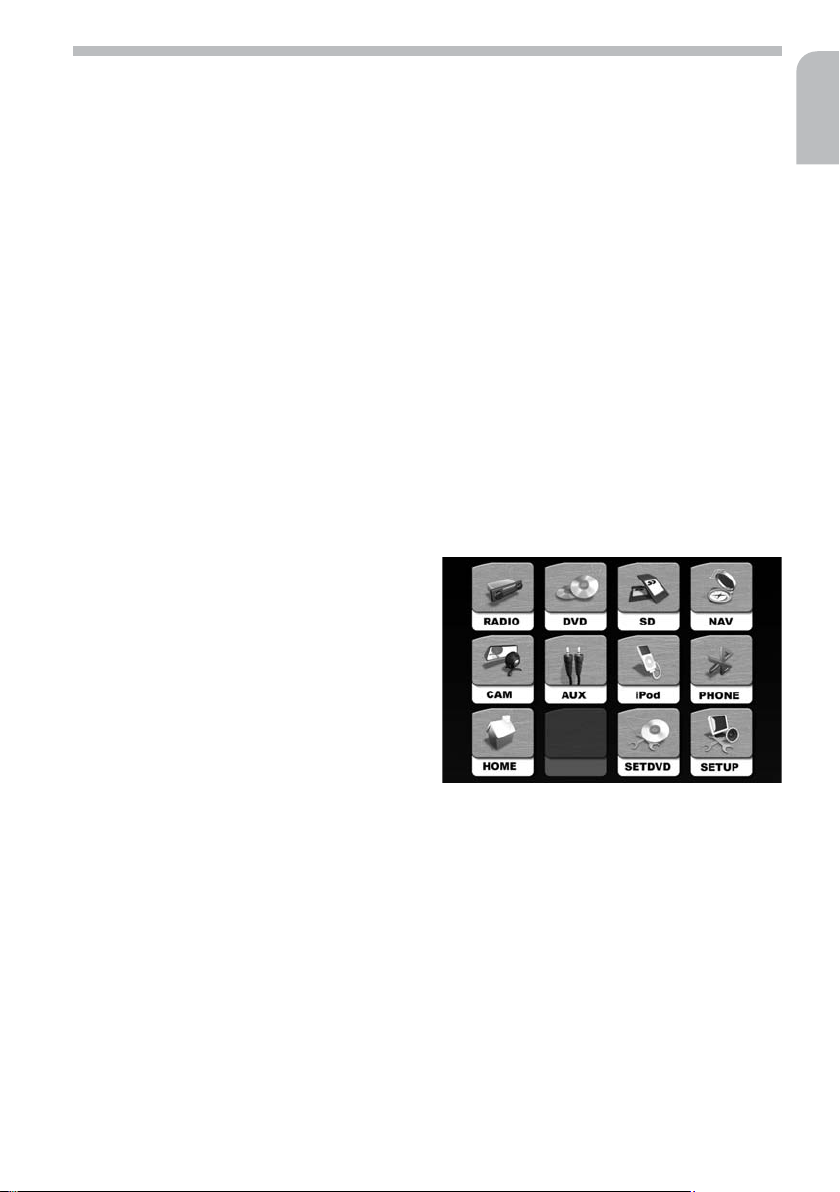
Main menu
The main menu can be called up as follows:
Touch area A (top left) on the touchscreen, or
☞
press the MENU button on the TFT monitor.
☞
The following options are available in the main menu:
RADIO . . . . . Switches to radio mode and calls
DVD . . . . . . Switches to DVD/VCD/CD play-
SD . . . . . . . . Calls up the SD card menu
NAV* . . . . . Switches to navigation system
CAM* . . . . . Switches to reversing camera
AUX* . . . . . Switches to AUX-IN input mode
iPod* . . . . . Calls up the iPod menu
PHONE*. . . . Calls up the Bluetooth menu
HOME . . . . . Back to previous menu
SETDVD . . . Calls up the DVD menu
SETUP . . . . . Calls up the setup menu
up the radio menu
back
mode
9
English
-
* Can only be selected when a suitable unit is connected.
■
Alternative source selection
Press the MODE button on the TFT monitor repeatedly until the desired source is displayed
☞
in the upper section of the screen.
The selected source is displayed on the TFT monitor.
:
Sources that are not available or not connected cannot be selected.
✎
10
Operation
Video during driving
For reasons of driving safety, video images are only displayed on the TFT monitor of the mul
timedia system following selection of one of the video sources (“AUX-IN”, “DVD”, etc.)
when the hand brake is applied.
Reversing camera
If a reversing camera is connected to the multimedia system, the image from the reversing
camera appears on the TFT monitor when reverse gear is engaged.
Sound settings
Press and hold down the MENU button on the TFT monitor until the audio menu is dis
☞
played, or
on the touchscreen, touch the area in which the audio settings are displayed (e.g. in the
☞
RADIO, CDDA, MP3 or iPod menus).
On the touchscreen, touch the buttons next to the desired setting (EQ, BASS, TREBLE, etc.)
☞
to change the value.
You can also choose the desired setting by pressing the MENU button on the TFT monitor
✎
several times.
You then set the values using the VOL– and VOL+ buttons on the TFT monitor.
Touch the 8 symbol on the touchscreen to quit the menu again.
☞
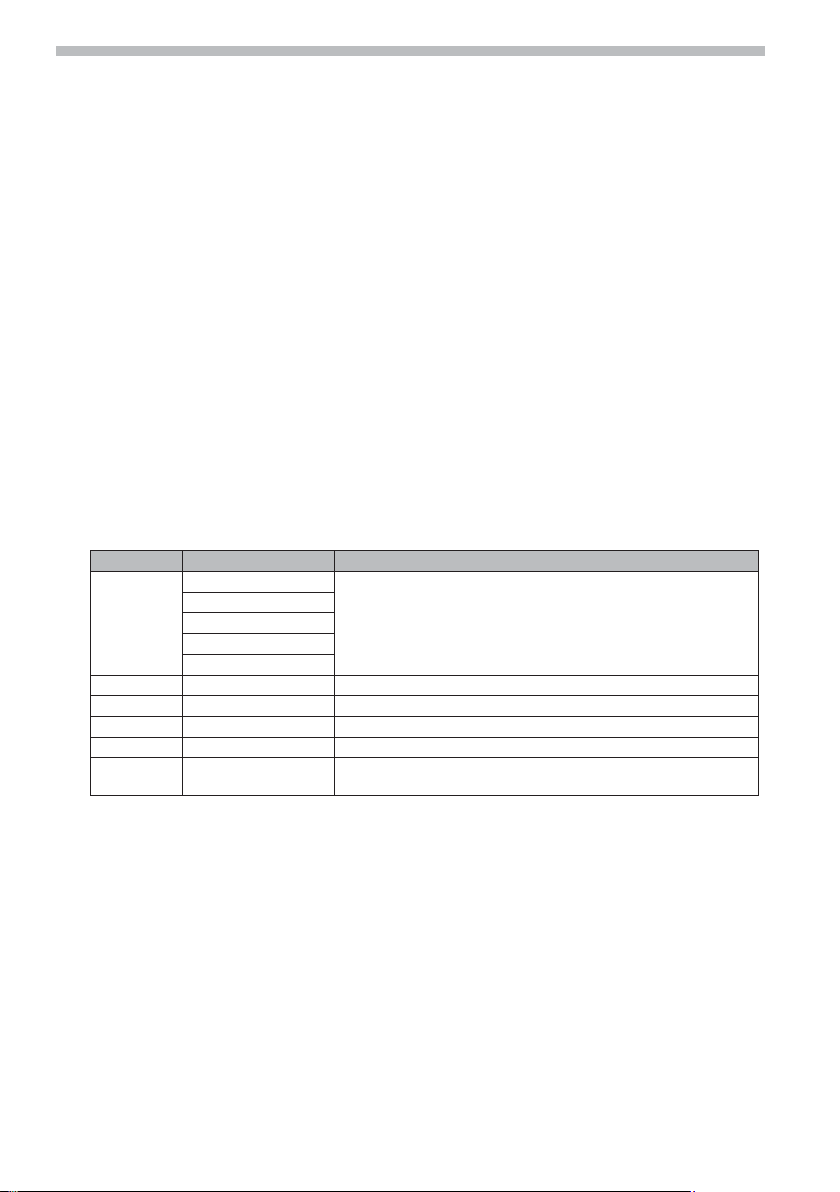
Function Adjustment range Description
EQ User Selection of a preset sound style.
Flat
Jazz
Pop
Classic
BASS -7 ... +7 For setting the bass
TREBLE -7 ... +7 For setting the treble
FADE -9 ... +9 For setting the volume fade front <-> rear
BAL -9 ... +9 For setting the volume balance left <-> right
LOUD off, levels 1-4 For switching the loudness function on/off and setting the
Bass and treble settings can only be made if the “User” option is set under “EQ”.
✎
When the LOUDNESS function is activated, “LOUD” is displayed on the screen along with
✎
the selected level.
Under “User” you can set user-specific values for BASS and
TREBLE.
intensity
-
-

Operation
11
Rear zone operation
The multimedia system allows two different sources to be played simultaneously if there is
an additional monitor connected to the AV output for the rear zone. The rear-seat passengers
can control the functions for the rear zone using the supplied remote control. See “Remote
control” for information on these functions.
Calling up the rear zone menu and selecting the source
■
Touch the headphone symbol (1) in one of
☞
the setup menus to call up the rear zone
menu.
Select the source to be displayed on the
☞
rear monitor.
Or:
Press the R-SRC button on the remote
☞
control to select the desired source.
Or:
Press and hold down the MODE button on
☞
the TFT monitor to activate the rear zone.
Switching off the rear zone
■
Touch the OFF symbol (2) in the rear zone menu, or
☞
press and hold down the MODE button on the TFT monitor.
☞
■ Quitting the rear zone menu
Touch the 8 symbol (3) in the rear zone menu.
■ Restrictions with multi-zone operation
The DVD and SD card sources cannot be selected simultaneously for the front unit and the
rear zone, as the front and rear zones share the same multimedia processor. In this case, the
multimedia system always switches to the same source (DVD or SD) for both zones.
When the DVD or SD card source is selected for the rear zone, the front unit switches to a
simplified menu display.
English
 Loading...