


 Loading...
Installation Guide for
RoboSHOT USB Enterprise-Class PTZ
Conferencing Cameras
Including RoboSHOT 12 USB, RoboSHOT 12EUSB, and RoboSHOT 30EUSB
Document 411-0000-31 Rev B
April 2019

Contents
Overview |
3 |
What's in this Guide |
3 |
Features |
3 |
Unpacking the Camera |
4 |
A Quick Look at the Camera |
6 |
Front of the Camera |
6 |
Back of the Camera – RoboSHOT 12 USB |
7 |
Back of the Camera – RoboSHOT 12E USB and RoboSHOT 30E USB |
8 |
Installation |
9 |
Don’t Void Your Warranty! |
9 |
Before You Install the Camera |
9 |
Installing the Wall Mount |
10 |
About Ceiling-Mounted Cameras |
10 |
Video Resolution Setting |
11 |
Camera Behavior Settings – RoboSHOT 12 USB |
12 |
RS-232 Serial Communication Settings |
13 |
RS-232 Connector Pin-Out |
13 |
Cabling Notes |
14 |
Connecting the Camera |
15 |
Basic Connections – RoboSHOT 12 USB |
15 |
Basic Connections – RoboSHOT 12E USB or RoboSHOT 30E USB |
16 |
Installing the Camera |
17 |
Powering Up the Camera |
18 |
Status Light |
18 |
Next Steps |
18 |
Operation, Storage, and Care |
18 |
Compliance and Conformity Statements – RoboSHOT 12E USB and RoboSHOT 30E USB |
19 |
FCC Part 15 Compliance |
19 |
ICES-003 Compliance |
19 |
European Compliance |
20 |
Compliance and Conformity Statements – RoboSHOT 12 USB |
21 |
FCC Part 15 Compliance |
21 |
ICES-003 Compliance |
21 |
European Compliance |
22 |
Warranty and Return Policy |
23 |
Photo Credits |
27 |
Index |
28 |
ii

Overview
This guide covers the RoboSHOT™ USB enterprise-class PTZ conferencing cameras:
nRoboSHOT 12 USB, North America – 999-9920-000 (silver and black)
nRoboSHOT 12 USB, Europe and UK – 999-9920-001 (silver and black)
nRoboSHOT 12 USB, Australia and New Zealand – 999-9920-009 (silver and black)
nRoboSHOT 12E USB, North America – 999-99200-000 (black), 999-99200-000W (white)
nRoboSHOT 12E USB, Europe and UK – 999-99200-001 (black), 999-99200-001W (white)
nRoboSHOT 12E USB, Australia and New Zealand – 999-99200-009 (black), 999-99200-009W (white)
nRoboSHOT 30E USB, North America – 999-99230-000 (black), 999-99230-000W (white)
nRoboSHOT 30E USB, Europe and UK – 999-99230-001 (black), 999-99230-001W (white)
nRoboSHOT 30E USB, Australia and New Zealand – 999-99230-009 (black), 999-99230-009W (white)
Some models may be unavailable at this time.
What's in this Guide
This guide covers:
nUnpacking the camera
nTips for a successful installation
nInstructions for installing the camera mount
nInformation on connecting and mounting the camera
nCamera power-on
Complete product information is available in the Complete Manual for RoboSHOT USB EnterpriseClass PTZ Conferencing Cameras.
Features
nRoboSHOT 12USB andRoboSHOT 12E USB: 12x optical zoom – perfect forhuddlerooms andsmall tomedium conferencerooms
RoboSHOT 30E USB: 30x optical zoom – best formedium tolargevenues suchas houses of worship andlecturetheaters
nRoboSHOT 12USB: Exmor® 1/2.8typeimagesensor
RoboSHOT 12E USB andRoboSHOT 30E USB: ExmorR™back-lit 1/2.5type, high-speed, low-noise imagesensor
nSimultaneous uncompressedUSB 3.0andH.264IP streaming(RTSP orRTMP)
nSelectableIP stream resolution; USB stream resolutionauto-negotiatedwithconferencingclient
nHDMI videooutput forlocal display
nSmooth, silent direct-drivemotors forprecisepanandtilt movements at upto120°persecond
nTri-Synchronous MotionTM simultaneous-arrival pan/tilt/zoom movement betweenpresets
nUniversal VideoClass (UVC)drivers supportedinWindows®, Mac® OS, andLinux operatingsystems, compatiblewithmost UC conferencingapplications
nPresenter-friendly IR remotecontrol
nIntegration-ready Telnet andserial RS-232control
nFull administrativecontrol viawebinterface; managethecameraremotely whilemonitoringthestream separately
3
InstallationGuidefor RoboSHOT USBEnterprise-ClassPTZ ConferencingCameras
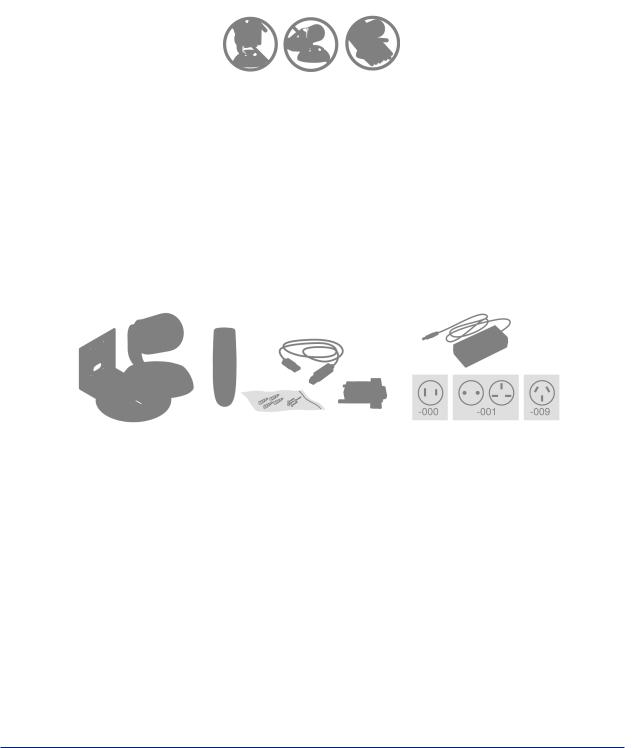
Unpacking the Camera
Make sure you have received all the items you expected.
Caution
Always support the camera's body when lifting or moving it. Lifting the camera by its head or mounting arm will damage it.
Note
Some models may be unavailable at this time.
RoboSHOT 12 USB, North America – 999-9920-000 (silver and black) RoboSHOT 12 USB, Europe/UK – 999-9920-001 (silver and black) RoboSHOT 12 USB, Australia/New Zealand – 999-9920-009 (silver and black)
nRoboSHOT 12 USB Camera
nVaddio IR Remote Commander
n12 VDC, 3.0 Amp switching power supply with AC cord set(s)
nThin Profile Wall Mount with mounting hardware, black
nEZCamera RS-232 control adapter, part number 998-1001-232
nUSB 3.0 Type A to Type B cable, 6 ft. (1.8m)
nQuick Start Guide
4

InstallationGuidefor RoboSHOT USBEnterprise-ClassPTZ ConferencingCameras
RoboSHOT 12E USB, North America – 999-99200-000 (black); 999-99200-000W (white) RoboSHOT 12E USB, Europe/UK – 999-99200-001 (black); 999-99200-001W (white) RoboSHOT 12E USB, Australia/New Zealand – 999-99200-009 (black); 999-99200-009W (white)
nRoboSHOT 12E USB camera, black or white
nThin Profile Wall Mount with mounting hardware, black or white, depending on camera color
nVaddioIR Remote Commander
nPoE+ mid-span power injector with AC cord set(s)
nEZCamera RS-232 control adapter, part number 998-1001-232
nUSB 3.0 Type A to Type B cable, 6 ft. (1.8m)
nQuick Start Guide
RoboSHOT 30E USB, North America – 999-99230-000 (black); 999-99230-000W (white) RoboSHOT 30E USB, Europe/UK – 999-99230-001 (black); 999-99230-001W (white) RoboSHOT 30E USB, Australia/New Zealand – 999-99230-009 (black); 999-99230-009W (white)
nRoboSHOT 30E USB camera, black or white
nThin Profile Wall Mount with mounting hardware, black or white, depending on camera color
nVaddio IR Remote Commander
nPoE+ mid-span power injector with AC cord set(s)
nEZCamera RS-232 control adapter, part number 998-1001-232
nUSB 3.0 Type A to Type B cable, 6 ft. (1.8m)
nQuick Start Guide
Download manuals, dimensional drawings, and other information from www.vaddio.com/support.
5

InstallationGuidefor RoboSHOT USBEnterprise-ClassPTZ ConferencingCameras
AQuick Look at the Camera
This section covers the physical features of the camera.
Front of the Camera
This photograph shows a RoboSHOT 12 USB camera. The RoboSHOT 12E USB and RoboSHOT 30E USB are similar in appearance, and are available in either black or white.
Camera and Zoom Lens:
nRoboSHOT 12 USB: 12x optical zoom (12x in Super-Wide mode, 10x in normal mode). Recommended for small to medium sized conference rooms.
nRoboSHOT 12E USB: 12x optical zoom; recommended for small to medium sized conference rooms.
nRoboSHOT 30E USB: 30x optical zoom; recommended for larger rooms.
IR sensor: Receives signals from the IR remote. Make sure there's nothing directly in front of the camera base, and point the remote at the camera.
Status light: The multi-colored LED indicates the camera's current state.
6

InstallationGuidefor RoboSHOT USBEnterprise-ClassPTZ ConferencingCameras
Back of the Camera – RoboSHOT 12 USB
n12 VDC 3.0 A – EIAJ-04 jack. Connect only the power supply shipped with the camera or approved replacement 12 VDC, 3A power supply. This connection is not needed if you connect to the network using a mid-span PoE+ power injector.
nNetwork PoE+ – RJ-45 connector. Connect to the network for network access for IP streaming and camera control via web interface or Telnet. Optionally connect to the network using a mid-span PoE+ power injector for power, streaming, and control.
nUSB 3.0 – USB type B connector. Connect to a computer for use with soft conferencing applications. Provides uncompressed USB 3.0 stream.
nHDMI video select switch – Select the appropriate HDMI video output resolution for the near-end video display. USB streaming resolution is auto-negotiated; IP streaming resolution is set in the administrative web interface.
nCamera Settings – DIP switches to set camera behaviors such as IR frequency, image flip (camera is invertible), normal or Super-Wide mode, and baud rate. See CameraBehaviorSettings.
nHDMI – HDMI video output connector. Connect to the near-end video display.
nRS-232 – RJ-45 connector. Optionally connect to a controller to manage the camera using a modified VISCA protocol.
Note
A label on the bottom of the camera lists the rotary and DIP switch settings.
7

InstallationGuidefor RoboSHOT USBEnterprise-ClassPTZ ConferencingCameras
Back of the Camera – RoboSHOT 12E USB and RoboSHOT 30E USB
nNetwork PoE+ – RJ-45 connector. Connect to the network via mid-span PoE+ power injector. Provides power and network access for IP streaming and camera control via web interface or Telnet.
nUSB 3.0 – USB type B connector. Connect to a computer for use with soft conferencing applications. Provides uncompressed USB 3.0 stream.
nHDMI video select switch – Select the appropriate HDMI video output resolution for the near-end video display. USB streaming resolution is auto-negotiated; IP streaming resolution is set in the administrative web interface.
nHDMI output – HDMI video output connector. Connect to the near-end video display.
nRS-232 port – RJ-45 connector. Optionally connect to a controller to manage the camera using a modified VISCA protocol.
Note
A label on the bottom of the camera lists the rotary switch settings.
8
InstallationGuidefor RoboSHOT USBEnterprise-ClassPTZ ConferencingCameras
Installation
This section covers:
nSelecting the location for the camera
nInstalling the mount
nRS-232 cable pin-out and communication settings
nSettings for the physical switches on the camera
nConnection diagrams
nConnecting and mounting the camera
And a required safety note here:
Note
PoE type networks connected to this equipment are for intra-building use only and should not be connected to lines that run outside of the building in which this product is located.
Don’t Void Your Warranty!
Caution
Always support the camera's body when lifting or moving it. Lifting the camera by its head or mounting arm will damage it.
Caution
This product is for indoor use. Do not install it outdoors or in a humid environment without the appropriate protective enclosure. Do not allow it to come into contact with any liquid.
For RoboSHOT 12 USB: Use the power supply included with the camera or recommended for use with it. Always check the output voltage listed on the power supply label, as power supplies for different products may look nearly identical. Using the wrong power supply will void the warranty, possibly causing unsafe operating conditions and damage to the product.
Do not install or operate this product if it has been dropped, damaged, or exposed to liquids. If any of these things happen, return it to Vaddio for safety and functional testing.
Before You Install the Camera
Things to keep in mind when deciding where to install the camera:
nConsider camera viewing angles, lighting conditions, line-of-sight obstructions, and in-wall obstructions wherethecamerais tobemounted.
nEnsurethat thecamerabody canmovefreely andwill normally point away from theceilingandlights. Thecamerawill not perform well if it is pointedtowardalight sourcesuchas alight fixtureorwindow.
nIf theIR RemoteCommanderwill beused, ensurethat nothingblocks theIR lens inthecamera's base.
9
Loading...