


UNIVERSAL
REMOTE
URC-L-1870
8in1
EN

Contents |
|
|
Introduction ----------------------------------------------------------------------------------- |
3 |
|
Battery Installation ------------------------------------------------------------------------ |
4 |
|
Function Keys ----------------------------------------------------------------------------------- |
5 |
|
Set up Your Remote Control |
|
|
Set-up by Brand and Code ------------------------------------------------------------------------------- |
6 |
|
Set-up by Auto Search ----------------------------------------------------------------------------------- |
6 |
|
Learn Function |
|
|
A. Learn a Command-------------------------------------------------------------------------------------------- |
8 |
|
B. Delete a Command------------------------------------------------------------------------------------------- |
9 |
|
C. Delete All Commands in a Device----------------------------------------------------------------------- |
10 |
|
D. Delete All Commands--------------------------------------------------------------------------------------- |
11 |
|
Other Set-up |
|
|
A. |
Set up Clock ----------------------------------------------------------------------------------------------- |
11 |
B. |
Volume lock ------------------------------------------------------------------------------------------------ |
12 |
C. |
Device lock ------------------------------------------------------------------------------------------------- |
13 |
D. |
Background Adjust --------------------------------------------------------------------------------------- |
14 |
E. |
Contrast Adjust--------------------------------------------------------------------------------------------- |
15 |
F. |
All off function----------------------------------------------------------------------------------------------- |
15 |
G. |
Show view--------------------------------------------------------------------------------------------------- |
15 |
H. |
Macro function---------------------------------------------------------------------------------------------- |
15 |
I. |
Delete Macro function------------------------------------------------------------------------------------ |
17 |
J. |
Device Alternation----------------------------------------------------------------------------------------- |
17 |
Clear All ----------------------------------------------------------------------------------------------- |
18 |
|
Need Help? ------------------------------------------------------------------------------------------ |
19 |
|
Device Brand Code List |
|
|
TV |
------------------------------------------------------------------------------------------------------ |
|
VCR ------------------------------------------------------------------------------------------------------ |
|
|
CBL/SAT ------------------------------------------------------------------------------------------------------ |
|
|
CD |
------------------------------------------------------------------------------------------------------- |
|
DVD ------------------------------------------------------------------------------------------------------ |
|
|
TAPE ------------------------------------------------------------------------------------------------------- |
|
|
TUNER ------------------------------------------------------------------------------------------------------- |
|
|
AUX ------------------------------------------------------------------------------------------------------ |
|
|
……………………………………………………………………………………………………2

Introduction
Thank you for purchasing the URC20-F15DL universal remote control. It has 8 direct device buttons with LCD screen and features the largest infrared code library on the European market. Based on our (patent pending) creative design, it has the easiest and fastest way to “set up directly” by brand name and code no. through the LCD screen even without the manual book.
The URC20-F15DL universal remote control covers almost all brands of Televisions (TV), DVD-players (DVD), DVR-players (DVD), DVB (CBL/SAT), (digital) Satellite receivers (CBL/SAT), Cable box (CBL/SAT), Video Recorders (VCR), Tuner receivers (TUNER), Tape receivers (TAPE), CD-players (CD), Audio amplifiers (AMP) and other Audio (AUX). It can operate all main functions of your devices.
You can also use “Auto Search” to scan the code library in case of you can’t find your device brand in the list.
Besides, URC20-F15 can “learn” a new code from an original remote control to supplement the codes in case of code shortage.
“Show View” function scans all channels for you to have a program quick view. “All off” function can switch off all your devices with one button.
“Macro” function makes several sequent operations with one button for your home theater
“Volume lock” can fix VOL+/VOLbutton to control only the amplifier for your home theater.
“Device lock” can prevent the device from being reset until you unlock it. URC20-F15 has backlight for LCD screen and separate device backlight to show you
the currently working device.
“Low battery indication” reminds you when needed to replace the batteries. “Device Alternation” allows you to set up any device to AUX. E.g. you can set up a
TV code to AUX and then you will have 2 TV device keys.
All the set up data will be stored in “back up memory” permanently, you don’t need to be worry about data loss when you replace battery.
The F15DL also has “real time clock” to show your time and AM or PM.
All above mentioned functions show you the URC20-F15D is a advanced, very powerful LCD universal remote control. Please read this user manual carefully prior to using you new LCD remote control.
Code Assignment
Bank |
for Device |
Initial code |
Total of codes |
|
|
|
|
TV |
TV |
042 |
372 |
|
|
|
|
VCR |
VCR |
115 |
170 |
|
|
|
|
CBL/SAT |
Satellite, Cable, DVB |
045 |
323 |
|
|
|
|
DVD |
DVD, DVR |
006 |
127 |
|
|
|
|
CD |
CD |
098 |
120 |
|
|
|
|
TUNER |
TUNER |
075 |
103 |
|
|
|
|
TAPE |
TAPE |
083 |
133 |
|
|
|
|
AUX |
AMP, LD |
030 |
178 |
|
|
|
|
……………………………………………………………………………………………………3

Battery Installation
This remote control needs 2 AAA batteries to work with. Fresh Alkaline batteries are strongly recommended. To install the batteries:
1.Turn the remote over, and lift the battery cover off.
2.Insert the batteries, matching the batteries to the (+) and (-) marks inside the battery compartment.
3.Slide the battery cover back into place.
Notice 1. Whenever the batteries needed replacement, the LCD remote will indicate this on the screen with a message. Please replace the new batteries now.
2.All data you have set up into the unit will be stored in memory even you take off the batteries, but you may need to set the clock again.
Securityand disposal references for batteries:
-Batteries are not included in the delivery!
-Keep children away from batteries. If batteries are being swallowed accidentally, consult a doctor immediately!
-Never bypass batteries.
-Please pay attention to the right polarity (+) and (-) of the batteries! Always replace both batteries at once; do not use old and new batteries together or batteries of different types at the same time.
-Do not open batteries, deform or recharge them!
-There is a risk of injury, in case of leaking batteries!
-Do not throw batteries into the fire.
-Danger of exploding is existent.
-Take exhausted batteries out of the device immediately.
-Take the batteries out of the device, if you do not use it for a long period of time.
With reference to environmental protection:
Packing materials are raw materials and can be used again.
Keep packing materials separate. For more information about recycling contact your local administration.
Old devices do not belong in the domestic refuse!
Dispose of old devices responsibly, and contribute to environmental protection. Your local administration will inform you about collecting points and opening times.
Old batteries do not belong in the domestic refuse!
Dispose of old batteries accordingly and contribute to environmental protection. Your local administration will inform you about collecting points and opening times.
Maintenance
Protect the remote control from dirt. Do not use solvents or other aggressive detergents. Clean the case with a damp cloth and dry it well afterwards.
Note:
In case of leaking batteries, wipe the battery compartment with a cloth. Do not insert new batteries straightaway.
……………………………………………………………………………………………………4

Function Keys
For you start to set up the remote control or show you the status in LCD
The number keys operate the same as on your original remote control, and maybe also used for entering device codes when set up.
Works like the TV/Video key on your original TV remote, select the input for TV.
Works like the Enter on your original remote.
Let you select the device you |
|
|
|
|
want to control. |
For TV Fastext. |
|
|
|
|
Television video, TV and text |
|||
|
mixed, |
Teletext |
mode, Page |
|
|
hold |
|
|
|
|
REW (fast reverse), PLAY |
|||
|
(operate your DVD,CD ect.), |
|||
|
FFWD (fast forward), REC |
|||
Works like the Channel Up and Down |
(Record), Stop (Terminate your |
|||
keys on your original remote control. |
operation), PAUSE (Pause the |
|||
|
function and standby) |
|
||
Turns the device on or off. |
|
|
|
|
|
Learning |
function |
to |
import |
Control the volume like the Volume |
instructions from other |
remote |
||
control |
|
|
|
|
Up and Down on your original remote |
|
|
|
|
|
|
|
|
|
control. |
|
|
|
|
Works like the UP, DOWN, LEFT, RIGHT, |
Scans all channel for your |
|||
OK key on your original remote control for |
program quick view. |
|
||
menu function. But during set up mode they |
|
|
|
|
are used for cursor, confirm and exit to |
Switches off all your devices |
|||
program your remote control only. |
with one button only. |
|
||
Works like the Menu or OSD (on-screen display) |
|
|
|
|
or Memory key on your original remote control |
|
|
|
|
Mute the sound
Let you make sequent operations for you home theater.
Ends the entry
……………………………………………………………………………………………………5
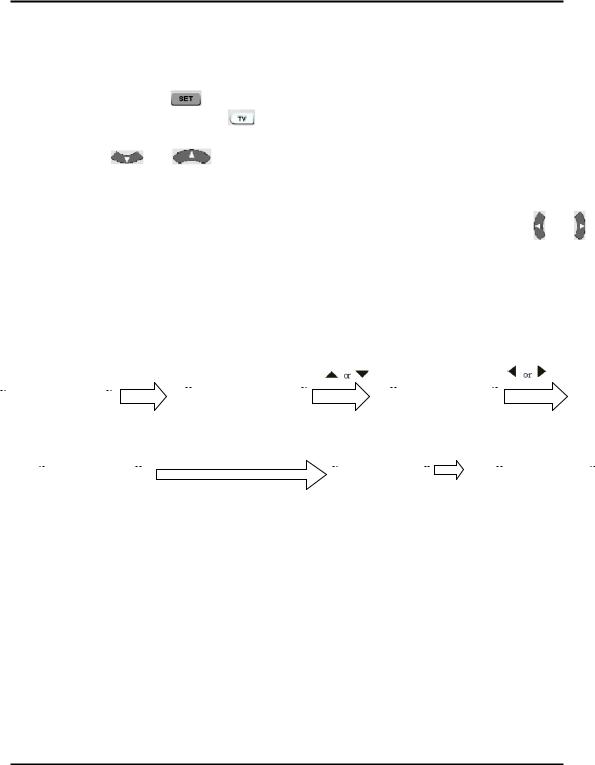
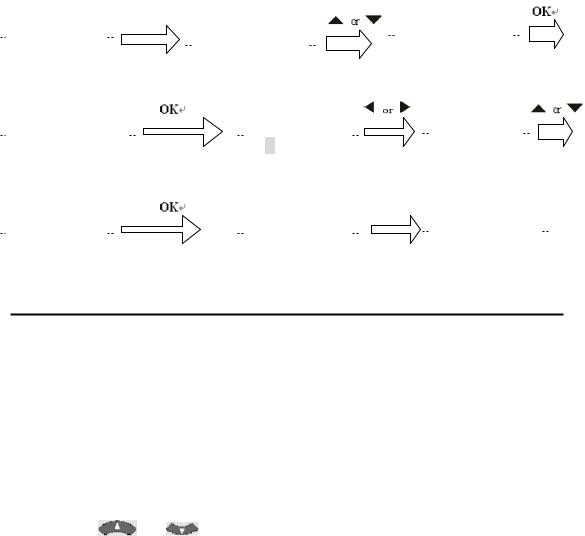
Direct Set Up (by Brand and Code)
This revolutionary method lets you directly choose the brand and code in LCD screen, simply set up your remote control even without manual book.
1.Turn on the device (e.g. your television set) you would like to operate. If it is a VCR,
please insert a tape. |
|
|
|
2.Press and hold the |
key on your remote control. Then press (simultaneously) |
||
a desired device keys (e.g. |
) |
||
3.Then release them, the brand will be displayed on the screen. |
|||
4.Press the |
or |
key to select the brand of your device (e.g. your TV |
|
brand: Philips) |
|
|
|
5.Check the function of the keys. If none of the keys of your new remote control can
work, or most of the keys work improperly, please try other code by the |
or |
key to choose, until all basic functions operated properly. |
|
6.If you are satisfied with the code, just press the  key to save it. LCD shows
“SUCCESS”and then finishes the set up.
|
|
|
|
|
|
|
|
|
SET+TV |
|
|
|
|
|
|
|
|
|
|
|
|
|
|
|
|
||
|
T V |
|
|
|
|
A C C E N T |
|
|
|
|
|
P H I L I P S |
|
|
|
|
|
|
|||||||||
|
|
|
|
|
|
|
|
|
|
|
|
|
|
|
|
|
|
|
|||||||||
|
|
|
|
|
|
|
|
|
|
|
|
|
|
|
|
|
|
|
|
|
|
|
|||||
|
|
|
|
|
|
|
|
|
|
|
|
|
023 |
|
|
|
|
|
0 0 1 |
|
|
|
|
|
|
||
|
|
|
|
|
|
|
|
|
|
|
|
|
|
|
|
|
|
|
|
|
|
|
|
||||
|
1 0 |
: |
4 5 |
A M |
|
|
|
|
|
|
|
|
|
|
|
|
|
|
|
|
|
||||||
|
|
|
|
|
|
|
|
|
|
|
|
|
|
|
|
|
|
|
|
|
|
||||||
|
|
|
|
|
|
|
|
|
|
|
|
|
|
|
|
|
|
|
|
|
|
|
|
|
|
|
|
|
|
|
|
|
|
|
|
|
|
|
i f s a t i s f i e d , p r e s s O K |
|
|
|
|
|
|
|
|
|
|
|
|
||||
|
|
|
|
|
|
|
|
|
|
|
|
|
|
|
|
|
|
|
|
|
|
|
|||||
|
|
|
|
P H I L I P S |
|
|
|
S U C C E S S |
|
|
|
|
T V 0 1 6 |
|
|||||||||||||
|
|
|
|
|
|
|
|
|
|
|
|
|
|
|
|
||||||||||||
|
|
|
|
|
|
|
|
|
|
|
|
|
|
|
|
|
|
|
|
|
|
|
|
||||
|
|
|
0 1 6 |
|
|
|
|
|
|
|
|
|
|
|
|
|
|
|
|
|
|
11 |
: |
4 5 A M |
|
||
|
|
|
|
|
|
|
|
|
|
|
|
|
|
|
|
|
|
|
|
|
|
|
|
|
|
|
|
Remark:
1.To terminate set up, please press .any device (e.g.  ) key or
  key.
key.
2.You must point your remote control to the device that you want to control when you test the keys.
3.


 ,
,  only used to program your new remote control
during set up. You can’t control your device as normal menu function at this moment until you finish set up.
4. If the device is locked, you must first unlock the device then set up.
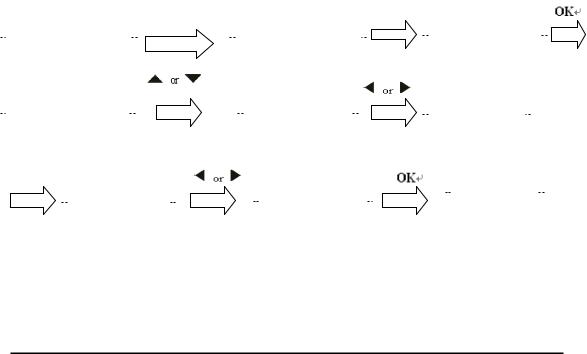
Set-up by Auto Search
In case of the set-up by Brand and Code failed or you can’t find the brand name in your remote control screen, you may use the Auto Search to find the correct code to operate your device.
1.Turn on the device (e.g. television) you would like to operate. If it is a VCR, please insert a tape.
……………………………………………………………………………………………………6
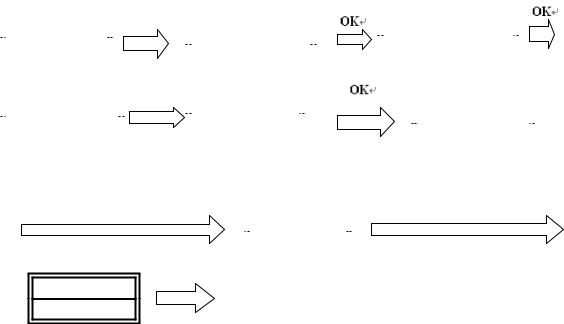
2.Press the  key on your new remote control for more than 3 seconds. Then release it.
3.Press the  or
or  keys to select to “CODE SETUP” in LCD menu, and press the
  key.
key.
4.The screen shows “DEV SEARCH” in the LCD menu, press the  key to
confirm. Then press your desired device key (e.g.  key) and then press
the  key to start the Auto Search (you must point your remote control to
your device during the search).
5.See if the device reacts or not, once the device reacts, press any key to stop the search.
6.Test if most of keys work good or not. If most keys work not good enough, please repeat step 4~5.
7.If you satisfy the reactive code, please press the  key to save it and LCD shows “SUCCESS” then show “DEV SEARCH”. You can press device key (e.g.
 ) again to finish set up or use
  or
or  to select other set up.
|
|
|
|
|
|
|
|
|
SET 3S |
|
|
|
|
|
|
|
|
|
|
|
|
|
|
|
|
T V |
0 1 0 |
|
|
|
|
C O D E S E T U P |
|
|
D E V S E A R C H |
|
|
|
|||||||||
|
|
|
|
|
|
|
|
|
|
|
|
||||||||||||
|
|
|
|
|
|
|
|
|
|
|
|
|
|
|
|
|
|
|
|||||
|
|
|
|
|
|
|
|
|
|
|
|
||||||||||||
|
11 |
: |
4 5 |
A M |
|
|
|
|
|
|
|
|
|
|
|
|
|
|
|
|
|
|
|
|
|
|
|
|
|
|
|
|
DVD |
|
|
|
|
|
|
|
|
|
|
|
|
|
|
|
|
|
|
|
|
|
|
|
|
|
|
|
|
|
|
|
|
|
|
|
|
|
|
|
|
|
|
|
|
|
|
|
|
|
|
|
|
|
|
|
|
|
|
|
|
|
|
|
|
|
|
|
|
|
|
|
|
|
|
|
|
|
|
|
|
|
|
|
|
|
|
|
|
T V |
|
0 1 0 |
|
|
|
|
D V D |
0 1 3 |
|
|
|
|
|
|
|
|
|
|
|
||
|
|
|
|
|
|
|
|
|
|
|
|
|
|
D V D 0 1 4 |
|
|
|||||||
|
|
|
|
|
|
|
|
|
|
|
|
|
|
||||||||||
|
|
|
|
|
|
|
|
|
|
|
|
|
|
|
|
|
|
|
|
|
|
||
|
|
|
|
|
|
|
|
|
|
|
|
|
|
|
|
|
|
|
|
|
|
||
|
|
|
|
|
|
|
|
|
|
|
|
|
|
|
|
|
|
|
|
||||
|
|
|
|
|
|
|
|
|
|
|
|
|
|
|
|
|
|
|
|
|
|
|
|
|
|
|
|
|
|
|
|
|
|
|
|
|
|
|
|
|
|
|
|
|
|
|
|
|
|
|
|
|
|
|
|
|
|
|
|
|
|
|
|
|
|
|
|
|
|
|
|
|
|
|
|
|
|
|
|
|
|
|
|
|
|
|
|
|
|
|
|
|
|
|
|
Press any key to stop the search |
|
|
check functions, if satisfied, press OK |
||
|
|
|
|
|
|
|
|
D VD |
0 3 5 |
|
|
|
|
|
|
|
|
|
|
|
|
|
|
|
|
|
|
|
|
S U C C E S S
Remark:
1.In case of you did not stop the search on time when device being reacted, you may press the  or
or  key to search back to find the passed code.
2.The keys of 

 ,
,  are only used to set-up your new remote control during the Auto Search, you can’t control your device for menu function at the moment until you finished set up.
……………………………………………………………………………………………………7
3.When remote control searches through all codes, the remote control will stop at the beginning code of the search.
4.If the device is locked, you must first unlock the device then set up.
Learn
The  function is used to supplement the preprogrammed code list. The standard
code list may provide most of functions needed, but you can add a small number of additional functions on your URC20-F15D. Or you can add a new code from a new original remote control which is shortage in the code list.
In learn mode, you must prepare a another original remote control where you will take codes from and add into your URC20-F15DL.
You can select “LEARN KEY”to learn commands, or “ DELETE KEY” to delete learnt commands, or choose “DELETE DEV” to delete all learnt commands under a device, or “DELETE ALL” to delete all learnt commands in the remote control.
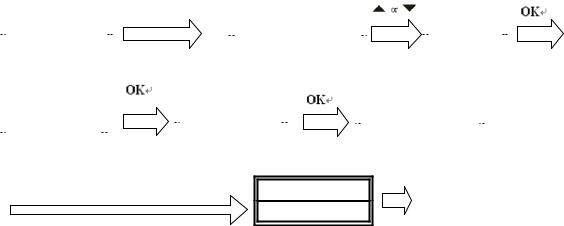
Learn a Command
1Press a device key (e.g.  key) where you want to learn into.
2Press and hold the  key for more than 3 seconds, and then release it.
3Scroll or
or  key to “LEARNING”, then press the
  key.
key.
4Scroll or
or  key to “LEARN KEY”, then press the
  key. The LCD
shows “SELECT KEY”.
5 Select a (target) key where you want to learn into (e.g. Power key). The LCD shows “WAITING”, it is waiting for your source IR signal. (If you don’t send a IR signal in 30s, LCD will show “FAILED” and then show “SELECT KEY” again.).
6 Point the transmitter of the original (source) remote control to the receiver window of URC20-F15DL by approximately 30mm apart. Refer to below drawing.
7 Press and hold a source key (e.g. Power key) from the original remote control until the LCD display “SUCCESS”. If LCD shows “FA IL E D ”, please repeat steps 4-6.
8.Repeat steps 4-6 to learn more other keys.
|
|
|
|
|
S E T 3 S |
C O D E S E T U P |
|
|
|
|
|
|
|
|
||||
|
T V |
0 1 0 |
|
|
L E A R N I N G |
|
|
|
||||||||||
|
|
|
|
|
|
|
|
|
||||||||||
|
|
|
|
|
|
|
|
|
|
|
|
|
|
|
|
|
|
|
|
|
|
|
|
|
|
|
|
|
|
|
|
|
|
|
|
|
|
|
11 |
: |
4 5 |
|
|
|
|
|
|
|
|
|
|
|
|
|
|
|
|
|
|
|
|
|
|
|
|
|
|
|
|
|
|
|
|
|
|
|
|
|
|
|
|
|
|
|
|
|
|
|
||||||
|
|
|
|
|
|
|
|
|
|
Press a target key e.g. Power |
|
|
|
|
|
|||
|
|
|
|
|
|
|
|
|
|
|
WA I T T T I N G |
|
||||||
|
L E A R N K E Y |
|
|
S E L EC T K E Y |
|
|
|
|||||||||||
|
|
|
|
|
|
|
|
|
|
|
|
|
||||||
|
|
|
|
|
|
|
|
|
|
|
|
|
|
|
||||
|
|
|
|
|
|
|
|
|
|
|
|
|||||||
|
|
|
|
|
|
|
|
|
|
|
|
|
|
|
|
|
|
|
|
|
|
|
|
|
|
|
|
|
|
|
|
|
|
|
|
|
|
|
|
|
|
|
|
|
|
|
|
|
|
|
|
|
|
|
|
|
|
|
|
|
|
|
|
|
|
|
|
|
|
|
|
|
|
|
|
|
|
|
|
|
|
|
|
|
|
|
|
|
|
|
|
|
|
|
……………………………………………………………………………………………………8
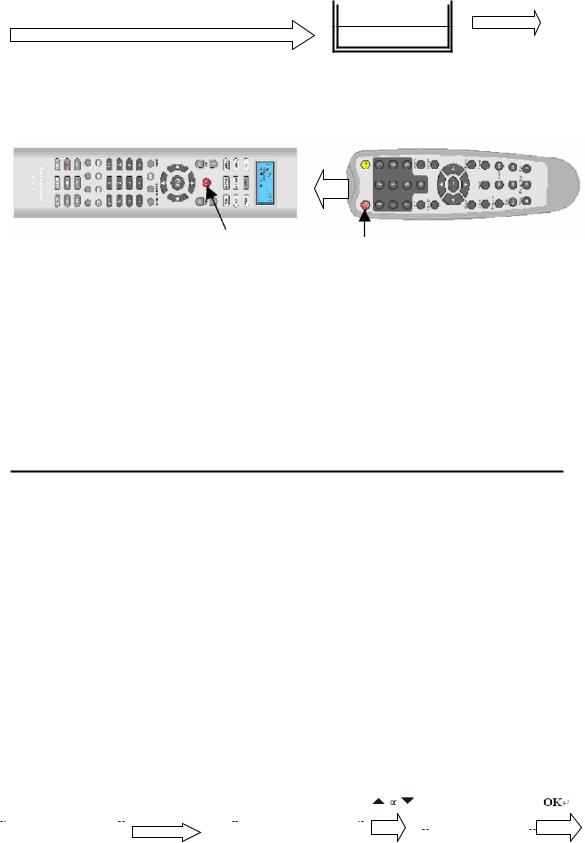
Press a source key from original remote, e.g. Power  SUCCESS
Receiver window |
|
Original Remote Control |
|
|
|
Target Key |
Source Key |
Remark:
1.A selected target key can be multi learnt from different sources keys, URC20-F15D will store the final learnt signal only.
2.All usual function keys can be learnt except ALL OFF, Show View and Macro etc..
3.Some code form may not be learn by this remote control.
4.You can learn about 100 keys totally for 8 device key.
5.You may press any device key (e.g.  key) to finish the learn operation. But you can’t quit when LCD shows “WAITING” until it’s ended.
Delete a Command
If you like to delete a learnt command, you can follow the steps as below:
1.Press the device key (e.g.  key) where you like to delete command from.
2.Press and hold the  key for more than 3 seconds, and then release it.
3.Scroll or
or  key to “LEARNING”, then press the
  key and the LCD shows “LEARN KEY”.
4.Scroll or
or  key to “DELETE KEY ” and then press the
  key.
key.
5.Press the key on URC20-F15DL that you want to delete, the LCD shows “SURE
DELET”and then press the  key to confirm, the LCD will show “SUCCESS”.
6.Repeat step 4 to delete other key if you want.
7.Press a device key (e.g.  key) to quit the delete operation when all desired commands are deleted.
|
|
|
|
|
|
S E T 3 S |
|
|
|
|
|
|
|
|
T V |
0 1 0 |
|
|
C O D E S E T U P |
|
|
|
L E A R N I N G |
|
|||
|
|
|
|
|
|
|
|
||||||
|
|
|
|
|
|
|
|
|
|
|
|
|
|
|
11 |
: |
4 5 |
|
|
|
|
|
|
||||
|
|
|
|
|
|
|
|
|
|
|
|||
|
|
|
|
|
|
|
|
|
|
|
|||
|
|
|
|
|
|
|
|
|
|
|
|
|
|
|
|
|
|
|
|
|
|
|
|
|
|
|
|
|
|
|
|
|
|
|
|
|
|
|
|
|
|
|
|
|
|
|
|
|
|
|
|
|
|
|
|
……………………………………………………………………………………………………9

L E A R N K E Y |
D E L E T E K E Y |
S E L E C T K E Y |
|
Select a key you want to delete |
|
|
|
d |
|
|
|
delete next key |
|
SURE DELET |
|
|
SUCCESS |
|
|||
|
|
|
|
|
|
|
||
|
|
|
|
|
|
|
|
|
|
|
|
|
|
|
|
|
|
|
|
|
|
|
|
|
|
|
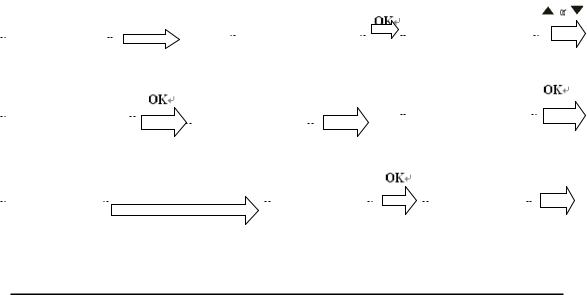
Delete All Command in a Device
If you want to delete all learnt commands in a device with one operation in stead of deleting every key one by one, please follow the below steps:
1.Press a device key (e.g.  key) where you want to delete commands.
2.Press and hold the  key for more than 3 seconds, and then release it.
3.Scroll or
or  key to “LEARNING”, then press the
  key and the LCD
display
“LEARN KEY”.
4. Scroll or
or  key to “DELETE DEV” and then press the
  key. The LCD
shows “SELECT DEV”
5.You select the device key (e.g.  key) want to delete.
6.The LCD shows “SURE DELET” , press the  key to confirm, the LCD shows
“SUCCESS”, then shows “SELECT DEV”.
7.Repeat step 4-5 to delete commands for other device key.
8.Press  to quit current operation.
|
|
|
|
|
|
S E T 3 S |
|
|
|
|
|
|
|
|
T V |
0 1 0 |
|
|
C O D E S E T U P |
|
|
|
L E A R N I N G |
|
|||
|
|
|
|
|
|
|
|
||||||
|
|
|
|
|
|
|
|
|
|
|
|
|
|
|
|
|
|
|
|
|
|
|
|
||||
|
11 |
: |
4 5 |
|
|
|
|
|
|
||||
|
|
|
|
|
|
|
|
|
|
|
|||
|
|
|
|
|
|
|
|
|
|
|
|||
|
|
|
|
|
|
|
|
|
|
|
|
|
|
|
|
|
|
|
|
|
|
|
|
|
|
|
|
|
|
|
|
|
|
|
|
|
|
|
|
|
|
|
|
|
|
|
|
|
|
|
|
|
|
|
|
Device key
L E A R N K E Y |
D E L E T E D E V |
S E L E C T D V E |
|
|
|
|
|
|
|
|
|
|
|
|
|
SURE DELET |
|
|
|
SUCCESS |
|
|
|
S E L E C T D V E |
|
|
|
|
|
|
|
|
|
|
|
|
|
|
|
|
|
|
|
||||
|
|
|
|
|
|
|
|
|
|
|
|
|
|
|
|
|
|
|
|
|
|
|
|
|
|
|
|
|
|
|
|
|
|
|
|
|
|
|
|
|
|
|
|
|
|
|
|
|
|
|
|
|
|
|
……………………………………………………………………………………………………10
Remark: sometimes it may take maximum about 3 minutes for delete all commands in one device. So if the commands are not many, suggest you delete commands one by one.
D. Delete All Learnt Commands
If you want to delete all learnt commands in your remote control, please follow the below steps:
1.Press and hold the  key for more than 3 seconds, then release it.
2.Scroll or
or  key to “LEARNING”, then press the
  key, LCD shows “LEARN KEY”.
3.Scroll or
or  key to “DELETE ALL” , then press the
  key.
key.
4.The LCD shows “SURE DELET” , then press the  key again, LCD shows
“SUCCESS” to finish the deletion.
|
|
|
|
|
|
|
|
S E T 3 S |
|
|
|
|
|
|
|
|
|
|
|
|
|
|
|
T V |
0 1 0 |
|
|
|
C O D E S E T U P |
|
|
|
L E A R N I N G |
|
|||||||||||
|
|
|
|
|
|
|
|
|
||||||||||||||
|
|
|
|
|
|
|
|
|
|
|
|
|
|
|
|
|
|
|
|
|
|
|
|
11 |
: |
4 5 |
|
|
|
|
|
|
|
|
|
|
|
|
|
|
|
|
|
|
|
|
|
|
|
|
|
|
|
|
|
|
|
|
|
|
|
|
|
|
|
|
|
|
|
|
|
|
|
|
|
|
|
|
|
|
|
|
|
|
|
|
|
||||
|
L E A R N K E Y |
|
|
D E L E T E A L L |
|
|
|
|
|
|
|
|
|
|||||||||
|
|
|
|
|
|
|
|
|
|
|
|
|
|
|
|
|
|
|
|
|||
|
|
|
|
|
|
|
|
|
|
|
|
|
|
|
|
|
|
|
|
|
|
|
|
|
|
|
|
|
|
|
|
|
|
|
|
|
|
|
|
|
|
|
|
|
|
|
|
|
|
|
|
|
|
|
|
|
|
|
|
|
|
|
|
|
||||
|
SURE DELET |
|
|
|
|
|
SUCCESS |
|
|
|
|
T V |
0 1 0 |
|
|
|
||||||
|
|
|
|
|
|
|
|
|
|
|
|
|
|
|
|
|
|
|
|
|
|
|
|
|
|
|
|
|
|
|
|
|
|
|
|
|
|
|
11 |
: |
4 5 |
|
|
|
|
|
|
|
|
|
|
|
|
|
|
|
|
|
|
|
|
|
|
|
|
|
|
|
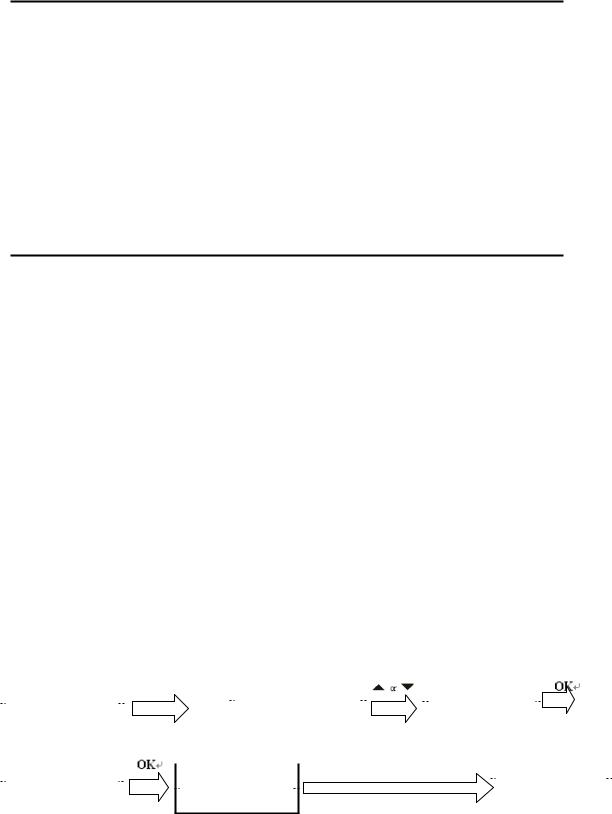
Other Set Up
A. Set up Clock
You can set up the clock on your URC20-F15DL remote control on it’s LCD screen as below:
1Press and hold the  key for more than 3 seconds, then release it.
2Press the  or
or  key to select the “CONFIGURE” menu, and then
press the |
key. |
|
3 Press the |
or |
key to select the “TIME SETUP” menu, and then |
press the |
key. |
|
……………………………………………………………………………………………………11
4Press the  or
or  key to move the cursor to select hour or minute or AM/PM, then
press the number key to set hour and minute, and press the  or
or  key to select AM or PM.
5 Press the  key to save the setting and LCD display “SUCCESS”exit to current
setup state, if you enter errors the LCD screen shows³ERROR”. You can press any device(e.g.  ) key to finish set up or press
  key return to the last state.
|
|
|
|
|
|
SET 3S |
|
|
|
|
|
|
|
|
T V |
|
|
|
CODE SETUP |
|
|
|
C O N F I G U R E |
|
|||
|
|
|
|
|
|
|
|
|
|||||
|
|
|
|
|
|
|
|
|
|
|
|
|
|
|
|
|
|
|
|
|
|||||||
|
1 0 |
: |
4 5 |
A M |
|
|
|||||||
|
|
|
|
|
|
|
|
|
|
||||
|
|
|
|
|
|
|
|
|
|
||||
|
|
|
|
|
|
|
|
|
|
|
|
|
|
|
|
|
|
|
|
|
|
|
|
|
|
|
|
|
|
|
|
|
|
|
|
|
|
|
|
|
|
|
|
|
|
|
|
|
|
|
|
|
|
|
|
TIME SETUP |
|
|
|
T I M E |
|
|
|
T I M E |
|
||
|
|
|
|
|
|
|
|
|
|
|
|
|
|
|
|
|
|
11 4 5 A M |
|
|
|
0 |
1 |
4 5 A M |
|
|
|
|
|
|
|
|
|
|
|
|
|
|
|
|
|
|
|
|
|
|
|
|
|
|
|
T I M E |
|
|
|
|
SUCCESS |
|
|
|
TIME SETUP |
|
|
|
|
|
|
|
|
|
|
|
|
|
|
0 2 |
3 0 P M |
|
|
|
|
|
|
|
|
|
B. Volume Lock
This function makes you very convenient when you only use one device to adjust volume. For example, you may use your amplifier as your main volume control, then
you can use this function to fix the volume and mute key to  , no matter which
device you use (even you use TV, DVD, VCR etc), the volume and mute key on remote control still control the volume and mute of your amplifier.
1.Press and hold the  key for more than 3 seconds, and then release it.
2.Press the  or
or  key to select the “CONFIGURE”, and then press the
 key.
key.
3. Press the |
or |
key to select the “VOL LOCK”, and then press the |
 key.
key.
4.Press the device key to select the device you want to fix, such as  .
.
5.Press the  or
or  key to change to “ON” or “OFF” mode.
6.Press the  key to save the setting and LCD display “SUCCESS”then “VOL
……………………………………………………………………………………………………12
LOCK” to current setup state, You can press any device key (e.g.  ) to finish set up or press the
  key to last state, or you can use
  or
or  to select other set
up.
|
|
|
|
|
|
|
|
S E T 3 S |
|
|
|
|
|
|
|
|
|
|
|
|
|
|
|
|
|
|
|
|
|
||
|
T V |
0 1 0 |
|
|
|
|
C O D E S E T U P |
|
|
|
C O N F I G U R E |
||||||||||||||||||||
|
|
|
|
|
|
|
|
|
|
|
|||||||||||||||||||||
|
|
|
|
|
|
|
|
|
|
|
|
|
|
|
|
|
|
|
|
|
|
|
|
|
|
|
|
|
|
|
|
|
11 |
: |
4 5 |
|
|
|
|
|
|
|
|
|
|
|
|
|
|
|
|
|
|
|
|
|
|
|
|
|
|
|
|
|
|
|
|
|
|
|
|
|
|
|
|
|
|
|
|
|
|
|
|
|
|
|
|
|
|
|
|
|
|
|
|
|
|
|
|
|
|
|
|
|
|
|
|
|
|
|
|
|
|
|
|
|
|
|
|
|
|
|
|
|
|||
|
TIME SETUP |
|
|
|
|
|
|
|
VO L L O C K |
|
|
|
|
|
T V |
O N |
|
|
|
|
|||||||||||
|
|
|
|
|
|
|
|
|
|
|
|
|
|
|
|
|
|
|
|
|
|
|
|
|
|
|
|
|
|
|
|
|
|
|
|
|
|
|
|
|
|
|
|
|
|
|
|
|
|
|
|
|
|
|
|
|
|
|
|
|
|
|
|
|
AMP |
|
|
|
|
|
|
|
|
|
|
|
|
|
|
|
|
|
|
|
|
|
|
|
|
|
|
|
|
||
|
|
|
|
|
A M P |
O FF |
|
|
|
|
|
|
|
|
AM P |
OFF |
|
|
|
|
|
|
|
|
SUCCESS |
|
|||||
|
|
|
|
|
|
|
|
|
|
|
|
|
|
|
|
|
|
|
|
|
|
|
|
||||||||
|
|
|
|
|
|
|
|
|
|
|
|
|
|
|
|
|
|
|
|
|
|
|
|
|
|
|
|||||
|
|
|
|
|
|
|
|
|
|
|
|
|
|
|
|
|
|
|
|
|
|
|
|
|
|
|
|
|
|
|
|
|
|
|
|
|
|
|
|
|
|
|
|
|
|
|
|
|
|
|
|
|
|
|
|
|
|
|
|
|
|
|
|
|
|
|
|
|
|
|
|
|
|
|
|
|
|
|
|
|
|
|
|
|
|
|
|
|
|
|
|
|
|
|
|
|
|
|
|
|
|
|
|
|
|
|
|
|
|
|
|
|
|
|
|
|
|
|
|
|
|
|
|
|
|
|
|
|
|
|
|
|
|
|
|
|
|
|
|
|
|
|
|
|
|
|
|
|
|
|
|
|
|
|
|
|
|
|
|
Remark: You can only lock one device for volume and mute of your new remote control. The locked device will be unlocked when you lock on the other device automatically.
CDevice Lock
You can use Device lock function to fix current device code and this device code can’t be changed by a new set up such as brand and code set up or auto search. You can set it to the “OFF” to quit from this function.
1Press and hold the “ “key for more than 3 seconds, then release it.
2Press the  or
or  key to select the “CONFIGURE”, then press the
 key.
key.
3Press the  or
or  key to select the “DEV LOCK”, then press the
key.
4Press the device key to select the device that you want to fix, such as  .
.
5Press the  or
or  key to change to the “ON” or “OFF” mode.
6Press the  key to save the setting and LCD display “SUCCESS”then “ DEV LOCK”, exit to current setup state. You can press any device key (e.g.
  ) to finish the set up or press the
  key to last state, or you can use
  or
or  to select other set up.
……………………………………………………………………………………………………13

|
|
|
|
|
|
|
|
|
|
|
|
S E T 3 S |
|
|
|
|
|
|
|
|
|
|
|
|
|
|
|
T V |
0 1 0 |
|
|
|
|
C O D E S E T U P |
|
|
C O N F I G U R E |
|
|||||||||||||||
|
|
|
|
|
|
|
|
|
|
|||||||||||||||||
|
|
|
|
|
|
|
|
|
|
|
|
|
|
|
|
|
|
|
|
|
|
|
|
|
|
|
|
11 |
: |
4 5 |
|
|
|
|
|
|
|
|
|
|
|
|
|
|
|
|
|
|
|
|
|
||
|
|
|
|
|
|
|
|
|
|
|
|
|
|
|
|
|
|
|
|
|
|
|
|
|
|
|
|
|
|
|
|
|
|
|
|
|
|
|
|
|
|
|
|
|
|
|
|
|
|||||
|
TIME SETUP |
|
|
|
|
D E V L O C K |
|
|
|
T V |
O F F |
|
|
|||||||||||||
|
|
|
|
|
|
|
|
|
|
|
|
|
|
|
|
|
|
|
|
|
|
|
|
|
|
|
|
|
|
|
|
|
|
|
|
|
|
|
|
|
|
|
|
|
|
|
|
|
|
|
|
|
|
|
|
|
|
|
|
|
|
|
|
|
|
|
|
|
|
|
|
|
|
|
|
|
|
|
|
|
|
|
|
|
|
|
|
|
|
|
|
|
|
|
|
|
|
|
|
|
|
||||||
|
|
|
T V |
|
O N |
|
|
|
|
|
|
|
SUCCESS |
|
|
|
|
|
|
|
|
|
||||
|
|
|
|
|
|
|
|
|
|
|
|
|
|
|
|
|
|
|
|
|
|
|
|
|
|
|
|
|
|
|
|
|
|
|
|
|
|
|
|
|
|
|
|
|
|
|
|
|
|
|
|
|
|
|
|
|
|
|
|
|
|
|
|
|
|
|
|
|
|
|
|
|
|
|
|
|
|
|
|
|
Remark:
You can fix all more than one device code and these device codes can’t be changed by neither Auto Search nor Brand Code Set up.
D. Background Light
If the background light is on, the background light will be lighted up for a while after you press any key.
1Press and hold the  key for more than 3 seconds, and then release it.
2 Press the  or
or  key to select the “CONFIGURE”, and then press
the  key.
key.
3 Press the  or
or  key to select the “LIGHT ”, and then press the
  key.
key.
4Press the  or
or  key to change to the “ON” or “OFF” mode.
5 Press the key to save setting and LCD shows SUCCESS then “LIGHT” exit to current setup state. You can press any device key to finish set up or press the
 key to last state, or you can use
  or
or  to select other set up.
E. Contrast Adjust
If you are not satisfied the LCD screen contrast of your remote control, you can use below steps to change it.
1Press and hold the  key for more than 3 seconds, then release it.
2Press the  or
or  key to select the “CONFIGURE”, then press the
 key.
key.
3 Press the  or
or  key to select the “CONTRAST”, then press the
……………………………………………………………………………………………………14

 key.
key.
4 Press the  or
or  key to adjust contrast level, then press the
 key until you
satisfied.
5Press the key to save the setting and the LCD shows SUCCESS then
“CONTRAST” exit to current setup state. You can press any device key to finish set up or press the  key to last state, or you can use
  or
or  to select other set up.
F.ALL OFF
You can turn off or turn on all devices by one button only and sometimes it’s convenient .
Press and hold the  key about 1 second and then release it. The remote control
will send out each power signal for each device key to turn on (or turn off) your appliance one by one. Meanwhile the device key on remote control flashes to tell you which power signal is been sending.
Remark: The remote control must be pointed to device that you like to control until the operation finished.
G. Show View
Show view function scans all TV or CAB/SAT channels for your quick view.
1.Press the device key to select the device (such as  ) that you want to operate.
2.Press and hold the SHOWVIEW key about 1 second. When the device’s LED flashes and it goes into Show View mode. The remote control automatically scans all channels for a brief view.
Remark: 1. The remote control must be pointed at the device until Show View operation finished.
2. If you want to exit the show view mode, please press any key during operation.
H. Macro
Macro function lets you make sequent operation for your home theater. URC20-F15D can has total 3 Macro operations.
Press and hold the MACRO key and  key (or 2, 3 key) simultaneously, then
release them, the remote control will send out a sequent IR commands that you programmed before. Meanwhile the device LED will flash to tell you which button command is sending.
……………………………………………………………………………………………………15
You can set up a Macro operation by following steps:
1.Press and hold the  key for more than 3 seconds, and then release it.
2.Press the  or
or  key to select “MACRO”, and then press the
  key.
key.
3.Press the  or
or  key to select the “MACRO1” (or Macro2 or Macro3),
then press the  key.
key.
4.The screen shows “SETUP ”, and then press the  key.
key.
5.LCD shows “SELECT KEY”, then you can select the device and function key for a
sequent operation that you like.
e.g.: TV+POWER+MUTE+AV, +DVD+PLAY, +VCR+RECORD, etc. That means you want to turn on the TV and shut off it s sound, switch TV input to AV port, at the same time DVD starts to play, VCR begins to record
6.Press the  key to save the setting, LCD shows “SUCCESS”then exit to current setup state,
7.You can press any device key to finish set up or press the  key to last state and use
  or
or  to select other set up.
|
|
|
|
|
SET 3S |
|
|
|
|
|
|
|
T V |
0 1 0 |
|
|
|
C O D E S E T U P |
|
|
M A C R O |
|
|
|
11 |
: |
4 5 A M |
|
|
|
|
|
|
|
|
|
|
|
|
|
|
|
|
|
|
|
|
|
|
|
|
|
|
|
|
|
|
|
|
|
|
|
|
S E T U P |
|
|
|
S E L E C T K E Y |
|
|
M A C R O 1 |
|
|
|
|
|
|
|
||
|
|
|
|
|
|
|
|
|
|
|
|
|
|
|
|
|
|
|
|
|
|
|
|
|
|
|
|
|
|
|
|
|
|
|
|
|
|
|
|
|
|
|
|
|
|
|
|
|
|
|
|
|
|
|
|
|
|
|
|
|
|
|
|
|
|
Input sequent operation, then press OK |
SUCCESS |
|
Remark:
1. A new Macro set up will erase and cover the last programmed Macro. 2.You can set up to maximum 10 commands in a Macro.
3. During operating Macro, be sure point your remote control to your appliance until finish this operation.
4..Be sure all the keys included in MACRO can send out signals, otherwise even if you programmed these keys inside the MACRO, it still can’t work properly when you operate this function. You can check those keys by pressing them to see the relative Device buttons flash or not before you set up into MACRO.
5. Be sure the device must have relative conditions when you operate MACRO function. For example the disc must be put in the DVD player and a video tape must be put in the VCR when you like to play the DVD or make a record by your VCR by Macro operation.
……………………………………………………………………………………………………16

I. Delete Macro
1.Press and hold the  key for more than 3 seconds, then release it.
2.Press the  or
or  key to select the “MACRO”, then press the
  key.
key.
3.Press the  or
or  key to select the “MACRO1”, then press the
  key. LCD shows “SET UP”
4.Press the  or
or  key to select the “DELETE ”, and then press the
  key.
key.
5.LCD shows “SURE DELETE”, Press the  key to confirm to delete and the LCD
display shows “SUCCESS”then goes back to the last state.
6.You can press any device key to finish the delete operation or press the  key to last state, and use
  or
or  to select other set up.
|
|
|
|
|
SET 3S |
|
|
|
|
|
|
T V |
0 1 0 |
|
C O D E S E T U P |
|
|
M A C R O |
|
||
|
|
|
|
|
|
|||||
|
|
|
|
|
|
|
|
|
|
|
|
11 |
: |
4 5 A M |
|
|
|
|
|
|
|
|
|
|
|
|
|
|
|
|
|
|
M A C R O 1 |
S E T U P |
D E L E T E
SURE DELET
SUCCESS
J. Device Alternation
URC20-F15D has a flexible device definition for  key. If you want operate second
VCR (or second TV, SAT/CBL, CD... etc.), you can set up it’s code to AUX device key for a device alteration (CODE SHIFT). Just follow the steps below:
1. Press and hold the  key for more than 3 seconds, then release it. Press the
 or
or  keys to select to “CODE SETUP”, and press the
  key.
key.
2. The LCD screen shows the “DEV SEARCH”, Press the  or
or  keys to
select “CODE SHIFT”, and press the  key. Then you press device key (e.g.
VCR key) for your desired operation device, then press  . And then enter the code
……………………………………………………………………………………………………17
number, e.g.005 (you can find them in the BRAND CODE LIST at the attachment of this manual book) of the device brand by number button.
3.Please press the  key to save it and exit, LCD shows “SUCCESS”. then return to current setup.
4.Now you can press  key to check, it must be set up to VCR code 005. You can
press any device key to finish Device Alternation or press the  key to last state, and use
  or
or  to select other set up.
|
|
|
|
|
|
SET 3S |
|
|
|
|
|
|
|
|
|
|
|
|
|
|
||
|
T V |
0 1 0 |
|
|
|
|
|
|
|
C O D E S E T U P |
|
|
|
D E V S E A R C H |
||||||||
|
|
|
|
|
|
|
|
|
|
|
|
|
|
|||||||||
|
|
|
|
|
|
|
|
|
|
|
|
|
|
|
|
|
|
|
|
|||
|
|
|
|
|
|
|
|
|
|
|
|
|
|
|
|
|
|
|
|
|
|
|
|
|
|
|
|
|
|
|
|
|
|
|
|
|
|
|
|
|
|
|
|
|
|
|
11 |
: |
4 5 A M |
|
|
|
|
|
|
|
|
|
|
|
|
|
|
|
|
|
|
|
|
|
|
|
|
|
|
|
|
|
|
|
|
|
|
|
|
|
|
|
|
|
|
|
|
|
|
|
|
|
|
|
|
|
|
|
|
|
|
VCR |
|
|
|
|
||
|
|
|
|
|
|
|
|
|
|
|
|
|
|
|
|
|
|
|
|
|||
|
C O D E S H I FT |
|
|
|
|
|
|
|
|
|
|
|
|
V C R |
0 1 8 |
|||||||
|
|
|
|
|
|
T V |
0 1 0 |
|
|
|
|
|
|
|||||||||
|
|
|
|
|
|
|
|
|
|
|
|
|
|
|
|
|
||||||
|
|
|
|
|
|
|
|
|
|
|
|
|
||||||||||
|
|
|
|
|
|
|
|
|
|
|
|
|
||||||||||
|
|
|
|
|
|
|
|
|
|
|
|
|
|
|
|
|
|
|
|
|
|
|
|
|
|
|
|
|
|
|
|
|
|
|
|
|
|
|
|
|
|
|
|
|
|
|
|
|
|
|
|
|
|
|
|
|
|
|
|
|
|
|
|
|
|
|
|
|
|
|
|
|
|
|
|
|
|
|
|
|
|
|
|
|
|
|
|
|
|
|
|
|
|
|
|
|
|
|
|
|
|
|
|
|
|
|
V C R |
0 1 |
8 |
|
|
Input the code no. 005 |
|
V C R 0 0 5 |
|
|
|
SUCCESS |
|
|
|
|
|
|
|
|
|
|
|
|
|
|
|
|
11 : 4 5 |
A M |
|
|
11 : 4 5 A M |
|
|
|
|
|
|||
|
|
|
|
|
|
|
|
|
|||||
|
|
|
|
|
|
|
|
|
|
|
|
|
|
|
|
|
|
|
|
|
|
|
|
|
|
|
|
Clear All
Erase all the setting up data, and go back to the factory default settings.
1.Press and hold the  key for more than 3 seconds, and then release it.
2.Press the  or
or  key to select the “CONFIGURE”, and then press the
  key.
key.
3.Press the  or
or  key to select the “CLEAR ALL”, and then press the
  key and LCD shows SURE CLEAR.
4.Then press the  key to clear all settings and go back to original factory default settings.
……………………………………………………………………………………………………18

Service and warranties:
Your new 8-in-1 remote control is pre-programmed and can handle all important functions of your device. In case of technical inquiries or information concerning our product or its use, our service team is at your service, to help you through a free phone hotline or via email.
Service Address:
SP European Service & Distribution Centre
Londonerstraße 11
D- 48455 Gildehaus
Service times: |
Monday to Friday from 9.00 to 18.00 |
Phone: |
00800 / 77 77 88 99 (free) |
E-Mail: |
Service@SupportPlus.org |
Note: Please don’t send us your device to our address without an explicit calling of our service team. The sender is responsible for any costs and the risk of unrequested submissions.
Need Help?
If you have questions about your remote control, just call our free-phone help line! Before you call, please read the manual carefully. However, please make a note of your device in the table below and tell it to our operators when you make a call.
Date of purchase: |
|
|
/ |
|
/ |
/ |
|
|
||
|
|
|
|
|
|
|
|
|
|
|
|
|
Day month year |
|
|
||||||
|
|
|
|
|
|
|
||||
Device |
Brand |
|
|
Model |
Model number of |
Code |
||||
|
|
|
|
|
|
|
number |
original remote |
|
|
TV |
|
|
|
|
|
|
|
|
|
|
|
|
|
|
|
|
|
|
|
|
|
VCR |
|
|
|
|
|
|
|
|
|
|
|
|
|
|
|
|
|
|
|
|
|
CBL/SAT |
|
|
|
|
|
|
|
|
|
|
|
|
|
|
|
|
|
|
|
|
|
DVD |
|
|
|
|
|
|
|
|
|
|
|
|
|
|
|
|
|
|
|
|
|
CD |
|
|
|
|
|
|
|
|
|
|
|
|
|
|
|
|
|
|
|
|
|
TUNER |
|
|
|
|
|
|
|
|
|
|
|
|
|
|
|
|
|
|
|
|
|
TAPE |
|
|
|
|
|
|
|
|
|
|
|
|
|
|
|
|
|
|
|
|
|
AUX |
|
|
|
|
|
|
|
|
|
|
|
|
|
|
|
|
|
|
|
|
|
……………………………………………………………………………………………………19
 Loading...