

Page 1

BC370CRS
OWNER’S
MANUAL
OWNER'S MANUAL
Page 2

Precautions
Before you use this scanner, please read and observe the following.
IMPORTANT!
This scanning radio has been manufactured so that it will not tune to the
radio frequencies assigned by the FCC for cellular telephone usage.
The Electronic Communications Privacy Act of 1986, as amended, makes
it a federal crime to intentionally intercept cellular or cordless telephone
transmissions or to market this radio when altered to receive them.
The installation, possession, or use of this scanning radio in a motor
vehicle may be prohibited, regulated, or require a permit in certain states,
cities, and/or local jurisdictions. Your local law enforcement officials
should be able to provide you with information regarding the laws in your
community.
Changes or modifications to this product not expressly approved by
Uniden, or operation of this product in any way other than as detailed by
this Operating Guide, could void your authority to operate this product.
EARPHONE WARNING!
You can use an optional 32 Ω stereo headset or earphone with this
scanner. Use of an incorrect earphone or stereo headset might be
potentially hazardous to your hearing. The output of the phone jack is
monaural, but you will hear it in both headphones of a stereo headset.
Set the speaker volume to a comfortable level before plugging in either a
monaural earphone or a stereo headset of the proper impedance (32 Ω).
Otherwise, you might experience some discomfort or possible hearing
damage if the volume suddenly becomes too loud because of the volume
control or squelch control setting. This is particularly true for the type of
earphone that is placed in the ear canal.
Precautions
2
Page 3

WARNING!
Uniden does not represent this unit to be waterproof. To reduce the risk
of fire or electrical shock, do not expose this unit to rain or moisture.
Uniden®and Bearcat®are registered trademarks of Uniden America
Corporation.
Other trademarks used throughout this manual are the property of their
respective holders.
Important: If you use the supplied AC adapter to power the scanner but
have not installed batteries in the scanner, never turn the scanner off by
disconnecting the AC adapter or unplugging it from the AC outlet.
This might corrupt the scanner’s memory. Always use POWER to turn the
scanner off before disconnecting AC power.
Precautions
3
Page 4

Contents
The FCC Wants You to Know . . . . . . . . . . . . . . . . . . . . . . . . . . . . . . .6
Scanning Legally . . . . . . . . . . . . . . . . . . . . . . . . . . . . . . . . . . . . . . . . .6
Unpacking Your Scanner . . . . . . . . . . . . . . . . . . . . . . . . . . . . . . . . . . .8
Introduction . . . . . . . . . . . . . . . . . . . . . . . . . . . . . . . . . . . . . . . . . . . . .9
Features . . . . . . . . . . . . . . . . . . . . . . . . . . . . . . . . . . . . . . . . . . . . . .11
Controls . . . . . . . . . . . . . . . . . . . . . . . . . . . . . . . . . . . . . . . . . . . . . . .13
Setting Up The Scanner . . . . . . . . . . . . . . . . . . . . . . . . . . . . . . . . . .18
Connecting Power . . . . . . . . . . . . . . . . . . . . . . . . . . . . . . . . . . . . . . .18
Connecting an Antenna . . . . . . . . . . . . . . . . . . . . . . . . . . . . . . . . . . .19
Using the Backlight . . . . . . . . . . . . . . . . . . . . . . . . . . . . . . . . . . . . . .20
Adjusting the Contrast . . . . . . . . . . . . . . . . . . . . . . . . . . . . . . . . . . . .20
Using the Radio Controlled Clock . . . . . . . . . . . . . . . . . . . . . . . . . . .21
Setting the Current Time and Date . . . . . . . . . . . . . . . . . . . . . . . . . . .21
Setting the Radio Controlled Clock Options . . . . . . . . . . . . . . . . . . . .21
Setting Your Time Zone . . . . . . . . . . . . . . . . . . . . . . . . . . . . . . . . . .22
Setting the Daylight Savings Time Option . . . . . . . . . . . . . . . . . . . . .22
Turning On/Off Radio Control . . . . . . . . . . . . . . . . . . . . . . . . . . . . . .23
Forcing a Reception Attempt . . . . . . . . . . . . . . . . . . . . . . . . . . . . . .23
Setting the Alarm Clock . . . . . . . . . . . . . . . . . . . . . . . . . . . . . . . . . . .24
Using Snooze . . . . . . . . . . . . . . . . . . . . . . . . . . . . . . . . . . . . . . . . . .24
Listening to AM/FM/TV Channels . . . . . . . . . . . . . . . . . . . . . . . . . . .25
Directly Selecting a Channel . . . . . . . . . . . . . . . . . . . . . . . . . . . . . . .25
Using AM/FM/TV Channel Memory . . . . . . . . . . . . . . . . . . . . . . . . . .25
Using All-Hazards . . . . . . . . . . . . . . . . . . . . . . . . . . . . . . . . . . . . . . .26
Limiting Alerts to Your County . . . . . . . . . . . . . . . . . . . . . . . . . . . . . .26
Programming County Codes . . . . . . . . . . . . . . . . . . . . . . . . . . . . . .26
Selecting Areas for Alerts . . . . . . . . . . . . . . . . . . . . . . . . . . . . . . . . .27
Receiving Alerts . . . . . . . . . . . . . . . . . . . . . . . . . . . . . . . . . . . . . . . .27
Using the Scanner Memories . . . . . . . . . . . . . . . . . . . . . . . . . . . . . .28
Programming Memories . . . . . . . . . . . . . . . . . . . . . . . . . . . . . . . . . . .28
Selecting a Memory . . . . . . . . . . . . . . . . . . . . . . . . . . . . . . . . . . . . . .30
Scanning Memory Banks . . . . . . . . . . . . . . . . . . . . . . . . . . . . . . . . . .31
Locking/Unlocking Memories . . . . . . . . . . . . . . . . . . . . . . . . . . . . . . .31
Using Priority Scan . . . . . . . . . . . . . . . . . . . . . . . . . . . . . . . . . . . . . .31
Setting Channel Delay . . . . . . . . . . . . . . . . . . . . . . . . . . . . . . . . . . . .32
Contents
4
Page 5

Searching for Active Frequencies . . . . . . . . . . . . . . . . . . . . . . . . . . .33
Using Limit Search . . . . . . . . . . . . . . . . . . . . . . . . . . . . . . . . . . . . . . .33
Programming an Upper/Lower Limit . . . . . . . . . . . . . . . . . . . . . . . . .33
Searching the Selected Range . . . . . . . . . . . . . . . . . . . . . . . . . . . . .33
Using Service Search . . . . . . . . . . . . . . . . . . . . . . . . . . . . . . . . . . . .33
Selecting a Service to Search . . . . . . . . . . . . . . . . . . . . . . . . . . . . .33
Saving a Found Frequency into a Scan Memory . . . . . . . . . . . . . . . .34
Search Lockouts . . . . . . . . . . . . . . . . . . . . . . . . . . . . . . . . . . . . . . . .34
Listening to Weather Channels . . . . . . . . . . . . . . . . . . . . . . . . . . . . .35
Care and Maintenance . . . . . . . . . . . . . . . . . . . . . . . . . . . . . . . . . . . .36
General Use . . . . . . . . . . . . . . . . . . . . . . . . . . . . . . . . . . . . . . . . . . .36
Location . . . . . . . . . . . . . . . . . . . . . . . . . . . . . . . . . . . . . . . . . . . . . . .36
Cleaning . . . . . . . . . . . . . . . . . . . . . . . . . . . . . . . . . . . . . . . . . . . . . .36
Repairs . . . . . . . . . . . . . . . . . . . . . . . . . . . . . . . . . . . . . . . . . . . . . . .36
Birdies . . . . . . . . . . . . . . . . . . . . . . . . . . . . . . . . . . . . . . . . . . . . . . . .36
Resetting the Scanner (Clearing all Memories) . . . . . . . . . . . . . . . . . .36
Technical Specifications . . . . . . . . . . . . . . . . . . . . . . . . . . . . . . . . . .37
One-Year Limited Warranty . . . . . . . . . . . . . . . . . . . . . . . . . . . . . . . .39
Contents
5
Page 6

The FCC Wants You to Know
This scanner has been tested and found to comply with the limits for a
scanning receiver, pursuant to Part 15 of the FCC Rules. These limits are
designed to provide reasonable protection against harmful interference in
a residential installation. This scanner generates, uses, and can radiate
radio frequency energy and, if not installed and used in accordance with
the instructions, may cause harmful interference to radio communications.
There is no guarantee that interference will not occur in a particular
installation. If this scanner does cause harmful interference to radio or
television reception, which can be determined by turning the scanner on
and off, you are encouraged to try to correct the interference by one or
more of the following measures:
• Reorient or relocate the receiving antenna
• Increase the separation between the scanner and the receiver
This device complies with Part 15 of the FCC Rules. Operation is subject
to the following two conditions: 1) This device may not cause harmful
interference, and 2) this device must accept any interference received,
including interference that may cause undesired operation.
Scanning Legally
Your scanner covers frequencies used by many different groups,
including police and fire departments, ambulance services, government
agencies, private companies, amateur radio services, military operations,
pager services, and wireline (telephone and telegraph) service providers.
It is legal to listen to almost every transmission your scanner can receive.
However, there are some transmissions that you should never
intentionally listen to. These include:
• Telephone conversations (cellular, cordless, or other private means of
telephone signal transmission)
• Pager transmissions
• Any scrambled or encrypted transmissions
According to the Electronic Communications Privacy Act (ECPA), you are
subject to fines and possible imprisonment for intentionally listening to,
using, or divulging the contents of such a conversation unless you have
the consent of a party to the conversation (unless such activity is
otherwise illegal). This scanner has been designed to prevent the
reception of cellular telephone transmissions and the decoding of
scrambled transmissions.
The FCC Wants You to Know
6
Page 7

This is done to comply with the legal requirement that scanners be
manufactured so they are not easy to modify to pick up these
transmissions. Do not open your scanner’s case to make any
modifications that could allow it to pick up transmissions that are illegal to
monitor. Modifying or tampering with your scanner’s internal components
or using it in a way other than as described in this manual could
invalidate your warranty and void your FCC authorization to operate it.
In some areas, mobile and/or portable use of this scanner is unlawful or
requires a permit. Check the laws in your area. It is also illegal in many
areas (and a bad idea everywhere) to interfere with the duties of public
safety officials by traveling to the scene of an incident without
authorization.
The FCC Wants You to Know
7
Page 8
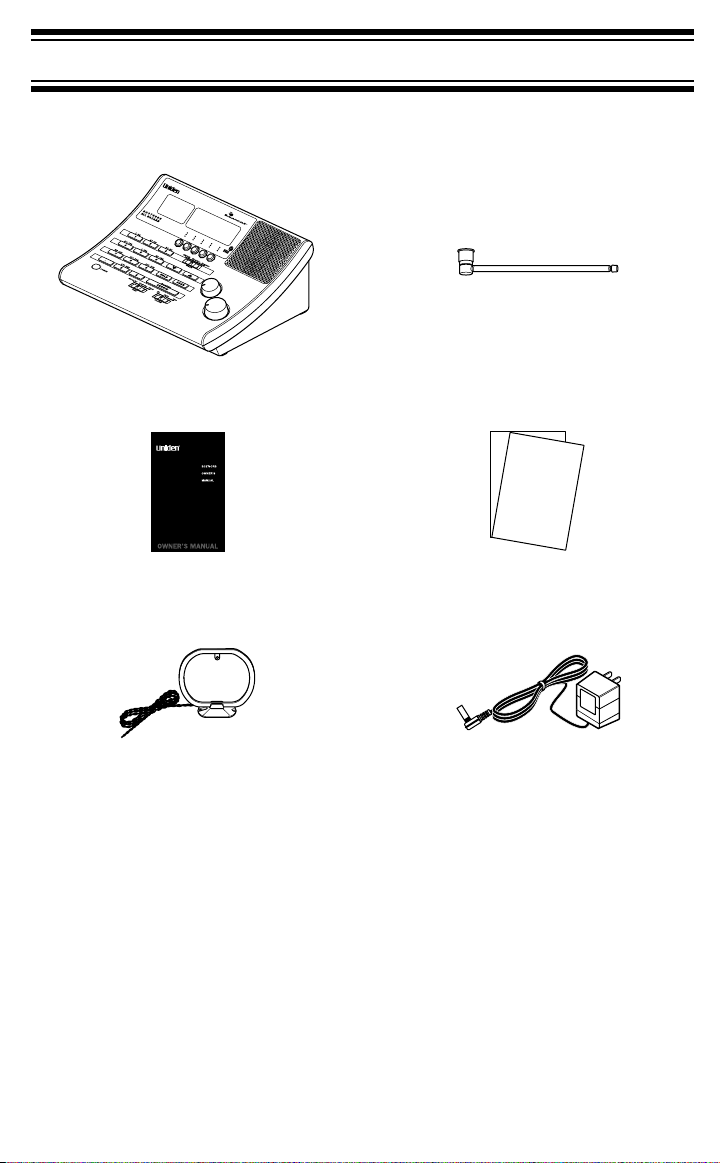
Unpacking Your Scanner
Please unpack this box carefully and make sure you have:
Telescopic Antenna
BC370CRS Scanner
This Owner’s Manual Other Printed Material
AM Loop Antenna AC Adapter
If any item is missing or obviously damaged, call the Uniden Parts Dept
at (800) 297-1023 Monday through Friday, from 8:00 AM to 5:00 PM or
online at www.uniden.com to remedy the situation.
Unpacking Your Scanner
8
Page 9

Introduction
Your BC370CRS scanner is a multi-featured conventional channel
scanner with All Hazards alert. You can easily enter and store frequencies
for police, fire/emergency, marine, air, amateur, and other radio services
into 300 channels distributed over ten banks.
The scanner also alerts you when NOAA (National Oceanic and
Atmospheric Administration) or any broadcast station the scanner is tuned
to issues an EAS (Emergency Alert System) signal. These alerts are
issued for severe weather, homeland security, and law enforcement
events (such as Amber alerts).
Your BC370CRS also has a built-in RCC (Radio Controlled Clock) that
automatically sets to the precise current time based on the NIST (National
Institution of Standards and Time) nationwide broadcast*. For more
information about the standard time signal, visit the National Institute of
Standards and Time at http://tf.nist.gov.
Use your scanner to monitor:
• Analog public safety channels
• Police and fire departments (including rescue and paramedics)
• NOAA weather transmissions (including 3 Canadian Coast Guard
channels)
• Business/Industrial radio and utilities
• Marine and amateur (ham radio) bands
• Aircraft (commercial and private) band
• Railroad
• AM/FM Broadcast Stations
• TV Channels 2-13
*Not available in all areas.
Introduction
9
Page 10

Your scanner can monitor the following bands.
Band Lower Limit Upper Limit Step
No. (MHz) (MHz)
1 0.5300 1.7000 AM 10 AM Broadcast
2 25.0000 27.9950 AM 5 AM Band
3 28.0000 29.9950 FM 5 10 Meter Amateur Band
4 30.0000 49.9950 FM 5 VHF Low Band
5 50.0000 54.0000 FM 5 6 Meter Amateur Band
59.7500
65.7500
6 71.7500 WFM 6000 TV Broadcast Ch. 2 - 6
81.7500
87.7500
7 88.0000 107.9000 WFM 100 FM Broadcast
8 108.0000 136.9875 AM 12.5 Aircraft
9 137.0000 143.9950 FM 5 Military Land Mobile
10 144.0000 147.9950 FM 5 2 Meter Amateur Band
11 148.0000 174.0000 FM 5 VHF High Band
179.7500
185.7500
191.7500
12 197.7500 WFM 6000 TV Broadcast Ch. 7 - 13
203.7500
209.7500
215.7500
13 225.0000 380.0000 AM 25 Military Air
14 406.0000 419.99375 FM 6.25 Fed. Gov. Land Mobile
15 420.0000 449.99375 FM 6.25 70cm Amateur Band
16 450.0000 469.99375 FM 6.25 UHF Standard Band
17 470.0000 512.0000 FM 6.25 UHF Television
18 806.0000 956.0000 FM 12.5 Public Safety/Business*
Modulation
(kHz)
Service
*Excluding the 824-849 and 869-894 MHz Cellular Telephone ranges.
10
Introduction
Page 11

Features
Channel Memory Scanning — Scans frequencies you have stored in
any of the channels or banks at a rate of up to 70 channels per second.
Memory Availability — Store and then scan any of up to 300 channels
distributed over 10 banks.
SAME All-Hazards Operation — In standby mode, constantly monitors
the last-tuned station and alerts you if it detects an alert transmission for
your area (NOAA and broadcast channels only).
Direct Channel Access — Press 0 - 9 and HOLD to directly access any
stored frequency.
Channel Lockout/Frequency Lockout — Skip over stored frequencies
(channels) using the Lockout feature to enable faster scanning. Lets you
designate up to fifty frequencies to skip during a search (limit or service)
to increase the scanning speed.
Radio Controlled Clock — Automatically sets to the precise time using
NIST broadcasts.
AM/FM and TV 2-13 Broadcast — Lets you store up to 30 preset
broadcast channels (10 AM and 20 FM/TV) for quick access.
Priority Channel — Designate a specific frequency as a Priority
Channel. The radio scans and checks that channel every 2 seconds.
Select and designate up to 10 frequencies as Priority Channels (one per
bank).
Duplicate Channel Alert — Lets you know that a selected frequency has
already been programmed into memory if you attempt to store it again.
Limit Frequency Searching — Lets you designate lower and upper
frequency range and search within that range for active frequencies.
You can then store frequencies in memory as channels for later recall.
Service Search — Lets you designate one of the five preprogrammed
service channels (Police, Fire/EMS, Air, Ham, Marine) to search.
Scan and Search Speed
• Scan Speed 70 channels per second maximum in SCAN MODE
• Search Speed 75 steps per second maximum in SEARCH MODE
• TURBO MODE For frequency steps 5kHz apart, searching occurs in
Turbo Mode which is 225 steps per second.
Introduction
11
Page 12

Clock Display — The scanner always displays the current time.
The clock also features an alarm that lets you wake to the selected radio
source or an alert tone up to 20 minutes or be shut off manually.
A convenient snooze button lets you silence the alarm for an extra
5-minutes.
Delay — You can enable or disable the 2-second delay to resume
scanning when a transmission ends. Enabling this feature helps prevent
missing a response from one of the parties in the transmission.
LCD Backlight — You can enable or disable the LCD back lighted
display.
Contrast Adjust — Lets you adjust the LCD contrast for best viewing.
Key Touch Tone — A tone sounds to confirm you have made a valid key
input while a different tone sounds to alert you to an invalid entry.
EEPROM Memory Backup — The scanner uses a non-volatile EEPROM
for memory backup.
Battery Alert — A battery icon ( ) alerts you if no battery is installed
or the battery power is low. An alert tone sounds when the battery needs
to be replaced. The backup provides backup for the clock when external
power is off or not connected and will power scanning for a short time.
Auto Power Off — Turns the scanner off when the battery power gets
too low.
12
Introduction
Page 13

Controls
1234567891011
12
13
14
15
1716
18 19
Scanner
Introduction
13
Page 14

1 Volume Control — Lets you raise or lower the level of the sound.
2 Squelch Control — Lets you set the signal level required to receive a
transmission. If you open the squelch all the way, you will hear hissing
between transmissions. This lets you hear weak signals, but prevents
scanning. As you close squelch, a stronger signal is required to stop
scanning and open audio. You normally set the control to a point just
where hissing on all channels stops between transmissions.
3 SCAN — Press to begin scanning the channels or to resume
scanning.
4 ALARM Select — Set to Off to disable alarm; Set to Radio to enable
the radio alarm; Set to Tone to enable the tone alarm.
5 SNOOZE/Backlight Key —
Backlight: Tap to turn the LCD backlight on for 15 seconds. Press and
hold to permanently turn on the backlight. Press and hold again to turn
off the backlight.
Snooze: Press while the alarm sounds to silence the alarm for
5 minutes.
6 TIME Set — Use to select your desired operation: Alarm Set; Clock
Set; Clock.
7 HOLD — Press to temporarily stop scanning, limit searching, or
weather scanning and remain on the channel. The scanner displays
the channel on hold. Press again to resume searching or scanning.
8 E/PGM — Press to enter the Program Mode. In Program Mode, enter
the desired frequency using the number buttons. Then press E/PGM
to store that frequency into the memory.
In Limit Search Mode, after entering the frequency, press E/PGM to
program the upper and lower limit frequency.
9 0 to 9 — Use the number buttons in four basic operations:
• press a number button to enter a frequency.
• press a number button to change a channel using the Direct
Channel Access feature.
• press a number button while scanning to enable or disable the
associated scanning bank memory bands.
10 POWER — Press to turn power on and off. The time and date display
when power is off (standby mode).
Introduction
14
Page 15

11 ./CLR — This key has three functions:
• press to input a decimal point when you enter a frequency.
• press to cancel a number button input - 0 to 9.
• press to clear an error display.
12 “Soft” Buttons — Functions for these 5 buttons depend on the
current mode. The Soft-button area at the bottom of the LCD will show
the buttons’ current function.
13 MODE Switch — Use to select the desired mode: AM/FM; Weather;
Scanner. (Slide switch must be set to Clock)
14
▼ — Press and release to move down through channel numbers in
the following HOLD modes: SCAN, PROGRAM, SERVICE SEARCH,
and WX or the step frequency in LIMIT SEARCH, and AM/FM mode.
(Refer to the frequency and step table on page 10.)
Press and hold for more than 1 second to have the changes run
continuously.
15
▲ — Press and release to move up through channel numbers in the
following HOLD modes: SCAN, PROGRAM, SERVICE SEARCH, and
WX or the step frequency in LIMIT SEARCH, and AM/FM mode.
(Refer to the frequency and step table on page 10.)
Press and hold for more than 1 second to have the changes run
continuously.
16 Headphone Jack — Lets you use an headphone for private listening.
17 External Alert Terminal — Connect a switch-closure activated device
such as a strobe or siren controller to provide additional alerting
options for the All-Hazards alert.
18 AM Loop Antenna — Connect the supplied loop antenna and position
it for best AM Broadcast radio reception.
19 Antenna Connector — Connect an external antenna using a BNC
connector.
Introduction
15
Page 16

ALARM
AM
PM
12345678910
HOLD PGM
25
50
75
BATT
L/0
FIRE
FM1
MST
HST
DST
DELAY
AIR
FM2
CST
AST
RCC
PRI
HAM
FIPS4
MEM
EST
UTC
RX
SRCH
POL
FIPS1
AM
PST
AKST
TZ
SVC
MRN
ALL
DIR
NEXT
PREV
731 8 9 10
4
6
2
5
11
12
14
15
16
17
18
20
19
21
22
23
25
24
26
27
29
28
30
13
LCD
1 Dish Icon — Indicates the reception status of the NIST Time signal.
More bars indicate a better signal. The icon flashes
when the radio is attempting reception.
2 Signal Indicator — Appears during time signal reception to indicate
signal strength. More bars indicate a better signal.
3 ALARM — Indicates the alarm is enabled. Flashes when alarm
sounds or if Snooze is selected.
4 CLOCK AREA — Indicates the current time.
5AM— Indicates AM and appears in Clock mode.
6PM— Indicates PM and appears in Clock mode.
7 1 to 10 — Scan mode: Indicates Channel memory Bank.
AM/FM mode: Indicates a radio station.
8 HOLD — Indicates a hold in Scan, Search, WX, or Direct Entry Mode.
9 PGM — Indicates Program mode.
10 Battery — Flashes when the battery power is low.
Non-flashing: No battery installed.
11 SRCH — Indicates Limit Search mode, Service Search mode and
Direct Entry Mode.
12 POL — Indicates a Police service search.
13 TZ — Time Zone selection mode for clock-setting mode.
16
Introduction
Page 17

14 L/O — Indicates a Locked Out channel or to skip a frequency while
searching.
15 FIRE — Indicates searching the Fire or Emergency Medical Services.
16 DST — Turns on/off the Daylight Savings Time mode for clock setting.
17 DELAY — Indicates a 2 second set delay for a channel before
scanning resumes.
18 AIR —
19 AM, FM1, FM2 — Selector for the current broadcast bands.
20 RCC — Turns the Radio Controlled Clock option on or off during clock-
21 PRI — Indicates the designated Priority channel.
22 HAM — Indicates searching amateur radio services.
23 MEM — Memory mode selector for broadcast.
24 PST, MST, CST, EST, AKST, HST, AST, UTC — Time Zones.
25 RX — Forces a reception attempt for the atomic clock during clock-
26 SVC — Sets the scanner to service search and changes the display
27 MRN — Indicates searching commercial and private watercraft
28 FIPS 1 - FIPS 4, ALL —Indicates the selected FIPS codes for
29 DIR — Direct frequency mode selector for broadcast.
30 NEXT, PREV — Selects the next/previous page of soft-key options.
Indicates searching commercial and private Air communications.
setting mode.
setting mode.
to show the available searches.
communications.
S.A.M.E All-Hazards operation.
Notes:
The backlight turns off automatically after 15 seconds from the last key
stroke (if not permanently turned on).
The scanner sounds special tones as follows:
• to confirm key entry.
• to indicate an error in key entry.
• to indicate low battery voltage.
Introduction
17
Page 18

Setting Up The Scanner
These guidelines will help you install and use your new scanner:
• If your scanner receives interference or electrical noise, move the
scanner or its antenna away from the source. You might also try
changing the height or angle of the antennas.
• Use an optional mono earphone or mono headset with proper
impedance for private listening.
• Do not use the scanner in high-moisture environments such as in the
kitchen or bathroom.
• Avoid placing the scanner in direct sunlight or near heating elements
or vents.
Connecting Power
• Insert the supplied AC
Adapter’s barrel plug into the
power jack on the back of the
scanner. Then plug the Adapter
into a standard household
outlet that supplies 120V AC,
60Hz. Do not plug the adapter
into a switch controlled outlet.
• Open the battery compartment
and insert 3 AA batteries.
Be sure to note the polarity
markings in the battery
compartment. You can use either
alkaline or rechargeable batteries, but
the scanner will not recharge batteries
in the compartment.
• Use only fresh alkaline AA batteries.
Rechargeable batteries can be used,
but battery life is shorter than with
alkaline batteries.
• Always remove old or weak batteries.
Batteries can leak chemicals that
destroy electronic circuits.
• Do not mix old and new batteries,
different types of batteries (standard,
alkaline, or rechargeable) or
rechargeable batteries of different
capacities.
18
Setting Up The Scanner
Page 19
Note that the batteries are intended to provide backup power for the clock
and for scanning for a short time. When the backup batteries becomes
too low, appears and flashes. Promptly replace the batteries.
When you either install batteries or connect the AC Adapter to a standard
US wall outlet, the scanner powers on and goes to STANDBY mode.
The display shows the initial clock time of 12:00 AM. The scanner
remains in STANDBY mode.
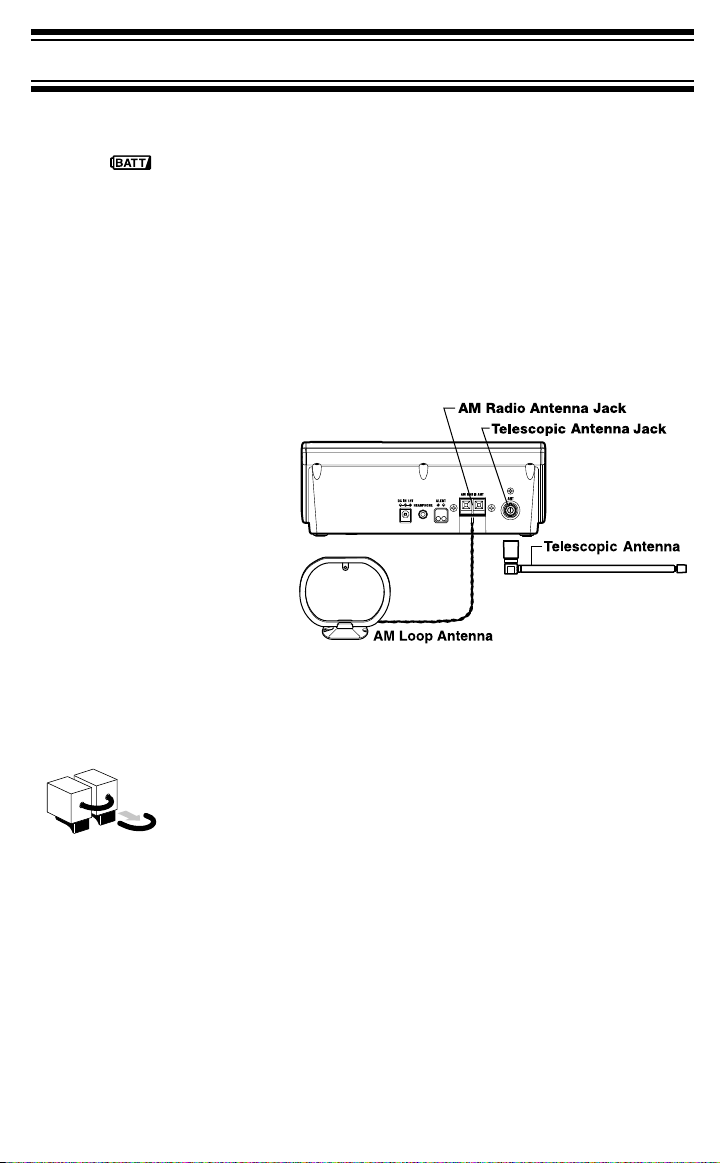
Connecting an Antenna
The scanner uses an
external loop antenna to
receive AM broadcast
stations and an external
telescopic antenna to
receive all other signals.
Connect the supplied rod
antenna by pushing the
antenna’s connector onto
the antenna jack on the
back of the scanner and
twisting it to the desired
angle. Connect the two
wires from the loop
antenna to the AM RADIO
ANT terminals on the
back of the scanner.
* Carefully remove the tube inserted before using the
AM Antenna Jack. When the Jack is not in use, keep
the tube mounted.
You can also use an external antenna (not supplied) to help to bring in
weaker signals. Use RG58, 50-Ohm lead with a BNC connector to
connect the antenna to the scanner. Connect and mount the antenna
according to the instructions provided with the antenna.
CAUTION: Be sure to follow all safety warnings provided with the
antenna. Failure to do so could expose you to risk of injury or death and
could severely damage the scanner.
Setting Up The Scanner
19
Page 20

Using the Backlight
To turn on the backlight for 15 seconds, tap SNOOZE/Backlight.
To turn on the backlight permanently, press and hold SNOOZE/Backlight
for over 2 seconds. To turn off the backlight, press and hold
SNOOZE/Backlight again.
Adjusting the Contrast
To change the contrast to provide the best visibility where you use it,
follow these steps.
1. Press POWER to put the scanner in standby mode.
2. Press ▲ or ▼. You hear a beep and the contrast starts to change.
Release ▲ or ▼ at the appropriate level.
Note:
The display contrast level returns to the default setting if power is lost.
20
Page 21

Using the Radio Controlled Clock
Your scanner’s Clock displays all the time. When you turn off the radio
functions, it also displays the current seconds and date. It can also be
used as a standard alarm clock. Even though your scanner can set its
time automatically from the nationwide NIST broadcast, since this signal
is usually weak and can often only be received reliably at night in many
areas, we recommend you manually set the time to get started.
Setting the Current Time and Date
Follow the steps to set the current time and date:
1. Move the slide switch to Clock Set.
The hour digits flash.
2. Press ▲ or ▼ to change the hour by one
hour or press the number keys to select
the present hour. Then press E/PGM.
The minutes digits flash.
3. Press ▲ or ▼ to change the minute setting by one minute or press the
appropriate number keys to enter the minutes. Press E/PGM. Seconds
reset to 00, the
4. Press ▲ or ▼ to move from AM to PM and back. Press E/PGM.
The current year flashes.
AM/PM icon flashes.
5. Press ▲ or ▼, or press the appropriate number keys to select the
correct year. Press E/PGM, the current month flashes.
6. Press ▲ or ▼, or press the appropriate number keys to select the
correct month. Press E/PGM, the current day flashes.
7. Press ▲ or ▼, or press the appropriate number keys to select the
correct day. Press E/PGM.
To exit the clock setting mode, move the slide switch to Clock.
Setting the Radio Controlled Clock Options
The radio controlled clock attempts to receive the time at the top of every
hour (e.g. 12:00, 1:00, 2:00 and so on) until it receives the time. While it
is checking for the time, the dish icon ( ) flashes and the signal
strength indicator appears to show the condition of the received NIST
signal. When it has successfully received the time, the dish icon ( )
will appear in the display. The dish remains steady for 24 hours from the
last successful signal reception. Even with a good signal, it will take 2-5
minutes to set the time from the NIST signal.
Using the Radio Controlled Clock
21
Page 22

The NIST signal is very weak, so might not from all parts of your house or
at all times of day. Typically, reception is best at night and near a window.
The time reception antenna is integrated into your scanner, and is not
part of the AM or scanner antenna.
Notes:
• The antenna receives most strongly when the scanner keeps its left
side facing to the source of waves, Fort Collins in Colorado.
Computers and some light dimmers can generate signals that can
•
interfere with the NIST signal. If this occurs, reposition the scanner away
from these devices, or turn them off to remove the interfering signal.
•
If the scanner is inside of a building that has a lot of metal, the timesetting signal will be blocked. Try positioning the scanner near a window.
There are four atomic clock settings:
• Time Zone
• Daylight Savings Time
• RCC (Radio Controlled Clock) On or Off
• Signal RX
Setting Your Time Zone
1. Slide the TIME switch to Clock Set. The hours setting starts to flash,
and the soft-key display changes to show the time-set functions.
2. Press the TZ soft key. The first set of time zone selections appears.
3. Press the soft key that corresponds to the time zone you are in. To see
more options, press the NEXT or PREV soft key. Or, to set your time
zone’s offset from UTC, use ▲ or ▼.
4. Once you have selected the correct setting, press E, then slide the
TIME switch back to Clock.
Setting the Daylight Savings Time Option
If your area pays attention to Daylight Savings Time, turn on the DST
option by:
1. Slide the TIME switch to Clock Set. The hours setting starts to flash,
and the soft-key display changes to show the time-set functions.
2. Press the DST soft key. The scanner shows the current DST setting
(ON or OFF).
Using the Radio Controlled Clock
22
Page 23

3. Use ▲ or ▼, or press the ON or OFF soft key to select the correct
option.
4. Once you have selected the correct setting, press E, then slide the
TIME switch back to Clock.
Note that turning on this setting tells the receiver to set the DST
according to the received NIST signal. It does not actually change the
time to daylight savings time unless it is appropriate.
Turning On/Off Radio Control
In some areas it is just not possible to receive the NIST signal. If this is
the case where you are, you should turn off the RCC option.
1. Slide the TIME switch to Clock Set. The hours setting starts to flash,
and the soft-key display changes to show the time-set functions.
2. Press the RCC soft key. The scanner shows the current RCC setting,
(ON or OFF).
3. Use ▲ or ▼, or press the ON or OFF soft key to select the desired
setting.
4. Once you have selected the correct setting, press E, then slide the
TIME switch back to Clock.
Forcing a Reception Attempt
You can force the scanner to try to receive the NIST signal at any time.
This is sometimes useful if you are trying to find the best position for the
scanner and don’t want to wait until the beginning of the hour.
1. Slide the TIME switch to Clock Set. The hours setting starts to flash,
and the soft-key display changes to show the time-set functions.
2. Press the RX soft key. The dish icon ( ) and
3. Slide the TIME switch back to Clock. The scanner will attempt to
receive the signal for 10 minutes. You can see the NIST signal strength
by referring to the signal bars next to the dish icon. When the scanner
successfully receives the time signal, the icon will stop flashing. If the
scanner cannot receive the signal within 10 minutes, the icon turns off.
Using the Radio Controlled Clock
RX icon starts to flash.
23
Page 24
Setting the Alarm Clock
Follow these steps to set the alarm time:
1. Slide the TIME switch to Alarm Set.
The hours digits flash.
2.
Press ▲ or ▼ to change the hour by one hour or press the number keys to
select the present hour. Then press E/PGM. The minutes digits flash.
3. Press ▲ or ▼ to change the minute setting by one minute or press the
appropriate number keys to enter the minutes. Press E/PGM.
The seconds reset to 00, the AM/PM icon flashes.
4.
Press ▲ or ▼ to move from AM to PM and back. Press E/PGM to make
your selection. To lock in the alarm time, move the slide switch to Clock.
To have the BC370CRS alert you at the
selected time, slide Off/Radio/Tone to either
Radio or Tone and turn off the scanner. If
you set the selector to Radio, the alarm will
sound with the selected audio source
(AM/FM, Scanner, or Weather). If you set the
selector to Tone, the scanner will sound a
tone at the set time. To silence the alarm,
slide Off/Radio/Tone to Off. If you do not turn
off the alarm, it will sound for 20 minutes,
then reset to alert you again the following day.
Using Snooze
When the alarm sounds, press the snooze
bar to silence the alarm for 5 minutes.
Using the Radio Controlled Clock
24
Page 25
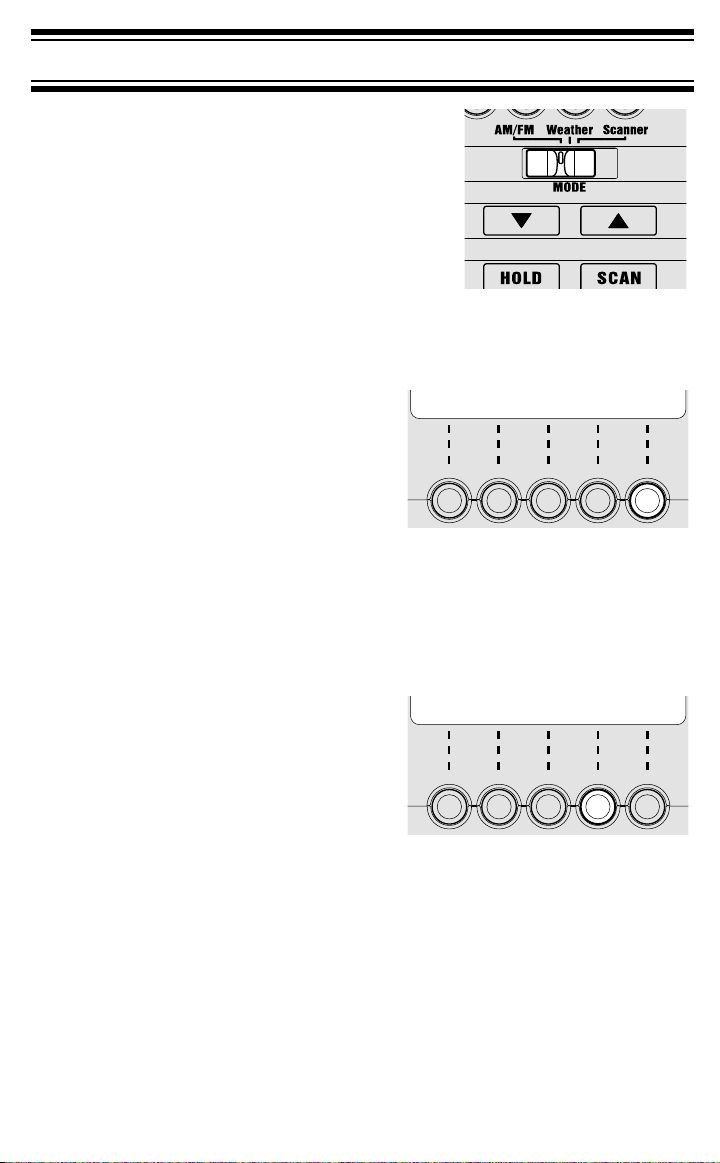
Listening to AM/FM/TV Channels
DIR
MEM
To listen to AM/FM/TV channels, slide the
mode selector to AM/FM. Then, press the
soft button at the top of the scanner to select
the desired source (AM for AM Broadcast,
FM1 or FM2 for FM or TV Broadcast).
Directly Selecting a Channel
Press the DIR soft key to select the
direct entry mode. Use ▲ or ▼ to scan
up or down the selected band. The
scanner stops on active channels. TV
channels are scanned after FM
channels in FM mode.
You can also enter the channel frequency using the keypad. Enter the
channel frequency (for FM or AM) or the TV channel number.
Using AM/FM/TV Channel Memory
Your scanner has 30 AM/FM
memories for quick channel recall
(10 for AM, 20 for FM/TV). To store a
channel into memory, First press the
soft key to select the desired band
(AM, FM1 or FM2). Then, directly
select the channel you want to store
(see above). While listening to the channel, press and hold the number
button that corresponds to the memory you want to save the channel into
for 2 seconds. The scanner switches to the Memory mode for the current
band.
To quickly recall a channel, select the band, select the channel memory
mode by pressing the MEM soft key, then tap the number button that
corresponds to the memory where the channel is stored.
Listening to AM/FM/TV Channels
25
Page 26

Using All-Hazards
Your BC370CRS’s All-Hazards function makes it one of the most powerful
weather radio receivers built. It will activate on local broadcast of the
standard EAS signal on NOAA (weather) channels, AM, FM, or TV
Broadcast channels. Your scanner automatically monitors for an EAS
alert on the last-tuned channel whenever you turn off the scanner.
To ensure that you are alerted, be sure to set the MODE switch to
Weather (if you receive alerts on standard NOAA channels), or to AM/FM
and tune to the appropriate broadcast channel in your area.
Limiting Alerts to Your County
Alerts include a special digital signal called S.A.M.E. (specific area
message encoding) that identifies the area impacted by an alert. This lets
you set the scanner to ignore alerts that are not for your county,
preventing many false alerts for storms that are in surrounding counties.
You can store up to 4 county codes in your scanner and select one or
more of them to receive alerts for.
Programming County Codes
Your scanner uses FIPS (Federal Information Processing Standards)
codes to identify counties. You can find the FIPS code for your area by
going to:
http://www.nws.noaa.gov/nwr/nwrsame.htm
and looking up your county’s 6-digit code. Once you have the codes for
the counties you are interested in, follow these steps to program them
into the scanner.
1. Slide the MODE switch to Weather.
2. Press and hold the soft key for the FIPS position you want to program.
After about 2 seconds, the display changes to show the current setting.
3. Use the keypad to enter the code for that position, then press E/PGM.
4. Tap the other FIPS keys and use the keypad to enter the codes you
want to associate with each key.
5. When you have programmed all FIPS codes, press the RTN soft key to
return to normal weather mode.
Using All-Hazards
26
Page 27

Selecting Areas for Alerts
To limit alerts to specific areas, in weather mode press the soft key for the
area you want to turn on or off. Activated areas are reverse-printed in the
display. Or, to receive alerts for all areas, press the ALL soft key to
reverse-highlight that option.
Note:
If you don’t select an area, the scanner will never sound an alert.
Receiving Alerts
The scanner receives alerts even if it is in standby mode (power off).
Select the appropriate weather, AM, FM, or TV broadcast channel. Then,
power-off the scanner. The bottom line of the display will indicate the
frequency the scanner is monitoring for alerts. If an alert is received, the
scanner sounds an alert tone, then you hear the audio for the alert. The
alert message summary is also displayed across the bottom of the
display.
During an alert, the terminals on the back of the scanner provide a switch
closure to activate external sounders or strobes (optional). These can be
easily controlled using an X10 PRO PowerFlash Interface (Model PSC01Input Mode A). See the interface’s instructions for installation of such
devices.
Using All-Hazards
27
Page 28

Using the Scanner Memories
Your scanner has 300 memories you can
store frequencies into for scanning.
The memories are arranged in 10 banks of
30 memories each. While scanning, you can
quickly select which bank to scan by
pressing the number button that corresponds
to the bank you want to turn on or off for
scanning. To select the scanner mode, slide
the MODE switch to Scanner.
Programming Memories
You will first need to determine the frequencies you want to program.
This varies widely depending on what you want to listen to and your
geographic area. There are many frequency reference sources available
on the internet that can get you started. One such source,
http://www.radioreference.com, has a diverse listing of many conventional
frequencies. You might also search for regional hobbyist sites that cover
your area or check the database at the FCC’s General Menu
(http://www.fcc.gov) for frequencies of interest.
Make a list of the frequencies you want to program, then organize them in
up to 10 groups of 10 or fewer and fill out the table below. It always helps
to plan and organize what you want to do before you start, so don’t skip
this important step. (The numbers in the left-hand columns below
correspond to your scanner’s memory numbers.)
Bank 1 Bank 2 Bank 3 Bank 4 Bank 5
111 213141
212 223242
313 233343
414 243444
515 253545
616 263646
717 273747
818 283848
919 293949
10 20 30 40 50
Using the Scanner Memories
28
Page 29

Bank 6 Bank 7 Bank 8 Bank 9 Bank 10
51 61 71 81 91
52 62 72 82 92
53 63 73 83 93
54 64 74 84 94
55 65 75 85 95
56 66 76 86 96
57 67 77 87 97
58 68 78 88 98
59 69 79 89 99
60 70 80 90 100
Bank 11 Bank 12 Bank 13 Bank 14 Bank 15
101 111 121 131 141
102 112 122 132 142
103 113 123 133 143
104 114 124 134 144
105 115 125 135 145
106 116 126 136 146
107 117 127 137 147
108 118 128 138 148
109 119 129 139 149
110 120 130 140 150
Bank 16 Bank 17 Bank 18 Bank 19 Bank 20
151 161 171 181 191
152 162 172 182 192
153 163 173 183 193
154 164 174 184 194
155 165 175 185 195
156 166 176 186 196
157 167 177 187 197
158 168 178 188 198
159 169 179 189 199
160 170 180 190 200
Bank 21 Bank 22 Bank 23 Bank 24 Bank 25
201 211 221 231 241
202 212 222 232 242
203 213 223 233 243
204 214 224 234 244
205 215 225 235 245
206 216 226 236 246
207 217 227 237 247
208 218 228 238 248
209 219 229 239 249
210 220 230 240 250
Using the Scanner Memories
29
Page 30

Bank 26 Bank 27 Bank 28 Bank 29 Bank 30
251 261 271 281 291
252 262 272 282 292
253 263 273 283 293
254 264 274 284 294
255 265 275 285 295
256 266 276 286 296
257 267 277 287 297
258 268 278 288 298
259 269 279 289 299
260 270 280 290 300
Once you fill out the above chart, follow these steps to enter or change a
frequency in a memory:
1. Press E/PGM to enter the program mode (the scanner turns on the
PGM icon).
2. If the current channel is not the one you want to program, enter the
memory number then press HOLD.
3. Enter the frequency including the decimal point, then press E/PGM.
4. To program the next memory, press ▲ or ▼ and repeat step 3.
To program a different memory, repeat from step 2.
5. To exit program mode, press HOLD or SCAN or change the scanner’s
mode.
Notes:
• Any frequency you program replaces the previous memory contents.
• If you enter a frequency you have already stored in a different
memory in Step 3, the scanner beeps and displays the channel
where you have previously stored the frequency. If you want to store
the frequency anyway, press E/PGM a second time in Step 3.
• To clear the contents of a memory, enter “0” in Step 3.
• Channels you program are automatically unlocked (see “Locking/
Unlocking Memories) and have Delay turned on (See “Setting
Channel Delay”).
Selecting a Memory
To select a single memory to monitor, press HOLD. The scanner turns on
the HOLD icon. Then, select a memory by pressing ▲ or ▼ to go to the
memory or input the memory number then press HOLD.
Using the Scanner Memories
30
Page 31

Scanning Memory Banks
To scan the memories you have programmed, press SCAN. The scanner
scans all unlocked programmed memories in enabled memory banks,
stopping on a memory when it detects a transmission. To turn on/off
memory banks, while scanning press the number button that corresponds
to the memory bank you want to enable or disable.
Locking/Unlocking Memories
You can lock memories so that they are not scanned, even if their bank is
turned on. Simply press L/O when the scanner stops on a transmission
on the frequency or manually select the memory (see page 30 for
“Selecting a Memory” section), then press L/O. The scanner turns on the
L/O icon when it is set to a memory that is locked out.
To unlock a memory, manually select the memory, then press L/O.
The scanner turns off the
scanning its bank.
To unlock all memories, press and hold L/O for 2 seconds, the scanner
beeps twice and the
L/O icon and includes the memory when
L/O icon disappears.
Using Priority Scan
You can set one memory in each bank as a priority memory. If you turn
on the Priority feature, the scanner will check the priority memories in
enabled banks every 2 seconds, even if it has stopped on a transmission
on another memory.
To set the memory in a bank to be the priority memory, manually select
the memory then, while holding on the memory, press E/PGM to put the
scanner in program mode and press PRI. The scanner turns on the
icon when it is stopped on a memory designated as priority.
To turn on Priority Scan, press PRI while the scanner is scanning or
holding on a memory (but not in program mode). You will notice a short
break in audio every 2 seconds as the scanner checks the enabled
priority memories. If there is a transmission on a priority memory, the
scanner will immediately tune to that memory.
PRI
Using the Scanner Memories
31
Page 32

Setting Channel Delay
You can set the scanner to pause for 2 seconds at the end of a
transmission on a memory. This is useful to help prevent missed replies.
Delay is turned on by default when you program a memory. To turn Delay
off (or back on), first, select the channel. Then, press DELAY.
The scanner reverses the DELAY icon for memories that have been
programmed with delay.
32
Using the Scanner Memories
Page 33

Searching for Active Frequencies
Many people enjoy searching for the unknown...frequencies that are in
use in their area but are not posted to any site or in any publication.
The BC370CRS has two ways to search: Limit searching that searches
between two set frequencies and Service Searching that searches for
specific types of agencies based on the FCC’s standard frequency
allocation for such services.
Using Limit Search
Programming an Upper/Lower Limit
Follow these steps to program an Upper and Lower limit for the limit
search:
1. Press SRCH soft key then HOLD. The scanner holds on the current
search frequency.
2. Enter one of the range limits, then press E/PGM.
Press ▲ or ▼, then enter the other range limit and press E/PGM.
Searching the Selected Range
After entering the limits (or use the default limits), press SRCH soft key.
The scanner starts searching from the lower range up to the higher
range. To change the direction of the search, press ▲ or ▼.
Using Service Search
You can select any of Police, Fire/EMS, Aircraft Ham, and Marine
channels for active frequencies in your area.
Selecting a Service to Search
Press SVC to enter the service search mode, then press the button
corresponding to the service you want to search. When the scanner stops
on a transmission, you can force it to resume searching by pressing
▲ or ▼.
Searching for Active Frequencies
33
Page 34

Saving a Found Frequency into a Scan Memory
When the scanner stops on the frequency you want to save, press HOLD
to hold on that frequency. Then, press E/PGM. The scanner displays the
lowest-numbered empty memory in the current bank (or the last-scanned
memory if all memories are used). Use ▲ or ▼ to select the memory to
hold the frequency, then press E/PGM to store the frequency into the
memory.
Search Lockouts
If the scanner stops on a frequency that you don’t want to hear, you can
lock it out. When locked out, the scanner won’t stop on the frequency in
either Limit Search or Service Search.
Simply press L/O when the scanner stops on the frequency to lock the
frequency out. To unlock the frequency, during search press HOLD.
Then manually step to the frequency using ▲ or ▼. When you have
selected the frequency, press L/O.
If you press and hold L/O for 2 seconds, all the frequencies can be
unlocked.
34
Searching for Active Frequencies
Page 35

Listening to Weather Channels
The scanner lets you easily listen to NOAA weather channels in use in
your area. Simply slide the audio source selector to Weather.
The scanner scans the preset weather frequencies and stops if it detects
a transmission. If you want to check for another frequency in use in your
area, press SCAN or press ▲ or ▼.
Seven NOAA weather channels are available across most of the US.
To find out which channel is in use in your area, visit their web site at
http://www.noaa.nws.gov. The scanner also includes three Canadian
Coast Guard weather broadcast frequencies (numbered 8-10 in the
scanner). Select one of these frequencies if they are in use in your area.
Listening to Weather Channels
35
Page 36

Care and Maintenance
General Use
• Turn the scanner off before disconnecting the power.
• If memory is lost, simply reprogram each channel.
• Always press each button firmly until you hear the entry tone for that
key entry.
Location
• Do not use the scanner in high-moisture environments such as the
kitchen or bathroom.
• Avoid placing the unit in direct sunlight or near heating elements or
vents.
• If the scanner receives strong interference or electrical noise, move it
or its antenna away from the source of the noise. If possible, a higher
elevation might provide better reception.
• Also try changing the height or angle of the antenna.
Cleaning
• Disconnect the power to the unit before cleaning.
• Clean the outside of the scanner with a mild detergent.
• To prevent scratches, do not use abrasive cleaners or solvents.
Be careful not to rub the LCD window.
• Do not use excessive amounts of water.
Repairs
Do not attempt any repair. The scanner contains no user serviceable
parts. Contact the Uniden Customer Service Center or take it to a
qualified repair technician.
Birdies
All radios can receive “birdies” (undesired signals). If your scanner stops
during Scan mode and no sound is heard, it might be receiving a birdie.
Birdies are internally generated signals inherent in the electronics of the
scanner. Press L/O to lock out the channel.
Resetting the Scanner (Clearing all Memories)
To reset the scanner to factory defaults, turn off the scanner. Then, while
holding down 2, 9, and HOLD, turn on the scanner. All scanner memory
contents are erased.
Care and Maintenance
36
Page 37

Technical Specifications
Certificated accordance with FCC Rules and Regulations Part 15 Subpart C as of date of manufacture.
Band Coverage : 18 Bands
Frequency Range :
Range (MHz) Step Mode
0.5300 to 1.7000 10 MHz AM AM Broadcast
25.0000 to 27.9950 5 kHz AM AM Band
28.0000 to 29.9950 5 kHz FM 10 Meter Amateur Band
30.0000 to 49.9950 5 kHz FM VHF Low Band
50.0000 to 54.0000 5 kHz FM 6 Meter Amateur Band
59.7500, 65.7500, 71.7500, 6 MHz WFM TV Broadcast Pickup 2ch-6ch
81.7500, 87.7500
88.0000 to 107.9000 100 kHz WFM FM Broadcast
108.0000 to 136.9875 12.5 kHz AM Aircraft Band
137.0000 to 143.9950 5 kHz FM Military Land Mobile
144.0000 to 147.9950 5 kHz FM 2 Meter Amateur Band
148.0000 to 174.0000 5 kHz FM VHF High Band
179.7500, 185.7500, 191.7500, 6 MHz WFM TV Broadcast Pickup 7ch-13ch
197.7500, 203.7500,
209.7500, 215.7500,
225.0000 to 380.0000 25 kHz AM Military Air
406.0000 to 419.9938 6.25 kHz FM Federal Gov. Land Mobile
420.0000 to 449.9938 6.25 kHz FM 70cm Amateur Band
450.0000 to 469.9938 6.25 kHz FM UHF Standard Band
470.0000 to 512.0000 6.25 kHz FM UHF TV
806.0000 to 823.9875 12.5 kHz FM Public Service Band
849.0125 to 868.9875 12.5 kHz FM Public Service Band
894.0125 to 956.0000 12.5 kHz FM Public Service Band
Weather Service Channel : 162.4000 MHz 162.5250 MHz
162.4250 MHz 162.5500 MHz
162.4500 MHz 161.6500 MHz
162.4750 MHz 161.7750 MHz
162.5000 MHz 163.2750 MHz
Technical Specifications
37
Page 38

Sensitivity (nominal) 12dB SNAD : 0.5 µV 0.53-1.70 MHz
0.3
µV 25-27.995 MHz
0.3
µV 28-54 MHz
0.7
µV 59.75-107.9 MHz
0.4
µV 108-136.9875 MHz
0.3
µV 137-174 MHz
0.8
µV 179.75-215.75 MHz
0.4
µV 225-380 MHz
0.3
µV 406-512 MHz
0.5
µV 806-956 MHz
Channels : 300 (30 channels
Scan Rate : Up to 70 channels per second
Search Rate : Up to 75 steps per second
Time Accuracy : +/
Audio Output(normal) : 0.9W Max
Alert Terminal Output : 9V DC (with AC adapter)
Power Requirements : 120V AC (±10%) 60Hz
Antenna : Telescoping (included), AM Radio Loop
External Jacks : Antenna jack
Accessories : AC Adapter (AD-1008)
Speaker : 8 ohm, 2 watt
Operating Temp :
Storage Temp :
Size : 209(W)
Weight : 1 lb. 5.2 oz (without antenna)
− 20 seconds per month at normal
temperature (25
doesn’t work)
Antenna (included)
AM Radio Antenna Jack
Headphone Jack
Alert Jack
DC 12V Power Jack
−10°C to +50°C
−20°C to +60°C
× 147.75(D) × 80.7(H) mm
× 10 Banks)
°C ± 5°C, during RCC
Features, specification, and availability of optional accessories are all
subject to change without notice.
Technical Specifications
38
Page 39

One-Year Limited Warranty
Important: Evidence of original purchase is required for warranty service.
WARRANTOR: UNIDEN AMERICA CORPORATION (“Uniden”)
ELEMENTS OF WARRANTY: Uniden warrants, for one year, to the original retail
owner, this Uniden Product to be free from defects in materials and craftsmanship
with only the limitations or exclusions set out below.
WARRANTY DURATION: This warranty to the original user shall terminate and
be of no further effect 12 months after the date of original retail sale. The warranty
is invalid if the Product is (A) damaged or not maintained as reasonable or
necessary, (B) modified, altered, or used as part of any conversion kits,
subassemblies, or any configurations not sold by Uniden, (C) improperly installed,
(D) serviced or repaired by someone other than an authorized Uniden service
center for a defect or malfunction covered by this warranty, (E) used in any
conjunction with equipment or parts or as part of any system not manufactured by
Uniden, or (F) installed or programmed by anyone other than as detailed by the
Operating Guide for this product.
STATEMENT OF REMEDY: In the event that the product does not conform to this
warranty at any time while this warranty is in effect, warrantor will repair the defect
and return it to you without charge for parts, service, or any other cost (except
shipping and handling) incurred by warrantor or its representatives in connection
with the performance of this warranty.
ABOVE IS THE SOLE AND ENTIRE WARRANTY PERTAINING TO THE PRODUCT
AND IS IN LIEU OF AND EXCLUDES ALL OTHER WARRANTIES OF ANY NATURE
WHATSOEVER, WHETHER EXPRESS, IMPLIED OR ARISING BY OPERATION OF
LAW, INCLUDING, BUT NOT LIMITED TO ANY IMPLIED WARRANTIES OF
MERCHANTABILITY OR FITNESS FOR A PARTICULAR PURPOSE. THIS
WARRANTY DOES NOT COVER OR PROVIDE FOR THE REIMBURSEMENT OR
PAYMENT OF INCIDENTAL OR CONSEQUENTIAL DAMAGES.
allow this exclusion or limitation of incidental or consequential damages so the
above limitation or exclusion might not apply to you.
LEGAL REMEDIES: This warranty gives you specific legal rights, and you might
also have other rights which vary from state to state. This warranty is void outside
the United States of America.
PROCEDURE FOR OBTAINING PERFORMANCE OF WARRANTY: If, after
following the instructions in this Operating Guide you are certain that the Product
is defective, pack the Product carefully (preferably in its original packaging).
Include evidence of original purchase and a note describing the defect that has
caused you to return it. The Product should be shipped freight prepaid, by
traceable means, or delivered, to warrantor at:
Uniden America Corporation
Parts and Service Division
4700 Amon Carter Boulevard
Fort Worth, TX 76155
(800) 297-1023, 8:00 a.m. to 5:00 p.m., Central,
Monday through Friday
THE LIMITED WARRANTY SET FORTH
Some states do not
One-Year Limited Warranty
39
Page 40

FOR
ACCESSORIES,
GO ONLINE &
WWW.UNIDEN.COM
THANK YOU FOR BUYING A UNIDEN PRODUCT.
REGISTER ONLINE TODAY!
May be covered under one or more of the following U.S. patents.
4,398,304 4,409,688 4,455,679 4,461,036 4,521,915 4,597,104
4,627,100 4,841,302 4,888,815 4,932,074 4,947,456 5,014,348
5,199,109 5,408,692 5,428,826 5,438,688 5,448,256 5,465,402
5,471,660 5,483,684 5,530,296 5,548,832 5,571,071 5,574,995
5,577,076 5,598,430 5,600,223 5,642,424 5,710,992 5,859,875
5,896,422 5,991,346 5,991,603 6,012,158 6,025,758 6,034,573
6,064,270 6,266,521
©2006. Uniden America Corporation, Fort Worth, Texas
Contains additional foreign articles. Custom manufactured in China.
UBZZ01338ZZ(0)
 Loading...