

Page 1

BC355C
SCANNER
OWNER’S MANUAL
1
Page 2

IMPORTANT INFORMATION
PRECAUTIONS
Before you use this scanner, please observe the following:
Warning
Uniden America Corporation does not represent this unit to be
waterproof. To reduce the risk of re, electrical shocks, or damage
to the unit, do not expose this unit to rain or moisture.
Patents
May be covered under one or more of the following U.S. patents:
5,199,109 5,408,692 5,428,826 5,438,688
5,465,402 5,471,660 5,483,684 5,530,296
5,548,832 5,551,071 5,574,995 5,577,076
5,598,430 5,642,424 5,710,992 5,991,346
6,025,758 6,034,573 6,064,270 6,839,550
7,006,797 7,013,110 7,505,738
Other patents pending.
2
Page 3

** These products contain Uniden proprietary information.
Software, control codes, protocols and other such related matter
may be the copyrighted work of Uniden America Corporation.
© Copyright 2009-2010, Uniden America Corporation. All Rights
Reserved.
© 2009 Uniden. This product contains Uniden proprietary
information.
Software, control codes, protocols and other such related matter
may be the copyrighted work of Uniden America Corporation.
Uniden ® is a registered trademark of Uniden America Corporation.
Bearcat ® is a registered trademark of Uniden America Corporation.
Close Call ® is a registered trademark of Uniden America
Corporation.
3
Page 4

TABLE OF CONTENTS
IMPORTANT INFORMATION . . . . . . . . . . . . . . . . . . . .2
PRECAUTIONS . . . . . . . . . . . . . . . . . . . . . . . . . . . . . . . . . . . . . . . 2
Warning . . . . . . . . . . . . . . . . . . . . . . . . . . . . . . . . . . . . . . . . . . . . 2
Patents . . . . . . . . . . . . . . . . . . . . . . . . . . . . . . . . . . . . . . . . . . . . . 2
THE FCC WANTS YOU TO KNOW . . . . . . . . . . . . . . . .7
SCANNING LEGALLY . . . . . . . . . . . . . . . . . . . . . . . . . . . . . . . . . 8
ABOUT YOUR NEW BC355C SCANNER . . . . . . . . . .9
FEATURE SUMMARY . . . . . . . . . . . . . . . . . . . . . . . . . . . . . . . . . 10
INCLUDED IN YOUR SCANNER PACKAGE . . . . . . . . . . . . . . 15
Optional Accessories . . . . . . . . . . . . . . . . . . . . . . . . . . . . . . . 15
INSTALLING THE BC355C SCANNER . . . . . . . . . . 16
FOR HOME USE DESKTOP INSTALLATION . . . . . . . . . . . 16
Helpful Hints . . . . . . . . . . . . . . . . . . . . . . . . . . . . . . . . . . . . . . 17
FOR MOBILE USE INCAR INSTALLATION . . . . . . . . . . . . 17
Temporary Mobile Installation . . . . . . . . . . . . . . . . . . . . . . 17
Permanent Mobile Installation . . . . . . . . . . . . . . . . . . . . . . 18
Permanently Mounting the BC355C Unit . . . . . . . . . . . 18
Permanently Connecting the Mobile Power Supply . 19
SCANNER OPERATION OVERVIEW . . . . . . . . . . . 20
BC355C FRONT PANEL . . . . . . . . . . . . . . . . . . . . . . . . . . . . . . . 20
4
Page 5

BC355C REAR PANEL . . . . . . . . . . . . . . . . . . . . . . . . . . . . . . . . 27
USING YOUR BC355C SCANNER . . . . . . . . . . . . . . 28
SET UP . . . . . . . . . . . . . . . . . . . . . . . . . . . . . . . . . . . . . . . . . . . . . . 28
Adjusting Squelch . . . . . . . . . . . . . . . . . . . . . . . . . . . . . . . . . . 28
OPERATING MODES . . . . . . . . . . . . . . . . . . . . . . . . . . . . . . . . . 29
SCAN . . . . . . . . . . . . . . . . . . . . . . . . . . . . . . . . . . . . . . . . . . . . . . 29
SEARCH . . . . . . . . . . . . . . . . . . . . . . . . . . . . . . . . . . . . . . . . . . . . 30
SPECIAL NOTES FOR SCANNING PD/FD/EMG AND AIR/
MRN BANKS . . . . . . . . . . . . . . . . . . . . . . . . . . . . . . . . . . . . . . 31
Scanning Service Bank Tips . . . . . . . . . . . . . . . . . . . . . . . . . 32
Searching Band Tips . . . . . . . . . . . . . . . . . . . . . . . . . . . . . . . . 35
SCREENS. . . . . . . . . . . . . . . . . . . . . . . . . . . . . . . . . . . . 36
SCANNING BANKS . . . . . . . . . . . . . . . . . . . . . . . . . . . . . . . . . . 36
SEARCHING BANDS . . . . . . . . . . . . . . . . . . . . . . . . . . . . . . . . . 37
SPECIAL FEATURES . . . . . . . . . . . . . . . . . . . . . . . . . . 37
LOCK OUT CHANNELS / FREQUENCIES . . . . . . . . . . . . . . . . 38
Types of Lock Out . . . . . . . . . . . . . . . . . . . . . . . . . . . . . . . . . . 38
Temporary Lock Out . . . . . . . . . . . . . . . . . . . . . . . . . . . . . . 38
Permanent Lock Out . . . . . . . . . . . . . . . . . . . . . . . . . . . . . . 39
Lock Out Limits . . . . . . . . . . . . . . . . . . . . . . . . . . . . . . . . . . . . . 39
Lock Out Tips . . . . . . . . . . . . . . . . . . . . . . . . . . . . . . . . . . . . . . 40
CLOSE CALL ® . . . . . . . . . . . . . . . . . . . . . . . . . . . . . . . . . . . . . . . 44
5
Page 6

Close Call Priority . . . . . . . . . . . . . . . . . . . . . . . . . . . . . . . . . . 45
Close Call Do Not Disturb . . . . . . . . . . . . . . . . . . . . . . . . . . . 45
Close Call Only . . . . . . . . . . . . . . . . . . . . . . . . . . . . . . . . . . . . . 45
Setting Up Close Call Modes . . . . . . . . . . . . . . . . . . . . . . . . . 46
Setting C ‐ C.bAnd Options . . . . . . . . . . . . . . . . . . . . . . . . 46
Setting C ‐ C.ALEt Options . . . . . . . . . . . . . . . . . . . . . . . . 48
Setting C ‐ C.PS Options . . . . . . . . . . . . . . . . . . . . . . . . . . 48
Close Call Tips . . . . . . . . . . . . . . . . . . . . . . . . . . . . . . . . . . . . 49
PRIVATE BANK . . . . . . . . . . . . . . . . . . . . . . . . . . . . . . . . . . . . . . 50
Programming Frequencies and Channels . . . . . . . . . . . . 51
Programming a Channel . . . . . . . . . . . . . . . . . . . . . . . . . . 52
Deleting a Programmed Frequency (programming
“000.0000”) . . . . . . . . . . . . . . . . . . . . . . . . . . . . . . . . . . . . . 54
PROGRAM LOCK FEATURE . . . . . . . . . . . . . . . . . . . . . . . . . . . 57
TROUBLESHOOTING GUIDE . . . . . . . . . . . . . . . . . 58
GENERAL PRODUCT CARE . . . . . . . . . . . . . . . . . . . 61
LOCATION . . . . . . . . . . . . . . . . . . . . . . . . . . . . . . . . . . . . . . . . . . 61
CLEANING . . . . . . . . . . . . . . . . . . . . . . . . . . . . . . . . . . . . . . . . . . 61
REPAIRS . . . . . . . . . . . . . . . . . . . . . . . . . . . . . . . . . . . . . . . . . . . . 62
BIRDIES . . . . . . . . . . . . . . . . . . . . . . . . . . . . . . . . . . . . . . . . . . . . 62
TECHNICAL SPECIFICATIONS . . . . . . . . . . . . . . . . 62
WARRANTY . . . . . . . . . . . . . . . . . . . . . . . . . . . . . . . . . 64
6
Page 7

THE FCC WANTS YOU TO KNOW
This scanner has been tested and found to comply with the limits
for a scanning receiver, pursuant to Part 15 of the FCC Rules. These
limits are designed to provide reasonable protection against
harmful interference in a residential installation. This scanner
generates, uses, and can radiate radio frequency energy and,
if not installed and used in accordance with the instructions,
may cause harmful interference to radio communications. There
is no guarantee that interference will not occur in a particular
installation. If this scanner does cause harmful interference to
radio or television reception, which can be determined by turning
the scanner on and o, you are encouraged to try to correct the
interference by one or more of the following measures:
Reorient or relocate the receiving antenna
•
Increase the separation between the scanner and the receiver
•
This device complies with Part 15 of the FCC Rules. Operation is
subject to the following two conditions:
This device may not cause harmful interference, and
1.
7
Page 8

This device must accept any interference received, including
2.
interference that may cause undesired operation.
SCANNING LEGALLY
Your scanner covers frequencies used by many dierent groups,
including police and re departments, ambulance services,
government agencies, private companies, amateur radio services,
military operations, pager services, and wireline (telephone and
telegraph) service providers. It is legal to listen to almost every
transmission your scanner can receive. However, there are some
transmissions that you should never intentionally listen to. These
include:
Telephone conversations (cellular, cordless, or other private
•
means of telephone signal transmission)
Pager transmissions
•
Any scrambled or encrypted transmissions
•
According to the Electronic Communications Privacy Act
(ECPA), you are subject to nes and possible imprisonment for
intentionally listening to, using, or divulging the contents of such
a conversation unless you have the consent of a party to the
8
Page 9

conversation (unless such activity is otherwise illegal). This scanner
has been designed to prevent the reception of cellular telephone
transmissions and the decoding of scrambled transmissions. This
is done to comply with the legal requirement that scanners be
manufactured so they are not easy to modify to pick up these
transmissions. Do not open your scanner’s case to make any
modications that could allow it to pick up transmissions that are
illegal to monitor. Modifying or tampering with your scanner’s
internal components or using it in a way other than as described
in this manual could invalidate your warranty and void your FCC
authorization to operate it. In some areas, mobile and/or portable
use of this scanner is unlawful or requires a permit. Check the
laws in your area. It is also illegal in many areas (and a bad idea
everywhere) to interfere with the duties of public safety ocials by
traveling to the scene of an incident without authorization.
ABOUT YOUR NEW BC355C SCANNER
The BC355C comes with 6 Service banks for monitoring police,
re/emergency medical services, marine, air, weather, and CB
frequencies. In addition, the BC355C has 13 separate band
searches.
9
Page 10

You can also save up to 300 frequencies that are scanned along
with the preset frequencies. So whenever you encounter a newly
activated local frequency for any service category, you can add it
to the bank for that category. This gives you quick access to the
frequencies you want to hear.
FEATURE SUMMARY
The BC355C is a compact mobile/base scanner and one of the
most user-friendly communication products available today. The
BC355C features include:
Turbo search – Allows your BC355C to search 180 steps per
•
second. (5 kHz step band only)
Seven Banks – 6 preprogrammed Service banks and one
•
standard, programmable Private bank. These banks include:
POLICE: 1,769 Factory-programmed Police
»
frequencies with 100 open channels (shared with
FIRE/EMG), allowing you to program additional
police frequencies into this bank.
FIRE/EMG: 280 Factory-programmed Fire/EMG
»
frequencies plus an additional 100 (shared with
10
Page 11

POLICE) open channels for you to program local
re/EMG frequencies into this bank.
Note: The Police and Fire/EMG banks share a single
key – PD/FD/EMG. Pressing this key will toggle between
the banks. Additional information is provided in later
sections.
AIR: 1,520 Factory-programmed frequencies
»
which covers the complete AIR band, 118.000 to
136.9875 MHz. 100 open channels (shared with
MRN) for user frequencies are also included.
MRN: 51 Factory-programmed frequencies which
»
cover the complete Marine band. 100 open channels
(shared with AIR) for user frequencies are also
included.
Note: The Air and MRN banks share a single key – AIR/
MRN. Pressing this key will toggle between the banks.
Additional information is provided in later sections.
WX: 10 Factory-programmed Weather
»
frequencies covering 7 NOAA Weather Service and 3
Canadian Marine Weather broadcasts.
CB: 40 Factory-programmed frequencies
»
covering CB communications.
11
Page 12

PRIVATE: 100-channel, fully user-programmable
»
bank.
Search Bands (13) – Press BAND to select a band to search.
•
Band Frequency Coverage
(MHz)
Mode Steps
(kHz)
25 – 28 25.0000 to 27.9950 AM 5 CB
28 – 30 28.0000 to 29.7000 FM 5
30 – 50 30.0000 to 49.9950 FM 5
50 – 54 50.0000 to 54.0000 FM 5
108 – 137 108.0000 to 136.9875 AM 12.5 Aircraft
137 – 144 137.0000 to 143.9950 FM 5 Military
144 – 148 144.0000 to 147.9950 FM 5
148 – 174 148.0000 to 174.0000 FM 5
406 – 420 406.0000 to 419.9875 FM 12.5
12
Service
10 Meter
HAM
VHF Low
Band
6 Meter
HAM
2 Meter
HAM
VHF
High
Band
Federal
Gov’t
Page 13

Band Frequency Coverage
(MHz)
420 – 450 420.0000 to 449.9875 FM 12.5
450 – 470 450.0000 to 469.9875 FM 12.5
470 – 512 470.0000 to 512.0000 FM 12.5
806.0000 to 823.9875 FM 12.5
806 – 956
849.0125 to 868.9875 FM 12.5
894.0125 to 956.0000
Mode Steps
(kHz)
FM 12.5
Service
70 cm
HAM
UHF
Band
UHF “T”
Band*
800
Band
800
Band
800
Band
* This scanner cannot decode digital TV transmissions.
Frequency Band Sensitivity (Nominal) 12 dB SINAD
25.000 - 27.995 0.4 µV
28.000 - 54.000 0.2 µV
137.000 - 174.000 0.2 µV
406.000 - 512.000 0.3 µV
13
Page 14

Frequency Band Sensitivity (Nominal) 12 dB SINAD
108.000 - 136.9875 0.4 µV
806.000 - 956.000 0.4 µV
Frequency Band Hum and Noise (Nominal)
25.000 - 27.995 48 dB
28.000 - 54.000 44 dB
137.000 - 174.000 44 dB
406.000 - 512.000 42 dB
108.000 - 136.9875 48 dB
806.000 - 956.000 44 dB
Frequency Band Close Call Sensitivity (Nominal)
25.000 - 54.000 450 µV
137.000 - 174.000 150 µV
406.000 - 512.000 130 µV
108.000 - 136.9875 200 µV
806.000 - 956.000 450 µV
14
Page 15

INCLUDED IN YOUR SCANNER PACKAGE
BC355C Scanner
•
Telescoping Antenna
•
Fixable Mobile Antenna
•
AC Adapter
•
Vehicle Power Adapter
•
DC Power Cord for hard-wiring power from your car to your
•
scanner.
Bracket
•
Screw
•
This Owner’s Manual
•
Other Printed Materials
•
If any of these items are missing or damaged, immediately contact
your place of purchase or Uniden Customer Hotline at: 1-800-2971023 during regular business hours Monday through Friday.
Optional Accessories
The following optional accessories for your BC355C are available:
Mobile Mounting Bracket (Model MB-007) – For mobile use (Incar Installation); use it to install the BC355C in your car.
15
Page 16

External Speaker (ESP20, ESP12, or ESP5) – To increase speaker
volume in noisy environments.
Contact your local Uniden Dealer or the Uniden Parts Department
by calling: (800) 554-3988 during regular business hours Monday
through Friday.
We can also be reached on the web at www.unidendirect.com.
INSTALLING THE BC355C SCANNER
FOR HOME USE DESKTOP INSTALLATION
Insert the DC plug end of the AC Adapter into the DC 13.8V
1.
jack on the rear panel.
Plug the AC Adapter into a standard 120V AC wall outlet.
2.
Plug the Telescoping Antenna into the ANT connector. Extend
3.
the antenna to its full height. For frequencies higher than 406
MHz, shortening the antenna may improve the reception.
Use the desktop stand (fold out from bottom of unit) for a better
viewing and operating angle.
16
Page 17

Helpful Hints
If strong interference or electrical noise is received, relocate
•
the scanner or its antenna away from the source.
If you are operating the scanner in a fringe area or need to
•
improve reception, use an optional antenna designed for
multi-band coverage. (You can purchase this type of antenna
at a local electronics store.)
If the optional antenna has no cable, use 50-70 ohm coaxial
•
cable for lead-in. A mating plug may be necessary for the
optional antennas.
FOR MOBILE USE INCAR INSTALLATION
Temporary Mobile Installation
A Vehicle Power Adapter is provided for an easy, temporary power
supply.
Warning: Do not use the Vehicle Power Adapter in a
positive ground vehicle.
17
Page 18

Plug one end of the Vehicle Power Adapter into the vehicle’s
1.
accessory power jack and the other end into the DC 13.8V jack
on the back of the scanner.
Connect the mobile antenna plug into the ANT connector on
2.
the rear panel. For more information on antenna installation,
please refer to the instruction guide that came with your
mobile antenna.
Permanent Mobile Installation
Permanently installing the BC355C scanner into a vehicle involves
two main steps - physically installing the scanner and physically
connecting the power supply. It does not matter which is installed
rst; perform these procedures in an order that is most appropriate
for your vehicle’s conguration.
Permanently Mounting the BC355C Unit
Select a location in your vehicle to mount the BC355C unit.
1.
Avoid any locations that could interfere with your driving. In a
passenger car, the ideal location is underneath the dashboard
on the passenger side.
Use the mounting bracket (optional) as a template for
2.
marking the location of the mounting screws.
18
Page 19

Note: If there are screws already holding the dashboard,
you may be able to use the same screw holes to mount the
bracket.
Drill the necessary holes and secure the mounting bracket in
3.
place using the screws provided.
CAUTION: Do not drill into air bags. Do not drill if what is
behind the dashboard is unknown.
Mount the scanner to the bracket only after the wiring has
4.
been connected to the rear panel.
Permanently Connecting the Mobile Power Supply
CAUTION: If you are not experienced in connecting
accessories to the vehicle fuse box, please see your
automotive dealer for advice on proper installation.
Check the vehicle battery connections to determine which
1.
battery terminal (positive or negative) is grounded to the
engine block or chassis. Most of today’s vehicles use a
negative ground. If your vehicle has a negative ground, follow
Steps 2 and 3. Otherwise, skip to the Caution in Step 3.
19
Page 20
Connect the RED wire of the DC power cord to the accessory
2.
contact in your vehicle’s +13.8 VDC fuse box.
Connect the BLACK wire of the DC power cord to the negative
3.
side of the vehicle (usually the chassis).
Caution: In vehicles with a positive ground, the RED wire
connects to the chassis and the BLACK wire connects to
the accessory contact in the fuse box.
Insert the DC plug into the DC 13.8V jack on the back panel.
4.
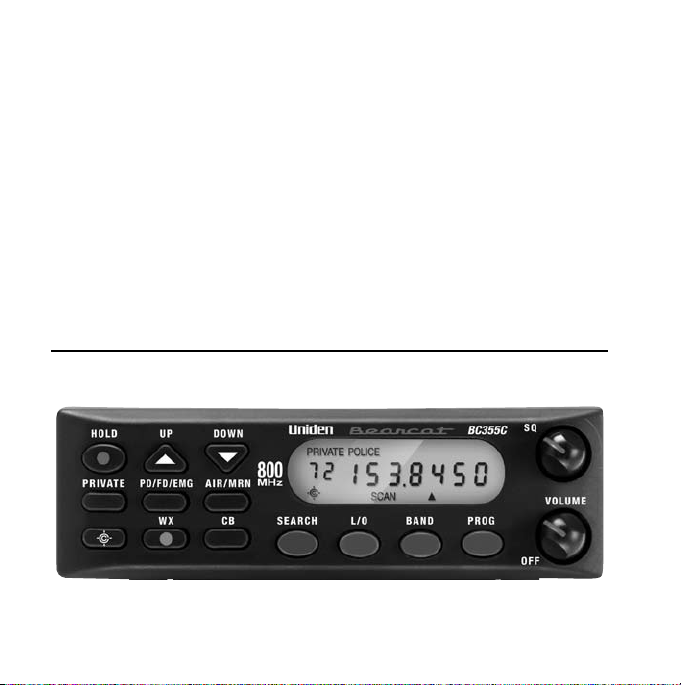
SCANNER OPERATION OVERVIEW
BC355C FRONT PANEL
20
Page 21

KEY PURPOSE
HOLD Press this key to stop scanning or searching
and to remain on the current frequency.
HOLD displays on the screen.
Press HOLD a second time to resume
scanning.
UP and DOWN Press these directional keys to:
Manually search up or down for
•
frequencies while in Hold mode.
Change direction of a search during
•
Search mode.
Quickly search up or down for
•
frequencies (hold UP or DOWN keys
for longer than 1 second) while in Hold
mode.
PRIVATE Scans user-programmed channels
programmed into the PRIVATE bank.
21
Page 22

KEY PURPOSE
PD/FD/EMG Press this key to scan the Police, Fire, and
Emergency Services bands. Pressing this
key cycles through the frequencies in the
following order:
Police/Fire/Emergency Services - all
•
activated
Police department only (turn o Fire/
•
EMG bank)
Fire/EMG only (turn o Police bank)
•
None active (turn o both Police and
•
Fire/EMG banks)
NOTE: The PD and FIRE/EMG banks
share 100 PRIVATE channels. These userprogrammed channels are scanned after the
preprogrammed channels if either service is
selected.
22
Page 23

KEY PURPOSE
AIR/MRN Press this key to scan the Air and Marine
bands. Pressing this key cycles through the
frequencies in the following order:
Air/MRN - both activated
•
Air only (turn o Marine bank)
•
Marine only (turn o Air bank)
•
None active (turn o both Air and
•
Marine banks)
NOTE: The AIR and MRN banks share
100 PRIVATE channels. These userprogrammed channels are scanned after the
preprogrammed channels if either service is
selected.
23
Page 24

KEY PURPOSE
CLOSE CALL
24
Press this key to begin monitoring for strong,
nearby signals. Pressing this key cycles
through the frequencies in the following
order:
Close Call ® Priority - CC checks
•
for Close Call hits every 2 seconds while
monitoring other frequencies. You will
hear a slight break in reception while
Close Call Priority is on.
Close Call Do Not Disturb - Checks
•
for Close Call hits every 2 seconds
unless the scanner is already receiving a
transmission. This prevents the breaks in
audio, but can check less often.
Close Call Only - Press the Close Call key
•
for longer than 2.5 seconds. The Close
Call Priority icon ashes to indicate this
mode.
Page 25

KEY PURPOSE
WX Press this key to activate the Weather
frequencies (7 NOAA/3 Canada Marine). No
other channels are scanned while the WX
bank is activated.
CB Press this key to monitor 40 programmed CB
channels.
SEARCH Press the SEARCH key to search for active
frequencies within a selected band range.
L/O Press this key to temporarily or permanently
lock out frequencies or channels from being
searched or scanned. (L/O is explained in
more detail in a later section.)
BAND Pressing this key displays the upper/lower
limits of a band range for 3 seconds (i.e., 406
‐ 420) and then begins searching that band
range. Continue pressing the BAND key for
other searchable bands.
25
Page 26

KEY PURPOSE
PROG Press this key to initiate and complete
programming a channel or frequency
(further detail is provided in a later section).
Note: If you press a nonprogrammable bank key (WX, or
CB),”Error” will be displayed; press a
programmable bank key.
ITEM PURPOSE
VOLUME
Control/Power
Switch
SQ (Squelch)
Control
Turn this control clockwise to turn on the
BC355C unit. Continue turning this control
clockwise to adjust the volume.
Adjust SQ to set the scan threshold. When
you are monitoring a single channel in
Manual Mode, adjust SQ to eliminate the
background noise heard in the absence of an
incoming signal.
26
Page 27

ITEM PURPOSE
LCD The Liquid Crystal Display (LCD) shows the
current channel or its frequency. It also
displays mode, status, and bank indicators.
It utilizes a 7-segment LCD pattern for
character display. (Go to “Screens” on page
36 for more details.)
BC355C REAR PANEL
ITEM PURPOSE
ANT BNC Antenna Connector. Insert the antenna
plug here.
27
Page 28

ITEM PURPOSE
EXT SP External Speakers. Insert optional external
speaker plug here.
DC 13.8V Power Connection. Connect the specied AC
Adapter or DC power cord here.
USING YOUR BC355C SCANNER
SET UP
Adjusting Squelch
To Adjust Squelch -
Turn SQ completely
1.
counterclockwise. You should
hear open squelch noise.
28
Page 29

To Adjust Squelch -
Turn SQ clockwise slowly until
2.
the sound disappears. This is
the threshold point at which the
incoming signal is just slightly
stronger than the noise will open
the squelch.
Adjust the volume to a
3.
comfortable listening level.
OPERATING MODES
The BC355C operates in two modes - Scan and Search:
SCAN
Scanning allows you to scan through channels in various service
banks.
Press a service bank key (PD/FD/EMG, AIR/MRN, WX, CB, or
PRIVATE) to nd an active frequency within that bank. All
activated banks plus their “private” channels are scanned. Press
other bank keys to add banks to scan.
29
Page 30

The Bank label/icon for the scanned frequency ashes while that
bank is scanned. When an active frequency is found, the scanner
stops on that frequency and the Bank label/icon remains steady.
When transmission ends, the scanner pauses 2 seconds for a new
transmission. If no new transmission is found, scanning resumes.
Press UP to manually continue scanning. Multiple active banks are
scanned in order.
Note: Before you can scan the Private bank, you must program
frequencies into the channels. Refer to “Private Bank” on page
50.
SEARCH
Search lets you search through pre-grouped bands of frequencies.
Press BAND key to select 1 of 13 separate frequency bands to
search. Press the SEARCH key to begin searching. The scanner
displays frequencies as it searches and stops on active frequencies
until that transmission ends. If no transmission resumes after 2
seconds, the search automatically continues through the rest of
the band. Use the UP or DOWN key to change the direction of the
search or press the BAND key again to change bands.
30
Page 31

SPECIAL NOTES FOR SCANNING PD/FD/EMG AND AIR/MRN BANKS
Two keys are home to multiple banks. The PD/FD/EMG key
manages the Police and Fire/Emergency Services banks and the
AIR/MRN key manages the Air and Marine banks.
Pressing PD/FD/EMG more than once will cycle through the banks
in this order:
Police/Fire/EMG
1.
Police
2.
Fire/EMG
3.
None
4.
NOTE: The PD and FIRE/EMG banks share 100 PRIVATE channels.
These user-programmed channels are scanned after preprogrammed
channels.
Pressing AIR/MRN more than once will cycle through the banks in
this order:
Air/Marine
1.
Air
2.
Marine
3.
None
4.
31
Page 32

NOTE: The AIR and MRN banks share 100 PRIVATE channels. These
user-programmed channels are scanned after preprogrammed
channels.
Scanning Service Bank Tips
If You Want to do This - Here’s How -
Begin scanning Press any service bank key; the bank
label ashes and the “SCAN” message
moves across the display screen.
Scanning automatically stops on
an active channel and displays that
frequency (except for locked-out
channels, which will be covered later
in this guide). It will stay on that
channel until the transmission ends.
Note: You must program
channels into the PRIVATE bank
before you can scan it.
Set up multiple service
banks to scan
Press a desired service bank’s key until
it displays. Continue pressing other
banks’ keys until all desired banks are
displayed (activated).
32
Page 33

If You Want to do This - Here’s How -
Stop scanning Press HOLD. The scanner stays on
the displayed channel until scanning
is resumed. The bank’s screen label
remains steady and does not ash.
Resume scanning Press one of the following keys to
continue scanning:
HOLD – Press this key to release the
•
Scan Hold and continue scanning.
The bank’s screen label resumes
ashing.
UP or DOWN - Press these keys to
•
step to the next/previous frequency.
Scan Hold remains active but single
channels can be monitored.
33
Page 34

If You Want to do This - Here’s How -
Resume scanning
•
(Cont.)
•
Keep scanning after the
BC355C has stopped on
an active channel
If the BC355C stops on an active
channel that you do not want to
monitor but you do not want to lock
out, press the bank key or the UP key.
You will scan to the next frequency.
Select a dierent bank
to scan
Use one of the following two
methods:
1.
2.
34
Any bank key - If you press a dierent
bank key, you will start scanning in
that new bank and the bank label will
resume ashing.
L/O key - Press this key to lock out
this frequency and step to the next
frequency
Use the UP key to move through
frequencies and banks.
Deactivate the bank(s) you do
not want to listen to, leaving only
the desired band active.
Page 35

Searching Band Tips
If You Want to Do This - Here’s How -
Begin searching Press the BAND key. The screen
displays the last known searched
band and then begins searching for
an active frequency in that band.
Continue after the
BC355C has stopped on
an active channel
If the BC355C stops on an active
channel that you do not want to
monitor but you do not want to lock
out, press the SEARCH key or the
UP/DOWN keys.
Stop searching Press HOLD. The scanner stays on
the displayed channel until searching
is resumed. Press HOLD again to
resume searching.
Select a dierent band
to search
Press the BAND key multiple times to
search through the available bands.
35
Page 36

SCREENS
This section shows typical screen displays:
SCANNING BANKS
police fire/emg air mrn
scan sc
scan
police
45.0600
hold scan
36
This screen shows BC355C
is actively scanning
a displayed bank.
“SCAN“scrolls from right to
left across the screen, and
the scanned bank will ash.
This screen shows that the
scanner has been put on
HOLD to monitor frequency
45.0600 on the Police bank.
Page 37

SEARCHING BANDS
148 ‐ 174
srch
409.9875
srch
When BAND is pressed, this
screen displays the band
range to be searched. Press
BAND again (or UP/DOWN
within 3 seconds) to see
other band ranges.
This SEARCH screen shows
that frequency 409.9875
has been found through
an upward search. Pointers
( or ) indicate the
direction of the search - up
or down.
SPECIAL FEATURES
The BC355C scanner boasts of several special features:
Lock Out Channels/Frequencies
•
Close Call
•
37
Page 38

Private Bank
•
Program Frequencies into Programmable Banks.
•
Program Lock
•
LOCK OUT CHANNELS / FREQUENCIES
Sometimes the scanner may stop on a particular channel or
frequency because of noise or other unwanted transmissions. This
feature lets you lock out channels and frequencies you don’t want
to scan. The Lock Out feature skips these channels and frequencies
during scanning.
Types of Lock Out
Temporary Lock Out
Pressing L/O once temporarily locks out the current frequency or
channel. The scanner displays “T L/O” for that frequency or channel
and continues scanning. All “T L/O” frequencies/channels are
restored when the scanner is powered o and back on.
38
Page 39

Permanent Lock Out
Pressing L/O twice permanently locks out the current frequency or
channel. The scanner displays “L/O” for that frequency or channel
and continues scanning. “L/O” frequencies/channels can be
manually restored; the procedure is provides in this section.
Lock Out Limits
Any of the 300 user-programmed channels can be locked out;
however, there is a limit to the number of frequencies that can
be locked out of a preprogrammed bank or band search. Up to
100 frequencies can be permanently locked out, and up to 100
frequencies can be temporarily locked out.
If you try to permanently or temporarily lock out 101 frequencies,
the scanner releases the rst locked out frequency when you lock
out the 101st frequency.
Locking out a frequency in any service bank or search band locks it
out in all service banks or search bands. However, it will not aect
the frequency if you have saved it in a channel.
You can only lock out all the channels or frequencies in the Private,
CB, and MRN banks. If you lock out all the channels or frequencies
39
Page 40

in one of these banks, pressing that bank key will make the scanner
emit an error tone and the scanner will not scan.
Note: You cannot lock out any frequencies in the WX bank.
Lock Out Tips
If You Want to Do This - Here’s How -
Temporary Lock Out While on a channel or frequency, press
L/O once. The scanner beeps and
temporarily locks out that channel
and displays “T LO.” If the scanner was
not in Hold mode, it then resumes
scanning. If the scanner was in Hold
mode, it does not resume scanning
until one of the following actions is
taken:
Press HOLD again to release the
•
Scan Hold function. Scanning
resumes on that bank.
40
Page 41

If You Want to Do This - Here’s How -
Temporary Lock Out
(Cont.)
Press the bank you were scanning
•
to resume scanning in that bank.
Press a dierent bank key to
•
begin scanning that new bank.
Permanent Lock Out While on a channel or frequency,
quickly press L/O key twice.
The scanner locks out that channel or
frequency, displays “T L/O” and then
“L/O,” and then resumes scanning.
Search for Permanently
Locked-Out Channels or
Frequencies
The scanner does not stop on locked
out channels or frequencies while
scanning; to search for and display
locked out channels or frequencies,
press HOLD, then use UP or DOWN to
search manually through the bank. “L/
O” appears on the screen to indicate
the lock out.
41
Page 42

If You Want to Do This - Here’s How -
Restoring a Single
Locked-Out Channel or
Frequency
(Example: Channel 12
of the Private bank is
locked out.)
42
Press the appropriate bank key
1.
(PRIVATE, PD/FD/EMG or AIR/
MRN) to start scanning the bank
that has the channel or frequency
you want to unlock.
Press HOLD to stop scanning.
2.
(“HOLD” and “ SCAN” must appear
on the screen.)
Use UP or DOWN keys to nd
3.
the specic locked out channel
or frequency (in this example,
Channel 12, which displays “L/O”).
Press L/O.
Page 43

If You Want to Do This - Here’s How -
Restoring a Single
Locked-Out Channel
(Cont.)
Restoring All
Permanently Locked
Out Channels/
Frequencies
“L/O” disappears to indicate that
4.
Channel 12 is now unlocked and
restored for scanning.
Note: For the factory
preprogrammed channels,
the earliest channel will be
unlocked when you lock out
more than 100 channels.
You can unlock all locked out
1.
programmable channels and
search skip frequencies in any
bank at one time. Press a bank
key to start scanning.
Press HOLD to stop scanning.
2.
43
Page 44

If You Want to Do This - Here’s How -
Restoring All
Permanently Locked
Out Channels/
Frequencies (Cont.)
Press and hold L/O for more than
3.
2.5 seconds until you hear two
beeps.
All locked out channels/
4.
frequencies in that bank are
now unlocked and restored for
scanning.
Note: When that bank is the Private
bank, all locked out channels of the
Private bank are restored
CLOSE CALL ®
The Close Call feature enables you to search for strong signals close
to your location. These signals could be from a nearby police car
or re engine or other radio source. Pressing the key activates
the Close Call functions in the following order:
Close Call Do Not Disturb
1.
Close Call Priority
2.
44
Page 45

Close Call O
3.46Setting Up Close Call Modes
Pressing and holding the key acativates Close Call Only
mode.
Close Call Priority
Repeatedly press until the Close Call Priority icon displays.
The scanner checks every 2 second for a nearby transmission. You
may hear a slight break in audio during this time. If you want to
monitor only Close Call hits, hold the key for longer than 2.5
seconds. The Close Call Priority icon ashes
Close Call Do Not Disturb
Repeatedly press until the Do Not Disturb icon displays.
The scanner will periodically make Close Call checks whenever it is
not receiving audio in another mode .
Close Call Only
Press and hold until the scanner displays a line of dashes and
the icon ashes. The scanner is now in Close Call Only mode. It will
only try to nd Close Call transmissions. This is also the rst step to
accessing the Close Call Setup modes.
45
Page 46

Press and hold to enter the Close Call Only mode. The
1.
screen displays a line of dashes.
Press again to display the Close Call menu selections:
2.
C - C.bAnd - Select which bands Close Call will check.
•
C - C.ALEt - Select alerts on/o.
•
C - C.PS - Set Pager screen.
•
Use the UP or DOWN keys to scroll through the menu
3.
selections.
Press PROG to select a menu, and then scroll up or down
4.
to view the menu options. When you have selected a menu
option, press PROG to set it.
Press BAND key to return to the previous option, or press
5.
to return to the CC mode selection options.
Setting C ‐ C.bAnd Options
Use this menu to select which bands get Close Call checks:
Page 47

Band Name Frequency (MHz)
b1 Lo VHF Low Band 25.0000 - 54.0000
b2 Air AIR Low Band 108.0000 - 136.9875
b3 Hi VHF High Band 137.0000 - 174.0000
b4 UHF UHF Band 406.0000 - 512.0000
b5 800 800MHz Band 806.0000 - 823.9857
849.0125 - 868.9875
894.0125 - 956.0000
From Step 4 previously, select C ‐ C.bAnd. The rst band
1.
selection displays (B1 LO is automatically set to ON):
b1 lo
▲▼
47
Page 48

Scroll up or down to select bands for Close Call to monitor.
2.
Press PROG. The screen displays that selection and “On.”
b1 lo on
▲▼
Setting C ‐ C.ALEt Options
This menu controls whether the scanner will send an alert tone
when a Close Call signal is detected. The options are:
ALt.bEEP - Scanner beeps when a CC signal is found.
•
ALt.OFF - Scanner does not been when a CC signal is found
•
Setting C ‐ C.PS Options
This menu controls whether the scanner will screen common
pager frequencies. The options are:
PS .On - Scanner screens out pager frequencies (lter on).
•
PS.OFF - Scanner allows pager frequencies (lter o).
•
48
Page 49

Close Call Tips
If You Want To - Here’s How -
Scan for Close Call
Transmissions while
Scanning other
Banks/Bands
Save a Frequency
Found Through
Close Call
Press the key. The Close Call icon
displays. Every two seconds there will be
a break in the scanner audio as it searches
for a nearby transmission.
the scanner nds a nearby signal
1.
through Close Call, it jumps to that
frequency but does not display it. It
does, however display the band
number and ashes “FOUND.”
b4 Found
srch
49
Page 50

If You Want To - Here’s How -
Save a Frequency
Found Through
Close Call (Cont.)
Press any key to conrm the
2.
frequency.
b4 468.0000
srch
Audio for that frequency continues
3.
until the signal stops.
PRIVATE BANK
The BC355C also provides 3 separate banks to hold favorite
frequencies. When you nd a frequency that you would like to
listen to again, you can program it into either the PD/FD/EMG or
AIR/MRN service bank or into the Private bank. The advantage to
programming frequencies into the Private bank is that you can
scan that bank with other service banks turned o.
Note: Although it is possible to program a Weather
frequency into the Private bank, it is not recommended.
50
Page 51

Weather frequencies broadcast continuously, and the
scanner will not change to other frequencies.
Programming Frequencies and Channels
Up to 100 frequencies (1 frequency per channel) can be
programmed into each of the following banks (300 frequencies
combined):
Police/Fire/EMG
•
Air/Marine
•
Private
•
Any displayed frequency for these banks can be programmed
into the scanner, and frequencies not currently displayed can be
located through the Search mode and through manually scanning
the preprogrammed banks. In addition, websites such as www.
radioreference.com provide listings of local broadcast frequencies.
NOTE: The CB and WX banks are not programmable.
ERROR displays if you try to program a frequency into
either of these two banks.
51
Page 52

Programming a Channel
The following steps detail how to program a frequency into a
channel for a specic bank when the frequency was found while
scanning or searching. In this example, the frequency was found
while scanning the Police bank.
police fire/emg air mrn
40.0600
scan
This SCAN screen shows
that frequency 40.0600
has been found through
a search of the active
(ashing) POLICE bank.
police
40.0600
hold scan
Press HOLD. HOLD displays.
52
CH 40.0600
hold
Press PROG. CH displays and
ashes.
Page 53

police fire/emg
6 000.0000
hold l/o
police fire/emg
40.0600
hold
Press the key for the bank
you want to program. In this
example, PD/FD/EMG was
pressed.
The screen cycles between
two displays. The rst
screen shows that channel
6 is the lowest available
channel on the POLICE
bank (press UP or DOWN to
select a dierent channel)
and the second screen
shows that frequency
40.0600 is available to be
programmed.
53
Page 54

police fire/emg
6 40.0600
hold scan
Press PROG. The scanner
programs the frequency
into the indicated channel
and then goes into SCAN
HOLD mode.
Press HOLD to release the
Hold and continue scanning
the rest of the programmed
channels, starting with
the channel you just
programmed.
Deleting a Programmed Frequency (programming “000.0000”)
The easiest method of deleting a frequency you have
programmed is to overwrite it with a null frequency (000.0000).
CH 40.0600
hold
From a normal scan setting
(a channel bank is ashing),
press PROG. HOLD displays
and CH displays and ashes.
Press and hold L/O for 2.5
seconds.
54
Page 55

CH 000.0000
hold
police fire/emg
3 40.0600
hold
Frequency changes to
000.0000 and CH continues
ashing.
Press the bank containing
the channel you wish to
clear. The screen displays
the rst programmable
channel for that bank. If that
channel displays 000.0000,
press UP or DOWN until
the channel/frequency
you wish to clear displays.
(In this example, channel
3 contains frequency
40.0600.)
55
Page 56

police fire/emg
3 40.0600
hold
police fire/emg
CH 000.0000
hold
The screen cycles between
two displays. The rst screen
shows that channel 3 on
the POLICE bank (40.0600)
is selected and the second
screen shows that the null
frequency (000.0000) is
ready to be programmed.
56
police fire/emg
3 000.0000
hold scan l/o
Press PROG.The screen
displays a null frequency in
that channel.
Press the bank key again
to resume scanning in that
bank.
Page 57

PROGRAM LOCK FEATURE
The BC355C has a Program Lock feature to prevent accidentally
programming entries or unauthorized programming. Press and
hold the PROG key for longer than 2.5 seconds to toggle Program
Lock on and o. Program Lock is available in the following modes:
Scan/Scan Hold
•
Band Search/Band Search Hold
•
Programming
•
Close Call
•
When Program Lock is turned on, the scanner displays “on Prg‐
Loc” and then returns to scanning mode. Press and hold the PROG
key again to unlock this function and return to the previous mode.
Attempts to program on a bank with Program Lock activated will
display “Prg‐Loc“ as a reminder. When Program Lock is turned o
(press and hold PROG for longer than 2.5 seconds), the scanner
displays “OF Prg‐Loc” and returns to the previous mode.
57
Page 58

TROUBLESHOOTING GUIDE
PROBLEM SOLUTION
Scanner won’t
work
Scanner won’t
work (Cont.)
58
Try one of these options:
Check the connections at both ends of
•
the AC adapter.
Turn on the wall switch of your room.
•
You could be using an outlet controlled
by the wall switch. Move the AC adapter
to another wall outlet.
Check the connections at both ends of
•
the DC cord or Vehicle Power Adapter.
Check to see if the fuse is blown. Make
•
sure the ignition key in your vehicle is in
the Accessory position.
Make sure the power switch is turned
•
on.
Page 59

PROBLEM SOLUTION
Improper
Reception
Try one of these options:
Check the antenna and its connection.
•
Move the scanner.
•
You may be in a fringe area. This
•
may require an optional multi-band
antenna. Check with your dealer or local
electronics store.
Weather scan
won’t work
Try one of these options:
Adjust the Squelch control.
•
Check the antenna connection.
•
Review each channel’s frequency to
•
see if it is still stored in memory and is
correct.
59
Page 60

PROBLEM SOLUTION
Scan won’t stop
Scan won’t start
Try one of these options:
Try one of these options:
Search won’t
start
PROGRAM key
Stop scan or search.
won’t work
You still have a
problem
60
Call our customer hotline at 1-800-297-1023.
Check and adjust Squelch
•
Check the antenna connection.
•
Check to see if all channels are locked
•
out. It is possible that none of the
programmed frequencies are active at
the time. Try the band search.
Press the bank key again.
•
Adjust the Squelch Control.
•
Scan program frequencies into the bank
•
before using (for PRIVATE bank).
Adjust the Squelch Control.
•
Check the antenna connection.
•
Page 61

GENERAL PRODUCT CARE
Turn the scanner o before disconnecting the power.
Always press each keypad button rmly until you hear the entry
tone for that key entry.
LOCATION
If strong interference or electrical noise is received, relocate the
scanner or its antenna away from the source of the noise. A higher
elevation, if possible, may provide better reception. You might also
try changing the height or angle of the telescoping antenna.
Do not use the scanner in high-moisture environments such as the
kitchen or bathroom.
Avoid placing the unit in direct sunlight or near heating elements
or vents.
CLEANING
Disconnect the power to the unit before cleaning.
61
Page 62

Clean the outside of the scanner with a soft cloth. To prevent
scratches, do not use abrasive cleaners or solvents. Be careful not
to rub the LCD window. Do not use excessive amounts of water.
REPAIRS
Do not attempt any repair. The scanner contains no serviceable
parts. Contact the Uniden Customer Hotline at 1-800-297-1023 or
take it to a qualied repair technician.
BIRDIES
All radios may receive undesired signals or birdies. If your scanner
stops during Search Mode and no sound is heard, it may be
receiving a birdie. Birdies are internally-generated signals inherent
in the receiver’s electronics. If the interference is not severe, you
might be able to turn SQ clockwise to cut out the birdie. You can
also press SEARCH to resume searching.
TECHNICAL SPECIFICATIONS
Size: 5-3/16”(W) x 5-3/4”(D) x 1-5/8”(H)
Weight: 1 lb 6.5 oz.
62
Page 63

Operating Temperature: – 20ºC (– 4ºF) to + 60ºC (+ 140ºF)
Power Requirements: DC 13.8V
Certied in accordance with FCC Rules and Regulations Part 15
Sub-part C as of date of manufacture.
Banks: 7 banks total (6 Service banks / 1 Private bank)
Police (PD): 1,769 Preprogrammed plus 100 programmable
•
channels shared with Fire/Emergency Services
Fire/Emergency (FD/EMG): 280 Preprogrammed plus 100
•
programmable channels shared with Police
Air (AIR): 1,520 Preprogrammed. (Plus 100 programmable
•
channels shared with Marine)
Marine (MRN): 51 Preprogrammed. (Plus 100 programmable
•
channels shared with Air).
Weather (WX): 10 Preprogrammed (7 for NOAA weather
•
service and 3 for Canada Marine).
CB: 40 programmed.
•
PRIVATE: 100 channels fully user-programmable.
•
Search Band: 13 searchable bands:
63
Page 64

Scan Rate: 50 channels/second
Search Rate: 60 steps/second
180 steps/second
(5 kHz steps band only)
Scan Delay: 2 seconds
Audio Output: Max. 1.2 W
Antenna: 50 ohms (Impedance)
Features, specications, and availability of optional accessories
are all subject to change without notice.
WARRANTY
One Year Limited Warranty
Important: Evidence of original purchase is required for
warranty service.
WARRANTOR: UNIDEN AMERICA CORPORATION (“Uniden”)
ELEMENTS OF WARRANTY: Uniden warrants, for one year, to
the original retail owner, this Uniden Product to be free from
64
Page 65

defects in materials and craftsmanship with only the limitations or
exclusions set out below.
WARRANTY DURATION: This warranty to the original user shall
terminate and be of no further eect 12 months after the date
of original retail sale. The warranty is invalid if the Product is
(A) damaged or not maintained as reasonable or necessary,
(B) modied, altered, or used as part of any conversion kits,
subassemblies, or any congurations not sold by Uniden, (C)
improperly installed, (D) serviced or repaired by someone
other than an authorized Uniden service center for a defect
or malfunction covered by this warranty, (E) used in any
conjunction with equipment or parts or as part of any system
not manufactured by Uniden, or (F) installed or programmed
by anyone other than as detailed by the owner’s manual for this
product.
STATEMENT OF REMEDY: In the event that the product does not
conform to this warranty at any time while this warranty is in eect,
warrantor will either, at its option, repair or replace the defective
unit and return it to you without charge for parts, service, or any
other cost (except shipping and handling) incurred by warrantor
or its representatives in connection with the performance of this
65
Page 66

warranty. Warrantor, at its option, may replace the unit with a new
or refurbished unit. THE LIMITED WARRANTY SET FORTH ABOVE IS
THE SOLE AND ENTIRE WARRANTY PERTAINING TO THE PRODUCT
AND IS IN LIEU OF AND EXCLUDES ALL OTHER WARRANTIES OF
ANY NATURE WHATSOEVER, WHETHER EXPRESS, IMPLIED OR
ARISING BY OPERATION OF LAW, INCLUDING, BUT NOT LIMITED TO
ANY IMPLIED WARRANTIES OF MERCHANTABILITY OR FITNESS FOR
A PARTICULAR PURPOSE. THIS WARRANTY DOES NOT COVER OR
PROVIDE FOR THE REIMBURSEMENT OR PAYMENT OF INCIDENTAL
OR CONSEQUENTIAL DAMAGES. Some states do not allow this
exclusion or limitation of incidental or consequential damages so
the above limitation or exclusion may not apply to you.
LEGAL REMEDIES: This warranty gives you specic legal rights, and
you may also have other rights which vary from state to state. This
warranty is void outside the United States of America and Canada.
PROCEDURE FOR OBTAINING PERFORMANCE OF WARRANTY:
If, after following the instructions in the owner’s manual you are
certain that the Product is defective, pack the Product carefully
(preferably in its original packaging). The Product should include
all parts and accessories originally packaged with the Product.
Include evidence of original purchase and a note describing the
66
Page 67

defect that has caused you to return it. The Product should be
shipped freight prepaid, by traceable means, to warrantor at:
Uniden America Corporation Parts and Service Division 4700 Amon
Carter Blvd. Fort Worth, TX 76155
(800) 297-1023, 8 a.m. to 5 p.m. CST, Monday through Friday
67
Page 68

THANK YOU FOR
PURCHASING A
UNIDEN PRODUCT!
A World Without Wires
2009 Uniden America Corporation. Ft. Worth, TX
All rights reserved.
UBZZ01362ZZ(0)
Printed in China
www.uniden.com
 Loading...