

Page 1
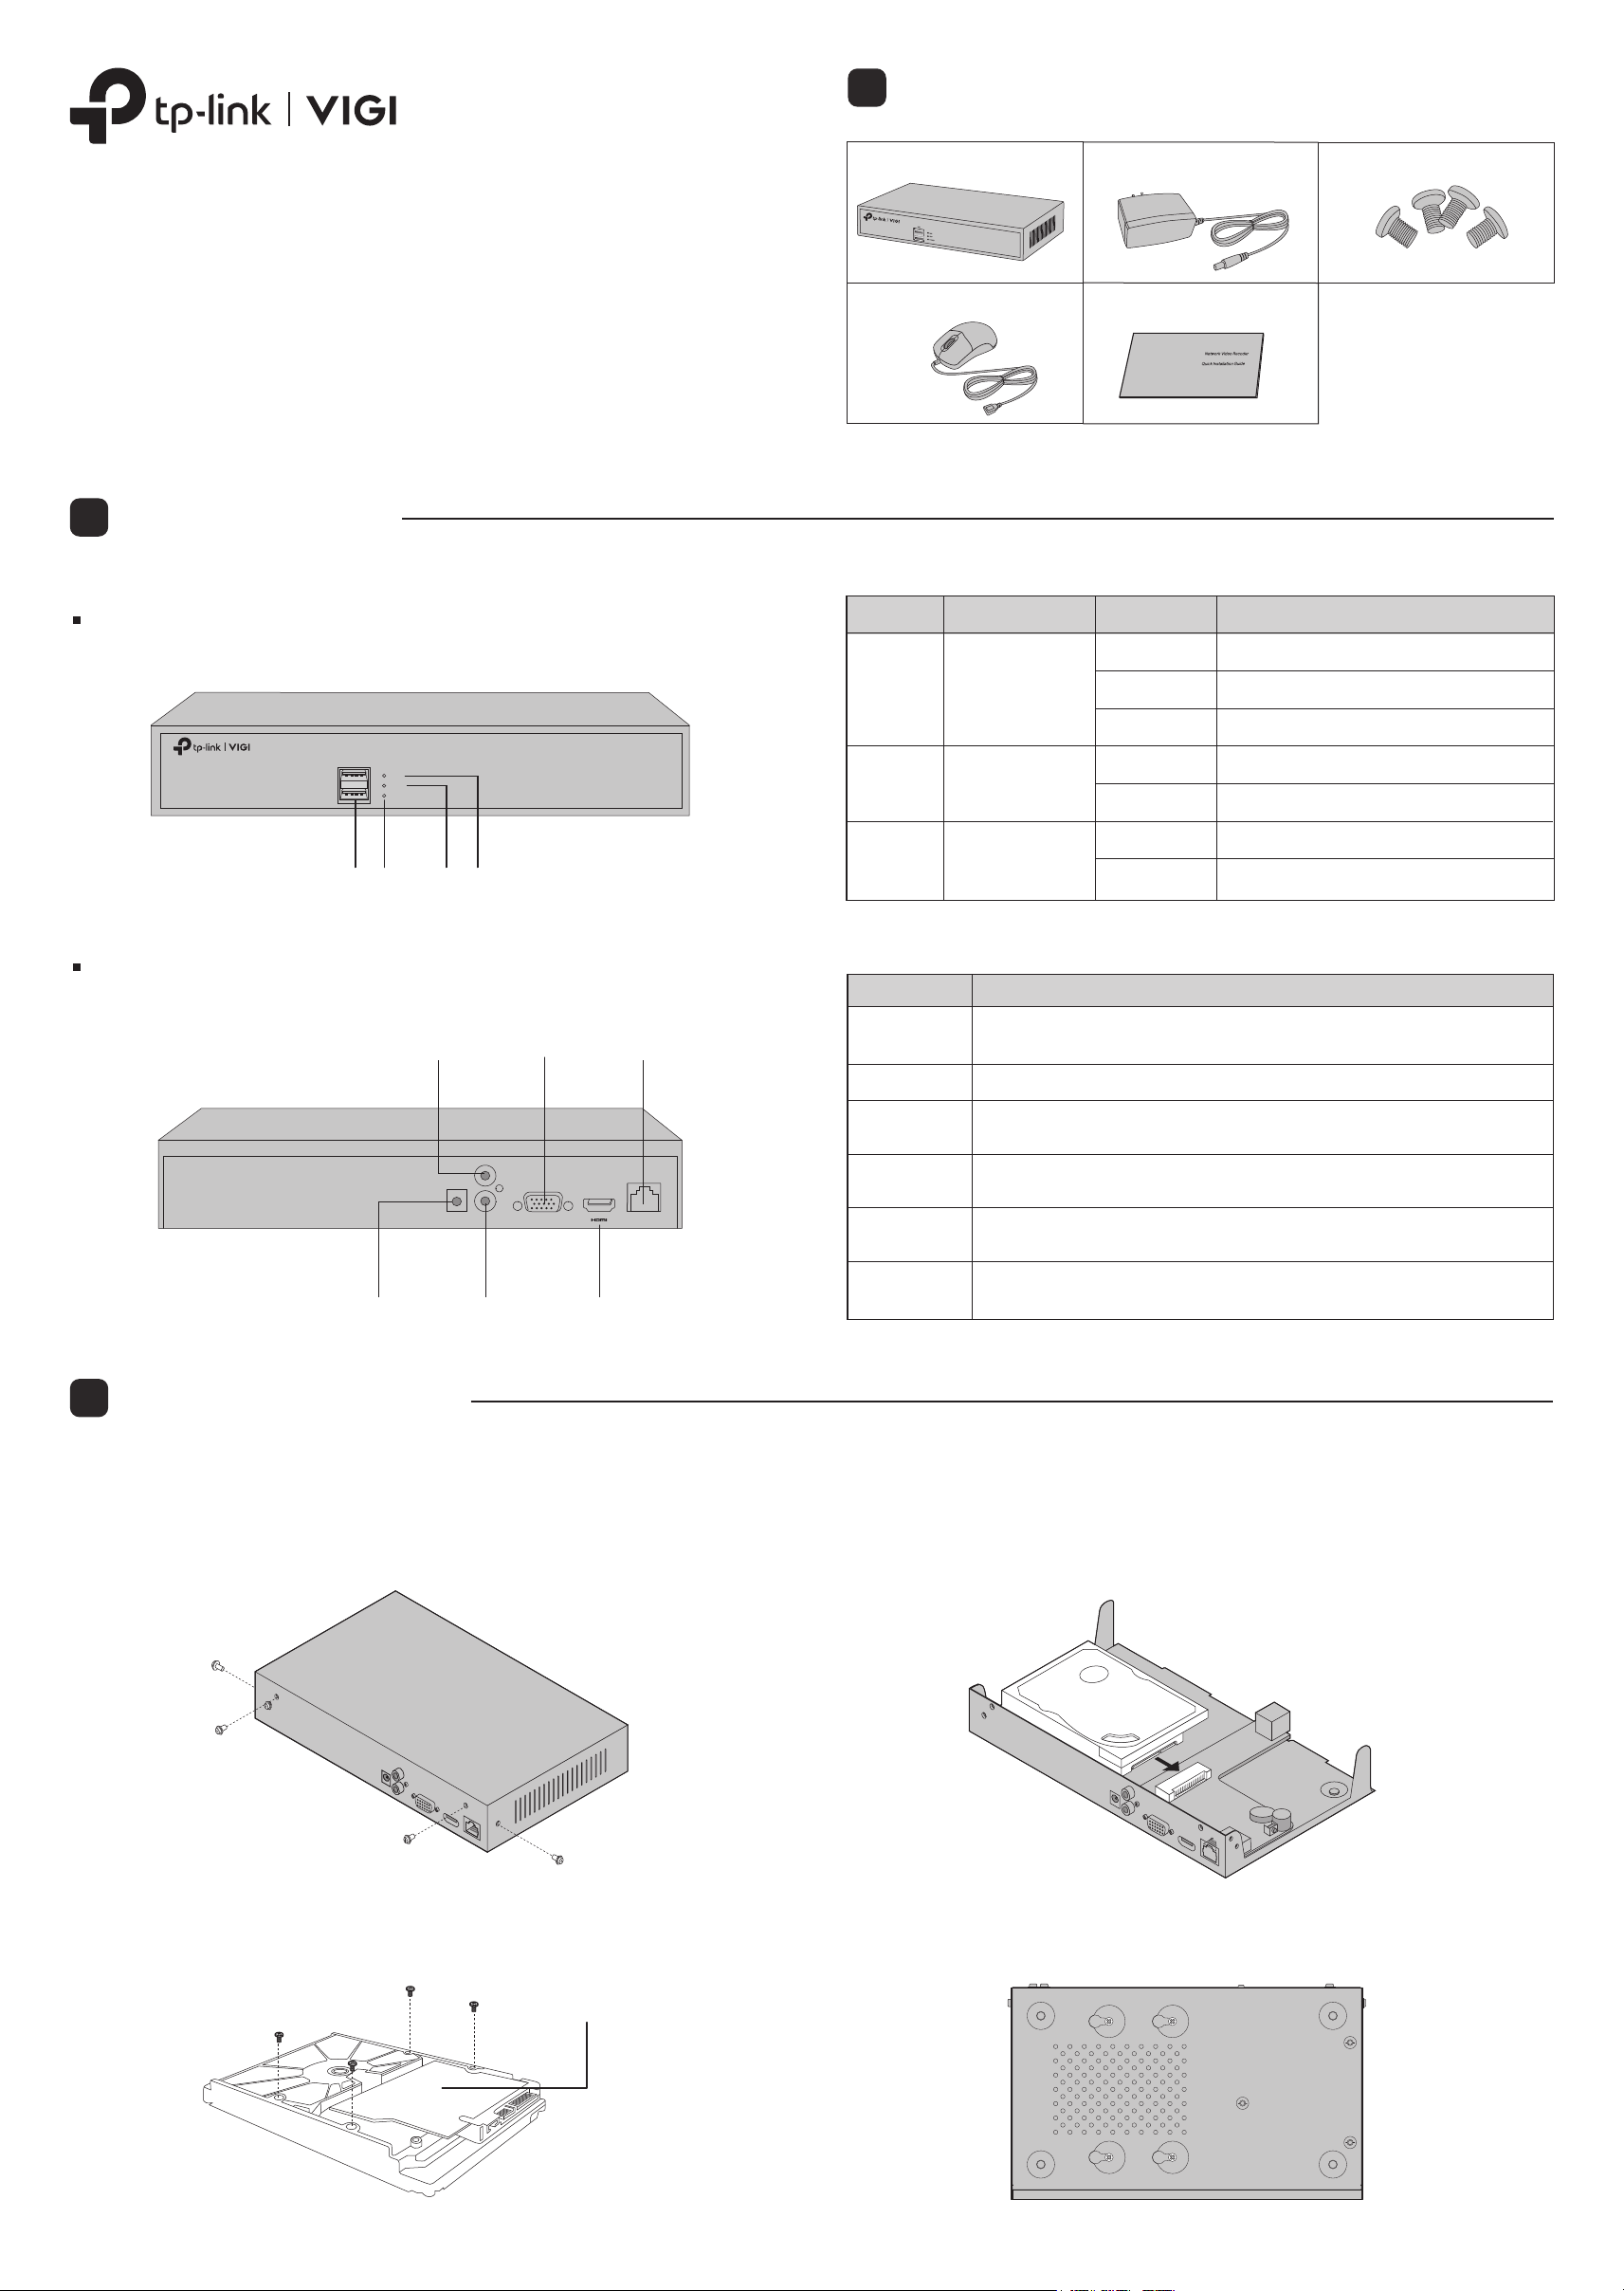
Package Contents
Network Video Recorder
1
©2021 TP-Link 7106509088 REV1.2.0
Quick Installation Guide
Network Video Recorder
*Images may dier from actual products.
Product Overview
2
Front Panel
USB
LAN
HDD
POWER
Network Video Recorder
Network Video Recorder
Mouse
Indicator Name Status Description
LAN
HDD
Network Status
Indicator
Hard Disk Drive
Indicator
Power Adapter HDD Screws
Quick Installation Guide
On
Flashing
O
On
O
Network is working properly.
Data is being transmitted or received.
The network is malfunctioning.
The HDD is normal.
No HDD or the HDD is malfunctioning.
Back Panel
POWERUSB HDD LAN
AUDIO IN
AUDIO IN
POWER
AUDIO OUT
POWER AUDIO OUT
VGA
VGA
HDMI
LAN
LAN
POWER
Interface Description
USB
(Front Panel)
POWER Connector for power input.
AUDIO IN /
AUDIO OUT
VGA
HDMI
LAN
Power Status
Indicator
2 USB ports for additional devices* such as USB mouse, USB storage device,
and USB keyboard.
Connector for audio input and output.
Note: Audio input only supports microphones with power supply.
Output port for analog video signals.
Connect your monitor to this port if it uses VGA connection.
Output port for high-denition audio and video signals. Connect
your monitor to this port if it uses HDMI connection.
RJ45 10/100Mbps self-adaptive Ethernet port.
Connect to an Ethernet device (eg. router and switch).
On
O The NVR is o.
The NVR is on.
3
Hard Drive Installation
For the rst time installation, please prepare a 3.5-inch hard disk drive (HDD). It is recommended to use the HDD of surveillance or enterprise
level. Before installation, please disconnect the power from the network video recorder (NVR).
1. Remove the xing screws on the side and back panels to open the
cover of the NVR.
2. Attach the 4 included HDD screws to your hard drive. Do not fasten.
3. Match the 4 screws on the HDD with the 4 holes on the NVR, and insert
the HDD interface into the slot.
4. Flip the NVR upside down and fasten the HDD screws. Replace the
cover and fasten the screws of the NVR.
Hard Disk Drive (HDD)
Page 2

4
Hardware Connection
Follow the steps below to complete the hardware connection.
1. Connect your monitor to the HDMI or VGA port according to the connection
port it supports.
2. Connect your monitor to a power source and turn it on.
POWER
AUDIO IN
AUDIO OUT
3. Connect the LAN port of the NVR to a network device with an Ethernet cable.
4. Connect the provided USB Mouse to the USB Interface of the NVR (front panel).
5. Connect the power adapter to the NVR.
Cautions
If you want to turn o the NVR after installing the hard drive, right click on the Live View
screen and click the Power button on Main Menu of your monitor. Do not unplug it directly.
The input voltage should match the power requirements of the NVR.
The buzzer on the NVR may be triggered when no hard drive is installed or the hard drive in
the NVR hasn’t been initialized.
5
Conguration
NVR can add and manage cameras in batches.
* Here we use TP-Link cameras as an example. For other camera brands, please refer to their User Manuals to add the cameras.
Power Adapter
VGA
or
Monitor
Mouse
LAN
Network Device
(e.g. Router, Switch)
Monitor
Monitor
USB
LAN
HDD
POWER
NVR
NVR
Network Video Recorder
Step 1. Connect your cameras to the same network as your NVR.
Step 2. Follow the instructions to nish Quick Setup.
1. Create a login password for the NVR and a preset password for your unset
cameras.
Note: Enter an email address for resetting the password of NVR or cameras.
2. Enable Plug and Play and the NVR will automatically nd and add the
cameras in your network.
3. Follow Quick Setup to complete the settings of the NVR.
Step 3. Right click on the Live View screen to open the Main Menu
for management.
(Optional) Step 4. Bind your NVR to a TP-Link ID for remote access
and management.
1. Right click on the Live View screen and click Settings.
2. Click Cloud Services on the top, enter your TP-Link ID and password, and
click Bind.
Network Camera
Network Device
(e.g. Router, Switch)
Network Camera
Note:
Make sure your NVR can get access to the internet before binding.
If you don’t have a TP-Link ID, sign up rst.
If your NVR fails to connect to the Internet, please refer to FAQ-Q3.
For more instructions, please refer to the NVR’s User Guide.
If you want to add a camera after Quick Setup, please follow the steps below:
1. Right click on the Live View screen and click Add Camera.
2. Select a camera and click + to add your camera directly. If you have disabled Plug
and Play on your NVR, please create a password or use the preset password for
your unset camera.
Note:
The password set for cameras in Quick Setup will be applied to your unset cameras.
If your cameras have been activated, use the previous passwords to add and manage the
cameras.
If you can’t nd your camera, refer to FAQ-Q2.
More Management Methods
You can add and manage your devices via any of the methods below.
Method 1: Via the VIGI Security Manager (Windows only)
View live video and modify NVR settings on your computer.
1. Download the VIGI Security Manager on your computer at
https://www.tp-link.com/support/download/vigi-security-manager/.
2. Install the VIGI Security Manager and open it.
3. NVR on the same network as your computer can be automatically discovered.
Go to Settings > Discovered Devices, click Add, and follow the instructions to
add your NVR.
Frequently Asked Questions
Q1. What should I do if I forget the login password of my NVR?
A1. Click Forgot Password on the login page and then follow the instructions to reset the password.
A2. Remove the cover, then press and hold the Reset button inside the NVR for over 3 seconds. The NVR will restore
to the factory settings. Then follow Quick Setup to create a login password.
Reset Button
Q2. What can I do if no cameras are found?
A1. Refresh to discover your cameras again.
A2. Make sure the cameras are powered on.
A3. Make sure your cameras and NVR or computer are in the same network.
A4. Try to add your cameras manually.
Q3. What can I do if my NVR fails to connect to the Internet?
A1. Check if the internet is working properly.
A2. Make sure your NVR is in the same network segment as your network devices. For more details, please refer to
the NVR’s User Guide.
If you have more questions, please visit https://www.tp-link.com/support/faq/2850/.
Method 2: Via the TP-Link VIGI App
Remotely view live video, manage NVR, and get instant alerts.
1. Download and install the TP-Link VIGI app.
or
2. Open the app and log in with your TP-Link ID. If you don’t have an account, sign up rst.
3. Tap the + button on the top right and follow the app instructions to add your NVR.
Safety Information
Keep the device away from water, re, humidity or hot environments.
Do not attempt to disassemble, repair, or modify the device.
Do not use damaged charger or USB cable to charge the device.
Do not use any other chargers than those recommended.
Adapter shall be installed near the equipment and shall be easily accessible.
Use only power supplies which are provided by manufacturer and in the original packing of this product. If you have
any questions, please don't hesitate to contact us.
Avoid disposal of a battery into re or a hot oven, or mechanically crushing or cutting of a battery, that can result in
an explosion.
Place the device with its bottom surface downward. Install it at stable places, and prevent it from falling.
CAUTION: RISK OF EXPLOSION IF BATTERY IS REPLACED BY AN INCORRECT TYPE. DISPOSE OF
USED BATTERIES ACCORDING TO THE INSTRUCTIONS.
*Some devices may be incompatible, such as wireless mouse.
Please read and follow the above safety information when operating the device. We cannot guarantee that no
accidents or damage will occur due to improper use of the device. Please use this product with care and operate at
your own risk.
TP-Link hereby declares that the device is in compliance with the essential requirements and other relevant provisions
of directives 2014/30/EU, 2014/35/EU, 2009/125/EC, 2011/65/EU and (EU)2015/863.
The original EU declaration of conformity may be found at https://www.tp-link.com/en/ce
For technical support, the user guide and other information, please visit
https://www.tp-link.com/support, or simply scan the QR code.
To ask questions, find answers, and communicate with TP-Link users or engineers,
please visit https://community.tp-link.com to join TP-Link Community.
If you have any suggestions or needs on the product guides, welcome to email
techwriter@tp-link.com.cn.
The terms HDMI, HDMI High-Denition Multimedia Interface, and the HDMI Logo are
trademarks or registered trademarks of HDMI Licensing Administrator, Inc.
 Loading...