


NC210
HD Wi-Fi Cloud Camera
1910011585
REV1.0.0

COPYRIGHT & TRADEMARKS
Specifications are subject to change without notice. is a registered trademark of
TP-LINK TECHNOLOGIES CO., LTD. Other brands and product names are trademarks or
registered trademarks of their respective holders.
No part of the specifications may be reproduced in any form or by any means or used to make any
derivative such as translation, transformation, or adaptation without permission from TP-LINK
TECHNOLOGIES CO., LTD. Copyright © 2016 TP-LINK TECHNOLOGIES CO., LTD. All rights
reserved.
http://www.tp-link.com

FCC STATEMENT
This equipment has been tested and found to comply with the limits for a Class B digital device,
pursuant to part 15 of the FCC Rules. These limits are designed to pro-vide reasonable protection
against harmful interference in a residential installation. This equipment generates, uses and can
radiate radio frequency energy and, if not in-stalled and used in accordance with the instructions,
may cause harmful interference to radio communications. However, there is no guarantee that
interference will not occur in a particular installation. If this equipment does cause harmful
interference to radio or television reception, which can be determined by turning the equipment off
and on, the user is encouraged to try to correct the interference by one or more of the following
measures:
Reorient or relocate the receiving antenna.
Increase the separation between the equipment and receiver.
Connect the equipment into an outlet on a circuit different from that to which the receiver is
connected.
Consult the dealer or an experienced radio/ TV technician for help.
This device complies with part 15 of the FCC Rules. Operation is subject to the following two
conditions:
1) This device may not cause harmful interference.
2) This device must accept any interference received, including interference that may cause
undesired operation.
Any changes or modifications not expressly approved by the party responsible for compliance
could void the user’s authority to operate the equipment.
Note: The manufacturer is not responsible for any radio or TV interference caused by unauthorized
modifications to this equipment. Such modifications could void the user’s authority to operate the
equipment.
FCC RF Radiation Exposure Statement:
This equipment complies with FCC RF radiation exposure limits set forth for an uncontrolled
environment. This device and its antenna must not be co-located or operating in conjunction with
any other antenna or transmitter.
“To comply with FCC RF exposure compliance requirements, this grant is applicable to only Mobile
Configurations. The antennas used for this transmitter must be installed to provide a separation
distance of at least 20 cm from all persons and must not be co-located or operating in conjunction
with any other antenna or transmitter.”
CE Mark Warning
This is a class B product. In a domestic environment, this product may cause radio interference, in
which case the user may be required to take adequate measures.
Adapter shall be installed near the equipment and shall be easily accessible.

Caution
Please make sure the temperature for adapter will be from 0 ˚C to 40 ˚C.
Canadian Compliance Statement
This device complies with Industry Canada license-exempt RSSs. Operation is subject to the
following two conditions:
1) This device may not cause interference, and
2) This device must accept any interference, including interference that may cause undesired
operation of the device.
Le présent appareil est conforme aux CNR d’Industrie Canada applicables aux appareils radio
exempts de licence. L’exploitation est autorisée aux deux conditions suivantes :
1) l’appareil ne doit pas produire de brouillage;
2) l’utilisateur de l’appareil doit accepter tout brouillage radioélectrique subi, meme si le
brouillage est susceptible d’en compromettre le fonctionnement.
Radiation Exposure Statement:
This equipment complies with IC radiation exposure limits set forth for an uncontrolled
environment. This equipment should be installed and operated with minimum distance 20cm
between the radiator & your body.
Déclaration d'exposition aux radiations:
Cet équipement est conforme aux limites d'exposition aux rayonnements IC établies pour un
environnement non contrôlé. Cet équipement doit être installé et utilisé avec un minimum de 20
cm de distance entre la source de rayonnement et votre corps.
Industry Canada Statement
CAN ICES-3 (B)/NMB-3(B)
Korea Warning Statements:
.
NCC Notice
注意!
依據 低功率電波輻射性電機管理辦法
第十二條 經型式認證合格之低功率射頻電機,非經許可,公司、商號或使用者均不得擅自變更頻率、
加大功率或變更原設計之特性或功能。
第十四條 低功率射頻電機之使用不得影響飛航安全及干擾合法通行;經發現有干擾現象時,應立即
停用,並改善至無干擾時方得繼續使用。前項合法通信,指依電信規定作業之無線電信。低功率射
頻電機需忍受合法通信或工業、科學以及醫療用電波輻射性電機設備之干擾。
BSMI Notice
安全諮詢及注意事項
請使用原裝電源供應器或只能按照本產品注明的電源類型使用本產品。

清潔本產品之前請先拔掉電源線。請勿使用液體、噴霧清潔劑或濕布進行清潔。
注意防潮,請勿將水或其他液體潑灑到本產品上。
插槽與開口供通風使用,以確保本產品的操作可靠並防止過熱,請勿堵塞或覆蓋開口。
請勿將本產品置放於靠近熱源的地方。除非有正常的通風,否則不可放在密閉位置中。
請不要私自打開機殼,不要嘗試自行維修本產品,請由授權的專業人士進行此項工作。
Продукт сертифіковано згідно с правилами системи УкрСЕПРО на відповідність вимогам
нормативних документів та вимогам, що передбачені чинними законодавчими актами
України.
Safety Information
When product has power button, the power button is one of the way to shut off the product;
when there is no power button, the only way to completely shut off power is to disconnect the
product or the power adapter from the power source.
Don’t disassemble the product, or make repairs yourself. You run the risk of electric shock and
voiding the limited warranty. If you need service, please contact us.
Avoid water and wet locations.
Adapter shall be installed near the equipment and shall be easily accessible.
The plug considered as disconnect device of adapter.
Use only power supplies which are provided by manufacturer and in the original
packing of this product. If you have any questions, please don't hesitate to contact us.
Explanation of the symbols on the product label
Symbol Explanation
DC voltage

RECYCLING
This product bears the selective sorting symbol for Waste electrical and electronic
equipment (WEEE). This means that this product must be handled pursuant to
European directive 2012/19/EU in order to be recycled or dismantled to minimize its
impact on the environment.
User has the choice to give his product to a competent recycling organization or to
the retailer when he buys a new electrical or electronic equipment.

TP-LINK TECHNOLOGIES CO., LTD
DECLARATION OF CONFORMITY
For the following equipment:
Product Description: HD Wi-Fi Cloud Camera
Model No.: NC210
Trademark: TP-LINK
We declare under our own responsibility that the above products satisfy all the technical regulations
applicable to the product within the scope of Council Directives:
Directives 1999/5/EC, Directives 2004/108/EC, Directives 2006/95/EC, Directives 1999/519/EC,
Directives 2011/65/EU
The above product is in conformity with the following standards or other normative documents
EN 300 328 V1.9.1
EN 301 489-1 V1.9.2 & EN 301 489-17 V2.2.1
EN 55022: 2010 + AC: 2011
EN 55024: 2010
EN 60950-1: 2006 + A11: 2009 + A1: 2010 + A12: 2011 +A2: 2013
EN 61000-3-2:2014/EN61000-3-3:2013
EN 62311: 2008
The product carries the CE Mark:
Person responsible for making this declaration:
Yang Hongliang
Product Manager of International Business
Date of issue: 2016-03-24
TP-LINK TECHNOLOGIES CO., LTD.
Building 24 (floors 1, 3, 4, 5), and 28 (floors 1-4) Central Science and Technology Park,
Shennan Rd, Nanshan, Shenzhen, China

CONTENTS
Chapter 1 About this Guide.................................................................................... 1
1.1 Conventions.................................................................................................................. 1
1.2 Overview of This Guide ................................................................................................1
Chapter 2 Get to know about your camera ........................................................... 2
2.1 Product Overview .........................................................................................................2
2.2 Main Features............................................................................................................... 2
2.3 Panel Appearance ........................................................................................................3
2.3.1 Front Panel ........................................................................................................3
2.3.2 Rear Panel ......................................................................................................... 4
Chapter 3 Set Up Your Camera .............................................................................. 5
3.1 Set up the Camera with the tpCamera APP..................................................................5
3.2 Position Your Camera ...................................................................................................6
Chapter 4 Configure Your Camera ......................................................................... 8
4.1 Log in to Your Camera ..................................................................................................8
4.2 Live View ......................................................................................................................9
4.3 Basic........................................................................................................................... 11
4.3.1 Basic > Status .................................................................................................. 11
4.3.2 Basic > Network...............................................................................................13
4.3.3 Basic > Wireless Connection ...........................................................................14
4.3.4 Basic > Cloud Setting.......................................................................................16
4.3.5 Basic > LED .....................................................................................................17
4.4 Advanced....................................................................................................................17
4.4.1 Advanced > Status...........................................................................................18
4.4.2 Advanced > Network........................................................................................18
4.4.3 Advanced > Wireless Connection ....................................................................21
4.4.4 Advanced > Cloud Setting ...............................................................................21
4.4.5 Advanced > Video............................................................................................21
4.4.6 Advanced > Sound Detection ..........................................................................22
4.4.7 Advanced > Motion Detection ..........................................................................23
4.4.8 Advanced > LED .............................................................................................. 24
4.5 System........................................................................................................................24
4.5.1 Account............................................................................................................25
4.5.2 Date/Time ........................................................................................................27
4.5.3 Management ....................................................................................................29
4.5.4 System Log ...................................................................................................... 31
Appendix: Specifications....................................................................................... 32

NC210 HD Wi-Fi Cloud Camera
Chapter 1 About this Guide
This User Guide contains information for setup and management of the Cloud Camera. Please
read this guide carefully before operation.
1.1 Conventions
In this Guide the following conventions are used:
The camera mentioned in this Guide stands for NC210 without any explanation.
Bold font indicates a button, a toolbar icon, menu or menu item.
Symbol in this Guide:
Symbol Description
Note:
Ignoring this type of note might result in a malfunction or damage to the
device.
1.2 Overview of This Guide
Chapter Introduction
Chapter 1 About This Guide Introduces the guide structure and conventions.
Chapter 2 Get to know about
your camera
Chapter 3 Set up your camera Introduces how to quickly set up the camera using the
Chapter 4 Configure the
Camera
Introduces the features, application and appearance of the
camera.
tpCamera app and how to position your camera.
Introduces how to configure the camera using the built-in web
management page.
1

NC210 HD Wi-Fi Cloud Camera
Chapter 2 Get to know about your camera
2.1 Product Overview
TP-LINK Cloud Camera is a versatile solution for home and office monitoring to keep an eye on
your home, kids or workplace, whatever you care for most.
TP-LINK Cloud Camera is a cloud-based Wi-Fi video monitoring device with free live streaming
and remote viewing, which makes it easy to stay connected with what you care most wherever you
are. You can view and manage your camera from anywhere over the Internet through the TP-LINK
Cloud website or through the tpCamera app for iOS and Android devices.
Through the camera’s web management page, you can view the status of the camera, and
configure lots of settings of the camera, such as network setting, the cloud setting, the motion
detection, and the sound detection.
With Motion Detection function, TP-LINK Cloud Camera can send you immediate notification by
email or tpCamera whenever motion or sound is detected automatically, allowing you to remain
aware of whatever is happening on the ground.
With a stable high speed Wi-Fi connection of up to 150Mbps for NC210, you can enjoy fluid video
streaming with ease.
With the adhesive (included) or screws (not included), you can place your camera anywhere you
want, on the table, the wall, or even on the ceiling.
2.2 Main Features
Advanced H.264 Video - For amazingly smooth HD video streaming
tpCamera App - Use the free tpCamera app to set up, view and manage the camera remotely
with your iOS and Android devices
TP-LINK Cloud (http://www.tplinkcloud.com
Web-based management page for basic and advanced configurations
Easy Setup – Connect and follow the tpCamera app’s instruction to install and operate the
camera within minutes
) access for easy viewing and management
Motion & Sound Detection - Immediate notification by email or tpCamera whenever motion or
sound is detected
Email or tpCamera app notification triggered by motion detection
Support wireless 802.11b/g/n with speed up to 150Mbps.
2
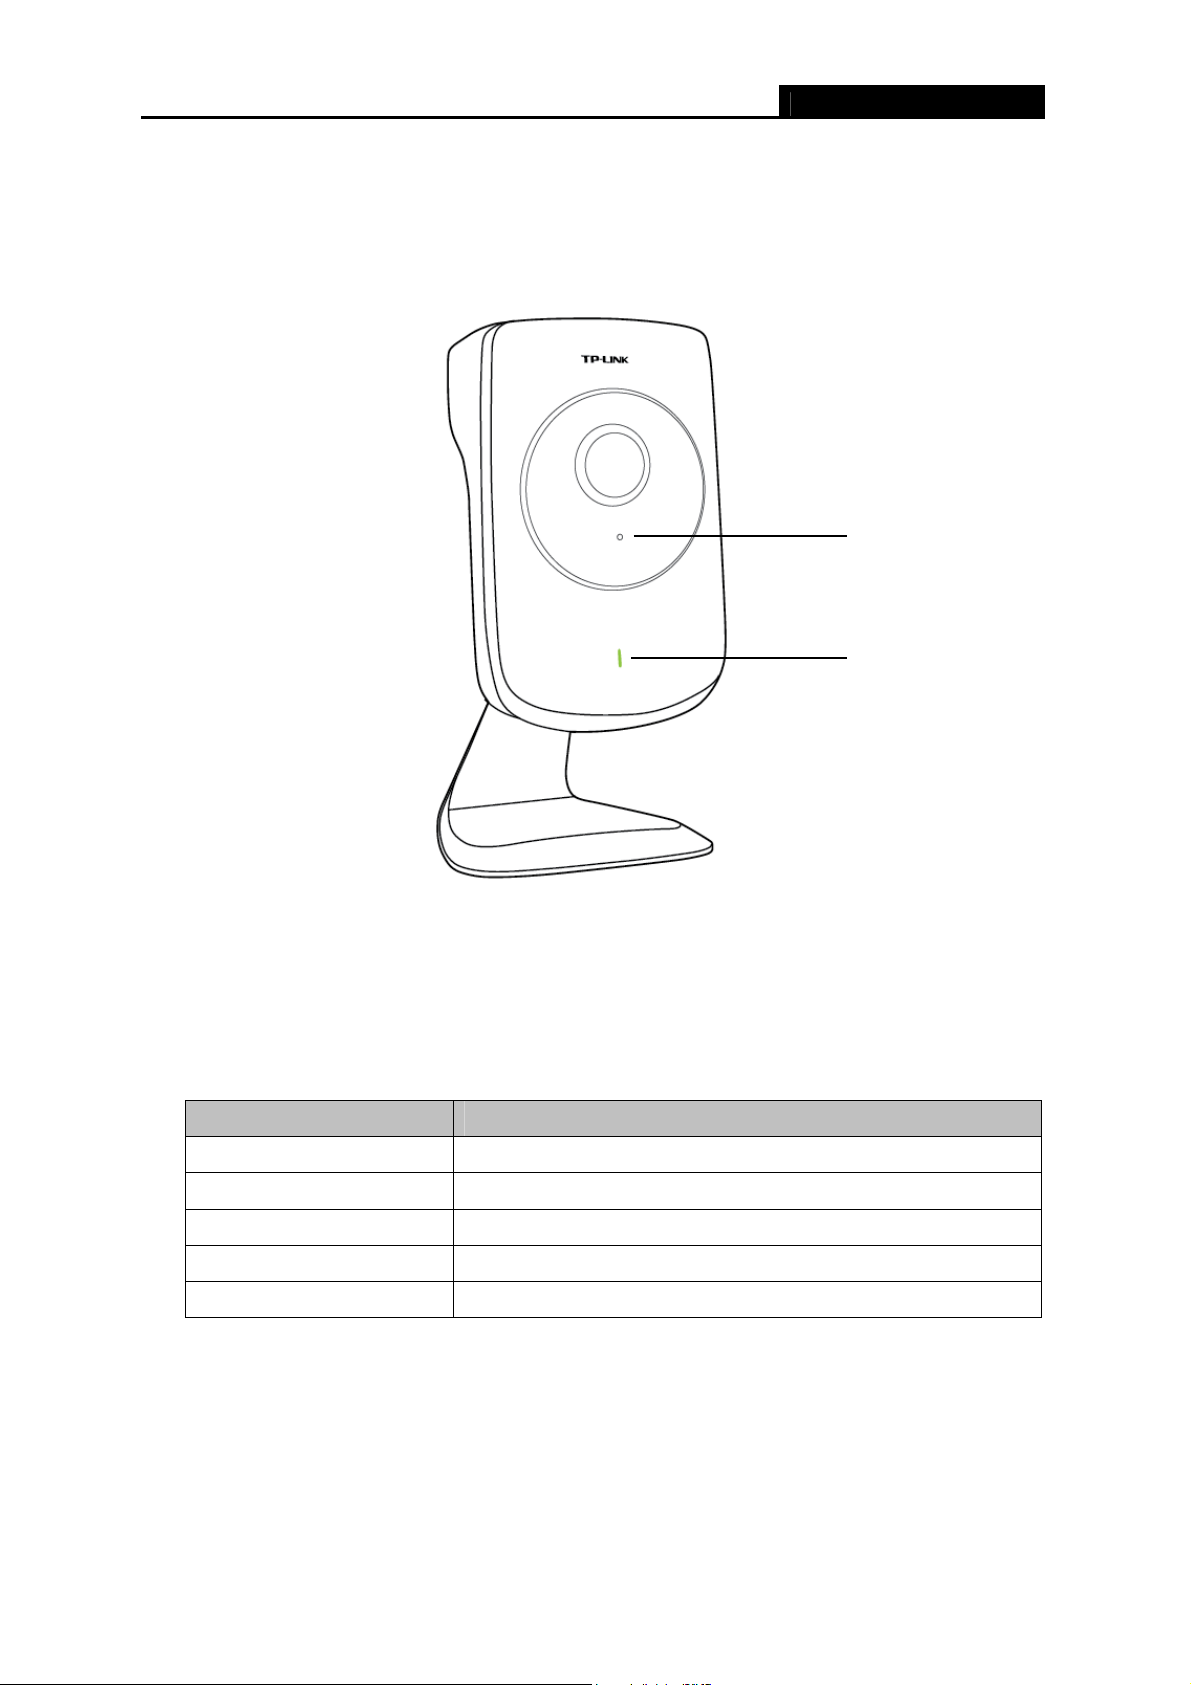
2.3 Panel Appearance
2.3.1 Front Panel
NC210 HD Wi-Fi Cloud Camera
Microphone
System LED
Figure 2-
Microphone: The camera has a built-in internal microphone. This microphone is hidden in
the pinhole located on the front panel.
System LED:
Status Indication
Flashing red and green
Flashing Red
Flashing Green
Solid Green
Solid Red
Ready to connect.
Wi-Fi not connected.
Wi-Fi connected (local view only).
Wi-Fi connected (local & remote view).
System restarting.
1 Front Panel
3

2.3.2 Rear Panel
NC210 HD Wi-Fi Cloud Camera
Power Jack
Heat Emission Holes
RESET Button
Figure 2-
Power Jack: The power jack is where you connect the power adapter to the camera.
RESET Button: While the camera is powered on, press the RESET button for 5 seconds until
the System LED on the front panel turns solid red. The camera will reset and reboot.
Note:
It is recommended to use a pen to press the RESET button on the camera. Do not use a
sharp object.
Heat Emission Holes: These holes are used for heat dissipation.
2 Rear Panel
4

NC210 HD Wi-Fi Cloud Camera
Chapter 3 Set Up Your Camera
3.1 Set up the Camera with the tpCamera APP
You can install your camera in minutes with the free tpCamera app.
Before you start the setup process, get your smartphone and make sure that it is connected to
your home network. To use the tpCamera app, your smartphone’s operating system should meet
these requirements: Android 4.1 or higher; iOS 7.0 or higher.
Step 1. Power on the camera.
Power on the camera using the provided power supply unit.
CameraOutlet
Step 2. Download and install the tpCamera app.
You can download the free tpCamera app from the App Store or Google play. You can also scan
the QR code below to download the tpCamera app.
OR
Step 3. Add the camera to your TP-LINK Cloud account.
Launch the tpCamera app, log into your TP-LINK Cloud account or create one if you do not have
an account. Then follow the app instructions to add your new camera to your account.
When you reach the My Cam screen, you have successfully added your camera and can start to
use your camera.
5
 Loading...