


1
Introduction
Notice on the Service Manual
1. This Service Manual for the RS2000 sewing machines is written to assist users in properly diagnosing and
correcting problems with the machine.Please read through this Service Manua l carefully and utilize it
as a reliable guide for daily service activities.
2. This Manual is composed of the following sections.
1. Specification
2. Troubleshooting
3. Adjustment of respective parts
4. Removal and reassembling of main components
When referring to this Service Manual for repair or others, start to read the "Troubleshooting" for
correct diagnosis and then proceed to the "Adjustment of respective sections" or "Removal and
reassembling of main components".
Important safety instruction
Following describes the safety instructions to prevent possible risks, damages or losses resulting
from improper handling in the repair, inspection or operation of the RS2000.Please read these
instructions carefully and observe them faithfully.
Meaning of warning symbols ( and ):
Precautions during inspection:
Mortal or serious injury could result from improper handling.
Physical injury or material loss could result from improper handling.
1. Make sure to turn the power supply off before starting the repair work.
There is risk of electric shock.
2. After removing parts for repair, or others, make sure to secure the electrical safety for the handling of
the sewing machine in accordance with local laws and regulations concerning electrical operations.
There is risk of electric shock.
1. When leaving from the sewing machine, turn off the power supply switch or disconnect the power cable
plug from the power outlet.
There is risk of injury.
1. When replacing parts, use only the genuine parts supplied by us in order to assure the performance
of the sewing machine.

2
CONTENTS
1.Specifications.......................................................................................... 4
2.Troubleshooting......................................................................................5
1.Improper tightness of stitches.........................................................................5
2.Skip stitch.......................................................................................................7
3.Thread breakage..........................................................................................10
4.Broken or bent needle..................................................................................13
5.Improper fabric feed .....................................................................................16
6.Disrupted pattern..........................................................................................18
7.Improper buttonhole sewing.........................................................................21
8.Improper lower thread winding length ..........................................................22
9.Improper upper threading............................................................................. 23
3.Adjustment of respective parts ............................................................. 24
1.Needle bar position.......................................................................................24
2.Timing between needle and hook.................................................................26
3.Clearance between needle and upper plate spring......................................28
4.Stitch width...................................................................................................29
5.Needle location.............................................................................................30
6.Needle sideways movement.........................................................................32
7.Thread tension..............................................................................................33
8.Feed dog position.........................................................................................34
9.Lower thread winding length.........................................................................36
10.Presser foot height .......................................................................................37
11.Needle threader............................................................................................ 38
12.Buttonhole sewing ........................................................................................39
13.Feeding amount............................................................................................ 41
14.Clearance between shuttle driver and shuttle hook...................................... 42
15.Belt tension...................................................................................................43
4.Removal and reassembling of main components................................. 45
1.External panels, etc......................................................................................45

3
MEMO

4
Specifications
1.Specifications
RS2000
RS2000 Series
* Pattern selection dial may be positioned on the right side face.
Item\Type
SD 2D 3D
Type of stitch
Straight lock stitch/zigzag sewing
Needle to be used
HA × 1, # 11 to 16 (Standard : # 14)
Hook type
Vertical half-turn rotary hook
Take-up lever type
Link take-up lever
Stitch length
Fixed for each
pattern
Adjust dial type: Max. 5 mm
Stitch width
Fixed for each pattern Adjust lever type: Max. 5 mm
Straight stitch needle standard
position
Center, Left
Type of pattern
18 types 20 types
Buttonhole type
4-step buttonhole 1-step buttonhole
Sewing speed
Max.: 800 rpm
Pattern selection
Dial type, endless bi-directional
Reverse stitching
Lever type
Presser bar lifter
2-step select lever type
Under thread winder
Needle stop by selector knob
Accessory
Stored under the extension table

5
Troubleshooting
2.Troubleshooting
1.Improper tightness of stitches
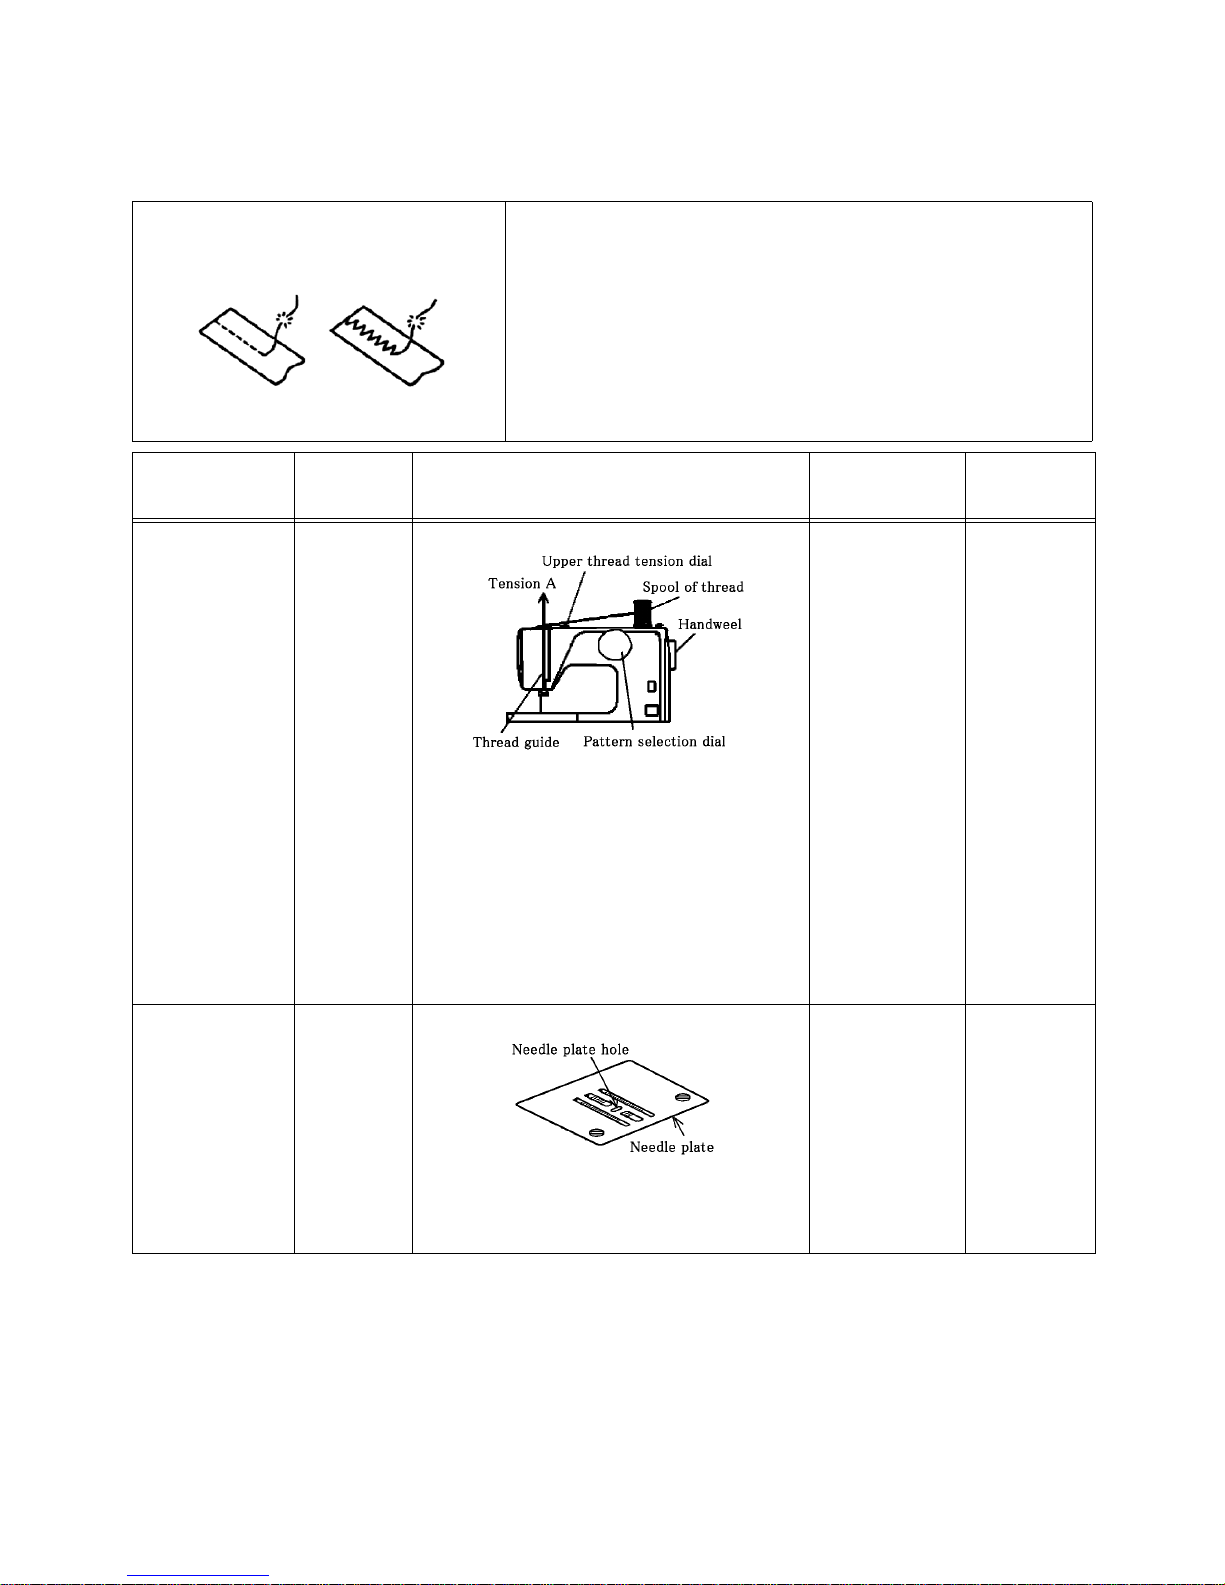
[Example of phenomenon] [Check item before adjustment]
Are upper and lower threads threaded properly?
Is the combination of needle and thread adequate for the
fabric?
Step Item Diagnosing Method Standard
Reference
Page
1. Upper thread
tension dial
Upper thread
tension
<Condition>
Upper thread tension dial: "5"
Thread: Cotton yarn # 60
<Diagnosis>
Pass the upper thread from the spool
of thread to the thread guide, pull the
thread vertically and measure the tension (A) when the value has stabilized.
(Using a measuring instrument)
A = 0.85 to 1.15 N[Adjustment]
page.33
2. Bobbin case
Lower thread
tension
<Condition>
Thread: Cotton yarn # 60
<Diagnosis>
After setting the bobbin in the bobbin
case, pull out the lower thread through
the lower thread guide. Measure the
tension (A) when the value has stabilized. (Using a measuring instrument.)
A = 0.3 to 0.4 N
[Adjustment]
page.33

6
Troubleshooting
3. Hook
Clearance
between
shuttle
driver and
shuttle hook
<Diagnosis>
Remove the extension table, and open
the shuttle cover.
Remove the bobbin case from the
hook.
When the shuttle driver is turned to left
by rotating the handweel, measure the
clearance (A) between the shuttle driver and the shuttle hook.
A = 0.3 to 0.6 mm[Adjustment]
page.42
Step Item Diagnosing Method Standard
Reference
Page
7
Troubleshooting
2.Skip stitch
[Example of phenomenon] [Check item before adjustment]
Is home-use sewing machine needle (HA × 1)used?
Is the needle installed correctly?
Is the needle bent?
Is the combination of needle and thread adequate for the
fabric?
Is the upper thread threaded properly?
Step Item Diagnosing Method Standard
Reference
Page
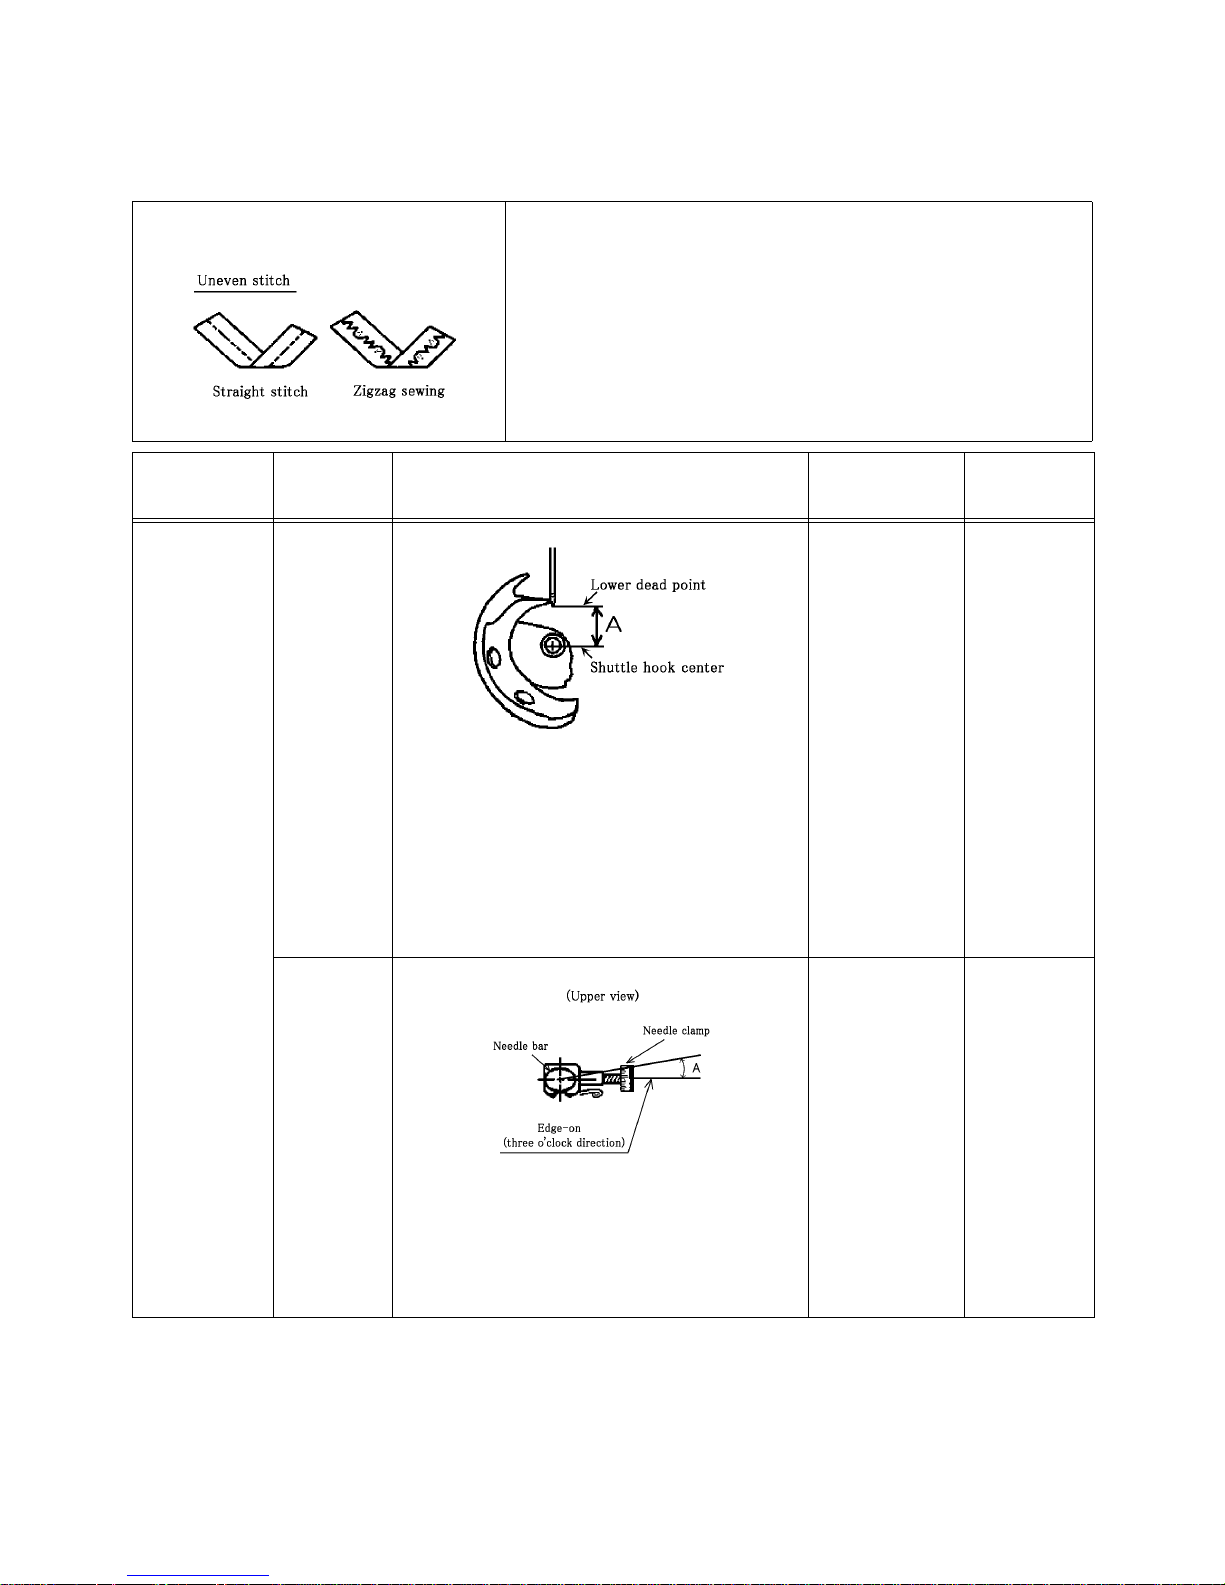
1. Needle and
hook
Needle bar
height
<Condition>
Needle: # 14
<Diagnosis>
Remove the extension table, and open the
shuttle cover.
When the needle bar is brought to the low-
er dead point by rotating the handweel,
measure the clearance (A) between the
needle point and the shuttle hook center.
A = 11.2 ± 0.2 mm[Adjustment]
page.24
Needle bar
direction
<Diagnosis>
Remove the face cover.
Check the needle clamp position.
When seeing from the top, measure the
angle (A) in the figure.
Needle clamp
position:
Just beside
when seeing
from the top
(right side seeing from the
front)
A= 0° to 1.5°
[Remove]
page.45
[Adjustment]
page.24
8
Troubleshooting
1. Needle and
hook
Clearance
between
needle and
hook
<Condition>
<SD>
Pattern selection dial: "6"
<2D>
Pattern selection dial: "4"
<3D>
Pattern selection dial: "3"
Stitch width lever: "0"
<Diagnosis>
Turn the handweel beyond the lower dead
point of needle bar. When the hook blade
point has protruded by 0.1 to 0.2 mm from
the side face of needle, measure the clearance (A) between the needle and the
hook.
A = 0.03 to 0.08 mm[Adjustment]
page.26
Amount of
needle
elevation
<Condition>
<SD>
Pattern selection dial: "5"
<2D>
Pattern selection dial: "3"
<3D>
Pattern selection dial: "4"
<Diagnosis>
Remove the extension table, and open the
shuttle cover.
When the hook blade point is aligned with
the needle center by rotating the handweel, measure the travel distance (A) of
needle bar, regarding the lower dead point
of needle bar as 0.
A = 1.85 ± 0.15 mm[Adjustment]
page.26
Step Item Diagnosing Method Standard
Reference
Page
9
Troubleshooting
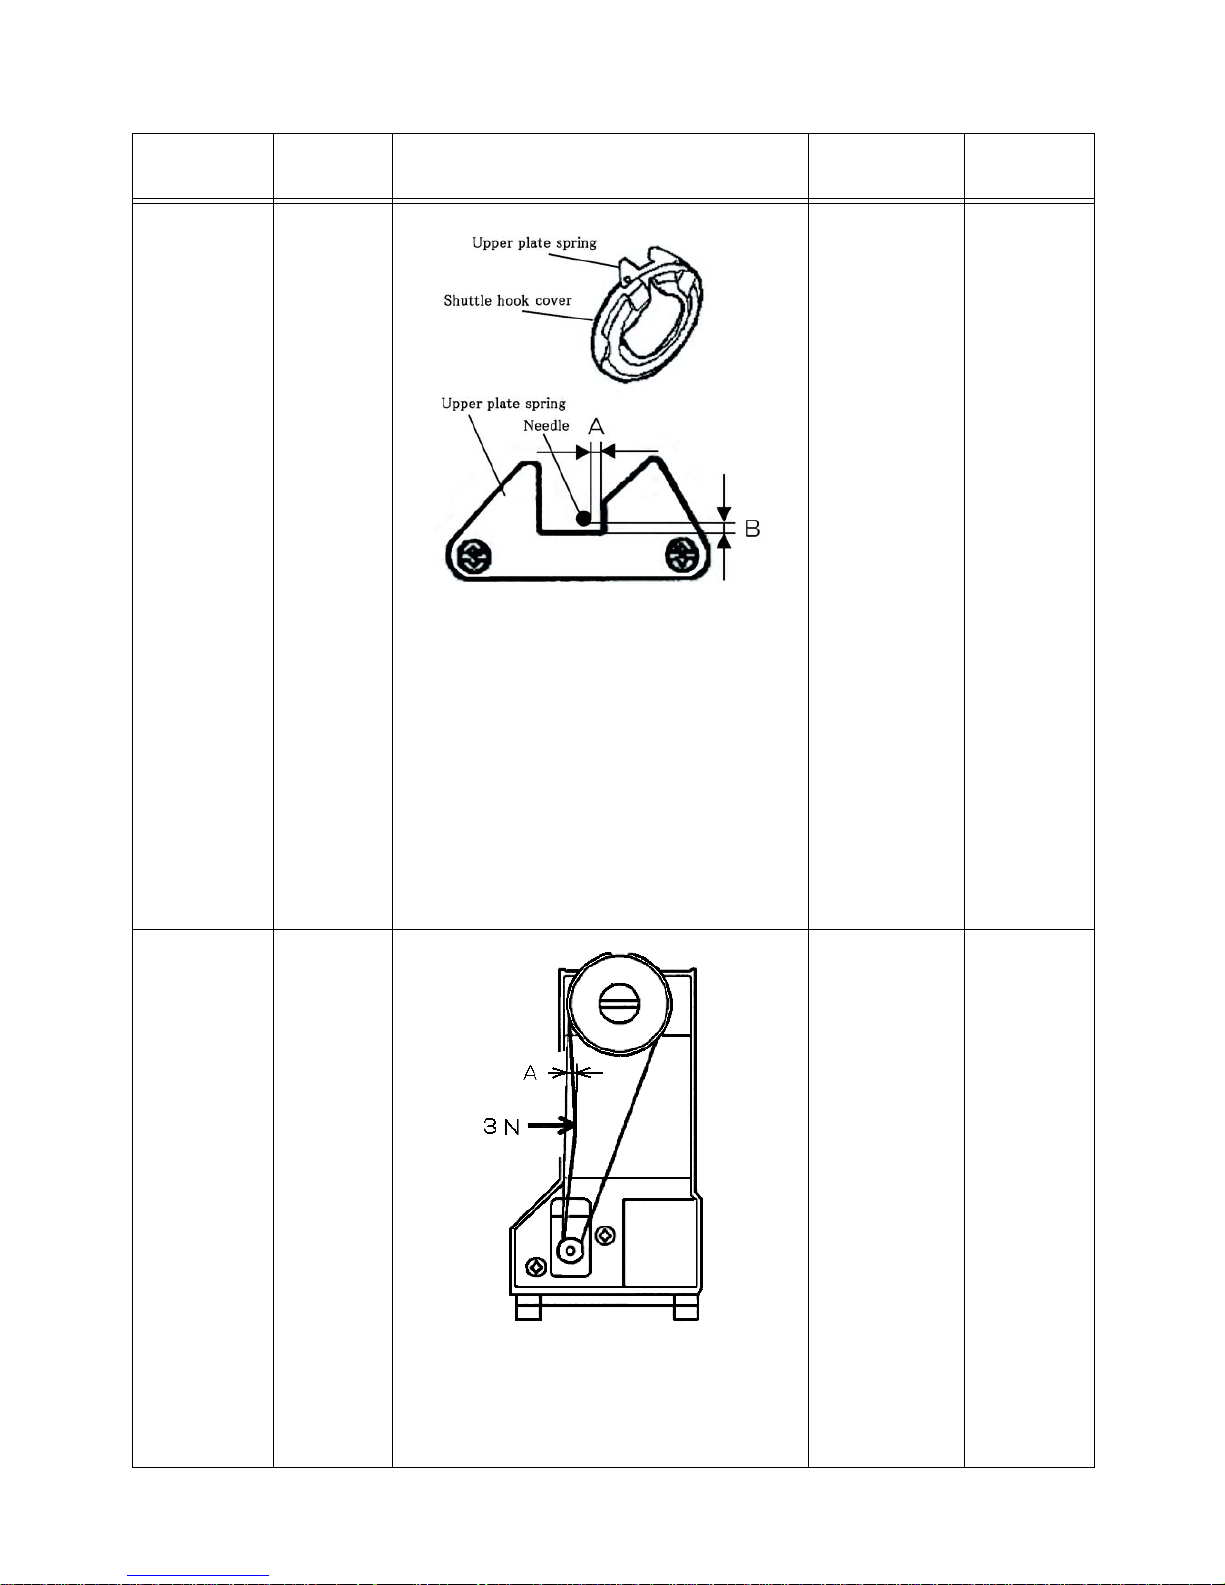
2. Needle and
upper
plate
spring
Clearance
between
needle and
upper plate
spring
<Condition>
<SD>
Pattern selection dial: "11"
<2D>
Pattern selection dial: "7"
<3D>
Pattern selection dial: "3"
Stitch width lever: "5"
<Diagnosis>
When the needle bar is brought to the low-
er dead point at the right side by rotating
the handweel, measure the clearance
(A, B) between the needle and the upper
plate spring.
A = 0.5 to 1.2
mm
B = 0.5 to 1.0
mm
[Adjustment]
page.28
3. Motor belt
Motor belt
tension
<Diagnosis>
Remove external panels and others.
When pressing the center of motor belt
with a force of 3N, measure the depth of
flexure (A) on the belt.
A = 7.0 to 9.0
mm
[Remove]
page.45
[Adjustment]
page.43
Step Item Diagnosing Method Standard
Reference
Page
10
Troubleshooting
3.Thread breakage
[Example of phenomenon] [Check item before adjustment]
Is home-use sewing machine needle (HA × 1)used?
Is the needle installed correctly?
Is the needle bent or deformed?
Is the combination of needle and thread adequate for the
fabric?
Is the upper thread tension set correctly?
Are upper and lower threads threaded properly?
Step Item Diagnosing Method Standard
Reference
Page
1. Upper thread
tension dial
Upper
thread
tension
<Condition>
Upper thread tension dial: "5"
Thread: Cotton yarn # 60
<Diagnosis>
Pass the upper thread from the spool of
thread to the thread guide, pull the
thread vertically and measure the tension (A) when the value has stabilized.
(Using a measuring instrument)
A = 0.85 to 1.15 N[Adjustment]
page.33
2. Needle plate
Flaw on
needle
plate
<Diagnosis>
Check the needle plate by touching
around the needle plate hole.
Flaw not
allowed.
Repair with
sand paper
(#800).

11
Troubleshooting
3. Hook
Clearance
between
shuttle
driver and
shuttle
hook
<Diagnosis>
Remove the extension table, and open
the shuttle cover.
Remove the bobbin case from the hook.
When the shuttle driver is turned to left
by rotating the handweel, measure the
clearance (A) between the shuttle driver
and the shuttle hook.
A = 0.3 to 0.6 mm[Adjustment]
page.42
Flaw on
hook blade
point
<Diagnosis>
Check the hook blade point by touching
the hook blade point with finger.
Flaw not
allowed.
Repair with
sand paper
(#800).
4. Needle and
hook
Amount of
needle
elevation
<Condition>
<SD>
Pattern selection dial: "5"
<2D>
Pattern selection dial: "3"
<3D>
Pattern selection dial: "4"
<Diagnosis>
Remove the extension table, and open
the shuttle cover.
When the hook blade point is aligned
with the needle center by rotating the
handweel, measure the travel distance
(A) of needle bar, regarding the lower
dead point of needle bar as 0.
A = 1.85 ± 0.15 mm[Adjustment]
page.26
Step Item Diagnosing Method Standard
Reference
Page
12
Troubleshooting
4. Needle and
hook
Needle bar
height
<Condition>
Needle: # 14
<Diagnosis>
Remove the extension table, and open
the shuttle cover.
When the needle bar is brought to the
lower dead point by rotating the handweel, measure the clearance (A) between the needle point and the shuttle
hook center.
A = 11.2 ± 0.2 mm[Adjustment]
page.24
5. Needle and
upper plate
spring
Clearance
between
needle and
upper plate
spring
<Condition>
<SD>
Pattern selection dial: "11"
<2D>
Pattern selection dial: "7"
<3D>
Pattern selection dial: "3"
Stitch width lever: "5"
<Diagnosis>
When the needle bar is brought to the
lower dead point at the right side by
rotating the handweel, measure the
clearance (A, B) between the needle and
the upper plate spring.
A = 0.5 to 1.2
mm
B = 0.5 to 1.0
mm
[Adjustment]
page.28
Step Item Diagnosing Method Standard
Reference
Page

13
Troubleshooting
4.Broken or bent needle
[Example of phenomenon] [Check item before adjustment]
Is home-use sewing machine needle (HA × 1)used?
Is the needle installed correctly?
Is the upper thread threaded properly?
Is a proper presser foot used?
Is the upper thread tension too strong?
Step Item Diagnosing Method Standard
Reference
Page
1. Needle and
needle plate
Needle
dropping
points
(At
straight
stitching)
<Condition>
<SD>
Pattern selection dial: "6"
<2D>
Pattern selection dial: "4"
<3D>
Pattern selection dial: "3"
Stitch width lever: "0"
<Diagnosis>
Rotate the handweel, bring down the
needle lower than the surface of needle
plate.
Measure the relative position (A, B) be-
tween the needle and the slot.
A = B
[Adjustment]
page.30
Needle
dropping
points
(At
maximum
zigzag
stitching)
<Condition>
<SD>
Pattern selection dial: "11"
<2D>
Pattern selection dial: "7"
<3D>
Pattern selection dial: "3"
Stitch width lever: "5"
<Diagnosis>
Rotate the handweel, bring down the
needle lower than the surface of needle
plate.
Measure the relative position (C) be-
tween the needle and the slot.
C = 0.7 ± 0.3 mm[Adjustment]
page.30
 Loading...