

Foreword
Welcome to the growing group of value−conscious people who drive Toyotas. We
are proud of the advanced engineering and quality construction of each vehicle we
build.
This electric vehicle is 2WD (FF).
This Owner’s Manual explains the operation of your new Toyota. Please read
it thoroughly and have all the occupants follow the instructions carefully.
Doing so will help you enjoy many years of safe and trouble−free motoring.
For important information about this manual and your Toyota, read the following pages carefully.
When it comes to service, remember that your EV service station knows your
vehicle best and is interested in your complete satisfaction. He will provide quality
maintenance and any other assistance you may require.
Please leave this Owner’s Manual in this vehicle at the time of resale. The next
owner will need this information also.
All information and specifications in this manual are current at the time of printing.
However, because of Toyota’s policy of continual product improvement, we reserve
the right to make changes at any time without notice.
Please note that this manual applies to all models and explains all equipment,
including options. Therefore, you may find some explanations for equipment
not installed on your vehicle.
© 2002 TOYOTA MOTOR CORPORATION
All rights reserved. This material may not be reproduced or copied, in whole or in
part, without the written permission of Toyota Motor Corporation.
i
Important information about this manual
Safety and vehicle damage warnings
Throughout this manual, you will see safety and vehicle damage warnings. You must follow these warnings carefully to
avoid possible injury or damage.
The types of warnings, what they look like, and how they are
used in this manual are explained as follows:
CAUTION
This is a warning against anything which may
cause injury to people if the warning is ignored.
You are informed about what you must or must not
do in order to reduce the risk of injury to yourself
and others.
NOTICE
This is a warning against anything which may
cause damage to the vehicle or its equipment if the
warning is ignored. You are informed about what
you must or must not do in order to avoid or reduce the risk of damage to your vehicle and its
equipment.
Safety symbol
When you see the safety symbol
shown above, it means: “Do not...”;
“Do not do this”; or “Do not let this
happen”.
ii

Important information about your Toyota
New vehicle warranty
Your new vehicle is covered by the following Toyota
limited warranties:
D New vehicle warranty
D Others
For further information, please refer to the ”Owner’s
Warranty Information Booklet” or ”Owner’s Manual Supplement”.
Your responsibility for maintenance
It is the owner’s responsibility to make sure that the
specified maintenance is performed. Section 7 gives details of these maintenance requirements. Also included in
Section 7 is general maintenance. For scheduled maintenance information, please refer to the “Owner’s Manual
Supplement”.
Accessories, spare parts and
modification of your Toyota
A wide variety of non−genuine spare parts and accessories for Toyota vehicles are currently available in the
market. You should know that Toyota does not warrant
these products and is not responsible for their performance, repair, or replacement, or for any damage they
may cause to, or adverse effect they may have on, your
Toyota vehicle.
This vehicle should not be modified with non−genuine
Toyota products. Modification with non−genuine Toyota
products could affect its performance, safety or durability, and may even violate governmental regulations. In
addition, damage or performance problems resulting from
the modification may not be covered under warranty.
iii

Installation of a mobile
two−way radio system
As the installation of a mobile two−way radio system in
your vehicle could affect electronic systems such as
anti−lock brake system, SRS airbag system and seat
belt pretensioner system, be sure to check with your EV
service station for precautionary measures or special
instructions regarding installation.
Scrapping of your Toyota
The SRS airbag and seat belt pretensioner devices in
your Toyota contain explosive chemicals. If the vehicle
is scrapped with the airbags and pretensioners left as
they are, this may cause an accident such as fire. Be
sure to have the systems of the SRS airbag and seat
belt pretensioner removed and disposed of by the qualified service shop or by your EV service station before
you dispose of your vehicle.
When the electric vehicle needs to be disposed of, sufficient care should be taken for the treatment of poisonous electrolyte of traction batteries. For the disposal of
the electric vehicle, consult your EV service station.
iv

On−pavement and off−road
driving tips
This vehicle belongs to the utility vehicle class. In general, utility vehicles have a significantly higher rollover
rate than other types of vehicles. This kind of vehicle
will handle and maneuver differently from an ordinary
passenger car because it is designed for off−road use
also. In addition, this kind of vehicle has a higher
ground clearance and center of gravity than that of an
ordinary passenger car. The ordinary utility vehicle is
more likely to rollover. Failure to operate this kind of
vehicle correctly may result in loss of control, accidents
or vehicle rollover causing death or serious injury. However, your RAV4 EV is an electric vehicle. It has heavy
traction batteries under the floor. So the ground clearance is not so high. Avoid off−road driving because it
may damage the traction batteries. Be sure to read
“Off−road vehicle precautions” on page 126 in Section 3
and “Off−road driving precautions” on page 137 in Section 4.
Traction batteries
Traction batteries have a service life. Call your EV service station or a service station for information concerning recycling or disposal of traction batteries and your
vehic le.
v
CAUTION
CAUTION
Precautions for use
of RAV4 EV
The RAV4 EV has both high voltage DC and AC systems as well as a 12−volt system. DC and AC high
voltage are both very dangerous and can cause death
or serious i njuries, severe burns and el ectric shock.
D In order to avoid personal injuries, do not touch
the high voltage wirings (orange colored) and their
connectors.
D Follow the caution labels attached to the high volt-
age parts.
D Do not remove or replace the high voltage parts
such as the power control unit (located in the
motor compartment), traction batteries (located under the floor), etc.
D Do not touch the service plug located under the
floor carpet of the rear seat without EV technical
training. (See page viii.) This component is provided to disable the high voltage system in case
of servicing at an EV service station.
If an accident occurs
D Pull the vehicle off the road, put the selector lever
in ”P” and remove the motor key.
D In order to avoid personal injuries, do not touch
any high voltage wirings and their connectors, and
high voltage parts (power control unit, traction
batteries, etc.).
D If some exposed electric wirings are protruding
inside or outside of the vehicle, an electric shock
may occur. Never touch the electric wirings.
D If fluid leaks or gets in some parts of the vehicle,
never touch it because it may be strong alkali
from the traction batteries. If it gets into your skin
or eyes, wash off immediately with a large amount
of water, if possible, boric acid solution, and get
immediate medical attention in order to help avoid
serious injury.
D If a vehicle fire occurs, extinguish it using a fire
extinguisher for the exclusive use on electric fires.
Or, use a large amount of water to prevent flammable gas from being generated from the batteries.
vi
D When your vehicle needs to be towed, do it with
the front wheels raised. For details on towing, see
“If your vehicle needs to be towed” on page 154
in Section 5.
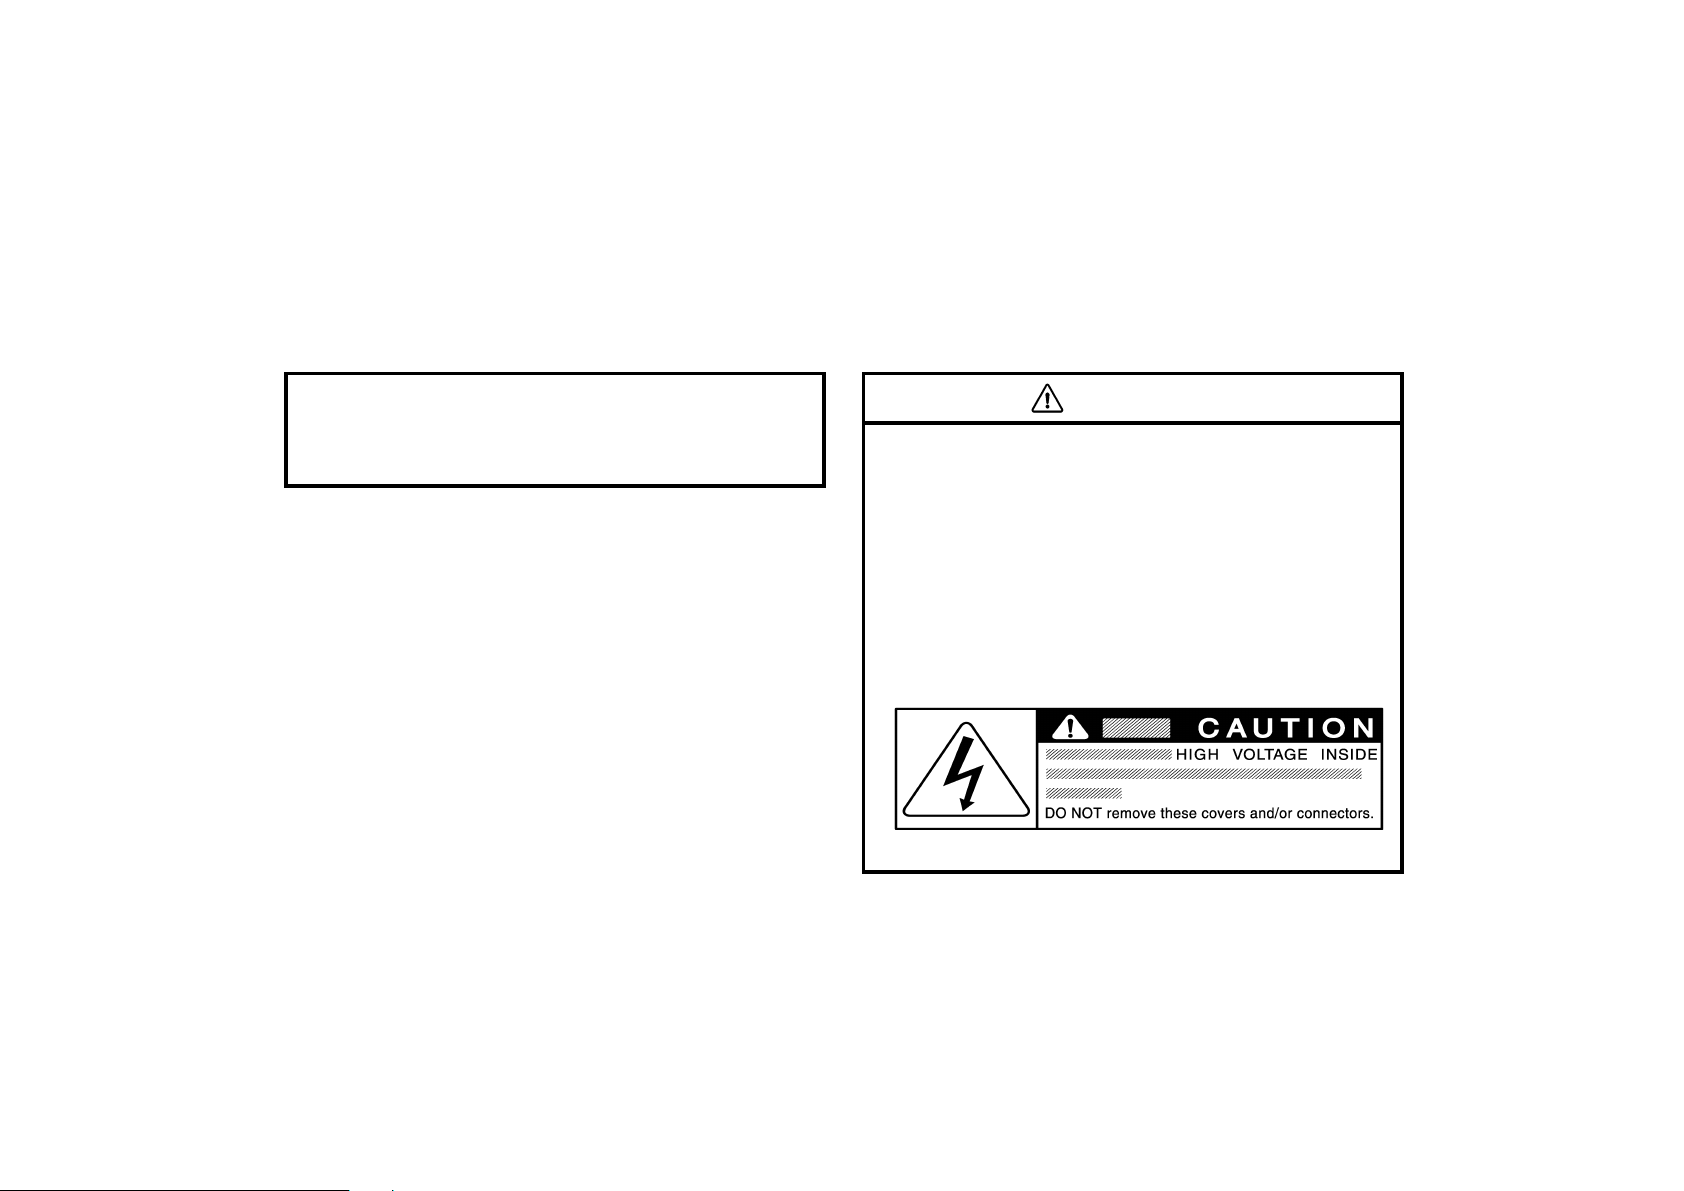
CAUTION
High Voltage
Your electric vehicle is equipped with cables connected to parts of the vehicle subject to high voltage (about 300 V). There are some other parts which
reach high temperatures when you are driving. Never
touch battery cables (wrapped in orange−colored harnesses) and their connector since high voltages are
applied and they are dangerous. Caution labels are
applied to these parts to identify them. Carefully
observe the instructions on these caution labels.
vii
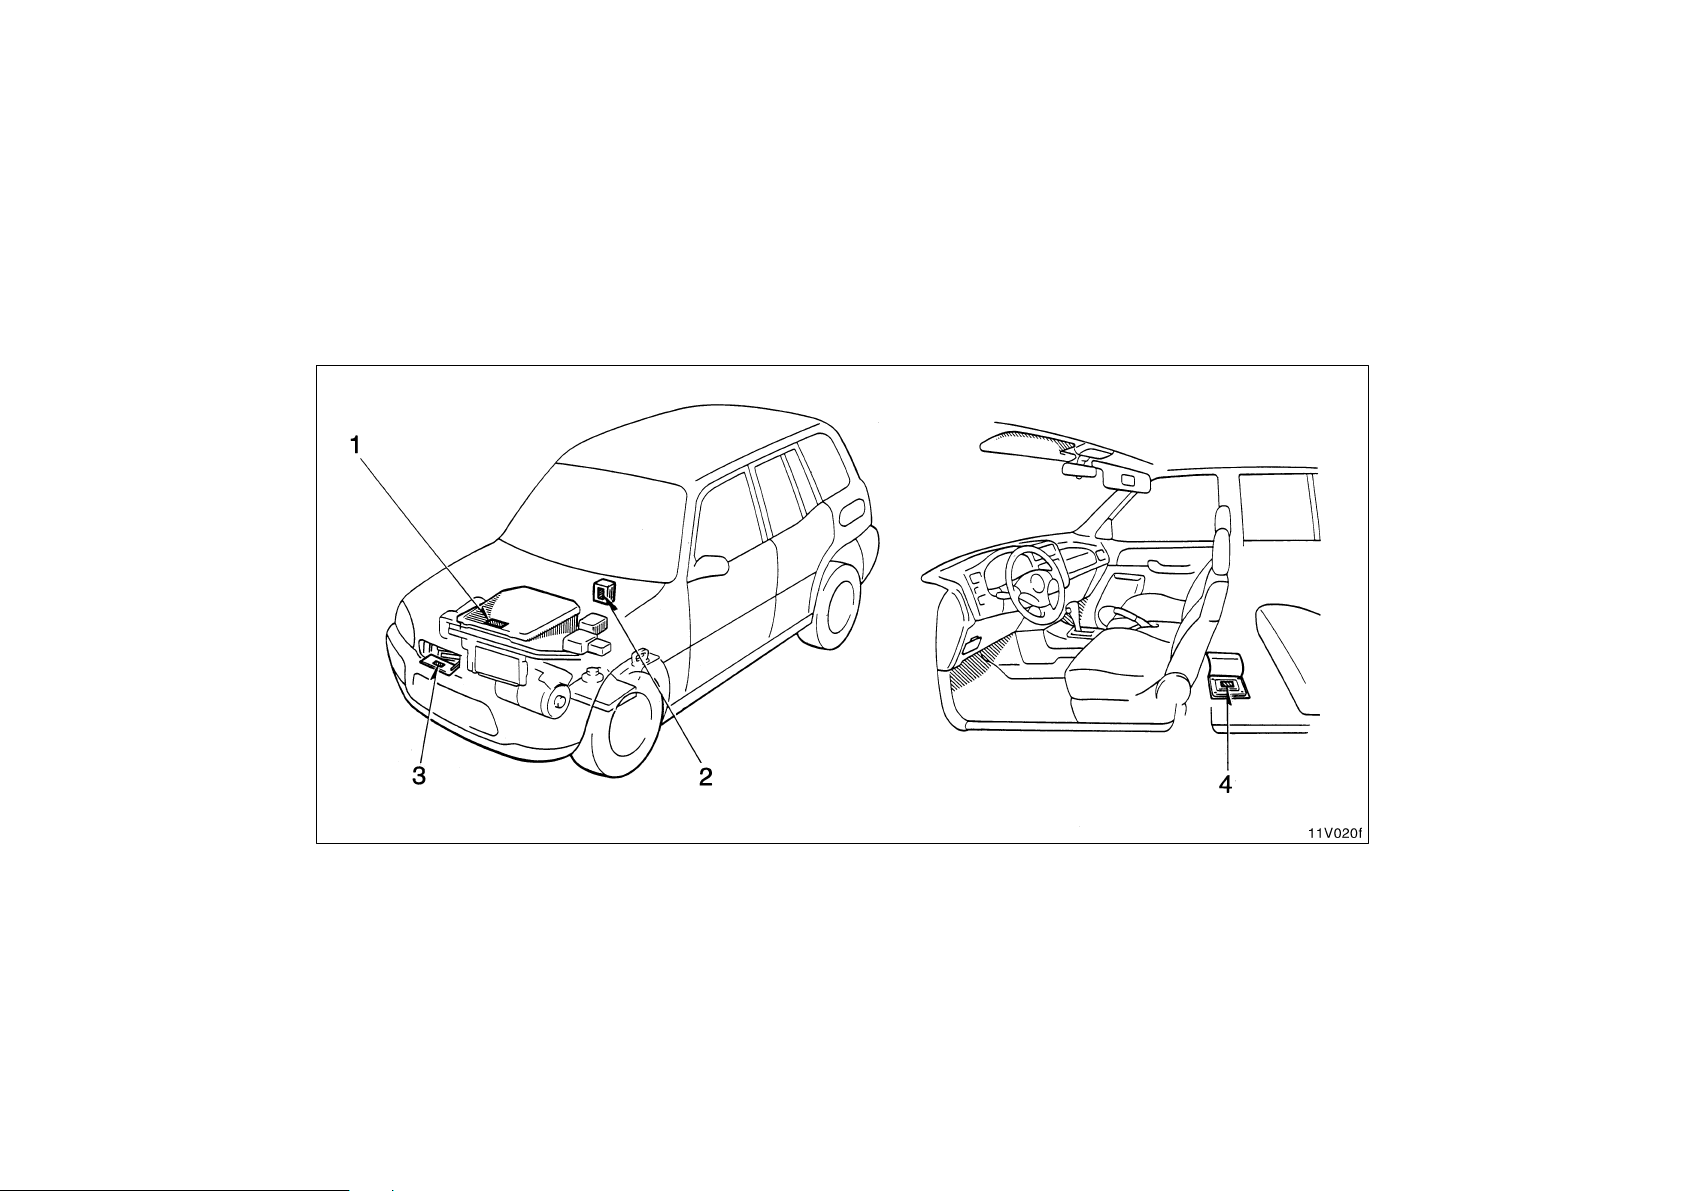
Location Of Warning Labels On High Voltage
Warnings for:
1. Power control unit
2. HWS noise filter
3. Charging
4. Service plug
viii

SECTION 1 – 1
FEATURES ON NEW TOYOTA RAV4 EV
Overview of instruments and controls
Instrument panel overview 2. . . . . . . . . . . . . . . . . . . . . . . . . . . . . . . . . . . . .
Instrument cluster overview 4. . . . . . . . . . . . . . . . . . . . . . . . . . . . . . . . . . . .
Indicator symbols on the instrument p anel 5. . . . . . . . . . . . . . . . . . . . . . .
Odometer and tri p meter 6. . . . . . . . . . . . . . . . . . . . . . . . . . . . . . . . . . . . . . .
SOC (State of charge) meter and traction battery voltmeter 6. . . . . . . .
Service reminder indicators and warning buzzers 7. . . . . . . . . . . . . . . .
1
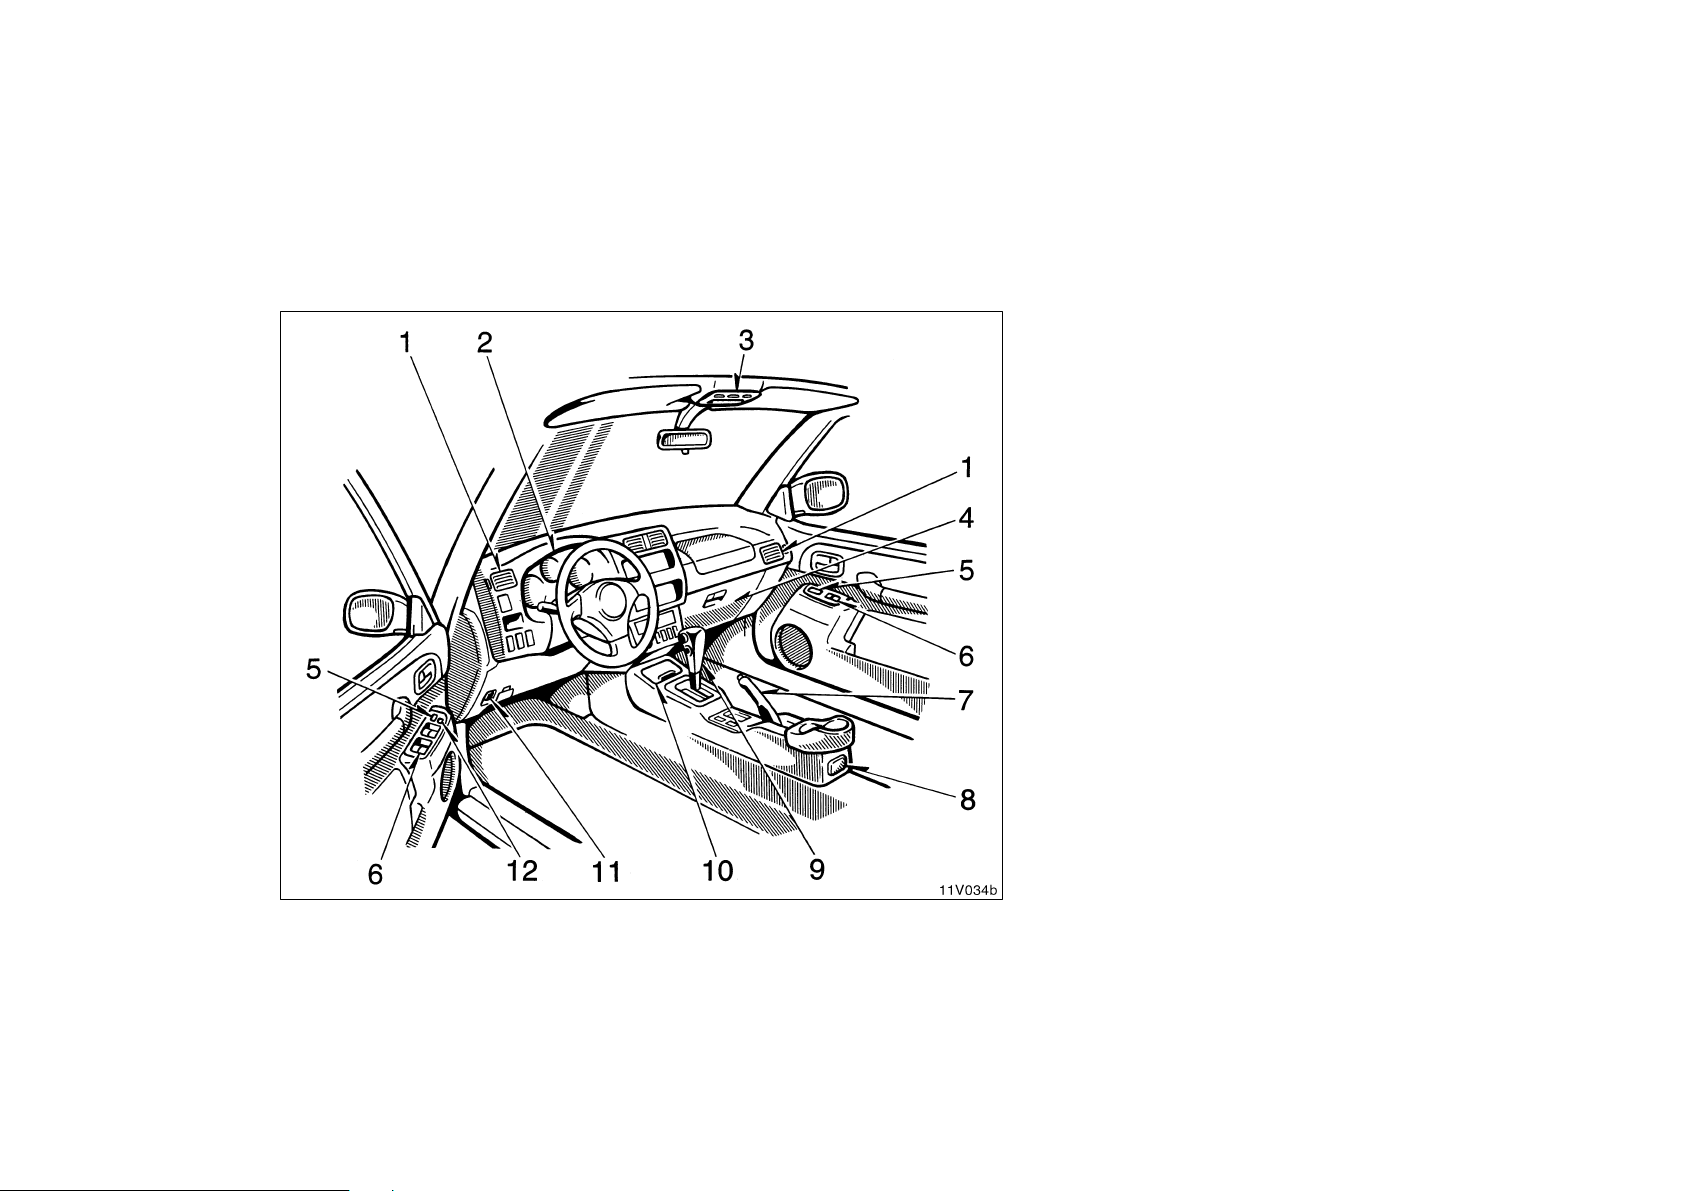
Instrument panel overview
1. Side vents
2. Instrument cluster
3. Personal lights
4. Glove box
5. Power door lock switches
6. Power window switches
7. Parking brake lever
8. Rear ashtray
9. Running mode selector lever
10. Front ashtray
11. Hood lock release lever
12. Window lock switch
2
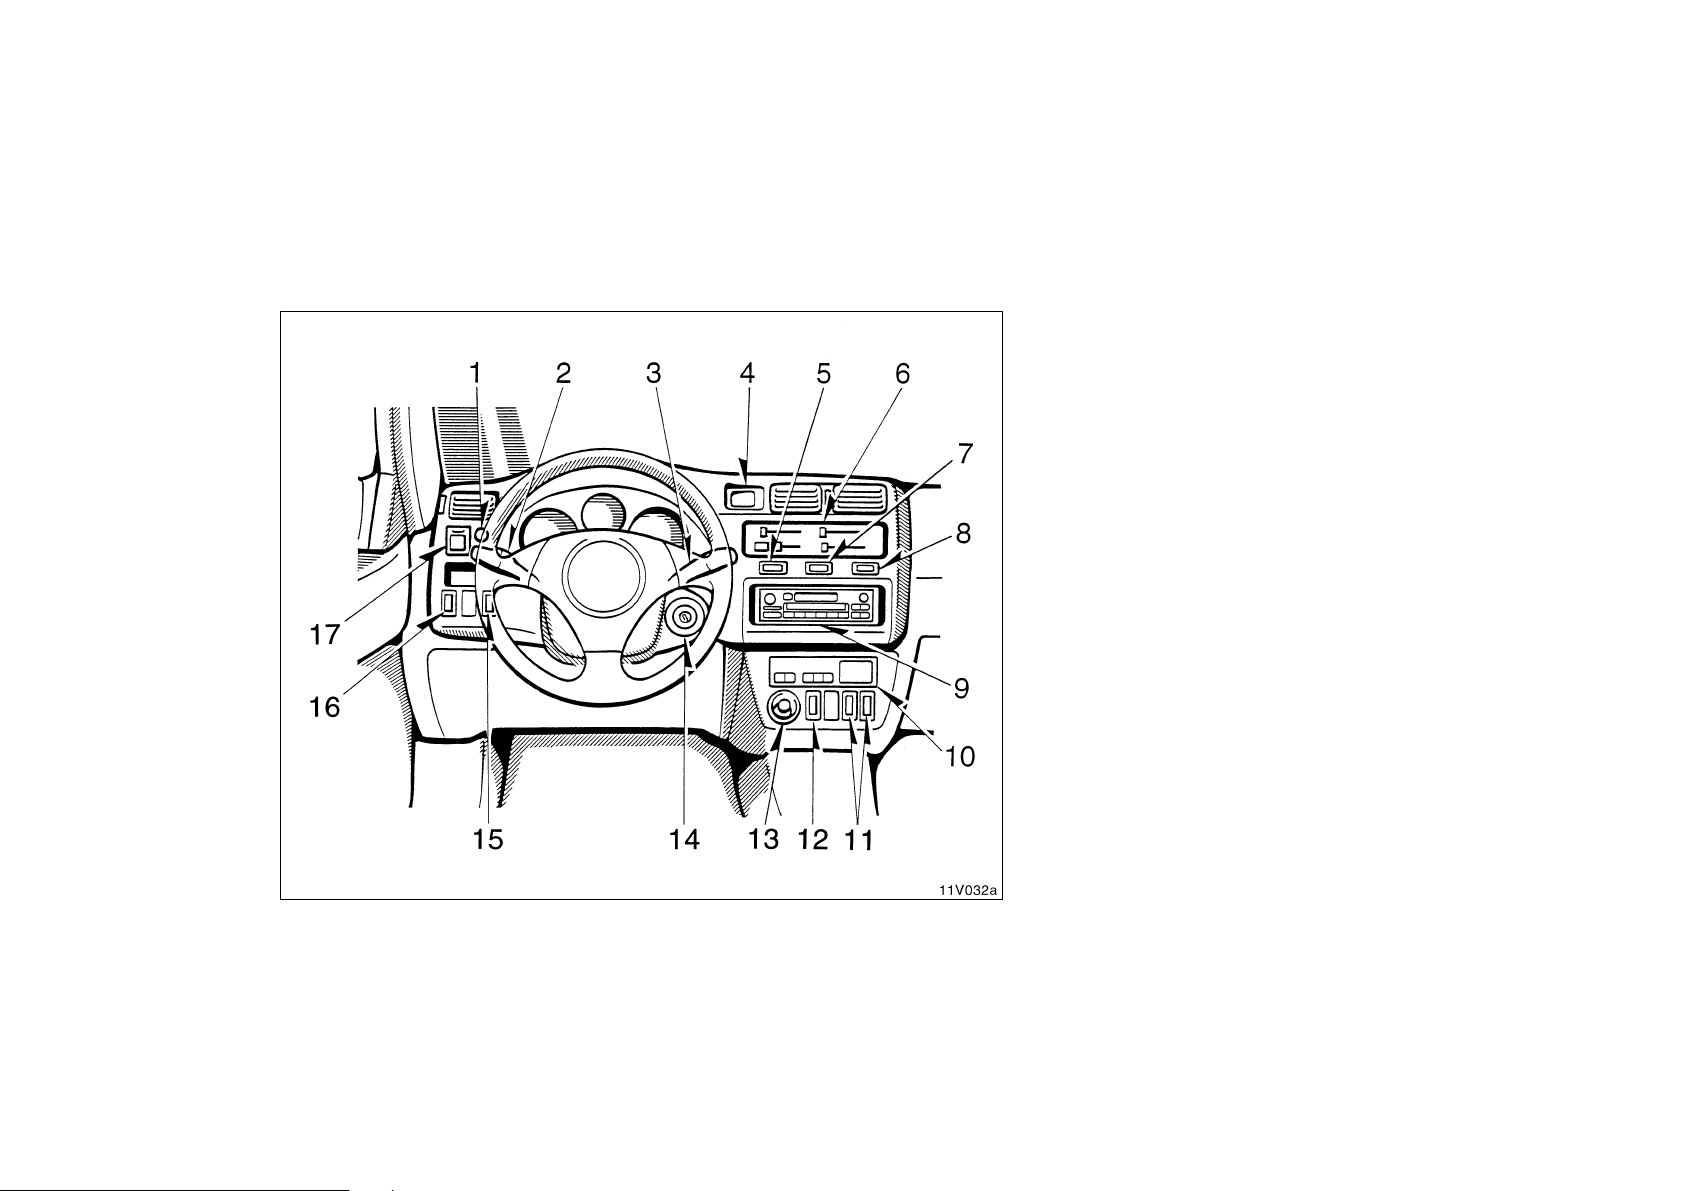
1. Instrument panel light control knob
2. Headlight and turn signal switch
3. Wiper and washer switch
4. Clock
5. HWS (Heated windshield) switch
6. Air conditioning controls
7. Emergency flasher switch
8. Rear window defogger switch
9. Car audio
10. Charge controller
11. Front seat heater switches
12. Charge door opener
13. Cigarette lighter
14. Motor switch
15. Set switch
16. Snow mode switch
17. Power rear view mirror control switches
3
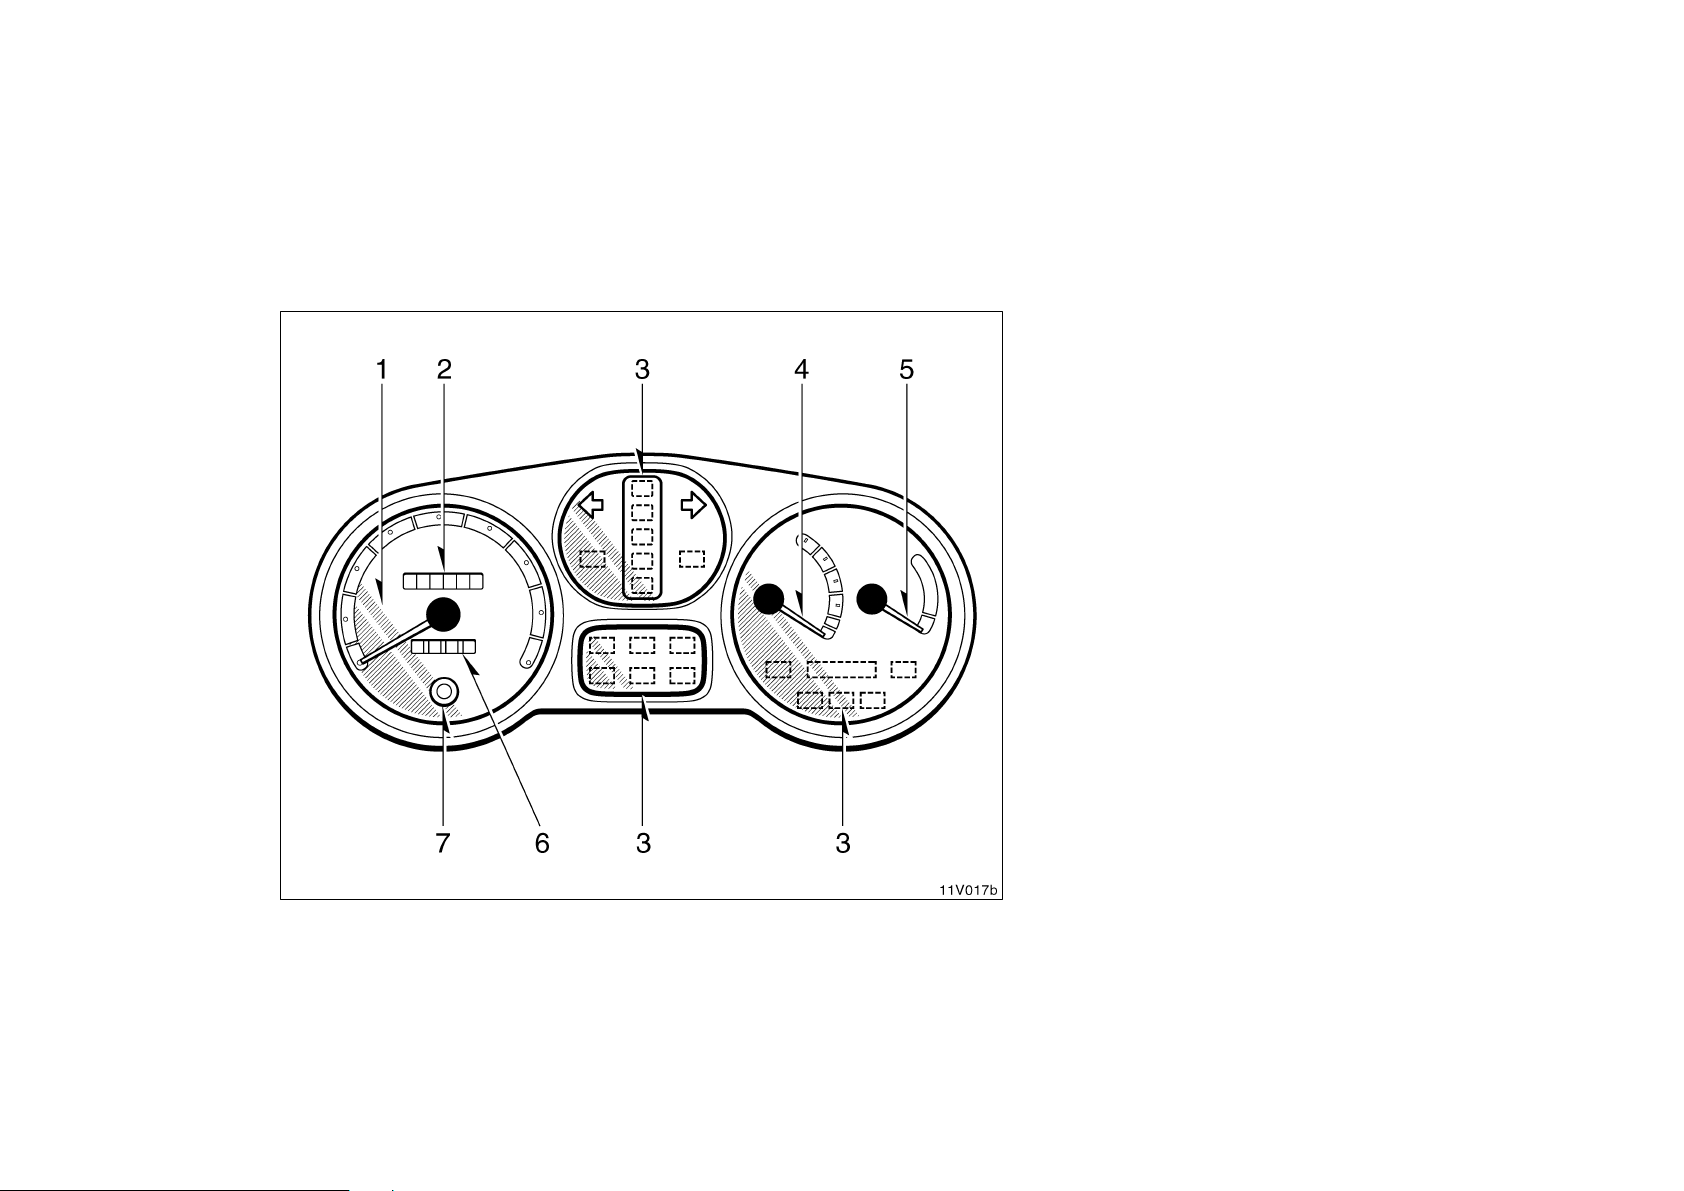
Instrument cluster overview
1. Speedometer
2. Odometer
3. Service reminder indicators or indicator
lights
4. SOC (State of Charge) meter
5. Traction battery voltmeter
6. Trip meter
7. Trip meter reset knob
4
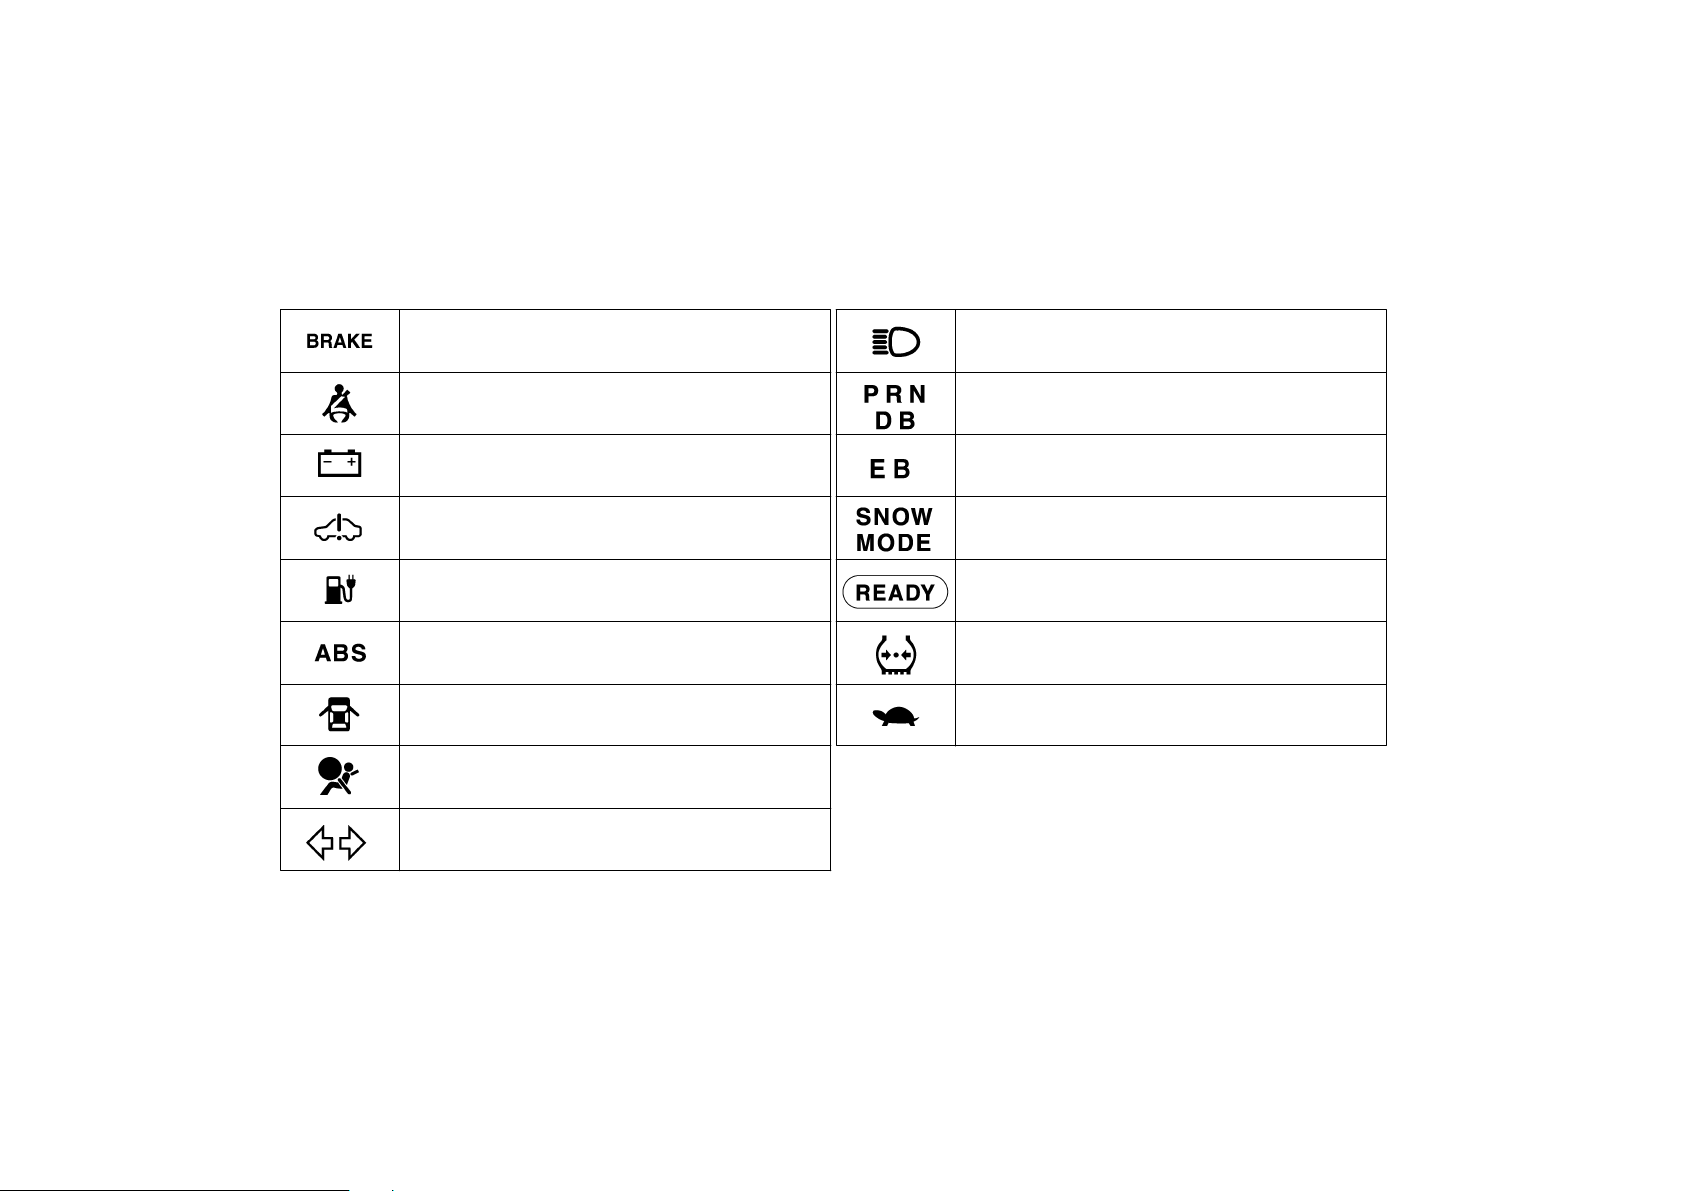
Indicator symbols on the instrument panel
Brake system warning light
Seat belt reminder light
∗
∗
Auxiliary battery discharge warning light
Motor system warning light
SOC (State of Charge) warning light
Anti−lock brake system warning light
Open door warning light
SRS warning light
∗
∗
∗
∗
∗
Turn signal indicator lights
Headlight high beam indicator light
Running mode position indicator light
∗
EB (Electrical Brake) mode indicator light
Snow mode indicator light
Driving ready light
Low tire pressure warning light
Output control warning light
∗
: For details, see ”Service reminder indicators and warning
∗
∗
buzzers” on page 7 in this section.
5
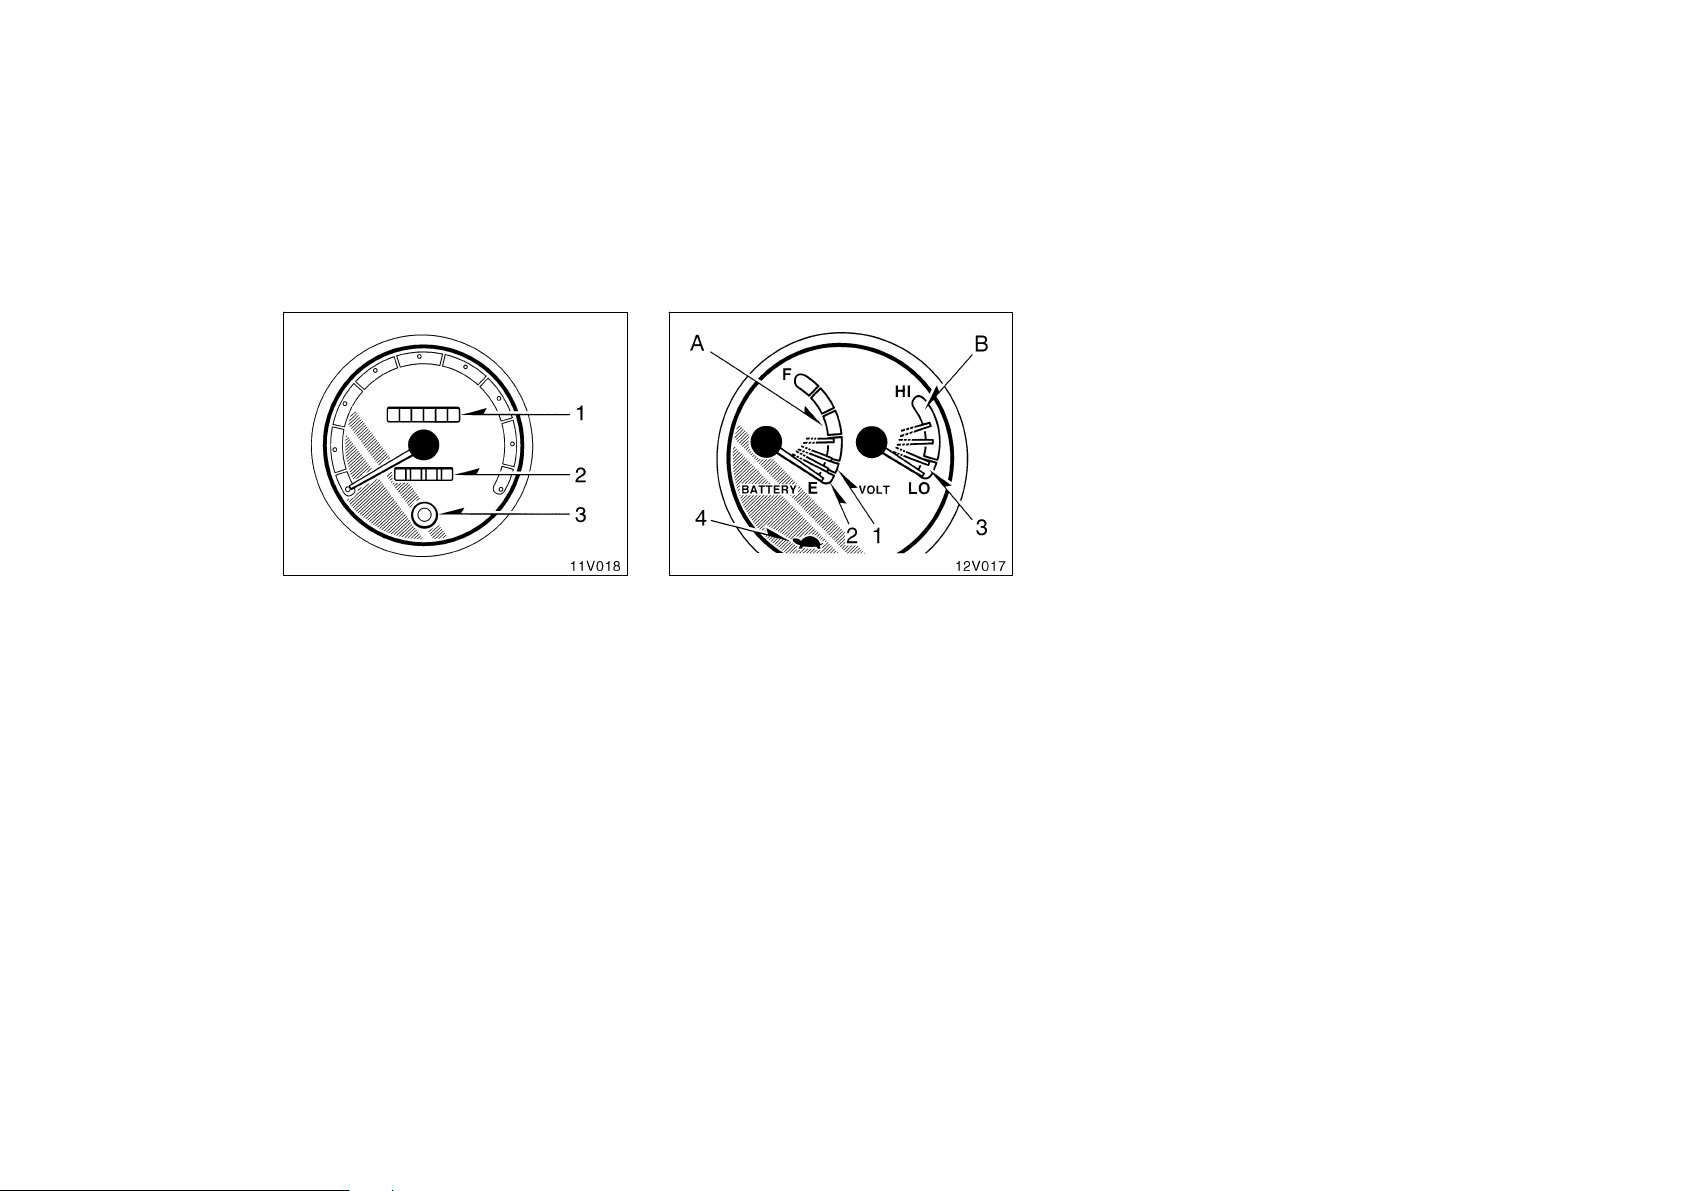
Odometer and trip meter
This meter displays the odometer and
trip meter.
1. Odometer— Shows the total distance
the vehicle has been driven.
2. Trip meter—Shows the distance driven
since the last time it was set to zero.
The black digits on white indicate
tenths of miles.
3. Trip meter reset knob—Resets the trip
meter to zero.
To reset the trip meter, push the knob.
SOC (State of Charge) meter
and traction battery voltmeter
Battery check
Check the battery condition using the SOC
meter and traction battery voltmeter.
A: SOC (State of Charge) meter—
The SOC meter indicates the battery
charging capacity with the motor switch on
or during charging.
1. Yellow zone—The area where application of charge is recommended.
2. Red zone—The area where immediate
application of charge is recommended.
With the decreased electric capacity, you
may not be able to continue driving and
the traction battery life will also be shortened.
B: Traction battery voltmeter—
The traction battery voltmeter indicates the
voltage level of the traction batteries. Increasing energy consumption is indicated
by a decreasing voltage level. (For example, acceleration, accessory use, etc.) For
best performance, recharge the batteries
when the voltmeter enters the yellow zone
(3). For further information, see “How to
drive” on page 17 in Section 1−2 and
“Brake system” on page 128 in Section 3.
Tips for Driving Distance:
The output control warning light (4)
comes on when the voltmeter enters
the yellow zone because of rapid acceleration, increasing energy consumption,
etc. When the voltage drops, the warning light comes on. The buzzer sounds
at further drop of voltage. As the ambient temperature becomes colder, the
voltmeter tends to enter the yellow
zone. To have a longer driving range,
continue your driving while keeping the
voltmeter from entering the yellow
zone.
6
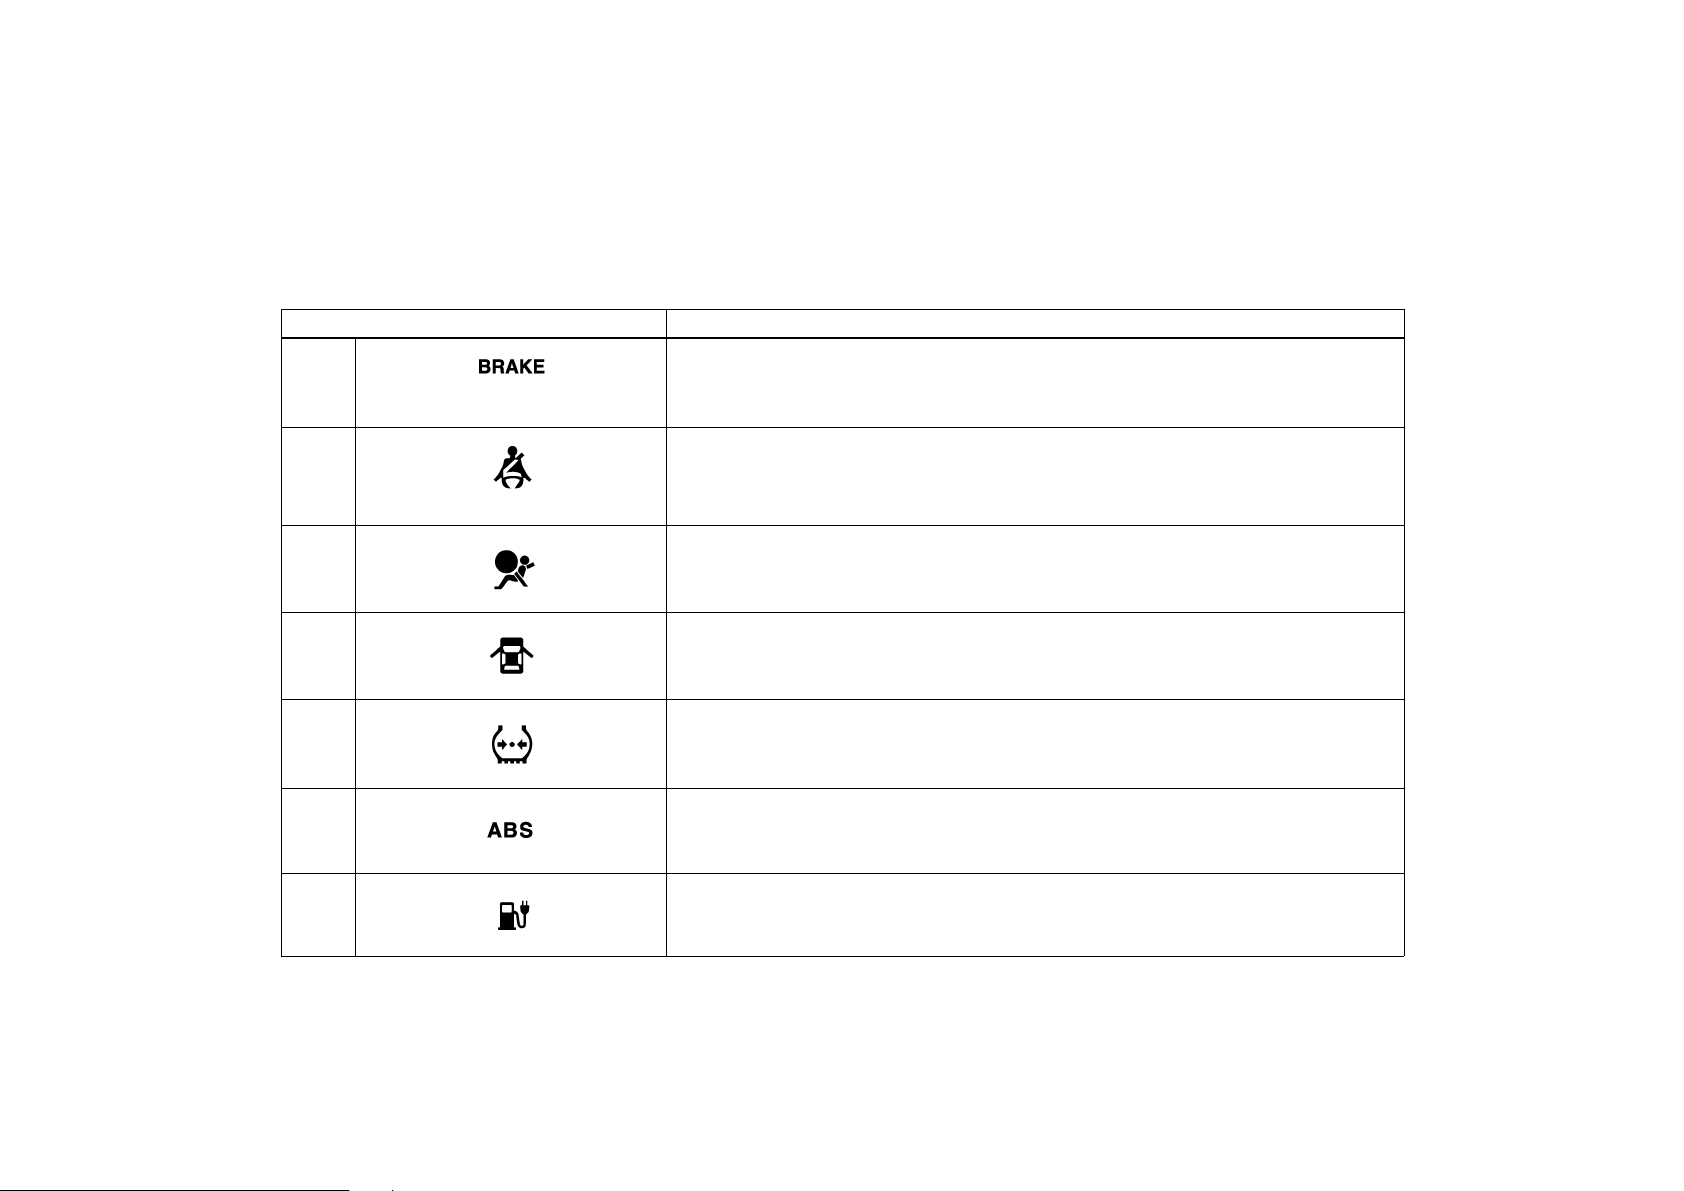
Service reminder indicators and warning buzzers
If the indicator or buzzer comes on... Do this.
(a)
(b)
(c)
(d)
(e)
(f)
(g)
If parking brake is off, stop immediately and contact EV service station.
(indicator and buzzer)
Fasten seat belts .
(indicator and buzzer)
Take vehicl e to EV service st ation immediat ely.
Close all side doors and back door.
Adjust tire pressure.
Take vehicle to EV service station.
If brake system warning light is also on, stop immediately and contact EV service
station.
Apply a charge.
7
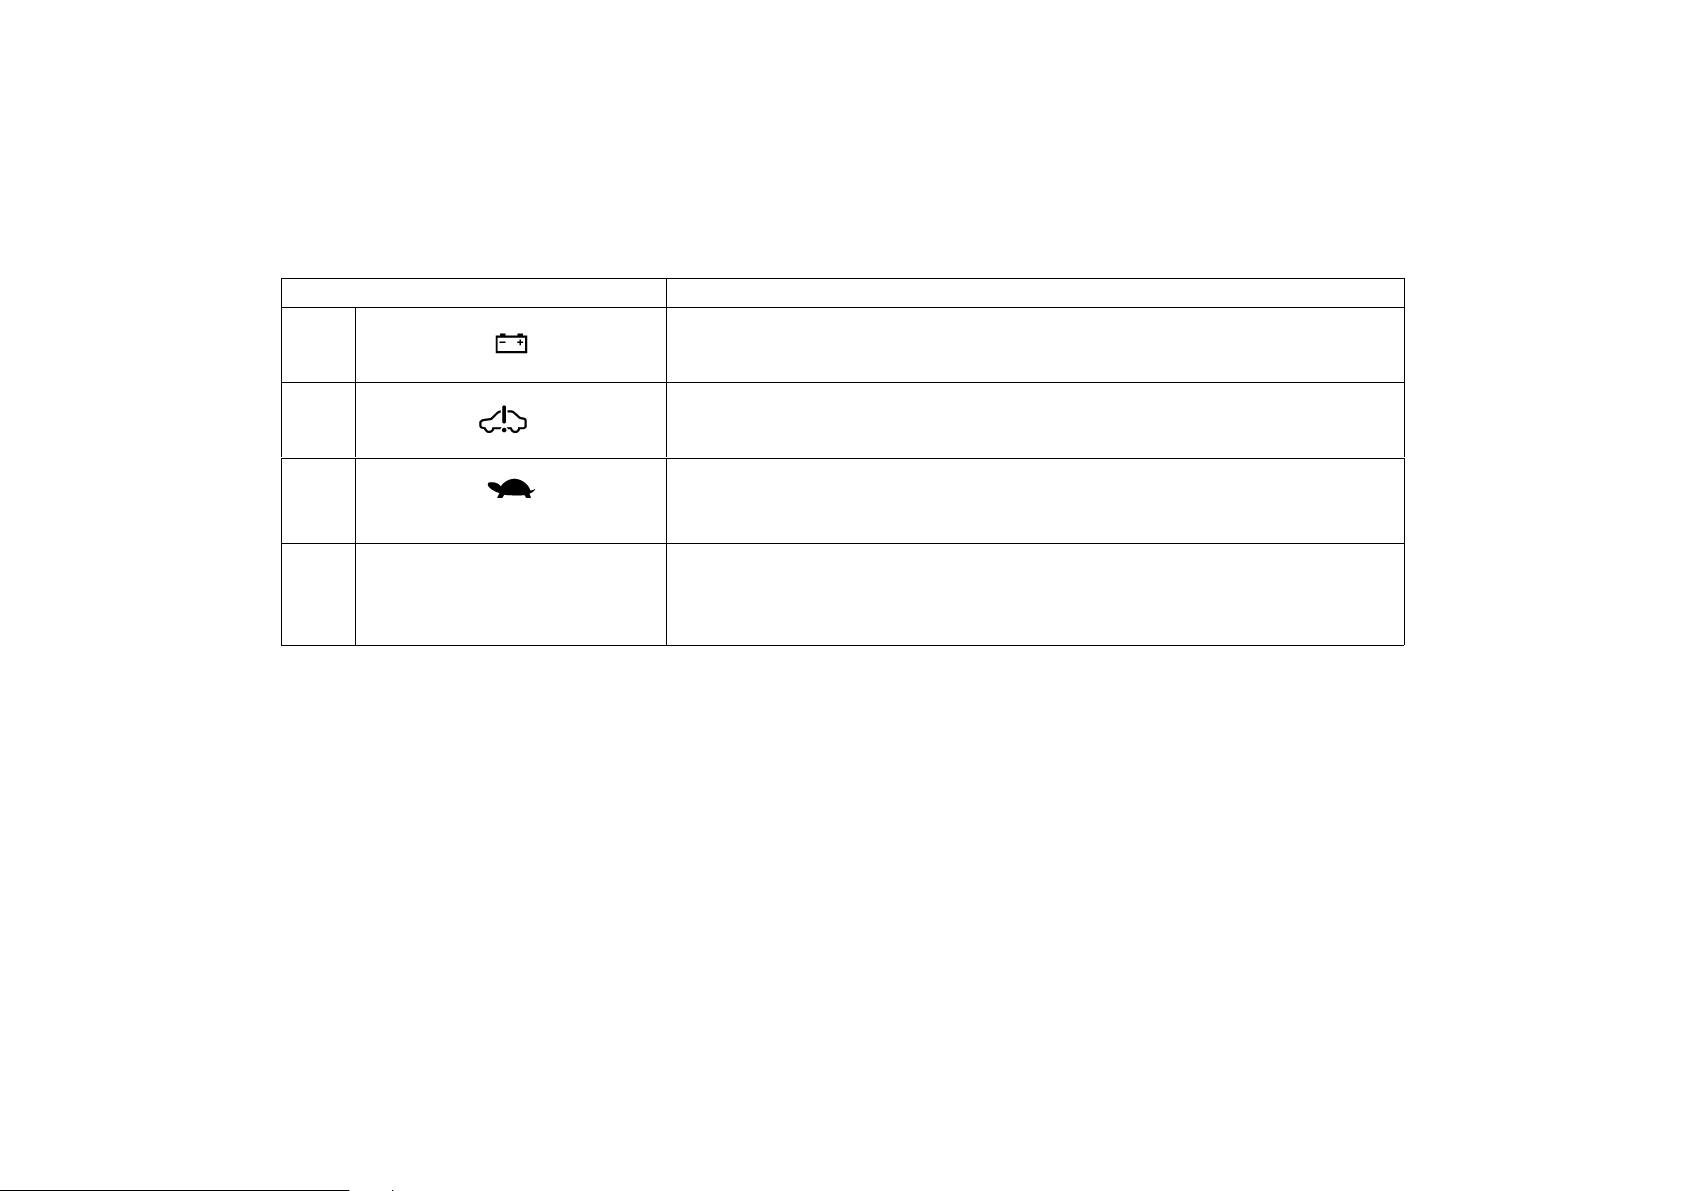
If the indicator or buzzer comes on... Do this.
(h)
(i)
(j)
(k)
(indicator and buzzer)
Buzzers
Stop and check .
Take vehicle to EV service station.
Drive at m oderate speed.
S Remove key.
S Turn off headli ghts.
S Shift the selector lever to “P”.
8
(a) Brake System Warning Light and
Buzzer
This light comes on in the following cases
when the motor switch is in the “ON”
position.
D When the parking brake is applied ...
This light comes on for a few seconds
when the motor switch is turned to the
“ON” position even after the parking brake
is released.
D When the brake fluid level is low ...
CAUTION
It is dangerous to continue driving
normally when the brake fluid level is
low.
D When the hydraulic brake booster
fails ...
If the hydraulic booster causes a problem
resulting in poor braking performance, the
warning light comes on and buzzer sounds
continuously.
D When the regenerative brake fails ...
For further information, see “Brake system” on page 128 in Section 3.
Have your vehicle checked at your EV
service station in the following cases:
D The light does not come on even if the
parking brake is applied when the motor switch is in the “ON” position.
D The light does not come on even if the
motor switch is turned on with the
parking brake released.
A warning light turning on briefly during
operation does not indicate a problem.
CAUTION
If either of the following conditions
occurs, immediately stop your vehicle
at a safe place and contact your EV
service station.
D The light does not turn off even
after the parking brake is released
while the traction motor is running.
D The warning buzzer comes on to-
gether with the warning light.
In either case, this can indicate that
the brakes may not work properly and
your stopping distance will become
longer. Depress the brake pedal firmly
and bring the vehicle to an immediate
stop.
Any of the following conditions may occur, but do not indicate the malfunction:
D The light may stay on for about 60
seconds after the motor switch is
turned to the “ON” position. It is normal if it turns off after a while.
D Depressing the brake pedal repeatedly
may turn on the warning light and
buzzer. It is normal if the light turns off
and the buzzer stops sounding after a
few seconds.
D You may hear a small sound in the
motor compartment after the traction
motor is started or the brake pedal is
depressed repeatedly. This is a pump
pulsating sound of the brake system,
and it is not a malfunction.
(b) Seat Belt Reminder Light and
Buzzer
This light and buzzer remind you to
buckle up the driver’s seat belt.
Once the motor switch is turned to ”ON”
or ”START”, the reminder light flashes and
buzzer sounds if the driver’s seat belt is
not fastened. Unless the driver fastens the
belt, the light stays flashing and the buzzer stops after about 4 to 8 seconds.
9

(c) SRS Warning Light
This indicator comes on when the mo-
tor switch is turned to the “ACC” or
“ON” position. It goes off after about
6 seconds. This means the SRS airbags
are operating properly.
This warning light system monitors the
airbag sensor assemblies, front airbag
sensors, inflators, warning light, interconnecting wiring and power sources.
If either of the following conditions occurs,
this indicates a malfunction somewhere in
the parts monitored by the warning light
system. Contact your EV service station
as soon as possible to service the vehicle.
D When the motor switch is turned to the
“ACC” or “ON” position, the light does
not come on, remains on or flashes.
D The light comes on or starts flashing
while driving.
If the light stays on, it indicates that the
driver and front passenger airbags have a
problem. If the light flashes, the seat belt
pretensioners have a problem.
(d) Open Door Warning Light
This warning light comes on when any of
the doors are not completely closed.
Do not drive the vehicle with the light on.
If any of the doors accidently opens during driving, it is danger and may cause an
acci dent.
(e) Low Tire Pressure Warning Light
This light warns that the tire pressure of
any one or more of the tires is critically
reduced. The light comes on when the
motor switch is turned to the ”ON” position. It goes off after about 3 seconds.
This indicates that the tire pressure warning system is functioning properly. If the
light remains on after about 3 seconds,
increase the tire pressure and start driving
after making sure the light is off.
If the light comes on while driving, adjust
tire pressure to the specified level. (See
”Tires” on page 205 in Section 9.) After
the tire pressure is adjusted, the light
should go off after driving at about more
than 30 km/h (19 mph) for some time. If
the light still remains on, have the tire
pressure warning system checked at your
EV service station.
(f) ”ABS” Warning Light
The light comes on when the motor switch
is turned to the “ON” position. If the anti−
lock brake system works properly, the
light turns off after a few seconds. Thereafter, if the system malfunctions, the light
comes on again.
When the “ABS” warning light is on (and
the brake system warning light is off), the
anti−lock brake system does not operate,
but the brake system still operates conventionally.
When the “ABS” warning light is on (and
the brake system warning light is off), the
anti−lock brake system does not operate
so that the wheels could lock up during
a sudden braking or braking on slippery
road surfaces.
If either of the following conditions occurs, this indicates a malfunction somewhere in the parts monitored by the
warning light system, Contact your EV
service station as soon as possible to
service the vehicle.
D The light does not come on when the
motor switch is turned to the “ON”
position, or remains on.
D The light comes on while you are driv-
ing.
10
A warning light turning on briefly during
operation does not indicate a problem.
Either of the following conditions may
occur, but do not indicate the malfunction:
D The light may stay on for about 60
seconds after the motor switch is
turned to the “ON” position. It is normal if it turns off after a while.
D Depressing the brake pedal repeatedly
may turn on the light. It is normal if
it turns off after a few seconds.
(g) SOC (State of Charge) Warning
Light
This warning light comes on when the
charging capacity is about less than 20 %
and flashes with less than 15 %. If this
light comes on, we recommend that you
should charge the traction batteries. And
if the light flashes, immediately apply a
charge.
With the discharged traction batteries, you
may not be able to continue driving and
the traction battery life will also be shortened.
(h) Auxiliary Battery Discharge Warning
Light
This light comes on when the motor
switch is on. It goes off when the traction motor is ready to run.
If this light comes on during driving, the
auxiliary battery system may have a problem. Decrease the vehicle speed and stop
in a safe place. If the light goes off, you
can drive. If not, contact EV service station.
(i) Motor System Caution Light
This light comes on when the motor
switch is on. It goes off when the traction
motor is ready to run.
The light comes on if the motor system
has a problem. If this light comes on, stop
the vehicle in a safe place and contact
EV service station.
(j) Output Control Warning Light and
Buzzer
This light comes on when the motor
switch is on. It goes off when the traction
motor is ready to run. The warning light
may come on if you continue driving under high load, or with an excessive load
applied on a steep incline or at higher or
lower ambient temperatures, or at the lower traction batteries voltage. The buzzer
sounds at further drop of voltage. The
voltage becomes lower as the SOC capacity decreases largely or battery temperature becomes lower. In this case, the power is limited, so that the acceleration
becomes uneven or the maximum vehicle
speed decreases. As this does not indicate a malfunction, you can continue driving at moderate speed.
CAUTION
If the light comes on frequently or
does not go off, the system may suddenly fail and your vehicle may become undriveable. Have your vehicle
checked at EV service station.
11

(k) Warning Buzzers
In the following cases, the buzzer continues to sound:
D The driver’s door is opened with the
key in the ”ACC” or ”LOCK” position.
D The driver’s door is opened with the
key removed from the motor switch
and the headlight switch left on.
D The driver’s door is opened with the
selector lever in a position other than
”P” when the ”READY” light is on.
CHECKING SERVICE REMINDER
INDICATORS (except the SOC warning
light)
1. Apply the parking brake.
2. Open one of the doors.
The open door warning light should
come on.
3. Close the door.
The open door warning light should go
off.
4. Turn the motor switch to ”ACC”.
The SRS airbag warning light should
come on. It goes off after about 6 seconds.
5. Turn the motor switch to ”ON”, but do
not start the motor.
All the service reminder indicators except the open door warning light and
SRS airbag warning light should come
on. The ”ABS” warning light and low
tire pressure warning light go off after
about 3 seconds.
If any service reminder indicator or warning buzzer does not function as described
above, have it checked by your EV service station as soon as possible.
12

SECTION 1 – 2
FEATURES ON NEW TOYOTA RAV4 EV
How to drive
Before starting the traction motor 14. . . . . . . . . . . . . . . . . . . . . . . . . . . . . .
Motor switch with steering lock 14. . . . . . . . . . . . . . . . . . . . . . . . . . . . . . . .
How to start the traction motor 15. . . . . . . . . . . . . . . . . . . . . . . . . . . . . . . .
How to drive 17. . . . . . . . . . . . . . . . . . . . . . . . . . . . . . . . . . . . . . . . . . . . . . . . .
Parking brake 21. . . . . . . . . . . . . . . . . . . . . . . . . . . . . . . . . . . . . . . . . . . . . . .
Tire pressure warning system 21. . . . . . . . . . . . . . . . . . . . . . . . . . . . . . . . .
13
Before starting the traction
motor
1. Check the area around the vehicle before entering it.
2. Adjust seat position, seatback angle
and head restraint height.
3. Adjust the inside and outside rear
view mirrors.
4. Lock all the doors.
5. Fasten seat belts.
When you get in a vehicle, check
whether the ”READY” light is on or
not.
Because the electric vehicle does not
produce any noise or vibration when the
vehicle is ready to start with the
”READY” light on, be careful not to start
the vehicle abruptly by depressing the
accelerator pedal inadvertently.
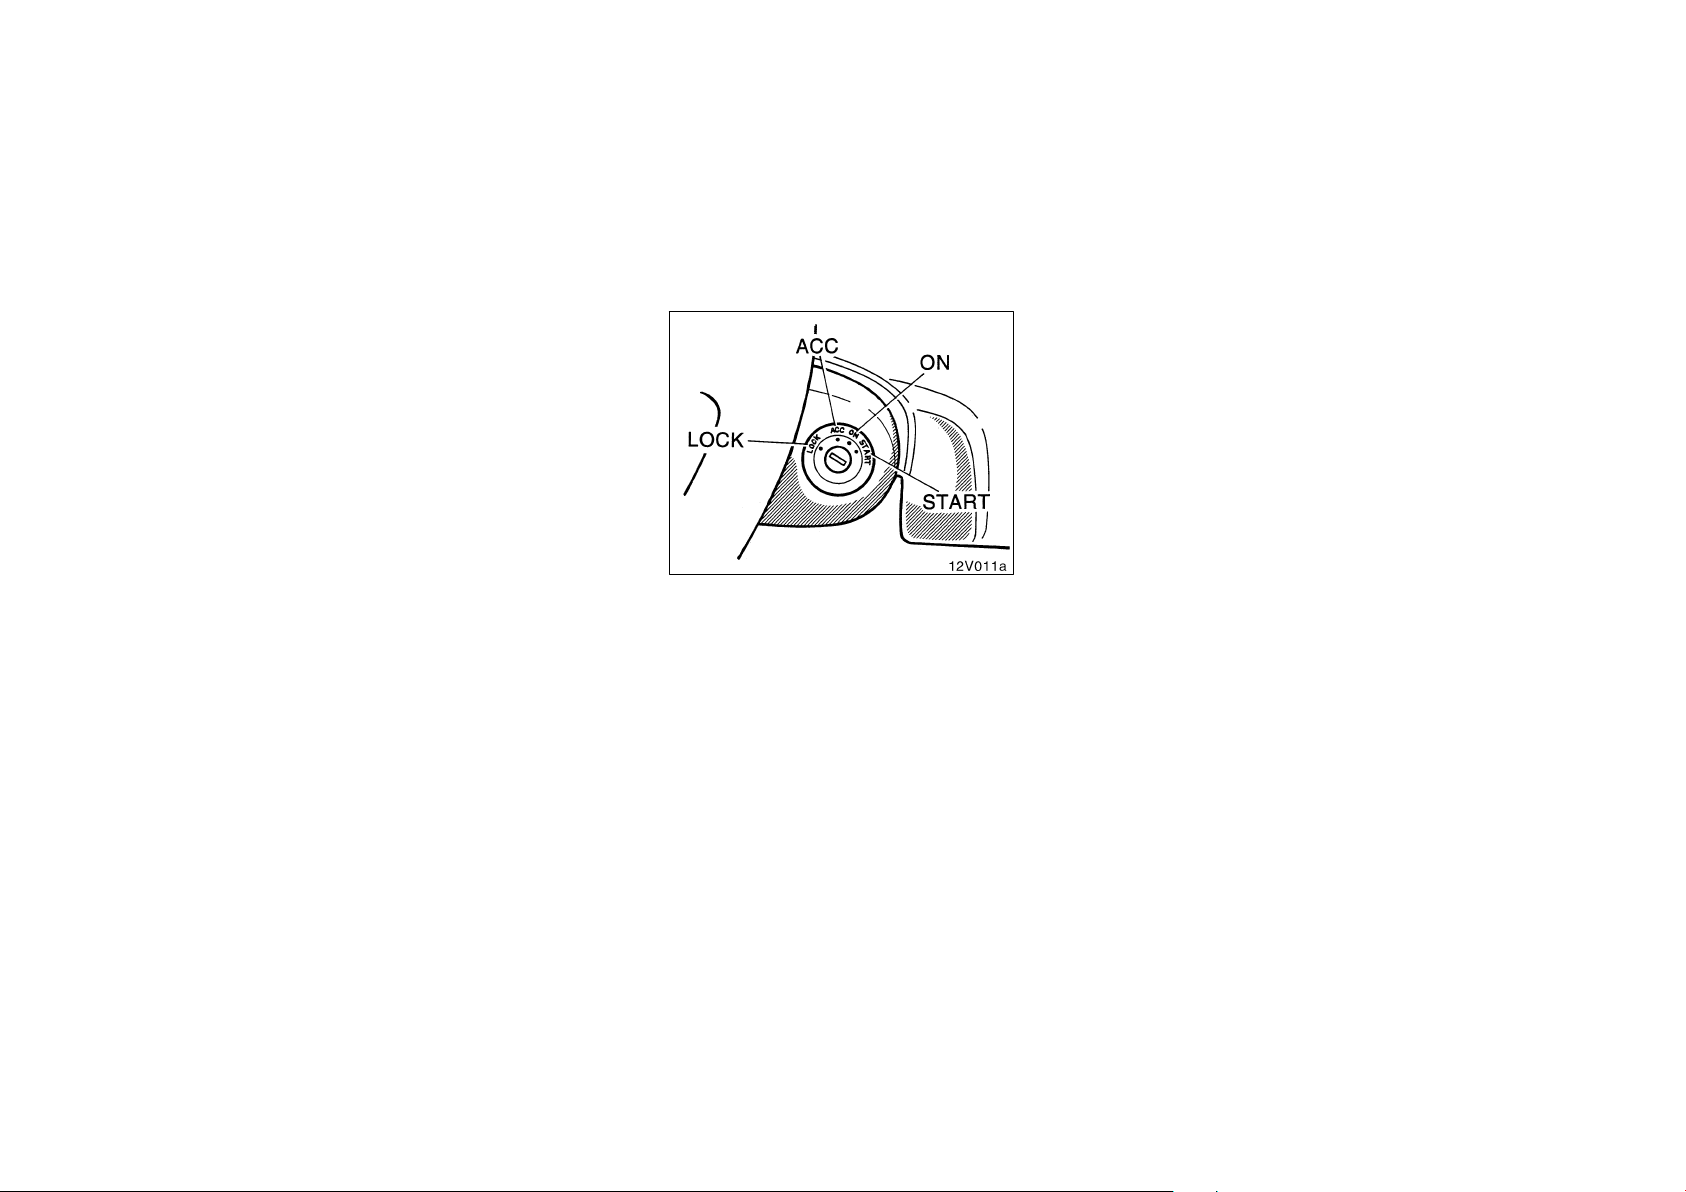
Motor switch with steering
lock
If you leave the key in the ”ACC” or
”LOCK” position and open the side door,
a buzzer will remind you to remove the
key.
”LOCK”—Traction motor is off and the
steering wheel is locked. The key can
be removed only at this position.
”START”—Traction motor is ready to
run. The key will return to the ”ON”
position when released.
Hold the motor switch at this position
until the ”READY” light comes on and a
beep sounds.
”ON”—Traction motor starts to run
when the accelerator pedal is depressed with the ”READY” light on,
and all accessories on.
This is the normal driving position.
”ACC”—Accessories such as the radio
operate, but the traction motor is off.
14
NOTICE
Do not leave the key in the ”ON”
position. The auxiliary battery will
discharge and the traction motor
could be damaged.
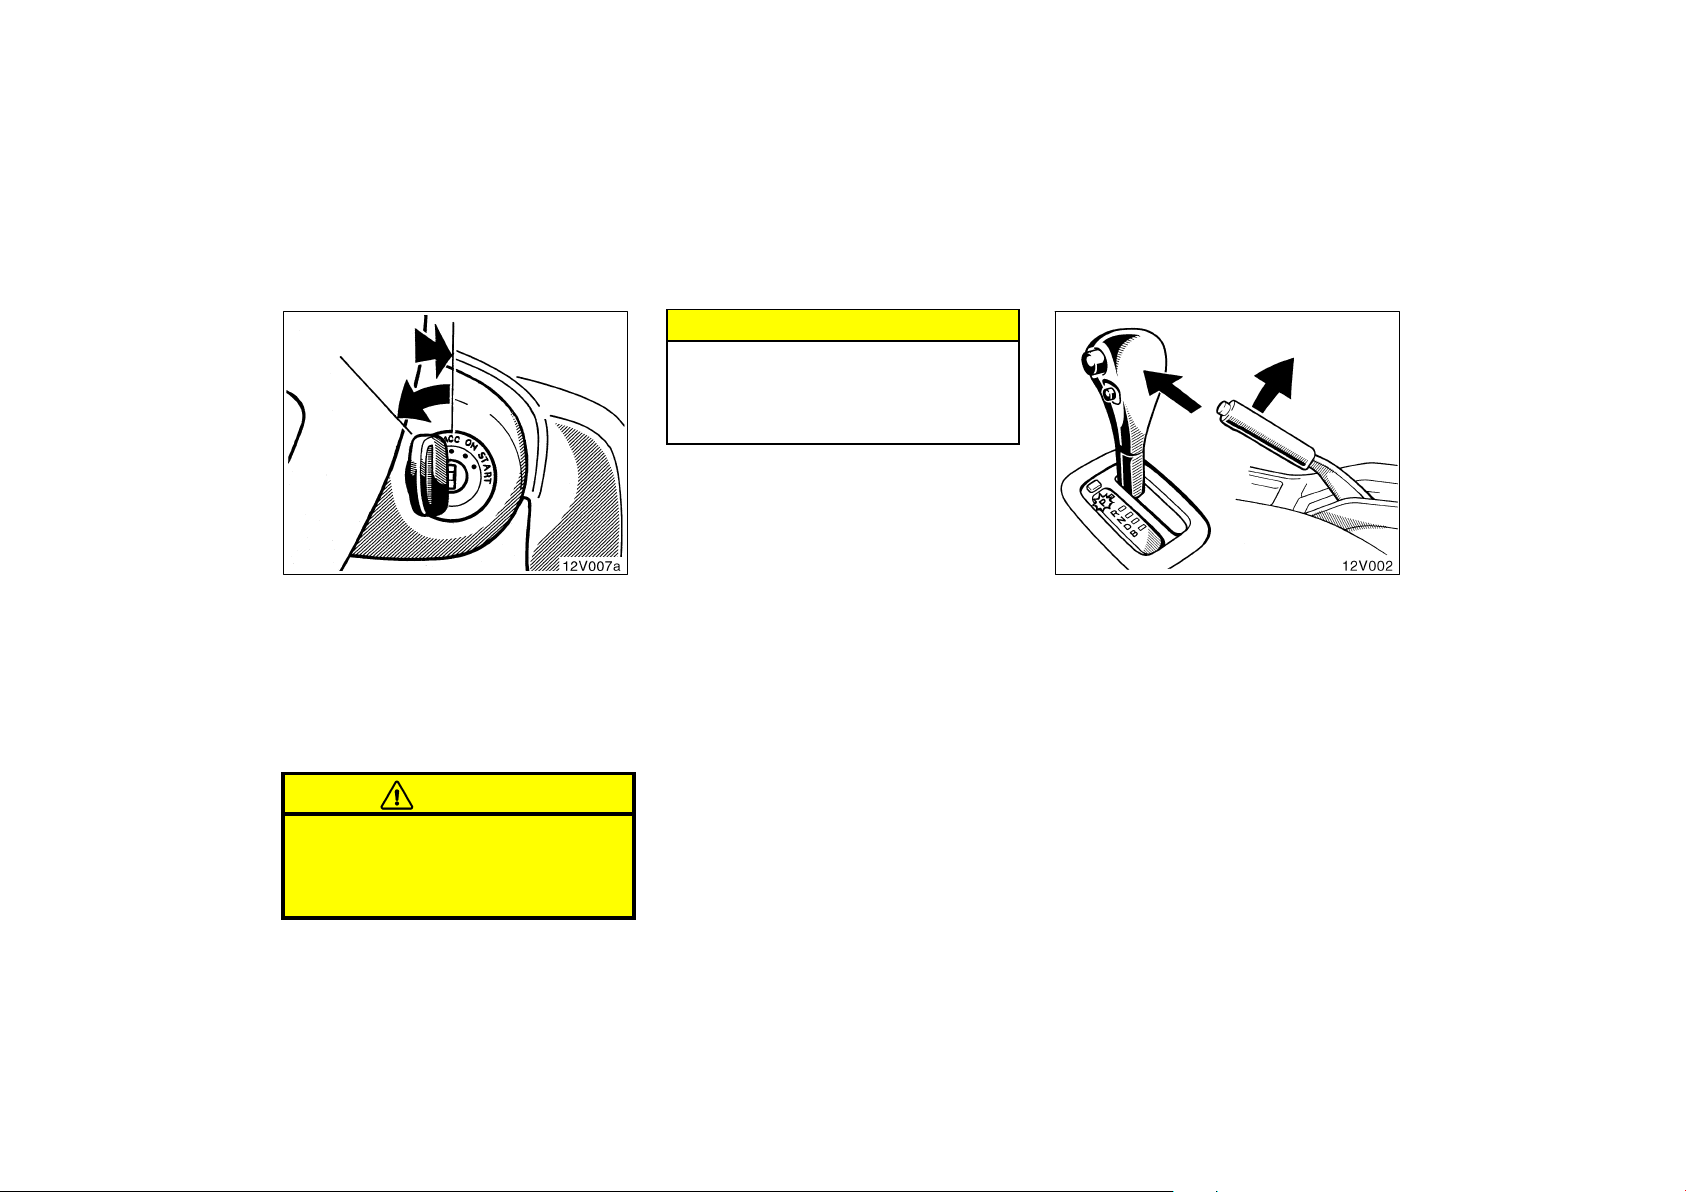
How to start the traction
motor— (a) Before starting
the traction motor
You must push in the key to turn it from
”ACC” to the ”LOCK” position.
When starting the traction motor, the key
may seem stuck at the ”LOCK” position.
To free it, first be sure the key is pushed
all the way in, and then rock the steering
wheel slightly while turning the key gently.
CAUTION
Never remove the key when the vehicle is moving, as this will lock the
steering wheel and result in loss of
steering control.
1. Make sure the charge coupler is not
connected.
If the charge coupler is connected when
the motor switch is turned to ”START”,
the traction motor is not ready to start.
Make sure the charging is finished and
disconnect the charge coupler.
2. Make sure the parking brake has been
applied.
3. Make sure the selector lever is in the
”P” position.
15
Although you may turn on the traction
motor with the selector lever in the ”N”
position, for your safety, be sure to start
the vehicle with the selector lever in the
”P” position.
4. Depress the brake pedal and hold it
to the floor until driving off.
16
(b) Turning on the traction motor
NOTICE
z If there is a problem in the traction
motor system, the ”READY” light
does not come on. Instead the motor system caution light comes on.
If this happens, contact EV service
station.
z With the auxiliary battery dis-
charged, turning the motor switch
to ”START” will not turn on the
”READY” light. If this happens,
contact EV service station.
Before starting the traction motor, be sure
to follow the instructions in ”(a) Before
starting the traction motor”.
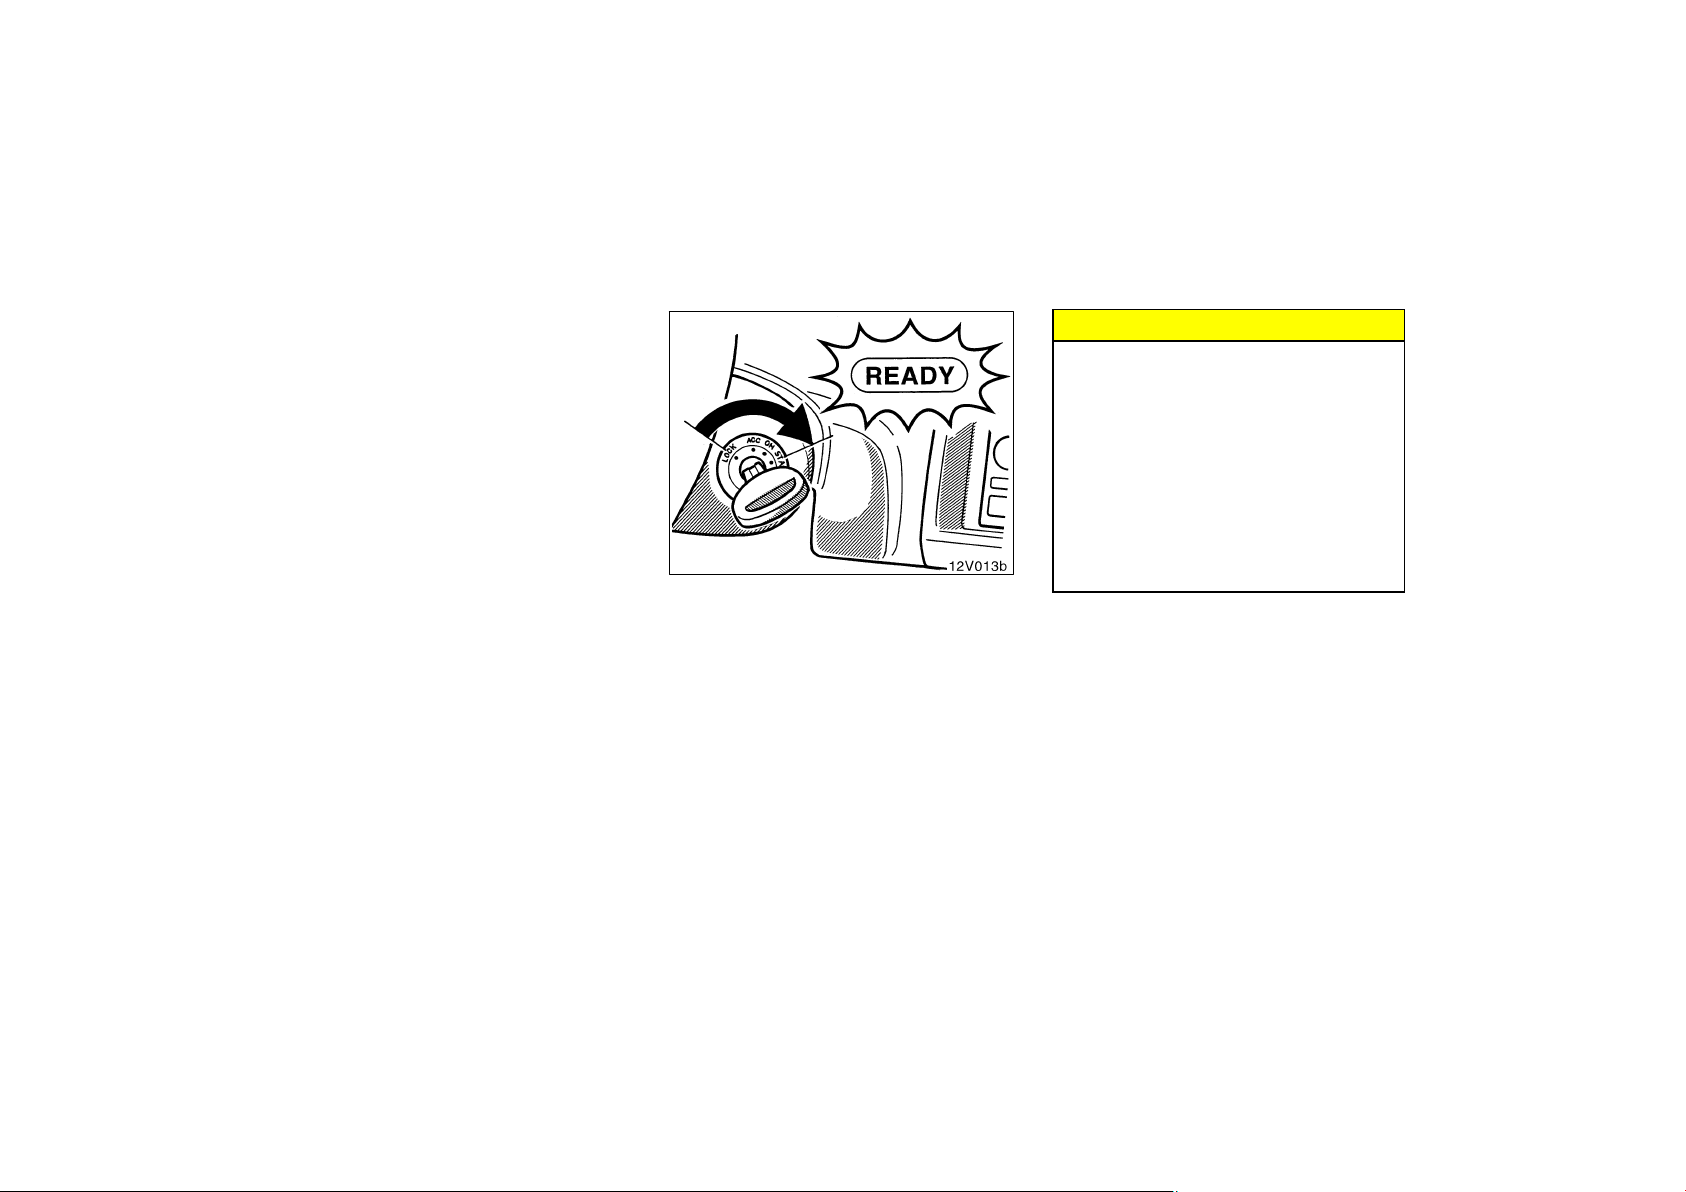
Normal starting procedure
Turn and hold the motor switch to
”START” with the brake pedal depressed
until the ”READY” light comes on and a
beep sounds. After making sure the
”READY” light is on, release your hand
from the motor switch.
The ”READY” light does not come on
when you depress the accelerator pedal
and/or the selector lever is put in a position other than ”P” or ”N”. Release your
foot from the accelerator pedal and/or put
the selector lever in ”P” and turn the
motor switch to ”START” again.
How to drive
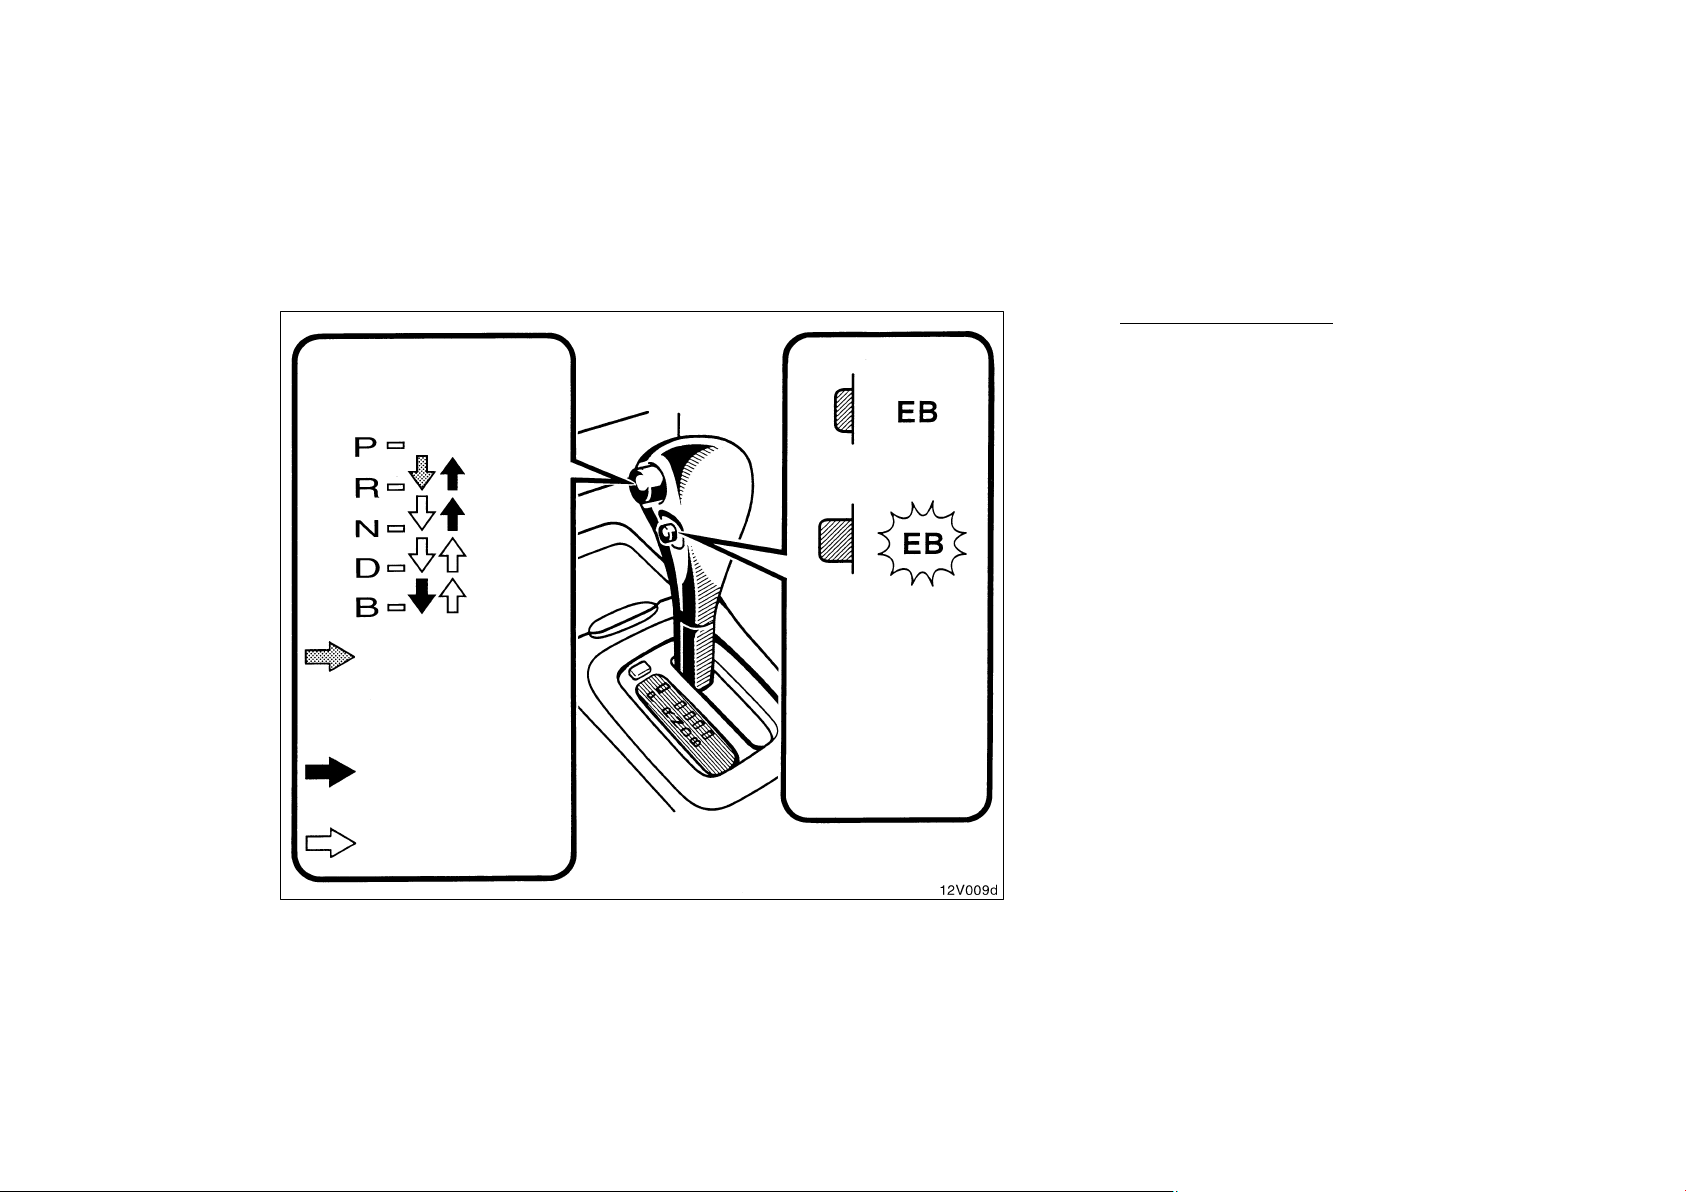
Lock release button —
To prevent misshifting
:With the brake pedal de-
pressed, shift while
pressing the lock release
button in
(The motor switch must
be in the ”ON” position.).
:Shift while pressing the
lock release button in.
:Shift normally.
EB button
OFF position
ON position
Releasing the
accelerator pedal
in “D” position will
provide engine
braking effect.
Selector Lever Position
P — Parking, motor starting and
key removal position
R — Reverse position
N — Neutral position
D — Normal driving position
When r eleasing the accelerator ped al with the E B button in ON position,
engine b raking ef fect will be applied.
B — Position for engine braking effect
More powerful engine braking ef fect
than EB mode will be applied.
Although the EB indicator light
comes on with the EB button ON,
additional EB engine braking effect
will not be applied.
Do not press the lock release button unless otherwise necessary.
You cannot shift the selector lever from
”P” with the motor switch at ”ACC” or
”LOCK” even after you depress the brake
pedal.
You cannot shift the selector lever if you
depress the brake pedal with the lock
release button pressed. You must first
depress the brake pedal, then push in
the lock release button and shift the selector lever.
17
(a) Normal driving
1. Shift the selector lever to ”D” or ”R”
with the brake pedal depressed.
CAUTION
Never put your foot on the accelerator pedal while shifting.
2. Release the parking brake.
3. Release your foot from the brake pedal and depress the accelerator pedal
to start the vehicle.
Operate the accelerator pedal carefully
because the speed at starting is controlled only by the accelerator pedal.
18
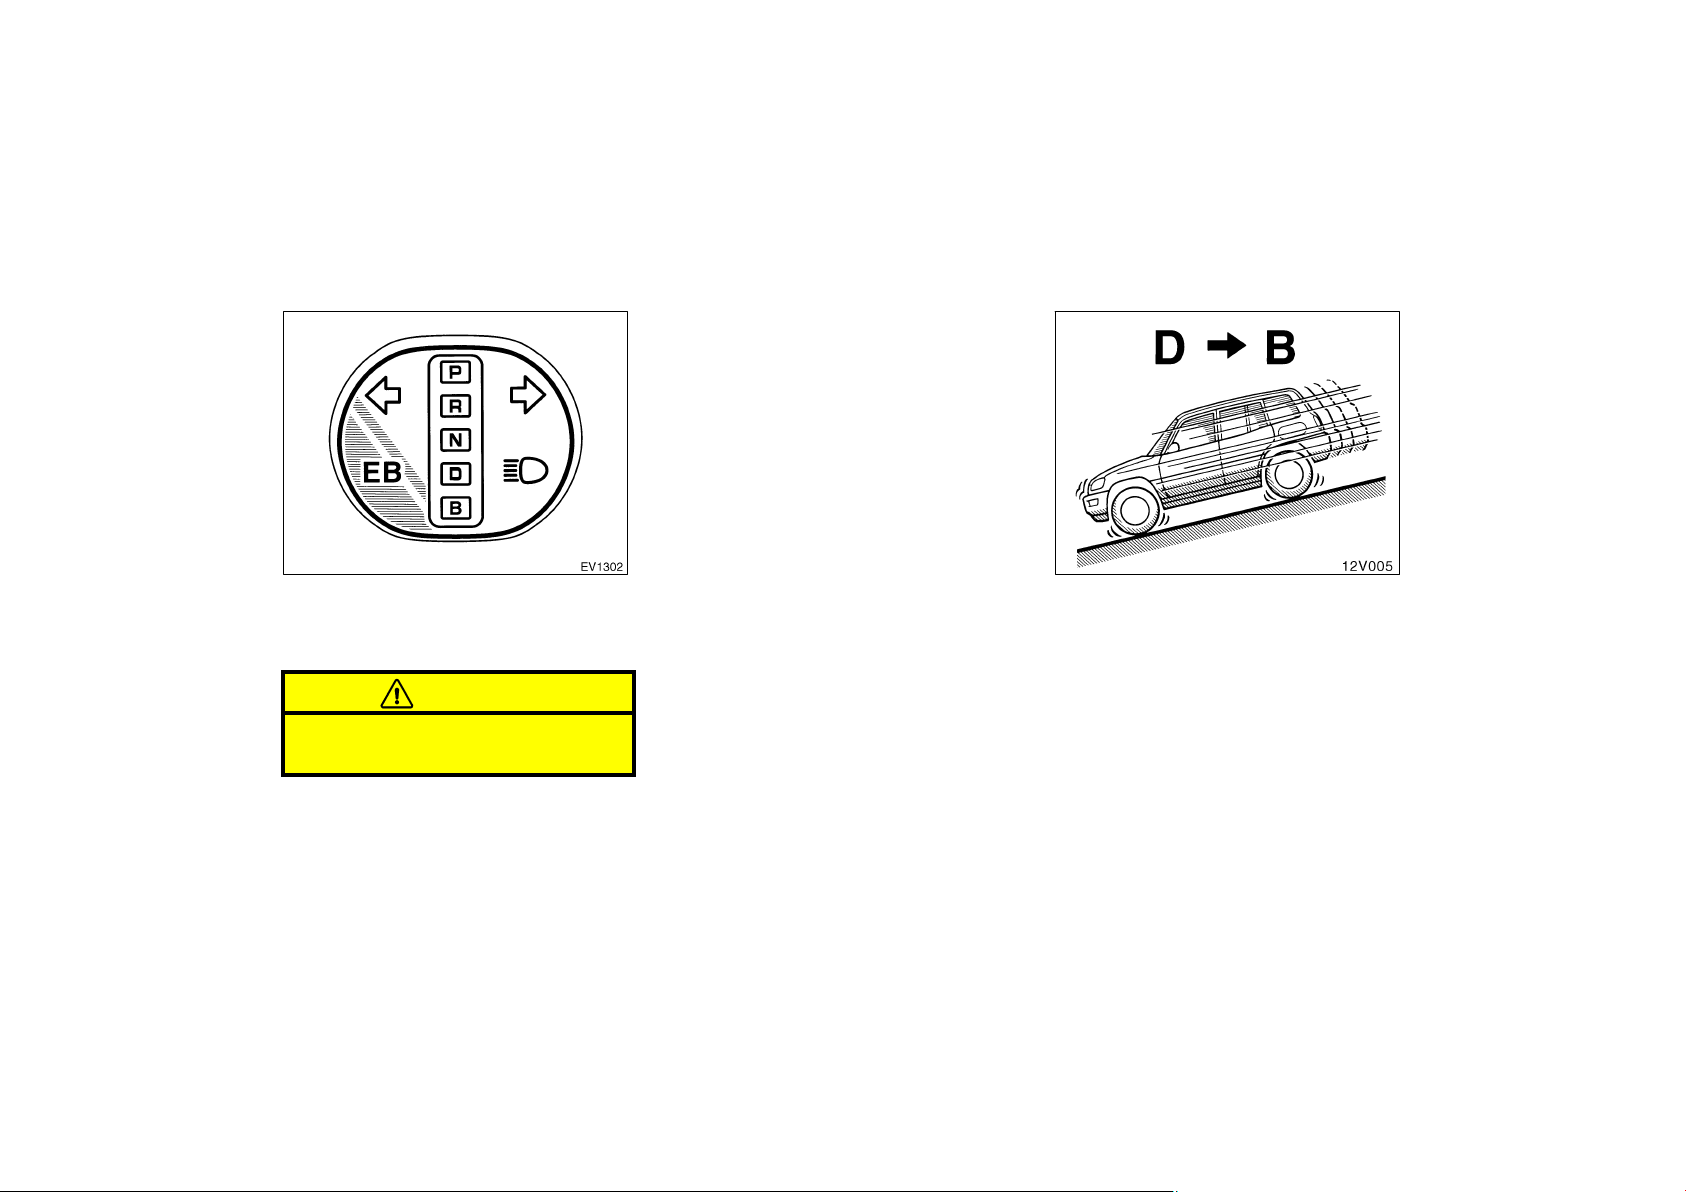
4. The selector lever should be operated
in the same manner as an ordinary
gasoline−fueled vehicle with an automatic transmission. If you desire an
“engine braking effect”, push the “EB”
button (EB indicator lamp will illuminate). The “engine braking effect” is
similar to that as an ordinary gasoline−fueled vehicle with an automatic
transmission. “Engine braking effect” is
not applied without the “EB” mode in
“D” position. For an additional “engine
braking effect”, move the selector lever to the “B” position.
Whenever you select “EB” or “B” mode,
the vehicle speed will decrease depending on the road conditions when you release the accelerator pedal. Select “B”
mode if more powerful engine braking effect is needed. Under certain driving conditions, such as downhill driving or long
decelerations, the “EB” and “B” mode can
be used to recharge the traction batteries
and increase the vehicle’s driving range.
See “Regenerative Brake” on page 128 in
Section 3 for additional information.
CAUTION
Be careful when downshifting on a
slippery surface. Abrupt shifting
could cause the vehicle to spin or
skid.
(b) Backing up
1. Bring the vehicle to a complete stop.
2. With the brake pedal held down with
your foot, shift the selector lever to
the ”R” position.
NOTICE
Never shift into reverse while the vehicle is moving.
(c) Parking
1. Bring the vehicle to a complete stop.
2. Pull the parking brake lever up fully to
securely apply the parking brake.
3. With the brake pedal pressed down,
shift the selector lever to the ”P” position.
If the driver’s door is opened with the
”READY” light on and the selector lever
at a position other than ”P”, you hear
beeps.
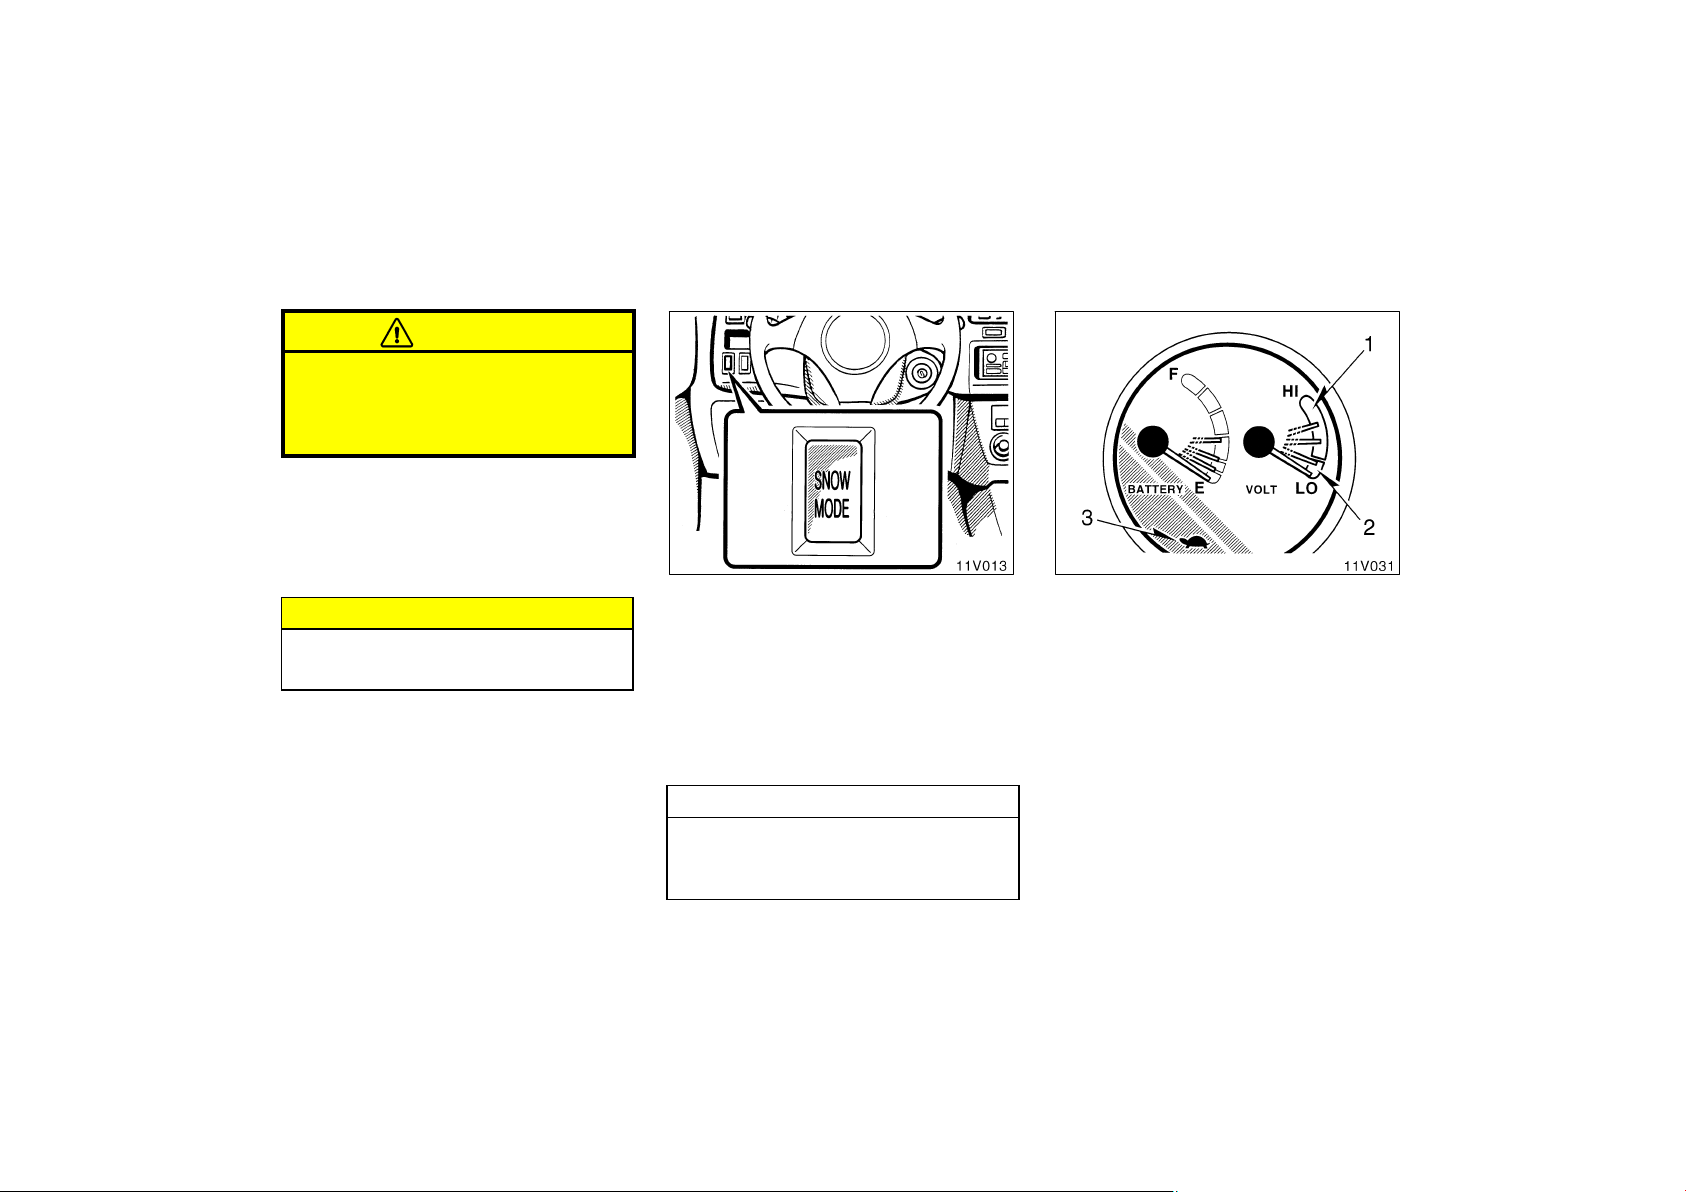
(d) Driving in ”SNOW MODE”
Push the switch to turn on the snow
mode when the vehicle is stopped.
The motor traction is controlled in this
mode, so you can start the vehicle
smoothly on the road in snow.
When you push the switch again, the
snow mode turns off.
NOTICE
Do not turn on or off the switch during driving. This operation will cause
acceleration shock.
(e) Good driving practices
Tips for Driving Distance:
1. Traction battery voltmeter
2. Yellow zone
3. Output control warning light
The output control warning l ight comes o n
when t he v oltmeter enters the yellow z one
because of rapid acceleration, increasing
energy consumption, etc. When the voltage drops, the warning light comes on.
The buzzer sounds at further drop of voltage. As the ambient temperature becomes
colder, the v oltmeter tends t o e nter the y el low zone. To have a longer driving range,
continue your driving while keeping the
voltmeter from entering the yellow zone.
19
Avoid the driving that may cause an
excessive load applied to the vehicle.
Driving such as high speed driving, driving on a slope, rapid speed increases,
frequent speed increases or decreases
will shorten the driving range.
Check the condition of the traction
batteries with the SOC meter and traction battery voltmeter and charge if
required.
If the traction battery’s capacity or voltage is excessively low, you might not be
able to drive the electric vehicle.
If the needle of the traction battery voltmeter enters the yellow zone frequently,
the driving range will be shortened.
(f) Effective operation for a longer
battery life
D Avoid acceleration at full throttle or
deceleration by applying the brakes
fully.
D Charge the traction batteries before
the SOC meter needle enters the yellow zone.
CAUTION
D While the vehicle is moving, never
attempt to move the selector lever
into ”P” position under any circumstances. Serious mechanical
damage and loss of vehicle control
may result.
D Always keep your foot on the
brake pedal while stopped with the
”READY” light on. With the selector lever in a position other than
”P” or ”N”, if you depress the accelerator pedal advertently, the vehicle may start abruptly.
NOTICE
Always use the brake pedal or the
parking brake to hold the vehicle on
an upgrade. Do not attempt to hold
the vehicle using the accelerator
pedal, as this can cause the transmission to overheat.
(g) If you cannot shift the selector le-
ver out of ”P” position.
If you cannot shift the selector lever from
the ”P” position even though the brake
pedal is depressed, use the shift lock
override button. For instructions, see ”If
you cannot shift running mode selector
lever” on page 157 in Section 5.
CAUTION
Only use the shift lock override button in an emergency. If you must
use the shift lock override button,
the safety interlock of the selector
lever is not functioning properly. For
your safety, have the vehicle serviced immediately.
20
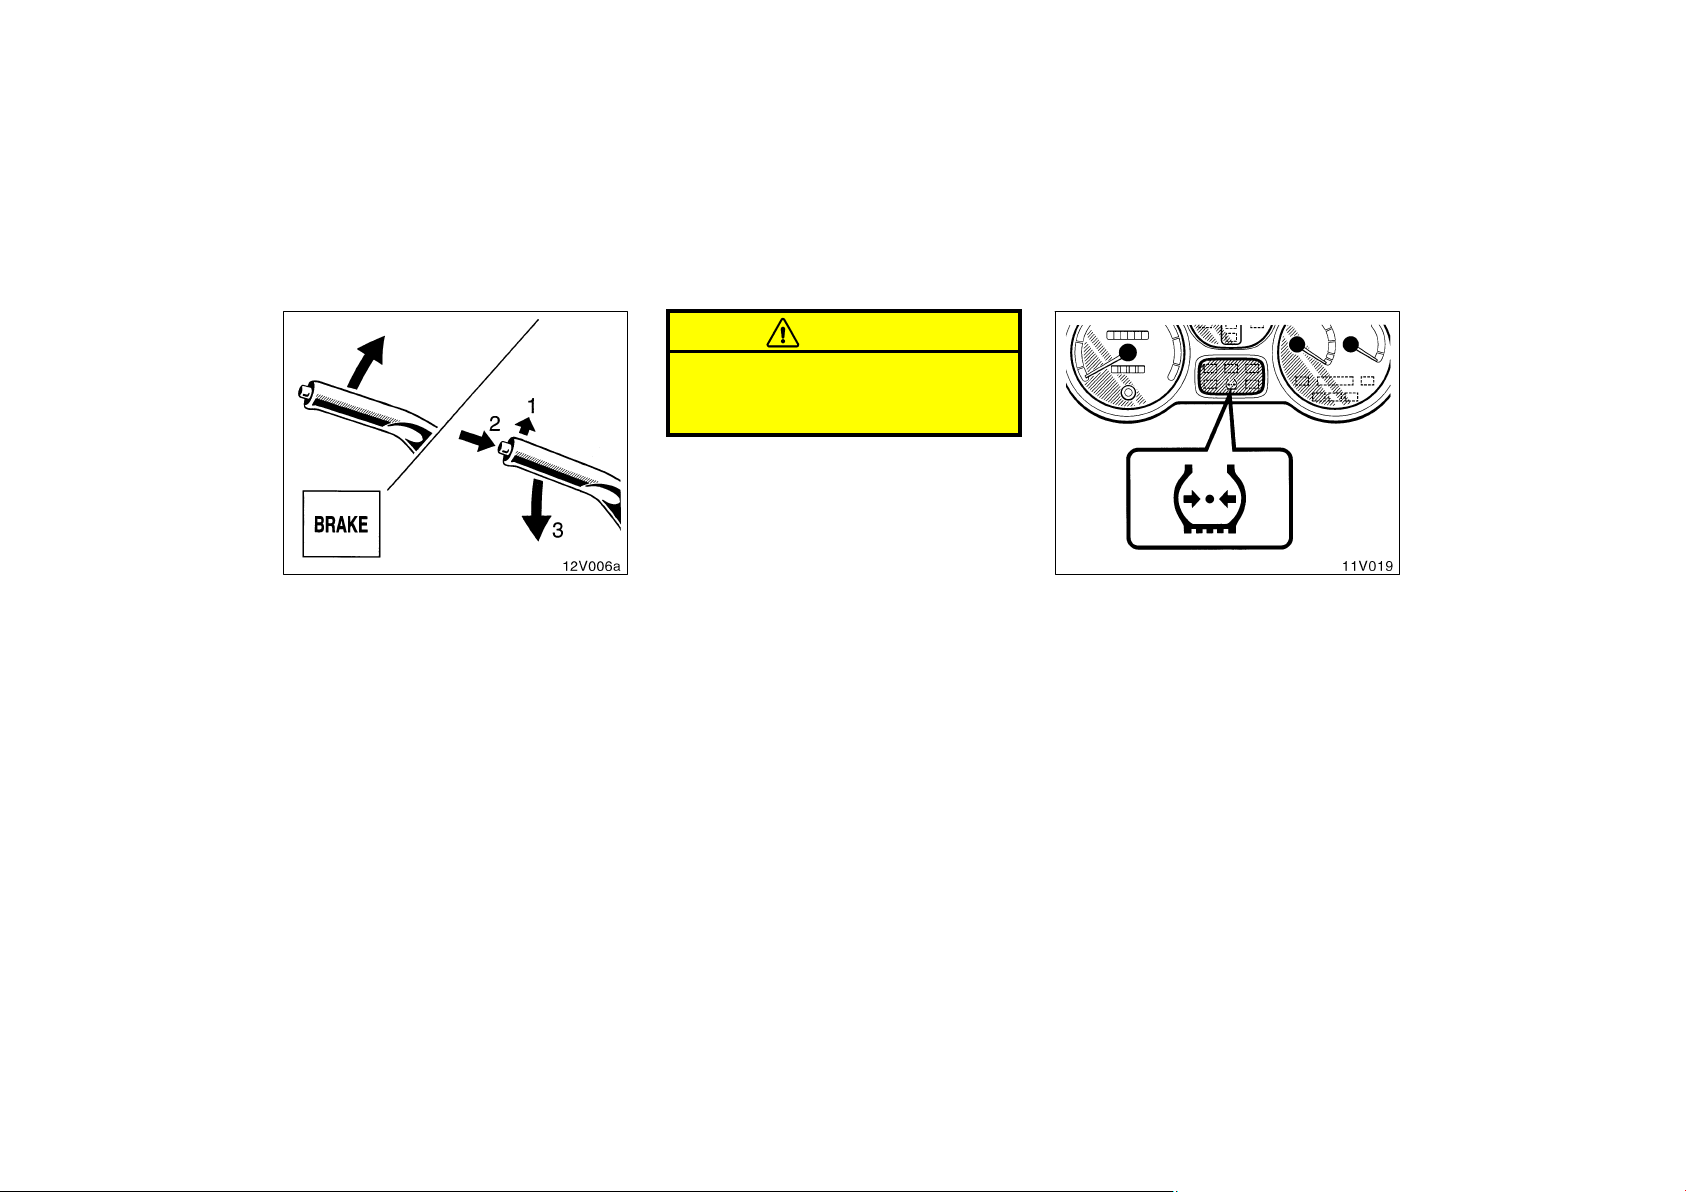
Parking brake
Tire pressure warning system
CAUTION
Before driving, be sure the parking
brake is fully released and the parking brake reminder light is off.
When parking, firmly apply the parking
brake to avoid inadvertent creeping.
To set: Pull up the lever. For better holding power, first depress the brake pedal
and hold it while setting the parking
brake.
To release: Pull up the lever slightly (1),
press the lock release button (2), and
lower (3).
To remind you that the parking brake is
set, the parking brake reminder light in
the instrument panel remains on until you
release the parking brake.
The tire pressure warning system is
designed to provide warning when tire
pressure of any one of the tires is
critically reduced while the vehicle is
moving. The low tire pressure warning
light comes on to inform you that
such low tire pressure may hamper
driving.
21

This system is not designed to operate
when the vehicle is stopped. Therefore,
check the tire pressures regularly. The
recommended cold tire pressures, tire
sizes and the vehicle capacity weight are
given in Section 9. The recommended
cold tire pressures and tire sizes are also
on the tire pressure label. (For instruction, see ”Checking tire pressure” on
page 183 in Section 8−2.)
Installed tires should be of the specified
size. They should be of the same size
and construction. If tires other than of the
specified size are used, or if tires of different sizes or constructions are mixed,
the tire pressure warning system will not
function properly.
LOW TIRE PRESSURE WARNING LIGHT
This light comes on when the motor
switch is turned to the ”ON” position. It
goes off after about 3 seconds. This indicates that the tire pressure warning system is functioning properly.
If the low tire pressure warning light
comes on while driving, adjust tire
pressure to the specified level. (See
”Tires” on page 205 in Section 9.)
After the tire pressure is adjusted, the
light should go off after driving at about
more than 30 km/h (19 mph) for some
time. If the light still remains on, have
the tire pressure warning system checked
at your EV service station.
The tire pressure warning system does
not function properly under certain circumstances. In the following cases,
the low tire pressure warning light
may not come on even if the tire pressure is low, or it may come on when
the tire pressure is actually normal.
D If the tread wear is uneven among the
installed tires.
D If a compact spare tire, snow tires, or
tire chains are used.
D If the tire pressure is excessively high-
er than specified, or if tire pressure is
suddenly reduced due to bursts or other causes.
D If the vehicle is driven on a slippery
road surface such as rough road and
frozen road.
D If the vehicle speed is less than 30
km/h (19 mph) and if the driving duration is less than about 5 minutes.
D After the replacement of wheels, the
tire pressure warning system may not
work properly. Contact EV service station.
22
 Loading...