


TABLE OF CONTENTS
1
Before driving
2
When driving
Interior
3
features
Maintenance
4
and care
When trouble
5
arises
Vehicle
6
specifications
Information on the EV system, adjusting and operating
features such as door locks, mirrors, and steering column.
Driving, stopping and safe-driving information.
Air conditioning, as well as other interior features for a
comfortable driving experience.
Cleaning and protecting your vehicle, performing do-ityourself maintenance, and maintenance information.
What to do if the vehicle needs to be towed, gets a flat
tire, or is involved in an accident.
Detailed vehicle information.
7
For owners
Index
Reporting safety defects for U.S. owners
Alphabetical listing of information contained in this
manual.
1

TABLE OF CONTENTS Index
1
Before driving
1-1. EV system
Characteristics of the EV
(Electric Vehicle) system.... 26
EV (Electric Vehicle)
system precautions............ 32
Energy monitor/
consumption screen........... 38
EV (Electric Vehicle)
driving tips.......................... 41
1-2. Navigation system screen
operations
Navigation system screen
operations .......................... 44
1-3. Charging
Charging equipment............. 46
Power sources that can
be used .............................. 50
Charging and pre-climate
(Remote Climate Control)
procedures......................... 53
When normal charging
cannot be carried out ......... 88
Inspecting the charging
cable .................................. 92
1-4. Key information
Keys..................................... 94
1-5. Opening, closing and
locking the doors
Smart key system................. 96
Wireless remote control...... 108
Side doors .......................... 110
Back door ........................... 113
1-6. Adjustable components
(seats, mirrors,
steering wheel)
Front seats.......................... 118
Rear seats.......................... 121
Head restraints................... 127
Seat belts............................ 131
Steering wheel.................... 140
Anti-glare inside rear
view mirror........................ 141
Outside rear view mirrors ... 143
1-7. Opening and closing the
windows
Power windows................... 146
1-8. Theft deterrent system
Immobilizer system............. 149
Theft prevention labels....... 151
1-9. Safety information
Correct driving posture....... 152
SRS airbags ....................... 154
Front passenger occupant
classification system......... 166
Child restraint systems ....... 172
Installing child restraints ..... 176
2

2
When driving
2-1. Driving procedures
Driving the vehicle............... 190
Power switch....................... 200
Transmission....................... 206
Turn signal lever ................. 215
Parking brake...................... 216
Horn.................................... 217
2-2. Instrument cluster
Gauges and meters ............ 218
Indicators and warning
lights ................................. 223
Multi-information display..... 227
2-3. Operating the lights and
wipers
Headlight switch.................. 234
Windshield wipers and
washer.............................. 238
Rear window wiper and
washer.............................. 241
2-4. Using other driving
systems
Cruise control...................... 243
Rear view monitor
system .............................. 247
Driving assist systems ........ 251
Hill-start assist control......... 256
2-5. Driving information
Utility vehicle
precautions....................... 258
Cargo and luggage............. 263
Vehicle load limits............... 267
Winter driving tips............... 268
Trailer towing...................... 273
Dinghy towing..................... 274
3
Interior features
3-1. Using the air conditioning
system and defogger
Automatic air
conditioning system.......... 276
Rear window and outside
rear view mirror
defoggers......................... 292
3-2. Using the interior lights
Interior lights list ................. 293
• Personal/interior light
main switch ...................... 294
• Personal/interior lights...... 294
• Interior light...................... 295
• Luggage compartment
light................................... 295
3-3. Using the storage features
List of storage features....... 296
• Glove box......................... 297
• Console box..................... 298
• Cup holders...................... 299
• Bottle holders................... 300
• Auxiliary boxes................. 302
1
2
3
4
5
6
7
3

TABLE OF CONTENTS Index
3-4. Other interior features
Sun visors .......................... 304
Vanity mirrors..................... 305
Power outlets ..................... 306
Seat heaters....................... 310
Armrest............................... 313
Coat hooks......................... 314
Assist grips......................... 315
Floor mat............................ 316
Luggage compartment
features............................ 317
Garage door opener........... 320
Safety Connect................... 326
4
Maintenance and care
4-1. Maintenance and care
Cleaning and protecting
the vehicle exterior........... 334
Cleaning and protecting
the vehicle interior............ 337
4-2. Maintenance
Maintenance
requirements.................... 340
General maintenance......... 342
4-3. Do-it-yourself maintenance
Do-it-yourself service
precautions....................... 346
Hood................................... 349
Positioning a floor jack........ 351
Motor compartment ............ 355
Tires.................................... 366
Tire inflation pressure......... 374
Wheels................................ 378
Air conditioning filter........... 381
Electronic key battery......... 383
Checking and replacing
fuses................................. 385
Headlight aim...................... 398
Light bulbs.......................... 400
5
When trouble arises
5-1. Essential information
Emergency flashers............ 412
If your vehicle needs to
be towed........................... 413
If you think something
is wrong............................ 416
4

5-2. Steps to take in an
emergency
If a warning light turns
on or a warning buzzer
sounds... .......................... 417
If a warning message is
displayed........................... 427
If you have a flat tire............ 447
If the EV (Electric Vehicle)
system will not start .......... 465
If you lose your keys........... 467
If the electronic key does
not operate properly.......... 468
If the vehicle 12-volt
battery is discharged......... 470
If your vehicle overheats..... 475
If the vehicle becomes
stuck ................................. 477
If your vehicle has to
be stopped in an
emergency........................ 479
7
For owners
Reporting safety defects
for U.S. owners ................ 506
Index
Abbreviation list........................ 508
Alphabetical index.................... 509
What to do if... .......................... 518
1
2
3
4
6
Vehicle specifications
6-1. Specifications
Maintenance data
(fluid capacity, etc.)........... 482
Tire information................... 489
6-2. Customization
Customizable features........ 500
6-3. Initialization
Items to initialize ................. 503
5
6
7
5
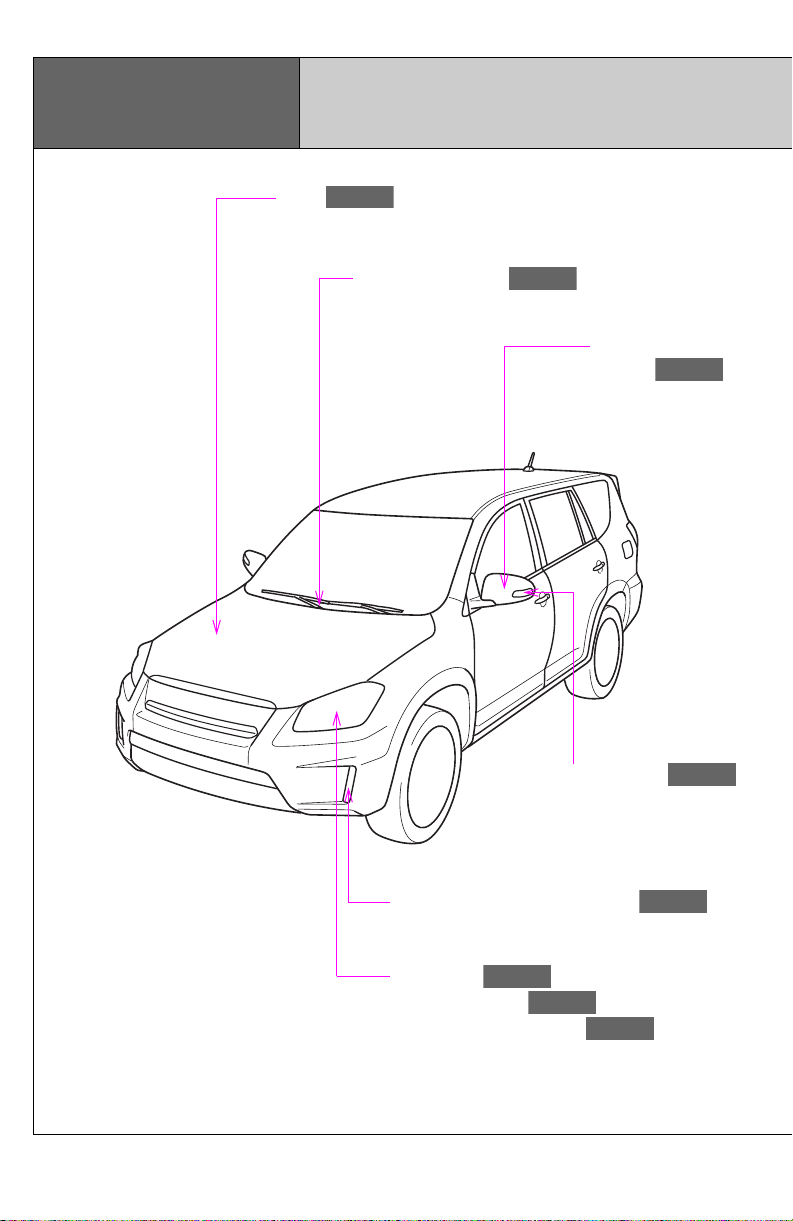
Pictorial index
P. 349
P. 143
P. 238
P. 215
P. 236
P. 234
P. 215
P. 234
Exterior
Hood
Windshield wipers
Outside rear view
mirrors
Turn signal lights
Daytime running/parking lights
Headlights
Front turn signal
Front side marker lights
6
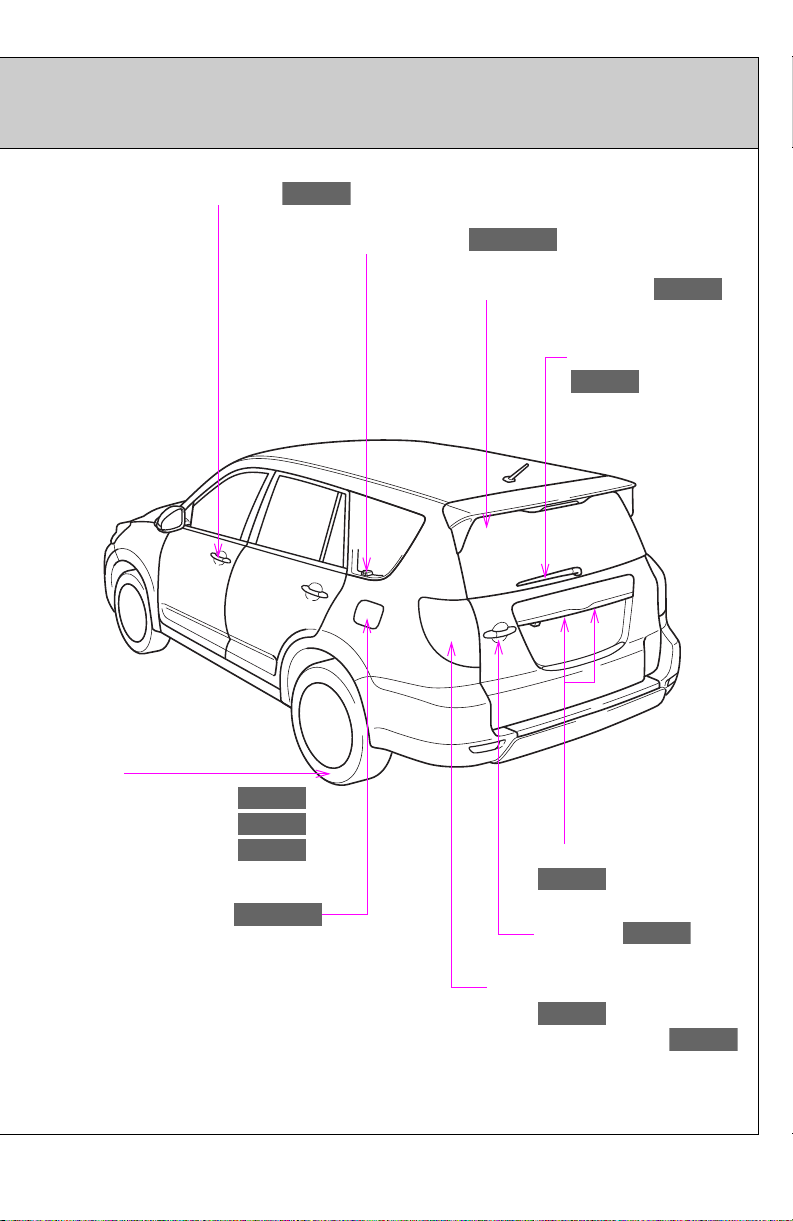
P. 366
P. 488
P. 489
P. 113
P. 234
P. 215
P. 241
P. 234
Side doors
P. 110
P. 292
P. 59, 419
P. 46, 59
Tires
●Rotation
●Inflation pressure
●Information
Charging indicator
Rear window defogger
Rear window wiper
License plate lights
Charging port door
Back door
Stop/tail and rear side marker
lights
Rear turn signal lights
7

P. 297
P. 118
P. 154
P. 154
P. 298
Pictorial index
P. 316
P. 131
P. 121
P. 302
P. 154
P. 127
P. 146
P. 300
P. 299
Head restraints
Seat belts
Power window switches
Bottle holders
Interior
SRS driver airbag
SRS front passenger
airbag
Auxiliary box
Cup holders
8
Rear seats
Glove box
Console box
Floor mat
Front seats
SRS side airbags
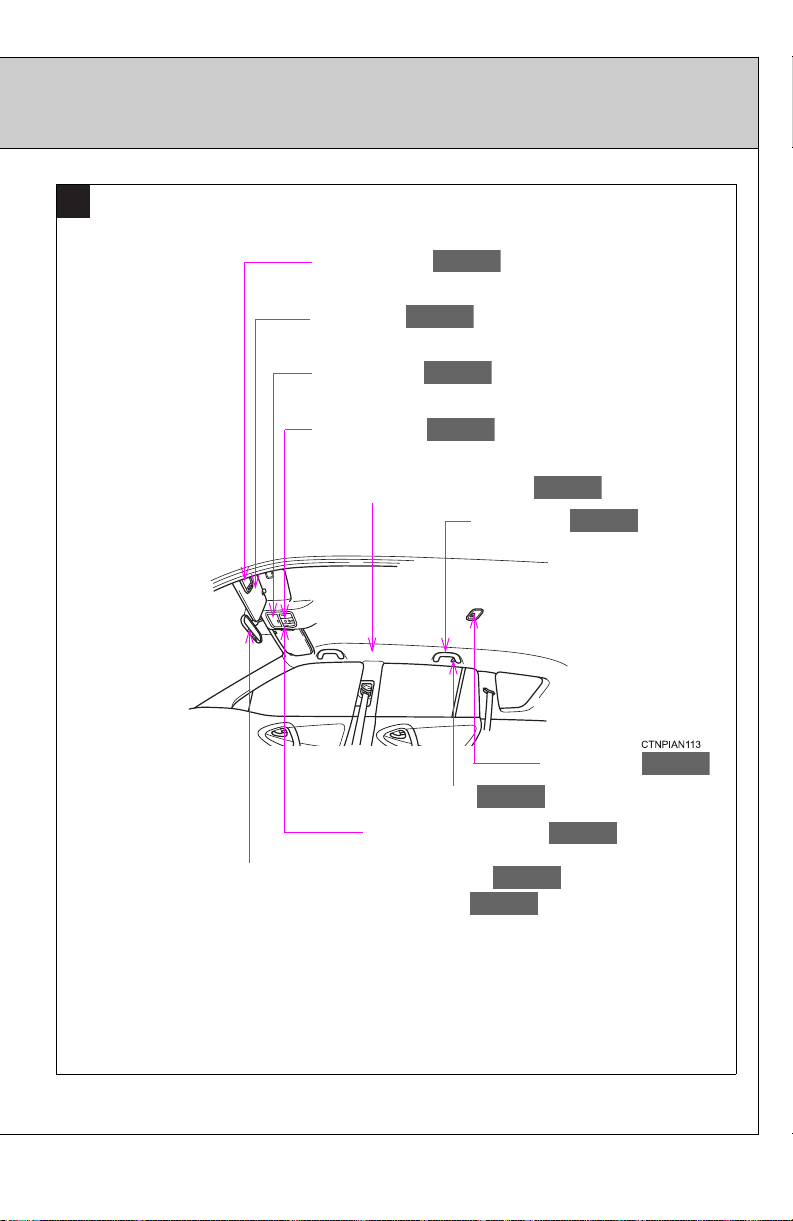
A
P. 305
P. 326
P. 304
P. 154
P. 295
P. 141
P. 320
P. 294
P. 302
P. 314
P. 315
Vanity mirrors
Sun visors
Auxiliary box
“SOS” button
SRS curtain shield airbags
Assist grips
Interior light
Coat hooks
Personal/interior lights
Anti-glare inside rear view mirror
Garage door opener switches
9
P. 146
P. 146
P. 110
P. 110
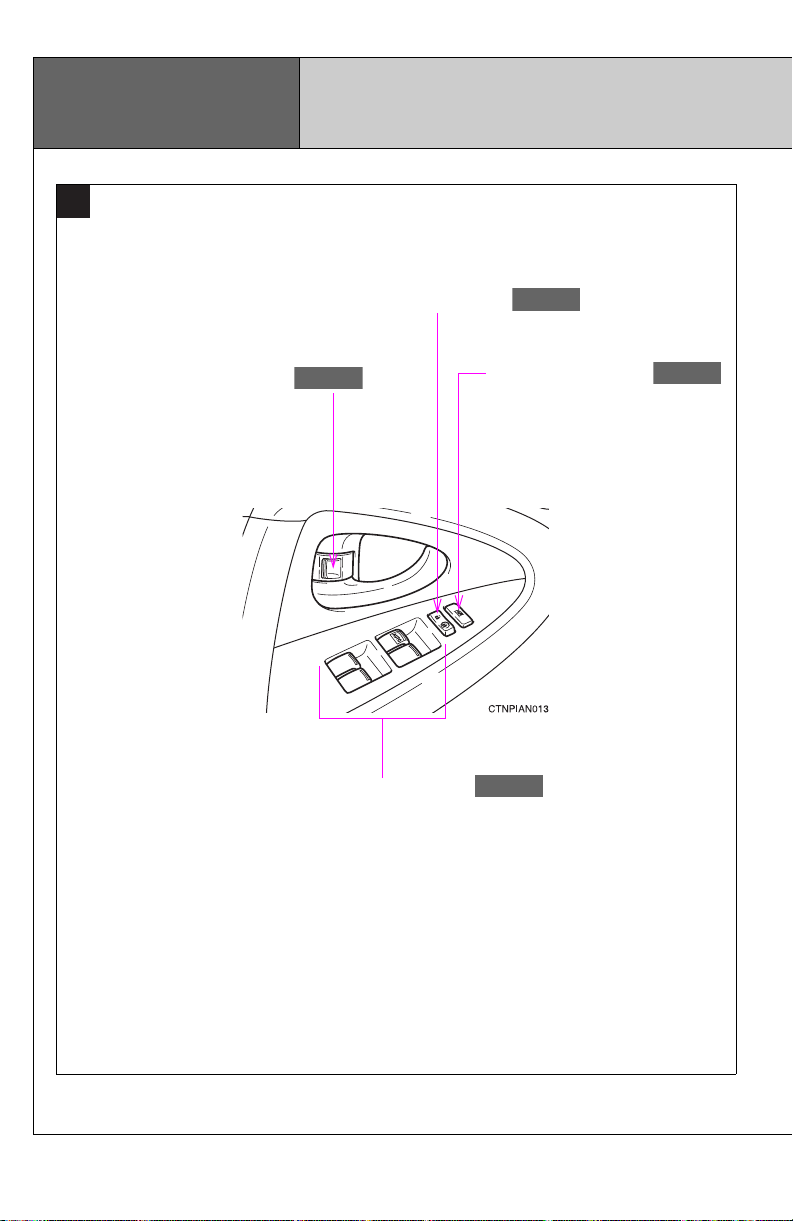
Pictorial index
B
Interior
Door lock switch
Inside lock buttons
Window lock switch
Power window switches
10
C
P. 143
P. 216
P. 299
P. 206
P. 209
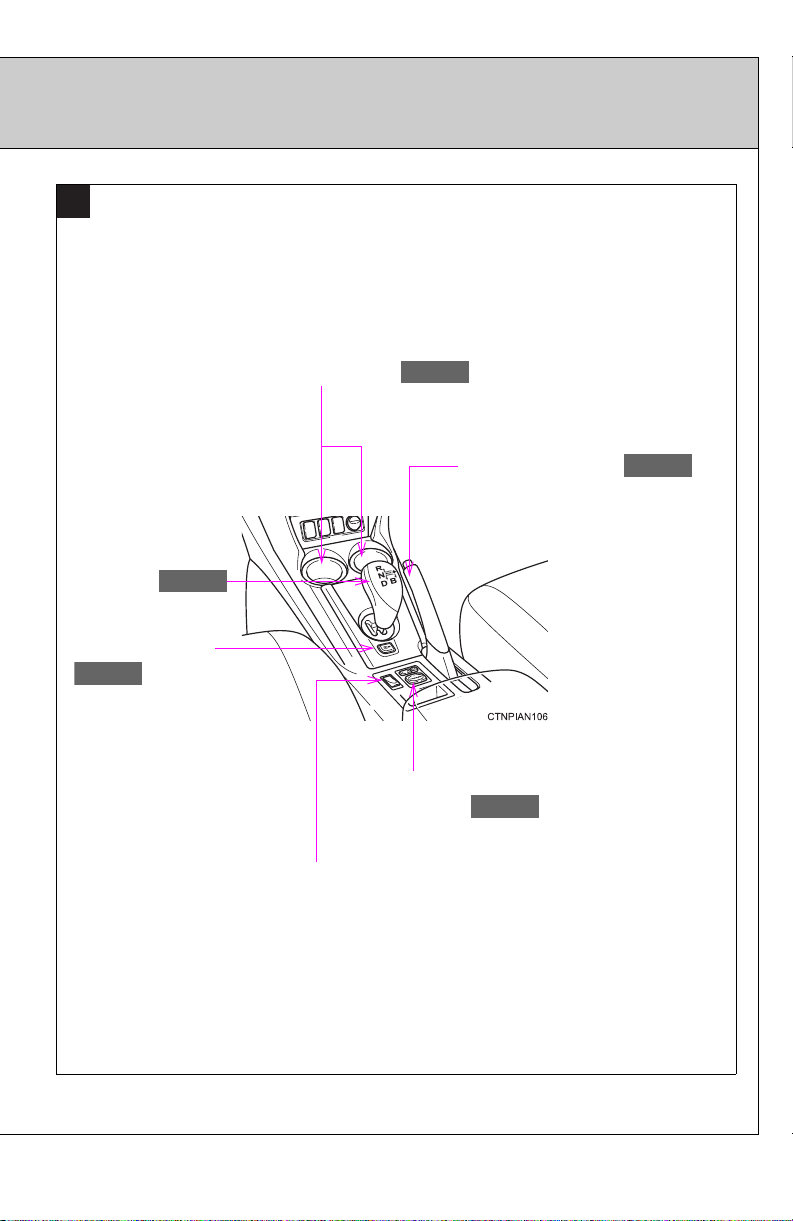
Shift lever
P position switch
Cup holders
Parking brake lever
Outside rear view mirror
switches
AUX port*/USB port*
*: Refer to “Navigation System Owner’s Manual”.
11
P. 140
P. 234
P. 215
P. 238
P. 241
P. 59
P. 412
Pictorial index
P. 218
P. 349
P. 217
Horn
Instrument panel
Gauges and meters
Headlight switch
Turn signal lever
Emergency flasher switch
Audio system*
Navigation system*
Charging port door
opener
Hood release lever
Tilt and telescopic steering lock release lever
12
Windshield wiper and washer switch
Rear window wiper and washer switch
A
P. 219
P. 235
Instrument panel light control dial
Manual headlight leveling dial
*: Refer to “Navigation System Owner’s Manual”.
13
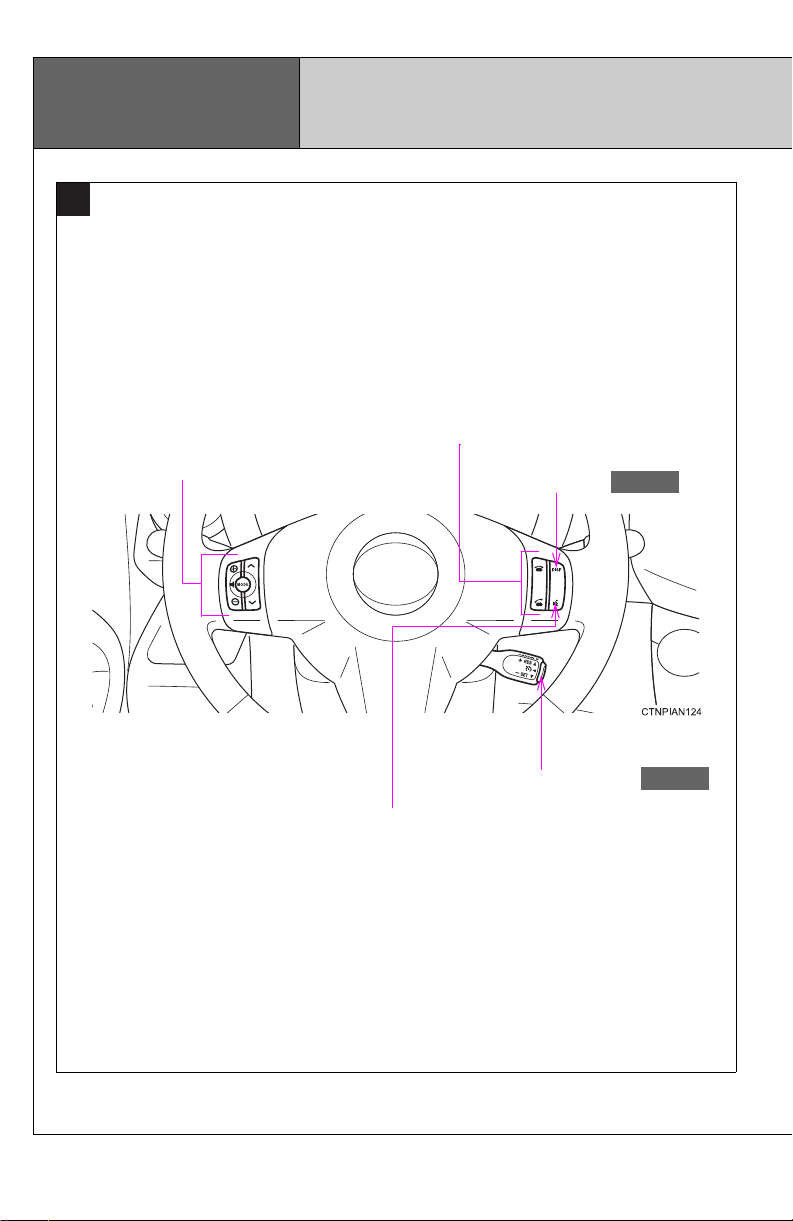
Pictorial index
P. 243
P. 228
B
Audio remote control switches *
Instrument panel
Telephone switches *
“DISP” switch
Cruise control switch
Talk switch *
14
C
P. 200
P. 292
P. 149
P. 276
P. 310
Power switch
Air conditioning system
Security indicator
Rear window and outside rear view
mirror defogger switch
Seat heater controls
*: Refer to “Navigation System Owner’s Manual”.
15
P. 208
P. 306
P. 252
Pictorial index
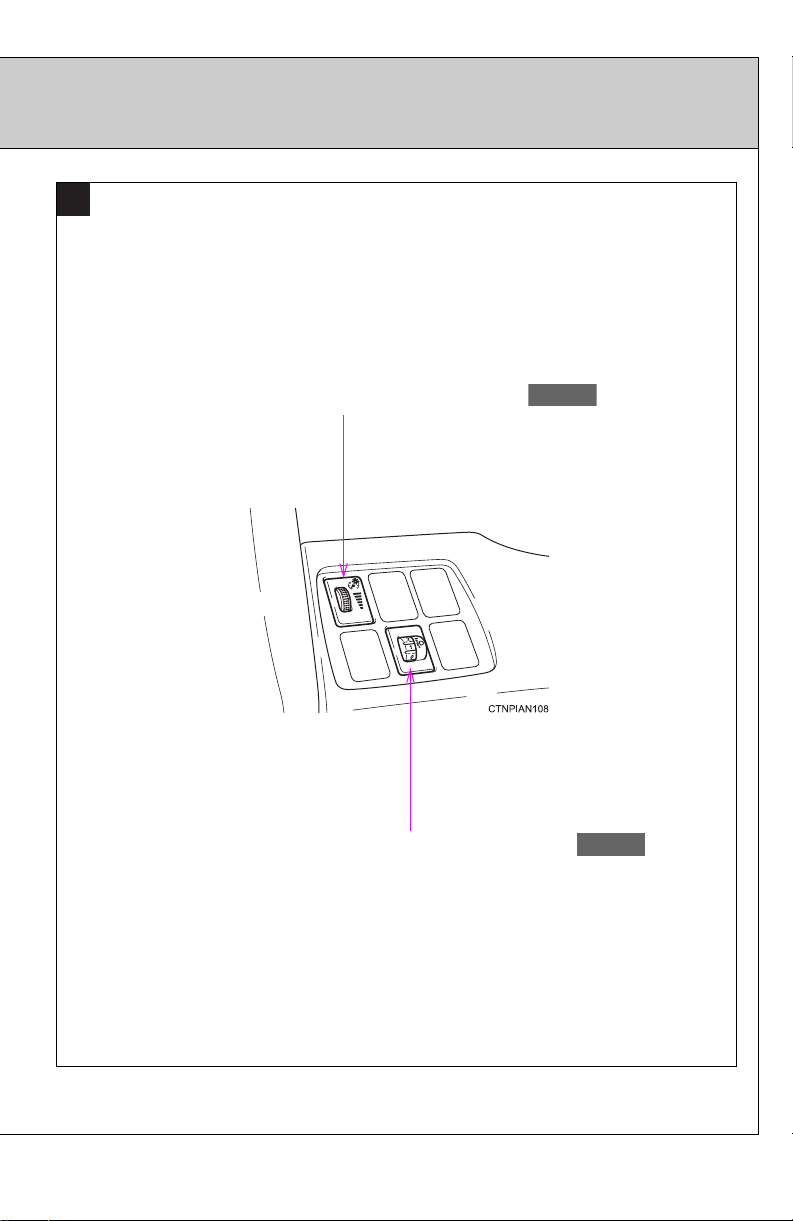
D
SPORT mode switch
VSC OFF
switch
Instrument panel
Power outlet
16
Pictorial index
P. 123
P. 317
P. 317
P. 317
P. 306
P. 295
Luggage compartment
Second seatback release lever
Grocery bag hooks
Luggage
compartment
light
Storage boxes
Cargo hooks
Power outlet
17

For your information
Main Owner’s Manual
Please note that this manual covers all models and all equipment, including
options. Therefore, you may find some explanations for equipment not
installed on your vehicle.
All specifications provided in this manual are current at the time of printing.
However, because of the Toyota policy of continual product improvement, we
reserve the right to make changes at any time without notice.
Depending on specifications, the vehicle shown in the illustrations may differ
from your vehicle in terms of equipment.
Accessories, spare parts and modification of your Toyota
A wide variety of non-genuine spare parts and accessories for Toyota
vehicles are currently available on the market. You should know that these
parts are not covered by Toyota warranty and that Toyota is not responsible
for their performance, repair, or replacement, or for any damage they may
cause to, or adverse effect they may have on, your Toyota vehicle.
This vehicle should not be modified with non-genuine Toyota products.
Modification with non-genuine Toyota products may affect performance,
safety or durability, and may even violate governmental regulations. In
addition, damage or performance problems resulting from the modification
may not be covered under warranty.
Installation of a mobile two-way radio system
The installation of a mobile two-way radio system in your vehicle could affect
electronic systems such as:
● Cruise control system
● Anti-lock brake system
● SRS airbag system
● Seat belt pretensioner system
Be sure to check with your Toyota dealer for precautionary measures or special instructions regarding installation of a mobile two-way radio system.
18

Vehicle data recordings
Your Toyota is equipped with several sophisticated computers that will record
certain data, such as:
• Electric motor speed (traction motor speed)
• Accelerator status
• Brake status
• Vehicle speed
• Shift position
• Traction battery status
The recorded data varies according to the vehicle grade level and options
with which it is equipped. Furthermore, these computers do not record con-
versations, sounds or pictures.
● Data usage
Toyota may use the data recorded in these computers to diagnose malfunc-
tions, conduct research and development, and improve quality.
Toyota will not disclose the recorded data to a third party except:
• With the consent of the vehicle owner or with the consent of the lessee if
the vehicle is leased
• In response to an official request by the police, a court of law or a government agency
• For use by Toyota in a law suit
• For research purposes where the data is not tied to a specific vehicle or
vehicle owner
● Usage of data collected through Safety Connect
If your Toyota has Safety Connect and if you have subscribed to those services, please refer to the Safety Connect Telematics Subscription Service
Agreement for information on data collected and its usage.
19

Event data recorder
This vehicle is equipped with an event data recorder (EDR). The main purpose of an EDR is to record, in certain crash or near crash-like situations,
such as an air bag deployment or hitting a road obstacle, data that will assist
in understanding how a vehicle’s systems performed. The EDR is designed
to record data related to vehicle dynamics and safety systems for a short
period of time, typically 30 seconds or less.
The EDR in this vehicle is designed to record such data as:
• How various systems in your vehicle were operating;
• Whether or not the driver and passenger safety belts were buckled/fastened;
• How far (if at all) the driver was depressing the accelerator and/or brake
pedal; and,
• How fast the vehicle was traveling.
These data can help provide a better understanding of the circumstances in
which crashes and injuries occur.
NOTE: EDR data are recorded by your vehicle only if a non-trivial crash situation occurs; no data are recorded by the EDR under normal driving conditions and no personal data (e.g., name, gender, age, and crash location) are
recorded. However, other parties, such as law enforcement, could combine
the EDR data with the type of personally identifying data routinely acquired
during a crash investigation.
To read data recorded by an EDR, special equipment is required, and access
to the vehicle or the EDR is needed. In addition to the vehicle manufacturer,
other parties, such as law enforcement, that have the special equipment, can
read the information if they have access to the vehicle or the EDR.
20

● Disclosure of the EDR data
Toyota will not disclose the data recorded in an EDR to a third party except
when:
• An agreement from the vehicle’s owner (or the lessee for a leased vehicle)
is obtained
• In response to an official request by the police, a court of law or a govern-
ment agency
• For use by Toyota in a law suit
However, if necessary, Toyota may:
• Use the data for research on vehicle safety performance
• Disclose the data to a third party for research purposes without disclosing
information about the specific vehicle or vehicle owner
Scrapping of your Toyota
The SRS airbag and seat belt pretensioner devices in your Toyota contain
explosive chemicals. If the vehicle is scrapped with the airbags and seat belt
pretensioners left as they are, this may cause an accident such as fire. Be
sure to have the systems of the SRS airbag and seat belt pretensioner
removed and disposed of by a qualified service shop or by your Toyota
dealer before you scrap your vehicle. Additionally, the lithium-ion battery
(traction battery) may cause an accident such as a fire if it is not removed
prior to scrapping. The lithium-ion battery can be disposed of at your Toyota
dealer.
Perchlorate Material
Special handling may apply, See www.dtsc.ca.go v/hazardouswaste/perchlorate.
Your vehicle has components that may contain perchlorate. These compo-
nents may include airbag, seat belt pretensioners, and wireless remote control batteries.
21

CAUTION
■ General precautions while driving
Driving under the influence: Never drive your vehicle when under the influence of alcohol or drugs that have impaired your ability to operate your vehicle. Alcohol and certain drugs delay reaction time, impair judgment and
reduce coordination, which could lead to an accident that could result in
death or serious injury.
Defensive driving: Always drive defensively. Anticipate mistakes that other
drivers or pedestrians might make and be ready to avoid accidents.
Driver distraction: Always give your full attention to driving. Anything that distracts the driver, such as adjusting controls, talking on a cellular phone or
reading can result in a collision with resulting death or serious injury to you,
your occupants or others.
■ General precaution regarding children’s safety
Never leave children unattended in the vehicle, and never allow children to
have or use the key.
Children may be able to start the vehicle or shift the vehicle into neutral.
There is also a danger that children may injure themselves by playing with
the windows, the moon roof, or other features of the vehicle. In addition, heat
build-up or extremely cold temperatures inside the vehicle can be fatal to
children.
■ Traction battery
Never resell, hand over or modify the traction battery. To prevent accidents,
traction batteries that have been removed from a disposed vehicle are collected through Toyota dealers. Do not dispose of the battery yourself.
Unless the battery is properly collected, the following may occur, resulting in
death or serious injury:
● The traction battery may be illegally disposed of or dumped, and someone
may touch a high voltage part, resulting in an electric shock.
● The traction battery is intended to be used exclusively with your EV. If the
traction battery is used outside of your vehicle or modified in any way, accidents such as electric shock, heat generation, smoke generation, an
explosion and electrolyte leakage may occur.
If the traction battery is resold or handed over to a third party, the possibility
of an accident is extremely high because the person receiving the traction
battery may not be aware of these dangers.
22

CAUTION
■ Disposal of the traction battery
If your vehicle is disposed of without the traction battery having been
removed, there is a danger of serious electric shock if high voltage parts,
cables and their connectors are touched. In the event that your vehicle must
be disposed of, the traction battery must be disposed of by your Toyota
dealer or a qualified service shop. If the traction battery is not disposed of
properly , it may cause electric shock that can result in death or serious injury.
23

Symbols used throughout this manual
CAUTION
NOTICE
Cautions & Notices
This is a warning against anything which may cause death or injury to people if
the warning is ignored. You are informed about what you must or must not do
in order to reduce the risk of injury to yourself and others.
This is a warning against anything which may cause damage to the vehicle or
its equipment if the warning is ignored. You are informed about what you must
or must not do in order to avoid or reduce the risk of damage to your Toyota
and its equipment.
Symbols used in illustrations
Safety symbol
24
The symbol of a circle with a slash through it means “Do not”, “Do
not do this”, or “Do not let this happen”.
Arrows indicating operations
Indicates the action (pushing, turning,
etc.) used to operate switches and other
devices.
Indicates the outcome of an operation
(e.g. a lid opens).

Before driving
1
1-1. EV system
Characteristics of the EV
(Electric Vehicle)
system ............................. 26
EV (Electric Vehicle)
system precautions.......... 32
Energy monitor/
consumption screen......... 38
EV (Electric Vehicle)
driving tips........................ 41
1-2. Navigation system screen
operations
Navigation system screen
operations........................ 44
1-3. Charging
Charging equipment........... 46
Power sources that can
be used............................ 50
Charging and pre-climate
(Remote Climate Control)
procedures....................... 53
When normal charging
cannot be carried out....... 88
Inspecting the charging
cable................................ 92
1-4. Key information
Keys................................... 94
1-5. Opening, closing and
locking the doors
Smart key system .............. 96
Wireless remote control... 108
Side doors........................ 110
Back door......................... 113
1-6. Adjustable components
(seats, mirrors,
steering wheel)
Front seats....................... 118
Rear seats........................ 121
Head restraints................. 127
Seat belts......................... 131
Steering wheel................. 140
Anti-glare inside rear
view mirror ..................... 141
Outside rear view
mirrors............................ 143
1-7. Opening and closing
the windows
Power windows................ 146
1-8. Theft deterrent system
Immobilizer system.......... 149
Theft prevention labels..... 151
1-9. Safety information
Correct driving posture..... 152
SRS airbags..................... 154
Front passenger occupant
classification system...... 166
Child restraint systems..... 172
Installing child
restraints........................ 176
25
1-1. EV system
The RAV4 EV is considerably different from a conventional vehicle.
Instead of using gasoline, the vehicle is driven using electricity in
the rechargeable traction battery to power the electric motor. This
technology is clean and has a low impact on the environment by not
emitting exhaust such as CO
2
or NOx during operation.
The illustration is an example for explanation purposes only and
may vary from the actual vehicle.
Electric motor (traction motor)
Traction battery
Provides electricity to the electric motor and air conditioning system.
12-volt battery
Provides electricity to various vehicle functions such as the audio system, wipers, headlights and so forth.
Characteristics of the EV (Electric Vehicle) system
26

1-1. EV system
■ Charging
The RAV4 EV is driven using electricity, received from an external power source, that is stored in the traction battery. Not only
public charging stations, but also household electrical receptacles can be used for charging. Procedures are different from
refueling a conventional vehicle. Therefore, make sure to r ead
the following thoroughly.
● Charging equipment (P. 46)
● Power sources that can be used (P. 50)
● How to charge your vehicle and set the pr e-climate schedule
(P. 53)
● When normal charging cannot be carried out (P. 88)
● Inspecting the charging cable (P. 92)
■ When braking (regenerative braking)
The electric motor (traction motor) charges the traction battery.
The driving range can be extended by actively using this regenerative braking to store electricity in the traction battery.
1
Before driving
Vehicle Proximity Notification System
A sound is produced while driving to warn pedestrians, people riding
bicycles or other people and vehicles in the surrounding area that
the vehicle is approaching. The pitch of the sound adjusts according
to vehicle speed. When vehicle speed is approximately 16 mph (25
km/h) or more, the warning system turns off.
27
1-1. EV system
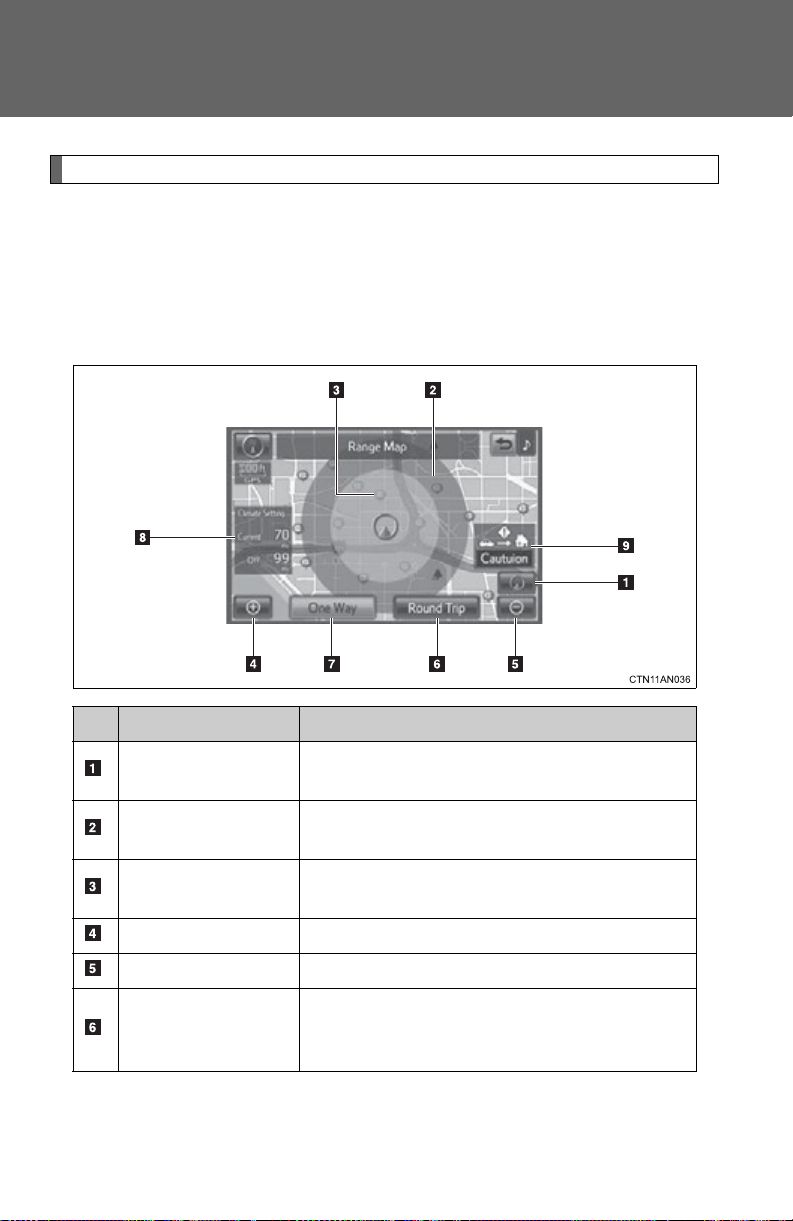
“Range map” screen
The driving area possible on the current charge level can be displayed as a reference. Charge stations in the surrounding area of the
current position can also be displayed. Press the “HOME” button, and
then touch “EV” followed by “Range Map” on the screen to display
the range map screen.
No. Name Function
Current position
Range circle
Charge station
Zoom in button Touch to magnify the map scale.
Zoom out button Touch to reduce the map scale.
“Round Trip”
28
Touch to return to the current position if the
map has been scrolled.
Shows the driving range based on the current charge level.
Shows the charge stations around the current position.
Touch to display the driving range for a
round trip. (Displayed when route guidance
is not being used.)
1-1. EV system
No. Name Function
Touch to display the driving range for a one-
“One Way”
way trip. (Displayed when route guidance is
not being used.)
Displays the driving range with the current
“Climate Setting”
air conditioning settings and with the air
conditioning turned off.
When a destination is set, or when Home is
registered, displays an estimation of
Reachable Destination Guidance
whether the destination can be reached on
the amount of charge remaining in the traction battery.
For details refer to the “Navigation System
Owner's Manual”.
For details on ions that are displayed during route guidance, refer to “Map
Screen” or “Starting Route Guidance” in the “Navigation System Owner’s
Manual”.
1
Before driving
■ Regenerative braking
During deceleration, kinetic energy from the vehicle is stored in the traction
battery for later use. This occurs while driving in D or B position when:
● The acceleration pedal is released
● The brake pedal is applied
■ 12-volt battery recharging
The traction battery automatically recharges the 12-volt battery when the EV
system is ON or while the traction battery is being charged from an electrical
receptacle.
If the vehicle is not used for one month or more, there is a possibility the 12volt battery may discharge. If this occurs, follow the correction procedures.
(P. 470)
■ When not using the vehicle for an extended period of time
P. 81
29

1-1. EV system
■ Charging
Be sure you maintain the traction battery charge level for your driving needs.
If the traction battery fully discharges, the vehicle cannot be driven at all.
Even when driving, keep early charging in mind. (P. 53) If the amount of
charge remaining in the traction battery becomes low, search for a charging
station using the navigation system*.
* For details, refer to the “Navigation System Owner's Manual”.
■ Driving Range
Based on the amount of charge remaining in the traction battery, the air-conditioning system mode and so forth, the calculated driving range is displayed
on the meter.
Depending on driving speed, road surface conditions, method of air-conditioning use, and so forth, the actual driving distance may increase or
decrease. Keep early charging in mind.
■ Noise and vibrations specific to an electric vehicle
Because an electric vehicle does not have the engine noise or vibrations
that a conventional vehicle has, the driver may not notice that the ready indicator is illuminated and the vehicle is in a drivable condition. For safety reasons, always shift the shift position to P and apply the parking brake when
parking the vehicle.
After starting the EV system, the following noises and vibrations may occur.
These noises and/or vibrations are not signs of a malfunction. For example:
● Motor sounds coming from the motor compartment.
● Electrical relay sounds may be heard from the traction battery when the
EV system starts or stops.
● Sounds may be heard from the transmission and its surrounding area
when the EV system starts or stops.
● Sounds may be heard due to regenerative braking when you depress the
brake pedal or release the accelerator pedal.
● Motor sounds may be heard when accelerating suddenly.
● Operational and motor sounds may be heard when the brake pedal is
depressed.
● The electric cooling fans in the front of the vehicle may be heard.
● Air conditioning operation sounds may be heard.
30

1-1. EV system
■ If the amount of charge remaining in the traction battery becomes low
P. 53
■ Vehicle Proximity Notification System
In the following cases, the Vehicle Proximity Notification System sound may
be difficult for pedestrians, people riding bicycles or other people and vehicles in the surrounding area to hear:
● When there is a lot of noise in the vicinity
● When it is raining or during strong winds
● When in the area surrounding the rear of the vehicle, rather than in front
of the vehicle
■ Maintenance, Repair and Disposal
Contact your Toyota dealer regarding maintenance, repair and disposal.
When disposing of your vehicle, traction batteries are collected through
Toyota dealers, and as such we appreciate your cooperation.
1
Before driving
31

1-1. EV system
Please do not attempt to disassemble or service the EV system, as it
contains high voltage (nearly 400 V), as well as parts that become
extremely hot when the EV system is operating. Obey the caution
labels attached to the vehicle.
EV (Electric Vehicle) system precautions
The illustration is an example for explanation purposes only and may
vary from the actual vehicle.
Cabin coolant heater
High voltage cables (orange)
Air conditioning compressor
DC/DC converter
Service plug
32
Charging port
Traction battery
Charger
Electric motor (traction
motor)
1-1. EV system
Emergency shut off system
When a certain level of impact is detected by the impact sensor, the
emergency shut off system turns off the EV system and blocks off the
high voltage current. If the emergency shut off system activates, your
vehicle will not restart. To restart the EV system, contact your Toyota
dealer.
Warning message
A message is automatically displayed when a malfunction occurs in
the EV system or an improper operation is attempted.
If a warning message is shown
on the multi-information display,
read the message and follow the
instructions. (P. 427)
1
Before driving
33

1-1. EV system
■ If a warning light comes on, a warning message is displayed, or the 12-
volt battery has been disconnected
The EV system may not start. In that case, try to start the system again. If
the “READY” indicator does not come on, contact your Toyota dealer.
■ Electromagnetic waves
● High voltage parts and cables on electric vehicles incorporate electro-
magnetic shielding, and therefore emit approximately the same amount
of electromagnetic waves as conventional gasoline powered vehicles or
home electronic appliances.
● Your vehicle may cause sound interference in some third party-produced
radio parts.
■ Traction battery (Lithium-ion battery)
The traction battery has a limited service life.
The traction battery capacity (the ability to store energy) reduces with time
and use in the same way as other rechargeable batteries. The extent at
which capacity reduces changes drastically depending on the environment
(ambient temperature, etc.) and usage conditions, such as how the vehicle
is driven and how the traction battery is charged. This is a natural characteristic of lithium-ion batteries, and is not a malfunction. In order to reduce the
possibility of the capacity decreasing, follow the directions listed on P. 80,
“Capacity reduction of the traction battery”.
34
1-1. EV system
CAUTION
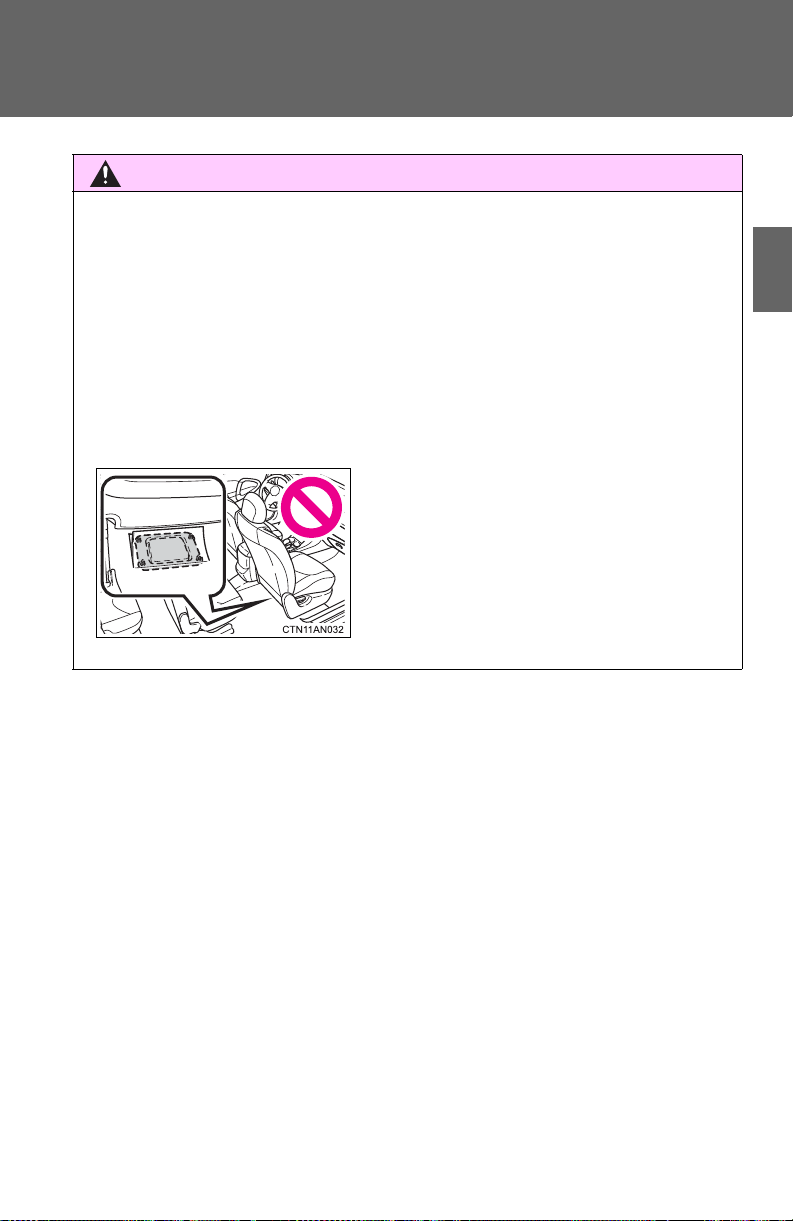
● Never try to open the service plug
access hole located under the front
passenger seat. The service plug is
used only when the vehicle is serviced
and is subject to high voltage.
■ High voltage precautions
The vehicle has high voltage DC and AC systems as well as a 12-volt system. DC and AC high voltage systems are very dangerous and can cause
severe burns and electric shock that may result in death or serious injury.
● Never touch, disassemble, remove or replace the high voltage parts,
cables or their connectors.
● The EV system will become hot after starting as the system uses high volt-
age. Be careful of both the high voltage and the high temperature, and
always obey the caution labels attached to the vehicle.
1
Before driving
35

1-1. EV system
CAUTION
■ Road accident cautions
Observe the following precautions to reduce the risk of death or serious
injury:
● Stop the vehicle in a safe place, apply the parking brake while depressing
the brake pedal, shift the shift position to P and turn the EV system off.
Then gradually release the brake pedal.
● Do not touch the high voltage parts, cables or connectors.
● If electric wires are exposed inside or outside your vehicle, an electric
shock may occur. Never touch exposed electric wires.
● Do not touch the traction battery if liquid is leaking from or adhering to it.
If electrolyte (Organic Carbonate-based electrolyte) from the traction battery comes into contact with the eyes or skin, it could cause blindness or
skin wounds. In the unlikely event that it comes into contact with the eyes
or skin, wash it off immediately with a large amount of water, and seek
immediate medical attention.
● If electrolyte is leaking from the traction battery, do not approach the vehi-
cle.
Even in the unlikely event that the traction battery is damaged, the internal
construction of the battery will prevent a large amount of electrolyte from
leaking out. However, any electrolyte that does leak out will give off acidic
fumes. These fumes are an irritant to skin and eyes and could cause acute
poisoning if inhaled.
● Do not bring burning or high-temperature items close to the electrolyte.
The electrolyte may ignite and cause a fire.
● If a fire occurs in the electric vehicle, leave the vehicle as soon as possi-
ble. Never use a fire extinguisher that is not meant for electrical fires.
Using even a small amount of water may be dangerous.
● If your vehicle needs to be towed, do so with the front wheels raised. If the
wheels connected to the electric motor (traction motor) are on the ground
when towing, the motor may continue to generate electricity. This may
cause an electricity leakage leading to a fire. (P. 413)
36

1-1. EV system
CAUTION
● Carefully check to see if there are exposed high voltage parts or cables.
Never touch the parts or cables. (P. 32)
● Carefully inspect the ground under the vehicle. If you find that liquid (other
than water from the air conditioning) has leaked onto the ground, the traction battery may have been damaged. Leave the vehicle as soon as possible.
■ Traction battery (lithium-ion battery) replacement and disposal
Do not replace, dispose of, modify, or reuse the traction battery and do not
use it for anything other than its intended use. Contact your Toyota dealer for
replacement or disposal.
If the traction battery is replaced, disposed of, modified or reused in an
improper way, or if the traction battery is used in a way it is not intended for,
there is a risk of severe burns and electrical shock that may result in death or
serious injury.
Also, improper handling of the traction battery can lead to environmental
hazards.
■ Caution while driving
The RAV4 EV does not make the sounds that a gasoline vehicle makes. As
such, pedestrians, people riding bicycles or other people and vehicles in the
surrounding area may not be aware of the vehicle starting off or approaching
them, so take extra care while driving.
1
Before driving
37
1-1. EV system
Y ou can view the status of your EV system on the navigation system.
STEP
1
STEP
2
STEP
3
Energy monitor/consumption screen
Trip Information screen/Past record screen
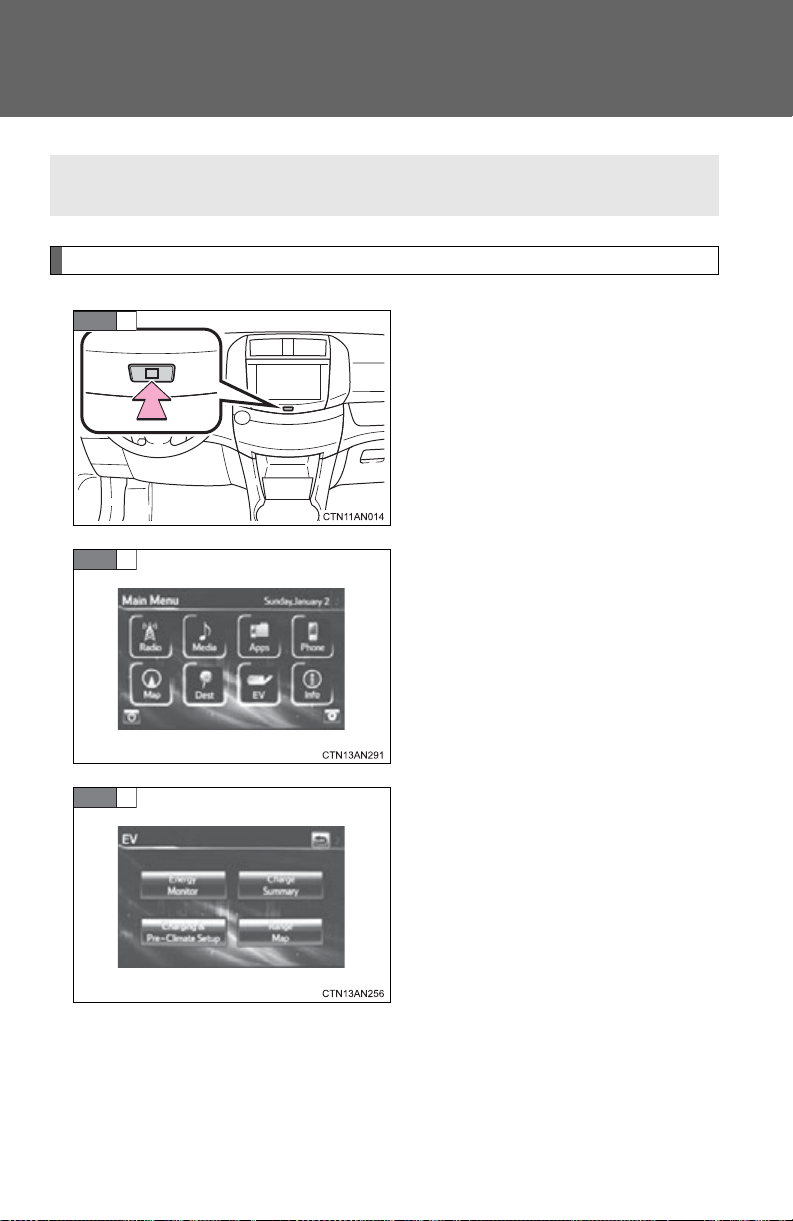
Press the HOME button.
Touch “EV” on the “Main Menu”
screen.
Touch “Energy Monitor” on the
“EV” screen.
38

1-1. EV system
■ Trip information screen
Power consumption in the
past 15 minutes
Displays the average vehicle
speed since the EV system
was started.
Displays the elapsed time
since the EV system was
started.
Regenerated energy in the
past 15 minutes
One symbol indicates 50 Wh.
Up to 5 symbols are shown.
Displays an estimated cruising
range
Reset the power consumption
and the regenerated energy
for the past 15 minutes.
Selecting “Yes” on the following screen will confirm resetting of all the data.
The image is an example only, and may vary slightly from actual conditions.
1
Before driving
39

1-1. EV system
■ Past record screen
Best past power consumption
Update
The average power consumption
and graph are updated, and a
new average power consumption
record begins.
Average power consumption
Displays a maximum of five past
records of the average power
consumption.
Reset the past records and
best past power consumption.
Selecting “Yes” on the following
screen will confirm resetting of all
the data.
The image is an example only, and may vary slightly from actual conditions.
40

1-1. EV system
Observe the following to reduce traction battery consumption and
increase driving range.
■ Driving in normal mode:
Normal mode (when compared with sport mode) allows the most efficient driving. (P. 208)
■ Route selection
In addition to a driving style of repeated acceleration and deceleration,
driving on routes that have steep inclines and long waits at traffic lights
will lead to poor power consumption. Check traffic reports before leaving, avoid delays and drive on flat roads as much as possible. When
encountering a delay, gently release the brake pedal to allow the vehicle to move forward slightly while avoiding overuse of the accelerator
pedal. Doing so can help control excessive energy consumption.
■ Use of EV System Indicator
Keeping the EV System Indicator needle within ECO area can help
improve Eco-friendly driving. (P. 221)
■ When braking the vehicle
Make sure to operate the brakes gently and in good time. A greater
amount of electrical energy can be retained when slowing down.
■ Highway driving
Control your speed, keep at a constant speed and obey speed limits.
Also, before stopping at a toll booth or similar, allow plenty of time to
release the accelerator and slowly stop the vehicle using regenerative
braking and the brake pedal. A greater amount of electrical energy can
be retained while slowing down.
EV (Electric Vehicle) driving tips
1
Before driving
41

1-1. EV system
■ Air conditioning system
Use the air conditioning only when necessary. Doing so can help control excessive energy consumption. Even when the air conditioning is
on, driving range can be extended by setting it to “ECO LO” or “ECO
HI”, or by turning the A/C off. (P. 276) If pre-climate (Remote Climate
Control) is operated before departure when the vehicle is plugged in,
depending on air-conditioning specifications, traction battery power
consumption can be reduced. (P. 53)
Additionally, keep in mind the following during heavy air conditioning
use in summer and winter.
In summer: In high temperatures, use the recirculated mode. Doing so
can help control excessive power consumption.
In winter: By combining use with the seat heater, the set temperature
for the heater can be reduced. This can increase power efficiency.
■ Checking tire inflation pressure
Make sure to check the tire inflation pressure frequently. Improper tire
inflation pressure can cause poor power consumption.
Also, as snow tires can cause large amounts of friction, their use on dry
roads can lead to poor power consumption. Use a tire that is appropriate for the season.
■ Luggage
Carrying luggage can lead to poor power consumption. Avoid carrying
unnecessary luggage. Installing a roof rack can also cause poor power
consumption.
42

1-1. EV system
■ Pre-driving warm-up
When the charging schedule is set
According to departure time, traction battery warm-up is performed
automatically. Therefore, the vehicle can be driven immediately.
(P. 203)
When the charging schedule is not set
If the traction battery’s available power becomes too low (due to temperature or charge level), a warning message will be shown on the
multi-information display. Until battery warm-up is completed, the EV
system may not be able to be started or power output may be limited
while driving. Follow the correction procedures. (P. 427)
■ Sport mode
When sport mode is selected, acceleration performance is maximized, and
maximum speed is increased but vehicle efficiency and driving range may
be reduced. (P. 208)
Every time the vehicle is turned on, normal mode will automatically be
selected. If sport mode is desired, it must be selected manually.
1
Before driving
43

1-2. Navigation system screen operations
Operations are performed by touching the navigation system screen
directly with your finger.
Navigation system screen operations
■ Main operations
Operation method Outline Main use
Touch
Quickly touch
and release
once.
Double tap*
Quickly touch
and release
twice.
Drag*
Touch the screen
with your finger,
and move the
screen to the
desired position.
Flick*
Quickly move the
screen left or
right by flicking
with your finger.
*: The above operations may not be performed on all screens.
Changing and
selecting various
settings.
Changing the map
scale.
Moving around the
map, adjusting
audio volume, etc.
Moving around the
map, skipping to
the next page of a
list, etc.
44

1-2. Navigation system screen operations
NOTICE
■ Navigation system screen operations
In the following conditions, operations may not be performed despite touching the screen. Also, take care because they may cause incorrect operations.
● When wearing gloves
● When operations are performed with your fingernails
● When operations are performed while foreign matter is stuck to the
screen
● When operations are performed using 2 fingers or more
● When operations are performed with a wet finger
■ When using the navigation system screen
The screen is designed to be touched softly. Do not press the screen with
sharp objects such as fingernails, the ends of ballpoint pens and pins. Doing
so may damage the screen.
1
Before driving
45
1-3. Charging
This vehicle is charged by connecting to an external power source.
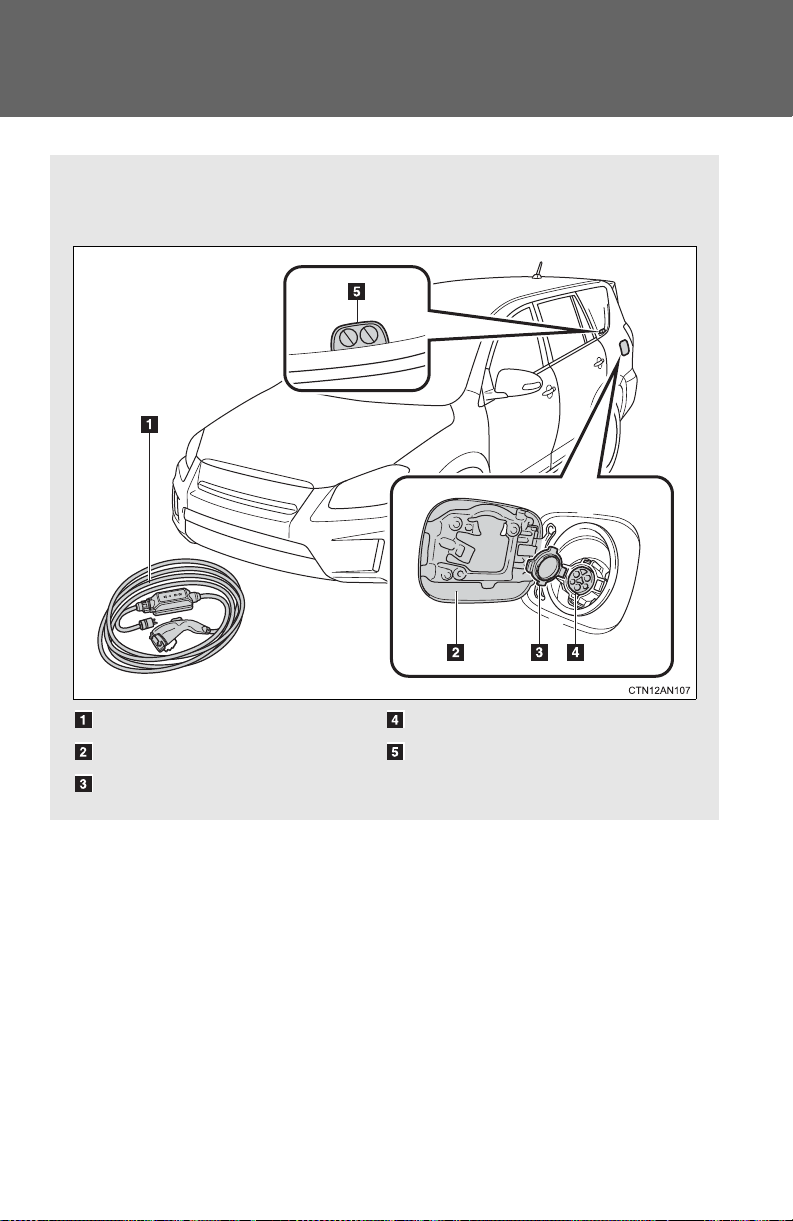
■ Charging equipment
Charging cable
Charging port door
Charging port cap
Charging port
Charging indicator
Charging equipment
46

■ The names of each part of the charging cable
*: The shape of the plug differs in accordance with the voltage and
the target region.
Charging connector
Latch release button
CCID (Charging Circuit Inter-
rupting Device)
Plug*
Power indicator
Error warning indicator
Test button
Reset button
1-3. Charging
1
Before driving
47

1-3. Charging
Safety functions
The CCID (Charging Circuit Interrupting Device) has the following
safety features.
■ Electrical leakage detect ion function
If an electrical leakage is detected during charging, the power
source will be automatically interrupted, thus preventing fires or
electrical shocks caused by electrical leakage.
If the power source is interrupted, the error warning indicator will illuminate.
If the power source is interrupted: P. 91
■ Electrical leakage test funct ion
The electrical leakage detection function can be tested prior to
charging to confirm that it is operating correctly.
When the test button is pressed while the plug is connected to an external power source, the error warning indicator should illuminate. (P. 59)
■ Conditions for supplying current to the vehicle
The CCID (Charging Circuit Interrupting Device) is designed to
prevent electrical current from being supplied to the charging connector when it is not connected to the vehicle, even if the plug is
inserted into an electrical receptacle.
■ Charging method
● The charging cable included with the vehicle is designed to be connected
only to an AC 120 V power source.
● Toyota strongly recommends t hat the vehicle be charged using a 240 V
charging station that is compliant with SAE J1772. This offers a faster
charge time than 120 V (level 1) charging. If you would like more information on obtaining 240 V (level 2) charging in your home, please consult the
Toyota dealer from whom you purchased your RAV4 EV, any other dealership authorized to sell the RAV4 EV or visit http://toyota.leviton.com/.
more information regarding public charging stations, please refer to the
“Navigation System Owner's Manual” regarding Charging Station POI or
Apps.
48
For

1-3. Charging
CAUTION
■ When using the charging cable and CCID (Charging Circuit Interrupt-
ing Device)
Observe the following precautions.
If you do not follow them, fire, electrical shock or damage may occur, possibly resulting in death or serious injury
● Do not attempt to disassemble or repair the charging cable, charging con-
nector, plug or CCID (Charging Circuit Interrupting Device). If a problem
arises with the charging cable or the CCID (Charging Circuit Interrupting
Device), stop charging immediately and contact your Toyota dealer.
● Do not subject the charging cable, charging connector, plug or CCID
(Charging Circuit Interrupting Device) to strong force or impact.
● Do not forcefully fold the charging cable or damage the charging cable
with sharp objects.
● Do not insert foreign objects into the charging connector or plug.
● Do hold the body of the charging connector or plug when removing or
inserting.
● Remove the charging connector from vehicle’s charging port FIRST,
before removing the plug from the electrical receptacle.
● Avoid exposure of plug to water or moisture.
● Do not attempt to modify the charging cable, charging connector, plug or
CCID (Charging Circuit Interrupting Device).
1
Before driving
49

1-3. Charging
A charging solution that fulfills the following criteria is necessary for
charging this vehicle. Confirm that the criteria is met before charging.
■ Power sources
● Connect the charging plug cable to an AC 120 V electrical
receptacle (NEMA 5-15R or NEMA 5-20R) with a GroundFault Circuit-Interrupter (GFCI) and with an over current circuit breaker in the service panel.
● Toyota recommends use of a dedicated rece ptacle with a single socket. If the receptacle has two sockets, do not plug any
other items into the other socket.
● This vehicle is expected to charge at public chargin g stations
that are compliant with SAE J1772. The navigation system
can show you a list of nearby public charging stations. Please
refer to the “Navigation System Owner's Manual” regarding
Charging Station POI or Apps for more information.
● When charging outdoors, make sure to connect to a raintight
electrical receptacle type that is appropriate for outdoor use.
■ Electrical receptacles that can be connected
NEMA 5-15R electrical
receptacle
NEMA 5-20R electrical
receptacle
The illustration is an example
shown for demonstration purposes, and may differ from the
actual configuration.
Power sources that can be used
50
1-3. Charging
CAUTION
■ The charging environment
For safer charging, the following charging equipment and settings are recommended.
● Weatherproof electrical receptacle
When charging outside using the Toyota-provided charging cable, connect to an appropriate outdoor receptacle with a “while-in-use” cover.
● Dedicated circuit
• To reduce the risk of fire, connect only to a circuit provided with 15A or
20A maximum branch circuit over-current protection in accordance
with the National Electric Code, ANSI/NFPA 70.
• To reduce the risk of electric shock when working with the plug, connect to an electrical receptacle with a Ground-Fault Circuit-Interrupter
(GFCI) or that has an Earth Leakage Circuit Breaker installed.
■ Using a DC charger
DC charging equipment cannot be used with this vehicle.
1
Before driving
■ Electrical Malfunctions
When charging the vehicle, make sure you observe the precautions included
in this manual.
Failure to do so or using a power source that does not meet the necessary
conditions can cause a fire, from electrical leakage or overheating, or electric shock that may result in death or serious injury.
51

1-3. Charging
CAUTION
● Do not connect the charging cable to a
multi-outlet adapter, multi-plugs, or conversion plug.
● Do not connect the charging cable to an
extension cable. The cable may overheat and does not contain a GroundFault Circuit-Interrupter (GFCI).
● Do not connect to a power strip.
■ Power sources precautions
Observe the following precautions.
If you do not follow them, fire, electrical shock or damage may occur, possibly resulting in death or serious injury.
● Connect to an AC 120 V electrical receptacle (NEMA 5-15R or NEMA 5-
20R) with a Ground-Fault Circuit-Interrupter (GFCI) and with an over current circuit breaker in a service panel.
● Do not perform charging with a damaged electrical receptacle.
52

1-3. Charging
On the RAV4 EV, setting the charge and pre-climate (Remote Climate
Control) schedule is performed on the navigation system's screen. A
variety of settings are available including charging and pre-climate
operations according to departure time. After thoroughly reading the
following instructions, make sure to correctly follow the procedures
when charging your vehicle.
■ Charging and pre-climate (Remote Climate Control)
Depending on the settings of the following functions, this vehicle
does not start charging by simply just plugging in the charging
cable.
Set any of the following functions before or after charging.
System Details
Charging
Charge immediately function
Regardless of the charging schedule settings,
starts charging immediately. (P. 64)
However, when this function is used, pre-climate schedule operations cannot be performed simultaneously.
Scheduled charging function
The time when charging is to be completed by
can be set for each day of the week. (P. 66)
Even when the schedule is set, the charge
immediately function can be selected if the EV
system is off. (P. 64)
After the immediate charge is complete, the
schedule will be returned to.
If the schedule is not set for any days of the
week, the charge immediately function will be
automatically selected.
Charging and pre-climate (Remote Climate Control) procedures
1
Before driving
53

1-3. Charging
*: By using a smart phone, pre-climate operations and so forth can
be performed from a distant location. (P. 58)
■ Important things to check before charging and pre-climate
operations (Remote Climate Control)
Before charging and pre-climate operations, always check that:
● The parking brake is securely set (P. 216)
● The shift position is in P (P. 206)
● All windows and doors are closed
● The motor compartment hood is securely closed
If the hood is open the electric cooling fans will not operate, raising
the temperature of the charger and traction battery. This may
increase charging time or cause charging to be aborted.
● All lights are turned off (For example, the headlights, emergency flashers, interior lights, etc.)
If any lights are turned on, then these features will consume electricity, and charging time will increase.
System Details
Pre-climate
(Remote Climate
Control)*
The time when pre-climate operations are to be
completed by can be set for each day of the
week.
Cabin temperature is adjusted before departure by performing climate control operations,
thereby reducing traction battery consumption
after departure. If these operations are performed while the vehicle is plugged in, the
traction battery's power consumption is
reduced, increasing driving range. (P. 66)
If the amount of charge remaining in the traction battery is 50% or less at the time pre-climate operations begin, pre-climate operations
will not be performed in order to preserve driving range.
54
1-3. Charging
■ Items to be regularly inspected
P. 92
■ By My Departure Schedule Setting
When the EV system is turned off, the screen changes to the
charging and pre-climate settings screen. If no operations are
performed for approximately 30 seconds, the screen turns off.
The actual screen may vary slightly, depending on settings.
1
Before driving
55
1-3. Charging
Function Details
Charge start
Displays the time that charging
started (if charging is in progress or
complete) or will start (if charging
schedule is set).
Battery charge amount
Displays the current amount of
charge remaining in the traction battery.
Charge complete schedule
Displays the schedule when charging
will be completed according to voltage.
Charge immediately button
Sets the immediate charge function
on/off.
Next departure schedule
Displays the currently set next departure schedule and charge/pre-climate settings.
Departure schedule Edit
button
Edits and sets the next departure
schedule and charge/pre-climate
schedule.
Extended charge mode
setting button
Sets extended charge mode on/off.
56
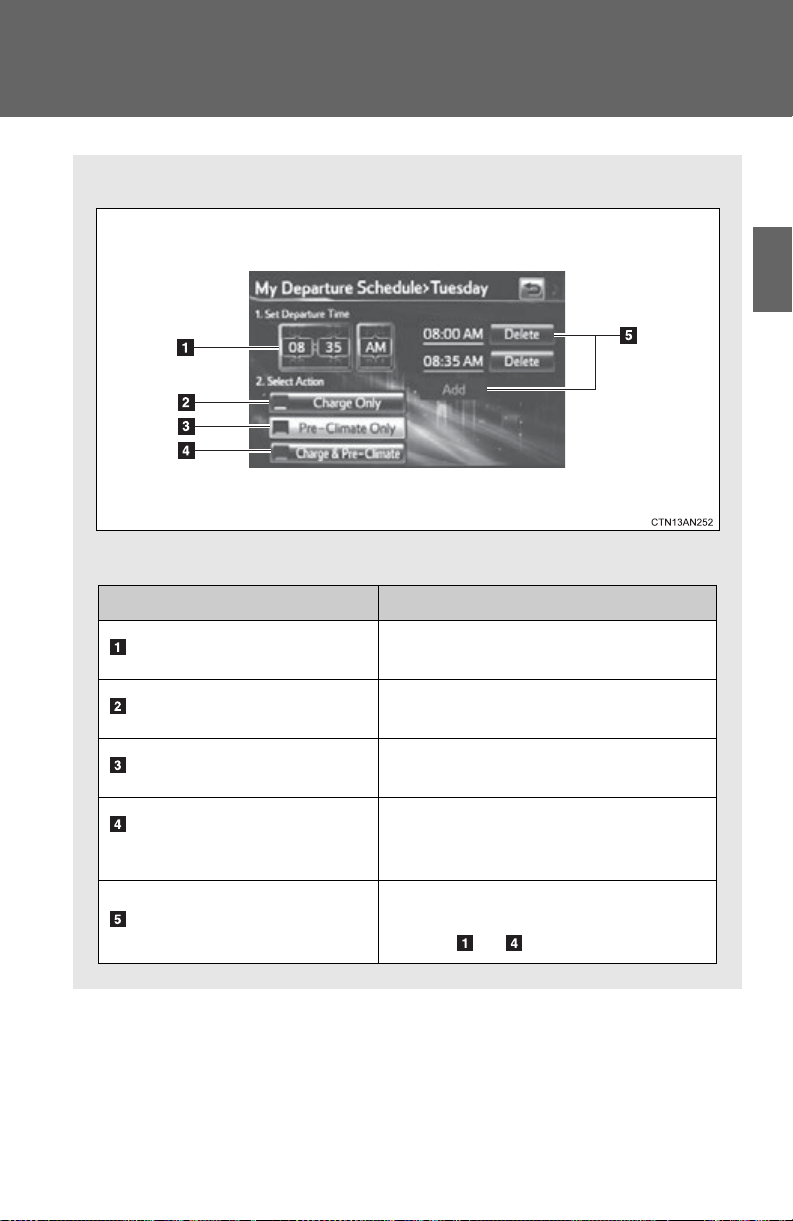
■ Charge and Pre-Climate Schedule Setting Screen
The actual screen may vary slightly, depending on settings.
Function Details
Set departure time dial
Set the desired time and day by flicking up or down.
Charge Only Button
To finish charging before the set
departure time.
Pre-Climate Only Button
To finish pre-climate operations
before the set departure time.
Charge and Pre-Climate
Button
To finish both charging and pre-climate operations before the set
departure time.
Add/Edit/Delete Button
To add, edit or delete items in the
schedule that were set using screen
buttons to .
1-3. Charging
1
Before driving
57

1-3. Charging
■ Charge mode
The RA V4 EV has the following 2 charge modes.
After understanding the characteristics of each mode, select the
appropriate mode according to usage instructions.
*: This value is only a reference value, for a traction battery without
any capacity deterioration. Depending on conditions such as airconditioning system usage, road conditions, years of usage and
so forth, the value may increase or decrease.
■ Linked smart phone function
For drivers who own a smart phone and have an active Entune
subscription, several features are available to remotely interact
with your vehicle.
For details, please refer to http://www.toyota.com/entune/
or call
1-800-331-4331
Charge
mode
Charge
amount*
Details
Normal
charge
mode
Approximately
80%
A mode that combines maximizing vehicle
performance and traction battery life.
Toyota recommends charging using this
mode whenever long distance driving is
not necessary.
Extended
charge
mode
(P. 72)
Approximately
100%
A mode that maximizes driving range on a
single charge. Continued use of this mode
may contribute to the reduction of the traction battery capacity over the vehicle life.
58
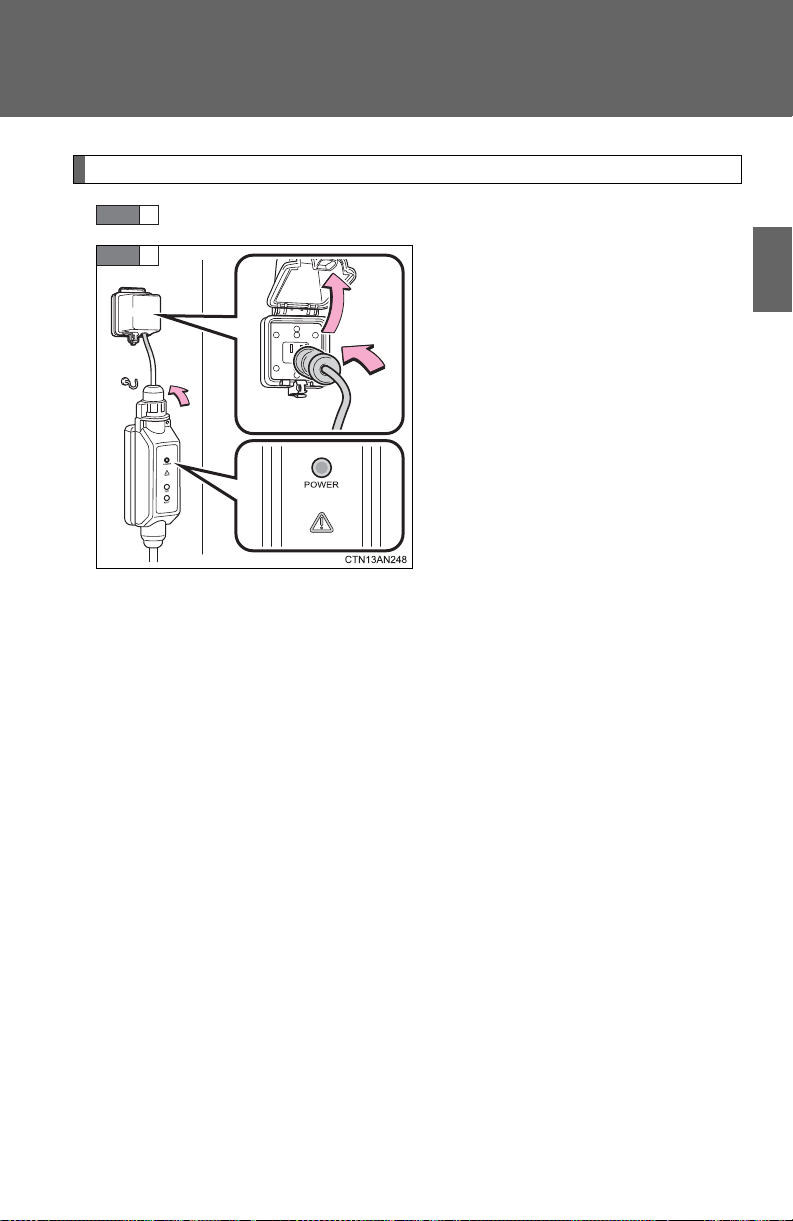
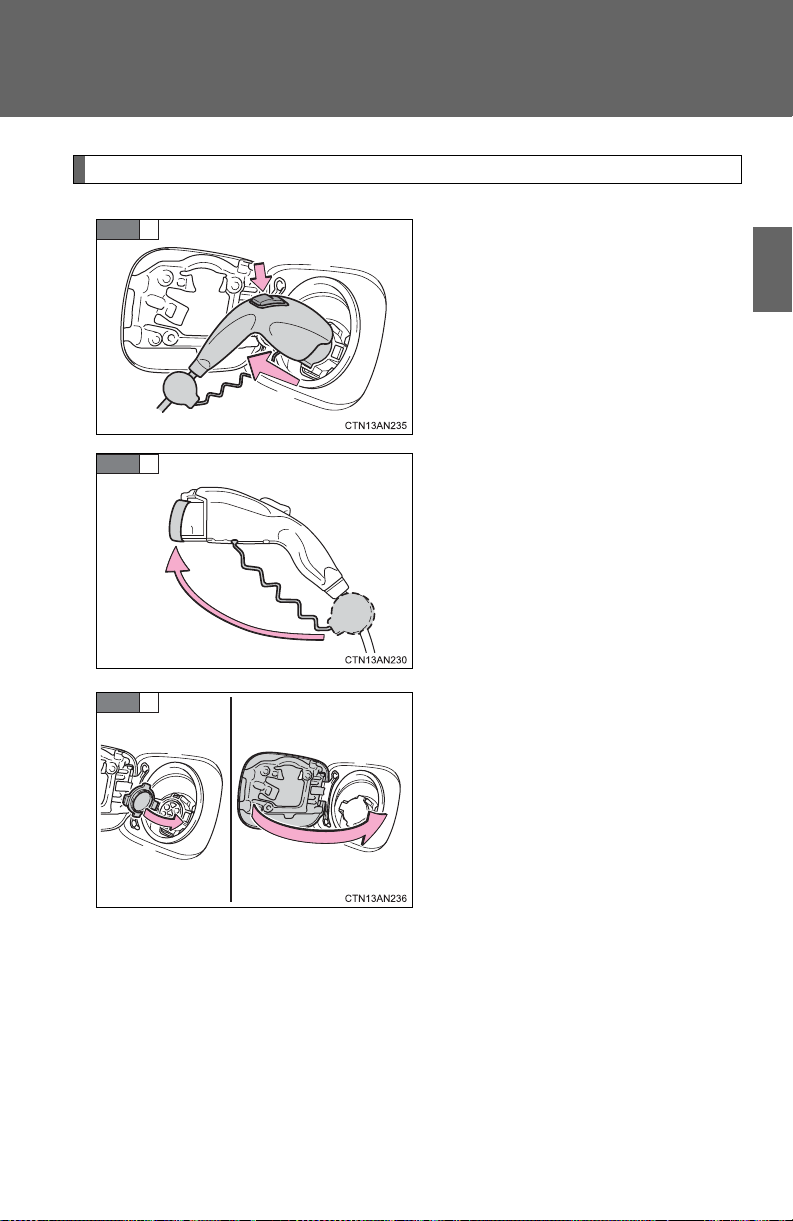
Plugging in the charging cable
STEP
1
STEP
2
*
Prepare the charging cable
1-3. Charging
Insert the charging cable’s plug
into the electrical receptacle of
the external power source.
Make sure that the standards of
the electrical receptacle and
charging cable's plug match.
(P. 50)
Check that the power indicator of
the CCID (Charging Circuit Interrupting Device) is illuminated. (If it
does not illuminate, refer to the
text on page 88.)
To reduce the burden on the electrical receptacle and charging
cable plug, Toyota recommends
hanging the CCID (Charging Circuit Interrupting Device) on a
hook or similar.
When charging outdoors, make
sure to use a “while-in-use” cover
as shown in the illustration.
*: “While-in-use” cover.
1
Before driving
59
1-3. Charging
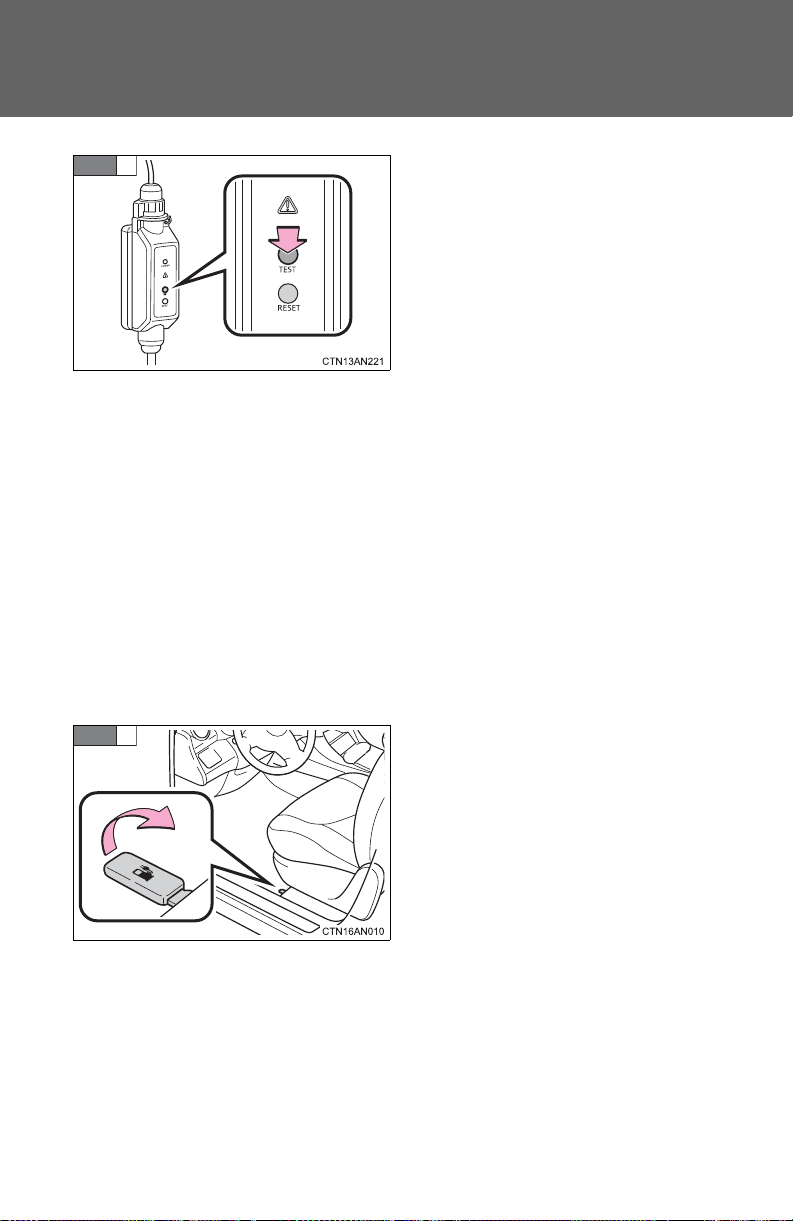
STEP
3
STEP
4
Press the test button on the
CCID (Charging Circuit Interrupting Device) to check that the
electrical leakage detection function operates properly.
If the error warning indicator illuminates when the test button is
pressed, the function is operating
correctly.
After the test has been completed, press the reset button to
turn off the error warning indicator. Charging cannot be carried
out while the error warning indicator is illuminated.
If the error warning indicator does
not come on even if the test button is pressed, it is likely that the
function is not operating correctly.
Stop charging immediately and
contact your Toyota dealer.
Pull up the charging port door
lever.
60
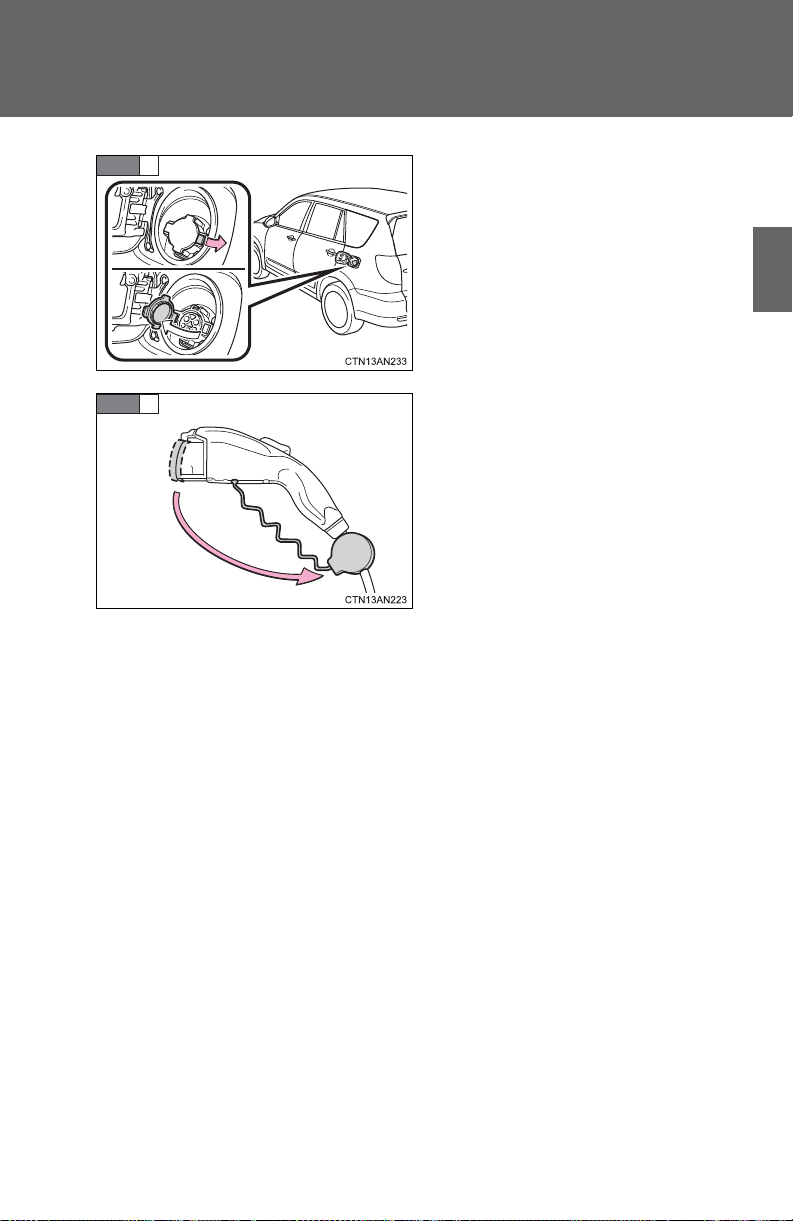
1-3. Charging
STEP
5
STEP
6
Unlock the charging port cap by
moving the lock.
Remove the charging connector
cap.
Affix the cap to the cable.
1
Before driving
61

1-3. Charging
STEP
7
Confirm the charging cable connector’s direction and insert it
into the charging port.
When inserting the connector,
insert it without pressing the latch
release button.
Align with the guide position
shown on the underside of the
charging connector with the
charging port, and push it in
straight and firmly until a click is
heard. Then, confirm that the connector is securely locked.
When plugging in has been completed correctly, the plug-in indicator on the meter comes on in
green. If there has been a problem with plugging in, the plug-in
indicator comes on in yellow.
(P. 419)
If the schedule is not set for any
days of the week or the charge
immediately function is selected,
charging will begin by simply
plugging in the charging cable.
If the EV system is on when the
vehicle is plugged in, the READY
indicator will automatically turn off
and a message will be shown on
the multi-information display.
(P. 443)
62

1-3. Charging
STEP
8
Light A Light B
Check the status of the charging indicator.
The charging indicator consists of 2 lights that display charging status
by illuminating, flashing and turning off as follows.
1
Before driving
Charging Status
The charging cable is connected to the vehicle and the
charging and/or pre-climate
schedule is set
Charge level is less than 49% Flashes Off
Charge level is between 50%
and less than 99%
Charging is complete
Malfunction occurred during
charging
Lights A and B flash on and off alternatively for 10 minutes.
(After 10 min. both lights remain off
until charging starts)
Both lights A and B illuminate for 10
minutes. (After 10 min. both lights
turn off)
Both lights A and B quickly flash
simultaneously for 10 seconds.
(After 10 sec. both lights turn off)
Charging Indicator
Light A Light B
Illuminates Flashes
The indicator lights will not flash or turn on when the charging cable is
not connected properly.
During charging, current charging status and the estimated time until
charging will be completed can be confirmed on the multi-information display or navigation display. (P. 74)
The error warning indicator of the CCID (Charging Circuit Interrupting
Device) has illuminated during charging: P. 88
63
1-3. Charging
STEP
1
STEP
2
STEP
2
STEP
3
Charging immediately
■ Charging using the Charge Immediately function
Turn the EV system off.
The charge settings screen will be displayed. If no operations are
performed for approximately 30 seconds, the screen turns off.
When the charging schedule is not set or charging immediately
has been set while the EV system was on.
When this screen is displayed,
proceed to step 3.
To change charging mode to normal/extended charge mode:
P. 72
When the charging schedule is set.
Touch “Charge Immediately”.
After operations have been completed, the “Charge Immediately”
screen button indicator illuminates.
This mode is a one time immediate charge. Once the charge is
complete, the schedule will be
returned to.
To change charging mode to normal/extended charge mode:
P. 72
To set the schedule to charge the vehicle and/or to use the preclimate: P. 66
Plug in the charging cable. (P. 59)
Charging will start.
64
1-3. Charging
STEP
1
STEP
2
STEP
3
■ Setting charge mode to charge immediately in advance
Touch “EV”.
Touch “Charging & Pre-Climate
Setup”.
Touch or flick the screen
to the right to display the
“Charge Immediately on Plug-in”
screen.
If schedule is not set:
This step is skipped.
1
Before driving
Touch “Save”.
If “Save” is not touched, the
changes will not be reflected in
the charging schedule.
65
1-3. Charging
STEP
4
STEP
5
STEP
6
STEP
1
A screen advising that charge
mode has been changed to
immediate charge is displayed.
The EV screen is returned to
after a few seconds.
Turn the EV system off.
The charge settings screen will be displayed for approximately 30
seconds.
To change charging mode to normal/extended charge mode:
P. 72
Plug in the charging cable (P. 59)
Charging will start.
The estimated time charging will be completed in is displayed if an
immediate charge is performed.
Start charging according to departure time and the set preclimate completion time
■ Setting the charging and pre-climate schedule in advance
Touch “EV”.
66

1-3. Charging
STEP
2
STEP
3
STEP
4
Touch “Charging & Pre-Climate
Setup”.
Touch or flick the screen
to the left to display the “By My
Departure Schedule” screen.
If schedule is set:
This step is skipped.
Touch “Schedule Setup”.
Touch the desired day to be set.
1
Before driving
67
1-3. Charging
STEP
5
STEP
6
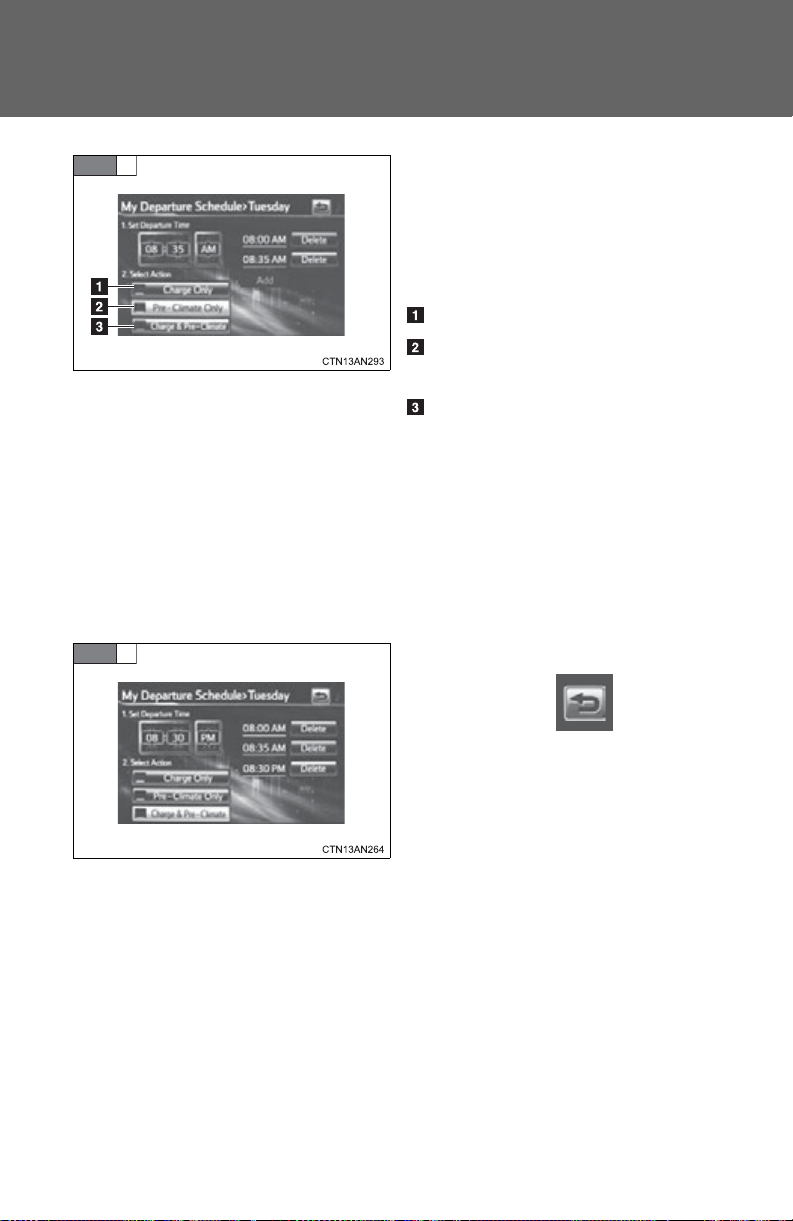
Flick the schedule to the desired
time for charging and/or pre-climate to be completed. Touch the
action to be completed by the set
time.
Charge only schedule setting
Pre-climate only schedule set-
ting
Charging and pre-climate
schedule setting
Up to 3 actions can be set for a
single day by touching “Add”.
To delete the set action, touch
“Delete”.
Two actions cannot be set to the
same time.
After settings have been com-
pleted, touch twice to
return to the “By My Departure
Schedule”.
68
1-3. Charging
STEP
7
STEP
8
STEP
8
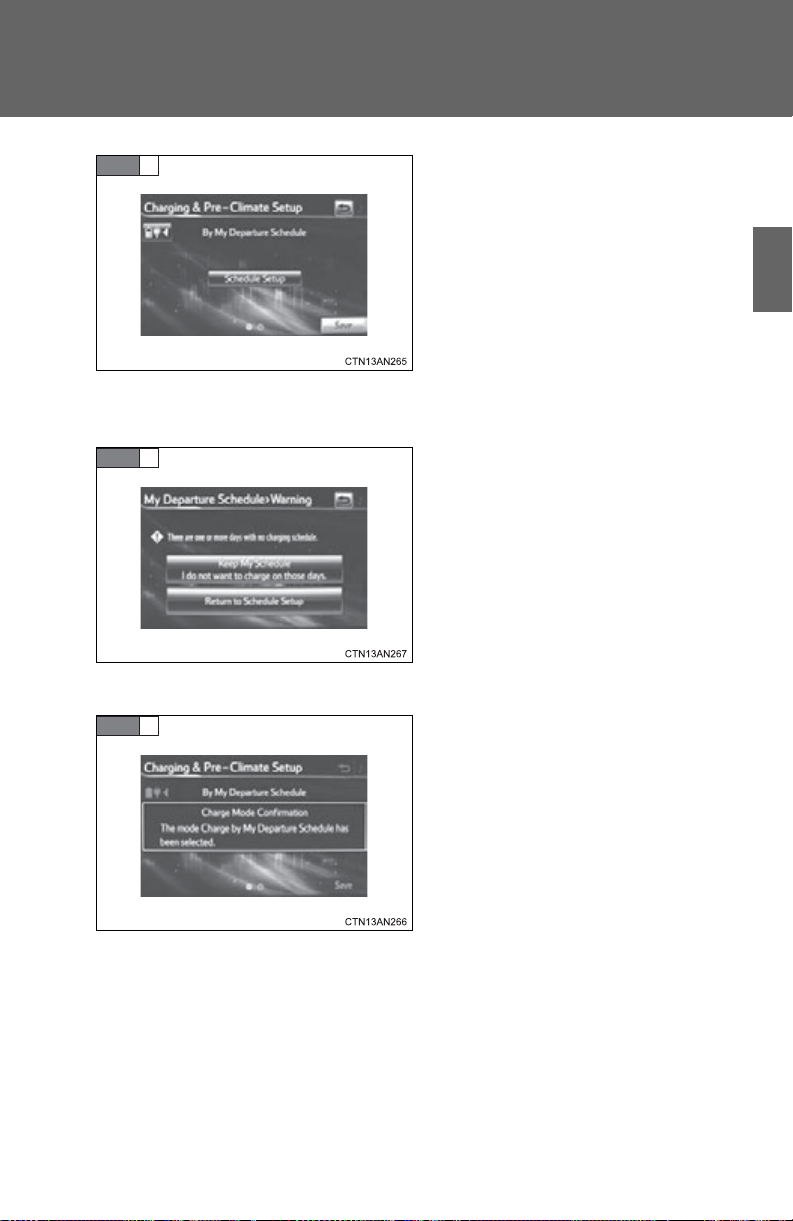
Touch “Save”.
If “Save” is not touched, the
changes will not be reflected in
the charging schedule.
When the charging schedule is only set for some days of the
week.
If “Keep My Schedule” is
touched, setting the charging
schedule will be completed and
the display will return to the EV
screen.
Touch “Return to Schedule
Setup” to set the charging
schedule for additional days.
1
Before driving
When the charging schedule is set for each day of the week.
A screen advising settings have
been completed is displayed.
The display will return to the EV
screen after a few seconds.
69

1-3. Charging
STEP
1
STEP
2
STEP
3
■ Adjusting the charge schedule's next departure after the
schedule has been set (One time departure)
In order to use this function, it is necessary to set the schedule
beforehand. (P. 66)
Turn the EV system off.
The charge settings screen will be displayed. If no operations are
performed for approximately 30 seconds, the screen turns off.
Touch “Edit”.
Touch “Yes”.
70
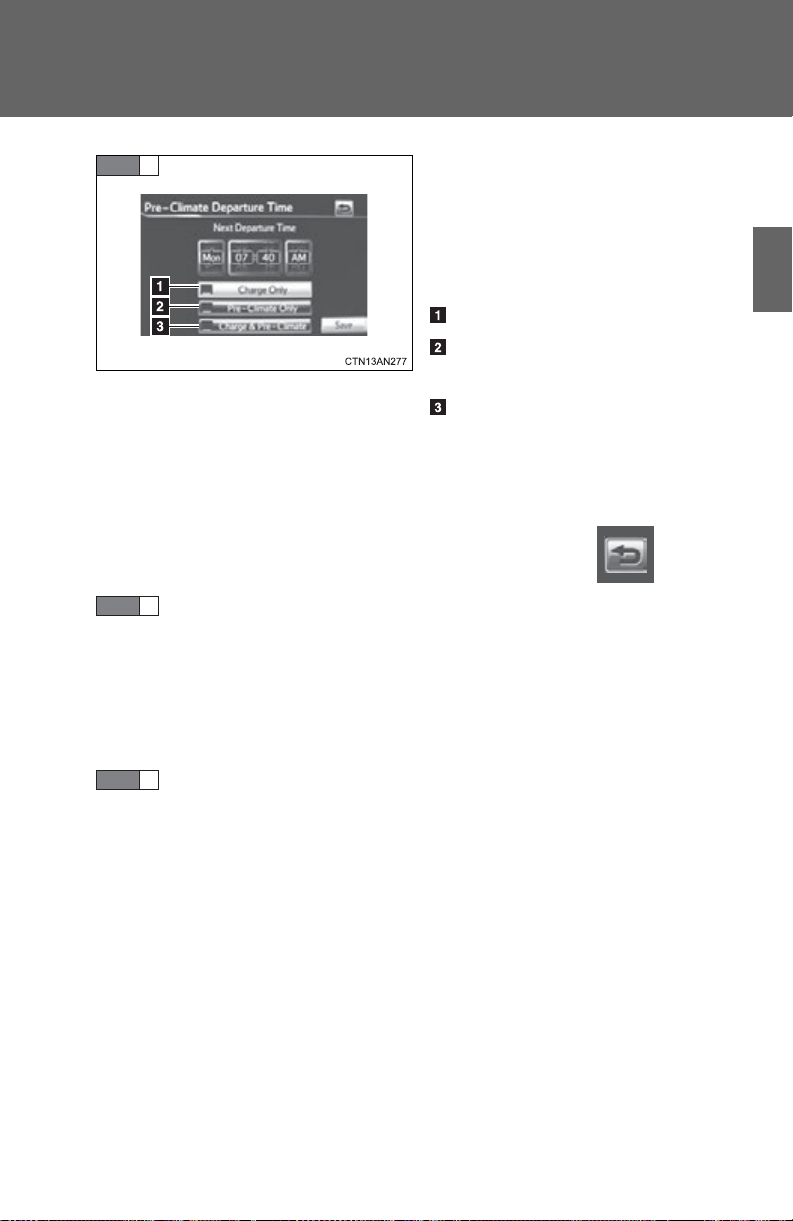
1-3. Charging
STEP
4
STEP
5
STEP
6
Flick the schedule to the desired
day and time for charging and/or
pre-climate to be completed.
Touch the action to be completed
by the set day and time.
1
Charge only schedule setting
Pre-climate only schedule set-
ting
Charging and pre-climate
schedule setting
Touch “Save” to start the selected
action.
To cancel, touch .
The set schedule will be displayed.
To change the set action or schedule, return to step 2.
To change charging mode to normal/extended charge mode:
P. 72
To charge immediately: P. 64
Plug in the charging cable. (P. 59)
Before driving
71
1-3. Charging
STEP
1
STEP
2
Indicator
STEP
3
STEP
3
STEP
4
Changing to normal/extended charge mode
Turn the EV system off.
The screen will change to the charging schedule screen. The screen
will turn off after approximately 30 seconds if no operations are performed. Depending on “Charging & Pre-Climate Setup” settings, the
displayed screen will differ.
When the vehicle is in extended charge mode, an extended charge
reminder is displayed on the screen for a few seconds.
Touch “Extended Charge”.
The current charge mode can be
confirmed by checking the indicator on the “Extended Charge”.
Illuminated:
Not illuminated:
Extended charge mode
Normal charge mode
To normal charge mode
The indicator will turn off, showing that the vehicle is in normal
charge mode.
To extended charge mode
When settings are completed, the indicator illuminates.
72
Touch “Yes” if it is desired to
change to extended charge
mode after reading the contents
of the confirmation screen.
If “No” is touched, or there are no
operations for a few seconds, the
previous screen will be returned
to.
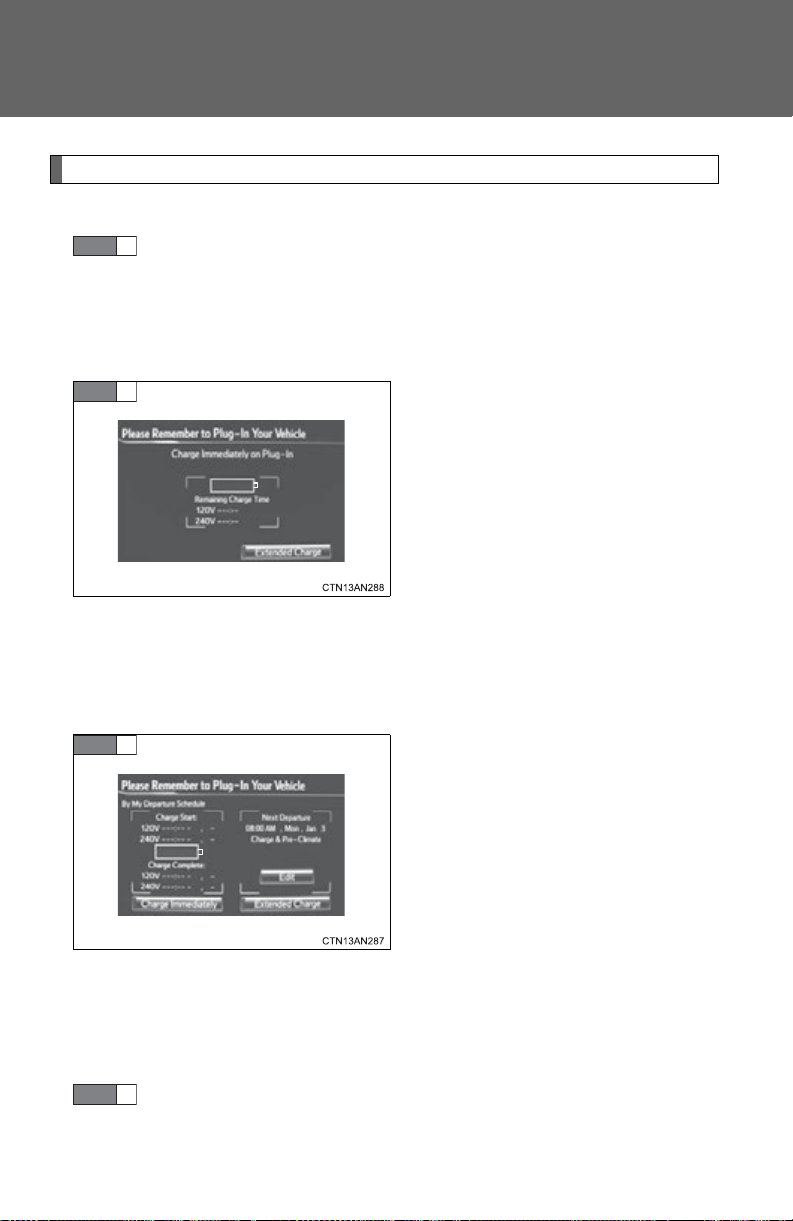
Unplugging the charging cable
STEP
1
STEP
2
STEP
3
1-3. Charging
Pull the charging connector
towards you while pressing the
latch release button.
1
If the charging connector is disconnected during charging (while
the charging indicator indicates
the vehicle is being charged),
charging will be interrupted.
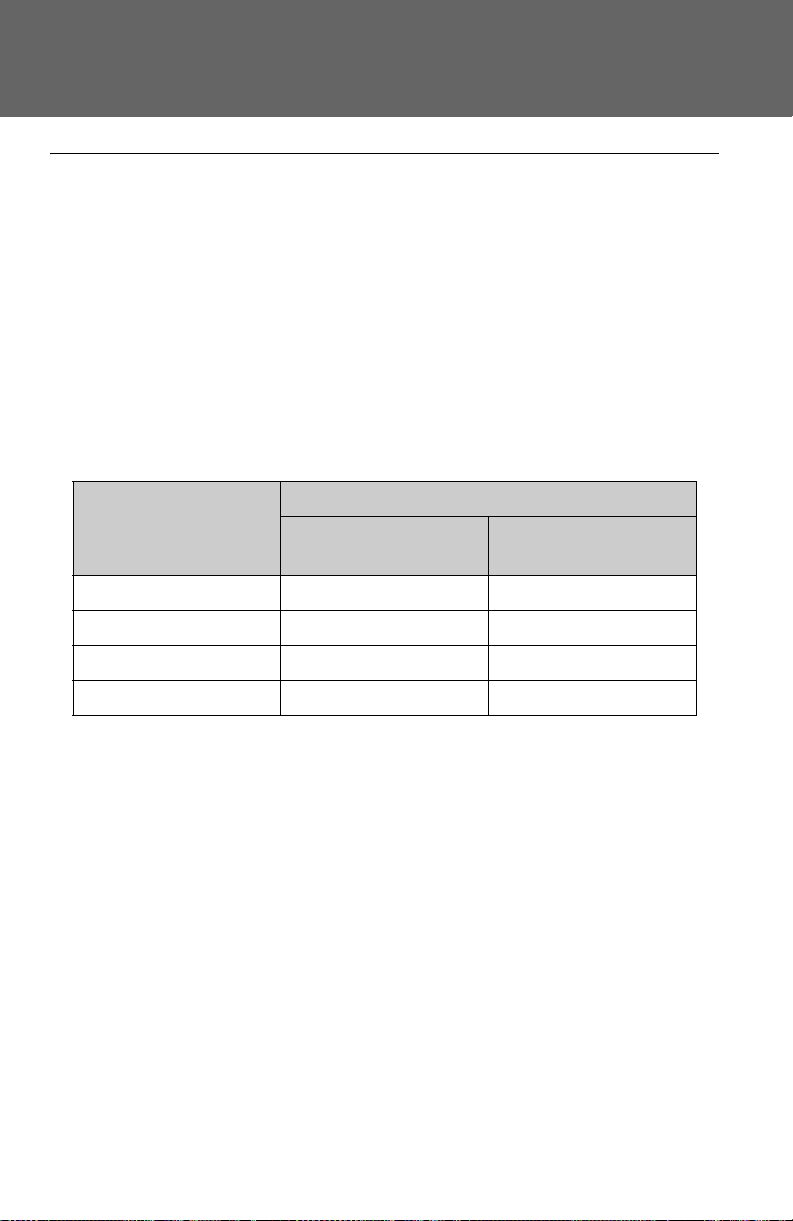
Attach the charging connector
cap.
Close the charging port cap, and
then close the charging port
door.
Firmly push the charging port cap
and charging port door, and
check that they are securely
locked.
Before driving
73

1-3. Charging
STEP
4
Remove the plug from the electrical receptacle when the charging equipment will not be used
for a prolonged period of time.
Hold the body of the plug when
removing.
Make sure to put the cable away
immediately after disconnecting.
(P. 87)
When leaving the plug inserted,
inspect the plug and connector
once a month to check if dirt or
dust has accumulated.
Contents shown on the multi-information display
A variety of information regarding charging is shown on the multiinformation display.
■ Results of Charging and Pre-climate Display
When charging/pre-climate operations are being performed or after
they have finished, the following information is displayed according
to vehicle conditions when the driver’s door is opened for approximately 30 seconds or until the “POWER” switch is turned to ON
mode.
74

Name Details
1-3. Charging
Plug connection information
Current charging status Displays current charging status.
Estimated charging time
Pre-climate result
Departure time*
*: If pre-climate operations are performed using a smart phone, this will not
be displayed even if the driver’s door is opened. (P. 58)
Displays if plug is currently plugged
in or not.
Displays both 120 V and 240 V estimated charging times.
When the plug is plugged in, only the
voltage of the connected receptacle
is displayed.
Displays result of pre-climate operations (if they were completed or interrupted and so forth).
Displays scheduled departure time
pre-climate operations were performed for.
In the following conditions, only the plug connection information will
be displayed:
● When the “POWER” switch is turned to ON mode after charging/
pre-climate operations.
1
Before driving
● When the charging/pre-climate schedule is not set.
If pre-climate operations are performed using a smart phone, pre-climate
result will be displayed. (P. 58)
Setting and changing the schedule (P. 66)
75

1-3. Charging
STEP
1
STEP
2
■ Charging information and warning messages
The first time the “POWER”
switch is turned to ON mode
after charging is completed, a
message detailing the results of
the charge is shown. Also, if an
operation that cannot be carried
out during charging was
attempted, a warning message
will be shown.
Comply with the instructions in
the message and perform any
necessary operations. (P. 443)
Confirming current charge settings
The amount of charge remaining in the traction battery and charging/
pre-climate schedule settings can be confirmed.
Touch “EV”.
Touch “Charge Su mmary”.
76
1-3. Charging
STEP
3
STEP
3
STEP
4
When the charging schedule is not set or charging immediately
has been set while the EV system was on.
Confirm that charge immediately
mode is set.
When the charging schedule is set.
Confirm the next charging/preclimate schedule.
If it is desirable to charge before
the next scheduled charge, use
one time departure.
1
Before driving
Touch “Edit”.
Touch “Yes”.
Changing the charging schedule.
For details on changing the
charging schedule, refer to Step 2
of one time departure. (P. 70)
77
1-3. Charging
Charge specification
(Amps/Voltage)
Charging time*1 (hours)
Normal charge mode
Extended charge
mode
40 A/240 V 5 6
30 A/240 V 6.5 8
16 A/240 V 12 15
12 A/120 V*
2
44 52
■ When leaving the vehicle
To prevent vehicle theft and to increase the efficiency of pre-climate operation, check that all windows are closed.
■ Amount of time required for charging
The amount of time required to fully charge the traction battery varies
according to a number of factors, such as the amount of charge remaining in
the traction battery, the power source being used, the charge settings, ambient temperature, battery temperature and so forth.
Only use the following times as a guide to estimate charging time. The estimated times are to fully charge a completely discharged battery in normal
charge mode or extended charge mode.
1
: Charging time will vary with ambient temperature.
*
2
*
: Toyota supplied charging cable at time of purchase
Because a 240 V power source charges more quickly than a 120 V power
source, Toyota recommends charging at 240 V.
■ Automatic OFF function when the charging cable is connected
If the charging cable is connected while the EV system is on, the EV system
is automatically turned off.
■ Default charge mode setting
The factory default setting is normal charge mode.
■ Charge mode setting
The charge mode will remain in the last charge mode selected for the next
time charging is performed.
78

1-3. Charging
■ During charging
● The surface of the CCID (Charging Circuit Interrupting Device) may
become hot, but this does not indicate a malfunction.
● Depending on radio wave conditions, interference may be heard on the
radio.
■ If charging has been interrupted
If charging is interrupted before the traction battery is fully charged (before
both charging indicator lights illuminate), the EV system cannot be started
and the shift position cannot be shifted from P for approximately 6 seconds.
Start the EV system after 6 seconds have elapsed.
■ Charging time may increase
In the following situations, charging time may become longer than normal:
● In very hot or very cold temperatures.
● The vehicle is consuming a lot of electricity, for example, when pre-cli-
mate is used.
● There is a power outage during charging.
● There is an interruption in the electrical supply.
● There is a drop in the voltage of your panel’s AC supply.
● The charge in the 12-volt battery is low, for example due to the vehicle
being left unused for a long period of time.
1
Before driving
79

1-3. Charging
■ Capacity reduction of the traction battery
The capacity of the traction battery will decline gradually with normal use
over the life of the vehicle. The rate at which it declines is dependant on a
number of factors, including environmental conditions and the way the vehicle is used. By observing the following precautions, battery capacity decline
can be suppressed.
● Avoid parking the vehicle for prolonged periods in areas with a high tem-
perature under direct sunlight when the traction battery is fully charged.
When storing the vehicle for prolonged periods, it is recommended to
park the vehicle in a shaded area or a cool garage. This helps minimize
traction battery capacity decline.
● When not driving long distances, it is recommended to charge using nor-
mal charge mode to help minimize traction battery capacity decline.
(P. 58, 72)
● Regular use of the scheduled charging function helps mitigate battery
capacity decline by avoiding storage at high SOC.
80

1-3. Charging
■ When not using the vehicle for an extended period of time
In order to preserve the traction battery, Toyota recommends plugging in the
vehicle whenever it is not in use.
Pre-climate operations will occur while the amount of charge remaining in
the traction battery is more than 50% at the time pre-climate operations
begin. If the schedule is left set, pre-climate operations will continue to function up to the maximum of 15 minutes even if the vehicle is not used for
extended periods of time. Because this uses energy from the traction battery, temporarily suspend the pre-climate schedule (smart phone exclusive
setting P. 58) or delete the pre-climate schedule, if the vehicle is not being
regularly used.
When using navigation screen operations, only canceling the schedule is
available. Because the schedule will need to be set once again when it is
used next time, Toyota recommends using a smart phone and temporarily
suspending the schedule.
■ If the amount of charge remaining in the traction battery becomes low
while driving
The driving power restriction output control warning light illuminates and
driving range is extended by automatically restricting driving power and air
conditioning system operations. Using the navigation system, promptly
search for the closest charging station and charge the vehicle. If the traction
battery fully discharges, driving will not be possible.
For information on how to search for a charging station, refer to the “Navigation System Owner's Manual”.
■ Charging schedule confirmation display after switching the EV system
off
The current charging schedule will be displayed for a while after the EV system is turned off. To change the charging schedule, set the schedule using
the navigation system’s screen. (P. 64, 70)
■ If the charging port door is frozen
P. 268
1
Before driving
81

1-3. Charging
■ Pre-climate operations automatic shut-off
Pre-climate will automatically shut off under the following conditions:
● After about 15 minutes have passed since operations began
● If any one of the operating conditions are not met
● If there is only a slight difference between the air conditioning set temper-
ature and the inside temperature.
● When a door is opened.
■ While pre-climate is operating
● The effectiveness of the pre-climate operations may differ according to
outside temperature. Pre-climate operations may be unable to reach the
set temperature during very cold or very hot weather.
● Sometimes during normal operation of the pre-climate schedule, the
electric fan may spin and an operating noise may be heard. However,
this does not indicate a malfunction.
■ Safety functions
● For safety purposes, the EV system cannot be started while the charging
cable is connected to the vehicle, even if the “POWER” switch is operated. (P. 443)
● If the charging cable is connected while the “READY” indicator light is
illuminated, the EV system will stop automatically and driving will not be
possible. (P. 443)
● When the charging cable is connected to the vehicle, the shift position
cannot be shifted out of P.
● For safety reasons, even if the charging cable is connected, charging will
not start while the latch release button is being pressed.
However, if the latch release button is pressed and held for a few seconds or
more while charging, charging will be canceled. To recommence charging,
reinsert the charging cable.
82

1-3. Charging
■ If charging has not been carried out in a long time
The charging port cap's lever may get stuck and not open automatically
even if the knob is moved. If this occurs, push aside the release button and
open the cap by hand.
■ When the outside temperature is low or high
The level shown on the SOC gauge (P. 218) may drop slightly when the
“POWER” switch is turned to ON mode, even if charging has been completed and the traction battery is fully charged. However, this does not indicate a malfunction.
■ Charging in extremely cold temperatures
If the vehicle is parked in ambient temperatures below freezing, 240 V
charging is recommended.
If only a 120 V outlet is available, the following will improve your charge process:
● Charge at mid-day (when it is warmest)
● Protect the vehicle from wind during charging.
If the vehicle is still too cold to charge, please contact your Toyota dealership
or tow it to a warmer charging location.
■ Handling the traction battery
P. 22
1
Before driving
83

1-3. Charging
CAUTION
■ Caution while charging
People with implantable cardiac pacemakers or cardiac resynchronization
therapy-pacemakers should keep away from the charging equipment and/or
charging cables while the vehicle is charging.
Charging may affect the operation of such devices.
■ When charging
● When charging the vehicle, make sure you observe the following precau-
tions. Failure to do so can cause a fire or electric shock that may result in
death or serious injury.
• Check that the electrical receptacle, charging cable and charging port
do not have any damage.
• Check that charging cable plug's prongs are not bent.
• Check that the charging cable plug prongs are not dirty from dust and
so forth.
• Insert the charging cable plug all the way into the electrical receptacle.
• Do not use an electrical receptacle that leaves the charging cable plug
unstable after being inserted, such as an electrical receptacle that is in
an extremely high location.
• Do not perform charging with the charging cable bundled or coiled.
• Check that the charging cable is not bent or underneath any heavy
objects.
• Use a hook or mounting bracket to support the charging cable, so that
it is not supported by the AC 120 V electrical receptacle.
• Use a dedicated AC 120 V electrical receptacle (NEMA 5-15R or
NEMA 5-20R).
84

1-3. Charging
CAUTION
● When charging the vehicle, make sure you observe the following precau-
tions. Failure to do so can cause an electric shock that may result in death
or serious injury.
• Check that the electrical receptacle, charging cable and charging port
do not have any areas that are damaged.
• Check that there is no snow or ice in the charging port
• Check that no water has built up in the charging port
• Do not plug in or unplug the charging cable plug with wet hands. Also,
do not get the charging cable plug or electrical receptacle wet.
• Do not touch the charging connector's end terminals or short them with
foreign objects.
• When the charging cable is not in use, store it in a location free from
moisture.
• Do not pull, twist or bend the charging cable.
• Do not touch the charging port’s end terminals with sharp metallic
objects, such as wire, needles, and so forth.
• When charging outdoors, make sure to connect to an appropriate outdoor receptacle with a “While-in-use” cover.
Also, if rain falls during charging, take care that rainwater does not run
along the length of cable and wet the electrical receptacle.
• If the electrical receptacle is submerged in water or covered in snow,
do not insert the charging cable’s plug. If, in this situation, the charging
cable plug is already plugged in and needs to be unplugged, first turn
off the breaker and then unplug the charging cable plug.
• To stop vehicle charging or if charging has been interrupted, disconnect the charging connector from the vehicle first, before unplugging
the charging cable plug form the receptacle.
• Do not charge the vehicle during weather that may produce lightning.
• If you hear thunder while charging the vehicle, turn the breaker off without touching the vehicle or charging cable.
1
Before driving
85

1-3. Charging
CAUTION
■ Precautions for the pre-climate
Do not use pre-climate if people are in the vehicle.
Even when pre-climate is used, the temperature inside the vehicle may
become very high or very low due to features such as the automatic shut-off.
Do not leave children and/or pets inside the vehicle.
● When in the sun, the temperature inside a vehicle with all its windows
closed may rise rapidly, possibly causing heat stroke or dehydration.
● When in cold weather, the temperature inside the vehicle may drop rapidly,
possibly causing hypothermia.
Both of the above cases can lead to a serious health hazard or even death.
■ Handling the traction battery
No part of the traction battery can be repaired by you or a non-Toyota technician. Never open the traction battery or perform any modifications to it. If you
find a malfunction with the battery, always contact your Toyota dealer.
■ If the error warning indicator on the CCID (Charging Circuit Interrupt-
ing Device) stays on during charging
Press the reset button on the CCID (Charging Circuit Interrupting Device)
(P. 91). If the error warning indicator does not turn off even when the reset
button is pressed, an electrical leakage may be occurring in the path to the
power source, or there may be a problem with the charging cable or the
charging system. In this event, stop charging immediately, remove the
charging cable and contact your Toyota dealer. An accident may occur or
damage may be inflicted if charging continues.
■ When the charging cable is connected to the vehicle
Do not operate the shift lever.
In the unlikely event that the charging cable has been damaged, the shift
position may change from P to another position and the vehicle could move,
possibly leading to an accident.
86

1-3. Charging
NOTICE
■ After charging
● After disconnecting the charging connector from the charging port, always
make sure to firmly lock the charging port cap by closing it until a click is
heard, and close the charging port door.
If the charging port cap or door is left open, water or foreign objects may
enter the charging port, which could lead to vehicle damage.
● Promptly unplug the charging cable plug from the electrical receptacle and
store the charging cable in a dry, clean place. The charging cable may be
damaged if stepped on.
■ Using private power generators
Do not use private power generators as a power source for charging.
Doing so may make charging unsafe.
■ Usable temperature range
● Do not charge if the outside temperature is below -22 °F (-30 °C), as it is
likely that charging will take longer , and equipment related to charging may
be damaged.
● Do not leave the vehicle or the charging cable in areas where the outside
temperature is lower than -40 °F (-40 °C). The vehicle or charging cable
may be damaged.
1
Before driving
87

1-3. Charging
If charging does not commence even though the correct procedure
has been carried out, and an error message is shown on the multiinformation display, try the correction procedures listed in the table
below.
If you still cannot correct the problem, contact your Toyota dealer.
When normal charging cannot be carried out
A problem has occurred during charging
Refer to the following table and carry out the appropriate cor rection
procedure.
Situation Reason Correction procedure
The plug is not properly
connected to the electrical receptacle.
There is a power outage.
The power indicator on
the CCID (Charging
Circuit Interrupting
Device) does not illuminate even when connected to a power
source
88
The circuit breaker has
activated.
Insert the plug firmly
into the electrical
receptacle.
Restart charging once
power has been
restored.
Check the circuit
breaker. If there is
nothing unusual, connect to another electrical receptacle and
check that charging is
possible.
If charging is possible,
there is likely a problem with the first electrical receptacle.
Contact your building
manager or an electrician.

Situation Reason Correction procedure
The power indicator on
the CCID (Charging
Circuit Interrupting
Device) does not illuminate even when connected to a power
source
The charging cable
connecting the CCID
(Charging Circuit Interrupting Device) to the
plug is damaged.
1-3. Charging
Stop charging immediately and contact your
Toyota dealer.
1
Before driving
The error warning indicator on the CCID
(Charging Circuit Interrupting Device) illuminates
The charging indicator
lights do not illuminate
or flash even though
the charging connector is connected
The electrical leakage
detection function or
the self-test function
has operated and the
power supply has been
interrupted.
The latch release button is being pressed.
The charging connector is not properly connected to the charging
port.
Reset the CCID
(Charging Circuit Interrupting Device).
(P. 91)
For safety purposes,
charging will be interrupted when the latch
release button is
pressed. (P. 82)
When connecting the
charging connector to
the vehicle, insert it into
the charging port without pressing the latch
release button.
Check that the charging connector is firmly
connected to the
charging port.
If the charging indicator
lights do not illuminate
or flash even though
the charging connector is firmly connected,
there may be a problem in the system. Stop
charging immediately
and consult your
Toyota dealer.
89

1-3. Charging
Situation Reason Correction procedure
The charging indicator
lights do not illuminate
or flash even though
the charging connector is connected
If the charging indicator
lights flash quickly
The traction battery is
already fully charged.
An error may have
occurred in the charging system.
Turn the “POWER”
switch to ON mode and
comply with the warning message shown on
the multi-information
display. (P. 443)
90
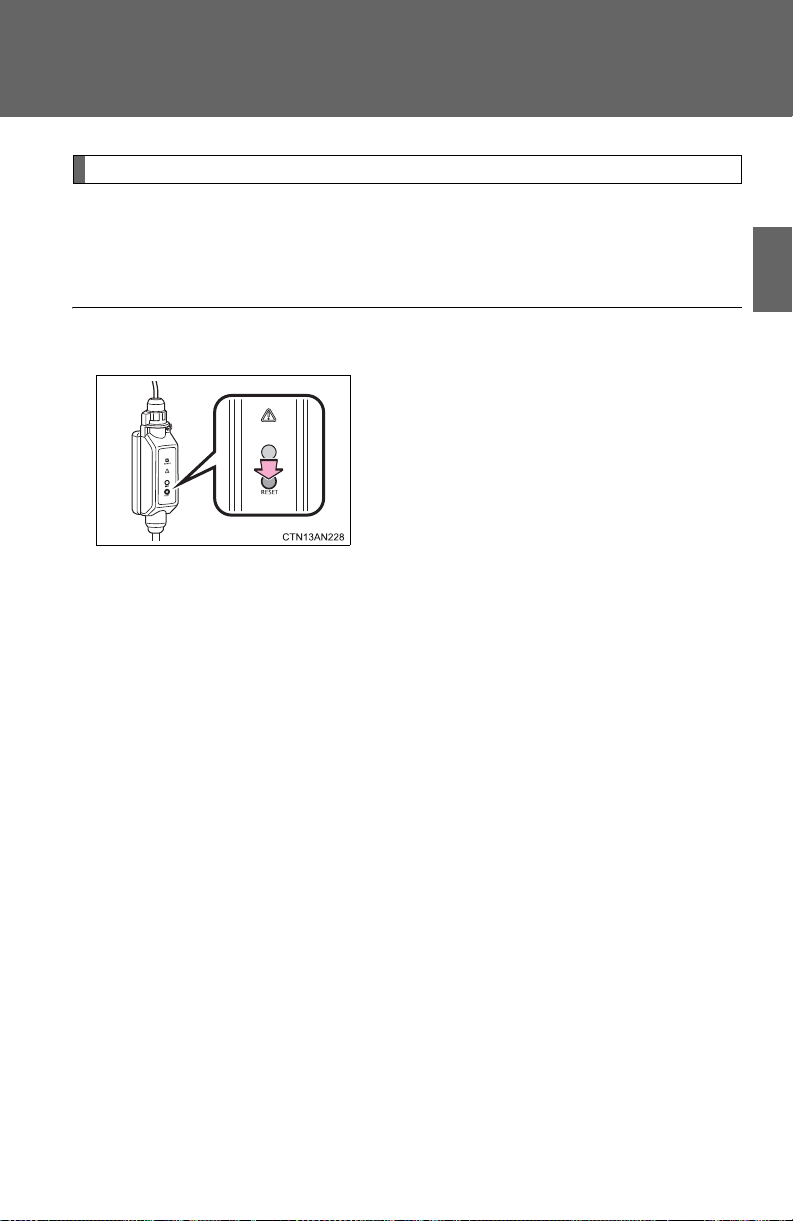
1-3. Charging
If the error warning indicator of the CCID
(Charging Circuit Interrupting Device) illuminates during charging, conduct either
of the following procedures.
● Press the reset button on the CCID
(Charging Circuit Interrupting Device).
● Disconnect the plug, wait for a short
while and reconnect.
The error warning indicator will go out
and the power source will reconnect.
● If the error warning indicator does not
illuminate a second time after the power
source has been reconnected, charging
can continue.
● If the error warning indicator illuminates
again, there may be a problem with the
charging cable or the power source.
Stop charging immediately and contact
your Toyota dealer.
If a warning message is displayed af t er cha rging
If a warning message is displayed when the “POWER” switch is
turned to ON mode after charging, comply with the contents of the
message and take any necessary actions. (P. 443)
■ Resetting the CCID (Charging Circuit Interrupting Device)
1
Before driving
91
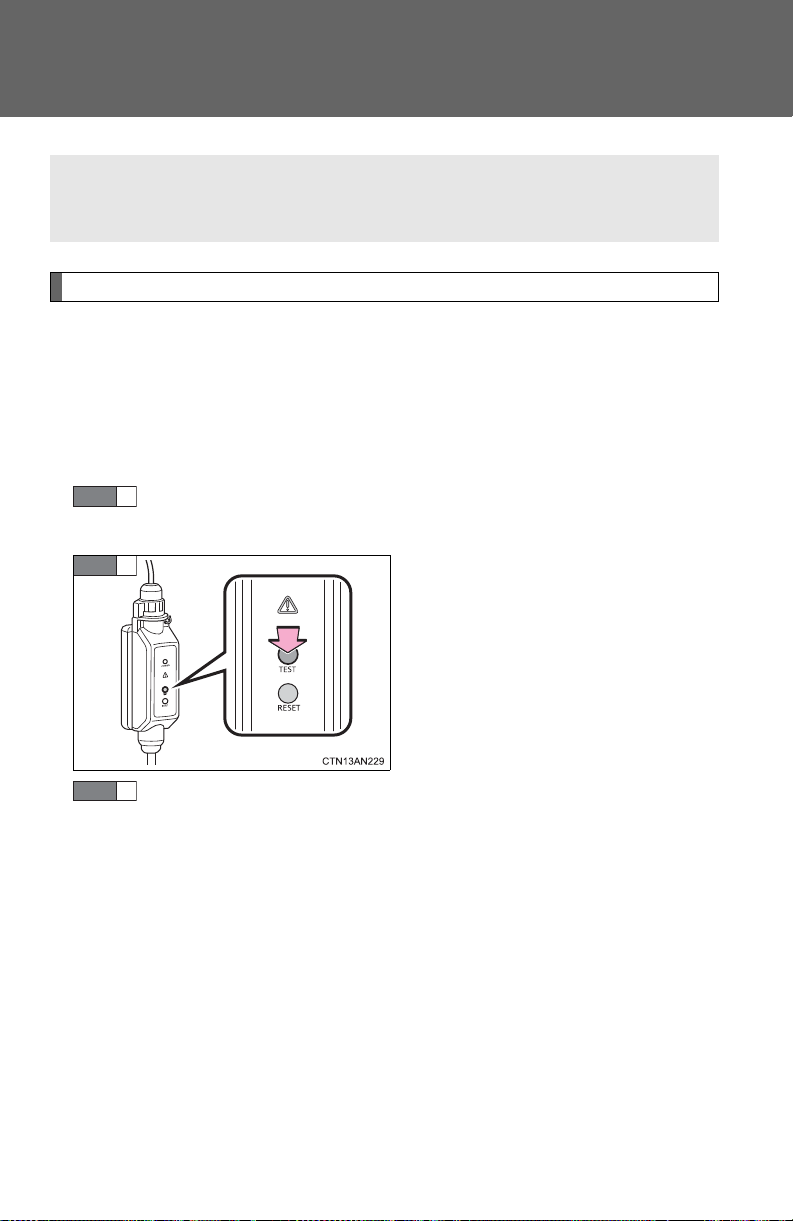
1-3. Charging
For safety, inspect the charging cable on a routine basis (at least
once a month).
STEP
1
STEP
2
STEP
3
Inspecting the charging cable
Inspecting the electrical leakage detection function
Check that the electrical leakage detection function operates properly
by following the procedure below.
In the unlikely event that the electrical leakage detection function
does not operate properly, contact your Toyota dealer as soon as
possible.
Insert the charging cable into the electrical receptacle of the
external power source.
Press the test button on the
CCID (Charging Circuit Interrupting Device).
If the error warning indicator illuminates when the test button is
pressed, the function is operating
correctly.
Press the reset button on the CCID (Charging Circuit Interrupting Device).
Turn off the error warning indicator. Charging cannot be carried out
while the error warning indicator is illuminated.
Charging can be continued by following the normal procedure. If not
charging, store the charging cable.
92

1-3. Charging
CAUTION
■ Routine inspection
Check the following points regularly.
If use is continued without inspection, fire or electric shock may occur, possibly resulting in death or serious injury.
● The charging cable, plug, charging connector, CCID (Charging Circuit
Interrupting Device) etc. have not been damaged
● The electrical receptacle has not been damaged
● The plug does not get extremely hot during use
● The tip of the plug has not been deformed
● The plug is not dirtied by dust etc.
Inspect the plug after removing it from the electrical receptacle.
■ Maintaining the charging cable
When the cable is dirty, first remove the dirt with a squeezed out cloth, and
then wipe the cable with a dry cloth. Do not wash with water, as doing so
could cause a fire or electrical shock when charging, which could lead to
death or serious injury.
■ When not using the charging cable for a long time
Remove the plug from the electrical receptacle. Dust could accumulate on
the plug or in the electrical receptacle, possibly causing overheating which
could lead to a fire.
Also, keep the cable in a place free from moisture.
1
Before driving
93
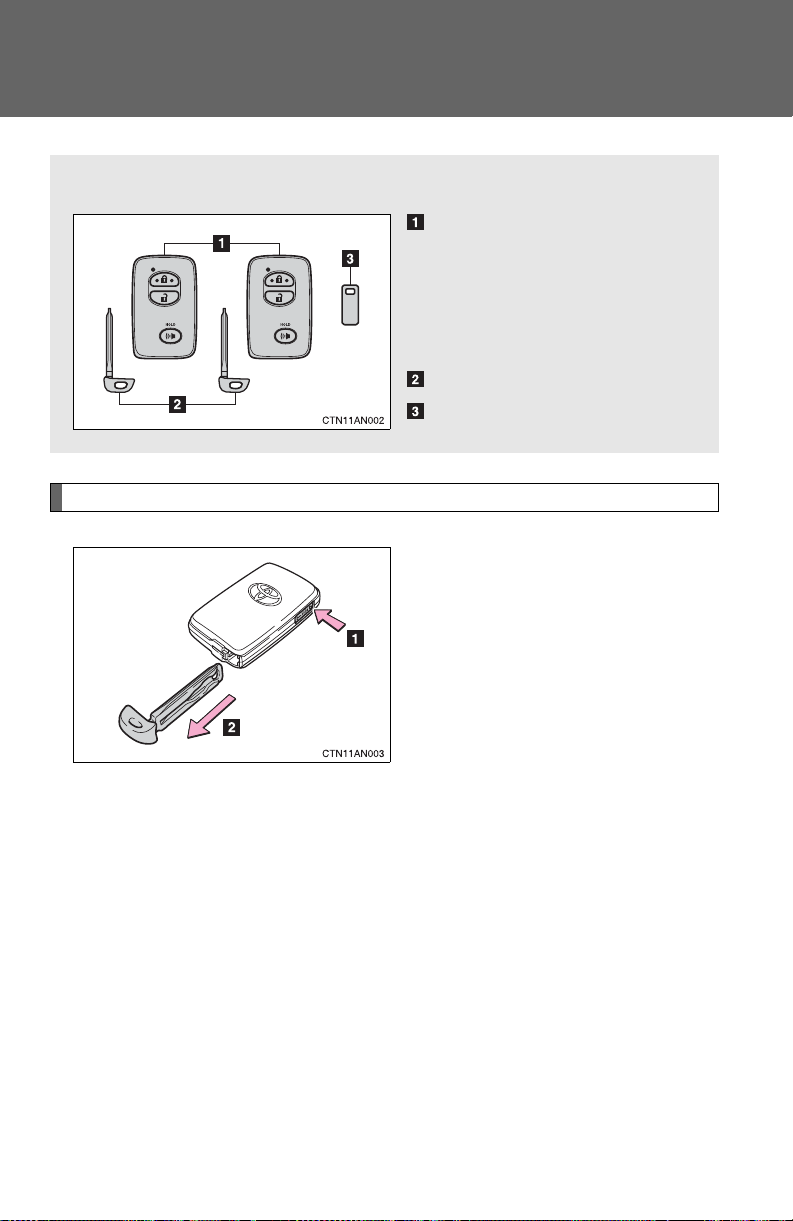
1-4. Key information
The following keys are provided with the vehicle.
Electronic keys
• Operating the smart key
system (P. 96)
• Operating the wireless
remote control function
(P. 108)
Mechanical keys
Key number plate
Keys
Using the mechanical key
To take out the mechanical key,
push the release button and take
the key out.
After using the mechanical key,
store it in the electronic key. Carry
the mechanical key together with
the electronic key. If the electronic
key battery is depleted or the
entry function does not operate
properly, you will need the
mechanical key. (P. 468)
94

1-4. Key information
NOTICE
■ When required to leave a key to the vehicle with a parking attendant
Lock the glove box as circumstances demand. (P. 297)
Remove the mechanical key for your own use and provide the attendant with
the electronic key only.
■ Key number plate
Keep the plate in a safe place such as your wallet, not in the vehicle. In the
event that a key is lost, a new key can be made by your Toy ota dealer using
the key number plate. (P. 467)
■ When riding in an aircraft
When bringing a key with wireless remote control function onto an aircraft,
make sure you do not press any buttons on the key while inside the aircraft
cabin. If you are carrying the key in your bag etc, ensure that the buttons are
not likely to be pressed accidentally. Pressing a button may cause the key to
emit radio waves that could interfere with the operation of the aircraft.
1
Before driving
■ To prevent key damage
● Do not subject the keys to strong shocks, expose them to high tempera-
tures by placing them in direct sunlight, or get them wet.
● Do not expose the keys to electromagnetic materials or attach any mate-
rial that blocks electromagnetic waves to the key surface.
● Do not disassemble the key.
95
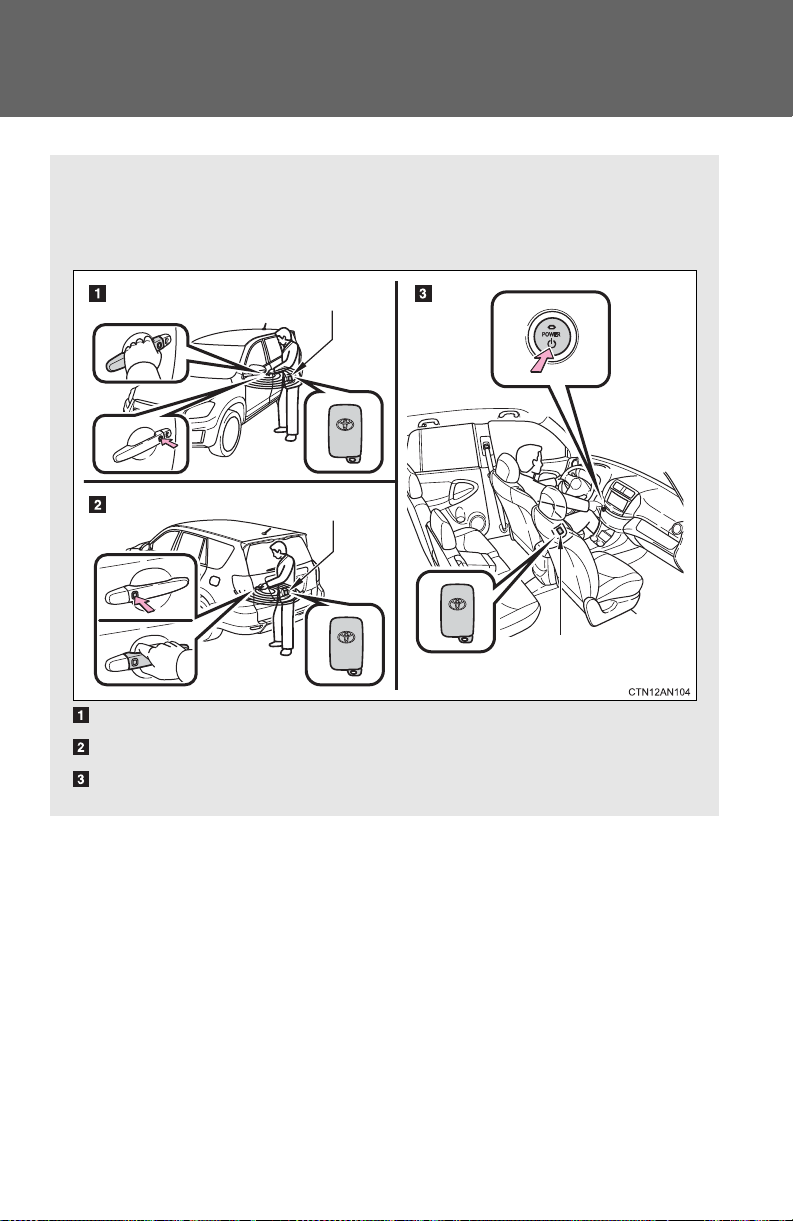
1-5. Opening, closing and locking the doors
The following operations can be performed simply by carrying the
electronic key on your person, for example in your pocket.
(The driver should always carry the electronic key.)
Locks and unlocks the doors (P. 97)
Locks and unlocks the back door (P. 97)
Starts the EV system (P. 200)
Electronic key
Electronic key
Electronic key
Smart key system
96
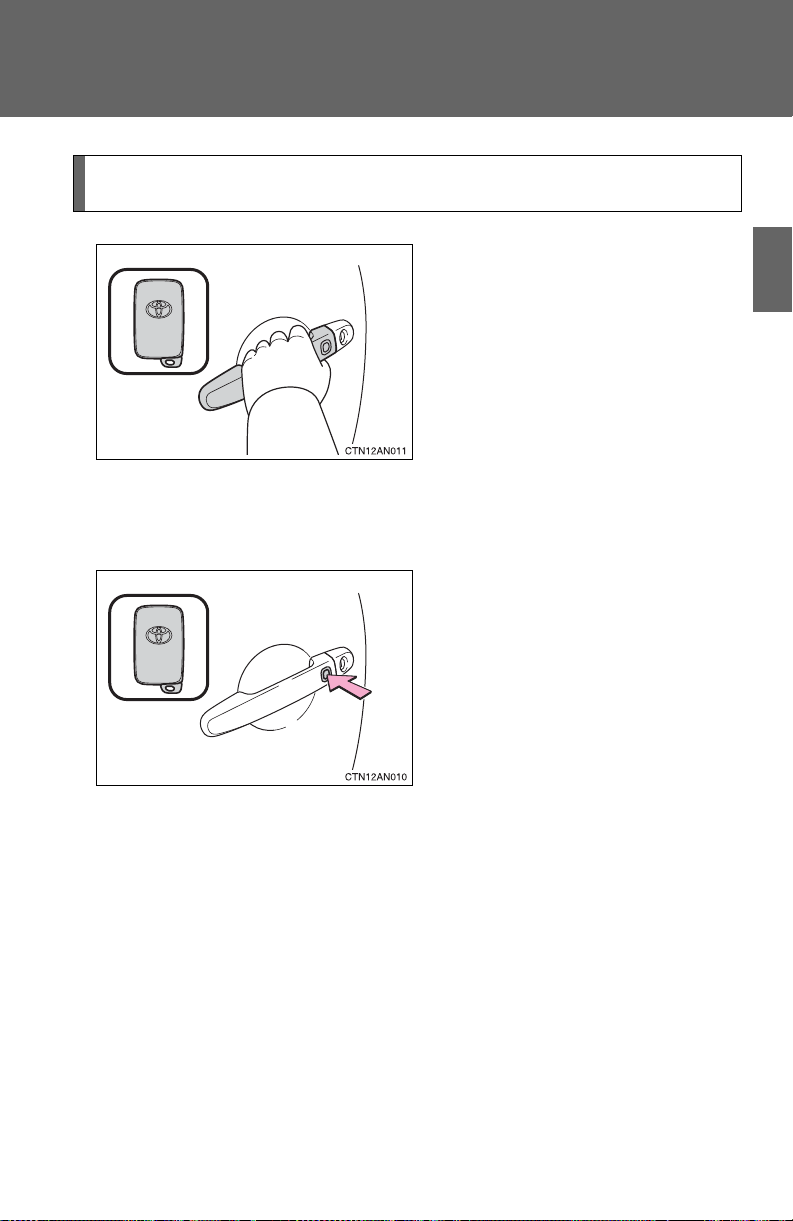
1-5. Opening, closing and locking th e do o r s
Unlocking and locking the doors and back door (front and back
door handles only)
Grip the driver’s door handle to
unlock the door. Grip the passenger’s door handle to unlock all
the doors.*
Make sure to touch the sensor on
the back of the handle.
The doors cannot be unlocked for
3 seconds after the doors are
locked.
*: The door unlock settings can be
changed. (P. 103)
Press the lock button to lock the
doors.
1
Before driving
97
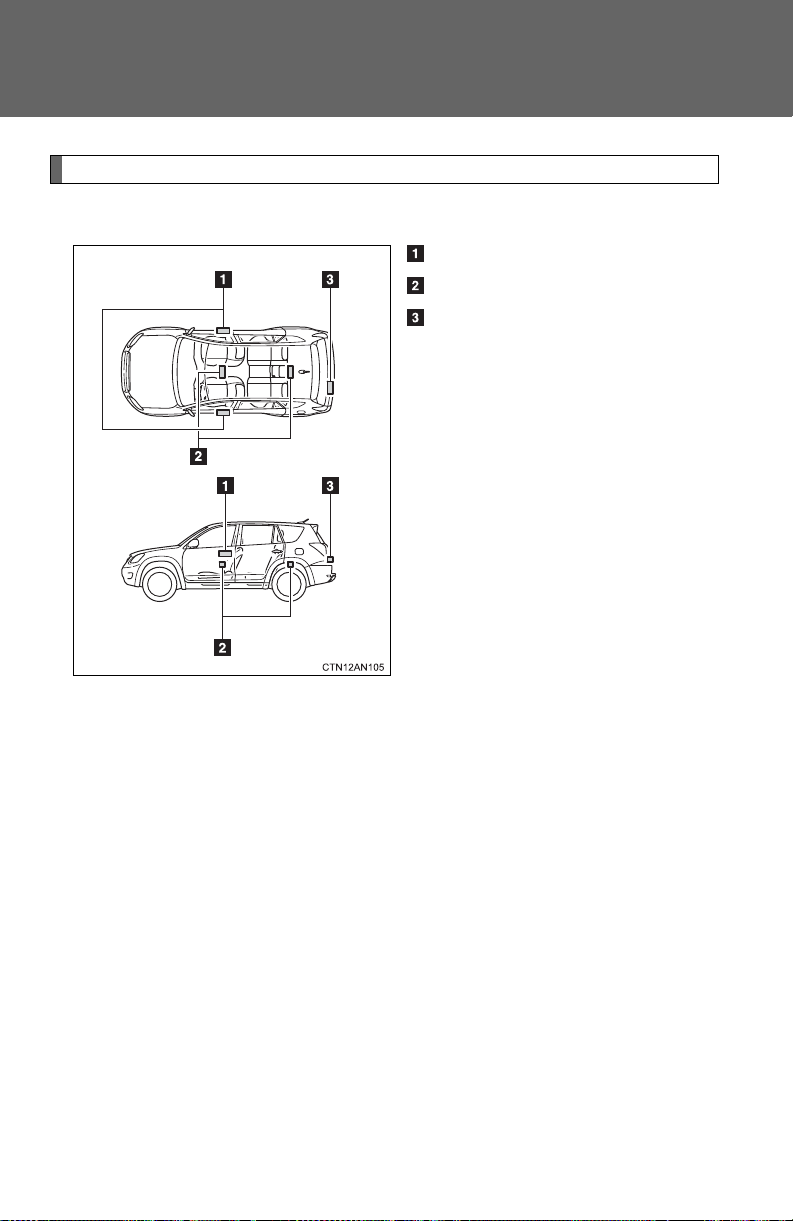
1-5. Opening, closing and locking the doors
Antenna location and effective range
■ Antenna location
Antennas outside the cabin
Antennas inside the cabin
Antenna outside the luggage
compartment
98
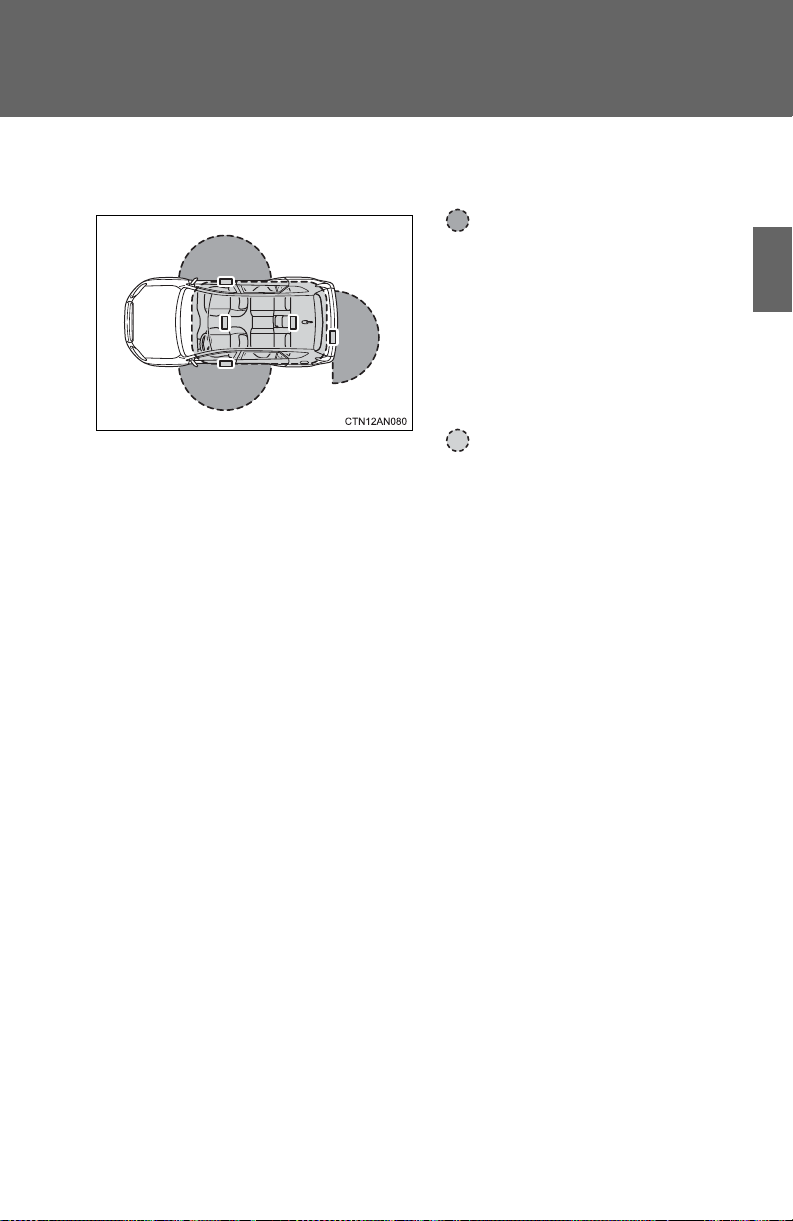
1-5. Opening, closing and locking th e do o r s
■ Effective range (areas within which the electronic key is
detected)
When locking or unlocking
the doors
The system can be operated
when the electronic key is
within about 2.3 ft. (0.7 m) of
either of the outside front
door handles and back door
handle.
When starting the EV system or changing
“POWER” switch modes
The system can be operated
when the electronic key is
inside the vehicle.
1
Before driving
99

1-5. Opening, closing and locking the doors
Alarm Situation Correction procedure
Interior alarm
pings once and
exterior alarm
sounds once for
10 seconds
*
1
An attempt was made to
lock the doors using the
entry function while the
electronic key was still
inside the passenger compartment.
Retrieve the electronic key from the
passenger compartment and lock the
doors again.
An attempt was made to
exit the vehicle and lock
the doors without first turning the “POWER” switch
off.
Turn the “POWER”
switch off and lock the
doors again.
Exterior alarm
sounds once for
10 seconds
An attempt was made to
lock the vehicle while a
door is open.
Close all of the doors
and lock the doors
again.
■ Operation signals
A buzzer sounds and the emergency flashers flash to indicate that the doors
have been locked/unlocked. (Locked: Once; Unlocked: Twice)
■ Alarms and warning indicators
A combination of exterior and interior alarms are used to prevent theft of the
vehicle and unforeseeable accidents resulting from erroneous operation.
Take appropriate measures according to the warning message shown on the
multi-information display. (P. 427)
The following table describes circumstances and correction procedures
when only alarms are sounded.
100
 Loading...