


 Loading...
User’s Manual
DE IT
DK NL
ES NO
FI PT
FR SE

Copyright
Copyright 2009. All rights reserved. No part of this publication may be reproduced, transmitted, transcribed, stored in a retrieval system or translated into any language or computer language, in any form or by any means, electronic, mechanical, magnetic, optical, chemical, manual or otherwise, without the prior written permission of this company.
Disclaimer
This company makes no representations or warranties, either expressed or implied, with respect to the contents hereof and specifically disclaims any warranties, merchantability or fitness for any particular purpose. Further, this company reserves the right to revise this publication and to make changes from time to time in the contents hereof without obligation to notify any person of such revision or changes.
Important safety instructions
Regarding the digital TV function, please be notified that in some areas, the signal reception quality can be affected due to the distance to signal transmission sites, or affected when blocked by an obstruction.
nRetain this user’s manual for future reference.
nRead the safety and operating instructions carefully before using the product. All warnings on the product and in the operating instructions should be observed.
nDo not place this product under direct sunlight or near heat sources, such as in a closed car under sunlight or near a stove. The outer casing of this product may become deformed and the sophisticated sensors inside may become damaged due to excessive heat.
nDo not use this product near water, in the rain or allow any liquid to get inside this product. Water and moisture may
EN-2 |
User’s Manual |

cause short-circuit to the electronic components and lead to malfunctions.
nDo not use this product near strong electromagnetic sources, such as a microwave oven. The electromagnetic interference may cause this product to malfunction.
nDo not drop or apply shock/vibration to this product. Strong impacts may damage the components inside.
nDo not insert objects other than compatible memory cards into the memory card slots of this product. The metal contacts inside the slots can easily become damaged by foreign objects.
nDo not use an unknown power adapter other than the one supplied with this product. Connecting this product to an unknown power adapter is very dangerous and may lead to fire or explosion.
nDo not cut, bend, modify, place heavy objects, or step on the cable of the power adapter. Otherwise the external insulation may be damaged and result in short-circuit or fire.
nIf there are strange odors or heat emitting from this product or any signs of malfunction, disconnect this product from the power immediately and contact your dealer for inspection or service.
nUse a smooth, soft cloth to clean the surface of the screen. Do not use liquid cleaners or glass cleaners.
nIf a foreign substance or water gets in this product, please turn the power off immediately and disconnect the power adapter. Next, remove the foreign substance or water, and then send the product to your nearest service center.
nDo not attempt to disassemble or modify this product. There are no user serviceable parts inside this product, and unauthorized modifications will cause the warranty to void.
nAlthough the LCD panel is made with high-precision technology and has effective pixels of 99.99% or more, black dots or bright points of light (red, blue, or green) may appear constantly on the LCD panel. This is a structural property of the LCD panel and is not a malfunction.
User’s Manual |
EN-3 |

Introduction
Welcome and thank you for choosing a TOSHIBA product.
For your convenience, your TOSHIBA product is furnished with two guides:
nQuick Start Guide, and
nthis comprehensive PDF User’s Manual.
Journe M400 features a 4.3" touch-sensitive Liquid Crystal Display (LCD) panel. This unit enables you to display photos or play music and video files stored on a microSD or microSDHC card. More than just a photo frame, this unit comes with digital TV and radio functions.
This unit (digital photo frame) is equipped with the following features:
nClear and bright pictures
nCapable of receiving digital TV and radio signals that comply with the DVB-T standard
nSupports multiple audio channels (depending on the signals received)
nSupports playback of multimedia files.
nAutomatic/manual time zone configuration
nMulti-language On-Screen Display (OSD) menus
nBuilt-in speaker
nSupports output of audio signals to equipment with compatible audio input sockets.
EN-4 |
User’s Manual |

Table of contents
Package contents . . . . . . . . . . . . . . . . . . . . . . . . . . . . . . . . . . 7
Identifying the parts . . . . . . . . . . . . . . . . . . . . . . . . . . . . . . . . 8
Left view . . . . . . . . . . . . . . . . . . . . . . . . . . . . . . . . . . . . . . . . 8 Right view . . . . . . . . . . . . . . . . . . . . . . . . . . . . . . . . . . . . . . . 9 Rear view . . . . . . . . . . . . . . . . . . . . . . . . . . . . . . . . . . . . . . 10
Getting started. . . . . . . . . . . . . . . . . . . . . . . . . . . . . . . . . . . . 11
Installing the hand strap . . . . . . . . . . . . . . . . . . . . . . . . . . . 11 Using the foot stand . . . . . . . . . . . . . . . . . . . . . . . . . . . . . . 11 Charging the battery . . . . . . . . . . . . . . . . . . . . . . . . . . . . . . 12 Using the power switch/lock key. . . . . . . . . . . . . . . . . . . . . 13 Inserting or removing the supplied microSD card. . . . . . . . 14 Using the built-in antenna . . . . . . . . . . . . . . . . . . . . . . . . . . 15
Operating this unit . . . . . . . . . . . . . . . . . . . . . . . . . . . . . . . . 17
First-time startup. . . . . . . . . . . . . . . . . . . . . . . . . . . . . . . . . 17 Basic operations . . . . . . . . . . . . . . . . . . . . . . . . . . . . . . . . . 18 Selecting a channel . . . . . . . . . . . . . . . . . . . . . . . . . . . . 18 Adjusting the volume . . . . . . . . . . . . . . . . . . . . . . . . . . . 18
Using the OSD menus . . . . . . . . . . . . . . . . . . . . . . . . . . . . . 19
Photo menu . . . . . . . . . . . . . . . . . . . . . . . . . . . . . . . . . . . . 19 Music menu . . . . . . . . . . . . . . . . . . . . . . . . . . . . . . . . . . . . 21 Video menu. . . . . . . . . . . . . . . . . . . . . . . . . . . . . . . . . . . . . 22 Digital TV and Digital Radio menus . . . . . . . . . . . . . . . . . . 23 Viewing TV Guide and Radio Guide (EPG) . . . . . . . . . . 24 Setting your favorite channels . . . . . . . . . . . . . . . . . . . . 24 Adding favorite channels . . . . . . . . . . . . . . . . . . . . . . 24 Removing favorite channels . . . . . . . . . . . . . . . . . . . 24 Going to a favorite channel . . . . . . . . . . . . . . . . . . . . 25 Setting up your password. . . . . . . . . . . . . . . . . . . . . . . . 25
User’s Manual |
EN-5 |

Setting Channel Lock . . . . . . . . . . . . . . . . . . . . . . . . . . . 26 To set Channel Lock for channels:. . . . . . . . . . . . . . . 26 To enable/disable Channel Lock: . . . . . . . . . . . . . . . . 27 Setting Parental Control . . . . . . . . . . . . . . . . . . . . . . . . . 27 Searching for channels manually . . . . . . . . . . . . . . . . . . 28 Setup. . . . . . . . . . . . . . . . . . . . . . . . . . . . . . . . . . . . . . . . 29
Setup menu . . . . . . . . . . . . . . . . . . . . . . . . . . . . . . . . . . . . . 31
Troubleshooting. . . . . . . . . . . . . . . . . . . . . . . . . . . . . . . . . . . 32 TOSHIBA support . . . . . . . . . . . . . . . . . . . . . . . . . . . . . . . . . 34
Regulatory information . . . . . . . . . . . . . . . . . . . . . . . . . . . . . 34
CE compliance . . . . . . . . . . . . . . . . . . . . . . . . . . . . . . . . . . 34 Working environment . . . . . . . . . . . . . . . . . . . . . . . . . . . . . 35 Following information is only valid for EU-member States: . 36 Following information is only valid for EU-member States: . 37 Disposal of products . . . . . . . . . . . . . . . . . . . . . . . . . . . . 37 Disposal of batteries and/or accumulators . . . . . . . . . . . 38
Specifications. . . . . . . . . . . . . . . . . . . . . . . . . . . . . . . . . . . . . 39
EN-6 |
User’s Manual |

Package contents
Carefully open the packing box and ensure that you have the following items.
nJourne M400 x 1
nCD x 1 (including a User’s Manual PDF file and video converter software)
nPower adapter x 1 (with a replaceable plug)
n1GB microSD card x 1 (with an SD adapter and a card container)
nHand strap x 1
nWarranty leaflet
nQuick Start Guide x 1
Available accessories may vary depending on the area where you purchased this unit.
User’s Manual |
EN-7 |
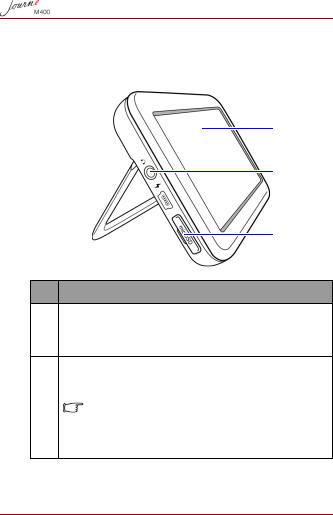
Identifying the parts
Left view
X
Y \
 Z
Z
[
No. Description
XTouch panel
Allows you to operate the menus and functions of this unit by tapping the touch-sensitive Liquid Crystal Display (LCD) panel.
YEarphone/Audio output socket
Supports stereo audio signal output to earphones or external audio devices.
•The built-in speaker will be muted once this socket is used.
•Avoid prolonged use of the earphones or listening at high volume. Otherwise your hearing may be damaged.
EN-8 |
User’s Manual |
ZPower socket
Allows you to connect the supplied power adapter to charge the built-in battery of this unit.
 This socket does not support file transfer with PC.
[microSD/microSDHC slot
Allows you to insert a microSD or microSDHC card into this slot for playing your stored audio, video, and image files. See “Inserting or removing the supplied microSD card” on page 14 for details.
\Foot stand
See “Using the foot stand” on page 11 for details.
Right view
X
Y
No. Description
XBuilt-in antenna
See “Inserting or removing the supplied microSD card” on page 14 for how to extend the antenna.
User’s Manual |
EN-9 |
YStrap hole
See “Installing the hand strap” on page 11 for how to install the hand strap.
Avoid applying excess force onto the connection between this unit and the hand strap. Otherwise the hand strap may break apart, causing this unit to fall and result in damages.
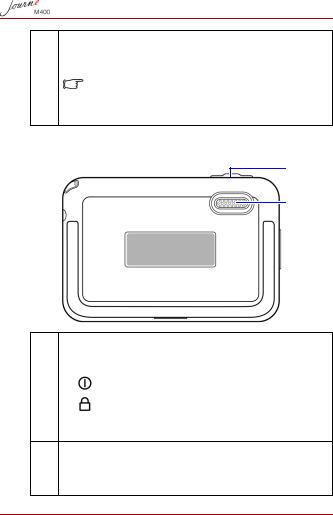
Rear view
X
Y
No. |
Description |
|
|
|
|
X |
Power switch/Lock key |
|
|
n |
: Turns this unit on/off. |
|
n |
: Locks up the touch panel. |
|
See “Using the power switch/lock key” on page 13 and |
|
|
“Charging the battery” on page 12 for details. |
|
YSpeaker
This speaker only delivers mono audio. To enjoy high quality stereo sounds, you need to connect this unit to a stereo audio device via the Earphone/Audio output socket.
EN-10 |
User’s Manual |
Getting started
Installing the hand strap
Refer to the illustration below to install the hand strap.
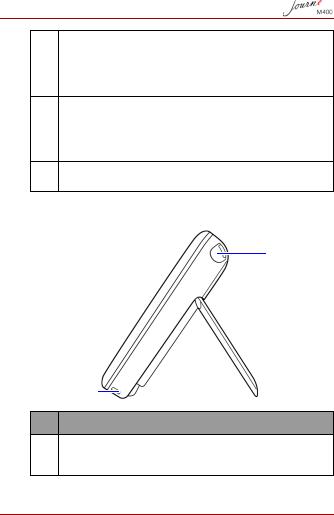
Using the foot stand
1.Use your fingernail to press in at the groove on the bottom edge of this unit as illustrated.
2.Lift up the foot stand as illustrated, and then place this unit on a stable surface.
User’s Manual |
EN-11 |

Charging the battery
1.Connect one end of the power adapter to the power socket on this unit, and then plug the other end into a wall outlet.
Power socket
 Power systems and plug types may vary depending on your country/region.
2.When charging the battery, the power status indicator lights up in orange, and an  icon appears on the top right
corner of the screen. Once the battery is fully charged, the orange light goes off and the icon disappears.
•When this unit is turned on and the built-in battery is in use, the indicator lights up in blue.
•When this unit is turned on and the battery is being charged, the indicator lights up in both orange and blue.
 • It takes approximately 3 hours to charge the battery using the power adapter, depending on the status of the battery (remaining battery power and battery life) and conditions of this unit (signal strength, volume, and brightness settings, etc.)
•You can turn on and use this unit while charging the battery. To speed up the charging process, turn off this unit.
EN-12 |
User’s Manual |
•You can also charge the battery by connecting this unit to a USB port on your PC using a USB cable (not provided). However, the charging speed is slower.
•The average lifetime of the built-in Lithium-polymer battery is about 300 cycles. After 300 recharging cycles, battery performance and capacity begins to decline gradually.
•Do not disassemble or modify the battery.
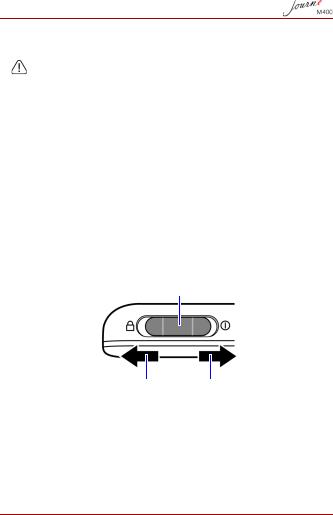
Using the power switch/lock key
Turning this unit on/off:
nTo turn on the power, slide the power switch/lock key to the
 position.
nWhen the power is on, slide the power switch/lock key to the
 position to turn it off.
Locking up the touch panel:
To lock up the touch panel, slide the power switch/lock key to the  position.
Power switch/Lock key
Screen lock-up |
Power on/off |
User’s Manual |
EN-13 |
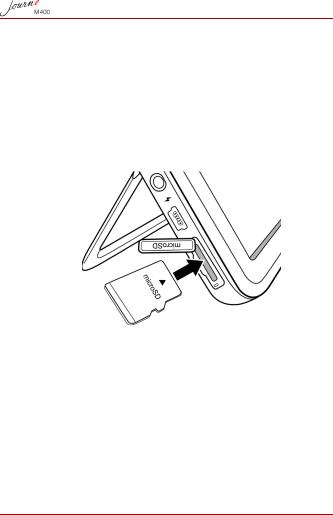
Inserting or removing the supplied microSD card
Load your photos onto the supplied microSD card, and then insert the memory card to this unit to display your photos. You can also load other types of media files to the microSD card, such as music and video files.
To insert the microSD card:
Insert the microSD card into the card slot following the direction indicated on the card.
To remove the microSD card:
Press on the microSD card to release the card.
 • This unit can support a microSD or microSDHC card with capacity up to 8GB.
•Both FAT16 and FAT32 file formats are supported. However, the NTFS file format is not supported.
•You can change or remove the microSD card when the power of this unit is either turned on or turned off.
EN-14 |
User’s Manual |
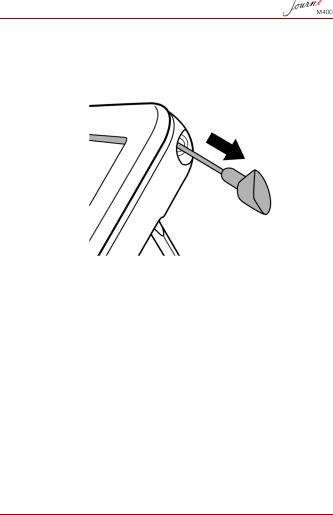
Using the built-in antenna
If you want to use the digital TV function, follow the instructions below to adjust the built-in antenna.
1. Gently pull the built-in antenna all the way out.
User’s Manual |
EN-15 |
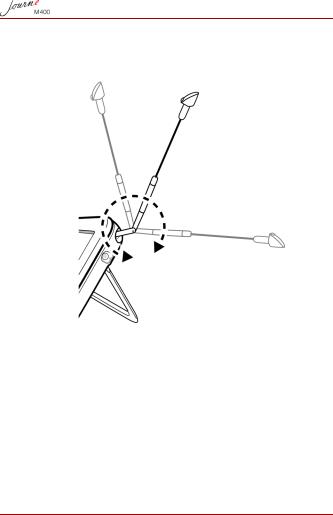
2.Rotate the antenna while observing the display on the screen until the signal reception achieves a satisfactory level.
 To determine the signal quality, check the signal quality indicator
  shown on the top right corner of the screen.
EN-16 |
User’s Manual |
Operating this unit
First-time startup
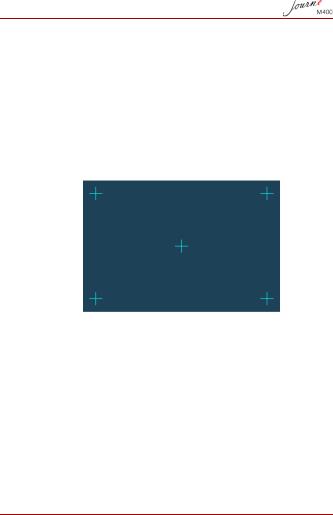
When using this unit for the first time, follow the instructions below to complete the first-time startup settings:
1.Slide the power switch to the  position to turn on this unit.
2.After startup, the touch panel calibration function will be initially activated, showing 5 plus signs on the screen. Tap these signs with your fingertip until they all disappear.
3.The Auto Installation screen appears.
a.Tap  or
or  in the OSD Language menu item to select your language.
b.Tap  or
or  in the Region menu item to select the
country/region where you are located.
 The “Time Zone” menu item will change accordingly as you choose your region setting. In some regions, there are more than one time zone, please choose the correct time zone manually according to the place you are located in.
c.Tap the Auto Search menu item, and then tap YES to start searching for available channels.
This unit will start searching for digital TV and radio channels with a search progress bar indicating the status.
User’s Manual |
EN-17 |

4.Once the Auto Search process is complete, this unit will display the first registered channel.
 The time required for the Auto Search process may vary depending on the number of available channels.
In some areas, the signal reception quality can be affected due to the distance to signal transmission sites, or affected when blocked by an obstruction.
Basic operations
Selecting a channel
nChanging channels sequentially:
In the Digital TV or Digital Radio menu, tap  or
or  to switch channels sequentially.
nSelecting a channel directly from the channel list:
In the Digital TV or Digital Radio menu, tap  to access the channel list. Tap
  or
or  of the scroll bar to browse through the channel list, and tap the specific channel you want to go to.
Adjusting the volume
In the Digital TV or Digital Radio menu, tap  or
or  to increase or decrease volume.
 The earphone or audio output volume will also change according to the volume level selected.
EN-18 |
User’s Manual |
Using the OSD menus
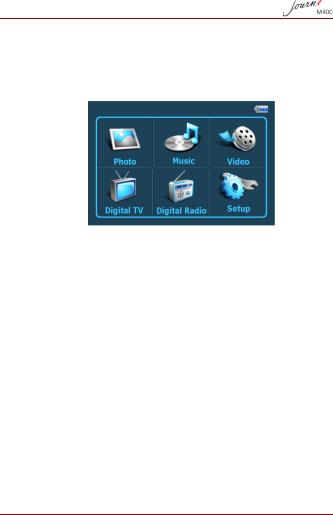
You can use the On-Screen Display (OSD) menus of this unit to change settings or access your desired functions. To go to each menu, tap a menu icon on the home page.
Photo menu
The Photo menu allows you to view photos that are stored on a microSD or microSDHC card.
 This unit supports the JPEG (*.jpg) and BMP (*.bmp) file formats.
1.Tap the Photo menu.
2.On the My Photo screen, browse your image files or any folder that contains image files.
3.Tap a photo to display it in full size.
User’s Manual |
EN-19 |
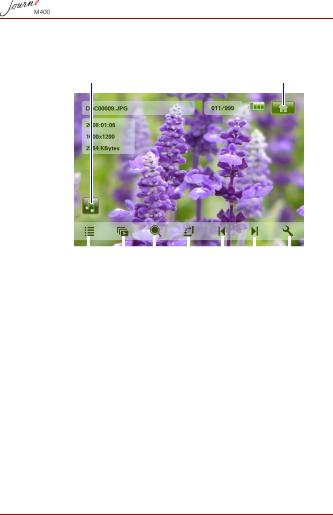
Controls on the Photo menu:
Specifies a music file to be played when |
|
viewing photos (only available if “Play Music” |
|
in Setup is turned on) |
Home page |
|
|
|
|
|
|
|
|
|
|
|
Returns to the |
|
|
Rotate |
|
Next photo |
|
||||
“My Photo” screen |
|
|
|
|
|
|
|
|
|
|
Slide Show |
|
|
Previous |
|
|
|
||||
|
|
Setup for slide show |
||||||||
|
|
|
|
|
photo |
|
||||
|
|
|
|
|
|
interval, music |
||||
Zoom-in/Zoom-out |
|
|
|
|
||||||
|
|
|
|
playback on/off, and |
||||||
|
|
|
|
|
|
|
|
|||
|
|
|
|
|
|
|
|
photo transition |
||
|
|
|
|
|
|
|
|
effects |
||
EN-20 |
User’s Manual |
Music menu
The Music menu allows you to play audio files that are stored on a microSD or microSDHC card.
 This unit supports the MP3 (*.mp3) audio file format.
1.Tap the Music menu.
2.On the My Music screen, tap an audio file or any folder that contains audio files.
3.Tap a music track you wish to play.
Or
Tap  next to the folder you wish to play.
Controls on the Music menu:
Home page
Volume up
Turn off the display 
Random 
Repeat
Volume down
|
|
|
|
|
|
|
Returns to the |
Stop |
Previous track |
|
|||
“My Music” screen |
|
|
|
|
|
|
|
|
|
Play/Pause |
|
Next track |
|
User’s Manual |
EN-21 |
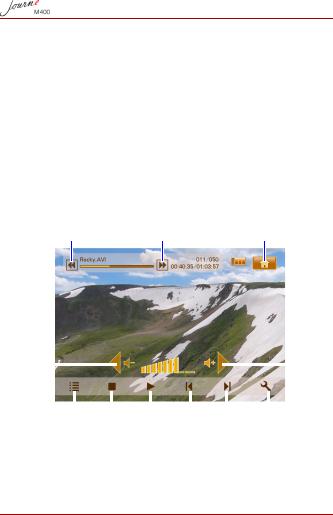
Video menu
The Video menu allows you to play video files that are stored on a microSD or microSDHC card.
 This unit supports the AVI (*.avi) with MP3 audio file format and MPEG4 video file format (up to 16 Mbit/s audio bitrate).
1.Tap the Video menu.
2.On the My Video screen, tap a video file or any folder that contains video files.
3.Tap a video file you wish to play.
Or
Tap  next to the folder you wish to play.
Controls on the Video menu:
Fast-rewind |
Fast-forward |
Home page |
Volume |
|
|
|
|
|
|
|
Volume |
|||||
down |
|
|
|
|
|
|
|
|
|
|
|
|
up |
|
|
|
|
|
|
|
|
|
|||||
Returns to |
|
the |
|
|
|
|
|
|
|
|
|||
|
Play/Pause |
Next file |
|
|
|
||||||||
“My Video” screen |
|
|
|
|
|
|
|
|
|
||||
|
|
|
|
|
|
|
|
|
|
|
|||
|
|
|
Stop |
|
Previous |
file |
Setup for display |
||||||
|
|
|
|
|
|
|
|
|
|
|
ratio and |
||
|
|
|
|
|
|
|
|
|
|
|
brightness |
||
EN-22 |
User’s Manual |

Digital TV and Digital Radio menus
Refer to the table below for information about the functional icons available in the Digital TV and Digital Radio menus.
Icon Description
Returns to the Home Page that shows the six menus.
Indicates current battery status.
Indicates current signal quality.
Appears when a channel is locked.
Turns off the display to save power.
Goes to the next channel.
Goes to the previous channel.
Increases the volume.
Decreases the volume.
Channel list: displays a list of available channels.
Favorite Channel list: displays a list of your favorite channels.
Setup: displays the Setup menu in which you can configure TV settings for this unit.
Preview: displays screen pictures of 6 channels in thumbnail view simultaneously.
TV Guide: displays information on all receivable TV channels, daily program schedules with descriptions.
User’s Manual |
EN-23 |

Viewing TV Guide and Radio Guide (EPG)
1.In the Digital TV or Digital Radio menu, tap  to enter
TV Guide or Radio Guide.
2.Tap  or
or  to switch between pages.
3. Find the channel you wish to go to, and then tap |
next to |
the specific channel to view the electronic program guide (EPG), in which more information about the selected channel and its available program schedule will be provided.
4. Tap  to exit.
 The program schedules and descriptions are subject to the content provided by TV or radio stations.
Setting your favorite channels
Adding favorite channels
1.In the Digital TV or Digital Radio menu, tap  to enter
TV Guide or Radio Guide.
2.Tap  or
or  to scroll through available channels.
3. Tap next to the specific channel that you wish to add to the Favorite Channel list. The added favorite channel will be
marked as  .
.
Repeat Step 2 to 3 if you wish to add more favorite channels.
4. Tap  to exit. Your settings will be saved automatically.
Removing favorite channels
1.In the Digital TV or Digital Radio menu, tap  to enter
TV Guide or Radio Guide.
2.Tap  or
or  to switch between pages and look for your favorite channels.
If a channel is set as a favorite one, you will see the  icon.
icon.
EN-24 |
User’s Manual |

3.To remove the channel from the Favorite Channel list, tap the
 icon. It will turn into
  .
.
Repeat Step 2 to 3 if you wish to remove more favorite channels.
4.Tap  to exit. Your settings will be saved automatically.
Going to a favorite channel
Tap anywhere on the screen during digital TV or radio playback. Available functional icons will appear on the screen
1.Tap  on the bottom right corner of the screen. The Favorite Channel list appears.
2.Scroll through the list and tap a channel name to go to the specific channel.
Setting up your password
Some operations on this unit are password-protected. To set up the password, follow the steps below:
When attempting to access blocked channels/programs, enable/ disable the Channel Lock function, or run the Manual Search process, you will be prompted to enter the password you set.
1.In the Digital TV or Digital Radio menu, tap  to enter
Setup.
2.Tap  or
or  to switch between pages.
3.Tap the Password menu item.
4.Enter the old password:
a.If this is the first time you set up the password, enter the default password 0000 on the Enter old password screen. If a password has already been set up before, enter the password.
nTo select a number, tap  or
or  .
.
nTo move to the next field, tap the field icon. b. Tap OK.
User’s Manual |
EN-25 |
5.Enter a new password:
a.On the Enter new password screen, enter a 4-digit password.
nTo select a number, tap  or
or  .
.
nTo move to the next field, tap the field icon.
b.Tap OK.
6.Confirm your new password:
a.On the Confirm new password screen, enter your new password again.
nTo select a number, tap  or
or  .
.
nTo move to the next field, tap the field icon.
b.Tap OK.
IMPORTANT: Write your selected password down here in this manual, so that it is available to you should you ever forget it.
Password: __ __ __ __
Keep this manual in a safe place.
Setting Channel Lock
The Channel Lock function can be used to prevent access to certain channels. For example, to prevent children from viewing inappropriate channels, such as adult-only channels. You can make a selection of channels to be protected by a password.
To set Channel Lock for channels:
1.In the Digital TV or Digital Radio menu, tap  to enter TV Guide or Radio Guide.
2.Tap  or
or  to switch between pages.
3.Tap  next to the channel you wish to add to the lock list.
4.On the Please enter password screen, enter the password you set.
n To select a number, tap  or
or  .
.
n To move to the next field, tap the field icon.
EN-26 |
User’s Manual |

5.Tap OK to confirm.
The channel will be marked as  .
.
6.Tap  to exit. Your settings will be saved automatically.
To enable/disable Channel Lock:
1.In the Digital TV or Digital Radio menu, tap  to enter
Setup.
2.Tap  or
or  to switch between pages.
3.Next to the Channel Lock menu item, tap  or
or  to enable/ disable the Channel Lock function.
 When enabling/disabling the Channel Lock function, you will be prompted to enter the password you set.
nON: The Channel Lock function is enabled, and the channels in the lock list will be locked.
nOFF: The Channel Lock function is disabled.
Setting Parental Control
The Parental Control function can be used to restrict access to certain digital TV/radio programs. You can block programs based on the age-based ratings.
 • The availability of the “Parental Control” function is subject to the content provided by TV stations.
•When accessing a program that is protected by Parental Control, you will be prompted to enter the password you set.
To activate this function, follow the steps below:
1.In the Digital TV or Digital Radio menu, tap  to enter
Setup.
2.Tap  or
or  to switch between pages.
3.Next to the Parental Lock menu item, tap  or
or  to select the age limit settings:
n No Lock: disables the Parental Control function.
User’s Manual |
EN-27 |
nTotal Lock: blocks all channels. When this option is selected, you need to enter the password you set to access channels.
n6: can only be viewed by persons 6 years of age and over.
n8: can only be viewed by persons 8 years of age and over.
n10: can only be viewed by persons 10 years of age and over.
n14: can only be viewed by persons 14 years of age and over.
n18: can only be viewed by persons 18 years of age and over.
Searching for channels manually
In addition to performing Auto Search (see “First-time startup” on page 17 for details), you can also search for channels manually to add new channels when only few channels are found. To search for channels manually, follow the steps below:
1. In the Digital TV or Digital Radio menu, tap |
to enter |
Setup. |
|
2.Tap  or
or  to switch between pages.
3.Tap the Manual Search menu item.
4.On the Please enter password screen, enter the password you set.
n To select a number, tap  or
or  .
.
n To move to the next field, tap the field icon.
5.Tap OK to confirm.
6.On the Manual Search page, tap  or
or  to select a frequency number that you wish to use.
For information on available channels and frequencies, please consult your local TV stations.
7.Tap  to start the manual search process.
The search results will appear on the screen. If manual search is failed, please verify whether the frequency setting is correct with your local TV stations.
EN-28 |
User’s Manual |

Setup
1.To enter Setup, tap  in the Digital TV or Digital Radio menu.
2.To switch among pages, tap  or
or  .
.
3.To select an option for a specific menu item, tap  or
or  .
.
Menu item |
Description |
|
|
Brightness |
Adjusts the brightness of the screen. |
|
|
Audio Channel |
Switches between the primary/secondary |
|
audio channel (if available). |
|
|
Subtitle |
Sets the subtitle language that will be |
|
displayed. |
|
The availability of subtitles is subject to |
|
the content provided by TV stations. |
|
|
Teletext Subtitle |
Sets the teletext subtitle that will be |
|
displayed. |
|
This function is only available when the |
|
TV channel contains Teletext Subtitle |
|
data. |
|
|
Teletext |
Teletext is a free service broadcast by some |
|
TV stations. It offers real-time text |
|
information, like news, weather, stock prices, |
|
etc. |
|
In this menu item, you can select a language |
|
you want for the Teletext service (if available) |
|
or turn off Teletext. |
|
This function is only available when the |
|
TV channel contains Teletext data. |
|
|
Auto Search |
Searches channels automatically. See |
|
“First-time startup” on page 17 for details. |
|
|
Manual Search |
Searches channels manually. |
|
|
User’s Manual |
EN-29 |

Region |
Selects the region where you are located. |
|
• The region setting will affect the Auto |
|
Search results. Please set the region |
|
correctly. Otherwise you may not be |
|
able to view programs or receive |
|
program information as normal. |
|
• When you travel from one city to |
|
another, please re-adjust your regional |
|
setting. |
|
|
Time Zone |
Sets the time zone that is specific to your |
|
region. |
|
|
LCN |
Turns Logical Channel Number (LCN) on/off. |
|
If this option is turned on, the channel |
|
numbers that have been set will remain |
|
unchanged when you use this unit in another |
|
different area. |
|
|
Display Ratio |
Allows the selection of TV aspect ratio. |
|
Choose from 4:3 LB (Letterbox), 4:3 PS (Pan |
|
& Scan), 16:9 LB (Letterbox), or 16:9 FIT (Fit |
|
Screen). |
|
|
Parental Lock |
Allows you to set the levels of Parental Lock. |
|
See “Setting Parental Control” on page 27 |
|
for details. |
|
|
Channel Lock |
Turns Channel Lock on/off. See “Setting |
|
Channel Lock” on page 26 for details. |
|
|
Password |
Allows you to set a password. See “Setting |
|
up your password” on page 25 for details. |
|
|
EN-30 |
User’s Manual |
Loading...