


SPECIFICATIONS
|
Model |
|
13A21 |
|
19A21 |
|
AC Power Input: |
120V, 60Hz |
|
||
|
AC Power Consumption: |
54 Watts |
|
73 Watts |
|
|
Picture Tube: |
Type 13 (335mm diagonal) |
|
Type 19 (480mm diagonal) |
|
|
Audio Power Output Rating: |
1.0 Watts |
|
1.5 Watts |
|
|
Speaker: |
3 inches (76mm) Full Range, 8 ohm x 1 |
|||
|
Tuner Type: |
181 Channel, Quartz PLL Frequency Synthesized |
|||
|
Remote Control: |
Infrared, Direct Access, 2 x AAA batteries (supplied) |
|||
|
|
VHF |
2-13 |
|
|
|
|
UHF |
14-69 |
|
|
|
|
CATV |
01-97 (5A)-(A-3) |
|
|
|
|
|
98-99 (A-2)-(A-1) |
|
|
|
Receiving Channels: |
|
14-22 (A)-(I) |
|
|
|
|
23-36 (J)-(W) |
|
||
|
|
|
|
||
|
|
|
37-65 (AA)-(FFF) |
|
|
|
|
|
66-125 (GGG)-(125) |
|
|
|
Antenna Input Impedance: |
75 Ohm (VHF/UHF) Coaxial Input |
|
||
|
Input: |
Video: 1.0 Vp-p 75 ohm |
|
||
|
Audio: 300 mV, 47k ohm |
|
|||
|
|
|
|||
|
Dimensions: |
Width: 14-1/4 inches (362mm) |
|
Width: 19-3/16 inches (488mm) |
|
|
Height: 12-5/8 inches (320.5mm) |
|
Height: 16-3/8 inches (416mm) |
||
|
|
|
|||
|
|
Depth: 14-3/16 inches (360mm) |
|
Depth: 18-5/16 inches (465mm) |
|
|
Weight: |
20.9 Ibs (9.5 kg) |
|
38.6 Ibs (17.5 kg) |
|
|
|
|
|
|
|
ACCESSORY
Remote Control with two size “AAA” batteries
|
|
|
|
|
|
|
Printed in Thailand |
|
|
|
|
|
|
|
|
|
|
|
|
|
|
|
|
|
|
|
|
|
|
|
|
|
|
|
|
|
|
|
|
3J81301B U |
|
|
|
|
|
||
|
|
|
|
|
|||
|
|
|
|
|
|||
01/06 |
|
|
|
|
|
|
|
ANTENNA/CATV CONNECTIONS
OWNER'S
MANUAL
COLOR TELEVISION
13A21
19A21
CAUTION
Changes or modifications not expressly approved by the party responsible for compliance with the FCC Rules could void the user's authority to operate this equipment.
ATTENTION
If you purchase a universal remote control from your local retailer, please contact the remote manufacturer for the required programming code.
TV/CATV MODE SELECTION
When shipped from the factory, the TV/CABLE menu option is set to the "CABLE" (Cable Television) mode. If not using CABLE, set this menu option to "TV " mode.
FEATURES
Quartz PLL Frequency Synthesized Tuning System - Electronically locks in and memorizes available channels for perfect reception.
181 Channel Tuner - The tuning system is capable of receiving all 68 VHF/UHF standard broadcast channels that are available in your area. When operating on a cable system, it can tune to the standard VHF channel frequencies plus up to 113 cable channel frequencies. The actual number of channels received depends upon channel reception in your area or your cable system.
On Screen 3 Language Display - This TV can display the on screen language in English, Spanish or French.
Picture Adjustments Using The Remote Control - The On-Screen display allows precise remote control adjustment of BRIGHTNESS, COLOR, CONTRAST, SHARPNESS, and TINT.
Sleep Timer - Operable from the remote control, this TV can be programmed up to 120 minutes to turn off automatically.
Memory Back Up - This system prevents loss of memorized channel selections in case a power interruption to the TV should occur.
Closed Captioned Decoder - Displays text captions or 1/2 of full screen text on the screen for hearing impaired viewers.
Front Audio/Video In Jack - A VCR or other video device may be hooked up.
V-Chip - The V-Chip function can read the rating of a TV program or movie content if the program is encoded with this information. V-Chip will allow you to set a restriction level.
Combination VHF/UHF Antenna
Single 75 ohm cable
300 ohm twin-lead wire
Splitter
300-75 OHM MATCHING
UHF Antenna Take off the Splitter TRANSFORMER
(not supplied)
300 ohm twin-lead wire
VHF Antenna
Single 75 ohm cable
300 ohm twin-lead wire |
COMBINER |
|
(not supplied) |
|
300-75 OHM MATCHING |
Incoming CATV |
TRANSFORMER |
(not supplied) |
CONVERTER/DESCRAMBLER |
|
This television has an extended tuning range and |
|
|
|
|
|
|
|
|
can tune most cable channels without using a cable |
CONVERTER/DESCRAMBLER |
|
company supplied converter box. Some cable |
|
|
companies offer "premium pay channels" in which |
||
|
|
|
|
|
|
A B |
the signal is scrambled. Descrambling these signals |
SPLITTER |
A/B SWITCH |
for normal viewing requires the use of a descrambler |
|
|
|
|
device which is generally provided by the cable |
|
|
|
company. |
Combination VHF/UHF Antenna (Single 75 ohm cable or 300 ohm twin-lead wire)
Connect the 75 ohm cable from a combination VHF/UHF antenna to the antenna jack.
If your combination antenna has a 300 ohm twin-lead wire, use the 300-75 ohm matching transformer (not supplied).
Combination VHF/UHF Antenna (Separate VHF and UHF 300 ohm twin-leads)
Connect the UHF twin-lead wire to a combiner (not supplied). Connect the VHF twin-lead to the 300-75 ohm matching transformer (not supplied). Attach the transformer to the combiner. Attach the combiner to the antenna jack.
Separate VHF/UHF Antennas
Connect the 75 ohm cable from the VHF antenna and the
UHF antenna twin-lead to a combiner (not supplied). Attach the combiner to the antenna jack.
NOTE: If your VHF antenna has a twin-lead wire, use the
300-75 ohm matching transformer (not supplied), then connect the transformer to the combiner.
For Subscribers to Basic Cable TV Service
For basic cable service not requiring a converter/ descrambler box, connect the CATV 75 ohm coaxial cable directly to the antenna jack on the back of the television.
For Subscribers to Scrambled Cable TV Service
If you subscribe to a cable service which requires the use of a converter/descrambler box, connect the incoming cable to the converter/descrambler box and connect the output of the box to the antenna jack on the back of the television. Follow the connections shown left. Set the television to the output of the converter/descrambler box (usually channel 3 or 4) and use the converter/descrambler box to select channels.
For Subscribers to Unscrambled Basic Cable with Scrambled Premium Channels
If you subscribe to a cable service in which basic cable channels are unscrambled and premium channels require the use of a converter/descrambler box, you may wish to use a two-set signal splitter (sometimes called a "two-set coupler") and an A/B switch box from the cable installer or an electronics supply store. Follow the connections shown left. With the switch in the "B" position, you can directly tune any nonscrambled channels on your TV. With the switch in the "A" position, tune your TV to the output of the converter/ descrambler box (usually channel 3 or 4) and use the box to tune scrambled channels.
3J81301B E |
2 |
5/17/01, 12:40 PM |
|
|
|
|
|
|
The lightning flash with arrowhead symbol, within an |
|
|
|
|
|
|
equilateral triangle is intended to alert the user to the |
|
|
|
|
|
|
presence of uninsulated dangerous voltage within |
|
|
|
|
|
|
|
|
|
|
|
|
|
the product's enclosure that may be of sufficient |
|
|
|
|
|
|
magnitude to constitute a risk of electric shock. |
CAUTION: TO REDUCE THE RISK OF ELECTRIC |
The exclamation point within an equilateral triangle is |
|||||
SHOCK, DO NOT REMOVE COVER |
||||||
(OR BACK). NO USER-SERVICEABLE |
intended to alert the user to the presence of important |
|||||
PARTS INSIDE. REFER SERVICING |
operating and maintenance (servicing) instructions |
|||||
TO QUALIFIED SERVICE PERSONNEL. |
in the literature accompanying the appliance. |
|||||
|
|
|
|
|
|
|
WARNING: TO PREVENT FIRE OR SHOCK HAZARD, DO NOT EXPOSE THIS APPLIANCE TO RAIN OR MOISTURE.
CAUTION: TO PREVENT ELECTRIC SHOCK DO NOT USE THIS POLARIZED PLUG WITH AN EXTENSION CORD, RECEPTACLE OR OTHER OUTLET UNLESS THE BLADES CAN BE FULLY INSERTED TO PREVENT BLADE EXPOSURE.
Limited United States Warranty
Toshiba America Consumer Products, Inc. (“TACP”) and Toshiba Hawaii Inc. (“THI”) make the following limited warranties. These limited warranties extend to the original consumer purchaser or any person receiving this set as a gift from the original consumer purchaser and to no other purchaser or transferee.
Limited One (1) Year Warranty
TACP and THI warrant this product and its parts against defects in materials or workmanship for a period of one (1) year after the date of original retail purchase. During this period, TACP and THI will repair or replace a defective part at their option, with a new or refurbished part, without charge to you. “Authorized TACP/THI service station personnel will come to your home when warranty service is required. Depending on the type of repair required, the service will either be performed in your home or the set will be taken to the authorized TACP/THI service station for repair and returned to your home at no cost to you.”
LimitedTwo (2) Year Warranty of Picture Tube
TACP and THI further warrant the picture tube in this product against defects in materials or workmanship for a period of two (2) years after the date of original retail purchase.
During this period, TACP and THI will repair or replace a defective picture tube at their option, with a new or refurbished picture tube, without charge to you, except that if a defective picture tube is replaced after one (1) year from the date of original retail purchase, you pay labor charges involved in the replacement.
Rental units
The warranty for rental units begins with the first rental of thirty (30) days from the date of shipment to the rental firm, whichever comes first.
Commercial units
Products sold and used for commercial use have a limited ninety (90) day warranty for all parts, labor and picture tube.
Owner’s manual and registration card
You should read this owner’s manual thoroughly before operating this product.You should complete and mail the enclosed registration card within ten days after you, or the person who has given you this product as a gift, purchased this product. This is one way to enable TACP/THI to provide you with better customer service and improved products. Failure to return the registration card will not affect your rights under this warranty.
Your responsibility
The above warranties are subject to the following conditions:
•You must retain your bill of sale or provide other proof of purchase.
•All warranty servicing of this product must be made by an Authorized TACP/THI Service Station.
•These warranties are effective only if the prod uct is purchased and operated in the U.S.A. or Puerto Rico.
•Labor service charges for set installation, set up, adjustment of customer controls and instal lation or repair of antenna sys tems are not covered by this warranty. Reception problems caused by inadequate antenna systems are your responsibility.
•Warranties extend only to defects in materials or workmanship as limited above and do not extend to any product or parts which have been lost or discarded by you or to damage to products or parts caused by misuse, accident, damage caused by Acts of God, such as lightning or fluctuations in electric power, improper installation, improper maintenance or use in violation of instructions furnished by us; or to units which have been modified or had the serial number removed, altered, defaced or rendered illegible.
How to obtain warranty service
If after following alI of the operating instructions in this manual and checking the section “Troubleshooting,” you find that service is needed;
•Call the TACP toll free number 1-800-631-3811 after you find a defective product or part to find the nearest Toshiba Authorized Service Station.
•Please present your bill of sale or other proof to the Authorized Service Station.
Authorized TACP/THI service station personnel will come to your home when warranty service is required. Depending on the type of repair required, the service will either be performed in your home or the set will be taken to the TACP/THI Authorized service station for repair and returned to your home at no cost to you.
In the Continental U.S.
If your TV requires service, call toll free: 1-800-631 -3811
Toll Free 1-800-631-3811
In Hawaii
If your TV requires service, call: (808) 591-9281
327 Kamakee Street, Honolulu, HI 96814
Limitations
All warranties implied by state law, including the implied warranties of merchantability and fitness for a particular purpose, are expressly limited to the duration of the limited warranties set forth above. With the exception of any warranties implied by state law as hereby limited, the foregoing warranty is exclusive and in lieu of all other warranties, guarantees, agreements and similar obligations of manufacturer or seller with respect to the repair or replacement of any parts. In no event shall TACP or THI be liable for consequential or incidental damages.
No person, agent, distributor, dealer or company is authorized to change, modify or extend the terms of these warranties in any manner whatsoever. The time within which action must be commenced to enforce any obligation of TACP or THI arising under this warranty or under any statute, or law of the United States or any state thereof, is hereby limited to 90 days from the date you discover or should have discovered, the defect. This limitation does not apply to implied warranties arising under state law.
This warranty gives you specific legal rights and you may also have other rights which may vary from state to state. Some states do not allow limitation on how long an implied warranty lasts, when an action may be brought, or the exclusion or limitation of incidental or consequential damages, so the above provisions may not apply to you.
REV. 9-01-98
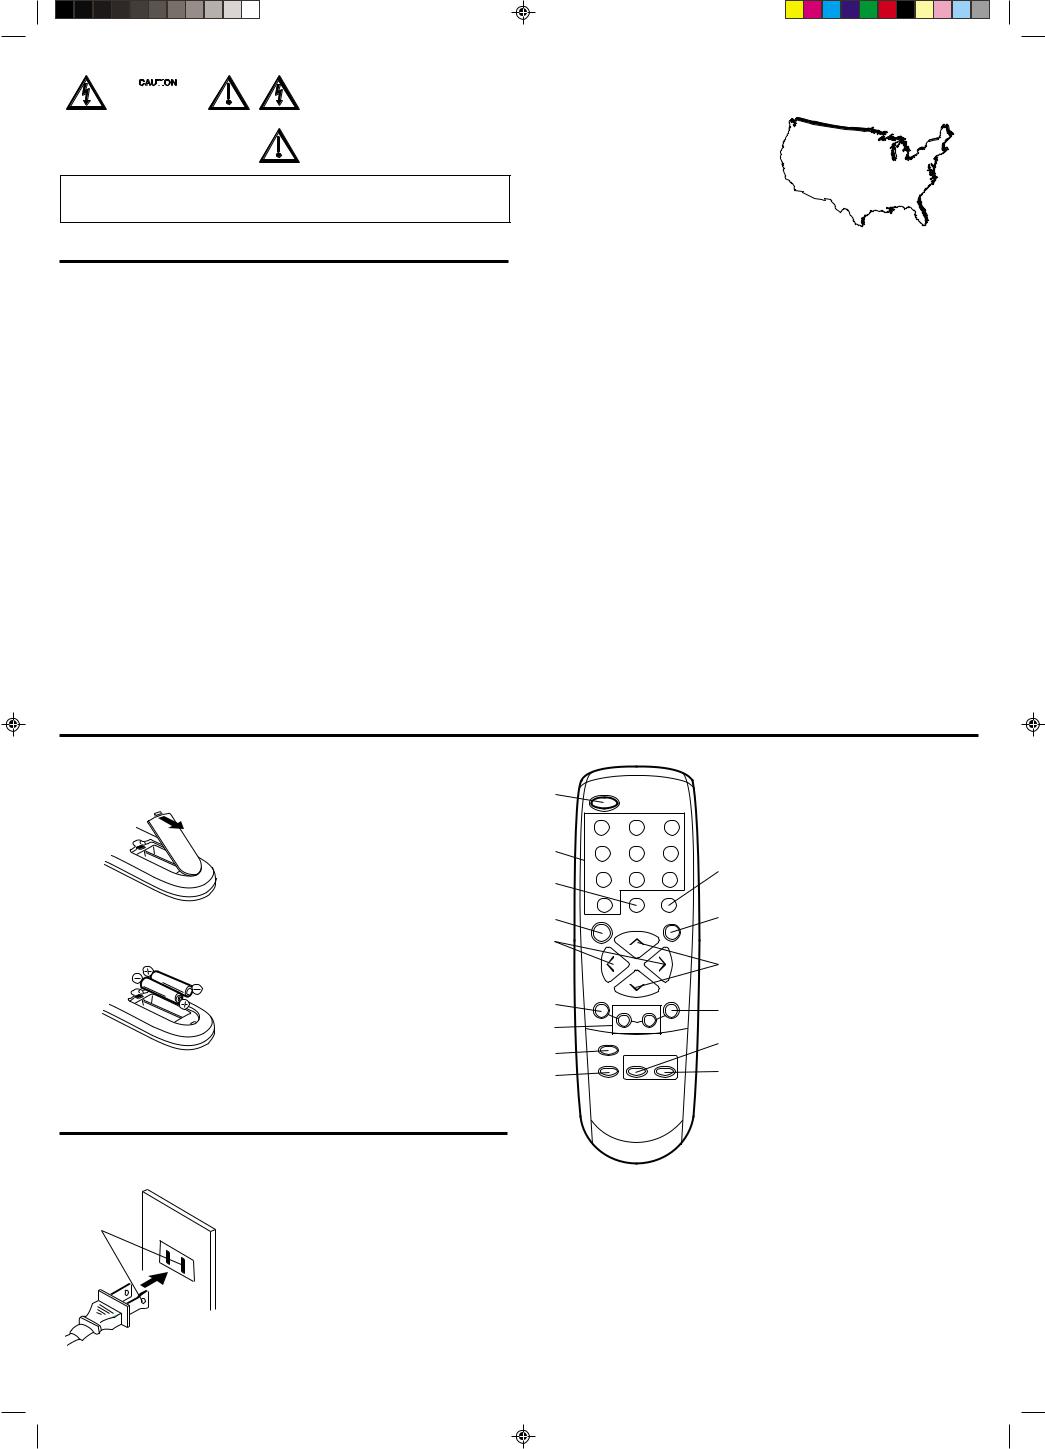
REMOTE CONTROL
Before using the remote control transmitter, batteries must first be installed.
HOW TO INSTALL BATTERIES
1. Open the battery compartment cover.
2. Install two "AAA" (penlight size) batteries.
3. Replace the battery compartment cover.
Use two "AAA" size penlight batteries (supplied) for the transmitter.The batteries may last approximately one year depending on how much the remote control is used. For best performance, it is recommended that batteries should be replaced on a yearly basis, or when the remote operation becomes erratic. Do not mix old and new batteries or different types.
BATTERY PRECAUTIONS
These precautions should be followed when using batteries in this device:
1.Use only the size and type of batteries specified.
2.Be sure to follow the correct polarity when installing the batteries as indicated in the battery compartment. Reversed batteries may cause damage to the device.
3.Do not mix different types of batteries together (e.g. Alkaline and Carbon-zinc) or old batteries with fresh ones.
4.If the device is not to be used for a long period of time, remove the batteries to prevent damage or injury from possible battery leakage.
5.Do not try to recharge batteries not intended to be recharged; they can overheat and rupture.
(Follow battery manufacturer's directions.)
POWER SOURCE
TO USE AC POWER SOURCE
Use the AC polarized line cord provided for operation on AC. Insert the AC cord plug into a standard 120V 60Hz polarized AC outlet.
AC Outlet
Wider Hole
and Blade
Polarized AC Cord Plug (One blade is wider than the other)
NOTE:
1.Never connect the AC line cord plug to other than the specified voltage (120V 60Hz). Use the attached power cord only.
2.If the polarized AC cord does not fit into a nonpolarized AC outlet, do not attempt to file or cut the blade. It is the user's responsibility to have an electrician replace the obsolete outlet.
3.If you cause a static discharge when touching the unit, and the unit fails to function, simply unplug the unit from the AC outlet, wait a few minutes, and plug it back in. The unit should return to normal operation.
|
|
|
|
|
|
After the sleep time is programmed, the |
|
|
|
|
|
|
|
display will disappear then reappear |
|
1 |
POWER |
|
|
|
|
momentarily every ten minutes to remind |
|
|
|
|
|
you the sleep timer function is operating. |
|||
|
|
|
|
|
|||
|
1 |
2 |
3 |
|
|
To confirm the sleep time setting, press |
|
|
|
|
the SLEEP button once and the remaining |
||||
|
|
|
|
|
|
||
|
4 |
5 |
6 |
|
|
time will be momentarily displayed. To |
|
2 |
|
|
cancel sleep time, press the SLEEP button |
||||
|
|
|
|
|
|||
|
7 |
8 |
9 |
10 |
|
repeatedly until the display turns to 0. |
|
3 |
5. |
VOL (VOLUME) + / – Buttons - Press the |
|||||
|
|
|
|
||||
|
|
|
|
|
+ button to increase, or the – button to |
||
|
0 |
CH RTN |
RECALL |
|
|
||
|
|
|
decrease the volume level. |
||||
|
|
|
|
||||
|
|
|
|
|
|
||
4 |
SLEEP |
|
MUTE |
11 |
6. |
MENU Button - Press to display the On- |
|
CH + |
|
Screen menu function. |
|||||
|
|
|
|
|
|||
5 |
|
|
|
|
7. |
SET + / – Buttons - Press to select the |
|
|
|
|
|
12 |
|
desired setting during On-Screen operations. |
|
|
VOL |
|
VOL |
8. |
RESET Button - Press to reset the On- |
||
|
– |
|
+ |
|
|
Screen picture adjustments to their |
|
|
|
|
|
|
|
||
|
MENU |
|
ENTER |
|
|
factory preset positions. |
|
6 |
– SET + |
|
9. |
TV/VIDEO Button - Switches between TV |
|||
|
|
CH – |
|
13 |
|
|
|
|
|
|
|
|
and external inputs. |
||
7 |
|
|
|
|
|
||
|
|
|
|
10. |
RECALL Button - When you press this |
||
|
RESET |
|
|
14 |
|
button, the channel number will appear in |
|
8 |
|
|
|
|
|||
TV/VIDEO CAP/TEXT |
1/2 |
|
|
the upper right corner of the screen. Press |
|||
|
15 |
|
the button again to remove display from |
||||
9 |
|
|
|
|
|||
|
|
|
|
|
the screen. |
||
|
|
|
|
|
|
||
11. MUTE Button - To turn off the sound, press this button once. The TV will be silenced and the symbol "MUTE" will appear on the screen. The muting feature can be released by pressing the "MUTE" button again or one of the VOL + or – buttons.
12. CH (CHANNEL) + / – Buttons - Press the +
1. POWER Button - Press to turn the TV on.
button to change to a higher numbered
Press again to turn the TV off.
channel set into memory. Press the – button
2. Direct Channel Selection Buttons (0-9) -
to change to a lower numbered channel set
Allows direct access to any channel.
into memory.
3. CH RTN Button - This button allows
13. ENTER Button - Press to enter or select
you to go back to the previous channel
information for On-Screen operations.
selected by just pressing the CH RTN
14. CAP/TEXT Button - Press this button to
button. Press this button again to return to
switch between normal TV and the two
the channel you were watching.
Closed Caption modes (captions and 1/2
4. SLEEP Button - To set the TV to turn off
of full screen text). Closed Captioning will
after a preset amount of time, press the
display text on screen for hearing impaired
SLEEP button on the remote control.
viewers.
The clock will count down 10 minutes
15. 1/2 Button - Switches between Channel 1
each time the button is pressed in the order of 120, 110, 100, ······ 20, 10, 0.
and Channel 2 in the Closed Caption mode.
3J81301A E |
3 |
5/2/01, 5:31 PM |
 Loading...