

Page 1
HB 4M00
USER GUIDE
V 1.0
Page 2

UK The CE symbol indicates that the unit complies with the essential
requirements of the directive 89/336/EEC.
UK The features described in this manual are published with reservation to
modifications.
This product is in compliance with the essential requirements and other relevant provisions of the R&TTE directive 89/336/EEC.
The Declaration of conformity can be found on :
http://www.topcom.be/cedeclarations.asp
Page 3
TOPCOM HB 4M00 3
ENGLISH
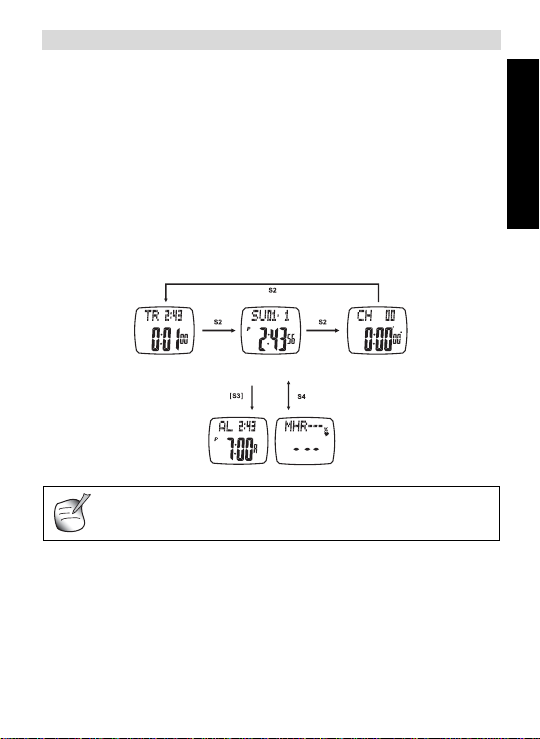
Current TimeMode
Daily Alarm Mode
Countdown Timer Mode Chronograph Mode
Heart Rate Mode
More information about the target heart rate zone, maximum
heart rate etc... can be found on:
www.topcom.net/sports/heartbeat.asp
1 INTRODUCTION
Congratulations on your purchase of the HB 4M00. We hope that you will
enjoy using the Heart Meter and the benefits it offers. In exercise or sports,
your heart naturally speeds up in pumping b lood to the body in accordance
with the increased energy level. The Heart Meter can calculate this increase
expressed as the number of beats per minute (bpm) to determine a target
heart rate safe for each individual. The HB 4M00 watch supports 5 user
modes:
1. Current time mode
2. Alarm mode
3. Chronograph mode
4. Countdown timer mode
5. Heart rate mode
2 SAFETY NOTES
Using a Heart Monitor is NOT a substitute for professional medical
attention. If you suffer from heart disorder , illness or have recently taken up
fitness training, it is advisable that you seek a doctor or talk to your trainer
and work out a fitness plan that suits you.
The watch should only be used as a guide in maintaining a safe h eart beat
rate for exercises. It should NOT be relied upon as a medical heart rate
monitor. If you are uncertain about how your exercise program will impact
on your heart, please consult a physician.
Page 4
ENGLISH
4 TOPCOM HB 4M00
3 CARE AND MAINTENANCE
DO NOT expose the watch to extreme weather conditions or cleaning
agents and solvents. Avoid dropping or rough handling of the watch. Avoid
fastening the strap too tightly. Clean the watch with a dry soft cloth or a soft
cloth moistened with water and mild detergent. Store the watch in a dry
place when not in use.
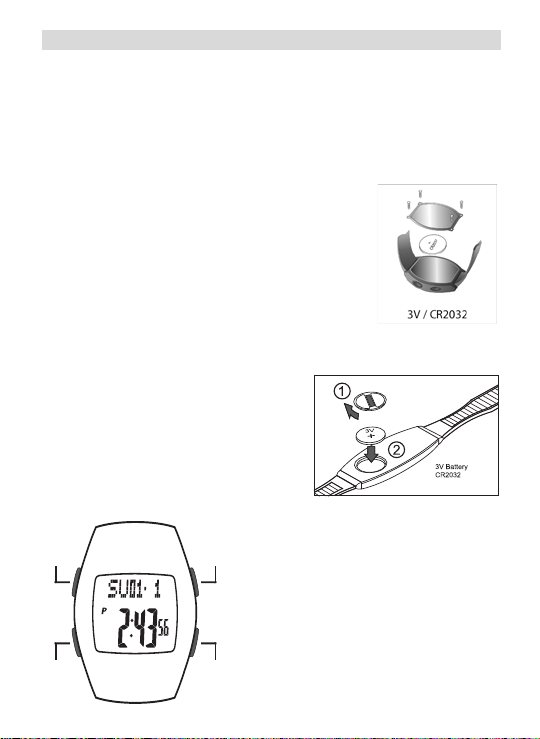
4 CHANGING THE BATTERY
If you are not confident with electronics, let the
battery be changed by a professional. Do not open
the watch yourself.
4.1 WATCH
• Remove the back cover of the watch with a
small screwdriver.
• Remove the old battery.
• Install the new 3V (CR2032) battery with the
positive (+) pole facing up and replace the cover.
4.2 CHEST BELT
• Remove the battery cover from the
bottom of the belt using a small coin.
• Remove the old battery.
• Install the new 3V (CR2032) battery
with the positive (+) pole facing the
battery cover and replace the cover.
5 BUTTONS
S1
S2
The buttons are mentioned in the manual
as follows:
S3
• S1 = Press S1 once
• [S1] = Press & hold S1
• S2 = Press S2 once
• [S2] = Press & hold S2
• S3 = Press S3 once
• [S3] = Press & hold S3
• S4 = Press S4 once
S4
• [S4] = Press & hold S4
Page 5

TOPCOM HB 4M00 5
ENGLISH
Current Time Mode
Setting Sequence
Increase or
decrease
the set value
Increase or
decrease
the set value
at a higher
speed
second
minute
hour
year
month
day
D/M orM/D
12/24-hr
beep
birth-year
birth-month
birth-day
Change and
different settings
select
chime
gender
unit of height
height
unit of weight
weight
activity level
Zone Upper Limit in %
Zone Upper Limit in BPM
Zone Lower Limit in %
Zone Lower Limit in BPM
5.1 MASTER RESET
Press and hold S1, S2, S3 and S4 simultaneously to reset the watch.
!!! All set information will be lost, also the time.
5.2 BACK LIGHT
Press S1 briefly to active the back light of the display for 3 seconds.
6 SETTING TIME/DATE, BEEP ON/OFF AND BIRTHDAY
In normal time mode (time on display):
• [S2]: Seconds will blink.
• S3 or S4: Set seconds to zero.
• S2: Confirm. Minutes will blink.
Page 6

ENGLISH
6 TOPCOM HB 4M00
• S3 or S4: Adjust minutes up or down. [S3] or [S4]: Adjust minutes
quickly.
• S2: Confirm. Hour will blink.
• S3 or S4: Adjust hour up or down. [S3] or [S4]: Adjust hour quickly.
• S2: Confirm.
• S3 or S4: Adjust year up or down.
[S3] or [S4]: Adjust year quickly.
• S2: Confirm
• S3 or S4: Adjust month up or down. [S3] or [S4] : Adjust mont h quickl y.
• S2: Confirm.
• S3 or S4: Adjust day up or down.
[S3] or [S4]: Adjust day quickly.
• S2: Confirm.
• S3 or S4: To set the month format in Month-Day or Day-Month.
• S2: Confirm.
• S3 or S4: To set the time format in 12HR or 24 HR.
• S2: Confirm.
• S3 or S4: To set Chime on (ON) or off (OF).
• S2: Confirm.
• S3 or S4: To set beep on (ON) or off (OF).
• S2: Confirm.
• S3 or S4: To set gender (M or F).
• S2: Confirm.
• S3 or S4: Adjust birth year up or down. [S3] or [S4]: Adjust year
quickly.
• S2: Confirm
• S3 or S4: Adjust birth month up or down. [S3] or [S4]: Adjust month
quickly.
• S2: Confirm
Page 7

TOPCOM HB 4M00 7
ENGLISH
Normal time mode will be displayed when NO key is pressed for
1 minute.
• S3 or S4: Adjust birthday up or down. [S3] or [S4]: Adjust day quickly.
• S2: Confirm
• S3 or S4: To set unit of height to feet (ft) or centimeters (cm).
• S2: Confirm.
• S3 or S4: Adjust height up or d own. [ S3] o r [ S4]: A djust he ight quickl y.
• S2: Confirm.
• S3 or S4: To set unit of weight to pound (lb) or kilogram (kg).
• S2: Confirm.
• S3 or S4: Adjust weight up or down. [S3] or [S4]: Adjust weight
quickly.
• S2: Confirm.
• S3 or S4: Adjust activity level between 1-3 (Zone 1-3). (See also “10.7
Heart rate with exercise timer” )
• S2: Confirm.
• S3 or S4: Adjust the user defined Alert zone (Z4) upper level in %.
[S3] or [S4]: Adjust level quickly.
• S2: Confirm.
• S3 or S4: Adjust the user defined Alert zone (Z4) upper level in BPM.
[S3] or [S4]: Adjust level quickly.
• S2: Confirm.
• S3 or S4: Adjust the user defined Alert zo ne (Z4) lower level in %. [S 3]
or [S4]: Adjust level quickly.
• S2: Confirm.
• S3 or S4: Adjust the user defined Alert zone (Z4) lower level in BPM.
[S3] or [S4]: Adjust level quickly.
• S2: Confirm.
• [S2]: To leave the setting.
Page 8
ENGLISH
8 TOPCOM HB 4M00
hour
minute
on / off
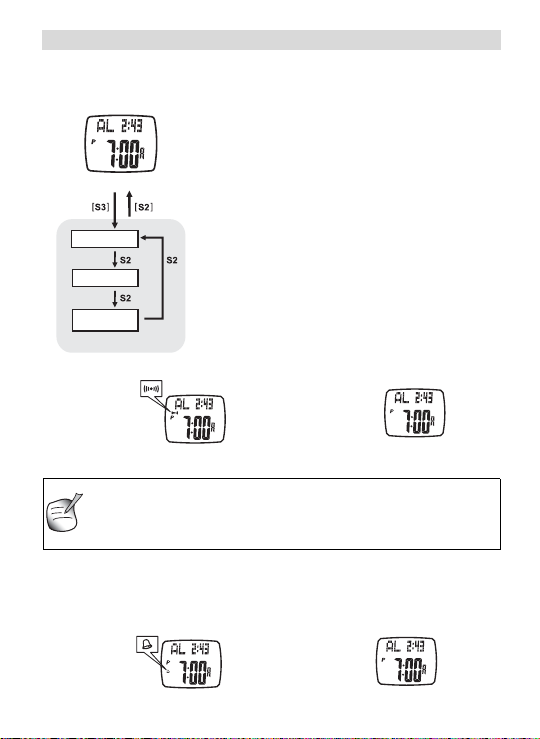
Setting Sequence
Daily Alarm Mode
• To see th e current alarm time, press S3 in normal time mode
• When the alarm is ON, the watch sounds at the alarm time.
• When the alarm rings, press any button except S1 to stop the
alarm.
7 SETTING ALARM TIME AND HOURLY CHIME
7.1 SETTING
Alarm on Alarm off
7.2 HOURLY CHIME
The hourly chime mode can be set in the Time/date setting (See “Setting
time/date, BEEP ON/OFF and birthday” on page5.
In normal time mode (time on display):
• [S3]: Hour will blink.
• S3 or S4: Adjust hour up or down.
[S3] or [S4]: Adjust hour quickly.
• S2: Confirm. Minutes will blink.
• S3 or S4: Adjust minutes up or down.
[S3] or [S4]: Adjust minutes quickly.
• S2: Confirm.
• S3 or S4: Adjust alarm On or Off.
• [S2]: T o confirm the setting of the alarm
time .
Chime on Chime off
Page 9

TOPCOM HB 4M00 9
ENGLISH
The chronograph counts up to 99 hours, 59 minutes and 59
seconds.
running time
running time
running
running time
Chronograph Mode
All Zero (First Hour)
(hour)
(second)
time (minute)
(1/100 second)
The maximum counting down time is 23 hours, 59 and minutes 59
seconds. The initial setting of the timer is 1 minute.
During the last 5 seconds the watch will beep on ce per second, and
10 seconds when it reach zero.
When the timer is counted to zero, it will automatically reload the
preset value.
8 CHRONOGRAPH MODE
In normal time mode:
• S2: To go to chronograph mode
• S3: Start/stop chrono.
• S4: To save the time when
chrono is running (Lap time).
The chrono display is frozen, it
will resume back after 10s.
• [S4] Reset the chrono (Only
when chrono is stopped) and
erase all LAP times.
8.1 LAP MEMORY
You can review the lap record no matter chrono is running or not:
• [S2]: to enter the chrono lap records.
• S3 or S4: to scroll between the LAP times (1-10).
• [S2]: to return back to normal chrono mode.
9 COUNTDOWN MODE
To set the countdown time:
• 2 x S2: To to ggle to countdown mode.
• [S2]: Hours will blink.
• S3 or S4: Adjust hour up or down.
• [S3] or [S4]: Adjust hour quickly.
• S2: Confirm. Minutes will blink.
Page 10

ENGLISH
10 TOPCOM HB 4M00
• S3 or S4: Adjust minutes up or down.
• [S3] or [S4]: Adjust minutes quickly.
• S2: Confirm. Seconds will blink.
• S3 or S4: Adjust seconds up or down.
• [S3] or [S4]: Adjust seconds quickly.
• [S2]: To confirm the count down time.
To start the count down:
• S3: Start the counting.
• S3: Stop / Pause the coun ting. [S4] to reset the counting timer (when
it’s stopped or paused).
10 HEARTBEAT MEASUREMENT
10.1 PRECAUTIONS
• Avoid fastening the strap too tight.
• Do not bend or fold the chest belt for preventing damage.
• Wetting the skin, where there is contact with the conductive area of
the chest belt will improve the conduction and get a more stable signal.
• The physical condition of an individual might effect the intensity of
measured signal.
• Avoid using the heart rate monitor close to a trolley car, a tram stop,
transformer, electric sub stati on and high- tension distribution line s etc.
The radio signal will be affected under influence of the environment
from high voltage and strong electromagnetic fields.
10.2 USING THE TRANSMITTER BELT.
Fasten the fastener at one end. Try the chest belt o n your chest and loosen
the stretch band if necessary.
Adjust the length of the stretch band until it feels conformable. The stretch
band must cling to the chest. Fasten the fastener at the other end. Adjust
the sensor to the center of your chest and be sure the backside of the
Page 11

TOPCOM HB 4M00 11
ENGLISH
Moisten the chess belt conductive pads with saliva of ECG-gel
(available at you local pharmacy) in order to ensure good
contact with the skin at all time.
MHR = 220 - (Your age)
lower limit - upper limit
Z1 : 65 % - 90%
Z2 : 65% - 85%
Z3 : 65% - 80%
pre-defines zone region
Z4 : default (65% - 75%)
user-defined zone region
sensor clings to your chest and touches the skin.
The chest belt has to be worn while using the heart rate function.
10.3 EXERCISE ZONES
Exercise zones are established by setting the Upper and Lower Heart Rate
Limits. These limits constitute a certain percentage of your Ma ximum Heart
Rate (MHR).
The following formula will help you to make an educated guess:
Use the following Heart Rate Zone Chart to select the zone you wish to
exercise in. You should consult a medical professional when selecting
a training zone, especially if you have a heart condition.
Page 12

ENGLISH
12 TOPCOM HB 4M00
Heart Rate Mode
Not activated
Activated
flashing
After 3 sec
heart rate is acquired
heart rate
(beats per minute)
heart rate
estimated maximum
heart rate)
(percentage of
After 5 minutes if no heart rate is received the watch will return to
Idle mode.
There are 4 Heart rate alert zones, Zone 1 -4:
• Zone 1- 3 are predefined as shown in the table above:
Zone 1= Performance
Zone 2 = Fitness
Zone 3 = health
• Zone 4 can be user defined. See “Setting time/date, BEEP ON/OFF
and birthday” on page 5.
10.4 HEART RATE MEASUREMENT
In time mode:
• S4: To go to Heart rate mode.
• S3: To activate the heart rate measurement
• When heart rate is received from the belt the following wi ll be showed:
- the heart rate in beats per minutes
- Percentage of estimated maximum heart rate MHR% ( = current HR/
MHR*100%)
Page 13

TOPCOM HB 4M00 13
ENGLISH
Current Heart Rate
Average Heart Rate
Minimum Heart Rate
Maximum Heart Rate
10.5 AVERAGE, MAXIMUM AND MINIMUM READING
In heart rate measurement:
• S3: to toggle from MHR% to
Average (AVG), Maximum
(MAX) and Minimum (MIN).
• [S4]: to reset the current
reading.
10.6
SETTING AND USING THE HEART RATE ZONE FUNCTION
Select the heart rate zone and setting the Zone + MHR Alarm
The heart rate alert zone can be set by one of the following principles:
Under Zone
In Zone
Above Zone
MHR alarm
Page 14

ENGLISH
14 TOPCOM HB 4M00
Heart Rate Mode
Alert Zone
Select Alert
Below Zone
In Zone
MHR Alert
Above Zone
Select options/
or any Heart Ra te
ON/OFF
ON/OFF
Alert
ON/OFF
Toggle ON/O FF
Alert
ON/OFF
Alert
ON/OFF
Zone
sub-mode
In heart rate or heart rate sub-mode:
press [S2]
S3 or S4: to set the zone alarm On/ Off
S2: to confirm
If you select ON:
S4 or S4: to select Zone 1-4
S2: to confirm
S4 or S4: to select Under Zone alarm
On/Off
S2: to confirm
S4 or S4: to select In Zone alarm On/
Off
S2: to confirm
S4 or S4: to select Above Zone alarm
On/Off
S2: to confirm
S4 or S4: to select MHR In Zone
alarm On/Off
S2: to confirm
Using the heart rate zone/MHR alarm
If the heart rate zone alarm is On, the ‘Zone’ icon will be shown on the
display.
When you are above or below the zone limit:
• An arrow left/right from the ‘Zone’ icon will indicate if you are under or
exceed the zone limit.
• The watch will beep twice every 15 seconds as a warning (depending
how you have set the alarm to be See “Setting and Using the heart
rate zone function” on page 13.)
• The display will blink
[S2]: to confirm
Page 15

TOPCOM HB 4M00 15
ENGLISH
beep !!!
below the
lower region
within the
beep !!!
beep !!!
beep !!!
beep !!!
beep !!!
desirable heart
rate region
exceed the
upper region
Heart Rate Mode
Calorie Burnt Estimation Mode
When you are in the zone:
• The blinking will stop
• The watch will beep twice every 15 seconds if you have set the In
Zone alarm ON (See “10.6 Setting and Using the heart rate zone
function” )
• The ‘Zone’ icon will be shown with a square
When you are above the MHR:
• The watch will beep 4x every 10 seconds if you have set the MHR
alarm ON (See “10.6 Setting and Using the heart rate zone f unction” )
10.7 HEART RATE WITH EXERCISE TIMER
During heart rate measurement press S2 to go to exercise time. The
exercise time automatically starts when valid HR is measured. Whe n no HR
is measured during 10 seconds, the timer will stop and flash.
When the HR measurement is started again after it has been stopped, the
timer will start again from the last reading.
• Press S2 again to see the calorie burnt estimation (KCal).
• [S4]:To reset the calorie counter.
Page 16

ENGLISH
16 TOPCOM HB 4M00
Fat Burnt Estimation Mode
By getting the exercise time, heart rating and activity le vel (See
“6 Setting time/date, BEEP ON/OFF and birthday” ), this wat ch
can estimate the fat burnt. Set the appropriate activity level
(1 = almost no exercise, 2 = frequently and 3 = intense.
Fat Burnt
Calorie Burnt
Heart Rate Display
Exercise Timer
Above Zone Timer
In Zone Timer
Total Zone Timer
Below Zone Timer
Estimation Display
Estimation Display
Display
• Press S2 again to see the Fat burnt estimation.
• [S4]:To reset the calorie counter.
• When exercise time is showed, press S3 to select between 4 different
times:
• Total Zone time: sum of below (In and out Zone time)
• Below Zone time: total time of heart rate measurement belo w the min.
zone setting.
• Above Zone time: total time of heart rate measurement above the
max. zone setting.
• In Zone time: total time of heart rate measurement in the zone region
setting.
Page 17

TOPCOM HB 4M00 17
ENGLISH
How to Reset the exercise time and zone time:
• Press S4 2 seconds to reset the zone time.
• Press S4 4 seconds to reset the exercise time.
11 SPECIFICATIONS
Current Time Mode
• Hour, minute and second
• Month, day, day of week and year
• 12 / 24 hour format selectable
• Month-day/Day-month selectable
• Auto calendar from year 2000 to 2055
• Birthday range from year 1900 to 2099
• Automatic age calculation from birthday for estimated maximum heart
rate calculation
• Hourly Chime on the hours
• Key tone ON/OFF
Heart Rate Mode
• Measuring range: 30 to 240 bpm
• 3 Pre-defined Heart Rate Zone Setting
• 1 User-defined Heart Rate Zone Setting
• Average, Minimum and Maximum Heart Rate records
• Selectable Heart Rate Zone Alert (Upper and lower limit)
• Over maximum Heart Rate hazard warning alarm
Daily Alarm Mode
• Daily Alarm: 1 daily alarm
• Alarm Duration: about 30 seconds
Chronograph Mode
• Resolution: 1/100 second
• Counting range: 99 hours, 59 minutes, 59.99 seconds
Countdown Timer Mode
• Resoluton: 1 second
• Setting limit: 23 hours, 59 minutes, 59 seconds
• Timer sound: beep every 1 second at last 10 seconds and beep for 2
seconds when count to zero
Heart Rate Exercise Timer
• Resolution: 1 second
• Counting range: 99 hours, 59 minutes, 59 seconds
• Total Zone time, Below, In, and above Zone time
Page 18

ENGLISH
18 TOPCOM HB 4M00
Calorie Burnt mode
• Calorie Burnt estimation
• Up to 99999Kcal
Fat Burnt mode
• Fat Burnt estimation
• Up to 99999g
Others
• Electro-luminescent backlight
12 TOPCOM WARRANTY
12.1 WARRANTY PERIOD
The Topcom units have a 24-month warranty period. The warranty period
starts on the day the new unit is purchased. There is no warranty on
standard or rechargeable batteries (AA/AAA type).
Consumables or defects causing a negligible effect on ope ration or value of
the equipment are not covered. The warranty has to be proven by
presentation of the original or copy of the purchase receipt, on which the
date of purchase and the unit-model are indicated.
12.2 WARRANTY HANDLING
A faulty unit needs to be returned to a Topcom service centre including a
valid purchase note and a filled in service card.
If the unit develops a fault during the warranty p eriod, Topcom or its officially
appointed service center will repair any defects caused by material or
manufacturing faults free of charge, by either repairing or exchanging the
faulty units or parts of the faulty units. In case of replacement, colour and
model can be different from the original purchased unit.
The initial purchase date shall determine the start of the warranty period.
The warranty period is not extended if the unit is exchang ed or repaire d by
Topcom or its appointed service centre.
12.3 WARRANTY EXCLUSIONS
Damage or defects caused by incorrect treatment or operation and damag e
resulting from use of non-original parts or accessories are not covered by
the warranty. The warranty does not cover damage caused by outside
factors, such as lightning, water and fire, nor any damage caused during
transportation. No warranty can be claimed if the serial number on the units
has been changed, removed or rendered illegible. Any warranty claims will
be invalid if the unit has been repaired, altered or modified by the buyer.
Page 19

SERVICE RETURN CARD - RÜCKSENDEKARTE -
RETURN WITH YOUR DEFECT PRODUCT
Name/Vorname/Prénom/Naam:
Surname/Familienname/Nom/Familienaam:
Street/Straße/Rue/Straat:
Nr./N°: Box/Postfach/Boîte/Postbus:
Location/Ort./Lieu/Plaats: Post code/Postleitzahl/Code Postal/Postcode:
Country/Land/Pays/Land:
Tel./Tél.:
E-mail:
Model name/Modellbezeichnung/Nom du modèle/Modelnaam:
Serial Nr/Seriennummer/N° série/Serienummer:
CARTE DE RETOUR SERVICE - RETOURFICHE
Purchase date/Kaufdatum/Date d’achat/Aankoopdatum:
Fault description/Beschreibung des Defekts/Description de la panne/Beschrijving defect:
(Original Proof of Purchase has to be attached to this return card to be valid for warranty)
Model name/Modellbezeichnung/Nom du modèle/Modelnaam:
Serial Nr/Seriennummer/N° série/Serienummer:
Purchase date/Kaufdatum/Date d’achat/Aankoopdatum:
Fault description/Beschreibung des Defekts/Description de la panne/Beschrijving defect:
(DD/MM/YYYY) - (TT/MM/JJJJ)
(DD/MM/YYYY) - (TT/MM/JJJJ)
Page 20

visit our website
www.topcom.net
 Loading...