

Page 1
Butler 3055
User Guide
Handleiding
Mode d’emploi
Bedienungsanleitung
Manual de operación
- v1 -
Page 2

This product is in compliance with the essential requirements and other relevant provisions of the R&TTE directive 1999/5/EC.
The Declaration of conformity can be found on :
http://www.topcom.net/support/declarations/
Page 3
Butler 3055
!! Important !!
To use ‘Caller ID’ (display caller), this service has to be activated on your phone line.
Normally you need a separate subscription from your telephone company to activate this function.
If you don’t have the Caller ID function on your phone line, the incoming telephone numbers
Pour utiliser la fonction ‘Caller ID/Clip’ (affichage de l’appelant), ce service doit être activé sur votre ligne
téléphonique. Généralement, vous avez besoin d’un abonnement séparé de votre compagnie de
Si vous n’avez pas la fonction ‘Caller ID - Affichage Appelant’ sur votre ligne téléphonique,
les numéros de téléphone entrants n’apparaîtront PAS sur l’écran de votre téléphone.
Om de ‘Nummerweergave’ te kunnen gebruiken, moet deze dienst geactiveerd zijn op uw telefoonlijn.
zullen de inkomende telefoonnummers NIET op de display van uw toestel verschijnen.
Zur Verwendung der ‘Rufnummernanzeige’ muss dieser Dienst erst für Ihre Telefonleitung
freigegeben werden. Zur Aktivierung dieser Dienstleistung benötigen Sie meistens ein separates
Wenn Sie für Ihre Telefonleitung keine Rufnummernanzeigefunktion haben, erscheinen
Para poder usar la función “Identificación de llamadas,este servicio tiene que estar dado de alta en
su línea telefónica. Normalmente es necesario abonarse a dicho serviciopara que la compañía
Si su línea telefónica no dispone de la funciónIdentificación de llamadas, la pantalla del aparato no
will NOT be shown on the display of your telephone.
!! Important !!
téléphone pour activer cette fonction.
!! Belangrijk !!
Om deze dienst te activeren, hebt U hiervoor meestal een apart abonnement
Indien U geen nummerweergavefunctie hebt op uw telefoonlijn,
die eingehenden Telefonnummern NICHT im Display Ihres Gerätes.
mostrará los números de teléfono de las llamadas entrantes.
van uw telefoonmaatschappij nodig.
!! Wichtig!!
Abonnement Ihrer Telefongesellschaft.
¡¡ Importante !!
telefónica active esta función.
GB The features described in this manual are published with reservation to modifications.
NL De in deze handleiding beschreven mogelijkheden worden gepubliceerd onder
voorbehoud van wijzigingen.
F Les possibilités décrites dans ce manuel sont publiées sous réserve de modifications.
D Die in dieser Bedienungsanleitung umschriebenen Möglichkeiten, werden vorbehaltlich
Änderungen publiziert.
ES Las características descritas en este manual pueden ser objeto de futuras modificaciones
.
Page 4

Butler 3055
Safety Instructions
•Only use the charger plug supplied. Do not use other chargers, as this may damage the
battery cells.
•Only insert rechargeable batteries of the same type. Never use ordinary,
non-rechargeable batteries. Insert rechargeable batteries so they connect to the right
poles (indicated in the battery compartment of the handset).
• Do not touch the charger and plug contacts with sharp or metal objects.
• The operation of some medical devices may be affected.
• The handset may cause an unpleasant buzzing sound in hearing aids.
• Do not place the basic unit in a damp room or at a distance of less than 1.5 m away
from a water source. Keep water away from the handset.
• Do not use the telephone in environments where there is a risk of explosions.
• Dispose of the batteries and maintain the telephone in an environment-friendly manner.
• As this telephone cannot be used in case of a power cut, you should use a
mains-independent telephone for emergency calls, e.g. a mobile phone.
Cleaning
Clean the telephone with a slightly damp cloth or with an anti-static cloth. Never use
cleaning agents or abrasive solvents.
4
444
Page 5

Butler 3055
1INSTALLATION 7
2 KEYS/LED 8
3DISPLAY (LCD) 10
4 HANDSET OPERATION 11
4.1 Setting the language 11
4.2 Making Calls 11
4.2.1 External Call 11
4.2.2 Number preparation 11
4.2.3 Redialling the last number dialled 11
4.2.4 Redial one of the last 5 numbers dialled 11
4.2.5 Calling a programmed number from the Phone Book 12
4.2.6 An internal call: calling another handset 12
4.3 Receiving a Call 12
4.3.1 Receiving an external call 12
4.3.2 Receiving an internal call 12
4.3.3 Receiving an external call during an internal call 13
4.4 Activate/deactivate handsfree function 13
4.5. Headset connection 13
4.6 Transferring a call to another handset 13
4.7 Out of Range Warning 13
4.8 Setting the speaker volume 13
4.9 Call Duration Indicator on the Display 14
4.10 Turning off the microphone (mute) 14
4.11 Pause key 14
4.12 Conference call (two internal DECT handsets and one external caller) 14
4.13 Locating a misplaced handset (paging) 14
4.14 Using the alphanumeric handset keypad0 15
4.15 The Phone Book 15
4.15.1 Adding a number and a name to the Phone Book 15
4.15.2 Looking up a number in the Phone Book 16
4.15.3 Changing a name or number in the Phone Book 16
4.15.4 Deleting name and number from the Phone Book 16
4.16 Switch the handset on/off 17
4.16.1 Switch the handset off 17
4.16.2 Switch the handset on 17
4.17 Setting the ring volume level on the handset 17
4.17.1 Setting the ring volume for external calls (0-9) 17
4.17.2 Setting the ringer volume for internal calls (1-9) 17
4.18 Setting the ringer melody on the handset 18
4.18.1 Setting a ringer melody for external calls (1-9) 18
4.18.2 Setting a ringer melody for internal calls (1-9) 18
4.19 Setting the ring volume level of the base 18
4.20 Locking the key pad 18
4.21 Turning key click on/off 19
4.22 The R key (flash) 19
4.23 Changing the PIN code 19
4.24 Subscribing a handset to a Butler 1000, 1010, 1210, 2405, 2410, 2450, 2455, 30xx base unit 20
4.25 Subscribing Butler 3055 handset on another base (other brand/model) 21
4.26 Subscribing a TOPCOM Butler 300 DECT GAP Headset 21
4.27 Removing subscription of a handset to a base unit 21
ENGLISH
5
55555555
5
Page 6

Butler 3055
4.28 Selecting a base unit 22
4.28.1 Automatic selection 22
4.28.2 Manual selection 22
4.29 Barring outgoing calls 23
4.30 Direct Call 23
4.30.1 To program the Direct Call number 23
4.30.2 Turn the Direct Call function ON/OFF 23
4.31 Default settings (reset) of the parameters 24
4.32 Complete Reinitialisation of the telephone 24
4.33 Setting the handset dialling mode 25
5 CALLER ID/CLIP 25
5.1. Setting the date and time 26
5.2 The Call List 26
5.3 Calling a number from the Call List 26
5.4 Storing a number from the Call List in the Phone Book 27
5.5 Deleting numbers from the Call List 27
5.5.1 Deleting one number 27
5.5.2 Delete all numbers 27
6 VOICE MAIL INDICATOR 27
7 BASE TELEPHONE OPERATION 27
7.1 Making a call 27
7.2 Adjusting the speaker volume 27
7.3 Setting the dial mode for the base 28
7.4 Transfer a call from base to handset 28
7.5 Setting the base flash time 28
8 ANSWERING MACHINE 28
8.1. LED Display 28
8.2 Base Key Functions 29
8.3 Outgoing Messages 29
8.3.1 Recording outgoing messages (OGM 1 or OGM 2) 29
8.3.2 Playback the Outgoing Message 29
8.3.3 Select outgoing message 30
8.3.4 Erasing the Outgoing Message 30
8.4 Turning Answering Machine On/Off 30
8.5 Setting Number of Rings 30
8.6 Checking Number of Rings 30
8.7 Setting Day and Time 31
8.8 Checking Day/Time 31
8.9 Programming the VIP Code 31
8.9.1 Changing the VIP Code 31
8.9.2 Checking the VIP Code 32
8.10 Operation 32
8.11 Recording a Memo 32
8.12 Playback of Incoming Messages and Memos 32
8.13 Erasing Messages 32
8.13.1 Erasing Messages One at a Time during Playback 32
8.13.2 Erase all messages 33
8.14 Memory Full 33
8.15 Remote Operation 33
8.16 Turning Answering Machine On Remotely 34
9 TROUBLE SHOOTING 35
10 TOPCOM WARRANTY 36
11 TECHNICAL CHARACTERISTICS 37
6
666666666
Page 7
Butler 3055
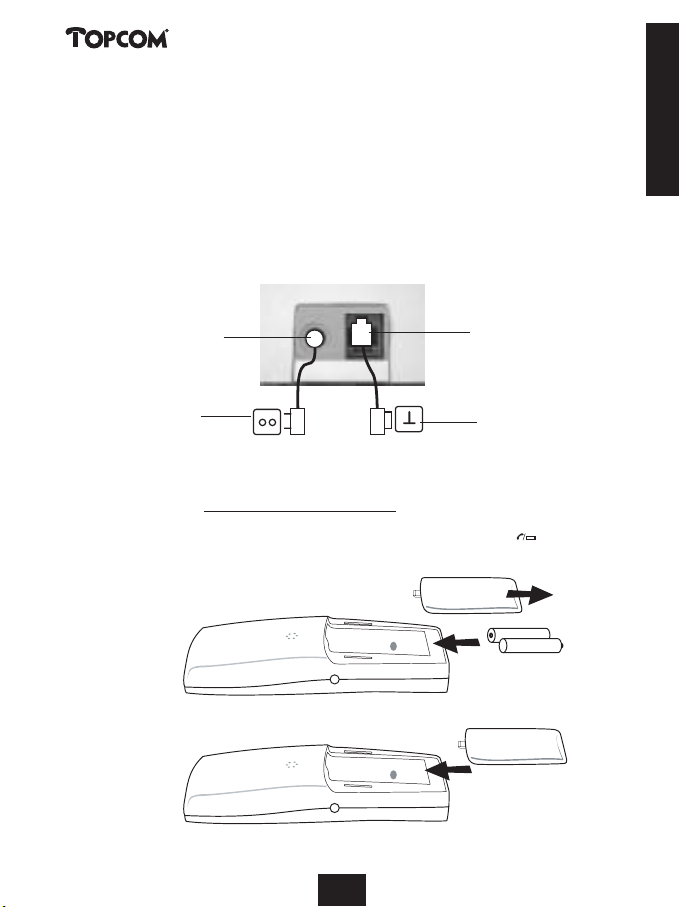
1 INSTALLATION
Before you use the telephone for the first time, you must first make sure the battery is charged
for 20 hours. If you do not do this, the telephone will not work optimally.
For installation, do the following:
• Plug one end of the adaptor into the outlet and the other end into the adapter jack on the
bottom of the telephone.
• Connect one end of the telephone cord with the wall phone jack and the other end to the
bottom of the telephone.
telephone connection
adapter outlet
adapter jack
wall phone jack
•Open the battery compartment (see below).
• Insert the batteries respecting the (+ and -) polarity.
• Close the battery compartment.
• Leave the handset on the base unit for 20 hours. The Line/Charge indicator (LED) on
the base unit will light up.
+-
-+
ENGLISH
7
77777777777
Page 8
Butler 3055
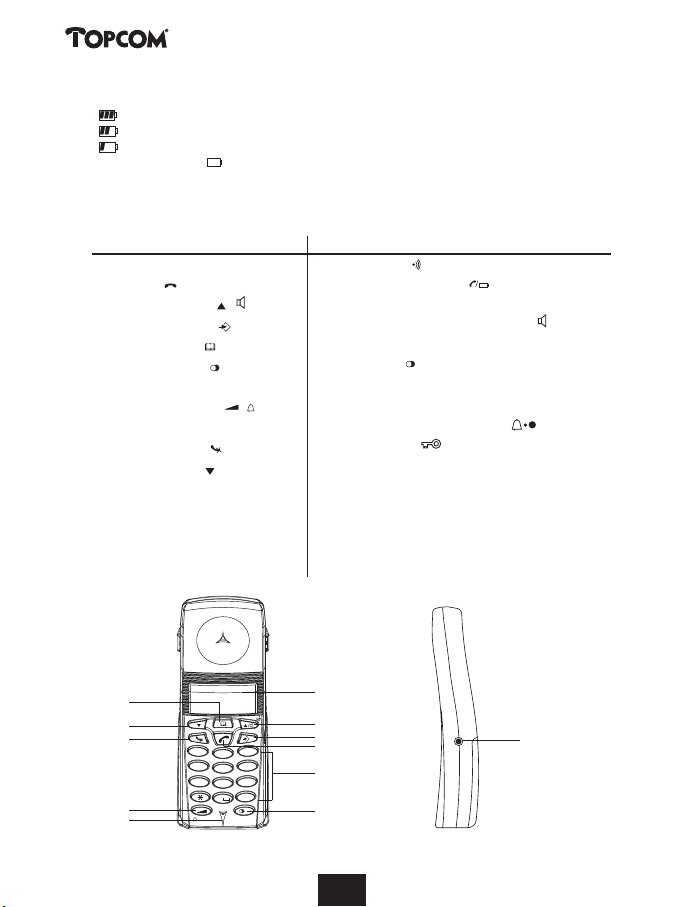
Battery indicator:
• The battery is fully charged.
• The battery is half drained (50%)
• The battery is low. When the battery is low, you will hear warning signals and the
battery symbol on the display will blink.
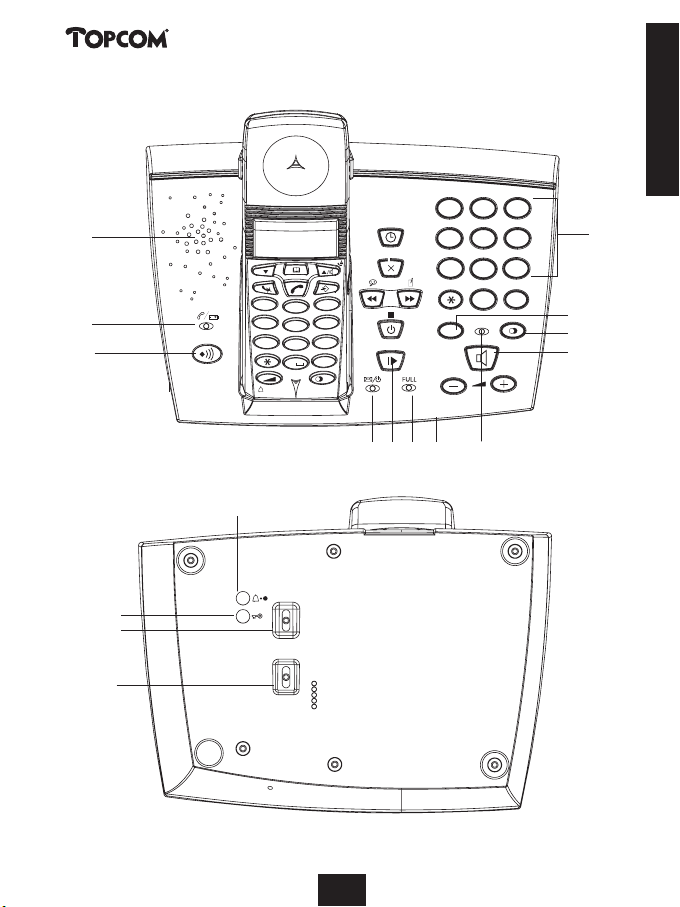
2KEYS/LED
HANDSET BASE
1 Display
2 Line key
3 Up/Handsfree key /
4 Programming key
5 Phonebook key
6 Redial/Pause key /P
7Microphone
8 Volume/Ringer key /
9 Alphanumeric keys
10 Delete/Mute key
11 Down/Flash key /R
12 Headset connection
13 Paging key
14 Line/Charge indicator (LED)
15 Base telephone dialling keys
16 Line/Handsfree base telephone key
17 Flash key R
18 Redial key
19 Tone/pulse switch
20 Flash time switch
21 Numbers of rings setting key
22 VIP code key
23 OFF-hook base telephone LED
24 Memory full LED
25 Messages/answering ON-OFF LED
26 Answering machine key
27 Microphone
28 Speaker
5
11
10
8
7
R
X
OK
DEF
3
1
ABC
2
MNO
GHI
6
4
JKL
5
WXYZ
PQRS
TUV
9
7
8
#
0
/P
1
3
4
2
12
9
6
8
88888888888
Page 9
Butler 3055
28
14
13
ENGLISH
ABC
DEF
2
1
GHI
4
R
X
1
GHI
4
PQRS
7
OK
DEF
3
ABC
2
MNO
6
JKL
5
WXYZ
TUV
9
8
#
0
/P
PQRS
7
R
3
MNO
JKL
6
5
WXYZ
TUV
9
8
0
#
15
17
18
16
25 26 24 27
23
21
22
20
19
300 ms
100 ms
P
T
9
Page 10

Butler 3055
00000000000000
88888/88888:88
3 DISPLAY (LCD)
4
12 3
1 Number of calls received.
2 Date (day/month) of calls received.
3 Time (hour:minutes) of calls received.
4 Call information.
5 Symbol display ( ):
- this symbol means that the handset is located within the range of the base unit.
-when this symbol starts blinking, this means you are beyond the range of the
base unit. Move closer to the base unit so that the connection between the base unit
and the handset can be restored.
6 Symbol display ( ):
- this symbol means that the telephone has received calls that are automatically
stored in the Call List.
7 Symbol display ( ):
- this symbol means that the mute function is activated, the microphone is turned off
during a conversation.
8 Symbol display ( ):
- this symbol appears on the display when you make or receive a call.
9 Symbol display ( ):
- this symbol means that the ringer is turned off. When you receive a call, the
telephone does not ring. The telephone will ring when you receive an internal call.
10 Symbol display ( ):
- this symbol is the battery indicator.
11 Symbol display ( ):
- this symbol means you are in the menu.
12 Symbol display ( ):
- this symbol appears when you browse the numbers in the Phone Book.
13 Symbol display ( ):
- this symbol appears when you have received a voice mail message (see chapter 6).
14 Symbol display ( ):
- this symbol means that the handsfree function is activated. You can now talk without
having to pick up the handset.
- Blinks when base telephone is active. You can’t take the line with the handset as long
as base telephone is active!
10
101010101010101010101010
Page 11

Butler 3055
4 HANDSET OPERATION
4.1 Setting the language
The telephone has 5 display languages: see display languages table on packaging!!
To set the language, do the following:
• Press the Programming key .
• Press the Up or Down key repeatedly until ‘SETTING’ appears on the display
• Press the Programming key .
• Press the Up or Down key repeatedly until ‘LANGUE’ appears on the display.
• Press the Programming key .
• The language set appears on the display.
• Press the Up or Down key repeatedly to select the language you would like to use.
• Once the desired language appears on the display, press the Programming key to confirm
your selection or repeatedly press the Mute/Delete key to leave the menu.
4.2 Making Calls
!!! When making external calls through the handset, base telephone operation is not possible!!!
4.2.1 External Call
• Press the Line key .
• The Line/Charge indicator (LED) on the base unit will blink. ‘EXT’ and the Call symbol
appear on the display.
• You will hear the dial tone. Dial the telephone number you wish to call.
• The number appears on the display and is dialled.
• After finishing your call, press the Line key to hang up.
4.2.2 Number preparation
• Dial the telephone number you wish to call. You can correct the number by pressing the
Delete/Mute key .
• Press the Line key .
• The Line/Charge indicator (LED) on the base unit will blink. ‘EXT’ and the Call symbol
appear on the display.
• The telephone number is dialled automatically.
• After finishing your call, press the Line key to hang up.
4.2.3 Redialling the last number dialled
• Press the Line key .
• The Line/Charge indicator (LED) on the base unit will blink. ‘EXT’ and the Call symbol
appear on the display.
• You will hear the dial tone.
• Press the Redial key . The number you last called is dialled automatically.
4.2.4 Redial one of the last 5 numbers dialled
• Press the Redial key . The number you last called appears on the display. If you would like
to dial one of the last 5 numbers dialled, press the Redial key a few times until the desired
number appears on the display.
11
111111111111111111111111
ENGLISH
Page 12

Butler 3055
• Press the Line key .
• The number shown on the display is dialled automatically.
• After finishing your call, press the Line key to hang up.
4.2.5 Calling a programmed number from the Phone Book
The telephone has a Phone Book in which you can program the telephone number with name.
If you would like to call a number from the Phone Book:
• Press the Phone Book key . The first number of the Phone Book appears on the display.
• Press the Up or Down key repeatedly to select the telephone number you wish to call.
• Press the Line key .
• The number shown on the display, is dialled automatically.
• After finishing your call, press the Line key to hang up.
4.2.6 An internal call: calling another handset
This function only works if multiple handsets are subscribed to the base unit !
• Press the Programming key .
• Press the Up or Down key repeatedly until ‘INTERCOM’ appears on the display.
• Press the Programming key .
• ‘INT‘ appears on the display
• Dial the number of the handset you would like to call.
• After finishing your call, press the Line key to hang up.
4.3 Receiving a Call
4.3.1 Receiving an external call
• All subscribed handsets will ring when you receive a call.
• The Call symbol blinks on the display.
• The telephone number of the caller appears on the display if you have Caller ID service (CLIP).
Consult your telephone company. The name of the caller also appears on the display if:
- the name is programmed into the Phone Book
- the network sends the name together with the telephone number
(FSK CID system only).
• Press the Line key to accept the external call.
• During the call ‘EXT’ and the symbol appear on the display. The call timer starts running.
• After finishing your call, press the Line key to hang up or put the handset back on the
base unit.
4.3.2 Receiving an internal call
This function only works if multiple handsets are subscribed to the base unit!
• The handset rings.
• ‘INT’ and the number of the handset calling, appear on the display. The Call
symbol blinks on the display.
• Press the Line key to accept the internal call.
• During the call, ‘INT’, the handset number of the caller and the symbol appear on the
display. The call timer starts running.
• After finishing your call, press the Line key to hang up.
12
12
1212121212121212121212
Page 13

Butler 3055
4.3.3 Receiving an external call during an internal call
If you receive an external call during an internal call, you will hear a call waiting tone (double beep)
on both handsets being used for an internal call.
• Press the Line key twice to accept the external call.
• After finishing your call, press the Line key to hang up.
4.4 Activate/deactivate handsfree function
This function allows you to communicate without having to pick up the handset. When you are
talking, press the Up/Handsfree key / to activate the handsfree function.
Press the same button to deactivate the handsfree function.
Note : When you are calling in handsfree mode and you want to change the volume, press the Volume
button .
Attention !! When you use the handsfree function for a long time, the batteries will be empty quickly !
4.5. Headset connection
You can connect a headset with a 3 pole jack plug of 2,5mm on the right side of the handset.
When the headset is connected, you can only hear and talk through the headset. The headset
microphone can still be muted by the Mute key. The handsfree speaker can still be activated by
pressing the handsfree key .
4.6 Transferring a call to another handset
• You have an external caller on the line.
• Press the Programming key .
• ‘INTERCOM’ appears on the display.
• Press the Programming key .
• The external call is now on hold.
• ‘INT‘ appears on the display.
• Dial the number of the handset to which you would like to transfer the call.
• If the handset dialled is answered, you can have an internal conversation. Press the Line key
and the external call is transferred.
• If the handset dialled is not answered, press the Down key to speak to the external caller
again.
4.7 Out of Range Warning
If the handset is out of range of the base unit, a warning signal will sound.
• ‘SEARCHING’ appears on the display and the symbol blinks on the display.
•Move closer to the base unit.
• As soon as you are back within range of the base unit, a signal sounds and the symbol
stops blinking.
4.8 Setting the speaker volume
Use the Volume/Ringer key / to set the volume of the speaker (handset). You can select
from 5 levels. The telephone is set to level ‘3’ by default.
ENGLISH
13
1313131313131313131313
13
Page 14

Butler 3055
During a call, you can change the volume:
• Press the Volume/Ringer key / .
• The volume level currently set appears on the display.
• Use the number keys to set the desired level (1-5).
• Press the Volume/Ringer key / to confirm your selection.
Note : You have 8 seconds to set the desired volume; if you do not, the telephone returns to standby
mode and the volume remains unchanged.
4.9 Call Duration Indicator on the Display
As soon as you press the Line key the call duration appears on the display (minutes-seconds).
E.g. “ 01-20 “ for 1 minute and 20 seconds.
The call duration remains visible on the display for 5 seconds after each call.
4.10 Turning off the microphone (mute)
It is possible to turn off the microphone during a call by pressing the Delete/Mute key . Now
you can speak freely without the caller being able to hear you.
• You are on the phone. The Line/Charge indicator (LED) on the base unit will blink and
the Call symbol appears on the display.
• Press the Delete/Mute key to turn off the microphone.
• The symbol ‘X’ appears on the display ( ).
•When you want to resume the conversation, press the Delete/Mute key again.
• The symbol ‘X’ disappears from the display ( ). The person on the other end of the line can
hear you again.
4.11 Pause key
If you dial a telephone number and you would like to add a pause to this number, press the
Pause key at the desired place in the number.
When you call this number, this pause (3 seconds) is automatically included.
4.12 Conference call (two internal DECT handsets and one external caller)
You can have a telephone conversation with one internal and one external caller at the same
time.
•While on the line with an external caller, press the Programming key .
• ‘INTERCOM’ appears on the display.
• Press the Programming key .
• The external call is now on hold.
• ‘INT‘ appears on the display.
• Dial the number of the handset you would like to include in the call.
•Once the handset dialled is answered, keep the ‘#’ key pressed for 3 seconds.
• ‘CONFERENCE’ appears on the display.
• Now you are connected to one external and one internal caller (conference call).
4.13 Locating a misplaced handset (paging)
If you cannot find the handset, briefly press the Paging key on the base unit.
All handsets subscribed with the base unit will sound a signal so you can locate the misplaced
handset. To stop the signal, briefly press the Line key on any handset.
14
141414
141414141414141414
Page 15
Butler 3055
4.14 Using the alphanumeric handset keypad
Use the alphanumeric keypad to type text. To select a letter, press the corresponding key. E.g.
if you press the alphanumeric key ’5’, the first character (j) appears on the display. Press it
repeatedly to select other characters from this key.
Press the ‘2’ key twice to select the letter ‘B’. If you would like to select both ‘A’ and ‘B’ after
each other, first press the ‘2’ key once to select ‘A’, wait 2 seconds until the cursor moves to the
next position and then press the ‘2’ key twice to select ‘B’. You can delete characters mistakenly
typed by using the Delete key . The character in front of the cursor will be deleted. You can
move the cursor by pressing the Up and Down keys .
Available characters
Press the right keys to get the following characters:
Keys First Second Third Fourth Fifth
1 + - / 1
2 A B C 2
3 D E F 3
4 G H I 4
5 J K L 5
6 M N O 6
7 P Q R S 7
8 T U V 8
9 W X Y Z 9
0 SPACE 0
4.15 The Phone Book
4.15.1 Adding a number and a name to the Phone Book
• Press the Programming key .
• Press the Up or Down key repeatedly until ‘PHONE BOOK’ appears on the display.
• Press the Programming key .
• ‘SEARCH‘ appears on the display.
• Press the Up or Down key repeatedly until ‘ADD NEW’ appears on the display.
• Press the Programming key .
• ‘NAME‘ appears on the display.
• Enter the name. Use the alphanumeric keys.
• Press the Programming key .
• Enter the telephone number. Use the alphanumeric keys.
• Press the Programming key .
• You will hear a long beep. The name and the number are stored in the Phone Book.
press press press press press
ENGLISH
15
151515
151515151515151515
Page 16
Butler 3055
4.15.2 Looking up a number in the Phone Book
• Press the Programming key .
• Press the Up or Down key repeatedly until ‘PHONE BOOK’ appears on the display.
• Press the Programming key .
• ‘SEARCH‘ appears on the display.
• Press the Programming key .
• Enter the first letters of the desired name.
• Press the Programming key .
• The first name, corresponding with these letters appears on the display.
• Press the Up or Down key to browse for other numbers in the Phone Book.
•Once the desired number appears on the display, the number will be automatically dialled
once the Line key is pressed.
4.15.3 Changing a name or number in the Phone Book
• Press the Programming key .
• Press the Up or Down key repeatedly until ‘PHONE BOOK’ appears on the display.
• Press the Programming key .
• ‘SEARCH‘ appears on the display.
• Press the Up or Down key repeatedly until ‘EDIT’ appears on the display.
• Press the Programming key .
• The first number in the Phone Book appears on the display.
• Press the Up or Down key until the desired number appears on the display.
• Press the Programming key to change the selected number programmed into the memory.
• Press the Delete key to delete each letter of the name and use the alphanumeric keypad
to enter the correct name.
• Press the Programming key .
• Press the Delete key to delete each digit of the number and use the alphanumeric keypad to
enter the correct number.
• Press the Programming key to save the changes made.
4.15.4 Deleting name and number from the Phone Book
• Press the Programming key .
• Press the Up or Down key repeatedly until ‘PHONE BOOK’ appears on the display.
• Press the Programming key .
• ‘SEARCH‘ appears on the display.
• Press the Up or Down key repeatedly until ‘DELETE’ appears on the display.
•Press the Programming key .
• The first number in the Phone Book appears on the display.
• Press the Up or Down key until the number you want to delete appears on the display.
• Press the Delete key .
• ‘DELETE ?’ appears on the display.
•Press the Programming key to confirm that you want to delete it.
16
161616
161616161616161616
Page 17

Butler 3055
4.16 Switch the handset on/off
4.16.1 Switch the handset off
The handset is turned on.
• Press the Programming key .
• Press the Up or Down key repeatedly until ‘POWER OFF?’ appears on the display.
• Press the Programming key . The telephone turns itself off. You cannot dial any more
numbers, nor receive any calls.
Note : If you would like to leave the menu without turning off the handset, press the Delete/Mute key .
4.16.2 Switch the handset on
The handset is turned off.
• Press the Programming key . The telephone turns itself on.
4.17 Setting the ring volume level on the handset
You can change the ring volume of an incoming call. You have 10 levels. You can set the ring
volume of internal and external calls separately so you can hear a difference.
If you select level ‘0’, the symbol appears on the display and you no longer hear the phone
ring when an external call is received (you still hear it ring for internal calls).
Level ‘9’ is the highest level. The telephone is set to level ‘5’ by default.
4.17.1 Setting the ring volume for external calls (0-9)
• Press the Programming key .
• Press the Up or Down key repeatedly until ‘RING SEL’ appears on the display.
• Press the Programming key .
• ‘EXTERNAL‘ appears on the display.
• Press the Programming key .
• Press the Up or Down key repeatedly until ‘VOLUME’ appears on the display.
• Press the Programming key .
• The current volume level used appears on the display.
• Enter a number between 0 and 9 to select the desired ringer volume. Use the number keypad
to do this.
• Press the Programming key to confirm your selection.
4.17.2 Setting the ringer volume for internal calls (1-9)
• Press the Programming key .
• Press the Up or Down key repeatedly until ‘RING SEL’ appears on the display.
• Press the Programming key .
• ‘EXTERNAL‘ appears on the display.
• Press the Up or Down key repeatedly until ‘INTERNAL’ appears on the display.
• Press the Programming key .
• Press the Up or Down key repeatedly until ‘VOLUME’ appears on the display.
• Press the Programming key .
• The current volume level appears on the display.
• Enter a number between 1 and 9 to select the desired ringer volume. Use the number keypad
to do this.
• Press the Programming key to confirm your selection.
ENGLISH
17
171717
171717171717171717
Page 18
Butler 3055
4.18 Setting the ringer melody on the handset
You can change the ringer melody for an incoming call. You have 9 ringer melodies to choose
from (1-9). By default, the ringer melody is set to ‘5’.
4.18.1 Setting a ringer melody for external calls (1-9)
• Press the Programming key .
• Press the Up or Down key repeatedly until ‘RING SEL’ appears on the display.
• Press the Programming key .
• ‘EXTERNAL‘ appears on the display.
• Press the Programming key .
•‘MELODIES‘ appears on the display.
• Press the Programming key .
• The currently set ringer melody appears on the display.
• Enter a number between 1 and 9 to select he desired ringer melody. Use the number keypad
to do this.
• Press the Programming key to confirm your selection.
4.18.2 Setting a ringer melody for internal calls (1-9)
• Press the Programming key .
• Press the Up or Down key repeatedly until ‘RING SEL’ appears on the display.
• Press the Programming key .
• ‘EXTERNAL‘ appears on the display.
• Press the Up or Down key repeatedly until ‘INTERNAL’ appears on the display.
• Press the Programming key .
•‘MELODIES‘ appears on the display.
• Press the Programming key .
• The currently set ringer melody appears on the display.
• Enter a number between 1 and 9 to select the desired ringer melody. Use the number keypad
for this.
• Press the Programming key to confirm your selection.
4.19 Setting the ring volume level of the base
You can change the ring volume and melody of the Butler 3055 base.
•When base is ringing
• Press volume key on base to increase or decrease ring volume
4.20 Locking the key pad
If you lock the alphanumeric keypad, it is impossible to dial a telephone number.
Only the Programming key can still be used. ‘KEY LOCKED’ will be displayed on the display.
• Press the Programming key .
•Press the Up or Down key repeatedly until ‘KEY SETUP’ appears on the display.
• Press the Programming key .
• KEY LOCK‘ appears on the display.
• Press the Programming key .
• The current status of the keypad appears on the display:
- ‘LOCK’: the keypad is locked
- ‘UNLOCK’: the keypad is not locked
18
1818181818181818181818
18
Page 19

Butler 3055
• Press the Up or Down key to make your selection.
• Press the Programming key to confirm your selection.
4.21 Turning key click on/off
You can set the telephone to make a sound whenever you press a key.
• Press the Programming key .
• Press the Up or Down key repeatedly until ‘KEY SETUP’ appears on the display.
• Press the Programming key .
• Press the Up or Down key repeatedly until ‘KEY CLICK’ appears on the display.
• Press the Programming key .
• The current status appears on the display:
- ‘CLICK ON’: turn on key click
- ‘CLICK OFF’: turn off key click
• Press the Up or Down key to make your selection.
• Press the Programming key to confirm your selection.
4.22 The R key (flash)
Press the Flash key ‘R’ to use certain services such as “call waiting” (if your telephone company
offers this feature); or to transfer calls if you use a telephone exchange (PABX). The Flash key
‘R’ is a brief interruption of the line. You can set the flash time to 100ms or 300ms. This is set
to 100ms by default! However, if your system requires a longer flash time, do the following:
• Press the Programming key .
• Press the Up or Down key repeatedly until ‘SETTING’ appears on the display
• Press the Programming key .
• Press the Up or Down key repeatedly until ‘RECALL’ appears on the display.
• Press the Programming key .
• Press the Up or Down key repeatedly to select the flash time:
- SHORT = 100ms
- LONG = 300ms
• Press the Programming key to confirm your selection.
Caution: The flash time set on the handset is independent from the base.
To set the base flash time, please refer to §7.5.
4.23 Changing the PIN code
Certain functions are only available if you know the PIN code of the telephone.
The PIN code has 4 digits. The default PIN code setting is ‘0000’. If you would like to change
the default PIN code and set your own secret code, do the following:
• Press the Programming key .
• Press the Up or Down key repeatedly until ‘SETTING’ appears on the display.
• Press the Programming key .
• Press the Up or Down key repeatedly until ‘PIN CODE’ appears on the display.
• Press the Programming key .
•‘OLD CODE’ appears on the display.
• Enter the old PIN code. Use the number keys.
• Press the Programming key .
ENGLISH
19
191919
191919191919191919
Page 20

Butler 3055
• ‘NEW CODE’ appears on the display.
• Enter the new PIN code in. Use the number keys.
• Press the Programming key .
• ‘AGAIN’ appears on the display.
• Enter the new PIN code again. Use the number keys.
• Press the Programming key .
• You hear a confirmation tone. The new PIN code has been set.
Caution : Do not forget your personal PIN code. If you do, you have to restore the default settings
(reset – see section 4.32).
4.24 Subscribing a handset to a Butler 1000, 1010, 1210, 2405, 2410, 2450, 2455,
30xx base unit
In order to be able to make and receive telephone calls, a new handset has to be subscribed to
the base unit. You can subscribe 5 handsets to one base unit. By default, each handset is subscribed as handset 1 on the base unit upon delivery (base unit 1).
!!! You only need to subscribe the handset if: !!!
• the handset subscription has been removed from the base unit (e.g. for reinitialisation)
• you want to subscribe a different handset to this base unit.
The underlined procedure is only applicable to a Butler 1000, 1010, 1210, 2405, 2410, 2450,
2455, 30xx handset and base unit!!
Keep the Paging key on the base unit pressed for 10 seconds until the Line/Charge indicator
on the base unit begins to blink rapidly. The Line/Charge indicator will blink rapidly
for one minute. During this minute, the base unit is in subscribing mode and you must do the
following to subscribe the handset:
• Press the Programming key .
• Press the Up or Down key repeatedly until ‘BASE SUB’ appears on the display.
• Press the Programming key .
• ‘BASE _‘ appears on the display.
• Enter a number of the base unit you would like to subscribe the handset to (1-4).
Use the number keypad.
Note: Each handset can be subscribed to 4 different DECT base units. Each base unit is assigned a
number from 1 to 4 in the handset. When you subscribe a new handset, you can assign a base unit
number. It is best to use ‘1’ .
• ‘SEARCHING’ and the symbol appears on the display.
• The RFPI code (each base unit has a unique RFPI code) appears on the display and a signal
sounds when the handset has found the base unit.
• Press the Programming key .
• ‘PIN’ appears on the display.
• Enter the 4-digit PIN code of the base unit in (default PIN code is ‘0000’). Use the number
keypad.
• Press the Programming key .
• The handset is subscribed to the base unit.
20
202020
202020202020202020
Page 21

Butler 3055
4.25 Subscribing Butler 3055 handset on another base (other brand/model)
Put the base in subscription mode (see manual of the base). If the base is in subscribing mode,
you have to do the following to subscribe the handset:
• Press the Programming key .
• Press the Up or Down key repeatedly until ‘BASE SUB’ appears on the display.
• Press the Programming key .
• ‘BASE _‘ appears on the display.
• Enter a number for the base unit to which you would like to subscribe the handset (1-4).
Use the number keypad.
• ‘SEARCHING’ and the symbol appear on the display.
• The RFPI code (each base unit has a unique RFPI code) appears on the display and a signal
sounds once the base unit is found by the handset.
• Press the Programming key .
• ‘PIN’ appears on the display.
• Enter the 4-digit PIN code of the base unit (default PIN code is ‘0000’). Use the number keypad.
• Press the Programming key .
• The handset is subscribed to the base unit.
4.26 Subscribing a TOPCOM Butler 300 DECT GAP Headset
Make sure that the base pin-code is set to ‘0000’! See 4.23 for changing the base pin-code.
Press the Paging key on the base unit for 10 seconds until the Line/charge indicator on
the base unit starts to blink quickly. The line/charge indicator will blink quickly for one
minute. During this minute, the base unit is in subscribing mode and you must do the following to subscribe the headset:
- Turn ON the headset by pressing the ON/OFF button until you hear two beep tones. At the
same time the red and green LED will lit ones.
- Remove the rubber cover of the power socket so that the hole of the power socket is free.
Pull out the rubber cover from the headset so that the registration key hole is free also.
- Press the headset registration key. The red LED will flash rapidly.
- If after a few seconds the green LED flashes slowly, the registration is successful.
- If the red LED flashes slowly, the registration is failed. Repeat above procedure and make
sure that the base pin-code is set to ‘0000’!
4.27 Removing subscription of a handset to a base unit
It is possible to cancel subscription of a handset to a base unit. You would do this if a
handset is damaged and has to be replaced by a new one.
Caution: You can only cancel subscription of another handset, not the handset you are using to do the
cancellation procedure.
• Press the Programming key .
• Press the Up or Down key repeatedly until ‘SETTING’ appears on the display.
• Press the Programming key .
ENGLISH
21
2121212121212121212121
21
Page 22

Butler 3055
• Press the Up or Down key repeatedly until ‘REMOVE HS’ appears on the display.
• Press the Programming key .
• ‘PIN’ appears on the display.
• Enter your 4-digit PIN code in (default PIN code is ‘0000’). Use the number keypad.
• Press the Programming key .
• ‘REMOVE HS’ appears on the display.
• Dial the number of the handset you want to remove (1 –5). Use the number keypad.
• Press the Programming key .
• ‘REMOVE HS’ appears on the display and the handset is removed
•NOT SUB’ appears on the handset removed.
4.28 Selecting a base unit
If your handset is subscribed to several base unit stations (max. 4) , you must select a base unit
because the handset can only communicate with one base unit at a time. There are two possibilities:
4.28.1 Automatic selection
If you set the handset to ‘automatic selection’, the handset will automatically choose the closest
base unit in standby.
• Press the Programming key .
• Press the Up or Down key repeatedly until ‘SETTING’ appears on the display.
• Press the Programming key .
• Press the Up or Down key repeatedly until ‘BASE SEL’ appears on the display.
• Press the Programming key .
• Press the Up or Down key repeatedly until ‘AUTO’ appears on the display.
• Press the Programming key .
• ‘SEARCHING’ and the symbol appear on the display.
•Asignal sounds once the handset has found a base unit.
4.28.2 Manual selection
If you set the handset to ‘manual selection’, the handset will only choose the base unit you
have set.
• Press the Programming key .
• Press the Up or Down key repeatedly until ‘SETTING’ appears on the display.
• Press the Programming key .
• Press the Up or Down key repeatedly until ‘BASE SEL’ appears on the display.
• Press the Programming key .
• Press the Up or Down key repeatedly until ‘MANUAL’ appears on the display.
• Press the Programming key .
• ‘BASE -‘ appears on the display.
• Enter the number of the base unit you want to select (1-4). Use the number keypad.
• Press the Programming key .
• ‘SEARCHING’ and the symbol appear on the display.
•Asignal sounds once the selected base unit has been found.
22
2222222222222222222222
22
Page 23

Butler 3055
Notes :
• Before you can select a base unit, the base unit must be subscribed to the handset first.
• If ‘NOT SUB’ appears on the display, this means the selected base unit does not exist or the handset has
not been subscribed.
4.29 Barring outgoing calls
You can program the handsets to bar calls to certain telephone numbers so that for instance ‘00’
international numbers cannot be called. Up to 5 numbers (of max. 5 digits) can be barred.
To do this, do the following:
• Press the Programming key .
• Press the Up or Down key repeatedly until ‘SETTING’ appears on the display.
• Press the Programming key .
• Press the Up or Down key repeatedly until ‘BARRING’ appears on the display.
• Press the Programming key .
• ‘PIN’ appears on the display.
• Enter your PIN code
• Press the Programming key .
• ‘BAR NUM ’ appears on the display. You are in memory “1. _ _ _ _ _”.
• Press the Up or Down key to select one of the 5 memories.
• Enter the number (max. 5 digits) to be barred, e.g. 01486.
• Press the Programming key .
• ‘HS _ _ _ _ _’ (= number on the handset (1-5)) ‘01486’ (= the barred numbers) appear on
the display.
• Enter the numbers of the handsets from which the barred numbers cannot be called.
• e.g. Press the number key 2, 3 and 5. On the display, this will appear: HS _2 3_5 01486
These handsets can no longer dial numbers beginning with ‘01486’.
• Press the Programming key to confirm your selection.
Repeat the same procedure described above if you would like to bar other numbers (max. 5)!
4.30 Direct Call
By setting a Direct Call number, the phone will automatically take the line and dial out this
number. This function is useful to use the phone as a emergency phone.
4.30.1 To program the Direct Call number
• Press the Programming key
• Press the up or down key until ‘DIRECT’ appears on the display
• Press the Programming key
• If necessary, delete the existing number by pressing the Delete-key a few times
• Enter the direct number
• Press the Programming key
4.30.2 Turn the Direct Call function ON/OFF
To turn it ON:
• Press the Programming key
• Press the up or down key until ‘DIRECT’ appears on the display
ENGLISH
23
23
2323232323232323232323
Page 24

Butler 3055
• Press the mute-key for 2s
• ‘DIRECT ON’ appears on the display
To turn if OFF:
- Quick press the Programming key twice
4.31 Default settings (reset) of the parameters
You can reset the standard (default) settings in the telephone. You need the PIN code to do this.
The default settings are:
Keypad: not locked
Key clicks: active
Speaker volume: level 3
Ringer melody: 1
Ringer volume : 5
Selection base unit: automatic
Flash time: 100ms
To restore the default settings, do the following:
• Press the Programming key .
• Press the Up or Down key repeatedly until ‘SETTING’ appears on the display.
• Press the Programming key .
• Press the Up or Down key repeatedly until ‘RESET’ appears on the display.
• Press the Programming key .
• ‘PIN’ appears on the display.
• Enter your PIN code.
• Press the Programming key .
4.32 Complete Reinitialisation of the telephone
This function allows you to completely reinitialise the telephone without requiring your PIN
code. This will delete all Phone Book memory entries, all handsets will be removed, all default
settings will be restored and the default PIN code will be restored to ‘0000’.
Do the following:
• Disconnect the battery in the telephone.
• Keep the ‘*’ key pressed and reconnect the battery until the handset rings continually and
the display lights up. Release the ‘*’ button and press the Programming key .
• The handset finds the base unit and a signal sounds.
• Briefly press the ‘*’ key.
• ‘RESET ?‘ appears on the display.
• Press the Programming key to confirm your selection of disconnect the battery to
discontinue the procedure.
• ‘RESETTING‘ appears on the display and a long beep tone sounds.
• ‘NOT SUB‘ appears on the display. The handset is completely reinitialised.
24
24
2424242424242424242424
Page 25

Butler 3055
Afterwards, you must resubscribe all handsets as described in point 4.24! However you no
longer need to set the base unit to subscription mode, because this now happens automatically!
4.33 Setting the handset dialling mode
There are two types of dialling modes:
- DTMF/Tone dialling (the most common)
- Pulse dialling (for older installations)
To change the mode of numeration:
- Press the programming key
- Press the Up or Down key repeatedly until ‘SETTING’ appears on the display.
- Press the Programming key
- Press the Up or Down key repeatedly until ‘DIAL MODE’ appears on the display.
- Press the Programming key
- Select ‘TONE’ or ‘PULSE’ by means of the UP and Down key
- Press the Programming key to confirm
Note: The handset dialling mode is independent from the base (See 7.3)!! To change the dialling mode of
the base telephone you have to use the T/P switch at the bottom of the base.
5 CALLER ID/CLIP
(This service only works when you have a Caller ID/Clip subscription. Contact your telephone
company).
When you receive a call, the telephone number of the caller, the date and time appears on the
handset display. The telephone can receive calls in both FSK and DTMF. If the name is programmed in the Phone Book, the name in the Phone Book is displayed!
The telephone can store 30 calls in a Call List that can be reviewed later. The telephone never
stores the same call twice. When the memory is full, the new calls automatically replace the
oldest calls in the memory. The symbol on the display blinks if the call is not read or not
answered. If the Call List is empty and you press the Up key , three beep tones will sound.
You can view the information of an incoming call as follows:
• Press the Up key . The name (if sent by the network or present in the Phone Book memory)
of the caller, the sequence number of the call in the Call List, the date and time of the call
appear on the display.
• Press the Down key . The telephone number of the caller appears on the display.
ENGLISH
25
25
2525252525252525252525
Page 26

Butler 3055
5.1. Setting the date and time
When you receive an incoming call and the date and time are not sent together with the
telephone number, this means that the date and the time will not be shown on the display. By
setting the date and time, they will be shown on the display, together with the telephone
number, every time a call comes in !
• Press the Programming key .
• Press the Up or Down key a few times until ‘SETTING’ appears on the display.
• Press the Programming key .
• ’DATE/TIME’ appears on the display.
• Press the Programming key again.
•When ‘YEAR’ appears on the display, enter the 2 last numbers of the year (00=2000,
01=2001, ...) and press the Programming key to confirm.
•When ‘MONTH’ appears on the display, enter the month (01=January, 02=February, ...) and
press the Programming key to confirm.
•When ‘DAY’ appears on the display, enter the day of the month and press the Programming
key to confirm.
•When ‘HOUR’ appears on the display, enter the current hour (in 24h format) and press the
Programming key to confirm.
•When ‘MINUTES’ appears on the display, enter the minutes and press the Programming key
to confirm.
The date and time are now set !
5.2 The Call List
The calls received are stored in the Call List (max. 30 numbers).
• Briefly press the Up key to view the most recent call.
• The name of the most recent caller appears on the display. If no name is available, ‘NO
NAME’ appears on the display.
• If it is a private number, ‘UNAVAL’ appears on the display.
• The date and time the call was received are linked to each call.
• Briefly press the Down key to view the telephone number of the call.
• Briefly press the Down key to browse other numbers on the list.
Notes :
• If neither the Up or Down key is pressed for 15 seconds, the telephone will return to standby mode.
• After a call is received, the number of the caller remains on the display for 15 seconds after the last ring.
• Caller ID is not available while you are on the line.
5.3 Calling a number from the Call List
• Press the Up key to go to the Call List
• Press the Up key to look up the desired call. Press the Down key to view the telephone
number.
• Once the number is on the display, press the Line key and the number is dialled automatically.
(The symbols and ‘EXT’ appear on the display and the call timer starts.)
26
262626
262626262626262626
Page 27

Butler 3055
5.4 Storing a number from the Call List in the Phone Book
• Press the Up key to go to the Call List.
• Press the Up key to look up the desired number.
• Press the Phone Book key twice.
• ‘STORE’ appears on the display.
• The number is stored in the Phone Book. If the call was displayed without a name (NO
NAME), you can add a name to this number in the Phone Book afterwards
• The telephone returns to standby-modus.
5.5 Deleting numbers from the Call List
5.5.1 Deleting one number
• Press the Up key to go to the Call List.
• Press the Up key to find the call you would like to delete.
•Once this call appears on the display, press the Delete key .
• ‘DELETE?’ appears on the display.
• Press the Programming key to confirm your selection or the Delete key to cancel.
• The call is deleted and the next call appears on the display.
5.5.2 Delete all numbers
• Press the Up key to go to the Call List.
• Keep the Delete key pressed until ‘DELETE ALL’ appears on the display.
• Press the Programming key to confirm your selection or the Delete key to cancel.
• All calls are deleted.
6 VOICE MAIL INDICATOR
This function only works if you have the voice mail or phone mail service and if the network
sends this indication along with the caller ID (CLIP) information!
When you receive a new message in your voice mail system, the ‘ ’ icon will appear on the
display. Once you have listened to your messages, the ‘ ’ icon will disappear.
7 BASE TELEPHONE OPERATION
You can also make a telephone call by using the base station handsfree speakerphone.
7.1 Making a call
• Press the Handsfree base dialling key to take the line
• Press the numeric keys on the base to form a telephone number
• Press again the Handsfree base dialling key to end the telephone conversation
7.2 Adjusting the speaker volume
Press the ‘+’ or ‘-’ key during base handsfree conversation to adjust the speaker volume. If
the speaker volume is too loud there is the possibility that the speaker starts to oscillate (flute
tone). To avoid this, please lower the speaker volume.
ENGLISH
27
2727
Page 28

Butler 3055
Caution: The handsfree communication is half duplex which means that if the person on the other side of
the line starts to speak, the microphone is muted, so the person can’t hear you at that time. Please try to
avoid speaking to each other at the same time.
Note: The handsfree speaker volume is different from the answering machine volume!!
7.3 Setting the dial mode for the base
You can set the base dialling mode in Pulse(P) or Tone/DTMF(T) by the switch at the bottom of
the base.
Caution: The base dialling mode is independent from the handset.
To set the handset dial mode please look at §4.34.
7.4 Transfer a call from base to handset
During base handsfree conversation you can transfer the call to any registered handset by
pressing the paging key . The line indicator LED will start to blink.
• You can take over the line by any registered handset when pressing the line-key .
•Or press the paging key again if you don’t want to transfer the call
Note: The handsets will not ring during transfer!!
7.5 Setting the base flash time
You can set the base flash time by the switch at the bottom of the base. You can set it in
100ms or 300ms.
Caution: The base flash time is different from the handset flash time. To set the handset flash time, please
refer to § 4.22.
8 ANSWERING MACHINE
The Butler 3055 has a built-in digital answering machine with a recording capacity of 11 min.
The answering machine can be operated remotely and features the possibility of recording two
outgoing messages (OGM 1 and OGM 2) (maximum of 2 min).
There are 2 possibilities:
-With OGM 1, the caller has the possibility to leave a message
-With OGM 2, only the outgoing message is given without the caller having the
opportunity to leave a message
The max. recording time for each incoming message = 2 min.
An internal voice will state various information, such as day and time of the call, as well as
settings such as VIP code, ringer tones .. The language of the internal voice is stated on the
packaging!
8.1. LED Display
The new message LED will flash if new messages have been received; the number of
flashes between each long pause indicates how many new calls have been recorded.
If the answering machine is switched off, the On-Off LED does not light.
28
2828
Page 29
Butler 3055
1,2
MEMORY FULL-LED is turned on when the internal memory is full and no new messages can be
recorded.
8.2 Base Key Functions
Note: - The
Key Stand-by mode During message
1 Play OGM Record OGM Go to previous message
2 Playback messages None Pause
3
4 speech +ringing
5 Select OGM Switch On-Off Stop
6 Play VIP-code Set VIP-code None
7 Current number of Set numbers of None
8 Playback Time Set date/time None
9
Press key briefly press key for 2 seconds play-back
8.3 Outgoing Messages
Two outgoing messages of 2 minutes can be recorded (OGM1 and OGM2).
•Outgoing message 1 for the answering function and possibility for callers to leave a
message.
•Outgoing message 2 for the answering function without allowing callers to leave a
messages on the machine.
8.3.1 Recording outgoing messages (OGM 1 or OGM 2)
• Press the -key to select the OGM.
•Avoice will playback the recorded OGM
• Press the -key for two seconds
1,2
• Record the outgoing message after the beep
• Press the Stop -key to stop recording.
Note: The recording cannot exceed 2 minutes. If no outgoing message is recorded, the prerecorded
outgoing message is used.
8.3.2 Playback the Outgoing Message
To check the outgoing message now set:
• Press the key.
Note: To stop playing the welcome note briefly press the Stop -key .
1,2
keys are at the bottom of the base
&
None Record memo Skip message
Set volume None Set volume
ring tones ring tones
None Delete all messages Delete message or
delete OGM
ENGLISH
29
2929
Page 30
Butler 3055
8.3.3 Select outgoing message
• Press the key to switch between the 2 outgoing messages.
• The internal voice will confirm the set outgoing message.
Notes:
It is only possible to select an outgoing message if the answering machine is turned on.
If the memory is full, only outgoing message 2 can be selected (only answering without recording
messages)
8.3.4 Erasing the Outgoing Message
If you erase the outgoing message, the default message will be played ‘Please call later’ .
Erase the outgoing message as follows:
• Select the desired outgoing message by pressing the key.
• Press the key to play the outgoing message.
• Keep the key pressed down when the OGM is played back.
8.4 Turning Answering Machine On/Off
If the answering machine is on, the -LED will light up and the machine will
automatically pick up the line after a number of rings (see 'Setting Number of Rings').
• Press the key for 2 secs to switch on the answering machine. A voice confirms the setting
• Press the key for another 2 secs to switch off the answering machine. A voice confirms
Note: Even if the answering machine is off, the machine will automatically pick up after 10 rings in order to
enable remote activation (see 8.15 Remote operation)
8.5 Setting Number of Rings
The number of rings after which the answering machine will answer calls can be set from 2 – 9
and TS (Toll saver). The standard setting is 3 rings. In Toll saver mode, the machine will answer
after 5 rings if there are no new messages, and after 2 rings if there are new messages. If there
are no new messages and you call your machine to check your messages remotely (see 8.15
Remote operation), you can hang up after the 2nd ring. You do not need to pay connection
fees and you know that you do not have any new messages.
• Briefly press the key. A voice will state the current number of rings.
• Press the key for 2 secs to set the number of ringing tones.
• Press the or key to change the current number of rings.
• Confirm the setting by pressing the key. The current ring setting is confirmed by the
Notes:
• If you do not press any keys for 3 seconds, the machine will revert back to the answering machine menu,
• If there is a loss of power in the base, the number of rings will revert to 3.
8.6 Checking Number of Rings
• Press the key briefly.
• The internal voice will state the number of rings set.
1,2
and says which outgoing message is active (OGM 1 or OGM 2).
the setting.
internal voice.
without changing the settings.
30
3030
Page 31

Butler 3055
8.7 Setting Day and Time
The day and time setting of the answering machine is independent of the telephone
component. The day and time of each call is registered and announced during play-back. The
format of the hour depends on the language of the internal voice. e.g. English is in 12-hour
format and German is in 24-hour format.
Programming the day and time:
• Keep the -key pressed down for 2 secs.
• The internal voice will ask you to set the day.
• Press a few times on or keys to set the day. The internal voice states the current
settings.
• Press the key to confirm the day.
• The internal voice will ask you to set the hour.
• Press a few times on or keys to set the hour.
• Press the key to confirm the hour.
• The internal voice will ask you to set the minutes.
• Press a few times on or keys to set the minutes.
• Press the key to confirm the minutes.
The complete day and time setting is then repeated for confirmation.
Notes:
• If you do not press any keys for 8 seconds, the previous day/time setting is saved and the machine
automatically exits the day/time setting mode.
• When you use the machine for the first time and have not yet set the day/time, no day/time registration
of incoming messages is recorded.
• If there is a loss of power to the base, the day/time must be re-entered.
8.8 Checking Day/Time
• Press the key to announce the day/time. The internal voice will say the current day/time
setting.
8.9 Programming the VIP Code
The VIP code is a 3-digit code used to operate the machine remotely (see Remote Operation).
The VIP code is set to '321' by default.
Note: If there is a loss of power to the base, the VIP code will revert to '321'.
8.9.1 Changing the VIP Code
• Keep the - key pressed down for 2 secs to change the VIP code.
• The internal voice asks you to set the VIP code and says the first number.
• Press a few times on or keys to set the first number of the VIP code.
• Press the de key to confirm the first number. The internal voice says the current set
2nd digit of the VIP code.
• Press a few times on or keys to set the second digit of the VIP code.
• Press the key to confirm the second number. The internal voice says the current set 3rd
digit of the VIP code.
ENGLISH
31
3131
Page 32

Butler 3055
• Press a few times on or keys to set the third digit of the VIP code.
• Press the de key to confirm the VIP code. You will hear a long beep. The internal voice
says the new VIP code for confirmation.
Note: If you do not press any keys for 8 seconds, the previous VIP code is saved and the machine
automatically exits the VIP setting mode.
8.9.2 Checking the VIP Code
• Press the key to play the VIP code. The internal voice says the current VIP code.
8.10 Operation
If a call is received and the answering machine is turned on, the answering machine will automatically pick up the line after the set number of rings. If
• outgoing message 1 has been selected, it will be played. After the outgoing message, a beep
will be heard and the caller can leave a message (of a max. 3 minutes).
•Outgoing message 2 has been selected, it will be played. After the beep, the line will
automatically be disconnected. The caller does not have the possibility to leave a message.
Note: If, during pick-up, nothing is said for 8 seconds, the line will be automatically disconnected.
8.11 Recording a Memo
With the Butler 3055, you can record memos. These memos are considered an incoming
message that can be picked up later by the user. The max. recording time for a memo is
2 minutes.
• Press the key for 2 seconds. After the beep, say your memo.
• Press the Stop -key to stop recording.
8.12 Playback of Incoming Messages and Memos
• Press the key to play the messages and memos.
• An internal message tells you how many messages there are (total) and how many new
(unheard) messages.
• The messages are played one at a time. If there are new messages, only the new messages
(those that have not been heard) are played.
• For each message, the internal voice says the day and time the message was recorded
• During playback, you can:
- go to the beginning of the current message by pressing the key once.
- go to the previous message by pressing the key twice.
- stop playback by pressing the Stop key .
- interrupt playback by pressing the Pause key . Press the Pause key again to restart
playback.
- go to the next message by pressing the key.
8.13 Erasing Messages
8.13.1 Erasing Messages One at a Time during Playback
Start message playback as explained above.
•When the message to be erased starts playing, press the delete key for 2 secs
• During erase the internal voice will tell you that the message is being erased.
• The machine will start playing the next message.
32
3232
Page 33

Butler 3055
8.13.2 Erase all messages
One can also erase all heard messages at one time. This erases only the messages that have
already been heard. New messages are not erased.
• Press the delete key for 2 secs.
• The internal voice confirms that the messages have been erased by saying how many new
(unheard) messages there are.
8.14 Memory Full
If the memory is full, MEMORY FULL-LED will flash. If the answering machine is turned on and
a call comes in, the machine will automatically play OGM 2 (answering machine function
without recorded caller message).
When listening to the messages, the internal voice will say that the memory is full and then
play back the messages.
• Erase all the messages after listening to them.
• The memory is free again.
8.15 Remote Operation
The answering machine can only be operated remotely using a tough-tone phone (DTMF tone
selection system).
• Call your machine.
• The answering machine picks up the line, you hear the outgoing message and a beep.
• After the beep, slowly dial the VIP code (default 321).
• You will hear two short beeps for confirmation.
• Enter the next codes to use the desired function:
a) Listening to Messages
• Press ‘2’ (listen to messages). The answer machine will play the messages.
During playback, you have the following options:
• Press ‘2’ to stop playback.
• Press ‘2’ to restart playback.
• Press ‘3’ to go to the next message.
• Press ‘1 1' to go to the previous message.
• Press ‘1’ to repeat the current message.
• Press ‘6’ to stop playback.
• Press ‘7’ to erase the current message.
b) Erasing All Old Messages
After listening to all messages, press ‘0’ to erase all messages.
c) Playing Outgoing Message
• Press ‘4’ to play the current outgoing message.
d) Recording Outgoing Message
• Press ‘9’ to select OGM 1 or OGM 2.
• Press ‘5’ to start recording
•Abeep will indicate that you can start recording.
ENGLISH
33
3333
Page 34

Butler 3055
• Say your message.
• Press ‘6’ to stop recording.
Note: Recording will be automatically interrupted after 2 minutes.
e) Turning Answering Machine On/Off
• Press the '9 ' key to switch on the answering machine.
• Press the '8' key to turn off the answering machine.
f) Ending Remote Operation
If you want to end remote operation, press ‘6’.
8.16 Turning Answering Machine On Remotely
If the answering machine is switched off, you can turn it on remotely.
• Call your machine.
• The machine will pick up automatically after 10 rings and play outgoing message 2.
• Dial the VIP code (default 321) slowly during the message plays.
• Press the '9' key.
• The internal voice will say that the answering machine has been turned on.
• Press ‘6’ to stop operation.
34
3434
Page 35

Butler 3055
9 TROUBLE SHOOTING
Symptom Possible cause Solution
No display Batteries uncharged Check the position of the
batteries
Recharge the batteries
Handset turned OFF Turn ON the handset
No tone Telephone cord badly Check the telephone
connected cord connection
The line is occupied Wait until the other handset
by another handset hangs up
The icon Handset out of range Bring the handset closer to
flashes the base
The base has no power Check the mains connection
supply to the base
The handset is not Register the handset to the
registered to the base base
Base or handset The ringing volume is Adjust the ringing volume
do not ring zero or low
Tone is good, but The dialling mode is Adjust the dialling mode
there is no wrong (pulse/tone)
communication
Telephone does not Manipulation error Remove the batteries and
react to pressing but them back in place
the keys
Keypad lock ON Turn OFF the Keypad Lock
Flash (R) Key does Wrong Flash time Change the flash time
not work
ENGLISH
35
3535
Page 36

Butler 3055
10 TOPCOM WARRANTY
• This equipment comes with a 24-month warranty. The warranty will be honoured on
presentation of the original bill or receipt, provided the date of purchase and the unit type
are indicated.
• During the time of the warranty Topcom will repair free of charge any defects caused by
material or manufacturing faults. Topcom will at its own discretion fulfil its warranty
obligations by either repairing or exchanging the faulty equipment.
• Any warranty claims will be invalidated as a result of intervention by the buyer or unqualified
third parties.
• Damage caused by inexpert treatment or operation, and damage resulting from the use of
non-original parts or accessories not recommended by Topcom is not covered by the
warranty.
• The warranty does not cover damage caused by outside factors, such as lightning, water and
fire, nor does it apply if the unit numbers on the equipment have been changed, removed or
rendered illegible.
Note: Please do not forget to enclose your receipt if you return the equipment
11 TECHNICAL CHARACTERISTICS
• Standard: DECT ( Digital Enhanced Cordless
• Frequency range: 1880 MHZ to 1900 MHz
• Number of channels: 120 duplex channels
•Modulation: GFSK
• Speech coding: 32 kbit/s
•Emission power: 10 mW ( average power per channel )
• Range: 300 m in open space /50 m maximum inhouse
• Base power supply: 220 V / 50 Hz for the base
• Handset Batteries: 2 rechargeable batteries AAA, NiMh 600mAh
• Handset autonomy: 100 hours in standby
• Talk time: 8 hours
• Charging time: 6-8 hours
• Normal conditions of use: +5 °C to +45 °C
• Dialling mode: Pulse / Tone
Telecommunications )
GAP ( Generic Access Profile )
36
3636
Page 37

Butler 3055
Veiligheidsvoorschriften
•Gebruik enkel de meegeleverde adapter. Geen vreemde adapters gebruiken, de accucel-
len kunnen hierdoor beschadigd worden.
•Gebruik enkel oplaadbare batterijen van hetzelfde type. Gebruik nooit gewone, niet
oplaadbare batterijen. Let bij het plaatsen van de oplaadbare batterijen op de polariteit
(aangeduid in de batterijruimte van de handset).
• Raak de laad- en stekkercontacten niet aan met scherpe en metalen voorwerpen.
• De werking van medische toestellen kan worden beïnvloed.
• De handset kan een onaangenaam gezoem veroorzaken in hoorapparaten.
• Het basisstation niet opstellen in vochtige ruimten en niet op minder dan 1,5 m van een
waterbron. De handset niet in aanraking brengen met water.
• De telefoon niet gebruiken in explosieve omgevingen.
•Ontdoe u op een milieuvriendelijke wijze van de batterijen en de telefoon.
• Daar bij stroomuitval met dit toestel niet kan getelefoneerd worden, in geval van nood
een telefoon gebruiken die geen netstroom nodig heeft bvb. een GSM.
Reinigen
Veeg de telefoon met een licht vochtig doek of met een antistatische doek af. Gebruik
nooit reinigingsmiddelen of agressieve oplosmiddelen.
NEDERLANDS
37
373737373737
Page 38

Butler 3055
1INSTALLATIE 40
2 TOETSEN/LED 41
3DISPLAY (LCD) 43
4 WERKING VAN DE HANDSET 44
4.1 Een taal instellen 44
4.2 Telefoneren 44
4.2.1 Een externe oproep 44
4.2.2 Blokkiezen 44
4.2.3 Terugbellen van het laatst gevormde nummer 44
4.2.4 Terugbellen van één van de 5 laatst gevormde nummers 45
4.2.5 Een geprogrammeerd nummer uit het Telefoonboek oproepen 45
4.2.6 Een interne oproep : een andere handset oproepen 45
4.3 Een oproep ontvangen 45
4.3.1 Een externe oproep ontvangen 45
4.3.2 Een interne oproep ontvangen 46
4.3.3 Ontvangst van een externe oproep tijdens een intern gesprek 46
4.4 Handenvrij-functie aan-/uitschakelen 46
4.5 Hoofdtelefoon aansluiting 46
4.6 Een oproep naar een andere handset doorverbinden 46
4.7 Waarschuwing Buiten Bereik 47
4.8 Instellen van het luidsprekervolume 47
4.9 Vermelding van de gespreksduur op de display 47
4.10 Uitschakeling microfoon (mute) 47
4.11 Pauzetoets 47
4.12 Conferentiegesprek (twee interne DECT handsets en één externe beller) 48
4.13 Een verloren handset terugvinden (paging) 48
4.14 Gebruik van het alfanumerisch klavier van de handset 48
4.15 Het Telefoonboek 49
4.15.1 Een nummer en een naam aan het Telefoonboek toevoegen 49
4.15.2 Een nummer uit het Telefoonboek opzoeken 49
4.15.3 Naam of nummer van het Telefoonboek wijzigen 49
4.15.4 Naam en nummer van het Telefoonboek wissen 50
4.16 De handset aan-/uitschakelen 50
4.16.1 De handset uitschakelen 50
4.16.2 De handset aanschakelen 50
4.17 Instellen van het belvolume van de handset 50
4.17.1 Instellen van het belvolume voor externe oproepen (0-9) 51
4.17.2 Instellen van het belvolume voor interne oproepen (1-9) 51
4.18 Instellen van de belmelodie van de Handset 51
4.18.1 Instellen van een belmelodie voor externe oproepen (1-9) 51
4.18.2 Instellen van een belmelodie voor interne oproepen (1-9) 52
4.19 Instellen van het basis belvolume 52
4.20 Vergrendeling van het klavier 52
4.21 Toetstonen aan-/uitschakelen 52
4.22 De R-toets (flash) 53
4.23 PINcode veranderen 53
4.24 Aanmelden van een handset op een Butler 1000, 1010, 1210, 2405, 2410, 2450, 2455,
30xx basis 54
4.25 Aanmelden van een Butler 3055 handset op een andere basis (ander type of merk) 55
4.26 Aanmelden van een TOPCOM Butler 300 DECT GAP Headset 55
4.27 Afmelden van een handset aan een basis 55
38
38383838383838
38
38
Page 39

Butler 3055
4.28 Een basis selecteren 56
4.28.1 Automatische selectie 56
4.28.2 Manuele selectie 56
4.29 Vergrendeling van uitgaande gesprekken 57
4.30 Rechtstreekse oproep (Direct call) 57
4.30.1 Baby call nummer programmeren 58
4.30.2. Rechtstreekse oproep Aan -Uitschakelen 58
4.31 Standaardinstellingen (reset) van de parameters 58
4.32 Complete reinitialisatie van het toestel 59
4.33 Kiesmode op de handset instellen 59
5 NUMMERWEERGAVE (CALLER ID/CLIP) 60
5.1 Datum en tijd instellen 60
5.2 De Oproeplijst 61
5.3 Een nummer van de Oproeplijst oproepen 61
5.4 Een nummer van de Oproeplijst in het Telefoonboek opslaan 61
5.5 Nummers van de Oproeplijst wissen 61
5.5.1 Eén nummer wissen 61
5.5.2 Alle nummers wissen 62
6 VOICE MAIL INDICATIE 62
7 BASISSTATION TELEFOON 62
7.1 Telefoneren 62
7.2 Luidspreker volume aanpassen 62
7.3 Kiesmode op de basis instellen 62
7.4 Gesprek doorverbinden van basis naar handset 62
7.5 Basis flashtijd instellen 63
8 ANTWOORDAPPARAAT 63
8.1 LED indicatie 63
8.2 Functies toetsenbord 64
8.3 Meldteksten 64
8.3.1 Opnemen uitgaande boodschappen (Meldtekst 1 of Meldtekst 2) 64
8.3.2 Controleren van de meldtekst 64
8.3.3 Meldtekst selecteren 65
8.3.4 Wissen van de uitgaande meldtekst 65
8.4 Antwoordapparaat aan/uit schakelen 65
8.5 Beltonen instellen 65
8.6 Aantal betonen controleren 66
8.7 Dag en tijd instellen 66
8.8 Dag/tijd controleren 66
8.9 VIP-code programmeren 66
8.9.1 Vip-code veranderen 66
8.9.2 Controleren van de VIP-code 67
8.10 Bediening 67
8.11 Opname memo tekst 67
8.12 Weergave van de binnengekomen boodschappen en memo’s 67
8.13 Boodschappen wissen 68
8.13.1 Boodschap per boodschap wissen tijdens weergave 68
8.13.2 Alle boodschappen wissen 68
8.14 Geheugen vol 68
8.15 Bediening vanop afstand 68
8.16 Antwoordapparaat aanschakelen vanop afstand 69
9 PROBLEMEN VERHELPEN 70
10 DE GARANTIE VAN TOPCOM 71
11 TECHNISCHE KENMERKEN 71
NEDERLANDS
39
393939
393939393939
Page 40

Butler 3055
1 INSTALLATIE
Als u het toestel voor het eerst wil gebruiken, moet u er eerst en vooral voor zorgen dat de
batterij gedurende 20 uren opgeladen wordt. Doet u dit niet, dan werkt het toestel niet
optimaal.
Bij de installatie gaat u dus als volgt te werk :
• Steek het ene uiteinde van de adapter in het stopcontact en het andere uiteinde in de
adapter-aansluiting aan de onderzijde van het toestel.
• Verbindt u het ene uiteinde van de telefoonlijn met de wandcontactdoos van het telefoonnet
en het andere uiteinde met de onderzijde van het toestel.
telefoonlijn-
aansluiting
stopcontact
adapteraansluiting
wandcontactdoos
van het telefoonnet
•Open de batterijruimte (zie hieronder).
• Plaats de batterijen en houd daarbij rekening met de polariteit (+ en -).
• Sluit de batterijruimte.
• Plaats de handset op de basis gedurden 20 uren. De Lijn/Laad-indicator (LED) op de
basis licht op.
+-
-+
40
40404040404040404040
40
Page 41

Butler 3055
Stand van de batterij :
• De batterij is volledig opgeladen.
• De batterij is half leeg (50%).
• De batterij is zwak. Als de batterij zwak is, hoort u waarschuwingssignalen en het
batterij-symbool op de display knippert.
2 TOETSEN/LED
HANDSET BASIS
1 Display
2 Lijntoets
3 Omhoog-/Handenvrijtoets
4 Programmeertoets
5 Telefoonboektoets
6 Herkies-/Pauzetoets /P
7Microfoon
8 Volume-/Beltoon-toets /
9 Alfanumerische toetsen
10 Wis/Mute-toets
11 Omlaag-/Flash-toets /R
12 Hoofdtelefoon aansluiting
13 Paging-toets
14 Lijn/Laad indicator (LED)
15 Basisstation telefoonklavier
/
16 Lijn/Handenvrij toets
17 Flash toets R
18 Herkies toets
19 Toon/Puls schakelaar
20 Flash time switch
21 Aantal beltonen toets
22 VIP code toets
23 Lijn LED basisstation telefoon
24 Geheugen vol LED
25 Booschappen/Antwoordapparaat Aan/Uit LED
26 Antwoordapparaat toetsen
27 Microfoon
28 Luidspreker
NEDERLANDS
5
11
10
8
7
R
X
OK
DEF
3
1
ABC
2
MNO
GHI
6
4
JKL
5
WXYZ
PQRS
TUV
9
7
8
#
0
/P
1
3
4
2
12
9
6
41
4141414141414141414141
Page 42

Butler 3055
28
14
13
ABC
DEF
2
1
GHI
4
R
X
1
GHI
4
PQRS
7
OK
DEF
3
ABC
2
MNO
6
JKL
5
WXYZ
TUV
9
8
#
0
/P
PQRS
7
R
3
MNO
JKL
6
5
WXYZ
TUV
9
8
0
#
15
17
18
16
25 26 24 27
23
21
22
20
19
300 ms
100 ms
P
T
42
Page 43

Butler 3055
00000000000000
88888/88888:88
3 DISPLAY (LCD)
12 3
1 Aantal ontvangen oproepen.
2 Vermelding van de datum (dag/maand) bij ontvangen oproepen.
3 Vermelding van het uur (uur:minuten) bij ontvangen oproepen.
4Oproepinformatie.
5 Symbool display ( ):
- dit symbool betekent dat de handset zich binnen het bereik van de basis bevindt
- als dit symbool begint te knipperen, betekent dit dat u zich buiten het bereik van
de basis bevindt. Ga dichter naar de basis zodat de verbinding tussen basis en
handset kan hersteld worden.
6 Symbool display ( ):
- dit symbool betekent dat het toestel oproepen ontvangen heeft die automatisch
opgeslagen worden in de Oproeplijst.
7 Symbool display ( ):
- dit symbool betekent dat de mute-functie geactiveerd is, de microfoon is uitgeschakeld
tijdens een gesprek.
8 Symbool display ( ):
- dit symbool verschijnt op het scherm als men telefoneert of een oproep ontvangt.
9 Symbool display ( ):
- dit symbool betekent dat de beltoon uitgeschakeld is. Als men een oproep ontvangt,
rinkelt het toestel niet. Bij een interne oproep rinkelt het toestel wel.
10 Symbool display ( ):
- dit symbool geeft de stand van de batterij weer.
11 Symbool display ( ):
- dit symbool betekent dat u zich in het menu bevindt.
12 Symbool display ( ):
- dit symbool verschijnt als u de nummers van het Telefoonboek doorloopt.
13 Symbool display ( ):
- dit symbool verschijnt als u een Voice Mail boodschap hebt ontvangen (zie hoofdstuk 6).
14 Symbool display ( ) :
- dit symbool betekent dat de handenvrij-functie geactiveerd is. U kan nu spreken
zonder de hoorn in de hand te nemen.
- knippert wanneer de telefoon in het basisstation actief is. U kan de lijn niet nemen via
de handset zolang de telefoon in het basisstation actief is.
4
NEDERLANDS
43
43
4343434343434343434343
Page 44

Butler 3055
4 WERKING VAN DE HANDSET
4.1 Een taal instellen
Het toestel heeft 5 display-talen : zie display talen tabel op de verpakking!!
Om de juiste taal in te stellen, doet u het volgende :
• Druk op de Programmeertoets .
• Druk enkele keren op de Omhoog- of Omlaagtoets tot ‘INSTELLING’ (SETTING) op de
display verschijnt
• Druk op de Programmeertoets .
• Druk enkele keren op de Omhoog- of Omlaagtoets tot ‘TAAL’ (LANGUAGE) verschijnt
op de display.
• Druk op de Programmeertoets .
•Op de display verschijnt de taal die ingesteld is.
• Druk enkele keren op de Omhoog- of Omlaagtoets om de taal te selecteren die u
wenst te gebruiken.
• Als de gewenste taal op de display verschijnt, drukt u op de Programmeertoets ter bevestiging
of druk meermaals op de Mute/Wis-toets om het menu te verlaten.
4.2 Telefoneren
!!! Wanneer u een gesprek voert via de handset, is een telefoongesprek via de basis niet mogelijk!!!
4.2.1 Een externe oproep
• Druk op de Lijntoets .
• De Lijn/Laad-indicator (LED) op de basis knippert. ‘EXT’ en het Oproep-symbool
verschijnen op de display.
•Uhoort de kiestoon. Geef het gewenste telefoonnummer in.
• Het nummer verschijnt op de display en wordt gevormd.
• Druk, na het gesprek, op de Lijntoets om de verbinding te verbreken of leg de handset
op de basis.
4.2.2 Blokkiezen
•Geef het gewenste telefoonnummer in. U kan het nummer corrigeren door op de Wis/Mutetoets te drukken.
• Druk op de Lijntoets .
• De Lijn/Laad-indicator (LED) op de basis knippert. ‘EXT’ en het Oproep-symbool
verschijnen op de display.
• Het telefoonnummer wordt automatisch gevormd.
• Druk, na het gesprek, op de Lijntoets om de verbinding te verbreken of leg de handset
op de basis.
4.2.3 Terugbellen van het laatst gevormde nummer
• Druk op de Lijntoets .
• De Lijn/Laad-indicator (LED) op de basis knippert. ‘EXT’ en het Oproep-symbool
verschijnen op de display.
•Uhoort de kiestoon.
44
4444444444444444444444
44
Page 45

Butler 3055
• Druk op de Herkiestoets . Het nummer dat u als laatste hebt opgebeld, wordt automatisch
gevormd zonder dat u het nummer opnieuw moet vormen.
4.2.4 Terugbellen van één van de 5 laatst gevormde nummers
• Druk op de Herkiestoets . Het nummer dat u het laatst hebt opgebeld, verschijnt op de
display. Als u één van de 5 laatst gevormde nummers wil terugbellen, drukt u enkele keren
op de Herkiestoets tot het gewenste nummer op de display verschijnt.
• Druk op de Lijntoets .
• Het nummer dat op de display staat, wordt automatisch gevormd zonder dat u het nummer
opnieuw moet vormen.
• Druk, na het gesprek, op de Lijntoets om de verbinding te verbreken of leg de handset
op de basis.
4.2.5 Een geprogrammeerd nummer uit het Telefoonboek oproepen
Het toestel beschikt over een Telefoonboek waarin u de telefoonnummers met naam kan
programmeren. Als u een nummer uit het Telefoonboek wil oproepen, doet u het volgende :
• Druk op de Telefoonboektoets . Het eerste nummer van het Telefoonboek, verschijnt op
de display.
• Druk meermaals op de Omhoog- of Omlaagtoets om het telefoonnummer te selecteren
dat u wenst te bellen.
• Druk op de Lijntoets .
• Het nummer dat op de display staat, wordt automatisch gevormd zonder dat u het nummer
opnieuw moet vormen.
• Druk, na het gesprek, op de Lijntoets om de verbinding te verbreken of leg de handset
op de basis.
4.2.6 Een interne oproep : een andere handset oproepen
Deze functie werkt enkel wanneer meerdere handsets zijn aangemeld op het basisstation!
• Druk op de Programmeertoets .
• Druk enkele keren op de Omhoog- of Omlaagtoets tot ‘INTERCOM’ verschijnt op de
display.
• Druk op de Programmeertoets .
• ‘INT‘ verschijnt op de display.
•Geef het nummer van de handset in die u wenst op te roepen.
• Druk, na het gesprek, op de Lijntoets , of leg de handset op de basis.
4.3 Een oproep ontvangen
4.3.1 Een externe oproep ontvangen
• Alle aangemelde handsets rinkelen als u een oproep ontvangt.
• Het Oproep-symbool knippert op de display.
• Het telefoonnummer van de oproeper verschijnt op de display indien u beschikt over de
dienst nummerweergave (CLIP). Raadpleeg hiervoor uw telefoonmaatschappij. De naam van
de oproeper verschijnt eveneens op de display als:
- de naam geprogrammeerd werd in het Telefoonboek
- indien het netwerk de naam samen met het telefoonnummer doorstuurt
(enkel FSK CID-systeem).
• Druk op de Lijntoets om de externe oproep aan te nemen.
NEDERLANDS
45
454545454545454545454545
Page 46

Butler 3055
• Tijdens het gesprek verschijnen ‘EXT’ en het symbool op de display. De gespreksduurteller
begint te lopen.
• Druk, na het gesprek, op de Lijntoets om de verbinding te verbreken of leg de handset
op de basis.
4.3.2 Een interne oproep ontvangen
Deze functie werkt enkel wanneer men meerdere handsets heeft aangemeld op het basisstation!
• De handset rinkelt.
• ‘INT’ en het nummer van de handset die u probeert te bereiken, verschijnen op de display.
Het Oproep-symbool knippert op de display.
• Druk op de Lijntoets om de interne oproep aan te nemen.
• Tijdens het gesprek verschijnen ‘INT’, het handsetnummer van de oproeper en het symbool
op de display. De gespreksduurteller begint te lopen.
• Druk, na het gesprek, op de Lijntoets om de verbinding te verbreken of leg de handset
op de basis.
4.3.3 Ontvangst van een externe oproep tijdens een intern gesprek
Als men een externe oproep ontvangt tijdens een intern gesprek, weerklinkt een aankloptoon
(dubbele beep) bij beide handsets die intern in gesprek zijn.
• Druk tweemaal op de Lijntoets om de externe oproep aan te nemen.
• Druk, na het gesprek, op de Lijntoets , of leg de handset op de basis.
4.4 Handenvrij-functie aan-/uitschakelen
Deze functie laat u toe een gesprek te voeren zonder dat u de hoorn in de hand hoeft te nemen.
Als u in gesprek bent, drukt u op de Omhoog-/Handenvrij-toets /om de handenvrij-functie
aan te schakelen.
Druk op dezelfde toets om de handenvrij-functie uit te schakelen.
Opmerking : Als u handenvrij aan het telefoneren bent en u wil het volume aanpassen,
druk dan op de Volume-toets .
Opgepast !! Langdurig gebruik van de handenvrij-functie heeft tot gevolg dat de batterijen
sneller leeg zullen zijn !
4.5 Hoofdtelefoon aansluiting
U kan een koptelefoon met een 3-polige jack plug van 2,5mm aansluiten aan de
rechterkant van de handset. Als de koptelefoon is aangesloten, kan u enkel via de koptelefoon
spreken en luisteren. De microfoon van de koptelefoon kan uitgeschakeld worden met de Mutetoets . De handenvrij luidspreker kan nog steeds geactiveerd worden door op de Handenvrijtoets te drukken.
4.6 Een oproep naar een andere handset doorverbinden
•Ubent in gesprek met een externe beller.
• Druk op de Programmeertoets .
• ‘INTERCOM’ verschijnt op de display.
46
464646464646464646464646
Page 47

Butler 3055
• Druk op de Programmeertoets .
• De externe oproep staat nu in wacht.
• ‘INT‘ verschijnt op de display.
•Geef het nummer van de handset in waarnaar u de oproep wil doorverbinden.
• Als de opgebelde handset wordt opgenomen, kan u een intern gesprek voeren. Druk op de
Lijntoets en de externe oproep wordt doorverbonden.
• Als de opgebelde handset niet opneemt, druk dan op de Omlaag-toets om de externe
oproep terug aan te nemen.
4.7 Waarschuwing Buiten Bereik
Als de handset zich buiten het bereik van de basis bevindt, weerklinkt een waarschuwingssignaal.
• ‘ZOEKEN’ (SEARCHING) verschijnt op de display en het symbool knippert op de display.
•Ga dichter naar de basis.
• Zodra u terug binnen het bereik van de basis bent, weerklinkt een signaal en het symbool
knippert niet meer.
4.8 Instellen van het luidsprekervolume
Gebruik de Volume/Beltoon-toets / om het volume van de luidspreker (handset) in te stellen.
U kan kiezen tussen 5 niveaus. Standaard staat het toestel op niveau ‘3’ ingesteld.
Tijdens een gesprek kan u het volume als volgt aanpassen :
• Druk op de Volume/Beltoon-toets / .
• Het niveau van het huidig ingestelde volume verschijnt op de display.
•Gebruik de cijfertoetsen om het gewenste niveau (1-5) in te stellen.
• Druk op de Volume/Beltoon-toets / ter bevestiging.
Opmerking : U hebt 8 seconden de tijd om het gewenste volume in te stellen, zoniet keert het toestel
terug naar standby-modus en blijft het volume onveranderd.
4.9 Vermelding van de gespreksduur op de display
Zodra u op de Lijntoets drukt, verschijnt de gespreksduur op de display (minuten-seconden).
Bvb. “ 01-20 “ voor 1 minuut en 20 seconden.
Na elke oproep blijft de gespreksduur nog 5 seconden zichtbaar op de display.
4.10 Uitschakeling microfoon (mute)
Het is mogelijk de microfoon tijdens een gesprek uit te schakelen door op de Wis-/Mute-toets
te drukken. U kan nu vrij spreken zonder dat de beller u kan horen.
•Ubent in gesprek. De Lijn/Laad-indicator (LED) op de basis knippert en het Oproepsymbool verschijnt op de display.
• Druk op de Wis/Mute-toets om de microfoon uit te schakelen.
• Het symbool ‘X’ verschijnt op de display ( ).
• Als u het gesprek wil verderzetten, drukt u nogmaals op de Wis/Mute-toets .
• Het symbool ‘X’ verdwijnt van de display ( ). Uw correspondent kan u weer horen.
4.11 Pauzetoets
Als u een telefoonnummer vormt en u wil een pauze aan dit nummer toevoegen, druk dan, op
de gewenste plaats in het nummer, op de Pauzetoets .
Als u dit nummer oproept, dan wordt deze pauze (van 3s) automatisch gevormd.
NEDERLANDS
47
474747474747474747474747
Page 48

Butler 3055
4.12 Conferentiegesprek (twee interne DECT handsets en één externe beller)
U kan tegelijkertijd met één interne en één externe beller een telefoongesprek voeren.
• Als u in gesprek bent met een externe beller, druk op de Programmeertoets .
• ‘INTERCOM’ verschijnt op de display.
• Druk op de Programmeertoets .
• De externe oproep staat nu in wacht.
• ‘INT‘ verschijnt op de display.
•Geef het nummer van de handset in die u wenst te betrekken bij de oproep.
• Als de opgebelde handset wordt opgenomen, houd de ‘#’-toets gedurende 3 seconden gedrukt.
• ‘CONFERENT’ (CONFERENCE) verschijnt op de display.
•Ubent nu in verbinding met één externe en één interne beller (conferentiegesprek).
4.13 Een verloren handset terugvinden (paging)
Als u een handset niet meer terugvindt, druk dan kort op de Paging-toets van de basis.
Alle handsets die aangemeld zijn op de basis, laten een signaal horen waardoor u de verloren
handset kan traceren.
Om het signaal te stoppen, drukt u kort op de Lijntoets van de handset.
4.14 Gebruik van het alfanumerisch klavier van de handset
Gebruik het alfanumerisch klavier om tekst in te geven. Om een letter te selecteren, drukt u op
de overeenstemmende toets. Bvb. als u op numerische toets ’5’ drukt, verschijnt het eerste
karakter (j) op de display, druk meerdere mÏ24len als u de andere karakters onder deze toets
wil selecteren.
Druk 2x op toets ‘2’ om de letter ‘B’ te selecteren. Wil u zowel ‘A’ en ‘B’ na elkaar invoeren,
druk dan eerst éénmaal op toets ‘2’ om ‘A’ te selecteren, wacht 2 seconden tot de cursor naar
de volgende plaats gaat en druk dan tweemaal op toets ‘2’ om ‘B’ te selecteren.
Verkeerd ingevoerde karakters kan u wissen met behulp van de Wistoets . Het karakter voor
de cursor zal gewist worden. U kan de cursor verplaatsen door te drukken op de Omhoog- en
Omlaag-toetsen .
Beschikbare karakters
Druk op de juiste toetsen om de volgende karakters te verkrijgen :
Toetsen Eerste Tweede Derde Vierde Vijfde
1 + - / 1
2 A B C 2
3 D E F 3
4 G H I 4
5 J K L 5
6 M N O 6
7 P Q R S 7
8 T U V 8
9 W X Y Z 9
0 SPATIE 0
druk druk druk druk druk
48
484848484848484848484848
Page 49

Butler 3055
4.15 Het Telefoonboek
4.15.1 Een nummer en een naam aan het Telefoonboek toevoegen
• Druk op de Programmeertoets .
• Druk enkele keren op de Omhoog- of Omlaagtoets tot ‘TELEFOONBK’ (PHONE BOOK) op
de display verschijnt.
• Druk op de Programmeertoets .
• ‘ZOEKEN’ (SEARCH) verschijnt op de display.
• Druk enkele keren op de Omhoog- of Omlaagtoets tot ‘NIEUW TOEV’ (ADD NEW) op de
display verschijnt.
• Druk op de Programmeertoets .
• ‘NAAM’ (NAME) verschijnt op de display.
•Geef de naam in. Gebruik hiervoor de alfanumerische toetsen.
• Druk op de Programmeertoets .
•Geef het telefoonnummer in. Gebruik hiervoor de alfanumerische toetsen.
• Druk op de Programmeertoets .
• Er weerklinkt een lange beeptoon. De naam en het nummer zijn opgeslagen in het
Telefoonboek.
4.15.2 Een nummer uit het Telefoonboek opzoeken
• Druk op de Programmeertoets .
• Druk enkele keren op de Omhoog- of Omlaagtoets tot ‘TELEFOONBK’ (PHONE BOOK) op
de display verschijnt.
• Druk op de Programmeertoets .
• ‘ZOEKEN’ (SEARCH) verschijnt op de display.
• Druk op de Programmeertoets .
•Geef de eerste letters van de gewenste naam in.
• Druk op de Programmeertoets .
• De eerste naam, die met deze letters overeenkomt, verschijnt op het scherm.
• Druk op de Omhoog- of Omlaagtoets om de andere nummers in het Telefoonboek te
doorlopen.
•Wanneer het gewenste nummer op het scherm verschijnt, dan zal het nummer automatisch
gevormd worden na het drukken van de lijntoets .
4.15.3 Naam of nummer van het Telefoonboek wijzigen
• Druk op de Programmeertoets .
• Druk enkele keren op de Omhoog- of Omlaagtoets tot ‘TELEFOONBK’ (PHONE BOOK)
op de display verschijnt.
• Druk op de Programmeertoets .
• ‘ZOEKEN’ (SEARCH) verschijnt op de display.
• Druk enkele keren op de Omhoog- of Omlaagtoets tot ‘BEWERKEN’ (EDIT) op de display
verschijnt.
• Druk op de Programmeertoets .
• Het eerste nummer van het Telefoonboek verschijnt op de display.
• Druk op de Omhoog- of Omlaagtoets tot het gewenste nummer op de display verschijnt.
• Druk op de Programmeertoets om het geselecteerde geheugennummer te veranderen.
NEDERLANDS
49
494949494949494949494949
Page 50

Butler 3055
• Druk op de Wistoets om de naam letter per letter te wissen en gebruik het alfanumerisch
klavier om de correcte naam in te geven.
• Druk op de Programmeertoets .
• Druk op de Wistoets om het nummer cijfer per cijfer te wissen en gebruik het alfanumerisch
klavier om de juiste nummer in te geven.
• Druk op de Programmeertoets om de uitgevoerde wijzigingen te bewaren.
4.15.4 Naam en nummer van het Telefoonboek wissen
• Druk op de Programmeertoets .
• Druk enkele keren op de Omhoog- of Omlaagtoets tot ‘TELEFOONBK’ (PHONE BOOK)
op de display verschijnt.
• Druk op de Programmeertoets .
• ‘ZOEKEN’ (SEARCH) verschijnt op de display.
• Druk enkele keren op de Omhoog- of Omlaagtoets tot ‘WISSEN’ (DELETE) op de display
verschijnt.
• Druk op de Programmeertoets .
• Het eerste nummer van het Telefoonboek verschijnt op de display.
• Druk op de Omhoog- of Omlaagtoets tot het nummer, dat u wil wissen, op de display
verschijnt.
• Druk op de Wistoets .
• ‘WISSEN ?’ (DELETE ?) verschijnt op de display.
• Druk op de Programmeertoets om het wissen te bevestigen.
4.16 De handset aan-/uitschakelen
4.16.1 De handset uitschakelen
De handset is aangeschakeld.
• Druk op de Programmeertoets .
• Druk enkele keren op de Omhoog- of Omlaagtoets tot ‘HS UIT ?’ (POWER OFF?) verschijnt
op de display.
• Druk op de Programmeertoets . Het toestel schakelt zichzelf uit. U kan geen nummers
meer vormen, noch oproepen ontvangen.
Opm. : Wenst u het menu te verlaten zonder de handset uit te schakelen, druk dan op de Wis/Mute-
toets .
4.16.2 De handset aanschakelen
De handset is uitgeschakeld.
• Druk op de Programmeertoets . Het toestel schakelt zichzelf aan.
4.17 Instellen van het belvolume van de handset
Indien u wenst, kan u het belvolume van een binnenkomende oproep aanpassen. U beschikt
over 10 niveaus. Het belvolume van interne en externe oproepen kan u apart instellen zodat u
een verschil hoort.
Als u niveau ‘0’ kiest, verschijnt het symbool op de display en hoort u geen beltoon bij een
binnenkomende externe oproep (bij een interne oproep hoort u nog steeds een beltoon).
Niveau ‘9’ is het hoogste niveau. Standaard staat het toestel op niveau ‘5’ ingesteld.
50
5050505050505050
50505050
Page 51

Butler 3055
4.17.1 Instellen van het belvolume voor externe oproepen (0-9)
• Druk op de Programmeertoets .
• Druk enkele keren op de Omhoog- of Omlaagtoets tot ‘BEL INST’ (RING SEL) op de display
verschijnt.
• Druk op de Programmeertoets .
• ‘EXTERN’ (EXTERNAL) verschijnt op de display.
• Druk op de Programmeertoets .
• Druk enkele keren op de Omhoog- of Omlaagtoets tot ‘VOLUME’ op de display verschijnt.
• Druk op de Programmeertoets .
• Het niveau van het huidig gebruikte volume verschijnt op de display.
•Geef een nummer in tussen 0 en 9 om het gewenste belvolume te selecteren. Gebruik
hiervoor het cijferklavier.
• Druk op de Programmeertoets ter bevestiging.
4.17.2 Instellen van het belvolume voor interne oproepen (1-9)
• Druk op de Programmeertoets .
• Druk enkele keren op de Omhoog- of Omlaagtoets tot ‘BEL INST’ (RING SEL) op de display
verschijnt.
• Druk op de Programmeertoets .
• ‘EXTERN’ (EXTERNAL) verschijnt op de display.
• Druk enkele keren op de Omhoog- of Omlaagtoets tot ‘INTERN’ (INTERNAL) op de
display verschijnt.
• Druk op de Programmeertoets .
• Druk enkele keren op de Omhoog- of Omlaagtoets tot ‘VOLUME’ op de display verschijnt.
• Druk op de Programmeertoets .
• Het niveau van het huidig gebruikte volume verschijnt op de display.
•Geef een nummer in tussen 1 en 9 om het gewenste belvolume te selecteren. Gebruik
hiervoor het cijferklavier.
• Druk op de Programmeertoets ter bevestiging.
4.18 Instellen van de belmelodie van de Handset
Indien u wenst, kan u de belmelodie van een binnenkomende oproep aanpassen. U beschikt
over 9 belmelodieën (1-9). Standaard staat belmelodie ‘5’ ingesteld.
4.18.1 Instellen van een belmelodie voor externe oproepen (1-9)
• Druk op de Programmeertoets .
• Druk enkele keren op de Omhoog- of Omlaagtoets tot ‘BEL INST’ (RING SEL) op de display
verschijnt.
• Druk op de Programmeertoets .
• ‘EXTERN’ (EXTERNAL) verschijnt op de display.
• Druk op de Programmeertoets .
•‘MELODIE’ (MELODIES) verschijnt op de display.
• Druk op de Programmeertoets .
• De huidig ingestelde belmelodie verschijnt op de display.
•Geef een nummer in tussen 1 en 9 om de gewenste belmelodie te selecteren. Gebruik
hiervoor het cijferklavier.
• Druk op de Programmeertoets ter bevestiging.
NEDERLANDS
51
5151515151
51515151515151
Page 52

Butler 3055
4.18.2 Instellen van een belmelodie voor interne oproepen (1-9)
• Druk op de Programmeertoets .
• Druk enkele keren op de Omhoog- of Omlaagtoets tot ‘BEL INST’ (RING SEL) op de display
verschijnt.
• Druk op de Programmeertoets .
• ‘EXTERN’ (EXTERNAL) verschijnt op de display.
• Druk enkele keren op de Omhoog- of Omlaagtoets tot ‘INTERN’ (INTERNAL) op de
display verschijnt.
• Druk op de Programmeertoets .
•‘MELODIE’(MELODIES) verschijnt op de display.
• Druk op de Programmeertoets .
• De huidig ingestelde belmelodie verschijnt op de display.
•Geef een nummer in tussen 1 en 9 om de gewenste belmelodie te selecteren. Gebruik
hiervoor het cijferklavier.
• Druk op de Programmeertoets ter bevestiging.
4.19 Instellen van het basis belvolume
Indien nodig kan u het belvolume van de basis wijzigen.
• Als de basis belt, druk op de volume toets op de basis om het belvolume te verhogen
of verlagen
4.20 Vergrendeling van het klavier
Als u het alfanumerisch klavier vergrendelt, is het onmogelijk om nog een telefoonnummer te
vormen. Enkel de Programmeertoets kan nog gebruikt worden. ‘KLAV BLOKK’ (KEY LOCKED)
staat op het scherm.
• Druk op de Programmeertoets .
• Druk enkele keren op de Omhoog- of Omlaagtoets tot ‘KLAVIER’ (KEY SETUP) op de display
verschijnt.
• Druk op de Programmeertoets .
• ‘KLAV BLOK’ (KEY LOCK) verschijnt op de display.
• Druk op de Programmeertoets .
• De huidige toestand van het klavier verschijnt op het scherm :
- ‘BLOKK AAN’ (LOCK) : het klavier is vergrendeld
- ‘BLOKK UIT’ (UNLOCK) : het klavier is niet vergrendeld
• Druk op de Omhoog- of Omlaagtoets om uw keuze te maken.
• Druk op de Programmeertoets ter bevestiging.
4.21 Toetstonen aan-/uitschakelen
U kan het toestel zodanig instellen dat er een toon weerklinkt telkens als u op een toets drukt.
• Druk op de Programmeertoets .
• Druk enkele keren op de Omhoog- of Omlaagtoets tot ‘KLAVIER’ (KEY SETUP) op de display
verschijnt.
• Druk op de Programmeertoets .
• Druk enkele keren op de Omhoog- of Omlaagtoets tot ‘TOETSTONEN’ (KEY CLICK) op de
display verschijnt.
52
52525252525252525252
5252
Page 53

Butler 3055
• Druk op de Programmeertoets .
• De huidige toestand verschijnt op het scherm :
-‘TOETST AAN’ (CLICK ON) : toetstonen aanschakelen
-‘TOETST UIT’ (CLICK OFF) : toetstonen uitschakelen
• Druk op de Omhoog- of Omlaagtoets om uw keuze te maken.
• Druk op de Programmeertoets ter bevestiging.
4.22 De R-toets (flash)
Druk op de Flashtoets ‘R’ om bepaalde diensten te gebruiken zoals “2de oproep” (indien deze
functie door uw telefoonmaatschappij aangeboden wordt); of om oproepen door te verbinden
als u gebruik maakt van een binnenhuiscentrale (PABX).
De Flashtoets ‘R’ is een korte onderbreking op de lijn. U kan de flash tijd instellen op 100ms of
300ms. Standaard staat deze op 100ms! Indien uw systeem echter een langere flashtijd nodig
heeft, doet u het volgende:
• Druk op de Programmeertoets .
• Druk enkele keren op de Omhoog- of Omlaagtoets tot ‘INSTELLING’ (SETTING) op de
display verschijnt.
• Druk op de Programmeertoets .
• Druk enkele keren op de Omhoog- of Omlaagtoets tot ‘FLASH’ (RECALL) op de display
verschijnt.
• Druk op de Programmeertoets .
• Druk enkele keren op de Omhoog- of Omlaagtoets om de flashtijd te selecteren:
- ‘FLASH KORT’ (SHORT) = 100ms
- ‘FLASH LANG’ (LONG) = 300ms
• Druk op de Programmeertoets ter bevestiging.
Opmerking: De ingestelde flashtijd op de handset is onafhankelijk van de basis. Om de flashtijd op de basis
in te stellen, zie §7.5.
4.23 PINcode veranderen
Bepaalde functies zijn enkel toegankelijk als u de PINcode van het toestel kent. Dankzij deze
geheime code worden instellingen beschermd die enkel door u mogen veranderd worden. De
PINcode bestaat uit 4 cijfers. De standaard ingestelde PINcode is ‘0000’. Als u de standaard
PINcode wil wijzigen en uw eigen geheime code wil instellen, doet u het volgende :
• Druk op de Programmeertoets .
• Druk enkele keren op de Omhoog- of Omlaagtoets tot ‘INSTELLING’ (SETTING) op de
display verschijnt.
• Druk op de Programmeertoets .
• Druk enkele keren op de Omhoog- of Omlaagtoets tot ‘PIN CODE’ op de display verschijnt.
• Druk op de Programmeertoets .
•‘OUDE PIN’ (OLD CODE) verschijnt op de display.
•Geef de oude PINcode in. Gebruik hiervoor de cijfertoetsen.
• Druk op de Programmeertoets .
• ‘NIEUWE PIN’ (NEW CODE) verschijnt op de display.
•Geef de nieuwe PINcode in. Gebruik hiervoor de cijfertoetsen.
• Druk op de Programmeertoets .
NEDERLANDS
53
535353535353535353535353
Page 54

Butler 3055
• ‘HERHAAL’ (AGAIN) verschijnt op de display.
•Geef de nieuwe PINcode nogmaals in. Gebruik hiervoor de cijfertoetsen.
• Druk op de Programmeertoets .
•Uhoort een bevestigingstoon. De nieuwe PINcode is ingesteld.
Opgepast : Vergeet uw persoonlijke PINcode niet ! Mocht dit toch gebeuren, dan moeten de standaard-
instellingen terug ingesteld worden (reset - zie hoofdstuk 4.32).
4.24 Aanmelden van een handset op een Butler 1000, 1010, 1210, 2405, 2410,
2450, 2455, 30xx basis
Om te kunnen telefoneren en oproepen te kunnen ontvangen, moet een nieuwe handset
aangemeld worden op de basis. U kan 5 handsets op één basis aanmelden. Elk handset is bij uitlevering standaard aangemeld als handset 1 op de bijgeleverde basis (basis 1).
!!! U hoeft enkel deze aanmelding uit te voeren: !!!
• indien de handset is afgemeld op zijn basis (bij een reinitialisatie bv)
•wanneer u een andere handset op deze basis wilt aanmelden.
De onderstaande procedure is enkel geldig voor een Butler 1000, 1010, 1210, 2405, 2410,
2450, 2455, 30xx handset en basis!!
Houd de Paging-toets op de basis 10 seconden ingedrukt tot de Lijn/Laad-indicator op
de basis snel begint te knipperen. De Lijn/Laad-indicator zal gedurende één minuut snel
knipperen. Tijdens deze minuut is de basis in aanmeld-modus en moet u het volgende doen om
de handset aan te melden :
• Druk op de Programmeertoets .
• Druk enkele keren op de Omhoog- of Omlaagtoets tot ‘BASIS AANM’ (BASE SUB) op de
display verschijnt.
• Druk op de Programmeertoets .
• ‘BASIS _’ (BASE _) verschijnt op de display.
•Geef een nummer van de basis in die u aan de handset wil aanmelden (1-4). Gebruik
hiervoor het cijferklavier.
Opmerking : Elke handset kan op 4 verschillende DECT basissen aangemeld worden. Elke basis krijgt een
nummer van 1 tot 4 in de handset. Als U een nieuwe handset aanmeldt, mag U een basisnummer
toewijzen, gebruik bij voorkeur ‘1’ .
• ‘ZOEKEN’ (SEARCHING) en het symbool verschijnen op de display.
• De RFPI code (elke basis heeft een unieke RFPI code) verschijnt op de display en er weerklinkt
een signaal als de basis gevonden wordt door de handset.
• Druk op de Programmeertoets .
• ‘PIN CODE’ (PIN) verschijnt op de display.
•Geef de 4-cijferige PINcode van de basis in (standaard PINcode is ‘0000’). Gebruik hiervoor
het cijferklavier.
• Druk op de Programmeertoets .
• De handset is aangemeld op de basis.
54
545454545454545454545454
Page 55

Butler 3055
4.25 Aanmelden van een Butler 3055 handset op een andere basis (ander type of
merk)
Zet de basis in aanmeld-modus (zie handleiding van de basis). Als de basis in aanmeld–modus is
moet u het volgende doen om de handset aan te melden:
• Druk op de Programmeertoets .
• Druk enkele keren op de Omhoog- of Omlaagtoets tot ‘BASIS AANM’ (BASE SUB) op de
display verschijnt.
• Druk op de Programmeertoets .
• ‘BASIS _’ (BASE _) verschijnt op de display.
•Geef een nummer van de basis in die u aan de handset wil aanmelden (1-4). Gebruik
hiervoor het cijferklavier.
• ‘ZOEKEN’ (SEARCHING) en het symbool verschijnen op de display.
• De RFPI code (elke basis heeft een unieke RFPI code) verschijnt op de display en er weerklinkt
een signaal als de basis gevonden wordt door de handset.
• Druk op de Programmeertoets .
• ‘PIN CODE’ (PIN) verschijnt op de display.
•Geef de 4-cijferige PINcode van de basis in (standaard PINcode is ‘0000’). Gebruik hiervoor
het cijferklavier.
• Druk op de Programmeertoets .
• De handset is aangemeld op de basis.
4.26 Aanmelden van een TOPCOM Butler 300 DECT GAP Headset
Zorg ervoor dat de basis pincode = ‘0000’!! Zie §4.23 om deze basis pincode te wijzigen.
Houd de Paging-toets op de basis 10 seconden ingedrukt tot de Lijn/laad-indicator op
de basis snel begint te knipperen. De Lijn/Laad-indicator zal gedurende één minuut snel
knipperen. Tijdens deze minuut is de basis in aanmeldmodus en moet u het volgende doen om
de headset aan te melden:
• Schakel de headset Aan door op de Aan/Uit-toets te drukken tot er 2 beep tonen hoorbaar
zijn. De rode en groene LED zal éénmaal knipperen.
• Druk op de headset aanmeldtoets. De rode LED zal vlug beginnen te knipperen.
- Indien na een aantal seconden de groene LED traag begint te knipperen is de registratie
gelukt.
- Indien de rode LED traag knippert is de registratie mislukt. Herbegin bovenstaande
procedure en zorg ervoor dat de basis pincode ingesteld staat op ‘0000’.
4.27 Afmelden van een handset aan een basis
Het is mogelijk een handset van een basis af te melden. Dit doet u in geval een handset
beschadigd is en moet vervangen worden door een nieuwe.
Opgelet : U kan enkel een andere handset afmelden, niet de handset die u gebruikt voor deze afmeldingsprocedure.
NEDERLANDS
55
555555555555555555555555
Page 56

Butler 3055
• Druk op de Programmeertoets .
• Druk enkele keren op de Omhoog- of Omlaagtoets tot ‘INSTELLING’ (SETTING) op de
display verschijnt.
• Druk op de Programmeertoets .
• Druk enkele keren op de Omhoog- of Omlaagtoets tot ‘AFM HANDS’ (REMOVE HS) op de
display verschijnt.
• Druk op de Programmeertoets .
• ‘PIN CODE’ (PIN) verschijnt op de display.
• Geef uw 4-cijferige PINcode in (standaard PINcode is ‘0000’). Gebruik hiervoor het cijferklavier.
• Druk op de Programmeertoets .
• ‘AFM HANDS’ (REMOVE HS) verschijnt op de display.
• Geef het nummer van de handset in die u wil afmelden (1 –5). Gebruik hiervoor het cijferklavier.
• Druk op de Programmeertoets .
• ‘AFM HANDS’ (REMOVE HS) verschijnt op de display en de handset is afgemeld.
•Op de afgemelde handset verschijnt ‘NT AANGEM’ (NOT SUB).
4.28 Een basis selecteren
Als uw handset is aangemeld op meerdere basisstations (max. 4), dan dient U een basis te
selecteren omdat een handset maar kan communiceren met één basis tegelijkertijd. Er zijn twee
mogelijkheden:
4.28.1 Automatische selectie
Als u ‘automatische selectie’ instelt, dan zal de handset automatisch de dichtstbijzijnde basis
kiezen in standby.
• Druk op de Programmeertoets .
• Druk enkele keren op de Omhoog- of Omlaagtoets tot ‘INSTELLING’ (SETTING) op de
display verschijnt.
• Druk op de Programmeertoets .
• Druk enkele keren op de Omhoog- of Omlaagtoets tot ‘BASIS SEL’ (BASE SEL) op de
display verschijnt.
• Druk op de Programmeertoets .
• Druk enkele keren op de Omhoog- of Omlaagtoets tot ‘AUTO’ op de display verschijnt.
• Druk op de Programmeertoets .
• ‘ZOEKEN’ (SEARCHING) en het symbool verschijnen op de display.
• Er weerklinkt een signaal als de handset een basis gevonden heeft.
4.28.2 Manuele selectie
Als u ‘manuele selectie’ instelt, dan zal de handset enkel de basis kiezen die u ingesteld hebt.
• Druk op de Programmeertoets .
• Druk enkele keren op de Omhoog- of Omlaagtoets tot ‘INSTELLING’ (SETTING) op de
display verschijnt.
• Druk op de Programmeertoets .
• Druk enkele keren op de Omhoog- of Omlaagtoets tot ‘BASIS SEL’ (BASE SEL) op de
display verschijnt.
• Druk op de Programmeertoets.
56
56565656565656565656
5656
Page 57

Butler 3055
• Druk enkele keren op de Omhoog- of Omlaagtoets tot ‘MANUEEL’ (MANUAL) op de
display verschijnt.
• Druk op de Programmeertoets .
• ‘BASIS_’ (BASE_) verschijnt op het display.
•Geef het nummer in van de basis die u wil selecteren (1-4). Gebruik hiervoor het cijferklavier.
• Druk op de Programmeertoets .
• ‘ZOEKEN’ (SEARCHING) en het symbool verschijnen op de display.
• Er weerklinkt een signaal als de geselecteerde basis is gevonden.
Opmerkingen :
• Vooraleer u een basis kan selecteren, dient deze eerst aan de handset aangemeld te worden.
• Als ‘NT AANGEM’ (NOT SUB) op de display verschijnt, betekent dit dat de geselecteerde basis niet bestaat
of dat de handset niet aangemeld is.
4.29 Vergrendeling van uitgaande gesprekken
U kan de handsets zodanig programmeren dat bepaalde telefoonnummers niet kunnen opgeroepen
worden bvb. ‘00’ internationale nummers kunnen niet opgebeld worden. Tot 5 nummers (van max.
5 cijfers) kunnen vergrendeld worden. U gaat als volgt te werk :
• Druk op de Programmeertoets .
• Druk enkele keren op de Omhoog- of Omlaagtoets tot ‘INSTELLING’ (SETTING) op de
display verschijnt.
• Druk op de Programmeertoets .
• Druk enkele keren op de Omhoog- of Omlaagtoets tot ‘BLOKKEREN’ (BARRING) op de
display verschijnt.
• Druk op de Programmeertoets .
• ‘PIN CODE’ (PIN) verschijnt op de display.
•Geef uw PINcode in.
• Druk op de Programmeertoets .
• ‘PIN BLOKK’ (BAR NUM) verschijnt op de display. U bevindt zich in geheugen “1. _ _ _ _ _”.
• Druk op de Omhoog- of Omlaagtoets om één van de 5 geheugens te selecteren.
•Geef het nummer in (max. 5 cijfers) dat vergrendeld moet worden bvb 01486.
• Druk op de Programmeertoets .
• ‘HS _ _ _ _ _’ = (nummer van de handset (1-5)) en ‘01486’ (= de vergrendelde cijfers)
verschijnen op de display.
•Geef de nummers van de handsets in die de vergrendelde cijfers niet mogen uitbellen.
• bvb. Druk op de cijfertoets 2, 3 en 5. Op het scherm verschijnt : HS _2 3_5 01486
Deze handsets mogen geen nummers vormen die met ‘01486’ beginnen.
• Druk op de Programmeertoets ter bevestiging.
Herhaal dezelfde procedure als hierboven indien u meerdere nummers wil blokkeren (max. 5)!
4.30 Rechtstreekse oproep (Direct call)
Wanneer u het baby call nummer heeft geprogrammeerd en aangeschakeld, zal dit nummer
automatisch worden gevormd bij eender welke toetsdruk.
NEDERLANDS
57
5757575757575757
57575757
Page 58

Butler 3055
4.30.1 Baby call nummer programmeren
• Druk op de programmeertoets
• Druk enkele keren op de Omhoog- of Omlaagtoets tot ‘Rechtstree’(DIRECT) verschijnt
• Druk op de programmeertoets
• Indien nodig, wis het huidig nummer door op de Wis-toets een aantal keren te drukken
•Geef het rechtstreeks nummer in
• Druk op de programmeertoets
4.30.2. Rechtstreekse oproep Aan -Uitschakelen
Aanschakelen:
• Druk op de programmeertoets
• Druk enkele keren op de Omhoog- of Omlaagtoets tot ‘Rechtstree’(DIRECT) verschijnt
• Druk op de Mute-toets gedurende 2 seconden
•‘RECHTS AAN’ (DIRECT ON) Verschijnt
Uitschakelen:
- Druk 2x vlug op de Programmeertoets
4.31 Standaardinstellingen (reset) van de parameters
U kan de standaardinstellingen (default) van het toestel terugplaatsen zodat het zich in dezelfde
staat bevindt als bij aankoop. Hiervoor hebt u de PINcode nodig.
De standaard instellingen zijn:
Klavier : niet vergrendeld
Klaviertonen : actief
Luidsprekervolume : niveau 3
Belmelodie : 1
Belvolume : 5
Selectie basis : automatisch
Flash tijd : 100ms
U doet het volgende om de standaardinstellingen terug in te stellen :
• Druk op de Programmeertoets .
• Druk enkele keren op de Omhoog- of Omlaagtoets tot ‘INSTELLING’ (SETTING) op de
display verschijnt.
• Druk op de Programmeertoets .
• Druk enkele keren op de Omhoog- of Omlaagtoets tot ‘RESET’ op de display verschijnt.
• Druk op de Programmeertoets .
• ‘PIN CODE’ (PIN) verschijnt op de display.
•Geef uw PINcode in.
• Druk op de Programmeertoets .
58
585858585858585858585858
Page 59

Butler 3055
4.32 Complete reinitialisatie van het toestel
Deze functie laat u toe het toestel volledig te reïnitialiseren zonder dat u daarvoor de PINcode
nodig hebt. Hierdoor zullen alle Telefoonboekgeheugens gewist worden, alle handsets zullen afgemeld zijn, alle standaardinstellingen zijn terug ingesteld en de standaard PINcode staat terug op
‘0000’.
U doet het volgende:
• Koppel de batterij los van het toestel
• Houd de ‘*’-toets ingedrukt en koppel de batterij terug aan tot de handset aanhoudend
rinkelt en de display oplicht. Laat de ‘*’-toets los en druk op de Programmeertoets .
• De handset vindt de basis terug en er weerklinkt een signaal.
• Druk kort op de ‘*’-toets.
• ‘RESET ?‘ verschijnt op de display.
• Druk op de Programmeertoets ter bevestiging of ontkoppel de batterij om de procedure
te stoppen.
• ‘RESET OK’ (RESETTING) verschijnt op de display en een lange beeptoon weerklinkt.
• ‘NT AANGEM’ (NOT SUB) verschijnt op de display. De handset is volledig gereïnitialiseerd.
Nadien dient u alle handsets terug aan te melden zoals beschreven in punt 4.24! U dient echter de
basis niet meer in aanmeld-modus te plaatsen aangezien dit nu automatisch gebeurt!
4.33 Kiesmode op de handset instellen
Er zijn 2 kiesmodi:
- DTMF/Toonsysteem (het meest gebruikelijke)
- Pulssysteem (bij oudere installaties)
De kiesmodus wijzigen:
- Druk op de programmeertoets
- Druk op de omhoog- of omlaagtoets tot ‘Instelling’(Setting) op het display verschijnt.
- Druk op de programmeertoets
- Druk op de omhoog- of omlaagtoets tot ‘BELMODUS’(DIAL MODE) op het display
verschijnt.
- Druk op de programmeertoets
- Kies ‘TOON’(TONE) of ‘PULS’(PULSE) met de omhoog- of omlaagtoetsen
- Druk op de programmeertoets ter bevestiging
Opmerking: De handset kiesmode is onafhankelijk van de telefoon in de basis (Zie §7.3)!! Om het basisstation
kiesmode in te stellen dient u de T/P schakelaar onderaan de basis te wijzigen.
NEDERLANDS
59
595959595959595959595959
Page 60

Butler 3055
5 NUMMERWEERGAVE (CALLER ID/CLIP)
(Deze dienst werkt enkel als u een abonnement hebt op CLIP- of nummerweergave. Raadpleeg
hiervoor uw telefoonmaatschappij). Als men een oproep ontvangt, verschijnt het telefoonnummer
van de oproeper, de datum en het uur op de display van de handset. Het toestel kan oproepen
in FSK en DTMF ontvangen. Indien de naam geprogrammeerd staat in het Telefoonboek wordt
de naam van het Telefoonboek weergegeven!
Het toestel kan 30 oproepen bewaren in een Oproeplijst die later overlopen kunnen worden.
Het toestel bewaart nooit tweemaal dezelfde oproep. Als het geheugen vol is, vervangen de
nieuwe oproepen automatisch de oudste in het geheugen.
Bij een ongelezen of niet beantwoorde oproep, knippert het symbool op de display.
Als de Oproeplijst leeg is en u drukt op de Omhoog-toets , weerklinken er drie beeptonen.
U kan de gegevens van een binnenkomende oproep als volgt bekijken :
• Druk op de Omhoog-toets . De naam (indien meegestuurd door het netwerk of aanwezig
in het Telefoonboek-geheugen) van de oproeper, het volgnummer van de oproep in de
Oproeplijst en de datum en het uur van de oproep verschijnen op de display.
• Druk op de Omlaag-toets . Het telefoonnummer van de oproeper verschijnt op de display.
5.1 Datum en tijd instellen
Indien bij een binnenkomende oproep de datum en de tijd niet worden meegestuurd samen
met het oproepnummer, kan men de de datum en de tijd van de binnenkomende oproep niet
zien op de display.
Door de datum en de tijd in te stellen, zal deze informatie, samen met het nummer, worden
weergegeven bij elke binnenkomende oproep !
• Druk op de Programmeertoets .
• Druk enkele keren op de Omhoog- of Omlaagtoets tot ‘INSTELLING’ (SETTING) op de
display verschijnt.
• Druk op de Programmeertoets .
• ’DAG/TIJD’ (DATE/TIME) verschijnt op de display.
• Druk nogmaals op de Programmeertoets .
• Als ‘JAAR’ (YEAR) op de display verschijnt, geef dan de laatste 2 cijfers van het jaar in
(00=2000, 01=2001, ...) en druk op de Programmeertoets ter bevestiging.
• Als ‘MAAND’ (MONTH) verschijnt, geef dan de maand in (01=januari, 02=februari, ...) en
druk op de Programmeertoets ter bevestiging.
• Als ‘DAG’ (DAY) verschijnt, geef dan de dag van de maand in en druk op de
Programmeertoets ter bevestiging.
• Als ‘UUR’ (HOUR) verschijnt, geef dan het huidige uur in (in 24u formaat) en druk op de
Programmeertoets ter bevestiging.
• Als ‘MINUTEN’ (MINUTE) verschijnt, geef dan de minuten in en druk op de Programmeertoets
ter bevestiging.
De datum en het uur zijn nu ingesteld !
60
60606060606060606060
6060
Page 61

Butler 3055
5.2 De Oproeplijst
De ontvangen oproepen komen in de Oproeplijst terecht (max. 30 nummers).
• Druk kort op de Omhoog-toets om de meest recente oproep te bekijken.
• De naam van de meest recente oproep verschijnt op de display. Is er geen naam beschikbaar,
verschijnt ‘GEEN NAAM’ (NO NAME) op de display.
• Als het een privenummer betreft, verschijnt ‘NT BESCHIK’ (UNAVAL) op de display.
• De datum en het uur van ontvangst zijn aan elke oproep verbonden.
• Druk kort op de Omlaag-toets om het telefoonnummer, die bij de oproep hoort, te bekijken.
• Druk kort op de Omlaag-toets om de andere nummers van de lijst te doorlopen.
Opmerkingen :
• Indien er gedurende 15 seconden niet op de Omhoog- of Omlaag-toets wordt gedrukt, keert het
toestel terug naar standby-modus.
• Na ontvangst van een oproep, blijft het nummer van de oproeper nog 15 seconden na de laatste beltoon
zichtbaar op de display.
• Nummerweergave is niet mogelijk als u in gesprek bent.
5.3 Een nummer van de Oproeplijst oproepen
• Druk op de Omhoog-toets om naar de Oproeplijst te gaan.
• Druk op de Omhoog-toets om de gewenste oproep te zoeken. Druk de Omlaag-toets
om het telefoonnummer te bekijken.
• Als het nummer op de display staat, drukt u op de Lijntoets en het nummer wordt
automatisch gevormd. (De symbolen en ‘EXT’ verschijnen op de display en de gespreksduurteller loopt.)
5.4 Een nummer van de Oproeplijst in het Telefoonboek opslaan
• Druk op de Omhoog-toets om naar de Oproeplijst te gaan.
• Druk op de Omhoog- toets om het gewenste nummer te zoeken.
• Druk tweemaal op de Telefoonboektoets .
• ‘BEWAREN’ (STORE) verschijnt op de display
• Het nummer is opgeslagen in het Telefoonboek. Indien het een oproep was zonder naam
‘GEEN NAAM’ (NO NAME) kan u achteraf een naam toevoegen aan dit nummer in het
Telefoonboek.
• Het toestel keert terug naar standby-modus.
5.5 Nummers van de Oproeplijst wissen
5.5.1 Eén nummer wissen
• Druk op de Omhoog-toets om naar de Oproeplijst te gaan.
• Druk op de Omhoog- toets om de oproep die u wil wissen, te zoeken.
• Als deze oproep op de display verschijnt, druk dan op de Wistoets .
•‘WISSEN ?’ (DELETE ?) verschijnt op de display.
• Druk op de Programmeertoets ter bevestiging of de Wistoets om te annuleren.
• De oproep is gewist en de volgende oproep verschijnt op de display.
NEDERLANDS
61
616161616161616161
Page 62

Butler 3055
5.5.2 Alle nummers wissen
• Druk op de Omhoog-toets om naar de Oproeplijst te gaan.
• Houd de Wistoets ingedrukt tot ‘WIS ALLES’ (DELETE ALL) op de display verschijnt.
• Druk op de Programmeertoets ter bevestiging of op de Wistoets om te annuleren.
• Alle oproepen zijn gewist.
6 VOICE MAIL INDICATIE
Deze functie werkt enkel als u beschikt over de voice mail of phone mail dienst, en als het
netwerk deze indicatie doorstuurt samen met de Caller-ID/CLIP informatie!
Als u een nieuwe boodschap ontvangen hebt in uw Voice Mail systeem, zal het ‘ ’-icoon op
de display verschijnen. Nadat u uw boodschappen beluisterd hebt, zal het ‘ ’-icoon verdwijnen.
7 BASISSTATION TELEFOON
U kan ook telefoneren via de handenvrij telefoon in de basis.
7.1 Telefoneren
• Druk op de handenvrij toets
• Druk op de numerieke toetsen op de basis om het telefoonnummer te vormen
• Druk opnieuw op de handenvrijtoets om het gesprek te beëindigen
7.2 Luidspreker volume aanpassen
Druk op de ‘+’ of ‘-’ toets tijdens gesprek om het luidspreker volume aan te passen. Indien
het luidspreker volume te luid staat ingesteld kan de luidspreker gaan oscilleren (fluittoon).
Vermijd dit door het luidspreker volume terug lager in te stellen.
Opgepast: De handenvrij communicatie is maar in één richting. Indien de persoon aan de andere kant van
de lijn begint te praten, zal de microfoon uitgeschakeld worden, en zal hij u niet horen. Probeer om beurten
te spreken met elkaar.
Opmerking: Het handenvrij luidspreker volume is verschillend van het antwoordapparaat luidspreker volume.
7.3 Kiesmode op de basis instellen
U kan de basisstation telefoon kiesmodi instellen in Toon (T) of Puls (P) doormiddel van de
Toon/Puls schakelaar onderaan de basis.
Opgepast: Het kiessysteem in de basis is verschillend van de handsets. Zie §4.33 om het
kiessysteem van de handset in te stellen.
7.4 Gesprek doorverbinden van basis naar handset
Tijdens basisstation telefoneren kan u het gesprek doorverbinden naar eender welk handset
aangemeld op deze basis door op de paging toets te drukken. De lijn indicator LED
zal knipperen:
.
62
62
6262626262626262
Page 63

Butler 3055
•Ukan de lijn overnemen op eender welke handset door op de lijntoets te drukken.
• Druk opnieuw op de paging toets indien u het gesprek niet wilt doorverbinden
Opmerking: De handsets zullen niet bellen tijdens het doorverbinden.
7.5 Basis flashtijd instellen
U kan de flashtijd van de basisstation telefoon wijzigen doormiddel van de flashtijd schakelaar
onderaan de basis. De flashtijd kan ingesteld worden op 100ms of 300ms.
Opmerking: de basis flashtijd is verschillend van de handset flashtijd. Zie §4.22 om de handset flashtijd in te
stellen.
8 ANTWOORDAPPARAAT
De Butler 3055 heeft een ingebouwd digitaal antwoordapparaat met een opnamecapaciteit van
11 min. Het antwoordapparaat kan volledig vanop afstand bediend worden en heeft de mogelijkheid om twee uitgaande boodschappen (Meldtekst 1 en Meldtekst 2) op te slaan (van max.
2 min).
Er zijn 2 mogelijkheden:
-Met Meldtekst 1 heeft de oproeper de mogelijkheid een boodschap na te laten
-Met Meldtekst 2 wordt enkel de uitgaande meldtekst weergegeven zonder de mogelijkheid
een boodschap na te laten
De max. opnametijd per inkomende boodschap = 2min.
Een interne stem zal een aantal parameters weergeven, zoals dag en tijd van de oproep, alsook
de instellingsparameters zoals VIP-code, beltonen….. De taal van de interne stem staat vermeld
op de verpakkingsdoos!
8.1 LED indicatie
De boodschappen/ Aan-Uit LED knippert wanneer er nieuwe boodschappen zijn; het
aantal flitsen tussen elke lange pauze geeft aan hoeveel nieuwe oproepen zijn ontvangen.
Wanneer het antwoordapparaat uit staat is de Aan-Uit LED
De FULL-LED gaat aan wanneer het intern geheugen vol is en er geen nieuwe boodschappen
geregistreerd kunnen worden
gedoofd.
NEDERLANDS
63
6363636363636363
636363
Page 64

Butler 3055
8.2 Functies toetsenbord
Opmerking: - De toetsen
bevinden zich onderaan de basis
&
Toetsen Stand-by modus Tijdens afspelen
Korte toetsdruk Twee sec. indrukken boodschap
1,2
1 Weergave meldtekst Opname meldtekst Boodschap teruggaan
Weergave Geen Pauze
2
3
boodschappen
Geen Memo opnemen Boodschap overslaan
Volume instelling Geen Volume instelling
4 spraak + belvolume
5Meldtekst slecteren Beantwoorder Aan/Uit Stop
6Weergave VIP-code Instellen VIP-code Geen
7
Huidig aantal Instellen aantal beltonen Geen
beltonen
8 Weergave tijd Instellen datum/tijd Geen
Geen Alle boodschappen wissen Wissen boodschap of
9 meldtekst
8.3 Meldteksten
Er kunnen 2 meldteksten worden opgenomen van max. 2 minuten (OGM1 en OGM2).
•Meldtekst 1 voor de antwoordfunctie met inspreekmogelijkheid
•Meldtekst 2 voor de antwoordfunctie zonder inspreekmogelijkheid, het apparaat neemt geen
boodschappen op.
8.3.1 Opnemen uitgaande boodschappen (Meldtekst 1 of Meldtekst 2)
• Druk op de -toets om de meldtekst te selecteren
• Een stem geeft aan welke meldtekst er wordt opgenomen.
• Druk 2 seconden op de -toets
1,2
• Spreek de uitgaande boodschap in na de biep.
• Druk op de Stoptoets om de opname te beëindigen.
Opm: De opname kan max. 2 minuten bedragen. Indien er geen uitgaande boodschap is opgenomen, wordt
de standaard meldtekst weergegeven.
8.3.2 Controleren van de meldtekst
Om de huidig ingestelde meldtekst te controleren:
• Druk op de -toets.
Opm: Om de weergave te stoppen, drukt u kort op de Stop-toets .
1,2
64
64646464
64646464646464
Page 65

Butler 3055
8.3.3 Meldtekst selecteren
• Druk op de -toets om te makelen tussen de 2 meldteksten.
• De interne stem zal de ingestelde meldtekst bevestigen.
Opm.:
Het selecteren van een meldtekst is enkel mogelijk als het antwoordapparaat is aangeschakeld!
Als het geheugen vol is, zal enkel meldtekst 2 selecteerbaar zijn (enkel beantwoorden zonder registratie)!
8.3.4 Wissen van de uitgaande meldtekst
Wanneer men de uitgaande boodschap wist, zal de standaard-meldtekst worden weergegeven.
Het wissen van de uitgaande boodschap gaat als volgt:
• Selecteer de gewenste meldtekst met de -toets.
• Druk op de -toets om de meldtekst weer te geven.
• Druk en hou de -toets in tijdens de weergave van de meldtekst
8.4 Antwoordapparaat aan/uit schakelen
Als het antwoordapparaat is aangeschakeld zal de LED oplichten en zal het toestel
automatisch de lijn nemen na een aantal beltonen (instelbaar zie ‘Beltonen instellen’).
• Druk 2 sec. op de -toets om het antwoordapparaat aan te schakelen. Een stem bevestigt
de instelling en zegt welke meldtekst actief is (meldtekst 1 of meldtekst 2)
• Druk opnieuw 2 sec. op de -toets om het antwoordapparaat uit te schakelen. Een stem
bevestigt de instelling
Opm: Ook al staat het antwoordapparaat uit, toch zal het toestel na 10 beltonen automatisch de lijn nemen
om het aanschakelen vanop afstand te kunnen uitvoeren (zie 8.15 Bediening van op afstand).
8.5 Beltonen instellen
Het aantal beltonen waarna het antwoordapparaat de oproep zal beantwoorden, kan ingesteld
worden van 2 – 9 en TS (Toll saver). Standaard staat het toestel ingesteld op 3 beltonen. In Toll
saver modus zal het toestel antwoorden na 5 beltonen als er geen nieuwe boodschappen zijn,
en na 2 beltonen als er nieuwe boodschappen zijn. Als er geen nieuwe boodschappen zijn en u
belt naar het toestel om vanop afstand uw boodschappen op te vragen (zie verder bij 8.15
Bediening van op afstand), kan u al na de 3e beltoon inhaken. U hoeft geen verbindingskosten
te betalen en u weet dat er geen nieuwe boodschappen zijn.
• Druk kort op de -toets. Een stem zegt het huidig aantal beltonen.
• Druk 2 sec. op de -toets om het aantal beltonen in te stellen.
• Druk op de of -toets om het huidig aantal beltonen te wijzigen.
• Bevestig de instelling door op de -toets te drukken. Het huidig aantal ingestelde
beltonen wordt door de interne stem bevestigd.
Opm.:
-Indien u 3 sec. lang op geen enkele toets drukt, zal het toestel terugkeren zonder de instellingen te
wijzigen
-Bij stroomonderbreking in de basis zal het aantal beltonen terug op 3 staan!
1,2
NEDERLANDS
65
65656565656565656565
65
Page 66

Butler 3055
8.6 Aantal betonen controleren
• Druk kort op de -toets.
• De interne stem zal het aantal ingestelde beltonen weergeven
8.7 Dag en tijd instellen
De dag en tijd-instelling van het antwoordapparaat is onafhankelijk van het telefoongedeelte.
De dag en tijdstip van elke oproep wordt geregistreerd. Het formaat van het uur is afhankelijk
van de interne stem-taal: bv Engels is 12u-formaat en Duits = 24u-formaat.
Programmatie van de dag en tijd:
• Druk en hou de -toets 2sec. ingedrukt.
• De interne stem vraagt om de dag in te stellen.
• Druk een aantal maal op de of -toets om de dag in te stellen. De interne stem geeft
de huidige instelling weer.
• Druk op de -toets om de dag te bevestigen.
• De interne stem vraagt om het uur in te stellen.
• Druk een aantal maal op de of -toets om het uur in te stellen.
• Druk op de -toets om het uur te bevestigen.
• De interne stem vraagt om de minuten in te stellen.
• Druk een aantal maal op de of -toets om de minuten in te stellen.
• Druk op de -toets om de minuten te bevestigen.
De volledige dag- en tijd-instelling wordt nog eens herhaald ter bevestiging.
Opm:
•Als u 8 sec. lang op geen enkele toets drukt, wordt de vorige dag/tijd-instelling bewaard en verlaat het
toestel automatisch de dag/tijd-instelling.
•Als u het toestel voor het eerst gebruikt en u heeft de dag/tijd niet ingesteld, wordt er ook geen
dag/tijd-registratie bij een inkomende boodschap toegevoegd.
•Bij stroomonderbreking in de basis moet de dag/tijd opnieuw worden ingesteld!
8.8 Dag/tijd controleren
• Druk op de -toets om de dag/tijd weer te geven. De interne stem zegt de huidige dag/tijd
instelling.
8.9 VIP-code programmeren
De VIP-code is een 3-cijferige code die gebruikt wordt om het toestel vanop afstand te
bedienen (zie Bediening vanop afstand). Standaard staat de VIP-code op ‘321’ ingesteld.
Opm: Bij stroomonderbreking in de basis zal de VIP-code terug op ‘321’ worden gezet!
8.9.1 Vip-code veranderen
• Druk en hou de -toets 2 sec. ingedrukt om de VIP-code te wijzigen.
• De interne stem vraagt om de VIP-code in te stellen en zegt het eerste cijfer.
• Druk een aantal maal op de of -toets om het eerste cijfer van de VIP-code in te
stellen.
66
6666666666666666
66
Page 67

Butler 3055
• Druk op de -toets om het eerste cijfer te bevestigen. De interne stem zegt het huidig
ingestelde 2de cijfer van de VIP-code.
• Druk een aantal maal op de of -toets om het tweede cijfer van de VIP-code in te
stellen.
• Druk op de -toets om het tweede cijfer te bevestigen. De interne stem zegt het huidig
ingestelde 3de cijfer van de VIP-code.
• Druk een aantal maal op de of -toets om het 3de cijfer van de VIP-code in te stellen
• Druk op de -toets om de VIP-code te bevestigen. U hoort een lange biep-toon. De
interne stem zegt de nieuwe VIP-code ter bevestiging.
Opm: Als u 8 sec. lang op geen enkele toets drukt, wordt de vorige VIP-code bewaard en verlaat het toestel
automatisch de VIP-code instelling.
8.9.2 Controleren van de VIP-code
• Druk op de -toets om de VIP-code weer te geven. De interne stem zegt de huidige VIP-
code.
8.10 Bediening
Als er een oproep binnenkomt en het antwoordapparaat is aangeschakeld , zal na het aantal
ingestelde beltonen, het antwoordapparaat automatisch de lijn nemen. Indien:
•meldtekst 1 is geselecteerd, zal deze worden afgespeeld. Na de meldtekst zal er een biep-
signaal te horen zijn en kan de opbeller een boodschap inspreken (van max. 2 minuten).
•meldtekst 2 is geselecteerd, zal deze worden afgespeeld. Na de bieptoon zal de lijn automa-
tisch verbroken worden! Er is geen mogelijkheid om een boodschap in te spreken!
Opm.: Indien, tijdens de opname, 8 sec. niets wordt gezegd, word de verbinding automatisch verbroken!
8.11 Opname memo tekst
Met de Butler 3055 kan men memo’s opnemen. Deze memo’s worden aanzien als een
inkomende boodschap die later opgevraagd kan worden door de gebruiker. De max. opnameduur van een memo bedraagt 2 minuten.
• Druk 2 sec. op de -toets. Spreek de memo in na de biep.
• Druk op de Stop -toets om de opname te beëindigen
8.12 Weergave van de binnengekomen boodschappen en memo’s
• Druk kort op de -toets om de boodschappen en memo’s weer te geven.
• Een interne stem zegt hoeveel boodschappen er zijn (totaal) en hoeveel nieuwe
boodschappen (onbeluisterde).
• De boodschappen worden één voor één weergegeven. Indien er nieuwe boodschappen zijn,
worden enkel de nieuwe boodschappen (onbeluisterde) weergegeven.
• Voor elke boodschap zegt de interne stem op welke dag en op welk tijdstip de opname is
gebeurd.
• Tijdens de weergave kan u:
- naar het begin van de huidige boodschap gaan door 1x op de -toets te drukken.
- naar de vorige boodschap gaan door 2 x op de -toets te drukken.
- de weergave stoppen door op de Stop -toets te drukken.
NEDERLANDS
67
676767676767676767
Page 68

Butler 3055
- de weergave onderbreken door op de Pauze -toets te drukken. Druk nogmaals op de
Pauze -toets om de weergave verder te zetten.
- naar de volgende boodschap gaan door op de -toets te drukken.
8.13 Boodschappen wissen
8.13.1 Boodschap per boodschap wissen tijdens weergave
Start de weergave van de boodschappen zoals hierboven beschreven.
• Als de te wissen boodschap wordt weergegeven, drukt 2 sec.u op de Wis -toets.
• Tijdens het wissen laat de interne stem weten dat de boodschap wordt gewist.
• Het toestel start de weergave van de volgende boodschap.
8.13.2 Alle boodschappen wissen
Men kan ook alle nieuwe boodschappen tegelijkertijd wissen. Hierbij worden enkel de beluisterde boodschappen gewist. Nieuwe boodschappen worden niet gewist!
• Druk 2 sec. op de Wis -toets.
• De interne stem bevestigt het wissen van de boodschappen en laat weten hoeveel nieuwe
(onbeluisterde) boodschappen er zijn.
8.14 Geheugen vol
Wanneer het geheugen vol is zal de FULL-LED knipperen. Wanneer het antwoordapparaat is
aangeschakeld en er komt een oproep binnen, zal het toestel automatisch meldtekst 2 (antwoordfunctie zonder inspreek mogelijkheid) weergeven!
Tijdens het beluisteren van de boodschappen zal de interne stem zeggen dat het geheugen vol
is, en vervolgens de boodschappen afspelen.
•Wis alle boodschappen na ze beluisterd te hebben.
• Het geheugen is terug vrij.
8.15 Bediening vanop afstand
Het antwoordapparaat kan slechts vanop afstand bediend worden via een telefoon met druktoetsen (DTMF toonkiessysteem).
• Bel naar uw toestel.
• Het antwoordapparaat neemt de oproep aan, u hoort de meldtekst en een biep.
• Druk na de biep langzaam uw VIP-code in (standaard 321).
•Uhoort twee korte bieptonen ter bevestiging.
•Geef de volgende codes in om de gewenste functie op te roepen:
a) Boodschappen beluisteren
• Druk ‘2’ (beluisteren van de boodschappen). Het antwoordapparaat zal de boodschappen
weergeven.
Tijdens de weergave heeft u volgende mogelijkheden:
• Druk ‘2’ om de weergave te stoppen.
• Druk ‘2’ om de weergave terug te starten.
• Druk ‘3’ om naar de volgende boodschap te gaan.
68
6868686868
68686868
Page 69

Butler 3055
• Druk ‘1 1’ om naar de vorige boodschap te gaan.
• Druk ‘1’ om de huidige boodschap te herhalen.
• Druk ‘6’ om de weergave te beëindigen.
• Druk ‘7’ om de huidige boodschap te wissen.
b) Alle beluisterde boodschappen wissen
Na het beluisteren van alle boodschappen drukt u op ‘0’ om alle beluisterde boodschappen te
wissen!
c) Weergave meldtekst
• Druk op ‘4’ om de huidige meldtekst af te spelen.
d) Opname Meldtekst
• Druk op ‘9’ om Meldtekst 1 of Meldtekst 2 te selecteren.
• Druk op ‘5’ om de opname te selecteren.
• Een bieptoon geeft aan dat de opname kan beginnen.
• Spreek de meldtekst in.
• Druk op ‘6’ om de opname te beëindigen.
Opm: De opname wordt automatisch onderbroken na 2 min.
e) Antwoordapparaat Aan/uit schakelen
• Druk op ‘9’ om het antwoordapparaat aan te schakelen.
• Druk op de ‘8’ toets om het antwoordapparaat uit te schakelen.
f) Bediening vanop afstand beëindigen
Indien u de bediening vanop afstand wil beëindigen, druk dan op ‘6’.
8.16 Antwoordapparaat aanschakelen vanop afstand
Als het antwoordapparaat is uitgeschakeld, kan u het ook weer aanschakelen vanop afstand:
• Bel naar uw toestel.
• Het toestel zal na 10 beltonen automatisch de lijn nemen en meldtekst 2 weergeven.
•Geef de VIP-code (standaard 321) langzaam in na de meldtekst.
• Druk op de ‘9’ toets.
• De interne stem geeft aan dat het antwoordapparaat is aangeschakeld.
• Druk op ‘6’ om de bediening te beëindigen.
NEDERLANDS
69
6969696969696969
69
Page 70

Butler 3055
9 PROBLEMEN VERHELPEN
Symptoom Mogelijke oorzaak Oplossing
Geen scherm Batterijen niet opgeladen Controleer de positie
Handset uitgeschakeld (OFF) Handset inschakelen
Geen kiestoon Telefoonkabel verkeerd Controleer de aansluiting
aangesloten van de telefoonkabel
De lijn wordt gebruikt door Wacht tot de andere
een andere handset handset het gesprek
Het pictogram Handset buiten bereik Breng de handset dichter knippert
bij het basistoestel
Het basistoestel krijgt Controleer de
geen stroom. netaansluiting van het
De handset is niet Registreer de handset bij
geregistreerd het basistoestel
bij het basistoestel
Het basistoestel of de Er is geen belsignaal of Belvolume aanpassen
handset geven geen de beltoon is nauwelijks
belsignaal. hoorbaar.
Er is kiestoon, maar Verkeerd kiessysteem. Kiessysteem aanpassen
men kan geen (puls/toon).
nummer vormen.
De telefoon reageert Manipulatiefout. Verwijder de batterijen en
niet op toetsindrukken. plaats ze weer in het
Klaviervergrendeling AAN Schakel de
Flash (R)-toets Verkeerde flashtijd Stel de flashtijd in
van de batterijen
Herlaad de batterijen
(ON)
beëindigt
basistoestel.
toestel.
klaviervergrendeling uit
70
7070707070
70707070
Page 71

Butler 3055
10 DE GARANTIE VAN TOPCOM
• De garantieperiode bedraagt 24 maanden. De garantie wordt verleend na voorlegging van
de originele factuur of betalingsbevestiging waarop de datum van aankoop en het
toesteltype staan vermeld.
•Gedurende de garantieperiode verhelpt Topcom kostenloos alle defecten die te wijten zijn
aan materiaal- of productiefouten. Topcom kan, naar keuze, het defecte toestel ofwel
herstellen ofwel vervangen.
• De garantieclaim vervalt bij ingrepen door de koper of onbevoegde derden.
• Schade te wijten aan onoordeelkundige behandeling of bediening of aan het gebruik van
wisselstukken en accessoires die niet origineel of door Topcom aanbevolen zijn, valt niet
onder de garantie.
• Niet gedekt door de garantie is schade ten gevolge van externe invloedfactoren: bliksem,
water, brand e.d. of wanneer het toestelnummer op het toestel werd gewijzigd, verwijderd
of onleesbaar gemaakt.
Opgelet: Als u uw toestel terugstuurt, vergeet uw aankoopbewijs niet mee te sturen.
11 TECHNISCHE KENMERKEN
• Standaard: DECT (Digital Enhanced Cordless
Telecommunications)
GAP (Generic Access Profile)
• Frequentieband: 1880 MHZ tot 1900 MHz
• Aantal kanalen: 120 duplexkanalen
•Modulatie: GFSK
• Codering: 32 kbit/s
• Zendvermogen: 10 mW (gemiddeld vermogen per kanaal)
• Bereik: 300 m in openlucht / max. 50 m
binnenshuis
• Voeding basistoestel: 220 V / 50 Hz (basistoestel)
• Handsetbatterijen: 2 oplaadbare batterijen AAA,
NiMh 600mAh
• Autonomie basistoestel: 100 uur in standby
•Gesprekstijd: 8 uur
• Laadduur: 6-8 uur
• Normale gebruiksomstandigheden: +5 °C tot +45 °C
• Kiessysteem: Puls / toon
NEDERLANDS
71
717171717171717171
Page 72

Butler 3055
Consignes de sécurité
• Utilisez uniquement l’adaptateur fourni à la livraison. Ne pas utiliser des adaptateurs
étrangers, les cellules de charge pourraient être endommagées.
• Installez uniquement des batteries rechargeables du même type. N'utilisez en aucun cas
des batteries normales non rechargeables. Placez correctement les pôles des
batteries rechargeables (comme indiqué dans le compartiment à batteries du combiné).
• Ne touchez pas les contacts des chargeurs et des prises à l'aide d'objets
contendants et métalliques.
• Le fonctionnement des appareils médicaux peut être perturbé.
• Le combiné peut provoquer des grésillements désagréables dans des écouteurs.
• Ne pas placer le poste de base dans une pièce humide ou à moins de 1,5 m d'un point
d'eau. Le combiné ne peut être en contact avec l'eau.
• N'utilisez pas le téléphone dans un endroit où une explosion est susceptible de se
produire.
• Respectez les directives relatives à la mise en décharge et au retraitement des batteries et
du téléphone.
• Etant donné qu'il n'est pas possible d'utiliser le téléphone pendant une panne
d'électricité, employez un téléphone indépendant de l'alimentation sur secteur, par
exemple un téléphone portable, pour tout appel d'urgence.
Entretien
Frottez le téléphone avec un chiffon légèrement humide ou avec un linge antistatique.
N'utilisez jamais de produits détergents ou agressifs.
72
7272727272727272727272727272727272
Page 73

Butler 3055
1INSTALLATION 75
2 TOUCHES/DEL 76
3 ECRAN (LCD) 78
4 UTILISATION DU COMBINÉ 79
4.1 électionner une langue 79
4.2 Passer des appels 79
4.2.1 Un appel externe 79
4.2.2 Sélection d’un bloc 79
4.2.3 Rappel du dernier numéro formé 79
4.2.4 Rappel de l’un des 5 derniers numéros formés 80
4.2.5 Appeler un numéro programmé à partir du Répertoire 80
4.2.6 Un appel interne : appeler un autre combiné 80
4.3 Recevoir un appel 80
4.3.1 ecevoir un appel externe 80
4.3.2 Recevoir un appel interne 81
4.3.3 Réception d’un appel externe au cours d’une conversation interne 81
4.4 Activer/désactiver la fonction mains-libres 81
4.5 Connexion casque 81
4.6 Transférer un appel vers un autre combiné 82
4.7 Avertissement Hors de portée 82
4.8 Régler le volume du haut-parleur 82
4.9 Affichage de la durée de la conversation sur l’écran 82
4.10 Coupure du microphone (mute) 82
4.11 Touche Pause 83
4.12 Conversation en conférence (deux combinés internes DECT et un appelant externe) 83
4.13 Retrouver un combiné perdu (paging) 83
4.14 Utilisation du clavier alphanumérique du combiné 83
4.15 Le Répertoire 84
4.15.1 Ajouter un numéro et un nom au Répertoire 84
4.15.2 Chercher un numéro dans le Répertoire 84
4.15.3 Modifier un nom ou un numéro dans le Répertoire 85
4.15.4 Effacer un nom et un numéro du Répertoire 85
4.16 Activer/désactiver le combiné 85
4.16.1 Désactiver le combiné 85
4.16.2 Activer le combiné 86
4.17 Régler le volume de la sonnerie du combiné 86
4.17.1 Régler le volume de la sonnerie pour les appels externes (0-9) 86
4.17.2 Régler le volume de la sonnerie pour les appels internes (1-9) 86
4.18 Sélectionner le type de sonnerie (mélodie) du combiné 87
4.18.1 Sélectionner un type de sonnerie (mélodie) pour les appels externes (0-9) 87
4.18.2 Sélectionner un type de sonnerie (mélodie) pour les appels internes (1-9) 87
4.19 Réglage du niveau de volume de sonnerie de la base 87
4.20 Verrouillage du clavier 88
4.21 Activer/désactiver les tonalités des touches 88
4.22 La touche R (flash) 88
4.23 Modifier le code PIN 89
4.24 Annoncer un combiné à une base Butler 1000, 1010, 1210, 2405, 2410, 2450, 2455, 30xx 89
4.25 Enregistrer le combiné du Butler 3055 sur une autre base 90
4.26 Enregistrer un casque TOPCOM Butler 300 DECT GAP 91
4.27 Annuler l’annonce d’un combiné à une base 91
FRANÇAIS
73
73737373737373737373737373737373737373737373
Page 74

Butler 3055
4.28 Sélectionner une base 92
4.28.1 Sélection automatique 92
4.28.2 Sélection manuelle 92
4.29 Verrouillage des appels sortants 93
4.30 Direct Call 93
4.30.1 Pour programmer un numéro Direct Call 93
4.30.2 Activer / désactiver la fonction Direct Call 93
4.31 Réglages standard (reset) des paramètres 94
4.32 Réinitialisation complète de l’appareil 94
4.33 Régler le mode de numérotation du combiné 95
5 AFFICHAGE DU NUMERO (CALLER ID/CLIP) 96
5.1 Régler la date et l’heure 96
5.2 La Liste des appels 97
5.3 Appeler un numéro de la Liste des appels 97
5.4 Stocker un numéro de la Liste des appels dans le Répertoire 97
5.5 Effacer des numéros de la Liste des appels 97
5.5.1 Effacer un seul numéro 97
5.5.2 Effacer tous les numéros 98
6INDICATION VOICE MAIL 98
7 UTILISATION DE LA NUMÉROTATION SUR LA BASE 98
7.1 Passer un appel 98
7.2 Régler le volume du haut-parleur 98
7.3 Régler le mode de numérotation de la base 98
7.4 Transférer un appel de la base au combiné 99
7.5 Régler le temps flash de la base 99
8 RÉPONDEUR AUTOMATIQUE 99
8.1. Témoins lumineux 99
8.2 Fonction Touches 100
8.3 Messages sortants 100
8.3.1 Enregistrer les messages sortants (OGM 1 ou OGM 2) 100
8.3.2 Contrôle du message sortant 100
8.3.3 Sélection du message sortant 101
8.3.4 Effacer le message sortant 101
8.4 Activer/désactiver le répondeur automatique 101
8.5 Réglage des sonneries 101
8.6 Contrôle du nombre de sonneries 102
8.7 Réglage de la date et de l'heure 102
8.8 Contrôle jour/heure 102
8.9 Programmation du code VIP 102
8.9.1 Modifier le code Vip 103
8.9.2 Contrôle du code VIP 103
8.10 Fonctionnement 103
8.11 Enregistrement de notes 103
8.12 Lecture des messages entrés et des notes 103
8.13 Effacer les messages 104
8.13.1 Effacer message par message pendant la lecture 104
8.13.2 Effacer tous les messages 104
8.14 Mémoire pleine 104
8.15 Commande à distance 104
8.16 Activer le répondeur automatique à distance 105
9 DETECTION DE PANNES 106
10 GARANTIE DE TOPCOM 107
11 CARACTERISTIQUES TECHNIQUES 107
74
74747474747474747474747474747474747474747474
Page 75

Butler 3055
1 INSTALLATION
Si vous utilisez l’appareil pour la première fois, vous devrez avant tout veiller à ce que la batterie
soit mise en charge pendant 20 heures. Si vous ne le faites pas, le fonctionnement de l’appareil
ne sera pas optimal.
Pour l’installation, vous procédez comme suit :
• Insérez une extrémité de l’adaptateur dans la prise et l’autre extrémité dans le raccordement
de l’adaptateur sur la face inférieure de l’appareil.
• Reliez maintenant une extrémité de la ligne téléphonique à la prise téléphonique murale et
l’autre extrémité à la face inférieure de l’appareil.
ligne téléphonique
l‘adaptateur
dans la prise
l‘adaptateur
ligne téléphonique
dans la prise
•Ouvrez le logement de la batterie (voir ci-dessous).
• Insérez les piles en respectant la polarité (+ et -).
• Fermez le logement de la batterie.
• Placez le combiné sur la base pendant 20 heures. L’indicateur DEL Ligne/Charge
s’allume sur la base.
+-
-+
75
757575757575757575757575757575757575757575757575
FRANÇAIS
Page 76

HANDSET BASE
Butler 3055
Etat de la batterie :
• La batterie est entièrement chargée.
• La batterie est à moitié vide (50%).
• La batterie est faible. Si la batterie est faible, vous entendrez des signaux d’avertissement
et le symbole de la batterie clignotera sur l’écran.
2 TOUCHES/DEL
HANDSET BASE
1 Ecran
2 Touche Ligne
3 Touche Monter/Mains-libres
4 Touche de Programmation
5 Touche du Répertoire
6 Touche Rappel/Pause /P
7Microphone
8 Touche Volume/Tonalité
d’appel /
9 Touches alphanumériques
10 Touche Effacer/Mute
11 Touche Descendre/Flash /R
12 Connexion casque
13 Touche Paging
14 Indicateur Ligne/Charge (DEL)
15 Touches de numérotation de la base
/
16 Touche de numérotation de la base Ligne/mains-
libres
17 Touche Flash R
18 Touche de rappel
19 Commutateur tonalité/impulsion
20 Commutateur temps Flash
21 Touche de sélection du nombre
de sonneries
22 Touche code VIP
23 DEL de numérotation de la base OFF-hook
24 DEL mémoire remplie
25 DEL ON/OFF Messages/répondeur
26 Touche du répondeur
27 Microphone
28 Haut-parleur
5
11
10
8
7
R
X
OK
DEF
3
1
ABC
2
MNO
GHI
6
4
JKL
5
WXYZ
PQRS
TUV
9
7
8
#
0
/P
1
3
4
2
9
6
76
7676
76767676767676767676767676767676767676767676
12
Page 77

Butler 3055
28
14
13
ABC
DEF
2
1
GHI
4
R
X
1
GHI
4
PQRS
7
OK
DEF
3
ABC
2
MNO
6
JKL
5
WXYZ
TUV
9
8
#
0
/P
PQRS
7
R
3
MNO
JKL
6
5
WXYZ
TUV
9
8
0
#
15
17
18
16
25 26 24 27
23
FRANÇAIS
21
22
20
19
300 ms
100 ms
P
T
77
Page 78

Butler 3055
00000000000000
88888/88888:88
3 ECRAN (LCD)
12 3
1 Nombre d’appels reçus.
2 Affichage de la date (jour/mois) en cas d’appels reçus.
3 Affichage de l’heure (heure:minutes) en cas d’appels reçus.
4 Informations concernant l’appel.
5 Symbole écran ( ):
- ce symbole signifie que le combiné se situe à portée de la base.
- lorsque ce symbole se met à clignoter, cela signifie que vous vous trouvez hors de
portée de la base. Rapprochez-vous de la base pour que la liaison entre la base et le
combiné puisse être rétablie.
6 Symbole écran ( ):
- ce symbole signifie que l’appareil a reçu des appels qui sont automatiquement stockés
dans la Liste des Appels.
7 Symbole écran ( ):
- ce symbole signifie que la fonction Mute est activée, que le microphone est désactivé
pendant une conversation.
8 Symbole écran ( ):
- ce symbole apparaît sur l’écran lorsqu’on téléphone ou qu’on reçoit un appel.
9 Symbole écran ( ):
- ce symbole signifie que la tonalité d’appel est désactivée. L’appareil ne sonne pas
lorsqu’on reçoit un appel. L’appareil sonne toutefois en cas d’appel interne.
10 Symbole écran ( ):
- ce symbole reproduit l’état de la batterie.
11 Symbole écran ( ):
- ce symbole signifie que vous vous trouvez dans le menu.
12 Symbole écran ( ):
- ce symbole apparaît lorsque vous parcourez les numéros du Répertoire.
13 Symbole écran ( ):
- ce symbole apparaît lorsque vous avez reçu un message Voice Mail (voir chapitre 6).
14 Symbole écran ( ):
- ce symbole signifie que la fonction mains-libres est activée. Maintenant vous pouvez
parler sans décrocher le combiné.
- clignote lorsque la numérotation de la base est active. Vous ne pouvez pas prendre la
ligne avec le combiné tant que la numérotation de la base est active !
4
78
78787878787878787878787878787878787878787878787878
Page 79

Butler 3055
4 UTILISATION DU COMBINÉ
4.1 Sélectionner une langue
L’appareil dispose de 5 langues d’affichage : voir le tableau des langues d’affichage sur l’emballage !!
Pour sélectionner la langue voulue, vous procédez comme suit :
• Appuyez sur la touche de Programmation .
• Appuyez à plusieurs reprises sur la touche Monter ou Descendre jusqu’à ce que l’écran
affiche ‘REGLAGES’.
• Appuyez sur la touche de Programmation .
• Appuyez à plusieurs reprises sur la touche Monter ou Descendre jusqu’à ce que
l’écran affiche ‘LANGUE’.
• Appuyez sur la touche de Programmation .
• L’écran affiche la langue sélectionnée.
• Appuyez à plusieurs reprises sur la touche Monter ou Descendre afin de sélectionner la
langue que vous souhaitez utiliser.
• Lorsque la langue souhaitée apparaît à l’écran, vous appuyez sur la touche de Programmation
pour confirmer ou vous appuyez à plusieurs reprises sur la touche Mute/Effacer pour
quitter le menu.
4.2 Passer des appels
!!! Lorsque vous passez des appels externes à l’aide du combiné, téléphoner par la base n’est pas possible !!!
4.2.1 Un appel externe
• Appuyez sur la touche Ligne .
• L’indicateur Ligne/Charge (DEL) clignote sur la base. L’écran affiche ‘EXT’ et le symbole
d’appel .
• Vous entendez la tonalité d’appel. Introduisez le numéro de téléphone souhaité.
• Le numéro s’affiche à l’écran et est formé.
• Après la conversation, vous appuyez sur la touche Ligne pour couper la communication
ou vous posez le combiné sur la base.
4.2.2 Sélection d’un bloc
• Introduisez le numéro de téléphone souhaité. Vous pouvez corriger le numéro en appuyant
sur la touche Effacer/Mute .
• Appuyez sur la touche Ligne .
• L’indicateur Ligne/Charge (DEL) clignote sur la base. L’écran affiche ‘EXT’ et le symbole
d’appel .
• Le numéro de téléphone est formé automatiquement.
• Après la conversation, vous appuyez sur la touche Ligne pour couper la communication
ou vous posez le combiné sur la base.
4.2.3 Rappel du dernier numéro formé
• Appuyez sur la touche Ligne .
• L’indicateur Ligne/Charge (DEL) clignote sur la base. L’écran affiche ‘EXT’ et le symbole
d’appel .
79
79797979797979797979797979
797979797979797979797979
FRANÇAIS
Page 80

Butler 3055
• Vous entendez la tonalité d’appel.
• Appuyez sur la touche Rappel . Le numéro que vous avez appelé en dernier est formé
automatiquement sans que vous ayez à former une nouvelle fois ce numéro.
4.2.4 Rappel de l’un des 5 derniers numéros formés
• Appuyez sur la touche Rappel . Le numéro que vous avez appelé en dernier apparaît à
l’écran. Si vous souhaitez rappeler l’un des 5 derniers numéros formés, vous appuyez à plusieurs
reprises sur la touche Rappel jusqu’à ce que l’écran affiche le numéro souhaité.
• Appuyez sur la touche Ligne .
• Le numéro affiché à l’écran est formé automatiquement sans que vous ayez à former une
nouvelle fois ce numéro.
• Après la conversation, vous appuyez sur la touche Ligne pour couper la communication
ou vous posez le combiné sur la base.
4.2.5 Appeler un numéro programmé à partir du Répertoire
L’appareil dispose d’un Répertoire dans lequel vous pouvez programmer les numéros de téléphone
des appels reçus accompagnés du nom correspondant. Si vous souhaitez appeler un numéro à
partir du Répertoire, vous procédez comme suit :
• Appuyez sur la touche Répertoire . Le premier numéro du Répertoire apparaît à l’écran.
• Appuyez à plusieurs reprises sur la touche Descendre ou Monter pour sélectionner le
numéro de téléphone que vous souhaitez appeler.
• Appuyez sur la touche Ligne .
• Le numéro affiché à l’écran est formé automatiquement sans que vous ayez à former une
nouvelle fois ce numéro.
• Après la conversation, vous appuyez sur la touche Ligne pour couper la communication
ou vous posez le combiné sur la base.
4.2.6 Un appel interne : appeler un autre combiné
Cette fonction n’est applicable que si plusieurs combinés sont annoncés à la même station de
base !
• Appuyez sur la touche de Programmation .
• Appuyez sur la touche Monter ou Descendre l’écran affiche ‘INTERCOM’.
• Appuyez sur la touche de Programmation .
• ‘INT‘ apparaît à l’écran.
• Introduisez le numéro du combiné que vous souhaitez appeler.
• Après la conversation, vous appuyez sur la touche Ligne ou vous posez le combiné
manuel sur la base.
4.3 Recevoir un appel
4.3.1 Recevoir un appel externe
• Tous les combinés manuels imputés à la base sonnent lorsque vous recevez un appel.
• Le symbole d’appel clignote sur l’écran.
• Le numéro de téléphone de l’appelant apparaît à l’écran si vous disposez du service
d’affichage du numéro (CLIP). Consultez votre compagnie du téléphone à ce sujet. Le nom
de l’appelant apparaît également à l’écran si :
80
80808080808080808080808080808080808080808080808080
Page 81

Butler 3055
- le nom a été programmé dans le Répertoire
- le réseau transmet le nom en même temps que le numéro de téléphone
(uniquement le système FSK CID).
• Appuyez sur la touche Ligne pour prendre l’appel externe.
• Pendant la conversation, l’écran affiche ‘EXT’ et le symbole . Le compteur de durée de
conversation est enclenché.
• Après la conversation, vous appuyez sur la touche Ligne pour couper la communication
ou vous posez le combiné sur la base.
4.3.2 Recevoir un appel interne
Cette fonction n’est applicable que si plusieurs combinés sont annoncés à la même station de base !
• Le combiné sonne.
• ‘INT’ et le numéro du combiné que vous essayez d’atteindre apparaissent à l’écran.
Le symbole d’appel clignote sur l’écran.
• Appuyez sur la touche Ligne pour prendre l’appel interne.
• Pendant la conversation, l’écran affiche ‘INT’, le numéro du combiné et le symbole .
Le compteur de durée de conversation est enclenché.
• Après la conversation, vous appuyez sur la touche Ligne pour couper la communication
ou vous posez le combiné sur la base.
4.3.3 Réception d’un appel externe au cours d’une conversation interne
Lorsque vous recevez un appel externe au cours d’une conversation interne, vous entendez une
tonalité d’interpellation (double bip) dans les deux combinés qui sont en contact pour une
conversation interne.
• Appuyez à deux reprises sur la touche Ligne pour prendre l’appel externe.
• Après la conversation, vous appuyez sur la touche Ligne ou vous posez le combiné sur la
base.
4.4 Activer/désactiver la fonction mains-libres
Cette fonction vous permet de téléphoner sans décrocher le combiné. Quand vous téléphonez,
appuyez sur la touche Monter/Mains-libres /pour activer la fonction mains-libres.
Appuyez sur la même touche pour désactiver la fonction mains-libres.
Remarque :Quand vous téléphonez en mode mains-libres et vous voulez changer le
volume, appuyez sur la touche Volume .
FRANÇAIS
Attention !! Quand on utilise la fonction mains-libres longtemps, les batteries seront
épuisées plus vite !
4.5 Connexion casque
Vous pouvez raccorder le casque à l’aide d’une fiche jack à trois pôles de 2,5mm sur le côté
droit du combiné. Lorsque le casque est raccordé, vous pouvez
uniquement parler et entendre par le biais du casque. Le microphone du casque peut être désactivé à l’aide de la touche Mute .. Le haut-parleur mains-libres peut encore être activé en
appuyant sur la touche mains-libres .
81
8181818181818181818181818181818181
8181818181818181
Page 82

Butler 3055
4.6 Transférer un appel vers un autre combiné
• Vous êtes en communication avec un appelant externe.
• Appuyez sur la touche de Programmation .
• L’écran affiche ‘RECHERCHE’.
• Appuyez sur la touche de Programmation .
• L’appel externe est maintenant en attente.
• L’écran affiche ‘INT‘.
• Introduisez le numéro du combiné auquel vous souhaitez transférer l’appel.
• Lorsque le combiné appelé est décroché, vous pouvez avoir une conversation interne.
Appuyez sur la touche Ligne et l’appel externe est transféré.
• Si le combiné appelé ne décroche pas, appuyez sur la touche Descendre pour reprendre
l’appel externe.
4.7 Avertissement Hors de portée
Lorsque le combiné se trouve hors de portée de la base, il émet un signal d’avertissement.
• L’écran affiche ‘RECHERCHE’ et le symbole clignote sur l’écran.
• Rapprochez-vous de la base.
•Dès que vous êtes à nouveau à portée de la base, l’appareil émet un signal et le clignotement
du symbole est interrompu.
4.8 Régler le volume du haut-parleur
Utilisez la touche Volume/Tonalité d’appel / pour régler le volume du haut-parleur (combiné).
Vous avez le choix entre 5 niveaux. Le réglage standard prévoit le niveau ‘3’.
Au cours d’une conversation, vous pouvez adapter le volume comme suit :
• Appuyez sur la touche Volume/Tonalité d’appel / .
• Le niveau du réglage actuel du volume apparaît à l’écran.
• Utilisez les touches numériques pour sélectionner le niveau souhaité (1-5).
• Appuyez sur la touche Volume/Tonalité d’appel / pour confirmation.
Remarque : vous disposez de 8 secondes pour régler le volume souhaité. Sinon, l’appareil revient au
mode standby et le volume reste inchangé.
4.9 Affichage de la durée de la conversation sur l’écran
Dès que vous appuyez sur la touche Ligne , la durée de la conversation apparaît à l’écran
(minutes-secondes). Par exemple : “ 01-20 “ pour 1 minute et 20 secondes.
Après chaque communication, la durée de la conversation reste visible à l’écran pendant
5 secondes.
4.10 Coupure du microphone (mute)
Il est possible de désactiver le microphone en cours de conversation en appuyant sur la touche
Effacer/Mute . Vous pouvez maintenant parler librement sans que l’appelant puisse vous
entendre.
• Vous êtes en communication. L’indicateur Ligne/Charge (DEL) clignote sur la base et le
symbole d’appel apparaît à l’écran.
• Appuyez sur la touche Effacer/Mute pour désactiver le microphone.
• Le symbole ‘X’ apparaît sur l’écran ( ).
82
828282828282828282828282828282828282828282828282
82
Page 83

Butler 3055
• Si vous souhaitez poursuivre la conversation, vous appuyez une nouvelle fois sur la touche
Effacer/Mute .
• Le symbole ‘X’ disparaît alors de l’écran ( ). Votre correspondant peut vous entendre à
nouveau.
4.11 Touche Pause
Si vous formez un numéro de téléphone et si vous souhaitez ajouter une pause à ce numéro,
vous appuyez sur la touche Pause à l’endroit souhaité du numéro.
Lorsque vous appelez ce numéro, cette pause (de 3 s) sera insérée automatiquement.
4.12 Conversation en conférence (deux combinés internes DECT et un appelant
externe)
Vous pouvez avoir simultanément une conversation avec un appelant interne et un appelant
externe.
• Si vous êtes en communication avec un appelant externe, appuyez sur la touche de
Programmation .
• L’écran affiche ‘INTERCOM’.
• Appuyez sur la touche de Programmation .
• L’appel externe est maintenant en attente.
• L’écran affiche ‘INT‘.
• Introduisez le numéro du combiné que vous souhaitez impliquer dans la communication.
• Lorsque le combiné appelé est décroché, vous maintenez la touche ‘#’ enfoncée pendant
3 secondes.
• ‘CONFERENCE’ apparaît à l’écran.
• Vous êtes maintenant en communication avec un appelant externe et un appelant interne
(conversation en conférence).
4.13 Retrouver un combiné perdu (paging)
Si vous ne retrouvez plus un combiné, appuyez brièvement sur la touche Paging de la base.
Tous les combinés annoncés à cette base émettent un signal qui vous permet de localiser le
combiné perdu. Pour interrompre le signal, vous appuyez sur la touche Ligne du combiné.
4.14 Utilisation du clavier alphanumérique du combiné
Utilisez le clavier alphanumérique pour introduire un texte. Pour sélectionner une lettre, vous
appuyez sur la touche correspondante. Par exemple : si vous appuyez sur la touche numérique ’5’,
le premier caractère (j) apparaît à l’écran. Appuyez sur la touche à plusieurs reprises si vous voulez
sélectionner les autres caractères de cette touche.
Appuyez 2x sur la touche ‘2’ pour sélectionner la lettre ‘B’. Si vous voulez introduire successivement un ‘A’ et un ‘B’, vous appuyez d’abord une seule fois sur la touche ‘2’ pour sélectionner
le ‘A’, vous attendez 2 secondes jusqu’à ce que le curseur se déplace vers l’emplacement suivant et appuyez encore deux fois sur la touche ‘2’ pour sélectionner le ‘B’.
Les caractères fautivement introduits peuvent être effacés à l’aide de la touche Effacer . Le
caractère qui se trouve devant le curseur sera alors effacé. Vous pouvez déplacer le curseur à
l’aide des touches Monter et Descendre .
FRANÇAIS
83
8383838383838383838383838383838383
8383838383838383
Page 84

Butler 3055
Caractères disponibles
Activez les touches appropriées pour obtenir les caractères suivants :
Touches Première Deuxième Troisième Quatrième Cinquième
1 + - / 1
2 A B C 2
3 D E F 3
4 G H I 4
5 J K L 5
6 M N O 6
7 P Q R S 7
8 T U V 8
9 W X Y Z 9
0 ESPACE 0
4.15 Le Répertoire
4.15.1 Ajouter un numéro et un nom au Répertoire
• Appuyez sur la touche de Programmation .
• Appuyez à plusieurs reprises sur la touche Monter ou Descendre jusqu’à ce que l’écran
affiche ‘ANNUAIRE’.
• Appuyez sur la touche de Programmation .
• L’écran affiche ‘RECHERCHER’.
• Appuyez à plusieurs reprises sur la touche Monter ou Descendre jusqu’à ce que l’écran
affiche ‘AJOUTER’.
• Appuyez sur la touche de Programmation .
• L’écran affiche ‘‘NOM’‘.
• Introduisez le nom. Utilisez pour cela les touches alphanumériques.
• Appuyez sur la touche de Programmation .
• Introduisez le numéro de téléphone. Utilisez pour cela les touches alphanumériques.
• Appuyez sur la touche de Programmation .
• Vous entendrez un bip prolongé. Le nom et le numéro sont stockés dans le Répertoire.
4.15.2 Chercher un numéro dans le Répertoire
• Appuyez sur la touche de Programmation .
• Appuyez à plusieurs reprises sur la touche Monter ou Descendre jusqu’à ce que l’écran
affiche ‘ANNUAIRE’.
• Appuyez sur la touche de Programmation .
• L’écran affiche ‘RECHERCHER’.
• Appuyez sur la touche de Programmation .
• Introduisez les premières lettres du nom souhaité.
• Appuyez sur la touche de Programmation .
• Le premier nom correspondant à ces lettres apparaît à l’écran.
pression pression pression pression pression
84
848484
84848484848484848484848484848484848484848484
Page 85

Butler 3055
• Appuyez sur la touche Monter ou Descendre pour parcourir les autres numéros du
Répertoire.
• Lorsque le numéro souhaité apparaît à l’écran, ce numéro sera automatiquement formé
après avoir appuyé sur la touche Ligne .
4.15.3 Modifier un nom ou un numéro dans le Répertoire
• Appuyez sur la touche de Programmation .
• Appuyez à plusieurs reprises sur la touche Monter ou Descendre jusqu’à ce que l’écran
affiche ‘ANNUAIRE’.
• Appuyez sur la touche de Programmation .
• L’écran affiche ‘RECHERCHER’.
• Appuyez à plusieurs reprises sur la touche Monter ou Descendre jusqu’à ce que l’écran
affiche ‘CONSULTER’.
• Appuyez sur la touche de Programmation .
• Le premier numéro du Répertoire apparaît à l’écran.
• Appuyez sur la touche Monter ou Descendre jusqu’à ce que l’écran affiche le numéro
souhaité.
• Appuyez sur la touche de Programmation pour modifier le numéro sélectionné dans la
mémoire.
• Appuyez sur la touche Effacer afin d’effacer le nom lettre par lettre et utilisez le clavier
alphanumérique pour introduire le nom correct.
• Appuyez sur la touche de Programmation .
• Appuyez sur la touche Effacer pour effacer le numéro chiffre par chiffre et utilisez le clavier
alphanumérique pour introduire le numéro exact.
• Appuyez sur la touche de Programmation pour sauvegarder les modifications effectuées.
4.15.4 Effacer un nom et un numéro du Répertoire
• Appuyez sur la touche de Programmation .
• Appuyez à plusieurs reprises sur la touche Monter ou Descendre jusqu’à ce que l’écran
affiche ‘ANNUAIRE’.
• Appuyez sur la touche de Programmation .
• L’écran affiche ‘RECHERCHER’.
• Appuyez à plusieurs reprises sur la touche Monter ou Descendre jusqu’à ce que l’écran
affiche ‘EFFACER’.
• Appuyez sur la touche de Programmation .
• Le premier numéro du Répertoire apparaît à l’écran.
• Appuyez sur la touche Monter ou Descendre jusqu’à ce l’écran affiche le numéro que
vous souhaitez effacer.
• Appuyez sur la touche Effacer
• L’écran affiche ‘EFFACE ?’ .
• Appuyez sur la touche de Programmation pour confirmer l’effacement
4.16 Activer/désactiver le combiné
4.16.1 Désactiver le combiné
Le combiné est activé.
• Appuyez sur la touche de Programmation .
.
FRANÇAIS
85
858585858585858585858585858585858585858585858585
85
Page 86

Butler 3055
• Appuyez à plusieurs reprises sur la touche Monter ou Descendre jusqu’à ce que l’écran
affiche ‘ARRET’.
• Appuyez sur la touche de Programmation . L’appareil se débranche de lui-même. Vous ne
pouvez plus former de numéros, ni recevoir des appels.
Remarque : Si vous souhaitez quitter le menu sans désactiver le combiné, appuyez sur la touche
Effacer/Mute .
4.16.2 Activer le combiné
Le combiné est désactivé.
• Appuyez sur la touche de Programmation . L’appareil s’active lui-même.
4.17 Régler le volume de la sonnerie du combiné
Si vous le souhaitez, vous pouvez régler le volume de la sonnerie pour un appel entrant. Vous
disposez de 10 niveaux. Vous pouvez régler séparément le niveau de la sonnerie d’un appel
interne et celui-ci d’un appel externe, pour que vous entendiez une différence.
Si vous optez pour le niveau ‘0’, l’écran affiche le symbole et vous n’entendez aucune sonnerie
en cas d’appel entrant externe (en cas d’appel entrant interne, vous entendrez toujours la sonnerie).
Le niveau ‘9’ est le niveau le plus élevé. Le réglage standard de l’appareil prévoit le niveau ‘5’.
4.17.1 Régler le volume de la sonnerie pour les appels externes (0-9)
• Appuyez sur la touche de Programmation .
• Appuyez à plusieurs reprises sur la touche Monter ou Descendre jusqu’à ce que l’écran
affiche ‘REGL SONNE’.
• Appuyez sur la touche de Programmation .
• L’écran affiche ‘EXTERNE‘.
• Appuyez sur la touche de Programmation .
• Appuyez à plusieurs reprises sur la touche Monter ou Descendre jusqu’à ce que l’écran
affiche ‘VOLUME’.
• Appuyez sur la touche de Programmation .
• Le niveau du volume actuellement sélectionné apparaît à l’écran.
• Introduisez un chiffre compris entre 0 et 9 pour sélectionner le niveau souhaité pour la
sonnerie. Utilisez pour cela le clavier numérique.
• Appuyez sur la touche de Programmation pour confirmer.
4.17.2 Régler le volume de la sonnerie pour les appels internes (1-9)
• Appuyez sur la touche de Programmation .
• Appuyez à plusieurs reprises sur la touche Monter ou Descendre jusqu’à ce que l’écran
affiche ‘REGL SONNE’.
• Appuyez sur la touche de Programmation .
• L’écran affiche ‘EXTERNE‘.
• Appuyez à plusieurs reprises sur la touche Monter ou Descendre jusqu’à ce que l’écran
affiche ‘INTERNE’.
• Appuyez sur la touche de Programmation .
• Appuyez à plusieurs reprises sur la touche Monter ou Descendre jusqu’à ce que l’écran
affiche ‘VOLUME’.
86
86868686868686868686868686
868686868686868686868686
Page 87

Butler 3055
• Appuyez sur la touche de Programmation .
• Le niveau du volume actuellement sélectionné apparaît à l’écran.
• Introduisez un chiffre compris entre 1 et 9 pour sélectionner le niveau souhaité pour la sonnerie.
Utilisez pour cela le clavier numérique.
• Appuyez sur la touche de Programmation pour confirmer.
4.18 Sélectionner le type de sonnerie (mélodie) du combiné
Si vous le souhaitez, vous pouvez adapter le type de sonnerie (mélodie) accompagnant un
appel entrant. Vous disposez de 9 mélodies (1-9). Le réglage standard prévoit la mélodie ‘5’.
4.18.1 Sélectionner un type de sonnerie (mélodie) pour les appels externes (0-9)
• Appuyez sur la touche de Programmation .
• Appuyez à plusieurs reprises sur la touche Monter ou Descendre jusqu’à ce que l’écran
affiche ‘REGL SONNE’.
• Appuyez sur la touche de Programmation .
• L’écran affiche ‘EXTERNE‘.
• Appuyez sur la touche de Programmation .
• L’écran affiche ‘MELODIE‘.
• Appuyez sur la touche de Programmation .
• La mélodie actuellement sélectionnée apparaît à l’écran.
• Introduisez un chiffre compris entre 1 et 9 pour sélectionner la mélodie souhaitée. Utilisez
pour cela le clavier numérique.
• Appuyez sur la touche de Programmation pour confirmer.
4.18.2 Sélectionner un type de sonnerie (mélodie) pour les appels internes (1-9)
• Appuyez sur la touche de Programmation .
• Appuyez à plusieurs reprises sur la touche Monter ou Descendre jusqu’à ce que l’écran
affiche ‘REGL SONNE’.
• Appuyez sur la touche de Programmation .
• L’écran affiche ‘EXTERNE‘.
• Appuyez à plusieurs reprises sur la touche Monter ou Descendre jusqu’à ce que l’écran
affiche ‘INTERNE’.
• Appuyez sur la touche de Programmation .
• L’écran affiche ‘MELODIE‘.
• Appuyez sur la touche de Programmation .
• La mélodie actuellement sélectionnée apparaît à l’écran.
• Introduisez un chiffre compris entre 1 et 9 pour sélectionner la mélodie souhaitée. Utilisez
pour cela le clavier numérique.
• Appuyez sur la touche de Programmation pour confirmer.
4.19 Réglage du niveau de volume de sonnerie de la base
Si vous le souhaitez, il est possible de modifier le volume de la sonnerie de la base du Butler
3055
• Si la base sonne, appuyez sur la touche volume sur la base pour règler le volume de
sonnerie
FRANÇAIS
87
878787878787878787878787878787878787878787878787
87
Page 88

Butler 3055
4.20 Verrouillage du clavier
Si vous verrouillez le clavier alphanumérique, il est impossible de former encore un numéro de
téléphone. Vous ne pouvez plus utiliser que la touche de Programmation. L’écran affiche ‘CLV
BLOQUE’.
• Appuyez sur la touche de Programmation .
• Appuyez à plusieurs reprises sur la touche Monter ou Descendre jusqu’à ce que l’écran
affiche ‘CLAVIER’.
• Appuyez sur la touche de Programmation .
• L’écran affiche ‘ACCES CLAVIER‘.
• Appuyez sur la touche de Programmation .
• L’état actuel du clavier s’affiche à l’écran :
- ‘CLAV BLOQ’ : le clavier est verrouillé
- ‘CLAV ACTIF’ : le clavier est déverrouillé
• Appuyez sur la touche Monter ou Descendre pour effectuer votre choix.
• Appuyez sur la touche de Programmation pour confirmer.
4.21 Activer/désactiver les tonalités des touches
Vous pouvez régler l’appareil de façon à faire retentir une tonalité chaque fois que vous appuyez
sur une touche.
• Appuyez sur la touche de Programmation .
• Appuyez à plusieurs reprises la touche Monter ou Descendre jusqu’à ce que l’écran affiche
‘CLAVIER’.
• Appuyez sur la touche de Programmation .
• Appuyez à plusieurs reprises la touche Monter ou Descendre jusqu’à ce que l’écran affiche
‘BIP TOUCHE’.
• Appuyez sur la touche de Programmation .
• L’état actuel s’affiche à l’écran :
- ‘BIP ACTIF ’ : activer les tonalités
- ‘BIP DESACT’ : désactiver les tonalités
• Appuyez sur la touche Monter ou Descendre pour effectuer votre choix.
• Appuyez sur la touche de programmation pour confirmer.
4.22 La touche R (flash)
Appuyez sur la touche Flash ‘R’ pour utiliser certains services comme “2ème appel” (si cette
fonction est proposée par votre compagnie du téléphone); ou pour transférer des appels si vous
utilisez un central téléphonique (PABX). La touche Flash ‘R’ correspond à une brève coupure de
la ligne. Vous pouvez régler la durée du flash à 100ms ou 300ms. Le réglage standard prévoit
100ms ! Si votre système nécessite toutefois une durée flash plus longue, procédez comme suit :
• Appuyez sur la touche de Programmation .
• Appuyez à plusieurs reprises sur la touche Monter ou Descendre jusqu’à ce que l’écran
affiche ‘REGLAGES’.
• Appuyez sur la touche de Programmation .
• Appuyez à plusieurs reprises sur la touche Monter ou Descendre jusqu’à ce que l’écran
affiche ‘R’.
• Appuyez sur la touche de Programmation .
88
8888888888888888888888888888888888
8888888888888888
Page 89

Butler 3055
• Appuyez à plusieurs reprises sur la touche Monter ou Descendre pour sélectionner la
durée du flash :
- COURT = 100ms
- LONG = 300ms
• Appuyez sur la touche de Programmation pour confirmer.
Attention: Le temps flash réglé sur le combiné est indépendant de celui de la base. Pour régler le temps
flash de la base, veuillez vous reporter au point §7.5.
4.23 Modifier le code PIN
Certaines fonctions ne sont accessibles que si vous connaissez le code PIN de l’appareil. Grâce à
ce code secret, vous pouvez protéger des réglages que vous êtes seul à pouvoir modifier. Le
code PIN est composé de 4 chiffres. Le réglage standard prévoit le code PIN ‘0000’. Si vous
souhaitez modifier le code PIN standard et introduire votre propre code secret, vous procédez
comme suit :
• Appuyez sur la touche de Programmation .
• Appuyez à plusieurs reprises sur la touche Monter ou Descendre jusqu’à ce que l’écran
affiche ‘REGLAGES’.
• Appuyez sur la touche de Programmation .
• Appuyez à plusieurs reprises sur la touche Monter ou Descendre jusqu’à ce que l’écran
affiche ‘CODE PIN’.
• Appuyez sur la touche de Programmation .
• L’écran affiche ‘ANC CODE’.
• Introduisez l’ancien code PIN. Utilisez pour cela les touches numériques.
• Appuyez sur la touche de Programmation .
• L’écran affiche ‘NV CODE’.
• Introduisez le nouveau code PIN. Utilisez pour cela les touches numériques.
• Appuyez sur la touche de Programmation .
• L’ecran afffiche ’CONFIRMEZ’.
• Introduisez une nouvelle fois le nouveau code PIN. Utilisez pour cela les touches numériques.
• Appuyez sur la touche de Programmation .
• Vous entendez une tonalité de confirmation. Le nouveau code PIN est consigné.
Attention : N’oubliez pas votre code PIN personnel ! Si cela devait arriver, il faudrait reconsigner tous les
réglages standard (reset – voir chapitre 4.32).
4.24 Annoncer un combiné à une base Butler 1000, 1010, 1210, 2405, 2410, 2450,
2455, 30xx
Pour pouvoir téléphoner et recevoir des appels, il faut annoncer un nouveau combiné à la base.
Vous pouvez annoncer 5 combinés à une seule base. Lors de la livraison, les réglages standard
prévoient que chaque combiné soit annoncé à la base fournie (base 1) en tant que combiné 1.
!!! Vous n’avez à effectuer cette annonce que dans les cas suivants : !!!
• si l’annonce du combiné a été annulée au niveau de sa base (en cas de réinitialisation, par
exemple)
FRANÇAIS
89
898989
89898989898989898989898989898989898989898989
Page 90

Butler 3055
• lorsque vous souhaitez annoncer un autre combiné à cette même base.
La procédure ci-dessous n’est valable que pour un combiné et une base
Butler 1000, 1010, 1210, 2405, 2410, 2450, 2455, 30xx
Maintenez la touche Paging de la base enfoncée pendant 10 secondes jusqu’à ce que
l’indicateur Ligne/Charge de cette base commence à clignoter à intervalles rapides.
L’indicateur Ligne/Charge clignotera très vite pendant une minute. Pendant cette minute,
la base se trouve en mode d’annonce et vous devrez effectuer les manipulations suivantes
pour annoncer le combiné :
• Appuyez sur la touche de Programmation .
• Appuyez à plusieurs reprises sur la touche Monter ou Descendre jusqu’à ce que l’écran
affiche ‘ENREG BASE’.
• Appuyez sur la touche de Programmation .
• L’écran affiche ‘BASE _‘.
• Introduisez le numéro de la base que vous souhaitez annoncer au combiné (1-4).
Utilisez pour cela le clavier numérique.
Remarque : Chaque combiné peut être annoncé à 4 bases DECT différentes. Chaque base reçoit un numéro
de 1 à 4 au niveau du combiné. Si vous annoncez un nouveau combiné, vous pouvez lui attribuer un numéro
de base. Utilisez de préférence le ‘1’ .
• L’écran affiche ‘RECHERCHE’ et le symbole .
• Le code RFPI (chaque base dispose d’un code RFPI unique) apparaît à l’écran et un signal
retentit lorsque la base a été détectée par le combiné.
• Appuyez sur la touche de Programmation .
• L’écran affiche ‘PIN’.
• Introduisez le code PIN de la base en 4 chiffres (le code PIN standard est ‘0000’). Utilisez
pour cela le clavier numérique.
• Appuyez sur la touche de Programmation .
• Le combiné est annoncé à la base.
4.25 Enregistrer le combiné du Butler 3055 sur une autre base
(autre marque / modèle)
Mettez la base en mode de souscription (voir le manuel de la base). Lorsque la base est en
mode souscription, procédez comme suit pour enregistrer le combiné:
• Appuyez sur la touche de Programmation .
• Appuyez à plusieurs reprises sur la touche Monter ou Descendre jusqu’à ce que l’écran
affiche ‘ENREG BASE’.
• Appuyez sur la touche de Programmation .
• L’écran affiche ‘BASE _‘.
• Introduisez le numéro de la base que vous souhaitez annoncer au combiné (1-4). Utilisez
pour cela le clavier numérique.
• L’écran affiche ‘RECHERCHE’ et le symbole .
• Le code RFPI (chaque base dispose d’un code RFPI unique) apparaît à l’écran et un signal
retentit lorsque la base a été détectée par le combiné.
• Appuyez sur la touche de Programmation .
• L’écran affiche ‘PIN’.
90
9090909090909090909090909090909090
9090909090909090
Page 91

Butler 3055
• Introduisez le code PIN de la base en 4 chiffres (le code PIN standard est ‘0000’). Utilisez
pour cela le clavier numérique.
• Appuyez sur la touche de Programmation .
• Le combiné est annoncé à la base.
4.26 Enregistrer un casque TOPCOM Butler 300 DECT GAP
Assurez-vous que le code PIN de la base est réglé sur ’0000’! Voir le point 4.23 pour modifier
le code pin de la base.
Appuyez sur la touche Paging sur la base pendant 10 secondes jusqu’à ce que l’indicateur
Ligne/charge de l’unité de base commence à clignoter rapidement. L’indicateur
ligne/charge clignote rapidement pendant une minute. Pendant cette minute, la base est
en mode d’enregistrement et vous devez procéder comme suit pour enregistrer le casque :
• Allumez le casque en appuyant sur la touche ON /OFF jusqu’à ce que vous entendiez deux
bips. En même temps, les DEL verte et rouge s’allumeront.
• Appuyez sur la touche d’enregistrement du casque. La DEL clignote rapidement.
- Si après quelques secondes, la DEL verte clignote lentement, l’enregistrement est réussi.
- Si la DEL rouge clignote lentement, l’enregistrement a échoué. Répétez la procédure ci-
dessus et veillez à ce que le code pin de la base soit ’0000’!
4.27 Annuler l’annonce d’un combiné à une base
Il est possible d’annuler l’annonce d’un combiné à une base. Cette opération s’impose
lorsqu’un combiné est endommagé et doit être remplacé par un nouvel appareil.
Attention : Vous ne pouvez annuler que l’annonce d’un autre combiné, pas celle du combiné que vous utilisez pour cette procédure d’annulation.
• Appuyez sur la touche de Programmation .
• Appuyez à plusieurs reprises sur la touche Monter ou Descendre jusqu’à ce que l’écran
affiche ‘REGLAGES’.
• Appuyez sur la touche de Programmation .
• Appuyez à plusieurs reprises sur la touche Monter ou Descendre jusqu’à ce que l’écran affiche
‘SUP COMB’.
• Appuyez sur la touche de Programmation .
• L’écran affiche ‘PIN’.
• Introduisez votre code PIN en 4 chiffres (le code PIN standard est ‘0000’). Utilisez pour cela le
clavier numérique.
• Appuyez sur la touche de Programmation .
• L’écran affiche ‘SUP COMB’.
• Introduisez le numéro du combiné dont vous souhaitez annuler l’annonce. Utilisez
pour cela le clavier numérique (1 –5).
• Appuyez sur la touche de Programmation .
• L’écran affiche ‘SUP COMB’ et l’annonce du combiné est annulée.
• L’écran du combiné dont l’annonce a été annulée affiche ‘ANNULE’.
FRANÇAIS
91
9191919191919191919191919191919191
9191919191919191
Page 92

Butler 3055
4.28 Sélectionner une base
Lorsque votre combiné est annoncé à plusieurs stations de base (max. 4), vous devez sélectionner une base car un combiné ne peut communiquer qu’avec une seule base en même temps. Il
existe deux possibilités :
4.28.1 Sélection automatique
Si vous optez pour ‘sélection automatique’, le combiné optera automatiquement pour la base
la plus proche qui se trouve en standby.
• Appuyez sur la touche de Programmation .
• Appuyez à plusieurs reprises sur la touche Monter ou Descendre jusqu’à ce que l’écran
affiche ‘REGLAGES’.
• Appuyez sur la touche de Programmation .
• Appuyez à plusieurs reprises sur la touche Monter ou Descendre jusqu’à ce que l’écran
affiche ‘SELEC BASE’.
• Appuyez sur la touche de Programmation .
• Appuyez à plusieurs reprises sur la touche Monter ou Descendre jusqu’à ce que l’écran
affiche ‘AUTO’.
• Appuyez sur la touche de Programmation .
• L’écran affiche ‘RECHERCHE’ et le symbole .
• Le combiné émet un signal indiquant qu’il a détecté une base.
4.28.2 Sélection manuelle
Si vous optez pour ‘sélection manuelle’, le combiné ne choisira que la base que vous avez consignée.
• Appuyez sur la touche de Programmation .
• Appuyez à plusieurs reprises sur la touche Monter ou Descendre jusqu’à ce que l’écran
affiche ‘REGLAGES’.
• Appuyez sur la touche de Programmation .
• Appuyez à plusieurs reprises sur la touche Monter ou Descendre jusqu’à ce que l’écran
affiche ‘SELEC BASE’.
• Appuyez sur la touche de Programmation .
• Appuyez à plusieurs reprises sur la touche Monter ou Descendre jusqu’à ce que l’écran
affiche ‘MANUEL’.
• Appuyez sur la touche de Programmation .
• L’écran affiche ‘BASE _‘.
• Introduisez le numéro de la base que vous souhaitez sélectionner (1-4). Utilisez pour cela le
clavier numérique.
• Appuyez sur la touche de Programmation .
• L’écran affiche ‘RECHERCHE’ et le symbole .
• Le combiné émet un signal lorsqu’il a détecté la base sélectionnée.
Remarques :
• Avant de pouvoir sélectionner une base, il faut d’abord annoncer le combiné à cette station de base.
• Si l’écran affiche ‘NON ENREG’, cela signifie que la base sélectionnée n’existe pas ou que le combiné
n’a pas été annoncé.
92
92929292929292929292929292
929292929292929292929292
Page 93

Butler 3055
4.29 Verrouillage des appels sortants
Vous pouvez programmer les combinés de façon à ne pas permettre l’appel de certains numéros de
téléphone comme, par exemple, les numéros internationaux ‘00’. On peut verrouiller jusqu’à 5
numéros (de max. 5 chiffres).
Vous procédez comme suit :
• Appuyez sur la touche de Programmation .
• Appuyez à plusieurs reprises sur la touche Monter ou Descendre jusqu’à ce que l’écran
affiche ‘REGLAGES’.
• Appuyez sur la touche de Programmation .
• Appuyez à plusieurs reprises sur la touche Monter ou Descendre jusqu’à ce que l’écran
affiche ‘LIMITATION’.
• Appuyez sur la touche de Programmation .
• L’écran affiche ‘PIN’.
• Introduisez votre code PIN.
• Appuyez sur la touche de Programmation .
• L’écran affiche ‘NUM INTER’. Vous vous trouvez dans la mémoire “1. _ _ _ _ _”.
• Appuyez sur la touche Monter ou Descendre pour sélectionner l’une des 5 mémoires.
• Indiquez le numéro (max. 5 chiffres) qui doit être verrouillé. Par exemple : 01486.
• Appuyez sur la touche de Programmation .
• ‘HS _ _ _ _ _’ = numéro du combiné (1-5) et ‘01486’ = les chiffres verrouillés affichent à l’écran.
• Introduisez les numéros des combinés qui ne peuvent pas appeler les chiffres verrouillés.
• Par exemple : Appuyez sur les touches numériques 2, 3 et 5. L’écran affiche : HS _2 3_5
01486. Ces combinés ne peuvent pas former de numéros commençant par ‘01486’.
• Appuyez sur la touche de Programmation pour confirmer.
Répétez la même procédure ci-dessus si vous souhaitez bloquer plusieurs numéros (max. 5) !
4.30 Direct Call
En réglant un numéro Direct Call (appel direct), le téléphone ouvre automatiquement la ligne et
forme ce numéro. Cette fonction est utile pour utiliser le téléphone comme un téléphone d’urgence.
4.30.1 Pour programmer un numéro Direct Call
• Appuyez sur la touche de programmation
• Appuyez sur la touche up ou down jusqu’à ce que ‘DIRECT’ apparaisse à l’écran
• Appuyez sur la touche de programmation
• Si nécessaire, effacez le numéro existant en appuyant quelques fois sur la touche Delete
• Introduisez le numéro direct
• Appuyez sur la touche de programmation
4.30.2. Activer / désactiver la fonction Direct Call
Pour activer cette fonction :
• Appuyez sur la touche de programmation
• Appuyez sur la touche up ou down jusqu’à ce que ‘DIRECT’ apparaisse à l’écran
• Appuyez sur la touche mute pendant 2 secondes
• ‘DIRECT ON’ apparaît à l’écran
FRANÇAIS
93
939393
93939393939393939393939393939393939393939393
Page 94

Butler 3055
Pour désactiver cette fonction :
- Appuyez rapidement deux fois sur la touche de programmation
4.31 Réglages standard (reset) des paramètres
Vous pouvez ramener l’appareil aux réglages standard (par défaut) qui étaient consignés lors de
l’achat. Pour cela, vous avez besoin du code PIN.
Les réglages standard sont :
Clavier : non verrouillé
Tonalités clavier : activées
Volume haut-parleur : niveau 3
Type de sonnerie (mélodie): 1
Volume de sonnerie : 5
Sélection base : automatique
Durée Flash : 100ms
Vous procédez comme suit pour revenir aux réglages standard :
• Appuyez sur la touche de Programmation .
• Appuyez à plusieurs reprises sur la touche Monter ou Descendre jusqu’à ce que l’écran
affiche ‘REGLAGES’.
• Appuyez sur la touche de Programmation .
• Appuyez à plusieurs reprises sur la touche Monter ou Descendre jusqu’à ce que l’écran
affiche ‘INITIALISE’.
• Appuyez sur la touche de Programmation .
• L’écran affiche ‘PIN’.
• Introduisez votre code PIN.
• Appuyez sur la touche de Programmation .
4.32 Réinitialisation complète de l’appareil
Cette fonction vous permet de réinitialiser complètement votre appareil sans avoir besoin du
code PIN. En appliquant cette fonction, vous effacerez toutes les mémoires du Répertoire, vous
annulerez l’annonce de tous les combinés, vous réactiverez tous les réglages standard et vous
ramènerez le code PIN à ‘0000’. Procédez comme suit :
• Désaccouplez la batterie de l’appareil.
•Maintenez la touche ‘*’ enfoncée et rétablissez l’accouplement à la batterie jusqu’à ce que le
combiné sonne sans interruption et que l’écran s’allume. Relâcher la touche ‘*’ et appuyez
sur la touche de Programmation .
• Le combiné détecte la base et émet un signal.
• Appuyez brièvement sur la touche ‘*’.
• L’écran affiche ‘RAZ ?‘.
• Appuyez sur la touche de Programmation pour confirmer ou désaccouplez la batterie
pour interrompre la procédure.
• L’écran affiche ‘RAZ OK‘ et l’appareil émet un bip prolongé.
• L’écran affiche ‘ANNULE‘. Le combine est complètement réinitialisé.
94
949494949494949494949494949494949494949494949494
94
Page 95

Butler 3055
Vous devrez ensuite rétablir l’annonce de tous les combinés conformément à la description du
point 4.24!! Vous ne devez toutefois plus placer la base en mode d’annonce puisque cette
opération se fait maintenant automatiquement !
4.33 Régler le mode de numérotation du combiné
Il y a deux modes de numérotation :
- numérotation DTMF/Tonalité (le plus courant)
- numérotation par impulsion (pour les installations plus anciennes)
Pour modifier le mode de numérotation :
- Appuyez sur la touche programmation
- Appuyez sur la touche Up ou Down plusieurs fois jusqu’à ce que ’REGLAGES’ (SETTING)
apparaisse à l’écran.
- Appuyez sur la touche Programmation
- Appuyez sur la touche Up ou Down plusieurs fois jusqu’à ce que ’MODE APPEL’ (DIALMODE) apparaisse à l’écran.
- Appuyez sur la touche Programmation
- Sélectionnez ’MULTIFREQ’ (DTMF) ou ’DECIMAL’ (PULSE) à l’aide de la touche UP ou
Down
- Appuyez sur la touche Programmation pour confirmer
Note: Le mode de numérotation sur le combiné est indépendant de celui de la base (Voir 7.3)!! Pour modifier le mode de numérotation de la base, vous devez utiliser le commutateur T/P sous la base.
FRANÇAIS
95
959595959595959595959595959595959595959595959595
95
Page 96

Butler 3055
5AFFICHAGE DU NUMERO (CALLER ID/CLIP)
(Ce service ne fonctionne que si vous avez un abonnement ‘CLIP’ ou ‘Affichage du numéro’.
Consultez votre compagnie du téléphone à ce sujet)
Lorsqu’on reçoit un appel, le numéro de téléphone de l’appelant apparaît sur l’écran du combiné.
L’appareil peut recevoir des appels en modes FSK et DTMF. Si le nom est programmé dans le
Répertoire, l’écran affiche le nom du Répertoire !
L’appareil peut stocker dans une Liste des appels jusqu’à 30 appels qui pourront être consultés
ultérieurement. L’appareil ne conserve jamais deux fois le même appel. Lorsque la mémoire est
pleine, les nouveaux appels remplacent automatiquement les plus anciens appels stockés dans
la mémoire.
En cas d’appel non lu ou non répondu, le symbole clignote sur l’écran. Lorsque la Liste des
appels est vide et que vous appuyez sur la touche Monter , l’appareil émettra trois bips.
Vous pouvez consulter les données correspondantes à un appel entrant comme suit :
• Appuyez sur la touche Monter . Le nom (si envoyé par le réseau ou présent dans la
mémoire du Répertoire) de l’appelant, le numéro d’ordre de l’appel dans la Liste des appels,
la date et l’heure de l’appel s’affichent sur l’écran.
• Appuyez sur la touche Descendre . Le numéro de téléphone de l’appelant s’affiche sur
l’écran.
5.1. Régler la date et l’heure
Si vous recevez un appel entrant et votre compagnie téléphonique n’envoie pas la date et
l’heure avec le numéro de téléphone, on ne verra pas la date et l’heure sur l’écran chaque fois
on reçoit un appel.
Quand vous réglez la date et l’heure, chaque appel entrant sera visible sur l’écran avec indication de la date et l’heure !
• Appuyez sur la touche de Programmation .
• Appuyez plusieurs fois sur la touche Monter ou Descendre jusqu’à l’affichage de
‘REGLAGES’ à l’écran.
• Appuyez sur la touche de Programmation .
• ’JOUR/HEURE’ apparaît à l’écran.
• Appuyez encore une fois sur la touche de Programmation .
•Quand ‘ANNEE’ s’affiche à l’écran, introduisez les 2 derniers chiffres de l’année (00=2000,
01=2001, ...) et appuyez sur la touche de Programmation pour confirmer.
•Quand ‘MOIS’ s’affiche à l’écran, introduisez le mois (01=janvier, 02=février, ...) et appuyez
sur la touche de Programmation pour confirmer.
•Quand ‘JOUR’ s’affiche à l’écran, introduisez le jour et appuyez sur la touche de
Programmation pour confirmer.
•Quand ‘HEURE’ s’affiche à l’écran, introduisez l’heure actuelle (en format 24h) et appuyez
sur la touche de Programmation pour confirmer.
•Quand ‘MINUTES’ s’affiche à l’écran, introduisez les minutes et appuyez sur la touche de
Programmation pour confirmer.
La date et l’heure sont maintenant réglées !
96
9696969696969696969696969696969696
9696969696969696
Page 97

Butler 3055
5.2 La Liste des appels
Les appels reçus sont enregistrés dans la Liste des appels (max. 30 numéros).
• Appuyez brièvement sur la touche Monter afin de consulter l’appel le plus récent.
• Le nom de l’appel le plus récent est affiché à l’écran. Si aucun nom est disponible, l’écran
affiche ‘SANS NOM’.
• S’il s’agit d’un numéro privé, l’écran affiche ‘INDISPONIB’.
• La date et l’heure de réception sont liées à chaque appel.
• Appuyez brièvement sur la touche Descendre pour consulter le numéro de téléphone
correspondant à l’appel.
• Appuyez brièvement sur la touche Monter pour parcourir les autres numéros de la liste.
Remarques :
• Si ni la touche Monter , ni la touche Descendre ne sont activées pendant 15 secondes, l’appareil
revient au mode standby.
• Après réception d’un appel, le numéro de l’appelant reste visible à l’écran pendant 15 secondes après la
dernière tonalité.
• L’affichage du numéro n’est pas possible si vous êtes en communication.
5.3 Appeler un numéro de la Liste des appels
• Appuyez sur la touche Monter pour consulter la Liste des appels.
• Appuyez sur la touche Monter pour chercher l’appel souhaité. Appuyez sur la touche
Descendre pour consulter le numéro de téléphone.
• Lorsque le numéro est affiché à l’écran, vous appuyez sur la touche Ligne et le numéro
est automatiquement formé. (Les symboles et ‘EXT’ apparaissent sur l’écran et le compteur
de durée de la conversation est enclenché).
5.4 Stocker un numéro de la Liste des appels dans le Répertoire
• Appuyez sur la touche Monter pour consulter la Liste des appels.
• Appuyez sur la touche Monter pour chercher le numéro souhaité.
• Appuyez deux fois sur la touche Répertoire .
• L’écran affiche ‘MEMORISER’.
• Le numéro est stocké dans le Répertoire. S’il s’agit d’un appel sans nom (SANS NOM), vous
pouvez ultérieurement ajouter le nom à ce numéro dans le Répertoire.
• L’appareil revient au mode standby.
5.5 Effacer des numéros de la Liste des appels
5.5.1 Effacer un seul numéro
• Appuyez sur la touche Monter pour consulter la Liste des appels.
• Appuyez sur la touche Monter chercher l’appel que vous souhaitez effacer.
• Lorsque cet appel s’affiche à l’écran, vous appuyez sur la touche Effacer .
• L’écran affiche ‘EFFACE ?’.
• Appuyez sur la touche de Programmation pour confirmer ou sur la touche Effacer pour
annuler.
• L’appel est effacé et l’appel suivant apparaît à l’écran.
FRANÇAIS
97
97979797979797979797979797979797
Page 98

Butler 3055
5.5.2 Effacer tous les numéros
• Appuyez sur la touche Monter pour consulter la Liste des appels.
•Maintenez la touche Effacer enfoncée jusqu’à ce que l’écran affiche ‘EFF TOUT’.
• Appuyez sur la touche de Programmation pour confirmer ou sur la touche Effacer pour
annuler.
• Tous les appels sont effacés.
6 INDICATION VOICE MAIL
Vous ne pouvez utiliser cette fonction que si vous disposez du service Voice mail ou Phone mail
et si le réseau transmet cette indication en même temps que les informations concernant le
code Caller ID (Affichage Appelant/Clip) ! Si vous avez reçu un nouveau message dans votre
système de Voice mail, l’écran affichera l’icône ‘ ’. Lorsque vous aurez écouté vos messages,
l’icône ‘ ’ disparaîtra.
7 UTILISATION DU TÉLÉPONE PAR BASE
Vous pouvez également passer un appel téléphonique à l’aide de mode mains-libres de la station de base.
7.1 Passer un appel
• Appuyez la touche de numérotation mains-libres de la base pour prendre la ligne
• Appuyez sur les touches numériques de la base pour former un numéro de téléphone
• Appuyez à nouveau sur la touche de numérotation mains-libres de la base pour mettre un
terme à la conversation téléphonique
7.2 Régler le volume du haut-parleur
Appuyez sur la touche ’+’ ou ’-’ pendant la conversation mains-libres pour régler le volume
du haut-parleur. Si le volume du haut-parleur est trop élevé, il est possible que le haut-parleur
commence à osciller (tonalité de sifflement). Pour éviter ceci, veuillez baisser le volume du hautparleur.
Attention : La communication mains-libres est en semi duplex, ce qui signifie que si la personne de l’autre
côté de la ligne commence à parler, le microphone est désactivé de sorte que la personne ne peut vous
entendre à ce moment. Essayez d’éviter de vous parler en même temps.
Note : le volume du haut-parleur pour le mode mains-libres est différent du volume du répondeur !!
7.3 Régler le mode de numérotation de la base
Vous pouvez régler le mode de numérotation de la base en impulsion (P) ou tonalités/DTMF(T)
à l’aide du commutateur se trouvant sous la base.
Attention: le mode de numérotation de la base est indépendant de celui du combiné. Pour régler le mode
de numérotation du combiné, veuillez vous reporter au point §4.34.
98
9898
9898989898989898989898989898
Page 99

Butler 3055
7.4 Transférer un appel de la base au combiné
Pendant une conversation mains-libres sur la base, vous pouvez transférer l’appel vers n’importe quel combiné enregistré en appuyant sur la touche paging . La DEL d’indication de ligne
commence à clignoter.
vous pouvez reprendre la ligne depuis n’importe quel combiné enregistré en appuyant sur la
touche ligne .
Ou appuyez de nouveau sur la touche paging si vous ne souhaitez pas transférer l’appel
Note : Les combinés ne sonnent pas pendant le transfert !!
7.5 Régler le temps flash de la base
Vous pouvez régler le temps flash de la base à l’aide du commutateur situé sous la base. Vous
pouvez le régler sur 100ms ou 300ms.
Attention : Le temps flash de la base est différent de celui du combiné. Pour régler le temps flash du combiné, reportez-vous au point § 4.22.
8 RÉPONDEUR AUTOMATIQUE
Le Butler 3055 est doté d'un répondeur automatique numérique intégré présentant une
capacité d'enregistrement de 11 minutes. Le répondeur automatique peut être
complètement commandé à distance et est capable de mémoriser deux messages sortants
(Message sortant 1 et Message sortant 2) de maximum 2 minutes.
Il existe deux possibilités:
- Avec le Message sortant 1, l'appelant a la possibilité de laisser un message
- Avec le Message sortant 2, le message sortant est lu mais il n'est pas possible de laisser de
message
Le temps d'enregistrement maximal par message entrant est de 2 minutes.
Une voix interne indiquera un certain nombre de paramètres, tels que le jour et l'heure de l'appel, de même que les paramètres de réglage comme le code VIP, les sonneries,... La langue de
la voix interne est mentionnée sur l'emballage!
8.1. Témoins lumineux
Le témoin ‘Messages/Branché-Débranché’ clignotte lorsqu’il y a de nouveaux messages;
le nombre de clignotements entre chaque pause prolongée indique le nombre de nouveaux
messages qu’a reçus le répondeur.
Lorsque le répondeur est débranché, le temoin ‘Branché-Débranché’ est éteint.
Le témoin ‘FULL plein’ s’allume lorsque la mémoire interne est pleine et que l’appareil n’est plus
en mesure d’enregistrer de nouveaux messages.
FRANÇAIS
99
999999999999999999999999
Page 100

Butler 3055
1,2
1,2
1,2
8.2 Fonction Touches
Remarque: - Les touches & sont situées sur la face inférieure de la base
Touches Mode stand-by
1
2 Annoncer les messages Aucune fonction Pause
3
4
5 annonce débranché
6 Annoncer code VIP Consigner le code VIP Aucune fonction
7 Nombre de sonneries Réglage du nombre de Aucune fonction
8 Indication de l’heure Réglage date/heure Aucune fonction
9 annonce
Brève activation Activation de la touche
de la touche pendant deux secondes
Annoncer messages Enregistrement messages Message précédent
sortant sortant
Aucune fonction
Réglage du volume Aucune fonction Réglage du volume
Sélectionner texte Répondeur branché- Arret
programmé sonneries
Aucune fonction Effacer tous les messages Effacer message ou
Enregistrement d’une note
Pendant la lecture
du message
Message suivant
8.3 Messages sortants
Deux messages sortants de maximum 2 minutes (OGM1 et OGM2) peuvent être enregistrés.
•Message sortant 1 pour la fonction de réponse avec possibilité de laisser un message
•Message sortant 2 pour la fonction de réponse sans possibilité de laisser un message,
l'appareil n'enregistre pas de messages.
8.3.1 Enregistrer les messages sortants (OGM 1 ou OGM 2)
• Appuyer sur la Touche pour sélectionner le texte de l’annonce.
• Une voix indique quel message sortant est enregistré.
• Appuyez pendant 2 secondes sur la touche
• Dicter le message sortant après le bip.
• Appuyer sur la touche Stop pour arrêter l'enregistrement.
Remarque: L'enregistrement peut durer maximum 2 minutes. Si aucun message sortant n'est enregistré, le
message sortant standard est lu.
8.3.2 Contrôle du message sortant
Pour contrôler le message sortant programmé:
• Appuyer sur la touche .
Remarque: Pour arrêter la lecture, appuyer brièvement sur la touche Stop .
100
100100100100100100100100100100100100
 Loading...