


FPS SERIES
1000W In 1U
Front End Power Supplies
INSTRUCTION MANUAL
This Manual Cover Models:
FPS1000-12 FPS1000-24
FPS1000-32 FPS1000-48
FPS-S1U 19” Rack Single Output
FPS-T1U 19” Rack Triple Output
DWG NO: IA599-04-02-A

FPS1000 SERIES
INSTRUCTION MANUAL
DWG NO: IA599-04-02 A

TABLE OF CONTENTS
Warranty .................................................................................................................................Pg. 1
FPS1000, FPS-S1U and FPS-T1U rack Safety instructions ................................................. Pg. 2
FPS1000 Power Supply
Chapter 1: FPS1000 Series Specifications ............................................................................ Pg. 4
Chapter 2: FPS1000 Series Outline drawings ........................................................................Pg. 5
Chapter 3: FPS1000 Series Installation instructions ..............................................................Pg. 7
Chapter 4: Functions and features .......................................................................................Pg. 11
Chapter 5: Basic connections for operation .........................................................................Pg. 14
Chapter 6: Parallel and Series operation .............................................................................Pg. 16
2
Chapter 7: I
C BUS Interface option ....................................................................................Pg. 19
Chapter 8: FPS1000 Maintenance ......................................................................................Pg. 23
FPS-S1U rack
Chapter 9: FPS-S1U rack Specifications .............................................................................Pg. 25
Chapter 10: FPS-S1U rack Installation instructions .............................................................Pg. 26
Chapter 11: FPS-S1U and FPS-S1U/P Outline drawings ....................................................Pg. 30
Chapter 12: Basic connections for operation .......................................................................Pg. 32
Chapter 13: Parallel and Series operation ...........................................................................Pg. 34
2
Chapter 14: FPS-S1U I
C BUS Interface option ..................................................................Pg. 37
Chapter 15: FPS-S1U rack Maintenance .............................................................................Pg. 38
FPS-T1U rack
Chapter 16: FPS-T1U rack Specifications ............................................................................Pg. 40
Chapter 17: FPS-T1U rack Installation instructions .............................................................Pg. 41
Chapter 18: FPS-T1U and FPS-T1U/P Outline drawings ....................................................Pg. 45
Chapter 19: Basic connections for operation .......................................................................Pg. 47
Chapter 20: Parallel and Series operation ...........................................................................Pg. 49
2
Chapter 21: FPS-T1U I
C BUS Interface option ..................................................................Pg. 51
Chapter 22: FPS-T1U rack Maintenance .............................................................................Pg. 52

FPS1000 Instruction Manual
WARRANTY
This Densei-Lambda product is warranted against defects in materials and workmanship for a period of
two years from date of shipment.
During the warranty period , Densei-Lambda will, at it's option, either repair or replace products which
prove to be defective.
LIMITATION OF WARRANTY
The warranty shall not apply to defects resulting from improper or inadequate usage or maintenance by
the buyer, buyer supplied products or interfacing. The warranty shall not apply to defects resulting from
unauthorized modifications or from operation exceeding the environmental specifications of the product
or if the Warranty seal has been removed or altered by anyone other than Densei-Lambda authorized
personnel.
Densei-Lambda does not warrant the buyers circuitry or malfunctions of Densei- Lambda products resulting
from the buyer's circuitry. Furthermore, Densei-Lambda does not warrant any damage occurring as a
result of the buyer's circuitry or the buyer's-supplied products.
No other warranty is expressed or implied.
WARRANTY SERVICE
This product must be returned to an authorized Densei-Lambda service facility for repairs or other warranty
service. For products returned to Densei-Lambda for warranty service, the buyer shall prepay shipping
charges to Densei-Lambda and Densei-Lambda shall pay the shipping charges to return the product to
the buyer.
DISCLAIMER
The information contained in this document is subject to change without notice.
Densei-Lambda shall not be liable for errors contained in this document or for incidental or consequential
damages in connection with the furnishing, performance, or use of this material. No part of this document
may be photo-copied, reproduced or translated to another language without prior written consent of DenseiLambda.
1

FPS1000 POWER SUPPLY AND FPS-S1U RACK SAFETY INSTRUCTIONS
IMPORTANT SAFETY INSTRUCTIONS
Operating personnel must not remove the FPS1000, FPS-S1U and the FPS-T1U cover.
No internal adjustment or component replacement is allowed by non Densei-Lambda qualified service personnel. Never
replace components with power cable connected. To avoid injuries,always disconnect power, discharge circuits and remove
external voltage sources before touching components. These products are not authorized for use as critical components
in nuclear control systems, life support systems or equipment for use in hazardous environments without the express written
approval of the managing director of Densei-Lambda.
Restricted Access Area: The equipment should only be installed in a Restricted Access Area.
Access should be available to service personnel only.
WICHTIGE SICHERHEITSHINWEISE
Bedienungspersonal oder Anwender duerfen die Gehaeuseabdeckung des FPS1000, FPS-S1U und desFPS-T1U nicht entfernen.
Ersatzteiltausch - und Aenderungen duerfen nur von autorisiertem Densei-Lambda SERVICE-Personen bzw. Organisationen
durchgefuehrt werden.
Energieversorgungsanschluesse sind immer zu trennen, um Personenverletzungen durch gefaehrliche Energieinhalte und
Spannungen auszuschliessen.
Die Stromkreise sind zu entladen, externe Spannungsquellen sind zu entfernen bevor Bauteile bzw. Komponenten getauscht
werden.
Der direkte Zugriff auf das Racksystem ist nur dem geschulten Service-Personal erlaubt.
SAFETY APPROVALS
Vor Austausch von Bauteilen ist das Netzkabel bzw. die Versorgungsspannung zu trennen.
UL60950-1, UL Recognized, C-UL for canada. IEC/EN60950-1. CE marking, when applied to the FPS1000, FPS-S1U and
the FPS-T1U products, indicates compliance with the Low Voltage Directive (73/23EEC) as modified by the CE Marking
Directive (93/68EEC) in that it complies with EN60950-1.
SAFETY-CLASS OF INSULATION
The FPS1000, FPS-S1U and the FPS-T1U are designed for the following safety parameters: Material group IIIa, Pollution
degree 2, Overvoltage category II, Class I (earthed), indoor use as part of an overall equipment such that the FPS product
is accessible to service personnel only.
GROUNDING
These products are Safety Class I instruments. To minimize shock hazard, the instruments chassis must be connected to
an electrical ground. The instruments must be connected to the AC power supply mains through a three conductor power
cable, with the ground wire firmly connected to an electrical ground (safety ground) at the power outlet.
For instruments designed to be hard-wired to the supply mains, the protective earth terminal must be connected to the
safety electrical ground before any other connection is made.
Any interruption of the protective ground conductor, or disconnection of the protective earth terminal will cause a potential
shock hazard that might cause personal injury.
INPUT RATINGS
Do not use AC supply which exceeds the input voltage and frequency rating of these instruments. The input voltage and
frequency rating is: 100-240V~ , 50/60Hz. For safety reasons, the mains supply voltage flactuations should not exceed +/10% of nominal voltage.
FPS-S1U RACK AC INPUT
CAUTION:
Risk of electrical shock and energy hazard. Disconnecting one power supply disconnects only one power supply
module. To isolate the unit completely, disconnect all power supplies.
ACHTUNG:
Spannungsfuehrende Teile - Gefahr durch elektrischen Schlag order hohe Energieinhalte.
Alle Netzstecker der einzelnen Komponenten bzw. der Einschuebe muessen getrennt werden, damit das System
“spannungsfrei” ist.
2

FPS1000 Instruction Manual
ATTENTION:
Risque de choc et de danger e'lectriques. Le de'branchement d'une seule alimenttation stabilise'e ne de'branche uniquement
qu'un module "Alimentation Stabilise'e".
Pour isoler completement le module en cause, il faut de'brancher toutes les alimentations stabilise'es.
SAFETY SYMBOLS
CAUTION Risk of Electrical Shock.
Instruction manual symbol. The instrument will be marked with this symbol when it is
necessary for the user to refer to the instruction manual.
Indicates hazardous voltage.
Indicates ground terminal.
Protective Ground Conductor Terminal
Denotes hazard. An attention to a procedure is called. Not following the procedure correctly
could result in personal injury. A WARNING sign should not be skipped and all indicated
conditions must be fully understood and met.
Denotes hazard. An attention to a procedure is called. Not following the procedure correctly
could result in damage to the equipment.
ENERGY HAZARD
The FPS1000, FPS-S1U and the FPS-T1U products are capable of providing hazardous energy.
Manufacturers final equipment must provide protection to service personnel against inadvertent contact with these models
output terminals. If set such that hazardous energy can occur then the output terminals or connections therefore must not
be user accessible.
OVERCURRENT PROTECTION:
A readily accessible Listed branch circuit overcurrent protective device rated 20 A must be incorporated in the building wiring.
SERIAL OPERATION
The FPS-T1U product is capable of providing hazardous voltage output in case of the serial connection of two or more FPS1000
units in the rack. Manufacturers final equipment must provide protection to service personnel against inadvertent contact with
these models output terminals. If set such that hazardous voltage can occur then the output terminals or connections therefore
FUSES
There are no user replaceable fuses in the FPS1000, FPS-S1U and the FPS-T1U products. Internal fuses are sized for fault
protection and if a fuse was opened it would indicate that service is required. Fuse replacement should be made by qualified
technical personnel.
FPS-S1U and FPS-T1U racks contains no fuses. FPS1000 fuses rating are described below.
F101: F20A H 250Vac
F102: 6.3A 400Vdc
SICHERHEITSHINWEISE
Vor Anschluss an die Netzversorgung ist die Aufstellanleitung zu beachten!
1. Absicherung: F101: F20A H 250VAC, F102: 6.3A 400VDC
2. Der maximale Ableitstrom der Gesamtanlage darf 3.5mA nicht ueberschreiten.
3. Die Gehaeuseabdeckung darf nur im stromlosen Zustand geoeffnet werden.
ACHTUNG:
Sicherungen duerfen nur durch geschulte Service Personen getauscht werden.
3

CHAPTER 1 FPS1000 SERIES SPECIFICATIONS
FPS1000 SERIES SPECIFICATIONS
1V
Rated output voltage
2V
Output voltage set point
3V
Output voltage range
4A
Maximum Output Current (Refer to Fig.1)
5W
Maximum output power
6
Input voltage / frequency range
7
Maximum input current (at 100/200Vac)
8 ---
Power Factor (Typ)
9 (*2) %
Efficiency (Typ)
10 (*3) A
Inrush current
11 mS
Hold-up time
12 (*5) ---
Maximum line regulation
13 (*6) ---
Max load regulation
14 (*4) mV
Output Ripple and noise pk-pk
15 ---
Temperature stability
16
Temperature coefficient
17 (*7) V
Remote sensing
18 (*9) ---
Parallel operation
19
Series operation
20 ---
Over current protection
21 (*8) V
Over voltage protection
22 ---
Over temperature protection
23 ---
Remote On/Off control
24 ---
DC OK signal
25 ---
Over-Temp. warning
26 ---
AC fail signal
27 ---
Auxiliary power supply
28 ---
Vout voltage trimming
29 ---
Front panel indicators
2
30 ---
I
C Interface
31 ---
Operating temperature-models without IEC inlet
32 ---
Storage temperature
33 ---
Operating humidity
34 ---
Storage humidity
35 ---
Cooling
36 ---
Vibration
37 ---
Shock
38 ---
Conducted emission
39 ---
Radiated emission
40 ---
Applicable safety standards
Withstand voltage
41
42 ---
Insulation resistance
43 mA
Leakage current
44 Kg
Weight (Typ)
45 ---
Size (W*H*D)
models with IEC inlet
(*1) ---
A
PPM/°C
---
---
(*10)
---
FPS1000-12
12
12+/-1%
10.5~13.2
72
864
81/83%
20mS typical at 100Vac input, rated output voltage and less than 80% of rated load.
150
0.05% of rated Vout for 8hrs after 30min warm-up. Constant line, load and temperature.
14.3~15.7
By electrical signal or dry contact. ON: 0~0.6V or short. OFF: 2~15V or open.
Open collector signal. On when Vout>80+/-5% rated output. Max.sink current: 10mA
Possible, via Vout Trim pin in the I/O connector. Refer to Instruction Manual.
0~50°C: 100% load. Derate 2%/°C, 50°C to 60°C, Derate 2.5%/°C, 60°C to 70°C.
Input-Output: 3000Vrms, 1min. Input-Ground: 2000Vrms, 1min. Output-Ground:
More than 100Mohm at 25° C and 70% RH. Output-Ground: 500Vdc
FPS1000-24
24
24+/-1%
21.5~29
40
960
85~265Vac continuous, 47~63Hz, Single phase
12.0/6.0
>0.98 at 115/230V and maximum output power
84/86%
Less than 40A
0.40%
0.80%
200
200
Possible. Refer to Instruction Manual.
Possible. Refer to Instruction Manual.
Possible. Refer to Instruction Manual.
105~125% of maximum output current. Refer to Fig. 1
31~34
Inverter shut down method, automatic reset.
Open collector signal. Refer to Instruction Manual
Open collector signal. Refer to Instruction Manual
11.2~12.5VDC. 0.25A Maximum output current.
AC OK, DC OK, DC FAIL
Optional. Refer to Instruction Manual.
0~50°C: 100% load. Derate 2%/°C, 50°C to 60°C.
-30~85°C
10~90% RH, no condensation.
10~95% RH, no condensation.
By internal Fans. Variable speed control.
Built to meet ETS 300 019
Built to meet ETS 300 019
EN55022B, FCC part 15J-B, VCCI-B
EN55022B, FCC part 15J-B, VCCI-B
UL60950-1, EN60950-1
Less Than 1.1mA at 230Vac
2.0
127x41x290mm. Refer to Outline Drawing.
FPS1000-32
32
32+/-1%
28.8~38.4
31
992
84/86%
250
41.5~45.5
FPS1000-48
48
48+/-1%
43~58
21
1008
85/88%
300
62~66
500Vrms,1min.
Notes:
*1: For cases where conformance to various safety standards (UL, EN etc.) is required,
to be described as 100-240Vac (50/60Hz).
*2: At 100/200Vac, rated load and 25˚C ambient temperature.
*3: Not applicable for the noise filter inrush current less than 0.2mS.
*4: Measured with JEITA RC-9131A 1:1 probe, 20MHz B.W.
*5: From 85~132Vac or 170~265Vac, constant load.
*6: From No-load to Rated load, constant input voltage. Measured at the sensing point in Remote sense.
*7: Remote sensing can compensate up to 1V drop on each load wire.
*8: Inverter shut down method. Reset by AC voltage recycle or by On/Off control.
*9: Derate Maximum output power by 10% for input voltage less than 100V
RMS
.
*10 For FPS 1000-12/P(S), when used not with FPS-S1U or FPS-T1U
racks, an EMI suppressor clamp should be attached to the AC cable,
as close as possible to the AC inlet, to meet class B.
Vout (V)
V2
V1
Model FPS1000 FPS1000 FPS1000
V/I -24 -32 -48
V1 (V)
V2 (V)
I1 (A)
I2 (A)
FPS1000
-12
12
13.2
66
72
24 32 48
29 38.4 58
33 26 17.25
40 31 21
Fig. 1: Rated output current vs output voltage
I2
I1
Iout (A)
4

CHAPTER 2 OUTLINE DRAWINGS
1.2 FPS 1000 SERIES OUTLINE DRAWINGS
FPS1000 Instruction Manual
5
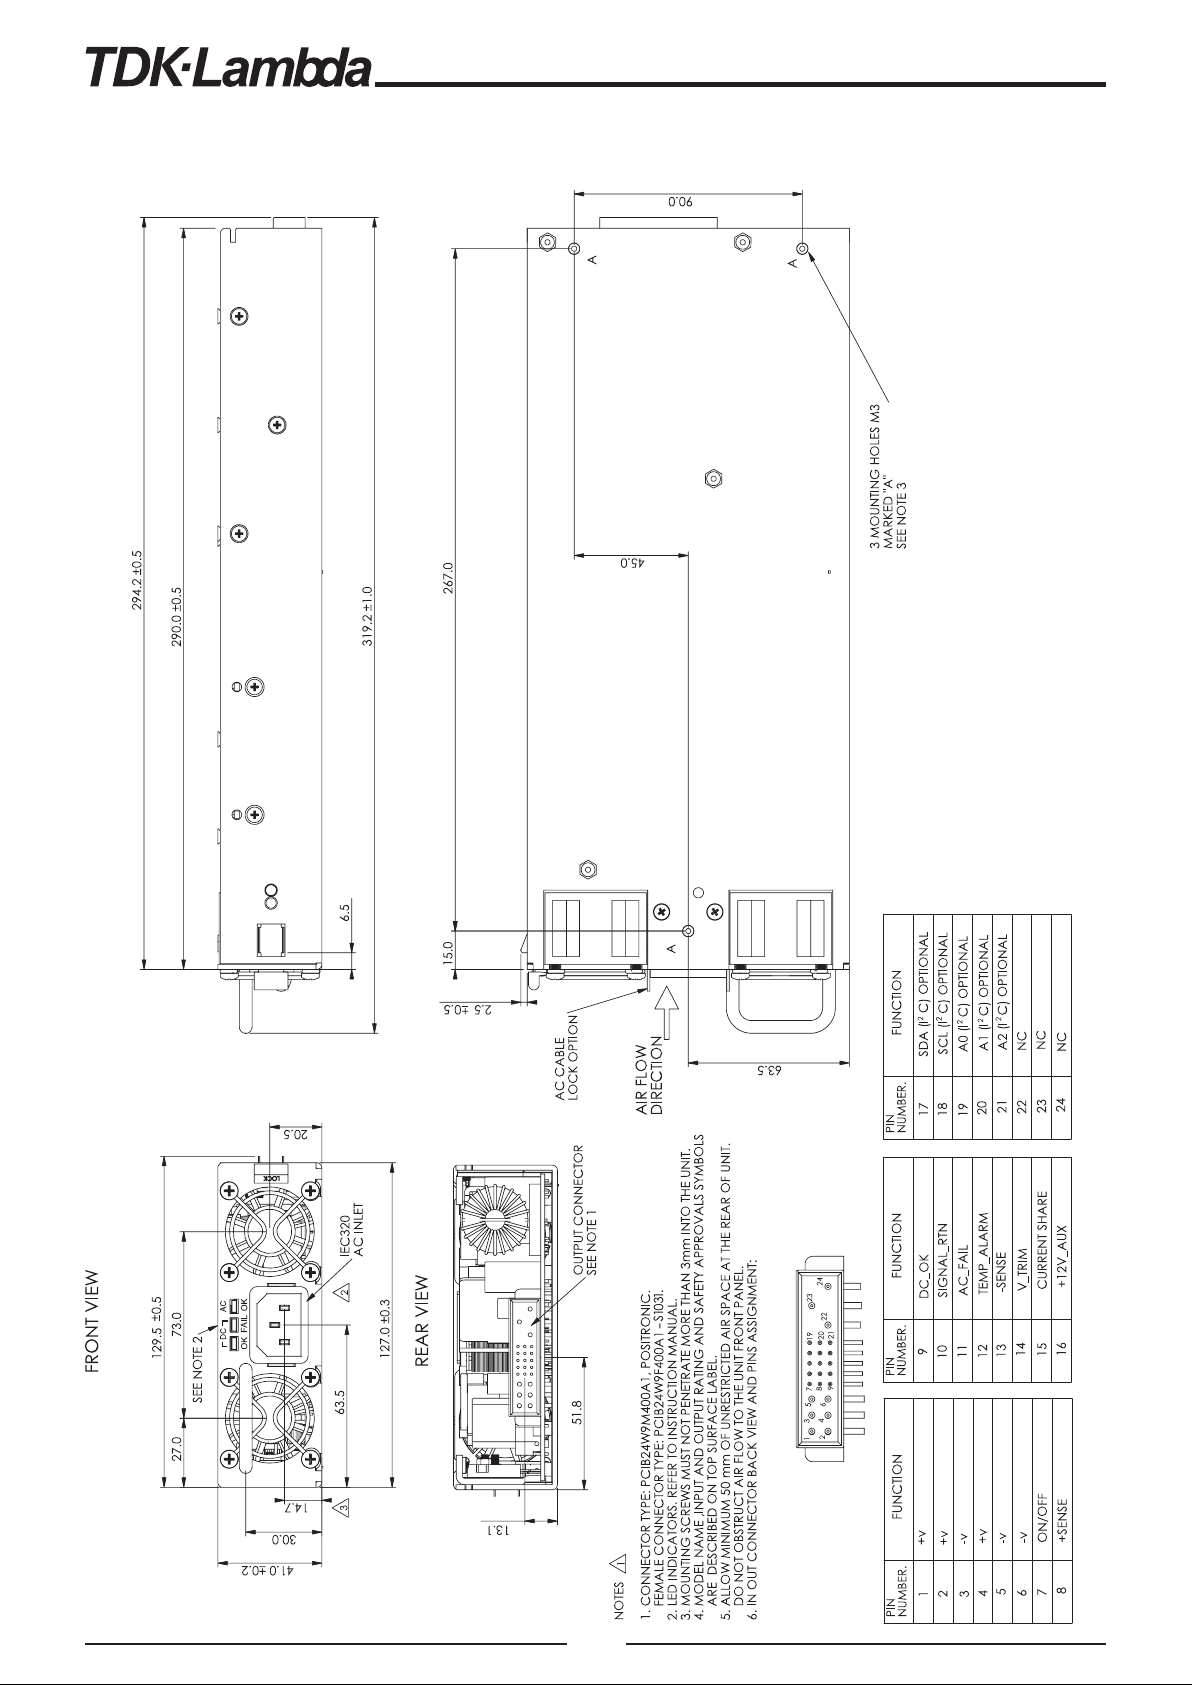
2.2 FPS 1000/P SERIES OUTLINE DRAWINGS
6

FPS1000 Instruction Manual
CHAPTER 3 FPS1000 POWER SUPPLY INSTALLATION
3.1 GENERAL
This chapter contains instructions for initial inspection, preparation for use and repackaging forshipment.
NOTE
FPS1000 power supplies series generate magnetic field
which might affect the operation of other instruments.
If your equipment is susceptible to magnetic fields, do
not position it adjacent to the FPS1000 unit.
3.2 PREPARATION FOR USE
In order to be operational the power supply must be connected to an appropriate AC source.
The AC source voltage should be within the power supply specification. Do not apply power before reading
sections 3.6 and 3.7.
Table 3-1 below describes the basic setup procedure. Follow the instructions in Table 3-1 in the sequence
given to prepare the power supply for use.
Step no Item Description Reference
1 Inspection Initial physical inspection of the power supply Section 3.3
2 Installation Installing the power supply. Section 3.4
Ensuring adequate ventilation. Section 3.5
3 AC source AC source requirements Section 3.6
4 Load connection Wire size selection. Local / Remote Section 3.7
sensing. Single or multiple loads.
Table 3-1: Basic setup procedure
3.3 INITIAL INSPECTION
Prior to shipment this power supply was inspected and found free of mechanical or electrical defects.
Upon unpacking of the power supply, inspect for any damage which may have occurred in transit.
The inspection should confirm that there is no exterior damage to the power supply.
Keep all packing material until the inspection has been completed. If damage is detected , file a claim with
carrier immediately and notify the Lambda sales or service facility nearest you.
3.4 FPS1000 MOUNTING
The FPS1000 power supplies series is designed to fit in the FPS-S1U and FPS-T1U, 19" rack, or in an
equivalent rack designed for the FPS1000 power supply.
The FPS1000 is secured to the rack using the spring lock device, located at the FPS1000 front panel.
Refer to the FPS1000 and the FPS-S1U and FPS-T1U outline drawings in Chapter 2, Chapter 11 and
Chapter 18.
When installation using mounting screws is required, the FPS1000 can be secured to the equipment using
the M3 mounting holes at its bottom surface. Refer to the FPS1000 outline drawings.
3.5 LOCATION MOUNTING AND COOLING
This power supply is fan cooled. The air intake is at the front panel and the exhaust is at the rear panel.
Upon installation allow cooling air to reach the front panel ventilation inlets and allow minimum 50mm of
unrestricted air space at the rear of the unit for the air exhaust.
3.6 AC SOURCE REQUIREMENTS
The FPS1000 series can be operated from a nominal 100V to 240V, single phase, 47~63Hz. Refer to the
specifications in chapter 1 for the input voltage range and the current required.
Ensure that under heavy load, the AC voltage supplied to the power supply does not fall below the "low
limit" specifications.
CAUTION
Connection of this power supply to an AC
power source should be made by an
electrician or other qualified personnel.
WARNING
There is a potential shock hazard if the power supply
chassis and cover are not connected to an electrical safety
ground via the safetyground in the AC input connector.
7

3.7 CONNECTING THE LOAD
WARNING
Turn off the AC input power before making or changing any rear panel
connection. Ensure that all connections are securely tightened before
applying power. There is a potential shock hazard when using a power
supply with a rated output greater than 40V.
3.7.1 Load Wiring.
The following considerations should be made to select wiring for connecting the load to the power supply:
* Current carrying capacity of the wire (refer to 3.7.2).
*Insulation rating of the wire should be at least equivalent to the maximum output voltage of the power
supply.
*Maximum wire length and voltage drop (refer to 3.7.2).
*Noise and impedance effects of the load wiring (refer to 3.7.3).
3.7.2 Current Carrying Capacity
Two factors should must be considered while selecting the wire size. 1.Wires should be at least heavy
enough not to overheating while carrying the power supply load current at the rated load, or the current
that would flow in the event the load wires were shorted, whichever is greater.
2.Wire size should be selected to enable voltage drop per lead to be less than 1.0V at the rated current.
Please refer to Tables 3-2 and 3-3 for maximum wire length to limit the voltage drop in American and
European dimensions respectively.
wire size
Resistivity Maximum length in Feet to limit voltage
AWG Ohm/kft drop to 1V or less.
5A 10A 20A 50A 150A
14 2.526 80 40 20 8 2
12 1.589 120 60 30 12 3.4
10 0.9994 200 100 50 20 6
8 0.6285 320 160 80 32 10
6 0.3953 500 250 125 50 16
4 0.2486 800 400 200 80 26
2 0.1564 1200 600 300 125 40
0 0.0983 2000 1000 500 200 68
Table 3-2:Maximum wire length for 1V drop on lead (in feet).
Cross sect. Resistivity
Area
Ohm/km drop to 1V or less.
Maximum length in meters to limit voltage
(mm^2) 5A 10A 20A 50A 150A
2.5 8.21 24.0 12.0 6.0 2.4 0.8
4 5.09 39.2 18.6 9.8 4.0 1.4
6 3.39 59.0 29.4 14.8 5.8 2.0
10 1.95 102.6 51.2 25.6 10.2 3.4
16 1.24 160.0 80.0 40.0 16.0 5.4
25 0.795 250.0 125.0 62.0 25.2 8.4
35 0.565 354.0 177.0 88.0 35.4 11.8
Table 3-3:Maximum wire length for 1V drop on lead (in meters).
For currents not shown in Tables 3-2 and 3-3 , use the formula :
Maximum length=1000/(current*resistivity)
Where current is expressed in ampers and resistivity in ohms/km or ohms/1000ft.
8

FPS1000 Instruction Manual
3.7.3 Noise and Impedance Effects
To minimize the noise pickup or radiation, the load wires and remote sense wires should be twisted-pairs
of the shortest possible length. Shielding of the sense leads may be necessary in high noise environments.
Even if noise is not a concern, the load and remote sense wires should be twisted-pairs to reduce coupling
between them, which might impact the stability of power supply. The sense leads should be separated
from the power leads.
Twisting the load wires reduces the parasitic inductance of the cable which could produce high frequency
voltage spikes at the load and the output of power supply because of current variation in the load itself.
The impedance introduced between the power supply output and the load could make the ripple and noise
at the load worse than the noise at the power supply rear panel output. Additional filtering with bypass
capacitors at the load terminals may be required to bypass the high frequency load current.
3.7.4 Inductive loads
To prevent damage to the power supply from inductive kickback, a diode should be connected across the
output. The diode voltage and current rating should be greater than the power supply maximum output
voltage and current rating. Connect the cathode to the positive output and the anode to the negative
output. Where positive load transients such as back EMF from a motor may occur, connect a surge
suppressor across the output to protect the power supply. The breakdown voltage rating of the suppressor
must be approximately 10% higher than the maximum output voltage of the power supply.
3.7.5 Making the load connections
Hazardous voltages may exist at the outputs and the load connections
when using a power supply with a rated output greater than 40V. To protect
personnel against accidental contact with hazardous voltages, ensure that
the load and it's connections has no accessible live parts.
Ensure that the load wiring insulation rating is greater than or equal to the
maximum output voltage of the power supply.
3.7.6 Front panel controls and indicator
1
2
3
4
Fig. 3-1: FPS1000 front panel
1
2 34
!
WARNING
5
1: Handle
2: DC OK green LED, on when the output
voltage is above 80% +/- 5% of its rated value.
56
3: DC Fail red LED, on when the output voltage
is lower than 80% +/- 5% of its rated value.
4: AC OK green LED, on when the input
voltage is higher than 85Vrms
5: Lock/Unlock lever. Automatically locks the
power supply to the FPS-S1U rack chassis
when the FPS1000 power supply is
inserted. Push the Lock/Unlock lever toward
the power supply cooling fan to withdraw
the FPS1000 from the rack.
6: IEC320 AC inlet
Fig. 3-2: FPS1000/P front panel
9

3.7.7 Input/Output connector information
The FPS1000 series uses male connector PCIB24W9M400A1, Positronic connector. To mate FPS1000
series to the load circuitry, use female connector PCIB24W9F400A1-S1031, Positronic connector.
Refer to Table 3-4 and to the Outline drawing in chapter 2 for the connector pinout description.
Pin No Function Description
1,2,4 +V Positive output voltage. Maximum current capacity: 24A/contact.
3,5,6 -V Negative output voltage. Maximum current capacity: 24A/contact.
7 On/Off control
8
+Sense
Turns the output to On and Off by electrical signal or dry contact between pin 7
and pin 10 (Signal Return). 0~0.6V or Short: On, 2~15V or Open: Off.
The maximum source current is 2.6mA.
Positive sensing. The +Sense signal should be connected to the positive terminal
of the load. The +Sense and -Sense leads should be twisted pair to minimize noise
pick-up effect. The maximum load wires drop compensation is 1V/wire.
9 DC_OK
10 Signal_Return
11 AC_Fail
12
13 -Sense
14 V_Trim
15 CS
16 +12V Auxiliary
17 SDA
18 SCL
19,20,21 A0, A1, A2
22 ACG
23 AC Line
24 AC Neutral
Over
Temperature
Alarm
Open collector signal, referenced to pin 10 (Signal Return). On when Vout≥80%+/5% of its rated value. The maximum sink current is 10mA and the maximum
external voltage is 15V.
Return for the following control and supervisory signals: On/Off, DC_OK,
Over_temperature Alarm, AC_Fail, Auxiliary 12V supply. The Signal return is isolated
from the output terminals.
Open collector signal, referenced to pin 10 (Signal Return). On when the input
voltage is ≥85Vrms. The maximum sink current is 10mA and the maximum external
voltage is15Vdc.
Open collector signal, referenced to pin 10 (Signal Return). On when the internal
temperature is within safe limit, Off approx. 10°C below Thermal shut down. The
maximum sink current is 10mA and the maximum external voltage is 15V.
Negative sensing. The -S signal should be connected to the negative terminal of
the load. The -S and +S leads should be twisted pair to minimize noise pick-up
effect. The maximum load wires drop compensation is 1V/wire.
Connection for output voltage trimming. The voltage can be trimmed within its
range specifications.
Current sharing signal. When units are connected in parallel, the CS pins of the
units should be connected to allow current balance between units.
Auxiliary voltage output, 11.2~12.5V, referenced to pin 10 (Signal Return). The
maximum load current is 0.25A. This output has built in Oring diode and is not
controlled by the On/Off control.
Serial Data used in the I
Serial Clock used in the I
2
I
C interface address lines. Refer to the I2C interface description in Chapter 7.
AC Ground connection, refer to the safety instructions for safety standards requirements.
For "/P" models the AC Ground is connected via the front panel IEC inlet.
AC Line connection, refer to the safety instructions for safety standards requirements.
For "/P" models the AC Line is connected via the front panel IEC inlet.
AC Neutral connection, refer to the safety instructions for safety standards requirements.
For "/P" models the AC Neutral is connected via the front panel IEC inlet.
2
C interface option. Refer to the I2C interface description.
2
C interface option. Refer to the I2C interface description.
Table 3-4: Rear In/Out connector pins function description
3.7.8 REPACKAGING FOR SHIPMENT
The original packaging material is reusable. If the original package is not available, contact the Lambda
Sales or service facility near you for details on obtaining suitable packaging and shipping information.
To ensure safe transportation of the instrument, it is recommended to use the original package.
Please attach a tag to the power supply describing the problem and specifying the owner, model number
and serial number of the power supply.
10

FPS1000 Instruction Manual
CHAPTER 4 FUNCTIONS AND FEATURES
4.1 Input Voltage Range
Input voltage is single phase 85~265Vac (47~63Hz). The power supply can be operated also with a DC input voltage,
120~330VDC but the safety approvals apply to the AC voltage only. Input voltage which is out of the specifications
might cause damage to the unit.
4.2 Output voltage trimming
The output voltage can be adjusted within the specifications via the V_Trim pin at the In/Out connector.
Refer to Fig 4-1 typical connection and calculation of the adjustment resistors:
Note that the Over Voltage Protection may trigger if the output voltage exceeds the maximum voltage specification.
Fig 4-1
+V
+S
8
FPS1000 R1 KΩ
V_trim
14
-S
13 R2 KΩ
-V
FPS1000-12:
R2=0.0324*V
R1(K
Ω)=5(KΩ)-R2(KΩ)
FPS1000-24:
R2=0.0785*V
R1(K
Ω)=20(KΩ)-R2(KΩ)
FPS1000-32:
R2=0.0463*V
R1(K
Ω)=20(KΩ)-R2(KΩΩ)
2
out -1.1298*Vout+9.9342
2
out -5.819*Vout+105.132
2
out -4.5805*Vout+109.49
FPS1000-48:
R2=0.0497*V
R1(K
Ω)=50(KΩ)-R2(KΩ)
2
out-7.2795*Vout+259.04
4.3 Over Voltage Protection (OVP)
The OVP triggers when the output voltage exceeds the maximum rating and reaches the OVP limit. When the OVP
is triggered, the output voltage shuts down. In order to resume operation, the AC input voltage should be removed
for more than 30 sec. The OVP level is factory set and is not adjustable.
4.4 Over Current Protection (OCP)
A constant current limiting with automatic recovery is provided. The OCP operates when the output current exceeds
105%~125% of the rated output current. The output voltage recovers automatically when the overload condition is removed.
Avoid operating the power supply under overload condition for long time as it might cause damage to the power
supply.
4.5 Over Temperature Protection (OTP)
The OTP is activated when the ambient temperature or the power supply internal temperature exceeds a safe temperature.
When the OTP is activated, the power supply output shuts down. The output recovers automatically when the ambient
temperature or the internal temperature cools to a safe limit.
4.6 Auxiliary 12V output
An isolated 11.2V~12.5V output is provided (Referenced to the Signals_Return potential). The maximum output
current from this output is 0.25A. This output has a built-in Oring diode to allow paralleling FPS1000 units. Use this
output for the control and monitoring signals described in this chapter or to operate application circuits.
4.7 Over Temperature Alarm
An open collector output provides an Over Temperature Alarm approx. 10°C below shut down by the OTP. The open
collector output is referenced to the Signals_Return potential and is isolated from the power supply +V and -V
terminals
The maximum sink current is 10mA and the maximum external voltage is 15V.
Refer to Fig 4-2 for typical application.
Fig 4-2
12V aux
16
FPS1000 10KΩ
12
Over temperature alarm
10
Signals return
11

4.8 DC_OK signal
An open collector output provides a low output voltage detection signal. The open collector output is on when the
output voltage is higher than 80%+/-5% of the rated output voltage of the power supply.
The open collector output is referenced to the Signals_Return potential and is isolated from the power supply +V
and -V terminals
The maximum sink current is 10mA and the maximum external voltage is 15V.
Refer to Fig 4-3 for typical application.
16 12V aux
FPS1000 10KΩ
9
DC_OK
10
Signals return
Fig 4-3
4.9 AC_Fail signal
An open collector output provides a low AC input voltage detection signal. The open collector output is on when the
input voltage is 85Vac or higher.
The open collector output is referenced to the Signals_Return potential and is isolated from the power supply +V
and -V terminals
The maximum sink current is 10mA and the maximum external voltage is 15V.
Refer to Fig 4-4 for typical application.
16 12V aux
FPS1000 10KΩ
11
AC_Fail signal
10
Signals return
Fig 4-4
4.10 Remote On/Off control
A Remote On/Off control input is provided. The Remote On/Off input is isolated from the power supply +V and -V
terminals and is referenced to the Signals_Return potential. The Remote On/Off can be operated either by electrical
signal or by dry contact.
(1) Operation by electrical signal:
0~0.6V: Output is On.
2~15V: Output is Off.
The maximum sink current is 2.6mA and the maximum external voltage is 15V.
(2) Operation by dry contact (relay or switch):
Short between On/Off input and Signals Return: Output is On.
Open circuit between On/Off input and Signals Return: Output is Off.
When the Remote On/Off function is not used, connect a short circuit between the On/Off control and the Signals_Return.
Refer to Fig 4-5 for the remote On/Off circuit description:
Fig 4-5
FPS1000 4.7KΩ
16 12V aux
7
On/Off control
10
Signals return
12
I source 2.6mA max, 15Vdc max.

FPS1000 Instruction Manual
4.11 Remote Sensing
The Remote sensing compensates voltage drop on the load wiring. The maximum voltage drop on each wire is 1V,
however, it is recommended to minimize the voltage drop on the load wires to improve the response to load current
changes.
In case that the sensing wires are long, use separate twisted pair wires for the sensing and for the load wires to
minimize noise pick-up.
It is recommended to connect electrolytic capacitors in the following locations:
1) Across the load terminals
2) Between the "+S" terminal and the "+V" terminal of the power supply.
3) Between the "-S" terminal and the "-V" terminal of the power supply.
Refer to Fig 4-6 for typical connection of remote sensing.
8
+S
FPS1000
+V
-V
1,2,4
3,5,6
+
+
LOAD
-
Fig 4-6
-S
+
13
13

CHAPTER 5 BASIC CONNECTIONS FOR OPERATION
5.1 Connecting single load, Local sensing
Local sensing is suitable for applications where load regulation is not critical. Fig 5-1 shows recommended
load and sensing connections for applications with a single load.
FPS1000
SIGNAL
RTN
ON/
OFF
1,2,4
+V
+S
8
13
-S
-V
710
3,5,6
+
LOAD
-
Fig 5-1: single load connection, local sensing
In Local sense applications, the +/- sense have to be connected to the
*
+/-V terminals of the FPS1000 units prior the operating the FPS1000 units
5.2 Connecting Single Load, Remote Sensing
Remote sensing is used in cases where the load regulation is important at the load terminals. Use twisted
or shielded wires to minimize noise pick-up. If shielded wires are used, the shield should be connected
to the ground at one point, either the power supply side or the load. The optimal point for the shield ground
should be determined by experimentation. Refer to the power supply specifications for the maximum
voltage drop allowed at the load wires.
Load line.
Up to 1V drop.
Sense lines
Twisted pairs
+
LOAD
-
Load line.
Up to 1V drop.
FPS1000
SIGNAL
RTN
ON/
OFF
1,2,4
+V
8
+S
13
-S
3,5,6
-V
710
Fig 5-2: Remote sensing, single load.
5.3 Connecting Multiple loads, radial distribution method
In cases of multiple loads connected to one supply, each load should be connected to the power supply's
output terminals using separate pairs of wires. It is recommended that each pair of wires will be as short
as possible and twisted or shielded to minimize noise pick-up and radiation.
The sense wires should be connected to the power supply output terminals or to the load with the most
critical load regulation requirement.
FPS1000
SIGNAL
RTN
ON/
OFF
1,2,4
+V
+S
8
13
-S
-V
710
3,5,6
+
-
+
-
+
LOAD # 1
LOAD # 2
LOAD # 3
-
Fig 5-3: Multiple loads connection , radial distribution
14

FPS1000 Instruction Manual
5.4 Multiple loads connection with distribution terminals
If remotely located output distribution terminals are used, the power supply output terminals should be
connected to the distribution terminals by a pair of twisted or shielded wires. Each load should be separately
connected to the remote distribution terminals (see Fig 5-4). If remote sensing is required, the sensing
wires should be connected to the distribution terminals or at the most critical load.
+V
-V
+
-
+
-
+
LOAD # 1
LOAD # 2
LOAD # 3
FPS1000
SIGNAL
RTN
ON/
OFF
1,2,4
+V
+S
8
13
-S
-V
710
3,5,6
-
Fig 5-4: Multiple loads connection with distribution terminal
5.5 Grounding outputs
Either the positive or negative output terminals can be grounded. To avoid noise problems caused by
common-mode current flowing from the load to ground, it is recommended to ground the output terminal
as close as possible to the power supply's output. Always use two wires to connect the load to the power
supply regardless of how the system is grounded.
15

CHAPTER 6 PARALLEL AND SERIES OPERATION
6.1 Parallel operation
Up to 8 FPS1000 units of the same output voltage rating can be connected in parallel. By connecting the CS signal
between the paralleled units, automatic current balance is achieved, with +/-10% accuracy. Derate the total output
current by 10% when using parallel operation to prevent overload condition.
The built-in Oring diodes on the main output and the 12V Auxiliary output allow N+1 operation.
For input voltages less than 100Vac, maximum output Power derated by 10% of the Power rating.
6.1.1 Parallel operation with Remote sensing
Fig 6-1 shows typical connection of parallel operation with Remote sensing. The CS signal wires should be as short
as possible and with the same length.
ON/
OFF
ON/
OFF
ON/
OFF
+V
+S
-S
-V
71015
+V
+S
-S
-V
71015
+V
+S
-S
-V
71015
+S
+S
-S
-S
+S
-S
+S
+V
LOAD
-V
-S
FPS1000 #1
SIG.
RTN
CS
FPS1000 #2
SIG.
RTN
CS
FPS1000 #N
SIG.
RTN
CS
Fig 6-1: Parallel operation with Remote sensing
6.1.2 Output voltage trimming at parallel operation
The output voltage of the units connected in parallel can be made by a single trimmer or resistive divider as shown
in Fig 6-2.
V TRIM
FPS1000 #1
SIG.
RTN
CS
15
FPS1000 #2
SIG.
RTN
15
FPS1000 #N
SIG.
RTN
15
+S
ON/
OFF
710
V TRIM
+S
ON/
OFFCS
710
V TRIM
+S
ON/
OFFCS
710
-S
V TRIM
+V
-S
-V
-S
Fig 6-2: Output voltage trimming at parallel operation
16
+S
-S
R1
R2
FPS1000-12:
R2=0.0324*V
R1(K
Ω)=5(KΩ)-R2(KΩ)
FPS1000-24:
R2=0.0785*V
R1(K
Ω)=20(KΩ)-R2(KΩ)
FPS1000-32:
R2=0.0463*V
R1(K
Ω)=20(KΩ)-R2(KΩΩ)
FPS1000-48:
R2=0.0497*V
R1(K
Ω)=50(KΩ)-R2(KΩ)
2
out -1.1298*Vout+9.9342
2
out -5.819*Vout+105.132
2
out -4.5805*Vout+109.49
2
out-7.2795*Vout+259.04

FPS1000 Instruction Manual
6.1.3 Signal Return bus at parallel operation
The Signal Return of each paralleled unit can be connected together to form a common Signal Return bus.
By this way, the control and monitoring signals of the paralleled units can be connected to the same control and
monitoring circuitry.
The Signal Return bus can be connected to the -V or -S or +V or -S or float. Fig 6-3 shows typical connection of
the Signal Return at parallel operation.
FPS1000 #1
OVER-TEMP
FPS1000 #2
OVER-TEMP
FPS1000 #N
OVER-TEMP
AC_FAIL
DC_OK
ALARM
SIG.
RETURN
AC_FAIL
DC_OK
ALARM
SIG.
RETURN
AC_FAIL
DC_OK
ALARM
SIG.
RETURN
9, 11, 12
10
9, 11, 12
10
9, 11, 12
10
Fig 6-3: Signal Return connection at parallel operation
CONTROL AND
MONITORING CIRCUITS
FPS1000 #1 SIGNALS
FPS1000 #2 SIGNALS
FPS1000 #N SIGNALS
SIGNALS RETURN
6.1.4 Remote On/Off control at parallel operation
The paralleled units can be turned On or Off via a single On/Off control. Refer to Fig 6-4 for typical application. The
Signal Return function of all the paralleled units should be connected together to create a common Signal Return
bus. The Signal Return bus may be connected to the -V or the +V potential or floated. In any case do not connect
the Signal Return bus to different potentials.
FPS1000 #1
FPS1000 #2
FPS1000 #N
ON/OFF
SIG.
RETURN
ON/OFF
SIG.
RETURN
ON/OFF
7
10
7
10
7
ON OFF
SIG.
RETURN
10
Fig 6-4: Remote On/Off control at parallel operation
17

6.2 Series operation
Two units can be seriesly connected to increase the output voltage or to create a bipolar voltage source. It is
recommended to connect diodes in parallel with each output to prevent reverse voltage in case of failure in one of
the power supplies. Each diode should be rated to at least the power supply rated output voltage and output current.
Refer to Fig 6-5 and 6-6 for typical lseries connection of power supplies.
Series connection for increased output voltage.
FPS1000 #1
SIG.
RTN
FPS1000 #2
SIG.
RTN
+S
+V
-V
ON/
-S
OFF
710
+S
+V
-V
ON/
-S
OFF
710
(*) Diodes are user supplied
(*)
(*)
+S
+V
LOAD
-V
-S
Fig 6-5: Series connection for increased output voltage
Series connection for positive and negative output voltage.
FPS1000 #1
SIG.
RTN
FPS1000 #2
SIG.
RTN
+S
+V
-V
ON/
-S
OFF
710
+S
+V
-V
ON/
-S
OFF
710
(*) Diodes are user supplied
(*)
(*)
+V
COMMON
-V
LOAD
Fig 6-6: Series connection for Bipolar output voltage
CAUTION
Series operation is not applicable for units with I
18
2
C bus option.

FPS1000 Instruction Manual
CHAPTER 7 I2C BUS INTERFACE OPTION
7.1 Introduction
2
C interface option includes facilities to monitor operating parameters of the power supply. The parameters
The I
are then transferred to the host PC if demanded, over a standard I
The following data can be monitored for the individual units connected to the I
1. Status of the unit.
2. Actual output voltage, output current and internal temperature of the unit.
3. Manufacturing related data (model, serial number, manufacturing date etc…).
2
C bus.
2
C bus:
7.1.1 Addressing (A0, A1, A2).
2
Three address lines allow up to eight FPS1000 units to be addressed on a single I
C bus. The address lines are
internally pulled-up to +5V by resistors. Addressing of a unit is achieved by hard-wiring an address line to the
-Sense to set it to "0" or leaving the address line open to set it to "1".
7.1.2 Serial clock
This line is clocked by the processor which controls the I
via a pull-up resistor of 2KΩ. The I
2
C interface is designed to run with a serial clock speed of 100KHz.
2
C bus. It should be connected to +5V (referenced to -Sense)
7.1.3 Serial dataThis line is a bidirectional data line. It should be connected to +5V
(referenced to -Sense) via a pull-up resistor of 2KΩ.
7.2 I2C Interface Specifications
7.2.1 General specifications
1. Clock frequency: 100KHz
2. Address lines: Three (A0, A1, A2). Support 8 power supply modules
7.2.2 Output voltage measurement
1. Measurement accuracy: +/-2% of full scale
2. Measurement resolution: 8 bits
3. Measurement range:
0~60.0V for 48V model / 0~40.0V for 32V model / 0-30.0V for 24V model.
7.2.3 Output current measurement
1. Measurement accuracy: +/-10% of full scale
2. Measurement resolution: 8 bits
3. Measurement range: 0~25.0A for 48V model
/
0~50A for 32V & 24V models
7.2.4 Internal temperature measurement
1. Measurement accuracy: +/-3°C
2. Measurement resolution: 8 bits
3. Measurement range: 0-100°C
7.2.5 EEPROM
1. EEPROM type: AT24C02AN-10S , Atmel, or equivalent
2. EEPROM data:
Model name, Serial no., Revision, Manufacture. Name, Output voltage,
Date, Country of manufacturing, Check-Sum
7.2.6 Status register
1. Register type: PCF8574, Philips, or equivalent.
2. Register content: DC Fail, Over-Temperature Protection (OTP)
Temperature Alarm, Fan Fail, AC Fail
CAUTION
The I2C bus address lines, serial clock and data are
referenced to the -Sense potential. When using series
connection of FPS1000 units, do not connect the I
2
C lines
of the units together.
19

2
7.3 Block diagram of the I
C option
Refer to Fig 7-1 for description of the I
2
C block diagram and for typical application.
A0
A1
A2
REGISTER
A0
A1
A2
ADC
OTP
Temperature Alarm
Fan Fail
AC Input Fail
Output voltage
Output current
Temperature
A0 A0
A1 A1
A2 A2
Output Fail
EEPROM
Fig 7-1: I2C option bloack diagram
Serial CLOCK
Serial DATA
7.4 Operation and functions
7.4.1. Digital status
Digital status functions are provided by a PCF8574, 8-bit Register. It provides a single 8-bit word when read by the
2
C controller. Fault is indicated by "1" and Good level is indicated by "0".
I
Refer to Table 7-1 for the register information.
BIT
FUNCTION MEANING
0 Output Fail
Output voltage is <80% +/- 5% of Vout rated
1 Over Temperature Protection Internal temperature is over 80°C. Supply turns off.
2 Temperature Alarm Internal temperature is over 70°C. Supply is on.
3 Fan Fail Failure of an internal fan.
4
AC Input Fail
AC Input <85Vac
5 Not Used Always "0".
6 Not Used Always "0".
7 Not Used Always "0".
Table 7-1
PCF8574 slave address:
Bit 7 6 5 4 3 2 1 0
Value 0 1 0 0 A2 A1 A0 R/W
7.4.2 EEPROM functions
A 256 bytes EEPROM included in the I
2
C option. The EEPROM type is AT24C02 and it is programmed at the factory
with the data shown in Table 7-2.
ADDRESS BYTES DATA
0 4 Number of fields
4 16 Manufacturer
20 20 Serial number
40 16 Revision
56 16 Country of manufacture
72 16 Model name
88 16 Output voltage
104 16 Date of manufacture
254 2 Checksum
Table 7-2
The slave EEPROM address is:
Bit 7 6 5 4 3 2 1 0
Value 1 0
1
0 A2 A1 A0 R/W
20

FPS1000 Instruction Manual
7.4.3 Analog functions
Analog functions are provided by a single PCF8591, 4-channel 8-bit A/D converter. When this device is read by the
serial buscontroller it provides an 8-bit word with the following information:
Channel 1: Output voltage, channel 2: Output current, channel 3: Internal temperature.
The PCF8591 slave address is:
Bit 7 6 5 4 3 2 1 0
Value 1 0 0 1 A2 A1 A0 R/W
The PCF8591 device initially requires a control byte to be written to the configuration register.
The control byte is as follows:
Bit 7 6 5 4 3 2 1 0
Value 0 A 0 0 0 B C D
When a single channel is to be read, A,B,C and D should be determined as follows:
A/D channel A B C D
Voltage 0 0 0 0
Current 0 0 0 1
Temperature 0 0 1 0
To read all channels with a single control byte, A and B have to be "1", C and D have to be "0". This control byte
sets the device so that on each successive read the data from the next A/D is read.Thus, the first result from a
sequence of reads should not be considered.
Note that on each read, a conversion is started for a particular channel and the result will be read from the previous channel.
7.4.4 A/D Scaling
The A/D readback has to be scaled to obtain a correct value for the voltage, current and the temperature. Note that
the voltage reading is made inside the power supply unit before the "Oring" diode and is typically 0.5V higher than
the actual output voltage.
The following scaling should be employed:
Refer to the following table for the scaling of the A/D channels:
FPS1000-12/S
0~15V
0~80A
0~100°C
FPS1000-32/S
The measurement range is from 0 to the maximum value listed in the range column. The resolution or scale of
reading is linear over the entire range and provides a linear output on the A/D converter.
7.5 Measurements and calculation examples
7.5.1 Output voltage readback
The voltage before the "Oring" diode is measured and can be read from the A/D converter. This voltage is higher
than the voltage at the output terminals by 0.5V typically.
Model: FPS 1000-48/S
1. Output voltage (at the output terminals): 48.0V
2. Voltage before the "Oring" diode: 48.0V+0.5V=48.5V
3. .Hex readback: CE (1100 1110).
4. Convert the hex readback to decimal: 206
5. Calculate measured Vout: Vout=206*0.2344=48.286V
0.0586 V/Bit
0.312 A/Bit
0.391°C/Bit
VALUE = BYTE VALUE x RESOLUTION
FPS1000-24/S
FPS1000-48/S
7.5.2 Output current readback
The output current is sensed by an internal shunt and measured by an A/D converter. Refer to the following examplefor
current readback calculation.
1. Actual output current: 21.0A
2. Hex readback: E0 (1110 0000).
3. Convert the hex readback to decimal: 224
4. Calculate measured Iout: Iout=224*0.0977=21.884A.
21

7.5.3 Internal temperature measurement
The internal ambient temperature is measured to provide information of the safe operation of the power supply. The
internal ambient temperature is usually higher than the power supply air intake temperature due to internal power
dissipation. As the power dissipation varies with the load, the internal ambient temperature increases with the load.
Refer to Fig 7-2 for typical internal temperature rise above the air intake temperature versus the load.
Internal temp.
rise (°C)
15
10
5
0
25 50 75 100 % of rated load
Fig 7-2: Internal temperature rise vs. load
Internal temperature calculation example:
1. Hex readback: 68 (0110 1000).
2. Convert hex readback to decimal: 104
3. Calculate the measured temperature:
o
Temp=104*0.391=40.664
C
7.6 Typical application diagram
A typical application is described in Fig 7-3.
PC
RS232
RS232
CABLE
Fig 7-3: Typical application of I
RS232 TO
2
C
I
CONVERTOR
2
C interface
CLOCK
DATA
GND
RETURN
SCL
SDA
FPS1000
A0 A1 A2
ON/OFF
CONTROL
ON/OFFSIGNAL
+S
+V
-V
-S
ADDRESS
SETTING
+
LOAD
-
22

FPS1000 Instruction Manual
CHAPTER 8 FPS1000 MAINTENANCE
8.1 Introduction
This chapter contains information about maintenance, calibration and troubleshooting of the FPS1000 power supply.
8.2 Units under warranty
Units requiring repairs during the warranty period should be returned to Densei-Lambda authorized service office.
Unauthorized repairs performed by other than the authorized service facilities may void the warranty.
8.3 Periodic maintenance
No routine maintenance of the FPS1000 power supply is required except for periodic cleaning. To clean, disconnect
the unit from the AC supply and allow 30sec. for discharging internal voltage. The FPS1000 should be cleaned using
mild solution of detergent and water. The solution should be applied onto a soft cloth, and not directly to the surface
of the unit. Do not use aromatic hydrocarbons or chlorinated solvents for cleaning. Use low pressure compressed
air to blow dust from the unit.
8.4 Adjustments and Calibration
No internal adjustment or calibration are required. Units that are returned for repair will be calibrated at the service
office.In any case ,opening the cover is not allowed.
8.5 Fan life expectancy
The fan life has limitation depending mainly on the ambient temperature. Please refer to Fig 8-1 for the expected
fan life vs. the ambient temperature. In case that the fan should be replaced, contact your nearest Densei-Lambda
authorized service office.
10
Life expectancy (years)
1
100500
Ambient temperature (°C)
Fig 8-1: Expected fan life vs. ambient temperature
8.6 Before concluding that the unit is at fault:
Before concluding that the unit is at fault, make the following tests:
* Check if the AC voltage is within the specification range.
*Check if the input and output wiring is correct.
*Check if the +S and -S wires are connected to the +Vout and -Vout (refer to sec. 4.11).
*Check if the wires size is sufficient (refer to sec. 3.7.2).
*Check if the output voltage control, V_Trim, is connected properly (refer to sec. 4.2).
*Check if the On/Off control is connected properly (refer to sec. 4.10).
*Check if the load current and power consumption are within the power supply specifications.
*Audible noise can be heard during dynamic load operation.
*Audible noise can be heard when the input voltage waveform is not sinusoidal.
8.7 Parts replacement and repair
As repairs are made only by the manufacturer or by its authorized service offices, no parts replacement information
is given inthis manual. In case of failure, unusual or erratic operation of the unit, contact your nearest Densei-Lambda
sales and service office.
23

FPS-S1U 19” Rack Single Output
24

CHAPTER 9 FPS-S1U RACK SPECIFICATIONS
1
Number of power supply modules (*1)
2
Maximum output power (*2)
3
Input voltage / frequency range (*3)
4
Maximum input current (at 100/200Vac)
5
AC input connector
6
Output terminals
7
Remote sensing (*4)
8
Parallel operation
9
Series operation (*5)
10
Remote On/Off control
11
DC_OK signal
12
AC fail signal
13
Over Temperature alarm signal
14
Vout voltage trimming
15
Auxiliary power supply
16
Operating temperature
Storage temperature
17
Operating humidity
18
Storage humidity
19
Vibration
20
Shock
21
Applicable safety standards
22
Withstand voltage
23
Insulation resistance
24
Weight (Typ)
25
Size (W*H*D)
26
Warranty
27
---
W
---
A
---
---
V
---
---
---
---
---
---
---
---
---
---
---
---
---
---
---
---
---
Kg
---
Yr
Maximum 3 x FPS1000 modules of the same output voltage rating.
FPS-S1U :IEC inlet for each power supply module . FPS-S1U/P :None
Possible. Up to 3 racks with max 8 FPS 1000 units of the same voltage and current rating.
Possible. Up to 2 racks of the same voltage and current rating
Separate control for each FPS 1000 unit , By electrical signal or dry contact
Separate control for each FPS1000 unit, Open collector signal.
Separate control for each FPS1000 unit ,Open collector signal.
Separate control for each FPS1000 unit ,Open collector signal.
Possible, via separate control for each FPS1000 unit .Refer to Instruction Manual.
11.2~12.5VDC.Maximum output current:0.25A*Number of installed FPS1000 units.
Input-Output: 3000Vrms, 1min. Input-Ground: 2000Vrms, 1min. Output-Ground:
More than 100Mohm at 25°C and 70% RH. Output-Ground: 500Vdc
FPS-S1U Instruction Manual
3000
85~265Vac continuous, 47~63Hz, Single phase
12.0/6.0 for each FPS1000 unit installed
Bus-bars.Refer to outline drawing.
Possible.
ON: 0~0.6V or short. OFF: 2~15V or open.
On when Vout >80% +/-5%. Max.sink current: 10mA
Refer to Instruction Manual
Refer to Instruction Manual
0~50°C: 100% load. Derate 2%/°C, 50°C to 60°C.
-30~85°C
10~90% RH, no condensation.
10~90% RH, no condensation.
Built to meet ETS 300 019
Built to meet ETS 300 019
UL60950-1, EN60950-1
500Vrms, 1min.
3.7
440x44x351mm. Refer to Outline Drawing.
Two Years
Notes:
*1: The Output of all the FPS1000 modules are connected in parallel in the rack.
*2: For input voltage lower than 100Vac, maximum output power derated by 10% of the power rating.
*3: For cases where conformance to to various safety standards (UL, EN etc.) is required, to be described
as 100-240Vac (50/60Hz).
*4: Remote sensing can compensate up to 1V drop on each load wire.
*5: Not apllicable for units with I
2
C bus option.
25

CHAPTER 10 FPS-S1U RACK INSTALLATION
10.1 GENERAL
This chapter contains instructions for initial inspection, preparation for use and repackaging for shipment.
In some sections in this chapter, where the instructions for the FPS-S1U and the FPS1000 are identical,
a reference to a section describing the FPS1000 will be given.
10.2 PREPARATION FOR USE
Table 10-1 below describes the basic setup procedure. Follow the instructions in Table 10-1 in the sequence
given to prepare the FPS-S1U rack for use.
Step no Item Description Reference
1 Inspection Initial physical inspection of the power supply Section 3.3
2 Installation Installing the power supply. Section 10.4
Ensuring adequate ventilation. Section 10.5
3 AC source AC source requirements Section 3.6
4 Load connection Wire size selection. Section 10.7
Table 10-1: Basic setup procedure
10.3 INITIAL INSPECTION
Refer to Sec. 3.3 for details.
10.4 FPS-S1U RACK MOUNTING
The FPS-S1U is designed to be mounted in a 19" rack. Use a support bars or surface to provide adequate
support for the rear of the power supply. Secure the FPS-S1U to its location using the front panel using
M6x12 screws via the mounting holes at its front side (Refer to the outline drawings in Chapter 11).
Do not obstruct the air exhaust at the rear panel of the unit.
10.5 LOCATION MOUNTING AND COOLING
The FPS1000 units installed in the FPS-S1U rack are fan cooled. The air intake is at the front panel and
the exhaust is at the rear panel. Upon installation allow cooling air to reach the front panel and allow
minimum 50mm of unrestricted air space at the rear of the unit for the air exhaust.
10.6 AC SOURCE REQUIREMENTS
Refer to Sect 3.6 for details.
10.7 CONNECTING THE LOAD
WARNING
Turn off the AC input power before making or changing any rear panel connection.
Ensure that all connections are securely tightened before applying power. There is a
potential shock hazard when using a power supply with a rated output greater than 40V.
10.7.1 Load Wiring
.Refer to Sec. 3.7.1, 3.7.2 and 3.7.3 for details.
10.7.2 Inductive loads
To prevent damage to the power supply from inductive kickback, a diode should be connected across the
output. The diode voltage and current rating should be greater than the power supply maximum output
voltage and total current rating. Connect the cathode to the positive output and the anode to the negative
output. Where positive load transients such as back EMF from a motor may occur, connect a surge
suppressor across the output to protect the power supply. The breakdown voltage rating of the suppressor
must be approximately 10% higher than the maximum output voltage of the power supply.
26

10.7.3 Making the load connections
FPS-S1U Instruction Manual
!
WARNING
Hazardous voltages may exist at the outputs and the load connections
when using a power supply with a rated output greater than 40V. To
protect personnel against accidental contact with hazardous voltages,
ensure that the load and it's connections has no accessible live parts.
Ensure that the load wiring insulation rating is greater than or equal to
the maximum output voltage of the power supply.
The load wires should be properly terminated with terminals securely attached. DO NOT use unterminated
wires for load connection at the FPS-S1U.
10.7.4 Rear panel description
1
Fig. 10-1: FPS-S1U Rear panel
2 5 1
3
4
1. Mounting brackets. Use M6x12 screws to fix the FPS-S1U to the rack.
2: DB25 connector for control and monitoring signals.
3: Output voltage terminals. Use M6x16 screws and M6 lug to connect the load wire. The recommended
tightening torque is 42~56Kgf.cm.
4. DIP switch for I
2
C option address setting. Refer to Chapter 14 for details.
5. IEC320 AC inlets, shown for FPS-S1U rack. For FPS-S1U/P, there are no IEC320 inlets on the rack.
10.7.5 Control and monitoring signals connector
Pin No Function
1 V_TRIM_B Connection for output voltage trimming of FPS1000 unit "B". The voltage can be
TEMP_ALARM_B2
DC_OK_B3
TEMP_ALARM_A4
ON/OFF_A5
Description
trimmed within its range specifications.
Open collector signal, referenced to pin 11 (Signal Return). On when the internal temperature
of FPS1000 unit "B" is within safe limit, Off approx. 10°C below Thermal shut down. The
maximum sink current is 10mA and the maximum external voltage is 15V.
Open collector signal, referenced to pin 11 (Signal Return). On when the output voltage
of FPS1000 unit "B" is higher than ≥ 80%+/-5%. The maximum sink current: 10mA
and the maximum external voltage is 15V.
Open collector signal, referenced to pin 11 (Signal Return). On when the internal temperature
of FPS1000 unit "A" is within safe limit, Off approx. 10°C below Thermal shut down. The
maximum sink current is 10mA and the maximum external voltage is 15V.
Turns the output of FPS1000 unit "A" to On and Off by electrical signal or dry contact
between pin 5 and pin 11 (Signal Return). 0~0.6V or Short: On, 2~15V or Open:
Off. The maximum source current is 2.6mA.
DC_OK_A6
V_TRIM_A7
+12V_AUX8
Open collector signal, referenced to pin 11 (Signal Return). On when the output
voltage of FPS1000 unit "A" is higher than V
current: 10mA and the maximum external voltage is 15V.
Connection for output voltage trimming of FPS1000 unit "A". The voltage can be
trimmed within its range specifications.
Auxiliary voltage output, 11.2~12.5V, referenced to pin 11 (Signal Return). The
maximum load current is 0.25A. This output has built in Oring diode and is not controlled
by the On/Off control.
out ≥ 80%+/-5%. The maximum sink
27

10.7.5 Control and monitoring signals connector
CS9
V_TRIM_C10
SIGNAL_RETURN11
DC_OK_C12
+SENSE13
AC_FAIL_B14
ON/OFF_B15
AC_FAIL_A16
17 NC
18 NC
19 NC
SCL (I2C)20
SDA (I2C)21
-SENSE22
TEMP_ALARM_C23
AC_FAIL_C24
ON/OFF_C25
Current sharing signal. When FPS-S1U racks are connected in parallel, the CS pins
of the units should be connected to allow current balance between units.
Connection for output voltage trimming of FPS1000 unit "C". The voltage can be
trimmed within its range specifications.
Return for the following control and supervisory signals: On/Off, DC_OK,
Over_temperature Alarm, AC_Fail, Auxiliary 12V supply. The Signal return is isolated
from the output terminals.
Open collector signal, referenced to pin 11 (Signal Return). On when the output voltage
of FPS1000 unit "C” is higher than ≥ 80%+/-5%. The maximum sink current: 10mA
and the maximum external voltage is 15V.
Positive sensing. The +Sense signal should be connected to the positive terminal of
the load. The +Sense and -Sense leads should be twisted pair to minimize noise pickup effect. The maximum load wires drop compensation is 1V/wire.
Open collector signal, referenced to pin 11 (Signal Return). On when the input voltage
of FPS1000 unit "B" is ≥85Vrms. The maximum sink current is 10mA, and the maximum
external voltage is 15Vdc.
Turns the output of FPS1000 unit "B" to On and Off by electrical signal or dry contact
between pin 15 and pin 11 (Signal Return). 0~0.6V or Short: On, 2~15V or Open:
Off. The maximum source current is 2.6mA.
Open collector signal, referenced to pin 11 (Signal Return). On when the input voltage
of FPS1000 unit "A" is ≥85Vrms. The maximum sink current is 10mA, and the maximum
external voltage is 15Vdc.
Not connected
Not connected
Not connected
Serial Clock used in the I
2
C interface option. Refer to the I2C interface description in
the Chapter 7 in this Instruction Manual.
2
Serial Data used in the I
C interface option. Refer to the I2C interface description in
the Chapter 7 in this Instruction Manual.
Negative sensing. The -Sense signal should be connected to the negative terminal
of the load. The -Sense and +Sense leads should be twisted pair to minimize noise
pick-up effect. The maximum load wires drop compensation is 1V/wire.
Open collector signal, referenced to pin 11 (Signal Return). On when the internal temperature
of FPS1000 unit "C" is within safe limit, Off approx 10°C below Thermal shut down. The
maximum sink current is 10mA and the maximum external voltage is 15V.
Open collector signal, referenced to pin 11 (Signal Return). On when the input voltage
of FPS1000 unit "C" is ≥85Vrms. The maximum sink current is 10mA, and the maximum
external voltage is 15Vdc.
Turns the output of FPS1000 unit "C" to On and Off by electrical signal or dry contact
between pin 25 and pin 11 (Signal Return). 0~0.6V or Short: On, 2~15V or Open: Off.
The maximum source current is 2.6mA.
28

FPS-S1U Instruction Manual
10.7.6 Modules location
Up to three FPS1000 modules of the same output voltage rating can be plugged into an FPS-S1U rack.
Refer to Fig 10-2 for the modules location.
PS MODULE “A”
PS MODULE “B”
Air flow direction
Front side
see note 1
PS MODULE “C”
Fig 10-2: FPS1000 modules location
Note 1: Forced air cooling allow minimum 50mm of unrestricted air space at the rear of the unit. Do not
obsruct air flow to the unit front panel.
10.7.7 Blank panels
Each FPS-S1U rack is supplied with two blank panels in the package. Use the blank panels to close the
front panel opening in places where FPS1000 power supplies are not installed. Use M3x6 screws to fix
the blank panel to the chassis. Refer to the outline drawings in chapter 11 for details.
10.7.8 Repackaging for shipment
Refer to Sec. 3.7.8 for details.
29

CHAPTER 11 FPS-S1U AND FPS-S1U/P OUTLINE DRAWINGS
11.1 FPS-S1U Outline Drawing
30

11.2 FPS-S1U/P Outline Drawing
FPS-S1U Instruction Manual
31

CHAPTER 12 BASIC CONNECTIONS FOR OPERATION FPS-S1U RACK
12.1 Connecting single load, Local sensing
Local sensing is suitable for applications where load regulation is not critical. Fig 12-1 shows recommended
load and sensing connections for applications with a single load.
FPS-S1U
SIGNAL
RTN
ON/
OFF
A
ON/
OFF
B
ON/
OFF
C
+V
+S
13
22
-S
-V
2515511
+V
LOAD
-V
Fig 12-1: single load connection, local sensing
In Local sense applications, the +/- sense have to be connected to the
*
+/-V terminals of the FPS-S1U prior to operating the FPS1000 units plugged in.
12.2 Connecting Single Load, Remote Sensing
Remote sensing is used in cases where the load regulation is important at the load terminals. Use twisted
or shielded wires to minimize noise pick-up. If shielded wires are used, the shield should be connected
to the ground at one point, either the power supply side or the load. The optimal point for the shield ground
should be determined by experimentation. Refer to the power supply specifications for the maximum
voltage drop allowed at the load wires.
Load line. Up to 1V drop.
+V
LOAD
-V
FPS-S1U
SIGNAL
RET
ON/
OFF
A
511
ON/
OFF
B
ON/
OFF
C
15 25
+V
+S
13
22
-S
-V
Sense lines
Twisted pairs
*
Load line.
Up to 1V drop.
Fig 12-2: Remote sensing, single load.
12.3 Multiple loads connection
If remotely located output distribution terminals are used, the power supply output terminals should be
connected to the distribution terminals by a pair of twisted or shielded wires. Each load should be separately
connected to the remote distribution terminals (see Fig 12-3). If remote sensing is required, the sensing
wires should be connected to the distribution terminals or at the most critical load.
+V
+
-
+
-
+
LOAD # 1
LOAD # 2
LOAD # 3
FPS-S1U
SIGNAL
RET
ON/
OFF
A
511
ON/
OFF
B
15 25
ON/
OFF
C
+V
+S
13
22
-S
-V
-V
-
Fig 12-3: Multiple loads connection with distribution terminal
32

FPS-S1U Instruction Manual
12.4 On/Off control
Fig 12-4 shows typical connection for individual On/Off control of each installed FPS1000 unit. The On/Off
control signal is applied to the DB25 connector located at the rear panel (refer to sec. 10.7.5).
When it is desired to control all the installed units simultaneously, it is possible to connect the On/Off control
as shown in Fig 12-5.
FPS-S1U
ON/OFF_A
ON/OFF_B
ON/OFF_C
SIGNAL_RET
15
25
11
5
ON/
OFF
UNIT
‘C’
ON/
OFF
UNIT
‘B’
ON/
OFF
UNIT
‘A’
FPS-S1U
ON/OFF_A
ON/OFF_B
ON/OFF_C
SIGNAL_RET
15
25
11
5
ON/
OFF
Fig 12-4: Individual On/Off control Fig 12-5: Single On/Off control
12.5 Output voltage trimming
Refer to Fig 12-6 for output voltage trimming typical application.
+V
FPS-S1U
V_TRIM_A
V_TRIM_B
V_TRIM_C
+S
13
7
1
10
22
-S
-V
Fig 12-6: Output voltage trimming
R1
R2
FPS-S1U with FPS1000-12 installed:
R2=0.0324*V
R1(K
Ω)=5(KΩ)-R2(KΩ)
FPS-S1U with FPS1000-24 installed:
R2=0.0785*V
R1(K
Ω)=20(KΩ)-R2(KΩ)
FPS-S1U with FPS1000-32 installed:
R2=0.0463*V
R1(K
Ω)=20(KΩ)-R2(KΩΩ)
FPS-S1U with FPS1000-48 installed:
R2=0.0497*V
R1(K
Ω)=50(KΩ)-R2(KΩ)
2
out -1.1298*Vout+9.9342
2
out -5.819*Vout+105.132
2
out -4.5805*Vout+109.49
2
out-7.2795*Vout+259.04
12.6 Supervisory signals
Supervisory signals are accessible at the J1-DB25 female connector on the rear panel of the rack.
Fig 12-7 shows a typical connection for FPS1000 unit "A" inside the rack.
Units "B" and "C" connections - Reffer to sec 10.7.5.
FPS-S1U
FPS-1000
Module A
FPS-1000 Module B
FPS-1000 Module C
Note: AC_FAIL, DC_OK and TEMP.ALARM are open collector signals.
12V AUX
AC_FAIL_A
DC_OK_A
TEMP.ALARM_A
SIGNAL RET
(J1)
8
16
6
4
11
10K
10K 10K
Application
Monitoring
and Control
circuts
Fig 12-7: Supervisory signals
12.7 Grounding outputs
Either the positive or negative output terminals can be grounded. To avoid noise problems caused by
common-mode current flowing from the load to ground, it is recommended to ground the output terminal
as close as possible to the power supply's output. Always use two wires to connect the load to the power
supply regardless of how the system is grounded.
33

CHAPTER 13 PARALLEL AND SERIES OPERATION
13.1 Parallel operation
Up to 3 FPS-S1U racks with up to 8 FPS1000 installed units of the same output voltage rating can be connected
in parallel. The built-in Oring diodes on the main output and on the +12V auxiliary voltage in each FPS1000 unit
allow N+1 operation. By connecting the CS signal between the paralleled units, automatic current balance is achieved,
with +/-10% accuracy. For input voltages less than 100Vac, maximum output Power derated by 10% of the Power
rating. Refer to Fig 13-1 for output Power derating in parallel operation.
% of rated Power
100
90
Input voltage
85
100
Fig 13-1: Output Power derating at parallel operation
265
(Vrms)
13.1.1 Parallel operation with Remote sensing
Fig13-2 shows typical connection of parallel operation with Remote sensing. The CS signal wires should be as short
aspossible and with the same length.
ON/
OFF
B
ON/
OFF
B
ON/
OFF
B
ON/
OFF
C
ON/
OFF
ON/
OFF
C
+V
+S
-S
-V
+S
-S
+S
+V
+S
-S
C
-V
+S
-S
+V
LOAD
-V
-S
+V
+S
-S
-V
+S
-S
FPS-S1U #1
ON/
SIG.
OFF
RTN
9CS11
515 25
FPS-S1U #2
ON/
SIG.
OFF
RTN
9CS11
515 25
FPS-S1U #3
ON/
SIG.
OFF
RTN
9CS11
515 25
A
A
A
Fig 13-2: Parallel operation with Remote sensing
34

FPS-S1U Instruction Manual
13.1.2 Output voltage trimming at parallel operation
The output voltage of the units connected in parallel can be made by a single trimmer or resistive divider.
FPS-S1U # 1
SIG.
RTN
CS
9
11
FPS-S1U # 2
SIG.
RTN
CS
FPS-S1U # 3
CS
9
119119
SIG.
RTN
11
V_TRIM
A, B, C
ON/
ON/
OFF
OFF
ABC
25155
V_TRIM
A, B, C
ON/
ON/
OFF
OFF
ABC
25155
V_TRIM
A, B, C
ON/
ON/
OFF
OFF
ABC
25155
ON/
OFF
ON/
OFF
ON/
OFF
+S
+S
+S
-S
-S
-S
10
10
10
7
1
7
1
7
1
V_TRIM
V_TRIM
V_TRIM
+V
-V
V_TRIM
V_TRIM
+S
R1
R2
-S
FPS-S1U with FPS1000-12 installed:
R2=0.0324*V
R1(K
Ω)=5(KΩ)-R2(KΩ)
FPS-S1U with FPS1000-24 installed:
R2=0.0785*V
Ω)=20(KΩ)-R2(KΩ)
R1(K
FPS-S1U with FPS1000-32 installed:
R2=0.0463*V
R1(K
Ω)=20(KΩ)-R2(KΩΩ)
FPS-S1U with FPS1000-48 installed:
R2=0.0497*V
R1(K
Ω)=50(KΩ)-R2(KΩ)
2
out -1.1298*Vout+9.9342
2
out -5.819*Vout+105.132
2
out -4.5805*Vout+109.49
2
out-7.2795*Vout+259.04
Fig 13-3: Output voltage trimming at parallel operation
13.1.3 Signal Return bus at parallel operation
The Signal Return of each paralleled FPS-S1U rack can be connected together to form a common Signal Return
bus. By this way, the control and monitoring signals of the paralleled racks can be connected to the same control
and monitoring circuitry. The Signal Return bus can be connected to the -V or -S or +V or -S or float. Fig 13-4 shows
typical connection of the Signal Return at parallel operation.
FPS-S1U #1
OVER-TEMP
FPS-S1U #2
OVER-TEMP
FPS-S1U #3
OVER-TEMP
AC_FAIL
DC_OK
ALARM
SIG.
RETURN
AC_FAIL
DC_OK
ALARM
SIG.
RETURN
AC_FAIL
DC_OK
ALARM
SIG.
RETURN
11
11
11
CONTROL AND
MONITORING CIRCUITS
FPS-S1U #1 SIGNALS
FPS-S1U #2 SIGNALS
FPS-S1U #3 SIGNALS
SIGNALS RETURN
Fig 13-4: Signal Return connection at parallel operation
35

13.1.4 Remote On/Off control at parallel operation
The paralleled racks can be turned On or Off via a single On/Off control. Refer to Fig 13-5 for typical application.
The Signal Return function of all the paralleled racks should be connected together to create a common Signal
Return bus. The Signal Return bus may be connected to the -V or the +V potential or floated. In any case do not
connect the Signal Return bus to different potentials.
ON/OFF
FPS-S1U #1
FPS-S1U #2
A, B, C
SIG.
RETURN
ON/OFF
A, B, C
SIG.
RETURN
5, 15, 25
11
2.6 mA / Installed unit
5, 15, 25
11
2.6 mA / Installed unit
ON OFF
5, 15, 25
2.6 mA / Installed unit
11
FPS-S1U #3
ON/OFF
A, B, C
SIG.
RETURN
Fig 13-5: Remote On/Off control at parallel operation
13.2 Series operation
Two FPS-S1U racks with the same output voltage rating can be connected in series to increase the output voltage
or to create a bipolar voltage source. It is recommended to connect diodes in parallel with each output to prevent
reverse voltage in case of failure in one of the power supplies.
Each diode should be rated to at least the power supply rated output voltage and output current.
Refer to Fig 13-6 and 13-7 for a typical series connection of power supplies.
CAUTION
Series operation is not applicable for units with I2C bus option.
ON/
OFF
C
ON/
OFF
C
+S
+V
(*)
-V
-S
+S
+V
(*)
-V
-S
(*) Diodes are user supplied
+S
+V
LOAD
-V
-S
FPS-S1U #1
ON/
ON/
11
SIG.
RTN
OFF
OFF
A
515 25
FPS-S1U #2
ON/
ON/
11
SIG.
RTN
OFF
OFF
A
515 25
B
B
Fig 13-6: Series connection for increased output voltage
FPS-S1U #1
ON/
SIG.
OFF
RTN
A
11
515 25
FPS-S1U #2
ON/
SIG.
OFF
RTN
A
11
515 25
ON/
OFF
ON/
OFF
+S
+V
ON/
-V
OFF
-S
C
B
(*)
+V
COMMON
+S
+V
ON/
-V
OFF
C
B
-S
(*)
-V
(*) Diodes are user supplied
Fig 13-7: Series connection for Bipolar output voltage
LOAD
36

CHAPTER 14 FPS-S1U I2C BUS INTERFACE OPTION
FPS-S1U Instruction Manual
14.1 Introduction
2
The FPS-S1U rack provides access to the I
C Bus interface in each installed FPS1000/S unit via the rear
panel DB25 female connector located at the rear panel. The Clock is connected to pin 20 and the Data
is connected to pin 21. The specifications of the I
2
C of the FPS1000/S power supplies are kept when they
are installed in the FPS-S1U rack. Refer to Chapter 7 for the specifications and all operating details.
14.2 Addressing (A0, A1, A2).
2
The rear panel 9 positions DIP switch is used to select the I
unit inside the rack. Each unit should have its own I
2
C address to communicate over the I2C bus.
C bus address for the individual FPS1000/S
Each address is made of three DIP switch positions, thus a single power supply in the FPS-S1U can be
addressed with one of 8 different addresses.
Refer to Fig 14-1 for the description of the DIP switch setting. The DIP switch down position is logic level
"1" and the up position is logic level "0".
ON
1 2345678 9
Module C Module B Module A
OFF
Fig 14-1: Address setting DIP switch (rear panel view)
CAUTION
2
The I
C bus address lines, serial clock and data are
referenced to the -Sense potential. When using series
connection of FPS-S1U racks, do not connect the
2
I
C lines of the units together.
37

CHAPTER 15 FPS-S1U MAINTENANCE
15.1 Introduction
This chapter contains information about maintenance, calibration and troubleshooting of the FPS-S1U
rack.
15.2 Units under warranty
Units requiring repairs during the warranty period should be returned to Densei-Lambda authorized service
office. Unauthorized repairs performed by other than the authorized service facilities may void the warranty.
15.3 Periodic maintenance
No routine maintenance of the FPS-S1U rack is required except for periodic cleaning. To clean, disconnect
the unit from the AC supply and allow 30sec. for discharging internal voltage. The FPS-S1U should be
cleaned using mild solution of detergent and water. The solution should be applied onto a soft cloth, and
not directly to the surface of the unit. Do not use aromatic hydrocarbons or chlorinated solvents for cleaning.
Use low pressure compressed air to blow dust from the unit.
15.4 Adjustments and Calibration
No internal adjustment or calibration are required. Units that are returned for repair will be calibrated at
the service office In any case ,opening the cover is not allowed.
15.5 Parts replacement and repair
As repairs are made only by the manufacturer or by its authorized service offices, no parts replacement
information is given in this manual. In case of failure, unusual or erratic operation of the unit, contact your
nearest Densei-Lambda sales and service office.
38

FPS-T1U 19” Rack Triple Output
39

CHAPTER 16 FPS-T1U RACK SPECIFICATIONS
1
Number of power supply modules (*1)
2
Maximum output power (*2)
3
Input voltage / frequency range (*3)
4
Maximum input current (at 100/200Vac)
5
AC input connector
6
Output terminals
7
Remote sensing (*4)
8
Parallel operation
9
Series operation (*5)
10
Remote On/Off control (*6)
11
DC_OK signal
12
AC fail signal
13
Over Temperature alarm signal
14
Vout voltage trimming
15
Auxiliary power supply
16
Operating temperature
17
Storage temperature
18
Operating humidity
19
Storage humidity
20
Vibration
21
Shock
22
Applicable safety standards
23
Withstand voltage
24
Insulation resistance
25
Weight (Typ)
26
Size (W*H*D)
27
Warranty
---
W
---
A
---
---
V
---
---
---
---
---
---
---
---
---
---
---
---
---
---
---
---
---
Kg
---
Yr
FPS-T1U :IEC inlet for each power supply module . FPS-T1U/P :None
Possible. Up to 3 racks with max 8FPS 1000 units of the same voltage and current rating.
Possible. Up to 3x FPS1000 units of the same voltage and current rating
Separate control for each FPS 1000 unit , By electrical signal or dry contact
On/Off logic is user selectable. Refer to instruction manual.
Separate control for each FPS1000 unit, Open collector signal.
Separate control for each FPS1000 unit ,Open collector signal.
Separate control for each FPS1000 unit ,Open collector signal.
Possible, via separate control for each FPS1000 unit .Refer to Instruction Manual.
11.2~12.5VDC.Maximum output current:0.25A, for each FPS1000 unit.
Input-Output: 3000Vrms, 1min. Input-Ground: 2000Vrms, 1min. Output-Ground:
More than 100Mohm at 25°C and 70% RH. Output-Ground: 500Vdc
Maximum 3 x FPS1000 modules.
3000
85~265Vac continuous, 47~63Hz, Single phase
12.0/6.0 for each FPS1000 unit installed
Bus-bars.Refer to outline drawing.
Possible.
On when Vout >80% +/-5%. Max.sink current: 10mA
Refer to Instruction Manual
Refer to Instruction Manual
0~50°C: 100% load. Derate 2%/°C, 50°C to 60°C.
-30~85°C
10~90% RH, no condensation.
10~95% RH, no condensation.
Built to meet ETS 300 019
Built to meet ETS 300 019
UL60950-1, EN60950-1
1414Vdc, 1min.
3.7
440x44x351mm. Refer to Outline Drawing.
Two Years
Notes:
*1: The Output of all the FPS1000 modules are floating in the rack.
*2: For input voltage lower than 100Vac, maximum output power derated by 10% of the power rating.
*3: For cases where conformance to to various safety standards (UL, EN etc.) is required, to be described
as 100-240Vac (50/60Hz).
*4: Remote sensing can compensate up to 1V drop on each load wire.
*5: Not apllicable for units with I
*6: Factory default: ON/OFF_1 P.S. is On when AC is applied.
2
C bus option.
40

FPS-T1U Instruction Manual
CHAPTER 17 FPS-T1U RACK INSTALLATION
17.1 GENERAL
This chapter contains instructions for initial inspection, preparation for use and repackaging for shipment.
In some sections in this chapter, where the instructions for the FPS-T1U and the FPS1000 are identical,
a reference to a section describing the FPS1000 will be given.
17.2 PREPARATION FOR USE
Table 10-1 below describes the basic setup procedure. Follow the instructions in Table 17-1 in the sequence
given to prepare the FPS-T1U rack for use.
Step no Item Description Reference
1 Inspection Initial physical inspection of the power supply Section 3.3
2 Installation Installing the power supply. Section 10.4
Ensuring adequate ventilation. Section 10.5
3 AC source AC source requirements Section 3.6
4 Load connection Wire size selection. Section 10.7
Table 17-1: Basic setup procedure
17.3 INITIAL INSPECTION
Refer to Sec. 3.3 for details.
17.4 FPS-T1U RACK MOUNTING
The FPS-T1U is designed to be mounted in a 19" rack. Use a support bars or surface to provide adequate
support for the rear of the power supply. Secure the FPS-T1U to its location using the front panel using
M6x12 screws via the mounting holes at its front side (Refer to the outline drawings in Chapter 18).
Do not obstruct the air exhaust at the rear panel of the unit.
17.5 LOCATION MOUNTING AND COOLING
The FPS1000 units installed in the FPS-T1U rack are fan cooled. The air intake is at the front panel and
the exhaust is at the rear panel. Upon installation allow cooling air to reach the front panel and allow
minimum 50mm of unrestricted air space at the rear of the unit for the air exhaust.
17.6 AC SOURCE REQUIREMENTS
Refer to Sect 3.6 for details.
17.7 CONNECTING THE LOAD
WARNING
Turn off the AC input power before making or changing any rear panel connection.
Ensure that all connections are securely tightened before applying power. There is a
potential shock hazard when using a power supply with a rated output greater than 40V.
17.7.1 Load Wiring
Refer to Sec. 3.7.1, 3.7.2 and 3.7.3 for details.
17.7.2 Inductive loads
To prevent damage to the power supply from inductive kickback, a diode should be connected across the
output. The diode voltage and current rating should be greater than the power supply maximum output
voltage and total current rating. Connect the cathode to the positive output and the anode to the negative
output. Where positive load transients such as back EMF from a motor may occur, connect a surge
suppressor across the output to protect the power supply. The breakdown voltage rating of the suppressor
must be approximately 10% higher than the maximum output voltage of the power supply.
41

17.7.3 Making the load connections
!
WARNING
Hazardous voltages may exist at the outputs and the load connections
when using a power supply with a rated output greater than 40V. To
protect personnel against accidental contact with hazardous voltages,
ensure that the load and it's connections has no accessible live parts.
Ensure that the load wiring insulation rating is greater than or equal to
the maximum output voltage of the power supply.
The load wires should be properly terminated with terminals securely attached. DO NOT use unterminated
wires for load connection at the FPS-T1U.
17.7.4 Rear panel description
1
2 3 5
Module C Module B Module A
4
1
Fig. 17-1: FPS-T1U Rear panel
1. Mounting brackets. Use M6x12 screws to fix the FPS-T1U to the rack.
2. Output voltage terminals rugged busbars. Use M5x12 screws for load wires recommended
Tightening torque 24~31 Kgf.cm.
3. Micro-Fit 3.0
TM
Dual Row Right Angle 16pins (Molex) connector for control and monitoring signals.
4. Ground stud M4 (three place).
5. IEC320 AC inlet ,shown for FPS-T1U. For FPS-T1U/P there are no IEC320 inlets on the rack.
42

FPS-T1U Instruction Manual
17.7.5 Rear Panel In/Out Connector Pins Function Description J1(A), J2(B), J3(C)
Pin No Function Description
1 SDA (I
2
C)
Serial Data used in the I
FPS1000 Instruction Manual.
2
C interface option. Refer to the I2C interface description in the
2
2 SCL (I
C)
3 SIGNAL_RETURN
ON/OFF_2 (*1)
4
5 DC_OK
6 V_TRIM
7 -SENSE
8 +SENSE
9 +12V_AUX
Serial Clock used in the I
2
C interface option. Refer to the I2C interface description in the
FPS1000 Instruction Manual.
Return for the following control and supervisory signals: On/Off, DC_OK, Over_temperature
Alarm, AC_Fail, Auxiliary 12V supply. The Signal return is isolated from the output terminals.
On/Off control. To use this input, pin#12 and pin#13 must be shorted together.
Short between On/Off_2 to pin#3: Off. Open On/Off_2: On.
The maximum source current is 1.2mA
Open collector signal, referenced to pin 3 (Signal Return). On when the output
voltage of FPS1000 unit is higher than Vout ≥ 80% +/-5%. The maximum sink current:
10mA and the maximum external voltage is 15V.
Connection for output voltage trimming of FPS1000 unit. The voltage can be trimmed within
its range specifications.
Negative sensing. The -Sense signal should be connected to the negative terminal of the load.
The -Sense and +Sense leads should be twisted pair to minimize noise pick-up effect. The
maximum load wires drop compensation is 1V/wire.
Positive sensing. The +Sense signal should be connected to the positive terminal of the load.
The +Sense and -Sense leads should be twisted pair to minimize noise pick-up effect. The
maximum load wires drop compensation is 1V/wire.
Auxiliary voltage output, 11.2~12.5V, referenced to pin 3 (Signal Return). The maximum
load current is 0.25A. This output is not controlled by the On/Off control.
10 CS
Current sharing signal. When FPS1000 units are connected in parallel, the CS pins of the
units should be connected to allow current balance between units.
Open collector signal, referenced to pin 3 (Signal Return). On when the input voltage of
11 AC_FAIL
FPS1000 unit is ≥85Vrms. The maximum sink current is 10mA, and the maximum external
voltage is 15Vdc.
Turns the output of FPS1000 unit to On and Off by electrical signal or dry contact between
12 ON/OFF_1 (*1)
pin 12 and pin 3 (Signal Return). 0~0.6V or Short: On, 2~15V or Open: Off.
The maximum sink current is 2.6 mA (when using pin#12, it should be disconected from pin#13).
Input used to select the On/Off control logic.
Short this input to pin#12 when using On/Off_2 as On/Off control.
Leave this input open when using On/Off_1 as On/Off control.
13
ON/OFF LOGIC
SELECT
Open collector signal, referenced to pin 3 (Signal Return). On when the internal temperature
14 TEMP_ALARM
of FPS1000 unit is within safe limit, Off approx. 10°C below Thermal shut down. The maximum
sink current is 10mA and the maximum external voltage is 15V.
15
16
- LOCAL SENSE
+ LOCAL SENSE
When working in local sense mode, connect -Local Sense to -Sense (pin#7).
When working in Remote sense mode, this input should be open.
When working in local sense mode, connect +Local Sense to +Sense (pin#8).
When working in Remote sense mode, this input should be open.
Rear In/Out connector pins function description (J1), (J2), (J3)
Note:
*1: On/Off_1 and On/Off_2 are reversed logic inputs.
J1(A), J2(B), J3(C) CONECTOR DESCRIPTION
MALE HEADER: P/N-43045-1600 (MOLEX)
FEMALE HOUSING (PLUG): P/N-43025-1600 (MOLEX)
FEMALE TERMINAL: P/N-43030 (MOLEX)
CONNECTOR PINOUT (REAR PANEL VIEW)
16 9
18
43

17.7.6 Modules location
Up to three FPS1000 modules can be plugged into an FPS-T1U rack.
Refer to Fig 17-2 for the modules location.
PS MODULE “A”
PS MODULE “B”
Air flow direction
Front side
see note 1
PS MODULE “C”
Fig 17-2: FPS1000 modules location
Note 1: Forced air cooling allow minimum 50mm of unrestricted air space at the rear of the unit. Do not
obsruct air flow to the unit front panel.
17.7.7 Blank panels
Each FPS-T1U rack is supplied with two blank panels in the package. Use the blank panels to close the
front panel opening in places where FPS1000 power supplies are not installed. Use M3x6 screws to fix
the blank panel to the chassis. Refer to the outline drawings in chapter 18 for details.
17.7.8 Repackaging for shipment
Refer to Sec. 3.7.8 for details.
44

FPS-T1U Instruction Manual
CHAPTER 18 FPS-T1U AND FPS-T1U/P OUTLINE DRAWINGS
18.1 FPS-T1U Outline Drawing
45

18.2 FPS-T1U/P Outline Drawing
11.1 FPS-T1U Outline Drawing
46

FPS-T1U Instruction Manual
CHAPTER 19 BASIC CONNECTIONS FOR OPERATION FPS-T1U RACK
19.1 Connecting Single Load, Remote Sensing
Remote sensing is used in cases where the load regulation is important at the load terminals. Use twisted
or shielded wires to minimize noise pick-up. If shielded wires are used, the shield should be connected
to the ground at one point, either the power supply side or the load. The optimal point for the shield ground
should be determined by experimentation. Refer to the power supply specifications for the maximum
voltage drop allowed at the load wires.
Load line. Up to 1V drop.
FPS-T1U
FPS-1000 Module A
FPS-1000 Module B
FPS-1000 Module C
ON/
OFF_1
A
J1(A)-3
ON/
OFF_1
B
J2(B)-3
J1(A)-12
J2(B)-12
ON/
OFF_1
C
J3(C)-3
J3(C)-12
+V
+S
+V
+S
+V
+S
-S
-V
-S
-V
-S
-V
J1-8
J1-7
J2-8
J2-7
J3-8
J3-7
Sense lines
Twisted pairs
Load line.
Up to 1V drop.
+V
LOAD
-V
+V
LOAD
-V
+V
LOAD
-V
Fig 19-1: Remote sensing, three load.
In Local sense applications, the +/- sense have to be connected to the
*
+/-Local Sense terminals of the FPS-T1U prior to operating the FPS1000 units plugged in.
19.2 On/Off control
Fig 19-2 and Fig 19.3 shows typical connection for individual On/Off control of each installed FPS1000 unit.
ON/OFF Control_1 ON/OFF Control_2
FPS-T1U
FPS-1000 Module A
FPS-1000 Module B
J1(A)-12
ON OFF
J1(A)-3
J2(B)-12
ON OFF
J2(B)-3
J3(C)-12
FPS-T1U
FPS-1000 Module A
FPS-1000 Module B
FPS-1000 Module C
J1(A)-4
OFF ON
J1(A)-3
J2(B)-4
OFF ON
J2(B)-3
J3(C)-4
FPS-1000 Module C
Connection for negative logic:
Closed: On Open: Off
Factory default: ON/OFF Control_1
ON OFF
J3(C)-3
Fig 19-2
47
ON/
ON/
OFF1
OFF
SLCT
J1(A)-13
J1(A)-12
A
ON/
ON/
OFF
OFF1
SLCT
J2(B)-12
J2(B)-13
B
ON/
ON/
OFF1
OFF
SLCT
J3(C)-13
J3(C)-12
Connection for positive logic:
Closed: Off Open: On
C
OFF ON
J3(C)-3
Fig 19-3

19.3 Output Voltag Trimming
Fig 19-4 shows typical output voltage trimming connection for FPS1000 unit ‘A’ inside the rack
Units ‘B’ and ‘C’ connections - Refer to 17.7.5
FPS-T1U
FPS1000
Module A
FPS-1000 Module B
FPS-1000 Module C
+S
V_TRIM
-S
J1(A)
J1(A)-8
J1(A)-6
J1(A)-7
J2(B)
J3(C)
R1
R2
R1&R2:0.5W
FPS1000-12:
R2=0.0324*V
Ω)=5(KΩ)-R2(KΩ)
R1(K
FPS1000-24:
R2=0.0785*V
R1(K
Ω)=20(KΩ)-R2(KΩ)
FPS1000-32:
R2=0.0463*V
R1(K
Ω)=20(KΩ)-R2(KΩΩ)
FPS1000-48:
R2=0.0497*V
R1(K
Ω)=50(KΩ)-R2(KΩ)
2
out -1.1298*Vout+9.9342
2
out -5.819*Vout+105.132
2
out -4.5805*Vout+109.49
2
out-7.2795*Vout+259.04
Fig 19-4 Output Voltag Trimming
19.4 Supervisory Signals
Signals are accessible at the J1(A), J2(B), J3(C) connectors on the rear panel of the rack
Fig 19-5 shows typical connection for FPS1000 unit ‘A’. inside the rack
Units ‘B’ and ‘C’. connections - Refer to 17.7.5
FPS-T1U
FPS1000
Module A
FPS-1000 Module B
FPS-1000 Module C
AC_FAIL_A
DC_OK_A
TEMP.ALARM_A
SIGNAL RET
12V AUX
J1(A)
9
11
5
14
3
J2(B)
J3(C)
10K
10K 10K
Application
Monitoring
and Control
circuits
Fig 19-5 Supervisory Signals
Note: AC_FAIL, DC_OK and TEMP.ALARM are open collector signals
19.5 Grounding outputs
Either the positive or negative output terminals can be grounded. To avoid noise problems caused by
common-mode current flowing from the load to ground, it is recommended to ground the output terminal
as close as possible to the power supply's output. Always use two wires to connect the load to the power
supply regardless of how the system is grounded.
48

FPS-T1U Instruction Manual
CHAPTER 20 PARALLEL AND SERIES OPERATION
20.1 Parallel operation
Up to 3 x FPS-T1U racks with up to 8 x FPS1000 installed units of the same output voltage rating can be connected
in parallel. The built-in Oring diodes on the main output and on the +12V auxiliary voltage in each FPS1000 unit
allow N+1 operation. By connecting the CS signal between the paralleled units, automatic current balance is achieved,
with +/-10% accuracy. For input voltages less than 100Vac, maximum output Power derated by 10% of the Power
rating. Refer to Fig 20-1 for output Power derating in parallel operation.
% of rated Power
100
90
Input voltage
Fig 20-1
85
100
265
(Vrms)
20.1.1 Parallel operation with Remote sensing
Fig 20-2 shows typical connection of parallel operation with Remote sensing. The CS signal wires should be as short
aspossible and with the same length.
ON/
C
+V
+S
-S
-V
+V
+S
-S
-V
+V
+S
-S
-V
+S
-S
+S
-S
+S
-S
+S
+V
LOAD
-V
-S
FPS-T1U
FPS-1000 Module A
CS
FPS-1000 Module B
CS
J1(C)-10 J1(B)-10 J1(A)-10
FPS-1000 Module C
CS
ON/
OFF_1
A
ON/
OFF_1
B
OFF_1
J1(A)-3
J1(A)-12
J2(B)-3
J3(C)-3
J2(B)-12
J3(C)-12
Fig 20-2 Parallel operation with Remote sensing
49

20.2 Series operation
Up to three FPS1000 with the same output voltage rating can be connected in series to increase the output voltage
or to create a bipolar voltage source. It is recommended to connect diodes in parallel with each output to prevent
reverse voltage in case of failure in one of the power supplies.
Each diode should be rated to at least the power supply rated output voltage and output current.
Refer to Fig 20-3 for a typical series connection of power supplies.
CAUTION
Series operation is not applicable for units with I2C bus option.
FPS-T1U
FPS-1000 Module A
FPS-1000 Module B
FPS-1000 Module C
ON/
OFF_1
A
J1(A)-3
J1(A)-12
ON/
OFF_1
B
J2(B)-3
ON/
OFF_1
J3(C)-3
J2(B)-12
C
J3(C)-12
Fig 20-3 Series operation
+S
+V
-V
-S
+S
+V
-V
-S
+S
+V
-V
-S
(*)
(*)
(*)
+S
+V
LOAD
-V
-S
(*) Diodes are user supplied
50

CHAPTER 21 FPS-T1U I2C BUS INTERFACE OPTION
FPS-T1U Instruction Manual
21.1 Introduction
The FPS-T1U rack provides access to the I
panel MOLEX female connector located at the rear panel. The Clock is connected to pin 2 and the Data
is connected to pin 1. The specifications of the I
are installed in the FPS-T1U rack. Refer to Chapter 7 for the specifications and all operating details.
21.2 Addressing (A0, A1, A2).
The address line of the FPS1000/S units installed in the FPS-T1U rack are internally fixed
Refer to the following table for detailes:
A0
Module “A”
Module “B”
Module “C”
Note: Address are applicable when modules FPS1000/S (I2C option) are used
1
0
1
A1
1
1
0
2
C Bus interface in each installed FPS1000/S unit via the rear
2
C of the FPS1000/S power supplies are kept when they
A2
1
1
1
CAUTION
2
C bus address lines, serial clock and data are
The I
referenced to the -Sense potential. When using series
connection of FPS-T1U racks, do not connect the
2
I
C lines of the units together.
51

CHAPTER 22 FPS-T1U MAINTENANCE
22.1 Introduction
This chapter contains information about maintenance, calibration and troubleshooting of the FPS-T1U
rack.
22.2 Units under warranty
Units requiring repairs during the warranty period should be returned to Densei-Lambda authorized service
office. Unauthorized repairs performed by other than the authorized service facilities may void the warranty.
22.3 Periodic maintenance
No routine maintenance of the FPS-T1U rack is required except for periodic cleaning. To clean, disconnect
the unit from the AC supply and allow 30sec. for discharging internal voltage. The FPS-T1U should be
cleaned using mild solution of detergent and water. The solution should be applied onto a soft cloth, and
not directly to the surface of the unit. Do not use aromatic hydrocarbons or chlorinated solvents for cleaning.
Use low pressure compressed air to blow dust from the unit.
22.4 Adjustments and Calibration
No internal adjustment or calibration are required. Units that are returned for repair will be calibrated at
the service office In any case ,opening the cover is not allowed.
22.5 Parts replacement and repair
As repairs are made only by the manufacturer or by its authorized service offices, no parts replacement
information is given in this manual. In case of failure, unusual or erratic operation of the unit, contact your
nearest Densei-Lambda sales and service office.
52

Notes
53

Notes
56
 Loading...