

Page 1

Europe, Middle East
ENGLISH
FRANÇAIS
DEUTSCH
NEDERLANDS
ITALIANO
ESPAÑOL
PORTUGUÊS
РУССКИЙ
ČESTINA
TÜRKÇE
POLSKI
SVENSKA
SUOMI
SLOVENCINA
MAGYAR NYELV
תירבע
ةيبرعلا
North America/
Norteamérica
ENGLISH
FRANÇAIS
ESPAÑOL
Latin America/
América Latina
ENGLISH
ESPAÑOL
PORTUGUÊS
Asia Pacic
日本語
简体中文
繁體中文
한국어
ENGLISH
Page 2
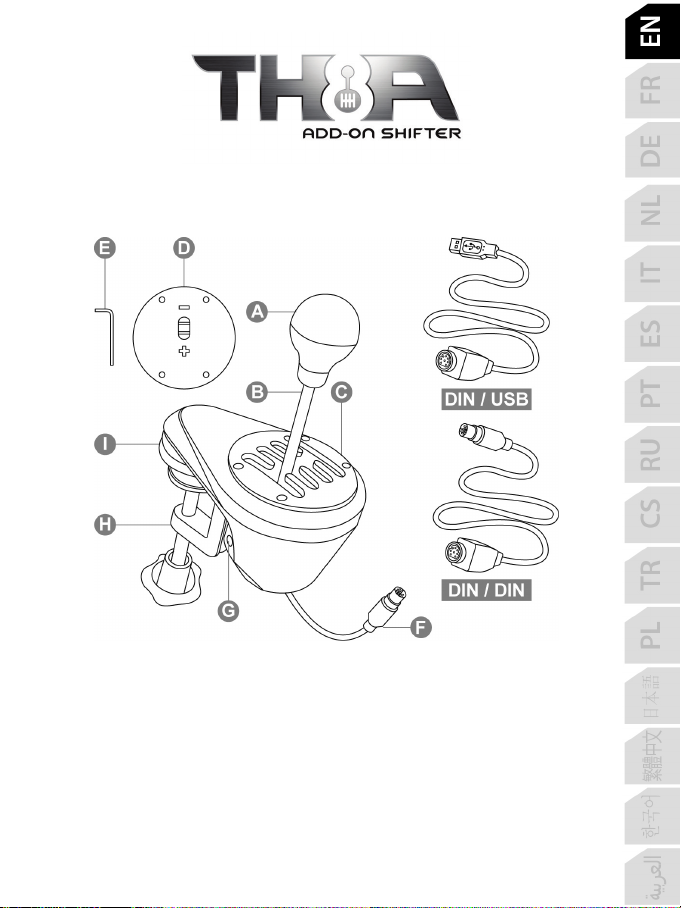
1/18
A Removable gear shift knob
E 2.5 mm Allen key (included)
F Cable and DIN connector
PlayStation®4/PlayStation®5 – Xbox One/Xbox Series – PC
User Manual
TECHNICAL FEATURES
(not installed by default)
B Stick
C Adjustable “H-pattern (7+1)” shift plate
(installed by default)
D Adjustable “Sequential (+/-)” shift plate
(not installed by default)
G Internal tensioning screw
H Adjustable clamping system
I “Screw threads” for cockpit mounting
DIN / USB Detachable DIN / USB cable
DIN / DIN Detachable DIN / DIN cable
Page 3

2/18
WARNING
Before using this product, be sure to read through this manual carefully. Retain this manual for
future reference.
Warning – Electric shock
* Keep this product in a dry place, and do not expose it to dust or sunlight.
* Respect the direction of insertion for connectors.
* Do not twist or pull on the connectors and cables.
* Do not spill liquid on the product or its connector.
* Do not short-circuit the product.
* Do not dismantle this product (apart from for the possible adjustments described in this manual),
do not attempt to burn the product and do not expose the product to high temperatures.
Warning – Injuries due to repetitive movements
Playing with a shifter may result in muscle and joint pains. To avoid any problems:
* Avoid playing for extended periods of time.
* Take a 10 to 15 minutes break after each hour of playing.
* Should you experience fatigue or pain in your hands, wrists or arms, stop playing and rest for a
few hours before starting to play again.
* If the symptoms or pains described above persist when you resume playing, stop playing and
consult your doctor.
* Verify that the base of the shifter is properly mounted, as described in the instructions found in this
manual.
Warning – Pinching risk in shift plate openings
* Keep out of the reach of children.
* When playing a game, never place your fingers (or any other parts of your body) in the openings in
the shift plates.
NEVER
Page 4
3/18
TIGHTEN
UNTIGHTEN
TIGHTEN
UNTIGHTEN
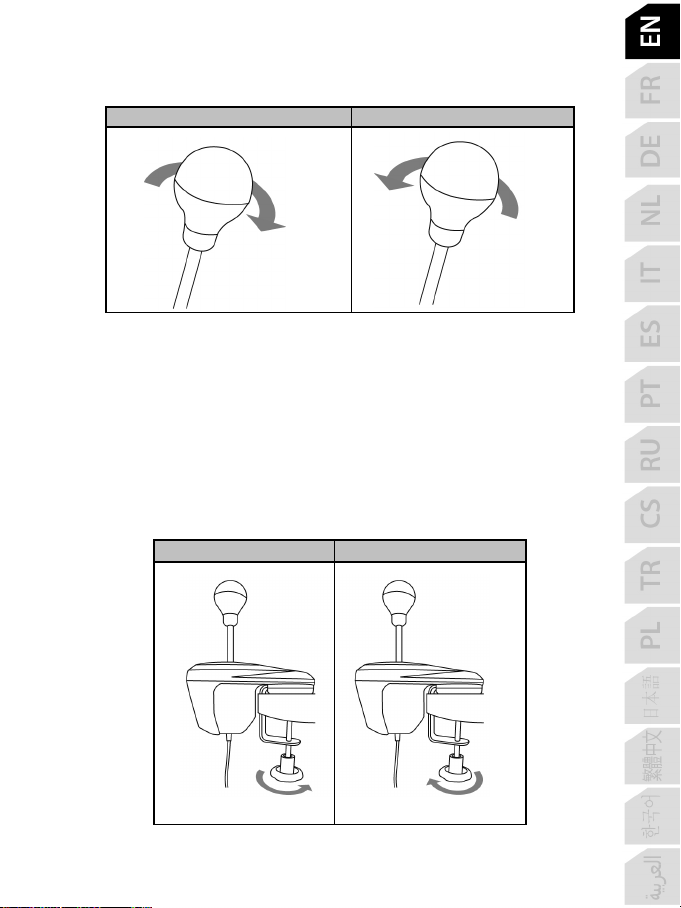
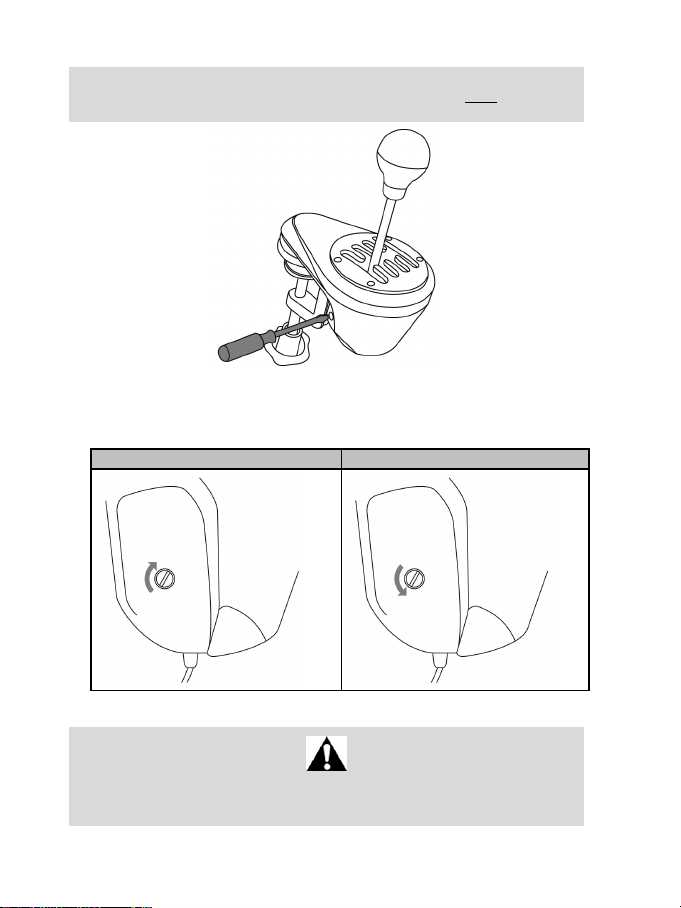
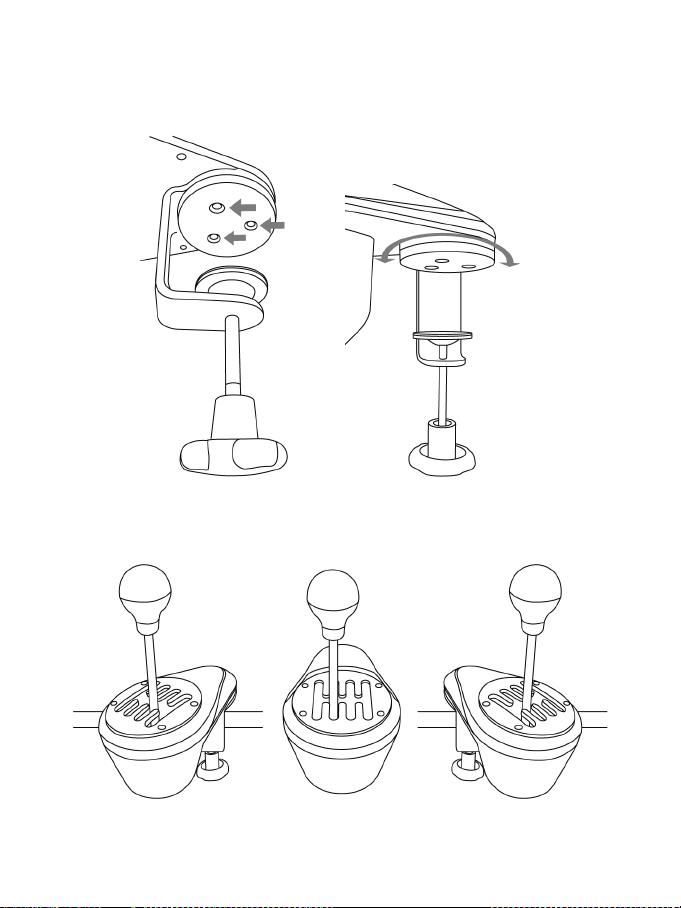
INSTALLING THE GEAR SHIFT KNOB
1. To screw the gear shift knob (A) onto its stick (B): turn the gear shift knob clockwise.
2. To unscrew the gear shift knob: turn the knob counterclockwise.
MOUNTING THE SHIFTER
Mounting is optimized for any type of support:
- Tables, desks or shelves from 1 to 55 mm in thickness, via the clamping system (H).
- Cockpits, via the built-in “screw threads” (the clamping system is removable).
Mounting the shifter on a table or desk
1. Place the nose of the shifter on a table or other flat surface.
2. To tighten: turn the clamping wheel counterclockwise.
3. To untighten: turn the clamping wheel clockwise.
Page 5
4/18
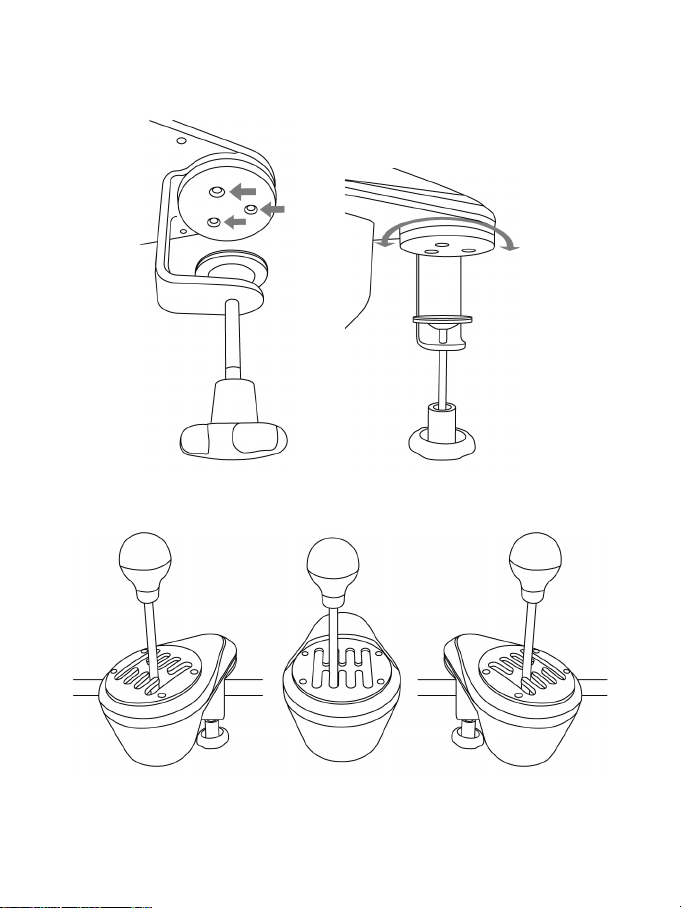
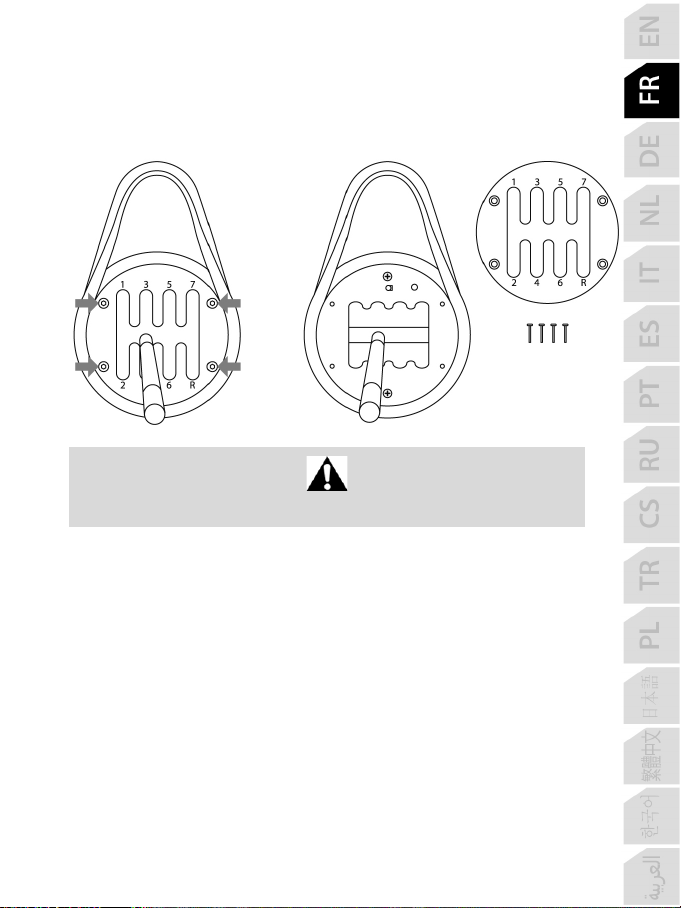
Positioning and rotating the clamping system (can be adjusted by 360°)
1. Using the included 2.5 mm Allen key (E), very slightly unscrew the 3 screws holding the
clamping system (H) in place.
The clamping system (and therefore the entire shifter) can now be rotated manually by 360°.
2. Select your preferred position along the 360° of rotation (3 examples are shown below, among
the many other possibilities available).
Next, retighten the 3 screws holding the clamping system in place.
Page 6
5/18
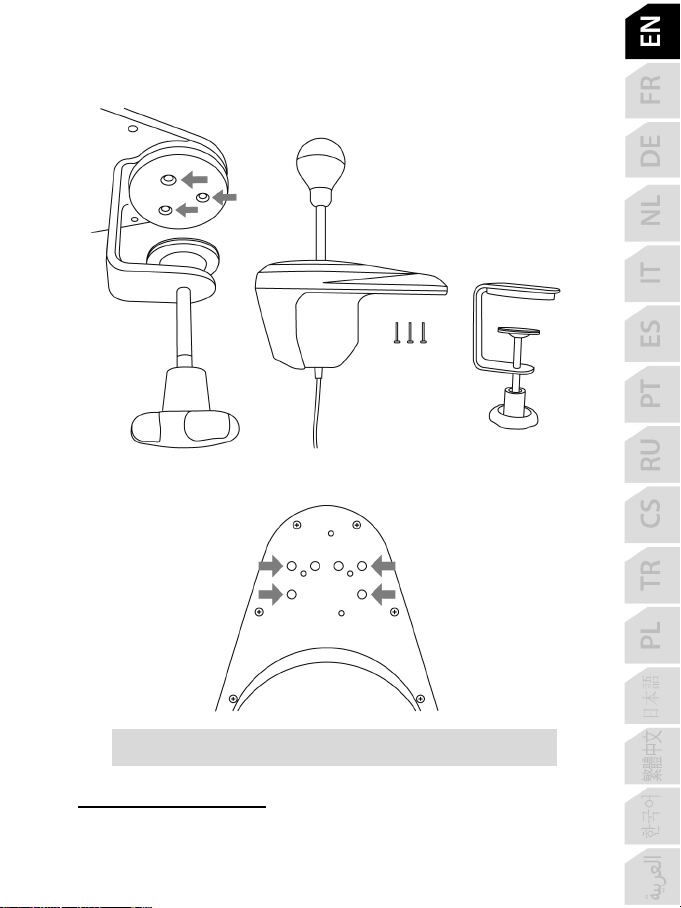
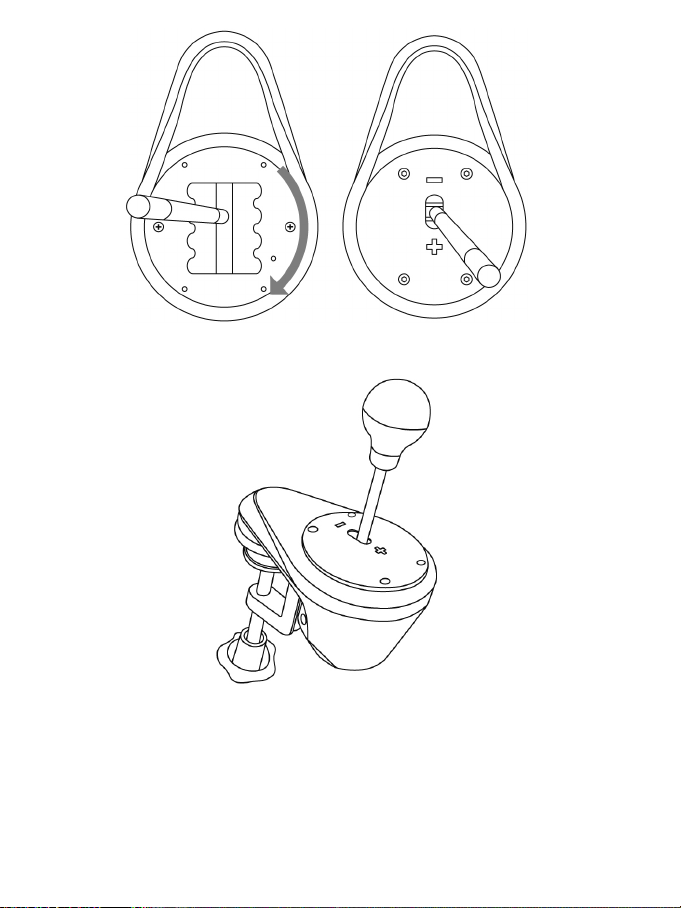
Mounting the shifter in a cockpit
1. Using the included 2.5 mm Allen key (E), completely unscrew and remove the 3 screws
holding the clamping system (H) in place. Detach the clamping system from the shifter.
2. Once the clamping system has been removed, screw 2 “M6” screws (not included) into the
cockpit shelf, and into 2 of the 4 small “screw threads” (I) located on the underside of the shifter's
nose.
Be sure not to use “M6” screws that are too long, which may pierce
and damage the upper part of the shifter’s nose.
A shifter mounting template for cockpits is available at
https://support.thrustmaster.com
. Click Racing Wheels / TH8A Shifter, and then select
Manual.
Page 7

6/18
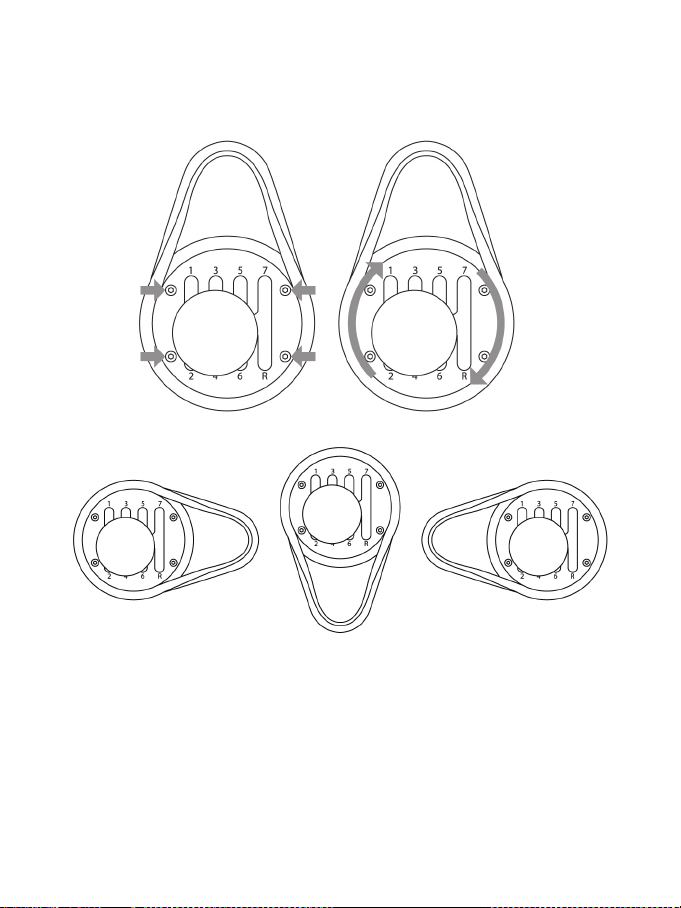
POSITIONING AND ROTATING THE SHIFT PLATES (CAN BE ADJUSTED
BY 360°)
1. Using the included 2.5 mm Allen key (E), slightly unscrew the 4 screws holding the shift plate
(C or D) in place.
The shift plate can now be rotated manually by 360°.
2. Select your preferred position along the 360° of rotation (3 examples are shown below, among
the many other possibilities available).
3. Retighten the 4 screws holding the shift plate in place.
Page 8

7/18
SWITCHING FROM THE “H-PATTERN (7+1)” SHIFT PLATE
TO THE “SEQUENTIAL (+/-)” SHIFT PLATE
1. Unscrew (counterclockwise) and remove the gear shift knob (A).
2. Using the included 2.5 mm Allen key (E), completely unscrew and remove the 4 screws
holding the “H-pattern (7+1)” shift plate in place. Remove the shift plate.
During this procedure, take care not to accidentally let
any of the screws fall inside the internal mechanism.
3. Manually rotate the internal structure 90° to the right (clockwise).
Next, install the “Sequential (+/-)” shift plate.
Page 9

8/18
4. Using the included 2.5 mm Allen key (E), replace and completely retighten the 4 screws holding
the “Sequential (+/-)” shift plate in place. Screw the gear shift knob back on (clockwise).
Carry out this procedure in reverse to replace the “H-patt ern (7+1)” shift plate.
Page 10

9/18
Notes regarding the internal structure's top cover:
J: 4 “screw threads” to attach the shift plates (C or D).
K: 2 screws which hold the internal structure in place (do not unscrew).
L: Button which automatically detects the type of shift plate used (C or D). Is pressed automatically
when the “Sequential (+/-)” shift plate is installed. Keep this area clean in order to avoid any
detection problems.
M: Slot for easier positioning of the shift plates.
Page 11
10/18
ADJUSTING THE GEAR SHIFT RESISTANCE
INCREASING THE RESISTANCE
DECREASING THE RESISTANCE
* Only applies to the “H-pattern (7+1)” shift plate.
* Before making any adjustments, the “H-pattern (7+1)” shift plate must be installed in
its original position (please see the diagram below).
1. Using a large flat head screwdriver, place the screwdriver in the head of the internal tensioning
screw (G) located in the lower left section of the shifter’s housing.
2. To slightly increase the resistance: turn the screw clockwise.
3. To slightly decrease the resistance: turn the screw counterclockwise.
2 full turns are enough to go from one extreme to the other.
To avoid damaging the system:
- Stop tightening the screw when you feel strong resistance.
- Stop untightening the screw if the stick becomes loose and wobbly.
Page 12

11/18
SETUP INSTRUCTIONS FOR GAME CONSOLES
PLAYSTATION®4/PLAYSTATION®5
According to the PS4™/PS5™ game or the racing wheel that you are
using:
PS4™ = Connect(*) the TH8A shifter directly to the PS4™'s USB port
- Connect the TH8A shifter's DIN connector to the DIN / USB cable.
- Connect the TH8A shifter to one of your PS4™'s USB ports.
- Start the game.
The TH8A shifter can then operate with either the H-PATTERN (7+1) or SEQUENTIAL (+/-)
shift plates.
Or
PS4™/PS5™ = Connect(*) the TH8A shifter directly to the Thrustmaster
racing wheel's base
(only applicable if your Thrustmaster racing wheel features a built-in shifter connector)
- Connect the TH8A shifter's DIN connector to the DIN / DIN detachable cable.
- Connect the TH8A shifter to the shifter connector located at the back of the racing wheel's base.
- Connect your racing wheel, then start the game.
The TH8A shifter can then operate with either the H-PATTERN (7+1) or SEQUENTIAL (+/-)
shift plates.
(*) Important recommendations for the PS4™/PS5™ system (applicable
only if using a Thrustmaster racing wheel featuring a built-in shifter connector)
- PS4™/PS5™ : When using the TH8A shifter's SEQUENTIAL (+/-) shift plate, you can also
connect the shifter at the back of the racing wheel using the detachable DIN / DIN cable. The
TH8A shifter is then connected to the racing wheel's UP (= R1) and DOWN (= L1) paddle shifters.
With this racing wheel, the TH8A shifter's SEQUENTIAL (+ /-) shift plate functions with 100% of
racing games for PS4™/PS5™ that are compatible with the racing wheel.
- PS4™: Some games enable you to use two TH8A shifters simultaneously:
One TH8A shifter with an H-PATTERN (7+1) shift plate, connected to the PS4™'s USB port
+ One TH8A shifter with a SEQUENTIAL (+/-) shift plate, connected to the back of the racing wheel
* A list of games for PS4™/PS5™ that are compatible with the TH8A shifter and the
relevant connection instructions(*) (which vary according to games) are available here:
https://support.thrustmaster.com Click Racing Wheels / TH8A Shifter, and then select
Games settings. This list is updated regularly.
* On PS4™ systems, we recommend that you do not use a USB hub when connecting the
racing wheel or the TH8A shifter; connect the device directly to the PS4™'s USB ports.
* Some games require that you install the latest available updates for the TH8A shifter
to function correctly (your games console must be connected to the internet).
Page 13

12/18
XBOX ONE/XBOX SERIES
= With all Xbox One/Xbox Series games, always connect the TH8A
shifter directly to the Thrustmaster racing wheel's base (NEVER to the
game console's USB port).
- Connect the TH8A shifter's DIN connector to the DIN / DIN detachable cable.
- Connect the TH8A shifter to the shifter connector located at the back of the racing wheel's base.
- Connect your racing wheel, then start the game.
The TH8A shifter can then operate with either the H-PATTERN (7+1) or SEQUENTIAL (+/-)
shift plates.
Important note about the Xbox One/Xbox Series:
When using the TH8A shifter's SEQUENTIAL (+/-) shift plate, the shifter is connected to the racing
wheel's UP (= RB) and DOWN (= LB) paddle shifters.
When using the TH8A shifter's SEQUENTIAL (+ /-) shift plate, the TH8A shifter functions with
100% of racing games for Xbox One/Xbox Series that are compatible with the Thrustmaster
racing wheel for Xbox One/Xbox Series.
* A list of games for Xbox One/Xbox Series that are compatible with the TH8A shifter is
available here:
https://support.thrustmaster.com. Click Racing Wheels / TH8A Shifter, and then select
Games settings. This list is updated regularly.
* Some games require that you install the latest available updates for the TH8A shifter
to function correctly (your games console must be connected to the internet).
To ensure compatibility of your Thrustmaster racing wheel for Xbox One/Xbox
Series with the TH8A shifter, you may be required to update the racing wheel's
firmware with the latest version available via PC here:
https://support.thrustmaster.com. Click Racing Wheels / TH8A Shifter, and then
select Firmware.
Page 14

13/18
SETUP INSTRUCTIONS FOR PC
= With all PC games(*), always connect the TH8A shifter directly to one
of the PC's USB ports.
- Connect the TH8A shifter's DIN connector to the DIN / USB cable.
- Connect the TH8A shifter to one of your PC's USB ports.
- When connected to a PC, the TH8A shifter is a Plug & Play device and is automatically detected
and installed.
- The device then appears as 'T500 RS Gear Shift' in the Windows® Control Panel.
- Click Properties to test and view the device's features.
- Start the game.
You are now ready to race!
(*) Important recommendations for PCs (applicable only if using a
Thrustmaster racing wheel featuring a built-in shifter connector)
- When using the TH8A shifter's SEQUENTIAL (+/-) shift plate, you can also connect the
shifter at the back of the racing wheel using the detachable DIN / DIN cable. The TH8A shifter
is then connected to the racing wheel's UP (= 2) and DOWN (= 1) paddle shifters.
With this racing wheel, the TH8A shifter's SEQUENTIAL (+ /-) shift plate functions with 100% of
racing games for PC that are compatible with the racing wheel.
- Some games enable you to use two TH8A shifters simultaneously:
One TH8A shifter with an H-PATTERN (7+1) shift plate, connected to the PC's USB port
+ One TH8A shifter with a SEQUENTIAL (+/-) shift plate, connected to the back of the racing wheel
* On PC, the Thrustmaster shifter is compatible with:
- all games supporting MULTI-USB and shifters.
- all wheels on the market.
* We recommend connecting your racing wheel and TH8A shifter directly to your PC's
USB 2.0 (not USB 3.0) ports, without using a hub.
* For some PC games, you must install the latest available game updates in order for
the TH8A shifter to function properly.
* For some PC games (in order to avoid any conflicts between the wheel and the TH8A
shifter), it may be necessary:
- not to map anything onto the wheel's gear shift paddles.
- to enable the “Hold button for gear” function.
Page 15
14/18
MAPPING ON PC
SOFTWARE PACKAGE
A software package for PC is available here:
https://support.thrustmaster.com
- After installing the software package, you will be able to:
* check your TH8A shifter's firmware version.
* update the firmware (if necessary) with the latest available version.
* use the “BOOTLOADER Method” (to restore your shifter, in the event of loss of firmware).
* access a customized Control Panel (game controller) on PC.
* on PC, enjoy the ANALOG mode (handbrake)
. Click Racing Wheels / TH8A Shifter, and then select Drivers.
ADVANCED CALIBRATION SOFTWARE
The TH8A gear shift calibration is automatically carried out.
An advanced calibration software application for PC is also available here:
https://support.thrustmaster.com
allows you to adjust the gear shift travel to your convenience.
When the settings are complete, they are instantly saved into the internal gear shift memory (and
can be used on PS4™/PS5™, Xbox One/Xbox Series and PC).
. Click Racing Wheels / TH8A Shifter, and then select Software. It
Page 16

15/18
According to the game or racing wheel (*) :
- Or at the back of the racing wheel (DIN)
Always at the back of the racing wheel
(DIN)
Always at the back of the racing wheel
(DIN)
SUMMARY INSTRUCTIONS FOR CONNECTING THE TH8A SHIFTER TO
VARIOUS SYSTEMS
Connect the TH8A shifter
PS4™
- Either directly to the PS4™/PS5™
system (USB)
PS5™
XBOX ONE/XBOX SERIES
PC Always(*) directly to the PC (USB)
(*) For more information regarding any exceptions, please refer to the
Important recommendations sections on the manual's relevant pages.
WARNING
* Never connect the TH8A shifter directly to any device other than a Thrustmaster racing wheel,
even if the device features an identical DIN connector. This could cause damage to the TH8A shifter
or the other device.
TROUBLESHOOTING
* My shifter is not functioning correctly, or seems to be improperly calibrated:
- Turn off your computer or console, disconnect your shifter, reconnect it and then restart your
game.
- In your game, under “Options/Controller”, select or set up the most appropriate configuration.
- Refer to your game's user manual or online help for more information.
- Various help topics and tips (not included in this manual), a list of compatible games, etc. are
available on the https://support.thrustmaster.com
- On Xbox One/Xbox Series, to ensure compatibility of your Thrustmaster racing wheel for Xbox
One/Xbox Series with the TH8A shifter, you may be required to update the racing wheel's firmware
with the latest version available via PC here: https://support.thrustmaster.com. Click Racing Wheels
/ TH8A Shifter, and then select Firmware.
website. Click Racing Wheels / TH8A Shifter.
Page 17

16/18
CONSUMER WARRANTY INFORMATION
Worldwide, Guillemot Corporation S.A., whose registered office is located at Place du Granier, B.P.
97143, 35571 Chantepie, France (hereinafter “Guillemot”) warrants to the consumer that this
Thrustmaster product shall be free from defects in materials and workmanship, for a warranty period
which corresponds to the time limit to bring an action for conformity with respect to this product. In
the countries of the European Union, this corresponds to a period of two (2) years from delivery of
the Thrustmaster product. In other countries, the warranty period corresponds to the time limit to
bring an action for conformity with respect to the Thrustmaster product according to applicable laws
of the country in which the consumer was domiciled on the date of purchase of the Thrustmaster
product (if no such action exists in the corresponding country, then the warranty period shall be one
(1) year from the original date of purchase of the Thrustmaster product).
Notwithstanding the above, rechargeable batteries are covered by a warranty period of six (6)
months from the date of original purchase.
Should the product appear to be defective during the warranty period, immediately contact
Technical Support, who will indicate the procedure to follow. If the defect is confirmed, the product
must be returned to its place of purchase (or any other location indicated by Technical Support).
Within the context of this warranty, the consumer’s defective product shall, at Technical Support’s option, be
either replaced or returned to working order. If, during the warranty period, the Thrustmaster product is
subject to such reconditioning, any period of at least seven (7) days during which the product is out of use
shall be added to th e remaining warranty period (this period runs from the date of the consumer’s request for
intervention or from the date on which the product in question is made available for reconditioning, if the date
on which the product is made available for reconditioning is subsequent to the date of the request for
intervention). If permitted under applicable law, the full liability of Guillemot and its subsidiaries (including for
consequential damages) is limited to the return to working order or the replacement of the Thrustmaster
product. If permitted under applicable law, Guillemot disclaims all warranties of merchantability or fitness for
a particular purpose.
This warranty shall not apply: (1) if the product has been modified, opened, altered, or has suffered damage
as a result of inappropriate or abusive use, negligence, an accident, normal wear, or any other cause
unrelated to a material or manufacturing defect (including, but not limited to, combining the Thrustmaster
product with any unsuitable element, including in particular power supplies, rechargeable batteries,
chargers, or any other elements not supplied by Guillemot for this product); (2) if the product has been used
for any use other than home use, including for professional or commercial purposes (game rooms, training,
competitions, for example); (3) in the event of failure to comply with the instructions provided by Technical
Support; (4) to software, said software being subject to a specific warranty; (5) to consumables (elements to
be replaced over the product’s lifespan: disposable batteries, audio headset or headphone ear pads, for
example); (6) to accessories (cables, cases, pouches, bags, wrist-straps, for example); (7) if the product was
sold at public auction.
This warranty is nontransferable.
The consumer’s legal rights with respect to laws applicable to the sale of consumer goods in his or
her country are not affected by this warranty.
Page 18

17/18
Additional warranty provisions
During the warranty period, Guillemot shall not provide, in principle, any spare parts, as Technical
Support is the only party authorized to open and/or recondition any Thrustmaster product (with the
exception of any reconditioning procedures which Technical Support may request that the consumer
carry out, by way of written instructions – for example, due to the simplicity and the lack of confidentiality
of the reconditioning process – and by providing the consumer with the required spare part(s), where
applicable).
Given its innovation cycles and in order to protect its know-how and trade secrets, Guillemot shall
not provide, in principle, any reconditioning notification or spare parts for any Thrustmaster product
whose warranty period has expired.
In the United States of America and in Canada, this warranty is limited to the product’s internal
mechanism and external housing. In no event shall Guillemot or its affiliates be held liable to any
third party for any consequential or incidental damages resulting from the breach of any express or
implied warranties. Some States/Provinces do not allow limitation on how long an implied warranty
lasts or exclusion or limitation of liability for consequential or incidental damages, so the above
limitations or exclusions may not apply to you. This warranty gives you specific legal rights, and you
may also have other rights which vary from State to State or Province to Province.
Liability
If permitted under applicable law, Guillemot Corporation S.A. (hereinafter “Guillemot”) and its
subsidiaries disclaim all liability for any damages caused by one or more of the following: (1) the
product has been modified, opened or altered; (2) failure to comply with assembly instructions; (3)
inappropriate or abusive use, negligence, an accident (an impact, for example); (4) normal wear; (5)
the use of the product for any use other than home use, including for professional or commercial
purposes (game rooms, training, competitions, for example). If permitted under applicable law,
Guillemot and its subsidiaries disclaim all liability for any damages unrelated to a material or
manufacturing defect with respect to the product (including, but not limited to, any damages caused
directly or indirectly by any software, or by combining the Thrustmaster product with any unsuitable
element, including in particular power supplies, rechargeable batteries, chargers, or any other
elements not supplied by Guillemot for this product).
FCC STATEMENT
1. This device complies with Part 15 of the FCC Rules. Operation is subject to the following two
conditions:
(1) This device may not cause harmful interference, and
(2) This device must accept any interference received, including interference that may cause
undesired operation.
2. Changes or modifications not expressly approved by the party responsible for compliance could
void the user's authority to operate the equipment.
Page 19

18/18
COPYRIGHT
TECHNICAL SUPPORT
https://support.thrustmaster.com
*
*
© 2021 Guillemot Corporation S.A. All rights reserved. Thrustmaster® is a registered trademark of
Guillemot Corporation S.A. PlayStation® is a registered trademark of Sony Interactive Entertainment,
Inc. Windows® is a registered trademark of Microsoft Corporation in the United States and/or in other
countries. All other trademarks are the property of their respective owners. Illustrations not binding.
Contents, designs and specifications are subject to change without notice and may vary from one
country to another. Made in China.
ENVIRONMENTAL PROTECTION RECOMMENDATION
In the European Union: At the end of its working life, this product should not be
disposed of with standard household waste, but rather dropped off at a collection
point for the disposal of Waste Electrical and Electronic Equipment (WEEE) for
recycling.
This is confirmed by the symbol found on the product, user manual or packaging.
Depending on their characteristics, the materials may be recycled. Through
you can make a significant contribution towards helping to protect the environment.
Please contact your local authorities for information on the collection poi nt nearest you.
For all other countries: Please adhere to local recycling laws for electrical and electronic equipment.
Retain this information. Colours and decorations may vary.
Plastic fasteners and adhesives should be removed from the product before it is used.
www.thrustmaster.com
*Applicable to EU, UK and Turkey only
recycling and other forms of processing Waste Electrical and Electronic Equipment,
Page 20

1/18
A Pommeau amovible
E Clé Allen 2,5 mm fournie
F Câble et connecteur DIN
PlayStation®4/PlayStation®5 – Xbox One/Xbox Series – PC
CARACTÉRISTIQUES TECHNIQUES
(non installé par défaut)
B Levier
C Grille « H (7+1) » orientable
(installé par défaut)
D Grille « Séquentielle (+/-) » orientable
(non installé par défaut)
Manuel de l’utilisateur
G Vis de tension interne
H Système de fixation orientable
I « Pas de vis » pour fixation cockpit
DIN / USB Câble détachable DIN / USB
DIN / DIN Câble détachable DIN / DIN
Page 21

2/18
AVERTISSEMENT
Avant d’utiliser ce produit, lisez attentivement cette documentation et conservez-la pour pouvoir la
consulter ultérieurement.
Avertissement – Chocs électriques
* Conservez le produit dans un endroit sec et ne l’exposez ni à la poussière ni au soleil.
* Respectez les sens de branchement.
* Ne tordez pas et ne tirez pas sur les connecteurs et câbles.
* Ne renversez pas de liquide sur le produit et son connecteur.
* Ne mettez pas le produit en court-circuit.
* Ne démontez jamais le produit (hormis pour les réglages possibles notifiés dans ce manuel), ne le
jetez pas au feu et ne l’exposez pas à des températures élevées.
Avertissement – Blessures dues aux mouvements répétitifs
Jouer avec une boîte de vitesses peut causer des douleurs aux muscles et aux articulations. Afin
d’éviter tout problème :
* Evitez les périodes trop longues de jeu.
* Faites une pause de 10 à 15 minutes après chaque heure de jeu.
* Si vous éprouvez fatigue ou douleur au niveau des mains, des poignets ou des bras, cessez de
jouer et reposez-vous pendant quelques heures avant de recommencer à jouer.
* Si les symptômes ou les douleurs indiqués ci-dessus persistent lorsque vous reprenez le jeu,
arrêtez de jouer et consultez votre médecin.
* Vérifiez que la base de la boîte de vitesses est correctement fixée, conformément aux instructions
du manuel.
Avertissement – Risque de pincement au niveau des grilles de passage de vitesses
* Laissez hors de portée des enfants.
* Lors des phases de jeu, ne placez jamais vos doigts (ou autres parties du corps) dans les grilles
de passage de vitesses
JAMAIS
Page 22

3/18
SERRER
DESSERRER
SERRER
DESSERRER
INSTALLATION DU POMMEAU
1. Pour visser le pommeau (A) sur son levier (B) : tournez le pommeau dans le sens des aiguilles
d’une montre.
2. Pour dévisser le pommeau : tournez-le dans le sens inverse des aiguilles d’une montre.
FIXATION DE LA BOÎTE DE VITESSES
La fixation est optimisée pour tout type de support :
- Tables, bureaux ou tablettes de 1 à 55 mm d’épaisseur via le système de fixation (H)
- Cockpits via les « pas de vis » (I) intégrés (et le système de fixation qui est amovible)
Fixer la boîte de vitesses sur une table ou un bureau
1. Placez le nez de la boîte de vitesses sur une table ou autre surface plane.
2. Pour serrer : tournez la molette de fixation dans le sens inverse des aiguilles d’une montre.
3. Pour desserrer : tournez la molette dans le sens des aiguilles d’une montre.
Page 23

4/18
Position et rotation du système de fixation (ajustable sur 360°)
1. A l’aide de la clé Allen 2,5 mm fournie (E), dévissez très légèrement les 3 vis maintenant le
système de fixation (H).
Le système de fixation (et donc l’ensemble de la boîte) peut alors tourner manuellement sur 360°
2. Choisissez votre position préférée sur 360° (3 exemples parmi de nombreuses autres
possibilités sont illustrés ci-dessous).
Revissez ensuite les 3 vis maintenant le système de fixation.
Page 24

5/18
Fixer la boîte de vitesses sur un cockpit
1. A l’aide de la clé Allen 2,5 mm fournie (E), dévissez complètement et retirez les 3 vis
maintenant le système de fixation (H). Séparez-le ensuite de la boîte de vitesses.
2. Une fois le système de fixation enlevé, vissez 2 vis « M6 » (non fournies) dans la tablette du
cockpit et dans 2 des 4 petits « pas de vis » (I) situés sous le nez inférieur de la boîte de
vitesses.
N’utilisez pas de vis « M6 » trop longue qui pourrait transpercer
et endommager le nez supérieur de la boîte de vitesses
Plan d’implantation de la boite de vitesse pour les cockpits disponible sur
https://support.thrustmaster.com
(cliquez sur Volants / TH8A Shifter puis Manuel
utilisateur)
Page 25

6/18
POSITION ET ROTATION DES GRILLES (AJUSTABLES SUR 360°)
1. A l’aide de la clé Allen 2,5 mm fournie (E), dévissez légèrement les 4 vis maintenant la grille de
passage de vitesses (C ou D).
La grille peut alors tourner manuellement sur 360°.
2. Choisissez votre position préférée sur 360° (3 exemples parmi de nombreuses autres
possibilités sont illustrés ci-dessous)
3. Revissez les 4 vis maintenant la grille.
Page 26
7/18
BASCULER DE LA GRILLE « H (7+1) »
A LA GRILLE « SEQUENTIELLE (+/-)
1. Dévissez (dans le sens inverse des aiguilles d’une montre) et enlevez le pommeau (A).
2. A l’aide de la clé Allen 2,5 mm fournie (E), dévissez complètement les 4 vis maintenant la grille
« H (7+1) ». Enlevez la grille.
Lors de cette opération, veillez à ne pas laisser tomber accidentellement
l’une des vis à l’intérieur du mécanisme interne.
3. Tournez manuellement la structure interne de 90° vers la droite.
Installez ensuite la grille « Séquentielle (+/-) ».
Page 27
8/18
4. A l’aide de la clé Allen 2,5 mm fournie (E), revissez complètement les 4 vis maintenant la grille
« Séquentielle (+/-) ». Revissez le pommeau.
Effectuez l’opération inverse pour revenir à la grille « H (7+1) ».
Page 28

9/18
Remarques concernant le capot supérieur de la structure interne :
J : 4 « Pas de vis » pour fixer les grilles (C ou D)
K : 2 Vis qui fixent la structure interne (ne pas dévisser).
L : Bouton d’auto-détection du type de grille utilisé (C ou D). Est appuyé automatiquement lorsque
vous installez la grille « Séquentielle (+/-) ». Laissez propre pour éviter tout conflit de détection.
M : Détrompeur pour positionner les grilles plus facilement
Page 29

10/18
AJUSTER LA RESISTANCE DU PASSAGE DES VITESSES
AUGMENTER LA RESISTANCE
DIMINUER LA RESISTANCE
* Ne fonctionne que pour la grille « H (7+1) »
* Avant ajustement, la grille « H (7+1) » doit être impérativement installée en position
originale (schéma ci-dessous)
1. A l’aide d’un large tournevis plat, accédez à l’embout de vis plat (G) situé en bas à gauche de la
coque.
2. Pour augmenter légèrement la résistance : vissez dans le sens des aiguilles d’une montre.
3. Pour diminuer légèrement la résistance : dévissez dans le sens inverse des aiguilles d’une
montre.
Pour ne pas endommager le système :
- Arrêtez de visser lorsque vous sentez une forte résistance.
- Arrêtez de dévisser lorsque le levier devient lâche et prend du jeu.
2 tours complets suffisent pour passer d’un extrême à l’autre
Page 30

11/18
INSTALLATION SUR CONSOLE DE JEU PLAYSTATION®4/PLAYSTATION®5
En fonction du jeu PS4™/PS5™ ou du volant utilisé :
PS4™ = Branchez (*) le TH8A directement sur le port USB de la PS4™
- Branchez le connecteur DIN du TH8A sur le câble DIN / USB.
- Branchez le TH8A sur l’un des ports USB de votre PS4™.
- Lancez votre jeu.
Le TH8A est alors fonctionnel avec grille H (7+1) ou grille SEQUENTIELLE (+/-).
Ou
PS4™/PS5™ = Branchez (*) le TH8A directement sur la base du volant
Thrustmaster
(possible uniquement si votre volant Thrustmaster possède un connecteur de
boîte de vitesses intégré)
- Branchez le connecteur DIN du TH8A au câble détachable DIN / DIN.
- Branchez le TH8A au connecteur pour la boîte de vitesses situé à l’arrière de la base du volant.
- Branchez votre volant, puis lancez le jeu.
Le TH8A est alors fonctionnel avec grille H (7+1) ou grille SEQUENTIELLE (+/-).
(*) Astuces importantes sur PS4™/PS5™ (valables uniquement si vous
utilisez un volant Thrustmaster avec connecteur de boîte de vitesses intégré)
- PS4™/PS5™ : Lorsque la grille SEQUENTIELLE (+/-) du TH8A est installée, vous pouvez
également brancher la boîte à l’arrière du volant à l’aide du câble détachable DIN / DIN. Dans
ce cas, le TH8A est couplé avec les palettes de vitesses UP (= R1) et DOWN (= L1) du volant.
Avec ce volant, le TH8A avec grille SEQUENTIELLE (+ /-) est donc compatible dans 100% des jeux
PS4™/PS5™ compatibles avec le volant.
- PS4™ : En fonction des jeux, vous pouvez également utiliser deux TH8A simultanément :
* La liste des jeux PS4™/PS5™ compatibles avec le TH8A et la procédure de
branchement nécessaire (*) en fonction du jeu utilisé sont disponibles ici :
https://support.thrustmaster.com (cliquez sur Volants / TH8A Shifter puis Paramètres
de jeux). Cette liste est régulièrement mise à jour.
* Sur PS4™, il est conseillé de ne pas utiliser de hub pour la connexion USB (que ce
soit pour le volant ou le TH8A) = branchez directement sur les ports USB de la PS4™.
* Pour certains jeux, il est indispensable d’installer les dernières mises à jour
disponibles pour que le TH8A soit fonctionnel (vous devez être connecté à Internet).
un TH8A avec grille H (7+1) branché sur le port USB de la PS4™
+ un TH8A avec grille SEQUENTIELLE (+/-) branché à l’arrière du volant
Page 31
12/18
XBOX ONE/XBOX SERIES
= Pour tous les jeux Xbox One/Xbox Series, branchez toujours le TH8A
directement à la base du volant Thrustmaster (et jamais sur le port USB
de la console)
- Branchez le connecteur DIN du TH8A sur le câble détachable DIN / DIN.
- Branchez le TH8A sur le connecteur pour la boîte de vitesses situé à l’arrière de la base du volant
- Branchez votre volant, puis lancez le jeu.
Le TH8A est alors fonctionnel avec grille H (7+1) ou grille SEQUENTIELLE (+/-).
Remarque importante sur Xbox One/Xbox Series :
Lorsque la grille du TH8A est en mode « SEQUENTIELLE (+/-) », la boite de vitesse est couplée
avec les palettes de vitesses UP (= RB) & DOWN (= LB) de la roue du volant.
Lorsque la grille SEQUENTIELLE (+/-) du TH8A est installée, le TH8A est compatible dans
100% des jeux Xbox One/Xbox Series compatibles avec le volant Thrustmaster Xbox
One/Xbox Series.
* La liste des jeux Xbox One/Xbox Series compatibles avec le TH8A est disponible ici :
https://support.thrustmaster.com (cliquez sur Volants / TH8A Shifter puis Paramètres
de jeux). Cette liste est régulièrement actualisée.
* Pour certains jeux, il est indispensable d’installer les dernières mises à jour
disponibles pour que le TH8A soit fonctionnel (vous devez être connecté à Internet).
Pour que votre volant Thrustmaster Xbox One/Xbox Series soit compatible avec
le TH8A, il peut être nécessaire de mettre à jour le firmware du volant avec la
dernière version disponible, via PC, à cette adresse :
https://support.thrustmaster.com (cliquez sur Volants / TH8A Shifter puis
Firmware).
Page 32

13/18
INSTALLATION SUR PC
= Pour tous les jeux PC (*), branchez toujours le TH8A directement sur
le port USB du PC.
- Branchez le connecteur DIN du TH8A sur le câble DIN / USB.
- Branchez le TH8A sur l’un des ports USB de votre PC
- Le TH8A est Plug & Play sur PC : votre périphérique sera alors automatiquement détecté et
installé.
- Il apparaîtra dans le « Control Panel / Contrôleur de jeu » de Windows® sous le nom T500 RS
Gear Shift.
- Cliquez sur Propriétés pour tester et visualiser ses fonctionnalités.
- Lancez le jeu.
Vous êtes maintenant prêt à jouer !
(*) Astuces importantes sur PC (valables uniquement si vous utilisez un
volant Thrustmaster avec connecteur de boîte de vitesses intégré)
- Lorsque la grille SEQUENTIELLE (+/-) du TH8A est installée, vous pouvez également
brancher la boîte à l’arrière du volant à l’aide du câble détachable DIN / DIN. Dans ce cas, le
TH8A est couplé avec les palettes de vitesses UP (= 2) et DOWN (= 1) du volant.
Avec ce volant, le TH8A avec grille SEQUENTIELLE (+ /-) est compatible dans 100% des jeux PC
compatibles avec le volant.
- En fonction des jeux, vous pouvez également utiliser deux TH8A simultanément :
un TH8A avec grille H (7+1) branché sur le port USB du PC
+ un TH8A avec grille SEQUENTIELLE (+/-) branché à l’arrière du volant
* Sur PC, la boîte de vitesses Thrustmaster est compatible :
- dans tous les jeux acceptant le MULTI-USB et les boîtes de vitesses
- avec tous les volants du marché
* Il est préférable de brancher le volant et le TH8A directement sur les ports USB 2.0
(et non 3.0) de votre PC, sans utiliser de hub.
* Pour certains jeux PC, il est indispensable d’installer les dernières mises à jour du jeu
disponibles pour que le TH8A soit fonctionnel.
* Dans certains jeux PC (pour éviter tout conflit entre le volant et le TH8A), il peut-être
nécessaire :
- de ne rien configurer sur les palettes de changement de vitesses du volant
- d’activer la fonction « Bouton Pressé : Changement Vitesse »
Page 33

14/18
MAPPING SUR PC
PACKAGE LOGICIEL
Sur PC, un package logiciel est disponible ici :
https://support.thrustmaster.com
Une fois le package logiciel installé, vous pourrez :
* vérifier la version de firmware du TH8A
* mettre à jour (si nécessaire) le firmware avec la dernière version disponible
* utiliser la méthode BOOTLOADER (pour réveiller votre TH8A en cas de perte de firmware)
* profiter sur PC d’un Control Panel (Contrôleur de jeu) personnalisé
* profiter sur PC du mode ANALOG (Frein à main)
(cliquez sur Volants / TH8A Shifter puis Pilotes).
LOGICIEL DE CALIBRATION AVANCEE
La calibration du TH8A est automatique.
Un logiciel de calibration avancée sur PC est également disponible ici :
https://support.thrustmaster.com
permettre d’ajuster à votre convenance la course des rapports.
Une fois les réglages effectués, ils seront instantanément sauvegardés dans la mémoire
interne du TH8A (et seront opérationnels sur PS4™/PS5™, Xbox One/Xbox Series et PC).
(cliquez sur Volants / TH8A Shifter puis Logiciel), pour vous
Page 34

15/18
En fonction du jeu ou du volant utilisé (*) :
XBOX ONE/XBOX SERIES
Toujours à l'arrière du volant (DIN)
RECAPITULATIF DE BRANCHEMENT DU TH8A EN FONCTION DE LA
PLATEFORME UTILISÉE
Branchez le TH8A
PS4™
- soit sur la PS4™/PS5™ (USB)
- soit à l'arrière du volant (DIN)
PS5™ Toujours à l'arrière du volant (DIN)
PC Toujours (*) sur le PC (USB)
(*) Pour connaître les exceptions, reportez-vous aux sections Astuces
importantes dans les pages correspondantes du manuel.
AVERTISSEMENT
* Ne branchez jamais le TH8A directement sur un volant d’une marque autre que Thrustmaster,
même si le connecteur DIN est compatible. Vous risquez d’endommager le TH8A ou le volant de
l’autre marque.
DEPANNAGE
* Ma boîte de vitesses ne fonctionne pas correctement ou semble mal calibrée :
- Eteignez votre ordinateur ou votre console, débranchez votre boîte de vitesses, rebranchez-la et
relancez votre jeu.
- Dans votre jeu, dans « Options / Contrôleur », choisissez ou paramétrez la configuration la mieux
appropriée.
- Reportez-vous au manuel de l’utilisateur ou à l’aide en ligne de votre jeu pour plus d’informations.
- Aides et astuces diverses (non notifiées dans ce manuel), liste des jeux compatibles, etc.
disponibles sur le site https://support.thrustmaster.com
- Sur Xbox One/Xbox Series, pour que votre volant Thrustmaster Xbox One/Xbox Series soit
compatible avec le TH8A, il peut être nécessaire de mettre à jour le firmware du volant avec la
dernière version disponible, via PC, à cette adresse : https://support.thrustmaster.com (cliquez sur
Volants / TH8A Shifter puis Firmware).
. Cliquez sur Volants / TH8A Shifter.
Page 35

16/18
INFORMATIONS RELATIVES A LA GARANTIE AUX CONSOMMATEURS
Dans le monde entier, Guillemot Corporation S.A., ayant son siège social Place du Granier, B.P. 97143, 35571
Chantepie, France (ci-après « Guillemot ») garantit au consommateur que le présent produit Thrustmaster est exempt
de défaut matériel et de vice de fabrication, et ce, pour une période de garantie qui correspond au délai pour intenter
une action en conformité de ce produit. Dans les pays de l’Union Européenne, ce délai est de deux (2) ans à compter de
la délivrance du produit Thrustmaster. Dans les autres pays, la durée de la période de garantie correspond au délai pour
intenter une action en conformité du produit Thrustmaster selon la législation en vigueur dans le pays où le
consommateur avait son domicile lors de l’achat du produit Thrustmaster (si une telle action en conformité n’existe pas
dans ce pays alors la période de garantie est de un (1) an à compter de la date d’achat d’origine du produit
Thrustmaster).
Si, au cours de la période de garantie, le produit semble défectueux, contactez immédiatement le Support Technique
qui vous indiquera la procédure à suivre. Si le défaut est confirmé, le produit devra être retourné à son lieu d’achat (ou
tout autre lieu indiqué par le Support Technique).
Dans le cadre de la garantie, le consommateur bénéficiera, au choix du Support Technique, d'un remplacement ou
d'une remise en état de marche du produit défectueux. Si, pendant la période de garantie, le produit Thrustmaster fait
l'objet d'une telle remise en état, toute période d'immobilisation d'au moins sept jours vient s'ajouter à la durée de la
garantie qui restait à courir (cette période court à compter de la demande d'intervention du consommateur ou de la mise
à disposition pour remise en état du produit en cause, si cette mise à disposition est postérieure à la demande
d'intervention). Lorsque la loi applicable l’autorise, toute responsabilité de Guillemot et ses filiales (y compris pour les
dommages indirects) se limite à la remise en état de marche ou au remplacement du produit Thrustmaster. Lorsque la
loi applicable l’autorise, Guillemot exclut toutes garanties de qualité marchande ou d’adaptation à un usage particulier.
Cette garantie ne s’appliquera pas : (1) si le produit a été modifié, ouvert, altéré, ou a subi des dommages résultant d’une
utilisation inappropriée ou abusive, d’une négligence, d’un accident, de l’usure normale, ou de toute autre cause non liée à un
défaut matériel ou à un vice de fabrication (y compris, mais non limitativement, une combinaison du produit Thrustmaster
avec tout élément inadapté, notamment alimentations électriques, batteries, chargeurs, ou tous autres éléments non-fournis
par Guillemot pour ce produit) ; (2) si le produit a été utilisé en dehors du cadre privé, à des fins professionnelles ou
commerciales (salles de jeu, formations, compétitions, par exemple). (3) en cas de non respect des instructions du Support
Technique ; (4) aux logiciels, lesdits logiciels faisant l’objet d’une garantie spécifique ; (5) aux consommables (éléments à
remplacer pendant la durée de vie du produit : piles, coussinets de casque audio, par exemple) ; (6) aux accessoires (câbles,
étuis, housses, sacs, dragonnes, par exemple) ; (7) si le produit a été vendu aux enchères publiques.
Cette garantie n’est pas transférable.
Les droits légaux du consommateur au titre de la législation applicable dans son pays à la vente de biens de
consommation ne sont pas affectés par la présente garantie.
Par exemple, en France, indépendamment de la présente garantie, le vendeur reste tenu de la garantie légale de
conformité mentionnée aux articles L. 217-4 à L.217-12 du code de la consommation et de celle relative aux défauts
(vices cachés) de la chose vendue, dans les conditions prévues aux articles 1641 à 1648 et 2232 du code civil. La loi
applicable (c'est-à-dire la loi française) impose de reproduire les extraits de la loi française suivants:
Article L. 217-4 du code de la consommation:
Le vendeur livre un bien conforme au contrat et répond des défauts de conformité existant lors de la délivrance.
Il répond également des défauts de conformité résultant de l'emballage, des instructions de montage ou de l'installation
lorsque celle-ci a été mise à sa charge par le contrat ou a été réalisée sous sa responsabilité.
Article L. 217-5 du code de la consommation:
Le bien est conforme au contrat :
1° S'il est propre à l'usage habituellement attendu d'un bien semblable et, le cas échéant :
- s'il correspond à la description donnée par le vendeur et possède les qualités que celui-ci a présentées à l'acheteur
sous forme d'échantillon ou de modèle ;
- s'il présente les qualités qu'un acheteur peut légitimement attendre eu égard aux déclarations publiques faites par le
vendeur, par le producteur ou par son représentant, notamment dans la publicité ou l'étiquetage ;
2° Ou s'il présente les caractéristiques définies d'un commun accord par les parties ou est propre à tout usage spécial
recherché par l'acheteur, porté à la connaissance du vendeur et que ce dernier a accepté.
Article L. 217-12 du code de la consommation:
L'action résultant du défaut de conformité se prescrit par deux ans à compter de la délivrance du bien.
Article L. 217-16 du code de la consommation:
Lorsque l'acheteur demande au vendeur, pendant le cours de la garantie commerciale qui lui a été consentie lors de
l'acquisition ou de la réparation d'un bien meuble, une remise en état couverte par la garantie, toute période
d'immobilisation d'au moins sept jours vient s'ajouter à la durée de la garantie qui restait à courir.
Cette période court à compter de la demande d'intervention de l'acheteur ou de la mise à disposition pour réparation du
bien en cause, si cette mise à disposition est postérieure à la demande d'intervention.
Page 36

17/18
Article L. 1641 du code civil:
Le vendeur est tenu de la garantie à raison des défauts cachés de la chose vendue qui la rendent impropre à l'usage
auquel on la destine, ou qui diminuent tellement cet usage que l'acheteur ne l'aurait pas acquise, ou n'en aurait donné
qu'un moindre prix, s'il les avait connus.
Article L. 1648 alinéa 1er du code civil:
L'action résultant des vices rédhibitoires doit être intentée par l'acquéreur dans un délai de deux ans à compter de la
découverte du vice.
Stipulations additionnelles à la garantie
Pendant la période de garantie, Guillemot ne fournira, en principe, pas de pièce détachée car le Support Technique est
seul habilité tant à ouvrir qu'à remettre en état tout produit Thrustmaster (à l'exception des remises en état que le
Support Technique demanderait, par instructions écrites, au consommateur d'effectuer -par exemple en raison de la
simplicité et de l'absence de confidentialité du processus de remise en état-, en lui fournissant, le cas échéant, la ou les
pièces détachées nécessaires).
Compte tenu de ses cycles d'innovation et pour préserver ses savoir-faire et secrets, Guillemot ne fournira, en principe,
ni notice de remise en état, ni pièce détachée pour tout produit Thrustmaster dont la période de garantie est expirée.
Aux États-Unis d’Amérique et au Canada, la présente garantie est limitée au mécanis me interne et au boîtier externe du produit. En
aucun cas, Guillemot ou ses sociétés affiliées ne sauraient être tenues responsables envers qui que ce soit de tous dommages
indirects ou dommages accessoires résultant du non respect des garanties expresses ou implicites. Certains États/Provinces
n’autorisent pas la limitation sur la durée d’une garantie implicite, ou l’exclusion ou la limitation de res ponsabilité pour les dommages
indirects ou accessoires, de sorte que les limitations ou exclusions ci-dessus pe uvent ne pas vous être applicables. Cette garantie
vous confère des droits spécifiques ; vous pouvez également bénéficier d’autres droits qui peuvent différer d’un État/Province à
l’autre.
Responsabilité
Lorsque la loi applicable l’autorise, Guillemot Corporation S.A. (ci-après « Guillemot ») et ses filiales excluent toute
responsabilité pour tous dommages causés par un ou plusieurs des faits suivants: (1) le produit a été modifié, ouvert, altéré,
(2) l’irrespect des instructions de montage, (3) l’utilisation inappropriée ou abusive, la négligence, l’accident (un choc, par
exemple), (4) l’usure normale du produit, (5) l’utilisation du produit en dehors du cadre privé, à des fins professionnelles ou
commerciales (salles de jeu, formations, compétitions, par exemple). Lorsque la loi applicable l’autorise, Guillemot et ses
filiales excluent toute responsabilité pour tout dommage dont la cause n’est pas liée à un défaut matériel ou à un vice de
fabrication du produit (y compris, mais non limitativement, tout dommage causé directement ou indirectement par tout logiciel,
ou par une combinaison du produit Thrustmaster avec tout é lément inadapté, notamment alimentations électriques, batteries,
chargeurs, ou tous autres éléments non-fournis par Guillemot pour ce produit).
Page 37

18/18
COPYRIGHT
SUPPORT TECHNIQUE
*
*
© 2021 Guillemot Corporation S.A. Tous droits réservés. Thrustmaster
Guillemot Corporation S.A. PlayStation
Inc. Windows® Microsoft® est une marque déposée de Microsoft Corporation aux Etats-Unis et/ou
dans d’autres pays. Toutes les autres marques sont la propriété de leurs propriétaires respectifs.
Illustrations non contractuelles. Le contenu, la conception et les spécifications sont susceptibles de
changer sans préavis et de varier selon les pays. Fabriqué en Chine.
RECOMMANDATION RELATIVE A LA PROTECTION DE L’ENVIRONNEMENT
protection de l’environnement. Veuillez consulter les autorités locales qui vous indiqueront le point de
collecte concerné.
Dans les autres pays : Veuillez vous reporter aux législations locales relatives au recyclage des
équipements électriques et électroniques.
Informations à conserver. Les couleurs et décorations peuvent varier.
Il est recommandé de retirer les attaches en plastique et les adhésifs avant d’utiliser le produit.
www.thrustmaster.com
*Applicable à l’UE, au RU et la Turquie uniquement
Dans l’Union Européenne : En fin de vie, ce produit ne doit pas être éliminé avec
les déchets ménagers normaux mais déposé à un point de collecte des déchets
d'équipements électriques et électroniques en vue de son recyclage.
Ceci est confirmé par le symbole figurant sur le produit, le manuel utilisateur ou
l’emballage.
En fonction de leurs caractéristiques, les matériaux peuvent être recyclés. Par le
recyclage et par les autres formes de valorisation des déchets d'équipements
électriques et électroniques, vous contribuez de manière significative à la
®
est une marque déposée de Sony Interactive Entertainment
®
est une marque déposée de
https://support.thrustmaster.com
Page 38

1/18
A Abnehmbarer Schaltkopf
E 2.5 mm Inbusschlüssel (enthalten)
F Kabel und DIN-Stecker
PlayStation®4/PlayStation®5 – Xbox One/Xbox Series – PC
TECHNISCHE FEATURES
(werksseitig nicht montiert)
B Schaltstange
C Anpaßbare “H-Schaltung (7+1)” Schaltplatte
(werksseitig vormontiert)
D Anpaßbare “Sequenzielle (+/-)”Schaltplatte
(werksseitig nicht montiert)
Benutzerhandbuch
G Interne Spannschraube
H Anpaßbares Klemmsystem
I “Schraubgewinde” zur Cockpitmontage
DIN/USB Abnehmbares DIN/USB Kabel
DIN/DIN Abnehmbares DIN/DIN Kabel
Page 39

2/18
WARNUNG
Bevor Sie dieses Produkt in Gebrauch nehmen, lesen Sie sich dieses Handbuch sorgfältig durch.
Heben Sie dieses Handbuch für zukünftiges Nachlesen auf.
Warnung – Elektrischer Schlag
* Bewahren Sie dieses Produkt an einem trockenen Ort auf und setzen es weder Staub noch
direktem Sonnenlicht aus.
* Beachten Sie die Einsteckrichtung für Stecker.
* Verdrehen oder ziehen Sie weder (an) Kabel(n) oder Stecker(n).
* Verschütten Sie keine Flüssigkeiten auf das Produkt oder dessen Stecker.
* Schließen Sie dieses Produkt nicht kurz.
* Nehmen Sie dieses Produkt nicht auseinander (außer für mögliche Anpassungen, die in diesem
Handbuch beschrieben werden), versuchen Sie dieses Produkt nicht zu verbrennen oder setzen es
hohen Temperaturen aus.
Warnung – Schädigungen durch wiederholte Bewegungen
Spielen mit einem Gangschalthebel kann Muskel- und Gelenkschmerzen verursachen. Um jedwede
Probleme zu vermeiden:
* Vermeiden Sie das Spielen über sehr lange Zeiträume.
* Pausieren Sie nach jeder Spielstunde für 10 bis 15 Minuten.
* Sollten Sie Ermüdungserscheinungen oder Schmerzen in Ihren Händen, Handgelenken oder
Armen verspüren, hören Sie mit dem Spielen auf und ruhen für einige Stunden aus bevor Sie
weiterspielen.
* Falls die oben beschriebenen Symptome oder Schmerzen weiterbestehen nachdem Sie wieder zu
Spielen begonnen haben, hören Sie mit dem Spielen auf und konsultieren Ihren Arzt.
* Stellen Sie sicher, daß die Basis des Gangschalthebels ordnungsgemäß nach den in diesem
Handbuch beschriebenen Instruktionen montiert ist.
Warnung – Klemmgefahr durch die Öffnungen der Schaltplatte
* Außer Reichweite von Kindern aufbewahren.
* Beim Spielen niemals Ihre Finger (oder jedwede anderen Körperteile) in die Öffnungen der
Schaltplatte stecken.
NIEMALS
Page 40

3/18
ANSCHRAUBEN
ABSCHRAUBEN
ANSCHRAUBEN
ABSCHRAUBEN
MONTIEREN DES SCHALTKOPFES
1. Um den Schaltkopf (A) auf dessen Schaltstange (B) zu montieren: Drehen Sie den Schaltkopf im
Uhrzeigersinn.
2. Um den Schaltkopf abzuschrauben: Drehen Sie den Schaltkopf gegen den Uhrzeigersinn.
MONTIEREN DER GANGSCHALTUNG
Optimierte Montage für jedweden Anbautyp:
- Tische, Schreibtische oder Regale von 1 bis 55 mm Dicke via des Klemmsystems (H).
- Cockpits via der eingebauten “Schraubgewinde” (das Klemmsystem ist abnehmbar).
Montieren der Gangschaltung auf einem Tisch oder Schreibtisch
1. Plazieren Sie die Nase der Gangschaltung auf einem Tisch oder auf einer anderen flachen
Oberfläche.
2. Zum Anschrauben: Drehen Sie das Feststellrad entgegen dem Uhrzeigersinn.
3. Zum Abschrauben: Drehen Sie das Feststellrad im Uhrzeigersinn.
Page 41
4/18
Positionierung und drehen des Klemmsystems (kann um 360° gedreht werden)
1. Benutzen Sie den beigelegten 2.5 mm Inbusschlüssel (E) und lösen ein wenig die 3 Schrauben,
die das Klemmsystem (H) in Position halten.
Das Klemmsystem (und demnach die ganze Gangschaltung) kann nun manuell um 360° gedreht
werden.
2. Wählen Sie Ihre bevorzugte Position (3 Beispiele, unter vielen anderen Möglichkeiten, werden
unten gezeigt).
Als nächstes ziehen Sie die 3 Halteschrauben, die das Klemmsystem in Position halten, wieder
an.
Page 42

5/18
Montieren der Gangschaltung in einem Cockpit
1. Benutzen Sie den beigelegten 2.5 mm Inbusschlüssel (E) und schrauben die 3 Schrauben, die
das Klemmsystem (H) in Position halten, komplett ab. Nehmen Sie das Klemmsystem von der
Gangschaltung ab.
2. Ist das Klemmsystem entfernt, schrauben Sie 2 “M6” (metrische Schrauben mit 16mm-Gewinde)
Schrauben (nicht enthalten) durch die Cockpit-Platte und in 2 der 4 kleinen “Schraubgewinde” (I)
an der Unterseite der Nase der Gangschaltung.
Stellen Sie sicher, daß die “M6” Schrauben nicht zu lang sind, da diese sonst den
oberen Teil der Gangschaltungsnase perforieren und beschädigen könnten.
Zum Einbau der Gangschaltung in ein Cockpit ist unter
https://support.thrustmaster.com
(klicken Sie auf Lenkräder / TH8A Shifter und wählen
dann Benutzerhandbuch) eine Montageschablone erhältlich.
Page 43
6/18
POSITIONIERUNG UND DREHEN DER SCHALTPLATTEN (KÖNNEN UM
360° GEDREHT WERDEN)
1. Benutzen Sie den beigelegten 2.5 mm Inbusschlüssel (E), und lösen ein wenig die 4
Schrauben, die die Schaltplatte (C oder D) in Position halten.
Die Schaltplatte kann nun manuell um 360° gedreht werden.
2. Wählen Sie Ihre bevorzugte Position (3 Beispiele, unter vielen anderen Möglichkeiten, werden
unten gezeigt).
3. Als nächstes ziehen Sie die 4 Halteschrauben, die die Schaltplatte in Position halten, wieder an.
Page 44

7/18
WECHSEL DER “H-SCHALTUNG (7+1)” SCHALTPLATTE
AUF DIE “SEQUENZIELLE (+/-)” SCHALTPLATTE
1. Schrauben Sie den Schaltkopf (A) entgegen dem Uhrzeigersinn ab.
2. Benutzen Sie den beigelegten 2.5 mm Inbusschlüssel (E), lösen und entfernen Sie vollständig
die 4 Schrauben, die die “H-Schaltung (7+1)” Schaltplatte in Position halten. Entfernen Sie die
Schaltplatte.
Achten Sie darauf, daß während dieser Prozedur keine der
Schrauben versehentlich in den internen Mechanismus fallen.
3. Drehen Sie manuell die interne Struktur um 90° nach rechts (im Uhrzeigersinn).
Montieren Sie dann die “Sequenzielle (+/-)” Schaltplatte.
Page 45

8/18
4. Mittels des beigelegten 2.5 mm Inbusschlüssels (E), setzen Sie die 4 Schrauben, die die
“Sequenzielle (+/-)” Schaltplatte in Position halten, komplett wieder ein und ziehen diese wieder
fest. Schrauben Sie den Schaltkopf im Uhrzeigersinn wieder an.
Führen Sie diese Prozedur umgekehrt aus, um die “H-Schaltung (7+1)” Schaltplatte wieder
zu montieren.
Page 46

9/18
Anmerkungen bezüglich der Abdeckung der internen Baugruppe:
J: 4 “Schraubgewinde”, um die Schaltplatten anzuschrauben (C oder D).
K: 2 Schrauben, um die interne Baugruppe in Position zu halten (nicht abschrauben).
L: Button, der automatisch den Typ der benutzten Schaltplatte (C oder D) erkennt. Ist automatisch
gedrückt wenn die “Sequenzielle (+/-)” Schaltplatte montiert ist. Halten Sie diesen Bereich
sauber, um jedwede Erkennungsprobleme zu vermeiden.
M: Führungsnut zur leichteren Positionierung der Schaltplatte.
Page 47

10/18
ANPASSEN DES SCHALTUNGSWIDERSTANDS
VERSTÄRKEN DES WIDERSTANDS
MINDERN DES WIDERSTANDS
* Nur bei der “H-Schaltung (7+1)” Schaltplatte anwendbar.
* Bevor Sie irgendwelche Anpassungen vornehmen, muß die “H-Schaltung (7+1)”
Schaltplatte in ihrer Originalposition montiert worden sein. (Siehe Diagramm unten).
1. Nutzen Sie einen großen Schlitzschraubendreher und plazieren diesen im Schlitz am Kopf der
internen Spannschraube (G), die sich unten links am Gehäuse der Gangschaltung befindet.
2. Um den Widerstand leicht zu erhöhen: Drehen Sie die Schraube im Uhrzeigersinn.
3. Um den Widerstand leicht zu mindern: Drehen Sie die Schraube entgegen des Uhrzeigersinns.
2 volle Umdrehungen reichen aus, um von einem in das andere Extrem zu
gelangen.
Um eine Beschädigung des Systems zu verhindern:
- Hören Sie mit dem Festschrauben der Schraube auf wenn Sie einen starken
Widerstand bemerken.
- Hören Sie mit dem Lösen der Schraube auf wenn diese locker und wackelig ist.
Page 48

11/18
INSTALLATIONSANWEISUNGEN FÜR SPIELKONSOLEN
PLAYSTATION®4/PLAYSTATION®5
Je nach PS4™/PS5™-Spiel oder dem benutzten Rennlenker:
PS4™ = Schließen(*) Sie die TH8A Gangschaltung direkt an den PS4™ USB-Port an
- Verbinden Sie den DIN-Stecker der TH8A Gangschaltung mit dem DIN/USB Kabel.
- Schließen Sie die TH8A Gangschaltung an einen der USB-Ports Ihrer PS4™ an.
- Starten Sie das Spiel.
Die TH8A Gangschaltung kann dann sowohl mit der H-SCHALTUNG (7+1) als auch der
SEQUENZIELLEN (+/-) Schaltplatte benutzt werden.
Oder
PS4™/PS5™ = Schließen (*) Sie die TH8A Gangschaltung direkt an die Thrustmaster-
Rennlenkerbasis an
(nur anwendbar bei Verwendung eines Thrustmaster-Lenkrads mit einem eingebauten
Gangschaltungs-Anschluss)
- Verbinden Sie den DIN-Stecker der TH8A Gangschaltung mit dem abnehmbaren DIN/DIN Kabel.
- Schließen Sie die TH8A Gangschaltung an die Gangschaltungsbuchse hinten an der
Rennlenkerbasis an.
- Schließen Sie Ihren Rennlenker an und starten das Spiel.
Die TH8A Gangschaltung funktioniert dann sowohl mit der H-SCHALTUNG (7+1) als auch der
SEQUENZIELLEN (+/-) Schaltplatte.
(*) Wichtige Empfehlungen für das PS4™/PS5™ System (nur anwendbar bei Verwendung eines
Thrustmaster-Lenkrads mit einem eingebauten Gangschaltungs-Anschluss)
- PS4™/PS5™: Wenn Sie die SEQUENZIELLE (+/-) Schaltplatte der TH8A Gangschaltung nutzen,
können Sie die Gangschaltung mittels des abnehmbaren DIN/DIN Kabels hinten am Rennlenker
anschließen. Die TH8A Gangschaltung ist nun an die UP (= R1) und DOWN (= L1) Schaltwippen
angeschlossen. Mit diesem Rennlenker funktioniert die SEQUENZIELLE (+/-) Schaltplatte der TH8A
Gangschal tung mit 100% der Rennspiele für PS4™/PS5™, die mit dem Rennlenker kompatibel sind.
- PS4™: Einige Spiele ermöglichen Ihnen die gleichzeitige Nutzung von zwei TH8A Gangschaltungen:
Eine TH8A Gangschaltung mit einer H-SCHALTUNG Schaltplatte (7+1), die an einen USB-Port der
+ Eine TH8A Gangschaltung mit einer SEQUENZIELLEN Schaltplatte (+/-), die hinten an den
* Eine Liste der kompatiblen Spiele für PS4™/PS5™, die auch mit der TH8A Gangschaltung
kompatibel sind, finden Sie hier:
https://support.thrustmaster.com (klicken Sie auf Lenkräder / TH8A Shifter und wählen dann SpieleEinstellungen). Diese Liste wird regelmäßig aktualisiert.
* Wir empfehlen bei PS4™ Systemen, daß Sie keinen USB-Hub zum Anschluss des Rennlenkers
oder der TH8A Gangschaltung an die Spielkonsole benutzen. Schließen Sie die Geräte direkt an die
USB-Ports der PS4™ an.
* Einige Spiele erfordern, daß Sie die neusten verfügbaren Aktualisierungen für die TH8A
Gangschaltung installieren, damit diese ordnungsgemäß funktioniert (Ihre Spielkonsole muß mit
dem Internet verbunden sein).
PS4™ angeschlossen wird
Rennlenker angeschlossen wird.
Page 49

12/18
XBOX ONE/XBOX SERIES
= Bei allen Xbox One/Xbox Series Spielen: Schließen Sie die TH8A
Gangschaltung immer direkt an die Thrustmaster-Rennlenkerbasis an
(NIEMALS an den USB-Port der Spielkonsole).
- Verbinden Sie den DIN-Stecker der TH8A Gangschaltung mit dem abnehmbaren DIN/DIN Kabel.
- Schließen Sie die TH8A Gangschaltung an die Gangschaltungsbuchse hinten an der
Rennlenkerbasis an.
- Schließen Sie Ihren Rennlenker an und starten das Spiel.
Die TH8A Gangschaltung funktioniert dann sowohl mit der H-SCHALTUNG (7+1) als auch der
SEQUENZIELLEN (+/-) Schaltplatte.
Wichtige Empfehlungen für die Xbox One/Xbox Series:
Wenn Sie die SEQUENZIELLE (+/-) Schaltplatte der TH8A Gangschaltung nutzen, ist die
Gangschaltung nun an die UP (= RB) und DOWN (= LB) Schaltwippen angeschlossen.
Wenn Sie die SEQUENZIELLE Schaltplatte (+ /-) der TH8A Gangschaltung nutzen, funktioniert
die Gangschaltung mit 100% der Rennspiele für Xbox One/Xbox Series, die mit dem
Thrustmaster-Rennlenker für Xbox One/Xbox Series kompatibel sind.
* Eine Liste der kompatiblen Spiele für Xbox ™, die auch mit der TH8A Gangschaltung
kompatibel sind, finden Sie hier:
https://support.thrustmaster.com (klicken Sie auf Lenkräder / TH8A Shifter und wählen
dann Spiele-Einstellungen). Diese Liste wird regelmäßig aktualisiert.
* Einige Spiele erfordern, daß Sie die neusten verfügbaren Aktualisierungen für die
TH8A Gangschaltung installieren, damit diese ordnungsgemäß funktioniert (Ihre
Spielkonsole muß mit dem Internet verbunden sein).
Um die Kompatibilität Ihres Thrustmaster Rennlenkers für die Xbox One/Xbox
Series mit der TH8A Gangschaltung zu gewährleisten, kann es erforderlich sein,
die Firmware des Rennlenkers mit der neuesten verfügbaren Version für PC hier
zu aktualisieren: https://support.thrustmaster.com (klicken Sie auf Lenkräder /
TH8A Shifter und wählen dann Firmware).
Page 50

13/18
INSTALLATIONSANWEISUNGEN FÜR PC
= Bei allen PC-Spielen (*): Schließen Sie TH8A Gangschaltung immer
direkt an einen der USB-Ports des PCs an.
- Verbinden Sie den DIN-Stecker der TH8A Gangschaltung mit dem DIN/USB Kabel.
- Schließen Sie die TH8A Gangschaltung an einen der USB-Ports Ihres PCs an.
- Beim Anschluss an einen PC wird die TH8A Gangschaltung als Plug&Play Gerät automatisch
erkannt und installiert.
- Das Gerät wird dann als 'T500 RS Gear Shift' in der Windows
- Klicken Sie bitte auf Eigenschaften, um die Merkmale des Gerätes zu testen und zu betrachten.
- Starten Sie das Spiel.
Sie können nun Ihr Rennen beginnen!
®
Systemsteuerung aufgeführt.
(*)Wichtige Empfehlungen für PCs (nur anwendbar bei Verwendung eines
Thrustmaster-Lenkrads mit einem eingebauten Gangschaltungs-Anschluss)
- Wenn Sie die SEQUENZIELLE (+/-) Schaltplatte der TH8A Gangschaltung nutzen, können
Sie die Gangschaltung mittels des abnehmbaren DIN/DIN Kabels hinten am Rennlenker
anschließen. Die TH8A Gangschaltung ist nun an die UP (= 2) und DOWN (= 1) Schaltwippen
angeschlossen. Mit diesem Rennlenker funktioniert die SEQUENZIELLE (+/-) Schaltplatte der TH8A
Gangschaltung mit 100% der Rennspiele für PC, die mit dem Rennlenker kompatibel sind.
- - Einige Spiele ermöglichen Ihnen die gleichzeitige Nutzung von zwei TH8A Gangschaltungen:
Eine TH8A Gangschaltung mit einer H-SCHALTUNG Schaltplatte (7+1), die an einen USB-Port des
+ Eine TH8A Gangschaltung mit einer SEQUENZIELLEN Schaltplatte (+/-), die hinten an den
* Auf dem PC ist die Thrustmaster-Gangschaltung kompatibel mit:
- Allen Spielen, die MULTI-USB und Gangschaltungen unterstützen.
- Allen Lenkern auf dem Markt.
* Wir empfehlen, daß Sie den Rennlenker und auch die TH8A Gangschaltung direkt an
die USB 2.0 Ports (nicht USB 3.0) Ihres PCs anschließen. Bitte nutzen Sie keinen
zwischengeschalteten Hub.
* Bei einigen PC-Spielen müssen Sie die neusten Spielaktualisierungen herunterladen
und installieren, um eine ordnungsgemäße Funktion der TH8A Gangschaltung zu
gewährleisten.
* Bei einigen PC-Spielen (um Konflikte zwischen Lenker und Gangschaltung zu
vermeiden) kann es nötig sein:
- Nichts auf die Gangschaltungshebel des Lenkers zu mappen.
- Die Funktion “Halte Button zum Schalten” zu aktivieren.
PCs angeschlossen wird
Rennlenker angeschlossen wird.
Page 51

14/18
MAPPING AUF PC
SOFTWARE PAKET
Ein “Softwarepaket” ist hier erhältlich: https://support.thrustmaster.com (klicken Sie auf Lenkräder /
TH8A Shifter und wählen dann Treiber).
- Nach der Installation des Softwarepaketes sind Sie in der Lage:
* Die Firmware-Version Ihrer Gangschaltung zu überprüfen.
* Die Firmware mit der neusten Version zu aktualisieren (falls nötig).
* Die “BOOTLOADER”- Methode zu nutzen
(um Ihre Gangschaltung nach einem Verlust der Firmware wiederherzustellen).
* Auf ein angepasstes Steuermenü (Gamecontroller) auf dem PC zuzugreifen.
* Den ANALOGEN Modus (Handbremse) auf dem PC zu genießen.
ERWEITERTE KALIBRIERUNGSSOFTWARE
Die TH8A Gangschaltungskalibrierung wird automatisch ausgeführt.
Eine erweiterte Kalibrierungssoftware für PC ist ebenfalls hier erhältlich:
https://support.thrustmaster.com
Software). Diese ermöglicht Ihnen den Hub des Gangschalters nach Ihrem Gusto einzustellen.
Wenn alle Einstellungen vorgenommen wurden, sind diese sofort im internen Speicher der
Gangschaltung abgespeichert und können auf PS4™/PS5™, Xbox One/Xbox Series und PC
genutzt werden.
(klicken Sie auf Lenkräder / TH8A Shifter und wählen dann
Page 52

15/18
Ja nach Spiel oder Rennlenker (*) :
- Oder hinten am Rennlenker (DIN)
PS5™
(*)
ZUSAMMENFASSENDE ANWEISUNGEN ZUM ANSCHLUSS DER TH8A
GANGSCHALTUNG AN VERSCHIEDENE SYSTEME
Anschluss der TH8A Gangschaltung
PS4™
- Entweder direkt an das PS4™/PS5™
System (USB)
Immer hinten am Rennlenker (DIN)
XBOX ONE/XBOX SERIES Immer hinten am Rennlenker (DIN)
PC
Immer
direkt an den PC (USB)
(*) Für weitere Informationen über Ausnahmen lesen Sie bitte in den
Abschnitten über Wichtige Empfehlungen in den relevanten Abschnitten
des Handbuchs nach.
WARNUNG
* Schließen Sie niemals die TH8A Gangschaltung direkt an ein anderes Gerät als einen
Thrustmaster Rennlenker an, auch wenn das Gerät über einen identischen DIN-Stecker verfügt.
Dies könnte die TH8A Gangschaltung oder das andere Gerät beschädigen.
FEHLERBESEITIGUNG
* Meine Gangschaltung funktioniert nicht richtig oder ist falsch kalibriert:
- Schalten Sie Ihren Computer oder Ihre Konsole aus, trennen Ihre Gangschaltung und stecken
diese wieder ein, schalten den PC/die Konsole wieder ein und starten Ihr Spiel erneut.
- Unter “Optionen/Controller” in Ihrem Spiel wählen oder richten Sie die geeignetste Konfiguration
ein.
- Lesen Sie im Handbuch Ihres Spiels oder in der Online-Hilfe für weitere Information nach.
- Verschiedene Hilfethemen und Tips (nicht in diesem Handbuch enthalten), Liste der kompatiblen
Spiele finden Sie auf der https://support.thrustmaster.com
TH8A Shifter.
- Auf der Xbox One/Xbox Series: Um die Kompatibilität Ihres Thrustmaster Rennlenkers für die
Xbox One/Xbox Series mit der TH8A Gangschaltung zu gewährleisten, kann es erforderlich sein,
die Firmware des Rennlenkers mit der neuesten verfügbaren Version für PC hier zu aktualisieren:
https://support.thrustmaster.com (klicken Sie auf Lenkräder / TH8A Shifter und wählen dann
Firmware).
Website. Klicken Sie auf Lenkräder /
Page 53

16/18
Kunden-Garantie-Information
Guillemot Corporation S.A. mit Hauptfirmensitz in Place du Granier, B.P. 97143, 35571 Chantepie,
France (fortfolgend “Guillemot”) garantiert Kunden weltweit, daß dieses Thrustmaster Produkt frei
von Mängeln in Material und Verarbeitung für eine Gewährleistungsfrist ist, die mit der Frist für eine
Mängelrüge bezüglich des Produktes übereinstimmt. In den Ländern der Europäischen Union
entspricht diese einem Zeitraum von zwei (2) Jahren ab Kaufdatum des Thrustmaster Produktes. In
anderen Ländern entspricht die Gewährleistungsfrist der zeitlichen Begrenzung für eine Mängelrüge
bezüglich des Thrustmaster Produktes in Übereinstimmung mit anwendbarem Recht des Landes, in
dem der Kunde zum Zeitpunkt des Erwerbs eines Thrustmaster Produktes wohnhaft ist. Sollte eine
entsprechende Regelung in dem entsprechenden Land nicht existieren, umfasst die
Gewährleistungspflicht einen Zeitraum von einem (1) Jahr ab dem originären Kaufdatum des
Thrustmaster Produktes.
Sollten bei dem Produkt innerhalb der Gewährleistungsfrist Defekte auftreten, kontaktieren Sie
unverzüglich den technischen Kundendienst, der die weitere Vorgehensweise anzeigt. Wurde der
Defekt bestätigt, muß das Produkt an die Verkaufsstelle (oder an eine andere Stelle, je nach
Maßgabe des technischen Kundendienstes) retourniert werden.
Im Rahmen dieser Garantie sollte das defekte Produkt des Kunden, je nach Entscheidung des
technischen Kundendienstes, entweder ausgetauscht oder repariert werden. Sollte während der
Garantiezeit das Thrustmaster Produkt einer derartigen Instandsetzung unterliegen und das
Produkt während eines Zeitraums von mindestens sieben (7) Tagen nicht benutzbar sein, wird
diese Zeit der restlichen Garantiezeit hinzugefügt. Diese Frist läuft ab dem Zeitpunkt, an dem der
Wunsch des Verbrauchers bezüglich einer Intervention vorliegt oder ab dem Tag, an dem das
fragliche Produkt zur Instandsetzung zur Verfügung steht, falls das Datum, an dem das Produkt zur
Instandsetzung zur Verfügung steht, dem Datum des Antrags auf Intervention nachfolgt. Wenn nach
geltendem Recht zulässig, beschränkt sich die volle Haftung von Guillemot und ihrer
Tochtergesellschaften auf die Reparatur oder den Austausch des Thrustmaster Produktes (inklusive
Folgeschäden). Wenn nach geltendem Recht zulässig, lehnt Guillemot alle Gewährleistungen der
Marktgängigkeit oder Eignung für einen bestimmten Zweck ab.
Der Gewährleistungsanspruch verfällt: (1) Falls das Produkt modifiziert, geöffnet, verändert oder ein
Schaden durch unsachgemäßen oder missbräuchlichen Gebrauch hervorgerufen wurde, sowie
durch Fahrlässigkeit, einen Unfall, Verschleiß oder irgendeinem anderen Grund – aber nicht durch
Material- oder Herstellungsfehler (einschließlich, aber nicht beschränkt auf, die Kombination der
Thrustmaster Produkte mit ungeeigneten Elementen, insbesondere Netzteile, Akkus, Ladegeräte,
oder andere Elemente, die von Guillemot für dieses Produkt nicht mitgeliefert wurden); (2) Falls das
Produkt für eine andere Nutzung als zum privaten Hausgebrauch, einschließlich für professionelle
oder kommerzielle Zwecke (z. B. Spielhallen, Training, Wettkämpfe) verwendet wird; (3) Im Falle
der Nichteinhaltung der durch den technischen Support erteilten Anweisungen; (4) Durch Software.
Die besagte Software ist Gegenstand einer speziellen Garantie; (5) Bei Verbrauchsmaterialien
(Elemente, die während der Produktlebensdauer ausgetauscht werden, wie z. B. Einwegbatterien,
Ohrpolster für ein Audioheadset oder für Kopfhörer); (6) Bei Accessoires (z. B. Kabel, Etuis,
Taschen, Beutel, Handgelenk-Riemen); (7) Falls das Produkt in einer öffentlichen Versteigerung
verkauft wurde.Diese Garantie ist nicht übertragbar.
Die Rechte des Kunden in Übereinstimmung mit anwendbarem Recht bezüglich des Verkaufs auf
Konsumgüter im Land der/der Kunden/Kundin wird durch diese Garantie nicht beeinträchtigt.
Page 54

17/18
Zusätzliche Gewährleistungsbestimmungen
Während der Garantiezeit bietet Guillemot grundsätzlich keine Ersatzteile an, da der technische
Kundendienst der einzige autorisierte Partner zum Öffnen und/oder Instandsetzen jedweden
Thrustmaster-Produkts ist (mit Ausnahme von irgendwelchen Instandsetzungsprozeduren, die der
Kunde nach Maßgabe des technischen Kundendienstes und durch schriftliche Instruktionen sowie
der Zurverfügungstellung des/der eventuell erforderlichen Ersatzteil(s)(e) selbst in der Lage ist
durchzuführen – zum Beispiel aufgrund der Einfachheit und einer nicht erforderlichen
Geheimhaltung des Instandsetzungsverfahrens).
Aufgrund seiner Innovationszyklen und um sein Know-how und seine Geschäftsgeheimnisse zu
schützen, bietet Guillemot grundsätzlich keine Instandsetzungs-Benachrichtigung oder Ersatzteile
für alle Thrustmaster Produkte an, deren Garantiezeit abgelaufen ist.
Haftung
Wenn nach dem anwendbaren Recht zulässig, lehnen Guillemot Corporation S.A. (fortfolgend
"Guillemot") und ihre Tochtergesellschaften jegliche Haftung für Schäden, die auf eine oder mehrere
der folgenden Ursachen zurückzuführen sind, ab: (1) das Produkt wurde modifiziert, geöffnet oder
geändert; (2) Nichtbefolgung der Montageanleitung; (3) unangebrachte Nutzung, Fahrlässigkeit, Unfall
(z. B. ein Aufprall); (4) normalem Verschleiß; (5) Die Verwendung des Produkts für jedwede andere
Nutzung als zum privaten Hausgebrauch, einschließlich professionelle oder kommerzielle Zwecke (z. B.
Spielhallen, Training, Wettkämpfe). Wenn nach anwendbarem Recht zulässig, lehnen Guillemot und
seine Niederlassungen jegliche Haftung für Schäden, die nicht auf einen Material- oder
Herstellungsfehler in Bezug auf das Produkt beruhen (einschließlich, aber nicht beschränkt auf, etwaige
Schäden, die direkt oder indirekt durch Software oder durch die Kombination der Thrustmaster
Produkte mit ungeeigneten Elementen, insbesondere Netzteile, Akkus, Ladegeräte, oder andere
Elemente, die von Guillemot für dieses Produkt nicht geliefert wurden), ab.
Page 55

18/18
COPYRIGHT
TECHNISCHER SUPPORT
*
*
© Guillemot Corporation S.A. 2021. Alle Rechte vorbehalten. Thrustmaster
Warenzeichen der Guillemot Corporation S.A. PlayStation
Sony Interactive Entertainment Inc. Windows® ist ein eingetragenes Warenzeichen der Microsoft
Corporation in den Vereinigten Staaten von Amerika und/oder anderen Ländern. Alle anderen
Handelsmarken sind im Besitz Ihrer jeweiligen Eigentümer. Illustrationen nicht verbindlich. Inhalte,
Design und Spezifikationen können ohne vorherige Ankündigung geändert werden und können von
Land zu Land unterschiedlich sein. Hergestellt in China.
Hinweise zum Umweltschutz
Wichtige Informationen. Die Farben und Verzierungen können abweichen.
Plastikhalterungen und Aufkleber bitte vor der Nutzung des Produktes entfernen.
www.thrustmaster.com
* Nur in der E U, dem Vereinigten Königreich und der Türkei anwendbar
In der Europäischen Union: Dieses Produkt darf nach Ende seiner Lebensdauer
nicht über den Hausmüll entsorgt werden, sondern muss an einem Sammelpunkt
für das Recycling von elektrischen und elektronischen Geräten abgegeben
werden.
Das Symbol auf dem Produkt, der Gebrauchsanleitung oder der Verpackung
weist darauf hin.
Die Werkstoffe sind gemäß ihrer Kennzeichnung wiederverwertbar. Mit der
Wiederverwertung, der stofflichen Verwertung oder anderen Formen von
Altgeräten leisten Sie einen wichtigen Beitrag zum Schutz unserer Umwelt. Bitte
erfragen Sie bei der Gemeindeverwaltung die zuständige Entsorgungsstelle.
Für alle anderen Länder: Bitte beachten Sie die lokalen Entsorgungsrichtlinien/Gesetze bezüglich elektrischen und elektronischen Equipments.
®
ist ein eingetragenes Warenzeichen von
®
ist ein eingetragenes
https://support.thrustmaster.com
Page 56

1/18
A Afneembare pookknop
E 2,5 mm inbussleutel (meegeleverd)
F Kabel-en DIN-connector
PlayStation®4/PlayStation®5 - Xbox One/Xbox Series - PC
TECHNISCHE KENMERKEN
(niet geïnstalleerd bij levering)
B Versnellingspook
C Schakelplaat, “H-patroon (7+1)”, verwisselbaar
(geïnstalleerd bij levering)
D Schakelplaat, “Sequentieel(+/-)”, verwisselbaar
(niet geïnstalleerd bij levering)
Handleiding
G Aandraaiboutje
H Instelbaar klemsysteem
I Schroefdraden voor montage in cockpit
DIN / USB Afneembare DIN / USB-kabel
DIN / DIN Afneembare DIN / DIN-kabel
Page 57

2/18
WAARSCHUWING
Lees, voordat u dit product gebruikt, deze handleiding zorgvuldig door. Bewaar deze handleiding om
hem eventueel op een later tijdstip te kunnen raadplegen.
Waarschuwing – Elektrische schok
* Gebruik en bewaar dit product op een droge plek, uit de zon en stofvrij.
* Let bij het insteken van connectors op de juiste wijze van insteken.
* Trek nooit te hard aan een kabel of connector en zorg dat er geen knikken in kabels komen.
* Mors geen vloeistoffen op het product en/of de connectors.
* Veroorzaak geen kortsluiting.
* Haal dit product niet uit elkaar (behalve voor eventuele in deze handleiding beschreven
aanpassingen), verbrand het niet en stel het niet bloot aan hoge temperaturen.
Waarschuwing – Mogelijk letsel ten gevolge van herhaalde bewegingen
Het gebruik van een versnellingspook bij het gamen kan leiden tot pijn in spieren en/of gewrichten.
Om problemen te voorkomen:
* Vermijd te lang gamen.
* Neem na elk uur gamen een pauze van 10 of 15 minuten.
* Bij last van vermoeidheid of pijn in handen, polsen of armen, moet het gamen worden gestopt en
een paar uur worden gerust voordat er weer verder kan worden gespeeld.
* Als de hier boven beschreven sy mptomen van pijn of las t blijven aanhouden t ijdens het gamen, m oet
het gamen worden gestopt en moet de huisarts worden geraadpleegd.
* Controleer dat de voet van de versnellingspook goed en correct vastzit zoals beschreven in deze
handleiding.
Waarschuwing – Beknellingsgevaar van sleuven in schakelplaten
* Houd de schakelplaten buiten het bereik van kinderen.
* Steek tijdens het spelen nooit een vinger of een ander lichaamsdeel in de sleuven van de
schakelplaten.
NOOIT
Page 58
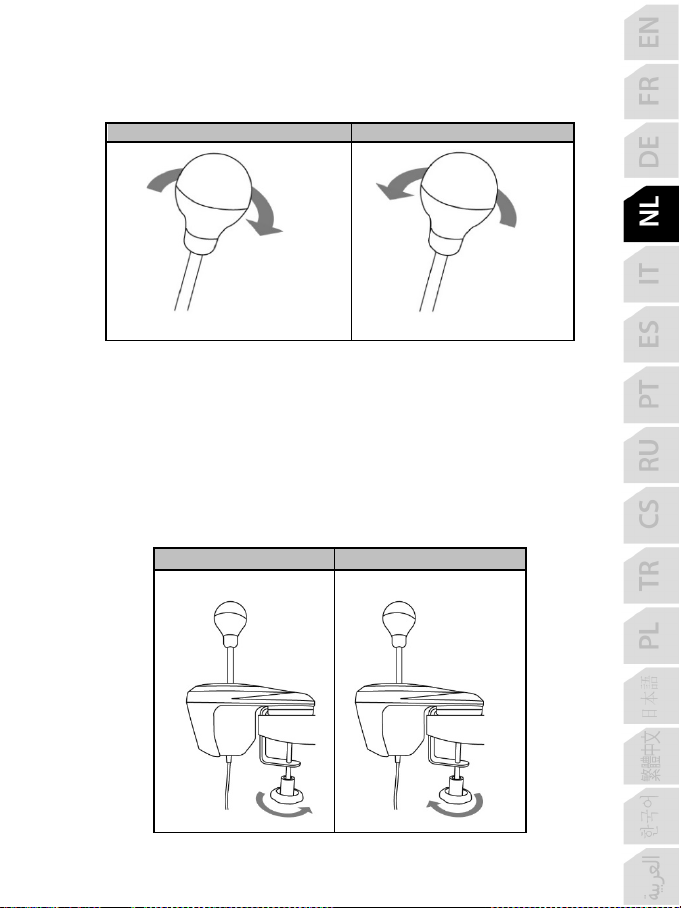
3/18
VASTDRAAIEN
LOSDRAAIEN
VASTDRAAIEN
LOSDRAAIEN
DE KNOP VAN DE SCHAKELPOOK BEVESTIGEN
1. De knop van de schakelpook (A) op de pook (B) bevestigen: draai de knop rechtsom (met de
wijzers van de klok mee).
2. De knop losdraaien: draai de knop linksom (tegen de wijzers van de klok in).
DE VERSNELLINGSPOOK BEVESTIGEN
De pook is zo ontworpen dat hij op diverse manieren kan worden bevestigd:
- Tafels, bureaus of planken van 1 tot 55 mm dik, via het klemsysteem (H).
- Cockpits, via de ingebouwde schroefdraden (het klemsysteem is afneembaar).
De versnellingspook op een tafel of bureaublad bevestigen.
1. Zet de tong van de pook op een tafel of ander vlak oppervlak.
2.
Vastdraaien: draai het klemwiel linksom (tegen de wijzers van de klok in).
3.
Losdraaien: draai het klemwiel rechtsom (met de wijzers van de klok mee).
Page 59

4/18
Het klemsysteem plaatsen en draaien (kan tot 360° worden verdraaid)
1. Draai met behulp van de meegeleverde 2,5 mm inbussleutel (E) de drie boutjes waarmee het
klemsysteem (H) vastzit een beetje los.
Het klemsy steem (en daarmee d e hele schakelpook) k an nu met de hand tot 360° worden gedr aaid.
2. Kies de gewenste stand van de pook (hieronder staan drie van de vele mogelijke standen
afgebeeld).
Draai de drie boutjes weer vast waarmee het klemsysteem op zijn plaats zit.
Page 60

5/18
De versnellingspook in een cockpit monteren
1. Draai met behulp van de meegeleverde 2,5 mm inbussleutel (E) de drie boutjes waarmee het
klemsysteem (H) vastzit helemaal los en verwijder de boutjes. Maak het klemsysteem los
van de pook.
2. Draai twee M6-boutjes (niet meegeleverd) in de cockpitplank en in twee van de vier smalle
schroefdraden (I) onder op de tong van de versnellingspook.
Let op: gebruik geen M6-boutjes die te lang zijn. Deze kunnen de
toplaag van de tong van de pook beschadigen.
Een montagesjabloon voor cockpits voor de schakelpook is beschikbaar op
https://support.thrustmaster.com
(klik op Racing Wheels / TH8A Shifter, selecteer
Handleiding).
Page 61

6/18
DE VERSNELLINGSPLAATJES PLAATSEN EN DRAAIEN (KUNNEN TOT
360° WORDEN VERDRAAID)
1. Draai met behulp van de meegeleverde 2,5 mm inbussleutel (E) de vier boutjes waarmee de
schakelplaat (C of D) op zijn plaats zit een beetje los.
De schakelplaat kan nu met de hand tot 360° worden gedraaid.
2. Kies de gewenste stand van de pook (hieronder staan drie van de vele mogelijke standen
afgebeeld).
3. Draai de vier boutjes weer vast waarmee de schakelplaat op zijn plaats zit.
Page 62
7/18
DE “H-PATROON (7+1)” SCHAKELPLAAT VERWISSELEN VOOR DE
“SEQUENTIËLE (+/-)” SCHAKELPLAAT
1. Draai de knop van de schakelpook los (tegen de wijzers van de klok in) en verwijder de knop (A).
2. Draai met behulp van de meegelever de 2,5 mm inbussleutel (E) de vier boutjes waarmee de “ Hpatroon (7+1)” schakelplaat vastzit helemaal los. Verwijder de schakelplaat.
Let op dat er tijdens het losmaken van de plaat geen boutjes in
het mechanisme van de pook vallen.
3. Draai het binnenwerk met de hand 90° naar rechts (met de wijzers van de klok mee).
Installeer vervolgens de “Sequentiële (+/-)” schakelplaat.
Page 63
8/18
4. Draai met behulp van de meegeleverde 2,5 mm inbussleutel (E) de vier boutjes weer goed vast
waarmee de “Sequentiële (+/-)” schakel plaat op zijn pl aats wordt gehoude n. Schroef de knop van
de schakelpook weer vast (rechtsom, met de wijzers van de klok mee).
Voer deze procedure in omgekeerde volgorde uit om de “H-patroon (7+1)” schakelplaat te
verwisselen.
Page 64

9/18
Opmerkingen over de bovenkant van het binnenwerk:
J: Vier schroefdraden voor het bevestigen van schakelplaat (C) of (D).
K: Twee boutjes waarmee het binnenwerk vastzit (niet losdraaien).
L:
Schakelaar die automatisch herkent welke schakelplaat wordt gebruikt ((C) of (D)). De schakelaar
wordt automatisch ingedrukt als de “Sequentiële (+/-)” schakelplaat is geïnstalleerd. Houd de
schakelaar schoon om problemen bij het detecteren te voorkomen.
M:
Opening voor het gemakkelijker positioneren van de schakelplaten.
Page 65

10/18
DE WEERSTAND VAN HET SCHAKELEN AANPASSEN
DE WEERSTAND VERHOGEN
DE WEERSTAND VERLAGEN
* Is alleen van toepassing op de “H-patroon (7+1)” schakelplaat.
* Voordat er een aanpassing wordt gemaakt, moet de “H-patroon (7+1)” schakelplaat
in de originele positie zijn gemonteerd (zie onderstaande afbeelding).
1. Gebruik een grote schroevendraaier voor het verdraaien van het interne aandraaiboutje (G) dat
zich linksonder in de pookbehuizing bevindt.
2.
De weerstand verhogen: draai het boutje rechtsom (met de wijzers van de klok mee).
3.
De weerstand verlagen: draai het boutje linksom (tegen de wijzers van de klok in).
Het verschil tussen de laagste en de hoogste weer stand is het boutje twee keer
Schade aan het system voorkomen:
- Stop met vastdraaien van het boutje als het moeizaam gaat.
- Stop met het losdraaien als het boutje los komt te zitten.
volledig rond draaien.
Page 66

11/18
SETUP-INSTRUCTIES VOOR GAMECONSOLES
PLAYSTATION®4/PLAYSTATION®5
Afhankelijk van de PS4™/PS5™-game of het racestuur dat u gebruikt:
PS4™ = Sluit (*) de TH8A Shifter rechtstreeks aan op de USB-poort van de PS4™.
- Sluit de DIN-connector van de TH8A Shifter aan op de DIN / USB-kabel.
- Sluit de TH8A Shifter aan op een van de USB-poorten van de PS4™.
- Start de game.
De TH8A Shifter kan vervolgens gebruikt worden met de H-Patroon (7+1) of de Sequentiële
(+/-) schakelplaat.
Of
PS4™/PS5™ = Sluit (*) de TH8A Shifter rechtstreeks aan op de voet van het Thrustmasterracestuur.
(alleen van toepassing als het Thrustmaster-racestuur is voorzien van ingebouwde schakelpookconnector)
- Sluit de DIN-connector van de TH8A Shifter aan op de afneembare DIN / DIN-kabel.
- Sluit de TH8A Shifter aan op de connector op de achterkant van de voet van het racestuur.
- Sluit uw racestuur aan en start de game.
De TH8A Shifter kan vervolgens gebruikt worden met de H-Patroon (7+1) of de Sequentiële (+/-)
schakelplaat.
(*) Belangrijke aanbevelingen voor het PS4™/PS5™-systeem (alleen van toepassing als een
Thrustmaster-racestuur met een ingebouwde connector voor een schakelpook wordt gebruikt)
- PS4™/PS5™: Bij gebruik van de Sequentiële (+/-) schakelplaat van de TH8A Shifter kunt u de
schakelpook ook op de achterzijde van het racest uur aansluiten met de afneembare DIN / DINkabel. De TH8A Shifter is dan verbonden met de UP (= R1) en DOWN (= L1) schakelflippers van het
racestuur.
Met dit racestuur werkt de Sequentiële (+/-) schakelplaat van de TH8A Shifter met 100% van de
PS4™/PS5™-racegames die compatibel zijn met het racestuur.
- PS4™: In sommige games is het mogelijk twee TH8A Shifters tegelijkertijd te gebruiken:
Eén TH8A Shifter met H-patroon (7+1) schakelplaat aangesloten op USB-poort van PS4™
+ Eén TH8A Shifter met Sequentiële (+/-) schakelplaat aangesloten op achterzijde van racestuur
* Een overzicht van games voor de PS4™/PS5™ die compatibel zijn met de TH8A Shifter
en de van toepassing zijnde aansluitinstructies (*) (verschillend per game) zijn
beschikbaar op: https://support.thrustmaster.com (klik op Racing Wheels / TH8A Shifter,
selecteer Spellen instellingen). Dit overzicht wordt regelmatig bijgewerkt.
* Op PS4™-systemen raden wij u aan geen USB-hub te gebruiken bij het aansluiten van
het racestuur of de TH8A Shifter. Sluit het apparaat altijd rechtstreeks aan op de USBpoorten van de PS4™.
* Voor sommige games is het voor een correct functioneren nodig dat u de meest recente
updates voor de TH8A Shifter installeert (uw gameconsole moet verbonden zijn met internet).
Page 67

12/18
XBOX ONE/XBOX SERIES
= Sluit bij elke Xbox One/Xbox Series-game de TH8A Shifter altijd
rechtstreeks aan op de voet van het Thrustmaster-racestuur en NOOIT op
de USB-poort van de gameconsole.
- Sluit de DIN-connector van de TH8A Shifter aan op de afneembare DIN / DIN-kabel.
- Sluit de TH8A Shifter aan op de connector op de achterkant van de voet van het racestuur.
- Sluit uw racestuur aan en start de game.
De TH8A Shifter kan vervolgens gebruikt worden met de H-Patroon (7+1) of de Sequentiële (+/-)
schakelplaat.
Belangrijke opmerking over de Xbox One/Xbox Series:
Bij gebruik van de Sequentiële (+/-) schakelplaat van de TH8A Shifter is de schakelpook verbonden
met de UP (= RB) en DOWN (= LB) schakelflippers van het racestuur.
Met dit racestuur werkt de Sequentiële (+ /-) schakelplaat van de TH8A Shifter met 100% van de
Xbox One/Xbox Series-racegames die compatibel zijn met het racestuur.
* Een overzicht van Xbox One/Xbox Series-games die compatibel zijn met de TH8A
Shifter is te vinden op: https://support.thrustmaster.com (klik op Racing Wheels / TH8A
Shifter, selecteer Spellen instellingen). Dit overzicht wordt regelmatig bijgewerkt.
* Voor sommige games is het voor een correct functioneren nodig dat u de meest recente
updates voor de TH8A Shifter installeert (uw gameconsole moet verbonden zijn met
internet).
Om de compatibiliteit van uw Thrustmaster-racestuur voor de Xbox One/Xbox
Series met de TH8A Shifter te waarborgen, moet u mogelijk de firmware van het
racestuur via uw pc bijwerken met de nieuwste versie die te downloaden is op:
https://support.thrustmaster.com (klik op Racing Wheels / TH8A Shifter, selecteer
Firmware).
Page 68

13/18
SETUP-INSTRUCTIES VOOR DE PC
= Sluit bij elke pc-game (*) de TH8A Shifter altijd rechtstreeks aan op een
van de USB-poorten van de pc.
- Sluit de DIN-connector van de TH8A Shifter aan op de DIN / USB-kabel.
- Sluit de TH8A Shifter aan op een van de USB-poorten van de pc.
- De TH8A Shifter is een Plug & Play apparaat wanneer het is aangesloten op een pc en wordt
automatisch gedetecteerd en geïnstalleerd.
- Het apparaat verschijnt vervolgens als 'T500 RS Gear Shift' in het Configuratiescherm van
Windows®.
- Klik op Eigenschappen om de functies van het apparaat te bekijken en te testen.
- Start de game.
Nu kan er geracet worden!
(*) Belangrijke aanbevelingen voor een pc (alleen van toepassing als een
Thrustmaster-racestuur met een ingebouwde connector voor een schakelpook
wordt gebruikt)
- Bij gebruik van de Sequentiële (+/-) schakelplaat van de TH8A Shifter kunt u de schakelpook
ook op de achterzijde van het racestuur aansluiten met de afneembare DIN / DIN-kabel. De
TH8A Shifter is dan verbonden met de UP (= 2) en DOWN (= 1) schakelflippers van het racestuur.
Met dit racestuur werkt de Sequentiële (+/-) schakelplaat van de TH8A Shifter met 100% van de pcracegames die compatibel zijn met het racestuur.
- In sommige games is het mogelijk twee TH8A Shifters tegelijkertijd te gebruiken:
Eén TH8A Shifter met een H-patroon (7+1) schakelplaat aangesloten op de USB-poort van de pc
+ Eén TH8A Shifter met een Sequentiële (+/-) schakelplaat aangesloten op de achterzijde van het
* Op een pc is de Thrustmaster-schakelpook compatibel met:
- alle games die MULTI-USB en schakelpoken ondersteunen.
- alle racesturen op de markt.
* Wij adviseren het racestuur en de TH8A Shifter rechtstreeks aan te sluiten op een USB
2.0-poort (geen USB 3.0) van de pc en niet via een USB-hub.
* Voor sommige pc-games, moeten de meest recente updates worden geïnstalleerd via
internet voor een blijvende correcte werking van de TH8A-schakelpook.
* Voor sommige pc-games kan het om conflicten tussen het stuur en de pook te
voorkomen, nodig zijn om :
- niets toe te wijzen aan de schakelflippers van het stuur.
- de functie “Hold button for gear” (Knop vasthouden voor versnelling) in te schakelen.
racestuur
Page 69

14/18
MAPPING OP DE PC
SOFTWAREBUNDEL
Een “softwarebundel” is te downloaden op: https://support.thrustmaster.com (klik op Racing Wheels
/ TH8A Shifter, selecteer Drivers).
- Functionaliteit van de softwarebundel:
* controleren van de firmwareversie van de schakelpook.
* de firmware bijwerken, indien nodig, met de meest recente versie.
* gebruik van de “BOOTLOADER-methode”
(de werking van de schakelpook herstellen als de firmware niet meer werkt)
* toegang tot een specifiek Controlepaneel (gamecontroller) op de pc.
* op de pc genieten van de analoge modus (handrem)
GEAVANCEERDE KALIBRATIESOFTWARE
De kalibratie van het schakelen van de TH8A gebeurt automatisch.
U kunt geavanceerde kalibratiesoftware voor de pc downloaden op: https://support.thrustmaster.com
(klik op Racing Wheels / TH8A Shifter, selecteer Software). Hiermee stelt u de gewenste slag van de
pook in.
De gemaakte instellingen worden onmiddellijk opgeslagen in het interne geheugen van de pook en
kunnen op de pc, PS4™/PS5™ en Xbox One/Xbox Series worden gebruikt.
Page 70

15/18
Afhankelijk van de game of het racestuur(*):
Altijd op de achterkant van het racestuur
(DIN)
Altijd op de achterkant van het racestuur
(DIN)
SAMENVATTENDE INSTRUCTIES VOOR HET AANSLUITEN VAN DE
TH8A SHIFTER OP VERSCHILLENDE SYSTEMEN
De TH8A Shifter aansluiten
PS4™
- Of rechtstreeks op de PS4™/PS5™ (USB)
- Of op de achterkant van het racestuur (DIN)
PS5™
XBOX ONE/XBOX SERIES
PC Altijd(*) rechtstreeks op de pc (USB)
(*) Raadpleeg voor meer informatie over eventuele uitzonderingen de
Belangrijke aanbevelingen op de betreffende pagina's van de handleiding.
WAARSCHUWING
* Sluit de TH8A Shifter nooit rechtstreeks aan op een ander apparaat dan een Thrustmasterracestuur, zelfs als het apparaat beschikt over een identieke DIN-connector. Dit kan schade
veroorzaken aan de TH8A Shifter of het andere apparaat.
VERHELPEN VAN PROBLEMEN
* Mijn schakelpook werkt niet goed of lijkt niet goed gekalibreerd te zijn:
- Zet de computer of console uit, koppel de schakelpook los, sluit de pook opnieuw aan en start de
game opnieuw op.
- Ga in de game naar het menu met opties voor de controller en selecteer de beste configuratie, of
maak deze aan.
- Raadpleeg de handleiding of de online help van de game voor meer informatie.
- Aanvullende helpinformatie en tips (niet aanwezig in deze handleiding), een overzicht van
compatibele games, enz, zijn beschikbaar op de website https://support.thrustmaster.com
Racing Wheels / TH8A Shifter.
- Om op de Xbox One/Xbox Series de compatibiliteit van uw Thrustmaster-racestuur voor de Xbox
One/Xbox S eries met de TH8A Shifter te waarborgen, moet u mogelijk de firmware van het rac estuur via
uw pc bijwerken met de nieuwste versie die te downloaden is op: https://support.thrustmaster.com (klik
op Racing Wheels / TH8A Shifter, selecteer Firmware).
. Klik op
Page 71

16/18
Informatie met betrekking tot kopersgarantie
Wereldwijd garandeert Guillemo t Corporation S.A., h et statutair adres gev estigd aan de Place d u Granier,
B.P. 97143, 35571 Chantepie, Frankrijk, (hierna te noemen “Guillemot”) aan de de koper dat dit
Thrustmaster-product vrij zal zijn van m ateriaal- en fabricagefouten gedurende een garantieperiode gelijk
aan de tijd maximaal vereist om een restitutie/vervanging voor dit product te claimen. In landen van de
Europese Unie komt dit overeen met een periode van twee (2) jaar vanaf het moment van levering van
het Thrustm aster-product. In andere landen kom t de garantieperio de overeen met de ti jd maximaal ver eist
om een restitutie/vervanging voor dit Thrustmaster-product te claimen zoals wettelijk is vastgelegd in het
land waarin de koper woonachtig was op de datum van aankoop van het Thrustmaster-product. Indien
een dergelijk claimrecht niet wettelijk is vastgelegd in het betreffende land, geldt een garantieperiode van
één (1) jaar vanaf datum aankoop van het Thrustmaster-product.
Indien u in de garantieperiode een defect meent te constateren aan dit product, neem dan onmiddellijk
contact op met Technical Support die u zal informeren over de te volgen procedure. Als het defect wordt
bevestigd, dient het product te worden geretourneerd naar de plaats van aankoop (of een andere locatie
die wordt opgegeven door Technical Support).
Binnen het gestelde van deze garantie wordt het defecte product van de koper gerepareerd of vervangen,
zulks ter beoordelin g van Technical Supp ort. Indien het Thrustmaster- product tijdens de garantieperiode
is onderworpen aan een dergelijk herstel, wordt elke periode van ten minste zeven (7) dagen waarin het
product niet in gebruik is, opgeteld bij de resterende garantieperiode (deze periode loopt vanaf de datum
van verzoek van de consument voor interventie of vanaf de datum waarop het product in kwestie
beschikbaar is gesteld voor herstel als de datum waarop het product ter beschikking wordt gesteld voor
herstel later is dan de datum van het verzoek om interventie). Indien toegestaan door van toepassing
zijnde wetgeving, beperkt de volledige aansprakelijkheid van Guillemot en haar dochterondernemingen
(inclusief de aansprakelijkheid voor vervolgschade) zich tot het repareren of vervangen van het
Thrustmaster-product. Indien toegestaan door van toepassing zijnde wetgeving, wijst Guillemot elke
garantie af met betrekking tot verhandelbaarheid of geschiktheid voor enig doel.
Deze garant ie is niet van krac ht: (1) indien het prod uct aangepast, geop end of gewijzigd is , of beschadigd
is ten gevolge van oneigenlijk of onvoorzichtig gebruik, verwaarlozing, een ongeluk, normale slijtage, of
enige andere oorzaak die niet gerelateerd is aan een materiaal- of fabricagefout (inclusief maar niet
beperkt tot het combineren van het Thrustmaster-product met enig ongeschikt element waaronder in het
bijzonder voedingsadapters, oplaadbare batterijen, opladers of enig ander element niet geleverd door
Guillemot voor dit product); (2) als het product is gebruikt voor enig ander doel dan thuisgebruik, zoals
maar niet exclusief een professioneel of commercieel doel (bijvoorbeeld game rooms, training,
wedstrijden); (3) indien u zich niet houdt aan de instructies zoals verstrekt door Technical Support; (4) op
software die onder een specifieke garantie valt; (5) op verbruiksartikelen (elementen die tijdens de
levensduur van het product worden vervangen zoals bijvoorbeeld batterijen of pads van een headset of
koptelefoon); (6) op accessoires (zoals bijvoorbeeld kabels, behuizingen, hoesjes, etui's, draagtassen of
polsbandjes); (7) indien het product werd verkocht op een openbare veiling.
Deze garantie is niet overdraagbaar.
De wettelijke rechten van de koper die in zijn/haar land van toepassing zijn op de verkoop van
consumentproducten worden op generlei wijze door deze garantie beperkt.
Page 72

17/18
Aanvullende garantiebepalingen
Gedurende de garantieperiode zal Guillemot in principe nooit reserveonderdelen leveren omdat
Technical Support de enige partij is die bevoegd is een Thrustmaster-product te openen en/of te
herstellen (met uitzondering van een herstelprocedure die de klant door Technical Support gevraagd
wordt uit te voeren met behulp van schriftelijke instructies – omdat deze procedure bijvoorbeeld
eenvoudig is en het herstelproces niet vertrouwelijk is –
de benodigde onderdelen, indien van toepassing).
Gezien de innovatiecycli en om haar knowhow en handelsgeheimen te beschermen, zal Guillemot in
principe nooit een herstelbeschrijving of reserveonderdelen verstrekken voor een Thrustmaster-product
waarvan de garantieperiode is verstreken.
Aansprakelijkheid
Indien toegestaan door van toepassing zijnde wetgeving, wijzen Guillemot Corporation S.A. (hierna te
noemen “Guillemot”
) en haar dochterondernemingen alle aansprakelijkheid af voor enige schade
veroorzaakt door één van de volgend e oorzaken : (1) indien het pro duct aangepast, geopend of gewijzigd
is; (2) de montage-instructies niet z ijn opgevolgd; (3) oneigenlijk of onv oorzichtig gebruik , verwaarlozing,
een ongeluk (bijvoorbeeld stoten); (4) normale slijtage; (5) het gebruik van het product voor enig ander
doel dan thuisgebruik, zoals maar niet exclusief een professioneel of commercieel doel (bijvoorbeeld
game rooms, training, wedstrijden). Indien toegestaan onder van toepassing zijnde wetgeving, wijzen
Guillemot en haar dochterondernemingen alle aansprakelijkheid af voor enige schade aan dit product
niet gerelateerd aan een materiaal- of fabricagefout (inclusief maar niet beperkt tot enige schade direct
of indirect veroorzaakt door enige software, of door het combineren van het Thrustmaster-product met
enig ongeschikt element waaronder in het bijzonder voedingsadapters, oplaadbare batterijen, opladers
of enig ander element niet geleverd door Guillemot voor dit product).
en door het verstrekken aan de consument van
Page 73
18/18
COPYRIGHT
*
*
© 2021 Guillemot Corporation S.A. Alle rechten voorbehouden. Thrustmaster
handelsmerk van Guillemot Corporation S.A. PlayStation® is een geregistreerd handelsmerk van Sony
Interactive Entertainment Inc. Windows® is een geregistreerd handelsmerk van Microsoft Corporation in
de Verenigde Staten en/of andere landen. Alle andere handelsmerken zijn eigendom van de respectieve
eigenaren. Afbeeldingen zijn niet bindend. Inhoud, ontwerp en specificaties kunnen zonder kennisgeving
vooraf worden gewijzigd en kunnen per land verschillen. Geproduceerd in China.
AANBEVELINGEN VOOR DE BESCHERMING VAN HET MILIEU
Neem contact op met uw gemeente voor informatie over een inzamelpunt bij u in de buurt.
In alle andere landen: houd u aan de plaatselijk milieuwetgeving voor elektrische en elektronische
apparaten.
Bewaar deze informatie. De kleuren en decoraties kunnen variëren.
Plastic bevestigingen en hechtmaterialen moeten van het product worden verwijderd voordat het wordt
gebruikt.
www.thrustmaster.com
*Alleen van toepassing in de EU, het VK en Turkije
In de Europ ese Unie: Gooi dit pr oduct na het einde va n de levensduur niet weg met
het normale afval, maar breng het naar het door uw gemeente aangewezen
inzamelpunt voor elektrische en/of computerapparatuur.
Ter herinnering is hiertoe op het product, de gebruikshandleiding of de verpakking
een symbool aangebracht.
De meeste materialen kunnen worden gerecycled. Door recycling en andere
methoden voor verantwoorde verwerking van afgedankte elektrische en
elektronische apparaten kunt u een belangrijke bijdrage leveren aan de
bescherming van het milieu.
®
is een geregistreerd
TECHNISCHE ONDERSTEUNING
https://support.thrustmaster.com
Page 74
1/18
A Pomello del cambio rimuovibile
E Chiave Allen da 2,5 mm (inclusa)
F Cavo e connettore DIN
PlayStation®4/PlayStation®5 – Xbox One/Xbox Series – PC
CARATTERISTICHE TECNICHE
(non preventivamente installato)
B Leva
C Placca metallica del cambio in stile “H (7+1)”
(preventivamente installata)
D Placca metallica del cambio in stile
“Sequenziale (+/-)”
(non preventivamente installato)
Manuale d’uso
G Vite interna di tensionamento
H Sistema di fissaggio a morsa regolabile
I “Fori delle viti” per il fissaggio all’abitacolo
DIN / USB Cavo rimuovibile DIN / USB
DIN / DIN Cavo rimuovibile DIN / DIN
Page 75
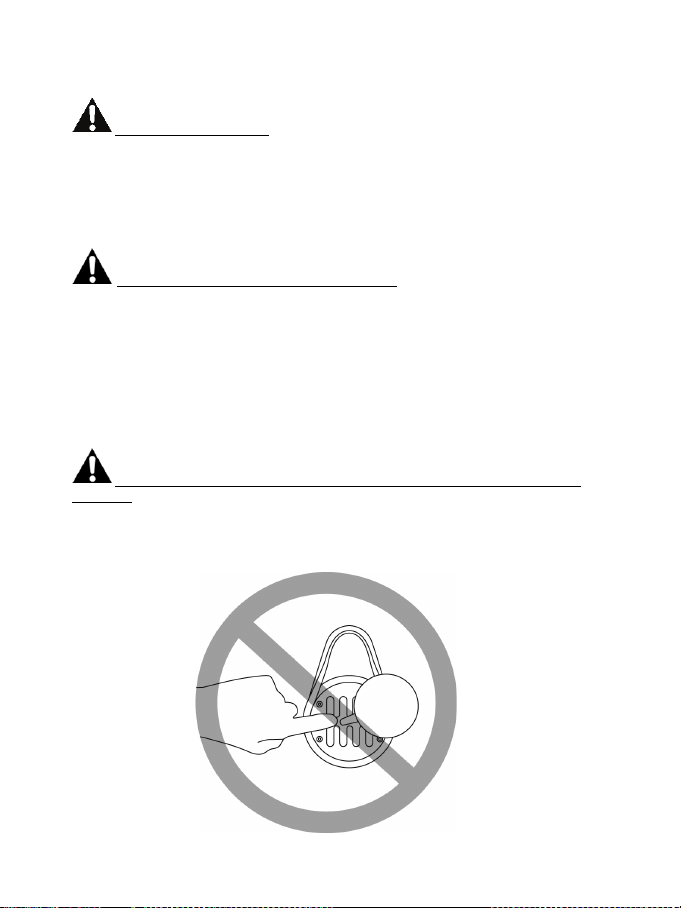
2/18
ATTENZIONE
Prima di utilizzare questo prodotto, assicurati di aver letto con attenzione il presente manuale.
Conserva questo manuale per una futura consultazione.
Attenzione – Shock elettrico
* Conserva questo prodotto in un luogo asciutto e non esporlo alla polvere o alla luce del sole.
* Rispetta la direzione di inserimento dei connettori.
* Non torcere e non tirare i connettori e i cavi.
* Non versare liquidi sul prodotto e sui relativi connettori.
* Non cortocircuitare il prodotto.
* Non smontare questo prodotto (eccezion fatta per i possibili aggiustamenti descritti nel presente
manuale), non cercare di bruciare il prodotto e non esporlo alle alte temperature.
Attenzione – Infortuni causati da movimenti ripetuti
Giocare con u n sistema di cambio marc ia può causare dolori ai muscoli e alle articol azioni. Per evitare
qualsiasi problema:
* Evita di giocare per lunghi periodi di tempo.
* Fai una pausa di 10 - 15 minuti ogni ora di gioco.
* Se dovessi provare stanchezza o dolore alle mani, ai polsi o alle braccia, smetti di giocare e riposati
per qualche ora prima di ricominciare a giocare.
* Qualora i sintomi o i dolori descritti in precedenza dovessero ripresentarsi anche dopo aver
ricominciato, smetti immediatamente di giocare e consulta il tuo dottore.
* Verifica che la base o il cambio siano stati fissati correttamente, così come descritto nelle istruzioni
riportate nel presente manuale.
Attenzione – Rischio di schiacciamento a causa delle aperture presenti nelle placche
del cambio
* Tenere lontano dalla portata dei bambini.
* Quando giochi, non appoggiare mai le tue dita (o qualsiasi altra parte del corpo) nelle aperture
presenti nelle placche del cambio.
MAI
Page 76

3/18
AVVITA
SVITA
STRINGI
ALLENTA
INSTALLAZIONE DEL POMELLO DEL CAMBIO
1. Per avvitare il pomello del cambio (A) alla relativa leva (B): ruota il pomello del cambio in senso
orario.
2. Per svitare il pomello del cambio: ruota il pomello in senso antiorario.
FISSAGGIO DEL SISTEMA DI CAMBIO MARCIA
Il montaggio risulta ottimale con qualsiasi tipo di supporto:
- Tavoli, scrivanie o ripiani da 1 a 55 mm di spessore, tramite il sistema a morsa (H).
- Abitacolo, utilizzando i “fori per le viti” integrati (il sistema a morsa è rimuovibile).
Fissaggio del sistema di cambio di marcia a un tavolo o a una scrivania
1. Posiziona la punta del cambio su un tavolo o su altra superficie piatta.
2. Per stringere: ruota la rotella della morsa in senso antiorario.
3. Per allentare: ruota la rotella della morsa in senso orario.
Page 77
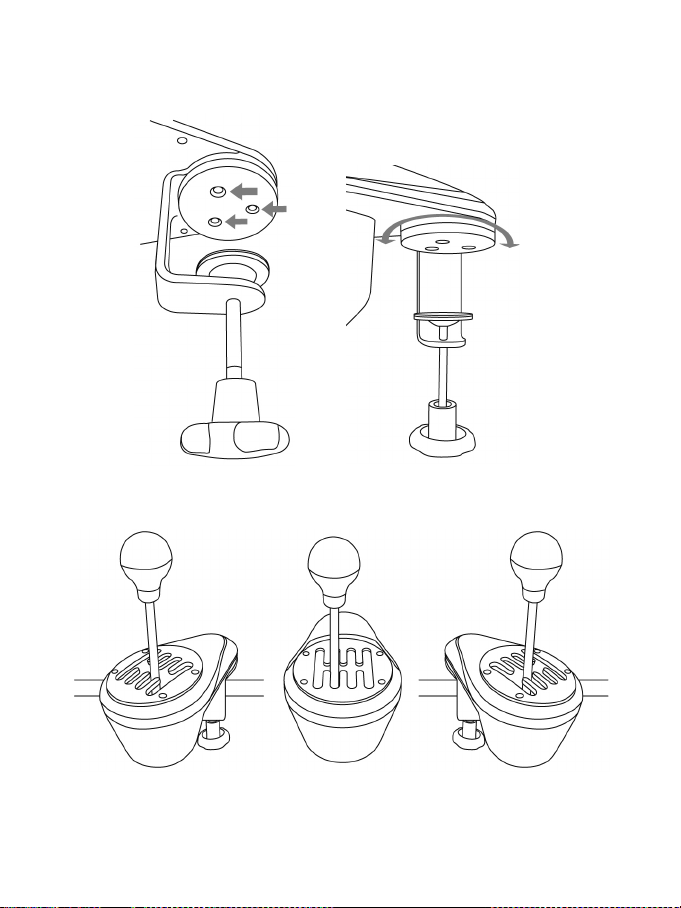
4/18
Posizionamento e rotazione del sistema a morsa (può essere regolato a 360°)
1. Utilizzando l’acclusa chiave Allen da 2,5 mm (E), svita appena le 3 viti di fissaggio del sistema a
morsa (H).
Il sistema a morsa (e di conseguenza tutto il cambio) può ora essere ruotato manualmente a 360°.
2. Scegli la tua posizione preferita lungo i 360° di rotazione (riportiamo qui sotto 3 diversi esempi,
scelti tra le svariate posizioni possibili).
Dopodiché, riavvita le 3 viti di fissaggio del sistema a morsa.
Page 78

5/18
Fissaggio del sistema di cambio marcia ad un abitacolo
1. Utilizzando l’acclusa chiave Allen da 2,5 mm (E), svita completamente e rimuovi le 3 viti di
fissaggio del sistema a morsa (H). Rimuovi il sistema a morsa dal cambio.
2. Dopo aver rimos so il sistema a m orsa, avvita 2 viti “M6” (non incluse) all’abitac olo e in 2 dei 4 piccoli
“fori delle viti” (I) presenti nella parte inferiori della punta del cambio.
Assicurati di non utilizzare viti “M6” troppo lunghe: potresti forare e
danneggiare la parte superiore della punta del cambio.
Un modello di fissaggio del cambio a un abitacolo è disponibile sul sito
https://support.thrustmaster.com
(clicca su Volanti / TH8A Shifter, dopodiché seleziona
Manuale).
Page 79
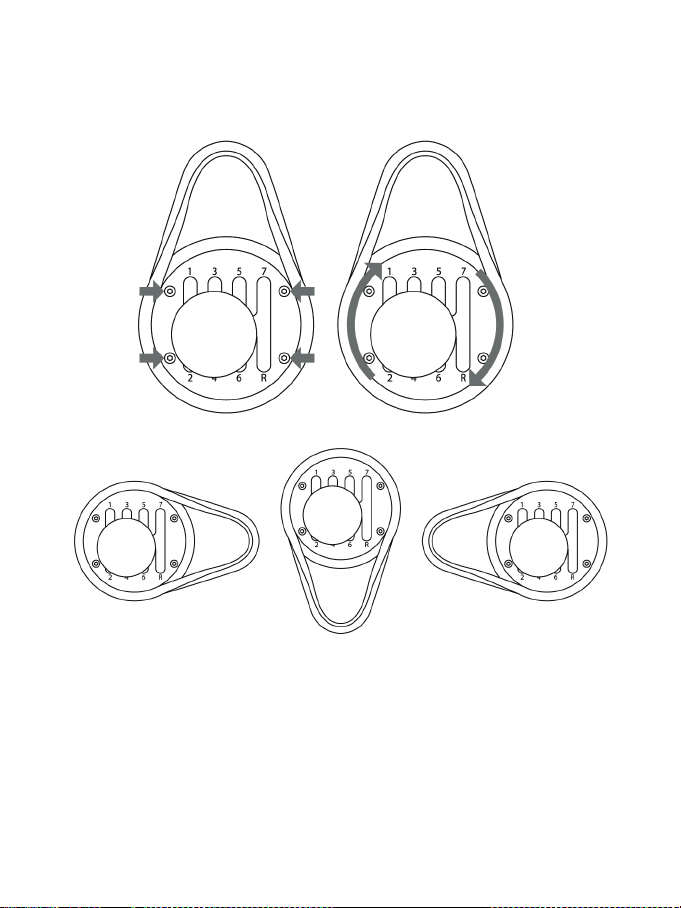
6/18
POSIZIONAMENTO E ROTAZIONE DELLE PLACCHE DEL CAMBIO
(POSSONO ESSERE REGOLATE A 360°)
1. Utilizzando l’acclusa chiave Allen da 2,5 mm (E), svita leggermente le 4 viti di fissaggio della
placca metallica del cambio (C o D).
È ora possibile ruotare manualmente la placca del cambio a 360°.
2. Scegli la tua posizione preferita lungo i 360° di rotazione (riportiamo qui sotto 3 diversi esempi,
scelti tra le svariate posizioni possibili).
3. Riavvita le 4 viti di fissaggio della placca del cambio.
Page 80

7/18
SOSTITUZIONE DELLA PLACCA METALLICA IN STILE “H (7+1)” CON
LA PLACCA IN STILE “SEQUENZIALE (+/-)”
1. Svita (in senso antiorario) e rimuovi il pomello del cambio (A).
2. Utilizzando l’acclusa chiave Allen da 2,5 mm (E), svita completamente e rimuovi le 4 viti di
fissaggio della placca del cambio in stile “H (7+1)”. Rimuovi la placca del cambio.
Durante questa procedura, fai attenzione a non lasciar
accidentalmente cadere nessuna vite nel meccanismo interno.
3. Ruota manualmente la struttura interna di 90° verso destra (in senso orario).
Dopodiché, installa la placca del cambio “Sequenziale (+/-)”.
Page 81
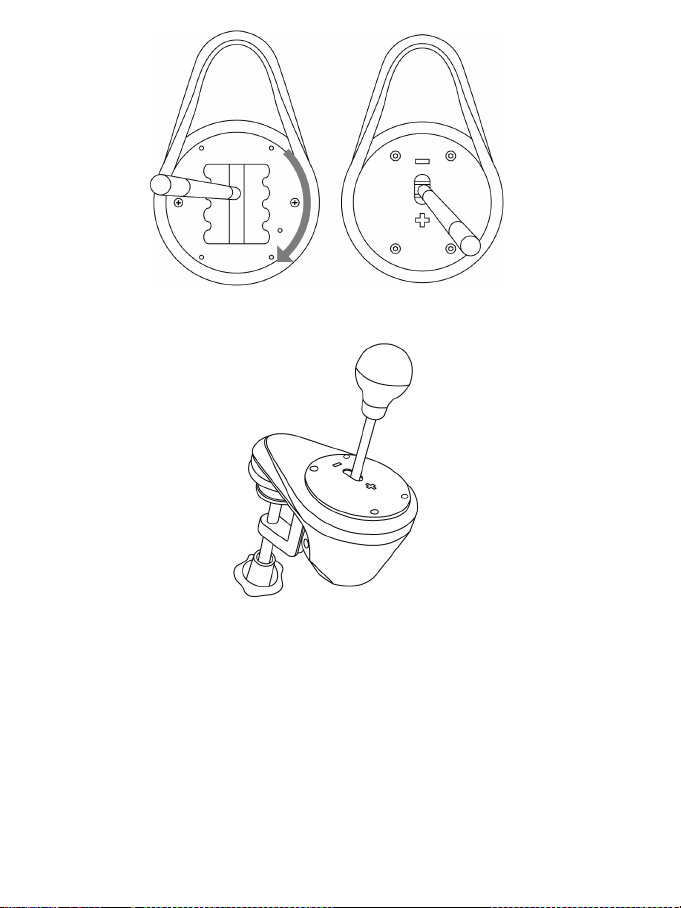
8/18
4. Utilizzando l’acclusa chiave Allen da 2,5 mm (E), reinserisci e stringi a fondo le 4 viti di bloccaggio
della placca del cambio “Sequenziale (+/-)”. Riavvita il pomello del cambio (in senso orario).
Per sostituire la placca del cambio ad “H (7+1)” esegui questa procedura al contrario.
Page 82

9/18
Note riguardanti la cover superiore della struttura interna:
J: 4 “fori per le viti” per il fissaggio delle placche del cambio (C o D).
K: 2 viti che bloccano la struttura interna (non svitarle).
L: Pulsante che individua automaticamente il tipo di placca del cambio utilizzata (C o D). Viene
premuto automaticamente quando viene installata la placca del cambio “Sequenziale (+/-)”. Per
evitare problemi di rilevazione, mantieni sempre pulita quest’area.
M: Slot per un più facile posizionamento delle placche del cambio.
Page 83

10/18
REGOLAZIONE DELLA RESISTENZA DEL CAMBIO
AUMENTARE LA RESISTENZA
RIDURRE LA RESISTENZA
* Applicabile soltanto alla placca del cambio ad “H (7+1)”.
* Prima di effettuare una qualsiasi regolazione, la placca del cambio ad “H (7+1)” deve
essere installata nella sua posizione originale (vedi la figura qui sotto).
1. Munendoti di un cacciavite grande con la punta a taglio, infila il cacciavite nella testa della vite
interna di tensionamento (G), presente nella parte inferiore sinistra della scatola del cambio.
2. Per aumentare leggermente la resistenza: gira la vite in senso orario.
3. Per ridurre leggermente la resistenza: gira la vite in senso antiorario.
Per passare da un estremo all’altro, sono sufficienti 2 giri completi.
Per evitare di danneggiare il sistema:
- Se avverti una resistenza consistente, non stringere più la vite.
- Se la leva del cambio dovesse diventare molle e traballante, non allentare più la vite.
Page 84

11/18
ISTRUZIONI DI INSTALLAZIONE PER CONSOLE
PLAYSTATION®4/PLAYSTATION®5
A seconda del gioco per PS4™/PS5™ o al volante che stai utilizzando:
PS4™ = Collega(*) il cambio TH8A direttamente alla porta USB della PS4™
- Collega il connettore DIN del cambio TH8A al cavo DIN / USB.
- Collega il cavo TH8A ad una delle porte USB della tua PS4™.
- Avvia il gioco.
Il cambio TH8A può quindi funzionare sia con la placca ad H (7+1) che con la placca
SEQUENZIALE (+/-).
Oppure
PS4™/PS5™ = Collega(*) il cambio TH8A direttamente alla base del volante Thrustmaster
(da considerarsi soltanto se il tuo volante Thrustmaster è dotato di connettore per cambi integrato)
- Collega il connettore DIN del cambio TH8A al cavo rimuovibile DIN / DIN.
- Collega il cambio TH8A al connettore per cambi presente sul retro della base del volante.
- Collega il tuo volante, dopodiché avvia il gioco.
Il cambio TH8A può quindi funzionare sia con la placca ad H (7+1) che con quella
SEQUENZIALE (+/-).
(*) Raccomandazion i importanti per il sistema PS4™/PS5™ (da considerars i soltanto se si ut ilizza
un volante Thrustmaster dotato di connettore per cambi integrato)
- PS4™/PS5™: Utilizzando la placca SEQUENZIALE (+/-) del cambio TH8A, potrai collegare il
cambio anche al retro del volante, tramite il cavo rimuovibile DIN / DIN. Il cambio TH8A verrà
quindi collegato alle leve del cambio UP (= R1) e DOWN (= L1) del volante.
Con questo volante, la placc a SEQUENZIALE (+ /-) del cambio TH 8A funzionerà al 1 00% con i giochi
di guida per PS4™/PS5™ compatibili con il volante.
- PS4™: Alcuni giochi ti permettono di utilizzare due cambi TH8A contemporaneamente:
Un cambio TH8A con placca ad H (7+1), collegato alla porta USB della PS4™
+ un cambio TH8A con placca SEQUENZIALE (+/-), collegato al retro del volante
* Un elenco di giochi per PS4™/PS5™ compatibili con il cambio TH8A, con le relative
istruzioni per le connessioni(*) (variabili a seconda del gioco), è disponibile qui:
https://support.thrustmaster.com (clicca su Volanti / TH8A Shifter, dopodiché seleziona
Impostazioni giochi). Questo elenco viene aggiornato regolarmente.
* Su sistemi PS4™, per collegare il volante o il cambio TH8A alla console, ti consigliamo
di non utilizzare un hub USB: collega la periferica direttamente a una porta USB della
PS4™.
* Per un corretto funzionamento del cambio TH8A, alcuni giochi richiedono l’installazione
degli aggiornamenti più recenti (la tua console deve essere collegata a internet).
Page 85

12/18
XBOX ONE/XBOX SERIES
= Con tutti i giochi per Xbox One/Xbox Series, collega sempre il cambio
TH8A direttamente alla base del volante Thrustmaster (e MAI alla porta
USB della console).
- Collega il connettore DIN del cambio TH8A al cavo rimuovibile DIN / DIN.
- Collega il cambio TH8A al connettore per cambi presente sul retro della base del volante. – Collega
il tuo volante, dopodiché avvia il gioco.
Il cambio TH8A può quindi funzionare sia con la placca ad H (7+1) che con quella
SEQUENZIALE (+/-).
Nota importante a proposito di Xbox One/Xbox Series:
Utilizzando la placca SEQUENZIALE (+/-) del cambio TH8A, il cambio verrà collegato alle leve del
cambio UP (= RB) e DOWN (= LB) del volante.
Utilizzando la placca SEQUENZIA LE (+ /-) del cambio TH8A, il cambio TH8A funzionerà al 100%
con i giochi di guida per Xbox One/Xbox Series compatibili con il volante Thrustmaster per
Xbox One/Xbox Series.
* Un elenco di giochi per Xbox One/Xbox Series compatibili con il cambio TH8A è
disponibile qui:
https://support.thrustmaster.com (clicca su Volanti / TH8A Shifter, dopodiché seleziona
Impostazioni giochi). Questo elenco viene aggiornato regolarmente.
* Per un corretto funzionamento del cambio TH8A, alcuni giochi richiedono l’installazione
degli aggiornamenti più recenti (la tua console deve essere collegata a internet).
Affinché il tuo volante Thrustmaster per Xbox One/Xbox Series risulti compatibile
con il cambio TH8A, ti potrebbe essere richiesto di aggiornare, via PC, il firmware
del volante alla versione più recente, disponibile qui:
https://support.thrustmaster.com (clicca su Volanti / TH8A Shifter, dopodiché
seleziona Firmware).
Page 86

13/18
ISTRUZIONI DI INSTALLAZIONE PER PC
= Con tutti i giochi per PC(*), collega sempre il cambio TH8A direttamente
ad una delle porte USB del PC.
- Collega il connettore DIN del cambio TH8A al cavo DIN / USB.
- Collega il cambio TH8A ad una delle porte USB del tuo PC.
- Quando è connesso a un PC, il cambio TH8A è a tutti gli effetti una periferica Plug & Play e viene
pertanto riconosciuta e installata automaticamente.
- La periferica compare quindi come 'T500 RS Gear Shift' nel Pannello di Controllo di Windows®.
- Clicca su Proprietà per testare e visualizzare le funzioni della periferica.
- Avvia il gioco.
Ora sei pronto/a per gareggiare!
(*) Raccomandazioni importanti per PC (da considerarsi soltanto se si
utilizza un volante Thrustmaster dotato di connettore per cambi integrato)
- Utilizzando la placca SEQUENZIALE (+/-) del cambio TH8A, potrai collegare il cambio anche
al retro del volante, tramite il cavo rimuovibile DIN / DIN. Il cambio TH8A verrà quindi collegato
alle leve del cambio UP (= 2) e DOWN (= 1) del volante.
Con questo volante, la placc a SEQUENZIALE (+ /-) del cambio TH 8A funzionerà al 1 00% con i giochi
di guida per PC compatibili con il volante.
- Alcuni giochi ti permettono di utilizzare due cambi TH8A contemporaneamente:
+ un cambio TH8A con placca SEQUENZIALE (+/-), collegato al retro del volante
* Su PC, il cambio Thrustmaster è compatibile con:
- tutti i giochi he supportano i sistemi di cambio marcia e il MULTI-USB.
- tutti i volanti disponibili sul mercato.
* Ti consigliamo di collegare il tuo volante e il cambio TH8A direttamente alle porte USB
2.0 del tuo PC (e non alle porte USB 3.0), senza utilizzare alcun hub.
* Con alcuni giochi su PC, per far funzionare correttamente il cambio Thrustmaster,
dovrai installare gli ultimi aggiornamenti disponibili per i giochi in questione.
* Con alcuni giochi su PC (per evitare conflitti tra il volante e il cambio), potrebbe essere
necessario:
- non assegnare alcun comando alle leve del cambio montate sul volante.
- attivare la funzione “Tieni premuto per cambiare”.
Un cambio TH8A con placca ad H (7+1), collegato alla porta USB del PC
Page 87

14/18
MAPPATURA SU PC
PACCHETTO SOFTWARE
Un “pacchetto software” è disponibile al seguente indirizzo: https://support.thrustmaster.com. Clicca
su Volanti / TH8A Shifter, dopodiché seleziona Driver.
- Dopo aver installato il pacchetto software, potrai:
* controllare la versione del firmware del tuo sistema di cambio marcia.
* aggiornare il firmware (se necessario) all’ultima versione disponibile.
* utilizzare il “Metodo BOOTLOADER”
(per resettare il tuo sistema di cambio marcia, in caso di perdita del firmware).
* accedere a un Pannello di Controllo dedicato (controller di gioco) su PC.
* su PC, sfruttare la modalità ANALOGICA (freno a mano)
SOFTWARE DI CALIBRAZIONE AVANZATA
La calibrazione del cambio TH8A avviene automaticamente.
Per PC, un software di calibrazione avanzata è disponibile al seguente indirizzo:
https://support.thrustmaster.com
permetterà di regolare a tuo piacimento la corsa del cambio.
Una volta impostati i parametri, questi vengono immediatamente salvati nella memoria interna del
cambio (e possono essere utilizzati su PS4™/PS5™, Xbox One/Xbox Series e PC).
(clicca su Volanti / TH8A Shifter, dopodiché seleziona Software). Ti
Page 88

15/18
A seconda del gioco o del volante(*) :
- Oppure al retro del volante (DIN)
PS5™
(*)
RIEPILOGO DELLE ISTRUZIONI PER IL COLLEGAMENTO DEL CAMBIO
TH8A AI VARI SISTEMI
Collegare il cambio TH8A
PS4™
- Direttamente al sistema PS4™/PS5™
(USB)
Sempre al retro del volante (DIN)
XBOX ONE/XBOX SERIES Sempre al retro del volante (DIN)
PC
Sempre
direttamente al PC (USB)
(*) Per ulteriori informazioni sulle varie eccezioni, consulta i paragrafi
Raccomandazioni importanti nelle relative pagine del manuale.
ATTENZIONE
* Non collegare mai direttamente il cambio TH8A ad una qualunque periferica che non sia un volante
Thrustmaster, anche se la periferica dovesse disporre di un identico connettore DIN. Ciò potrebbe
danneggiare il cambio TH8A o l’altra periferica.
RISOLUZIONE DEI PROBLEMI
* Il mio cambio non funziona correttamente o non sembra essere perfettamente calibrato:
- Spegni il tuo c omputer o la tua console, scollega il t uo sistema di cambio m arcia, ricollegalo e ri avvia
quindi il tuo gioco.
- Nel tuo gioco, in “Opzioni/Controller”, seleziona o imposta la configurazione più appropriata.
- Per ulteriori informazioni, consulta l’aiuto online o il manuale d’uso del tuo gioco.
- Aiuti e consigli su svariati argomenti (non inclusi nel presente manuale), un elenco dei giochi
compatibili, ecc. sono disponibili sul sito web https://support.thrustmaster.com
TH8A Shifter.
- Su Xbox One/Xbox Series, affinché il tuo volante Thrustmaster per Xbox One/Xbox Series risulti
compatibil e con il cambi o TH8A, ti p otrebbe essere richiesto di ag giornare, via P C, il firmwar e del volante
alla versione più recente, disponibile qui: https://support.thrustmaster.com (Clicca su Volanti / TH8A
Shifter / Firmware).
. Clicca su Volanti /
Page 89

16/18
Informazioni sulla garanzia al consumatore
A livello mondiale, Guillemot Corporation S.A., avente sede legale in Place du Granier, B.P. 97143,
35571 Chantepie, Francia (d’ora in avanti “Guillemot”) garantisce al consumatore che il presente
prodotto Thrustmaster sarà privo di difetti relativi ai materiali e alla fabbricazione, per un periodo di
garanzia corrispondente al limite temporale stabilito per la presentazione di un reclamo riguardante
la conformità del prodotto in questione. Nei paesi della Comunità Europea, tale periodo equivale a
due (2) anni a partire dalla c onsegna del prodot to Thrustmaster. I n altri paesi, la dur ata della garanzia
corrisponde al limite temporale stabilito per la presentazione di un reclamo riguardante la conformità
del prodotto Thrustmaster in base alle leggi applicabili nel paese in cui il consumatore risiedeva alla
data di acquisto del prodotto Thrustmaster (qualora nel paese in questione non esistesse alcuna
norma a riguardo, il periodo di garanzia corrisponderà a un (1) anno a partire dalla data originale di
acquisto del prodotto Thrustmaster).
Qualora, durante il periodo di garanzia, il prodotto dovesse apparire difettoso, contatti
immediatamente l’Assistenza Tecnica, che le indicherà la procedura da seguire. Qualora il difetto
dovesse essere confermato, il prodotto dovrà essere riportato al luogo di acquisto (o qualsiasi altro
luogo indicato dall’Assistenza Tecnica).
Nel contesto della presente garanzia, il prodotto difettoso di proprietà del consumatore potrà essere
sostituito o reso nuovamente funzionante, a discrezione dell’Assistenza Tecnica. Se, durante il
periodo coperto dalla garanzia, il prodotto Thrustmaster fosse oggetto di tale rimessa in operatività,
alla rimanente durata della garanzia dovrà essere aggiunto un periodo di almeno sette (7) giorni,
durante il quale il prodotto risulta non utilizzabile (tale periodo intercorre dalla data della richiesta di
intervento da parte del consumatore o dalla data in cui il prodotto in questione è reso disponibile per
la rimessa in operatività, questo nel caso in cui tale data sia successiva alla data di richiesta di
intervento). Qualora le leggi applicabili in materia lo consentano, la totale responsabilità di Guillemot
e delle sue controllate (compresi i danni conseguenti) si limita alla rimessa in operatività o alla
sostituzione del prodotto Thrustmaster. Qualora le leggi applicabili in materia lo consentano,
Guillemot declina ogni garanzia sulla commerciabilità o la conformità a finalità particolari.
La presente garanzia non potrà essere applicata: (1) se il prodotto è stato modificato, aperto, alterato
o ha subito danni derivanti da un uso inappropriato o non autorizzato, da negligenza, da un incidente,
dalla semplice usura, o da qualsiasi altra causa non riconducibile a difetti nei materiali o
nell'assemblaggio (compresi, ma non i soli, prodotti Thrustmaster com binati con elementi inadatti, tra
cui, in particolare, batterie ricaricabili, caricatori o qualsiasi altro elemento non fornito da Guillemot
per questo prodotto); (2) nel caso in cui il prodotto sia stato utilizzato per qualsiasi altro scopo al di
fuori dell’uso domestico, comprese finalità professionali o commerciali (esempio: sale giochi,
allenamenti, concorsi); (3) in caso di mancato rispetto delle istruzioni fornite dall'Assistenza Tecnica;
(4) in cas o di software, ovv ero software sogge tto a una specifi ca garanzia; (5) ai materiali di cons umo
(elementi che richiedono la loro sostituzione al termine della loro durata di esercizio come, ad
esempio, batterie di tipo convenzionale o cuscinetti protettivi per auricolari o cuffie); (6) agli accessori
(ad esempio, cavi, custodie, borsette, borse, cinturini); (7) se il prodotto è stato venduto ad un'asta
pubblica.
La presente garanzia non è trasferibile.
I diritti legali del consumatore, stabiliti dalle leggi vigenti in materia di vendita di beni di consumo nel
relativo paese, non vengono intaccati dalla presente garanzia.
Page 90
17/18
Disposizioni addizionali sulla garanzia
Per tutta la durata della garanzia, in linea di principio, Guillemot non fornirà alcuna parte di ricambio,
in quanto la sola Assistenza Tecnica è la parte autorizzata ad aprire e/o rimettere in funzionamento
tutti i prodotti Thrustmaster (fatta eccezione per eventuali procedure di rimessa in operatività che
l’Assistenza Tecnica potrebbe richiedere al consumatore, attraverso istruzioni scritte – viste, ad
esempio, la semplicità e la mancanza di riservatezza della procedura di rimessa in operatività – e
fornendo al consumatore le necessarie parti di ricambio, se ve ne fosse l’esigenza).
Considerando i propri cicli di innovazione e per proteggere il proprio know-how e i propri segreti
commerciali, in linea di principio, Guillemot non fornirà alcuna notifica o parte di ricambio finalizzata
alla rimessa in attività di un qualunque prodotto Thrustmaster il cui periodo di garanzia risultasse
scaduto.
Responsabilità
Qualora le leggi applicabili in materia lo consentano, Guillemot Corporation S.A. (d'ora in avanti
“Guillemot”) e le sue controllate declinano ogni responsabilità per qualsiasi danno derivante da
almeno una delle seguenti condizioni: (1) il prod otto è stato modificato, aperto o alterato; (2) mancato
rispetto delle istruzioni di installazione; (3) uso inappropriato o non permesso, negligenza, incidente
(come, ad es empio, un impatto); (4) semplice usura; (5) utilizzo del prodotto per qualsiasi altro sc opo
al di fuori dell’uso domestico, comprese finalità professionali o commerciali (esempio: sale giochi,
allenamenti, concorsi). Qualora le leggi applicabili in materia lo consentano, Guillemot e le sue
controllate declinano o gni responsabilità per qualsiasi danno non riconducibile a difetti nei materiali o
nella fabbricazione del prodotto (compresi, ma non i soli, potenziali danni causati direttamente o
indirettamente da un qualunque software, oppure dall’uso del prodotto Thrustmaster in combinazione
con elementi inadatti, tra cui, in particolare, batterie ricaricabili, caricatori o qualsiasi altro elemento
non fornito da Guillemot per questo prodotto).
Page 91
18/18
COPYRIGHT
ASSISTENZA TECNICA
*
*
© 2021 Guillemot Corporation S.A. Tutti i diritti riservati. Thrustmaster
proprietà di Guillemot Corporation S.A. PlayStation® è un marchio registrato di proprietà di Sony
Interactive Entertainment Inc. Windows® è un marchio registrato di proprietà di Microsoft Corporation,
negli Stati Uniti e/o altri Paesi. Tutti gli altri marchi appartengono ai legittimi proprietari. Illustrazioni
escluse. I contenuti, i design e le caratteristiche possono essere oggetto di modifiche senza preavviso e
possono variare da un Paese all’altro. Fabbricato in Cina.
RACCOMANDAZIONI SULLA TUTELA DELL’AMBIENTE
Elettronico, è possibile fornire un importante contributo per la salvaguardia dell’ambiente.
Per conoscere i punti di raccolta più vicini a te, contatta le autorità locali competenti.
In tutti gli altri Paesi: per favore, rispetta le leggi locali sul riciclo dei materiali elettrici ed elettronici.
Informazioni da conservare. I colori e le decorazioni possono variare.
I ganci di plastica e gli adesivi dovrebbero essere rimossi dal prodotto prima che quest’ultimo venga
utilizzato.
www.thrustmaster.com
*Valido solo in UE, Regno Unito e Turc hia
Nell’Unione Europea: Al termine della sua vita operativa, questo prodotto non
dovrebbe essere gettato assieme ai comuni rifiuti, ma dovrebbe essere portato ad
un apposito punto di raccolta destinato al riciclaggio del Materiale Elettrico ed
Elettronico.
Ciò è confermato dal simbolo riportato sul prodotto, nel manuale d’uso o sulla
confezione.
A seconda delle proprie caratteristiche, i materiali potrebbero essere riciclati.
Tramite il riciclaggio ed altre forme di trattamento del Materiale Elettrico ed
®
è un marchio registrato di
https://support.thrustmaster.com
Page 92

1/18
A Pomo de cambio de marchas desmontable
E Llave Allen de 2,5 mm (incluida)
F Cable y conector DIN
PlayStation®4/PlayStation®5 – Xbox One/Xbox Series – PC
CARACTERÍSTICAS TÉCNICAS
(no está instalado de forma predeterminada)
B Palanca
C Placa de cambio ajustable con “forma de
H (7+1)”
(instalada de forma predeterminada)
D Placa de cambio ajustable “Secuencial (+/-)”
(no está instalada de forma predeterminada)
Manual del usuario
G Tornillo tensor interno
H Sistema de anclaje ajustable
I “Roscas de tornillo” para montaje en cabina
DIN / USB Cable DIN / USB desmontable
DIN / DIN Cable DIN / DIN desmontable
Page 93
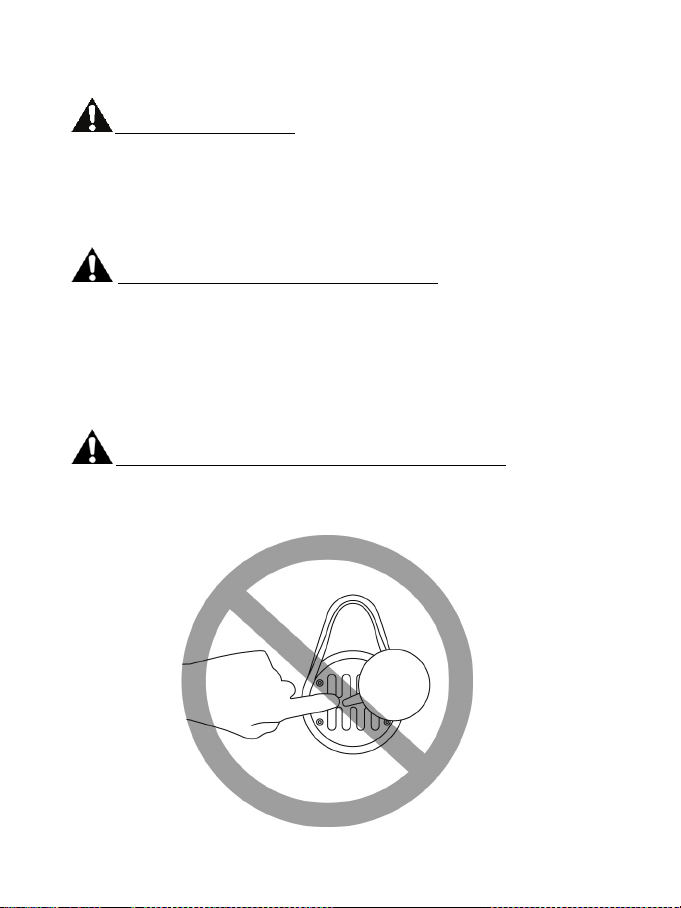
2/18
AVISO
Antes de utilizar este producto, asegúrate de leer detenidamente este manual. Conserva este
manual para consultarlo en el futuro.
Advertencia – Descarga eléctrica
* Mantén este producto en un lugar seco y no lo expongas al polvo ni a la luz directa del sol.
* Respeta la dirección de inserción de los conectores.
* No retuerzas ni tires de los conectores ni de los cables.
* No derrames líquidos en el producto ni en su conector.
* No cortocircuites el producto.
* No desmontes este producto (excepto los posibles ajustes descritos en este manual), no intentes
quemar el producto ni lo expongas a temperaturas elevadas.
Advertencia – Lesiones debidas a movimientos repetitivos
Jugar con una palanca puede producir dolores musculares y articulares. Para evitar problemas:
* Evita jugar durante períodos de tiempo prolongados.
* Haz descansos de 10 a 15 minutos por cada hora de juego.
* Si experimentas fatiga o dolor en las manos, muñecas o brazos, deja de jugar y descansa durante
unas horas antes de volver a jugar.
* Si los síntomas o el dolor descritos anteriormente persisten cuando vuelves a jugar, deja de
hacerlo y consulta al médico.
* Verifica que la base de la palanca de cambios está montada correctamente, según se describe en
las instrucciones detalladas en este manual.
Advertencia – Riesgo de pillarse en las aberturas de la placa de cambio
* Mantén el dispositivo fuera del alcance de los niños.
* Cuando estés jugando, no coloques nunca los dedos (ni cualquier otra parte de tu cuerpo) en las
aberturas de las placas de cambio.
NUNCA
Page 94
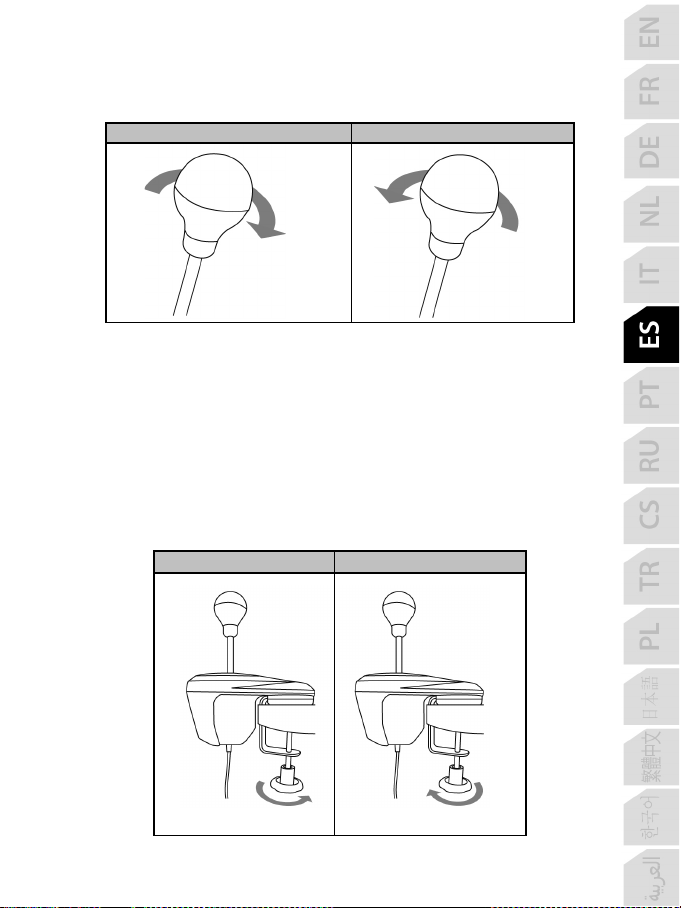
3/18
APRETAR
AFLOJAR
APRETAR
AFLOJAR
INSTALACIÓN DEL POMO DEL CAMBIO DE MARCHAS
1. Para atornillar el pomo del cambio de marchas (A) en su palanca (B): gira el pomo del cambio
de marchas en sentido horario.
2. Para desatornillar el pomo del cambio de marchas: gira el pomo en sentido antihorario.
MONTAJE DE LA PALANCA DE CAMBIO DE MARCHAS
El montaje está optimizado para cualquier tipo de soporte:
- Mesas, escritorios o estantes de 1 a 55 mm de gr osor, mediante el sistema de anclaje (H).
- Cabinas, mediante las “roscas de tornillo” integradas (el sistema de anclaje es
desmontable).
Montaje de la palanca de cambio de marchas en una mesa o escritorio
1. Coloca el morro del cambio de marchas en una mesa u otra superficie plana.
2. Para apretar: gira la rueda del anclaje en sentido antihorario.
3. Para aflojar: gira la rueda del anclaje en sentido horario.
Page 95
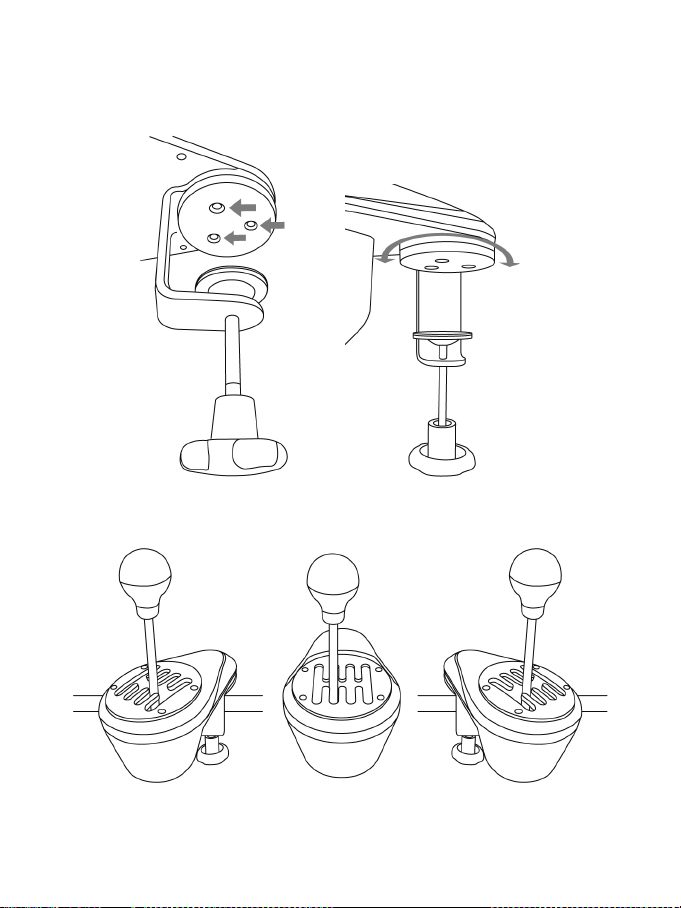
4/18
Colocación y rotación del sistema de anclaje (se puede ajustar en 360°)
1. Mediante la llave Allen de 2,5 mm incluida (E), desatornilla muy ligeramente los 3 tornillos que
sujetan el sistema de anclaje (H) en su sitio.
El sistema de anclaje (y por consiguiente todo el cambio de marchas) ahora se puede rotar
manualmente 360°.
2. Selecciona la posición que prefieras a lo largo de los 360° de rotación (a continuación se
muestran 3 ejemplos, entre las otras muchas posibilidades disponibles).
A continuación, vuelve a apretar los 3 tornillos que sujetan el sistema de anclaje en su sitio.
Page 96

5/18
Montaje de la palanca de cambio de marchas en una cabina
1. Mediante la llave Allen de 2,5 mm incluida (E), desatornilla totalmente y quita los 3 tornillos
que sujetan el sistema de anclaje (H) en su sitio. Quita el sistema de anclaje de la palanca de
cambio de marchas.
2. Una vez retirado el sistema de anclaje, atornilla 2 tornillos “M6” (no incluidos) en el estante de la
cabina, y en 2 de las 4 pequeñas “roscas de tornillos” (I) situadas en la cara inferior del morro de
la palanca de cambio de marchas.
Asegúrate de no utilizar tornillos “M6” que sean demasiado largos, ya que
podrías perforar y dañar la parte superior del morro de la palanca de cambio.
Hay una plantilla de montaje del cambio de marchas disponible en
https://support.thrustmaster.com
(haz clic en Volantes de carreras / TH8A Shifter,
después selecciona Manual).
Page 97

6/18
COLOCACIÓN Y ROTACIÓN DE LAS PLACAS DE CAMBIO (SE PUEDEN
AJUSTAR EN 360°)
1. Mediante la llave Allen de 2,5 mm incluida (E), desatornilla muy ligeramente los 4 tornillos que
sujetan la placa de cambio (C o D) en su sitio.
Ahora puedes rotar manualmente 360° la placa de cambio.
2. Selecciona la posición que prefieras a lo largo de los 360° de rotación (a continuación se
muestran 3 ejemplos, entre las otras muchas posibilidades disponibles).
3. Vuelve a apretar los 4 tornillos que sujetan la placa de cambio en su sitio.
Page 98

7/18
CAMBIO DE LA PLACA DE CAMBIO CON “FORMA DE H (7+1)”
A LA PLACA DE CAMBIO “SECUENCIAL (+/-)”
1. Desatornilla (en sentido antihorario) y quita el pomo del cambio de marchas (A).
2. Mediante la llave Allen de 2,5 mm incluida (E), desatornilla totalmente y quita los 4 tornillos
que sujetan la placa de cambio con “forma de H (7+1)” en su sitio. Quita la placa de cambio.
Durante este procedimiento, ten cuidado de no perder por
accidente ningún tornillo dentro del mecanismo interno.
3. Rota manualmente la estructura interna 90° hacia la derecha (sentido horario).
A continuación, instala la placa de cambio “Secuencial (+/-)”.
Page 99

8/18
4. Mediante la llave Allen de 2,5 mm incluida (E), vuelve a colocar y aprieta completamente los 4
tornillos que sujetan la placa de cambio “Secuencial (+/-)” en su sitio. Atornilla el pomo del
cambio de marchas (sentido horario).
Haz este procedimiento a la inversa para sustituir la placa de cambio con “forma de H (7+1)”.
Page 100
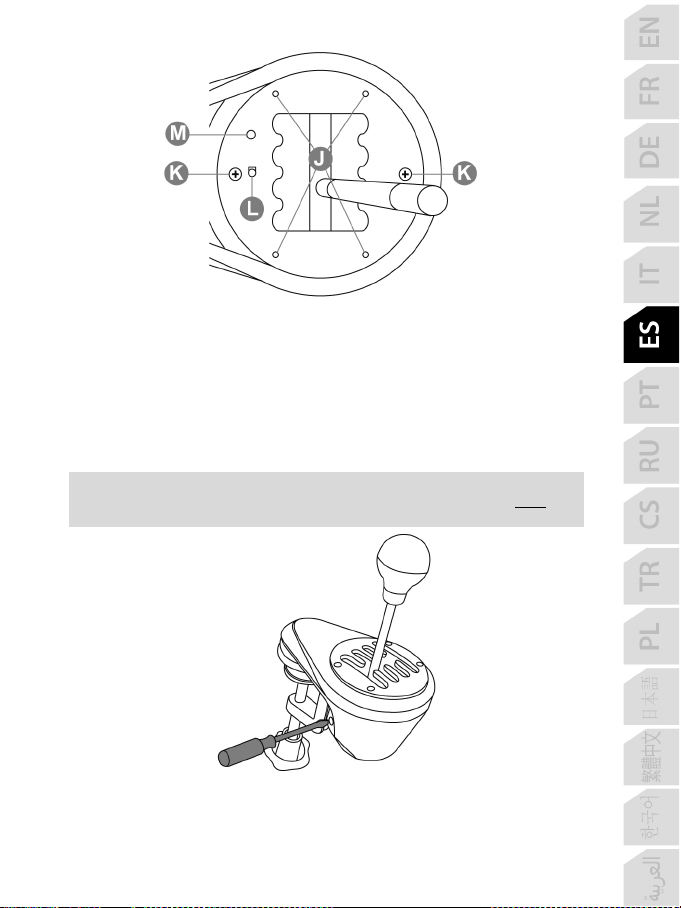
9/18
Notas relativas a la cubierta superior de la estructura interna:
J: 4 “roscas de tornillo” para sujetar las placas de cambio (C o D).
K: 2 tornillos que sostienen en su sitio la estructura interna (no desatornillar).
L: Botón que detecta automáticamente el tipo de placa de cambio utilizada (C o D). Se pulsa
automáticamente cuando se instala la placa de cambio “Secuencial (+/-)”. Mantén limpia esta
zona para evitar problemas de detección.
M: Ranura para colocar más fácilmente las placas de cambio.
AJUSTE DE LA RESISTENCIA DEL CAMBIO DE MARCHAS
* Sólo se aplica a la placa de cambio con “forma de H (7+1)”.
* Antes de hacer ajustes, la placa de cambio con “forma de H (7+1)” debe estar
instalada en su posición original (consulta el diagrama que hay a continuación).
1. Mediante un destornillador largo de cabeza plana, coloca el destornillador en la cabeza del
tornillo tensor interno (G) situado en la sección inferior izquierda de la carcasa de la palanca de
cambio de marchas.
 Loading...