

Page 1

Page 2

1/10
For: PC & PlayStation®3
User Manual
Page 3
2/10
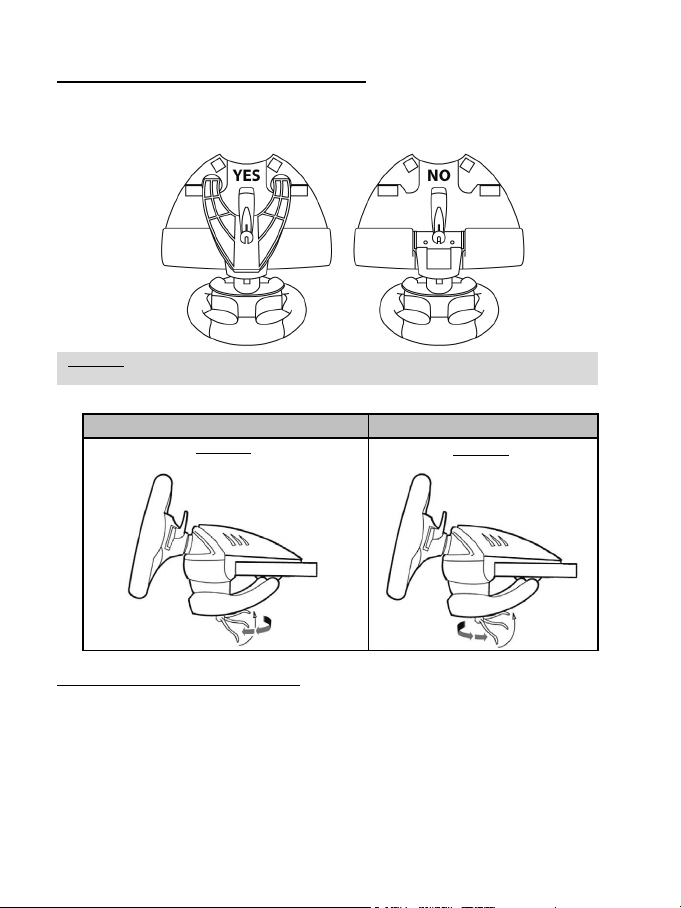
SETTING UP THE RACING WHEEL
WARNING: Never tighten the screw alone, without the attachment system!
To tighten:
To release:
Attaching the racing wheel to a table or a desktop
- Place the racing wheel on a table or any other horizontal, flat and stable surface.
- Insert the fastening screw in the attachment system, then tighten the device by turning the screw
counterclockwise, so that it feeds into the large threaded hole located beneath the racing wheel, until
the device is perfectly stable.
(This could damage the racing wheel).
ASSEMBLY REMOVAL
Turn the screw counterclockwise
Attaching the racing wheel to a cockpit
- Place the racing wheel on the cockpit shelf.
- Drive two M6 screws (not included with the racing wheel) through the cockpit shelf, then feed them into
the two small threaded holes located beneath the racing wheel.
- Then, tighten the standard attachment system by inserting the fastening screw in the large threaded
hole.
Turn the screw clockwise
Page 4
3/10
Important notes to avoid calibration problems:
game)
In PlayStation®3 and PC games,
(except buttons 13-17, which are inactive on PC).
CONNECTING THE RACING WHEEL TO THE MAINS
European versions only
Important note: the Eur opean version of the T100 FFB is equipped with an internal power supply, located
directly inside the racing wheel's base.
- Simply connect the racing wheel's mains connector to a 220 V power outlet.
Other versions (non-European)
Note: Contrary to the European version, the non-European T100 FFB features an external power supply;
a specific device is provided with the racing wheel.
- Connect the external adapter to the relevant connector located at the back of the racing wheel, then
connect the external mains power adapter to a standard power outlet featuring the same voltage.
CONNECTING THE PEDAL SET TO THE RACING WHEEL
Connect the pedal set to the racing wheel using the relevant connector, located at the back of the racing
wheel.
AUTOMATIC RACING WHEEL AND PEDAL SET CALIBRATION
The racing wheel calibration occurs automatically when you connect the racing wheel's power adapter and
USB connector. (This operation causes the racing wheel to move.) The pedal set calibration also occurs
automatically; simply press the pedals a few times.
- Never connect the racing wheel's USB connector before connecting the pedal set
(when the racing wheel self-calibrates following connection, or when starting or exiting a
The European version must exclusively be supplied with 220V!
Never open the racing wheel base – shock hazard!
- Never press the pedals when the racing wheel starts
the racing wheel is recognized as an F430 Force Feedback racing wheel,
and in the Control Panel interface on PC,
which offers the same features as this one
Page 5

4/10
PC
Note:
your game!
System requirements: PC (Windows® XP, Vista, 7 and 8) featuring a USB port.
Installing the Force Feedback drivers for PC
1. Access http://ts.thrustmaster.com to download the Force Feedback drivers and software for PC (in the
Updates and Downloads section, click PC / Wheels / T100 FFB or PlayStation / Wheels / T100 FFB,
then click Drivers).
2. Once the download and installation are finished, click Finish and restart your computer.
3. Once your computer has restarted, connect the USB connector to one of the USB ports on your CPU.
Windows® automatically detects the new device.
4. Installing the drivers:
Driver installation occurs automatically. Follow the instructions displayed onscreen to complete the
installation.
5. Select Start/Settings/Control Panel, then double-click Game Controllers (or Gaming Options,
according to your operating system).
The Game Controllers dialog displays; the racing wheel appears onscreen, with the status
indication OK.
6. In the Control Panel, click Properties to configure your racing wheel:
• Test Device: Enables you to test and view the buttons, the D-Pad and the racing wheel and pedal
set axes.
• Test Forces: Enables you to test 8 force effects and to configure the Force Feedback and
Automatic centering effects.
You are now ready to race!
Adjusting the Force Feedback effects on PC
On page 2 of the Control Panel, four settings are available and can be adjusted from 0 to 150% :
Main forces / Static forces / Dynamic forces / Aggressiveness
On PC, always remember to close the Control Panel interface entirely before launching
Page 6

5/10
PEDAL SET MODE
Racing wheel LED
SEPARATE (this mode is r ecommended for most games)
RED
COMBINED
GREEN
Note:
AUTOMATIC CENTERING
Racing wheel LED
INACTIVE (mode recommended for all PC Force Feedback games)
NOT FLASHING
ACTIVE
FLASHING
Configuring the pedal set on PC
By default, your racing wheel's accelerator and brake controls operate in "Separate" mode; this setting
means that the pedals operate on independent axes.
This mode considerably improves precision when racing.
If your game is not compatible with the "Separate" mode, the pedal set connected to your racing wheel will
not operate correctly. You will then need to exit the game and select the "Combined" mode (in which both
pedals operate on the same axis).
Configuring the pedal set's mode using the software:
(This setting is stored in the device's memory, even after you restart your c omputer or disconnect and
reconnect your racing wheel.)
- On page 1 of the Control Panel, select the required mode, then click OK.
Configuring the pedal set's mode using the hardware:
(This setting is stored in the device's memory; it must be performed every time you start your computer or
disconnect the racing wheel)
- Press and release both pedals simultaneously (accelerator and brake) + the Force button located on the
racing wheel (F button).
If your PC game is not compatible with the pedal set's "Separate" mode, we recommend
Adjusting the automatic centering feature on PC
By default, the racing wheel's automatic centering feature is deactivated.
Most recent games feature their own automatic centering mode.
It is therefore strongly recommended (in most cases) to deactivate the racing wheel's automatic
centering feature and let your game manage this feature. The Force Feedback quality will be
improved.
The automatic centering mode should essentially be used with games that do not feature a Force
Feedback option, or feature only a "weak" automatic centering feature.
Adjusting the automatic centering feature using the software:
- Access page 2 of the Control Panel interface.
- To deactivate the automatic centering feature, select "By the game".
- To activate the automatic centering feature, select "By the wheel".
In this mode, you can adjust the automatic centering feature's intensity, from 0 to 100%.
Adjusting the automatic centering feature using the hardware:
To activate or deactivate the automatic centering featuring directly within your game, simply press the
Force button (i.e. the "F" button) on your racing wheel. When activated, the automatic centering feature's
intensity matches the value previously defined for the "By the wheel" setting in the Control Panel interface.
you switch your racing wheel to the "Combined" mode.
Page 7

6/10
PLAYSTATION3
HINT:
and use the brake pedal to cancel it.
Installing the racing wheel on PlayStation®3
- Connect the USB connector to one of your console's USB ports.
You are now ready to race!
General notes for PlayStation®3
- When in the global menu, use your console's official controller (not your racing wheel) to navigate and start
your games.
= The racing wheel's mapping* feature will only run once the game is started.
- The racing wheel doesn't feature a PS button
= Use your console's official controller to exit your games and turn off your console.
- Adjusting the Force Feedback effects on PS3
= You can adjust the in-game force settings in the Options/Controls section (these options are not available in
some games).
- Adjusting the racing wheel and pedal set's sensitivity on PS3
= You can adjust the in-game sensitivity settings in the Options/Controls section (these options are not
available in some games).
- A list of PS3™ games compatible with the racing wheel's Force Feedback feature is available on
http://ts.thrustmaster.com (in the Downloads and Updates section, click PC / Wheels / T100 FFB or
PlayStation / Wheels / T100 FFB, then select Games settings).
In some PS3™ games
you can use the accelerator pedal to confirm a selection
(e.g. GRAN TURISMO®),
Page 8
7/10
TROUBLESHOOTING
- The racing wheel and pedal set do not operate correctly, or calibration seems incorrect:
Turn off your computer or your console, disconnect your racing wheel entirely, then reconnect all cables
(connecting the racing wheel's USB connector last), then restart your computer or your console and your
game.
Always connect the pedal set to the racing wheel before connecting any USB connectors, and never press
any of the pedals while the racing wheels is self-calibrating at startup or the game is starting.
- The racing wheel moves on its own during gameplay:
This is normal; it is caused by the automatic centering feature that is available in some games. To stop
these movements, simply place your hands on the racing wheel or reduce the Force Feedback feature's
intensity.
- The racing wheel is detected, but doesn't work with my game:
Open your game's Options interface to configure your racing wheel. Please refer to your game's user
manual or online help for more information.
- The Force Feedback feature does not react correctly on PC:
In the racing wheel's Control Panel interface (i.e. the Game Controllers interface in Windows®), restore all
forces to their default value (100%) and deactivate the automatic centering feature (the indicator light
should not flash).
In some PC games, it is also necessary to invert the forces (in this case, select "Negative forces" or move
the cursor to "-100%" in your game's options). In other games, the forces should not be inverted (in this
case, select "Positive forces" or move the cursor to "+ 100%" in your game's options).
- The pedal set does not operate correctly in "Separate" mode on PC
(e.g. in the game, the selection cursor moves around on its' own)
Exit the game and switch your pedal set to "Combined" mode. Restart your game, then configure your
racing wheel once more via your game's options management interface.
SAFETY RECOMMENDATIONS AND INFORMATION
- When connecting your racing wheel and during the automatic calibration phase: to avoid
calibration errors, do not turn the racing wheel and do not press any of the pedals or buttons.
- If you do not plan to use your racing wheel for a prolonged period of time, to avoid
pointless electricity consumption and to prevent any damage to your racing wheel,
disconnect the power adapter from the racing wheel. Remember to reconnect the power adapter
before you start playing again!
- Your racing wheel includes a Force Feedback feature: Keep young children away from your
racing wheel, particularly during the automatic calibration phases.
For safety reasons, do not use the pedal set with bare feet or when wearing only socks.
THRUSTMASTER® SHALL NOT BE HELD RESPONSIBLE FOR ANY PHYSICAL INJURIES
OCCURRING WHEN USING THE PEDAL SET WITHOUT SHOES.
Page 9

8/10
Consumer warranty information
Worldwide, Guillemot Corporation S.A. (hereinafter “Guillemot”) warrants to the consumer that this
Thrustmaster product shall be free from defects in materials and workmanship, for a warranty
period which corresponds to the time limit to bring an action for conformity with respect to this
product. In the countries of the European Union, this corresponds to a period of two (2) years from
delivery of the Thrustmaster product. In other countries, the warranty period corresponds to the
time limit to bring an action for conformity with respect to the Thrustmaster product according to
applicable laws of the country in which the consumer was domiciled on the date of purchase of the
Thrustmaster product (if no such action exists in the corresponding country, then the warranty
period shall be one (1) year from the original date of purchase of the Thrustmaster product).
Notwithstanding the above, rechargeable batteries are covered by a warranty period of six (6)
months from the date of original purchase.
Should the product appear to be defective during the warranty period, immediately contact
Technical Support, who will indicate the procedure to follow. If the defect is confirmed, the product
must be returned to its place of purchase (or any other location indicated by Technical Support).
Within the context of this warranty, the consumer’s defective product shall, at Technical Support’s
option, be either repaired or replaced. If permitted under applicable law, the full liability of Guillemot
and its subsidiaries (including for consequential damages) is limited to the repair or replacement of
the Thrustmaster product. If permitted under applicable law, Guillemot disclaims all warranties of
merchantability or fitness for a particular purpose. The consumer’s legal rights with respect to laws
applicable to the sale of consumer goods are not affected by this warranty.
This warranty shall not apply: (1) if the product has been modified, opened, altered, or has suffered
damage as a result of inappropriate or abusive use, negligence, an accident, normal wear, or any
other cause unrelated to a material or manufacturing defect (including, but not limited to, combining the
Thrustmaster product with any unsuitable element, including in particular power supplies, rechargeable
batteries, chargers, or any other elements not supplied by Guillemot for this product); (2) in the event
of failure to comply with the instructions provided by Technical Support; (3) to software, said software
being subject to a specific warranty; (4) to consumables (elements to be replaced over the product’s
lifespan: disposable batteries, audio headset or headphone ear pads, for example); (5) to accessories
(cables, cases, pouches, bags, wrist-straps, for example); (6) if the product was sold at public auction.
This warranty is nontransferable.
Additional warranty provisions
In the United States of America and in Canada, this warranty is limited to the product’s internal
mechanism and external housing. In no event shall Guillemot or its affiliates be held liable to any
third party for any consequential or incidental damages resulting from the breach of any express or
implied warranties. Some States/Provinces do not allow limitation on how long an implied warranty
lasts or exclusion or limitation of liability for consequential or incidental damages, so the above
limitations or exclusions may not apply to you. This warranty gives you specific legal rights, and
you may also have other rights which vary from State to State or Province to Province.
Page 10

9/10
Liability
If permitted under applicable law, Guillemot Corporation S.A. (hereinafter “Guillemot”) and its
subsidiaries disclaim all liability for any damages caused by one or more of the following: (1) the
product has been modified, opened or altered; (2) failure to comply with assembly instructions; (3)
inappropriate or abusive use, negligence, an accident (an impact, for example); (4) normal wear. If
permitted under applicable law, Guillemot and its subsidiaries disclaim all liability for any damages
unrelated to a material or manufacturing defect with respect to the product (including, but not
limited to, any damages caused directly or indirectly by any software, or by combining the
Thrustmaster product with any unsuitable element, including in particular power supplies,
rechargeable batteries, chargers, or any other elements not supplied by Guillemot for this product).
FCC STATEMENT
1. This device complies with Part 15 of the FCC Rules. Operation is subject to the following two
conditions:
(1) This device may not cause harmful interference, and
(2) This device must accept any interference received, including interference that may cause
undesired operation.
2. Changes or modifications not expressly approved by the party responsible for compliance could
void the user's authority to operate the equipment.
COPYRIGHT
© 2015 Guillemot Corporation S.A. All rights reserved. Thrustmaster® is a registered trademark of
Guillemot Corporation S.A. PlayStation® is a registered trademark of Sony Computer
Entertainment, Inc. Windows® is a registered trademark of Microsoft Corporation in the United
States and/or in other countries. All other trademarks and brand names are hereby acknowledged
and are the property of their respective owners. Illustrations not binding. Contents, designs and
specifications are subject to change without notice and may vary from one country to another.
Made in China.
TouchSense® Technology licensed from Immersion Corporation. Protected by one or more of the
U.S. Patents found at the following address www.immersion.com/patent-marking.html and other
patents pending.
Page 11
10/10
ENVIRONMENTAL PROTECTION RECOMMENDATION
TECHNICAL SUPPORT
Equipment, you can make a significant contribution towards helping to protect the
environment.
Please contact your local authorities for information on the collection point nearest you.
Retain this information. Colours and decorations may vary.
This product conforms to all standards regarding children 14 years of age and older. This
product is not suitable for use by children less than 14 years of age.
www.thrustmaster.com
At the end of its working life, this product should not be disposed of with
standard household waste, but rather dropped off at a collection point for the
disposal of Waste Electrical and Electronic Equipment (WEEE) for recycling.
This is confirmed by the symbol found on the product, user manual or
packaging.
Depending on their characteristics, the materials may be recycled. Through
recycling and other forms of processing Waste Electrical and Electronic
http://ts.thrustmaster.com
Page 12

1/10
Pour: PC & PlayStation®3
Manuel de l’utilisateur
Page 13

2/10
INSTALLATION DU VOLANT
ATTENTION : Ne jamais visser la vis de serrage sans le système de fixation !
Pour serrer :
Pour desserrer :
Fixer le volant sur une table ou un bureau
- Placez le volant sur une table ou autre surface plane.
- Placez la vis de serrage dans le système de fixation, puis vissez l’ensemble (dans le sens inverse des
aiguilles d’une montre) dans le gros pas de vis situé sous le volant, jusqu’à ce que ce dernier soit
parfaitement stable.
(au risque de détériorer le volant).
MONTAGE DEMONTAGE
Vissez dans le sens inverse des aiguilles d’une
Fixer le volant sur un cockpit
- Placez le volant sur la tablette du cockpit.
- Vissez 2 vis M6 (non fournies avec le volant) dans la tablette du cockpit et dans les 2 petits pas de vis
situés sous le volant.
- Vissez en plus le système de fixation classique (dans le gros pas de vis).
montre
Dévissez dans le sens des aiguilles
d’une montre
Page 14

3/10
Remarques importantes pour éviter des problèmes de calibration:
(lors de l’autocalibration au branchement, au lancement ou à la sortie d’un jeu)
Dans les jeux PlayStation®3 et PC
(excepté les boutons 13 à 17 qui sont inactifs sur PC).
RELIER LE VOLANT AU SECTEUR
Pour les versions européennes (uniquement)
Remarque importante : l’alimentation du T100 FFB version européenne est interne et donc située
directement dans la bas e du volant.
- Reliez tout simplement la prise secteur du volant sur une prise de courant 220V.
Pour les autres versions (non-européennes)
Remarque : à la différence de la version européenne, l’alimentation du T100 FFB version non-européenne
est externe avec un adaptateur secteur externe spécifique fourni.
- Reliez l’adaptateur secteur externe en branchant son connecteur à l’arrière du volant, puis branchez
l’adaptateur secteur externe sur une prise de courant correspondant au même voltage.
RELIER LE PEDALIER AU VOLANT
Reliez le pédalier au volant en branchant son connecteur à l’arrière du volant.
CALIBRAGE AUTOMATIQUE DU VOLANT ET DES PEDALES
La roue du volant s’autocalibre de manière automatique une fois l’adaptateur secteur et le connecteur
USB connectés. (Cette opération entraîne des mouvements du volant.) Les pédales se calibrent
également automatiquement après quelques pressions.
La version européenne ne doit être branchée que sur du 220V. !
Ne jamais ouvrir la base du volant sous risque de choc électrique !
- Ne jamais brancher l’USB du volant avant de brancher le pédalier
- Ne jamais appuyer sur les pédales lorsque le volant démarre
(ainsi que dans le Panneau de configuration PC),
votre volant est reconnu comme un volant F430 Force Feedback
avec les mêmes fonctionnalités que celui-ci
Page 15

4/10
PC
Remarque :
jeu !
Configuration requise : PC (Windows® XP, Vista, 7, 8) équipé d'un port USB.
Installation des pilotes Force Feedback PC
1. Allez sur http://ts.thrustmaster.com pour télécharger les pilotes et le logiciel Force Feedback pour PC
(dans la section Mise à jour et téléchargement, cliquez sur PC / Volant / T100 FFB ou PlayStation /
Volant / T100 FFB, puis Pilotes).
2. Une fois le téléchargement et l'installation terminés, cliquez sur Terminer et redémarrez votre
ordinateur.
3. Au redémarrage de l'ordinateur, reliez le connecteur USB à l'un des ports USB de votre unité centrale.
Windows® détectera automatiquement le nouveau périphérique.
4. Installation des pilotes :
L'installation des pilotes est automatique. Suivez les instructions affichées à l’écran pour terminer
l’installation.
5. Sélectionnez Démarrer/Paramètres/Panneau de configuration, puis double-cliquez sur Contrôleur
de jeu (ou Options de jeu selon votre système d’exploitation).
La boîte de di alogue Contrôleurs de jeu affichera le nom du volant avec l'état OK.
6. Dans le Control Panel, cliquez sur Propriétés pour configurer votre volant :
• Test du périphérique : vous permet de tester et visualiser les boutons, le D-Pad et les axes du
volant et du pédalier.
• Tester les forces : vous permet de tester 8 effets de Force et de configurer le réglage des effets
de ForceFeedback et des effets d’Autocentrage.
Vous êtes maintenant prêt à jouer !
Réglage des effets Force Feedback sur PC
Dans la page 2 du Control Panel, 4 réglages possibles de 0 à 150 % :
Forces principales / Forces statiques / Forces dynamiques / Agressivité
Sur PC, pensez à toujours fermer complètement le Control Panel avant de lancer votre
Page 16

5/10
MODE DU PEDALIER
LED du volant
SEPARE (mode conseillé dans la majorité des jeux)
ROUGE
COMBINE
VERT
Remarque :
AUTO-CENTRAGE
LED du volant
DESACTIVE (mode conseillé pour tous les jeux Force Feedback PC)
NE CLIGNOTE PAS
ACTIVE
CLIGNOTE
Configuration du pédalier sur PC
Par défaut, les commandes d’accélérateur et de freins de votre volant fonctionnent en mode Séparé, ce
qui signifie que les pédales fonctionnent sur des axes indépendants.
Ce mode permet d’améliorer considérablement la précision de votre pilotage.
Si votre jeu ne supporte pas le mode Séparé, le pédalier de votre volant ne fonctionnera pas
correctement. Vous devez alors quitter le jeu et sélectionner le mode Combiné (où les pédales
fonctionnent sur le même axe).
Réglage du mode pédalier par logiciel :
(opération conservée en mémoire même après un redémarrage ou une déconnexion de votre volant)
- Dans la page 1 du Control Panel, cliquez sur l e mode souhaité, puis sur Ok.
Réglage du mode pédalier par hardware :
(opération conservée en mémoire : à effectuer à chaque redémarrage ou déconnexion)
- Appuyez simultanément et relâchez les 2 pédales (accélérateur et frein) + le bouton Force situé sur le
volant (bouton F).
Si votre jeu PC n’accepte pas le mode Pédalier Séparé,
basculez alors votre volant en mode Pédalier Combiné
Réglage de la fonction Auto-centrage sur PC
Par défaut, l’auto-centrage du volant est désactivé.
La plupart des jeux récents proposent leur propre mode d’auto-centrage.
Il est donc fortement conseillé (dans la majorité des cas) de désactiver l’auto-centrage du volant,
pour laisser le jeu le gérer. Le Force Feedback sera alors de meilleure qualité.
Le mode auto-centrage activé sera surtout utile dans les jeux n’utilisant pas de Force Feedback ou
utilisant un faible retour au centre.
Réglage de l’auto-centrage par logiciel :
- Accédez à la page 2 du Control Panel.
- Pour désactiver l’auto-centrage, cliquez sur Via le jeu.
- Pour activer l’auto-centrage, cliquez sur Via le volant.
Dans ce mode, vous pouvez régler l’intensité du retour au centre automatique de 0 à 100 %.
Réglage de l’auto-centrage par hardware :
Pour activer ou désactiver l’auto-centrage directement dans votre jeu, appuyez simplement sur le bouton
Force (bouton « F ») de votre volant. En mode activé, l’intensité du retour au centre correspondra au
pourcentage attribué précédemment au paramètre Via le volant dans le Control Panel.
Page 17

6/10
PLAYSTATION3
ASTUCE :
et la pédale de frein pour annuler
Installation sur PlayStation®3
- Reliez le connecteur USB à l'un des ports USB de votre console.
Vous êtes maintenant prêt à jouer !
Remarques générales sur PlayStation®3
- Dans le menu général, utilisez votre manette officielle (et non votre volant) pour naviguer et lancer vos jeux
= Le Mapping* du volant ne sera fonctionnel qu’une fois le jeu lancé.
- Le volant ne possède pas de bouton PS
= Utilisez votre manette officielle pour quitter vos jeux ou éteindre la console.
- Réglage des effets Force Feedback sur PS3
= Dans votre jeu modifiez les paramètres de force dans « Option/Contrôles » (dans certains jeux, ces options
ne sont pas disponibles).
- Réglage de la sensibilité du volant et du pédalier sur PS3
= Dans votre jeu, modifiez les paramètres de sensibilité dans Option/Contrôles (dans certains jeux, ces options
ne sont pas disponibles).
- Liste des jeux PS3™ compatibles Force Feedback avec le volant disponible sur http://ts.thrustmaster.com
(dans la section Mise à jour et téléchargement, cliquez sur PC / Volant / T100 FFB ou PlayStation / Volant /
T100 FFB, puis Paramétrage des jeux).
Dans certains jeux PS3™
(par exemple GRAN TURISMO®),
utilisez la pédale d’accélérateur pour valider
Page 18

7/10
DEPANNAGE
- Mon volant et mes pédales ne fonctionnent pas correctement ou semble mal calibré :
Eteignez votre ordinateur ou votre console, déconnectez entièrement votre volant, reconnectez tous les
câbles (en branchant en dernier l’USB du volant) puis redémarrez et relancez votre jeu.
Branchez toujours le pédalier au volant avant de brancher l’USB et n’appuyez jamais sur les pédales
pendant les phases d’autocalibration lorsque le volant démarre ou que le jeu se lance.
- Mon volant bouge tout seul dans le jeu :
Ceci est normal, il s'agit de la fonction d’auto-centrage disponible dans certains jeux. Pour arrêter ces
mouvements, il suffit de placer ses mains sur le volant ou de diminuer l’intensité du Force Feedback.
- Mon volant est détecté, mais ne fonctionne pas avec mon jeu :
Ouvrez l’interface de gestion des Options de votre jeu pour configurer votre volant. Reportez-vous au
manuel de l’utilisateur ou à l’aide en ligne de votre jeu pour plus d’informations.
- Le Force Feedback ne réagit pas correctement sur PC :
Dans le Control Panel du volant (= contrôleur de jeu Windows®), remettez l’ensemble des forces à leur
valeur par défaut (100 %) et désactivez l’auto-centrage = le témoin ne doit pas clignoter.
Dans certains jeux PC, il est également nécessaire d’inverser les forces (choisissez alors dans les options
du jeu Forces négatives ou positionnez le curseur sur - 100 %). Dans d’autres jeux, les forces ne doivent
pas être inversées (dans ce cas, choisissez Forces positive ou + 100 %).
- Mon pédalier ne fonctionne pas correctement en Mode Séparé sur PC
(Exemple : une fois dans le jeu, le curseur de sélection se déplace tout seul)
Quittez le jeu et basculez votre pédalier en Mode Combiné. Relancez le jeu puis configurez de nouveau
votre volant dans l’interface de gestion des options de votre jeu.
PRÉCONISATIONS ET INFORMATIONS RELATIVES À LA SÉCURITÉ
- Lors de la connexion de votre volant et pendant la phase d’auto-calibration : pour éviter
toute mauvaise calibration, ne tournez jamais le volant, n'appuyez pas sur les pédales ou sur les
boutons.
- Lors des périodes prolongées d’inactivité et pour éviter toute consommation inutile
d’énergie ou toute détérioration, débranchez le volant du secteur. Rebranchez-le avant de
reprendre la partie.
- Votre volant est à retour de force : Ne laissez jamais votre volant à la portée des jeunes
enfants surtout lors des phases d’auto-calibration.
Pour des raisons de sécurité, ne jouez pas pieds nus ou en chaussettes lorsque vous utilisez le
THRUSTMASTER® DECLINE TOUTE RESPONSABILITE EN CAS DE BLESSURE SUITE A UNE
UTILISATION DU PEDALIER SANS CHAUSSURES.
pédalier.
Page 19

8/10
Informations relatives à la garantie aux consommateurs
Dans le monde entier, Guillemot Corporation S.A. (ci-après « Guillemot ») garantit au
consommateur que le présent produit Thrustmaster est exempt de défaut matériel et de vice de
fabrication, et ce, pour une période de garantie qui correspond au délai pour intenter une action
en conformité de ce produit. Dans les pays de l’Union Européenne, ce délai est de deux (2) ans
à compter de la délivrance du produit Thrustmaster. Dans les autres pays, la durée de la
période de garantie correspond au délai pour intenter une action en conformité du produit
Thrustmaster selon la législation en vigueur dans le pays où le consommateur avait son
domicile lors de l’achat du produit Thrustmaster (si une telle action en conformité n’existe pas
dans ce pays alors la période de garantie est de un (1) an à compter de la date d’achat d’origine
du produit Thrustmaster).
Nonobstant ce qui précède, les batteries sont garanties six (6) mois à compter de la date d’achat
d’origine.
Si, au cours de la période de garantie, le produit semble défectueux, contactez
immédiatement le Support Technique qui vous indiquera la procédure à suivre. Si le défaut
est confirmé, le produit devra être retourné à son lieu d’achat (ou tout autre lieu indiqué par
le Support Technique).
Dans le cadre de la garantie, le consommateur bénéficiera, au choix du Support Technique,
du remplacement ou de la réparation du produit défectueux. Lorsque la loi applicable
l’autorise, toute responsabilité de Guillemot et ses filiales (y compris pour les dommages
indirects) se limite à la réparation ou au remplacement du produit Thrustmaster. Lorsque la
loi applicable l’autorise, Guillemot exclut toutes garanties de qualité marchande ou
d’adaptation à un usage particulier. Les droits légaux du consommateur au titre de la
législation applicable à la vente de biens de consommation ne sont pas affectés par la
présente garantie.
Cette garantie ne s’appliquera pas : (1) si le produit a été modifié, ouvert, altéré, ou a subi des
dommages résultant d’une utilisation inappropriée ou abusive, d’une négligence, d’un accident, de
l’usure normale, ou de toute autre cause non liée à un défaut matériel ou à un vice de fabrication (y
compris, mais non limitativement, une combinaison du produit Thrustmaster avec tout élément
inadapté, notamment alimentations électriques, batteries, chargeurs, ou tous autres éléments nonfournis par Guillemot pour ce produit) ; (2) en cas de non respect des instructions du Support
Technique ; (3) aux logiciels, lesdits logiciels faisant l’objet d’une garantie spécifique ; (4) aux
consommables (éléments à remplacer pendant la durée de vie du produit : piles, coussinets de
casque audio, par exemple) ; (5) aux accessoires (câbles, étuis, housses, sacs, dragonnes, par
exemple) ; (6) si le produit a été vendu aux enchères publiques.
Cette garantie n’est pas transférable.
Page 20

9/10
Stipulations additionnelles à la garantie
Aux États-Unis d’Amérique et au Canada, cette garantie est limitée au mécanisme interne et au
boîtier externe du produit. En aucun cas, Guillemot ou ses sociétés affiliées ne sauraient être
tenues responsables envers qui que ce soit de tous dommages indirects ou dommages
accessoires résultant du non respect des garanties expresses ou implicites. Certains
États/Provinces n’autorisent pas la limitation sur la durée d’une garantie implicite, ou l’exclusion
ou la limitation de responsabilité pour les dommages indirects ou accessoires, de sorte que les
limitations ou exclusions ci-dessus peuvent ne pas vous être applicables. Cette garantie vous
confère des droits spécifiques ; vous pouvez également bénéficier d’autres droits qui peuvent
différer d’un État/Province à l’autre.
Responsabilité
Lorsque la loi applicable l’autorise, Guillemot Corporation S.A. (ci-après « Guillemot ») et ses
filiales excluent toute responsabilité pour tous dommages causés par un ou plusieurs des faits
suivants: (1) le produit a été modifié, ouvert, altéré, (2) l’irrespect des instructions de montage,
(3) l’utilisation inappropriée ou abusive, la négligence, l’accident (un choc, par exemple), (4)
l’usure normale du produit. Lorsque la loi applicable l’autorise, Guillemot et ses filiales excluent
toute responsabilité pour tout dommage dont la cause n’est pas liée à un défaut matériel ou à
un vice de fabrication du produit (y compris, mais non limitativement, tout dommage causé
directement ou indirectement par tout logiciel, ou par une combinaison du produit Thrustmaster
avec tout élément inadapté, notamment alimentations électriques, batteries, chargeurs, ou tous
autres éléments non-fournis par Guillemot pour ce produit).
COPYRIGHT
© 2015 Guillemot Corporation S.A. Tous droits réservés. Thrustmaster
déposée de Guillemot Corporation S.A. PlayStation
®
est une marque déposée de Sony
Computer Entertainment Inc. Windows® est une marque déposée de Microsoft Corporation
aux Etats-Unis et/ou dans d’autres pays. Toutes les autres marques déposées et noms
commerciaux sont reconnus par les présentes et sont la propriété de leurs propriétaires
respectifs. Illustrations non contractuelles. Le contenu, la conception et les spécifications
sont susceptibles de changer sans préavis et de varier selon les pays. Fabriqué en Chine.
Technologie TouchSense® sous licence d’Immersion Corporation. Protégée par un ou
plusieurs des brevets américains dont la liste est disponible à l’adresse
www.immersion.com/patent-marking.html, et d’autres brevets en attente.
®
est une marque
Page 21

10/10
RECOMMANDATION RELATIVE A LA PROTECTION DE L’ENVIRONNEMENT
SUPPORT TECHNIQUE
significative à la protection de l’environnement.
Veuillez consulter les autorités locales qui vous indiqueront le point de collecte concerné.
Informations à conserver. Les couleurs et décorations peuvent varier.
Ce produit est en conformité avec l’ensemble des normes relatives aux enfants de plus de 14
ans. Il ne convient pas aux enfants de moins de 14 ans.
www.thrustmaster.com
En fin de vie, ce produit ne doit pas être éliminé avec les déchets ménagers
normaux mais déposé à un point de collecte des déchets d'équipements
électriques et électroniques en vue de son recyclage.
Ceci est confirmé par le symbole figurant sur le produit, le manuel utilisateur
ou l’emballage.
En fonction de leurs caractéristiques, les matériaux peuvent être recyclés.
Par le recyclage et par les autres formes de valorisation des déchets
d'équipements électriques et électroniques, vous contribuez de manière
http://ts.thrustmaster.com
Page 22

1/10
Für: PC & PlayStation®3
Benutzerhandbuch
Page 23

2/10
AUFBAU DES RENNLENKERS
WARNUNG: Drehen Sie die Schraube niemals ohne das Befestigungssystem ein -
Befestigen:
Entfernen:
Befestigen des Rennlenkers an einem Tisch oder Schreibtisch
- Plazieren Sie den Rennlenker auf einem Tisch oder einer sonstigen horizontalen, stabilen Fläche.
- Führen Sie die Feststellschraube in das Befestigungssystem ein. Schrauben Sie den Lenker mit dieser
Schraube entgegen dem Uhrzeigersinn fest in das Gewinde unterhalb des Lenkrads, bis dieses sicher
und stabil befestigt ist.
dies könnte zu einer Beschädigung des Rennlenkers führen!
ZUSAMMENBAU ENTFERNEN
Schraube entgegen dem Uhrzeigersinn drehen
Schraube im Uhrzeigersinn drehen
Montage des Rennlenkers in einem Cockpit
- Plazieren Sie den Rennlenker auf das Cockpit-Gestell.
- Führen Sie zwei M6-Schrauben (nicht im Paket enthalten) durch das Cockpit-Gestell und führen diese
hernach in die kleinen Gewinde unterhalb des Lenkers ein.
- Befestigen Sie dann das Standard-Befestigungssystem mittels der Feststellschraube, die Sie in das
große Gewinde eindrehen.
Page 24
3/10
Wichtige Anmerkungen zur Vermeidung von Kalibrierungsproblemen:
beim Starten/Verlassen eines Spiels)
Bei PlayStation®3 und PC Spielen und in der Systemsteuerung auf dem PC wird der
(außer den Buttons 13-17, die auf dem PC inaktiv sind).
ANSCHLUSS DES RENNLENKERS AN DIE STROMVERSORGUNG
Nur europäische Version
Wichtige Anmerkung: Die europäische Versi on des T100 FFB ist mit einem internen Netzanschluss
ausgestattet, der sich direkt innerhalb der Basis des Rennlenkers befindet.
- Stecken Sie den Netzstecker des Rennlenkers einfach in eine 220 V führende Steckdose.
Andere Versionen (Nicht-Europäisch)
Achtung: Im Gegensatz zu der europäischen Version ist die nicht-europäische Version des T100 FFB mit
einem externen Netzteil ausgestattet, das mit dem Rennlenker ausgeliefert wird.
- Schließen Sie das externe Netzteil an den entsprechenden Anschluss auf der Rückseite des Lenkrads
an und stecken dann das externe Steckernetzteil in eine Steckdose mit der gleichen Spannung.
ANSCHLUSS DES PEDALSETS AN DEN RENNLENKER
Schließen Sie mittels des entsprechenden Anschlusses, hinten am Lenkrad, das Pedalset an.
AUTOMATISCHE KALIBRIERUNG DES LENKERS UND DES PEDALSETS
Die Kalibrierung des Rennlenkers erfolgt automatisch, nachdem der Stromanschluss und die USBVerbindung hergestellt wurden. (Bei dieser Operation bewegt sich das Lenkrad selbstständig.) Die
Kalibrierung des Pedalsets erfolgt ebenfalls automatisch – drücken Sie dazu ein paarmal auf die Pedale.
Die europäische Version muß ausschließlich mit 220 V betrieben werden!
Öffnen Sie niemals die Basis des Rennlenkers – es besteht die Gefahr eines Stromschlages!
- Schließen Sie den USB-Stecker des Rennlenkers niemals vor dem Anschluss des
- Drücken Sie niemals die Pedale, wenn der Rennlenker startet
(d. h., wenn der Rennlenker eine Selbstkalibrierung nach dem Anschließen ausführt oder
Rennlenker als F430 Force Feedback Rennlenker erkannt,
der die gleichen Merkmale wie dieser aufweist
Pedalsets an
Page 25

4/10
PC
Bitte beachten Sie:
PC!
PEDALSET-MODUS
Rennlenker-LED
SEPARAT (dieser Modus ist für die meisten Spiele empfohlen)
ROT
KOMBINIERT
GRÜN
Systemanforderungen: PC (Windows® XP, Vista, 7 und 8) mit einem USB-Anschluss.
Installieren der Force-Feedback-Treiber für PC
1. Zum Herunterladen der Force-Feedback-Treiber und der Software für PC, gehen Sie bitte auf
http://ts.thrustmaster.com (in der Updates and Downloads Sektion klicken Sie auf PC / Wheels / T100
FFB oder PlayStation / Wheels / T100 FFB und klicken dann auf Drivers [Treiber]).
2. Nachdem das Herunterladen und die Installation beendet wurden, klicken Sie bitte auf Beenden und
starten Ihren Computer neu.
3. Nach dem Computer-Neustart schließen Sie den USB-Stecker des Lenkers an einen USB-Anschluss
Ihres PCs an. Windows® erkennt das neue Gerät automatisch.
4. Treiberinstallation:
Die Treiberinstallation erfolgt automatisch. Folgen Sie den Bildschirmanweisungen, um die Installation
fertigzustellen.
5. Wählen Sie Start/Einstellungen/Systemsteuerung und (doppel-)klicken dann auf Game Controller
(oder Spieloptionen, je nach Ihrem Betriebssystem).
Der Game Controller Dialog zeigt den Rennlenker mit der Statusmel dung OK an.
6. In der Steuerkonsole klicken Sie auf Eigenschaften, um Ihren Rennlenker zu konfigurieren:
• Test Gerät: Hier wird Ihnen ermöglicht die Buttons, das D-Pad den Rennlenker und die Achsen
des Pedalsets zu testen und zu betrachten.
• Test Forces: Hier wird Ihnen ermöglicht die 8 Force-Effekte zu testen und die Force Feedback
und die automatischen Zentrierungs-Effekte zu konfigurieren.
Sie können nun mit dem Rennen loslegen!
Einstellen der Force Feedback Effekte auf dem PC
Auf Seite 2 der Steuerkonsole sind vier Einstellungen verfügbar und können von 0 auf 150 % eingestellt
werden:
Haupt-Forces / Statische Forces / Dynamische Forces / Aggressivität
Bevor Sie Ihr Spiel starten, schließen Sie immer vollständig die Steuerkonsole auf dem
Konfigurieren des Pedalsets auf dem PC
Werksseitig voreingestellt arbeiten die Beschleunigungs- und Bremskontrollen Ihres Lenkers im "Separat"
Modus. Diese Einstellung bedeutet, daß die Pedale auf verschiedenen Achsen operieren. Dieser Modus
verbessert die Präzision beim Rennen deutlich.
Sollte Ihr Spiel mit dem "Separat" Modus nicht kompatibel sein, wird das Pedalset nicht ordnungsgemäß
funktionieren. Sie müssen dann das Spiel verlassen und den "Kombiniert" Modus auswählen (in dem
beide Pedale auf derselben Achse operieren).
Page 26

5/10
Bitte beachten Sie:
"Kombiniert" Modus zu schalten.
INAKTIV (empfohlener Modus für alle PC Force Feedback Spiele)
NICHT BLINKEND
AKTIV
BLINKEND
Konfigurieren des Pedalset-Modus mittels der Software:
(Diese Einstellung wird im Speicher des Gerätes gesichert, auch wenn Sie den Computer neu starten
oder Ihren Rennlenker trennen und erneut anschließen.)
- Den gewünschten Modus auf Seite 1 der Steuerkonsole auswählen und dann auf OK klicken.
Konfigurieren des Pedalset-Modus mittels der Hardware:
(Diese Einstellung wird im Speicher des Ger ätes gesichert, auch wenn Sie den Computer neu starten
oder Ihren Rennlenker trennen und erneut anschließen.)
- Drücken und Freigeben beider Pedale gleichzeitig (Gas und Bremse) + des Force-Buttons am
Rennlenker (F Button).
Sollte Ihr PC-Spiel nicht mit dem "Separat" Modus des Pedalsets
kompatibel sein, empfehlen wir Ihren Rennlenker in den
Einstellen der automatischen Zentrierfunktion auf dem PC
Die automatische Zentrierfunktion des Rennlenkers ist werksseitig deaktiviert.
Die meisten aktuellen Spiele verfügen über einen eigenen automatischen Zentrierungsmodus.
Es ist demnach dringend angeraten (in den meisten Fällen) die automatische Zentrierungsfunktion
des Rennlenkers zu deaktivieren und diese Funktion durch Ihr Spiel handhaben zu lassen. Die
Force Feedback Qualität wird verbessert.
Die automatische Zentrierfunktion sollte hauptsächlich in Spielen, die nicht über eine Force Feedback
Option verfügen (oder die nur eine sehr schwache automatische Zentrierungsfunktion aufweisen),
eingesetzt werden.
Einstellen der automatischen Zentrierungsfunktion mittels der Software:
- Rufen Sie Seite 2 in der Steuerkonsole auf.
- Um die automatische Zentrierungsfunktion zu deaktivieren, wählen Sie "Durch das Spiel" aus.
- Um die automatische Zentrierungsfunktion zu aktivieren, wählen Sie "Durch den Lenker" aus.
In diesem Modus können Sie die Intensität der automatischen Zentrierungsfunktion auf einen Wert von 0
bis 100 % einstellen.
Einstellen der automatischen Zentrierungsfunktion mittels der Hardware:
Um die automatische Zentrierungsfunktion direkt während des Spiels zu aktivieren/deaktivieren, drücken
Sie einfach den Force-Button (d. h. den "F" Button) an Ihrem Rennlenker. Wenn aktiviert, stimmt die
Intensität der automatischen Zentrierungsfunktion mit dem Wert überein, der vorher per Steuerkonsole für
die Einstellung "Durch den Lenker" vorgegeben wurde.
AUTOMATISCHE ZENTRIERUNG Rennlenker-LED
Page 27

6/10
PLAYSTATION3
TIP:
stornieren.
Anschluss des Rennlenkers an eine PlayStation®3
- Stecken Sie den USB-Stecker des Lenkers in einen USB-Anschluss der Konsole.
Sie können nun mit dem Rennen loslegen!
Allgemeine Anmerkungen für PlayStation®3
- Wenn Sie sich im Hauptmenü befinden, nutzen Sie bitte den offiziellen Kontroller (und nicht Ihren
Rennlenker), um zu navigieren und Ihre Spiele zu starten.
= Die Mappingfunktion* des Lenkers funktioniert nur, wenn das Spiel gestartet wurde.
- Der Rennlenker verfügt über keinen PS Button
= Nutzen Sie den offiziellen Kontroller, um Ihre Spiele zu beenden und die Konsole auszuschalten.
- Einstellen der Force-Feedback-Effekte auf der PS3
= Sie können die In-Game-Force-Einstellungen in der Sektion Optionen/Steuerung vornehmen (diese Optionen
sind in einigen Spielen nicht verfügbar).
- Einstellen der Empfindlichkeit des Lenkers und des Pedalsets auf der PS3
= Sie können die In-Game-Empfindlichkeits-Einstellungen in der Sektion Optionen/Steuerung vornehmen
(diese Optionen sind in einigen Spielen nicht verfügbar).
- Eine Liste mit PS3™ Spielen, die mit der Force Feedback Funktion kompatibel sind, steht unter
http://ts.thrustmaster.com zur Verfügung (in der Sektion Downloads and Updates klicken Sie auf PC /
Wheels / T100 FFB oder PlayStation / Wheels / T100 FFB und wählen dann Games Settings).
Bei einigen PS3™ Spielen
können Sie das Gaspedal dazu benutzen eine Auswahl zu
bestätigen und das Bremspedal dazu nutzen, diese zu
(z. B. GRAN TURISMO®),
Page 28

7/10
Ihrem Lenkrad, speziell während der automatischen Kalibrierungsphasen.
FEHLERBESEITIGUNG
- Der Rennlenker und das Pedalset funktionieren nicht korrekt oder die Kalibrierung scheint nicht
korrekt zu sein:
Schalten Sie Ihren Computer oder Ihre Konsole aus und trennen Ihren Rennlenker komplett vom
entsprechenden Gerät. Schließen Sie dann alle Kabel erneut an (den USB-Stecker des Lenkers zuletzt)
und starten dann Ihr Spiel neu.
Schließen Sie das Pedalset immer an den Lenker an, bevor sie jedwede anderen USB-Anschlüsse
herstellen und drücken niemals irgendein Pedal während der Selbstkalibrierung des Lenkers (zu Beginn
oder beim Start eines Spiels).
- Der Rennlenker bewegt sich von selbst während des Spielens:
Dies ist völlig normal und wird durch die automatische Zentrierungsfunktion, die in einigen Spielen
verfügbar ist, ausgelöst. Um diese Bewegungen zu stoppen, legen Sie Ihre Hände auf den Lenker oder
reduzieren die Force-Feedback-Intensität.
- Der Rennlenker wird erkannt, aber funktioniert nicht mit meinem Spiel:
Öffnen Sie die Options-Oberfläche Ihres Spiels, um Ihren Rennlenker zu konfigurieren. Bitte lesen Sie im
Benutzerhandbuch oder in der Online-Hilfe Ihres Spiels für weitere Informationen nach.
- Die Force Feedback Funktion reagiert nicht korrekt auf meinem PC:
In der Steuerkonsole des Rennlenkers (d. h. des Game-Controller-Interface bei Windows®) alle Forces
auf die Standardwerte zurücksetzen (100 %) und die automatische Zentrierungsfunktion deaktivieren (die
Anzeige-LED sollte nicht blinken).
Bei einigen PC-Spielen ist es auch erforderlich, die Forces zu invertieren (in diesem Fall wählen Sie
"Negative Forces" oder stellen den Cursor auf "-100 %" in Ihren Spieloptionen). In anderen Spielen sollten
die Forces nicht invertiert sein (in diesem Fall wählen Sie "Positive Forces" oder stellen den Cursor auf
"+100 %" in Ihren Spieloptionen).
- Das Pedalset funktioniert nicht ordnungsgemäß im "Separat" Modus auf dem PC
(z. B. im Spiel bewegt sich der Auswahl-Cursor von selbst):
Beenden Sie das Spiel und schalten Ihr Pedalset in den "Kombiniert" Modus. Starten Sie Ihr Spiel neu
und konfigurieren Ihren Rennlenker nochmals in den Spieloptionen Ihres Spiels.
SICHERHEITSEMPFEHLUNGEN UND INFORMATION
- Wenn Sie Ihren Rennlenker anschließen und während der automatischen
Kalibrierungsphase: Um Kalibrierungsfehler zu vermeiden, drehen Sie niemals am Lenkrad oder
betätigen eins der Pedale oder jedwede Buttons.
- Falls Sie Ihr Lenkrad für eine längere Zeit nicht nutzen, unnötigen Stromverbrauch
ausschließen wollen und Ihren Rennlenker vor Schaden bewahren wollen, trennen Sie Ihren
Rennlenker vom Stromnetz. Vergessen Sie nicht Ihren Rennlenker wieder mit dem Stromnetz zu
verbinden, wenn Sie erneut spielen möchten!
- Ihr Rennlenker verfügt über eine Force-Feedback-Funktion: Halten Sie Kinder fern von
Aus Sicherheitsgründen sollten Sie Ihr Pedalset niemals barfuß oder in Socken benutzen.
THRUSTMASTER® IST NICHT HAFTBAR ZU MACHEN FÜR SCHÄDEN, DIE DARAUS ENTSTEHEN
WENN DAS PEDALSET OHNE DAS TRAGEN VON SCHUHEN BENUTZT WIRD.
Page 29

8/10
Kunden-Garantie-Information
Guillemot Corporation S.A. (fortfolgend “Guillemot”) garantiert Kunden weltweit, daß dieses
Thrustmaster Produkt frei von Mängeln in Material und Verarbeitung für eine
Gewährleistungsfrist ist, die mit der Frist für eine Mängelrüge bezüglich des Produktes
übereinstimmt. In den Ländern der Europäischen Union entspricht diese einem Zeitraum von
zwei (2) Jahren ab Kaufdatum des Thrustmaster Produktes. In anderen Ländern entspricht
die Gewährleistungsfrist der zeitlichen Begrenzung für eine Mängelrüge bezüglich des
Thrustmaster Produktes in Übereinstimmung mit anwendbarem Recht des Landes, in dem
der Kunde zum Zeitpunkt des Erwerbs eines Thrustmaster Produktes wohnhaft ist. Sollte
eine entsprechende Regelung in dem entsprechenden Land nicht existieren, umfasst die
Gewährleistungspflicht einen Zeitraum von einem (1) Jahr ab dem originären Kaufdatum des
Thrustmaster Produktes.
Ungeachtet dessen werden wiederaufladbare Batterien (fortfolgend „Akkus“) durch eine
Gewährleistungsfrist von sechs (6) Monaten ab dem Kaufdatum abgedeckt.
Sollten bei dem Produkt innerhalb der Gewährleistungsfrist Defekte auftreten, kontaktieren
Sie unverzüglich den Technischen Kundendienst, der die weitere Vorgehensweise anzeigt.
Wurde der Defekt bestätigt, muß das Produkt an die Verkaufsstelle (oder an eine andere
Stelle, je nach Maßgabe des Technischen Kundendienstes) retourniert werden.
Im Rahmen dieser Garantie sollte das defekte Produkt des Kunden, je nach Entscheidung
des Technischen Kundendienstes, repariert oder ausgetauscht werden. Wenn nach
geltendem Recht zulässig, beschränkt sich die volle Haftung von Guillemot und ihrer
Tochtergesellschaften auf die Reparatur oder den Austausch des Thrustmaster Produktes
(inklusive Folgeschäden). Wenn nach geltendem Recht zulässig, lehnt Guillemot alle
Gewährleistungen der Marktgängigkeit oder Eignung für einen bestimmten Zweck ab. Die
Rechte des Kunden in Übereinstimmung mit anwendbarem Recht bezüglich des Verkaufs
auf Konsumgüter wird durch diese Garantie nicht beeinträchtigt.
Der Gewährleistungsanspruch verfällt: (1) Falls das Produkt modifiziert, geöffnet, verändert
oder ein Schaden durch unsachgemäßen oder missbräuchlichen Gebrauch hervorgerufen
wurde, sowie durch Fahrlässigkeit, einen Unfall, Verschleiß oder irgendeinem anderen
Grund – aber nicht durch Material- oder Herstellungsfehler (einschließlich, aber nicht
beschränkt auf, die Kombination der Thrustmaster Produkte mit ungeeigneten Elementen,
insbesondere Netzteile, Akkus, Ladegeräte, oder andere Elemente, die von Guillemot für
dieses Produkt nicht mitgeliefert wurden); (2) im Falle der Nichteinhaltung der durch den
Technischen Support erteilten Anweisungen; (3) durch Software. Die besagte Software ist
Gegenstand einer speziellen Garantie; (4) bei Verbrauchsmaterialien (Elemente, die
während der Produktlebensdauer ausgetauscht werden, wie z. B. Einwegbatterien,
Ohrpolster für ein Audioheadset oder für Kopfhörer); (5) bei Accessoires (z. B. Kabel, Etuis,
Taschen, Beutel, Handgelenk-Riemen); (6) Falls das Produkt in einer öffentlichen
Versteigerung verkauft wurde.
Diese Garantie ist nicht übertragbar.
Page 30

9/10
Haftung
Wenn nach dem anwendbaren Recht zulässig, lehnen Guillemot Corporation S.A.
(fortfolgend "Guillemot") und ihre Tochtergesellschaften jegliche Haftung für Schäden, die
auf eine oder mehrere der folgenden Ursachen zurückzuführen sind, ab: (1) das Produkt
wurde modifiziert, geöffnet oder geändert; (2) Nichtbefolgung der Montageanleitung; (3)
unangebrachte Nutzung, Fahrlässigkeit, Unfall (z. B. ein Aufprall); (4) normalem Verschleiß.
Wenn nach dem anwendbaren Recht zulässig, lehnen Guillemot und seine Niederlassungen
jegliche Haftung für Schäden, die nicht auf einen Material- oder Herstellungsfehler in Bezug
auf das Produkt beruhen (einschließlich, aber nicht beschränkt auf, etwaige Schäden, die
direkt oder indirekt durch Software oder durch die Kombination der Thrustmaster Produkte
mit ungeeigneten Elementen, insbesondere Netzteile, Akkus, Ladegeräte, oder andere
Elemente, die von Guillemot für dieses Produkt nicht geliefert wurden), ab.
COPYRIGHT
© 2015 Guillemot Corporation S.A. Alle Rechte vorbehalten. Thrustmaster® ist ein
eingetragenes Warenzeichen der Guillemot Corporation S.A. PlayStation
eingetragenes Warenzeichen von Sony Computer Entertainment Inc. Windows® ist ein
eingetragenes Warenzeichen der Microsoft Corporation in den Vereinigten Staaten von
Amerika und/oder anderen Ländern. Alle anderen Warenzeichen oder Handelsmarken
werden hierdurch ausdrücklich anerkannt und sind im Besitz Ihrer jeweiligen Eigentümer.
Illustrationen nicht verbindlich. Inhalte, Design und Spezifikationen können ohne vorherige
Ankündigung geändert werden und können von Land zu Land unterschiedlich sein.
Hergestellt in China.
TouchSense® Technologie lizenziert von Immersion Corporation. Geschützt durch eins oder
mehrere U.S. Patente. Eine entsprechende Aufstellung ist unter
www.immersion.com/patent-marking.html zu finden. Andere Patente angemeldet.
®
ist ein
Page 31

10/10
HINWEISE ZUM UMWELTSCHUTZ
TECHNISCHER SUPPORT
Wiederverwertung, der stofflichen Verwertung oder anderen Formen von Altgeräten leisten
Sie einen wichtigen Beitrag zum Schutz unserer Umwelt.
Bitte erfragen Sie bei der Gemeindeverwaltung die zuständige Entsorgungsstelle.
Wichtige Informationen. Die Farben und Verzierungen können abweichen.
Dieses Produkt stimmt mit allen Standards, die Kinder ab 14 und älter betreffen, überein.
Dieses Produkt ist nicht geeignet für den Gebrauch von Kindern, die jünger als 14 Jahre
sind.
www.thrustmaster.com
Dieses Produkt darf nach Ende seiner Lebensdauer nicht über den
Hausmüll entsorgt werden, sondern muss an einem Sammelpunkt für das
Recycling von elektrischen und elektronischen Geräten abgegeben
werden.
Das Symbol auf dem Produkt, der Gebrauchsanleitung oder der
Verpackung weist darauf hin.
Die Werkstoffe sind gemäß ihrer Kennzeichnung wiederverwertbar. Mit der
http://ts.thrustmaster.com
Page 32

1/10
Voor: pc & PlayStation®3
Handleiding
Page 33

2/10
RACESTUUR INSTALLEREN
WAARSCHUWING: draai de schroef nooit in het racestuur zonder het
Vastdraaien:
Losdraaien:
Racestuur op tafel of werkblad bevestigen
- Plaats het racestuur op een tafel of een ander horizontaal, vlak en stabiel oppervlak.
- Plaats de bevestigingsschroef in het bevestigingssysteem en draai de schroef aan (tegen de klok in)
zodat deze vast komt te zitten in het schroefgat onder het racestuur en het apparaat volledig stabiel is.
bevestigingssysteem. (Hierdoor kan het racestuur beschadigen).
MONTEREN DEMONTEREN
Draai de schroef linksom (tegen de wijzers van de
klok in).
Racestuur aan een cockpit bevestigen
- Plaats het racestuur op het cockpitpaneel.
- Draai twee M6-schroeven (niet bij het racestuur meegeleverd) door het cockpitpaneel en in de twee
kleine schroefgaten aan de onderkant van het racestuur.
- Monteer vervolgens het standaardbevestigingssysteem door de bevestigingsschroef in het grote
schroefgat vast te draaien.
Draai de schroef rechtsom (met de
wijzers van de klok mee).
Page 34

3/10
Belangrijke aanwijzingen om problemen bij het kalibreren te voorkomen:
starten of beëindigen van een game)
In games op de PlayStation®3 en op de pc,
(behalve de knoppen 13-17 die niet actief zijn op de pc).
RACESTUUR AANSLUITEN OP NETSTROOM
Alleen Europese versies
Belangrijke opmerking: de Europese versie v an de T100 FFB heeft een interne voeding ingebouwd in de
voet van het racestuur.
- Steek de netstroomstekker van het stuur in een stopcontact.
Andere versies (niet-Europees)
Opmerking: de niet-Europese versie van de T100 FFB heeft, in tegenstelling tot de Europese versie, een
externe voedingsadapter die apart wordt meegeleverd bij het racestuur.
- Sluit de externe voedingsadapter aan op de betreffende connector op de achterzijde van het racestuur.
Sluit daarna de externe voedingsadapter aan op een stopcontact met hetzelfde voltage als de adapter.
PEDAALSET AANSLUITEN OP RACESTUUR
Sluit de pedaalset aan op de bijbehorende connector op de achterzijde van het racestuur.
RACESTUUR EN PEDAALSET AUTOMATISCH KALIBREREN
Het racestuur wordt automatisch gekalibreerd wanneer de voedingsadapter en de USB-connector van het
racestuur worden aangesloten. (Hierbij beweegt het racestuur.) Ook de pedaalset wordt automatisch
gekalibreerd. U hoeft alleen de pedalen een paar keer in te trappen.
De Europese versie mag alleen op 220 V netstroom worden aangesloten!
De voet van het racestuur mag nooit worden geopend
vanwege het risico op elektrische schokken!
- Sluit altijd EERST de pedaalset aan VOORDAT u de USB-connector van het racestuur
- Trap NOOIT de pedalen in tijdens het opstarten van het racestuur
(wanneer het racestuur zichzelf automatisch kalibreert na te zijn aangesloten of bij het
wordt het racestuur herkend als een F430 Force Feedback racestuur,
en in het configuratiescherm op de pc,
dat dezelfde functionaliteit heeft als dit stuur
aansluit
Page 35

4/10
PC
Opmerking: vergeet niet op de pc het configuratiescherm volledig af te sluiten voordat u
PEDAALSETMODUS
Racestuur-LED
SEPARATE (deze modus wordt aanbevolen voor de meeste
games)
GECOMBINEERD
GROEN
Systeemvereisten: pc (Windows® XP, Vista, 7 en 8) met een USB-poort.
Drivers voor Force Feedback voor pc installeren
1. Ga naar http://ts.thrustmaster.com en download de Force Feedback drivers en software voor de pc (klik in
de sectie Updates and Downloads op PC / Wheels / T100 FFB of op PlayStation / Wheels / T100 FFB
en klik vervolgens op Drivers).
2. Klik na het downloaden en installeren op Voltooien en start de computer opnieuw op.
3. Nadat de computer opnieuw is opgestart, sluit u de USB-connector aan op een van de USB-poorten
van de pc. Windows® herkent het nieuwe apparaat automatisch.
4. De drivers installeren:
De drivers worden automatisch geïnstalleerd. Volg de instructies op het scherm om de installatie te
voltooien.
5. Selecteer Start/Instellingen/Configuratiescherm en dubbelklik op Spelbesturingen (of Spelopties,
afhankelijk van het gebruikte besturingssysteem).
Het dialoogvenster Spelbesturingen wordt geopend en het racestuur wordt op het scherm
weergegeven met als status OK.
6. Klik in het Configuratiescherm op Eigenschappen om het racestuur te configureren:
• Test Device (apparaat testen): hiermee kunt u de knoppen, de D-pad en de assen van het stuur
en de pedaalset bekijken en testen.
• Test forces (effecten testen): hiermee test u acht Force-effecten en configureert u de effecten
voor Force Feedback en automatisch centreren.
Nu kan er geracet worden!
Effecten van Force Feedback op de pc instellen
Op pagina 2 van het Configuratiescherm zijn vier instellingen beschikbaar. Deze hebben een waarde
tussen 0 tot 150%: Main forces (hoofdkrachten) / Static forces (statische krachten) / Dynamic forces
(dynamische krachten) / Aggressiveness (agressiviteit).
een game start.
Pedaalset op pc configureren
Standaard werkt de bediening voor gas geven en remmen van het racestuur in de modus "Separate"
(onafhankelijk van elkaar). Bij deze instelling functioneren de pedalen op verschillende assen.
In deze modus is de precisie bij het racen veel hoger.
Als de game niet geschikt is voor de modus "Separate", werkt de pedaalset die op het racestuur is
aangesloten, niet goed. U moet dan de game afsluiten en de modus "Combined" selecteren (waarbij beide
pedalen op dezelfde as werken).
ROOD
Page 36

5/10
Opmerking:
"Combined" in te stellen.
AUTOMATISCH CENTREREN
Racestuur-LED
INACTIVE (deze modus wordt aanbevolen voor alle Force Feedback
games)
ACTIEF
KNIPPERT
De pedaalsetmodus configureren met behulp van de software:
(Deze instelling wordt in het apparaatgeheugen opgeslagen en blijft behouden bij het opnieuw opstarten
van de computer en bij het loskoppelen en weer aansluiten van het racestuur.)
- Selecteer op pagina 1 van het configuratiescherm de gewenste modus en klik op OK.
De pedaalsetmodus configureren met behulp van de hardware:
(Deze instelling wordt in het apparaatgeheugen opgeslagen en moet worden uitgevoerd elke keer dat de
computer wordt opgestart of het racestuur wordt losgekoppeld)
- Trap beide pedalen (gas en rem) tegelijk in en laat ze weer opkomen + druk op de Force-knop op het
racestuur (F-knop).
Als uw pc-game niet compatibel is met de modus "Separate" van de
pedaalset, is het raadzaam het racestuur op de modus
Automatische centreerfunctie op pc instellen
Standaard is het automatisch centreersysteem van het racestuur uitgeschakeld.
De meeste recente games hebben een eigen automatische centreermodus.
Het wordt (in de meeste gevallen) dan ook sterk aanbevolen om de automatische centreerfunctie
van het racestuur uit te schakelen en het automatisch centreren over te laten aan de game. Dit
levert een betere kwaliteit Force Feedback op.
De modus voor automatisch centreren moet in principe alleen worden gebruikt voor games zonder optie
voor Force Feedback of voor games met alleen een matige functie voor automatisch centreren.
Automatische centreerfunctie instellen met behulp van de software:
- Ga naar pagina 2 van het configuratiescherm.
- Selecteer "By the game" (via de game) als u de automatische centreerfunctie wilt uitschakelen.
- Selecteer "By the wheel" (via het racestuur) als u de automatische centreerfunctie wilt inschakelen.
In deze modus kunt u de i ntensiteit van de automatische centreerfunctie aanpassen, tussen 0 en 100%.
Automatische centreerfunctie instellen met behulp van de hardware:
Als u het automatische centreersysteem direct vanuit de game wilt inschakelen of uitschakelen, drukt u op
de Force-knop (de "F"-knop) op het racestuur. Wanneer het automatische centreersysteem is
ingeschakeld, komt de intensiteit overeen met de waarde die eerder is vastgelegd voor "By the wheel" in
het configuratiescherm.
KNIPPERT NIET
Page 37

6/10
PLAYSTATION3
HINT:
selectie en het rempedaal om deze te annuleren.
Racestuur installeren op PlayStation®3
- Sluit de USB-connector aan op een van de USB-poorten van de console.
Nu kan er geracet worden!
Algemene opmerkingen over de PlayStation®3
- Gebruik in het hoofdmenu van de PS3™ de officiële controller van de console en niet uw racestuur om te
navigeren en games te starten.
= De mapping*-functie van het racestuur werkt alleen nadat de game is gestart.
- Het racestuur heeft geen PS-knop
= Gebruik de officiële controller van de console om games af te sluiten of de console uit te zetten.
- Effecten van Force Feedback op de PS3 aanpassen
= De in-game Force Feedback-instellingen zijn aan te passen in de sectie met opties voor de controller (deze
opties zijn niet in elke game beschikbaar).
- Gevoeligheid van racestuur en pedaalset instellen op PS3
= De in-game instellingen voor gevoeligheid zijn aan te passen in de sectie met opties voor de controller (dez e
opties zijn niet in elke game beschikbaar).
- Een lijst met PS3™-games die compatibel zijn met de Force Feedback-functie van dit racestuur is
beschikbaar op http://ts.thrustmaster.com. Klik in de sectie Downloads and Updates op PC / Wheels / T100
FFB of op PlayStation / Wheels / T100 FFB en selecteer Games settings).
In sommige PS3™-games (bijvoorbeeld GRAN TURISMO®),
kan het gaspedaal gebruikt worden voor het bevestigen van een
Page 38

7/10
van het racestuur, vooral tijdens het automatisch kalibreren.
VERHELPEN VAN PROBLEMEN
- Het racestuur en de pedaalset werken niet goed of kalibreren lukt niet:
Zet uw computer of console uit, koppel het racestuur helemaal los, sluit alle kabels opnieuw aan met de
USB-connector van het stuur als laatste en start het computer of console en de game opnieuw op.
Sluit altijd de pedaalset aan op het stuur voordat u een USB-connector aansluit en trap nooit op het remof gaspedaal als het stuur zichzelf aan het kalibreren is tijdens opstarten van het stuur of van de game.
- Het racestuur beweegt uit zichzelf tijdens het gamen:
Dit is normaal en komt door de automatische centreerfunctie die in sommige games beschikbaar is. Wilt u
deze bewegingen stoppen, leg dan de handen op het stuur of kies een zwakkere ForceFeedbackinstelling.
- Her racestuur wordt wel gedetecteerd op de computer, maar werkt niet in de game:
Ga in de game naar de opties en configureer het racestuur. Raadpleeg de handleiding of de online help
van de game voor meer informatie.
- De Force Feedback-functie reageert niet goed op de pc:
Stel in het configuratiescherm van het racestuur (bijvoorbeeld via Spelbesturingen in Windows®) alle
effecten weer in op de standaardwaarde (100%) en schakel de automatische centreerfunctie uit (de
indicator mag niet knipperen).
In sommige pc-games is het ook noodzakelijk om de effecten om te keren (selecteer in dit geval "Negative
forces" of verplaats de cursor naar "-100%" in de opties van de game). In andere games mogen de
effecten juist niet worden omgekeerd (selecteer in dat geval "Positive forces" of verplaats de cursor naar
"+ 100%" in de opties van de game).
- De pedaalset werkt niet goed in de modus "Separate" op de pc
(in de game bijvoorbeeld beweegt de selectiecursor vanzelf)
Sluit de game af en stel de pedaalset in op de modus "Combined". Start de game opnieuw en stel het
racestuur nog een keer in via de opties van de game.
VEILIGHEIDSINFORMATIE EN -AANBEVELINGEN
- Bij het aansluiten van het racestuur en tijdens het automatisch kalibreren: u voorkomt
kalibratiefouten door tijdens het kalibreren niet aan het racestuur te draaien en de pedalen of
knoppen niet aan te raken.
- Als u het racestuur een langere tijd niet gaat gebruiken, kunt u onnodig
elektriciteitsverbruik en schade aan het racestuur voorkomen door de voedingsadapter los te
koppelen van het racestuur. Vergeet niet de voedingsadapter weer aan te sluiten voordat u weer
gaat spelen.
- Het racestuur heeft een Force Feedback-functie: houd jonge kinderen daarom uit de buurt
Voor uw en andermans veiligheid mag de pedaalset nooit bediend worden op blote voeten of met
THRUSTMASTER® KAN NIET AANSPRAKELIJK WORDEN GESTELD VOOR ENIG LICHAMELIJK
LETSEL OPGELOPEN BIJ HET GEBRUIK VAN DE PEDAALSET ZONDER DAT ER SCHOENEN
alleen sokken aan.
WORDEN GEDRAGEN.
Page 39

8/10
Informatie met betrekking tot kopersgarantie
Wereldwijd garandeert Guillemot Corporation S.A. (“Guillemot”) de koper dat dit
Thrustmaster-product vrij zal zijn van materiaal- en fabricagefouten gedurende een
garantieperiode gelijk aan de tijd maximaal vereist om een restitutie/vervanging voor dit
product te claimen. In landen van de Europese Unie komt dit overeen met een periode van
twee (2) jaar vanaf het moment van levering van het Thrustmaster-product. In andere landen
komt de garantieperiode overeen met de tijd maximaal vereist om een restitutie/vervanging
voor dit Thrustmaster-product te claimen zoals wettelijk is vastgelegd in het land waarin de
koper woonachtig was op de datum van aankoop van het Thrustmaster-product. Indien een
dergelijk claimrecht niet wettelijk is vastgelegd in het betreffende land, geldt een
garantieperiode van één (1) jaar vanaf datum aankoop van het Thrustmaster-product.
Ongacht het hierboven gestelde, geldt voor oplaadbare batterijen een garantieperiode van
zes (6) maanden vanaf datum aankoop.
Indien u in de garantieperiode een defect meent te constateren aan dit product, neem dan
onmiddellijk contact op met Technical Support die u zal informeren over de te volgen
procedure. Als het defect wordt bevestigd, dient het product te worden geretourneerd naar
de plaats van aankoop (of een andere locatie die wordt opgegeven door Technical Support).
Binnen het gestelde van deze garantie wordt het defecte product van de koper gerepareerd
of vervangen, zulks ter beoordeling van Technical Support. Indien toegestaan door van
toepassing zijnde wetgeving, beperkt de volledige aansprakelijkheid van Guillemot en haar
dochterondernemingen (inclusief de aansprakelijkheid voor vervolgschade) zich tot het
repareren of vervangen van het Thrustmaster-product. Indien toegestaan door van
toepassing zijnde wetgeving, wijst Guillemot elke garantie af met betrekking tot
verhandelbaarheid of geschiktheid voor enig doel. De wettelijke rechten van de koper die
van toepassing zijn op de verkoop van consumentproducten worden op generlei wijze door
deze garantie beperkt.
Deze garantie is niet van kracht: (1) indien het product aangepast, geopend of gewijzigd is,
of beschadigd is ten gevolge van oneigenlijk of onvoorzichtig gebruik, verwaarlozing, een
ongeluk, normale slijtage, of enige andere oorzaak die niet gerelateerd is aan een materiaalof fabricagefout (inclusief maar niet beperkt tot het combineren van het Thrustmaster-product
met enig ongeschikt element waaronder in het bijzonder voedingsadapters, oplaadbare
batterijen, opladers of enig ander element niet geleverd door Guillemot voor dit product); (2)
indien u zich niet houdt aan de instructies zoals verstrekt door Technical Support; (3) op
software die onder een specifieke garantie valt; (4) op verbruiksartikelen (elementen die
tijdens de levensduur van het product worden vervangen zoals bijvoorbeeld batterijen of
pads van een headset of koptelefoon); (5) op accessoires (zoals bijvoorbeeld kabels,
behuizingen, hoesjes, etui's, draagtassen of polsbandjes); (6) indien het product werd
verkocht op een openbare veiling.
Deze garantie is niet overdraagbaar.
Page 40

9/10
Aansprakelijkheid
Indien toegestaan door van toepassing zijnde wetgeving, wijzen Guillemot Corporation S.A.
(hierna te noemen “Guillemot”) en haar dochterondernemingen alle aansprakelijkheid af voor
enige schade veroorzaakt door één van de volgende oorzaken: (1) indien het product
aangepast, geopend of gewijzigd is; (2) de montage-instructies niet zijn opgevolgd; (3)
oneigenlijk of onvoorzichtig gebruik, verwaarlozing, een ongeluk (bijvoorbeeld stoten); (4)
normale slijtage. Indien toegestaan onder van toepassing zijnde wetgeving, wijzen Guillemot
en haar dochterondernemingen alle aansprakelijkheid af voor enige schade aan dit product
niet gerelateerd aan een materiaal- of fabricagefout (inclusief maar niet beperkt tot enige
schade direct of indirect veroorzaakt door enige software, of door het combineren van het
Thrustmaster-product met enig ongeschikt element waaronder in het bijzonder
voedingsadapters, oplaadbare batterijen, opladers of enig ander element niet geleverd door
Guillemot voor dit product).
COPYRIGHT
© 2015 Guillemot Corporation S.A. Alle rechten voorbehouden. Thrustmaster
geregistreerd handelsmerk van Guillemot Corporation S.A. PlayStation
®
is een geregistreerd
handelsmerk van Sony Computer Entertainment Inc. Windows® is een geregistreerd
handelsmerk van Microsoft Corporation in de Verenigde Staten en/of andere landen. Alle
andere handelsmerken en merknamen worden hierbij erkend en zijn eigendom van de
respectieve eigenaren. Afbeeldingen zijn niet bindend. Inhoud, ontwerp en specificaties
kunnen zonder kennisgeving vooraf worden gewijzigd en kunnen per land verschillen.
Geproduceerd in China.
TouchSense® Technology in licentie van Immersion Corporation. Beschermd door één of
meer Amerikaanse patenten zoals vermeld op www.immersion.com/patent-marking.html en
door ander patenten aangevraagd.
®
is een
Page 41

10/10
AANBEVELINGEN VOOR DE BESCHERMING VAN HET MILIEU
elektrische en elektronische apparaten kunt u een belangrijke bijdrage leveren aan de
bescherming van het milieu.
Neem contact op met uw gemeente voor informatie over een inzamelpunt bij u in de buurt.
Bewaar deze informatie. De kleuren en decoraties kunnen variëren.
Dit product voldoet aan alle normen voor kinderen van 14 jaar en ouder. Dit product is niet
geschikt voor gebruik door kinderen jonger dan 14 jaar.
www.thrustmaster.com
Gooi dit product na het einde van de levensduur niet weg met het normale
afval, maar breng het naar het door uw gemeente aangewezen
inzamelpunt voor elektrische en/of computerapparatuur.
Ter herinnering is hiertoe op het product, de gebruikshandleiding of de
verpakking een symbool aangebracht.
De meeste materialen kunnen worden gerecycled. Door recycling en
andere methoden voor verantwoorde verwerking van afgedankte
TECHNISCHE ONDERSTEUNING
http://ts.thrustmaster.com
Page 42

1/10
Per: PC e PlayStation®3
Manuale d'uso
Page 43

2/10
INSTALLAZIONE DEL VOLANTE
ATTENZIONE: Non stringere mai la vite da sola, senza il sistema di fissaggio!
Per stringere:
Gira la vite in senso antiorario
Per sganciare:
Gira la vite in senso orario
Fissaggio del volante ad un tavolo o a una scrivania.
- Colloca il volante su un tavolo o qualsiasi altra superficie orizzontale, piana e stabile.
- Inserisci la vite di fissaggio nel sistema di aggancio, quindi vincola la periferica girando la vite in senso
antiorario, in modo tale che penetri nell'ampio foro filettato presente sul retro del volante, finché il
volante non risulti perfettamente stabile.
(Ciò potrebbe danneggiare il volante).
MONTAGGIO RIMOZIONE
Fissare il volante a un abitacolo
- Colloca il volante sul cruscotto dell'abitacolo.
- Fai passare 2 viti M6 (non accluse al volante) attraverso il cruscotto dell'abitacolo, dopodiché inseriscile
nei due piccoli fori filettati presenti sotto al volante.
- Quindi, avvita il sistema di aggancio standard inserendo la vite di fissaggio nell'ampio foro filettato.
Page 44

3/10
Note importanti per evitare problemi di calibrazione:
abbandonando un gioco)
Nei giochi PlayStation®3 e PC,
(tranne i pulsanti 13-17, non attivi su PC).
COLLEGARE IL VOLANTE ALLA CORRENTE ELETTRICA
Solo versione Europea
Nota importante: la versione Europea del T100 F FB è dotata di un alimentatore interno, collocato
direttamente nella base del volante.
- Non devi far altro che collegare il connettore di alimentazione del volante ad una presa elettrica a 220 V.
Altre versioni (non Europea)
Nota: contrariamente alla versione Europea, il T100 FFB non Europeo è dotato di un alimentatore
esterno; assieme al volante viene distribuita un apposito apparecchio.
- Collega l'alimentatore esterno all'apposito connettore presente sul retro del volante, dopodiché collega
l'alimentatore esterno ad una normale presa di corrente dal medesimo voltaggio.
COLLEGARE LA PEDALIERA AL VOLANTE
Collega la pedaliera al volante utilizzando l'apposito connettore, presente sul retro del volante.
CALIBRAZIONE AUTOMATICA DI VOLANTE E PEDALIERA
La calibrazione del volante avviene automaticamente non appena colleghi l'alimentatore e il connettore
USB del volante. (Questa operazione fa sì che il volante si muova.) Anche la calibrazione del volante
avviene automaticamente; semplicemente, premi alcune volte i pedali.
La versione Europea deve essere alimentata esclusivamente a 220V!
Non aprire mai la base del volante - rischio di shock elettrico!
- Non collegare mai il connettore USB del volante prima di colegare la pedaliera
(durante l'auto-calibrazione del volante dopo averlo collegato, oppure avviando o
- Non premere mai i pedali quando il volante si avvia
oltre che nell'interfaccia del Pannello di Controllo su PC,
il volante viene identificato come un volante F430 Force Feedback,
anch'esso caratterizzato dalle medesime funzioni
Page 45

4/10
PC
Nota:
Su
Controllo!
Requisiti di sistema: PC (Windows® XP, Vista, 7 e 8) dotato di porta USB.
Installazione dei driver Force Feedback per PC
1. Accedi all'indirizzo http://ts.thrustmaster.com per scaricare i driver Force Feedback e il software per PC
(nella sezione Aggiornamenti e Download, clicca su PC / Wheels / T100 FFB o PlayStation / Wheels /
T100 FFB, dopodiché scegli Driver).
2. Dopo aver completato download e installazione, clicca su Fine e riavvia il tuo computer.
3. Una volta riavviato il tuo computer, collega il connettore USB ad una porta USB del tuo sistema.
Windows® individuerà la nuova periferica automaticamente.
4. Installazione dei driver:
L'installazione dei driver avviene automaticamente. Completa l'installazione seguendo le istruzioni che
compaiono sullo schermo.
5. Seleziona Start/Impostazioni/Pannello di controllo, quindi fai doppio clic su Controller di gioco (o
Opzioni di gioco, a seconda del tuo sistema operativo).
Comparirà la finestra di dialogo Controller di gioco; il volante apparirà sullo schermo, con lo
status di OK.
6. Nel Panello di controllo, clicca su Proprietà per configurare il tuo volante:
• Test Periferica: ti permette di testare e visualizzare i pulsanti, il D-Pad e gli assi di volante e
pedaliera.
• Test Forze: ti permette di testare 8 effetti di forza e di configurare gli effetti Force Feedback e il
Centraggio automatico.
Ora sei pronto per gareggiare!
Regolazione degli effetti Force Feedback su PC
Nella pagina 2 del Pannello di Controllo, sono disponibili quattro parametri, regolabili da 0 a 150% :
Forze principali / Forze statiche / Forze dinamiche / Aggressività
PC, prima di avviare il tuo gioco ricordati sempre di chiudere la finestra del Pannello di
Page 46

5/10
MODALITÀ PEDALIERA
LED volante
SEPARATA (questa modalità è consigliata per la maggior parte
dei giochi)
COMBINATA
VERDE
Nota:
consigliamo di attivare la modalità "Combinata" del tuo volante.
CENTRAGGIO AUTOMATICO
LED volante
INATTIVO (modalità consigliata per tutti i giochi PC Force Feedback)
NON LAMPEGGIA
ATTIVO
LAMPEGGIA
Configurare la pedaliera su PC
Per default, l’acceleratore e il freno del tuo volante operano in modalità "Separata"; ciò significa che i
pedali si muovono su assi indipendenti.
Questa modalità aumenta considerevolmente la precisione di guida.
Qualora il tuo gioco non fosse compatibile con la modalità "Separata", la pedaliera collegata al tuo volante
non funzionerà correttamente. Dovrai quindi uscire dal gioco e selezionare la modalità "Combinata" (nella
quale entrambi i pedali operano lungo il medesimo asse).
ROSSO
Configurare la modalità della pedaliera via software:
(Questa impostazione viene salvata nella mem oria della periferic a, anche se riavvii il computer o scolleghi
e ricolleghi il tuo volante.)
- A pagina 1 del Pannello di Controllo, seleziona la modalità desiderata, dopodiché clicca su OK.
Configurare la modalità della pedaliera via hardware:
(Questa impostazione viene salvata nella memoria della periferica; dovrà essere selezionata
ogniqualvolta avvii il tuo computer o scolleghi il volante)
- Premi e rilascia simultaneamente entrambi i pedali (acceleratore e freno) + il pulsante Force presente
sul volante (pulsante F).
Se il tuo gioco per PC non è compatibile con la modalità "Separata" della pedaliera, ti
Regolare la funzione di centraggio automatico su PC
Per default, la funzione di centraggio automatico del volante è disattivata.
La maggior parte dei giochi più recenti dispongono di una propria modalità di centraggio automatico.
Pertanto (nella maggior parte dei casi), ti consigliamo vivamente di disattivare la funzione di
centraggio automatico del volante, lasciando che sia il tuo gioco ad occuparsene. La qualità del
Force Feedback migliorerà sensibilmente.
La funzione di centraggio automatico dovrebbe essere tendenzialmente utilizzata con i giochi che non
dispongono di una funzione Force Feedback, o che presentano una funzione di centraggio automatico
"debole".
Regolare la funzione di centraggio automatico via software:
- Accedi alla pagina 2 del Pannello di Controllo.
- Per disattivare la funzione di centraggio automatico, seleziona "Tramite il gioco".
- Per attivare la funzione di centraggio automatico, seleziona "Tramite il volante".
In questa modalità, puoi regolare l’intensità della funzione di centraggio automatico, da 0 a 100%.
Regolare la funzione di centraggio automatico via hardware:
Per attivare o disattivare la funzione di centraggio automatico direttamente dal tuo gioco, non devi far altro
che premere il pulsante Force (ovvero il pulsante "F") del tuo volante. Quando attivata, l’intensità della
funzione di centraggio automatico corrisponde al valore precedentemente definito dal parametro "Tramite
il volante" del Pannello di Controllo.
Page 47

6/10
PLAYSTATION3
CONSIGLIO:
e il pedale del freno per annullarla.
Installare il volante su PlayStation®3
- Collega il connettore USB ad una porta USB della tua console.
Ora sei pronto per gareggiare!
Note generali per PlayStation®3
- Nel menu globale, utilizza il controller ufficiale della tua console (e non il volante) per navigare e avviare i tuoi
giochi.
= La funzione di mappatura* del tuo volante funzionerà soltanto a gioco avviato.
- Il volante non dispone di un pulsante PS
= Per uscire dai tuoi giochi o per spegnere la tua console, utilizza il controller ufficiale della console.
- Regolare gli effetti Force Feedback su PS3
= Puoi regolare gli effetti di forza direttamente dal gioco, nella sezione Opzioni/Controlli (in alcuni giochi, tali
opzioni non sono disponibili).
- Regolare la sensibilità di volante e pedaliera su PS3
= Puoi regolare la sensibilità direttamente dal gioco, nella sezione Opzioni/Controlli (in alcuni giochi, tali opzioni
non sono disponibili).
- Puoi trovare un elenco di giochi per PS3™ compatibili con la funzione Force Feedback a questo indirizzo
http://ts.thrustmaster.com (nella sezione Downloads and Updates, clicca su PC / W heels / T100 FFB o
PlayStation / Wheels / T100 FFB, quindi seleziona Games settings).
In alcuni giochi PS3™
puoi utilizzare l’acceleratore per confermare una scelta
(es. GRAN TURISMO®),
Page 48

7/10
INFORMAZIONI E RACCO
-
nella calibrazione
sprechi di corrente elettrica e per evitare possibili danni al tuo volante
del tuo volante
-
soprattutto durante le fasi di calibrazione automatica.
RISOLUZIONE DEI PROBLEMI
- Il volante e la pedaliera non funzionano correttamente, oppure la calibrazione non sembra essere
andata a buon fine:
Spegni il tuo computer o la tua console, scollega completamente il tuo volante, quindi ricollega tutti i cavi
(collegando per ultimo il connettore USB del volante), dopodiché riavvia il tuo computer o la tua console e
il tuo gioco.
Prima di collegare un qualsiasi connettore USB, collega la pedaliera e non premere mai i pedali mentre il
volante si auto-calibra all’accensione o all’avvio di un gioco.
- Il volante si muove da solo mentre gioco:
Ciò è normale; è dovuto alla funzione di centraggio automatico, disponibile in alcuni giochi. Per
interrompere tali movimenti, non devi far altro che appoggiare le tue mani sul volante oppure ridurre
l’intensità della funzione Force Feedback.
- Il volante viene riconosciuto, ma non funziona con il mio gioco:
Apri la finestra delle Opzioni del tuo gioco per configurare il volante. Per ulteriori informazioni, ti invitiamo
a consultare il manuale d’uso o la guida online del tuo gioco.
- La funzione Force Feedback non risponde come dovrebbe su PC:
Nel Pannello di Controllo del volante (ovvero nell’interfaccia Periferiche di Gioco di Windows®), riporta
tutte le forze al loro valore predefinito (100%) e disattiva la funzione di centraggio automatico (il LED non
dovrebbe lampeggiare).
In alcuni giochi per PC, potrebbe essere necessario anche invertire le forze (in questo caso, nelle opzioni
del tuo gioco, seleziona "Forze negative" oppure sposta l’indicatore su "-100%"). In altri giochi, le forze
non dovrebbero essere invertite (in questo caso, nelle opzioni del tuo gioco, seleziona "Forze positive"
oppure sposta l’indicatore su "+100%").
- La pedaliera non funziona correttamente in modalità "Separata" su PC
(ad esempio, il cursore del gioco si muove da solo)
Esci dal gioco e attiva la modalità "Combinata" della tua pedaliera. Riavvia il tuo gioco, quindi configura
nuovamente il tuo volante utilizzando l’interfaccia della opzioni del tuo gioco.
Quando colleghi il tuo volante e durante la fase di calibrazione automatica: per evitare errori
Se pensi di non dover utilizzare il tuo volante per un lungo periodo di tempo, per evitare inutili
. Ricordati poi di ricollegarlo prima di ricominciare a giocare!
Il tuo volante è dotato di una funzione Force Feedback: allontana i tuoi bambini dal volante,
MANDAZIONI SULLA SICUREZZA
, non muovere il volante e non premere alcun pedale o pulsante.
, scollega l’alimentatore
Per motivi di sicurezza, non utilizzare la pedaliera a piedi nudi o indossando unicamente calzini.
THRUSTMASTER® NON POTRÀ ESSERE RITENUTA RESPONSABILE PER UN QUALUNQUE
INFORTUNIO OCCORSO DURANTE L’USO DELLA PEDALIERA SENZA SCARPE.
Page 49

8/10
Informazioni sulla garanzia al consumatore
A livello mondiale, Guillemot Corporation S.A. (d’ora in avanti “Guillemot”) garantisce al
consumatore che il presente prodotto Thrustmaster sarà privo di difetti relativi ai materiali e
alla fabbricazione, per un periodo di garanzia corrispondente al limite temporale stabilito per
la presentazione di un reclamo riguardante la conformità del prodotto in questione. Nei paesi
della Comunità Europea, tale periodo equivale a due (2) anni a partire dalla consegna del
prodotto Thrustmaster. In altri paesi, la durata della garanzia corrisponde al limite temporale
stabilito per la presentazione di un reclamo riguardante la conformità del prodotto
Thrustmaster in base alle leggi applicabili nel paese in cui il consumatore risiedeva alla data
di acquisto del prodotto Thrustmaster (qualora nel paese in questione non esistesse alcuna
norma a riguardo, il periodo di garanzia corrisponderà a un (1) anno a partire dalla data
originale di acquisto del prodotto Thrustmaster).
Diversamente da quanto affermato in precedenza, le batterie ricaricabili sono coperte da una
garanzia di sei (6) mesi dalla data di acquisto originale.
Qualora, durante il periodo di garanzia, il prodotto dovesse apparire difettoso, contatti
immediatamente l’Assistenza Tecnica, che le indicherà la procedura da seguire. Qualora il
difetto dovesse essere confermato, il prodotto dovrà essere riportato al luogo di acquisto (o
qualsiasi altro luogo indicato dall’Assistenza Tecnica).
Nel contesto della presente garanzia, il prodotto difettoso di proprietà del consumatore potrà
essere riparato oppure sostituito, a discrezione dell’Assistenza Tecnica. Qualora le leggi
applicabili in materia lo consentano, la totale responsabilità di Guillemot e delle sue
controllate (compresi i danni conseguenti) si limita alla riparazione o alla sostituzione del
prodotto Thrustmaster. Qualora le leggi applicabili in materia lo consentano, Guillemot
declina ogni garanzia sulla commerciabilità o la conformità a finalità particolari. I diritti legali
del consumatore, stabiliti dalle leggi vigenti in materia di vendita di beni di consumo, non
vengono intaccati dalla presente garanzia.
La presente garanzia non potrà essere applicata: (1) se il prodotto è stato modificato, aperto,
alterato o ha subito danni derivanti da un uso inappropriato o non autorizzato, da negligenza,
da un incidente, dalla semplice usura, o da qualsiasi altra causa non riconducibile a difetti
nei materiali o nell'assemblaggio (compresi, ma non i soli, prodotti Thrustmaster combinati
con elementi inadatti, tra cui, in particolare, batterie ricaricabili, caricatori o qualsiasi altro
elemento non fornito da Guillemot per questo prodotto); (2) in caso di mancato rispetto delle
istruzioni fornite dall'Assistenza Tecnica; (3) in caso di software, ovvero software soggetto a
una specifica garanzia; (4) ai materiali di consumo (elementi che richiedono la loro
sostituzione al termine della loro durata di esercizio come, ad esempio, batterie di tipo
convenzionale o cuscinetti protettivi per auricolari o cuffie); (5) agli accessori (ad esempio,
cavi, custodie, borsette, borse, cinturini); (6) se il prodotto è stato venduto ad un'asta
pubblica.
La presente garanzia non è trasferibile.
Page 50

9/10
Responsabilità
Qualora le leggi applicabili in materia lo consentano, Guillemot Corporation S.A. (d'ora in
avanti “Guillemot”) e le sue controllate declinano ogni responsabilità per qualsiasi danno
derivante da almeno una delle seguenti condizioni: (1) il prodotto è stato modificato, aperto o
alterato; (2) mancato rispetto delle istruzioni di installazione; (3) uso inappropriato o non
permesso, negligenza, incidente (come, ad esempio, un impatto); (4) semplice usura.
Qualora le leggi applicabili in materia lo consentano, Guillemot e le sue controllate declinano
ogni responsabilità per qualsiasi danno non riconducibile a difetti nei materiali o nella
fabbricazione del prodotto (compresi, ma non i soli, potenziali danni causati direttamente o
indirettamente da un qualunque software, oppure dall’uso del prodotto Thrustmaster in
combinazione con elementi inadatti, tra cui, in particolare, batterie ricaricabili, caricatori o
qualsiasi altro elemento non fornito da Guillemot per questo prodotto).
COPYRIGHT
© 2015 Guillemot Corporation S.A. Tutti i diritti riservati. Thrustmaster
registrato di proprietà di Guillemot Corporation S.A. PlayStation® è un marchio registrato di
proprietà di Sony Computer Entertainment Inc. Windows® è un marchio registrato di
proprietà di Microsoft Corporation, negli Stati Uniti e/o altri Paesi. Tutti gli altri marchi e nomi
commerciali vengono qui citati previa autorizzazione ed appartengono ai legittimi proprietari.
Illustrazioni escluse. I contenuti, i design e le caratteristiche possono essere oggetto di
modifiche senza preavviso e possono variare da un Paese all’altro. Fabbricato in Cina.
TouchSense® Technology sotto licenza di Immersion Corporation. Protetta da uno o più
brevetti americani, il cui elenco è consultabile all’indirizzo www.immersion.com/patentmarking.html, oltre ad altri brevetti in fase di approvazione.
®
è un marchio
Page 51

10/10
ASSISTENZA TECNICA
RACCOMANDAZIONI SULLA TUTELA DELL’AMBIENTE
Tramite il riciclaggio ed altre forme di trattamento del Materiale Elettrico ed Elettronico, è
possibile fornire un importante contributo per la salvaguardia dell’ambiente.
Per conoscere i punti di raccolta più vicini a te, contatta le autorità locali competenti.
Informazioni da conservare. I colori e le decorazioni possono variare.
Questo prodotto è conforme con le norme relative ai bambini di età superiore ai 14 anni. Non
è adatto all’uso da parte di bambini di età inferiore ai 14 anni.
www.thrustmaster.com
Al termine della sua vita operativa, questo prodotto non dovrebbe essere
gettato assieme ai comuni rifiuti, ma dovrebbe essere portato ad un
apposito punto di raccolta destinato al riciclaggio del Materiale Elettrico ed
Elettronico.
Ciò è confermato dal simbolo riportato sul prodotto, nel manuale d’uso o
sulla confezione.
A seconda delle proprie caratteristiche, i materiali potrebbero essere riciclati.
http://ts.thrustmaster.com
Page 52

1/10
Para: PC y PlayStation®3
Manual del usuario
Page 53

2/10
INSTALACIÓN DEL VOLANTE DE CARRERAS
AVISO: ¡No aprietes nunca el tornillo solo, sin el sistema de fijación!
Para apretar:
Para soltar:
Fijar el volante de carreras a una mesa o un escritorio
- Coloca el volante de carreras en una mesa o en otra superficie horizontal, plana y estable.
- Inserta el tornillo de sujeción en el sistema de fijación y, a continuación, ajusta el dispositivo girando el
tornillo en sentido antihorario, para que entre en el agujero roscado grande situado debajo del volante
de carreras, hasta que el dispositivo esté perfectamente estable.
(De hacerlo así se podría dañar el volante).
MONTAJE
Gira el tornillo en sentido antihorario
Fijar el volante de carreras a una cabina
- Coloca el volante de carreras en el estante de la cabina.
- Pasa dos tornillos M6 (no incluidos con el volante de carreras) a través del estante de la cabina e
insértalos en los dos agujeros roscados pequeños que hay debajo del volante de carreras.
- A continuación, aprieta el sistema de fijación estándar insertando el tornillo de sujeción en el agujero
roscado grande.
DESMONTAJE
Gira el tornillo en sentido horario
Page 54

3/10
Notas importantes para evitar problemas de calibración:
de él)
En juegos de PlayStation®3 y PC,
(excepto los botones 13-17, que están inactivos en el PC).
CONECTAR EL VOLANTE DE CARRERAS A LA RED ELÉCTRICA
Sólo versiones europeas
Nota importante: La versión europea del T100 FFB está equipada con una fuente de alimentación interna,
situada direc tamente en el interior de la bas e del volante de carreras.
¡La versión europea se debe conectar exclusivamente a una corriente de 220 V!
- Basta con conectar el enchufe eléctrico del volante de carreras a una toma eléctrica de 220 V.
Otras versiones (no europeas)
Nota: Al contrario que sucede con la versión europea, los T100 FFB no europeos incluyen una fuente de
alimentación externa; s e proporciona un dispositivo específico con el volante de carreras.
- Conecta el adaptador externo al conector correspondiente situado en la parte trasera del volante de
carreras y luego conecta el adaptador de corriente eléctrica externo a una toma eléctrica estándar con el
mismo voltaje.
CONECTAR LOS PEDALES AL VOLANTE DE CARRERAS
Conecta los pedales al volante de carreras mediante el conector correspondiente, situado en la parte
trasera del volante de carreras.
CALIBRACIÓN AUTOMÁTICA DEL VOLANTE Y DE LOS PEDALES
La calibración del volante de carreras se realiza de forma automática al conectar el adaptador de
corriente del volante y el conector USB. (Esta operación hace que el volante de carreras se mueva). La
calibración de los pedales también es automática, sin más que pisar los pedales algunas veces.
¡No abrir nunca la base del volante de carreras, riesgo de descarga eléctrica!
- No conectes nunca el conector USB del volante de carreras antes de conectar los
(cuando el volante de carreras se autocalibr a tras la conexión o al iniciar un juego o salir
el volante de carreras se reconoce como un volante de carreras F430 Force Feedback,
- No pises nunca los pedales cuando el volante se inicie
y en la interfaz del Panel de control del PC,
que ofrece las mismas funciones que éste
pedales
Page 55

4/10
Nota:
ejecutar el juego.
LED del volante de
carreras
SEPARADO (es el modo recomendado para la mayoría de los juegos)
ROJO
COMBINADO
VERDE
PC
Requisitos del sistema: PC (Windows® XP, Vista, 7 y 8) que cuente con un puerto USB.
Instalar los controladores Force Feedback para PC
1. Accede a http://ts.thrustmaster.com para descargar los controladores Force Feedback y el software para
PC (en la sección Updates and Downloads, haz clic en PC / Wheels / T100 FFB o PlayStation / Wheels /
T100 FFB y, a continuación, haz clic en Drivers).
2. Una vez finalizada la descarga e instalación, haz clic en Terminar y reinicia el ordenador.
3. Cuando el ordenador se haya reiniciado, enchufa el conector USB en un puerto USB de la CPU.
Windows® detectará automáticamente el nuevo dispositivo.
4. Instalación de los controladores:
La instalación de los controladores se realiza de forma automática. Sigue las instrucciones mostradas
en la pantalla para terminar la instalación.
5. Selecciona Inicio/Configuración/Panel de control y, a continuación, haz doble clic en Dispositivos
de juego (u Opciones de juego, dependiendo del sistema operativo).
Se mostrará el cuadro de di álogo Dispositivos de juego y el volante de carreras apar ecerá en la
pantalla con la indicación de estado OK.
6. En el Panel de control, haz clic en Propiedades para configurar el volante de carreras:
• Comprobar dispositivo: Te permite probar y ver los botones, el D-Pad y el volante de carreras y
los ejes de los pedales.
• Comprobar fuerzas: Te permite comprobar los 8 efectos de fuerzas y configurar los efectos de
centrado automático y de Force Feedback.
¡Ya estás prep arado para correr!
Ajustar los efectos Force Feedback en PC
En la página 2 del Panel de control hay cuatro ajustes disponibles que se pueden graduar de 0 a 150%:
Fuerzas principales / Fuerzas estáticas / Fuerzas dinámicas / Agresividad
En PC, acuérdate siempre de cerrar totalmente la interfaz del Panel de control antes de
Configurar los pedales en PC
De forma predeterminada, los controles de acelerador y freno del volante de carreras funcionan en modo
“Separado”, lo que significa que los pedales funcionan en ejes independientes.
Este modo mejora considerablemente la precisión al correr.
Si tu juego no es compatible con el modo "Separado", los pedales conectados al volante de carreras no
funcionarán correctamente. A continuación tendrás que salir del juego y seleccionar el modo “Combinado”
(en el que ambos pedales funcionan en el mismo eje).
MODO DE PEDALES
Page 56

5/10
Nota:
recomendamos que cambies el volante de carreras al modo "Combinado".
LED del volante de
carreras
INACTIVO (modo recomendado para todos los juegos de PC con Force
Feedback)
ACTIVO
PARPADEA
Configurar el modo de los pedales mediante el software:
(Esta configuración se guarda en l a memoria del dispositivo, incluso después de reiniciar el ordenador o
desconectar y volver a conectar el volante de carreras).
- En la página 1 del Panel de control, selecciona el modo necesario y, a continuación, haz clic en
Aceptar.
Configurar el modo de los pedales mediante el hardware:
(Este ajuste se almacena en la memoria del dispositivo; se debe realizar cada vez que inicies el
ordenador o desconectes el vol ante de carreras).
- Pisa y suelta ambos pedales simultáneamente (acelerador y freno) + el botón Force situado en el
volante de carreras (botón F).
Si tu juego de PC no es compatible con el modo "Separado" de los pedales, te
Ajustar la función de centrado automático en PC
De forma predeterminada, la función de centrado automático del volante está desactivada.
La mayoría de los juegos recientes incorporan su propio modo de centrado automático.
Por lo tanto, se recomienda (en la mayoría de los casos) desactivar la función de centrado
automático del volante y dejar que el juego la gestione. Esto mejorará la calidad de Force
Feedback.
El modo de centrado automático se debería utilizar fundamentalmente con juegos que no incorporen una
opción de Force Feedback, o que tengan solo una "débil" función de centrado automático.
Ajustar la función de centrado automático mediante el software:
- Accede a la Página 2 de la interfaz del Panel de control.
- Para desactivar la función de centrado automático, selecciona "By the game (Mediante el juego)".
- Para activar la función de centrado automático, selecciona "By the wheel (Mediante el volante)".
En este modo puedes ajustar la intensidad de la función de centrado automático de 0 a 100%.
Ajustar la función de centrado automático mediante el hardware:
Para activar o desactivar la función de centrado automático directamente dentro del juego, basta con que
pulses el botón Force (es decir, el botón "F") del volante de carreras. Cuando está activada, la
intensidad de la función de centrado automático coincide con el valor definido previamente para la
configuración "By the wheel" (Mediante el volante) en la interfaz del Panel de control.
CENTRADO AUTOMÁTICO
NO PARPADEA
Page 57

6/10
PLAYSTATION3
CONSEJO:
y usar el pedal del freno para cancelarla.
Instalar el volante de carreras en PlayStation®3
- Conecta el conector USB a uno de los puertos USB de la consola.
¡Ya estás preparado par a correr!
Notas generales para PlayStation®3
- Cuando estés en el menú global, usa el controlador oficial de la consola (no el volante) para desplazarte y
ejecutar los juegos.
= La función de mapeado* del volante de carreras sólo funcionará cuando se haya iniciado el juego.
- El volante de de carreras no incluye un botón PS
= Usa el controlador oficial de la consola para salir de los juegos y apagar la consola.
- Ajustar los efectos Force Feedback en PS3
= Puedes ajustar los valores de fuerza en el juego en la sección Opciones/Controles (estas opciones no están
disponibles en algunos juegos).
- Ajusta la sensibilidad del volante de carreras y los pedales en PS3
= Puedes ajustar los valores de sensibilidad en el juego en la sección Opciones/Controles (estas opciones no
están disponi bles en algunos juegos).
- En http://ts.thrustmaster.com hay una lista de juegos de PS3™ compatibles con la función Force Feedback
del volante de carreras (en la sección Downloads and Updates, haz clic en PC / Wheels / T100 FFB o
PlayStation / Wheels / T100 FFB y luego selecciona Games settings).
En algunos juegos de PS3™
puedes usar el pedal del acelerador para confirmar una selección
(p. ej. GRAN TURISMO®),
Page 58

7/10
se acerquen al volante de carreras, particularmente durante las fases de calibración automática.
RESOLUCIÓN DE PROBLEMAS
- El volante de carreras y los pedales no funcionan correctamente o la calibración parece
incorrecta:
Apaga el ordenador o la consola, desconecta el volante de carreras por completo y luego vuelve a
conectar todos los cables (conectando lo último el conector USB del volante de carreras), para luego
reiniciar el ordenador o la consola y el juego.
Conecta siempre los pedales al volante de carreras antes de conectar ningún conector USB y no pises nunca
ningún pedal mientras el v olante de carreras se está autocalibrando al iniciar o si el juego está arrancando.
- El volante de carreras se mueve solo durante el juego:
Esto es normal, se debe a la función de centrado automático que está disponible en algunos juegos. Para
detener esos movimientos, basta con que coloques tus manos en el volante de carreras o reduzcas la
intensidad de la función Force Feedback.
- El volante de carreras se detecta, pero no funciona con el juego:
Abre la interfaz de Opciones del juego para configurar el volante de carreras. Consulta el manual del
usuario o la ayuda en línea del juego para obtener más información.
- La función Force Feedback no reacciona correctamente en PC:
En la interfaz del Panel de control del volante de carreras (es decir, la interfaz de Dispositivos de juego en
Windows®), restaura todas las fuerzas a su valor predeterminado (100%) y desactiva la función de
centrado automático (la luz indicadora no parpadeará).
En algunos juegos de PC también es necesario invertir las fuerzas (en este caso, selecciona "Fuerzas negativas"
o mueve el cursor a "-100%" en las opciones del juego). En otros juegos las fuerzas no se invertirán (en este caso,
selecci ona "Fuerzas posi tivas" o mueve el cursor a "+ 100%" en las opciones del juego).
- Los pedales no funcionan correctamente en modo "Separado" en PC
(p. ej. en el juego, el cursor de selección se mueve solo)
Sal del juego y cambia los pedales al modo "Combinado". Reinicia el juego y, a continuación, configura el
volante de carreras una vez más mediante la interfaz de gestión de opciones del juego.
INFORMACIÓN Y RECOMENDACIONES DE SEGURIDAD
- Al conectar el volante de carreras y durante la fase de calibración automática: para evitar
errores de calibración, no gires el volante de carreras y no pulses ni los pedales ni los botones.
- Si no piensas utilizar el volante de carreras durante un período de tiempo prolongado,
para evitar un consumo inútil de electricidad y para evitar dañar el volante de carreras,
desconecta el adaptador de corriente del volante de carreras. ¡Recuerda volver a conectar el
adaptador de corriente antes de empezar a jugar de nuevo!
- Tu volante de carreras incluye una función Force Feedback: evita que los niños pequeños
Por razones de seguridad, no uses los pedales con los pies descalzos ni llevando únicamente
THRUSTMASTER® NO SERÁ RESPONSABLE DE NINGUNA LESIÓN PRODUCIDA POR USAR LOS
PEDALES SIN CALZADO.
calcetines.
Page 59

8/10
Información de garantía al consumidor
En todo el mundo, Guillemot Corporation S.A. (en lo sucesivo “Guillemot”) garantiza al
consumidor que este producto de Thrustmaster estará libre de defectos de materiales y
mano de obra, durante un período de garantía que corresponde al límite de tiempo para
interponer una acción legal referida a la conformidad en relación con este producto. En los
países de la Unión Europea, esto corresponde a un período de dos (2) años a partir de la
entrega del producto de Thrustmaster. En otros países, el período de garantía corresponde
al límite de tiempo para interponer una acción legal referida a la conformidad en relación con
este producto de Thrustmaster según las leyes aplicables del país en el que el consumidor
estuviese domiciliado en la fecha de compra del producto de Thrustmaster (si no existiese
una acción similar en el país correspondiente, entonces el período de garantía será de un
(1) año a partir de la fecha de compra original del producto de Thrustmaster).
A pesar de lo anterior, las baterías recargables están cubiertas por un período de garantía
de seis (6) meses a partir de la fecha de compra original.
Si el producto resultase defectuoso durante el período de garantía, hay que ponerse en
contacto inmediatamente con el Soporte Técnico, que indicará el procedimiento a seguir. Si
se confirma el defecto, el producto debe devolverse a su lugar de compra (o a cualquier otra
ubicación indicada por el Soporte Técnico).
Dentro del contexto de esta garantía, el producto defectuoso del consumidor será reparado o
sustituido, a elección del Soporte Técnico. Si la ley aplicable lo permite, toda la responsabilidad
de Guillemot y sus filiales (incluso por daños resultantes) se limita a la reparación o sustitución
del producto de Thrustmaster. Si la ley aplicable lo permite, Guillemot renuncia a todas las
garantías de comerciabilidad o adecuación para un propósito determinado. Los derechos
legales del consumidor en relación con las leyes aplicables a la venta de productos de consumo
no se ven afectados por esta garantía.
Esta garantía no se aplicará: (1) si el producto ha sido modificado, abierto, alterado o ha
sufrido daños como resultado de un uso inapropiado o abuso, negligencia, accidente,
desgaste normal, o cualquier otra causa no relacionada con un defecto de materiales o
fabricación (incluyendo, pero no de forma exclusiva, la combinación del producto de
Thrustmaster con cualquier elemento no adecuado, incluyendo en particular fuentes de
alimentación, baterías recargables, cargadores o cualquier otro elemento no suministrado
por Guillemot para este producto); (2) en caso de incumplimiento de las instrucciones
proporcionadas por el Soporte Técnico; (3) a software, es decir software sujeto a una
garantía específica; (2) en caso de incumplimiento de las instrucciones proporcionadas por
el Soporte Técnico; (3) a software, es decir software sujeto a una garantía específica; (4) a
consumibles (elementos que se tienen que reemplazar a lo largo de la vida del producto: por
ejemplo, baterías desechables o almohadillas para auriculares de audio); (5) a accesorios
(por ejemplo, cables, cajas, bolsas, bolsos o muñequeras); (6) si el producto se ha vendido
en una subasta pública. (6) si el producto se ha vendido en una subasta pública.
Esta garantía no es transferible.
Page 60

9/10
Responsabilidad
Si la ley aplicable lo permite, Guillemot Corporation S.A. (en lo sucesivo “Guillemot”) y sus
filiales renuncian a toda responsabilidad por los daños causados por uno o más de los
siguientes motivos: (1) el producto ha sido modificado, abierto o alterado; (2) incumplimiento
de las instrucciones de montaje; (3) uso inapropiado o abuso, negligencia, accidente (un
impacto, por ejemplo); (4) desgaste normal. Si la ley aplicable lo permite, Guillemot y sus
filiales renuncian a toda responsabilidad por los daños no relacionados con defectos de
materiales o fabricación en relación con el producto (incluyendo, pero no de forma exclusiva,
los daños causados de forma directa o indirecta por cualquier software, o por combinar el
producto de Thrustmaster con cualquier elemento no adecuado, incluyendo en particular
fuentes de alimentación, baterías recargables, cargadores o cualquier otro elemento no
suministrado por Guillemot para este producto).
COPYRIGHT
© 2015 Guillemot Corporation S.A. Todos los derechos reservados. Thrustmaster
marca registrada de Guillemot Corporation S.A. PlayStation
®
es una marca comercial
registrada de Sony Computer Entertainment Inc. Windows® es una marca registrada de
Microsoft Corporation en Estados Unidos y/o en otros países. Todas las demás marcas
registradas y nombres comerciales se reconocen por los presentes y son propiedad de sus
respectivos dueños. Ilustraciones no definitivas. El contenido, la concepción y las
especificaciones son susceptibles de cambiar sin previo aviso y varían según el país.
Fabricado en China.
TouchSense® Technology con licencia de Immersion Corporation. Protegida por una o más
de las patentes de Estados Unidos que se encuentran en la siguiente dirección
www.immersion.com/patent-marking.html y otras patentes pendientes.
®
es una
Page 61

10/10
SOPORTE TÉCNICO
RECOMENDACIÓN DE PROTECCIÓN AMBIENTAL
eléctricos y el equipamiento electrónico puedes contribuir de forma significativa a ayudar a
proteger el medio ambiente.
Contacta con las autoridades locales para más información sobre el punto de recogida más
cercano.
Esta información debe conservarse. Los colores y motivos decorativos pueden variar.
Este producto cumple con todas las normas relativas a los niños de más de 14 años. No es
recomendable para niños de menos de 14 años.
www.thrustmaster.com
Al terminar su vida útil, este producto no debe tirarse en un contenedor de
basuras estándar, sino que debe dejarse en un punto de recogida de
desechos eléctricos y equipamiento electrónico para ser reciclado.
Esto viene confirmado por el símbolo que se encuentra en el producto,
manual del usuario o embalaje.
Dependiendo de sus características, los materiales pueden reciclarse.
Mediante el reciclaje y otras formas de procesamiento de los desechos
http://ts.thrustmaster.com
Page 62

1/10
Para: PC e PlayStation®3
Manual do Utilizador
Page 63

2/10
CONFIGURAR O VOLANTE
ATENÇÃO: Nunca aperte apenas o parafuso, sem o sistema de fixação!
Para apertar:
Para soltar:
Fixar o volante a uma mesa ou secretária
- Coloque o volante em cima de uma mesa ou de qualquer outra superfície horizontal, plana e estável.
- Insira o parafuso de aperto no sistema de fixação e em seguida aperte o dispositivo rodando o
parafuso no sentido anti-horário, de forma a entrar no furo roscado grande situado por baixo do
volante, até o dispositivo ficar perfeitamente estável.
(Se o fizer, poderá danificar o volante.)
MONTAGEM REMOÇÃO
Rode o parafuso no sentido anti-horário
Fixar o volante a um cockpit
- Coloque o volante na prateleira do cockpit.
- Insira dois parafusos M6 (não incluídos com o volante) na prateleira do cockpit e em seguida enrosque-
os nos dois furos roscados pequenos situados por baixo do volante.
- Em seguida, aperte o sistema de fixação padrão inserindo o parafuso de aperto no furo roscado grande.
Rode o parafuso no sentido horário
Page 64

3/10
Notas importantes para evitar problemas de calibração:
um jogo)
Nos jogos para a PlayStation®3 e PC,
(exceto os botões 13-17, que estão inativos no PC).
LIGAR O VOLANTE À CORRENTE
Apenas versões europeias
Importante: a versão europeia do T100 FFB está equipada c om uma fonte de alimentação interna,
situada diretamente no interior da base do volante.
A versão europeia deve ser alimentada exclusivamente com corrente de 220 V!
- Basta ligar o conector de alimentação do volante a uma tomada elétrica de 220 V.
Outras versões (não europeias)
Nota: ao contrário da versão europeia, o T100 FFB não europeu possui uma fonte de alimentação
externa; é fornecido um dispositivo específico com o volante.
- Ligue o transformador externo ao conector relevante na parte posterior do volante e em seguida a uma
tomada elétrica padrão de tensão idêntica.
LIGAR O CONJUNTO DE PEDAIS AO VOLANTE
Ligue o conjunto de pedais ao volante utilizando o conector relevante, situado na parte posterior do
volante.
CALIBRAÇÃO AUTOMÁTICA DO VOLANTE E DO CONJUNTO DE PEDAIS
A calibração do volante ocorre automaticamente quando liga o transformador e o conector USB do
volante. (Esta operação faz o volante mover-se.) A calibração do conjunto de pedais também ocorre
automaticamente; basta premir os pedais várias vezes.
- Nunca ligue o conector USB do volante antes de ligar o conjunto de pedais
(quando o volante é calibrado automaticamente após a ligação ou quando entra ou sai de
Nunca abra a base do volante – perigo de choque!
- Nunca carregue nos pedais durante o arranque do volante
assim como na interface do Painel de Controlo no PC,
o volante é reconhecido como um volante F430 Force Feedback,
o qual oferece as mesmas características do que este
Page 65

4/10
PC
Nota:
Controlo antes de iniciar o jogo!
MODO DO CONJUNTO DE PEDAIS
LED do volante
SEPARADO (este modo é rec omendado para a maioria dos
jogos)
COMBINADO
VERDE
Requisitos do sistema: PC (Windows® XP, Vista, 7 e 8) com uma porta USB.
Instalar os controladores de Force Feedback para PC
1. Aceda a http://ts.thrustmaster.com para transferir os controladores e o software de Force Feedback para
PC (na secção Updates and Downloads, clique em PC / Wheels / T100 FFB ou PlayStation / Wheels /
T100 FFB e depois em Drivers).
2. Quando a transferência e a instalação tiverem terminado, clique em Concluir e reinicie o computador.
3. Depois de o computador reiniciar, ligue o conector USB a uma das portas USB do processador. O
Windows® deteta automaticamente o novo dispositivo.
4. Instalar os controladores:
A instalação dos controladores processa-se automaticamente. Siga as instruções apresentadas no
ecrã para concluir a instalação.
5. Selecione Iniciar/Definições/Painel de Controlo e em seguida faça duplo clique em Controladores
de jogos (ou Opções do Jogo, consoante o seu sistema operativo).
Surge a caixa de diálogo Controladores de jogos; o volante fica visível no ecrã, com a indicação
de estado OK.
6. No Painel de Controlo, clique em Propriedades para configurar o volante:
• Test Device: Permite-lhe testar e ver os botões, o D-Pad e os eixos do volante e do conjunto de
pedais.
• Test Forces: Permite-lhe testar 8 efeitos de força e configurar os efeitos Force Feedback e de
centragem automática.
Está pronto para começar a jogar!
Ajustar os efeitos Force Feedback no PC
Na página 2 do Painel de Controlo estão disponíveis quatro definições, que podem ser ajustadas de 0 a
150%:
Main forces (Forças principais) / Static forces (Forças estáticas) / Dynamic forces (Forças dinâmicas) /
Aggressiveness (Agressividade)
No PC, certifique-se de que fecha sempre completamente a interface do Painel de
Configurar o conjunto de pedais no PC
Por predefinição, os controlos de aceleração e travagem do volante funcionam em modo "Separado", o
que significa que os pedais funcionam em eixos independentes.
Este modo melhora consideravelmente a precisão durante as corridas.
Se o seu jogo não for compatível com o modo "Separado", o conjunto de pedais ligado ao volante não
funcionará corretamente. Terá então de sair do jogo e selecionar o modo "Combinado" (no qual ambos os
pedais funcionam no mesmo eixo).
VERMELHO
Page 66

5/10
Nota:
modo "Combinado".
CENTRAGEM AUTOMÁTICA
LED do volante
INATIVA (modo recomendado para todos os jogos Force Feedback
para PC)
NÃO
INTERMITENTE
ATIVA
INTERMITENTE
Configurar o modo do conjunto de pedais via software:
(Esta definição fica guardada na memória do di spositivo, mesmo depois de reiniciar o computador ou de
desligar e voltar a ligar o volante.)
- Na página 1 do painel de Controlo, selecione o modo pretendido e em seguida clique em OK.
Configurar o modo do conjunto de pedais via hardware:
(Esta definição fica guardada na memória do dispositivo; deve ser executada sempre que liga o
computador ou desliga o volante.)
- Prima e solte ambos os pedais em simultâneo (acelerador e travão) + botão Force no volante (botão F).
Se o jogo para PC não for compatível com o modo "Separado" do
conjunto de pedais, recomendamos que mude o volante para o
Ajustar a funcionalidade de centragem automática no PC
Por predefinição, a funcionalidade de centragem automática do volante está desativada.
Os jogos mais recentes possuem o seu próprio modo de centragem automática.
Como tal, recomendamos vivamente (na maioria dos casos) que desative a funcionalidade de
centragem automática do volante e deixe que seja o jogo a geri-la. A qualidade dos efeitos Force
Feedback beneficiará com isso.
O modo de centragem automática deverá ser utilizado essencialmente com jogos que não dispõem de
uma opção Force Feedback, ou possuem apenas uma funcionalidade de centragem automática
"reduzida".
Ajustar a funcionalidade de centragem automática via software:
- Aceda à página 2 da interface do Painel de Controlo.
- Para desativar a funcionalidade de centragem automática, selecione "By the game".
- Para ativar a funcionalidade de centragem automática, selecione "By the wheel".
Neste modo, pode ajustar a intensidade da funcionalidade de centragem automática de 0 a 100%.
Ajustar a funcionalidade de centragem automática via hardware:
Para ativar ou desativar a funcionalidade de centragem automática diretamente no jogo, basta premir o
botão Force (botão "F" ) no volante. Quando ativada, a intensidade da funcionalidade de centragem
automática iguala o valor previamente definido para a definição "By the wheel" na interface do Painel de
Controlo.
Page 67

6/10
PLAYSTATION3
SUGESTÃO:
e o pedal do travão para cancelá-la.
Instalar o volante na PlayStation®3
- Ligue o conector USB a uma das portas USB da consola.
Está pronto para começar a jogar!
Notas gerais para a PlayStation®3
- No menu geral, utilize o comando oficial da consola (não o volante) para navegar e iniciar os seus jogos.
= A funcionalidade de mapeamento* do volante só será executada depois de o jogo começar.
- O volante não possui um botão PS
= Utilize o comando oficial da consola para sair dos jogos e desligar a consola.
Ajustar os efeitos Force Feedback na PS3
= Pode ajustar as definições de força no jogo na secção Opções/Controlos (estas opções não estão
disponíveis em alguns jogos).
- Ajustar a sensibilidade do volante e do conjunto de pedais na PS3
= Pode ajustar as definições de sensibilidade no jogo na secção Opções/Controlos (estas opções não estão
disponíveis em alguns jogos).
- Uma lista de jogos para a PS3™ compatíveis com a funcionalidade Force Feedback do volante está
disponível em http://ts.thrustmaster.com (na secção Downloads and Updates, clique em PC / Wheels /
T100 FFB ou PlayStation / Wheels / T100 FFB e em seguida selecione Games settings).
Em alguns jogos para a PS3™
pode utilizar o pedal do acelerador para confirmar uma seleção
(GRAN TURISMO®, por exemplo),
Page 68

7/10
RESOLUÇÃO DE PROBLEMAS
- O volante e o conjunto de pedais não funcionam corretamente, ou a calibragem parece incorreta:
Desligue o computador ou a consola, desligue o volante completamente, em seguida volte a ligar todos
os cabos (ligando o conector USB do volante por último) e por fim reinicie o computador ou a consola e o
jogo.
Ligue sempre o conjunto de pedais ao volante antes de ligar quaisquer conectores USB, e nunca
carregue nos pedais durante a calibragem automática do volante no arranque ou o início do jogo.
- O volante move-se sozinho durante o jogo:
Isto é normal; é causado pela funcionalidade de centragem automática que está disponível em alguns
jogos. Para parar estes movimentos, basta colocar as mãos no volante ou diminuir a intensidade da
funcionalidade Force Feedback.
- O volante é detetado, mas não funciona no jogo:
Abra a interface de opções do jogo para configurar o volante. Consulte o manual do utilizador do jogo ou
a ajuda online para mais informações.
- A funcionalidade Force Feedback não reage corretamente no PC:
Na interface do Painel de Controlo do volante (isto é, a interface Controladores de jogos no Windows®),
restaure todas as forças para o respetivo valor predefinido (100%) e desative a funcionalidade de
centragem automática (a luz do indicador não deverá piscar).
Em alguns jogos para PC, é igualmente necessário inverter as forças (neste caso, selecione "Negative
forces" ou mova o cursor para "-100%" nas opções do jogo). Noutros jogos, as forças não deverão ser
invertidas (neste caso, selecione "Positive forces" ou mova o cursor para "+100%" nas opções do jogo).
- O conjunto de pedais não funciona corretamente no modo "Separado" no PC
(por exemplo, no jogo, o cursor de seleção move-se sozinho)
Saia do jogo e mude o conjunto de pedais para o modo "Combinado". Reinicie o jogo e em seguida
configure o volante novamente através da interface de gestão das opções do jogo.
RECOMENDAÇÕES E INFORMAÇÕES DE SEGURANÇA
- Quando ligar o volante e durante a fase de calibração automática: para evitar erros de
calibração, não rode o volante nem carregue nos pedais ou botões.
- Se não tenciona utilizar o volante durante um longo período de tempo, para evitar um
consumo de eletricidade desnecessário e quaisquer danos no volante, desligue o
transformador do volante. Ligue novamente o transformador antes de voltar a jogar!
- O volante inclui uma funcionalidade Force Feedback: Mantenha as crianças afastadas do
volante, em particular durante as fases de calibração automática.
Por razões de segurança, nunca utilize o conjunto de pedais com os pés descalços ou quando
estiver apenas de meias calçadas.
A THRUSTMASTER® NÃO SE RESPONSABILIZA POR QUAISQUER DANOS FÍSICOS QUE
OCORRAM AO UTILIZAR O CONJUNTO DE PEDAIS SEM SAPATOS.
Page 69

8/10
Informações sobre a garantia para o consumidor
A Guillemot Corporation S.A. (a seguir designada como “Guillemot”) garante a nível mundial
ao consumidor que este produto Thrustmaster está livre de defeitos em termos de materiais
e fabrico durante um período de garantia que corresponde ao limite de tempo para intentar
uma ação de conformidade relativamente a este produto. Nos países da União Europeia,
isto corresponde a um período de dois (2) desde a entrega do produto Thrustmaster.
Noutros países, o período de garantia corresponde ao limite de tempo para intentar uma
ação de conformidade relativamente ao produto Thrustmaster de acordo com a legislação
em vigor do país no qual o consumidor residia à data de compra do produto Thrustmaster
(se a dita ação não existir no país correspondente, então o período de garantia será de um
(1) ano a partir da data de compra original do produto Thrustmaster.
Não obstante o supracitado, as baterias recarregáveis estão cobertas por um período de
garantia de seis (6) meses a partir da data de compra original.
No caso de o produto apresentar algum defeito durante o período da garantia, contacte
imediatamente o Suporte Técnico, que lhe indicará o procedimento a tomar. Se esse defeito
se confirmar, o produto terá de ser devolvido ao respetivo local de compra (ou qualquer
outro local indicado pelo Suporte Técnico).
No âmbito da presente garantia, e por opção do Suporte Técnico, o produto defeituoso do
consumidor será reparado ou substituído. Se for permitido pela legislação em vigor, a
responsabilidade total da Guillemot e das respetivas filiais (incluindo para danos indiretos)
está limitada à reparação ou substituição do produto Thrustmaster. Se for permitido pela
legislação em vigor, a Guillemot rejeita todas as garantias de comercialização ou adequação
a um fim específico. Os direitos legais do consumidor no que concerne à legislação aplicável
à venda de bens de consumo não são afetados pela presente garantia.
A presente garantia não se aplicará: (1) se o produto tiver sido modificado, aberto, alterado
ou danificado em resultado de utilização inadequada ou abusiva, negligência, acidente,
desgaste normal ou qualquer outra casa relacionada com um defeito de material ou fabrico
(incluindo, mas sem limitação, combinar o produto Thrustmaster com qualquer elemento
inadequado, incluindo, em particular, fontes de alimentação, baterias recarregáveis,
carregadores ou quaisquer outros elementos não fornecidos pela Guillemot para este
produto); (2) na eventualidade de incumprimento das instruções fornecidas pelo Suporte
Técnico; (3) a software, estando o mesmo sujeito a uma garantia específica; (4) a
consumíveis (elementos para substituir ao longo da vida útil do produto, como baterias
descartáveis e auriculares de auscultadores, por exemplo); (5) a acessórios (cabos, estojos,
bolsas, sacos e correias de pulso, por exemplo); (6) se o produto foi vendido num leilão
público.
A presente garantia não é transmissível.
Page 70

9/10
Responsabilidade
Se for permitido ao abrigo da legislação aplicável, a Guillemot Corporation S.A. (a seguir
designada “Guillemot”) e as respetivas filiais rejeitam qualquer responsabilidade por danos
resultantes de uma ou mais das seguintes causas: (1) o produto foi modificado, aberto ou
alterado; (2) incumprimento das instruções de montagem; (3) utilização inadequada ou
abusiva, negligência ou acidente (um impacto, por exemplo); (4) desgaste normal. Se for
permitido ao abrigo da legislação aplicável, a Guillemot e as respetivas filiais rejeitam
qualquer responsabilidade por danos relacionados com um defeito de material ou fabrico
relativamente ao produto (incluindo, mas sem limitação, quaisquer danos causados direta ou
indiretamente por qualquer software ou por combinar o produto Thrustmaster com qualquer
elemento inadequado, incluindo, em particular, fontes de alimentação, baterias
recarregáveis, carregadores ou quaisquer outros elementos não fornecidos pela Guillemot
para este produto).
DIREITOS DE AUTOR
© 2015 Guillemot Corporation S.A. Todos os direitos reservados. Thrustmaster
marca registada da Guillemot Corporation S.A. PlayStation
Computer Entertainment Inc. Windows
®
é uma marca registada da Microsoft Corporation
®
é uma marca registada da Sony
nos Estados Unidos e/ou noutros países. Todas as outras marcas comerciais e nomes de
marcas são por este meio reconhecidas e pertencem aos respectivos proprietários. As
ilustrações não são vinculativas. Os conteúdos, desenhos e especificações estão sujeitos a
alteração sem aviso prévio e podem variar de país para país. Fabricado na China.
Tecnologia TouchSense® sob licença da Immersion Corporation. Protegido por uma ou
mais patentes norte-americanas disponíveis no endereço www.immersion.com/patentmarking.html e por outras patentes em processo de aprovação.
®
é uma
Page 71

10/10
SUPORTE TÉCNICO
RECOMENDAÇÕES DE PROTECÇÃO AMBIENTAL
Através da reciclagem e de outras formas de processamento de resíduos de equipamento
eléctrico e electrónico, pode dar um importante contributo no sentido de ajudar a proteger o
ambiente.
Contacte as autoridades locais para saber onde fica o ponto de recolha mais perto da sua
área de residência.
Informações a reter. As cores e as decorações podem variar.
Este produto está em conformidade com as normas relativas às crianças com mais de 14
anos de idade. Não é recomendado às crianças com menos de 14 anos de idade.
www.thrustmaster.com
Quando este produto chegar ao fim da sua vida útil, não o elimine
juntamente com os resíduos domésticos normais; em vez disso, deixe-o
num ponto de recolha de resíduos de equipamento eléctrico e electrónico
(REEE) para posterior reciclagem.
O símbolo presente no produto, no manual de utilizador ou na caixa
confirma-o.
Os materiais podem ser reciclados, dependendo das suas características.
http://ts.thrustmaster.com
Page 72

1/10
Для ПК и PlayStation®3
Инструкция по эксплуатации
Page 73

2/10
УСТАНОВКА РУЛЕВОЙ СИСТЕМЫ
ВНИМАНИЕ! Нельзя закручивать винт без системы крепления!
Фиксация
Ослабление
Размещение рулевого колеса на столе.
- Расположите гоночный руль на столе или иной горизонтальной плоской и устойчивой
поверхности.
- Вставьте крепежный винт в систему крепления и надежно зафиксируйте руль, затягивая винт
против часовой стрелки, так чтобы он вошел в большое резьбовое отверстие, расположенное
ниже руля.
В противном случае возможно повреждение рулевой системы.
СБОРКА ДЕМОНТАЖ
Закручивайте винт против часовой
стрелки
Закрепление рулевого колеса на кокпите
- Расположите рулевое колесо на щитке кокпита.
- Через отверстия в щитке кокпита вставьте два винта M6 (не входят в комплект гоночного руля) в
два небольших винтовых отверстия на нижней стороне базы руля.
- Затем затяните стандартную систему крепления, вставив крепежный винт в большое резьбовое
отверстие.
Раскручивайте винт по часовой
стрелке
Page 74

3/10
Важные замечания во избежание проблем с калибровкой
из игры).
В играх для PlayStation®3 и ПК,
(кроме кнопок 13-17, которые не активны на ПК).
ПОДКЛЮЧЕНИЕ РУЛЕВОЙ СИСТЕМЫ К ЭЛЕКТРОПИТАНИЮ
Только для версий для Европы
Важно! Европейская версия системы T100 FFB оснащена встроенным сетевым адаптером,
который расположен непосредственно в базе руля.
- Просто подключите шнур питания рулевой системы к сети с напряжением 220 В.
Другие версии (не европейская)
Примечание: в отличие от европейской версии, неевропейская версия системы T100 FFB
поставляется с внешним адаптером питания в виде особого устройства.
- Подключите внешний адаптер к соответствующему разъему на задней стороне базы рулевого
колеса, а затем — к стандартной электророзетке соответствующего напряжения.
ПОДКЛЮЧЕНИЕ ПЕДАЛЬНОГО БЛОКА К РУЛЕВОЙ СИСТЕМЕ
Подключите педальный блок к рулевому колесу с помощью соответствующего разъема на задней
стороне базы.
АВТОМАТИЧЕСКАЯ КАЛИБРОВКА РУЛЯ И ПЕДАЛЬНОГО БЛОКА
Калибровка гоночного руля выполняется автоматически при подключении рулевой системы к сети
питания и к внешнему устройству через USB-разъем (во время этой операции руль двигается).
Калибровка педального блока также выполняется автоматически, достаточно несколько раз нажать
на педали.
Европейская версия поддерживает питание только напряжением 220В!
Открывать базу гоночного руля нельзя — существует опасность поражения
электрическим током!
- Нельзя подключать к рулевой системе USB-кабель перед подключением
- Нельзя нажимать педали во время запуска руля
(во время автокалибровки после подключения, а также во время запуска и выхода
рулевая система отображается в виде гоночного руля F430 Force Feedback,
педального блока.
а также на панели управления на ПК
аналогичного по функциям данной модели
Page 75

4/10
Примечание.
РЕЖИМ РАБОТЫ ПЕДАЛЬНОГО БЛОКА
Индикатор на руле
РАЗДЕЛЬНЫЙ (рекомендуется для большинства игр)
КРАСНЫЙ
СОВМЕСТНЫЙ
ЗЕЛЕНЫЙ
ПК
Требования к системе: ПК (Windows® XP, Vista, 7 и 8) с USB-портом.
Установка драйверов силовой обратной связи на ПК
1. На сайте http://ts.thrustmaster.com можно загрузить драйверы силовой обратной связи и
программное обеспечение для ПК (в разделе Обновления и загрузки щелкните PC / Wheels / T100
FFB или PlayStation / Wheels / T100 FFB, затем выберите Драйверы).
2. После завершения загрузки и установки щелкните кнопку Готово и перезапустите компьютер.
3. После перезагрузки компьютера подключите USB-кабель к одному из USB-портов на системном
блоке. Windows® автоматически распознает новое устройство.
4. Установка драйверов:
Установка драйвера выполняется автоматически. Завершите установку, выполнив указания на
экране.
5. Выберите Пуск/Настройка/Панель управления, затем дважды щелкните Игровые
устройства (или «Игровые параметры», в зависимости от операционной системы).
Отображается диал оговое окно Игровые устройства; на экране отображается значок
рулевой сист емы с индикацией состояния OK.
6. На Панели управления щелкните Свойства для настройки рулевой системы.
• Тестирование устройства: тестирование и просмотр функциональных кнопок,
многопозиционной кнопки и осей руля и педального блока.
• Тестирование силовых эффектов: возможность протестировать 8 силовых эффектов и
настроить параметры эффектов силовой обратной связи и автоцентрирования.
Теперь все готово для игры!
Настройка эффектов силовой обратной связи на ПК
На второй странице Панели управления можно отрегулировать значения четырех параметров от 0
до 150 %: основные силовые эффекты, статические силовые эффекты, динамические силовые
эффекты, агрессивность.
Перед запуском игры на ПК обязательно закрывайте окно Панели задач!
Настройка педального блока на ПК
По умолчанию педали газа и тормоза рулевой системы действуют в раздельном режиме, то есть,
функционируют на независимых осях.
Такой режим значительно повышает точность работы во время гонки.
Если игра не совместима с раздельным режимом, подключенный к рулю педальный блок не будет
функционировать должным образом. Затем следует выйти из игры и выбрать совместный режим
(при котором обе педали функционируют на одной оси).
Page 76

5/10
Примечание:
систему в совместный режим.
АВТОЦЕНТРИРОВАНИЕ
Индикатор на руле
ВЫКЛЮЧЕНО (рекомендуется для всех ПК-игр с поддержкой
силовой обрат ной связи)
ВКЛЮЧЕНО
МИГАЕТ
Настройка режима педального блока программным способом
(настройка сохраняется в памяти устройства даже после перезагрузки компьютера,
отключения и повторного подключения рулевой системы)
- На первой странице Панели управления выберите нужный режим и щелкните OK.
Настройка режима педального блока аппаратным способом
(настройка сохраняется в памяти устройства; ее следует выполнять при каждом запус ке
компьютера и после отключения рулевой системы)
- Нажмите и удержите одновременно обе педали (педали газа и тормоза) + кнопку силовых
эффектов на руле (кнопка F).
Если ПК-игра не совместима с раздельным режимом работы
педального блока, рекомендуется переключить рулевую
Настройка функции автоцентрирования на ПК
По умолчанию функция автоцентрирования рулевой системы отключена.
В большинстве современных игр предусмотрена собственная функция автоцентрирования.
Поэтому рекомендуется (в большинстве случаев) деактивировать функцию
автоцентрирования на рулевой системе и использовать эту функцию в игре. Это
положительно скажется на качестве эффекта силовой обратной связи.
Режим автоцентрирования следует использовать преимущественно с играми, не
поддерживающими функции силовой обратной связи или предлагающими «слабую» функцию
автоцентрирования.
Настройка функции автоцентрирования программным способом
- Откройте вторую страницу интерфейса Панели управления.
- Для выключения функции автоцентрирования выберите вариант «Выполняется игрой».
- Для включения функции автоцентрирования выберите вариант «Выполняется рулевой системой».
В этом режиме можно настроить значение интенсивности функции автоцентрирование в диапазоне
от 0 до 100%.
Настройка функции автоцентрирования аппаратным способом
Для включения или выключения функции автоматического центрирования непосредственно из
игры просто нажмите кнопку силовых эффектов (кнопку F) на руле. Значение интенсивности
включенной функции автоцентрирования соответствует ранее заданному значению параметра
«Выполняется рулевой системой» на Панели управления.
НЕ МИГАЕТ
Page 77

6/10
PLAYSTATION3
СОВЕТ.
а с помощью педали тормоза — отменять его.
Установка рулевой системы для PlayStation®3
- Подключите USB-кабель к одному из USB-портов консоли.
Теперь все готово для игры!
Общие примечания для PlayStation®3
- Для навигации по основному меню и запуска игр пользуйтесь официальным игровым пультом (а не
рулевой системой).
= Переопределение* функций на рулевой системе можно запустить только после запуска игры.
- На рулевой системе отсутствует кнопка PS
= Для выхода из игры и выключения консоли пользуйтесь официальным игровым пультом.
- Настройка эффектов силовой обратной связи на PS3
= Настройки силовой обратной связи для игры можно отрегулировать в разделе «Параметры/Органы
управления» (эти параметры поддерживаются не всеми играми).
- Настройка интенсивности руля и педального блока на PS3
= Настройки интенсивности для игры можно отрегулировать в разделе «Параметры/Органы
управления» (эти параметры поддерживаются не всеми играми).
- Перечень игр для PS3™, совместимых с функцией силовой обратной связи рулевой системы можно
найти на сайте: http://ts.thrustmaster.com (в разделе Downloads and Updates щ елкните PC / Wheels /
T100 FFB или Pl ayStation / Wheels / T100 FFB, затем выберите Games settings).
В некоторых играх для PS3™
подтверждать выбор можно с помощью педали газа,
(напр., GRAN TURISMO®)
Page 78

7/10
УСТРАНЕНИЕ НЕПОЛАДОК
- Гоночный руль и педальный блок не работают должным образом или калибровка
выглядит неверной
Выключите компьютер или консоль и полностью отключите рулевую систему, затем заново
подключите все кабели (в последнюю очередь подключая USB-кабель рулевой системы) и
перезапустите рулевую систему и игру.
Педальный блок всегда следует подключать к рулю перед подключением USB-кабелей. Во время
автокалибровки руля при запуске или загрузке игры нельзя нажимать педали.
- Во время игры руль самопроизвольно сдвигается
Это нормально. Такой эффект обусловлен функцией автоцентрирования, доступной в некоторых
играх. Во избежание этого движения просто положите руки на руль или уменьшите значение
интенсивности функции силовой обратной связи.
- Рулевая система обнаружена, но не работает в игре
Откройте окно с параметрами игры и настройте рулевую систему. Для получения дополнительных
сведений обратитесь к инструкции по эксплуатации или к Интернет-справке.
- Функция силовой обратной связи неправильно функционирует на ПК
В окне Панели управления рулевой системы (т.е. в окне «Игровые устройства» в Windows®)
восстановите стандартные значения всех силовых эффектов (100%) и отключите функцию
автоцентрирования (индикатор не должен мигать).
В некоторых ПК-играх необходимо инвертировать силовые эффекты (в таком случае выберите
вариант «Негативные силовые эффекты» или сместите курсор на значение «-100%» в параметрах
игры). В других играх силовые эффекты не надо инвертировать (в таком случае выберите вариант
«Позитивные силовые эффекты» или сместите курсор на значение «+100%» в параметрах игры).
- Педальный блок не работает должным образом на ПК в раздельном режиме
(т.е., в игре курсор выделения самопроизвольно двигается по кругу)
Выйдите из игры и переключите педальный блок в совместный режим. Перезапустите игру и еще
раз настройте рулевую систему с помощью интерфейса управления параметрами игры.
РЕКОМЕНДАЦИИ И СВЕДЕНИЯ ПО БЕЗОПАСНОСТИ
- При подключении рулевой системы и во время автокалибровки: во ибежание ошибок
калибровки не поворачивайте руль и не нажимайте педали и кнопки.
- Если не предполагается использование рулевой системы в течение длительного
срока, во избежание нецелесообразного расходования электроэнергии и для
предотвращения повреждения рулевой системы отключите от нее сетевой адаптер. Не
забудьте подключить сетевой адаптер перед началом игры!
- Если ваша рулевая система поддерживает функцию силовой обратной связи: не
допускайте к рулевой системе маленьких детей, особенно во время автокалибровки.
Из соображений безопасности никогда не нажимайте на педали босой ногой или ногой в
носке (без обуви).
КОМПАНИЯ THRUSTMASTER® НЕ НЕСЕТ ОТВЕТСТВЕННОСТИ ЗА ФИЗИЧЕСКИЕ ТРАВМЫ,
ПОЛУЧЕННЫЕ В РЕЗУЛЬТАТЕ НАЖИМАНИЯ НА ПЕДАЛИ НЕОБУТЫМИ НОГАМИ.
Page 79

8/10
Сведения о потребительской гарантии
Корпорация Guillemot Corporation S.A. (далее — «Guillemot») гарантирует своим
клиентам во всем мире, что в данном изделии Thrustmaster не будет выявлено никаких
дефектов материалов и производства в течение гарантийного периода, который равен
сроку предъявления претензии по соответствию для данного изделия. В странах
Европейского Союза этот срок соответствует двум (2) годам с момента поставки
изделия Thrustmaster. В других странах гарантийный период равен сроку
предъявления претензии по соответствию для изделия Thrustmaster, определяемому
соответствующим законодательством страны, в которой проживал потребитель на
момент приобретения изделия Thrustmaster (если подобные претензии не действуют в
соответствующей стране, гарантийный период равняется одному (1) году с
первоначальной даты приобретения изделия Thrustmaster).
Невзирая на вышеизложенное, гарантия на аккумуляторы равняется шести (6)
месяцам с первоначальной даты приобретения.
В случае обнаружения дефектов изделия во время гарантийного периода
незамедлительно обратитесь в службу технической поддержки, сотрудники которой
определят дальнейшую процедуру. Если дефект будет подтвержден, изделие следует
вернуть по месту приобретения (или в любое другое место, указанное службой
технической поддержки).
В рамках действия гарантии дефектное изделие будет, по усмотрению службы
технической поддержки, отремонтировано или заменено. В мере, разрешенной
применимым законодательством, полная ответственность компании Guillemot и ее
дочерних компаний (в том числе косвенный ущерб) ограничивается ремонтом или
заменой изделия Thrustmaster. В мере, разрешенной применимым законодательством,
компания Guillemot отказывается от любых гарантий коммерческой пригодности или
пригодности для определенной цели. Настоящая гарантия не ущемляет прав
потребителя, предоставляемых ему применимыми законами в отношении продажи
потребительских товаров.
Настоящая гарантия не распространяется: (1) на ситуации, когда изделие было
видоизменено, открыто, модифицировано или получило повреждения в результате
недопустимого или неправильного использования, небрежности или несчастного
случая, естественного износа или любой другой причины, не связанной с дефектом
материалов или производства (включая, помимо прочего, использование изделия
Thrustmaster совместно с любыми неподходящими элементами, в частности — с
блоками питания, аккумуляторами, зарядными устройствами и любыми другими
элементами, не входящими в комплектацию Guillemot для данного изделия); (2) на
ситуации, когда указания службы технической поддержки не были выполнены; (3) на
ПО, так как на такое ПО распространяется отдельная гарантия; (4) на расходные
материалы (элементы, предназначенные для замены в течение срока службы
изделия: например, батарейки и ушные подушки для гарнитур или наушников); (5) на
аксессуары (например, кабели, чехлы, сумки, футляры, наручные ремешки); (6) на
случаи продажи изделия с открытого аукциона.
Данная гарантия не подлежит передаче.
Page 80

9/10
Ответственность
В мере, разрешенной применимым законодательством, компания Guillemot Corporation
S.A. (далее — «Guillemot») и ее дочерние предприятия отказываются от любой
ответственности за любой ущерб, вызванный одним или несколькими из следующих
факторов: (1) видоизменение, вскрытие или модификация изделия; (2) несоблюдение
инструкций по сборке; (3) недопустимое или неправильное использование,
небрежность, несчастный случай (например, физическое воздействие); (4)
естественный износ. В мере, разрешенной применимым законодательством, компания
Guillemot и ее дочерние предприятия отказываются от любой ответственности за
любой ущерб, не связанный с дефектами материалов или изготовления, в отношении
данного изделия (включая, помимо прочего, любой ущерб, вызванный прямо или
опосредованно любым программным обеспечением или использованием изделия
Thrustmaster с любыми неподходящими элементами, в частности — блоками питания,
аккумуляторами, зарядными устройствами и любыми другими элементами, не
входящими в комплектацию Guillemot для данного изделия).
АВТОРСКОЕ ПРАВО
© 2015 Guillemot Corporation S.A. Все права защищены. Thrustmaster® является
зарегистрированной торговой маркой Guillemot Corporation. PlayStation® является
зарегистрированной торговой маркой Sony Computer Entertainment Inc. Microsoft®
Windows® является зарегистрированной торговой маркой Microsoft Corporation в
Соединенных Штатах Америки и/или других странах. Все прочие торговые марки и
фирменные названия приведенные в данном документе, являются собственностью
соответствующих владельцев. Иллюстрации могут не соответствовать внешнему
виду/функциям конкретного изделия. Содержание руководства, конструкция и
технические характеристики изделия изменяются без предварительного уведомления
и зависят от страны приобретения.
Технология TouchSense® по лицензии от корпорации Immersion Corporation.
Защищено одним или несколькими патентами США, с которыми можно ознакомиться
на сайте www.immersion.com/patent-marking.html, и другими патентами, ожидающими
рассмотрения.
Page 81

10/10
РЕКОМЕНДАЦИИ ПО ЗАЩИТЕ ОКРУЖАЮЩЕЙ СРЕДЫ
Обратитесь в местные органы власти за информацией о ближайшем пункте приема
таких отходов.
При пользовании изделием учитывайте следующее. Цвета и украшения могут
различаться.
Настоящий продукт соответствует всем стандартам в отношении детей в возрасте 14
лет и старше. Использование данного продукта детьми младше 14 лет недопустимо.
www.thrustmaster.com
После окончания срока службы данное изделие не следует
утилизировать вместе с бытовым мусором, но в пункте сбора отходов
электрического и электронного оборудования.
Данное указание подтверждается соответствующим символом,
нанесенным на изделие, руководство пользователя или упаковку.
В зависимости от свойств, материалы могут передаваться в повторную
переработку. Повторная переработка отходов электрического и
электронного оборудования может внести значительный вклад в
сохранение окружающей среды.
ТЕХНИЧЕСКОЙ ПОДДЕРЖКИ
http://ts.thrustmaster.com
Page 82

1/10
Για: PC & PlayStation®3
Εγχειρίδιο χρήσης
Page 83

2/10
ΕΓΚΑΤΑΣΤΑΣΗ ΤΙΜΟΝΙΕΡΑΣ
ΠΡΟΕΙΔΟΠΟΙΗΣΗ: Μην σφίγγετε τη βίδα μόνη της, χωρίς το σύστημα προσάρτησης!
Για σύσφιξη:
Για ελευθέρωση:
Τοποθέτηση τιμονιέρας σε τραπέζι ή γραφείο
- Τοποθετήστε την τιμονιέρα σε τραπέζι ή οποιαδήποτε άλλη οριζόντια, επίπεδη και σταθερή επιφάνεια.
- Εισάγετε τη βίδα σύσφιξης στο σύστημα προσάρτησης, μετά σφίξτε τη συσκευή στρέφοντας τη βίδα
σύσφιξης αριστερόστροφα, ώστε να στερεωθεί στην οπή του μεγάλου σπειρώματος κάτω από την
τιμονιέρα, έως ότου η συσκευή είναι εντελώς σταθερή.
(Αυτό ενδέχεται να καταστρέψει την τιμονιέρα).
ΣΥΝΑΡΜΟΛΟΓΗΣΗ
Στρέψτε τη βίδα αριστερόστροφα
Προσάρτηση της τιμονιέρας σε θέση οδηγού
- Τοποθετήστε την τιμονιέρα στην προεξοχή της θέσης του οδηγού.
- Οδηγήστε τις δύο βίδες M6 (δεν περιλαμβάνονται στην τιμονιέρα) μέσω της προεξοχής της θέσης του
οδηγού, και στη συνέχεια, τοποθετήστε τις στις οπές από τα δύο μικρά σπειρώματα που βρίσκονται
κάτω από την τιμονιέρα.
- Στη συνέχεια, σφίξτε το βασικό σύστημα προσάρτησης τοποθετώντας τη βίδα σύσφιξης μέσα στην
οπή του μεγάλου σπειρώματος.
ΑΦΑΙΡΕΣΗ
Στρέψτε τη βίδα δεξιόστροφα
Page 84

3/10
Σημαντικές σημειώσεις προς αποφυγή προβλημάτων βαθμονόμησης:
εκκίνηση ή την έξοδο από κάποιο παιχνίδι)
Σε παιχνίδια για PlayStation®3 και PC,
(εκτός από τα κουμπιά 13-17, τα οποία είναι ανενεργά σε PC).
ΣΥΝΔΕΣΗ ΤΗΣ ΤΙΜΟΝΙΕΡΑΣ ΣΤΟ ΡΕΥΜΑ
Μόνο για Ευρωπαϊκές εκδόσεις
Σημαντική σημείωση: η Ευρωπαϊκή έκδοση της τιμονιέρας T100 FFB διαθέτει εσωτερική παροχή
ρεύματος, που βρίσκεται απευθείας μέσα στη βάση της τιμονιέρας.
Η Ευρωπαϊκή έκδοση πρέπει να παρέχεται αποκλειστικά με ρεύμα τάσης 220V!
- Απλώς συνδέστε την υποδοχή ρεύματος της τιμονιέρας σε μια πρίζα τάσης 220 V.
Άλλες εκδόσεις (μη Ευρωπαϊκές)
Σημείωση: Σε αντίθεση με την Ευρωπαϊκή έκδοση, η μη Ευρωπαϊκή έκδοση της τιμονιέρας T100 FFB
διαθέτει εξωτερική πρίζα. Παρέχεται μια συγκεκριμένη συσκευή με την τιμονιέρα.
- Συνδέστε τον εξωτερικό αντάπτορα στην αντίστοιχη υποδοχή που βρίσκεται στο πίσω μέρος της
τιμονιέρας, και στη συνέχεια, συνδέστε τον εξωτερικό αντάπτορα του ρεύματος σε μια τυπική πρίζα
ρεύματος που έχει την ίδια τάση.
ΣΥΝΔΕΣΗ ΤΟΥ ΣΕΤ ΠΕΝΤΑΛ ΣΤΗΝ ΤΙΜΟΝΙΕΡΑ
Συνδέστε το σετ των πεντάλ στην τιμονιέρα χρησιμοποιώντας τη σχετική υποδοχή που βρίσκεται στο
πίσω μέρος της τιμονιέρας.
ΑΥΤΟΜΑΤΗ ΒΑΘΜΟΝΟΜΗΣΗ ΤΙΜΟΝΙΟΥ ΚΑΙ ΣΕΤ ΠΕΝΤΑΛ
Η βαθμονόμηση του τιμονιού πραγματοποιείται αυτόματα όταν συνδέετε τον αντάπτορα τροφοδοσίας του
τιμονιού και μια υποδοχή USB. (Αυτή η λειτουργία προκαλεί την κίνηση του τιμονιού) Η βαθμονόμηση
του σετ των πεντάλ επίσης πραγματοποιείται αυτόματα. Απλώς πατήστε τα πεντάλ μερικές φορές.
- Ποτέ μην συνδέετε την υποδοχή USB της τιμονιέρας πριν συνδέσετε το σετ των πεντάλ
(όταν η τιμονιέρα πραγματοποιεί αυτο-βαθμονόμηση και ακολουθεί σύνδεση, ή κατά την
Ποτέ μην ανοίγετε τη βάση της τιμονιέρας – κίνδυνος ηλεκτροπληξίας!
- Ποτέ μην πατάτε τα πεντάλ κατά την εκκίνηση της τιμονιέρας
και στο περιβάλλον διαχείρισης του Πίνακα ελέγχου σε PC,
η τιμονιέρα αναγνωρίζεται ως τιμονιέρα F430 Force Feedback,
που προσφέρει τις ίδιες λειτουργίες με αυτήν
Page 85

4/10
PC
Σημείωση:
ελέγχου πριν ξεκινήσετε το παιχνίδι σας!
Φωτεινή ένδειξη
LED τιμονιέρας
ΞΕΧΩΡΙΣΤΑ (αυτή η λειτουργία συνιστάται για τα
περισσότερα παιχνίδια)
ΣΥΝΔΥΑΣΤΙΚΑ
ΠΡΑΣΙΝΟ
Απαιτήσεις συστήματος: PC (Windows® XP, Vista, 7 και 8) με θύρα USB.
Εγκατάσταση των οδηγών της λειτουργίας Force Feedback για PC
1. Αποκτήστε πρόσβαση στον ιστότοπο http://ts.thrustmaster.com για να πραγματοποιήσετε λήψη των
οδηγών της λειτουργίας Force Feedback και του λογισμικού για PC (στην ενότητα Ενημερώσεις και
Λήψεις, κάντε κλικ στις επιλογές PC / Wheels / T100 FFB ή PlayStation / Wheels / T100 FFB, και στη
συνέχεια, κάντε κλικ στην επιλογή Οδηγοί).
2. Μόλις η λήψη και εγκατάσταση ολοκληρωθούν, κάντε κλικ στο κουμπί Τέλος και επανεκκινήστε τον
υπολογιστή σας.
3. Μόλις ο υπολογιστής σας πραγματοποιήσει επανεκκίνηση, συνδέστε την υποδοχή USB σε μία από
τις θύρες USB στην κεντρική μονάδα επεξεργασίας. Τα Windows® θα εντοπίσουν αυτόματα τη νέα
συσκευή.
4. Εγκατάσταση των οδηγών:
Ο οδηγός εγκαταστάθηκε αυτόματα. Ακολουθήστε τις οδηγίες που παρουσιάζονται στην οθόνη για να
ολοκληρώσετε την εγκατάσταση.
5. Κάντε κλικ στις επιλογές Έναρξη/Ρυθμίσεις/Πίνακας ελέγχου και έπειτα, κάντε διπλό κλικ στην
επιλογή Ελεγκτές παιχνιδιού (ή Επιλογές παιχνιδιού, ανάλογα με το λειτουργικό σας σύστημα).
Εμφανίζεται το πλαίσιο διαλόγου για τους Ελεγκτές παιχνιδιού. Η τιμονιέρα εμφανίζεται στην
οθόνη, με την ένδειξη OK.
6. Στον Πίνακα ελέγχου, κάντε κλικ στις Ιδιότητες για να διαμορφώσετε την τιμονιέρα σας:
Δοκιμή συσκευής: Σας επιτρέπει να δοκιμάσετε και να δείτε τα κουμπιά, τον σταυρό κατευθύνσεων
και τους άξονες της τιμονιέρας και του σετ πεντάλ.
Δοκιμή δυνάμεων: Σας δίνει τη δυνατότητα να δοκιμάσετε τα εφέ 8 δυνάμεων και να διαμορφώσετε
τα εφέ Force Feedback και Αυτόματο κεντράρισμα.
Τώρα είστε έτοιμοι για τον αγώνα!
Ρύθμιση των εφέ της λειτουργίας Force Feedback σε PC
Στη σελίδα 2 στον Πίνακα ελέγχου, υπάρχουν διαθέσιμες τέσσερις ρυθμίσεις και επιδέχονται ρύθμιση
από 0 έως 150% :
Κύριες δυνάμεις / Στατικές δυνάμεις / Δυναμικές δυνάμεις / Επιθετικότητα
Σε PC, να θυμάστε πάντα να κλείνετε εντελώς το περιβάλλον διαχείρισης του Πίνακα
Διαμόρφωση του σετ πεντάλ σε PC
Εξ' ορισμού, η επιτάχυνση και η πέδηση του τιμονιού σας βρίσκονται σε λειτουργία «Ξεχωριστά». Αυτή
η ρύθμιση σημαίνει ότι τα πεντάλ λειτουργούν σε ανεξάρτητους άξονες.
Αυτή η λειτουργία βελτιώνει σημαντικά την ακρίβεια κατά την οδήγηση.
Εάν το παιχνίδι σας δεν είναι συμβατό με τη λειτουργία «Ξεχωριστά», το σετ πεντάλ που συνδέετε με το
τιμόνι σας δεν θα λειτουργεί σωστά. Τότε θα πρέπει να βγείτε από το παιχνίδι και να επιλέξετε τη
λειτουργία «Συνδυαστικά» (στην οποία και τα δύο πεντάλ λειτουργούν στον ίδιο άξονα).
ΛΕΙΤΟΥΡΓΙΑ ΤΟΥ ΣΕΤ ΤΩΝ ΠΕΝΤΑΛ
ΚΟΚΚΙΝΟ
Page 86

5/10
Σημείωση:
λειτουργία «Συνδυαστικά».
Φωτεινή ένδειξη
LED τιμονιέρας
ΑΝΕΝΕΡΓΗ (η λειτουργία συνιστάται για όλα τα παιχνίδια με λειτουργία
Force Feedback σε PC)
ΔΕΝ
ΑΝΑΒΟΣΒΗΝΕΙ
ΕΝΕΡΓΗ
ΑΝΑΒΟΣΒΗΝΕΙ
Διαμόρφωση της λειτουργίας του σετ των πεντάλ με τη χρήση του λογισμικού:
(Αυτή η ρύθμιση αποθηκεύεται στ η μνήμη της συσκευής, ακόμη και μετά την επανεκκίνηση του
υπολογιστή σας ή την αποσύνδεση και την επανασύνδεση της τιμονιέρας σας.)
- Στη σελίδα 1 του Πίνακα ελέγχου, επιλέξτε την απαιτούμενη λειτουργία, έπειτα κάντε κλικ στο OK.
Διαμόρφωση της λειτουργίας του σετ των πεντάλ με τη χρήση του υλικού:
(Αυτή η ρύθμιση αποθηκεύεται στη μνήμη της συσκευής. Πρέπει να εκτελείται κάθε φορά που θέτετε σε
λειτουργία τον υπολογιστή σας ή αποσυνδέετε την τιμονιέρα.)
- Πατήστε και ελευθερώστε ταυτόχρονα και τα δύο πεντάλ (γκάζι και φρένο) + το κουμπί Force που
βρίσκεται στην τιμονιέρα (κουμπί F).
Αν το παιχνίδι σας δεν είναι συμβατό με τη λειτουργία του σετ των
πεντάλ «Ξεχωριστά», συνιστούμε να αλλάξετε το τιμόνι σας σε
Ρύθμιση της λειτουργίας της αυτόματης ευθυγράμμισης σε PC
Εξ' ορισμού, η δυνατότητα αυτόματης ευθυγράμμισης του τιμονιού απενεργοποιείται.
Τα πιο πρόσφατα παιχνίδια διαθέτουν τη δική τους λειτουργία αυτόματης ευθυγράμμισης τιμονιού.
Επομένως, συνιστάται (στις περισσότερες περιπτώσεις) να απενεργοποιείτε τη δυνατότητα
αυτόματης ευθυγράμμισης τιμονιού και να αφήνετε το παιχνίδι να διαχειριστεί αυτήν τη
λειτουργία. Η ποιότητα της λειτουργίας Force Feedback θα βελτιωθεί.
Η δυνατότητα αυτόματης ευθυγράμμισης τιμονιού θα πρέπει να χρησιμοποιείται ουσιαστικά με
παιχνίδια που δεν διαθέτουν την επιλογή Force Feedback ή διαθέτουν μόνο «περιορισμένη» δυνατότητα
αυτόματης ευθυγράμμισης τιμονιού.
Ρύθμιση της λειτουργίας της αυτόματης ευθυγράμμισης με τη χρήση λογισμικού:
- Μεταβείτε στη Σελίδα 2 στo περιβάλλον διαχείρισης στον Πίνακα ελέγχου.
- Για να απενεργοποιήσετε τη δυνατότητα αυτόματης ευθυγράμμισης τιμονιού, επιλέξτε «Από το
παιχνίδι».
- Για να ενεργοποιήσετε τη δυνατότητα αυτόματης ευθυγράμμισης τιμονιού, επιλέξτε «Από το τιμόνι».
Με αυτήν τη λειτουργία, μπορείτε να προσαρμόσετε τη δύναμη της δυνατότητας αυτόματης
ευθυγράμμισης τιμονιού από 0 έως 100%.
Ρύθμιση της λειτουργίας της αυτόματης ευθυγράμμισης με τη χρήση υλικού:
Για να ενεργοποιήσετε ή να απενεργοποιήσετε τη λειτουργία της αυτόματης ευθυγράμμισης τιμονιού
απευθείας μέσα από το παιχνίδι σας, απλώς πατήστε το κουμπί Force (δηλ. το κουμπί «F») στην
τιμονιέρα σας. Κατά την ενεργοποίηση, η δύναμη της δυνατότητας της αυτόματης ευθυγράμμισης
τιμονιού αντιστοιχεί με την τιμή που ορίστηκε πριν για τη ρύθμιση «Από το τιμόνι» στο περιβάλλον
διαχείρισης στον Πίνακα ελέγχου.
ΑΥΤΟΜΑΤΗ ΕΥΘΥΓΡΑΜΜΙΣΗ
Page 87

6/10
PLAYSTATION3
ΣΥΜΒΟΥΛΗ:
πεντάλ του φρένου για να την ακυρώσετε.
Εγκατάσταση της τιμονιέρας σε PlayStation®3
- Συνδέστε την υποδοχή USB σε μία από τις θύρες USB της κονσόλας σας.
Τώρα είστε έτοιμοι για τον αγώνα!
Γενικές σημειώσεις για το PlayStation®3
- Όταν βρίσκεστε στο κύριο μενού, χρησιμοποιήστε το επίσημο χειριστήριο παιχνιδιών της κονσόλας
σας (όχι την τιμονιέρα σας) για να περιηγηθείτε και να εκκινήσετε τα παιχνίδια σας.
= Η λειτουργία αντιστοίχιση* της τιμονιέρας θα λειτουργεί μόνο αφού ξεκινήσει το παιχνίδι.
- Η τιμονιέρα δεν διαθέτει κουμπί PS
= Χρησιμοποιήστε το επίσημο χειριστήριο παιχνιδιών της κονσόλας σας για έξοδο από τα παιχνίδια και
για να απενεργοποιήσετε την κονσόλα.
- Ρύθμιση των εφέ της λειτουργίας Force Feedback σε PS3
= Μπορείτε να τροποποιήσετε τις ρυθμίσεις της λειτουργίας μέσα στο παιχνίδι από την ενότητα
Επιλογές/Διαχείριση (αυτές οι επιλογές δεν είναι διαθέσιμες σε μερικά παιχνίδια).
- Ρύθμιση της ευαισθησίας της τιμονιέρας και του σετ των πεντάλ σε PS3
= Μπορείτε να τροποποιήσετε τις ρυθμίσεις ευαισθησίας μέσα στο παιχνίδι από την ενότητα
Επιλογές/Διαχείριση (αυτές οι επιλογές δεν είναι διαθέσιμες σε μερικά παιχνίδια).
- Υπάρχει διαθέσιμη μια λίστα με τα παιχνίδια του PS3™ που είναι συμβατά με τη λειτουργία Force
Feedback της τιμονιέρας στον ιστότοπο http://ts.thrustmaster.com (στην ενότητα Downloads and
Updates, κάντε κλικ στις επιλογές PC / Wheels / T100 FFB ή PlayStation / Wheels / T100 FFB, και στη
συνέχεια, επιλέξτε Games settings).
(π.χ. στο GRAN TURISMO®), μπορείτε να χρησιμοποιήσετε το
πεντάλ του γκαζιού για να επιβεβαιώσετε μια επιλογή και το
Σε μερικά παιχνίδια του PS3™
Page 88

7/10
από την τιμονιέρα, ειδικά κατά τη διάρκεια των φάσεων της αυτόματης βαθμονόμησης.
ΑΝΤΙΜΕΤΩΠΙΣΗ ΠΡΟΒΛΗΜΑΤΩΝ
- Το τιμόνι και το σετ πεντάλ δεν λειτουργούν σωστά ή η βαθμονόμηση φαίνεται λανθασμένη:
Απενεργοποιήστε τον υπολογιστή ή την κονσόλα σας, αποσυνδέστε εντελώς την τιμονιέρα σας, στη
συνέχεια, επανασυνδέστε όλα τα καλώδια (συνδέστε τελευταία την υποδοχή USB της τιμονιέρας) και
έπειτα, επανεκκινήστε τον υπολογιστή ή την κονσόλα σας και το παιχνίδι σας.
Πάντα συνδέετε το σετ των πεντάλ στην τιμονιέρα πριν συνδέσετε οποιαδήποτε υποδοχή USB, και ποτέ
μην πατάτε κανένα από τα πεντάλ κατά την αυτο-βαθμονόμηση της τιμονιέρας στην εκκίνηση ή την
έναρξη του παιχνιδιού.
- Το τιμόνι κινείται μόνο του κατά τη διάρκεια του παιχνιδιού:
Αυτό είναι φυσιολογικό και προκαλείται από τη δυνατότητα αυτόματης ευθυγράμμισης τιμονιού που
υπάρχει διαθέσιμη σε μερικά παιχνίδια. Για να σταματήσετε αυτές τις κινήσεις, απλώς τοποθετήστε τα
χέρια σας πάνω στο τιμόνι ή μειώστε την ισχύ της λειτουργίας Force Feedback.
- Το τιμόνι εντοπίζεται, αλλά δεν λειτουργεί με το παιχνίδι μου:
Ανοίξτε το περιβάλλον διαχείρισης του παιχνιδιού σας για να διαμορφώσετε την τιμονιέρα σας. Για
περισσότερες πληροφορίες, δείτε στο εγχειρίδιο χρήσης του παιχνιδιού σας ή στην online βοήθεια.
- Η λειτουργία Force Feedback δεν αντιδρά σωστά σε PC:
Στο περιβάλλον διαχείρισης στον Πίνακα ελέγχου της τιμονιέρας (δηλ. στο περιβάλλον διαχείρισης
στους Ελεγκτές παιχνιδιού σε Windows®), επαναφέρετε όλες τις δυνάμεις στην προεπιλεγμένη τιμή τους
(100%) και απενεργοποιήστε τη δυνατότητα αυτόματης ευθυγράμμισης τιμονιού (η φωτεινή ένδειξη δεν
θα πρέπει να αναβοσβήνει).
Σε μερικά παιχνίδια, είναι επίσης απαραίτητο να αναστρέφετε δυνάμεις (σε αυτήν την περίπτωση,
επιλέξτε «Αρνητικές δυνάμεις» ή μετακινήστε το ποντίκι στο «-100%» στις επιλογές του παιχνιδιού σας).
Σε άλλα παιχνίδια, οι δυνάμεις δεν θα πρέπει να αναστρέφονται (σε αυτήν την περίπτωση, επιλέξτε
«Θετικές δυνάμεις» ή μετακινήστε το ποντίκι στο «+100%» στις επιλογές του παιχνιδιού σας).
- Το σετ των πεντάλ δεν λειτουργεί σωστά στη λειτουργία « Ξεχωριστά» σε PC
(π.χ. στο παιχνίδι, ο δρομέας επιλογής μετακινείται γύρω από τον εαυτό του)
Βγείτε από το παιχνίδι και αλλάξτε το σετ των πεντάλ σε λειτουργία «Συνδυαστικά». Επανεκκινήστε το
παιχνίδι σας, έπειτα διαμορφώστε την τιμονιέρα σας μία ακόμη φορά μέσω του περιβάλλοντος
διαχείρισης στις επιλογές του παιχνιδιού σας.
ΠΡΟΤΑΣΕΙΣ ΚΑΙ ΠΛΗΡΟΦΟΡΙΕΣ ΣΧΕΤΙΚΑ ΜΕ ΤΗΝ ΑΣΦΑΛΕΙΑ
- Όταν συνδέετε το τιμόνι σας και κατά τη διάρκεια της φάσης της αυτόματης βαθμονόμησης:
για να αποφύγετε σφάλματα βαθμονόμησης, μην στρέφετε το τιμόνι και μην πιέζετε κανένα από τα
πεντάλ ή τα κουμπιά.
- Εάν δεν σχεδιάζετε να χρησιμοποιήσετε το τιμόνι σας για παρατεταμένο χρονικό διάστημα,
για να αποφύγετε την άσκοπη κατανάλωση ενέργειας και για να αποτρέψετε οποιαδήποτε
ζημιά στο τιμόνι σας, αποσυνδέστε τον αντάπτορα τροφοδοσίας από το τιμόνι. Θυμηθείτε να
επανασυνδέσετε τον αντάπτορα τροφοδοσίας πριν αρχίσετε να παίζετε πάλι!
- Το τιμόνι σας περιλαμβάνει τη λειτουργία Force Feedback: Κρατήστε τα μικρά παιδιά μακριά
Για λόγους ασφαλείας, ποτέ μην χρησιμοποιείτε το σετ των πεντάλ ξυπόλητοι ή ενώ φοράτε μόνο κάλτσες.
Η THRUSTMASTER® ΑΠΟΠΟΙΕΙΤΑΙ ΟΠΟΙΑΣΔΗΠΟΤΕ ΕΥΘΥΝΗΣ ΣΕ ΠΕΡΙΠΤΩΣΗ ΤΡΑΥΜΑΤΙΣΜΟΥ
ΠΟΥ ΠΡΟΚΑΛΕΙΤΑΙ ΑΠΟ ΤΗ ΧΡΗΣΗ ΤΟΥ ΣΕΤ ΤΩΝ ΠΕΝΤΑΛ ΧΩΡΙΣ ΠΑΠΟΥΤΣΙΑ.
Page 89

8/10
Πληροφορίες εγγύησης καταναλωτή
Παγκοσμίως, η Guillemot Corporation S.A. (εφεξής “Guillemot”) εγγυάται στον καταναλωτή
ότι το προϊόν της Thrustmaster δεν παρουσιάζει ελάττωμα στο υλικό ούτε κατασκευαστικές
ατέλειες για το χρονικό διάστημα της εγγύησης, το οποίο αντιστοιχεί στο χρονικό όριο για
άσκηση αγωγής για συμμόρφωση αναφορικά με αυτό το προϊόν. Στις χώρες της Ε.Ε., αυτό
αντιστοιχεί σε διάστημα δύο (2) ετών από την παράδοση του προϊόντος της Thrustmaster.
Σε άλλες χώρες, η περίοδος εγγύησης αντιστοιχεί στο χρονικό όριο για άσκηση αγωγής για
συμμόρφωση αναφορικά το προϊόν της Thrustmaster σύμφωνα με την ισχύουσα νομοθεσία
της χώρας στην οποία ο καταναλωτής διέμενε κατά την ημερομηνία αγοράς του προϊόντος
της Thrustmaster (σε περίπτωση που δεν υπάρχει τέτοια ενέργεια στην αντίστοιχη χώρα,
τότε η εγγύηση θα ισχύει για ένα (1) έτος από την αρχική ημερομηνία αγοράς του προϊόντος
της Thrustmaster).
Κατά παρέκκλιση των παραπάνω, οι επαναφορτιζόμενες μπαταρίες καλύπτονται από
περίοδο εγγύησης έξι (6) μηνών από ημερομηνία της αρχικής αγοράς.
Σε περίπτωση που το προϊόν σας φαίνεται να είναι ελαττωματικό κατά την περίοδο της
εγγύησης, επικοινωνήστε αμέσως με την Τεχνική υποστήριξη, η οποία θα υποδείξει την
διαδικασία που θα ακολουθήσετε. Αν το ελάττωμα επιβεβαιωθεί, το προϊόν πρέπει να
επιστραφεί στο σημείο αγοράς του (ή σε οποιοδήποτε άλλο σημείο υποδεικνύει η Τεχνική
υποστήριξη).
Στα πλαίσια της εγγύησης, το ελαττωματικό προϊόν του καταναλωτή, με επιλογή της
Τεχνικής υποστήριξης, είτε θα επισκευαστεί είτε θα αντικατασταθεί. Αν επιτρέπεται από την
ισχύουσα νομοθεσία, η πλήρης ευθύνη της Guillemot και των θυγατρικών της
(περιλαμβάνονται οι επακόλουθες ζημιές) περιορίζεται στην επισκευή ή αντικατάσταση του
προϊόντος της Thrustmaster. Αν επιτρέπεται από την ισχύουσα νομοθεσία, η Guillemot
αποποιείται κάθε εγγύηση εμπορευσιμότητας ή καταλληλότητας για τον συγκεκριμένο
σκοπό. Τα νομικά δικαιώματα του καταναλωτή σε σχέση με την ισχύουσα νομοθεσία όσον
αφορά την πώληση των καταναλωτικών ειδών δεν επηρεάζονται από την παρούσα
εγγύηση.
Η παρούσα εγγύηση δεν ισχύει: (1) αν το προϊόν έχει τροποποιηθεί, ανοιχτεί, μεταποιηθεί ή
υποστεί βλάβη ως αποτέλεσμα ακατάλληλης ή κακής χρήσης, αμέλειας, ατυχήματος,
φυσιολογικής φθοράς ή οποιασδήποτε άλλης αιτίας που δεν σχετίζεται με ελάττωμα στο υλικό
ή κατασκευαστικό ελάττωμα (συμπεριλαμβανομένων, ενδεικτικά, συνδυάζοντας το προϊόν της
Thrustmaster με οποιοδήποτε ακατάλληλο στοιχείο, συμπεριλαμβανομένων συγκεκριμένων
παροχών ρεύματος, επαναφορτιζόμενων μπαταριών, φορτιστών ή άλλων στοιχείων που δεν
παρέχονται από τη Guillemot για αυτό το προϊόν), (2) σε περίπτωση μη συμμόρφωσης με τις
οδηγίες που παρέχονται από την Τεχνική υποστήριξη, (3) για λογισμικό, το εν λόγω λογισμικό
υπόκειται σε συγκεκριμένη εγγύηση, (4) για αναλώσιμα (στοιχεία που πρόκειται να
αντικατασταθούν από τη διάρκεια ζωής του προϊόντος: για παράδειγμα, μπαταρίες μίας
χρήσης, καλύμματα αυτιών για σετ ακουστικών ή ακουστικά), (5) για αξεσουάρ (για
παράδειγμα, καλώδια, περιβλήματα, θήκες, τσάντες, λουράκια καρπού), (6) αν το προϊόν
πωληθεί σε δημοπρασία.
Η παρούσα εγγύηση δεν μεταβιβάζεται.
Page 90

9/10
Ευθύνη
Αν επιτρέπεται από την ισχύουσα νομοθεσία, η Guillemot Corporation S.A. (εφεξής “Guillemot”)
και οι θυγατρικές της αποποιούνται κάθε ευθύνης για οποιαδήποτε ζημιά προκαλείται από ένα
ή περισσότερα από τα ακόλουθα: (1) το προϊόν έχει τροποποιηθεί, ανοιχτεί ή μεταποιηθεί, (2)
αποτυχία ως προς τη συμμόρφωση με τις οδηγίες συναρμολόγησης, (3) ακατάλληλη ή κακή
χρήση, αμέλεια, ατύχημα (για παράδειγμα, πρόσκρουση), (4) φυσιολογική φθορά. Αν
επιτρέπεται από την ισχύουσα νομοθεσία, η Guillemot και οι θυγατρικές της αποποιούνται
κάθε ευθύνης για οποιαδήποτε ζημιά δεν σχετίζεται με λάθος στο υλικό ή την κατασκευή
αναφορά με το προϊόν (συμπεριλαμβάνεται, ενδεικτικά, οποιαδήποτε ζημιά προκαλείται άμεσα
ή έμμεσα από οποιοδήποτε λογισμικό ή από συνδυασμό του προϊόντος της Thrustmaster με
κάθε ακατάλληλο στοιχείο, συμπεριλαμβανομένων συγκεκριμένων παροχών ρεύματος,
επαναφορτιζόμενων μπαταριών, φορτιστών ή άλλων στοιχείων που δεν παρέχονται από την
Guillemot για αυτό το προϊόν).
ΠΝΕΥΜΑΤΙΚΑ ΔΙΚΑΙΩΜΑΤΑ
© 2015 Guillemot Corporation S.A. Με την επιφύλαξη παντός δικαιώματος. Η ονομασία
Thrustmaster® είναι εμπορικό σήμα της Guillemot Corporation S.A. Η ονομασία
PlayStation
Windows® είναι εμπορικό σήμα κατατεθέν της Microsoft Corporation στις Ηνωμένες
Πολιτείες Αμερικής και/ή σε άλλες χώρες. Όλα τα υπόλοιπα εμπορικά σήματα και οι
εμπορικές επωνυμίες με το παρόν επιβεβαιώνονται και αποτελούν ιδιοκτησία των
αντίστοιχων κατόχων τους. Οι εικόνες δεν είναι δεσμευτικές. Τα περιεχόμενα, οι
σχεδιασμοί και οι προσδιορισμοί προδιαγραφών υπόκεινται σε αλλαγή χωρίς ειδοποίηση
και ενδέχεται να ποικίλουν από χώρα σε χώρα. Κατασκευάζεται στην Κίνα.
Η τεχνολογία TouchSense® παρέχεται με άδεια χρήσης από την Immersion Corporation.
Προστατεύεται από μία ή περισσότερες πατέντες στις Η.Π.Α. που υπάρχουν στην ακόλουθη
ηλεκτρονική διεύθυνση και άλλες πατέντες που εκκρεμούν.
®
είναι εμπορικό σήμα της Sony Computer Entertainment Inc. Η ονομασία
Page 91

10/10
ΣΥΣΤΑΣΗ ΠΡΟΣΤΑΣΙΑΣ ΠΕΡΙΒΑΛΛΟΝΤΟΣ
ΤΕΧΝΙΚΉΣ ΥΠΟΣΤΉΡΙΞΗΣ
Μέσω της ανακύκλωσης και άλλων μορφών επεξεργασίας απόρριψης ηλεκτρικού και
ηλεκτρονικού εξοπλισμού, μπορείτε να συμβάλετε σημαντικά στην προστασία του περιβάλλοντος.
Επικοινωνήστε με τις τοπικές αρχές για το πλησιέστερο σε εσάς σημείο συλλογής.
Κρατήστε αυτές τις πληροφορίες. Τα χρώματα και τα διακοσμητικά ενδέχεται να ποικίλουν.
Αυτό το προϊόν συμμορφώνεται με όλα τα πρότυπα όσον αφορά τα παιδιά ηλικίας 14 ετών
και πάνω. Αυτό το προϊόν δεν είναι κατάλληλο για παιδιά ηλικίας κάτω των 14 ετών.
www.thrustmaster.com
Στο τέλος της ωφέλιμης διάρκειας ζωής, το παρόν προϊόν δεν πρέπει να
απορρίπτεται με τα τυπικά οικιακά απορρίμματα, αλλά να απορρίπτεται
σε σημείο συλλογής απόρριψης ηλεκτρικού και ηλεκτρονικού εξοπλισμού
για ανακύκλωση.
Το παρόν επιβεβαιώνεται με το σύμβολο που υπάρχει στο προϊόν, στο
εγχειρίδιο χρήσης ή στη συσκευασία.
Ανάλογα με τα χαρακτηριστικά τους, τα υλικά μπορούν να ανακυκλωθούν.
http://ts.thrustmaster.com
Page 92

1/10
PC ve PlayStation®3 için
Kullanım Kılavuzu
Page 93

2/10
YARIŞ DİREKSİYONU KURULUMU
UYARI: Vidayı, montaj sistemi olmadan asla tek başına sıkmayın!
Gevşetmek için:
Yarış direksiyonunun bir sehpa veya masaya takılması
- Yarış direksiyonunu bir masa veya yatay, düz ve sağlam bir yüzeye yerleştirin.
- Bağlantı vidasını montaj sistemine takın ve cihaz tamamen sabitlenene dek bağlantı vidasını saatin
aksi yönünde sıkarak, yarış direksiyonunu altındaki büyük dişli deliğe geçirin.
(Yarış direksiyonuna zarar verebilir).
TAKMA
Sıkmak için:
Vidayı saatin aksi yönünde çevirin
Yarış direksiyonunu kokpite takma
- Yarış direksiyonunu kokpit rafına yerleştirin.
- İki adet M6 vidayı (yarış direksiyonu ile birlikte verilmez) kokpit rafından geçirin ve yarış direksiyonunun
altında bulunan iki küçük dişli deliğe takın.
- Ardından bağlantı vidasını büyük dişli deliğe geçirerek standart montaj sistemini sıkın.
ÇIKARMA
Vidayı saat yönünde çevirin
Page 94

3/10
Kalibrasyon sorunlarını önlemek için önemli notlar:
başlatılırken ya da oyundan çıkılırken)
PlayStation®3 ve PC oyunlarında
(PC’de aktif olmayan 13-17 düğmeleri hariç).
YARIŞ DİREKSİYONUNU ŞEBEKE ELEKTRİĞİNE BAĞLAMA
Sadece Avrupa versiyonları
Önemli not: T100 FFB’nin Avrupa versiyonu doğrudan yarış direksiyonunun tabanında bulunan bir dahili
güç kaynağı ile donatılmıştır.
- Yarış direksiyonunun elektrik fişini 220 V’luk bir prize takın.
Diğer versiyonlar (Avrupa olmayan)
Not: Avrupa versiyonundan farklı olarak Avrupa olmayan T100 FFB’de bir harici güç kay nağı bulunur;
yarış direksiyonu ile birlikte özel bir aygıt verilir.
- Harici adaptörü yarış direksiyonunun arka kısmında bulunan ilgili konektöre bağlayın, daha sonra harici
şebeke elektriği adaptörünü aynı gerilime sahip standart bir elektrik prizine takın.
PEDAL SETİNİ YARIŞ DİREKSİYONUNA TAKMA
Pedal setini, yarış direksiyonunu arka kısmında bulunan ilgili konektörü kullanarak yarış direksiyonuna
bağlayın.
OTOMATİK YARIŞ DİREKSİYONU VE PEDAL SETİ KALİBRASYONU
Yarış direksiyonunun güç adaptörünü ve USB konektörünü bağladığınızda yarış direksiyonu kalibrasyonu
otomatik olarak yapılır. (Bu işlem yarış direksiyonunun hareket etmesine neden olur.) Pedal seti
kalibrasyonu da otomatik olarak yapılır; tek yapmanız gereken pedallara birkaç kez basmaktır.
- Yarış direksiyonunun USB konektörünü mutlaka pedal setini bağladıktan sonra bağlayın
(bağlantı sonrasında yarış direksiyonu otomatik kalibrasyon yaparken veya oyun
Avrupa versiyonu yalnızca 220V ile beslenmelidir!
Yarış direksiyonunu tabanını asla açmayın – elektrik çarpma tehlikesi!
- Yarış direksiyonu başlarken asla pedallara basmayın
ve PC’de Kontrol Paneli arayüzünde
yarış direksiyonu, bu direksiyon aynı özellikleri sunan
F430 Force Feedback yarış direksiyonu olarak tanınır
Page 95

4/10
PC
Not:
unutmayın!
PEDAL SETİ MODU
Yarış direksiyonu LED’i
AYRIK (çoğu oyun için bu mod önerilir)
KIRMIZI
BİRLEŞİK
YEŞİL
Sistem gereksinimleri: USB bağlantı noktası bulunan PC (Windows® XP, Vista, 7 ve 8).
PC’de Force Feedback sürücülerinin yüklenmesi
1. http://ts.thrustmaster.com adresine erişerek PC için Force Feedback sürücülerini ve yazılımını indirin
(Updates and Downloads kısmında PC / Wheels / T100 FFB veya PlayStation / Wheels / T100 FFB’e
ardından Drivers’a tıklayın).
2. İndirme ve yükleme tamamlandığında Finish düğmesine tıklayın ve bilgisayarınızı yeniden başlatın.
3. Bilgisayarınız yeniden başlatıldığında USB konektörünü bilgisayarınızın USB bağlantı noktalarından
birine bağlayın. Windows® yeni aygıtı otomatik olarak algılar.
4. Sürücülerin yüklenmesi:
Sürücü yüklemesi otomatik olarak yapılır. Ekranda görüntülenen talimatları izleyerek kurulumu
tamamlayın.
5. Başlat/Ayarlar/Denetim Masası öğelerini seçin ve Oyun Kumandaları (veya işletim sisteminize bağlı
olarak Oyun Seçenekleri) öğesine çift tıklayın.
Oyun Kumandaları iletişim kutusu açılır, yarış direksiyonu ekranda, durum göstergesi Tamam
şeklinde gösterilir .
6. Kontrol Panelinde, yarış direksiyonunuzu ayarlamak için Özellikler öğesine tıklayın:
• Test Device: Düğmeleri, D-pedi ve yarış direksiyonu ile pedal setinin eksenlerini test etmenizi ve
görmenizi sağlar.
• Test Forces: 8 güç efektini test etmenizi ve Güç Geri Beslemesi ile Otomatik merkezleme
efektlerini ayarlamanızı sağlar.
Artık yarışmaya hazırsınız!
PC’de Force Feedback efektlerinin ayarlanması
Kontrol Panelinin 2nci sayfasında dört ayar mevcut olup % 0 ile 150 arasında ayarlanabilir:
Ana güçler / Statik güçler / Dinamik güçler / Agresiflik
PC’de oyunu başlatmadan önce Kontrol Paneli arayüzünü tamamen kapatmayı asla
PC’de pedal setini ayarlama
Varsayılan olarak direksiyonunuzun gaz ve fren pedalları "Ayrık" modda çalışır; yani pedallar bağımsız
eksenlerde işlev görür.
Bu mod, yarış sırasında hassasiyeti kayda değer ölçüde artırır.
Oyununuz "Ayrık" modla uyumlu değilse yarış direksiyonunuza bağlı pedal seti düzgün çalışmaz. Bu
durumda oyundan çıkmanız ve "Birleşik" modu (bu modda her iki pedal da aynı eksende işlev görür)
seçmeniz gerekir.
Pedal seti modunun yazılım kullanılarak ayarlanması:
Page 96

5/10
Not:
“Birleşik” moda almanız önerilir.
Yarış direksiyonu
LED’i
DEVREDE DEĞİL (Tüm PC Force Feedback oyunlar için bu mod önerilir)
YANIP SÖNMEZ
DEVREDE
YANIP SÖNER
(Bu ayar cihazın hafızasına kaydedilir, bilgisayarınızı yeniden başlatsanız veya yarış direksiyonunuzu
ayırıp yeniden bağlasanız bile hafızada kayıtlı kalır.)
- Kontrol Panelinin 1inci sayfasında istenilen modu seçerek OK (Tamam)’a tıklayın.
Pedal seti modunun donanım kullanılarak ayarlanması:
(Bu ayar cihazın hafızasına kaydedilir; bilgisayarınızı her başlattığınızda veya yarış direksiyonunuzu her
ayırdığınızda tekrarlanmalıdır.)
- Her iki pedala (gaz ve fren) + yarış direksiyonunda bulunan Güç düğmesine (F düğmesi) aynı anda
basıp bırakın.
PC oyununuz pedal setinin “Ayrık” modu ile uyumlu değilse yarış direksiyonunu
PC’de otomatik merkezleme özelliğinin ayarlanması
Varsayılan olarak yarış direksiyonunu otomatik merkezleme özelliği devre dışıdır.
En son oyunlar, kendi otomatik merkezleme moduna sahiptir.
Bu nedenle (çoğu durumda) yarış direksiyonunun otomatik merkezleme özelliğinin devre dışı
bırakılması ve oyununuzun bu özelliği yönetmesine izin verilmesi şiddetle önerilir. Force Feedback
kalitesi artar.
Otomatik merkezleme modu esasen Force Feedback seçeneği olmayan ya da sadece "zayıf" bir otomatik
merkezleme özelliği olan oyunlarla kullanılmalıdır.
Otomatik merkezleme özelliğini yazılım kullanarak ayarlama:
- Kontrol Paneli arayüzünün 2nci sayfasına geçin.
- Otomatik merkezleme özelliğini devreden çıkarmak için "By the game" seçeneğini seçin.
- Otomatik merkezleme özelliğini devreye almak için "By the wheel" seçeneğini seçin.
Bu modda otomatik merkezleme özelliğinin gücünü % 0 ile 100 arasında ayarlayabilirsiniz.
Otomatik merkezleme özelliğini donanım kullanarak ayarlama:
Otomatik merkezleme özelliğini doğrudan oyunun içinde devreye almak veya devreden çıkarmak için
sadece yarış direksiyonunuzdaki Güç düğmesine (yani “F” düğmesine) basın. Devreye alındığında
otomatik merkezleme özelliğinin gücü, Kontrol Paneli arayüzündeki "By the wheel" ayarı için daha
önceden tanımlanmış değere denk gelir.
OTOMATİK MERKEZLEME
Page 97

6/10
PLAYSTATION3
İPUCU:
kullanabilirsiniz.
Yarış direksiyonunun PlayStation®3'e takılması
- USB konektörünü konsolun USB bağlantı noktalarından birine bağlayın.
Artık yarışmaya hazırsınız!
PlayStation®3 için genel notlar
- Küresel menüdeyken dolaşmak ve oyunlarınızı başlatmak için konsolunuzun resmi kumanda birimini kullanın
(direksiyonunuzu kullanmayın).
= Yarış direksiyonunun eşleştirme* özelliği yalnızca oyun başladığında çalışır.
- Yarış direksiyonunda PS düğmesi bulunmaz
= Oyunlardan çıkmak veya konsolunuzu kapatmak için konsolunuzun resmi kumanda birimini kullanın.
- PS3’de Force Feedback efektlerinin ayarlanması
= Oyun içi güç ayarlarını Seçenekler/Kumandalar kısmında ayarlayabilirsiniz (bu seçenekler bazı oyunlarda
kullanılamaz).
- PS3’de yarış direksiyonu ve pedal setinin hassasiyetinin ayarlanması
= Oyun içi hassasiyet ayarlarını Seçenekler/Kumandalar kısmında ayarlayabilirsiniz (bu seç enekler bazı
oyunlarda kullanılamaz).
- Yarış direksiyonunun Force Feedback özelliği ile uyumlu PS3™ oyunları listesi http://ts.thrustmaster.com
adresinde mevcuttur (Downloads and Updates kısmında PC / Wheels / T100 FFB veya PlayStation /
Wheels / T100 FFB’ye tıklayarak Games settings’i seçin).
bir seçimi onaylamak için gaz pedalını, iptal etmek için fren pedalını
Bazı PS3™ oyunlarında
(örneğin GRAN TURISMO®),
Page 98

7/10
SORUN GİDERME
- Yarış direksiyonu ve pedal seti düzgün çalışmıyor veya kalibrasyon hatalı gözüküyor:
Bilgisayarınızı veya konsolunuzu kapatın, yarış direksiyonunuzu tamamen ayırın, tüm kabloları tekrar
bağlayın (en son yarış direksiyonunun USB konektörünü bağlayın), ardından bilgisayarınızı yeniden
başlatın ve oyununuzu tekrar çalıştırın.
Pedal setini yarış direksiyonuna mutlaka herhangi bir USB konektör bağlamadan önce bağlayın ve yarış
direksiyonu başlangıçta otomatik kalibrasyon yaparken veya oyun başlarken pedallara asla basmayın.
- Oyun sırasında yarış direksiyonu kendiliğinden hareket ediyor:
Bu normal bir durum olup bazı oyunlarda mevcut olan otomatik merkezleme özelliğinden kaynaklanır. Bu
hareketleri durdurmak için ellerinizi yarış direksiyonuna koyun veya Force Feedback özelliğinin gücünü
azaltın.
- Yarış direksiyonu algılandı ancak oyunumla çalışmıyor:
Oyununuzun Seçenekler arayüzünü açarak yarış direksiyonunuzu ayarlayın. Daha fazla bilgi için lütfen
oyununuzun kullanma kılavuzuna veya online yardıma başvurun.
- Force Feedback özelliği PC’de düzgün tepki vermiyor:
Yarış direksiyonunun Kontrol Paneli arayüzünde (Windows®'da Oyun Kumandaları arayüzü), tüm güçleri
varsayılan değere (%100) geri yükleyin ve otomatik merkezleme özelliğini devreden çıkarın (gösterge
lambası yanıp sönmemelidir).
Bazı PC oyunlarında ayıca güçleri tersine çevirmeniz gerekir (bu durumda oyun seçenekleri yönetim
arayüzünde "Negatif güçler"i seçin veya imleci "-100%"e getirin). Diğer oyunlarda güçler tersine
çevrilmemelidir (bu durumda oyun seçeneklerinde "Pozitif güçler"i seçin veya imleci "+100%"e getirin).
- PC’de pedal seti "Ayrık" modda düzgün çalışmıyor
(örneğin oyunda seçim imleci kendiliğinden geziniyor)
Oyundan çıkın ve pedal setini "Birleşik" moda alın. Oyununuzu yeniden başlatın ve ardından yarış
direksiyonunuzu, oyun seçenekleri yönetim arayüzünden bir kez daha ayarlayın.
GÜVENLİK ÖNERİLERİ VE BİLGİLER
- Yarış direksiyonunuzu bağlarken veya otomatik kalibrasyon safhasında: Kalibrasyon
hatalarını engellemek için yarış direksiyonunu çevirmeyin, hiçbir pedala veya düğmeye
basmayın.
- Yarış direksiyonunuzu uzun süre kullanmayacaksanız boş yere elektrik tüketilmesini
önlemek ve yarış direksiyonunuzun hasar görmesini engellemek için güç adaptörünü yarış
direksiyonundan ayırın. Tekrar oynamaya başlamadan önce güç adaptörünü yeniden
bağlamayı unutmayın!
- Yarış direksiyonunuzda Force Feedback özelliği vardır: Çocukları yarış
direksiyonunuzdan uzak tutun, özellikle otomatik kalibrasyon aşamasında.
Güvenlik nedeniyle pedal setini çıplak ayaklarla veya ayağınıza sadece çorap giyerek oynamayın.
PEDAL SETİNİ AYAKKABISIZ OLARAK KULLANIRKEN MEYDANA GELEN HER TÜRLÜ FİZİKSEL
YARALANMAYA KARŞI THRUSTMASTER® SORUMLU TUTULMAYACAKTIR.
Page 99

8/10
Tüketici garanti bilgisi
İşbu Thrustmaster ürünü, malzeme ve işçilik hatalarına karşı, müşterinin kusurlu ürünün
ücretinin iade edilmesi veya değiştirilmesi talebinde bulunabileceği süreye karşılık gelen
garanti süresince dünya çapında Guillemot Corporation S.A. (bundan sonra “Guillemot”
olarak ifade edilecektir) garantisi altındadır. Avrupa Birliği ülkelerinde bu süre, Thrustmaster
ürününün tesliminden itibaren iki (2) seneye karşılık gelir. Diğer ülkelerde garanti süresi,
Thrustmaster ürünü ile ilgili olarak, Thrustmaster ürününün satın alındığı tarihte müşterinin
ikamet ettiği ülkede geçerli yasalara uygun şekilde, müşterinin kusurlu ürünün ücretinin iade
edilmesi veya değiştirilmesi talebinde bulunabileceği süreye karşılık gelir (İlgili ülkede bu tür
bir düzenleme mevcut değilse garanti süresi Thrustmaster ürününün satın alındığı asıl
tarihten itibaren bir (1) yıl olacaktır).
Yukarıdakilere bağlı kalmaksızın, yeniden doldurulabilir piller ilk satın alındıkları tarihten
itibaren altı (6) ay boyunca garanti kapsamındadır.
Garanti süresi içinde üründe hata veya kusur tespit edilmesi durumunda derhal izlenecek
yöntem ile ilgili size bilgi verecek olan Teknik Destek servisimize başvurun. Hata veya kusur
onaylanırsa ürünün satın alındığı yere (ya da Teknik Destek servisi tarafından belirtilen yere)
iade edilmesi gerekmektedir.
İşbu garanti kapsamında müşterinin kusurlu ürünü, Teknik Destek servisinin insiyatifine bağlı
olarak, onarılacak veya değiştirilecektir. Yürürlükte olan yasaların izin verdiği durumlarda,
Guillemot ve bağlılarının tüm sorumluluğu (dolaylı hasarlar da dahil olmak üzere)
Thrustmaster ürününün onarılması veya değiştirilmesi ile sınırlıdır. Yürürlükte olan yasaların
izin vermesi halinde Guillemot, ticarete elverişlilik veya belirli bir amaca uygunluk ile ilgili tüm
garantileri reddeder. Tüketim mallarının satışına ilişkin tüketicinin yasal hakları işbu
garantiden etkilenmemektedir.
İşbu garanti aşağıdaki durumlar için geçerli değildir: (1) Ürün modifiye edilmişse, açılmışsa,
üzerinde değişiklik yapılmışsa, uygunsuz veya kötü kullanım, ihmal, kaza, normal aşınma ya
da malzeme veya üretim hatası ile ilgili olmayan nedenlerden dolayı hasar görmüşse (ancak
bununla sınırlı kalmamak üzere, Thrustmaster ürününü herhangi uygun bir elemanla
birleştirmek, buna dahil olarak özellikle güç kaynakları, yeniden doldurulabilir piller, şarj
cihazları veya bu ürün için Guillemot tarafından tedarik edilmemiş tüm diğer elemanlar); (2)
Teknik Destek servisi tarafından sağlanan talimatlara uyulmamışsa; (3) yazılım için, işbu
garanti geçerli değildir, söz konusu yazılım için sağlanan özel garanti hükümlerine tabidir; (4)
sarf malzemeleri için (ürünün kullanım süresi içinde değiştirilecek elemanlar: örneğin; tek
kullanımlık piller, kulaklık yastıkları); (5) aksesuarlar için (örneğin; kablolar, kılıflar, cepler,
çantalar, bileklikler); (6) ürün açık artırma ile satılmışsa.
Bu garanti devrolunamaz.
Page 100

9/10
Sorumluluk
Yürürlükte olan yasaların izin vermesi halinde, Guillemot Corporation S.A. (bundan sonra
“Guillemot” olarak ifade edilecektir) ve bağlıları aşağıdakilerin biri veya daha fazlasından
kaynaklanan her türlü hasara karşı tüm sorumluluğu reddeder: (1) Ürün modifiye edilmişse,
açılmışsa, üzerinde değişiklik yapılmışsa; (2) montaj talimatlarına uyulmamışsa; (3)
uygunsuz veya kötü kullanım, ihmal, kaza (örneğin bir darbe); (4) normal aşınma. Yürürlükte
olan yasaların izin vermesi halinde, Guillemot ve bağlıları ürünle ilgili malzeme veya üretim
hatası ile ilgili olmayan her türlü hasara karşı tüm sorumluluğu reddeder (ancak bununla
sınırlı kalmamak üzere, herhangi bir yazılımdan veya Thrustmaster ürününün herhangi bir
uygun olmayan elemanla birleştirilmesinden doğrudan veya dolaylı olarak kaynaklanan tüm
hasarlar, buna dahil olarak özellikle güç kaynakları, yeniden doldurulabilir piller, şarj cihazları
veya bu ürün için Guillemot tarafından tedarik edilmemiş tüm diğer elemanlar).
TELİF HAKKI
© 2015 Guillemot Corporation S.A. Tüm hakları saklıdır. Thrustmaster® Guillemot
Corporation S.A’nın tescilli markasıdır. PlayStation
tescilli markasıdır. Windows® ABD ve/veya diğer ülkelerde, Microsoft Corporation’ın tescilli
ticari markasıdır. Diğer tüm ticari markalar ve marka adları burada tanınmıştır ve kendi
sahiplerinin mülkiyetindedir. Resimler bağlayıcı değildir. İçerik, tasarım ve özellikler önceden
haber verilmeksizin değiştirilebilir ve bir ülkeden başka bir ülkeye değişiklik gösterebilir.
Çin’de yapılmıştır.
Immersion Corporation'dan lisanslı TouchSense® Teknolojisi. www.immersion.com/patentmarking.html adresinde bulunan bir veya daha fazla ABD patenti tarafından korunmuştur,
diğer patentler beklemektedir.
®
Sony Computer Entertainment Inc’in
 Loading...