


4965_Omslag.qxd 12-10-2006 09:36 Pagina 2
4965_Omslag.qxd 12-10-2006 09:36 Pagina 3
h
k
C/CS |
CW/CWE |
4965_BW.qxd 12-10-2006 10:07 Pagina 1
UK Instructions for use
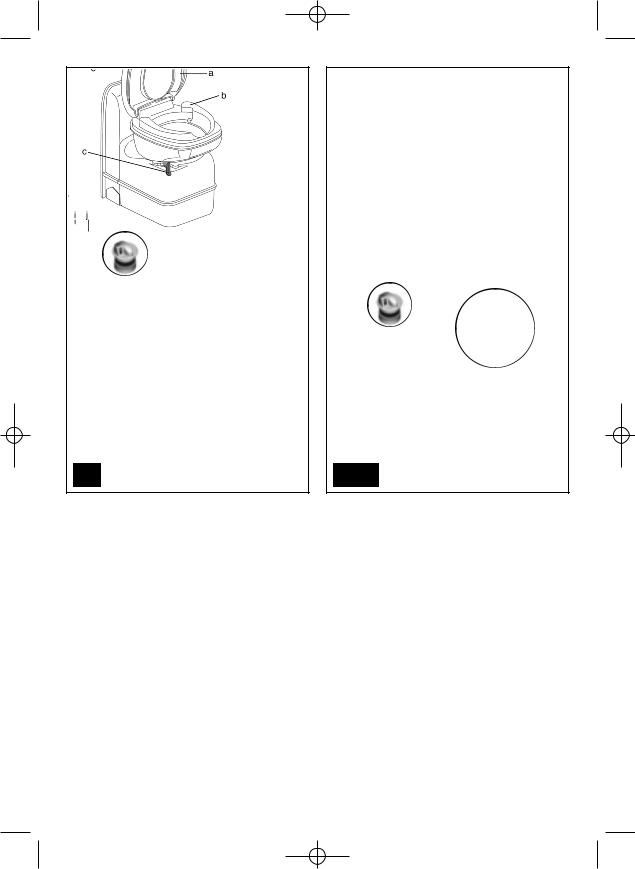
PARTS
a.Removable seat and cover.
b.Swivelling toilet bowl.
c.Valve blade handle.
d.Flush button.
e.Waste tank level indicator: warning light illuminates when the waste tank requires emptying.
f.Rotating emptying spout: ensures that the waste tank can be easily and hygienically emptied.
g+h.Automatic pressure release vent: ventilates the waste tank when this is inserted into the cassette toilet. Avoids excessive pressure build up in the waste tank. N.B. A black hose is attached to the automatic pressure release vent on some toilets. This hose transports the air to the outside through an access door or through the floor.
i.Upper handle.
j.Cover guarantees optimal hygiene. Opens when the waste tank is inserted into the toilet and closes when the waste tank is removed from the toilet.
k.Valve blade / valve seal.
l.Vent plunger: for emptying the waste tank without splashing.
m.Handle.
n.Valve blade opener.
o.Access door.
C-200 CW / CWE PARTS
AND FUNCTIONS
a.Removable seat and cover
b.Swivelling toilet bowl.
c.Valve blade handle.
d.Flush water tank.
e.Level indicator: warning light illuminates when the waste tank requires emptying.
f.Flush lever: the toilet flushes when the lever is moved up and down.
g.Power supply for the level indicator: two Penlite/AA 1.5 V alkaline batteries.
h.Waterfill door.
i.Rotating emptying spout: ensures that the waste tank
can be easily and hygienically emptied.
j+k. Automatic pressure release vent: ventilates the waste tank when this is inserted into the cassette toilet. Avoids excessive pressure build up in the waste tank. N.B. A black hose is attached to the automatic pressure release vent on some toilets. This hose transports the air to the outside through a hatch or through the floor.
l.Upper handle.
m.Cover: guarantees optimal hygiene. Opens when the
waste tank is inserted into the toilet and closes when the waste tank is removed from the toilet.
n.Valve blade / valve seal.
o.Vent plunger: for emptying the waste tank without splashing.
p.Handle.
q.Valve blade opener
r.Access door.
INTRODUCTION
The toilet is made up of two parts: a permanently fixed toilet and a waste tank that is accessible from the outside. The removable waste tank is located under the toilet and can be removed via an access door on the outside of the caravan or motor home.
PREPARING FOR USE
1.Remove the waste tank by pulling the safety catch upwards.
2.Pull the waste tank outwards to the stop. Tip it slightly and take out the tank completely.
3.Place the tank upright and turn the emptying spout upwards.
4.Remove the cap, with the measuring cup inside, from the emptying spout and pour the stated quantity of Thetford toilet fluid into the waste tank. This quickly
breaks down waste, avoids unpleasant smells in the waste tank and keeps the inside of the waste tank
clean. Add approximately 2 litres of water - enough to UK ensure that the bottom of the waste tank is covered.
Screw the measuring cap back onto the emptying spout. Turn the emptying spout back to its original position.
Warning! Never add toilet fluid via the valve blade or via the toilet bowl.
5.Slide the waste tank back into its original position via the access door.
Note! Never use force if you are having trouble getting the tank back into place easily. This may cause serious damage.
6.Make sure that the waste tank is secured with the safety catch. Shut the access door and lock it.
Point 7 only applies to models CW / CWE.
CW / CWE
7.Open the water fill door and fill the flush tank with the stated amount of Thetford Aqua Rinse. This keeps the flush water fresh and improves the flushing. Next, fill the flush water tank with clean water using a jerry can or hose.
USE
8. Turn the toilet bowl to the desired position.
- 1 -
4965_BW.qxd 12-10-2006 10:07 Pagina 2
CW
9+10 Run some water into the bowl by moving the flush handle up and down once. The toilet may be used with blade open or closed. To open the valve, pull the valve handle under the toilet bowl towards you.
Your Thetford toilet is now ready for use.
S/CS AND CWE
9a+10 Run some water into the bowl by pressing the flush button once. The toilet may be used with the blade open or closed. To open the valve, pull the valve handle under the toilet bowl towards you.
Your Thetford toilet is now ready for use.
S/CS
Note! Some vehicles are equipped with a high-pressure water pump. This can result in a powerful flush that spills over the top of the toilet bowl. In this case use the pressure reducer supplied (packed with the toilet instructions). This pressure reducer must be inserted into the water hose at the point where the toilet is connected to the central water system.
CW
11After use, open the valve blade (if it is still closed) and flush the toilet by moving the flush handle up and
UK |
down. Close the valve blade after flushing. |
S/CS AND CWE
11aAfter use, open the valve blade (if it is still closed) and flush the toilet by pressing the flush button. Close the valve blade after flushing.
Note! Do not leave water in the bowl if the toilet is not being used. This does not help to reduce unpleasant smells and only leads to flooding.
Important Warning Notice! Please do not travel with water in the flush tank of your toilet. Failure to adhere to this notice may result in water damage to your caravan or motor home.
EMPTYING
The waste tank must be emptied, at the latest, when the warning lamp is lit. It is advisable to empty the waste tank earlier. The warning lamp illuminates when the waste tank contains in excess of 15 litres. This indicates that a capacity of 2 litres is left, which will allow approximately 5 uses. Note! Do not allow the waste tank to become too full.
12Make sure that the valve blade is closed. Open the access door outside the vehicle. Pull the safety catch upwards and remove the waste tank.
13Carry the tank by the handles to a normal toilet or to a legal waste disposal site. Place the waste tank upright on the ground and turn the emptying spout upwards.
14Remove the emptying spout cap. Hold the waste tank by the upper handle nearest to the emptying spout.
Hold the rear handle with your other hand so that you can operate the vent plunger with your thumb. Keep the vent plunger pressed in to ensure the tank is emptied without splashing.
Note! The vent plunger should only be pressed once the emptying spout is pointing downwards!
After emptying, flush the tank and clean the valve blade thoroughly with water. Also, clean the valve blade with water. Slide the waste tank into the toilet and close the access door.
STORAGE S / CS
First empty the central water system. Press the flush button until the remaining water has been pumped away. Empty the waste tank. To allow the tank to dry, do not place the cap back on the emptying spout of the waste tank.
CW / CWE
Empty the flush water tank by moving the flush handle up and down (C-200 CW) or by pressing the flush button (C-200 CWE). Flush the tank until it is empty and no more water is being pumped out. Then empty the waste tank. To allow the tank to dry, do not place the cap back on the emptying spout of the waste tank. Place a sufficiently large bowl under the drain plug to catch the remaining water from the water tank and remove the drain plug.
CLEANING AND MAINTENANCE
The waste tank seal, the automatic pressure release vent seal and the cap seal must be cleaned regularly. When the toilet is being used frequently, monthly cleaning is generally sufficient. We advise cleaning the seals and valve blade with Thetford Bathroom Cleaner.
Note! Never use household cleaners (bleach, solvents or other powerful cleaning agents). These may cause permanent damage to the seals and other toilet components.
If the toilet will not be used for a long period, it is advisable to clean the seals and coat them lightly with Thetford Seal Lubricant. This will ensure that they remain in good condition (supple).
Note! Never use Vaseline or any vegetable oil. These may cause leakage.
N.B. The valve blade seal is a part of the toilet that is subject to wear. Depending on the extent and manner of servicing, after a certain period the seal will lose quality and must be replaced.
WINTER USE
You can continue to use your Thetford cassette toilet in cold weather, as long as the toilet is situated in a heated location. If not, there is a risk of freezing. In this case we advise that the toilet is drained by following the instructions under ‘Storage’.
- 2 -

4965_BW.qxd 12-10-2006 10:07 Pagina 3
For environmental reasons the use of antifreeze is not advised.
USE DURING WARM WEATHER AND AT VARYING HEIGHTS
Height differences while travelling or temperature changes are not a problem as long as the waste tank is located in the toilet. The automatic pressure release vent keeps the pressure in the tank the same as outside.
THETFORD WARRANTY
3 years. Contact a Thetford Service Center or your point of sale for more information.
CUSTOMER SERVICE
For more information on your toilet or other Thetford products and services, turn to our website at www.thetford-europe.com or call the Thetford office nearest to you (see last page for details).
LIABILITY
Thetford is not liable for loss and/or damage caused directly or indirectly by use of the toilet.
FR Notice d’utilisation
PIECES ET FONCTIONS C-200-S/CS
a.Siège et couvercle amovibles.
b.Cuvette pivotante.
c.Poignée d’ouverture et de fermeture du clapet.
d.Bouton de rinçage.
e.Indicateur de niveau du réservoir à matières; le témoin lumineux s’allume lorsque vous devez vidanger le réservoir à matières.
f.Bras orientable; permet de vidanger le réservoir à matières aisément et convenablement.
g+h.Event automatique; assure l’aération du réservoir à matières une fois celui-ci introduit dans la toilette. L’évent prévient toute surpression dans le réservoir à matières.
N.B. Sur certains modèles de toilettes, l’évent automatique est relié à un flexible de couleur noire. Ce flexible permet la ventilation du réservoir vers l’extérieur.
i.Poignée de transport.
j.Couvercle coulissant pour une hygiène optimale. S’ouvre et se referme automatiquement en introduisant ou en retirant le réservoir à matières.
k.Clapet et joint d’étanchéité du clapet.
l.Bouton-poussoir de prise d’air pour une vidange sans risque d’éclaboussure.
m. Poignée latérale: permet d’extraire et de |
FR |
|
porter la cassette. |
||
|
n.Commande d’ouverture du clapet.
o.Portillon d’accès. Fermeture à clef par l’extérieur de l’habitacle.
PIECES ET FONCTIONS C-200
CW/CWE
a.Siège et couvercle amovibles.
b.Cuvette pivotante.
c.Poignée d’ouverture et de fermeture du clapet.
d.Réservoir d’eau propre.
e.Indicateur de niveau du réservoir à matières; le témoin lumineux s’allume lorsque vous devez vidanger le réservoir à matières.
f.Poignée de rinçage
g.Alimentation électrique de l’indicateur de niveau des matières (2 piles 1.5 Volts) (C200CW).
h.Porte d’accès au réservoir d’eau fraîche: se ferme depuis l’extérieur du véhicule.
i.Bras orientable; permet de vidanger le réservoir à matières aisément et convenablement.
j+k. Event automatique; assure l’aération du réservoir à matières une fois celui-ci introduit dans la toilette. L’évent prévient toute surpression dans le réservoir à matières.
N.B. Sur certains modèles de toilettes, l’évent automatique est relié à un flexible de couleur noire. Ce flexible permet la ventilation du réservoir vers l’extérieur.
- 3 -

4965_BW.qxd 12-10-2006 10:07 Pagina 4
l.Poignée de transport.
m.Couvercle coulissant garantit une hygiène optimale. S’ouvre et se referme automatiquement en introduisant ou en retirant le réservoir à matières.
n.Clapet et joint d’étanchéité du clapet.
o.Bouton-poussoir de prise d’air pour une vidange sans risque d’éclaboussure.
p.Poignée latérale: permet d’extraire et de porter la cassette.
q.Bouton d’ouverture du clapet.
r.Portillon d’accès. Fermeture à clef par l’extérieur de l’habitacle.
INTRODUCTION
La toilette se compose de deux parties: une toilette montée de façon permanente et un réservoir à matières amovible accessible depuis l’extérieur. Le réservoir à matières se trouve sous la toilette et est accessible en ouvrant la porte aménagée dans la cloison du véhicule.
MISE EN SERVICE
1.Tirez la patte de verrouillage vers le haut.
2.Tirez le réservoir à matières droit vers l’extérieur jusqu’à la butée. Faites basculer le réservoir vers le haut et extrayez-le totalement.
3.Placez le réservoir à la verticale et tournez le bras de vidange vers le haut.
4.Dévissez le bouchon doseur du bras orientable et
FR |
versez la quantité indiquée d’additif pour toilette |
|
|
|
Thetford dans le réservoir à matières. Ce liquide |
|
accélère la décomposition des matières, permet |
|
d’éviter les odeurs désagréables et assure la propreté |
|
de la paroi intérieure du réservoir à matières. Ajoutez |
|
ensuite environ 2 litres d’eau de manière à recouvrir |
|
entièrement le fond du réservoir. Revissez ensuite le |
|
bouchon doseur sur le bras de vidange. Tournez le bras |
|
de vidange pour le replacer dans sa position initiale. |
|
Avertissement! N’ajoutez jamais d’additif sanitaire |
|
directement par le clapet du réservoir ou par la cuvette |
|
de la toilette. |
5.Replacez le réservoir à matières dans sa position initiale par le portillon.
6.Assurez –vous que la cassette est bien verrouillée par la patte de fixation. Refermez le portillon.
Attention! Si vous ne parvenez pas à replacer le réservoir, ne forcez jamais. Cela peut provoquer de graves dégâts.
Le point 7 est uniquement valable pour les modèles
CW/CWE.
CW/CWE
7.Ouvrez la trappe de remplissage d’eau claire de la toilette et ajoutez 50ml de Thetford Aqua Rinse. Aqua Rinse améliore le rinçage et l’hygiène de votre toilette. Remplissez le réservoir d’eau claire à l’aide d’un jerrycan ou d’un tuyau d’eau.
FONCTIONNEMENT
8. Faites pivoter la cuvette dans la position souhaitée.
CW
9+10Avant d’utiliser la toilette, il est conseillé de faire couler de l’eau dans la cuvette en soulevant puis en abaissant la poignée de rinçage, puis ouvrir le clapet à l’aide de la poignée d’ouverture située sous la cuvette. Vous pouvez à présent utiliser votre toilette Thetford.
S/CS et CWE
9a+10aAvant d’utiliser la toilette, il est conseillé de faire couler de l’eau dans la cuvette en appuyant sur le bouton de rinçage, puis ouvrir le clapet à l’aide de la poignée d’ouverture située sous la cuvette. Vous pouvez à présent utiliser votre toilette Thetford.
S/CS
Attention! Certains véhicules sont équipés d’une pompe à eau à haute pression. Dans ce cas, la pression peut être assez puissante pour provoquer des débordements. Veillez alors à utiliser le réducteur de pression livré (emballé avec la notice d’utilisation de la toilette). Vous devez placer ce réducteur de pression dans le tube d’arrivée d’eau à l’endroit où la toilette est raccordée au système d’alimentation centrale en eau.
CW
11.Après utilisation, ouvrez le clapet et rincez la toilette en actionnant la poignée de haut en bas. Après le rinçage, fermez le clapet.
S/CS et CWE
11aAprès utilisation, ouvrez le clapet et rincez la toilette en appuyant sur le bouton de rinçage. Après le rinçage, fermez le clapet.
Attention! Ne laissez pas d’eau dans la cuvette lorsque vous n’utilisez pas la toilette. Cela ne contribue en rien à réduire les odeurs désagréables et ne peut qu’entraîner des débordements.
VIDANGE DU RESERVOIR A MATIERES
Le réservoir à matières doit être vidé au plus tard lorsque le témoin s’allume. Nous vous conseillons de vider le réservoir à matières avant. Le témoin s’allume lorsque le réservoir à matières contient plus de 15 litres.
Dès ce moment, la capacité résiduelle est de 2 litres, ce qui revient environ à 5 utilisations.
Attention! Ne laissez pas le réservoir à matières se remplir outre mesure.
12.Veillez à fermer le clapet. Ouvrez le portillon à l’extérieur du véhicule. Tirez la patte de verrouillage vers le haut et enlevez le réservoir à matières.
13.Portez le réservoir, en le tenant par l’une des poignées, jusqu’à des toilettes classiques ou une aire de service
- 4 -
4965_BW.qxd 12-10-2006 10:07 Pagina 5
autorisée. Mettez le réservoir à matières à la verticale et tournez le bras orientable vers le haut.
14.Dévissez le bouchon du bras orientable. Prendre la cassette d’une main par la poignée la plus proche du bras orientable. Prendre de l’autre main la poignée arrière , de sorte que le bouton prise d’air puisse se commander avec le pouce. Maintenez le bouton prise d’air enfoncé pendant que vous videz le réservoir. On évite ainsi les éclaboussures.
Attention! N’appuyez sur le bouton de prise d’air qu’une fois le bras orientable dirigé vers le bas. Lorsque le réservoir est vide, rincez le soigneusement à l’eau claire. Faites coulisser la cassette dans la toilette et refermez le portillon.
STOCKAGE S/CS
Vidanger complètement le système central d’eau. Vidanger toute l’eau de rinçage en appuyant sur le bouton de rinçage. Une fois cette opération effectuée, sortez puis vidangez votre réservoir à matières. Ne replacez pas le bouchon sur le bras orientable de la cassette pour qu’elle puisse sécher plus rapidement.
CW/CWE
Vidangez le réservoir d’eau claire en levant et abaissant la poignée de chasse (C-200 CW) ou en appuyant sur le bouton de rinçage (C-200 CWE). Rincez entièrement le réservoir jusqu’à ce que toute l’eau soit évacuée. Videz ensuite le réservoir à matières. Ne replacez pas le bouchon sur le bras orientable de la cassette pour qu’elle puisse sécher plus rapidement. Pour vidanger complètement le réservoir d’eau claire, placez un récipient suffisamment grand sous le bouchon de vidange et ôtez le bouchon de vidange.
NETTOYAGE ET ENTRETIEN
Le joint de clapet du réservoir à matières, le joint de l’évent d’évacuation automatique des gaz et le joint du bouchon doivent être nettoyés régulièrement. En cas d’utilisation fréquente, un nettoyage mensuel suffit généralement.
Nous vous recommandons de nettoyer les joints et le clapet à l’aide du ‘Nettoyant Salle de Bains de Thetford’.
Attention! N’utilisez jamais de produits détergents (chlore, solvant ou autre détergent puissant). Ces produits peuvent provoquer des dégâts irrémédiables aux joints d’étanchéité et autres pièces de la toilette.
Lorsque la toilette n’est pas utilisée pendant un temps prolongé, il est conseillé de nettoyer les joints et de les enduire légèrement avec le Spray Lubrifiant de Thetford. Les joints restent alors en bon état (souples). Attention! N’utilisez jamais de vaseline ou d’huiles végétales. Ces produits peuvent provoquer des fuites.
N.B. Le joint de clapet est une pièce de votre toilette sujette à l’usure. Selon la fréquence et le mode d’entretien, il convient de remplacer les joints d’étanchéité.
UTILISATION PAR TEMPS FROID |
|
|
Si votre toilette à cassette Thetford se trouve dans un |
|
|
endroit chauffé, vous pouvez l’utiliser normalement par |
|
|
temps froid. Dans le cas contraire, elle risque de geler. |
|
|
Dans ce cas, nous vous conseillons de vider la toilette en |
|
|
suivant les instructions de la rubrique ‘Stockage’. |
|
|
L’utilisation de produits antigel n’est pas conseillée car elle |
|
|
entraîne une pollution de l’environnement. |
|
|
UTILISATION PAR TEMPS CHAUD |
|
|
ET LORS DE GRANDS ECARTS |
|
|
DE TEMPERATURE |
|
|
Les écarts d’altitude pendant le voyage ou les variations de |
|
|
température ne constituent pas un problème tant que le |
|
|
réservoir à matières est inséré dans la toilette. L’évent pour |
|
|
l’évacuation automatique des gaz maintient la pression à |
|
|
l’intérieur du réservoir au même niveau que la pression |
|
|
extérieure. |
|
|
GARANTIE THETFORD |
|
|
3 ans. Contactez un Centre de Service Agrée Thetford ou votre |
|
|
point de vente pour plus d’informations sur la garantie. |
|
|
INFORMATIONS |
|
|
FR |
||
COMPLEMENTAIRES |
||
|
||
Pour de plus amples informations sur votre toilette ou |
|
|
|
||
d’autres produits et services Thetford, consultez notre site |
|
|
Web à l’adresse www.thetford-europe.com ou appelez le |
|
|
bureau Thetford le plus proche de chez vous (voir |
|
|
coordonnées sur la dernière page). |
|
|
RESPONSABILITE |
|
|
Thetford ne peut en aucun cas être tenu responsable de la |
|
|
perte et/ou de dommages résultant directement ou |
|
|
indirectement de l’utilisation de la toilette. |
|
- 5 -
4965_BW.qxd 12-10-2006 10:07 Pagina 6
SE Bruksanvisning
SPECIFIKATIONER C-200 S/CS
a.Avtagbar sittring och lock.
b.Vridbar toalettskål.
c.Handtag som öppnar ventilbladet.
d.Spolningsknapp.
e.Nivåvisare för avfallstanken; lampan tänds när tanken bör tömmas.
f.Vridbart tömningsrör; gör tömningen av kassetten lätt
och bekväm.
g+h.Automatisk luftningsventil; luftar avfallstanken när den är inskjuten i toaletten. Detta förhindrar övertryck i avfallstanken. OBS. På somliga toaletter är en svart slang monterad på den automatiska avluftaren. Genom denna slang leds luften ut genom dörren eller genom golvet.
i.Övre bärhandtag.
j.Glidlock; öppnas och stängs automatiskt när avfallstanken skjuts in eller ut. Garanterar optimal hygien.
k.Ventilblad / ventilpackning.
l.Luftningsknapp; garanterar jämn tömning utan stänk.
m.Bärhandtag.
n.Knapp som öppnar bladventilen.
o.Servicelucka
SE |
SPECIFIKATIONER C-200 CW/CWE |
|
|
a. |
Avtagbar sittring och lock. |
|
b. |
Vridbar toalettskål. |
|
||
|
c. |
Handtag som öppnar ventilbladet. |
|
d. |
Spolvattentank. |
|
e. |
Nivåvisare: lampan tänds när avfallstanken måste |
|
|
tömmas. |
|
f. |
Spolhandtag: toaletten spolas genom att föra handtaget |
|
|
uppåt och nedåt. |
|
g. |
Strömkälla för nivåvisaren: två alkalibatterier, typ |
|
|
Penlite 1,5 V AA. |
|
h. |
Påfyllningslucka spolvattentank. |
|
i. |
Vridbart tömningsrör; gör tömningen av kassetten lätt |
|
|
och bekväm. |
|
j+k.Automatisk luftningsventil; luftar avfallstanken när den |
|
|
|
är inskjuten i toaletten. Detta förhindrar övertryck i |
|
|
fallstanken. OBS. På somliga toaletter är en svart slang |
|
|
monterad på den automatiska avluftaren. Genom denna |
|
|
slang leds luften ut genom dörren eller genom golvet. |
|
l. |
Övre bärhandtag. |
|
m. Glidlock; öppnas och stängs automatiskt när |
|
|
|
avfallstanken skjuts in eller ut. Garanterar optimal |
|
|
hygien. |
|
n. |
Ventilblad / ventilpackning. |
|
o. |
Luftningsknapp; garanterar jämn tömning utan stänk. |
|
p. |
Bärhandtag. |
|
q. |
Knapp som öppnar ventilbladet. |
|
r. |
Servicelucka |
INLEDNING
Toaletten består av två delar: en permanent monterad toalett och en lös avfallstank som kan kommas åt från utsidan. Avfallstanken sitter under toaletten och kan tas ut genom en lucka i husvagnens eller –bilens utsida.
FÖRBEREDELSER FÖR
ANVÄNDNING
1.Avlägsna avfallstanken genom att dra låsreglaget uppåt.
2.Drag tanken utåt till anslaget. Luta den något och lyft ut tanken helt.
3.Sätt ner tanken på högkant och vrid tömningsröret uppåt.
4.Öppna locket, med doseringsbägaren på insidan, på tömningsröret och tillsätt angiven mängd Thetford saneringsvätska i avfallstanken. Vätskan förekommer dålig lukt, bryter ned avfallet och håller dessutom avfallstanken ren. Tillsätt sedan ungefär 2 l vatten så att tankens botten blir täckt med vätska. Sätt på doseringslocket på pipen. Vrid tillbaka tömningsröret. Varning! Tillsät inte saneringsvätska genom ventilbladet eller genom toalettskålen.
5.Skjut tillbaka avfallstanken genom luckan till sitt ursprungliga läge.
Obs! Skjut aldrig in tanken med kraft om det inte lyckas att få den på plats. Detta kan leda till allvarlig skada.
6.Se till att avfallstanken är ordentligt spärrad med låsreglaget. Stäng serviceluckan och lås den.
Punkt 7 gäller endast för modell CW/CWE.
CW/CWE
7.Öppna spoltankens påfyllningslucka och fyll tanken med angiven mängd Thetford Aqua Rinse. Detta håller spolvattnet färskt och förbättrar spolningen. Fyll sedan med en dunk eller vattenslang spoltanken med rent vatten.
ANVÄNDNING
8. Vrid toalettskålen till önskat läge.
CW
9.+10.Fyll litet vatten i skålen genom att föra spolhandtaget uppåt och nedåt och öppna skjutspjället genom att dra handtaget under skålen mot dig. Din Thetford toalett är nu klar för bruk.
S/CS
Obs! Somliga fordon är försedda med en vattenpump med högt vattentryck. Detta kan leda till för kraftig spolning så att toalettskålen svämmar över. Använd i så fall den bifogade tryckreduktorn (förpackad tillsammans med toalettens bruksanvisning). Denna tryckreduktor ska placeras i vattenslangen på platsen där toaletten kopplas till det centrala vattensystemet.
- 6 -

4965_BW.qxd 12-10-2006 10:07 Pagina 7
CW
11.Efter bruk öppnar du reglaget (om det inte redan är öppet) och spolar toaletten genom att föra spolhandtaget uppåt och nedåt. Stäng reglaget när du har spolat.
S/CS och CWE
11aEfter bruk öppnar du reglaget (om det inte redan är öppet) och spolar toaletten genom att trycka på spolningsknappen. Stäng reglaget när du har spolat. Obs! Låt det inte stå vatten i skålen när toaletten inte används. Detta hjälper inte mot obehaglig doft och kan endast orsaka översvämning.
TÖMNING
Avfallstanken måste tömmas senast när lampan tänds. Vi rekommenderar att du tömmer tanken tidigare. Lampan tänds när avfallstanken innehåller mer än 15 liter. Från den stunden finns en restkapacitet på 2 liter, vilket överenskommer med ungefär 5 toalettbesök.
Obs! Låt inte avfallstanken bli för full.
12Se till att reglaget är ordentligt stängt. Öppna serviceluckan på fordonets utsida. Drag låsreglaget uppåt och tag ut avfallstanken.
13Transportera avfallstanken till en vanlig toalett eller till en tillåten tömningsplats. Sätt avfallstanken på sidan och vrid tömningsröret uppåt.
14Tag av locket på tömningsröret. Grip avfallstanken vid det övre bärhandtaget, som sitter närmast tömningsröret. Grip med den andra handen det bakre bärhandtaget, så att du under tömningen når luftningsknappen med tummen. Håll knappen intryckt medan du tömmer tanken.
Obs! Tryck inte på luftknappen förrän tömningsröret är riktat nedåt! Spola tanken efteråt med rent vatten. Rengör även reglaget med vatten. Skjut in avfallstanken i toaletten och stäng luckan.
FÖRVARING
S/CS
Töm först det centrala vattensystemet. Tryck på spolningsknappen tills det resterande vattnet har pumpats bort. Töm avfallstanken. Sätt inte tillbaka locket på tömningsröret. På det sättet torkar toalettsystemet ordentligt.
CW/CWE
Töm spolvattentanken genom att föra spolhandtaget uppåt och nedåt (C-200 CW) eller trycka på spolningsknappen (C-200 CWE). Spola tills tanken är tom och inget vatten mer pumpas upp. Töm sedan avfallstanken. Sätt inte tillbaka locket på tömningsröret. På det sättet torkar toalettsystemet ordentligt. Placera ett tillräckligt stort kärl under tömningstappen för att tömma ut det sista vattnet ur vattentanken. Töm spolvattentanken genom att avlägsna tappen.
RENGÖRING OCH UNDERHÅLL
Tätningarna för avfallstanken, den automatiska avluftaren och locket måste rengöras regelbundet. Vid regelbunden användning är det vanligen tillräckligt att rengöra dem 1x per månad.
Vi rekommenderar att du rengör tätningarna och bladet med Thetford Badrumsrengöring.
Obs! Använd aldrig hushållsprodukter (klor, lösningsmedel eller andra kraftiga rengöringsmedel) eftersom de kan orsaka permanenta skador på tätningen och andra delar av toaletten.
Om toaletten inte kommer att användas under längre tid bör tätningarna rengöras och behandlas lätt med olivolja. Då hålls de i god (smidig) form. Använd inte vaselin eller annan växtbaserad olja än olivolja, eftersom detta kan orsaka problem.
OBS. Bladets tätningsring är en del av toaletten som är utsatt för slitage. Beroende på hur ofta och väl den underhålls kommer funktionen efter en viss tid att försämras, tätningsringen måste då bytas ut. Tätningarna för avfallstanken, den automatiska avluftaren och locket måste rengöras regelbundet. Vid regelbunden användning är det vanligen tillräckligt att rengöra dem 1x per månad.
Vi rekommenderar att du rengör tätningarna och bladet |
SE |
|
|
med Thetford Badrumsrengöring. |
|
Obs! Använd aldrig hushållsprodukter (klor, lösningsmedel |
|
|
|
eller andra kraftiga rengöringsmedel) eftersom de kan |
|
orsaka permanenta skador på tätningen och andra delar av |
|
toaletten. |
|
Om toaletten inte kommer att användas under längre tid |
|
bör tätningarna rengöras och behandlas lätt med olivolja. |
|
Då hålls de i god (smidig) form. Använd inte vaselin eller |
|
annan växtbaserad olja än olivolja, eftersom detta kan |
|
orsaka problem. |
|
OBS. Bladets tätningsring är en del av toaletten som är |
|
utsatt för slitage. Beroende på hur ofta och väl den |
|
underhålls kommer funktionen efter en viss tid att |
|
försämras, tätningsringen måste då |
|
bytas ut. |
|
VINTERANVÄNDNING |
|
Thetford Kassettoalett kan användas vid kallt väder om den |
|
placeras i ett uppvärmt utrymme. Annars föreligger risk att |
|
den fryser. I så fall rekommenderar vi att du tömmer |
|
toaletten enligt anvisningarna under ‘Vinterförvaring’. Bruk |
|
av ett frostskyddsmedel, t.ex. ett sådant som används till |
|
bilkylare, rekommenderas ej i samband med |
|
miljöbelastning. |
|
- 7 -

4965_BW.qxd 12-10-2006 10:07 Pagina 8
STORA TEMPERATUROCH NIVÅSKILLNADER
Ändringar i höjden under körning eller temperaturändringar är inget problem så länge avfallstanken sitter i toaletten. Den automatiska avluftaren anpassar trycket i tanken till det utvändiga trycket.
THETFORD GARANTI
3 år. Ta kontakt med ett Thetford Service Center eller din lokala återförsäljare om du vill ha mer information om garantin.
MER INFORMATION
Du hittar mer information om din toalett eller andra produkter och tjänster från Thetford på vår webbplats på adressen www.thetford-europe.com eller genom att ringa närmaste Thetford-kontor (du hittar kontaktinformationen på sista sidan).
ANSVARIGHET
Thetford åtar sig inget ansvar för förlust och/eller skada till följd av toalettens användning.
ES
ES Instrucciones de manejo
COMPONENTES Y FUNCIONES DEL C-200 S/CS
a.Asiento y tapa desmontables.
b.Taza de inodoro giratoria.
c.Palanca para abrir la compuerta de cierre.
d.Botón de lavado.
e.Indicador de nivel del depósito de residuos;
la lamparilla se enciende cuando haya que vaciar el depósito de residuos.
f.Embudo giratorio; permite vaciar el depósito de residuos de una forma cómoda e higiénica.
g+h. Aireación automática; airea el depósito de residuos cuando está introducido en el inodoro de casete. Evita un exceso de presión en el depósito de residuos. Nota: En algunos inodoros una manguera negra está conectada con el botón de aireación automática. Por esta manguera el aire sale al exterior a través de la pequeña puerta o a través del suelo.
i.Asidero superior.
j.Tapadera; garantiza una higiene óptima. Se abre al introducir el depósito de residuos en el inodoro y se cierra al quitar el depósito de residuos del inodoro.
k.Compuerta de cierre / goma de cierre.
l.Émbolo de ventilación; para vaciar el depósito de residuos in salpicar.
m.Tirador.
n.Botón para abrir la compuerta de cierre.
o.Puerta de acceso
COMPONENTES Y FUNCIONES DEL C-200 CW/CWE
a.Asiento y tapa desmontables.
b.Taza de inodoro giratoria.
c.Palanca para abrir la compuerta de cierre.
d.Depósito de agua de lavado.
e.Indicador de nivel: la lamparilla se enciende cuando haya que vaciar el depósito de residuos.
f.Palanca de lavado: moviendo la palanca hacia arriba y hacia abajo se lava el inodoro.
g.Toma de corriente para el indicador de nivel: dos baterías del tipo Penlite 1,5 V AA alcalina.
h.Trampilla para el llenado del depósito de agua de lavado.
i.Embudo giratorio; permite vaciar el depósito de residuos de una forma cómoda e higiénica.
j+k. Aireación automática; airea el depósito de residuos cuando está introducido en el inodoro de casete. Evita un exceso de presión en el depósito de residuos. Nota: En algunos inodoros una manguera negra está conectada con el botón de aireación automática. Por esta manguera el aire sale al exterior a través de la pequeña puerta o a través del suelo.
l.Asidero superior.
m.Tapadera; garantiza una higiene óptima. Se abre al
- 8 -
4965_BW.qxd 12-10-2006 10:07 Pagina 9
introducir el depósito de residuos en el inodoro y se cierra al quitar el depósito de residuos del inodoro.
n.Compuerta de cierre / goma de cierre.
o.Émbolo de ventilación; para vaciar el depósito de residuos in salpicar.
p.Tirador.
q.Botón para abrir la compuerta de cierre.
r.Puerta de acceso.
INTRODUCCIÓN
El inodoro está compuesto de dos partes: un inodoro fijo montado y un depósito de residuos desmontable y accesible desde el exterior. El depósito de residuos desmontable se encuentra debajo del inodoro y puede ser retirado a través de una pequeña puerta en la parte exterior de la autocaravana o el tráiler.
PREPARACIÓN PARA EL USO
1.Retire el depósito de residuos tirando del perno de sujeción hacia arriba.
2.Saque el de depósito de residuos hacia fuera contra el tope. Ladeándolo ligeramente, puede retirar el depósito completamente.
3.Coloque el depósito en posición vertical y gire el embudo hacia arriba.
4.Gire el tapón del embudo con el vaso dosificador en el interior y vierta la cantidad indicada de líquido para inodoros Thetford en el depósito de residuos. Este líquido aligera la descomposición de los residuos, evita olores desagradables en el depósito de residuos y mantiene el interior del depósito de residuos limpio. A continuación, añada aproximadamente 2 litros de agua, de forma que el fondo del depósito de residuos quede completamente cubierto. Enrosque el vaso dosificador nuevamente sobre el embudo. Vuelva a girar el embudo hasta su posición inicial.
¡Advertencia! No debe nunca añadir líquido para inodoros a través de la válvula de cierre o la taza del inodoro.
5.A través de la pequeña puerta de acceso, vuelva a colocar el depósito de residuos en su posición inicial. ¡Cuidado! No intente nunca forzar la entrada del depósito de residuos cuando no consigue colocarlo en su sitio. Puede causar daños graves.
6.Asegúrese de que el depósito de residuos quede bloqueado con el perno de sujeción. Cierre la puerta de acceso con llave.
El punto 7 sólo es aplicable a la versión CW/CWE.
CW/CWE
7.Abra la trampilla de llenado del depósito de agua de lavado y llene el depósito de agua de lavado con la cantidad de líquido Thetford Aqua Rinse indicada para el depósito de agua. Este líquido mantiene fresca el agua de lavado y mejora el lavado. A continuación, llene el depósito de agua de lavado con agua limpia, utilizando un bidón o una manguera.
MANEJO
8. Gire la taza del inodoro en la posición deseada.
CW
9.+10.Introduzca una pequeña cantidad de agua en la taza moviendo la palanca de lavado hacia arriba y hacia abajo o abra la compuerta tirando de la palanca de la compuerta debajo de la taza del inodoro. Ahora ya puede utilizar su inodoro Thetford.
S/CS y CWE
9a.+10.Introduzca una pequeña cantidad de agua en la taza oprimiendo el botón de lavado o abra la compuerta tirando de la palanca de la compuerta debajo de la taza del inodoro. Ahora ya puede utilizar su inodoro Thetford.
S/CS
¡Cuidado! Algunos vehículos están dotados de una bomba de agua con una elevada presión del agua. Esta presión puede provocar un lavado demasiado vigoroso causando un derrame del agua por encima de la taza del inodoro. En estos casos debe utilizar el reductor de presión suministrado con el equipo (envasado junto con las instrucciones de uso del inodoro). Este reductor de presión debe ser introducido en la manguera de agua en el punto de conexión del inodoro con el sistema central de
agua.
ES
CW
11.Después de usarlo, abra la compuerta de cierre (si aún está cerrada) y lave el inodoro moviendo la palanca de lavado hacia arriba y hacia abajo. Después del lavado, cierre la compuerta de cierre.
S/CS y CWE
11a.Después de usarlo, abra la compuerta de cierre (si aún está cerrada) y lave el inodoro oprimiendo el botón de lavado. Después del lavado, cierre la compuerta de cierre.
¡Cuidado! No deje agua en la taza si no usa el inodoro. No favorece la eliminación de olores desagradables y sólo puede provocar la salida del agua.
VACIADO
El depósito de residuos debe vaciarse a más tardar cuando se enciende la lamparilla. Se recomienda vaciar el depósito de residuos antes. La lamparilla se enciende cuando el depósito de residuos tiene más de 15 litros. A partir de este momento, queda una capacidad restante de 2 litros, equivalente a ± 5 usos.
¡Cuidado! No deje que el depósito de residuos se llene demasiado.
12.Asegúrese de que la válvula de cierre esté cerrada. Abra la puerta de acceso en el exterior del vehículo. Oprima el perno de sujeción hacia abajo y retire el depósito de residuos.
- 9 -
 Loading...