

Page 1

DW1 455 FI
9placesettings
10 place settings
half-load function
Page 2

Dear Custom er ,
Pleasecarefully readthismanualbeforeusing t he
dishwasher,it will help you t o use and maintain the
dishw ash er pro pe rly.
Keepit torefertoit at a laterdate.
Passit on to anysubsequent owner of theappliance.
This manua l contain s sec ti ons on safety Instruct ion s,
OperatingInstructions, Installation Instructions and
Troubles hooti ng Tips, etc.
ControlPanel...................................................3
Dishwasher Features.................................... ...3
A WaterSoft ener.......... ..... ...... ....... .. ...... ..... ..4、
B LoadingtheSaltintothe Softener.................5、
C Fill the R i nse Aid Dispen s er.... ...... . .. .... .. ... ...5、
D Funct i on of Dete rg ent .... . .. .. .. ......... ... .. . .. ... .. 6
、
Attenti on b ef ore or afte r loading the Dish was her
Baskets..........................................................9
Loadi n g t he upper ...... ... ... . ... ... ... ... ... .. . 10Basket
LoadingtheLower ...............................10Basket
Toreview the sect ion o n t roublesho oting Tip s
will helpyou t osolve some common problems
byyourself .
Ifyou cannot solve the problems b y yo urself ,
please ask for the help o f professional technicians.
The man ufacturer,follow ing apolicy ofcon stant
developmentand updating of the product,may
make modifi cations w itho ut gi ving priornotice.
This usermanualshall alsobegotfrom the
manufacturer or responsible vendor.
WashCycle Table...........................................11
Turning on th e Appliance . ... ..... . ... ..... .. . ...... . .. ..11
ChangetheProgramme.............. ................12....
At the end of theWashCycle...........................12
Filtering System.............................................13
Carin g for the Dishw as he r.... . .... . . ... .. ... . . ... ... . .. 14.
..................................15Install atio n p rep arat ion
...16Ae s t h e tic pan e l 's dimensio ns a nd i nstallati o n
..............18Tensionad justm ent oft he door sp ring
..............................18Connectionofdrain hoses
......................... 19Dis hwasher in stall a tion steps
AboutElectricity Connecting...........................20
ColdWaterC onnection.................................. 21
Beforecallingf or service........................... .....23.
Errorcodes.................................... ..............24.
Technicalinformation.............................. .... .25..
Page 3

When using your dish washer,
follow the precautions listed be low:
Thisappliance is intendedto beused inhousehold
andsimilarapplications such as:
-staff kitchen areas insho ps, offices and other
worki ng environm ents;
-farm houses;
-byclientsinhotels, motelsand otherresidentialtype
environments;
-bedand breakfasttypeenvironments.
Thisappliance can be used by childrenaged from 8
yearsand aboveand personswith reduced physical,
sensory or me ntal capa bilities or lack of experie nce
andknowledgeif they have beengiven supervision
or instruction concerning use of theapplianceina
safe way and understandthe hazards involved.
Children shall not playwith theappliance. Cleaning
anduser maintenance shall notbe made by children
withoutsupervision. ForEN60335-1
()
This a ppliance is not intend ed for use by p ersons
(including children)withreducedphysical,sensory
or me nta l c apa bi li ti es , or la ck o f e xp er ie nc e and
knowled ge ,unles sthey h ave been given s upervisio n
or instruction concerning use of theapplianceby a
personresponsiblefor their safety. ForIEC60335-1
()
Thisapplianceis for indooruse only,for household
useonly.
To pr otec t agai nst th e risk of ele ctrical sho ck, do no t
immerse the unit,cordorplug in waterorother liquid.
Pleaseunplugbefore cleaningand maintenancethe
appliance.
Use a soft clothmoistenwith mild soap, and thenu se
adryclothtowipeitagain.
Page 4

This appliance must be earthed. In the event of a
malfunction or breakdown, earthing will reduce the risk
of anelectric shock by providing a path of least
resistance of electric current. This appliance is equipped
with a cord having an equipment-earthing conductor
and a grounding plug.
The plug must be plugged into an appropriate outlet that
is installed and earthed in accordance with all local
codes and ordinances.
Improper connection of the equipment-earthing
conductor can result in the risk of an electric shock.
Check with a qualified electrician or service
representative if you are in doubt whether the appliance
is properly grounded.
Do not modify the plug provided with the appliance;
If it does not fit the outlet.
Have a proper outlet installed by a qualified electrician.
Do not abuse, sit on, or stand on the door or dish rack of
the dishwasher.
Do not operate your dishwasher unless all enclosure
panels are properly in place.
Open the door very carefully if the dishwasher is
operating, there is a risk of water squirting out.
Do not place any heavy objects on or stand on the door
when it is open. The appliance could tip forward.
When loading items to be washed:
1) Locate sharp items so that they are not likely to
damage the door seal;
Page 5

2) Warning: Knives and other utensils with sharp points
must be loaded in the basket with their points down or
placed in a horizontal position.
Check that the detergent powder is empty after
completion of the wash cycle.
Do not wash plastic items unless they are marked
dishwasher safe or the equivalent.
For plastic items n
ot so marked,
check the manufacturer's
recommendations.
Use only detergent and rinse additives designed for
an automatic dishwasher.
Never use soap, laundry detergent, or hand washing
detergent in your dishwasher.
Children should be supervised to ensure that they do not
play with the appliance.
The door should not be left open, since this could increase
the risk of tripping.
If the supply cord is damaged, it must be replaced by the
manufacturer or its service agent or a similarly qualified
person in order to avoid a hazard.
During installation, the power supply must not be
excessively or dangerously bent or flattened.
Do not tamper with controls.
The appliance is to be connected to the water mains using
new hose sets and that old hose-sets should not be reused.
The maximum number of place settings to be washed
is 12.
The maximum permissible inlet water pressure is 1MPa.
The minimum permissible inlet water pressure is 0.04 MPa.
Page 6

Dispose of the dishwasher packaging material
correctly.
All packagingmaterialscan be recycled.
Plasticparts aremarkedwith the standard
international abbreviations:
PE forpolyethylene,e.g.sheet wrapping material
PS for pol ystyrene, e.g. p adding materi al
POM polyo xymethylene, e.g . plasti c clips
PP poly propyl ene, e.g. Salt fill er
ABS AcrylonitrileButadiene Styrene,e.g. Control
Panel.
Packag ing mate rial could be d ange rous for c hildren!
Fordisposing ofpackageand theapplianceplease
go to a r ecyclin gcent re.T heref ore cut off t he pow er
supply cable a nd make the d oor closi ng devi ce
unusab le.
Cardboard packagingis manufactured from recycled
paper a nd should be disposed in th ew aste paper
collecti on for rec ycling.
Byensuringthisproductis disposed ofcorrectly, you
willhelp preventpotentialnegative consequences
forthe environmentandhuman health, whichcould
otherw ise be ca used by ina ppropr iate wast e handli ng
of thi s pr oduct.
Formore detailedinformation aboutrecyclingof this
produc t, pl ease co ntact yo ur lo cal c ity offic eand yo ur
househ old waste di sposal s ervice.
DISPOSAL: Do not disposethis productas unsorted
municipal waste. C ollectionof such waste separately
forspecialtreatmentis necessary.
Page 7

Fordetailedoperating method readthe correspondingcontenton the instructionmanual.
Switch on the appliance Open the door,press the On/Off button to switch on the appliance .
Witheachwashcycle.
Fill the detergent dispenser
Compartment
For programmes with pre-wash only.
(Follow the user instructions!)
C
B
A
Check the rinse aid level
Checkthe regeneration
salt level
Load the baskets
Select a programme
Running the dishwasher
Changing the programme
Electric indicator on controlpanel(ifprovided).
(On models with water softener system only.)
Electric indicator on control panel (if provided).
If there is no salt warning light in the control panel
(for some models), you can estimate when to fill the salt into
the softener by the number of cycles the dishwasher has run.
Scrapeoff any large amountof leftover food. Softenremnantsofburnt foodinpans,
thenload thebaskets.Refer to thedishwasher loadinginstructions.
Press the Programme Button until the selected programme lights up.
( See the section entitled Operationinstruction )“”
Turnonthewatertap,closethedoor.Themachinewillstartworkingafterabout10seconds.
1.A running cycle canonlybe modified ifit has been running for a short time. Otherwise thedetergent
may have already been released and the water already drained. If this is the case, the detergent
dispensermust be refilled.
2. Press the for more than3 secondstocancel the running programme.
3. Select a new programme.
4. Restart the dishwasher.
Programme Button
Add forgottendishesin the
dishwasher.
If the appliance is switched
off during a wash cycle.
Switch off the appliance
Turn off the water tap,
unload the baskets
1.Open the door a little to stop the dishwasher.
2.After the spray arms stop working, you can open the door completely.
3.Add the forgotten dishes.
4.Close the door, the dishwasher will start running again after 10 seconds.
If the appliance is switched off during a wash cycle, when switched
on again, please re-select the washing cycle and operate the dishwasher
according to the original Power-on state ).
When the working cycle has finished, the buzzer of the
dishwasher will sound 8 times, then stop.
Turn off the appliance using the On/Off Button.
Warning: wait a few minutes (about 15 minutes) before unloading the dishwasher to avoid handling
the dishes and utensils while they are still hot and more susceptible to break.
They will a lso dry better.Unload the appliance,startingfrom the lower basket.
Open the do or carefull y.
Hotsteam may escape
when thedoor is opened!
2
Page 8

Toget the best performance fr omyour di shwasher,read alloperatinginstructions
beforeusing itfor the first time.
1.Power indicator: Toshow wh en t he p ower on.
2.Salt and r inse aid warning lights:To sh ow
whenthesalt container o rdispenserneedtobe
refilled
3.Del ay indica tors : t o show the d el ay time
(3h/6h/9h/)
4.Haft loa d indi cator : To show when you select the
haft load functi on .
5.Prog ram indicato rs: to s how which program
you have chose;
Front view
Front view
1
6.Half load functio ns B utto n:Toselect Half load
functions. (W ith this Hal f load functio n yo u ca n
only useit w hen youhave onlyabout or le ss t han
5place setting dish wave, and youwill see less
waterandenergy consumption , can onlybeused
with Intensive, Norma l, ECO , Glass a n d 1 Hour .)
7.Delay Button : ToPress t he button todelay.
8.ProgramButton:ToPress thebutton toselect a
wash Pr ogram.
9.On/OffB utton:To turn on/off the power supply.
Back View
Back View
2
3
4
5
6
Cupshelf
1
2
Innerpipe
3
Lower baske t
4
Salt cont ainer
5
Dispenser
6
8
7
9
10
Cutlery rack
7
Spra y arm s
8
Filter assembly
9
3
Inlet pipe connecto r
10
DrainpipeUpperbasket
11
11
Page 9

Before using your di shwasher for the first time :
A. Set th e water softener
B. Add 1.5Kg di shwasher salt and then ful l fillthe salt con tainer withwater
C. Filltherinseaiddispenser
D. Fill i n de t e r gent
The wat er soften er must be setmanu ally, using th e w ater hardness di al.
The wat er soften er isdesigned to remove minerals andsalts from t hewater, wh ich w ould have
a detrimenta l o r adverse effect onthe op eration of the appliance.
The higher the conte nt o f these minerals and sal ts, thehar der your water i s.
The softener should beadjusted according to the ha rdness ofthe water in your area.Your lo cal Water Author ity
can advise y ouon the hardnessof thewater inyourarea.
Adjusting Salt Consumption
The dishwas her isdesigned to all ow foradjustment in the amount ofsa lt co nsumed based o n the hardness of
the waterused.Thisisintended to optimise andcustomisethe levelof saltconsumption.
Pleasefollowthestepsbelow for adjustmentin saltconsumption.
1. Open the d oor , Switch on the appliance;
2. Press the Program butto n for more than 5 s econd s to start the water softener
set m odel within 60seconds af ter theappliance was sw itched on(The S alt a nd
Rinse aidwarningl ights will be onperio dically when it get in the se t m odel );
3. Press the Program butto n to select the proper set acc ording toyour local envi ronment,
the s ets w ill change in the f ollowing sequence: H1->H2->H3->H4- >H5->H6;
4. Press the Powerbutton to e nd theset u p model.
WATER H A RD N ESS
dH
0~5
6-11
12-17
18-22
23-34
35-55
dH=1.25Clarke=1.78fH=0.178mmol/l
1
fH
0~9 0~0.94 0
10-20
21-30
31-40 22-28 3.1-4.0
41-60
61-98 43-69 6.1-9.8
Clarke
0~6
7-14
15-21
29-42
mmol/l
1.0-2.0 9
2.1-3 .0 12
4.1-6 .0 30
Selector Position
H1( Ra pid )
H2(1 Hour)
H3(1Hour Rapid )、
H4(G lass)
H5(Glass Rapid)、
H6(G lass 1Hour)、
Salt cons um pt ion
(gram/cycle)
20
60
DH: Germ a n deg ree
fH: French degree
Clark: Britishdegree
The manufactory s etting: H4 (E N 50 242)
Contact yo ur local water board for information on the hardness of your w ater supply.
If yourm odel doesn ot have anyw ater softener,you may skip this section.
WATER SOFTENER
Thehar dness o f the water v aries f rom place to place. If hard water is us ed i n the dishwasher, de posits w ill
form on the dish es and utensils.
Theapplian ce i s eq uipped with a sp ecial softener thatuses asalt container spe cifically designed to eliminate
lime a nd minera ls from the wate r.
4
Page 10

Always u se thesalt intended f or u se with dishw asher.
The sa lt c ontain er i s l ocated beneath the lower basket andshould be fill ed a s e xplaine d
inthe following:
Attention!
Only use salt spe cifically designed f or t he usein di shwashers! Every ot her t ype of
salt no t specificallyde signed for the u se in a d ishwas her, especial ly tab le salt, will
damage t he w ater softener.In caseof d amages caused bythe useof unsuitable
salt the manufacturer does notgive anywarranty nor isliable for any damages cau sed.
Only f ill wi th sal t justbefore starting one of thecomplete washing p rograms.
This willprevent anygrains of s alt orsalty water,which may have been spi lled,
remaining on the bottom of the m achine for any period of time, which m ay cau se
corrosion.
A After the l ower basket has been removed, unscrew and remov e the cap from the salt container.
B Pl ace theend of the funnel ( supp lied) into t he hole and introdu ce abou t 1.5kg o f di s hwasher salt.
Full f ill the salt container with water,It is normal f or a small amount o f water to come outof thesalt container.
C
D After filling the cont ainer , screw the c ap t igh tly back clo ckwise.
E The saltwarninglight willstop being afterthesaltcontainer has beenfilled withsalt.
F Immediately aft er f il ling t he salt into the salt co ntain er, a w ashing program should be start ed
program O therwise the fi lt er sy stem, pump o r other im portant parts ofthe machine maybe damaged
bysalty water. This is outofwarranty.
1.The sal t container mustonly be refil led when the salt warning light in the control panel comes on.Depen ding on
how well the s alt d isso lves, th e saltwarning light may still be on e ven t hough the salt container isfilled.
If there is no salt w arning lightin thecon trol panel (for so me M ode ls),you c an e stimate whento fill
the salt into thesoftener by the cycles t hat t he dishwasher ha s run.
2. If thereare spills of the salt, a soak or a rapid program should be run to remove the excessive sa lt.
3. If the mach ine nee ds to be dumped for the reas ons of transi t, repa ir and so on, please use the bibulous cloth or
analog to blot upthe wa ter inthe salt container, an ds crew thecap t ightly,afterward, transit orrepair the mach ine.
After t ransiting orrepa iring t he machine and confirming it in order,load thesalt into the softener according to the
process of B. Loading the salt into the Softener . O ther wise, it could be mak e thebig damage to the machi ne,
for exa mple, ru stiness, conk and so on. Such problems are out of t he guarantee range.
).
“”
(Wesuggesttousea short
RinseAid Dispenser
The r inse aid isrelea se d d uring the final ri nse to prevent water fro m forming droplets on y o ur dishes, which can
leave spots and st reaks. Italso improvesdrying by allowing water t oroll offthe dishes. Your dishwasher i s
designedtouseliquidrinse aids.Therinse aid dispenser islocated insidethedoornext to thedetergentdispenser.
To fil l the di spens er, ope n the c ap and pourthe rinse aid into th e dispenser until the l e vel i n dicator turn s completel y
black. The volume of the rinse aidcont ainer is about 110ml.
Function of Rinse Aid
Rinse aid is aut oma tically added d uring the l ast rinse, ensuring thorough rinsing, and spot and st reak f ree drying.
Attention!
Only usebranded rinse aid for dishwasher.Neverfillthe rinseaiddispenser withany o ther substances
(e.g. Dishwasher cleaning agent, liq uid detergent). This woulddamage the app lian ce.
5
Page 11
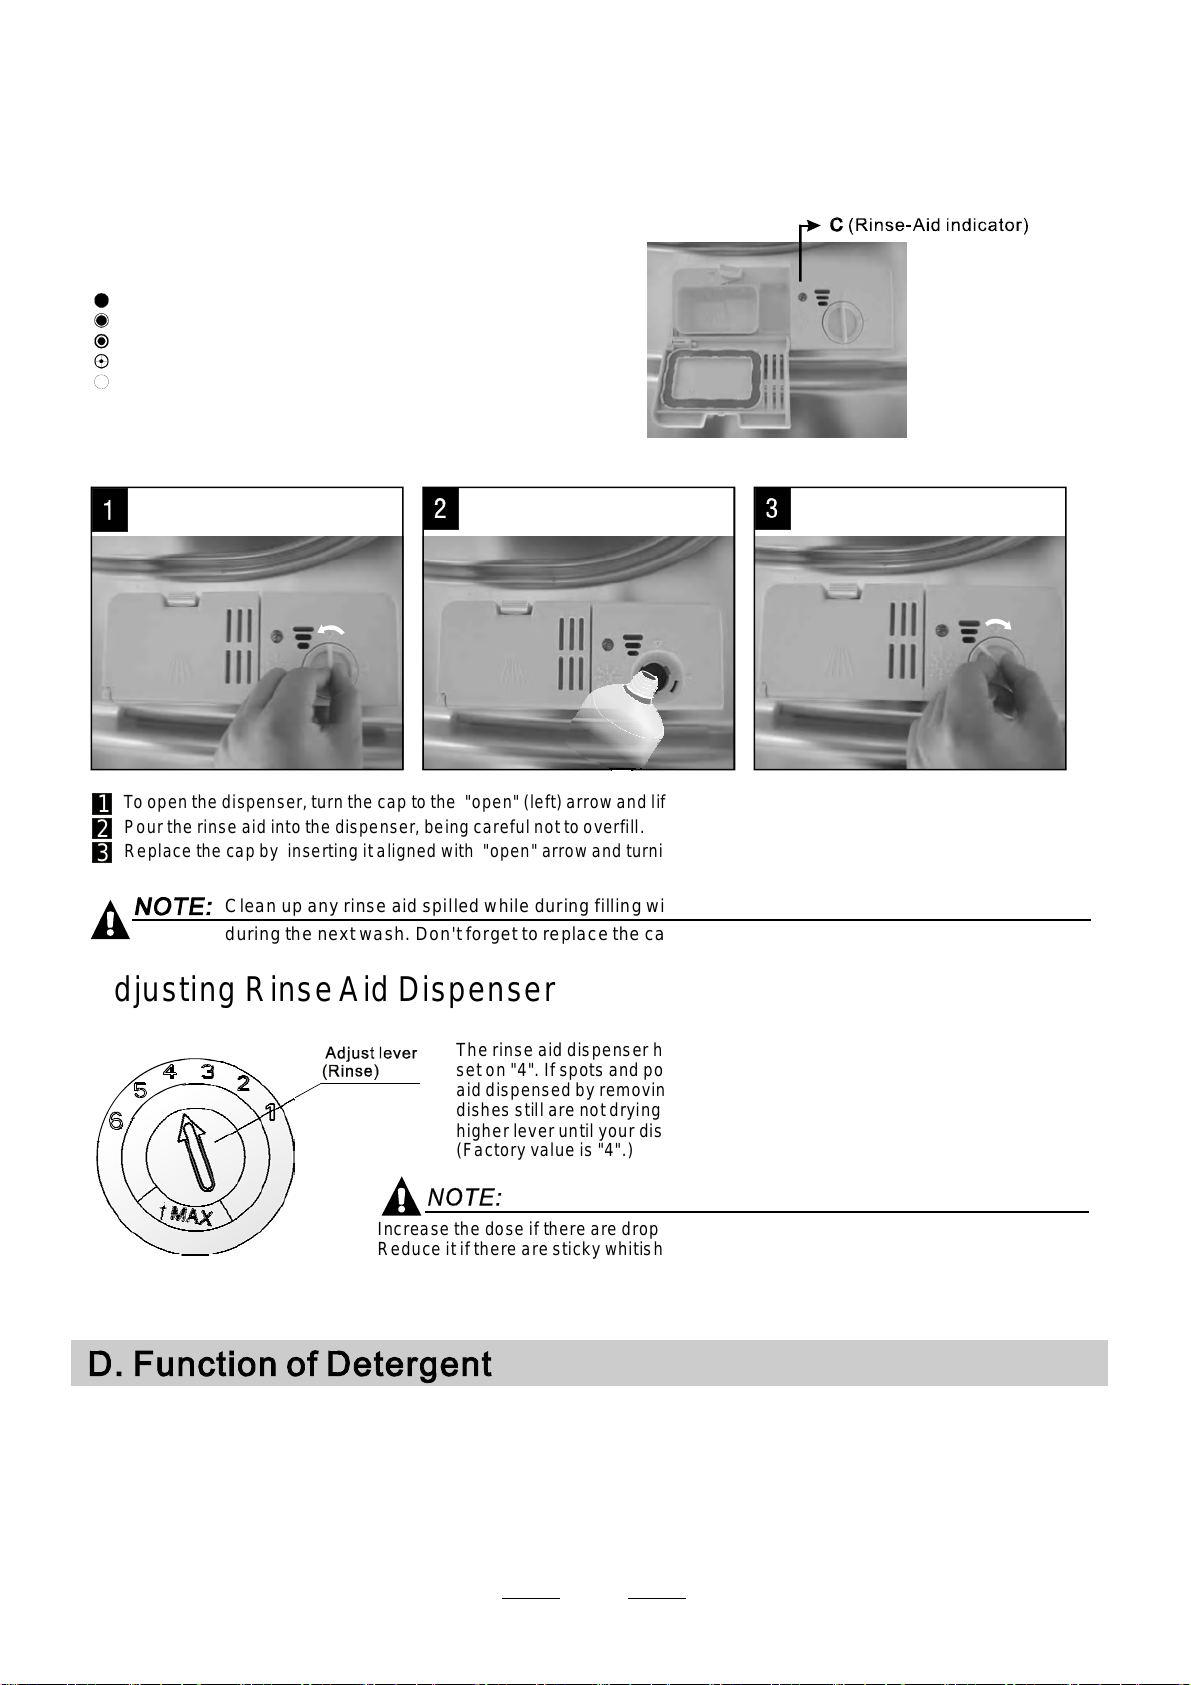
WhentoRefilltheRinseAidDispenser
Ifther eis no rins e-aid warning ligh t inthe c ontrol panel, you can estimate the amount f rom thecolour
ofthe optical l evel indicator C located next to the cap. When th e rinse-aid c ontainer isfull, the wh ole
indicator will be d ark .As the rinse-aid di minishes, thesize of the dark dot decreases. You should never let
the ri nse aid l ev el fall 1 / 4 ful l.
Asthe rinse aid diminishes, the siz e o f theblack do t
onthe rinseaid level indicatorchanges,asillustrated below.
Full
3/4full
1/2full
1/4 full-Should refill to eliminatespotting
Empty
""
To op en the d i spenser, t urn the cap to the " ope n" (left) arrow an d lift i t out.
1
Pour the ri nse aid into th e dispenser, being careful not t o o ver fill .
2
Replace the cap b y in serting italigned with "open" arrow and turning it to t he closed (right) arrow.
3
Cl ean up any rinse ai d sp i ll ed w hi le durin g filli ng with an abs o rbe nt c l oth to av oi d ex cessi v e foaming
during the next wash.
Don't for get t o replace the cap be fore you close dishwasher d oor.
Adjusti ng R inseAid Disp enser
The ri nse aid dispe nser has six or four settings. Alw ays start wi th t he d ispens er
set o n "4". If spots and poor dr ying are a p roble m, i ncrease the amoun t o f r inse
aid d ispensed b y removing thedispe nser l id and rotatin g t he d ial to "5". If t he
dishes s till are not drying properlyo r ar e showspots, adjust th e dial to thenext
higher lever until your dishesare spot-free. Therecommend ed setting is "4".
(Factoryvalueis "4".)
Increase the doseifthere aredrops of water o rlime spots on t hedishesafterwashing.
Reduce i tiftherearestickywhitish stainson yourdisheso ra bluishfilm onglassware or
knifeblades.
Detergents with its chemic al ingredients are necess ary t o remove dirt,crus h dir t and trans port itou t of the di shw asher.
Mosto f the commercial qu ality d etergentsare suitableforthispurpose.
Attention!
ProperUseof Detergent
Useonly detergent s pecifical ly m ade for the usein dishwashers. Keep your detergent f resh and dry.
Don't putpowdered detergent intothe dispenseruntilyou'reready to washdishes.
6
Page 12
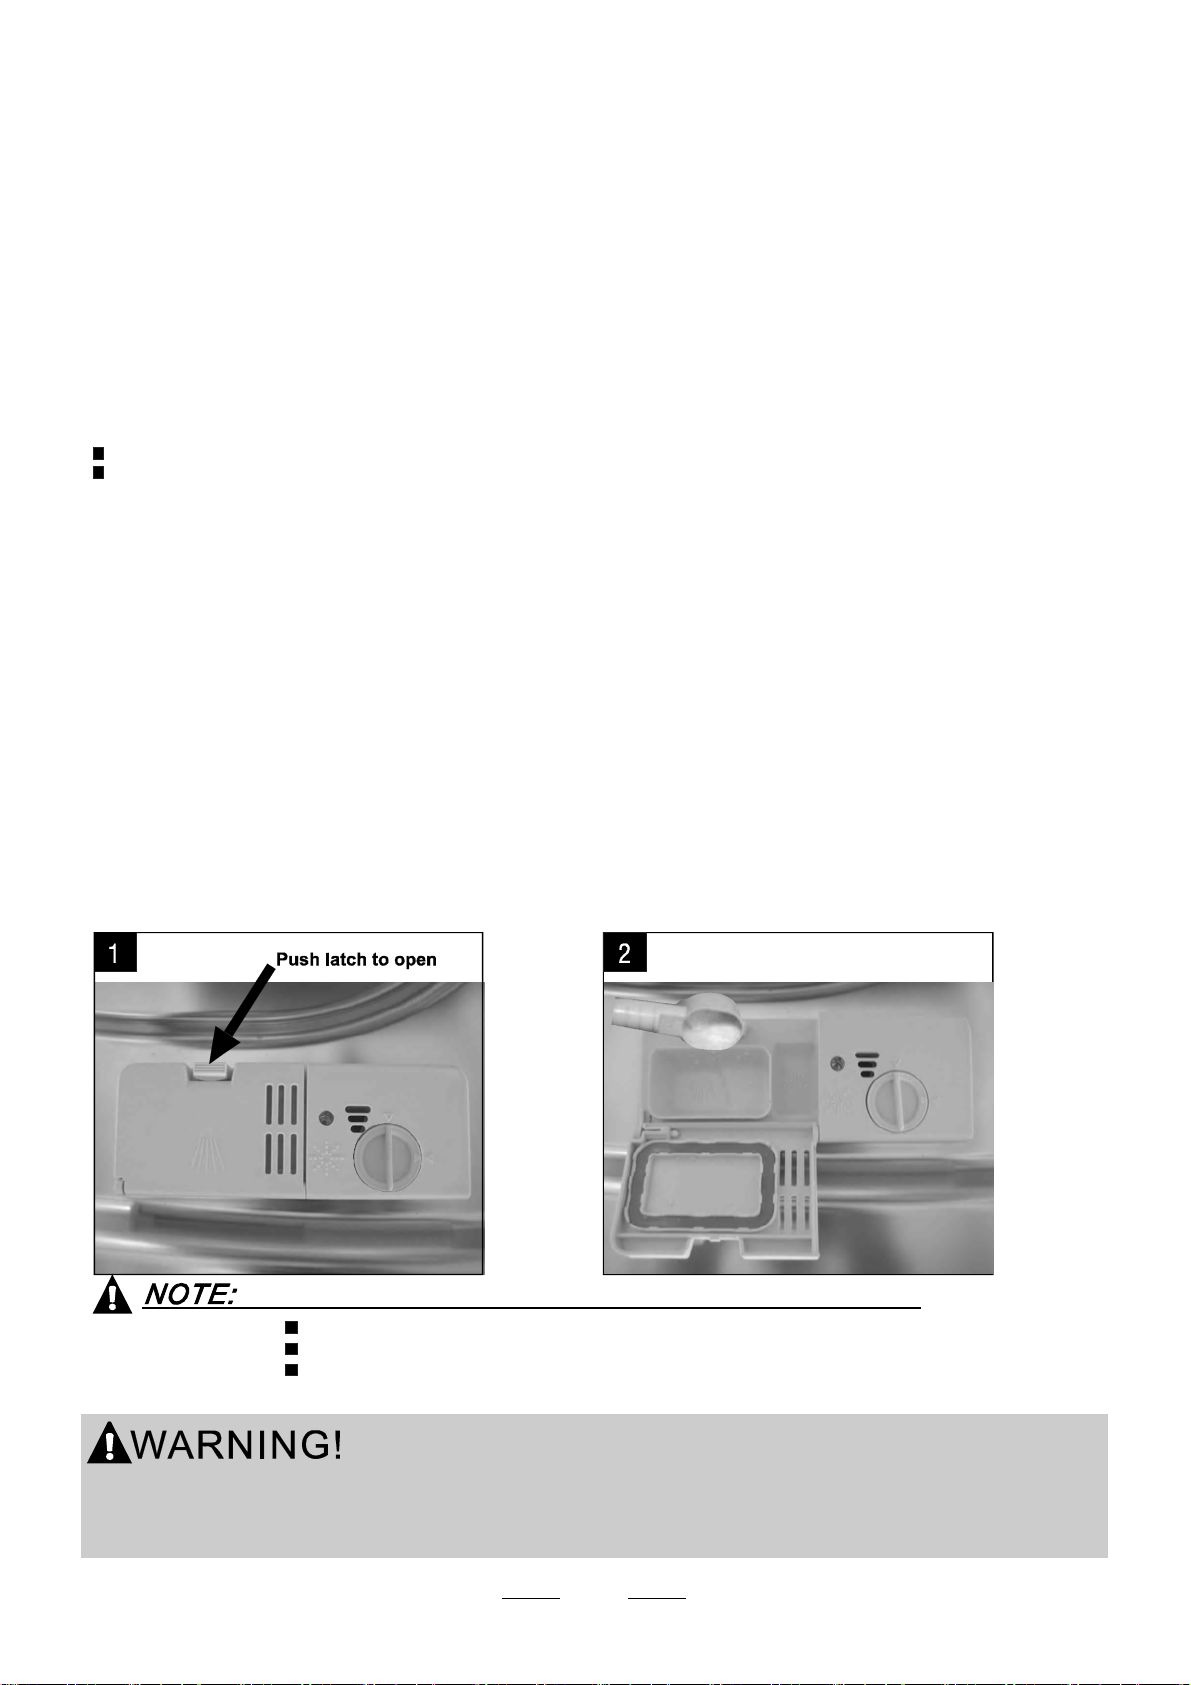
Deterg ents
The re ar e 3 sor ts of det e rgent s
1.Withphosphateandwith ch lorine
2.Withphosphate andwithout chlorine
3.Withoutphosphate and without chlorine
Normally new pulverised detergent is without phosphate. T hus thewater so ftener function o f
phosph ate is no t give n. In th i s c ase we recommen d to fi l l s a lt i n the sa lt conta in er ev en w he n
the hardness of wate r is only 6 d H. I f detergents w ithout ph osphate are usedin the case of hard wat er
often whi te s pots appear on d ishe s an d gl asses. I n this case please add more detergent toreach
better resul ts . De t e r gents without chlorine do only ble ach a lit tle. Strong an d co l o u red s p o t s w i ll not
beremoved completely.In th is c a se p lease c hoos ea program with a hi gher temperature.
°
Concentr ated Deterge nt
Basedontheir chemicalcomposition,detergentscan be splitintwobasictypes:
conventional,alkaline detergents w ith caustic components
lo w alkal i ne co nc ent r at ed d et er ge nts with nat ura l enzymes
DetergentTablets
Detergenttablets ofdifferentbrands dissolve at different speeds.For thisreasonsome
detergent ta blets ca nnot dissolve anddevelop theirfull cleaning po wer duringshort
programs. There fore please use long programs wh en u sing d eterg ent t ablets, to
ens ure the c om pl ete remov a l of de t erg e n t re si du al s.
Detergent Dispenser
The dispens er m ust b e re filled before the start of each washcycle f ollowing the i nstructions
provided in the w ash cycletable . Your dishwasher uses less detergent andrinse aidthan
Conventionaldishwasher. Generally, only one tablespoonofdetergent is needed for
anormal washload. More heavilysoiled it ems needmore detergent. Always addthe
detergen t just before starting the dishwas her, otherwise it could ge t damp a nd will not
dissol v e pro pe r ly.
Amountof Detergentto Use
If the lid is closed: pr ess release button. T he lid wi ll sp ring open.
Always add the dete rgent justbefore starting ea ch wash cycle.
Only use branded detergentaid for dishwasher.
Dishwasherdetergent is corrosive!
Take care tokeep it out of reachof children.
7
Page 13
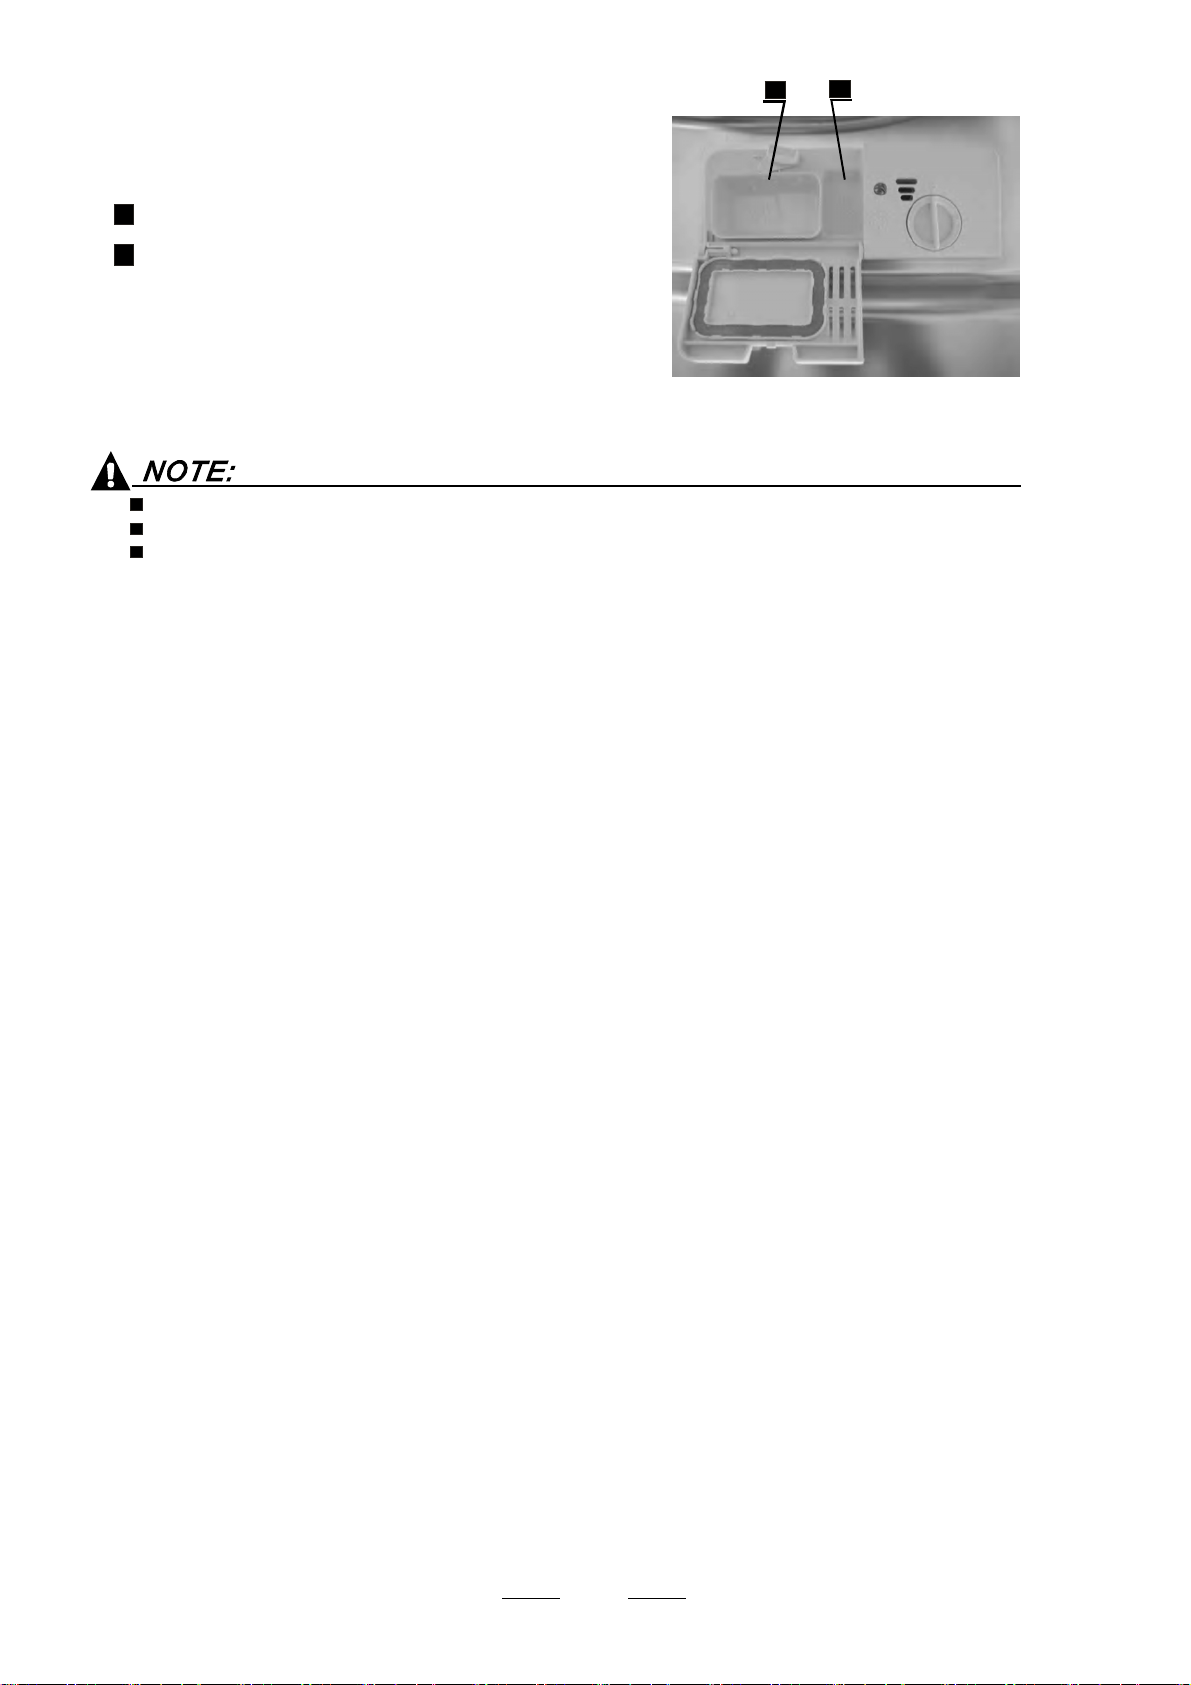
A
B
Fillin Detergent
Fillthe detergent dispenser w ith d etergent.
The marking ind icates the dos ing le vels , as
illus t ra ted o n the right:
The pla ce o f main wash cyc le dete rgent placed.
A
The pla ce o f pr e-wash c ycle detergent place d.
B
Pleaseo bserve th e m anufactur ers do sing andstorage
Recommendationsas stated onthedetergent packaging.
Closethelid and press untilit locks in place.
If the dish es a r e heav i ly soil ed , place an ad dit i ona l
detergent dosein the pre-wash detergent chamber.This d etergent will takeeffect durin g the pre-wash phase.
Youf ind information ab out the amo unt o f de tergent for th e si ngle programme onthe last page.
Please a ware, that accordingto t he level soi ling and the specific hardnessof water d ifference sare possible.
Please observe themanufacturer'srecommendationsonthedetergent packaging.
8
Page 14
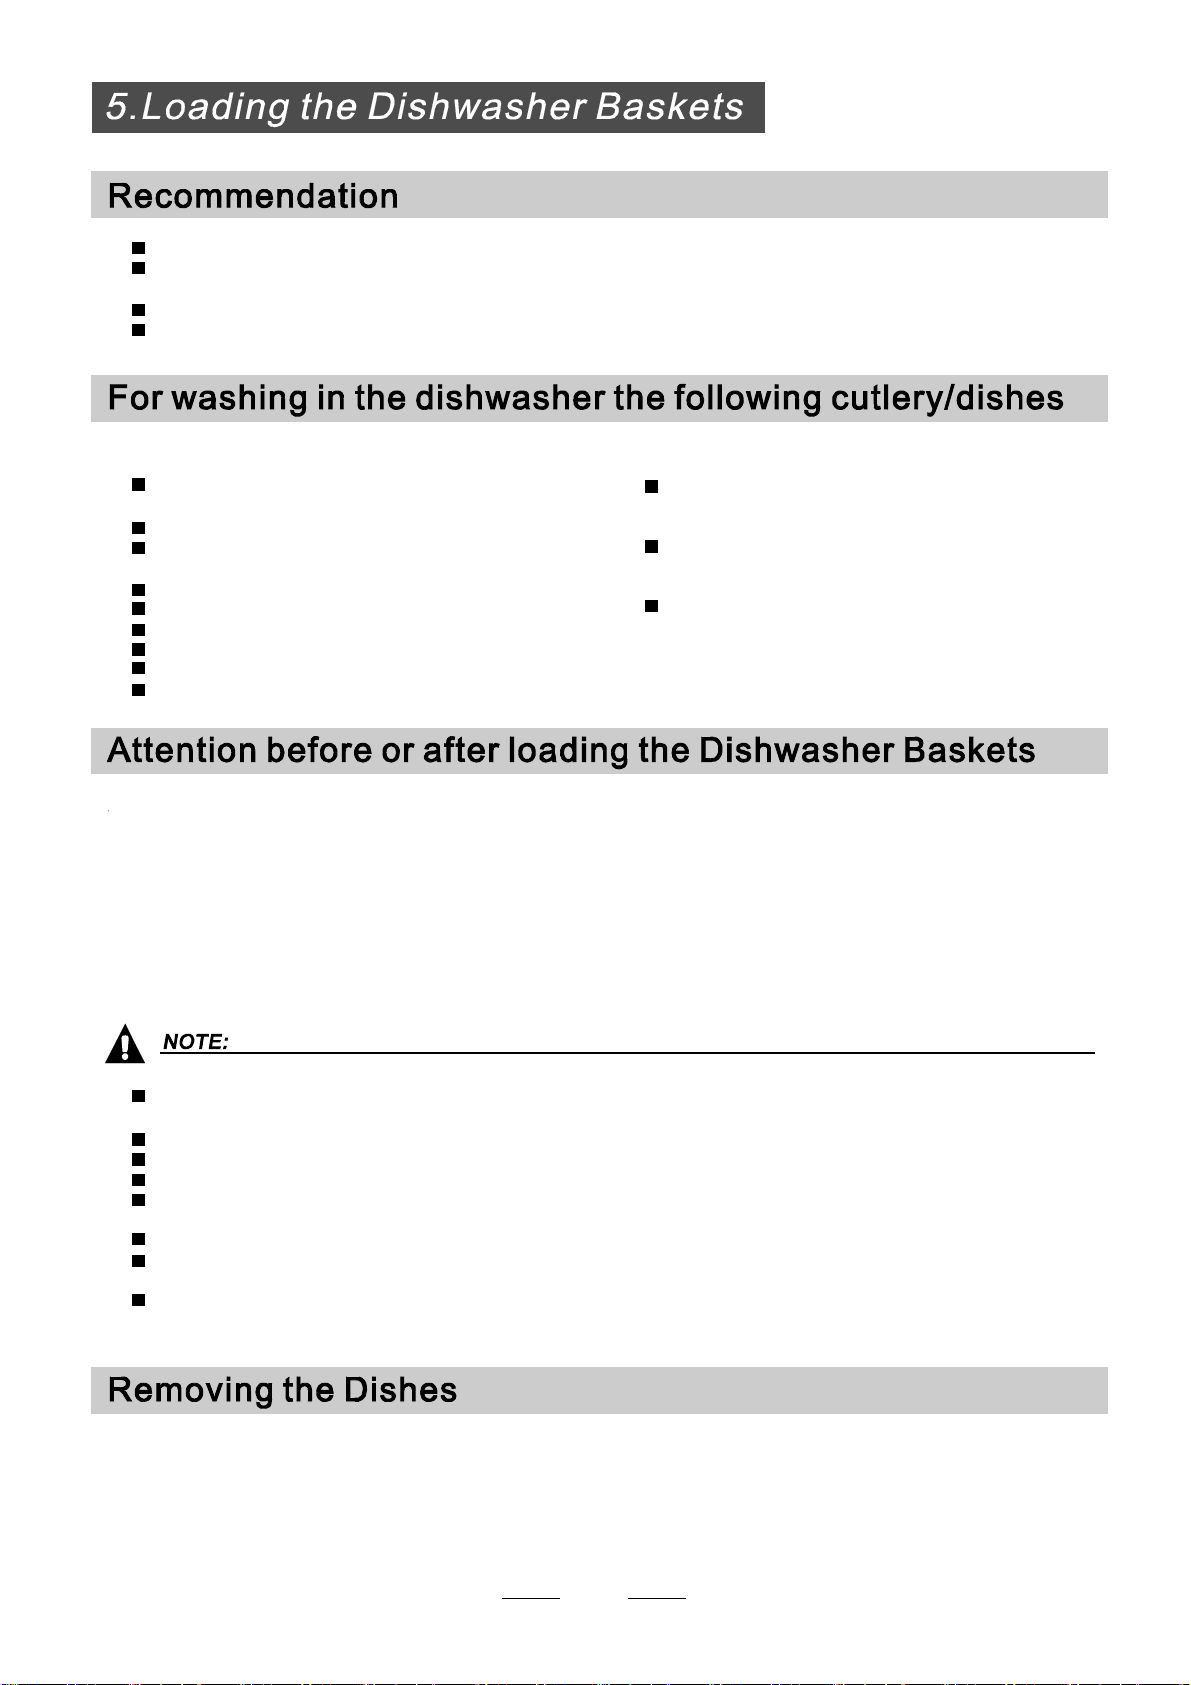
Considerbuyingutensils whichareidentifiedas dishwasher-proof.
Use a mild detergentthat is describedas'kind to dishes'.Ifnecessary,seek further
information from the detergentmanufacturers.
Forparticularitems,select a program withaslowatemperatureaspossible.
To pr ev ent damage, do not t ake glass a nd cutler y out of the dishwashe r immediat ely
after the p rogr amm e h as ende d.
Are not su itable
Cutlerywith wooden, hornchina or
mother-of-pearl handles
Plastic items that are not heat r esistant
Older cut lery with glued parts t hat arenot
temperatureresistant
Bonded c utlery items or dishes
Pewter or cooper items
Crystal gla ss
Steel itemssubject to rust ing
Wooden platte rs
Items madefrom syntheticfibres
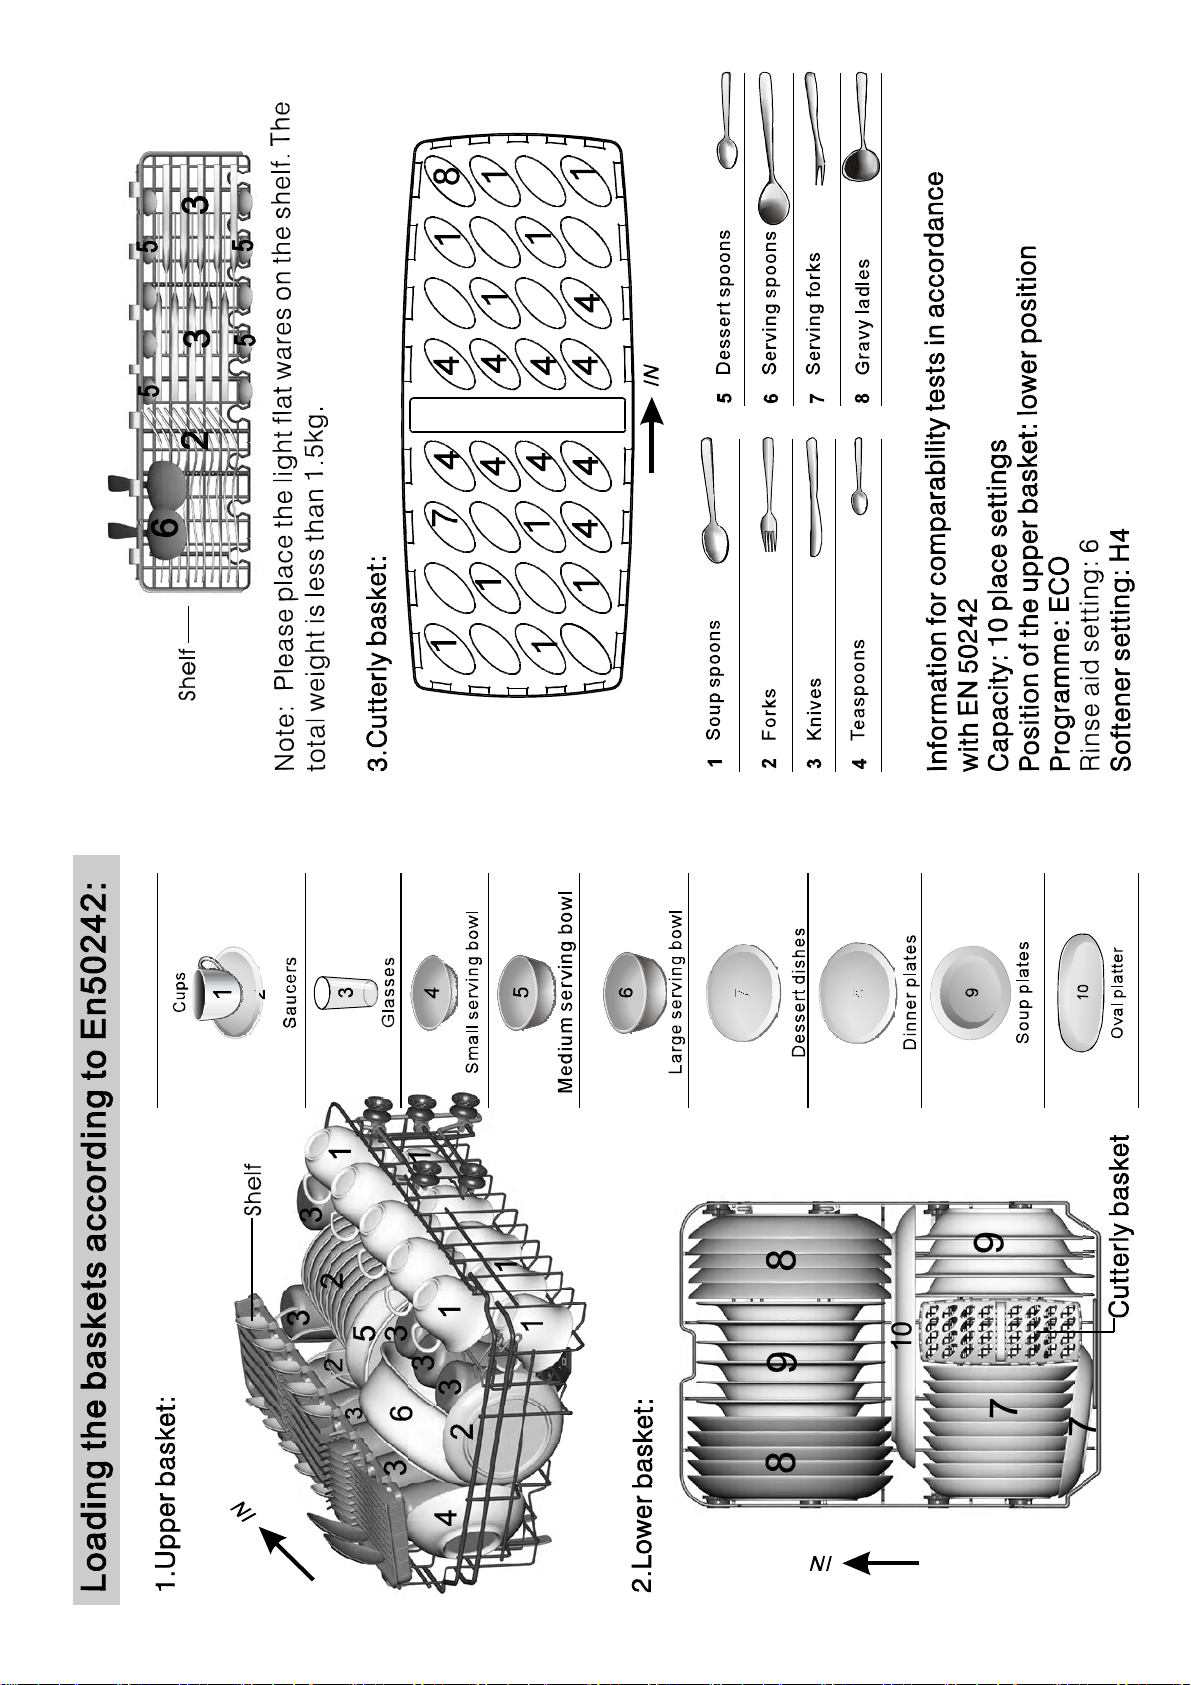
(For best performance of the dishwasher,follow these load ing gu ide lines.
Features and appearance of baske ts and cutlery baskets may vary fr om yourmodel.)
Scrape offany largeamounts of left over fo od. S often remnants ofburnt food in pans.
It is not necess ary torinse the d ishes u nder running water.
Place objects in the dishwa sher in following way:
1.Itemssuch a s cups, glasses, pots/pans, etc. are fa ced downwards.
2.Curveditems, or ones with recess es, sh ould b e l oaded aslant s o th at wate r can run off.
3.Allutensils are stacked securely andcan not tip over.
4.Allutensils are placed in t he way that t he spray arms can rotate freely during wa shing.
Very small it ems sho uld n ot b e w ashed in the dishwasher as they c ould ea sily fall out of the basket.
Are of limited suitability
Some ty pes ofglasses canbecome
dull afte r a large number of washes
Silver and a lumi num parts have a
tendencytodiscolour duringwashing
Glazedpatternsmay fadeifmachine
washed freq uently
Load holl ow it ems such as cups, glasses, pans etc.With the opening facing downwardsso that
wat e r cann o t co lle c t in the c ont a i n e r or a deep ba se.
Dishes anditems of cutlery mustnotlie inside oneanother,or covereachother.
To av oid d amage to gl asses, theymus t nottouch.
Load large ite ms w hich ar e mostdifficult toclean into the lower basket.
The uppe r basket is designed to hold m ore d elicate and lighter dishware such as glasses, coffee
andteacups
Long bladed kni ves stored in an uprigh t po sition are a potential hazard!
Long and/or s harp itemsof cutlery such as carving knives must bepositioned
horizon tally i n the upp er b asket.
Please do not overload your dishw asher. This is importan t forgood results a nd f or
reasonab le consumption of energy.
To pre vent water drippi ng fr om t he upper basket into t he lower basket, we re commend that you
empty the lower basket first and the n t he upper bask et.
9
Page 15
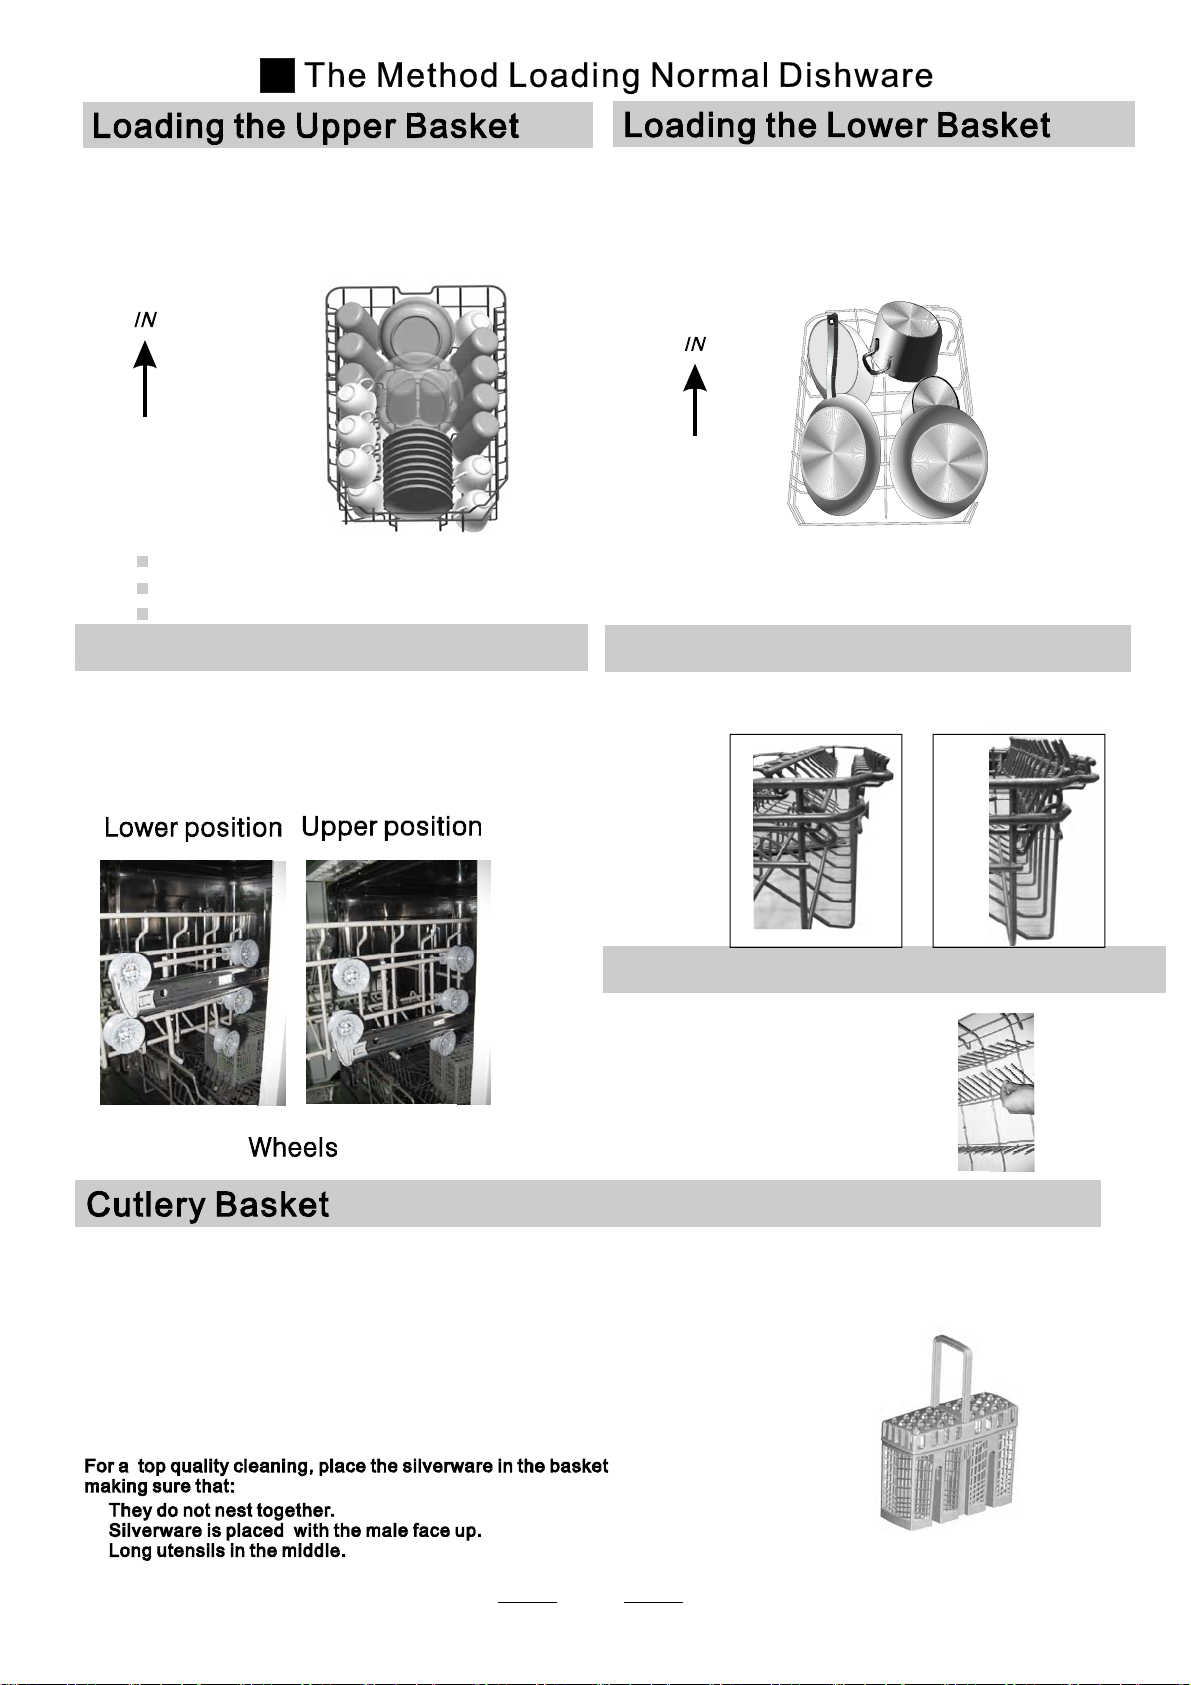
The u pper basket isdesigned t o holdmore delicate
and lighte r di shware s uch asglasses, coffee and
teacups andsaucers,aswellasplates, small bowls
andshallow pans (aslongastheyarenottoo dirty).
Positionthedishesandcookwaresothatthey w ill
notget movedbythespray of water.
Please be reminded that:
Pots,servingbowls,etc,mustalwaysbeplacedtopdown.
D eep po ts should be s l a nt ed to al lo w w ater to fl ow out .
The Botto m B ask et feature s folding spikes so tha t larger or morepot s and p ans can be loade d.
We sug gest that you p la ce large items and t he most
difficultto clean itemsare to be placed into thelower
basket: su ch a s po ts, pans, lids, serving di shes and
bowls, as s h own in the f i gur e be low. It is prefer ab l e t o
pla ce s erv ing dishe s an d lids on the si d e of the racks
in order to a void bl ocking t he rotation of the t op spray
arm.
Adju sting the Upper Bask et
The h eight ofthe upper ba sket can be ad justed inorder to
create mo re s pace for larg e utensil s b oth f or theupper
/lower basket . The height o f th e up per basket can be
adjusted byplacingthewheelsondifferent height of the
rails. Longitems, serving cutle ry,salad ser vers and knives
shouldbeplacedontheshelf so thatthey do notobstruct
therotationofthesprayarms..
Foldin g bac k the cu p sheli ves
For bett er st acking ofpots andpans,
the spik es can be folded down as
show in the p ict u re righ t .
Foldin g Spike s of Low er Bask et
For bett er stacking ofpots and pans,
the spi kes c an b e f olded down a s
show in the pictur e right.
Cutleryshouldbe placed in thecutlery rackseparately
from eachother in th e appropriate positions, and do
make surethe ute nsils do not nest together,th is m ay
cause badperformance.
10
Page 16
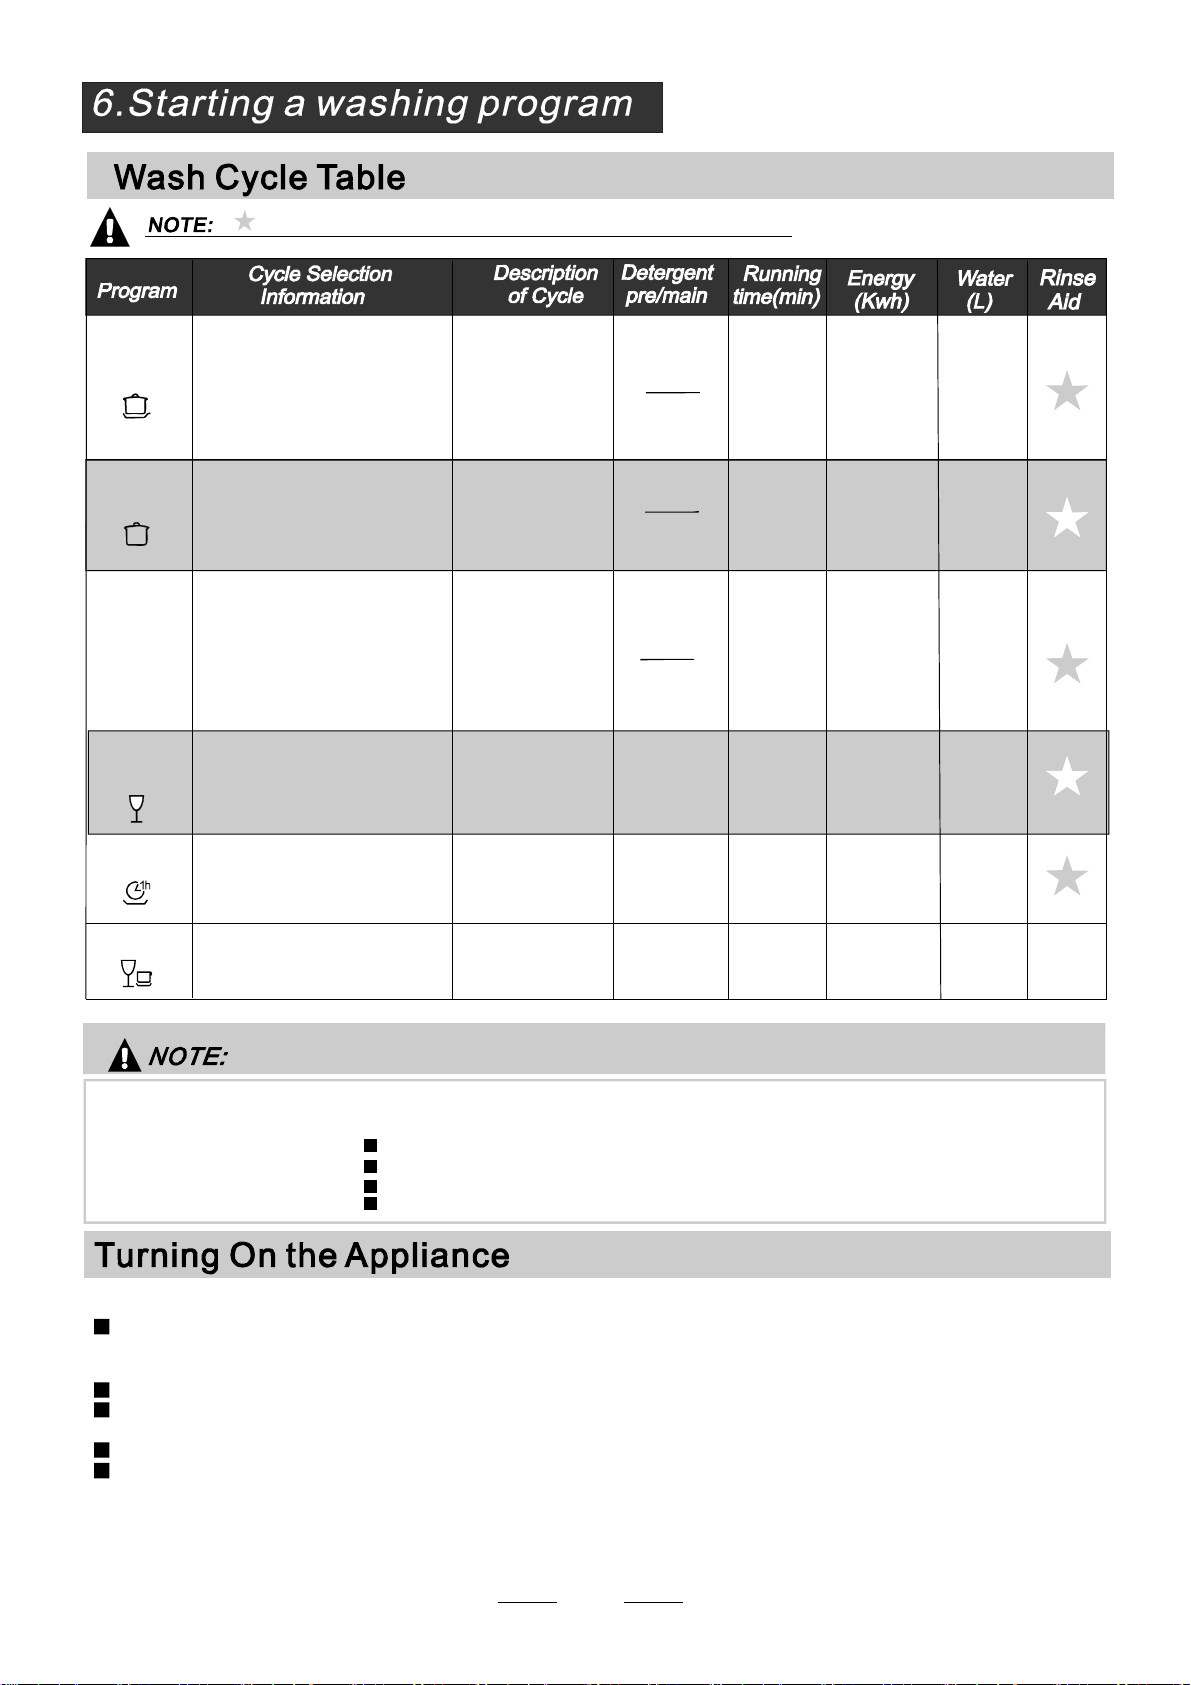
()
Means:need to fill rinse into theRinse-AidDispenser.
Intensive
Normal
ECO.
(*EN50242)
Glass
1Hour
Rapid
For heaviest soiled crockery,
andnormallysoiledpots
pans dishes e tc withdried
、
、
onsoiling.
For normally soiled loads,
such as , plat es,glasses
pots
andlightly soiledpans.
Thisisstandardprogramme,
itis suitabletocleannormally
soiledtablewareand it is the
mostefficient programmein
termsofits combined energy
andwaterconsumption for
thattypeoftableware.
For lightlysoiled cr ockery
and glass
For l ight ly soiled loads that
do not need exce llent drying
efficiency.
Ashor ter wash for lightly
soiled loads and q uick w ash.
Pre-wash(50 )
Wash (65 )
℃
℃
Rinse
Rinse
Rinse(65 )
℃
Drying
Pre-wash( 45 )
Wash (55 )
℃
℃
Rinse
Rinse(65 )
℃
Drying
Pre-wash
Wash (50 )
Rinse(65 )
℃
℃
Drying
Pre-wash
wash(40 )
℃
Rinse
Rinse(60 )
℃
Drying
Pre-wash(50 )℃
Wash(62 )
Rinse ( 55 )
℃
℃
Drying
Wash (40 )
℃
Rinse
Rinse(45 )
℃
3/22g
(or )3in1
3/22g
(or )3in1
25g
(or )3in1
25g
3/22g
20g
135
155
175
110
60
40 0.45
1.3
1.07
0.83
0.7
0.85
16
13
9.0
13
9.0
10
*EN 5024 2 :Thisprogram me i s t he testcycle. Theinformat ion forcomparabili ty t est
in accord ance w ith E N 50242,as follows:
Capacity: 10setting
Position Uppe r basket: upper wheels o nrai ls
Rinse aid setting: 6
49w; Po:0.45w.
Pl:0.
Startin g a cy cle wash
Draw out the lower and upper bask et, l oad thedishes and push them back.
1
It i s c ommended to lo ad th e lo wer basketfi rst, t hen theupper one(see the sectio n en titled
“”
Loadingthe Dishwasher ).
Pour inthe d eterg ent (se e t he section entit led Salt, Detergent and RinseAi d ).
2
Insert theplug into the socket. The power supp ly is 220-240 VAC /50 HZ, thespecification
3
“”
of th e so cket is10A 250VAC. Make sure that the w ater supply is turned onto full pressure.
Open t he door,p ress the ON/OFF Button, andthe ON/OFF l ight willturn on.
4
Press theprogram Button , the w ash program wi ll b e changed a s fo llows direction:
5
Intensive- >Normal-> ECO->Glass ->1Hour ;->Rapid
If a program isselected, therespo nse ligh t will light. Th en c lose the door,the dishwasher
beginsto start.
11
Page 17
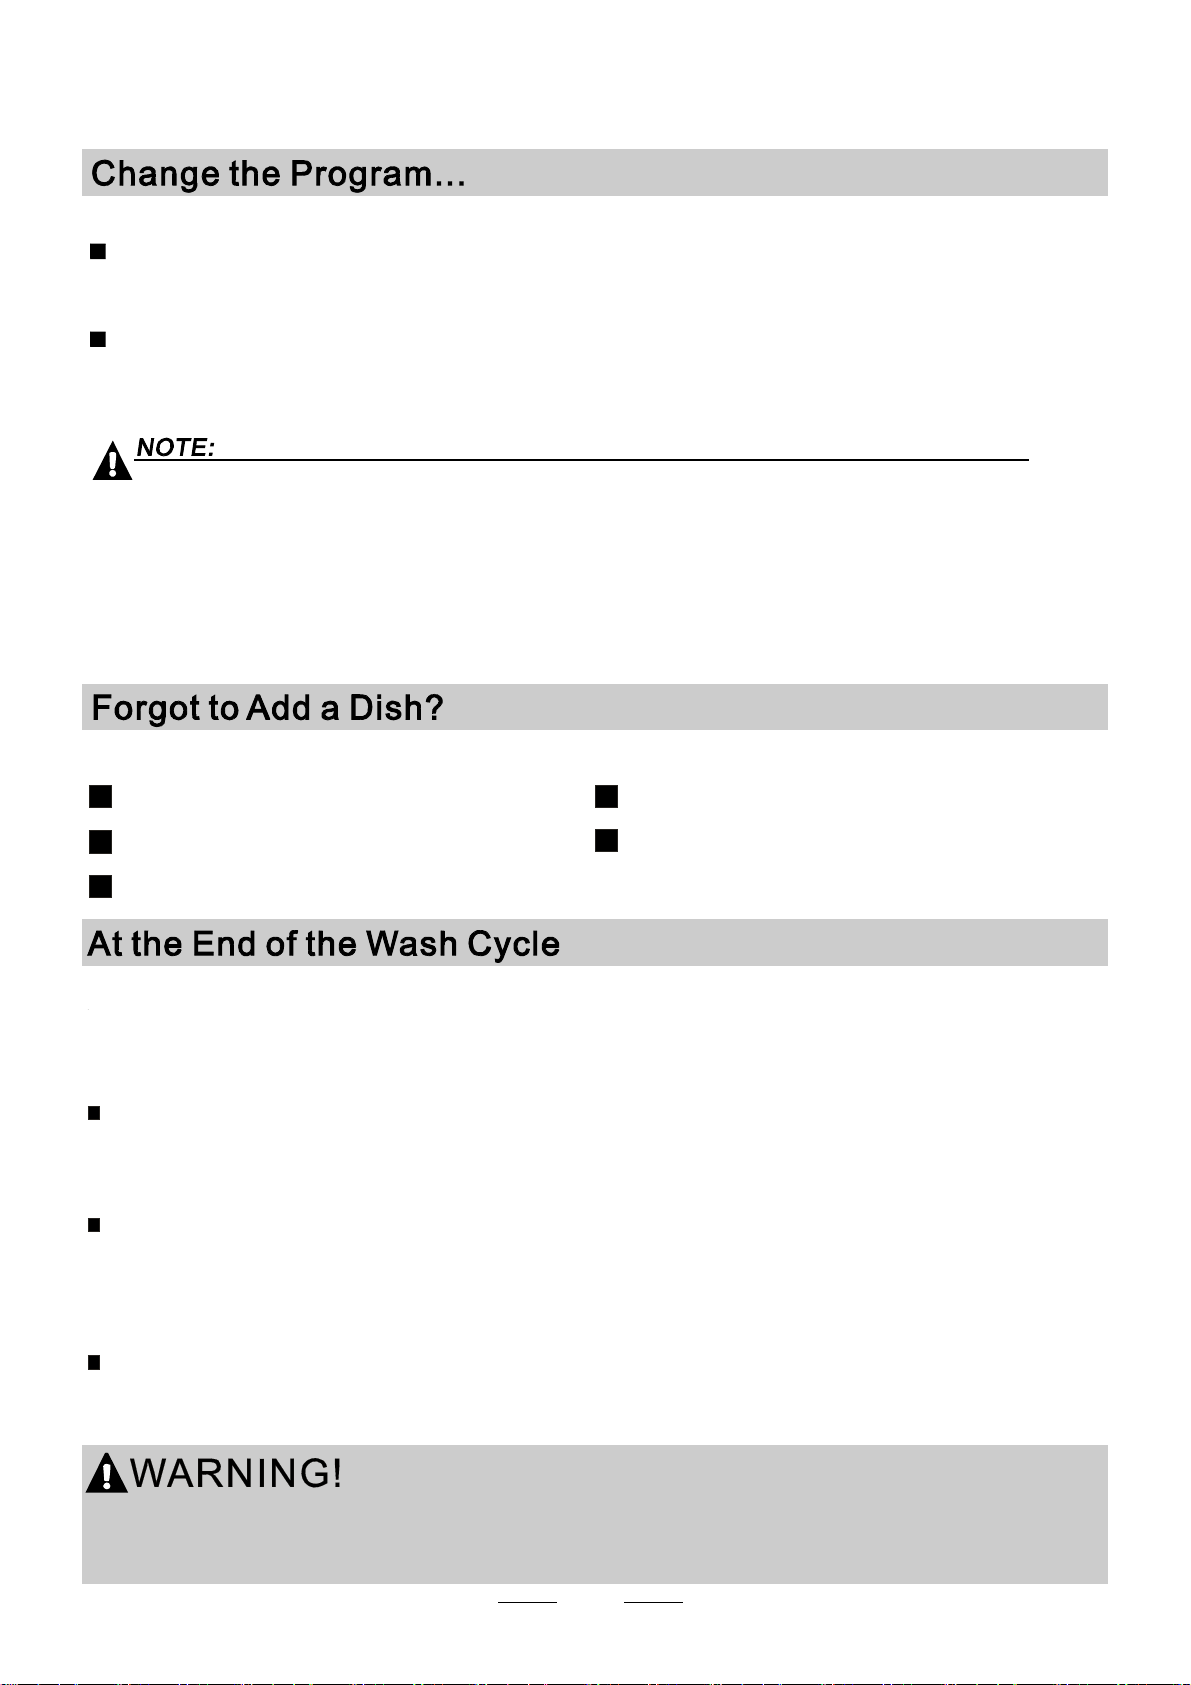
Premise:
Acycle th at is underway can on ly bemodified if it has on ly beenrunning for a s hort time. Otherwis e, the
1
detergent may hav e a lread y be en released, a nd theapplian ce m ay have alrea dy drained the wash wa ter.
If t his i s the case , th e detergent disp enser must be refilled (see the sectio n ent itled " Loading the
Detergent " ).
Open t he door ,p ress theProgr am b utton , th e m achine will be in st andb y sta te,
2
then yo u cancha nge the program to the desired cyc le setting (see the s ection entitled " Star ting a
wash cycl e. .." ) .
more than 3 s econds
Ifyou openthe door ,the machinewill pause. The program lightwill
stopblinkingand thebuzzerwill mooingeveryminuteunless youclose the door.After
you c lo se the door ,the machin e will keep on workin g after 10 seconds.
Aforgotten dish can be added any time before the detergent cup opens.
Open the door a little .
1
After the spray arms stop working, you can open the door
2
completely.
Add forgotten dishes.
3
When the worki n g cy cle h as fini s hed, the buz zer of th e dishw a she r wi ll sound fo r 8 sec o n d s , th en stop. Turn off
the a ppliance using the ON/OFF button, shut off the water s upply andopen the door of th e di shwashe r.
Wait for afew m inutes before unloading th e dis hwasher toavoi d ha ndling t he dishes and utensils w hile they
are s till hotand m ore susceptible tobreak age. The y wil l als o dr y be tter.
duringa w ashcycle
Close the door
4
The dishwasherwill run after 10 seconds.
5
SwitchOffthe Dishwasher
The pro gram light is off,only in this case the programme ha s ended.
1.Switchoff the dishwasher by pre ssing the ON/OFF button.
2.Turnoffthe watertap!
Openthedoor carefully.
Hot dishes are sensitive to knocks. The dishes shou ld t herefore beallowed to cool down arou nd 15 minutes
beforeremovingfromtheappliance.
Open t he d ishwasher's door,leave it ajar and wai t a few mi nutes before remov ing the dishes. In this way t hey
will be cooler an d t he drying will be improved.
Unloading thedishwasher
Itis normal that the di shwasher is wet inside.
Empty th e l ower basket first and then the up per on e. T his will avoid water dripping from the uppe r Bas ket onto
the dis hes inthe l ower one.
It is danger ous to o pen t he door w hen wash ing,
beca use the ho t water may s cald you.
12
Page 18
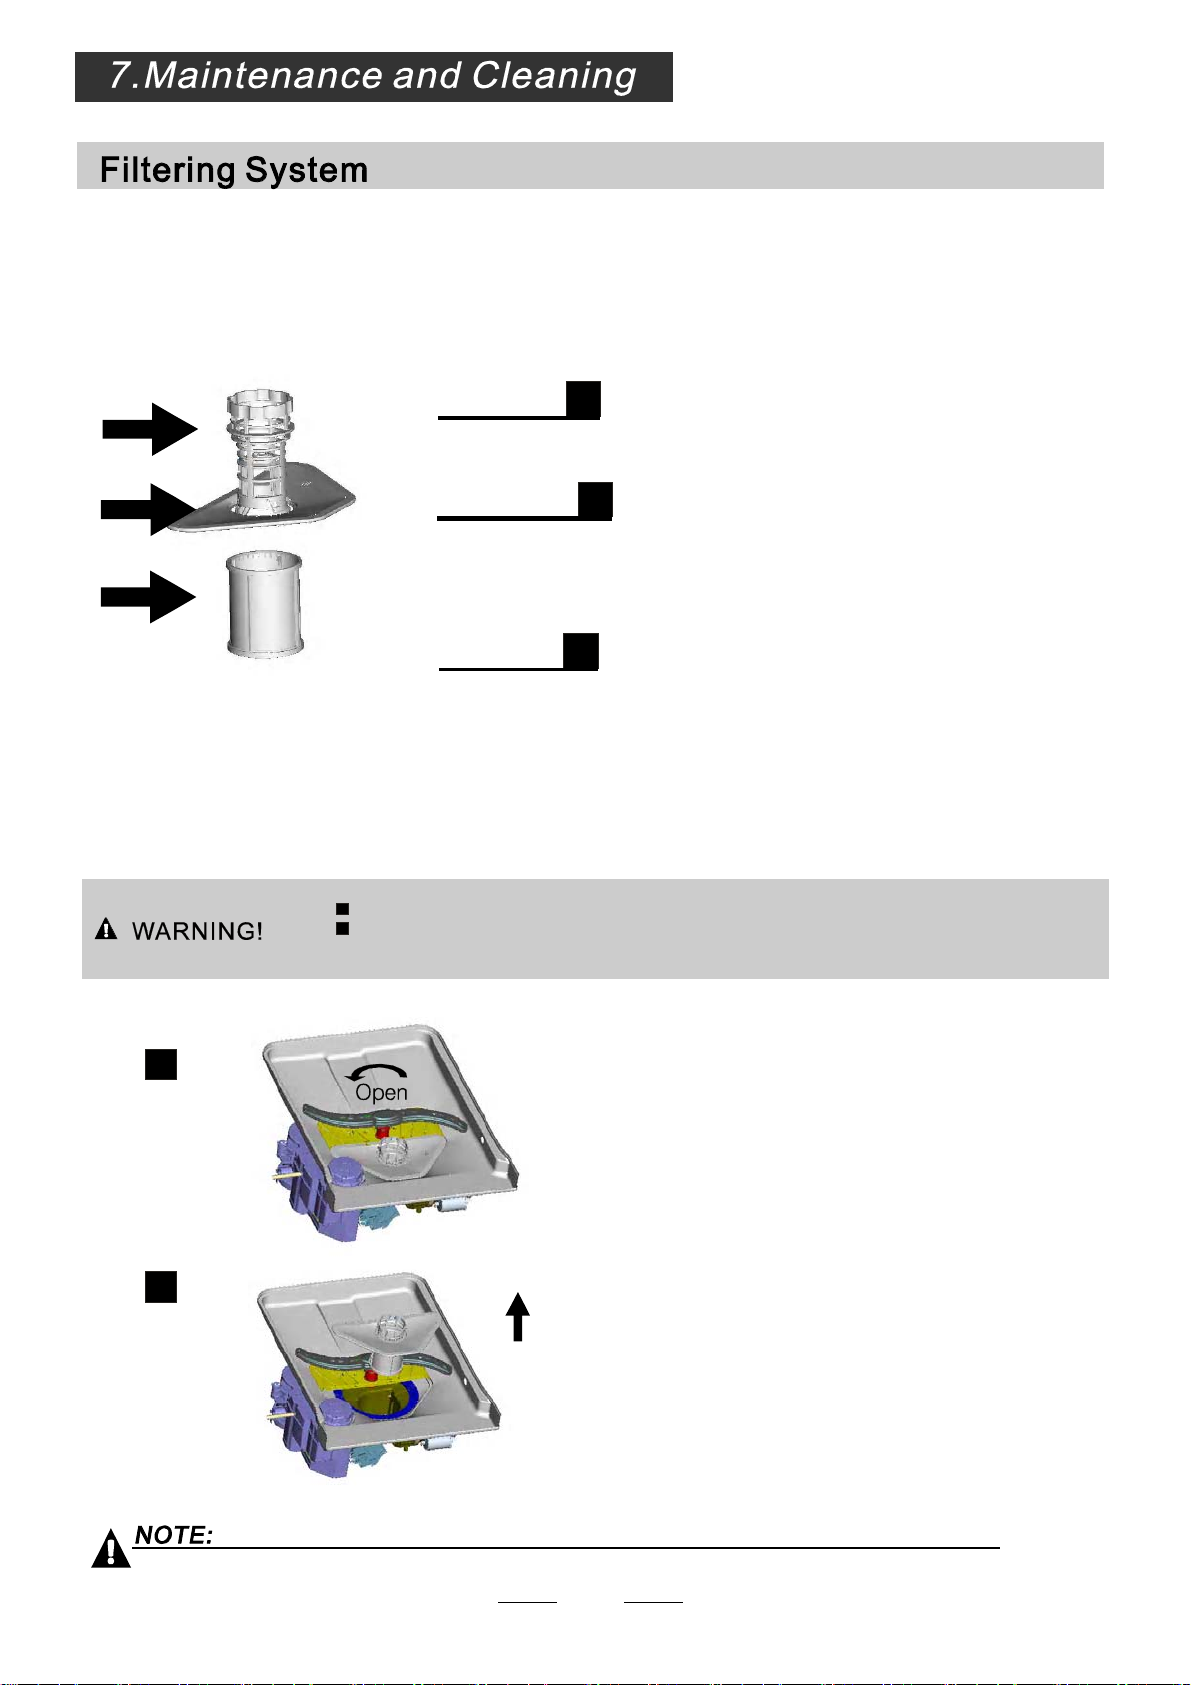
The filter prev ents lar ger remnants of food orother objects f rom getting insi de th e pu mp.
Theresiduesmayblockthe filter, inthis casetheymust be removed.
The filter system consi sts of a coar se fi lter,aflat ( Main filter)
An d a mi c rofilter( F i ne fil ter).
1
2
3
2
1
3
Main filter
Foodand soil particlestrappedin thisfilter arepulverized by a
special jet on t he lower spr ay a rm an d w ashed d own todrain.
Coarse filter
Larger items, s uc h as p i e c es of bone s or glass, t ha t cou l d bl o ck
thedrain aretrappedinthe coarsefilter.To remove the items
caught by the filter,gently s queeze the tap on the top of this
filterandlift out.
Fine filter
This filterholdssoiland foodresidues in the sumparea a nd
preventsitfrom beingredeposit on thedishesduring washcycle.
Filterassembly
Thefilter efficiently
For b est performance and results, the f ilter mustbe cleaned re gularly. t his r eason, it i s a good idea to
remove thelarger food pa rticles trapped in the filter aft er e ach wash cycle by rinsing the s emicirc ular filter and
cup u nder ru nnin g wa ter.To re move th e fil ter d evice , p ull th e c up handle in the upwar d d irection.
removes f ood particles fro m th e wa sh w ater,allowin g it to be recycled d uring the cycl e.
For
Th e d is h washer m us t n e ver b e us ed wi t ho ut the filter s.
Improper replacement of the f ilter may red uce the performanc e lev el ofthe appliance
anddamagedishes andutensils.
2
1
Step 1 Turn the filter in ant i-clockwise direction,:
Step 2 l ift the filter assy up:
When following this procedure from step1 to step 2, the filter system will be removed;
when followingit from Step 2 to Step 1, the filter system will be installed.
13
Page 19
Remarks:
- Inspec t t he filtersfor blockinga fter e very timethe dishwasher ha s beenused.
- By unscrewing thecoarse filter,you can remove the filter system. Removeany food remna nts and
cleanthefiltersunder runningwater.
Theentirefilterassembly shouldbe cleaned oncea week.
Cleaning the Filter
To cle an t h e co a rs e fi l ter and t he f i n e f i l t e r, use a cl ean i n g b rush. Re as sem ble the fi l ter parts as s hown in the f igu r es
on th e last pa ge and r eins ert the entire assemb ly in the dishwa sher, positionin g it in its s eat and pressing dow nwar ds.
Whencleaningthe filters, don'tknockon them. Otherwise,thefilterscould b e
contorted andthe performance of thedishwasher couldbedecreased.
The cont rol p anel canbe cleaned by using a lightly dampened cloth .
After cleanin g, m ake sureto dryit t horoug hly.
For the e xteri or, use a go od a pp lianc e po lis h w ax .
Neveruse s harp objects, scouring pads orhar sh c leaners onany partof t he dishwasher.
CleaningThe Door
To clean thee dge aroundthe d oor, you should u se o nly asoft warm,damp cloth.
To avoid penetration o f water into the door lock and electrical components, d o not
usea spray cle aner ofany kind.
Never u se a spray c leaner toclean the door panel as it m ay dam age the door lock
and electricalcomponents.
Abrasive ag ents o r somepaper towels shou ld not be use d b ecause o f therisk o f
scra tching or leavin g spots on th e st ainless st ee l surface.
Protec tAga inst Freezi ng
please take frost protection measures on t he dishwasher inwinter. Ever y fter wa shing c ycles,
please operate as follows
1.Cutoff the electricalpower tothedishwasher.
2.Turnoff the water suppl y an d d isconnec t thewater inlet pipe from thewater val ve.
3.Drain the water fr om t he inletpipe and water valve. (Use a p an togather thewater)
4.Reconnect the water i nlet pipe to the wate r val ve.
5.Remove the filter at the bott om o f thetub and use a sponge to soak up wate r in the sum p.
:
If your dishwasher cannot w ork because of the ice,
please contact prof essional service pe rsons.
timea
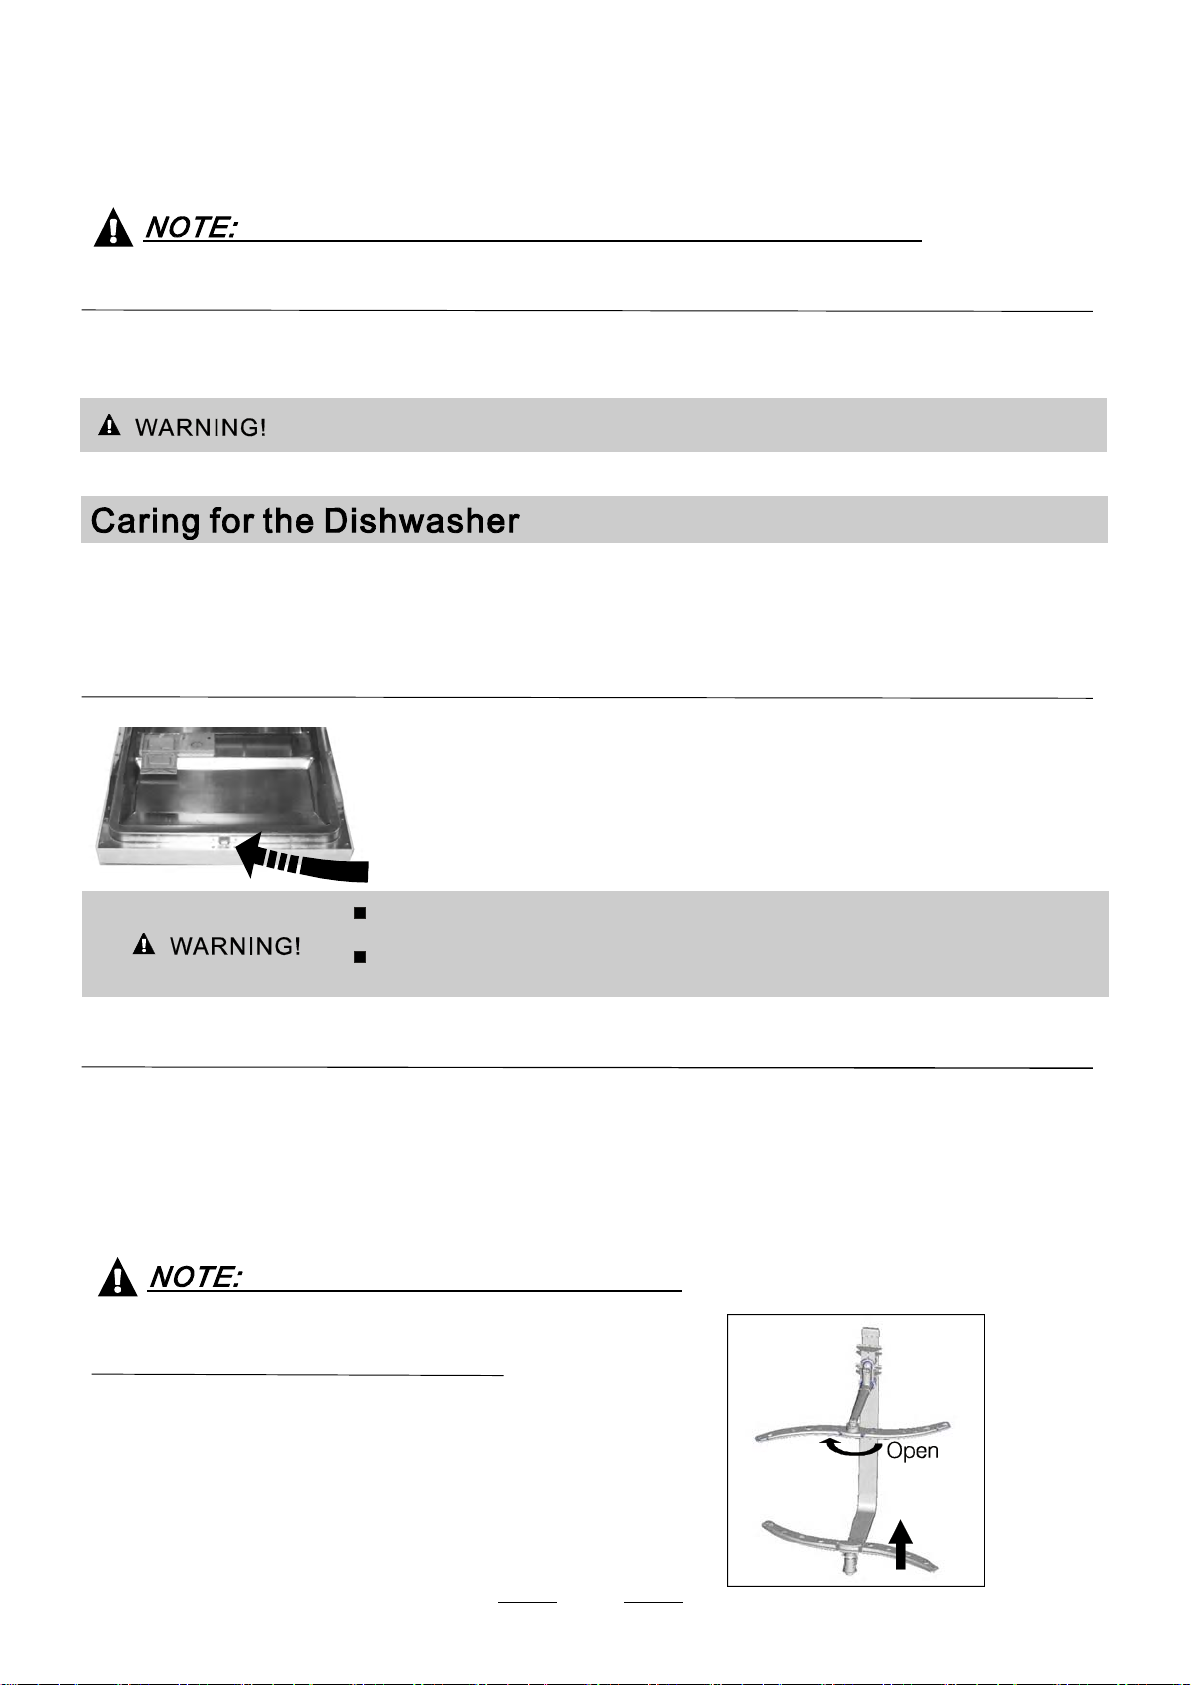
Cleani ng th e Sp rayArms
It is ne ce ss ar y t o clean th e spray arm s regul arl y for h ar d
water chemicalswill clogthespray armjets a ndbearings.
Toremov e the upper spr a y arm, hold t he nut, rot ate the arm
clockwise toremoveit.
Toremovethe lowerspray arm,pull out thespray armupward.
Washthe arm s in soapy andwarm water an d u se a soft brus h t o
clean t he jets . R eplace them after rinsing t hem thoroughly.
14
Page 20
AfterEveryWash
After every wash, turn offthe wa ter supplyto the
appliance and leave the doorslightly open so t ha t
moisture and odour s a re no t t rapped inside.
RemovethePlug
Before cl eaning or per forming maintenance, always
remove the plug from the socket.
No Sol vent s or Abras ive Cleanin g
To clean theexterior and rubber parts of the dishwasher,
donotusesolvents or abrasivecleaningproducts.
Only use a cloth with warm soapy wate r.
Tor em ove spots or stains from the sur f ace of t he
interi or, us e a clot h dampened with w a ter an a little
vinegar,or a cleaning product mad e s pecifically for
dishwashers.
WhennotinUse for aLongTime
It isrecommendthatyou runawash cycle with the
dishwasher e mpty an d the n r emove the plu g fro m the
socket, turn offthe water supplyand leave the door of
the app li a n c e sl ig ht ly open. Thi s w ill hel p t h e d oo r
sealstolast l ongerandpreventodoursfrom forming
withinth e appliance.
Moving theApplianc e
If the appliance must be moved, tr y to keep it in the
verticalposition. If absolutelynecessary,it can be
positioned on its back.
Seals
Oneofthefactorsthatcauseodourstoforminthe
dishwasher i s foo d th at r emain s tr apped in the seals.
Periodic cleaning with a d amp sponge will prevent this
fro m occurri ng.
Electrical Sh ock Hazard
The inst allation of t he p ipes
and electr ical equipments
shouldbedone by professionals.
●
Installationpreparation
The i nstallatio n po sition of dis hwasher should be near t he e xisti ng in let anddrain hoses a nd
power cord.
Oneside of thecabinetsink shouldbechosentofacilitate theconnection of drainhosesof
the dishwasher.
Note: pl ease c heck the accompanying installation accessories(hook foraesthetic panel,screw)
Disconnect electricalpower before
installingdishwasher.
Failuretodosocanresultindeathor
electrical sh ock.
15
Page 21
Please carefully read theinstallationinstruction.
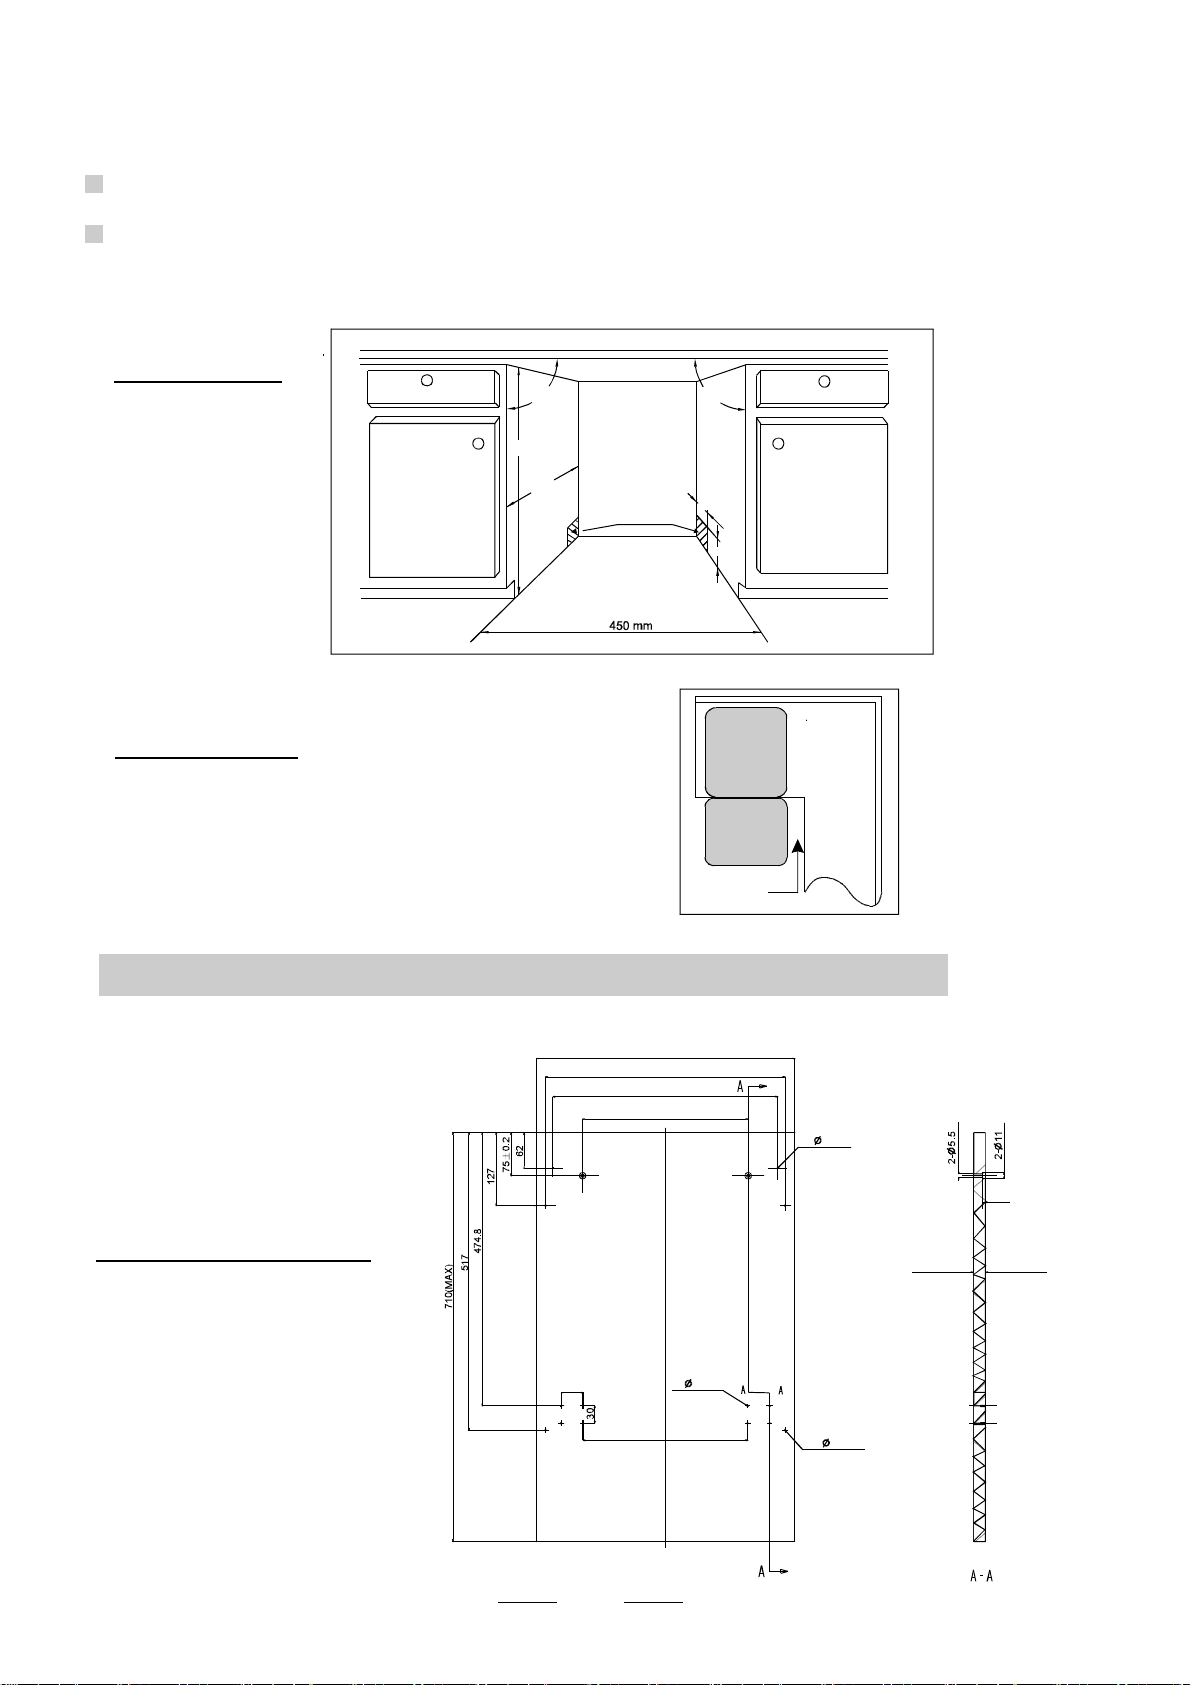
Illustrations o fcabinetdimensionsa ndinstallationposition of thedishwasher
Preparations should b e ma de b efore moving th e dishwasher tothe ins tallation place.
Choose a place near the sink to facilitate the inst allation of in let a nd d rain hoses
1
(see f igure 1).
2
If dishwasher isinstalled atthe cornerof thecab inet, thereshoul d be some sp ace
(illustratedinfigure2) whenthe doorisopened.
【】Figure1
Cabinetdimensions
Lessthan 5mm
betwee n th e top
ofdishwasherand
cabinetand the
outer door aligned
tocabinet.
820mm
580mm
90 °
Electrical, drainand
watersupplyline
entrances
Spacebetweencabinet
bottom and floor
90 °
80
100
【】Figure2
Dishwasher
Minimumspacewhen
the door is opened
Door of
dishwasher
Minimum space of 50mm
●
Aesthetic panel's dimensions and installation
1
The aesthetic woodenp anelcould be processedaccordingto the Figure3.
439
416 0.2±
390 0.2±
287.5 0.2±
【】Figure 3
The ae sthe t ic pa nel sh oul d
be proc ess e d in accor dan c e
withthe illustrated dim ensions
2- 2
Cabinet
dp8
5
20 MAX()
(Unit: mm)
dp8
286
8- 2
4- 2
dp8
38
16
Page 22
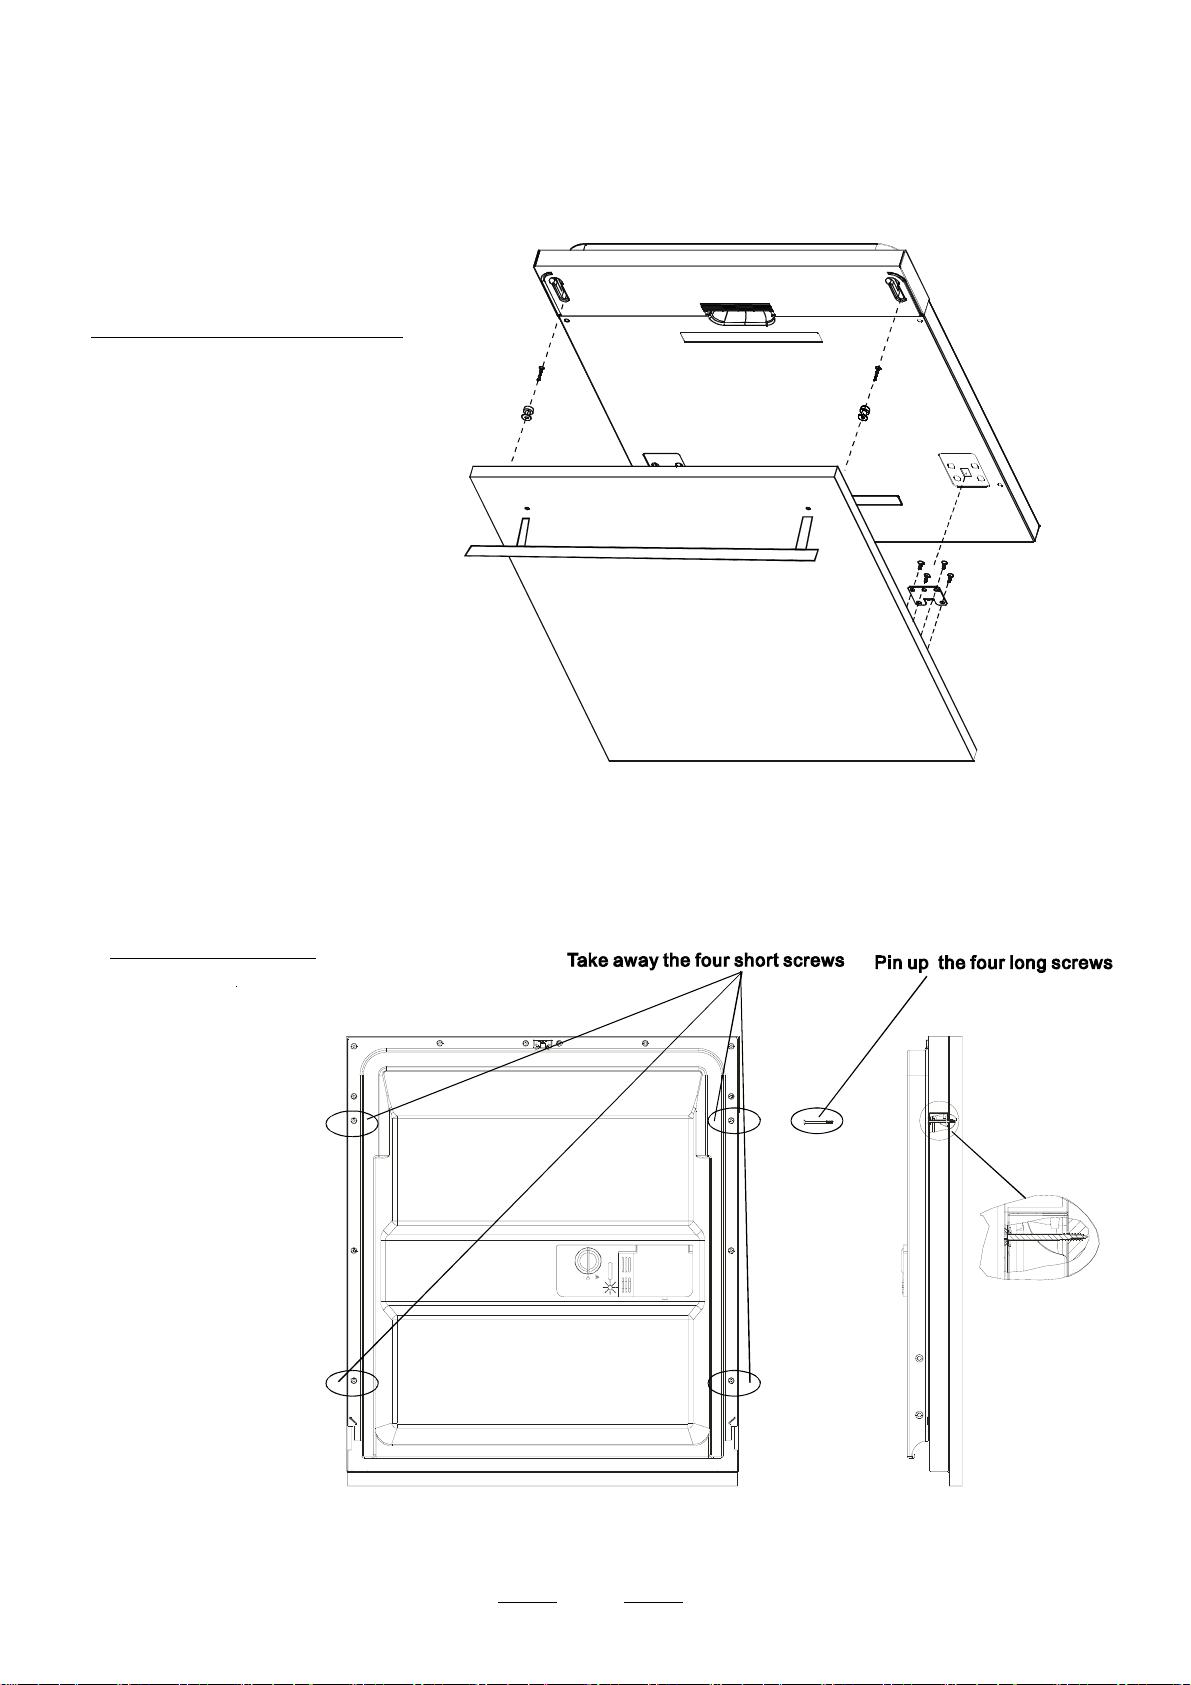
2 Installthehook on the aesthetic woodenpanelandput the hookinto theslotof theouterdoor of
dishw as her ( see fi gur e 4a). Af te r positi o nin g of the p an el , fix the pa ne l onto the outer doo r by
screwsandbolts(See figure 4b) .
【】Figure 4a
Installationofaesthetic panel
【】Figure4b
Installationof aesthetic
woodenpanel
.take away the four
1
sho rt screws
2
. pin up the four long
scre ws
17
Page 23
●
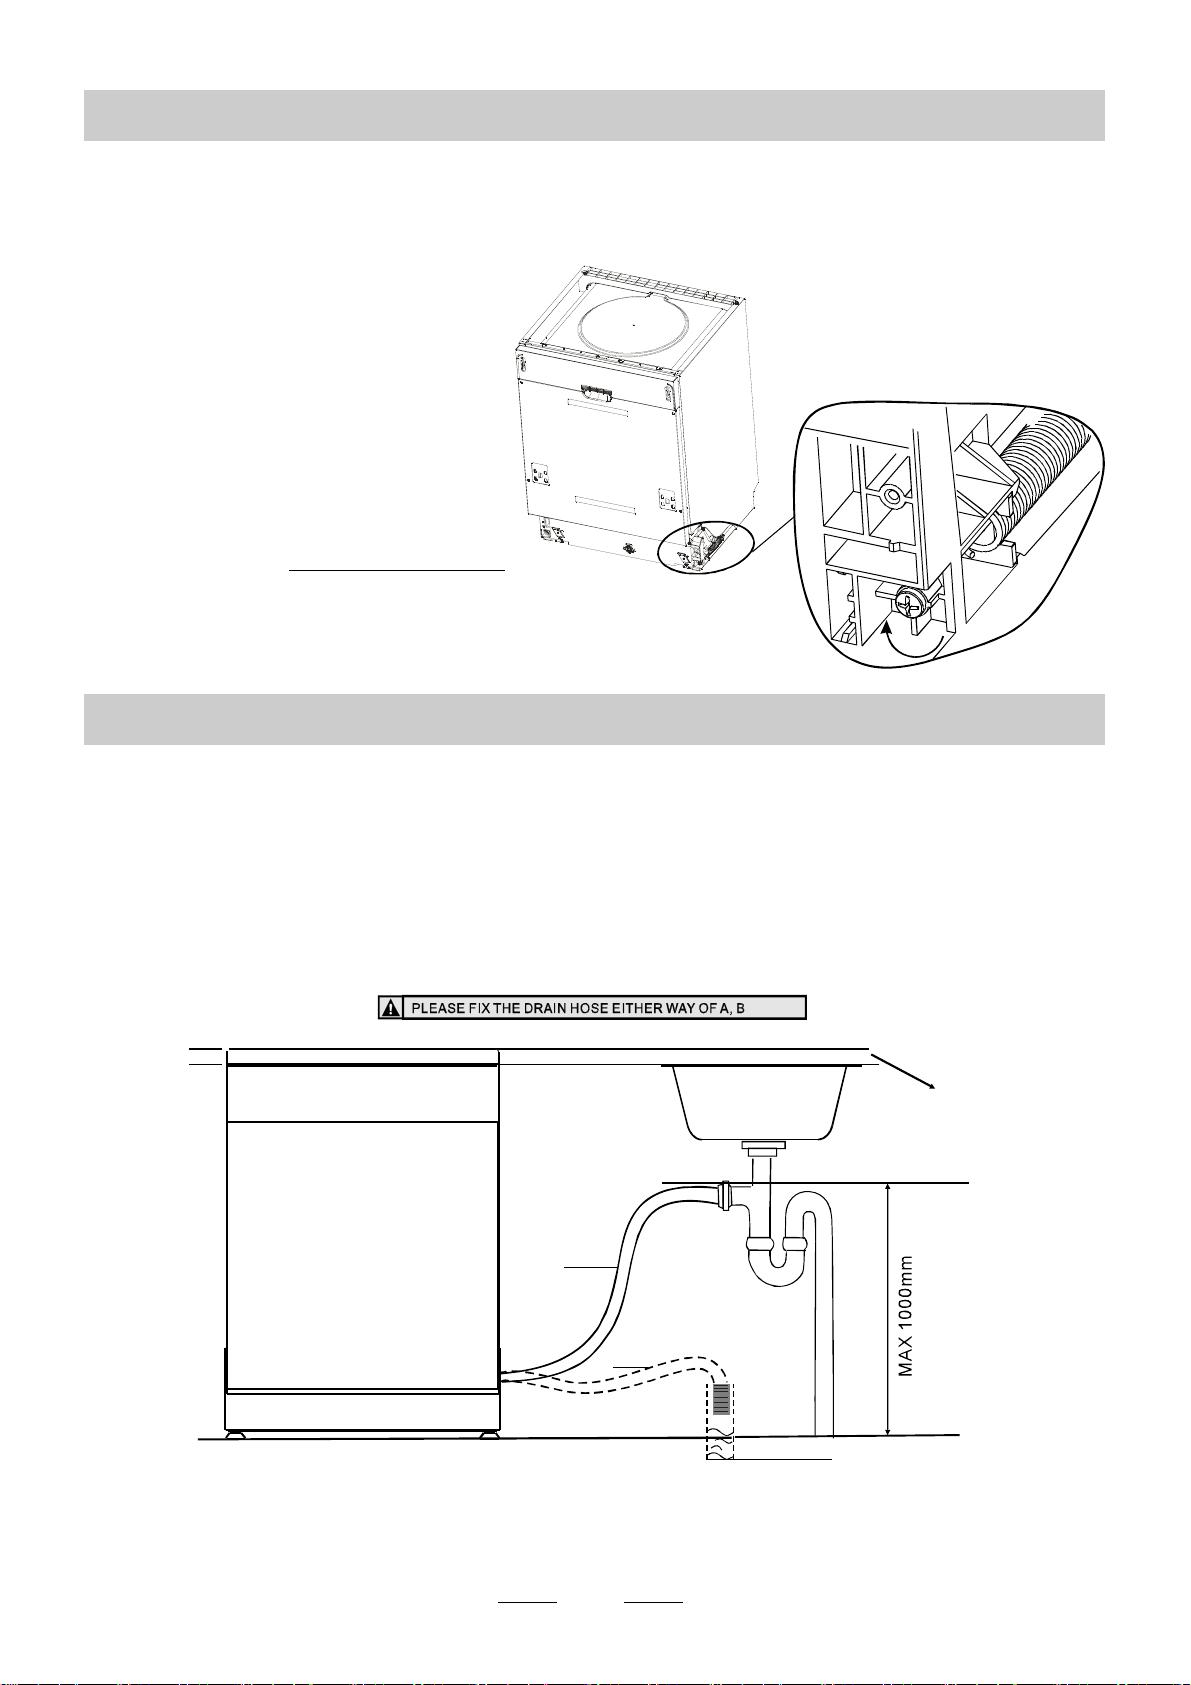
Tension adjustment of the door spring
Thedoorspringsareset at thefactory to thepropertensionf ortheouter door.
If ae sth etic wooden panel are ins tall ed, you wi ll ha ve t o ad jus t t he do o r spr ing tensi on.
Rotatethe adjustingscrew todrivethe adjustortostrain or relaxthesteel cable
(seefigure 5).
Doo r spring tensi on is c o rre ct when
the doorremainshorizontalin the
fullyopenedposition yetrises
toaclosewiththeslightliftofa
finger.
,
【】Figure5
Tension adjustment
ofthedoor spring
●
Connectionof drain hoses
Insert th e drainhose into a d rain pipe with a m inimum di ameter of 40mm , or let i t run into thesink, ma king sure to
avoid bendingor crimpingit. The topofthehosemustbeless than1000mm.
Front
Counter
NOTE
The top of the hose
must be less than
A
1000mm.
Drain pipe
B
φ 40m m
18
Page 24
●
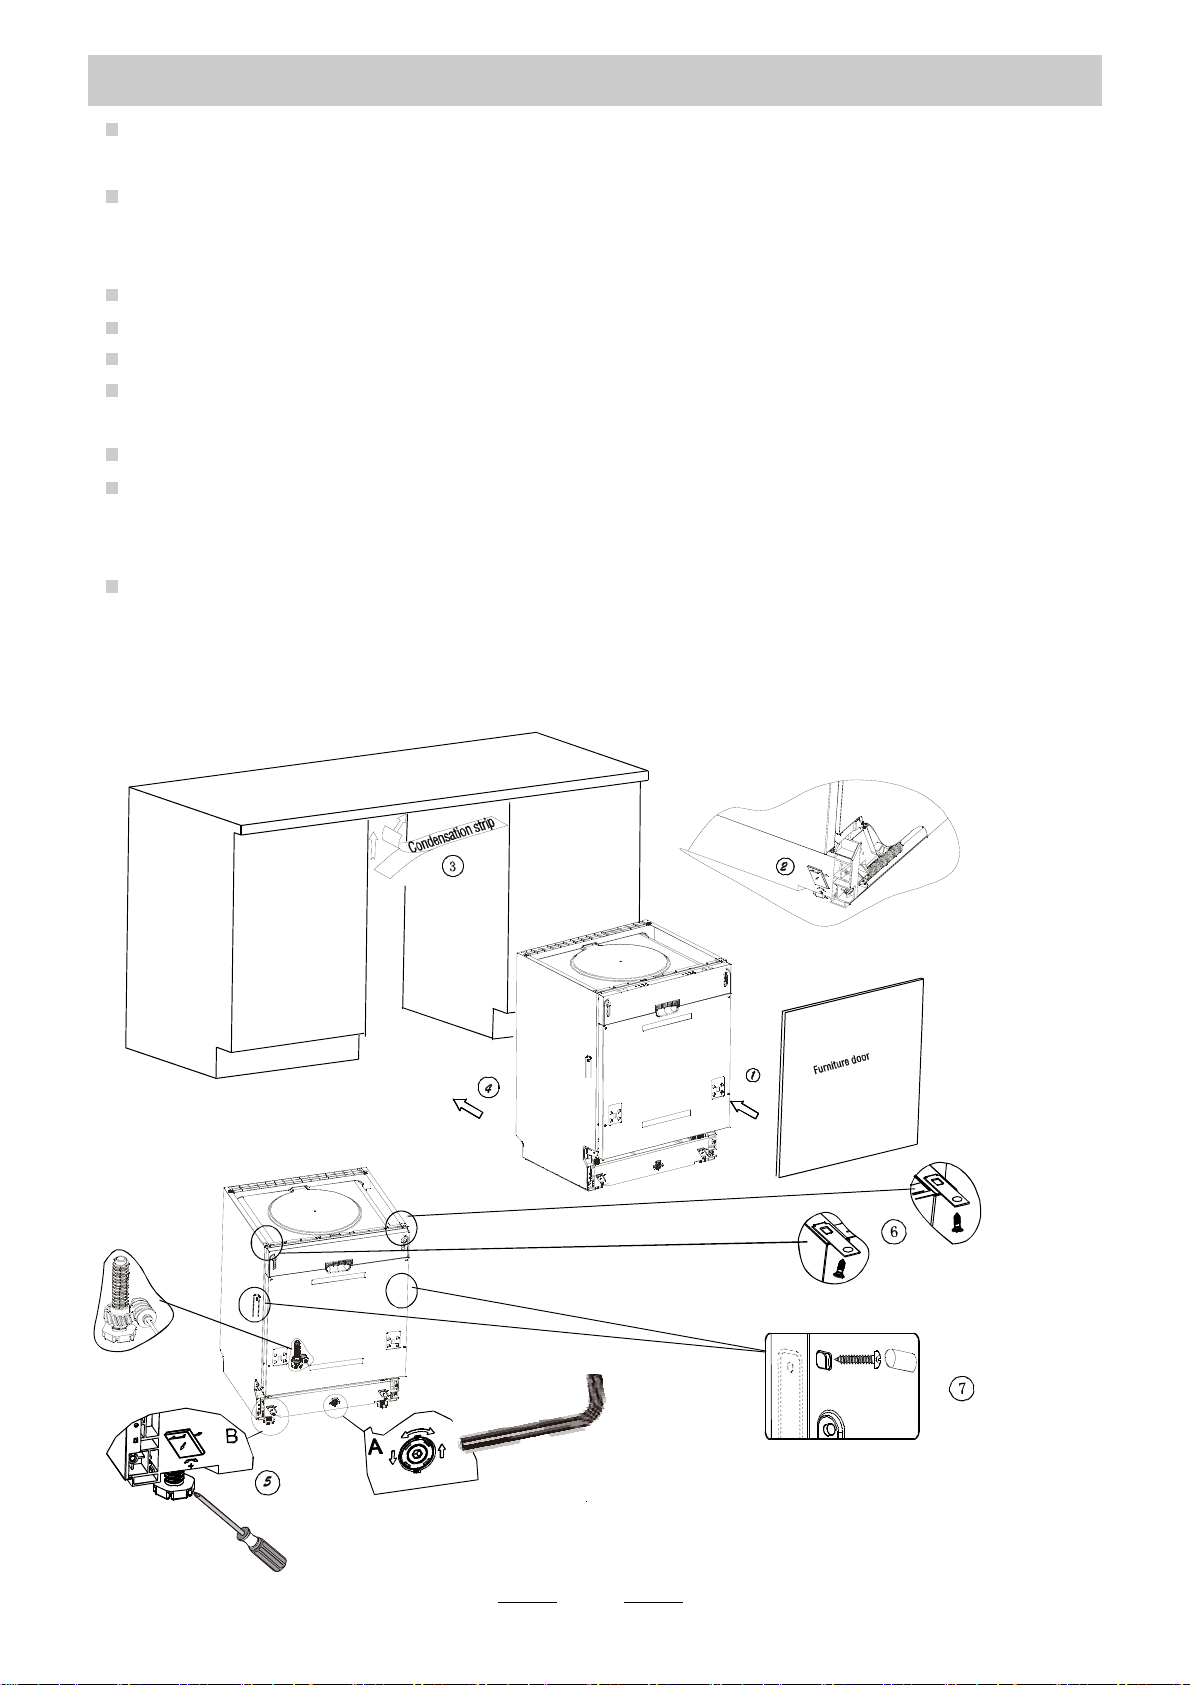
Dishwasher installation steps
1
Install the furniture door to the outer door of the dishwasher using the brackets provided. Refer
to the template for positioning of the brackets.
2
Adjust the tension of the door springs by using an Allen key turning in a clockwise motion to
tighten the left and right door springs. Failure to do this could cause damage to your dishwasher
(Illustration 2)
Connect the inlet hose to the cold water supply
3.
4.
Connect the drain hose. Refer to diagram (Figure 6)
5.
Connect the power cord
Affix the condensationstrip under the work surface of cabinet. Please ensure the condensation
6
strip is flush with edge of work surface.
7
Place the dishwasher into position.(Illustration 4)
8
Level the dishwasher. The rear food can be adjusted from the front of the dishwasher by turning
the Allen screw in the middle of the base of dishwasher use an Allen key (Illustration 5A). To adjust
the front feet, use a flat screw driver and turn the front feet until the dishwasheris level (Illustration 5B).
9 The dishwasher must be secured in place. There are two ways to do this:
A. Normal work surface:Put the installation hooks into the slot of both sides plane and secure them
to the work surface with two woodscrews (Illustration 6).
B. Marble or granite work top: Open the door , unclench the plastic covers in both sides , secure
dishwasher to the work surface with two woodscrews, then fix the two plasticcovers (Illustration7).
.
【Figure
19
7】
Page 25
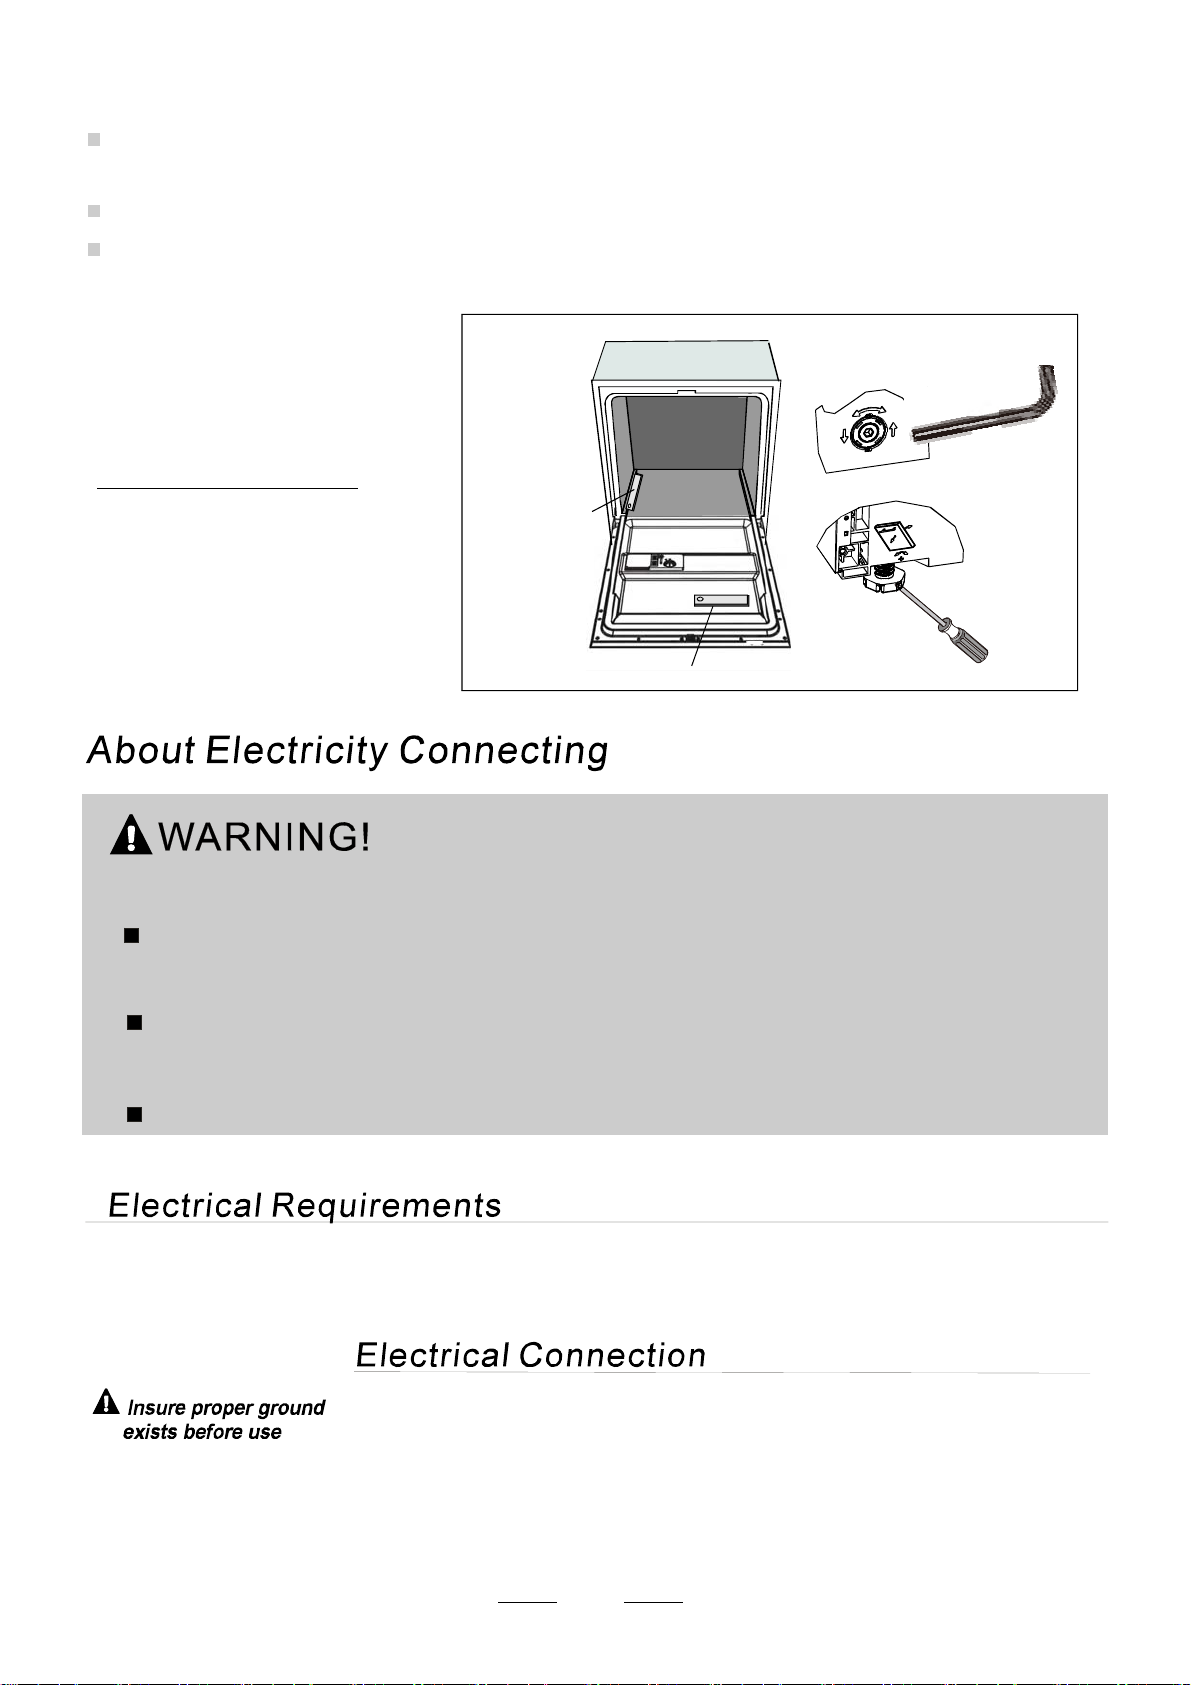
Dishw ashe r m ust be leve l for proper dish rack op erat ion and wa sh p erfo rman ce.
Placea spirit levelondoorand rack trackinside the tub asshownto check thatthe
1
dishwasherislevel.
levelthe dishwasherby adjusting the three levelling legs individually.
2
3
Whenlevelthe dishwasher,please pay attention nottoletthe dishwashertipover.
【】Figu re 8
Illustra tion o f feet ad justment
NOTE:
Themaximum adjustment
heightof the feetis50 mm.
Check leve l Front to Back
Spirit le ve l
Check level side to side
For personal safety:
Do not use an extension cord or an adapter plu g
with this appliance.
Do not, under any circumstances, cut or remove the
earthing
Connection from the power co rd.
Please look at the rating label to know t he rating vol tage and c onnect the d ishwash er to the appropriate power s upp ly.
Use therequi red fuse10 amp, tim e de lay fuse or circuit br eaker recommended and provide separat e ci rcuit serving
only this app liance.
Ensurethevoltageandfrequencyofthe powerbeing correspondsto
thoseon the ratingplate.Onlyinsert the p lug into anelectricalso cket which i searthed
properly. If the el ectri cal socket to which theappli ance m ust be conne cte d is not
appropriate fortheplug , replacethesocket,ratherthanusinga adaptors or thelikeas
they couldca use ov erhea ting and burns.
20
Page 26
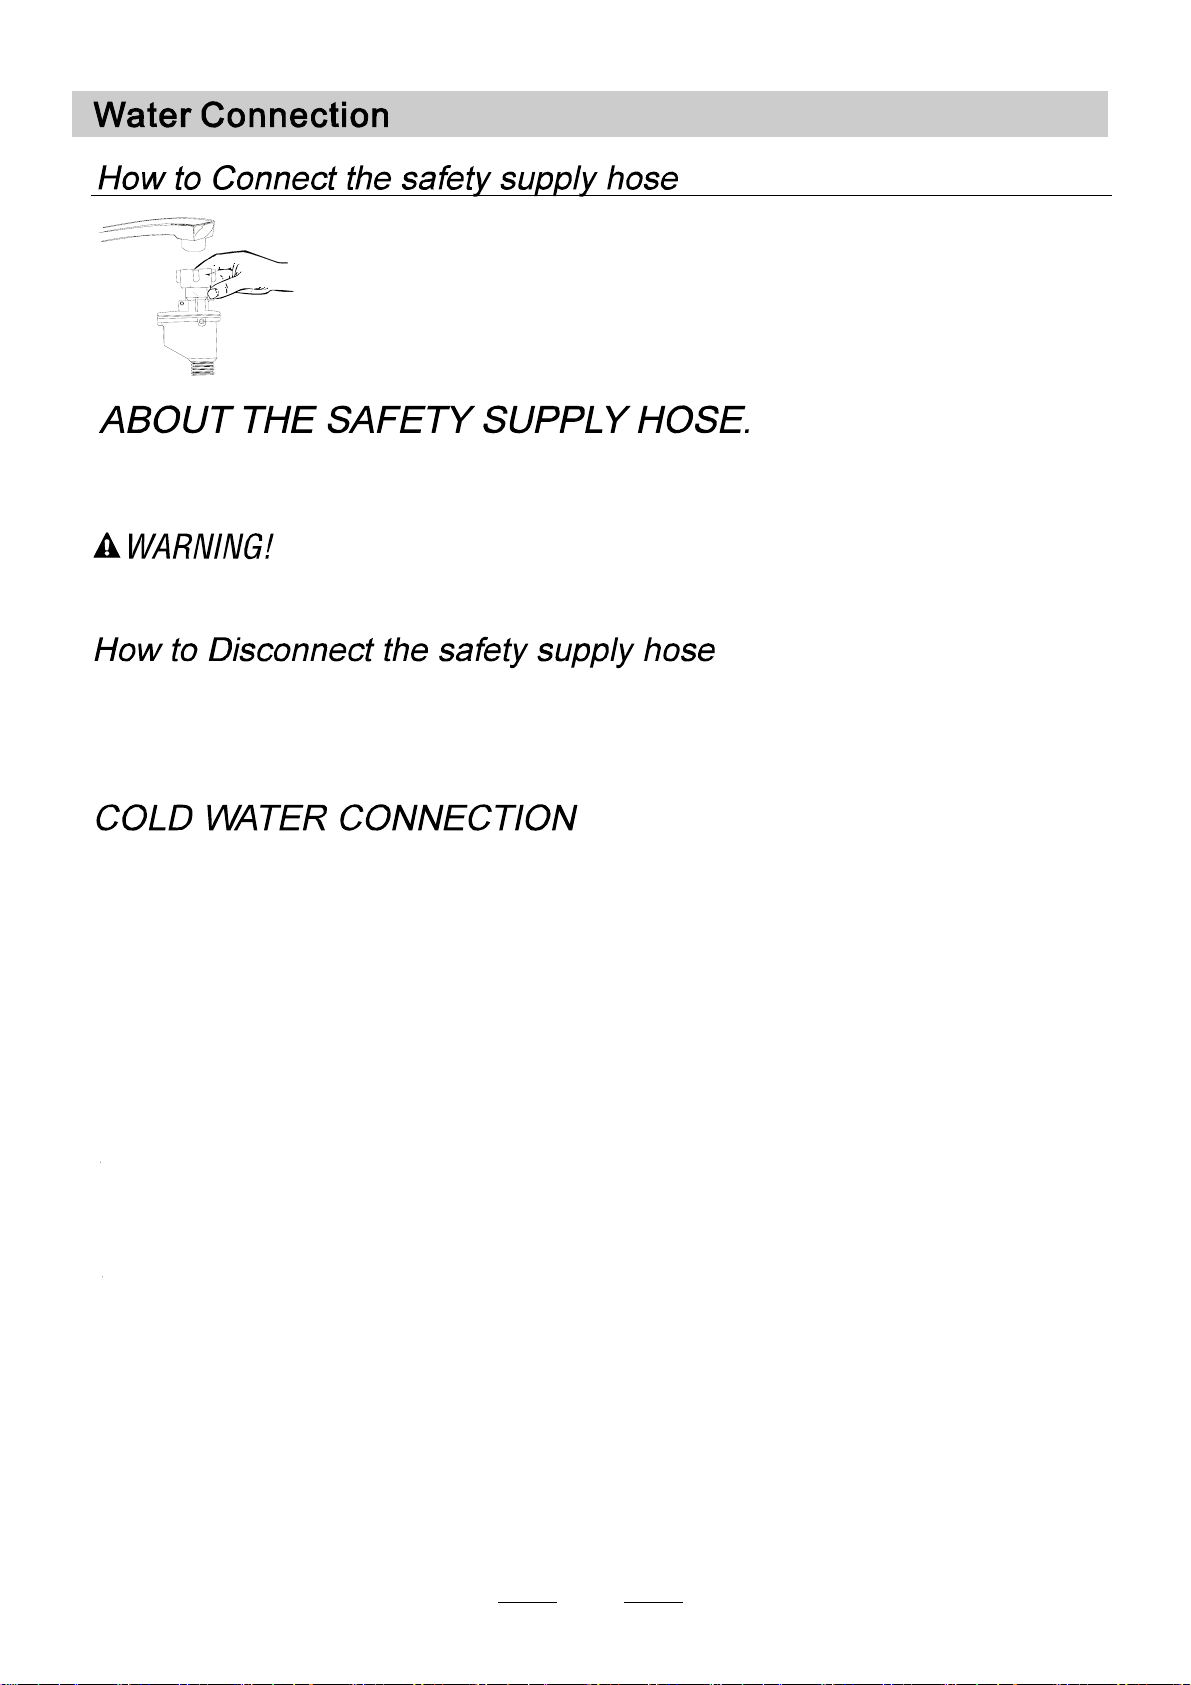
Th e ap plianc e must be conn ected to th e water m ai n s usi ng n ew hose-se t s .
The o ld ho se-sets should no t be reu sed.
Waterpressure must b e b etween 0,04MPa and 1 MPa.If the pressure is be low t he
minimum co nsult our Service Department for advice.
Pull The safety supply hoses completely out from storage compartment located at rear of dishwasher.
1
Tighter the screws of the safety supply hose to the faucet with thread 3/4inch.
2
Turn water fully on before starting the dishwasher.
3
The sa fety supply hose consists ofthe double wa lls.The hose's sy stem guarantees it s intervention by blocking the
flow o f waterin caseof thesuppl y ho se b reaking and when t he air space between t he supply hose itself and the ou ter
corrugated hose is full of water.
Ahosethat attaches to a sink spray can burst ifit isinstalle d on the sam e w ater line as thedishw asher.If yoursink
has one , it is rec ommended t hat thehose bedisco nnected and the hole plugged .
Turn off the water.
1
Release the water pressure by depressing the pressure releasebutton. This relieves water pressure and prote cts you, and the
2
room, from severe splashing.
Unscrew The safety supply hose from the faucet..
3
Connect thecold watersupply hose to athread ed 3/4(inch) c onnector and make sure th at it is fa stened tightly in place.
Ifthe w at er p ipes arenew orhave not been used for an e xtended period of time, let the water ru nto make sur e that the
water is clear and free ofimpurities . If this p recaution isnot taken, the re is a ris k thatthe water inlet can g et b locked
and damage the appl iance .
Positioning theAp pliance
Position theappliance in the desired location.The backshould rest against the wall behind i t, a nd t he sides,
along t he adjacent c abinets o r walls. The dishwasher i s equipped with water supply anddrain h oses that can
bepositionedeither tothe right o rthe left sidesto facilitate p roperinstallation.
How to Drain E xcess Water Fro m Hoses
If the sink is 1000 h igher from the floor,the exces s w ater inho ses cannotbe dr ained directly
intothe sink. It will b enecessaryto drain excess water from hoses into abowlor suitable
container that is held outside and lo wer than the sink.
Water Outlet
Connectthe water d rain hose. Thedrainhosemust b ecorrectly fitted to avoidwaterleaks.
Ensure that the waterinl et h ose isnot ki nked or s quashed.
Exte nsio n Ho se
Ifyou need adrain h ose extension, make sure to usea simil ar drain ho se.
Itmust be n o lon ger than 4 metres; o ther wise the cleanin g eff ect o f the dis hwasher could b e re duced.
Syphon Connection
Insert t he d rain hoseinto adrain pipe with a m inimum diameterof 40mm, or let i t ru n int o th e sin k, m aking sure t o
avoid ben din g o r crimpin g it. T h e top of the hose must be les s t ha n 10 00mm.
21
Page 27
Thefollowingthings shouldbecheckedbefore startingthe dishwasher.
1 The dishwasherisleveland fixedproperly
2 The inlet valveisopen
3 There is a leakageattheconnections of the conducts
4 The wires are tightlyconnected
5 The power is switchedon
6 The inlet and drainhosesare knotted
7 Allpackingmaterials andprintings should betakenout from the dishwasher
Afterinstallation, pleasemakesure to keep thismanual.
Thecontentof this manual isveryhelpful to the users.
22
Page 28
Fuse blown, or the
circuit breaker acted
Replace fuse or reset circuitbreaker . Remove any other
appliance s sharing the samecircuit with the dishwasher
Power supplyis not
turned on
Water pressure is low
Door of dishwasher
not properly closed.
Kink in drain hose
Filter clogged
Kitchen sink clogged
Improper detergent
Spilled rinse-aid
Make sure the dishwasher is turned on and thedoor is
closed securely.
Make sure the power cord is properly plugged into the
wall socket.
Check that the water supply is connected properly and
the water is turned on.
Make sure to close the door properly and latch it.
Check drain hose.
Check coarse the filter
(see section titled )" CleaningThe Filter "
Check thekitchen sink to make sure it is drainin g well.
If the problem is the kitchen sink not draining ,you may
need a plumber rather than a serviceman for dishwashers.
Use only the special dishwasher detergent to avoid suds.
If this occurs,open the dishwasher and let suds evapora te.
Add 1 gallon of cold water to the tub. Close and latch the
dishwasher, then select anycycle.Dishwasher will drain
outthe water at the first step.Openthe door after draining
is stop and check if the suds is disappeared.
Repeat if necessary.
Always wipe up rinse-aid spills immediately.
Detergent with
colourant was used
Hard water minerals
The affected items are
notcorrosion resistant.
A programme was not
run after dishwasher
salt was added.
Traces of salt have
gotten into the wash cycle.
The lid of the softer
is loose
Aspayarmis
r
knocking against
an itemin a basket
Items of crockery
are loose in the
wash cabinet
This may becaused
by on-site installation
or the cross-section of
the piping.
Make sure that the detergent is the one without
colourant.
To clean the interior, use a damp sponge with
dishwasher detergent and wearrubber gloves .
Never use any other cleaner than dishwasher
detergent for the risk of foamingor suds.
Always run the quick wash programme .
without any crockery in the dishwasher and
without selecting the Turbofunction (if present),
after adding dis hwasher salt.
Check the lip .Ensure the fix is fine.
Interrupt the programme, and rearrange the items
which are obstructing the sp ay arm.r
Interrupt the programme,
and rearrange the items of crockery.
This has no influence on the dishwasher function.
if in doubt,contact a suitably qualified plumber.
23
Page 29
The dishes were not
loaded correctly.
See notes in " Loading the Dishwasher Baskets ".
Theprogramme was
notpowerful enough.
Not enough detergent
wasdispensed.
Items are blocking
the path of sp ay arms.r
The filter combination
inthebaseofwash
cabinet is not clean or
is not correctly fitted.
This may cause
the sp ay arm jets
r
to get blocked.
Combination of soft
water andtoomuch
detergent.
Aluminum utensils
have rubbed against
dishes.
Dishes block
detergentcups.
Improper loading
Too little rinse-aid
Select a more intensive programme.
See" Wash Cycle Table ."
Use more detergent, or change your detergent.
Rearrange the items so that the sp ay can rotate freely.r
Clean and/or fit the filter combination correctly.
Clean the sp ay arm jets. See "Cleaning the Spray
Arms".
Use less detergent if you have soft water and select
a shortest cycle to wash the glassware and to get
them clean.
Use a mild abrasive cleaner to eliminate those marks.
Re-loadin g the dishes properly.
Load the dishwasher as suggested in the directions.
Increase the amount of rinse-aid/refill the rinse-aid
dispenser.
r
Dishes are removed
too soon
Wrong program
has been selected
Use of cutlery with
a low-quality coating
Do not empty your dishwasher immediately after
washing. Open the door slightly so that the steam can
escape. Begin unloading the dishwasher only once t
he dishes are barely warm to the touch. Empty the low
basket first. This prevents water form droppin g off
dishes in the upper basket.
In short program the washing temperature is lower.
This also lowers cleaning performance. Choose
a program with a long washing time.
Water drainage is more difficult with these items.
Cutlery or dishes of this type are not suitable for
washing in the dishwasher.
When some malfunctions come on, the appliance will display error codes to warn you:
The R a pi d light flicke r fleetly
The Glass light flicke r fleet ly
Longer inlet time.
Overflow.
Faucets is not opened, or water intake is
restricted,or water pressure is too low.
Some element of dishwasher leaks .
24
Page 30
If overflow occurs, turn off the main water supply before calling a service.
If there is water in the base pan because of an overfill or small leak,
the water should be removed before restarting the dishwasher.
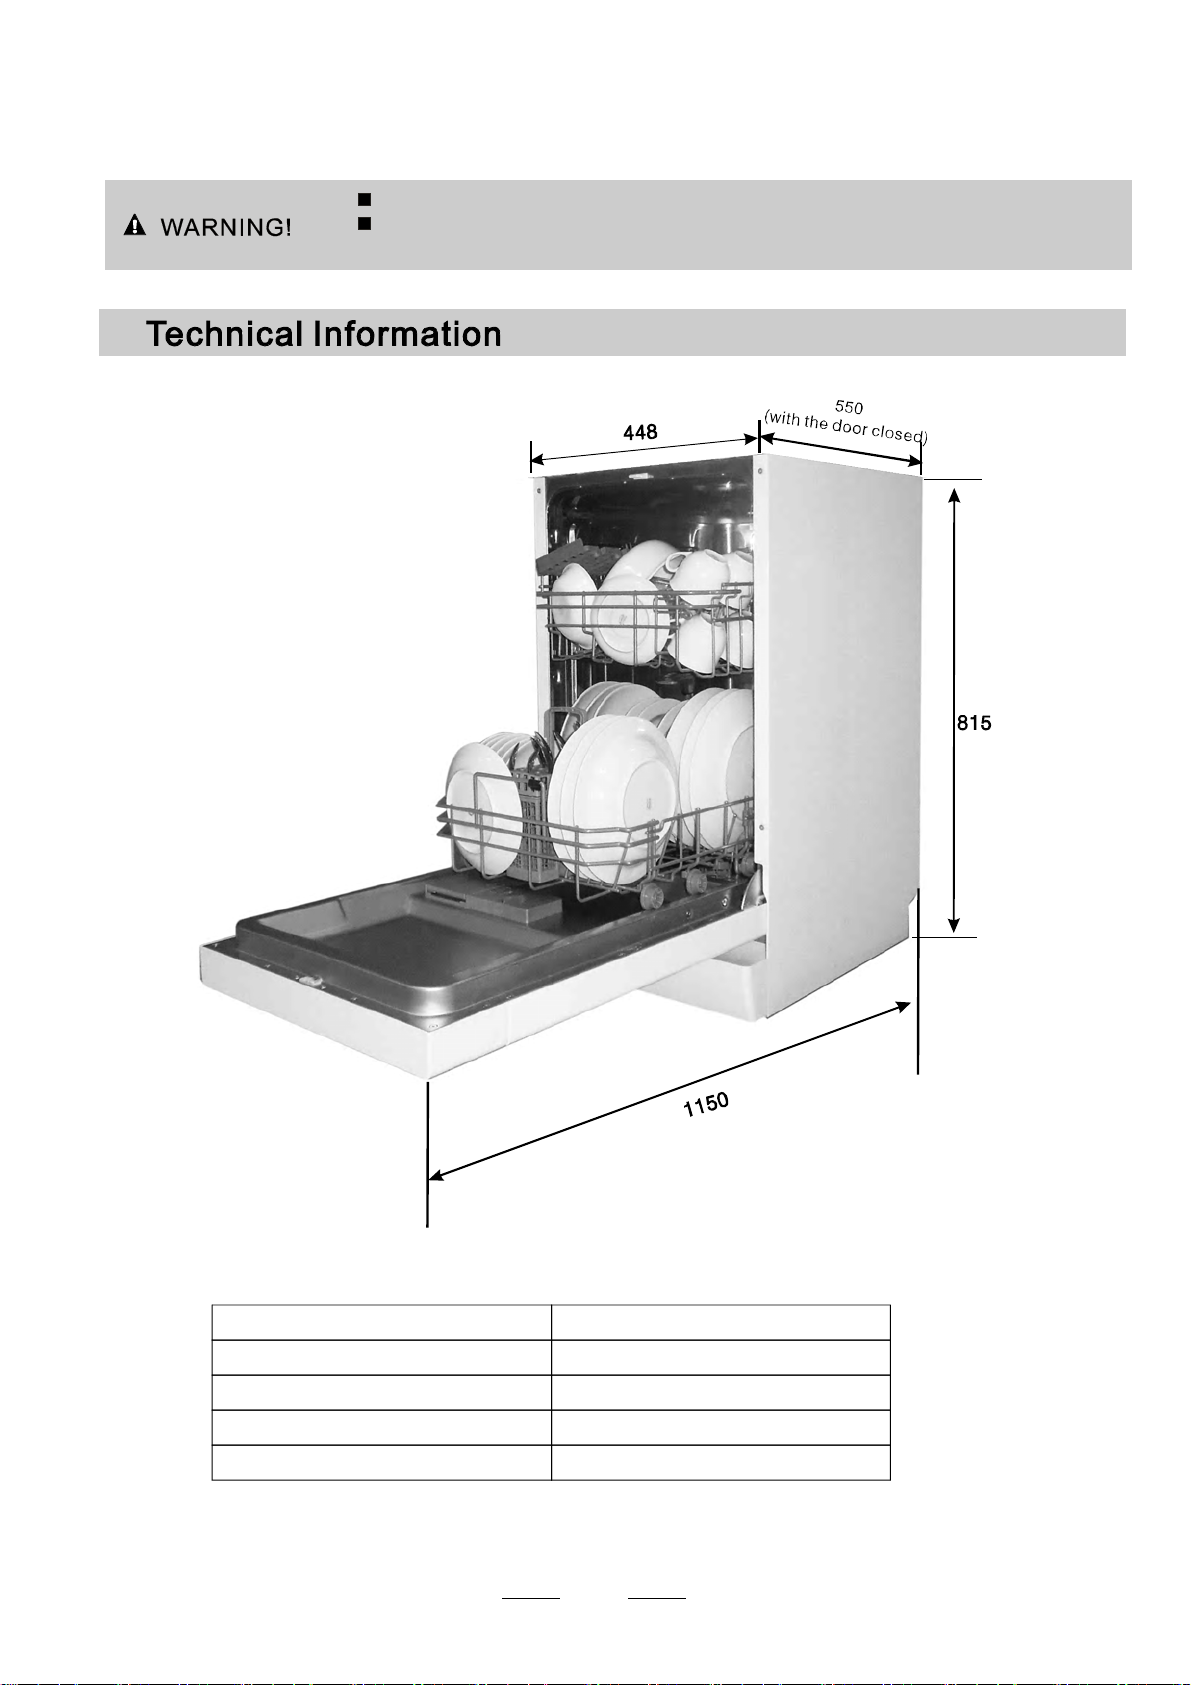
Height: 815mm
Width : 448mm
()
Depth: 550mm
with the door closed
Pow er s upp l y: see rat i ng la b el
Capacity: 10 placesettings
25
Page 31
Page 32
Technical Data Sheet
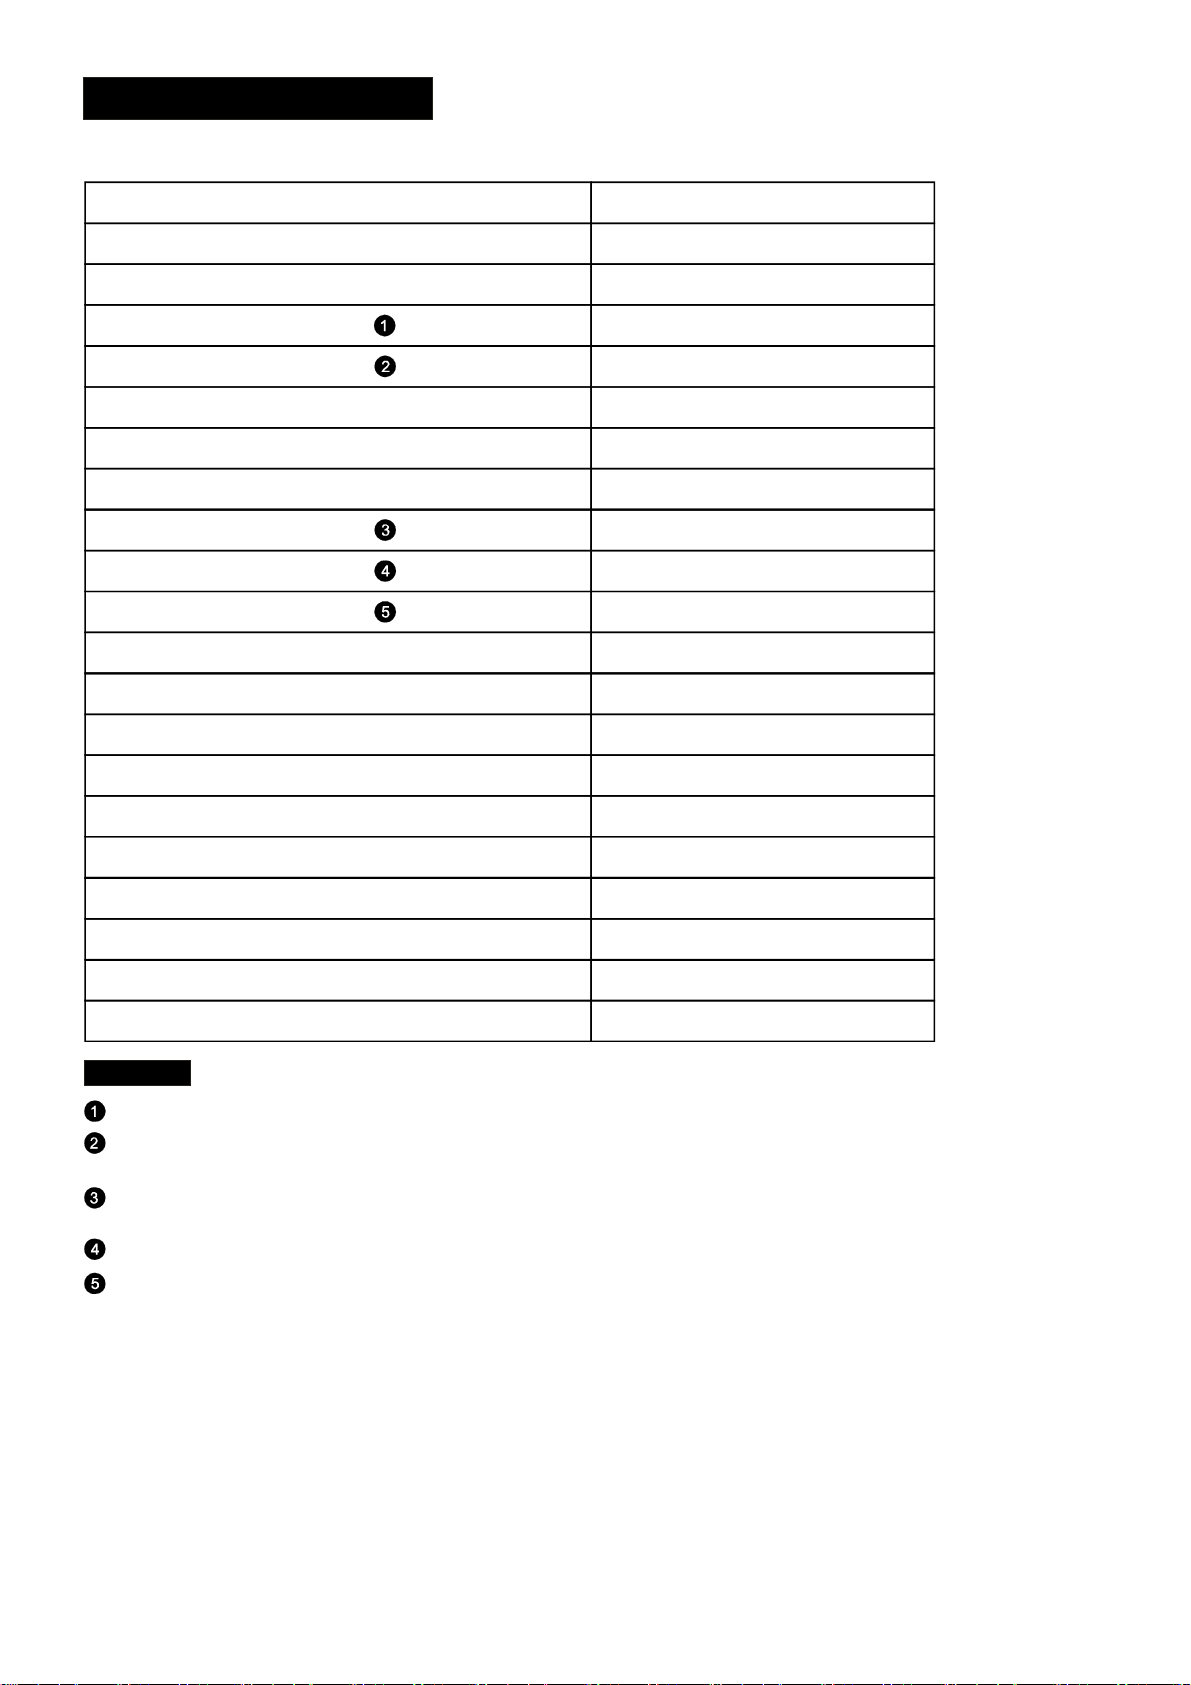
Sheet of househol d d ishwas her a ccordi ng to EU Dir ective 1059/2010:
Manufacturer
Type/ Descri ption
Standard place s ettings
Energy efficienc y class
Annual e nergy consumption
Energy consumption of the standard cleaning cycle
Power consumption ofoff-mode
Power consumption ofleft-on mode
Annual w ater consumption
Drying efficien cy cl ass
Standard cleaning cycle
Program duration of the sta ndard cleaning cycl e
Noise level
Mounting
Couldbebuild-in
TEKA
DW1455FI
10
A+
237 kW h
0.83 kWh
0.45 W
0.
49 W
2520 l itre
A
ECO 50
175 mi n
49dB(A) re 1 pW
Bu ild- in
Yes
℃
Height
Width
Depth (w ith connectors)
Power consumption
Rated v oltage /freque ncy
Waterpressure (flowpressure)
NOTE:
A+ + + (highest efficiency) to D (lowest efficiency)
En e rgy con sum p t ion 237 kWh pe r year, bas ed on 28 0 stan dard cl ean ing cy cl es using co l d w ater fill and
the consump tion of the lowpower modes.Actual energy con sumption will dep end onhow t he appliance is used.
Waterconsumption 2520 litre peryear, based on 280standardcleaning cycles.Actualwaterconsumption
will depend on h ow t he a ppl iance is used.
A(highest e fficiency) to G ( lowest e fficiency)
This pr ogram i s suitable for cleaning soiled norma lly soiledtable ware andthat itis the
mostefficie nt pr ogramme in terms of its combined en ergy an d water consump tion for
that type o f tablew are.
ThedevicemeetstheEuropeanstandardsandthedirectives inthecurrentversionatdelivery:
-LVD 2006/ 95/EC
-EMC200 4/108/EC
- ErP 2009/ 125 / EC
“”
“”
81.5 cm
44.8 cm
55 cm
1760-2100 W
AC220-240 V/ 5 0H z
0.4-10 bar =0.04-1 Mpa
The ab ove valueshave beenmeasur ed inaccordance with sta ndards underspecifi ed o perating conditions.
Results may vary gr eatly according toquantity a nd pollution ofthe dishes, water hardness,
amount ofdetergent, etc.
The man ual isbased on the European U nion's s tand ards and rules.
Page 33
 Loading...